

Page 1
Atlona USB to HDMI Converter
AT-HDPiX2
Toll free: 1-877-536-3976
Local: 1-408-962-0515
User Manual
www.atlona.com
Page 2

TABLE OF CONTENTS
1. Introduction .................................................. 2
2. Package Contents .................................................. 2
3. Application .................................................. 2
4. System Requirements .................................................. 2
5. Features .................................................. 3
6. Specification .................................................. 3
7. Installation .................................................. 4
8. Using the DisplayLink Manager .................................................. 5
8.1. Using the DisplayLink Manager .................................................. 5
8.2. Using Multiple HDPiX2 units .................................................. 10
8.3. Software Update .................................................. 10
9. Uninstall the Device Driver .................................................. 11
10. Troubleshooting .................................................. 12
11. Setup Guide .................................................. 13
12. Managing Multiple Displays .................................................. 13
12.1. Setting the Display Resolutions .................................................. 14
12.2. Rotating a Display .................................................. 14
12.3. Setting the Position of Displays .................................................. 15
12.3.1. Display Positions .................................................. 15
12.3.2. Setting the Display to Mirror mode .................................................. 15
12.3.3. Setting the Display to Extend .................................................. 16
12.3.4. Using both extended and mirrored displays .................................................. 16
12.3.5. Changing the main display .................................................. 16
12.4. Configuring Displays from the Menu Bar .................................................. 17
13. Known Issues .................................................. 17
14. Safety Information .................................................. 18
15. Warranty .................................................. 19
16. Atlona Product Registration .................................................. 20
Toll free: 1-877-536-3976
Local: 1-408-962-0515
1
www.atlona.com
Page 3

INTRODUCTION
Atlona Technologies presents the all new USB to HDMI adaptor, the AT-HDPiX2. This new solution is designed to add a
HDMI port to any computer (Mac or PC) and has limitless applications in both consumer and commercial environments.
From digital signage to home theater, the all new HDPiX2 provides a simple solution for viewing content from a computer on any HDTV making it the perfect device for any consumer or commercial application.
Set up is as simple as plug and play; convenient for any user, no matter the level of technical knowledge. Connect up
to 6 x AT-HDPiX2 to a PC and up to 4 x AT-HDPiX to a Mac. The HDPiX2 is able to display resolutions up to 1080p or
1600x1200
PACKAGE CONTENTS
• Atlona USB to HDMI Converter device
• Operation Manual x 1
• Driver CD x 1 (Mac users, please download drivers from Atlona website www.thehdpix.com/download.html
APPLICATION
The AT-HDPiX2 is a perfect device for viewing content from a computer on any HDTV making it the perfect device for
any consumer or commercial applications. HDPiX2 becomes your second video card which allows you to clone another
HDTV monitor which will be an identical replication of your laptop screen or desktop. Whatever you do on the computer will display on your main computer as well as on the HDTV you are connecting the HDPiX2 too. Most of our customers are using the HDPiX2 for viewing Youtube, Hulu, downloaded movies, photos, powerpoint presentation and many
others. User has no limit on what to display.
SYSTEM REQUIREMENTS
• Operating System: Microsoft Windows XP, Vista (32/64 bit) and Windows 7, Snow Leopard 10.6.2 and 10.6.3,
Leopard 10.5.8, Tiger 10.4.11 (new support is added monthly. Please check DisplayLink.com for updates)
• Processor: Pentium 4 2.4GHz or above
• 512MB RAM or above
• Available USB 2.0 port
• 30Mb of available disk space
Toll free: 1-877-536-3976
Local: 1-408-962-0515
2
www.atlona.com
Page 4
FEATURES
• Plug & play. Installs in seconds.
• Easily connect up to 6 (Windows OS)/ 4 (Mac OS) monitors to one PC through USB 2.0.
• Offers Great quality video and Audio though HDMI output.
• Supports resolution up to 1080p or 1600x1200
• Bundled Software:
• Supports Extended and Mirror Functions
• Supports screen resolution and color quality adjustment in extended mode.
• Allows you to rotate the screen on the add-on monitor by 90, 180 or 270 degrees
• Supports online update automatically.
• Compatible with Windows XP and Vista (32/64bit)and Window 7, Snow Leopard 10.6.2 and 10.6.3, Leopard
10.5.8, Tiger 10.4.11 (new support is added monthly. Please check DisplayLink.com for updates)
• Completely new architecture to support Vista Aero (32/64bit).
• Supports all Intel Macs.
• No external power supply needed (power is supplied from the PC through USB connection).
SPECIFICATIONS
Video input USB 2.0
Video output HDMI up to 1080p or 1600x1200
USB 2.0
Operating System Support Window XP/7, Vista 32/64, Mac OS X Tiger 10.4.11 or Mac OS X
Leopard 10.5.5 and Snow Leopard 10.6.3
Dimensions (mm) 114 x 65 x 26
Wight (g) 200
Chassis Material Aluminum
Color Black
Operating Temperature 10°C ~ 40°C
Power Consumption 2W
Toll free: 1-877-536-3976
Local: 1-408-962-0515
3
www.atlona.com
Page 5
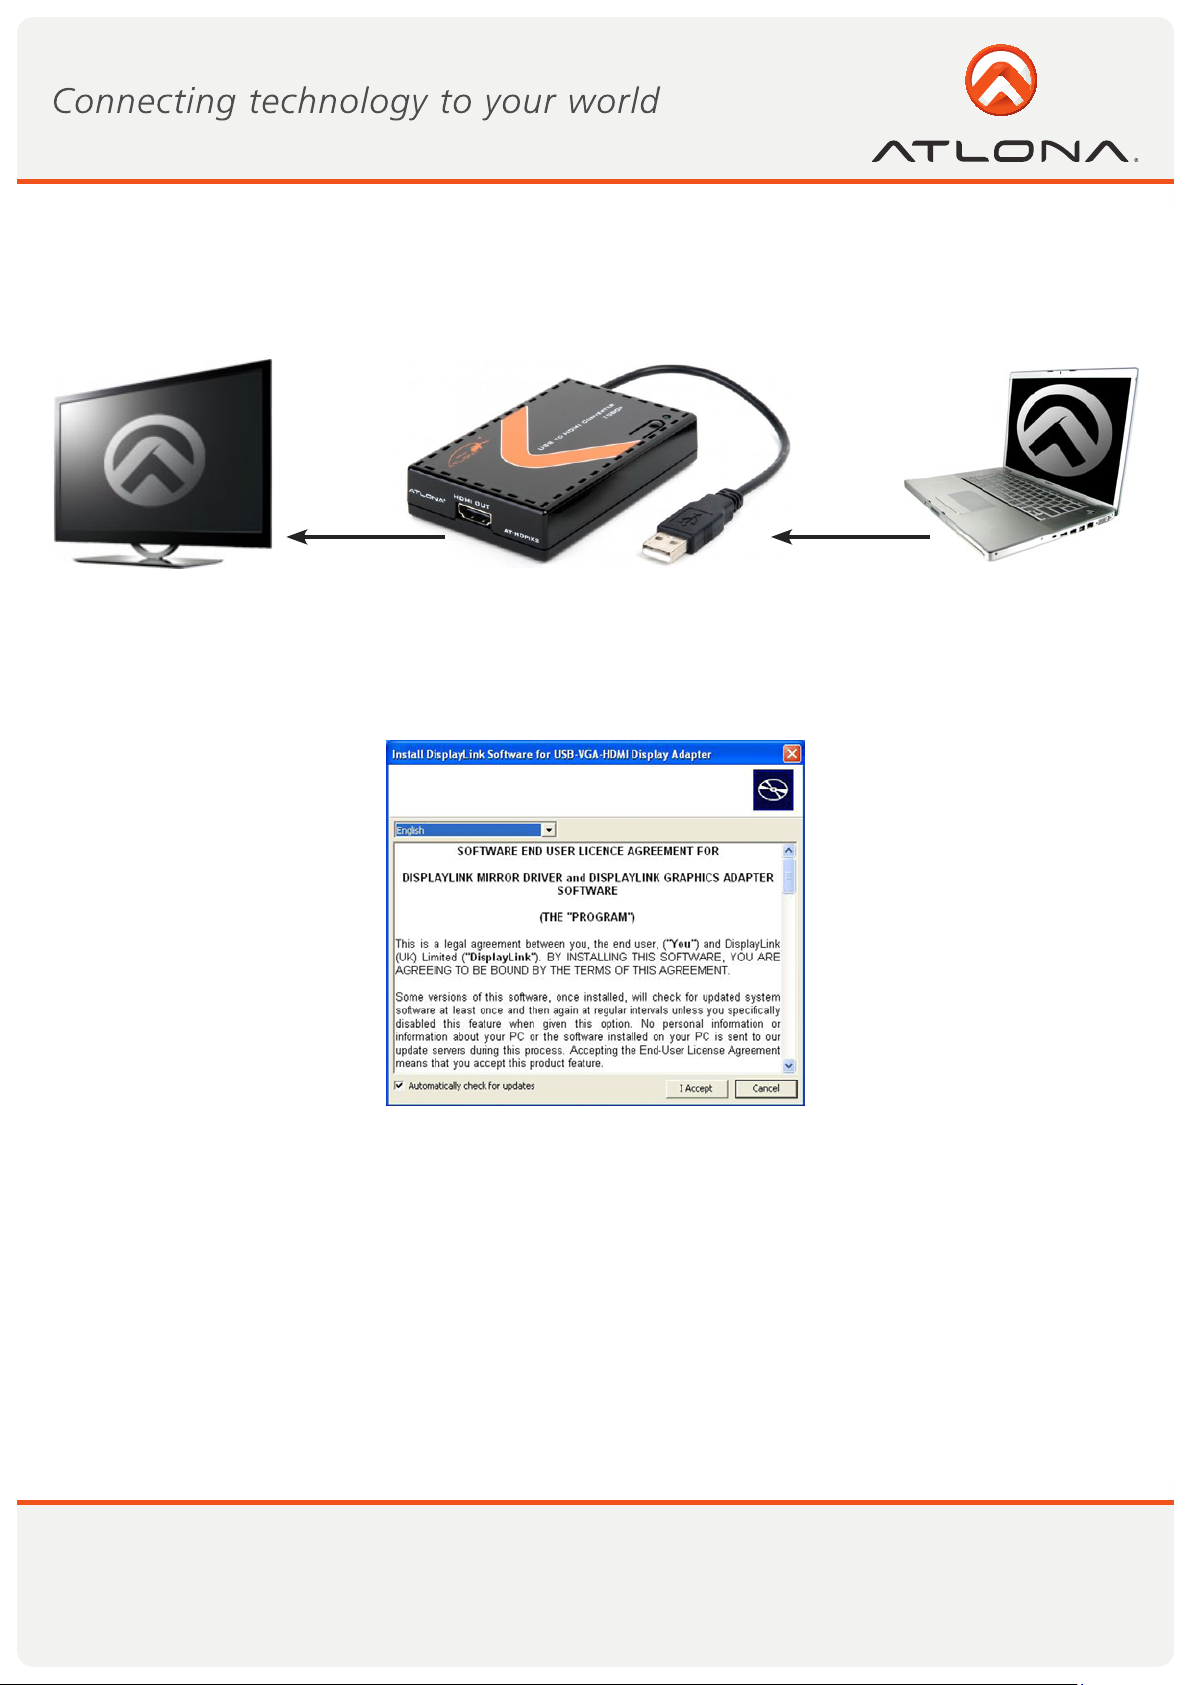
INSTALLATION
Monitor AT-HDPiX2 Notebook / PC
1. Step 1: Insert the provided CD , then execute the Setup.exe file and select your language to install.
If you don’t have a CD, please download drivers from: http://www.displaylink.com/support/downloads.php
2. Step 2: Connect the unit to an USB 2.0 port of your computer.
3. Step 3: Use the supplied HDMI cable to connect your monitor or projector that supports HDMI.
4. Step 4: Switching EDID, the defaulting setting is on ON and the device will detect TV’s EDID. Leave as it is when
the display is propertly. Switching from ON to OFF inputsource PC must be reboot in order for the device to use the
built-in EDID. However, from OFF to ON the reboot is not necessary.
Toll free: 1-877-536-3976
Local: 1-408-962-0515
4
www.atlona.com
Page 6

USING THE DISPLAYLINK MANAGER
8.1. Using the DisplayLink Manager
After the driver is installed, a utility (DisplayLink Manager) will automatically appear in the system tray. The utility
allows you to quickly change the settings and resolution for DisplayLink Manager. Right clicking the icon will bring
out the context menu.
Screen Resolution: Select the screen resolution (available only in extended mode).
NOTE: When display has build-in native EDID the screen will show the display’s resolution, if no EDID the screen have
the follow resolution.
Toll free: 1-877-536-3976
Local: 1-408-962-0515
5
www.atlona.com
Page 7
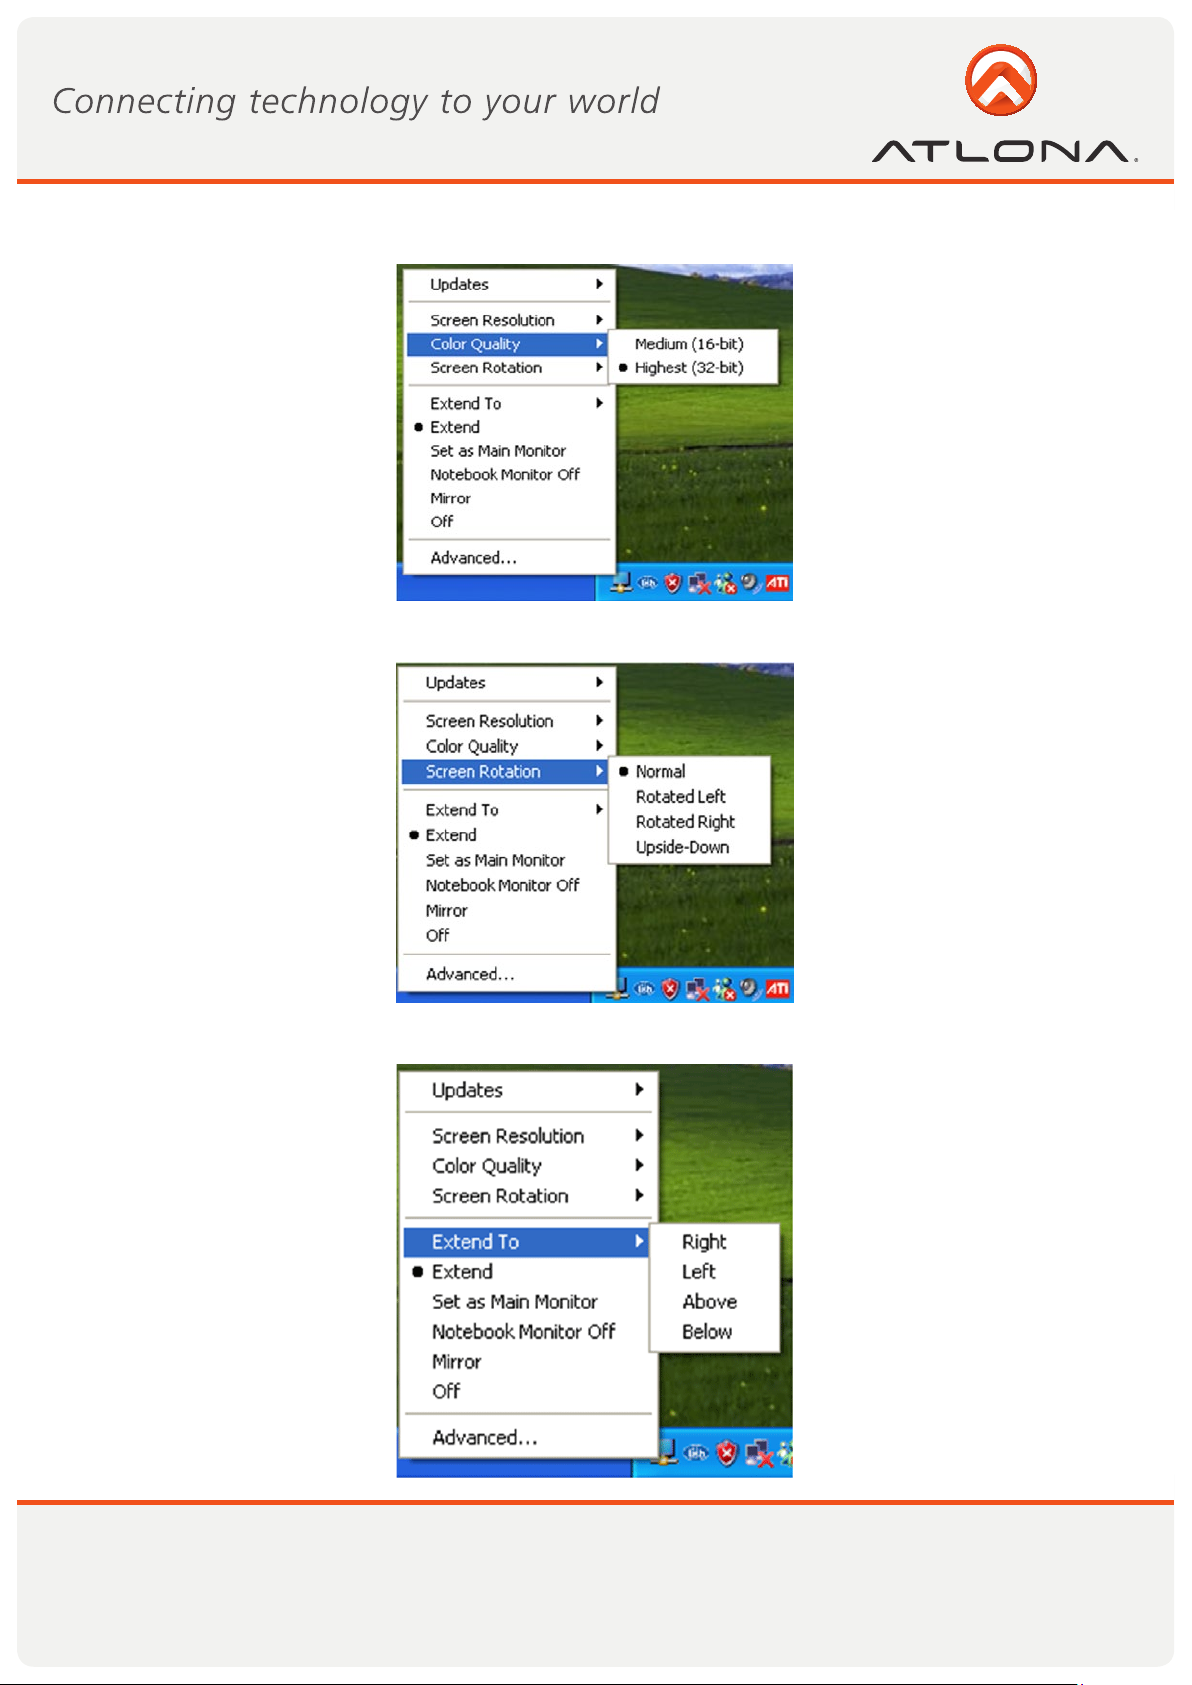
Color Quality: Select the screen color quality (available only in extended mode).
Screen Rotation: Rotate the screen on the additional monitor by 90, 180 or 270 degrees.
Extend to: Reposition the extended screen to the top, bottom, left or right of the primary display.
Toll free: 1-877-536-3976
Local: 1-408-962-0515
6
www.atlona.com
Page 8

Extend: Set the DisplayLink Manager to Extended mode.
Set as Main Monitor: Set the monitor to be the main monitor.
Toll free: 1-877-536-3976
Local: 1-408-962-0515
7
www.atlona.com
Page 9

Notebook Monitor off: Set the PC/notebook’s monitor off.
Mirror: Set the DisplayLink Manager to Mirror mode. You can see the same desktop image on the additional monitor.
Toll free: 1-877-536-3976
Local: 1-408-962-0515
8
www.atlona.com
Page 10

Off: Disable the HDPiX2 Manager on the system.
Advanced: Directly access the Display Properties. You can also adjust the resolution, color quality, position and re-
fresh rate via the Display Properties.
Toll free: 1-877-536-3976
Local: 1-408-962-0515
9
www.atlona.com
Page 11

INTRODUCTION
8.2. Using Multiple HDPiX2 units
You don’t need need to install driver again as long as you has completed above process of driver installation in advance.
It will automatically define the ID.
NOTE: When connecting more than one HDPiX2 to a computer, a system with higher CPU performance is recommend.
8.3. Software Update (THIS STEP IS RECOMMENDED AS IT SOLVES A LOT OF ISSUES)
Click the Updates -> Check Now…, and it will check and download the latest fi immediately..
NOTE: Confirm that your computer is already connected to the network.
Toll free: 1-877-536-3976
Local: 1-408-962-0515
10
www.atlona.com
Page 12

Automatic Update: Click the Updates -> Configure… , the Updates Options window will appear as shown below. You can set the update method and frequency in the windows.
UNINSTALL THE DEVICE DRIVER
Follow the steps below to uninstall the driver of the Multi View.
Step 1: Open the Control Panel: Start -> Control Panel -> Add or Remove Programs.
Step 2: Select USB to HDMI DisplayLink Adapter and click Remove.
Toll free: 1-877-536-3976
Local: 1-408-962-0515
11
www.atlona.com
Page 13

Step 3: Click Yes to confirm the removal.
Step 4: Click Yes to restart your computer.
TROUBLESHOOTING
Situation Check Point
The device driver has been
installed, but the DisplayLink Manager is not
working
DVD player not working
when move it over to the
extended display
The mouse not move
pass the right side of the
screen as it should on
extended desktop
1. Make sure you restart your computer after the driver installation.
2. Check all the connectors are plugged in correctly.
3. Make sure the USB port that you are using is USB 2.0.
4. Check the additional monitor is connected correctly and the power is on.
5. Make sure the operating system, the Display- Link Manager is compatible
with.
6. Try a different computer.
Try to open the program in the additional display first before playing the
DVD.
Check the display settings and make sure that your display number 2 is on
the right side of display number 1.
Toll free: 1-877-536-3976
Local: 1-408-962-0515
12
www.atlona.com
Page 14

SETUP GUIDE
The latest version of this software can be obtained from: www.displaylink.com/mac
Installing/Uninstalling the DisplayLink Driver
To run the DisplayLink Installer, double-click the DisplayLink Installer image: this will mount the DisplayLink installer.
MANAGING MULTIPLE DISPLAYS
When attaching a display that the software has not seen before, the display will
default to being extended to the right of
the main display.
To configure the settings for each of your
USB attached displays, select ‘Displays’
from the ‘System Preferences’ menu. This
will open a ‘Display Preferences’ window
on each of your attached displays allowing
you to configure each display as required.
It is possible to use the ‘Gather Windows’
button to bring all the ‘Display Preferences’ windows onto the main display.
Toll free: 1-877-536-3976
Local: 1-408-962-0515
13
www.atlona.com
Page 15

12.1. Setting the Display Resolutions
To change the display’s resolution, select an available resolution from the Display Preferences window of the display you
wish to change:
Display Preferences:
Resolution Options
The resolutions available depend on both the DisplayLink enabled product and the capabilities of the connected display.
12.2. Rotating a Display
If you wish to rotate your display, you can configure the orientation using the ‘Rotate’ drop down. Select the appropriate
angle of rotation to match your display’s set up:
Display Preferences:
Rotation Options
Each time the user rotates, any settings made to the mode, resolution, frequency or depth are remembered the next time
the user switches back to that angle of rotation.
Toll free: 1-877-536-3976
Local: 1-408-962-0515
14
www.atlona.com
Page 16

FEATURES
12.3. Setting the Position of Displays
If your computer is connected to more than two displays, you can specify that some are mirrored displays and others
show the extended desktop.
A mirrored display shows the same content as the main display whereas an extended display will be an extension to
your existing desktop.
You can arrange your displays so that they match the physical layout of your displays by selecting the ‘Arrangement’
pane within Display Preferences. This ensures that you can easily navigate between all connected displays.
12.3.1. Display Positions
To move the position of a display, click and hold the display you wish to move then drag it to the desired position.
The display will be highlighted with a red border whilst you are moving the display to its new position.
Display Preferences:
Moving Display Positions
12.3.2. Setting the Display to Mirror mode
When in Mirror mode, additional displays will display what is being shown on the primary display. Checking the “Mirror Display” on the ‘Arrangement’ pane enables this feature.
Display Preferences:
Displays set to Mirror
Toll free: 1-877-536-3976
Local: 1-408-962-0515
15
www.atlona.com
Page 17

12.3.3. Setting the Display to Extend
To extend connected displays, make sure that the “Mirror Display” on the ‘Arrangement’ pane is unchecked.
Display Preferences:
Display set to Extend
12.3.4. Using both extended and mirrored displays
To work with both extended and mirrored displays, turn off mirroring then in the Arrangement pane press and
hold ‘cmd’ and ‘alt’ and drag and drop the display you wish to mirror over the primary display.
Repeat this with each display you wish to mirror, those untouched will remain extending.
12.3.5. Changing the main display
You can change which is the main display by moving the Menu Bar between displays. Changing the main display
affects where new windows appear and the position of the Dock.
The ‘Menu Bar’ can be moved so that it is shown on an alternative display. Clicking the white menu bar and
dragging it to the desired display will perform this action.
Display Preferences:
Moving Menu Bar
Toll free: 1-877-536-3976
Local: 1-408-962-0515
16
www.atlona.com
Page 18

12.4. Configuring Displays from the Menu Bar
If you have checked the “Show displays in menu bar” in Display Preferences then you can configure displays by clicking
the display icon in the menu bar. This will show a menu similar to the following:
Displays Menu Bar
This menu allows you to perform the following actions:
• Detect all displays connected to the Mac.
• Turn display mirroring on/off
• Set the resolution of both the primary display, and the additional display(s), by selecting one of the recently used
resolutions.
• Configure how many ‘recent resolutions’ should be shown in this menu.
• Open ‘Display Preferences’.
FEATURES
This release does not support OpenGL acceleration (3D hardware acceleration) so therefore applications and features
that require OpenGL, Quartz Extreme, Quartz Composer and other framework based on OpenGL will not be fully supported.
Examples of such features are Keynote Presentations, iPhoto Slideshows and iMovie.
The most up to date information about known issues and FAQs can be found at: www.displaylink.com/mac
Toll free: 1-877-536-3976
Local: 1-408-962-0515
17
www.atlona.com
Page 19

SAFETY INFORMATION
Safeguards
To reduce the risk of electric shock, do not
expose this product to rain or moisture
If the wall plug does not fit into your local
power socket, hire an electrician to replace
your obsolete socket.
Do not modify the wall plug. Doing so will
void the warranty and safety features.
This equipment should be installed near
the socket outlet and the device should
be easily accessible in the case it requires
disconnection.
Precautions
FCC regulations state that any unauthorized changes or modifications to this equipment, not expressly
approved by the manufacturer, could void the user’s authority to operate this equipment.
Operate this product using only the included external power supply. Use of other power supplies could impair
performance, damage the product, or cause fires.
In the event of an electrostatic discharge this device may automatically turn off. If this occurs, unplug the device
and plug it back in.
Protect and route power cords so they will not be stepped on or pinched by anything placed on or against
them. Be especially careful of plug-ins or cord exit points from this product.
Avoid excessive humidity, sudden temperature changes or temperature extremes.
Keep this product away from wet locations such as bathtubs, sinks, laundries, wet basements, fish tanks, and
swimming pools.
Use only accessories recommended by Atlona to avoid fire, shock, or other hazards.
Unplug the product before cleaning. Use a damp cloth for cleaning and not cleaning fluid or aerosols.
Such products could enter the unit and cause damage, fire, or electric shock. Some substances may also
mar the finish of the product.
Never open, remove unit panels, or make any adjustments not described in this manual. Attempting to
do so could expose you to dangerous electrical shock or other hazards. It may also cause damage to your
AT-HDPiX2. Opening the product will void the warranty.
Do not attempt to service the unit. Disconnect the product and contact your authorized Atlona reseller or
contact Atlona directly.
Toll free: 1-877-536-3976
Local: 1-408-962-0515
18
www.atlona.com
Page 20

WARRANTY
Limited Warranty
Atlona Technologies warrants that (a) its products (the AT-HDPiX2) will perform
substantially in accordance with the accompanying written materials for a period of 3 years from
the date of receipt and (b) that the product will be free from defects in materials and workmanship
under normal use and service for a period of 3 years. In the event applicable law imposes any
implied warranties, the implied warranty period is limited to 3 years from the date of receipt. Some
jurisdictions do not allow such limitations on duration of an implied warranty, so the above limitation
may not apply to customers that fall within those areas.
Customer Remedies
Atlona Technologies’ and its suppliers’ entire liability and Customer’s exclusive remedy shall
be, at Atlona Technologies’ decision, either return of the price paid for the product, repair, or
replacement of the product that does not meet this Limited Warranty and which is returned to Atlona
Technologies with a copy of the Customer’s receipt. This Limited Warranty is void if failure of the
product has resulted from accident, abuse, misapplication, or natural occurrence. In example but not
limited to: power surges (electrical storms, local power outage), dropping the product (or items on
the product), contact with fluids, and physical misconduct (i.e. kicking or punching). Any replacement
product will be warranted for the remainder of the original warranty period.
No other warranties
To the maximum extent permitted by applicable law, Atlona Technologies and its suppliers
disclaim all other warranties, either expressed or implied, including, but not limited to, implied
warranties of merchantability and fitness for a particular purpose, with regard to the product and any
related written materials. This Limited Warranty gives customer specific legal rights. Customers may
have other rights depending on the jurisdiction.
No liability for damages
To the maximum extent permitted by applicable law, in no event shall Atlona Technologies or
its suppliers be liable for any damages arising out of the use of or inability to use this product, even
if Atlona Technologies has been advised of the possibility of such damages. Such damages include
but are not limited to: special, incidental, consequential, or indirect damages for personal injury, loss
of business profits, business interruption, loss of business information, or any other pecuniary loss.
Atlona Technologies’ and its suppliers’ entire liability under any provision of this agreement shall
be limited to the amount actually paid by you for the product. Some Jurisdictions do not allow the
exclusion or limitation of liability for consequential or incidental damage. The above limitations may
not apply to you in such jurisdictional cases.
Toll free: 1-877-536-3976
Local: 1-408-962-0515
19
www.atlona.com
Page 21

ATLONA PRODUCT REGISTRATION
Thank you for purchasing this Atlona product. - We hope you enjoy it and will take an extra few
moments to register your new purchase.
Registration creates an ownership record if your product is lost or stolen and helps ensure you’ll
receive notification of performance issues and firmware updates.
At Atlona, we respect and protect your privacy, assuring you that your registration information
is completely secure. Atlona product registration is completely voluntary and failure to register will not
diminish your limited warranty rights.
To register go to: http://www.atlona.com/registration
Toll free: 1-877-536-3976
Local: 1-408-962-0515
20
www.atlona.com
 Loading...