

Page 1
Atmosphere AZM4 / AZM8 / AZMP4 / AZMP8
Quick Start guide
Welcome
Thank you for choosing AtlasIED and the Atmosphere line of signal processors for your
project. The Atmosphere family of products are designed to meet the highest standards
for design, quality, and value that our customers have come to expect from AtlasIED.
The flexibility and breadth of available accessories that the Atmosphere ecosystem
offers is unmatched in the industry and makes it the perfect solution for a wide variety
of applications. With a new approach to solving real world customer problems, the
Atmosphere line of products sets the new standard for the fixed architecture zone
based processing market. From all of us at AtlasIED, we once again thank you for your
purchase and look forward to working with you in the future.
Scan QR code to download the full user manual.
The user manual can also be found at the following
address: www.atlasied.com/atmosphere_manual
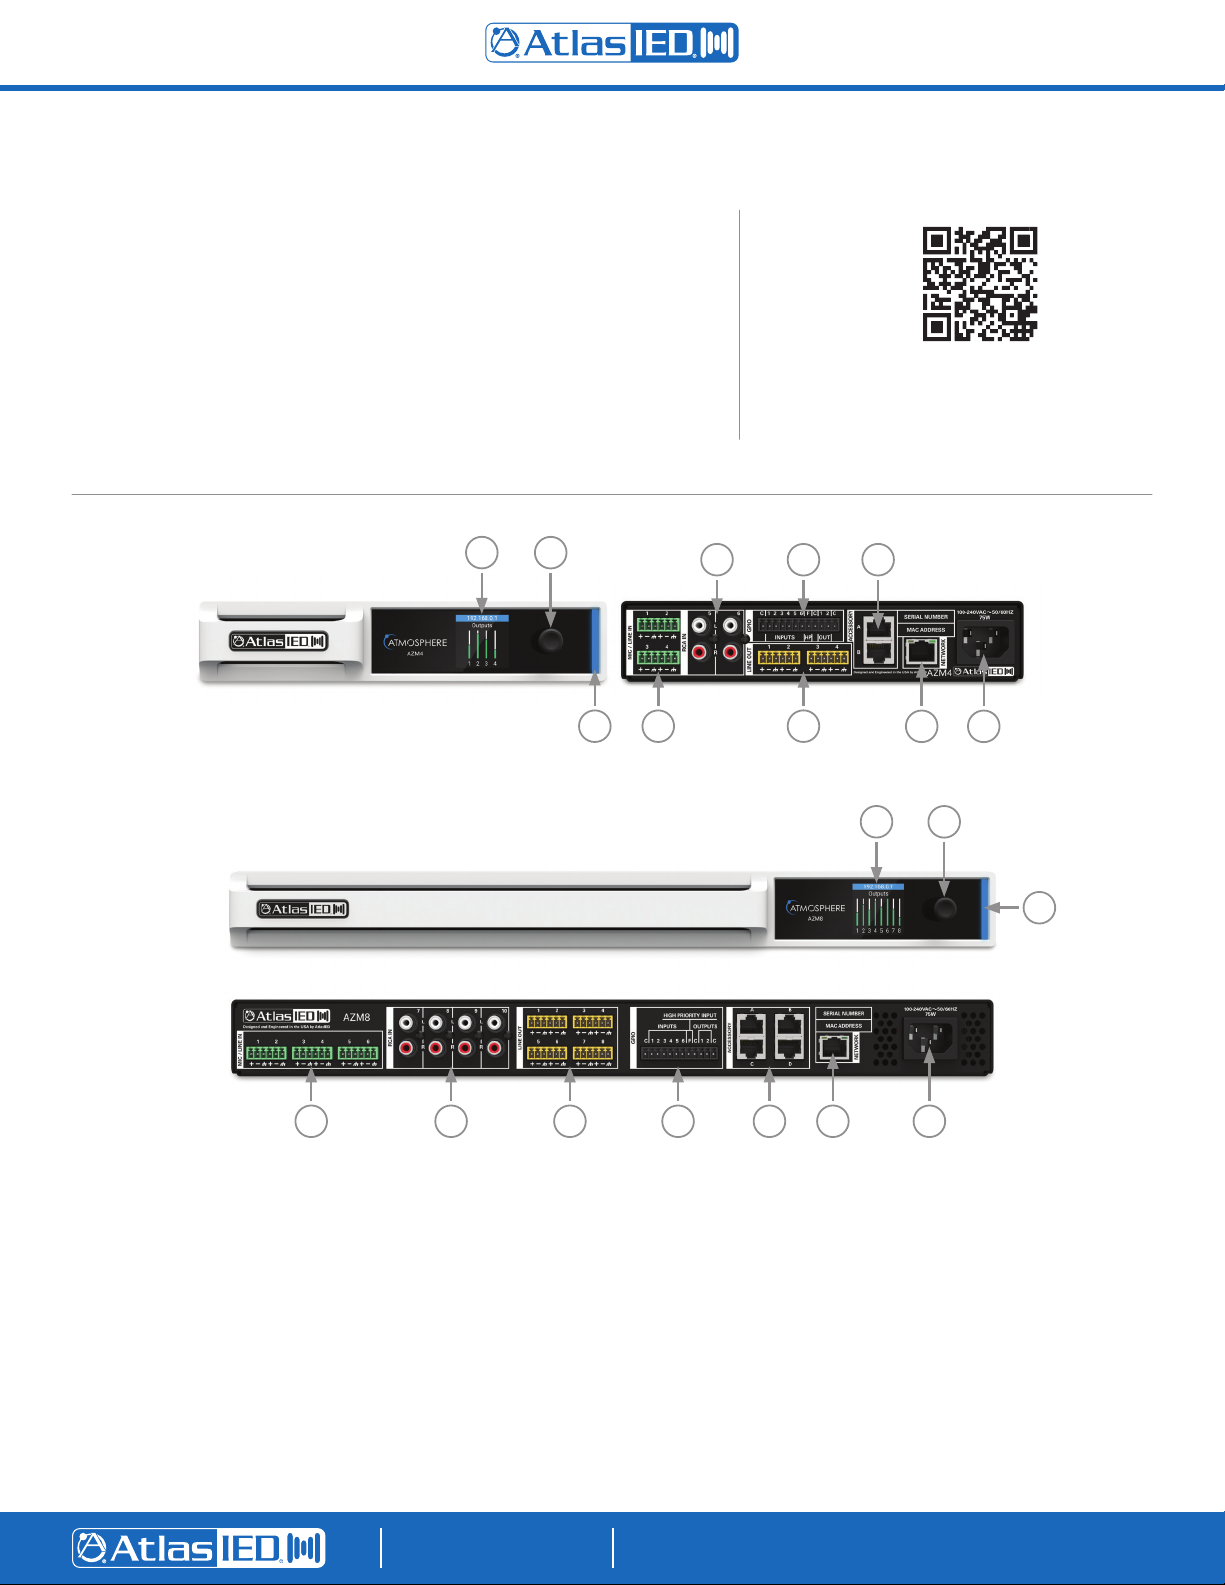
AZM4
AZM8
1
2
3
4
4 5 6 7
5
7
6
8 9 10
8
9
10
1
2
3
Front and Back Panel Controls / Connections
1. Color screen displays the IP address, shows system information,
and allows changes to network settings
2. Push button encoder for navigating front panel menu
3. Status Light Bar
• Blue – Unit is powered on and operating normally
• Flashing Red – Fault detected
4. Balanced Mic / Line inputs with phantom power
5. Unbalanced Mono Summed RCA Inputs
6. Balanced Line Outputs
1601 JACK MCKAY BLVD.
ENNIS, TEXAS 75119 U.S.A.
7. GPIO and High Priority Inputs
• Recall routines
• Recall scenes
• Trigger GPO preset
• Combine rooms
• Recall bell schedule
• Trigger messages
• Play high priority message
8. Accessory ports for Atmosphere accessories
9. Network port
10. IEC Inlet
TELEPHONE: (800) 876-3333
[email protected]
AtlasIED.com
Page 2
1
2
3
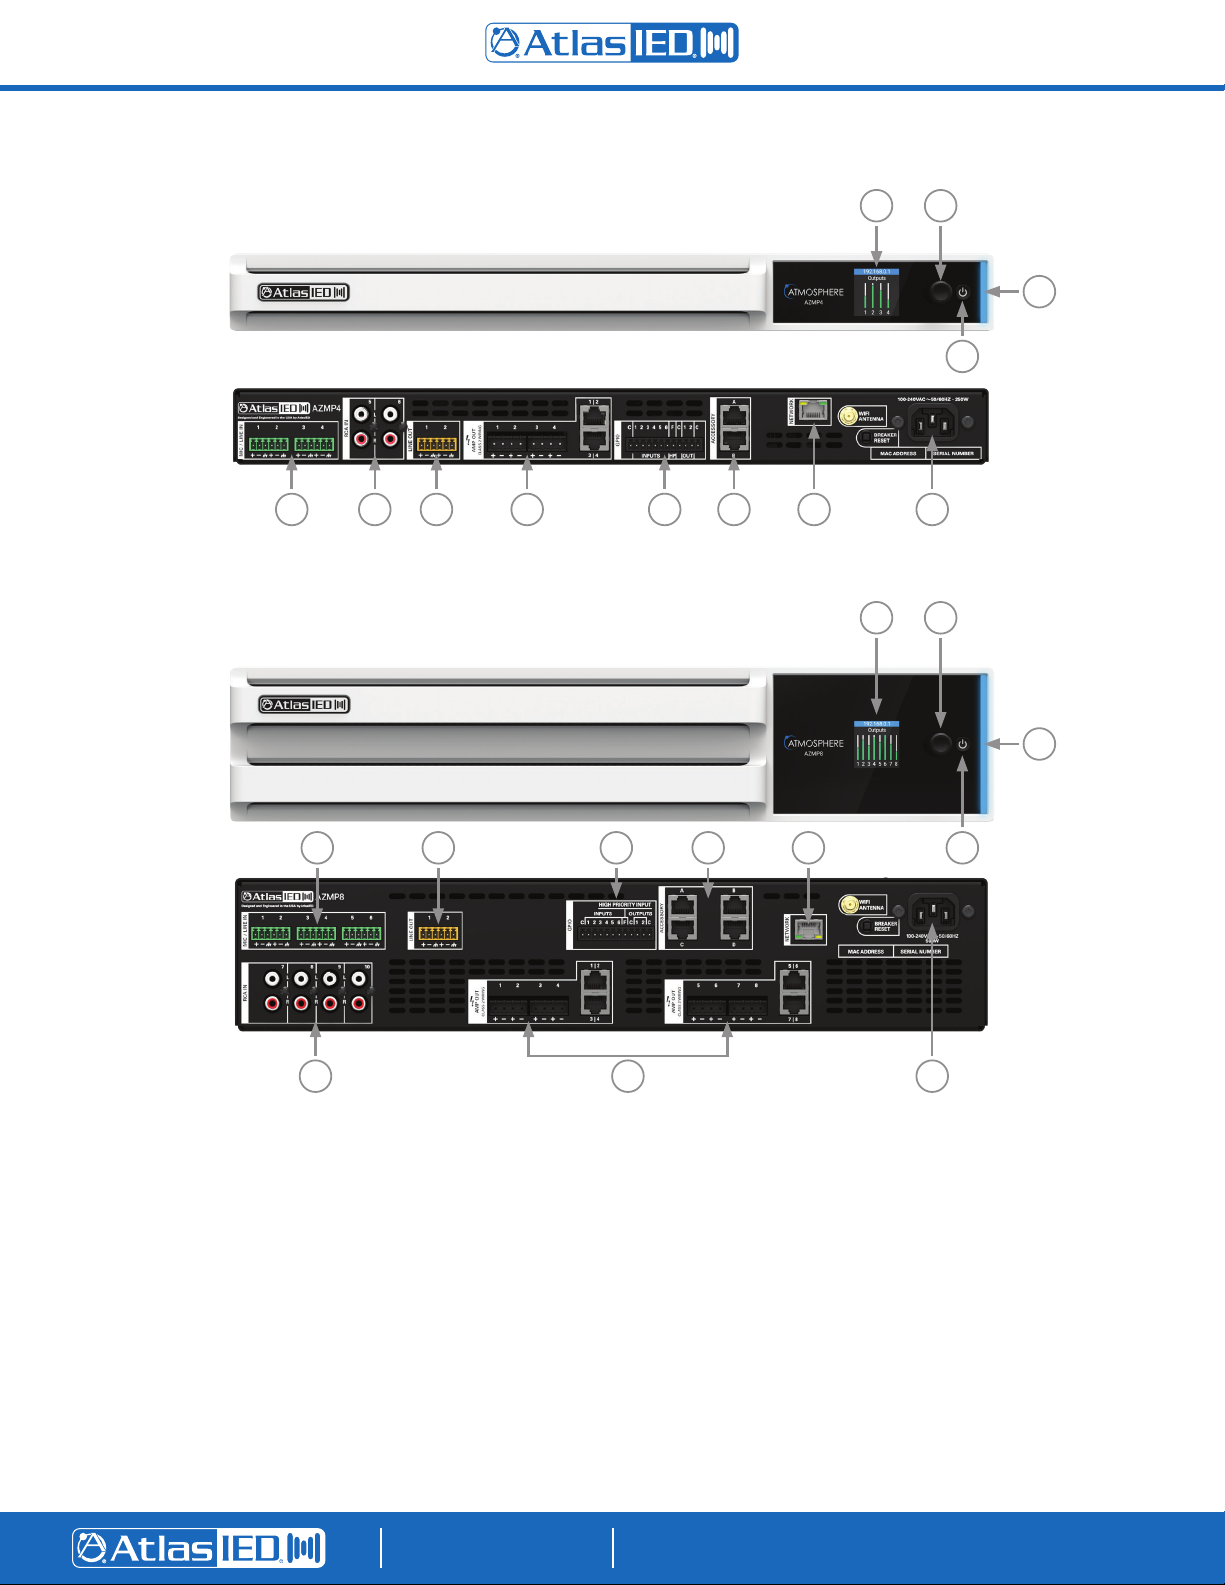
AZMP4
5 6 7
AZMP8
8 9
10 11 12
1
1175 109
4
2
3
4
6 128
Front and Back Panel Controls / Connections
1. Color screen displays the IP address, shows system information,
and allows changes to network settings
2. Push button encoder for navigating front panel menu
3. Status Light Bar
• Blue – Unit is powered on and operating normally
• Flashing Red – Fault detected
4. Power button
5. Balanced Mic / Line inputs with phantom power
6. Unbalanced Mono Summed RCA Inputs
7. Balanced Line Outputs
8. Amplifier Outputs
1601 JACK MCKAY BLVD.
ENNIS, TEXAS 75119 U.S.A.
9. GPIO and High Priority Inputs
• Recall routines
• Recall scenes
• Trigger GPO preset
• Combine rooms
• Recall bell schedule
• Trigger messages
• Play high priority message
10. Accessory ports for Atmosphere accessories
11. Network Port
12. IEC Inlet
TELEPHONE: (800) 876-3333
[email protected]
AtlasIED.com
Page 3
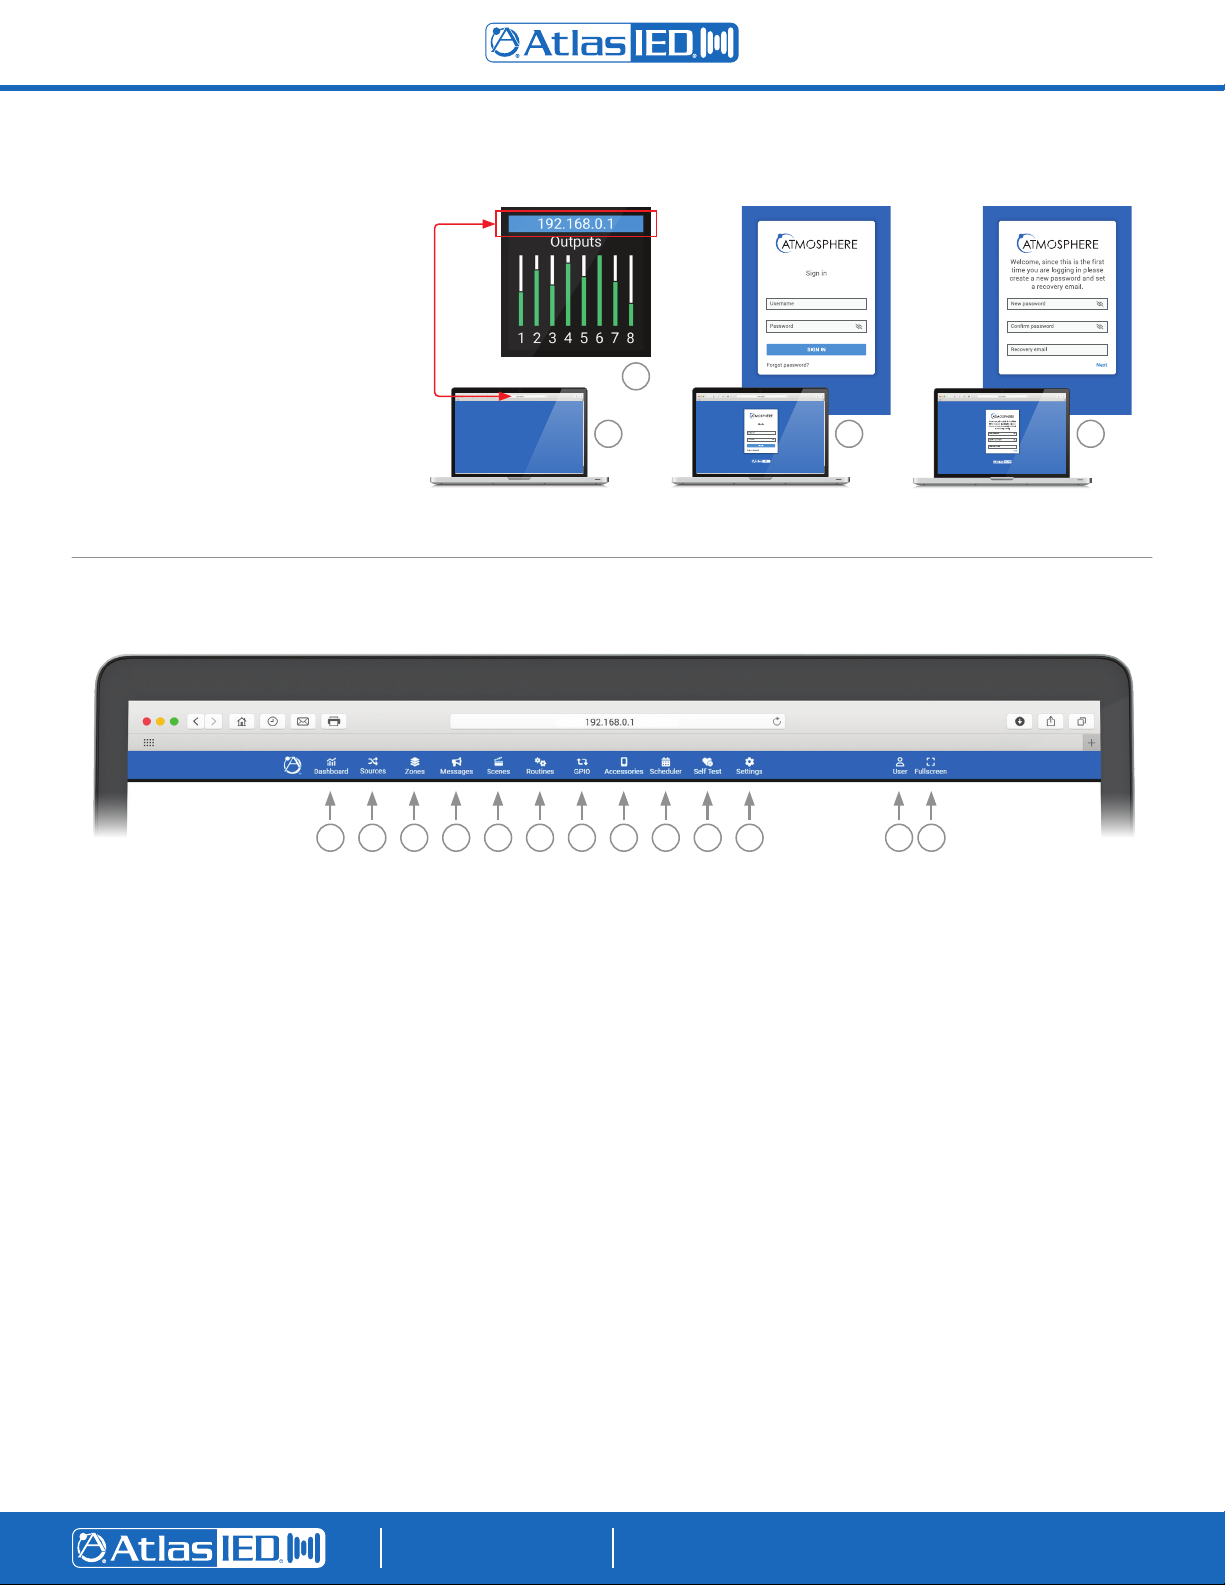
Logging Into The AZM / AZMP
1. Open a web browser on a device that
is on the same network as the AZM /
AZMP
2. Navigate to the IP address shown on
the front panel using the web browser
address bar
3. Login using the username “admin”
and password “admin”
4. Follow the on screen instructions to
change the default login credentials
User Interface
2
1 3 4
1 2 3 4 5 6 7 8 9 10 11
1. Dashboard General system information
2. Sources Add and configure sources
3. Zones Create and configure zones
4. Messages Create custom message events
5. Scenes Create preset scenes (volume, source, and mute)
6. Routines Create event to simultaneously trigger a scene,
message, GPO, and/or bell schedule change
7. GPIO Configure GPIO port behavior
12 13
8. Accessories View and configure all accessories
9. Scheduler Schedule routines, scenes, messages, bells,
GPO presets, and room combine
10. Self Test Configure automatic system tests and notifications
11. Settings View and set global parameters for the AZM
12. User Add/remove/edit user accounts
13. Full Screen Uses entire screen to display the user interface
1601 JACK MCKAY BLVD.
ENNIS, TEXAS 75119 U.S.A.
TELEPHONE: (800) 876-3333
[email protected]
AtlasIED.com
Page 4
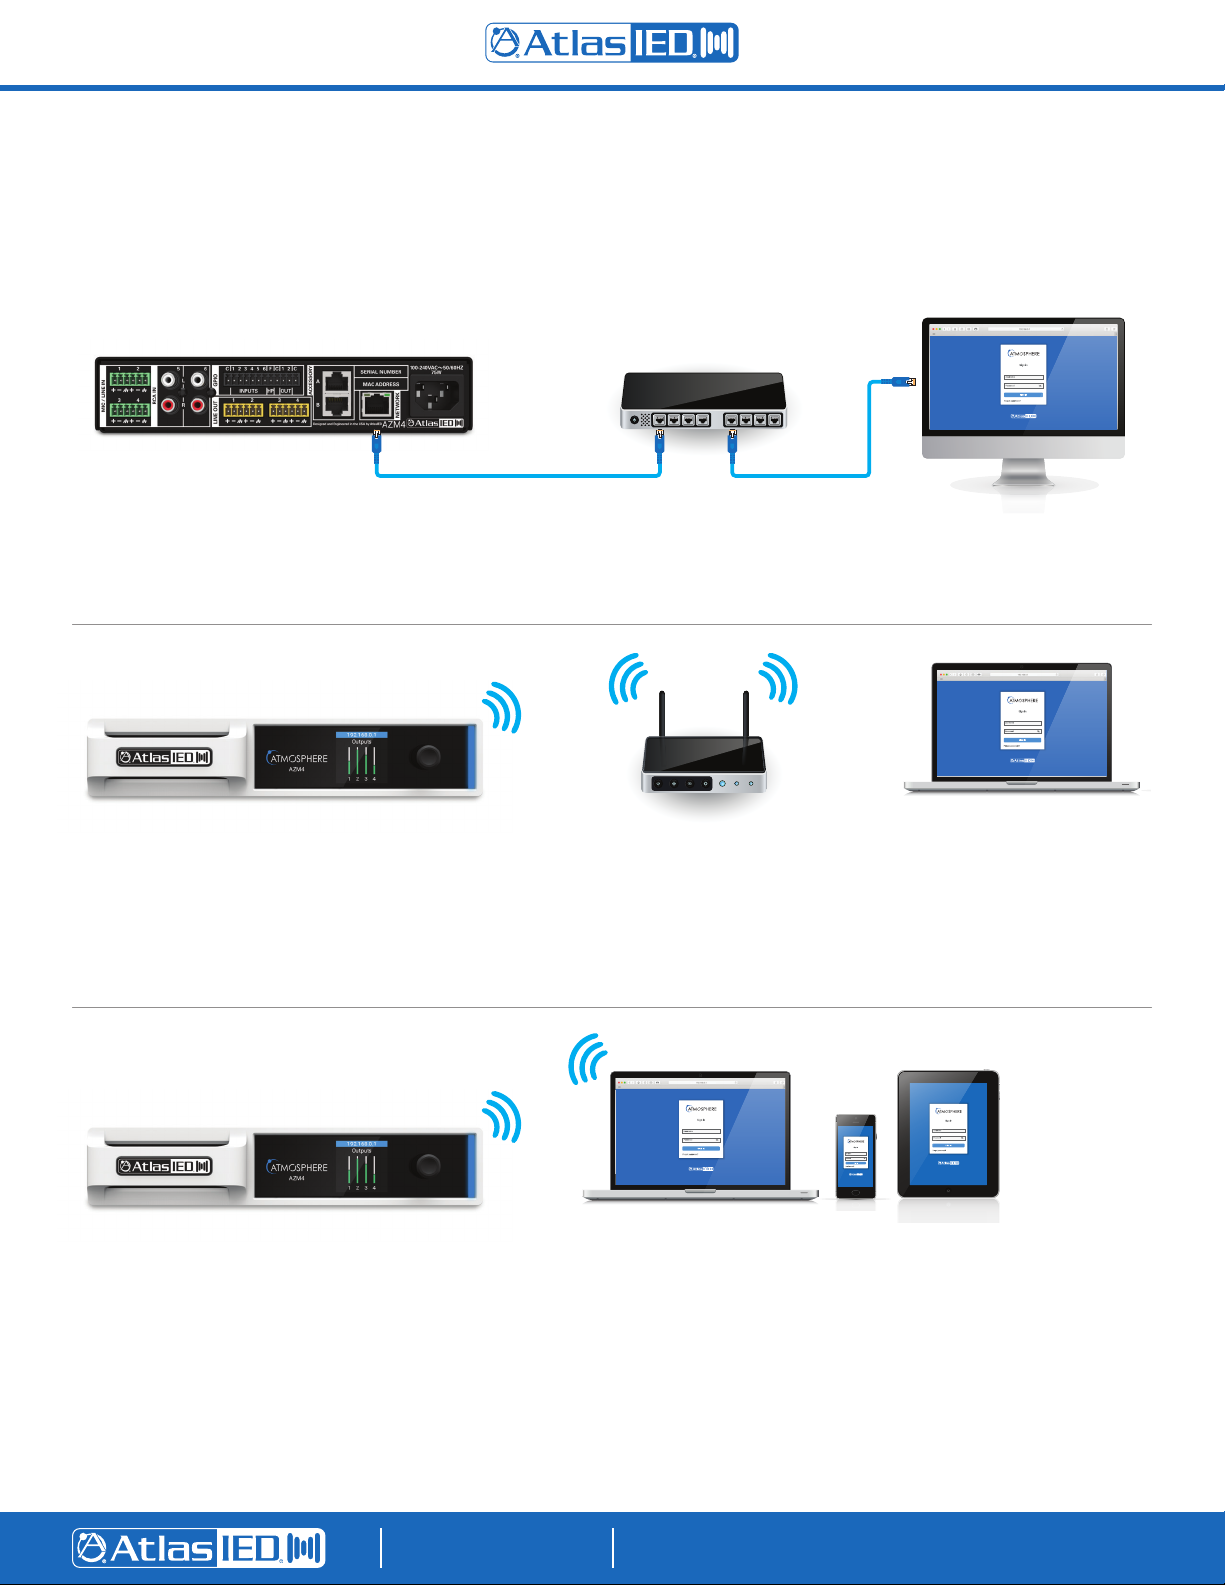
Connecting Devices To The AZM / AZMP For Conguration
Out of the box, the AZM / AZMP is configured to connect to an existing network via the back panel Ethernet port. However, there are two additional
methods for connecting to the AZM / AZMP for configuration. If no existing network is available, it is recommended that the onboard Wi-Fi be used in
access point mode for initial configuration.
1 – Ethernet Connection (Wired connection)
• Connect an RJ45 cable (CAT5e or CAT6) from the AZM / AZMP network port to an existing network
• Using a web browser enabled device on the network, navigate to the IP address that appears on the AZM / AZMP front panel screen using the
address bar located in the web browser
2 – Wi-Fi Connection (Connect to existing wireless network)
• From the front panel menu enable Wi-Fi mode (Network>WiFi>Change Mode>WiFi then confirm the change)
• Select the Wi-Fi network you would like to connect to (Network>WiFi>WiFi Networks)
• Enter the password and then select the green check-mark to connect to the network
Note: The Wi-Fi connection can be set up in the user interface if the AZM / AZMP is connected via the Ethernet port
3 – Access Point Connection (On board Wi-Fi creates a local wireless network for connection)
• From the front panel menu enable Access Point mode (Network>WiFi>Change Mode>Access Pt then confirm the change)
• The unit will now broadcast an SSID (AtlasIED_AZM/AZMP will be the default SSID) that can be found using Wi-Fi enabled devices
• Select the now available network from the settings page on your device and connect (The default password is AtlasIED. This can be changed in the
user interface)
• Using a web browser on the device, navigate to the IP address that appears on the AZM / AZMP front panel screen using the address bar located in
the web browser
1601 JACK MCKAY BLVD.
ENNIS, TEXAS 75119 U.S.A.
TELEPHONE: (800) 876-3333
[email protected]
AtlasIED.com
Page 5
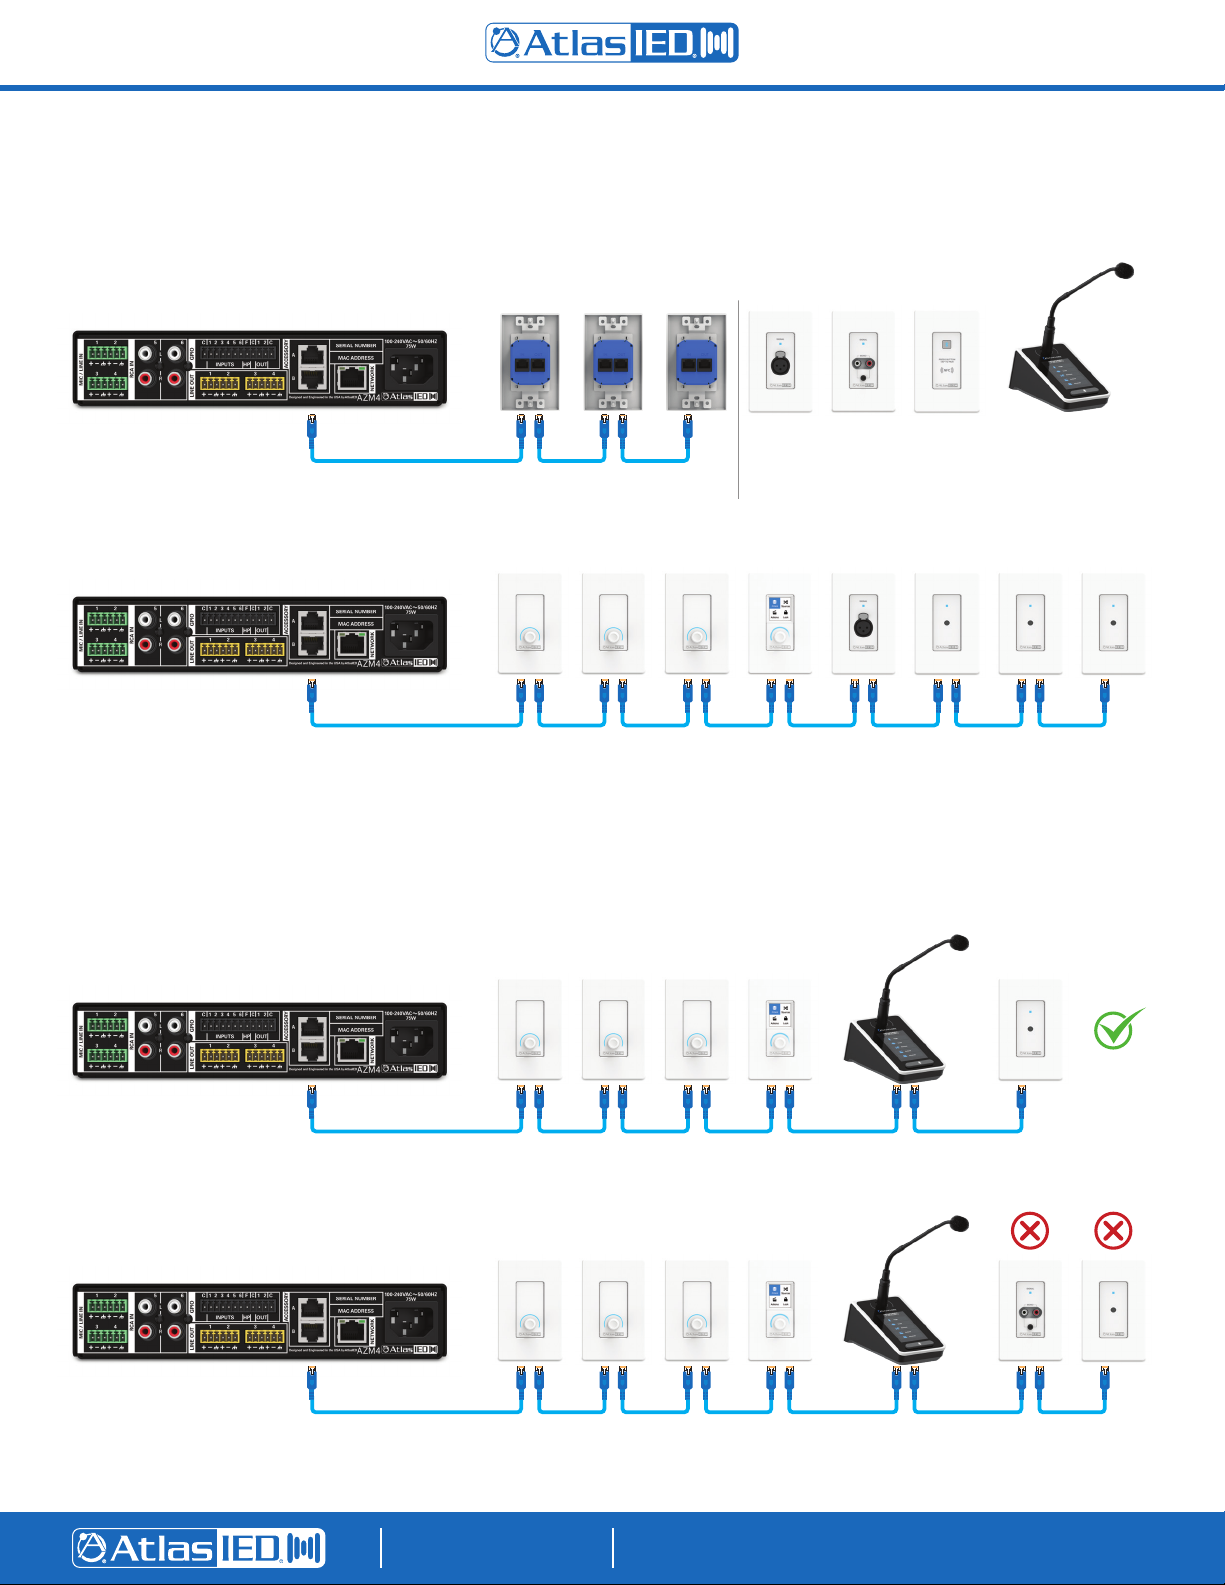
Connecting Accessories
All accessories are plug and play and are recognized by the AZM / AZMP when plugged in. Below are rules that need to be followed in order to guarantee
adequate and reliable performance of all connected accessories.
• CAT5e or CAT6 cable should be used to connect accessories to the host processor
A-XLR /
A-XLR-EU
• One audio wall plate (A-XLR, A-RCA, A-BT) or X-ZPS
A-RCA /
A-RCA-EU
A-BT /
A-BT-EU
X-ZPS
can be used per accessory port
• Up to 8 accessories can be daisy chained from a single port
• Up to 16 accessories can be connected to a single AZM / AZMP (a maximum of 8 X-ANS accessories can be used per AZM / AZMP)
• Each Accessory port can accept up to 1 remote audio wall plate (2 per AZM4 / AZMP4, 4 per AZM8 / AZMP8)
• The maximum cable length from the AZM / AZMP to the last accessory on the chain is 1000' (305m)
• There are no cable length restrictions between accessories
• The “IN” port is connected to the upstream device (AZM / AZMP or other accessory)
• The X-ZPS paging station consumes 3 accessory slots per port, therefore the maximum number of devices on a single port including the X-ZPS
is 6 total
• No limits exceeded
• Too many audio inputs, max 1 per port
• Too many devices on port, max 8 (without X-ZPS) or max 6 (with X-ZPS)
1601 JACK MCKAY BLVD.
ENNIS, TEXAS 75119 U.S.A.
TELEPHONE: (800) 876-3333
[email protected]
AtlasIED.com
Page 6
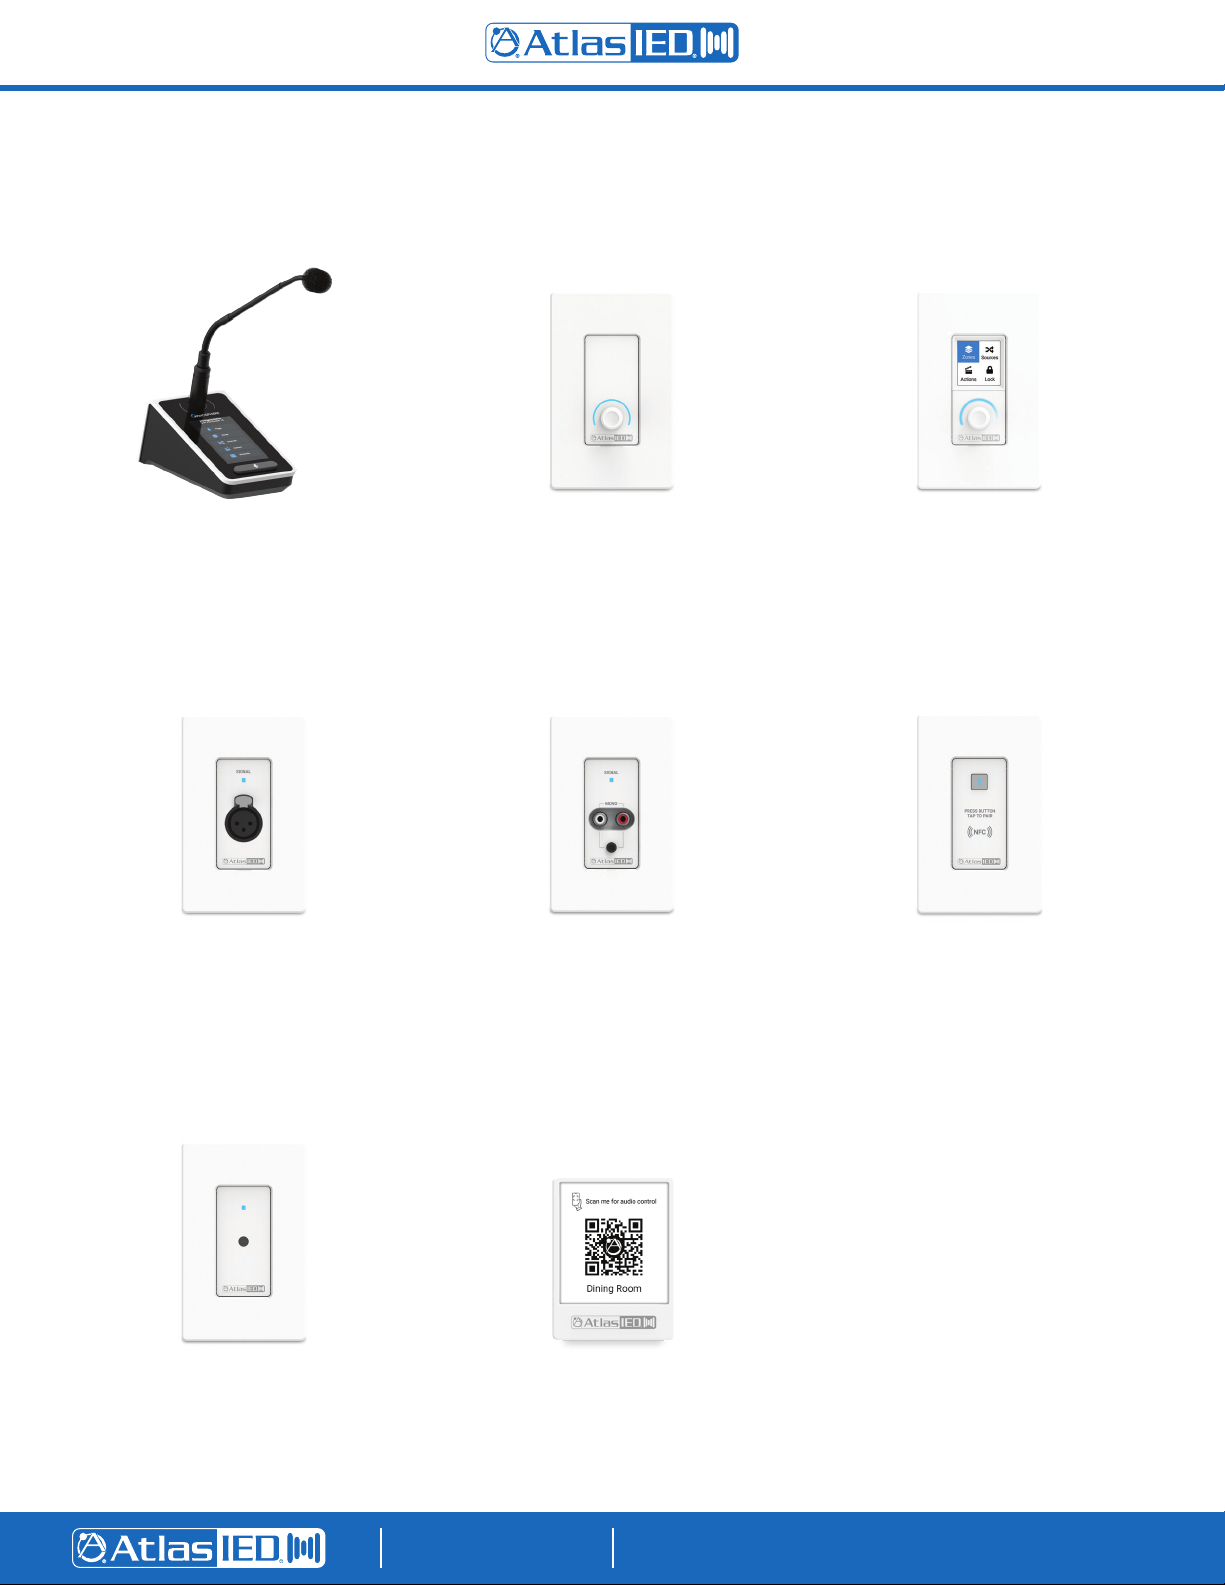
Available Accessories
X-ZPS
Touchscreen zone paging station with all call
and custom group paging features combined
with a high-quality, gooseneck microphone.
Also serves as a system controller for volume,
source selection, message recall, and more
A-XLR / A-XLR-EU
Single balanced mic line XLR with
phantom power
C-V / C-V-EU
Volume controller
A-RCA / A-RCA-EU
Mono summed unbalanced RCA / 3.5mm
C-ZSV / C-ZSV-EU
Pin code protected, multi-zone, volume, source,
message recall, routine, scene, and GPO trigger
controller
A-BT / A-BT-EU
Mono summed commercial Bluetooth
endpoint with NFC
X-ANS / X-ANS-EU
Ambient noise compensation sensor
Placard for printed virtual wall controller
QR Code
1601 JACK MCKAY BLVD.
ENNIS, TEXAS 75119 U.S.A.
X-GEM
TELEPHONE: (800) 876-3333
[email protected]
AtlasIED.com
Page 7
TO REDUCE THE RISK OF ELECTRIC SHOCK
DO NOT REMOVE COVER (OR BACK)
NO USER SERVICEABLE PARTS INSIDE
REFER SERVICING TO QUALIFIED PERSONNEL
RISQUE DE CHOC ELECTRIQUE
NE PAS OUVRIR
RISK OF ELECTRIC SHOCK
DO NOT OPEN
CAUTION
Important Safety Instructions
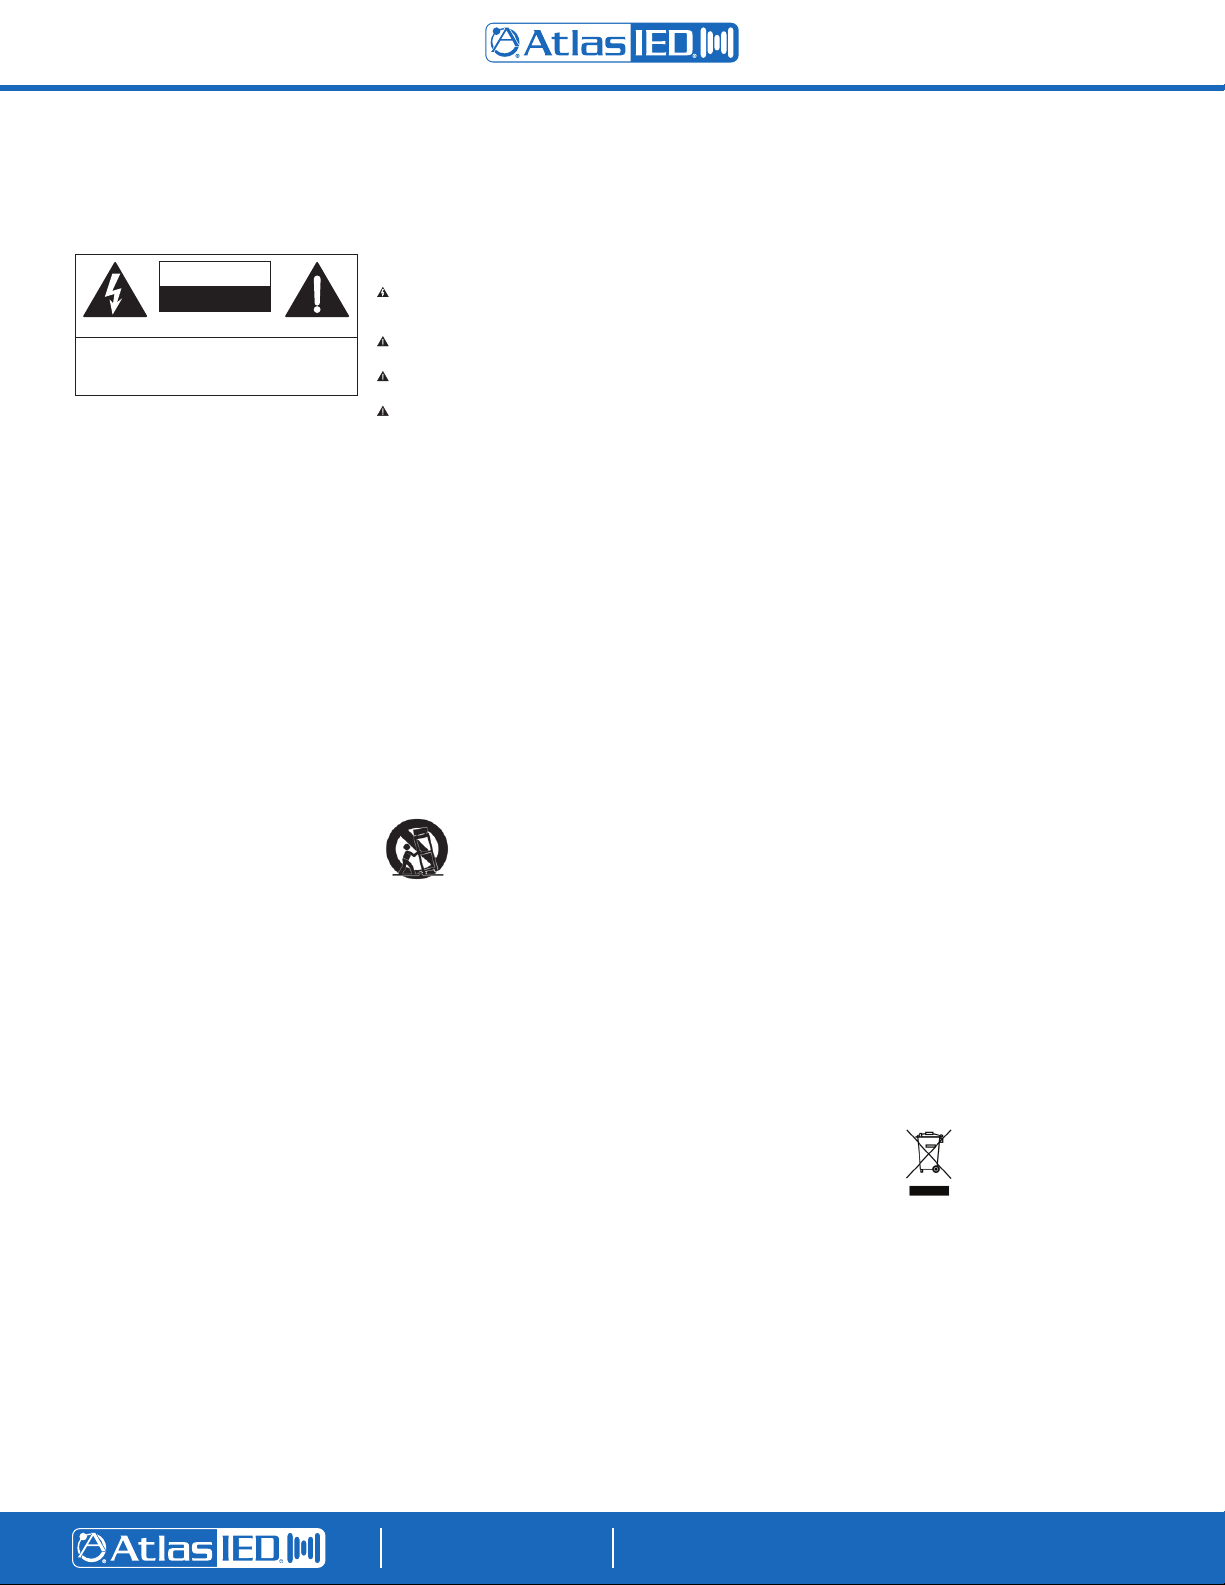
Labeling on products and the Installation Instructions & User Manual may use safety related graphical symbols as shown below to note
safety requirements.
Lightning Bolt: lightning flash with arrowhead symbol, within an equilateral triangle, WARNING symbol, is intended to alert the user
to the presence of un-insulated dangerous voltage within the product’s enclosure that may be sufficient in magnitude to constitute a risk
of electric shock to persons or domestic animals.
Exclamation Point: The exclamation point within an equilateral triangle, CAUTION symbol, is intended to alert the user to the
presence of important operating and maintenance (servicing) instructions, or a hazard that can damage equipment.
Do not proceed beyond a WARNING or CAUTION notice until you have understood the hazardous condition and have taken
appropriate steps.
Ne continuez pas avant d’avoir pris connaissance du danger et prendre les mesures appropriées.
1. Read these instructions.
2. Keep these instructions.
3. Heed all warnings.
4. Follow all instructions.
5. Do not use this device near
water.
6. Clean only with dry cloth.
7. Do not block any ventilation
openings. Install in accordance
with the manufacturer’s
instructions.
8. Do not install near any heat
sources such as radiators,
heat registers, stoves, or other
device that produce heat.
9. This product is equipped with
a three-wire grounding-type
plug, a plug having a third
(grounding) pin. This plug will
only fit into a grounding-type
power outlet. This is a safety
feature. If you are unable to
insert the plug into the outlet,
contact your electrician to
replace your obsolete outlet.
Do not defeat the safety
purpose of the grounding-type
plug.
10. To completely disconnect this
equipment from the mains,
disconnect the power supply
cord plug from the receptacle.
11. The mains plug of the power
supply cord shall remain
readily operable.
12. Protect the power cord
from being walked on or
pinched particularly at plugs,
convenience receptacles, and
the point where they exit from
the device.
13. Only use attachments /
accessories specified by the
manufacturer.
14. Use only with the cart, stand,
tripod, bracket, or table
specified by the manufacturer,
or sold with the device. When
a cart is used, use caution
when moving the cart / device
combination to avoid injury
from tip-over.
15. Unplug this device during
lightning storms or when
unused for long periods of
time.
16. Refer all servicing to qualified
service personnel. Servicing
is required when the device
has been damaged in any
way, such as power-supply
cord or plug is damaged, liquid
has been spilled, or objects
have fallen into the device,
the device has been exposed
to rain or moisture, does not
operate normally, or has been
dropped.
WARNING: To reduce the risk
of fire or electric shock, do not
expose this apparatus to rain,
moisture, dripping, splashing, or
place objects filled with liquids on
the equipment.
AVERTISSEMENT: Afin de réduire
le risque d’incendie ou de choc
électrique, n’exposez pas cet
appareil à la pluie, à l’humidité, à
l’égouttement, aux éclaboussures,
et ne posez pas des objets remplis
de liquide sur l’appareil
WARNING: If apparatus is
equipped with Class I grounding
plugs for safety purposes, it must
be connected to MAINS that
employ a protective earth ground
connection.
AVERTISSEMENT: si l’appareil est
équipé de prises de terre classe I,
pour des raisons de sécurité, il doit
être branché sur un réseau ayant
une prise de terre de protection.
WARNING: The MAINS plug on
this device may be used as the
DISCONNECT DEVICE for MAINS
power and must remain readily
operable.
AVERTISSEMENT: La prise
principale de cet appareil peut
être utilisé comme DISPOSITIF
de DECONNEXION du courant
principal et doit rester facilement
accessible.
WARNING: Installation and
maintenance of AtlasIED
equipment is to be made by
trained / qualified personnel and
must conform to all applicable local
codes.
AVERTISSEMENT: l’installation et
la maintenance des équipements
AtlasIED doit être faite par du
personnel formé / qualifié et
doivent être conformes à toutes
les réglementations locales en
vigueur.
WARNING: If unit contains a
lithium battery, there is a danger of
explosion. Replace only with the
same or equivalent type.
AVERTISSEMENT: Si l’unité
contient une pile au lithium, il y a
un danger d’explosion. Remplacezla uniquement avec un modèle
identique ou équivalent.
WEEE NOTICE: This appliance
is labeled in accordance with
European Directive 2012/19/EU
concerning waste of electrical and
electronic equipment (WEEE). This
label indicates that this product
should not be disposed of with
household waste. It should be
deposited at an appropriate facility
to enable recovery and recycling.
©2023 Atlas Sound LP. The Atlas “Circle A”, Soundolier, and Atlas Sound are trademarks of Atlas Sound L.P. IED is a Registered Trademark of Innovative Electronic Designs LLC. All rights reserved.
All other Trademarks are property of their respective owners. No endorsement is implied. Due to continual product development, specifications are subject to change without notice. ATS006162 RevE 3/23
1601 JACK MCKAY BLVD.
ENNIS, TEXAS 75119 U.S.A.
TELEPHONE: (800) 876-3333
[email protected]
AtlasIED.com
 Loading...