

Page 1

343 Vanderbilt Avenue Norwood, MA 02062
Telephone: (781) 762-6300 Fax: (781) 762-6868
STA-200 STREAMING AMPLIFIER USER GUIDE
Page 2
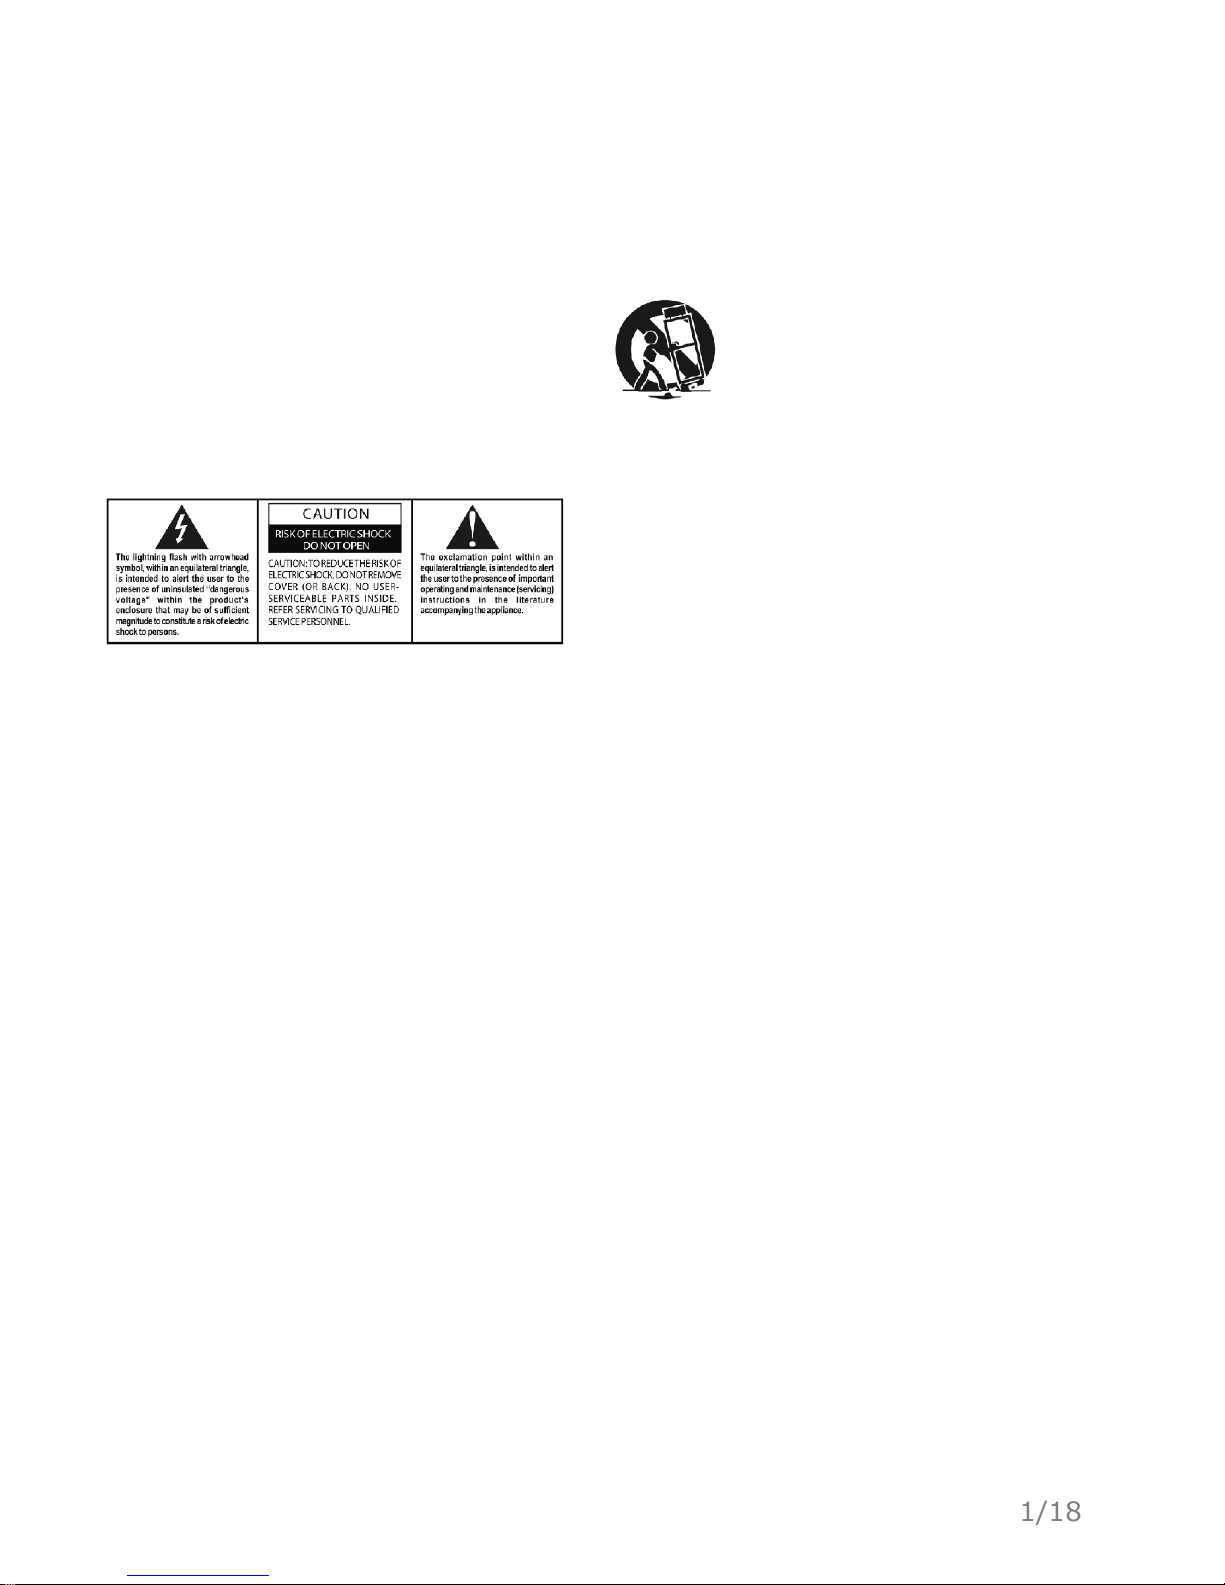
Important Safety Instructions
1. Read these instructions.
2. Keep these instructions.
3. Heed all warnings.
4. Follow all instructions.
5. Do not use this apparatus near water.
6. Clean only with dry cloth.
7. Do not block any ventilation openings. Install in accordance with the
manufacturer’s instructions.
8. Do not install near any heat sources such as radiators, heat registers,
stoves, or other apparatus (including amplifiers) that produce heat.
9. Do not defeat the safety purpose of the polarized or grounding-type
plug. A polarized plug has two blades with one wider than the other .
A grounding type plug has two blades and a third grounding prong.
The wide blade or the third prong are provided for your safety. If the
provided plug does not fit into your outlet, consult an electrician for
replacement of the obsolete outlet.
10. Protect the power cord from being walked on or pinched
particularly at plugs, convenience receptacles, and the point where
they exit from the apparatus.
11. Only use attachments/accessories specified by the manufacturer.
13. Unplug this apparatus during lightning storms or when unused for long
periods of time.
14. Refer all servicing to qualified service personnel. Servicing is required
when the apparatus has been damaged in any way, such as power- supply
cord or plug is damaged, liquid has been spilled or objects have fallen into
the apparatus, the apparatus has been exposed to rain or moisture, does not
operate normally, or has been dropped.
15. Grounding or Polarization–This product may be equipped with a
polarized alternating-current line plug (a plug having one blade wider than
the other). This plug will fit into the power outlet only one way. This is a
safety feature. If you are unable to insert the plug fully into the outlet, try
reversing the plug. If the plug should still fail to fit, contact your electrician
to replace your obsolete outlet. Do not defeat the safety purpose of the
polarized plug.
Alternate Warnings–This product is equipped with a three-wire groundingtype plug, a plug having a third (grounding) pin. This plug will only fit into
a grounding-type power outlet. This is a safety feature. If you are unable to
insert the plug into the outlet, contact your electrician to replace your
obsolete outlet. Do not defeat the safety purpose of the grounding-type plug.
16. Ventilation–Slots and openings in the cabinet are provided for
ventilation and to ensure reliable operation of the product and to protect it
from overheating, and these openings must not be blocked or covered. The
openings should never be blocked by placing the product on a bed, sofa,
rug, or other similar surface. This product should not be placed in a built-in
installation such as a bookcase or rack unless proper ventilation is provided
or the manufacturer’s instructions have been adhered to.
17. The MAINS plug or an appliance coupler is used as the disconnect
device, the disconnect device shall remain readily operable.
18. CLASS II apparatus with double insulation, and no protective earth
provided.
19. CAUTION: Danger of explosion if the remote control battery is
incorrectly replaced. Replace only with the same or equivalent type.
20. WARNING: The remote control battery (battery or batteries or battery
pack) shall not be exposed to excessive heat such as sunshine, fire or the
like.
21. No naked flame sources, such as lighted candles, should be placed on
the apparatus.
TO PREVENT FIRE OR SHOCK HAZARD, DO NOT USE
THIS PLUG WITH AN EXTENSION CORD, RECEPTACLE
OR OTHER OUTLET UNLESS THE BLADES CAN BE
FULLY INSERTED TO PREVENT BLADE EXPOSURE
TO PREVENT FIRE OR SHOCK HAZARD, DO NOT
EXPOSE THIS APPLIANCE TO RAIN OR MOISTURE.
12. Use only with the cart, stand, tripod, bracket, or table
specified by the manufacturer
, or sold with the apparatus.
When a cart is used, use caution when moving the cart/
apparatus combination to avoid injury from tip-over.
Important Safety Instructions
1/18
Page 3

FCC Compliance Statement
This device complies with part 15 of the FCC Rules. Operation is subject to
the following two conditions:
1. This device may not cause harmful interference, and
2. This device must accept any interference received, including interfer- ence
that may cause undesired operation.
FCC WARNING
This equipment has been tested and found to comply with the limits for a Class
B digital device, pursuant to Part 15 of the FCC Rules. These limits are
designed to provide reasonable protection against harmful interference in a
residential installation.
This equipment generates, uses and can radiate radio frequency energy and, if
not installed and used in accordance with the instructions, may cause harmful
inerference to radio communications.
However, there is no guarantee that interference will not occur in a particu- lar
installation. If this equipment does cause harmful interference to
radio or television reception, which can be determined by turning the equipment off and on, the user is encouraged to try to correct the interference by one
or more of the following measures:
• Reorient or relocate the receiving antenna.
• Increase the separation between the equipment and the receiver.
• Connect the equipment into an outlet different from that to which the receiver
is connected.
• Consult the dealer or an experienced radio/TV technician for help. Caution:
To comply with the limits for an FCC Class B comput
ing device, always use any shielded signal cord supplied with this unit.
The Federal Communications Commission warns that changes or modifications of the unit not expressly approved by the party responsible for compliance could void the user’s authority to operate the equipment.
Radio Frequency Interference Statement
Warning:
This is a Class B product. In a domestic environment, this product may cause
radio interference in which case the user may be required to take adequate
measures.
European Union Information on Disposal for Users of Waste
Electrical & Electronic Equipment (private households)
This symbol on the product(s) and / or accompanying documents means
that used electrical and electronic products should not be mixed with
general household waste. For proper treatment, recovery and recycling,
please take this product(s) to designated collection points where it will be
accepted free of charge.
Alternatively, in some countries you may be able to return your products
to your local retailer upon purchase of an equivalent new product.
Disposing of this product correctly will help save valuable resources and
prevent any potential negative effects on human health and the environment, which could otherwise arise from inappropriate waste handling.
Please contact your local authority for further details of your nearest
desig- nated collection point.
Penalties may be applicable for incorrect disposal of this waste, in accordance with you national legislation.
For business users in the European Union
If you wish to discard electrical and electronic equipment, please contact
your dealer or supplier for further information.
Information on Disposal in other Countries outside the European Union
This symbol is only valid in the European Union. If you wish to discard
this product please contact your local authorities or dealer and ask for the
cor- rect method of disposal.
Important Safety Instructions
Qualcomm aptX is a product of Qualcomm Technologies International,
Ltd. Qualcomm is a trademark of Qualcomm Incorporated, registered in
the United States and other countries, used with permission. aptX is a
trademark of Qualcomm Technologies International, Ltd., registered in
the United States and other countries, used with permission.
2/18
Page 4

Introduction
2
Initial Setup
6
Connecting a Bluetooth Source
8
Using your STA-200 as a SKAA receiver
10
Using the Line in Analog Audio Input
12
Using the AUX Input
12
Using Several STA-200 Units Together in a SKAA Network
13
15
16
3/18
The SKAA cmd App
The SKAA cmd App Specifications
Trouble Shooting Guide
17
Page 5
Introduction
IR Audio Input
4/18
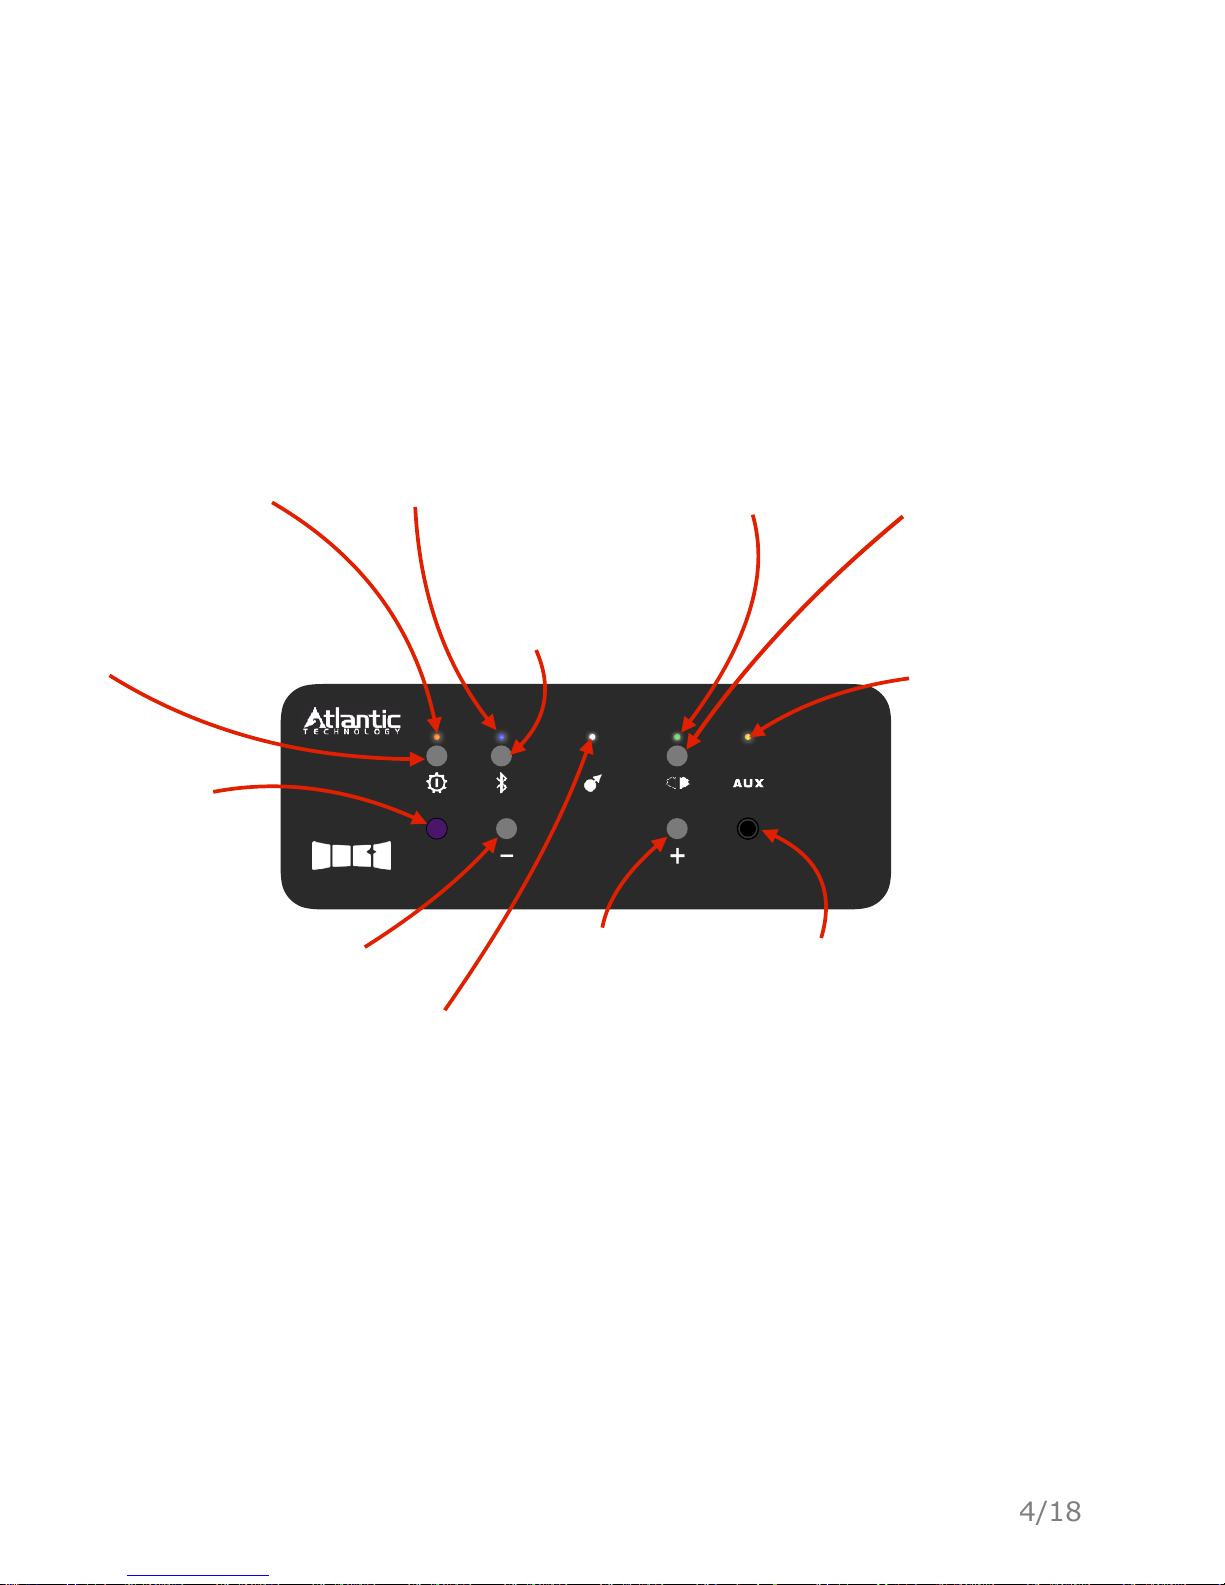
Power LED
Bright Orange: On
Dim Orange: Sleep
Gear Button
Click to switch modes
Hold to power on/off
Bluetooth LED
See Page 6 for
description
Bluetooth Button
See Page 6 for
description
Relay LED
See Page 10-11 for
description
SKAA Indicator
LED See Page 8 for
description
Volume
Down Button
Volume
Up Button
AUX Input
Jack See Page 9
for description
Infrared
Receiver
Sensor for
IR remote
SKAA Bond Button
See Page 8 for
description
AUX LED
See Page 9 for
description
Page 6
Introduction
5/18
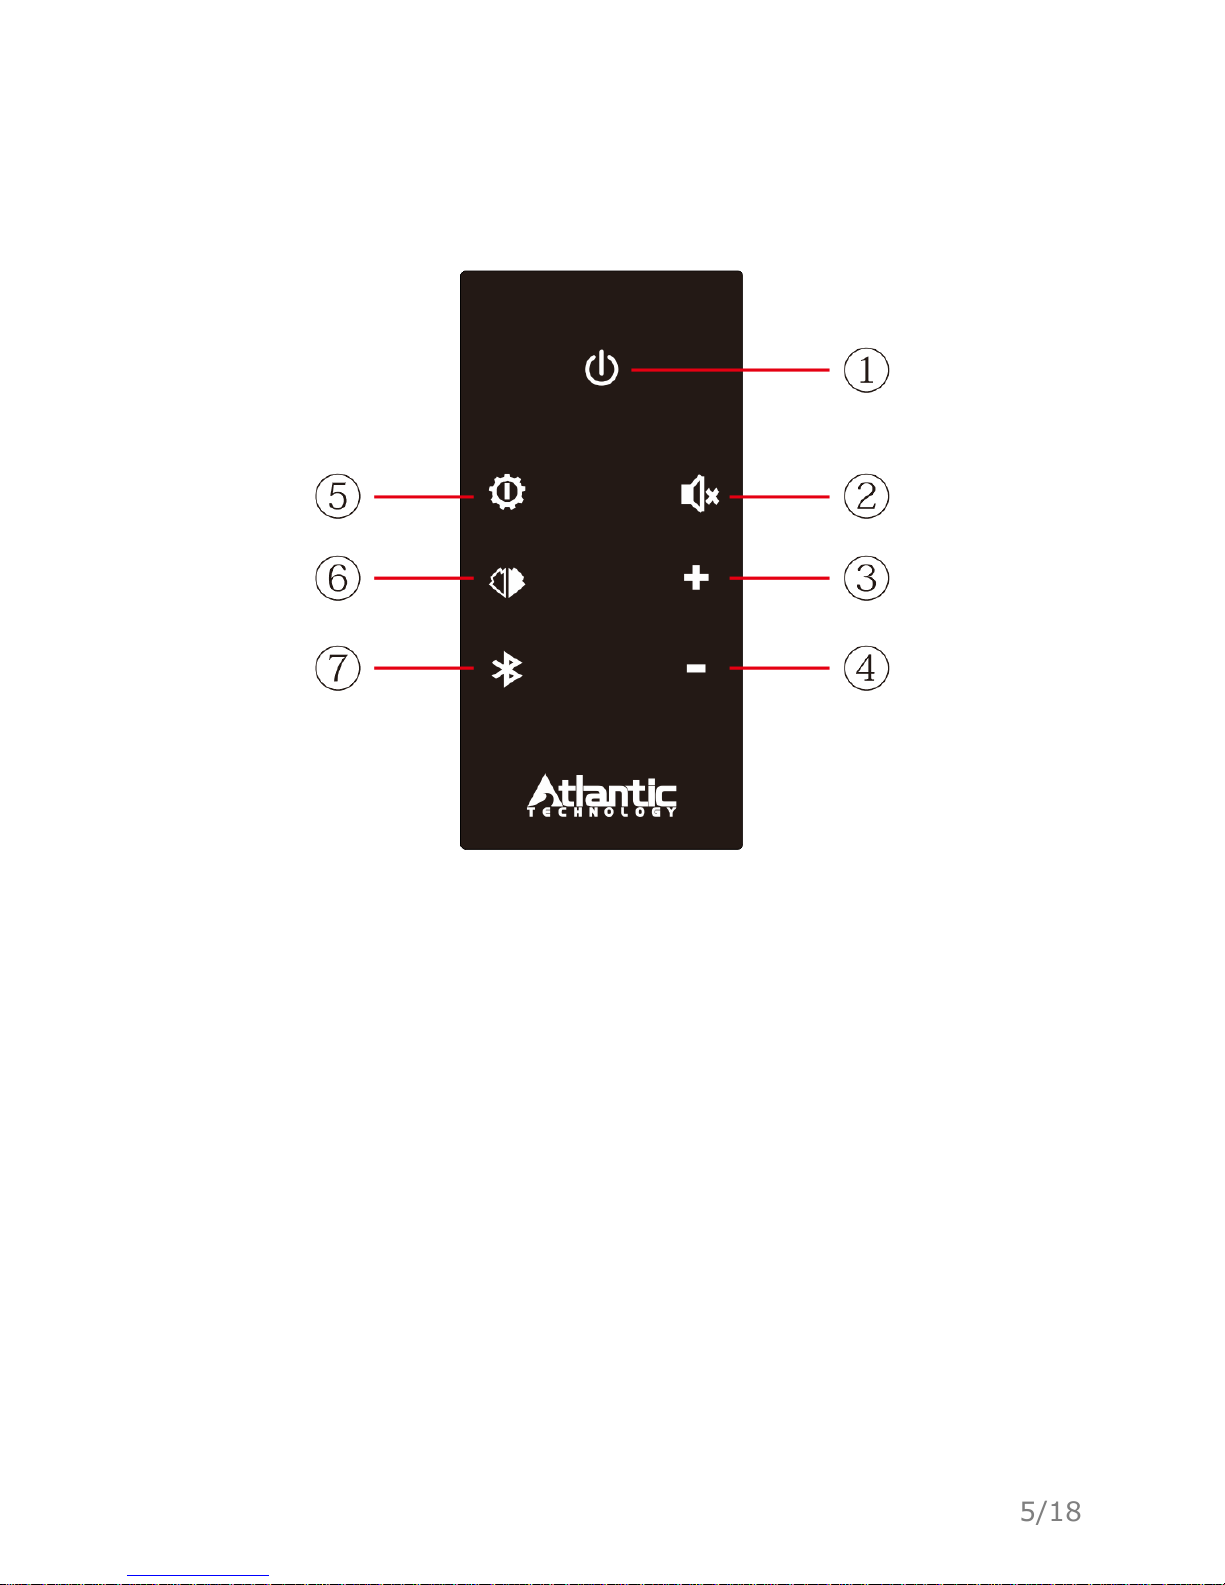
Remote control
1. POWER ON/OFF Button
2. MUTE Button
3. Volume Up Button
4. Volume Down Button
5. Gear Button
6. SKAA Bond Button
7. Bluetooth Button
Page 7

Speaker Output
L
L
R
R
Line in Line out
R
L
+
_
Power
On
Off
100-240~50/60Hz
200 Watts Max Power
Speaker Output
L
L
R
R
Line in Line out
R
L
+
_
Power
On
Off
100-240~50/60Hz
200 Watts Max Power
Initial Setup
The STA-200 supports both active and passive speakers.
If you are connecting active speakers (i.e. if your speakers use
power cables), connect them to the output labeled "Line out".
If you are connecting passive speakers (i.e. if your speakers are
powered solely by the connection to your STA-200), connect them to the
output labeled "Speaker Output".
6/18
Page 8

Initial Setup
7/18
Before attempting to use any buttons on the front plate, ensure that the power
switch on the back of your STA-200 is flipped to the "On" position. Next, hold
the Gear button for two seconds to power on the unit. Once the power LED is
illuminated, click the Gear button to cycle through the modes.
Works as an ordinary BT
speaker. Use the Bluetooth
button to pair with your phone.
It’s a fully-functional SKAA receiver.
Feed it audio with any SKAA
hardware transmitter or any other
STA-200 in Relay mode.
Plug in any 3.5 mm stereo audio source into
the AUX jack on the front or any RCA line level
source into the Line In input on the back.
Same as AUX, but this mode
rebroadcasts the AUX audio to
up to 4 more speakers via SKAA!
Same as BT, but this mode
rebroadcasts the BT audio to up
to 4 more speakers via SKAA!
Page 9

Connecting a Bluetooth Source
Cycle to Bluetooth mode by clicking the Gear button. When in Bluetooth
mode, the Bluetooth LED will be illuminated.
IR
Audio Input
Enter pairing mode on the Bluetooth device you want to connect to the
STA-200 and select the STA-200 from the discoverable devices list.
This diagram represents the Bluetooth behavior of the STA-200
8/18
Page 10

Connecting a Bluetooth Source
Initialization
Clicking the Gear button while in any other mode enters the BT Mode or BT
Relay Mode and begins Initialization. Powering on the STA-200 in either BT
Mode or BT Relay Mode also starts Initialization.
Pairing List
The Paired List contains up to eight of the most recent hosts which have
successfully paired and connected with the STA-200.
Button
Clicking the button toggles between the Attempt Connection state and the
Pairing state. From the Connected state, a two-second press and hold of
the button will force the STA-200 to drop the connection to its currently
connected device and enter the Pairing state. A ten-second press & hold of
the button will clear the Paired List and enter the Pairing state.
Timeouts
From Initialization, the STA-200 attempts to connect to the most recently
connected host for ten seconds. After ten seconds, if a successful
connection has not been established, the STA-200 will enter the Pairing
state.
If the connected host goes out of range, the STA-200 attempts to reconnect
to that host for 60 seconds. After 60 seconds, if a successful connection has
not been established, the STA-200 will enter the Pairing state.
9/18
Page 11

Using your STA-200 as a SKAA receiver
The STA-200 can be used as a SKAA receiver when in SKAA mode. A SKAA
receiver receives wireless audio from any SKAA transmitter. For a complete
list of SKAA transmitters visit https://shop.atlantictechnology.com/
product/STA-200/
Ensure your SKAA transmitter is powered on and that your host device is
playing audio. For example, if you are using a smart phone, make sure that
your SKAA transmitter is plugged into your smart phone and that music is
playing.
Click the Gear button to cycle through modes. The SKAA Indicator LED will
illuminate once you have entered SKAA mode. When in SKAA mode, your
STA-200 should automatically begin playing the audio received over SKAA
through the speakers you have connected.
IR
Audio Input
One SKAA transmitter can serve up to four SKAA receivers.
SKAA
Transmitter
10/18
SKAA!
(Up to 50 m)
Page 12

Using your STA-200 as a SKAA receiver
IR Audio Input
Indicator
Bond Button
11/18
Page 13

Speaker Output
L
L
R
Line in Line out
R
R
L
+
_
Power
On
Off
100-240~50/60Hz
200 Watts Max Power
Using the Line in Analog Audio Input
12/18
Audio Source
IR Audio Input
Connect your line in input to the input labeled "Line in" on the back of
your STA-200.
Click the Gear button to cycle to AUX mode. When in AUX mode, the
yellow LED above AUX will illuminate.
Make sure no cables are plugged
into the audio input jack located
on the front of the STA-200. A
plug in the audio input jack will
block any audio signal from the
Line in input on the back.
IR Audio Input
Using the AUX Audio Input
Click the Gear button to cycle to AUX mode. When in AUX mode, the
yellow LED above AUX will illuminate.
Plug your audio device into the AUX jack located on the front of the
STA-200.
Page 14

13/18
Using Several STA-200 Units Together in a SKAA Network
Both Bluetooth and AUX modes come equipped with an optional Relay
mode. When in either BT Relay or AUX Relay modes, the white Relay LED
will be illuminated in addition to the Bluetooth or AUX LEDS. When in one
of the Relay modes, your Bluetooth or AUX signal is relayed over SKAA to
up to four more SKAA receivers.
IR Audio Input
Bluetooth Relay
SKAA Mode
SKAA Mode
SKAA Mode
SKAA Mode
Bluetooth!
(Up to 10 m)
SKAA!
(Up to 50 m)
BT-Relay Mode
Page 15

Using your STA-200 Together in a SKAA Network
14/18
AUX Relay
SKAA Mode
SKAA Mode
SKAA Mode
SKAA Mode
SKAA!
(Up to 50 m)
IR Audio Input
AUX Cable
AUX-Relay Mode
This will also work with an RCA line level source plugged into the Line In
input on the back of the STA-200. In this case, make sure there is nothing
plugged into the Audio Input jack on the front.
Page 16

SKAA cmd
15/18
SKAA cmd is an optional App available for iPhone, iPad, iPod, Android, Mac and
PC. You can find it on our website www.skaa.com/tlc/ or in the iOS App store
and Google Play. SKAA cmd is great for getting the most out of your STA-200.
To use SKAA cmd, throw your STA-200 into SKAA mode, download the app,
insert a SKAA transmitter and check out all of the customizable features of
SKAA. SKAA cmd only works with seven specific SKAA transmitters: Izabella,
Diz, Ursula, Gemma, Akiko, Talisa and Cassandra. The STA-200 will not work
with SKAA cmd unless you are using one of the supported transmitters.
Page 17

The test was performed according to
the following European standards:
Draft ETSI EN 301 489-1 V2.2.0(2017-03); Draft ETSI EN 301
489-17 V3.2.0 (2017-03); ETSI EN 301 893 V2.1.1 (2017-05);
ETSI EN 300 328 v2.1.1 (2016-11);
EN 62311:
2008
Safety Comments
The appliance is only suitable for moderate climates.
The maximum ambient temperature during use of the appliance must not
exceed 40°C/105°F.
Do not drop the appliance or expose it to any other type of impact.
Do not place the appliance in an area exposed to heat, direct sunlight,
dampness, moisture, rain, vibration, shock, dust or sand.
Only use a dry brush or cloth to clean the appliance.
Note:!
Use this appliance in a temperature range between -20°C and 45°C (-4°F and
113°F).
Symbols Used
Indoor Use Only
Protection class II appliance (ONLY FOR CLASS II
EQUIPMENT)
Do not dispose of the appliance along with normal
waste. Recycle the appliance.
STA-200 Specifications
!"#$$%&s
/.0%-
7$89,s
E9,89,s
H-#$+I.-6%-
E8%-#O.$
P=+8&#@*8#$%&
P=6%$+=.$+
3%=?",
'()*+,%-%.
'12))3*4*5."6
:;<<*0=-%&%++*,%>"$.&.?@*
<AB*7C*
LINE*7C*
/GF*EAH*
:;<<*0=-%&%++
7$JK9=&,L*0=M%J-#$?%*N.&,#?%
G%6.,%*>.$,-.&*#$M*>.$,-.&*8#$%&
QFP
W250*H105*D250mm
R(S;T
16/18
Page 18

Bond Button Icon
Before proceeding with reading the following frequently asked questions and answers, please
make sure that your SKAA devices are powered, in SKAA-mode (if applicable) and in range of one
another (~20 m).
1. When I power on my SKAA speaker, the Indicator is dim green and when I play
audio from my SKAA transmitter, no sound comes from the speaker.
Most likely your SKAA speaker is hunting for one of your favorite transmitters. Simply press the
Bond Button once, in order to switch to another favorite transmitter. If no other favorite
transmitters are saved on the Green List, pressing the Bond Button once will not have an effect.
In this case, double-click the Bond Button in order to put the speaker into Amber Mode. Amber
Mode will explore for new, unknown transmitters in the area that are currently playing audio. If
the issue persists, you can always factory reset the SKAA receiver by six-clicking the Bond
Button. The SKAA Indicator will flicker red for one second and the speaker will return to Amber
Mode. If six-clicking the Bond Button has no effect, see the next trouble-shooting item.
2. When I power on my SKAA speaker and attempt to play audio from a SKAA
transmitter, I hear no sound, the Indicator is dim green and no matter how many times
I click the Bond button, nothing changes.
In this case, your SKAA speaker is a Slave speaker in a Cluster of speakers. This means that this
speaker was probably sold with at least one other speaker, and one of these other speakers is the
Master speaker. The Master speaker is responsible for controlling all Slave speakers. A Slave
speaker will always follow the Master speaker. Some Slave speakers still contain a Bond Button in
order to mute the speaker (this can be accomplished by triple-clicking the Bond Button). Any
SKAA speaker with a Bond Button on it can be a stand-alone speaker, however it will have to be
"unclustered" See the SKAA Receiver User’s Guide for the unclustering procedure.
Trouble Shooting Guide
The purpose of this guide is to provide answers to frequently asked questions when using STA200
products for the first time.
Note: SKAA provides a very simple, one-button, one-LED, interface. These two components are
called, and will be referred to as, the Bond Button and the SKAA Indicator.
At any time, when interacting with SKAA, the user may locate the Bond Button and rapidly click it
six times to reset SKAA to its factory settings. In some cases, it can prove useful to factory-reset
an SKAA receiver. If an SKAA transmitter is available and transmitting audio, the factory-reset
automatically Bonds to the transmitter and resets the volume.
17/18
Page 19

Trouble Shooting Guide
3.What is the difference between Green Mode and Amber Mode and how do I use
them?
When you power on a SKAA speaker for the first time, it will be in Amber Mode. You can
identify a speaker in Amber Mode by the behavior of its SKAA Indicator (if the SKAA
Indicator is amber, the speaker is in Amber Mode). When in Amber Mode, the speaker
will explore for new, unknown transmitters in the area that are currently playing audio.
Once found, it will Bond to that transmitter, the SKAA Indicator will switch from dim
amber to bright amber and the speaker will start playing audio. The speaker is now
Bonded and in Amber Mode. Green Mode can be achieved after an SKAA speaker is
Bonded and in Amber mode. Once a speaker is Bonded and in Amber Mode, simply hold
down the Bond Button for three seconds. The SKAA Indicator will switch from bright
amber to bright green. Now, the next time you power down your SKAA speaker(s) and
transmitter(s) and power them back on again, the SKAA speaker(s) will be waiting for
the transmitter on the Green List. When the transmitter becomes available, it will
automatically Bond to it. SKAA speakers can store up to ten transmitters on a Green
List. To cycle through transmitters on a Green List, simply click the Bond Button once to
cycle to the next transmitter on the Green List.
4. How do I know which SKAA compatible receivers work with each other?
All devices running SKAA OS 2.1 and newer are designed to work together seamlessly. These
three lines should be single spaced, not double spaced.
contact us via:
support@skaa.com and we will help you.
18/18
Page 20

343 Vanderbilt Avenue Norwood, MA 02062
Telephone: (781) 762-6300 Fax: (781) 762-6868
 Loading...