

Page 1
NOTICE D’UTILISATION ET D’INSTALLATION
Installation and operating manual - Gebruiks- en installatiehandleiding - Manual de utilización e instalación - Manual do Usuario
e da Instalação - Instrukcja obsługi i monta
żu -
TATOU DIGITAL
PANNEAU RAYONNANT VERSIONS HORIZONTALES ET VERTICALES
Radiant panel heater - Horizontal and vertical
Warmtestraalradiator - Horizontale en verticale modellen
Emisor radiante - Versiones horizontales y verticales
Emissor radiante - Versões horizontais e verticais
Promiennik elektryczny - wersja POZIOMA i PIONOWA
F
GB
NL
SP
P
PL
RU
GUIDE À CONSERVER
PAR L’UTILISATEUR
Manual must be kept by end user
Gids te bewaren door de gebruiker
Guía que deberá ser conservada por el usuario
Guia a conservar pelo usuario
Page 2

Sommaire
Mise en garde................................................................................................................................2
Installation
Préparer l’installation de l’appareil..................................................................................................3
Déverrouiller la patte d’accrochage de l’appareil .......................................................................4
Fixer la patte d’accrochage au mur ................................................................................................4
Raccorder l’appareil............................................................................................................................5
Verrouiller l’appareil sur la patte d’accrochage ...........................................................................6
Fonctionnement..........................................................................................................................7
Utilisation
Mettre en marche votre appareil ....................................................................................................8
Mettre en veille votre appareil .......................................................................................................8
Choisir votre mode de chauffage ..................................................................................................9
Chauffer votre pièce : utilisation du mode Confort ...............................................................10
Abaisser la température de votre pièce : utilisation du mode Eco......................................11
Programmer votre période de chauffe : utilisation du mode prog..............................12 à 16
M’absenter plus de 24 heures : utilisation du mode Hors Gel ............................................17
Utiliser les fonctions d’économies d’énergie.....................................................................18 à 22
Verrouiller les commandes.............................................................................................................23
Verrouiller le panneau de commande .........................................................................................23
Etalonner la température ................................................................................................................24
Entretien ............................................................................................................................................24
Retour au réglage de base usine ...................................................................................................24
En cas de problème..........................................................................................................................25
F
1
Page 3
Nous vous remercions de votre choix et de votre confiance. L’appareil que vous venez d’acquérir a
été soumis à de nombreux tests et contrôles afin d’en assurer la qualité et ainsi vous apporter une
entière satisfaction.
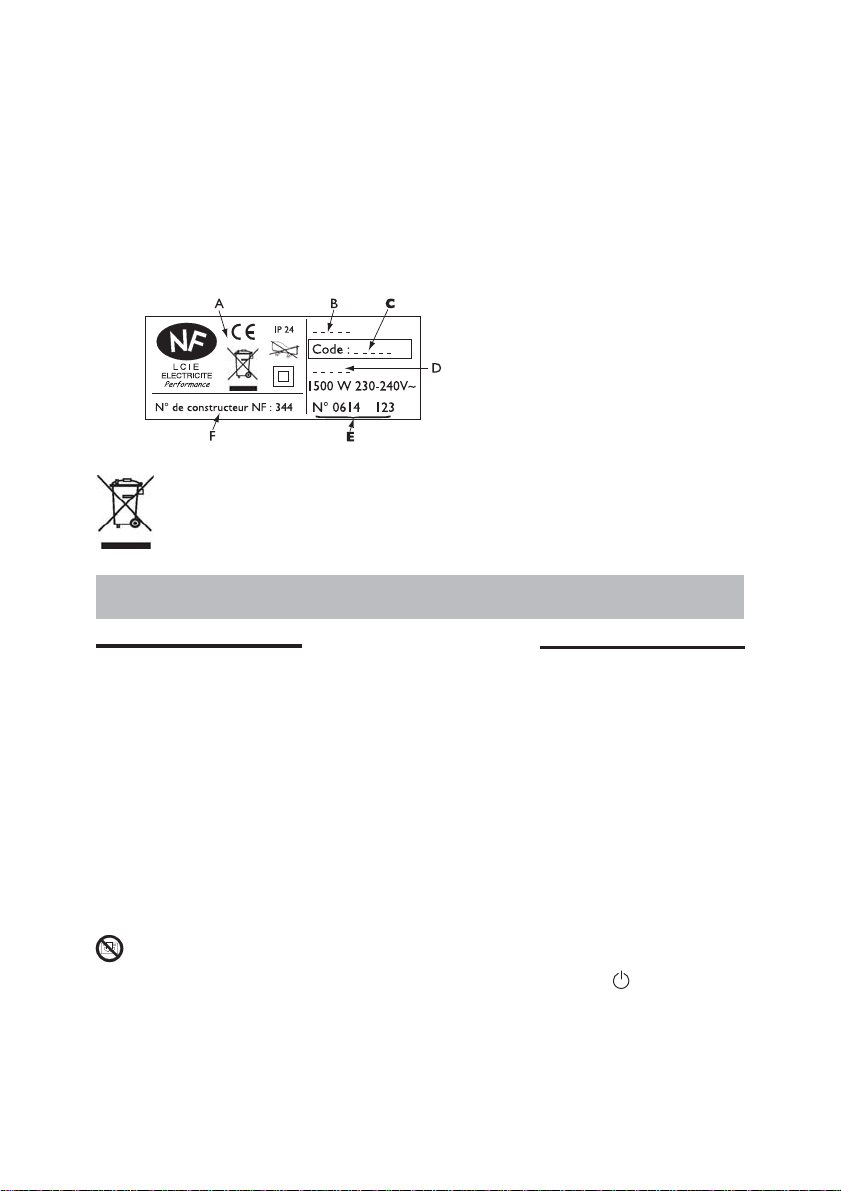
Les références de votre appareil
Elles sont situées sur le côté droit de l’appareil.
Le Code commercial et le Numéro de série identifient auprès du constructeur l’appareil que vous
venez d’acquérir.
Les appareils munis de ce symbole ne doivent pas être mis avec les ordures ménagères, mais
doivent être collectés séparément et recyclés.
La collecte et le recyclage des produits en fin de vie doivent être effectués selon les dispositions et les décrets locaux.
Normes, labels de qualité
A
Nom commercial
B
Code commercial
C
Référence de fabrication
D
N° de série
E
N° de constructeur
F
Conservez la notice, même après l’installation de l’appareil.
Mise en garde
- Veillez à ce que les enfants ne s'appuient pas sur l’appareil et ne jouent pas à proximité quand il
fonctionne, la surface de celui-ci risquant dans certaines circonstances de causer des brûlures sur
la peau, notamment du fait que leurs réflexes ne sont pas encore acquis ou sont plus lents que ceux
d’un adulte. En cas de risque, prévoyez l'installation d'une grille de protection devant l’appareil.
- Cet appareil n’est pas prévu pour être utilisé par des personnes (y compris les enfants) dont les capacités physiques, sensorielles ou mentales sont réduites, ou des personnes dénuées d’expérience ou
de connaissance, sauf si elles ont pu bénéficier, par l’intermédiaire d’une personne responsable de
leur sécurité, d’une surveillance ou d’instructions préalables concernant l’utilisation de l’appareil.
- Il convient de surveiller les enfants afin qu’ils ne jouent pas avec l’appareil.
- Toutes interventions sur les parties électriques doivent être effectuées par un professionnel qualifié.
- Veillez à ne pas introduire d’objets ou de papier dans l’appareil.
- A la première mise en chauffe, une légère odeur peut apparaître correspondant à l’évacuation des
éventuelles traces liées à la fabrication de l’appareil.
- Pour éviter une surchauffe et une détérioration des éléments de votre appareil, ne couvrez pas
l’appareil (rideaux, serviettes,...).
- Pour toutes interventions, il est impératif que l’appareil soit mis en position et refroidi avant
décrochage de la patte.
2
Page 4
Installation
PRÉPARER L’INSTALLATION DE L’APPAREIL
Règles d’installation
- Cet appareil a été conçu pour être installé dans un local résidentiel. Dans tout autre cas, veuillez
consulter votre distributeur.
- L’installation doit être faite dans les règles de l’art et conforme aux normes en vigueur dans
le pays d’installation (NFC 15100 pour la France).
- L’appareil doit être alimenté en 230 V Mono 50Hz.
-
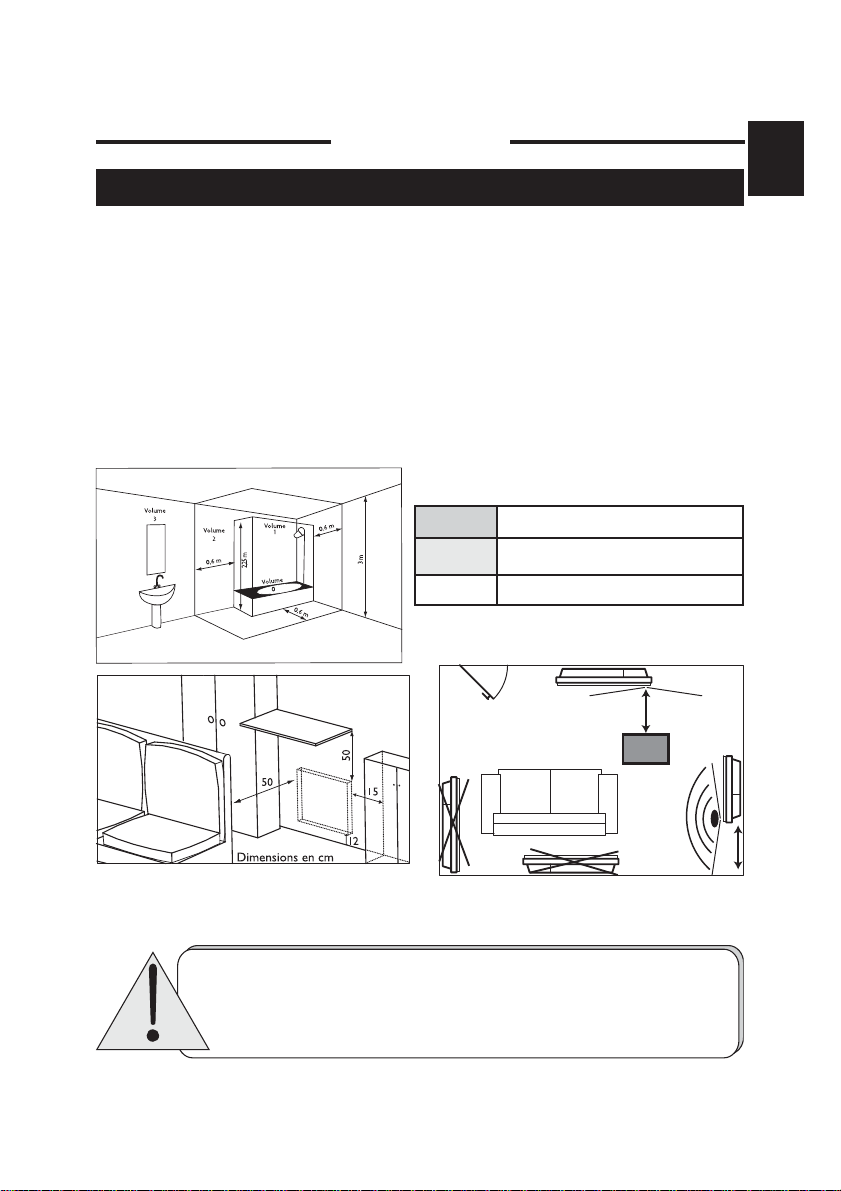
Dans des locaux humides comme les salles de bains et les cuisines, vous devez installer le boîtier de
raccordement au moins à 25 cm du sol.
Tenir l’appareil éloigné d’un courant d’air susceptible de perturber son fonctionnement (ex : sous une Ventilation Mécanique Centralisée,etc...).
Ne pas l’installer sous une prise de courant fixe.
F
Respectez les distances minimales avec le
mobilier pour l’emplacement de l’appareil.
Il est fortement déconseillé de monter les appareils verticaux au-dessus d'une altitude
de 1000 m (risque de mauvais fonctionnement).
L'installation d'un appareil en altitude provoque une élévation de la température de
sortie d'air (de l'ordre de 10°C par 1000 m de dénivelé).
Il est interdit de monter un appareil vertical horizontalement et vice-versa.
Il est interdit d'utiliser l'appareil en configuration mobile, sur pied ou roulettes.
Volume 1
Volume 2
Volume 3
Pour optimiser la détection d’absence de votre appareil,
évitez de l’installer dans un angle fermé ou derrière un
meuble.
3
Pas d’appareil électrique
Appareil électrique Classe II - IP X4
Appareil électrique Classe II
50 cm
15 cm
Page 5
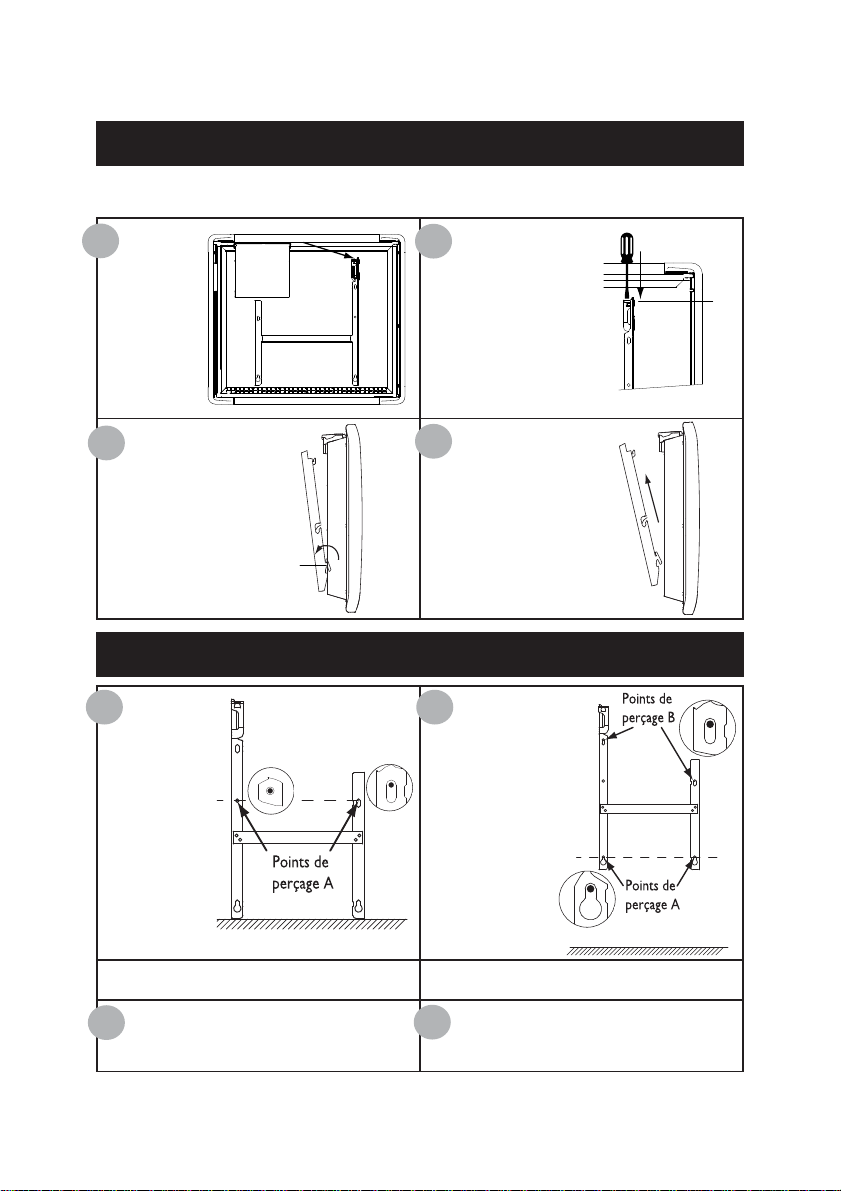
DEVERROUILLER LA PATTE D’ACCROCHAGE DE L’APPAREIL
Nous vous conseillons de poser l’appareil à plat face vers le sol, en prenant garde de protéger sa
façade d’éventuelles rayures.
1
Munissez-vous
d’un tournevis
plat et
soulevez la
languette en
veillant à ne pas
la déformer.
3
Faîtes basculer la patte
d’accrochage autour
des crochets inférieurs
S1.
S1
FIXER LA PATTE D’ACCROCHAGE AU MUR
1 2
Posez la patte
d’accrochage au
sol et contre le
mur. Repérez les
points de perçage
A.
2
Tout en maintenant la
languette soulevée, poussez
la patte d’accrochage vers
le bas de l’appareil pour
dégager les crochets
supérieurs S2. Il est conseillé d’utiliser des gants de
protection.
4
Retirez la patte d’accrochage.
Remontez la patte
d’accrochage en l’alignant avec les points
de perçage A pour
repérer les points de
perçage B (vous pou-
vez éventuellement
utiliser un niveau).
2
S
Les points de perçage A donnent la position des fixations inférieures.
Percez les 4 trous et mettez des chevilles.
3
En cas de support particulier, utilisez des
chevilles adaptées (ex : plaque de plâtre).
Les points de perçage B donnent la position des fixations supérieures.
Positionnez et vissez la patte d’accrochage.
4
4
Page 6
RACCORDER L’APPAREIL
Règles de raccordement
- L’appareil doit être alimenté en 230 V Mono 50Hz.
- L’alimentation de l’appareil doit être directement raccordée au réseau après le disjoncteur et sans
interrupteur intermédiaire.
- Le raccordement au secteur se fera à l’aide du câble de l’appareil par l’intermédiaire d’un boîtier de
raccordement. Dans des locaux humides comme les salles de bains et les cuisines, il faut installer le
boîtier de raccordement au moins à 25 cm du sol.
- Le raccordement à la terre est interdit. Ne pas brancher le fil pilote (fil noir) à la terre.
- L’installation doit être équipée d’un dispositif de coupure omnipolaire ayant une distance d’ouverture de
contact d’au moins 3 mm.
- Si le câble d’alimentation est endommagé, il doit être remplacé par un professionnel.
- Si vous utilisez le fil pilote et s’il est protégé par un différentiel 30mA (ex : salle de bains), il est nécessaire de protéger l’alimentation du fil pilote sur ce différentiel.
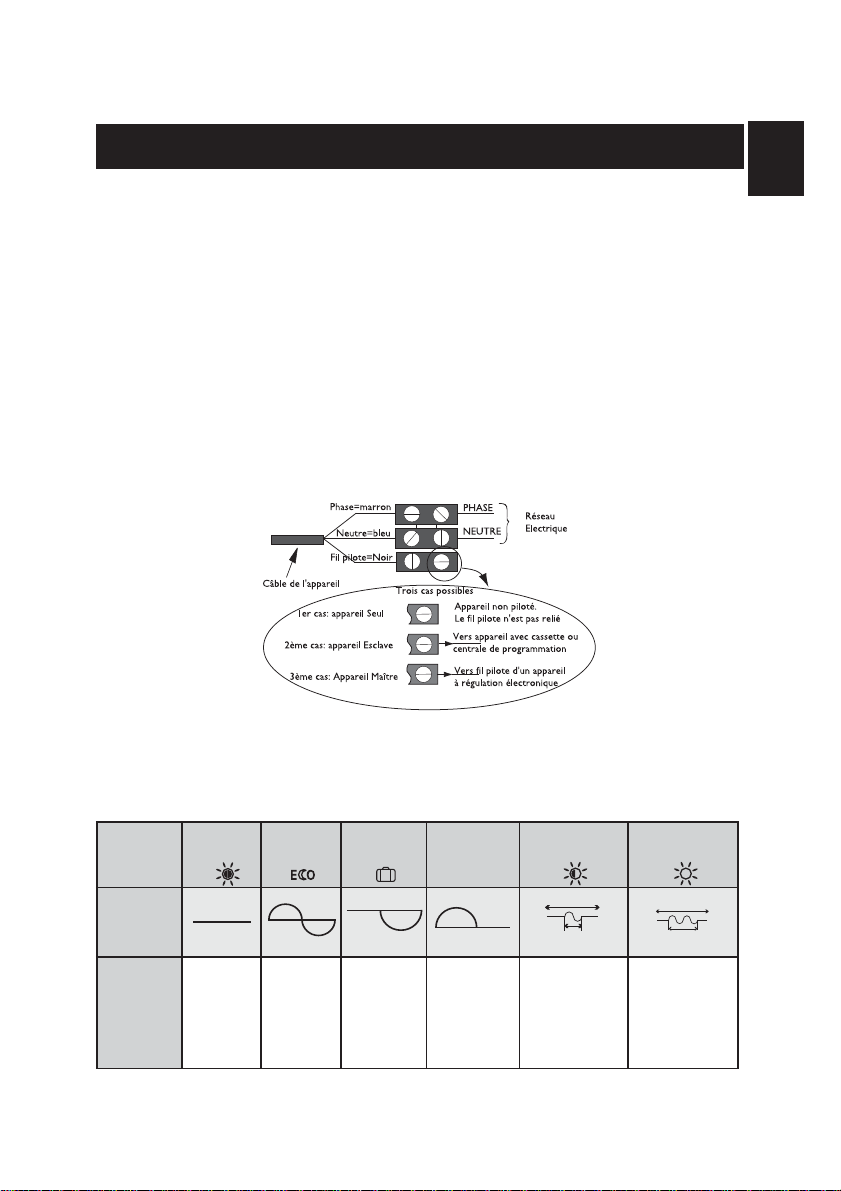
Schéma de raccordement de l’appareil
- Coupez le courant et branchez les fils d’après le schéma suivant :
F
- Vous pouvez raccorder le fil pilote si votre maison est équipée d’une centrale de programmation, d’un
programmateur ou d’un gestionnaire.
Dans ce cas, pour vérifier la transmission correcte des ordres de programmation, procédez aux
vérifications suivantes en fonction des modes choisis (Confort, Eco, ...):
CONFORT ECO HORS GEL
ARRET DU
CHAUFFAGE
CONFORT
-1°C
CONFORT
-2°C
DELESTAGE
SIGNAL A
TRANSMETTRE
5'
3''
5'
7''
MESURE
ENTRE LE
FIL PILOTE
ET LE
0Volt 230 Volt
-115 Volts
négative
+115 Volts
positive
230 Volts
pendant 3 s
230 volts
pendant 7 s
NEUTRE
5
Page 7

VERROUILLER L’APPAREIL SUR LA PATTE D’ACCROCHAGE
1
Posez l’appareil
incliné sur les supports S1.
2
Faîtes basculer l’appareil en le soulevant
pour le poser sur les
2
S
supports S2.
S1
3
CLIC
Abaissez l’appareil sur la patte d’accrochage.
Un clic vous indique que l’appareil est fixé
et verrouillé.
Pour déverrouiller l’appareil de la patte d’accrochage, munissez-vous d’un tournevis plat
et poussez la languette (située en haut à gauche de la patte d’accrochage derrière l’appareil)
vers le mur.
Soulevez l’appareil tout en maintenant la languette avec le tournevis. Basculez-
le en avant puis retirez-le des supports S1.
6
Page 8
Fonctionnement
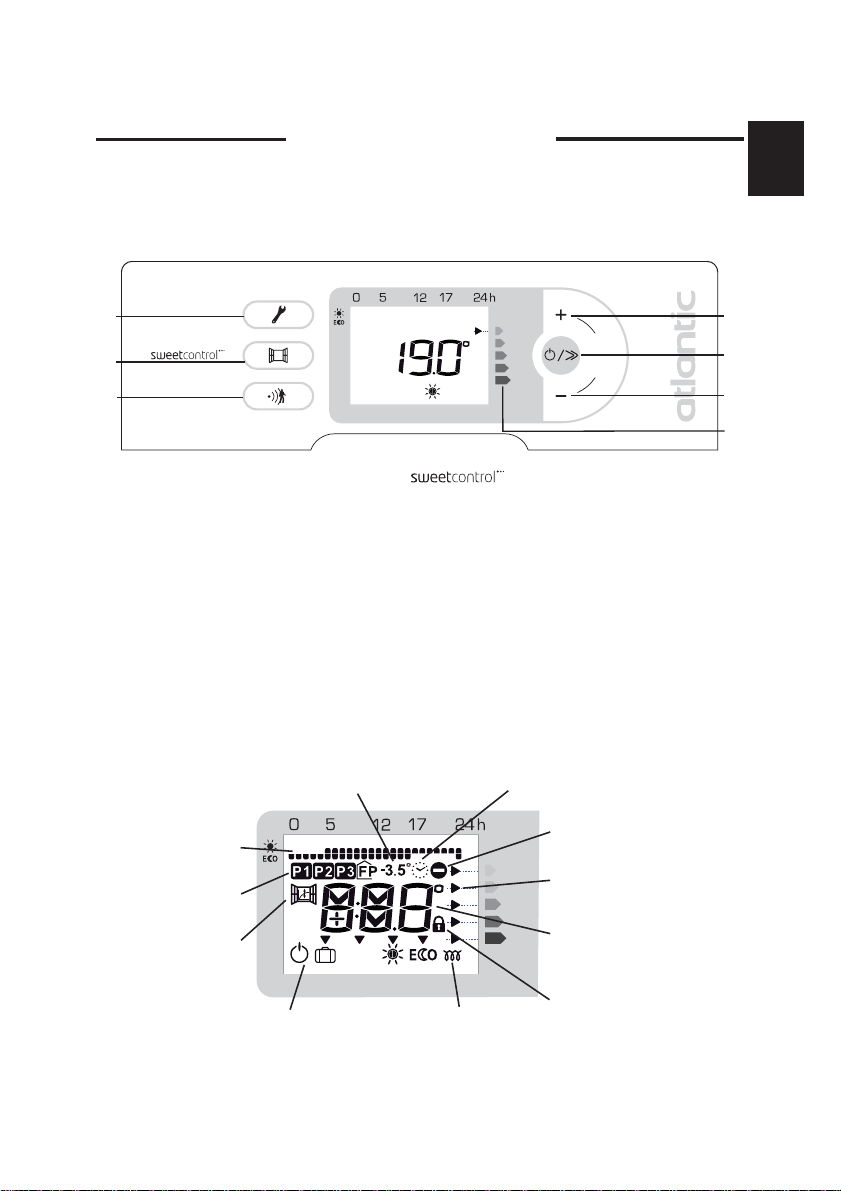
Le boîtier de commande
Pour plus de confort et d’économie, votre appareil est doté d’un boitier de commande à affichage
digital. Il vous permet de régler toutes les fonctionnalités de l’appareil.
F
C
B
A
A
Détecteur d’absence et de présence
B
Fonction Aération - détection d’ouverture et fermeture de fenêtre
C
Programmation / réglage du jour et de l’heure
D
Augmentation de la température
E
Mise en marche / Changement des modes de chauffe - défilement / Mise en veille
F
Abaissement de la température
G
Fonction indicateur de consommation
Enlever le film plastique placé sur le boîtier de commande.
Les différents affichages
Jour et heure à régler
Affichage du programme
Sélection du program
me
Température Eco conseillée
é
q
u
i
l
i
b
r
e
Action impossible
Indicateur de consommation
D
E
F
G
Fonction aération
Mod
Au bout de 2 minutes d’inactivité, l’écran revient à l’affichage principal.
PROG
es
Témoin de ch
7
auffe
Affichage température,
jour et heure si réglage en cours
Vérrouillage des commandes
Page 9
Utilisation
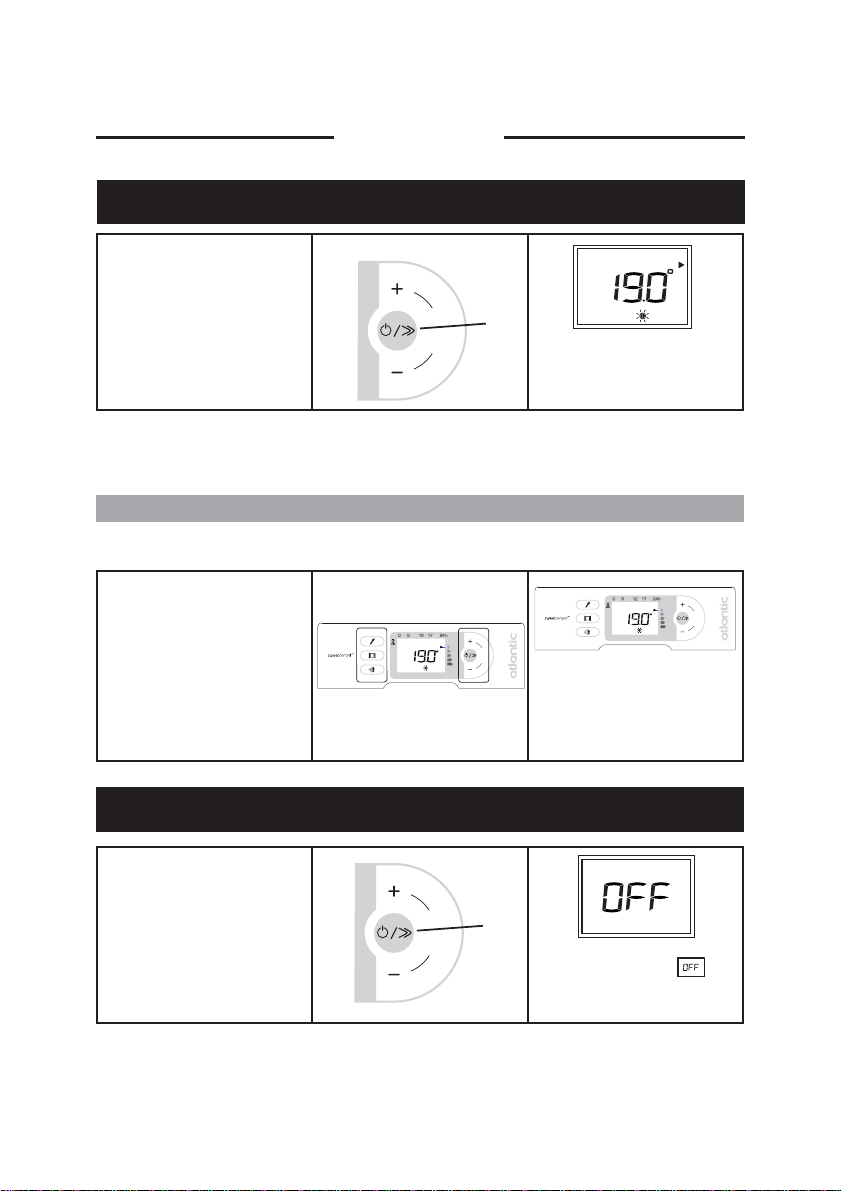
METTRE EN MARCHE VOTRE APPAREIL
Pour mettre en marche l’appareil, appuyez sur la touche
Mise en marche (E).
é
q
u
E
i
l
i
b
r
e
L’appareil affiche la température
de confort.
Lors de la première mise en route, l’appareil est réglé en mode Confort, à 19° C.
ACTIVER L’ÉCRAN
Si l’écran n’est pas éclairé, un appui sur n’importe quelle touche ne fait qu’activer l’éclairage de l’écran.
é
q
u
i
l
i
b
r
e
é
Si l’écran n’est pas éclairé,
appuyez sur n’importe quelle
touche pour le réactiver.
q
u
i
l
i
b
r
e
Vous pouvez maintenant appuyer sur la touche correspondant au réglage que vous
souhaitez faire.
METTRE EN VEILLE VOTRE APPAREIL
Pour mettre en veille votre
appareil, maintenez appuyé la
touche Mise en veille (E).
é
q
u
E
i
l
i
b
r
e
Votre panneau affiche puis
s’éteint.
8
Page 10

CHOISIR VOTRE MODE DE CHAUFFAGE
Vous pouvez faire fonctionner votre appareil dans plusieurs modes :
- Le mode Confort , qui vous permet d’obtenir une température ambiante agréable.
- Le mode , qui vous permet d’abaisser la température de votre pièce lors d’une absence prolongée de la maison, ou pendant la nuit, notamment dans les chambres.
F
- Le mode Programmation , qui vous permet de programmer les modes Confort et Eco
en fonction des périodes d’occupation de la pièce, au moyen des programmes P1, P2, P3 ou au
moyen d’un système de programmation (centralisé).
- Le mode Hors Gel qui vous permet de maintenir une température de 7° C (à ± 3° C) lors
d’une absence de plus de 24 heures.
PROG
9
Page 11
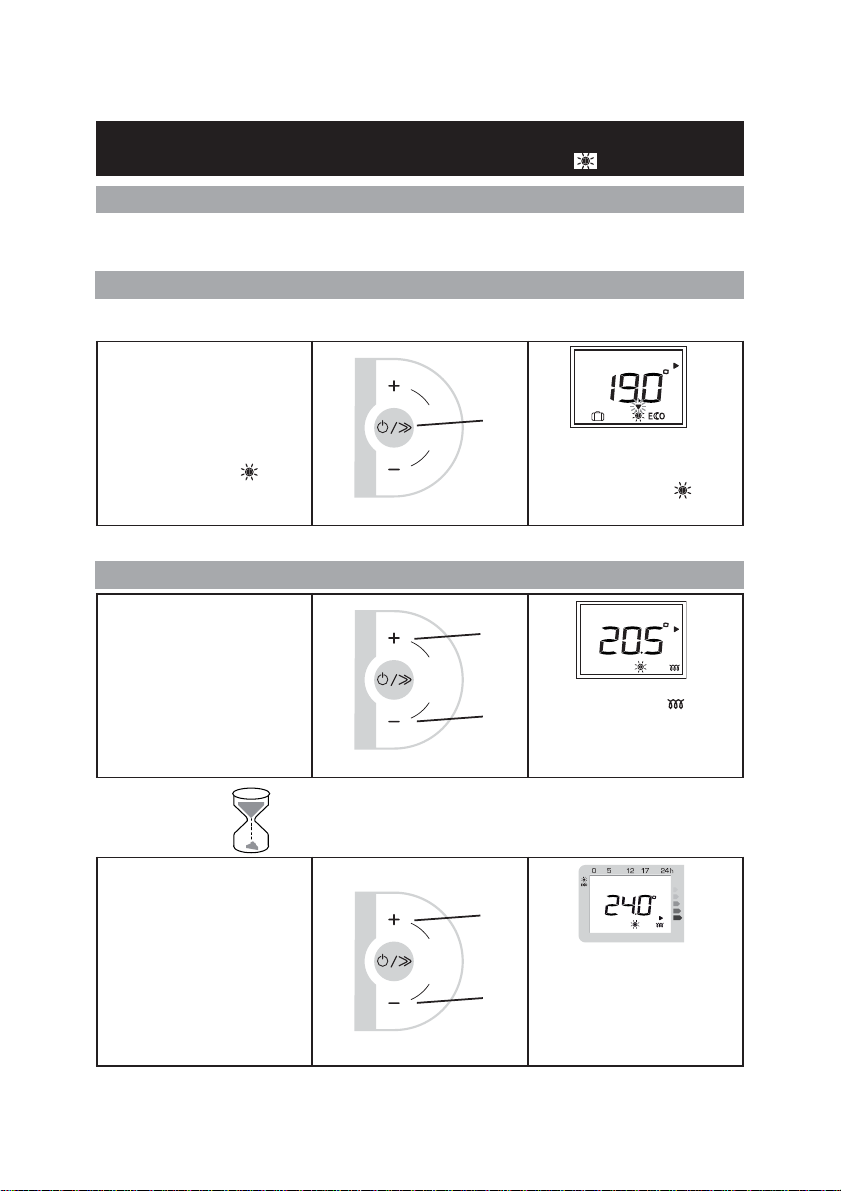
CHAUFFER VOTRE PIÈCE :
UTILISATION DU MODE CONFORT
DESCRIPTION
Ce mode vous permet d’avoir la température ambiante souhaitée dans la pièce. Les voyants de
l’indicateur de consommation vont vous permettre d’optimiser votre réglage (voir en page 22).
COMMENT ACTIVER CE MODE ?
Si l’écran n’est pas éclairé, un appui sur n’importe quelle touche ne fait qu’activer l’éclairage de l’écran.
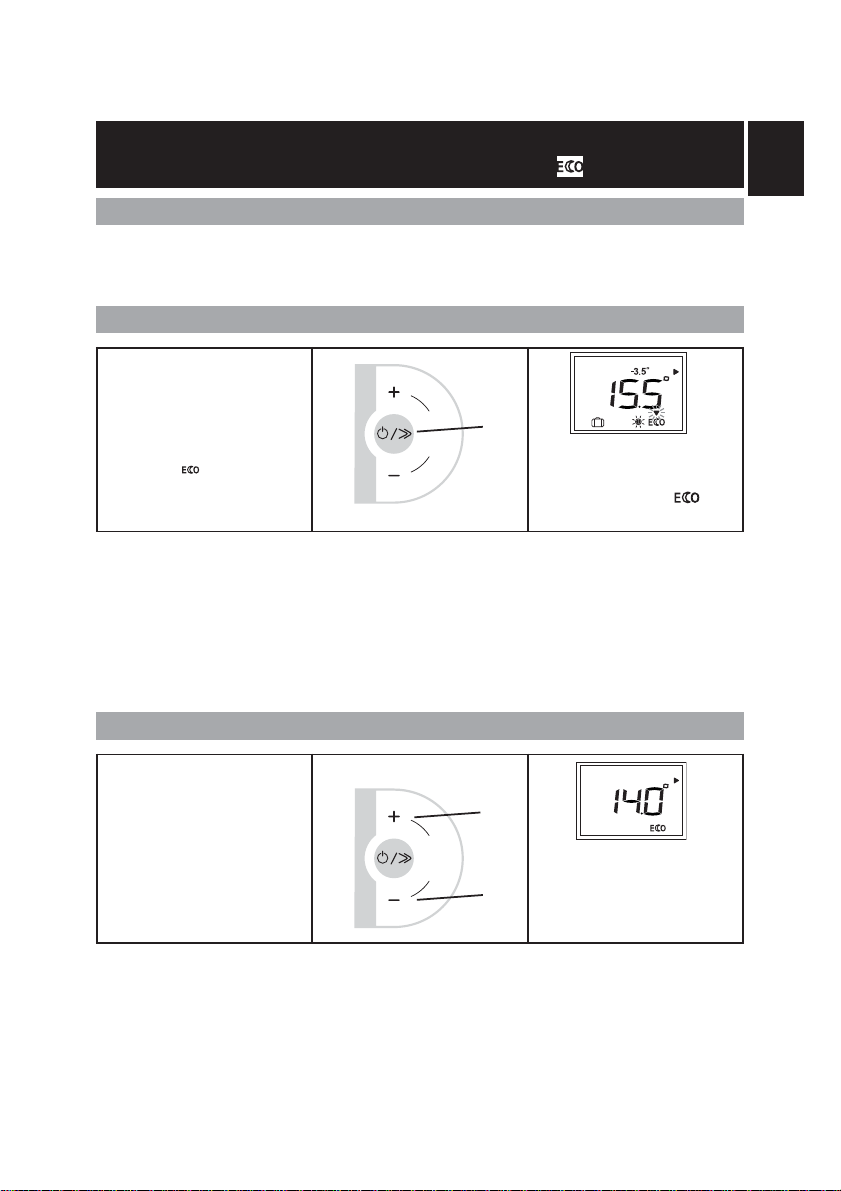
Pour activer le mode Confort,
appuyez plusieurs fois sur la
touche Défilement (E) jusqu’à
ce que la flèche de sélection soit
sur le mode Confort .
é
q
u
E
i
l
i
b
r
e
La flèche de sélection de mode
clignote quelques secondes, puis
seul le pictogramme reste
affiché : le réglage est validé.
La température Confort conseillée est de 19° C. Le mode Confort va de 12,5° C à 28° C.
COMMENT MODIFIER LA TEMPÉRATURE SOUHAITÉE ?
D
é
Pour modifier la température
affichée, appuyez sur les touches
+(D)ou - (F).
q
u
i
l
i
b
r
e
Le voyant de chauffe apparaît
F
à l’écran si la température
ambiante est inférieure à celle
affichée.
Attendez au minimum 6 heures pour
que la température se stabilise.
D
Si la température de la pièce ne
vous convient pas, ajustez l’affichage en appuyant sur les
touches +(D)ou -(F).
é
q
u
i
l
i
b
r
e
Plus la température indiquée sur
l’écran est élevée, plus le voyant
F
de l’indicateur de consommation
se décalera vers le bas (indicateurs
orange et rouge).
PROG
10
Page 12
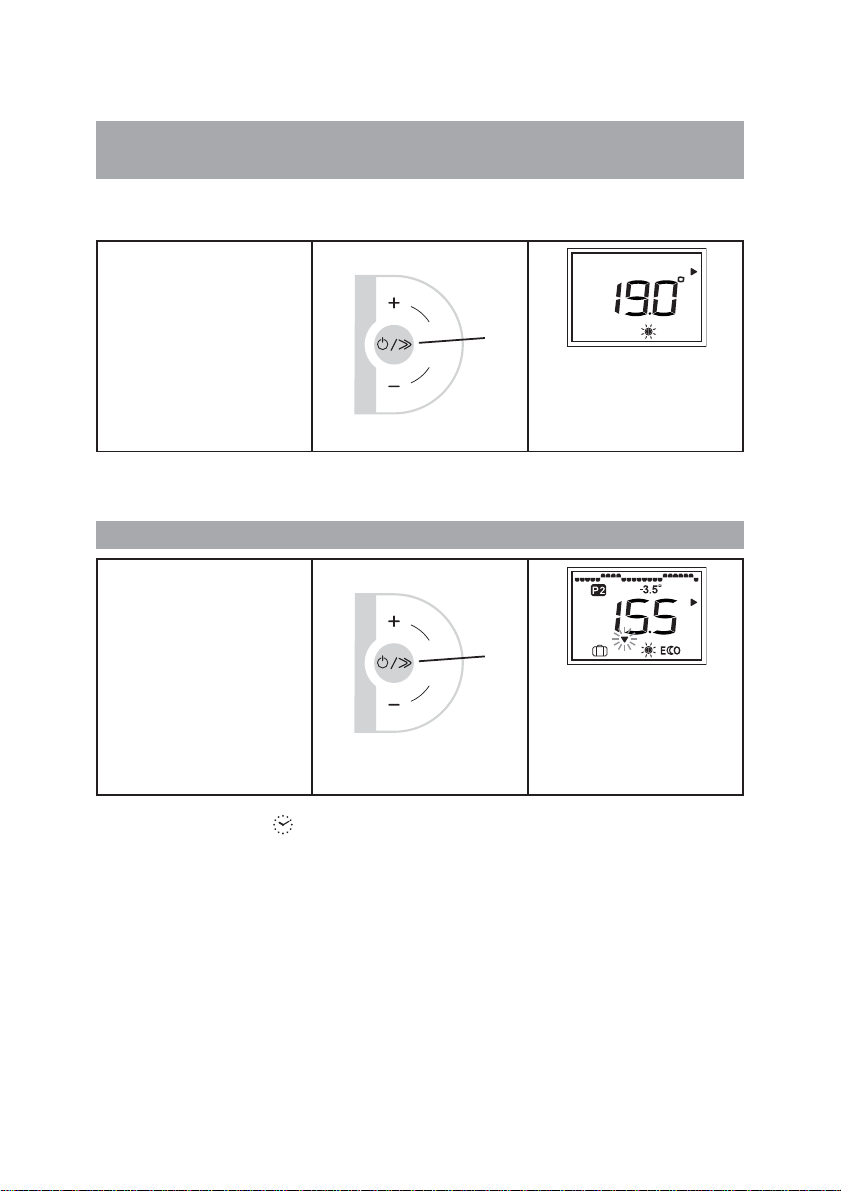
ABAISSER LA TEMPÉRATURE DE VOTRE PIÈCE :
UTILISATION DU MODE ECO
DESCRIPTION
Il est conseillé d’utiliser ce mode pour des périodes d’absences comprises entre 2 heures et 24 heures, ou pendant la nuit, notamment dans les chambres.
COMMENT ACTIVER CE MODE ?
F
Appuyez plusieurs fois sur la
touche Défilement (E) jusqu’à
ce que la flèche de sélection soit
sur le mode .
é
q
u
E
i
l
i
b
r
e
La flèche de sélection de mode
PROG
clignote quelques secondes, puis
seul le pictogramme reste
affiché : le réglage est validé.
La température Eco conseillé est de -3,5° C par rapport à la température Confort (exemple de réglage : 19° C en
mode Confort et 15,5° C en mode Eco). Si le pictogramme -3,5° C n’apparaît pas à l’écran, c’est que l’écart avec
la température de Confort réglée est différent de -3,5° C.
Si vous abaissez la température Confort en dessous de la température Eco, la température Eco baissera automatiquement de -0,5°C par rapport à la température Confort. En revanche,si vous augmentez la température Confort,
la température Eco ne change pas.
COMMENT MODIFIER LA TEMPÉRATURE SOUHAITÉE ?
Si vous le souhaitez, vous pouvez
modifier la température affichée,
en appuyant sur les touches +
(D) ou -(F).
D
é
q
u
i
l
i
b
r
e
La température Eco choisie s’affiche à l’écran.
F
11
Page 13
PROGRAMMER VOS PÉRIODES DE CHAUFFE :
UTILISATION DU MODE
Vous pouvez programmer vos périodes de température Confort et soit en utilisant un des
trois programmes pré-enregistrés, soit en connectant le fil pilote sur un programmateur (mode Fil
pilote (FP) proposé par défaut - reportez-vous à la notice jointe à votre programmateur).
Il est possible de brancher sur un programmateur plusieurs appareils.
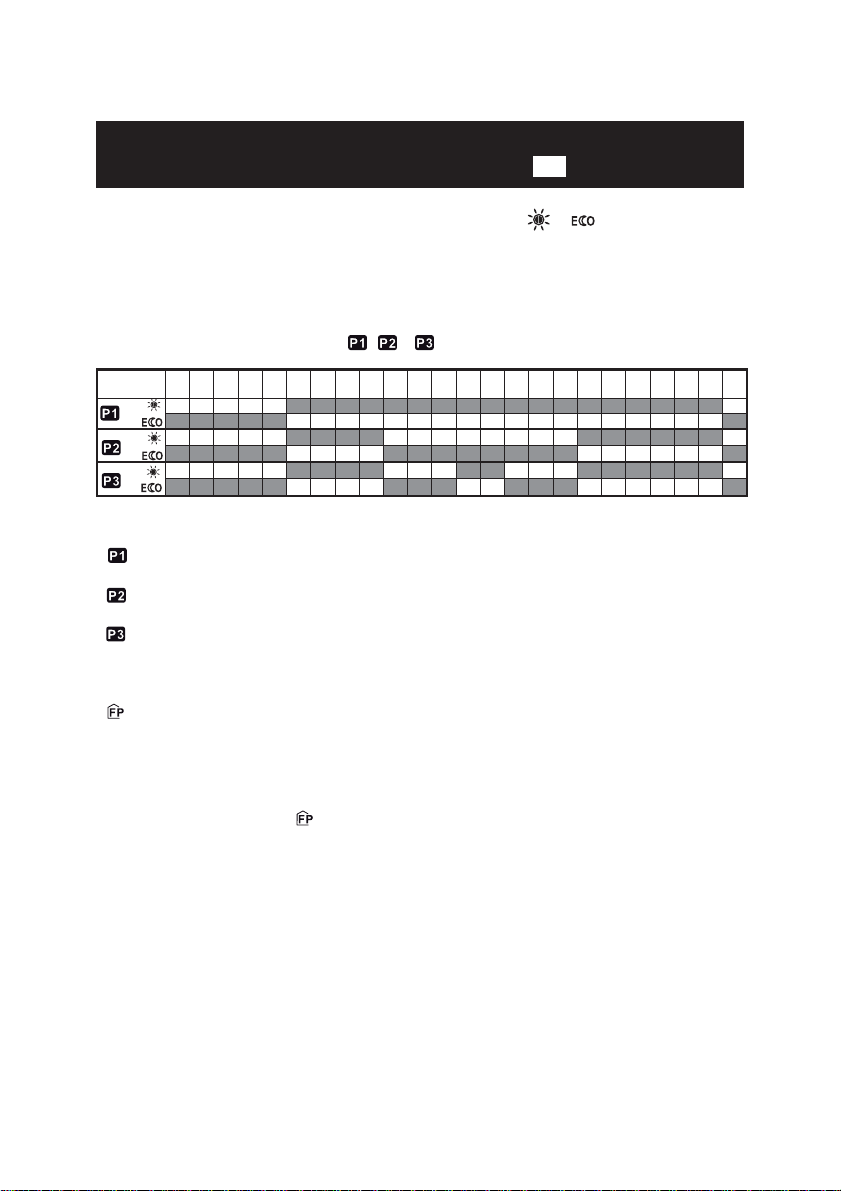
3 programmes sont pré-enregistrés : , et et non modifiables.
PROG
0h 1h 2h 3h 4h 5h 6h 7h 8h 9h
10h 11h 12h 13h 14h 15h 16h 17h 18h 19h 20h 21h 22h 23h
est préconisé pour une présence constante, par exemple le week-end (mode Eco de 23 h à 5 h,
mode Confort de 5 h à 23 h).
est préconisé si vous êtes absents la journée (mode Eco de 23 h à 5 h et de 9 h à 17 h, mode
Confort de 5 h à 9 h et de 17 h à 23 h).
est préconisé si vous êtes absents la journée, mais que vous rentrez le midi (mode Eco de 23 h
à 5 h, de 9 h à 12 h et de 14 h à 17 h, mode Confort de 5 h à 9 h, de 12 h à 14 h et de 17 h à
23 h).
correspond à l’utilisation d’un programmateur.
Nota : En cas d’absence d’ordre sur le fil pilote, l’appareil fonctionne en mode Confort.
Lors du passage du mode Confort vers le mode Eco, le temps de basculement est de l’ordre de 12 secondes.
Les ordres Hors Gel et Délestage sont prioritaires par rapport aux modes Eco, Confort et programmation (P1, P2, P3 et ).
12
Page 14
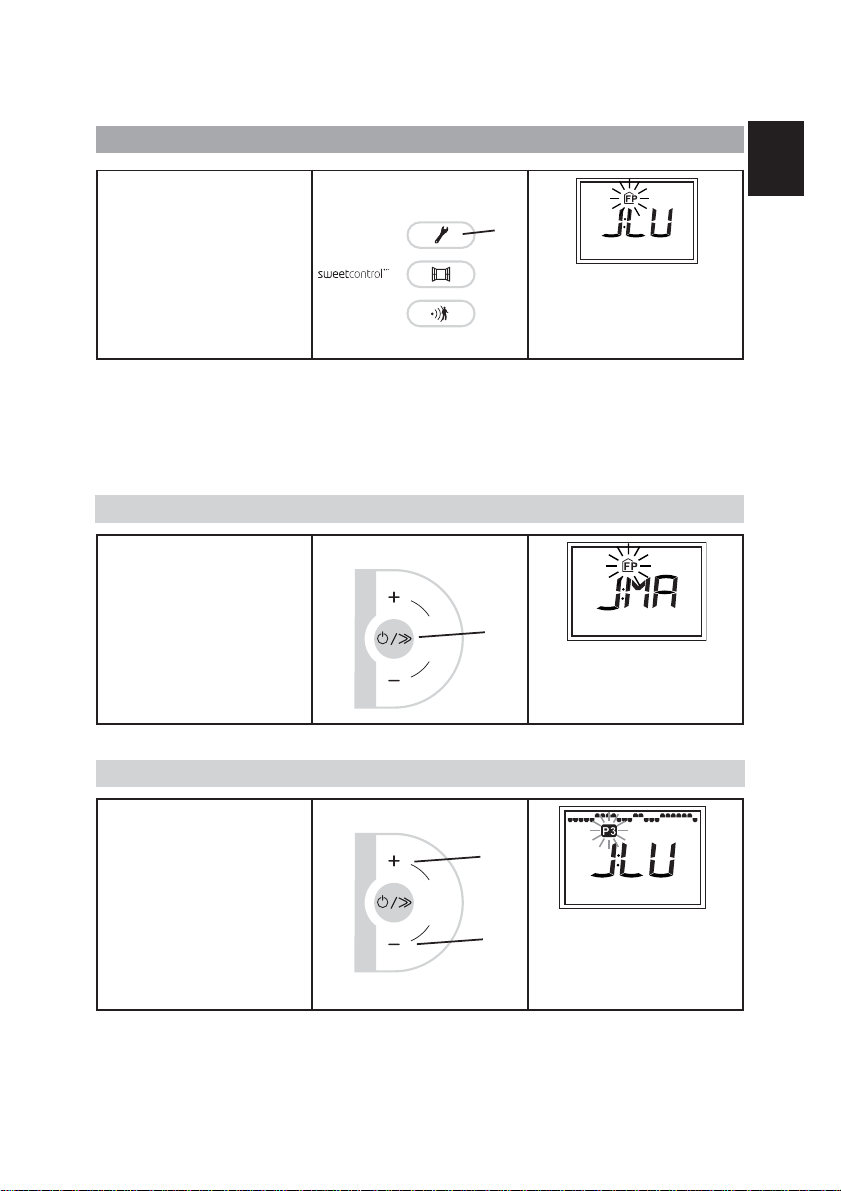
COMMENT RÉGLER LE JOUR ET L’HEURE ?
Avant de régler la programmation, il faut mettre à l’heure l’appareil ou s’assurer qu’il est déjà à la
bonne date et la bonne heure.
F
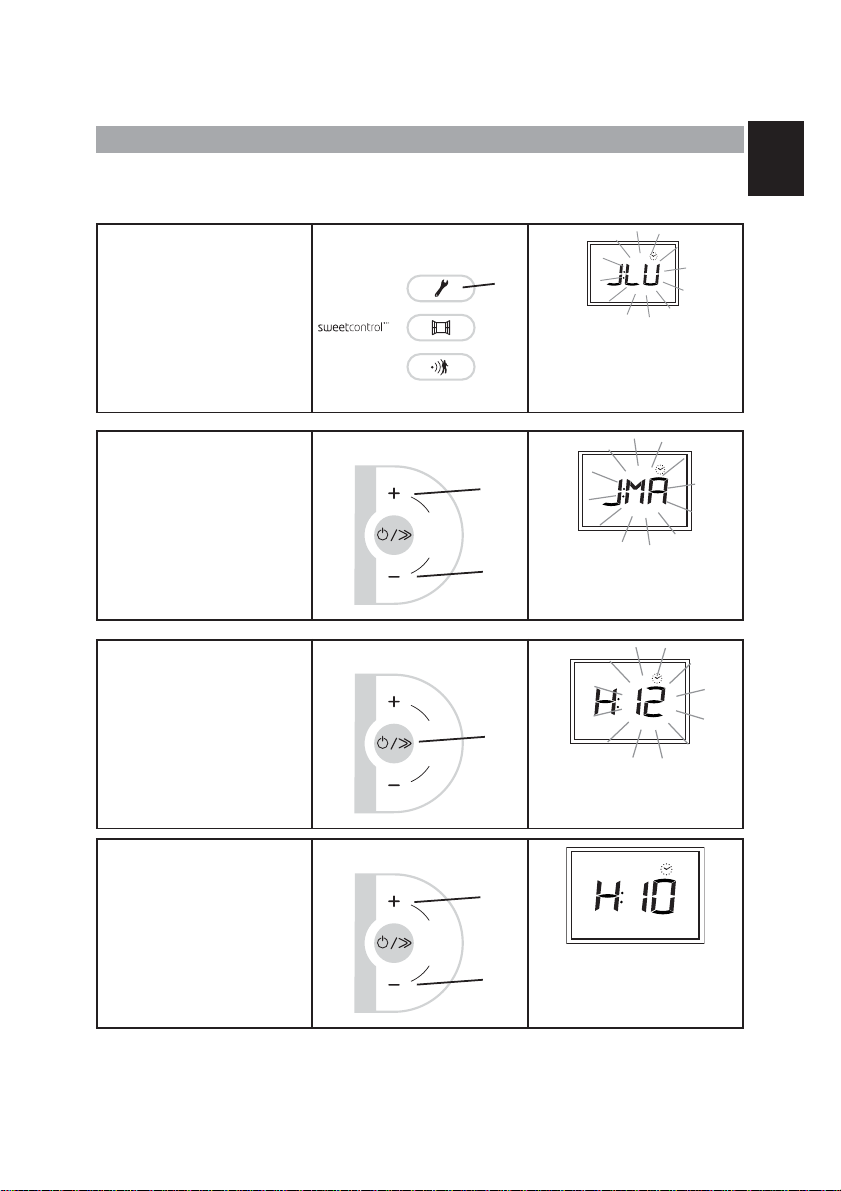
Pour accéder au réglage du jour
et de l’heure, maintenez appuyé
quelques secondes la touche
Programmation (C).
Pour modifier le jour, appuyez
sur la touche + (D) ou la touche
- (F).
Pour accéder au réglage de
l’heure, appuyez sur la touche
Défilement (E).
C
Les lettres sur l’écran
clignotent : vous pouvez commencer à régler le jour.
(J = jour - LU = lundi)
D
é
q
u
i
l
i
b
r
e
é
q
u
i
l
i
b
r
e
Vous avez modifié le jour. Vous
F
pouvez accéder au réglage de
l’heure.
E
Les lettres sur l’écran clignotent
pour modifier l’heure.
Pour modifier l’heure, appuyez
sur la touche + (D) ou la touche
- (F).
D
é
q
u
i
l
i
b
r
e
13
Vous avez modifié l’heure. Vous
F
pouvez accéder au réglage des
minutes.
Page 15
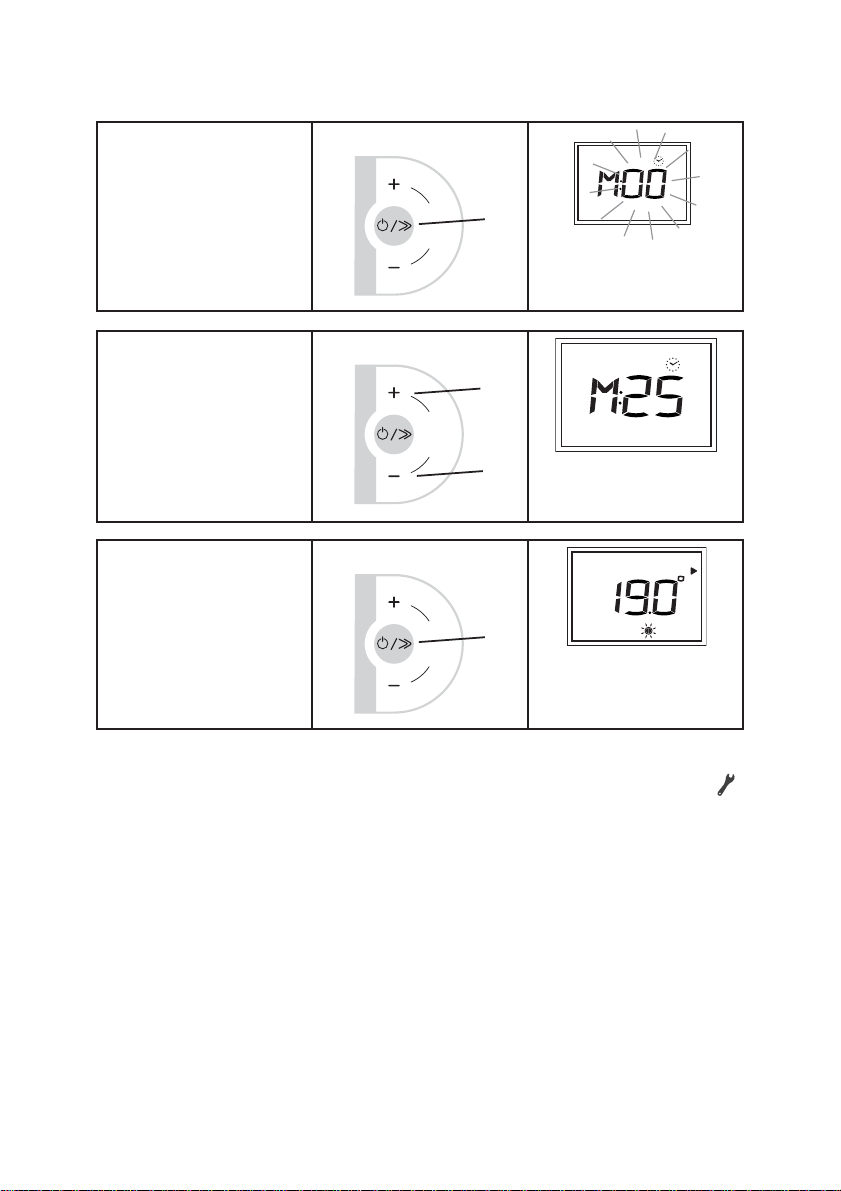
Pour accéder au réglage des minutes, appuyez sur la touche
Défilement (E).
é
q
u
E
i
l
i
b
r
e
Les lettres sur l’écran clignotent
pour modifier les minutes.
Pour modifier les minutes,
appuyez sur la touche + (D) ou
la touche - (F).
Pour valider les minutes,
appuyez sur la touche
Défilement (E).
Nota : A tout moment, vous pouvez sor tir des réglages en appuyant sur la touche Programmation (C) .
Les réglages effectués sont enregistrés.
é
q
u
i
l
i
b
r
e
F
Vous avez modifié les minutes.
Vous pouvez valider le réglage.
é
q
u
E
i
l
i
b
r
e
L’écran revient à l’affichage principal.
D
14
Page 16
COMMENT ATTRIBUER UN PROGRAMME JOURNALIER ?
F
Pour accéder au programme
C
journalier, effectuez un appui
court sur la touche
Programmation (C).
Pour le lundi, le programme “FP”
est sélectionné.
(J = jour - LU = lundi FP = programmateur)
Deux solutions sont possibles :
a- Vous souhaitez conserver le programme sélectionné,
b- Vous souhaitez modifier le programme sélectionné.
a- Conserver le programme sélectionné - exemple du lundi
Vous souhaitez conserver le programme “FP” le lundi : appuyez
sur la touche Défilement (E),
pour passer au réglage du jour
suivant.
é
q
u
E
i
l
i
b
r
e
Le programme du lundi est
validé. Vous pouvez maintenant
programmer le mardi.
b- Modifier le programme sélectionné - exemple du lundi
Vous souhaitez modifier le programme “FP” du lundi : appuyez
sur la touche + (D) ou la touche
- (F) jusqu’à ce que le programme voulu clignote à l’écran.
D
é
q
u
i
l
i
b
r
e
15
Vous avez choisi le programme
F
P3 pour le lundi, vous pouvez le
valider en appuyant sur la touche
Défilement (E).
Page 17
COMMENT ATTRIBUER UN PROGRAMME JOURNALIER
À TOUS LES JOURS DE LA SEMAINE
Procédez de la même façon pour tous les jours de la semaine, jusqu’au dimanche, soit en conservant
le programme sélectionné, soit en le modifiant.
?
Validez les programmes choisis
pour chaque jour de la semaine,
en appuyant sur la touche
Défilement (E).
é
q
u
E
i
l
i
b
r
e
Vous avez validé vos programmes journaliers. Il faut
maintenant activer le mode
Programmation .
PROG
Nota : Même en cas de coupure de courant, les réglages restent enregistrés.
COMMENT ACTIVER LE MODE PROGRAMMATION ?
Pour activer le mode
Programmation, appuyez sur la
touche Défilement (E) jusqu’à
ce que la flèche soit sur le
mode .
PROG
é
q
u
E
i
l
i
b
r
e
PROG
PROG
La flèche de sélection de mode
clignote quelques secondes, puis
reste affiché ainsi que le
PROG
pictogramme du mode en cours
de programmation.
Nota : Si le pictogramme clignote, vous devez vérifier le réglage du jour et de l’heure (voir page 13).
16
Page 18

M’ABSENTER PLUS DE 24 HEURES :
UTILSATION DU MODE HORS GEL
DESCRIPTION
La température Hors Gel est préréglée à 7° C (±3° C) et ne peut pas être modifiée.
COMMENT ACTIVER CE MODE ?
F
Appuyez sur la touche
Défilement (E) jusqu’à ce que
la flèche soit sur le mode Hors
Gel .
é
q
u
E
i
l
i
b
r
e
La flèche de sélection de mode
clignote quelques secondes, puis
le pictogramme reste affiché.
PROG
17
Page 19

UTILISER LES FONCTIONS D’ÉCONOMIES D’ÉNERGIE :
ÉTECTION D’ABSENCE ET DE PRÉSENCE
D
Ces fonctions permettent à votre appareil de s’adapter de lui-même à votre vie quotidienne, sans que
vous n’ayez à vous en préoccuper.
Pour utiliser ces fonctions, nous vous conseillons de régler votre appareil sur les modes
Confort ou .
Cette fonction vient en complément de la programmation.
Cette fonction permet de baisser automatiquement la température de votre pièce, dès lors que vous
la quittez favorisant ainsi les économies d’énergie.
La détection se fait à partir d’une hauteur supérieure à 45 cm environ (schéma 1) et de façon progressive
(schéma 2) :
12 cm
5m
45 cm
environ
schéma 1
PROG
20°
schéma 2
Ex. : Votre appareil est réglé à 19° C , en mode Confort (programmé ou non)
A 9 h 00, il détecte votre absence.
A 9 h 30, sa température de fonctionnement passe à 18° C.
A 10 h 00, sa température de fonctionnement passe à 17 ° C.
18
Page 20

COMMENT ACTIVER LA DÉTECTION D’ABSENCE ET DE PRÉSENCE ?
Pour activer la détection,
appuyez sur la touche
Sweetcontrol (A).
S’il ne détecte aucune présence, votre appareil abaissera automatiquement et progressivement sa
température jusqu’à -2° C par rapport au réglage de la température Confort.
A votre retour, votre appareil reprendra son fonctionnement initial.
Le symbole clignote lorsqu’une présence est détectée.
Le symbole représentant la
détection d’absence / présence
A
s’affiche à l’écran.
COMMENT DÉSACTIVER LA DÉTECTION D’ABSENCE ET DE PRÉSENCE ?
Pour désactiver la détection,
appuyez sur la touche
Sweetcontrol (A).
Le symbole représentant la
détection d’absence / présence
A
disparaît de l’écran.
F
19
Page 21

UTILISER LES FONCTIONS D’ÉCONOMIES D’ÉNERGIE :
ONCTION AÉRATION
F
Cette fonction permet l’arrêt et la reprise automatique de la chauffe de l’appareil, dès lors que vous
aérez votre pièce, permettant ainsi d’économiser l’énergie.
Lorsque vous ouvrirez la fenêtre de la pièce où est installé votre appareil, ce symbole clignotera
pour signaler la prise en compte de l’aération, et adaptera la chauffe en conséquence. A la fermeture
de la fenêtre, ce symbole arrêtera de clignoter et l’appareil reprendra son fonctionnement normal.
Nous vous déconseillons l’usage de la fonction Aération dans les couloirs et pièces situés à proximité d’une porte d’entrée donnant sur l’extérieur ou dans le garage.
Ne pas chauffer la pièce pendant l’aération de la pièce permet de réaliser des économies d’énergie. Si
vous oubliez d’éteindre votre appareil lors de l’ouverture prolongée d’une fenêtre, la fonction Aération
permet d’y pallier et évite à votre appareil de chauffer inutilement : votre appareil détectera automatiquement l’ouverture et la fermeture de la fenêtre, vous évitant tout gaspillage d’énergie.
Votre appareil réagit aux ouvertures et fermetures de fenêtre, en fonction de plusieurs variables, dont
notamment :
- température de consigne souhaitée dans la pièce,
- température extérieure,
- configuration de votre installation...
Zone d'emplacement la plus optimale
En détectant l’ouverture et la fermeture de la fenêtre, la fonction Aération vous permet d’adopter
naturellement un geste éco-citoyen : ne pas chauffer inutilement votre logement lorsque vous l’aérez,
pour plus de confort et d’économies.
20
Page 22

COMMENT ACTIVER LA DÉTECTION D’OUVERTURE ET DE FERMETURE DE FENÊTRE ?
Pour activer la détection,
appuyez sur la touche Aération
(B).
Sa température de fonctionnement est de 7° C, à ± 3° C, pendant toute la durée d’aération de votre
pièce. A la fermeture de la fenêtre, votre appareil reprendra son fonctionnement initial.
Après 2 heures, l’appareil se remet en chauffe dans tous les cas. La durée maximum
d’aération prévue est de 2 heures.
NB : Si la fonction ne satisfait pas à votre besoin, vous pouvez arrêter manuellement la chauffe de votre appareil (appui long sur touche Mise en marche (E)).
Le symbole clignote lorsqu’il abaisse sa température de fonctionnement.
C
OMMENT DÉSACTIVER LA DÉTECTION D’OUVERTURE ET DE FERMETURE DE FENÊTRE
Pour désactiver la détection,
appuyez sur la touche Aération
(B).
B
Le symbole représentant la
détection d’ouverture et de fermeture de fenêtre s’affiche à
l’écran.
B
Le symbole représentant la
détection d’ouverture et de fermeture de fenêtre disparaît de
l’écran.
F
?
21
Page 23

UTILISER LES FONCTIONS D’ÉCONOMIES D’ÉNERGIE :
ONCTION EQUILIBRE
F
Utilisez la fonction Equilibre pour régler votre appareil à la température optimale, juste équilibre
entre votre confort et vos économies.
COMMENT UTILISER LA FONCTION ÉQUILIBRE ?
Pour l’utiliser, maintenez appuyé
simultanément les touches :
- Augmentation (D) et
- Diminution (F).
Cette fonction ne modifie pas la programmation de votre appareil.
é
q
u
i
l
i
b
r
e
La température affichée est de
F
19° C en mode Confort et
de 15,5° C en mode .
UTILISER LES FONCTIONS D’ÉCONOMIES D’ÉNERGIE :
F
ONCTION INDICATEUR DE CONSOMMATION
La consommation d’un appareil de chauffage électrique dépend, entre autres, de la température
demandée. La température préconisée par les pouvoirs publics est de 19° C, en mode Confort
(15,5° C en mode Eco).
La fonction “indicateur de consommation” vous permet de vous positionner par rapport à cette
température recommandée.
Ainsi, en fonction de la température demandée :
- Si la flèche noire de l’écran se positionne devant le 2ème pictogramme orange ou le rouge, vous aurez un comportement plus responsable en abaissant
significativement votre température demandée.
- Si la flèche noire de l’écran se positionne devant le 1er pictogramme orange,
vous aurez un comportement plus responsable en abaissant légèrement votre
température demandée.
- Si la flèche noire est devant le pictogramme vert, vous êtes à la température
recommandée et vous avez d’ores et déjà un comportement responsable.
D
Tous les appareils d’une même pièce doivent être équipés des mêmes fonctionnalités. Les
fonctions d’économies d’énergie devront être réglées de la même manière sur chaque appareil.
22
Page 24

VERROUILLER LES COMMANDES
Afin d’éviter toutes manipulations intempestives du boîtier de commande, nous vous conseillons de
le verrouiller.
COMMENT VERROUILLER LES COMMANDES ?
F
Pour verrouiller les commandes,
B
E
maintenez appuyé simultanément et quelques secondes les
touches :
- Aération (B) et
- Mise en marche (E).
é
q
u
i
l
i
b
r
e
Un cadenas s’affiche à l’écran : il
n’est plus possible de modifier les
réglages.
COMMENT DEVERROUILLER LES COMMANDES ?
Pour deverrouiller les commandes, maintenez appuyé simultanément et quelques secondes les
touches :
- Aération (B) et
- Mise en marche (E).
B
E
é
q
u
i
l
i
b
r
e
Le cadenas disparaît de l’écran :
les réglages peuvent être modifiés.
VERROUILLER LE PANNEAU DE COMMANDE
Vous pouvez aussi verrouiller le panneau de commande à l’aide de la vis fournie.
Retirez la vis située à l’intérieur
du panneau de commande.
Fermez le volet du panneau de
commande.
Bloquez le volet à l’aide de la vis.
Le panneau ne peut plus être
ouvert, les commandes ne sont
plus accessibles.
23
Page 25

ETALONNER LA TEMPÉRATURE
Après plusieurs heures de chauffe, il est possible, en fonction de votre installation, que vous releviez
une température différente de celle affichée sur votre appareil. Dans ce cas, vous pouvez étalonner
la température affichée.
C
E
Maintenez appuyé simultanément les touches :
- Programmation (C),
- Mise en marche (E).
é
q
u
i
l
i
b
r
e
Avec les touches
choisissez votre valeur d’étalon-
+ (D)ou-(F)
nage (entre -2°C et 2°C).
Ex : La température affichée sur votre appareil est 20° C.
La température affichée sur votre thermomètre est de 19° C Choisissez la valeur d’étalonnage -1° C.
Validez votre choix en appuyant sur la touche Programmation (C). Votre appareil chauffera la pièce jusqu’à
atteindre 20° C .
ENTRETIEN
Pour conserver les performances de l’appareil, il est nécessaire, environ 2 fois par an, d’effectuer son
dépoussiérage.
Ne jamais utiliser de produits abrasifs et de solvants.
RETOUR AU RÉGLAGE DE BASE USINE
Votre appareil vous offre la possibilité de revenir au réglage de base.
Maintenez appuyé simultanément
les touches
- Aération (B),
- Réglages (C),
- Défilement (E),
jusqu’à ce que sur l’écran apparaissent tous les affichages (voir
page 7 les différents affichages).
C
B
E
é
q
u
i
l
i
b
r
e
L’appareil se met en mode
Confort à 19° C. Le mode
est à 15,5° C. Les fonctions d’économie d’énergie et les programmations sont désactivées.
,
24
Page 26

EN CAS DE PROBLÈME
PROBLÈME RENCONTRÉ VÉRIFICATION À FAIRE
Le voyant de chauffe
clignote.
La sonde est débranchée ou ne fonctionne plus.
Contactez votre installateur.
F
L’appareil ne chauffe
pas.
L’appareil chauffe tout
le temps.
L’appareil ne chauffe
pas assez.
L’appareil chauffe
alors que la fenêtre
est ouverte.
L’appareil est très
chaud en surface.
Vérifier que le mode est bien activé.
Si vous êtes en programmation, vérifiez que le programmateur est en mode
Confort. Assurez-vous que les disjoncteurs de l’installation sont enclenchés
ou bien que le délesteur (si vous en avez un) n’a pas coupé l’alimentation de
l’appareil. Vérifiez la température de l’air de la pièce : si elle est trop élevée,
le voyant de chauffe ne s’allume pas : l’appareil ne chauffe pas.
Vérifiez que l’appareil n’est pas situé dans un courant d’air ou que le réglage
de la température n’a pas été modifié.
Il peut y avoir un aléa dans le réseau électrique. En cas de problème (thermo-
stat bloqué...), coupez l’alimentation de l’appareil (fusible, disjoncteur) pendant
environ 10 minutes, puis rallumez-le.
Si le phénomène se reproduit fréquemment, faîtes contrôler l’alimentation
par votre distributeur d’énergie.
Augmentez la température en appuyant sur la touche +(E)
Si le réglage est au maximum, faîtes les vérifications suivantes :
- Vérifiez si un autre mode de chauffage existe dans la pièce.
- Assurez-vous que votre appareil ne chauffe que la pièce (porte fermée).
- Faîtes vérifier la tension d’alimentation de l’appareil.
- Vérifiez si la puissance de votre appareil est adaptée à la taille de votre
pièce (nous vous préconisons en moyenne 100 W/m
fond de 2,50 m).
Il peut y avoir un laps de temps entre l’ouverture de la fenêtre et l’arrêt de
la chauffe.
Si ce laps de temps vous paraît trop long, vous pouvez arrêter manuellement
la chauffe de l’appareil.
Il est normal que l’appareil soit chaud lorsqu’il fonctionne, la température
maximale de surface étant limitée conformément à la norme NF Electricité
Performance. Si toutefois vous jugez que votre appareil est toujours trop
chaud, vérifiez que la puissance est adaptée à la surface de votre pièce (nous
vous préconisons 100 W/m
l’appareil n’est pas placé dans un courant d’air qui perturberait sa régulation.
2
pour une hauteur sous plafond de 2,50 m) et que
2
pour une hauteur de pla-
25
Page 27

PROBLÈME RENCONTRÉ VÉRIFICATION À FAIRE
Des traces de salissures apparaissent sur
le mur autour de l’appareil.
Le voyant de chauffe
apparaît sur l’écran
lorsque l’appareil est
en mode Eco.
Pour les appareils équipés d’un système de programmation ou pilotés par l’intermédiaire du fil pilote :
L’appareil ne suit pas
les ordres de programmation externes.
Si vous n’avez pas réussi à résoudre votre problème, contactez votre installateur en vous
munissant préalablement des références de votre appareil (voir page 2), de la température de la pièce et de votre système de programmation éventuel.
Les salissures sont liées à la mauvaise qualité de l’air ambiant. Il est conseillé,
dans ce cas, de vérifier la bonne aération de la pièce (ventilation, entrée d’air,
etc.), et la propreté de l’air, et d’éviter de fumer à l’intérieur. Ces salissures
ne justifient pas le remplacement sous garantie de l’appareil.
Ce fonctionnement est normal. L’appareil peut chauffer de manière à maintenir une température Eco.
Assurez-vous de la bonne utilisation de la centrale de programmation (voir
notice d’utilisation) ou que le programmateur est bien engagé dans son logement et qu’il fonctionne normalement (vérifier l’état des piles, du fusible, ...).
Vérifiez que votre appareil est en mode Programmation et que le programme
externe “Centralisée” est attribué au jour souhaité de la semaine.
26
Page 28

Contents
Warning...........................................................................................................................................28
Installation
Preparing the installation of the device........................................................................................29
Unlocking the device’s hanging frame...........................................................................................30
Fixing the hanging frame to the wall.............................................................................................30
Connecting the device......................................................................................................................31
Locking the device on the hanging frame ....................................................................................32
Operation.......................................................................................................................................33
Use
Turning on your device ....................................................................................................................34
Putting your device in standby mode ..........................................................................................34
Choosing your heating mode ........................................................................................................35
Heating your room: how to use Comfort mode .....................................................................36
Lowering the temperature of your room: how to use Eco mode........................................37
Programming the heating period: how to use Programming mode...........................38 to 42
Absence of more than 24 hours: use the Frost Protection mode ......................................43
How to use the energy-saving functions...........................................................................44 to 48
Locking the controls .........................................................................................................................49
Locking the control panel ..............................................................................................................49
Calibrate the temperature ..............................................................................................................50
Maintenance .......................................................................................................................................50
Returning to the standard factory settings .................................................................................50
Troubleshooting .................................................................................................................................51
Warranty conditions.........................................................................................................................53
GB
27
Page 29

The device you have just purchased was submitted to many tests and checks ensuring its quality.
We thank you for your choice ant trust.We hope you will be fully satisfied.
The references for your device
These are located on the right-hand side of the device.
The commercial code and the serial number identify for the manufacturer the particular device you
have bought.
Standards, quality labels
A
Commercial name
B
Commercial code
C
Manufacturing reference
D
Serial number
E
Manufacturer’s number
F
Devices with this symbol must not be scrapped with normal household rubbish but be collected separately and recycled.
When these products come to the end of their useful life, they must be collected and recycled in accordance with the local regulations and bylaws.
Please keep this instruction manual even after installing your device.
Warning
- Please ensure that children do not lean on the device or play close to it when it is operating : its
surface may be hot enough to cause burns to their skin in some circumstances, particularly because their reflexes may not yet have been acquired or aur slower than those of an adult. If there is
any risk, fit a protective grill in front of the device.
This device is not intended for use by persons (including children) with physical, sensory or mental
disability, or by persons lacking experience or knowledge, unless they have received from a person
in charge of their safety adequate supervision or preliminary instructions on how to use the device.
- Care must be taken at all times to keep children from playing with the device.
- Do not obstruct the grills, even partially (either on the front of the device or underneath it): otherwise the device may overheat.
- If the supply cord is damaged, it must be replaced by a service agentor similarly qualified person in
order to avoid a hazard (applies to units fitted with a supply cord and plug).
- Units fitted with a three core supply cord (brown, blue and black), must be directly connected to
hard wiring by a licensed electrician.
- All work on the interior of the device must be carried out by a licensed electrician.
28
Page 30

Installation
PREPARING THE INSTALLATION OF THE DEVICE
Installation guidelines
- This device was designed to be installed in residential premises. In any other case, please call your
distributor.
- Installation must comply with the standards currently enforced in the country of use.
- The device must be supplied with 230V single-phase 50Hz.
-
In damp areas such as bathrooms and kitchens, you must install the connection box at least 25cm
above the floor.
Keep the device away from any draughts that may interfere with its operation (e.g.:
under a centrally controlled fan, etc...).
Do not install the heater under a fixed socket.
The device is fitted with a detection system, whose sensor is located on the front of the device.
GB
Comply with the minimum distances from
any furniture units when positioning the
device.
We strongly advise against installing vertical machines above an altitude of 1000m
(risk of faulty operation).
Installing a machine at altitude causes an increase in air output temperature
(of the order of 10°C per 1000m above sea level).
It is forbidden to install a vertical machine horizontally or vice versa.
Do not use the device in mobile, on feets or on casters.
Volume 1
Volume 2
Volume 3
To optimise absence detection by your device, do not
install it in a closed off corner or behind furniture.
29
No electrical device
Class II IPX24 electrical device
Class II electrical device
50 cm
15 cm
Page 31

UNLOCKING THE DEVICE’S HANGING FRAME
We recommend that you place the device face down on the floor, taking care to protect its front
surface from scratches.
1
Take a flat-bladed screwdriver
and lift the slider, taking care
not to bend it.
3
Swivel the hanging
frame downwards on
the lower brackets S1.
S1
FIXING THE HANGING FRAME TO THE WALL
1 2
Place the hanging
frame on the
floor against the
wall. Locate
drilling points A.
Drilling
points A
2
While keeping the slider
raised, push the hanging
frame towards the bottom
of the heater to release the
upper brackets S2.We
recommend that you wear
protective gloves.
4
Remove the hanging
frame.
Refit the hanging
frame, lining up with
drilling points A to
find drilling points B
(you can also use a
level).
Drilling
points B
Drilling
points A
2
S
Drilling points A show the position for the lower fastenings.
Drill the 4 holes and insert the wall plugs.
3
Use suitable wall plugs when fitting on a
specific support (e.g. plasterboard wall).
Drilling points B show the position for the upper fastenings.
Position the hanging frame and screw it
4
down.
30
Page 32

CONNECTING THE DEVICE
Connection rules and regulations
- The device must be supplied with 230V single-phase current at 50Hz.
- The device’s power supply must be directly connected to the main supply after the circuit breaker
without any intermediate switch.
- The device’s power cable must be connected to the main supply via a connection box. In damp areas,
such as bathrooms and kitchens, the connection box must be installed at least 25cm above the floor.
- An Earth connection is prohibited. Do not connect the pilot wire (black wire) to Earth.
- The installation must be fitted with an all-pole cut-off switch with a contact opening distance of at least
3mm.
- If the power cable is damaged, it must only be replaced by an electrician.
- If you are using the pilot wire and it is protected by a 30mA differential (e.g.: bathroom use), the pilot
wire’s power supply must also be protected on this differential.
Wiring diagram for the heating panel
- Cut off the power supply and connect the wires as shown in the following diagram:
Panel heater cable
Phase=brown
Neutral=blue
Pilot wire=Black
1st case: only one heater
2nd case: Slave heater
3rd case: Master heater
Three possible cases
The pilot wire end is insulated
and not further connected
To the appliance with cassette or
programming unit.
To pilot wire of an electronically
controlled appliance
PHASE
NEUTRAL
Electricity
grid
GB
You can connect the pilot wire if your home is equipped with a programming unit or controller.
-
In this case, make the following checks according the selected mode (Comfort, Eco, etc .) to that the
programming instructions are being transmitted correctly:
COMFORT ECO FROST
SWITCH-OFF
OF HEATING
COMFORT
-1°C
COMFORT
-2°C
AND POWER
CUT-OFF
SIGNAL TO BE
TRANSMITTED
5'
3''
5'
7''
MEASUREMENT
BETWEEN THE
PILOT WIRE
0Volt 230 Volts
-115 Volts
negative
+115 Volts
positive
230 Volts
for 3 s
230 volts
for 7 s
AND NEUTRAL
31
Page 33

LOCKING THE DEVICE ONTO THE HANGING FRAME
1
Position the tilted
device on brackets
S1.
2
Pivot the device
upwards and lift it to
position it on brack-
S2
ets S2.
S1
3
CLIC
Lower the device onto the hanging frame. A
click tells you that the device is fastened
and locked in place.
To unlock the device from the hanging frame, take a flat-bladed screwdriver and push the
slider (located on the top left-hand corner of the hanging frame behind the device) towards
the wall.
Lift the device while holding the slider in place with your screwdriver. Tilt it for-
wards and then remove it from brackets S1.
32
Page 34

Operation
Control box
For your comfort and to save energy, your device is equipped with a digital-display control unit. You
can set all of the device’s functions from the unit.
C
B
A
A
B
Airing function
C
Programming / Ste the correct time and day
D
Increase the temperature / Scroll
E
Turn on / Change heating modes – scroll / Standby
F
Lower the temperature / Scroll
G
Consumption indicator function
Remove the plastic film on the control unit
absence and presence detector
The different displays
Advised Eco temperature
Program displayed
Program selection
Day and time
é
q
u
i
l
i
b
r
e
Action not possible
Consumption indicators
GB
D
E
F
G
Airing function
Modes
After 2 minutes of inactivity, the screen returns to the main display.
PROG
Heating indicator
33
Temperature display or day
and time if being set
Controls locked
Page 35

Use
TURNING ON YOUR DEVICE
é
To turn on your device, press
the Power on key (E).
When first turned on, the device is set to Comfort mode at 19°C.
ACTIVATING THE SCREEN
If the screen is not lit up, press any button to activate the screen lighting.
If the screen backlighting is not
active, press any button to reactive it.
q
u
E
i
l
i
b
r
e
é
q
u
i
l
i
b
r
e
The device displays the ‘comfort’
temperature.
é
q
u
i
l
i
b
r
e
You can now press the appropriate button for the setting you
want to make.
PUTTING YOUR DEVICE IN STANDBY MODE
To put your device in standby
mode, hold the Standby key (E)
down.
é
q
u
E
i
l
i
b
r
e
The panel displays then turns
off.
34
Page 36

CHOOSING YOUR HEATING MODE
You can run your device in several modes:
- Comfort mode ( ) which enables you to have the right ambient temperature.
- Eco mode ( ) which enables you to lower the temperature in your room when you will be away
from your home for a long time or during the night, especially in bedrooms.
- The Programming mode, where you can program the Comfort and Eco modes depending
on when the room is used, using programs P1, P2, P3 or using a (centralised) programming sys-
tem.
- Frostmode( )which enables you to maintain a temperature of around 7°C during an absen-
ce of more than 24 hours, for example.
PROG
GB
35
Page 37

HEATING YOUR ROOM :
HOW TO USE COMFORT MODE
DESCRIPTION
This mode enables you to have the ambient temperature you desire in your room. The consumption
indicator lights enable you to optimise your setting (see page 48).
HOW TO ACTIVATE THIS MODE ?
If the screen is not lit up, press any button to activate the screen lighting.
To activate the Comfort mode,
press the Scroll key (E) several
times until the arrow is on the
Comfort mode.
The advised Comfort temperature is 19°C.
The Comfort mode ranges from 12.5°C to 28°C.
HOW TO CHANGE THE TEMPERATURE
To change the temperature displayed, press the + (D)or–(F)
keys.
If you want to change the room
temperature, change it by pressing the + (D)or–(F) keys.
é
q
u
E
i
l
i
b
r
e
The mode selection arrow flashes
for several seconds, then just the
icon remains on the display:
the setting is confirmed.
D
é
q
u
i
l
i
b
r
e
The heating icon appears on
F
the screen if the room temperature is lower than the one displayed.
Wait at least 6 hours for the room’s
temperature to stabilise.
D
é
q
u
i
l
i
b
r
e
As the temperature displayed on
F
the screen rises, the consumption
indicator light descends.
PROG
36
Page 38

LOWERING THE TEMPERATURE IN YOUR ROOM :
HOW TO USE ECO MODE
DESCRIPTION
We recommend that you use this mode when you will be absent for 2 to 24 hours, or during the
night, especially in bedrooms.
HOW TO ACTIVATE THIS MODE ?
é
Press the scroll key (E) several
times until the selection arrow is
on mode.
q
u
E
i
l
i
b
r
e
The mode selection arrow flashes
PROG
for several seconds, then just the
icon remains on the display:
the setting is confirmed.
The advised Eco temperature is -3.5°C compared with the Comfort temperature (setting example: 19°C in Comfort
mode and 15.5°C in Eco mode). If the -3.5°C icon does not appear on the screen, this means that the difference
compared with the set Comfor t temperature is not 3.5°C.
If you lower the Comfort temperature to below the Eco temperature, the Eco temperature lowers by -0.5°C compared with the Comfort mode If, however, you increase the Comfort temperature, the Eco temperature does not
change.
HOW TO CHANGE THE TEMPERATURE ?
GB
If you want, you can change the
temperature displayed by pressing the + (D)or–(F) keys.
D
é
q
u
i
l
i
b
r
e
37
The chosen Eco temperature
appears on the screen.
F
Page 39

PROGRAMMING THE HEATING PERIOD :
HOW TO USE PROG MODE
You can program your Comfort and temperature times either by using one of the three
prestored programs, or by connecting the pilot wire to a programming control (Pilot wire (FP) mode
is the default setting - refer to your programming control’s manual)
You can connect several devices to one programmer.
3 programs have been prestored: , and and they cannot be changed.
PROG
0h 1h 2h 3h 4h 5h 6h 7h 8h 9h
10h 11h 12h 13h 14h 15h 16h 17h 18h 19h 20h 21h 22h 23h
is recommended for when you are constantly at home, at the weekend for example (Eco mode
from 23h to 5h, Comfort mode from 5h to 23h).
is recommended if you are absent during the day (Eco mode from 23h to 5h and from 9h to
17h, Comfort mode from 5h to 9h and from 17h to 23h).
is recommended if you are absent during the day, but you come back home at lunchtime (Eco
mode from 23h to 5h, from 9h to 12h and from 14h to 17h, Comfort mode from 5h to 9h, from
12h to 14h and from 17h to 23h).
means that a programming control is used.
NB : If no command is received on the pilot wire, the device will function in Comfort mode.
When switching from Comfort to Eco mode, the new mode is active after about 12 seconds.
The Frost Protection and Load shedding commands have priority over the Eco, Comfort and programming (P1, P2, P3 and ) modes.
38
Page 40

HOW TO SET THE DAY OF THE WEEK AND TIME ?
Before programming the device, you must set the device to the correct time or make sure that the
system day and time is correct.
To set the day of the week and
the time, hold the Programming
key (C) down for several seconds.
To change the day, press the +
(D)or-(F)key.
To set the time, press the Scroll
(E) key.
C
GB
The letters on the screen start
flashing: you can now set the day
of the week.
(J= day - LU = Monday)
D
é
q
u
i
l
i
b
r
e
é
q
u
i
l
i
b
r
e
You have changed the day. You
F
can now set the time.
E
The letters on the screen flash
so that you can change the hour.
To change the hour, press the +
(D)or-(F)key.
D
é
q
u
i
l
i
b
r
e
39
You have changed the hour. You
F
can now set the minutes.
Page 41

To set the minutes, press the
Scroll (E) key.
To change the minutes, press the
+(D)or-(F)key.
To confirm the minutes, press
the Scroll (E) key.
é
q
u
E
i
l
i
b
r
e
The letters on the screen flash
so that you can change the minutes.
D
é
q
u
i
l
i
b
r
e
F
You can now confirm your setting.
é
q
u
E
i
l
i
b
r
e
The screen returns to the main
menu.
N.B.: You can exit the settings at any time by pressing the Programming key (C).
The settings made are saved.
40
Page 42

HOW TO ASSIGN A DAILY PROGRAM ?
C
To access the daily program,
press the Programming key (C).
Two solutions are possible :
a- you want to keep the selected program,
b- you want to change the selected program.
a-You want to keep the selected program – Monday in the example
For Monday, the ‘FP’ program is
selected.
(J= day - LU = Monday FP = programming control)
GB
You want to keep the ‘FP’ program for Monday: press the
Scroll key (E).
é
q
u
E
i
l
i
b
r
e
The program for Monday is confirmed. You can now select the
program for Tuesday.
b-You want to change the selected program – Monday in the example
You want to change the ‘FP’ program for Monday: press the +
(D)or-(F) key until the pro-
gram you want flashes on the
screen.
41
D
é
q
u
i
l
i
b
r
e
You have chosen the P3 program
F
for Monday, you can now confirm.
Page 43

HOW TO ASSIGN A DAILY PROGRAM TO ALL THE DAYS OF THE WEEK ?
Carry out the same procedure for all the days of the week, up until Sunday, either keeping the selected program or changing it.
é
Confirm the programs chosen
for each day of the week by
pressing the Scroll key (E).
N.B.: Even if there is a power cut, the settings are saved.
q
u
E
i
l
i
b
r
e
You have confirmed the daily
programs. You must now activate the Programming mode.
PROG
HOW TO ACTIVATE THE PROGRAMMING MODE ?
To activate the Programming
mode, press the Scroll key (E)
until the arrow is on this mode
.
PROG
é
q
u
i
l
i
b
r
e
PROG
E
PROG
The mode selection arrow flashes
several seconds, then remains on
the display with the icon of
the mode being programmed.
N.B.: If the icon blinks, you need to check the day and time settings (see page 39).
42
PROG
Page 44

ABSENCE OF MORE THAN 24 HOURS:
USING THE FROST PROTECTION MODE
The Frost Protection temperature is preset to 7°C (± 3° C) and cannot be changed.
HOW TO ACTIVATE THE FROST PROTECTION MODE ?
é
Press the scroll key (E) until the
selection arrow is on the Frost
Protection mode.
q
u
E
i
l
i
b
r
e
The mode selection arrow flash-
PROG
es for several seconds then the
icon remains on the display.
GB
43
Page 45

HOW TO USE THE ENERGY-SAVING FUNCTIONS :
BSENCE AND PRESENCE DETECTION
A
These functions enable your device to adapt itself to your daily life without your having to concern
yourself with it.
To use these functions, we recommend that you set the Comfort mode or Programming
mode.
PROG
These functions are in addition to the programming functions.
The function enables you to lower the temperature setting for your room automatically, as soon as
you leave it.
Absence detection is made from a height of over 45cm (Diagram 1) and operates progressively (Diagram 2):
5m
20°
45 cm
12 cm
environ
Diagram 1
Diagram 2
E.g.:Your device is set to 19°C, in Comfort mode (whether programmed or not)
At 9:00, it detects your absence.
At 9: 30, its operating instructions are set to18°C.
At 10:00, its operating instructions switch to 17°C .
44
Page 46

HOW TO ACTIVATE THE ABSENCE AND PRESENCE DETECTION ?
To activate it, press the
Sweetcontrol key (A).
If your device detects no one in the room, it automatically lowers the temperature setting progressively to 3.5°C lower than the Comfort temperature setting.
The symbol flashes when it detects a presence.
The symbol for absence /
presence detection appears on
A
the screen.
HOW TO DEACTIVATE THE ABSENCE AND PRESENCE DETECTION ?
To deactivate it, press the
Sweetcontrol key (A).
The symbol for absence /
presence detection disappears
A
from the screen.
GB
45
Page 47

HOW TO USE THE ENERGY-SAVING FUNCTIONS :
IRING FUNCTION
A
The function enables you to stop the device from heating and to start heating again automatically
when you are airing your room, thereby saving you energy.
We do not recommend the use of the Airing function in corridors and rooms located close to
an entrance door from outside your home or from the garage.
Do not heats the room while it is being ventilated allow you to save energy. If you do not turn off your
heater when a window is open for a long time, the airing function stops your device from heating
when it is not necessary: your heater automatically detects when the window is opened or closed and
therefore saves energy.
Your device reacts to an open or close window according to several variables, especially
- the temperature settings programmed for the room
- the outside temperature
- the location of your heater, etc.
By detecting whether the window is open or closed, the airing function helps you to be environmentally friendly: you save energy by not heating your house when you ventilated it.
Optimum zone
46
Page 48

HOW TO ACTIVATE THE WINDOW OPEN AND CLOSED DETECTION ?
To activate it, press the
Aeration key (B).
The operating instructions are for 7°C ±3°C for the whole time that your room is being aired. When you
close the window, your device will return to its initial operating mode.
After 2 hours, the device starts heating again in any case. The maximum expected airing
period is 2 hours.
N
NB: If the function does not meet your requirements, you can manually stop the device from heating
Power on key (E) for several seconds).
The symbol flashes when it is lowering its operating set point.
B
The symbol for absence /
presence detection appears on
the screen.
(press the
HOW TO DEACTIVATE THE WINDOW OPEN AND CLOSED DETECTION ?
To deactivate it, press the
Aeration key (B).
B
The symbol for window
open and closed detection disappears from the screen.
GB
47
Page 49

HOW TO USE THE ENERGY-SAVING FUNCTIONS :
HE BALANCE FUNCTION
T
Use the Balance function to set your device at an optimum temperature that is just the right balance
between being comfortable and saving energy.
HOW TO USE THE BALANCE FUNCTION ?
D
é
To use this function, press the
Increase (D) and Decrease (F)
keys simultaneously.
This function does not change how you have programmed your device.
q
u
i
l
i
b
r
e
The temperature displayed is
F
19°C in Comfort mode
and 15.5°C in mode.
HOW TO USE THE ENERGY-SAVING FUNCTIONS :
ONSUMPTION INDICATOR
C
The energy consumed by an electrical heating device depends, among other things, on the temperature required. The temperature recommended by the public authorities is 19°C, in Comfort
mode (15.5°C in Eco mode).
The “Consumption Indicator” function enables you to position yourself in accordance with this
recommended temperature.
Therefore, depending on the temperature required:
- If the black arrow on the screen is placed before the 2nd orange or the red
icon, you can save energy by significantly lowering the temperature you have
asked for.
- If the black arrow on the screen is placed before the 1st orange icon, you can
save energy by slightly lowering the temperature you have asked for.
- If the black arrow is in front of the green icon, you are already at the recommended temperature and are already making energy savings.
All the devices in the same room must be fitted with the same function capabilities.The energy-saving functions must be set in the same way on each heater.
48
Page 50

LOCKING THE CONTROLS
To avoid the control panel being used inopportunely, we advise you to lock it.
HOW TO LOCK THE CONTROLS ?
To lock the controls, press the
B
following keys simultaneously for
several seconds:
- Aeration (B)and
- Power on (E).
HOW TO UNLOCK THE CONTROLS ?
To unlock the controls, press the
following keys simultaneously for
several seconds:
- Aeration (B) and
- Power on (E).
B
LOCKING THE CONTROL PANEL
You can also lock the control panel using the screw provided.
E
é
q
u
i
l
i
b
r
e
A lock appears on the screen: the
settings can no longer be changed.
E
é
q
u
i
l
i
b
r
e
The lock disappears from the
screen: the settings can be
changed.
GB
Remove the screw located inside
the control panel.
Close the control panel’s flap.
Block the flap using the screw.
The panel can no longer be
opened, so the controls cannot be
accessed.
49
Page 51

CALIBRATE THE TEMPERATURE
Depending on your installation, the temperature you read may be different to the one displayed on
your device. In that case, you can calibrate the temperature displayed.
C
E
Hold the following keys down
simultaneously:
- Programming (C),
- Power on (E).
é
q
u
i
l
i
b
r
e
With the + (D)or-(F) keys,
choose your calibration value
(between -2°C and 2°C).
E.g. The temperature displayed on your device is 20°C.
The temperature displayed on your thermometer is 19°C -> Choose a calibration value of -1°C.
Confirm your choice by pressing the Programming key (C). Your device will heat until the room temperature reaches 20°C.
MAINTENANCE
To maintain your device’s performance, you must dust it approximately twice a year.
Never use abrasive products or solvents.
RETURNING TO THE STANDARD FACTORY SETTINGS
It is possible de return to the standard settings for your device.
Hold the following keys down
simultaneously
- Aeration (B),
- Settings (C),
- Scroll (E),
until everything is displayed on the
screen (see page 33 for the different
displays).
C
B
E
é
q
u
i
l
i
b
r
e
The device switches to Comfort
mode at 19°C. The mode
is at 15.5°C. The energy saving and
programmed functions are deactivated.
50
Page 52

TROUBLESHOOTING
PROBLEM
ENCOUNTERED
The heating light flashes
The device does not
heat.
The device heats all
the time.
The device heats
even though the window is open.
The device does not
heat enough.
The heating light
appears on the
screen when the
device is in Eco
mode.
Dirty marks appear
on the wall around
the device.
CHECKS TO BE MADE
The temperature probe is disconnected or is faulty.
Contact your installer.
Make sure that the mode is activated.
If you are operating under programming, check that the programmer is in
COMFORT mode.
that the power cut-off (if you have one) has not cut off the power to the device.
Check the air temperature in the room: if it is too high, the heating light does
not flash : the device does not heat.
- Check that the device is not in a draught or that the temperature setting has
not been altered.
- There may be a fluctuation in the main power supply. If there is a problem
(blocked thermostat...), cut off the power to the device (fuse, circuit breaker)
for approximately 10 minutes and then switch it back on.
- If the phenomenon recurs frequently, have your electricity utility check the
power supply.
There may be a delay between when the window is opened and when the
heating stops.
If you find this delay too long, you can manually stop your device.
Increase the temperature settings by pressing the + (E) key.
If the setting is at its maximum, carry out the following checks :
- Check whether there is another heating device in the room.
- Make sure that your device is only heating the room (door closed).
- Check the supply voltage to the device.
- Check that the power of your device is adapted to the size of your room
(on average, we recommend 100 W/m² for a ceiling height of 2.50 m).
This is normal. The device can heat to maintain an Eco temperature.
The dirty marks come from the bad quality of the air in the room. In this case,
you are advised to check that the room is correctly aired (ventilation,vent duct,
etc.), that the air is clean and not to smoke in the room. Your device will not
be replaced under guarantee because of these dirty marks.
Ensure that the installation’s circuit breakers are engaged and
GB
51
Page 53

PROBLEM
ENCOUNTERED
The device’s surface
is very hot.
It is normal for the device to be hot when it is operating; the maximum surface temperature is restricted in accordance with the NF electrical perfor-
CHECKS TO BE MADE
mance standard. However, if you think that your device is still too hot, check
that the output is suitable for the area of your room (we recommend 100W /
2
) and that the heater is not placed in a draught, which would interfere with
m
its self-regulation; also check that the installation guidelines have been followed (curtains, etc.)
For devices equipped with a programming system or controlled via a pilot wire:
The device is not
responding to the
external programming commands.
Make sure that the central programming system is working correctly (refer to
the user manual), or that the programming control is correctly placed in its
holder and that it is working correctly (check the batteries, fuse, etc .)
Make sure that your device is in Programming mode and that the external
“Centralised” program is assigned to the right day of the week.
If you do not succeed in solving your problem, contact your local installer and have the
details of your device’s references (see page 28), the room’s temperature and the programming system (if any)tohand.
52
Page 54

WARRANTY CONDITIONS
- The guarantee period is two years from the date of installation or purchase and may not exceed
30 months from the date of manufacture in the absence of a receipt.
-The guarantee covers the replacement and supply of components recognised as being defective,
excluding any damages or interest.
- The user is responsible for any labour or transport costs.
- The guarantee does not cover any damage arising from improper installation, abnormal use or nonobservance of the requirements of the said instructions for installation and use .
- The stipulations of the present guarantee conditions do not exclude any of the purchaser’s legal
rights of guarantee against faults or hidden defects, which are applicable in all cases under the stipulations of Articles 1641 of the Civil Code.
- Present this certificate to your distributor or installer only in the event of a claim, together with
your purchase invoice.
TYPE OF DEVICE*: . . . . . . . . . . . . . . . . . . . . . . . . . . . . . . . . . . . . . . . . . . . . . . . . . . . .
SERIAL NUMBER*: . . . . . . . . . . . . . . . . . . . . . . . . . . . . . . . . . . . . . . . . . . . . . . . . . . . .
CUSTOMER’S NAME AND ADDRESS: . . . . . . . . . . . . . . . . . . . . . . . . . . . . . . . . . . . . . . . . . . . . . . . . .
* This information can be found on the information plate situated on the left-hand side of the device.
ATLANTIC INTERNATIONAL
Tel: (33) 146836000
Fax: (33) 146836001
FOR SALES IN NEW ZEAL
ANDATLANTIC AUSTRALASIA - Phone :
0800 422 000 - Fax : 04 3800 509
FOR SALES IN AUSTRALIA
ATLANTIC AUSTRALASIA PTY LTD
4/13-25 Church Street
Hawthom Victoria 3122
Australia
Free call : 1800 677 857
Phone : 03 9852 9599
Fax : 03 9852 9844
web : www.atlantics.com.au
FOR SALES INTHE U.K.,
please contact :
ATOUR ATLANTIC LTD
Malling Works, Lewes
East Sussex BN7 2AY
Phone : 01580 2431 53
Fax : 01580 2411 80
E-mail : sales@tour-atlantic.ltd.uk
....................................................
INSTALLER’S STAMP
53
RYHG MARS 11 12-80-1293-A
Page 55

GARANTIE
DOCUMENT À CONSERVER PAR L’UTILISATEUR,
À PRÉSENTER UNIQUEMENT EN CAS DE RÉCLAMATION
La durée de garantie est de 2 ans à compter de la date d’installation ou d’achat et ne saurait excéder
30 mois à partir de la date de fabrication en l’absence de justificatif.
Atlantic assure l’échange ou la fourniture des pièces reconnues défectueuses à l’exclusion de tous
dommages et intérêts.
Les frais de main d’œuvre, de déplacement et de transport sont à la charge de l’usager.
Les détériorations provenant d’une installation non conforme, d’un réseau d’alimentation ne respectant
pas la norme NF EN 50160, d’un usage anormal ou du non respect des prescriptions de ladite notice ne
sont pas couvertes par la garantie.
Les dispositions des présentes conditions de garantie ne sont pas exclusives du bénéfice, au profit de
l’acheteur, de la garantie légale pour défauts et vices cachés qui s’applique en tout état de cause dans
les conditions des articles 1641 et suivants du code civil.
Présenter le présent certificat uniquement en cas de réclamation auprès du distributeur ou de votre
installateur, en y joignant votre facture d’achat.
TYPE DE L’APPAREIL* : ...............................................................................................
N° DE SÉRIE* : .............................................................................................................
NOM ET ADRESSE DU CLIENT : ..................................................................................
.....................................................................................................................................
* Ces renseignements se trouvent sur la plaque signalétique, côté gauche de l’appareil.
SATC
Rue Monge - ZI Nord
85002 LA ROCHE SUR YON Cedex
www.atlantic.fr
Cachet du distributeur
Tous les litiges relèvent de la compétence exclusive
des tribunaux de la Roche-sur-Yon.
Edition 2011
 Loading...