

Page 1
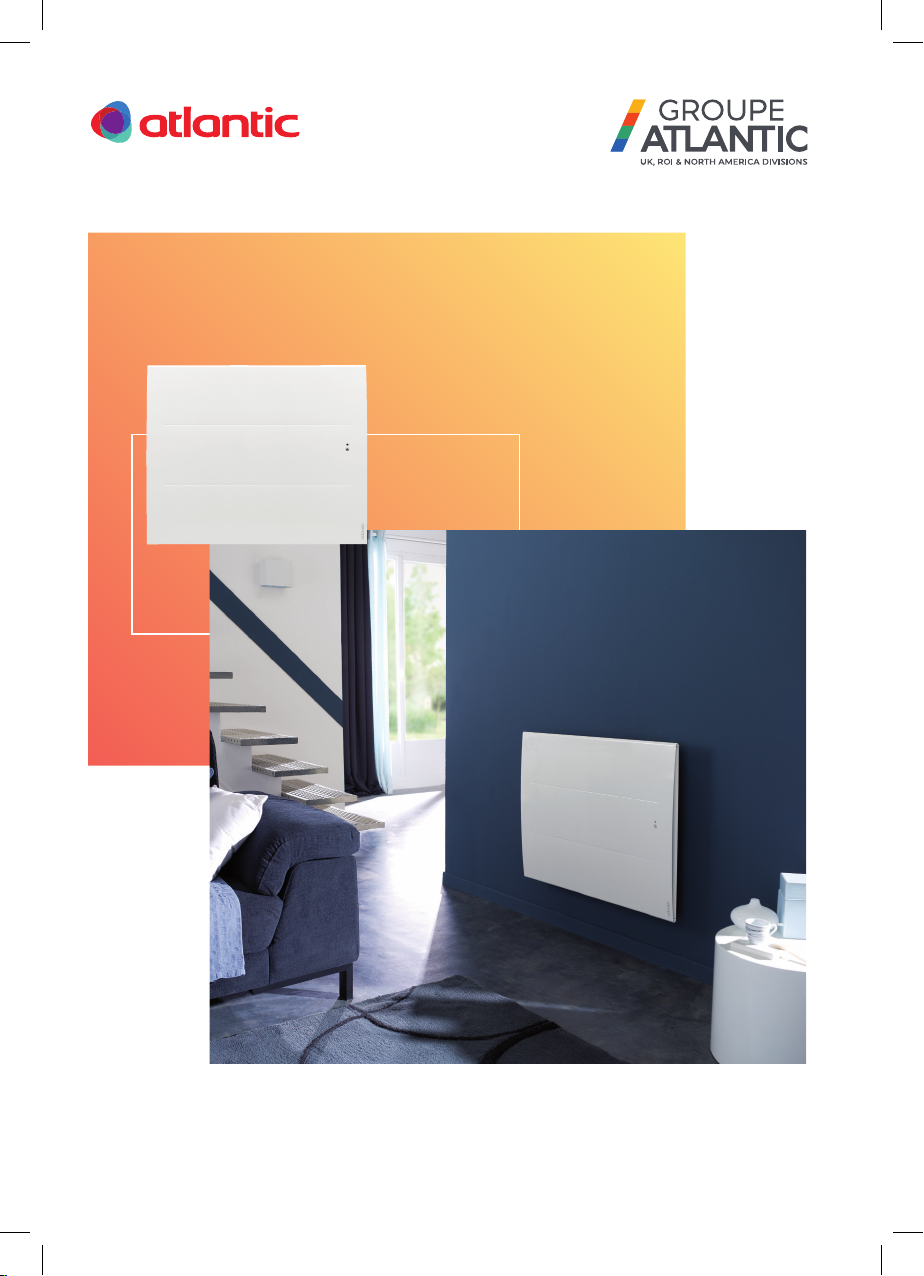
Oniris
QUALITY ACTIVE HEAT CONVECTOR
WITH USER-FRIENDLY CONTROLS
F127
SLIM-LINE DESIGNER RADIATOR WITH SMART
ENERGY-SAVING FUNCTIONS
All electrical appliances produced for the Company are guaranteed for one year against faulty material or workmanship. This applies only if the appliance has
been used for purposes in accordance with the instructions provided and has not been connected to an unsuitable electricity supply, or subject to misuse, neglect,
damage or modified or repaired by any person not authorised by the Company. This guarantee is oered to you as an extra benefit and does not aect your legal
rights. The correct electricity supply voltage is shown on the rating label attached to the appliance. Reasonable care has been taken to ensure that this guide is
accurate at the time of printing. In the interest of progress the Company reserve the right to vary specifications from time to time without notice.
1
Page 2

Warning
p 2
Declaration of Conformity - Directive RED 2014/53/EU
p 3
1- INSTALLING THE APPLIANCE
p 4
1.1- Installing the appliance
p 4
1.2 - Mounting the wall bracket
p 5
1.3 - Connecting the radiator
p 6
1.4 - Locking the appliance on its wall bracket
p 6
1.5 - Maintenance
p 6
2 - OPERATION
p 7
2.1 - The control unit
p 7
2.2 - Turning on / Switching to standby
p 7
2.3 - Locking / Unlocking the commands
p 7
2.4 - The switch
p 8
2.5 - Initial start-up
p 8
3 - CONNECTIVITY
p 9
3.1 - Accessing connectivities
p 9
4 - ADJUSTING THE TEMPERATURE
p 11
4.1 - Setpoint temperature
p 11
5 - OPERATING MODES
p 12
5.1 - Auto mode (not available on Low Height version)
p 12
5.2 - Basic mode
p 14
5.3 - Prog mode
p 14
6 - DETECTION FUNCTIONS
p 17
6.1 - Open window / Closed window
p 17
6.2 - Presence (not available on Low Height version)
p 18
7 - EXPERT MODE
p 19
8 - POWER CUT-OFF
p 21
9 – HELP
p 21
Identification of the appliance
p 23
Thank you for choosing this appliance and for the confidence you have thus placed in us. Your
Do not discard the manual, even after the radiator has been installed.
Horizontal (RAF3H-i2g) / Vertical (RAF3V-i2g) / Plinth (RAF3P-i2g) Models
Contents
recently acquired radiator has undergone numerous tests and inspections to ensure the best
Please read your radiator's manual and familiarise yourself with the operating guidelines in order
quality and to thus provide you with complete satisfaction.
to enhance your well-being.
2
Page 3

WARNING
- Caution very hot surface.
individuals are present.
CAUTION:
Some parts of this product can become very hot and cause burns.
Particular attention is required when children and dependent
Children under 3 must be kept away from this appliance, unless they are under constant supervision.
Children between the ages of 3 and 8 must only turn the appliance on or off provided that the
appliance has been positioned or installed in a normal intended position and provided that the
children are supervised or have been instructed with respect to the safe use of the appliance and
that they fully understand the potential dangers. Children between the ages of 3 and 8 must not
connect, adjust or clean the appliance or perform any product maintenance.
This appliance can be used by children who are at least 8 years old and by persons with limited
physical, sensory or mental abilities or without any experience or knowledge of the appliance if they
are properly supervised or if they have been given instructions with respect to the safe use of the
appliance and if the potential risks have been understood. Children must not play with the appliance.
Cleaning and maintenance of the appliance by the user must not be performed by children without
supervision.
The operating instructions for this appliance are available from our website or by contacting the
after-sales department.
To prevent overheating and for safety reasons, do not cover the heating appliance.
: Appliances with this symbol must not be disposed of in household waste but must be
collected separately and recycled. The collection and recycling of end-of-life products must
be carried out according to local provisions and orders.
3
Page 4

DECLARATION OF CONFORMITY
Thermor Pacific hereby declares that the equipment referred to hereafter is compliant with the
essential requirements of directive RED 2014/53/EU.
The EU declaration of conformity completed for this equipment is available on request from our
after-sales department (the address and telephone number are provided at the end of the manual).
Designation: radiator with i2g radio card.
Models: refer to the model reference in the manual's header.
Features:
Radio frequency: 868 MHz Transceiver.
Class 2 radio equipment: can be marketed and commissioned without any restrictions.
Radio range: from 100 to 300 metres in free-field conditions, varying according to the auxiliary
equipment (the range can be altered depending on the installation conditions and the
electromagnetic environment).
Conformity with radio standards and electromagnetic compatibility has been verified
by notified body 0081: LCIE France, Fontenay aux Roses.
DIRECTIVE RED 2014/53/EU
4
Page 5
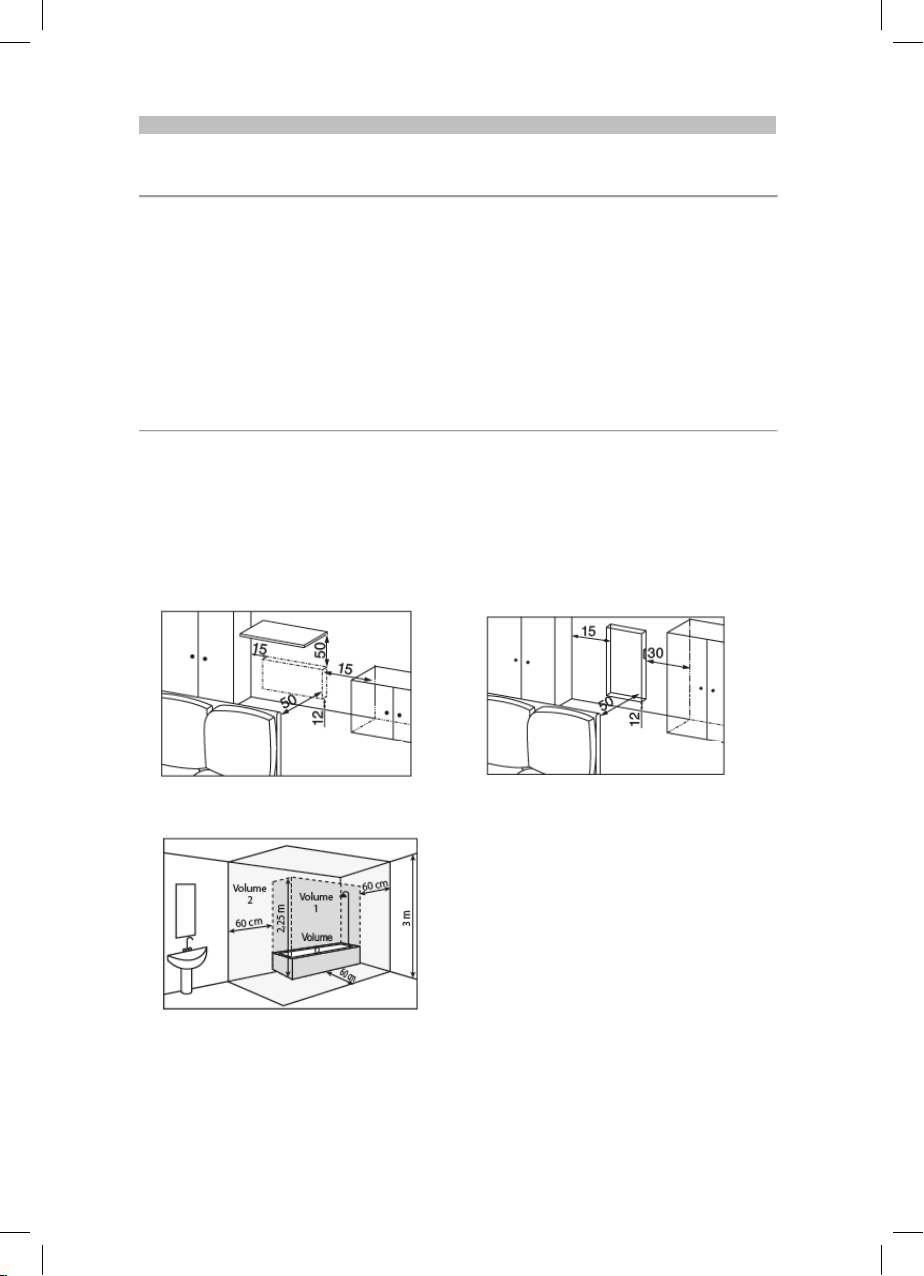
1- INSTALLING THE APPLIANCE
Horizontal and Plinth Model
Vertical Model
If you have a foam-mounted wall covering then
Sizes in cm
Sizes in cm
1.1- Installing the appliance
Your appliance is delivered with its own wall bracket. However, the choice of screws and of wall
plugs depends on the nature of your wall and you are responsible for ensuring that you use screws
and wall plugs that are adapted to the weight of the appliance.
Once the cardboard box cover has been removed, you can remove the wall bracket, which you can
then use as a hole drilling template.
To facilitate connection, this appliance (horizontal and low height version) has been designed so that
it stands upright throughout the connection period. For a Vertical appliance, ensure that the
appliance is placed in its wedge against the wall until it is placed on the wall bracket.
1.1.1 - Installation guidelines
This appliance has been designed to be installed in a residential room.
The installation must be carried out implementing best practices and in accordance with the current
standards in the country of installation (NFC 15100 for France).
Observe the minimum distances from furniture when locating the appliance (refer to the diagram).
a wedge having the same thickness as the foam
must be placed under the appliance's bracket
so that an open space is maintained behind the
appliance to prevent any interference with its
adjustment.
5
Page 6
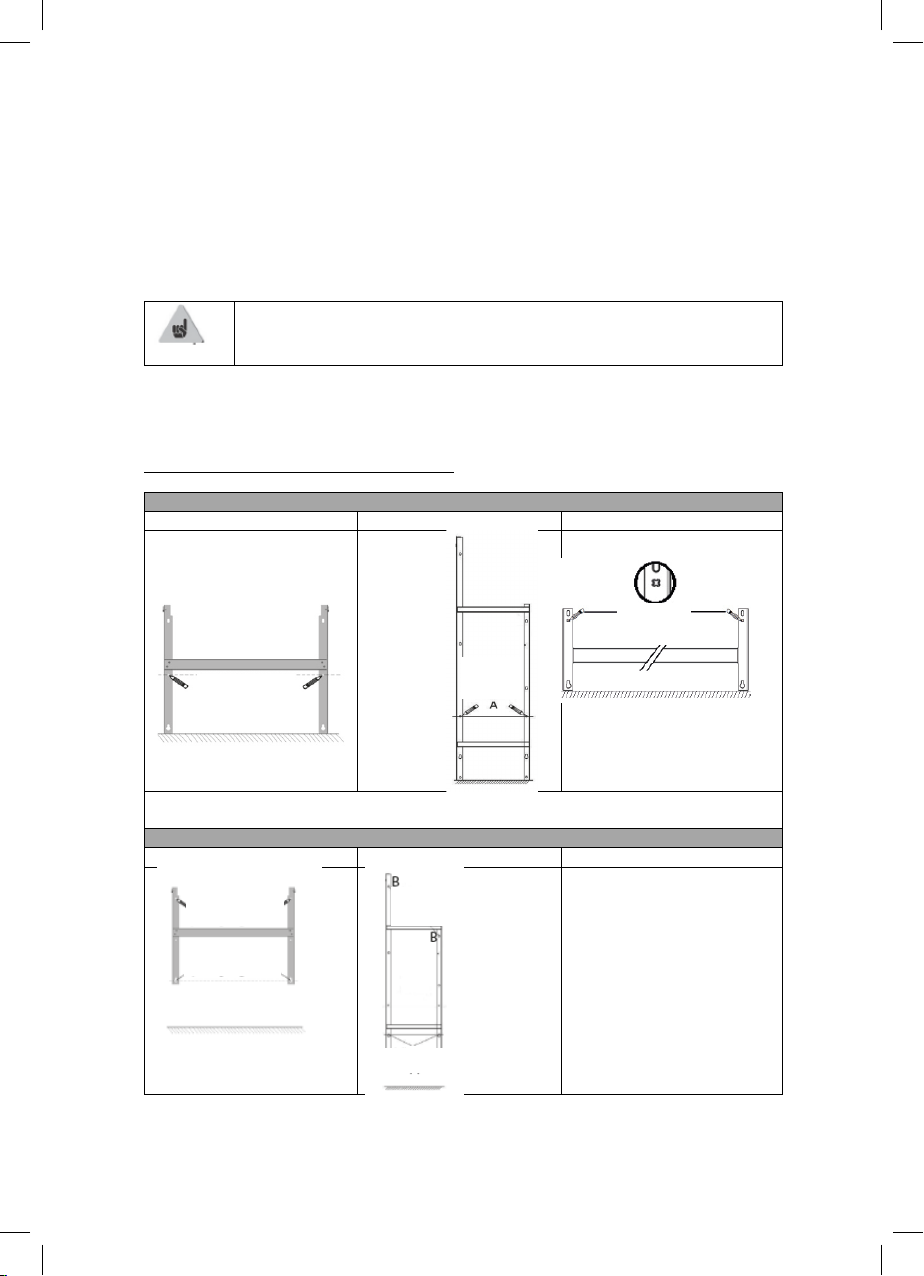
Step 1
Horizontal Model
Vertical Model
Plinth Model
lower mounts.
Step 2
Horizontal Model
Vertical Model
Plinth Model
Drilling points A
Drilling points B
Drilling
points
Screw in A
Drilling
Drilling
Drilling
Drilling points A
Do not install the appliance:
In an air current that is likely to interfere with its adjustment (under a
Centralised Mechanical Ventilation system, etc.).
Under a fixed electric socket.
In bathroom areas shown as 'Volume 1' in the above diagram.
Appliances used in bathrooms must be installed so that the switches and other devices for
controlling the appliance cannot be touched by an individual in the bath or the shower.
Installing an appliance at altitude increases the air outlet temperature (by
approximately 10°C per 1,000 m of elevation).
Installing the appliances above an altitude of 1,000 m is not recommended (risk of faulty operation).
Installing a vertical appliance horizontally, and vice versa, is prohibited. Using the appliance in a
mobile configuration, on feet or on rollers, is prohibited.
1.2 - Mounting the wall bracket on the wall
marks A
points A
Place the wall bracket on the ground. Mark the drilling points A, these give the position for the
Drilling
marks B
marks A
6
Page 7
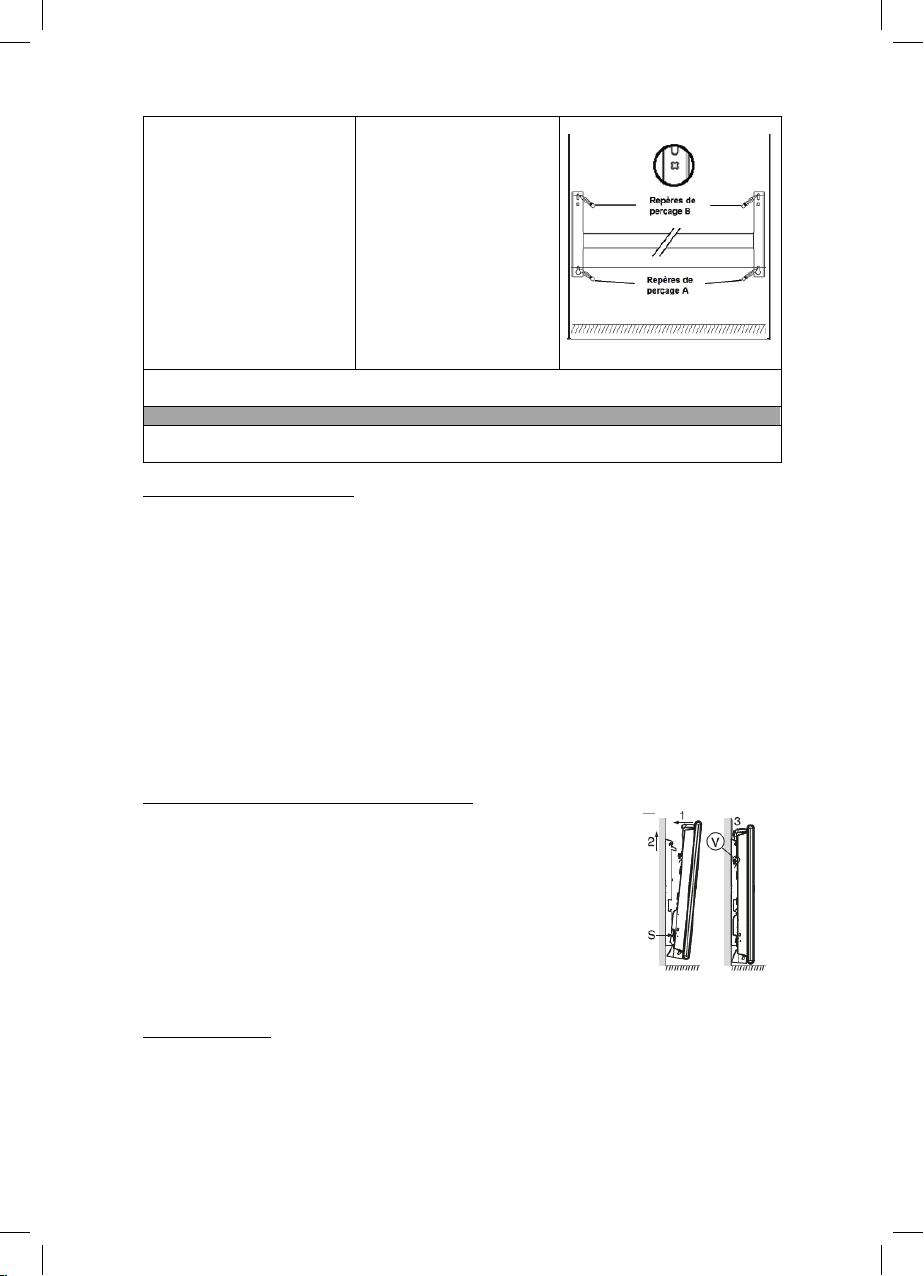
Re-mount the wall bracket by matching up the drilling points A with the lower holes on the wall
bracket. Mark the 2 drilling points B with a pen.
Step 3
Drill the 4 holes and insert wall plugs that are adapted to your wall (e.g. plasterboard, concrete).
Position and screw in the wall bracket.
1.3 - Connecting the radiator
The appliance must be supplied with 230 V 50 Hz.
The radiator power supply must be directly connected to the network downstream of the
omnipolar cut-off device in accordance with the installation guidelines.
A 3-wire cable (Brown = Phase, Blue = Neutral, Black = Pilot wire) is used to connect to the supply
circuit through a junction box.
In humid rooms, such as kitchens and bathrooms, the junction box must be installed at least 25 cm
from the ground.
The installation must be equipped with a circuit-breaker type protective device, with a 30 mA
differential.
Connection to ground is prohibited. Do not connect the pilot wire (black) to ground.
If the power supply cable is damaged, it must be replaced by the manufacturer, their after-sales
department or by a similarly qualified individual for safety reasons.
If the control or controlled device is protected by a 30 mA differential (for example: in the
bathroom), the power supply for the pilot wire on this differential needs to be protected.
1.4 - Locking the appliance on its wall bracket
- Place the appliance on the S bracket as per the diagram.
- Move the appliance towards the bracket, then lift the appliance
(arrows 1 and 2).
- Introduce the mounting brackets into the holes on the appliance,
then lower the appliance (arrow 3).
- Lock by rotating the 2 V-locks by a half turn, your appliance is now
mounted.
1.5 - Maintenance
Before performing any maintenance work, turn off your appliance by turning the On/Off switch to
the 0 position.
7
Page 8
In order to maintain the performance levels of your radiator, dust needs to be removed from the
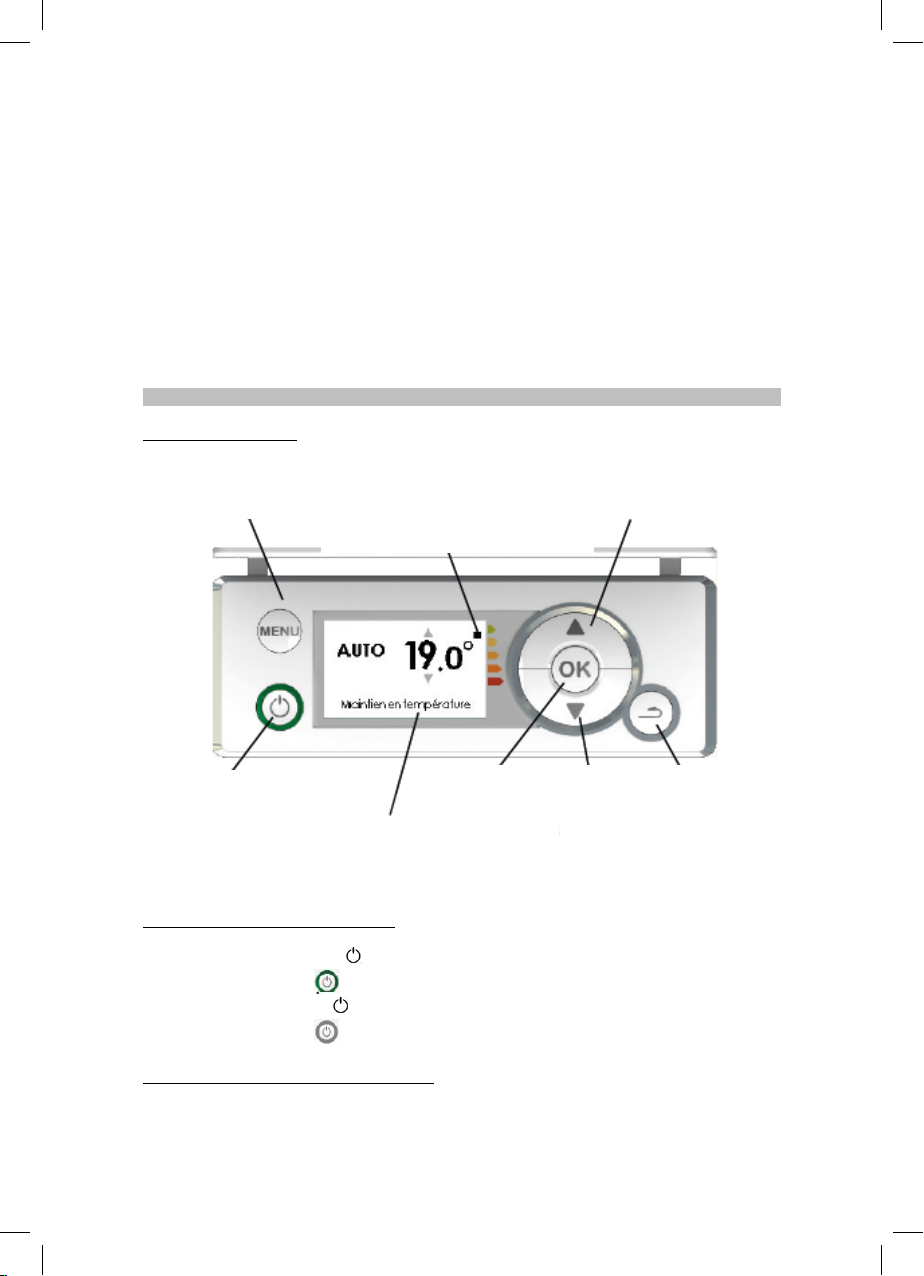
2 - OPERATION
Access settings and operating information
Consumption indicator
Confirm
Decrease
Display information
Turn on
Increase Navigate
Back
lower and upper grills of the appliance approximately two times per year using a vacuum cleaner or
a brush. The appliance can be cleaned using a damp cloth; never use abrasive products and solvents.
In a polluted environment, dirt can appear on the appliance's grill. This phenomenon is associated
with the poor quality of the ambient air. In this case, we recommend checking that the room is
properly ventilated (ventilation, air inlet, etc.). This dirt does not constitute grounds for warranty
replacement of the appliance.
2.1 - The control unit
Stop heating
2.2 - Turning on / Stopping heating
To turn on the appliance, press .
The green ring around the key lights up.
To turn the heating off, press .
The green ring around the key turns off.
2.3 - Locking / Unlocking the commands
Navigate
Follow instructions
8
Page 9
The control unit can be locked to prevent it from being unintentionally handled. To lock the control
unit, press together for 5 seconds.
Perform the same operation to unlock the control unit.
2.4 - The switch
An On/Off switch is located behind the appliance.
Only use this switch for an extended shut-down period (outside the heating periods). Check that the
switch is set to I (on).
After an extended shutdown period, the day and the time may need to be reset.
2.5 - Initial start-up
On initial power-up, follow the instructions displayed on the screen.
2.5.1 - Setting the language
Change the language using and confirm using .
The language setting can be re-accessed using the Expert Menu (refer to the "Expert Menu"
chapter).
2.5.2 - Setting the date and time
Set the day using and confirm using . Perform the same operation to set the month, year,
hour and minutes.
The date and time setting can be re-accessed.
By default, the unit automatically switches to summer/winter time.
Automatically switching to summer/winter time can be deactivated (refer to the "Expert Menu"
chapter).
2.5.3 - Appliance status
By default, on initial power-up:
The AUTO mode is selected for the Horizontal and Vertical version
(refer to the "Operating mode" chapter).
The Prog mode is selected for the Plinth version.
The setpoint temperature is set to 19°C.
The detection functions are active (refer to the "Detection
functions" chapter). For the Plinth version, only the "Open window"
detection function is active.
The maximum temperature reduction (during periods of absence) is
3°C relative to the setpoint temperature (refer to the "Operating
mode" chapter).
9
Page 10

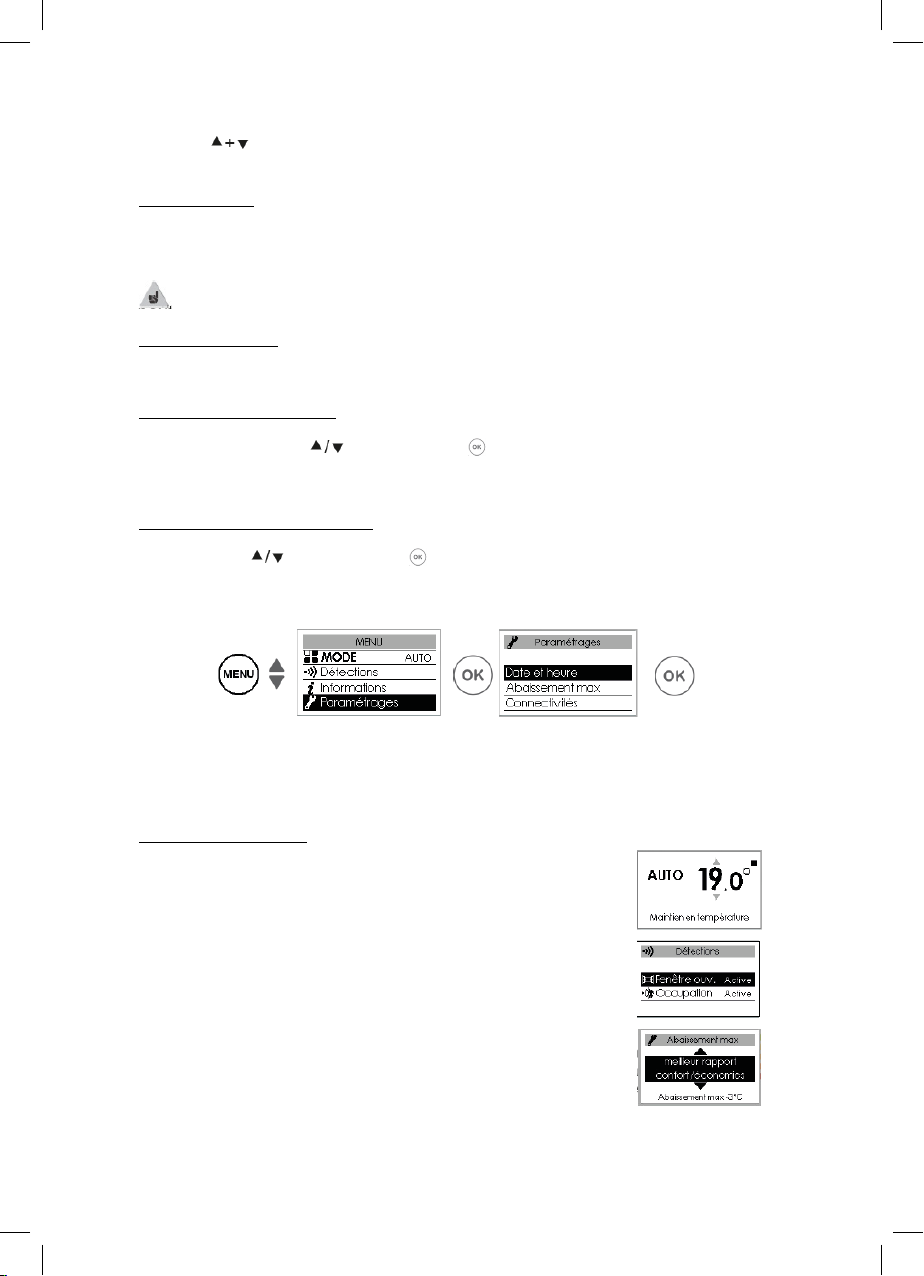
3 - CONNECTIVITY
Before performing any action, illuminate the screen by pressing any key.
This menu grants access to the configurations for Connectivities.
Our units are compatible with iO-homecontrol®.
This highly secure wireless radio communication technology is integrated in a wide range of
household equipment proposed by home specialist partner brands.
With our heating appliances that integrate iO-homecontrol® you can perform the following tasks
through the Connectivity menu:
• Pair several compatible appliances in the same room.
For optimum operation, only appliances located in the same room should be paired (up to a
maximum of 5 appliances).
• Connect your appliances to the Cozytouch app to control them remotely (from the app).
3.1 - Accessing CONNECTIVITIES: (Auto mode for the Horizontal and Vertical version and Prog
Mode for the Plinth version).
3.1.1 - Pairing between appliances
appliances that are located in the same room can be paired so that they can communicate and
share information.
For example, when several appliances are paired, a change in the setpoint temperature or in a mode
on one appliance is immediately fed back to all the other appliances.
Similarly, if one of the appliances in the room detects your presence, it will send this information to
the other appliances.
Accessing PAIRING
For example: pairing 3 appliances in the same room:
10
Page 11

Appliance 3
Appliance 1
Appliances 1 2 3
Appliance 2
Appliance 1
Appliance 1
or wait a few minutes
Wait for
next
display
to return to the initial
screen
Display the paired appliances:
You can view the appliances that you have paired.
Delete pairing:
This operation deletes all the connections between the appliances.
Add a pair:
The existing pairing must be deleted (refer to “Delete pairing") and the operation must be restarted
to pair all the appliances.
3.1.2 - Connection
This appliance is compatible with our Cozytouch product (all the relevant information is available on
our website) and with units using the iO-homecontrol® protocol.
Required accessories:
11
Page 12

iOS and Android compatible
the Google Store.
Cozytouch Bridge.
Internet access unit.
Perform all the connection or control operations from the app (follow
4 - ADJUSTING THE TEMPERATURE
Cozytouch App.
Available as a free download
from the App Store or from
This installation allows you to remotely control, program and check your appliance(s) using a
smartphone or a tablet.
For example, you can change the setpoint temperature or the operating mode, manage your periods
of absence by indicating your return date or view the consumption of your appliances.
You can connect to the app, to an appliance or to a set of appliances that you have paired.
the instructions displayed on your smartphone or on your tablet).
Connect your appliances
Follow the instructions provided in the app.
Sold by our brand distributors
or on our website.
If the appliances are already paired, then perform this operation on one appliance only.
Before performing any action, illuminate the screen by pressing any key.
4.1 - Setpoint temperature
To change the setpoint temperature, use .
By default, the setpoint temperature is set to 19°C (recommended temperature) and is adjustable
from 12°C to 28°C.
Use the consumption indicator to optimise your adjustment. When the consumption indicator is
level with the green symbol, your temperature level is below or equal to the recommended
temperature.
12
Page 13

5 - OPERATING MODES
AUTO
BASIC
PROG
Use of smart control. The
Access to the temperature
connectivity functions only.
Manual programming of
external programming).
A period of at least 6 hours needs to elapse for the temperature to stabilise.
It is possible, depending on your installation, that you will record a temperature that differs from
that displayed on your appliance. In this case, refer to the "Expert Mode" - "T° Calibration" chapter.
Frost Protection Position (Plinth version without Auto Mode)
Use this function when you are absent for more than 48 hours.
Irrespective of the selected mode, to activate Frost Protection press until 7.0°C is displayed.
When you return, reset the setpoint temperature to return to normal operation.
Before performing any action, illuminate the screen by pressing any key.
Select the operating mode best suited to your requirements.
3 modes are provided in the Horizontal and Vertical Version and 2 modes are provided in the Plinth
version (Basic and Prog):
appliance programs itself.
Accessing the MODES:
5.1 - Auto Mode (not available on Plinth version)
This mode allows smart control to be activated. You adjust the
desired temperature when you are present in the room and the
appliance optimises your comfort whilst implementing savings.
adjustment and to the
12
13
functions (use of the internal or
Page 14

The appliance:
• records your weekly lifestyle and any changes to your lifestyle in order to implement its own
programming;
• anticipates heating so that the room is at the correct temperature upon your return;
• detects any unforeseen periods of presence and absence in order to automatically adjust the
temperature;
• detects any opening and closing of windows in order to lower the temperature to 7°C when
you air the room.
5.1.1 - Functions accessible in AUTO mode
• Temperature reduction
Allows the maximum reduction level to be adjusted for the temperature that you desire during your
periods of absence (from -2°C to -4°C). By default it is set to -3°C.
• Detection functions
The presence detection function is always active.
By default, the open window detection function is active and can be deactivated (refer to the
"Detection functions" chapter).
• Displaying smart control information
Self-programming
Allows periods of presence to be displayed that have been observed by the appliance for each day of
the week. Your appliance continuously learns, stores and assesses your lifestyle in order to adapt the
temperature of your room.
Following the initial start-up, one week of operation is required in order to define selfprogramming. It is then refined and evolves over time.
14
Page 15

Anticipation time
To optimally anticipate heating up before you return, your appliance learns and stores the heating-up
time according to the characteristics of your room (volume, insulation, outside temperature, etc.).
Energy savings
Your appliance notifies you of any savings that have been made by showing the amount of time it has
taken to reduce the temperature over the past 7 days.
Following the initial start-up, one week of operation is required in order to see an initial
result. It will then be continuously updated.
5.2 - Basic Mode
The appliance continuously adheres to the adjusted setpoint temperature.
All the smart functions are deactivated.
5.3 - Prog Mode
This mode uses the internal or external programming. The appliance adheres
to:
the internal program defined for each day of the week; or
the instructions from the external programming system for your
installation.
5.3.1 - Define the programming source
Internal programming
This programming source is selected by default.
The appliance adheres to the defined programs.
Programs are pre-recorded. You can change the programs (refer to "Change the internal
programs").
External programming
15
Page 16

The appliance adheres to the instructions from the external programming system for your
Two comfort temperature
Three comfort temperature
from 17:00 hrs to 23:00 hrs
One comfort temperature
installation through a pilot wire link or an radio link.
To control one or more of the appliance(s) from an control point outside your
installation, then:
1) Exchange the security key before making the connection from the control point.
To this end, access "Menu, Expert, Configurations, Connectivities, Send security key or Receive
security key" (refer to the "Expert Menu" chapter).
2) Authorise the connection to each appliance if the installation is fitted with one of our brand
control points (refer to the "Expert Menu" chapter).
If the appliances are paired, send the security key from one appliance only.
If the appliances are not paired, exchange the key on each appliance.
Changing the internal programs
You can program up to 3 Comfort temperature periods for each day of the week.
Outside these periods, the appliance lowers the temperature (set to -3.5°C by default).
Change the periods using or and confirm using .
Examples of programs:
periods:
from 06:00 hrs to 08:00 hrs
from 17:00 hrs to 23:00 hrs
Copying a program
You can copy the program that is defined for one day to one (or more) other day(s).
Scroll through the days using OK. Copy using . Return to the previous day using .
For example: copy the program from Monday to Thursday.
periods:
from 06:00 hrs to 08:00 hrs
from 12:00 hrs to 14:00 hrs
period:
from 06:00 hrs to 23:00 hrs
16
Page 17

5.3.2 - Functions accessible in Prog Mode
Temperature reduction
or
Allows the reduction level to be adjusted for the temperature that you desire outside the Comfort
periods (from -2°C to -9°C). By default, it is set to -3.5° C (if the setpoint temperature is set to
19°C, then, outside the Comfort periods, it will reduce to 15.5°C).
Detection function (not available on Plinth version)
By default, the presence detection function is inactive and the open window function is active (refer
to the "Detection Functions" chapter).
Activating the presence detection function in Prog Mode allows any unforeseen presence to be
detected automatically.
For example: for Monday you programmed a temperature period from
17:00 hrs to 23:00 hrs. You return at 15:00 hrs. The appliance detects your
or
presence and automatically switches to the Comfort temperature
period.
One-off bypassing of the programming
Presence detection function inactive (not available on Plinth version)
17
Page 18

6 - DETECTION FUNCTIONS
Best location zone.
Allows any unforeseen presence to be managed.
For example: for Monday you programmed a Comfort temperature
period from 17:00 hrs to 23:00 hrs. You return at 15:00 hrs and the
appliance displays an Eco temperature.
You can manually increase the temperature.
One-off bypassing is active up until the next Comfort temperature
period that is defined in the program. The appliance then reverts to
its normal operation.
Before performing any action, illuminate the screen by pressing any key.
6.1 - Open window / Closed window
Enables detection of temperature variations associated with opening and closing your windows. If
you forget to turn off your appliance while a window is open for a long period, then this function
overcomes this problem and avoids unnecessarily heating your appliance.
The appliance automatically switches to Frost Protection mode
(7°C) when it detects an open window and returns to the
setpoint temperature when it detects its closure (the detection
time varies). The appliance reacts to the opening and closing of
windows according to several variables, which particularly
include:
the desired temperature in the room;
the outside temperature;
the configuration of the installation.
The use of this function is not recommended in corridors and in rooms located in the vicinity
of an entrance door opening onto the outside.
6.1.1 - Activating/Deactivating the function
For the Plinth version you can access the "Open window" function via the Prog mode.
18
Page 19
If the appliances are paired, you can deactivate the open window detection of a single
appliance without deactivating the others (refer to the "Configurations" chapter in the
"Expert Menu").
6.2 - Presence (not available on Plinth version)
Allows your room to be heated only when someone is
present. The appliance will then heat in Comfort mode.
To optimise your appliance's presence detection
function, the appliance must be installed to enable
optimum detection (for example: do not install the
appliance behind a sofa, in a frequently used area, such
as a corridor, near a wardrobe, etc.).
Detection is not possible underneath
6.2.1 - Activating/Deactivating the function
Function always active in AUTO MODE
For example: your appliance is set to 19°C in Comfort mode (whether or not it is programmed).
- at 09:00 hrs it detects your presence;
- at 09:30 hrs the operating temperature changes to 18°C;
- at 10:00 hrs the operating temperature changes to 17°C.
the sensor.
19
Page 20

7 - EXPERT MODE
Press
Information
General
Clock
Automatic Summer/Winter.
This configuration is active by default.
Date and time.
English.
Resetting
Used to return to the basic factory settings
be deleted.
Functions
T° Calibration
It is possible, depending on your installation,
to the temperature recorded in the room.
I leave
I return
After ½ hour I switch to
comfort mode -1°
After another ½ hour I
switch to comfort mode -2°
Before performing any action, illuminate the screen by pressing any key.
This menu grants access to the appliance's advanced functions.
together for 5 seconds
Allows appliance related information to be obtained that may be required if you
contact the after-sales department.
Allows activation or deactivation of
automatic switching from summer time to
Configurations
winter time.
My presence is detected
and I switch back to
comfort mode
Config.
Language Allows the language to be selected: French,
(with Auto mode active, setpoint at 19°C,
reduction at 3°C, detection functions active).
Pairing between appliances, connection to
the app or connection to a control point will
that you will record an ambient temperature
that differs from that displayed on your
appliance. Before performing any action, let
the temperature stabilise in Comfort mode
for at least 6 hours at the desired
temperature. You can then calibrate your
appliance to adjust the setpoint temperature
20
Page 21

The calibration value is between -3°C and
calibration value -2°C.
Window
If paired, allows the open window detection
of the other paired appliances.
installed.
Luminosity of
the ring
Allows the luminosity level of the ring (on
indicator) to be adjusted.
Restrictions
Max.
Allows a maximum setpoint temperature to
(from 19°C to 28°C).
Access
control
Allows the appliance's settings to be partially
or fully locked.
PIN code
Allows a personal access code to be
Code.
paired.
Receive
security key
Allows the security key to be received from
an iO control point.
+3°C.
For example: the temperature displayed on
your radiator is 20°C.
The temperature displayed on your
thermometer is 18°C => select the
detection
Deletion Reserved for radio controlled appliances.
temperature
function to be deactivated on this appliance
only. Deactivating the function on this
appliance does not deactivate the function on
the other paired appliances and allows it to
follow the open window detection function
Allows the setpoint temperature to be
reduced from -1°C to -2°C during peak rate
periods. You are notified of these periods
through the transmission of a private radio
message, depending on the system that is
be recorded that must not be exceeded. It is
set to 28°C by default and can be changed
recorded in the Expert Menu. Once
activated, access to the Expert Menu is
encoded.
Your personal code can be noted here.
To deactivate the code, return to the Expert
Menu, enter your personal code, and return
to Configurations => Restrictions => PIN
Connectivities Send security
key
The security key secures your iO installation
to prevent interference with nearby
equipment.
Key exchange provides the possibility of
connecting an iO control point to your
installation.
Allows the security key to be sent to an iO
control point.
Use this operation if the appliances are
21
Page 22
Makes existing pairing inoperative if the
pairs.
Authorise
Following key exchange, this operation is
control point that is not part of our brand.
Reset
Deletes all connectivities (pairing of
to a centralised control point).
operation.
Presence
sensor
Activates the sensor to check correct operation.
Radio
Test signal
transmission
Checks that there is good radio
appliances).
Test signal
Press
or
Wait
2 minutes
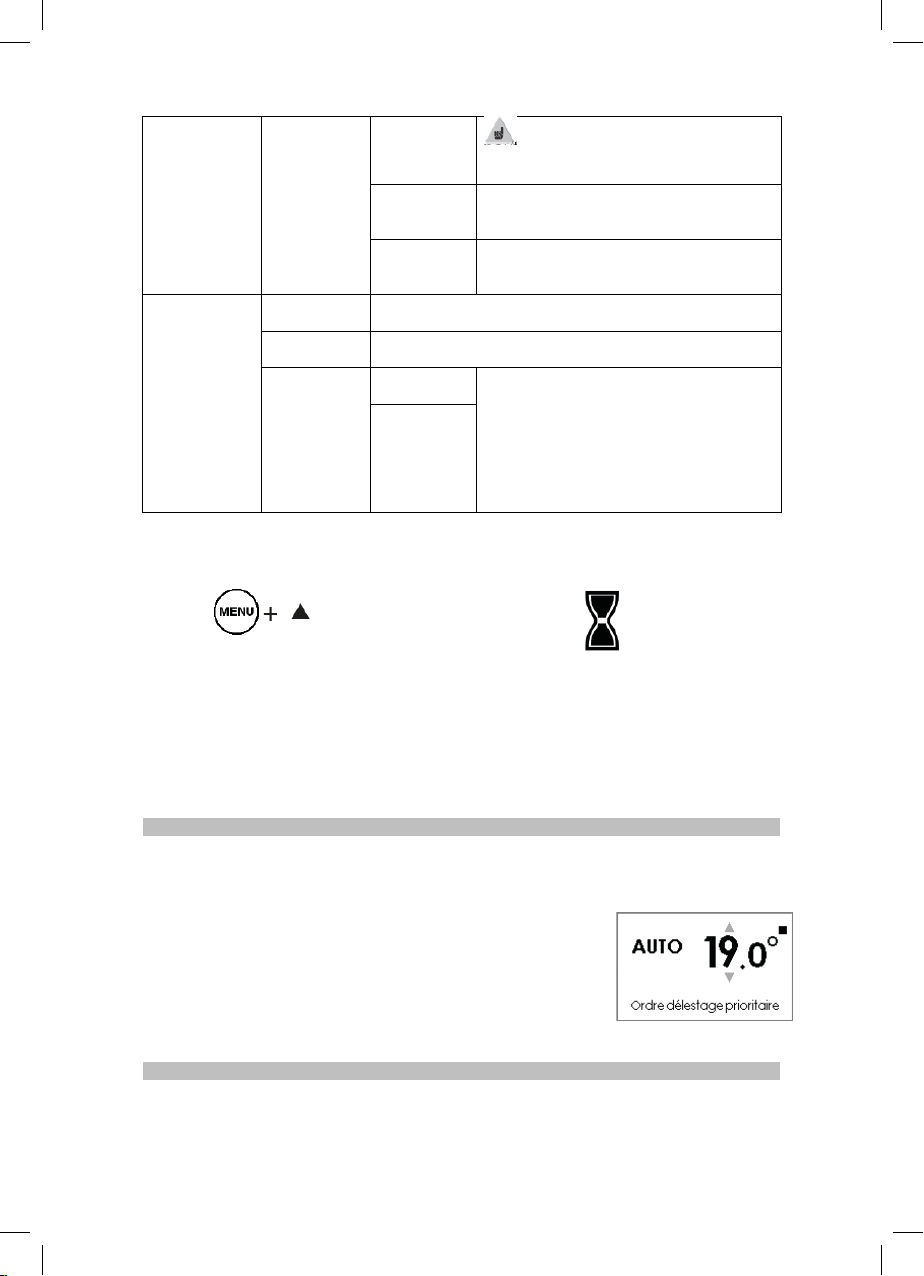
8 - POWER CUT-OFF
9 - HELP
security key is not transmitted to the other
connection
Connectivities
Test Main element Starts-up the heating element for 5 minutes to check
reception
To exit the Expert Menu:
together for 5 seconds
required to enable connection to an iO
appliances, connection to the app, connection
communication between two appliances by
transmitting a signal from one appliance and
receiving a signal on the other appliance. If
the signal is weak, then there is a risk of
losing communication. Check the installation
(distance and/or obstacles between the
Our appliances are compatible with various power cut-off systems.
However, you should not use power cut-off by interrupting the supply
circuit power supply since this system is incompatible with our
appliances. Unintentional and repeated interruptions to the electric
current can cause wear and damage to the electronic boards that will
not be covered by the manufacturer's warranty.
Irrespective of the selected Mode, during power cut-off periods, your
appliance will display "Priority power cut-off sequence".
22
Page 23
Problems
encountered
Check to be undertaken
The control unit screen
does not turn on.
Check that the switch located behind or on the side of the appliance is
in the I position. Check that the appliance is correctly powered.
The radiator does not
heat up.
If you have accessed programming, check that the programming is set
temperature, then it is normal for the appliance not to heat up.
The radiator heats up
continuously.
Check that the appliance is not located in an air current or that the
setpoint temperature adjustment has not been increased.
The radiator does not
Increase the Comfort setpoint temperature.
height of 2.50 m or 40 W/m3).
Traces of dirt appear on
The dirt is associated with poor ambient air quality. In this case, we
replacement of the appliance.
The heating icon
ECO mode.
This operation is normal. The radiator can heat up to maintain an Eco
The appliance does not
instructions.
Check that the date and time are set.
The radiator does not
instructions.
Ensure that the programming unit is being used correctly (refer to the
could interfere with its adjustment.
A "paired" appliance
Check that the appliance is correctly paired (refer to the
100 to 300 metres in free-field conditions / for 20 m2 concrete slabs.
accessible.
the Expert Menu (refer to the Expert chapter).
The appliance does not
Perform the following checks to check for the correct transmission of
to COMFORT.
Check that the installation's circuit-breakers are triggered or even that
the cut-off device (if present) has not cut-off heating.
Check the air temperature in the room: if it is higher than the setpoint
heat up sufficiently.
the wall around the
appliance.
appears on the screen
when the radiator is in
follow the internal
programming
follow the external
programming
The surface of the
radiator is very hot.
If the adjustment is at the maximum, perform the following checks:
- Check whether there is another form of heating in the room;
- Ensure that your appliance only heats up the room (door closed);
- Check the power supply voltage for the appliance;
- Check whether the power of your appliance is suitable for the size of
your room (we recommend an average of 100 W/m
2
for a ceiling
recommend checking that the room is properly ventilated (ventilation,
air inlet, etc.) and checking the cleanliness of the air and avoiding
smoking inside. This dirt does not constitute grounds for warranty
temperature.
Check that the appliance is in PROG MODE and that internal
programming is selected.
unit's operating instructions). Check that the appliance is in PROG
MODE and that external control is selected.
It is normal for the appliance to be hot when it operates, the maximum
surface temperature is limited in accordance with the NF Electricity
Performance standard. However, if you feel that your appliance is
always too hot, check that the power is suitable for the surface area of
your room (we recommend 100 W/m
3
40 W/m
) and that the appliance is not placed in an air current that
2
for a ceiling height of 2.50 m or
does not communicate
with the other "paired"
appliances.
The Expert Menu is not
respond to the
"CONNECTIVITIES" chapter). Delete the entire pairing procedure and
restart the procedure.
A maximum of 5 appliances can be paired. The maximum range is from
Have you entered a PIN code? You must enter your code to access
the programming instructions:
23
Page 24
instructions from the
Instructions
received
Oscilloscope Ref./
Neutral
Mode obtained
0 Volt
COMFORT
3 s/5 min
7 s/5 min
230 V
ECO
PROTECTION
approximately 12 seconds.
pilot wire.
230 V
230 V
– 115 V negative
+ 115 V positive
Within the context of programming using the pilot wire or a carrier
current, the frost protection or power-cut off instructions have
priority.
The delay for switching from the Comfort mode to the Eco mode is
If you have been unable to resolve your problem, contact a professional with the details of the
appliance readily available. Record the room temperature and provide details of any programming
system you use. You may also need to provide the information included in the Information section of
the Expert Menu.
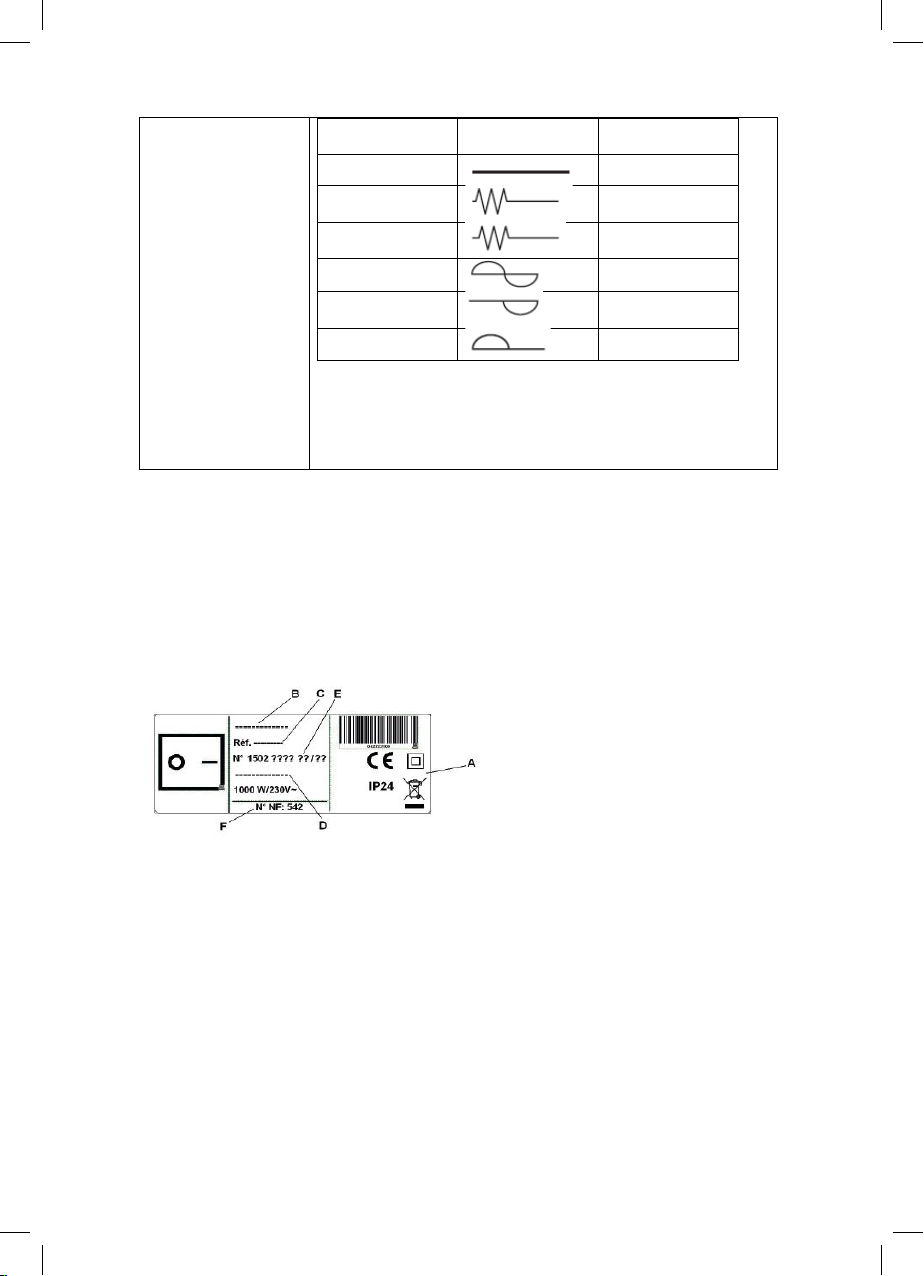
IDENTIFICATION OF THE APPLIANCE
Before contacting our pre-sales and after-sales department, please note the appliance's reference and
serial number. This information is written on the identification plate located on the right-hand side
of the appliance.
A Standards, quality labels
B Commercial name
C Commercial code
D Manufacturer's reference
E Serial No.
F Manufacturer's No.
(Non-contractual image)
COMFORT – 1° C
COMFORT – 2° C
FROST
STOP HEATING
24
Page 25

252627
Page 26

Page 27

Page 28

atlantic-heat.co.uk
T: 0844 3350 549 F: 0844 5436 180
E: enquiries@atlantic-heat.co.uk
Atlantic Heat | PO Box 103, National Avenue,
Kingston Upon Hull, HU5 4JN
Atlantic Heat is part of Ideal Boilers Limited. Ideal Boilers Ltd. pursues a policy of continuing improvement in the
design and performance of its products. The right is therefore reserved to vary specification without notice.
28
 Loading...