

Page 1
Reference guide
for professionals
and the user
to be kept by the user
for future reference
atlantic-comfort.com
code 074208
Document N° 1846-4
03/07/2017
Navilink A59
Intelligent Room
Temperature Controller
EN
ES
Page 2
Reference guide "1846- EN"
Navilink A59 Intelligent Room Temperature Controller
- 2 -
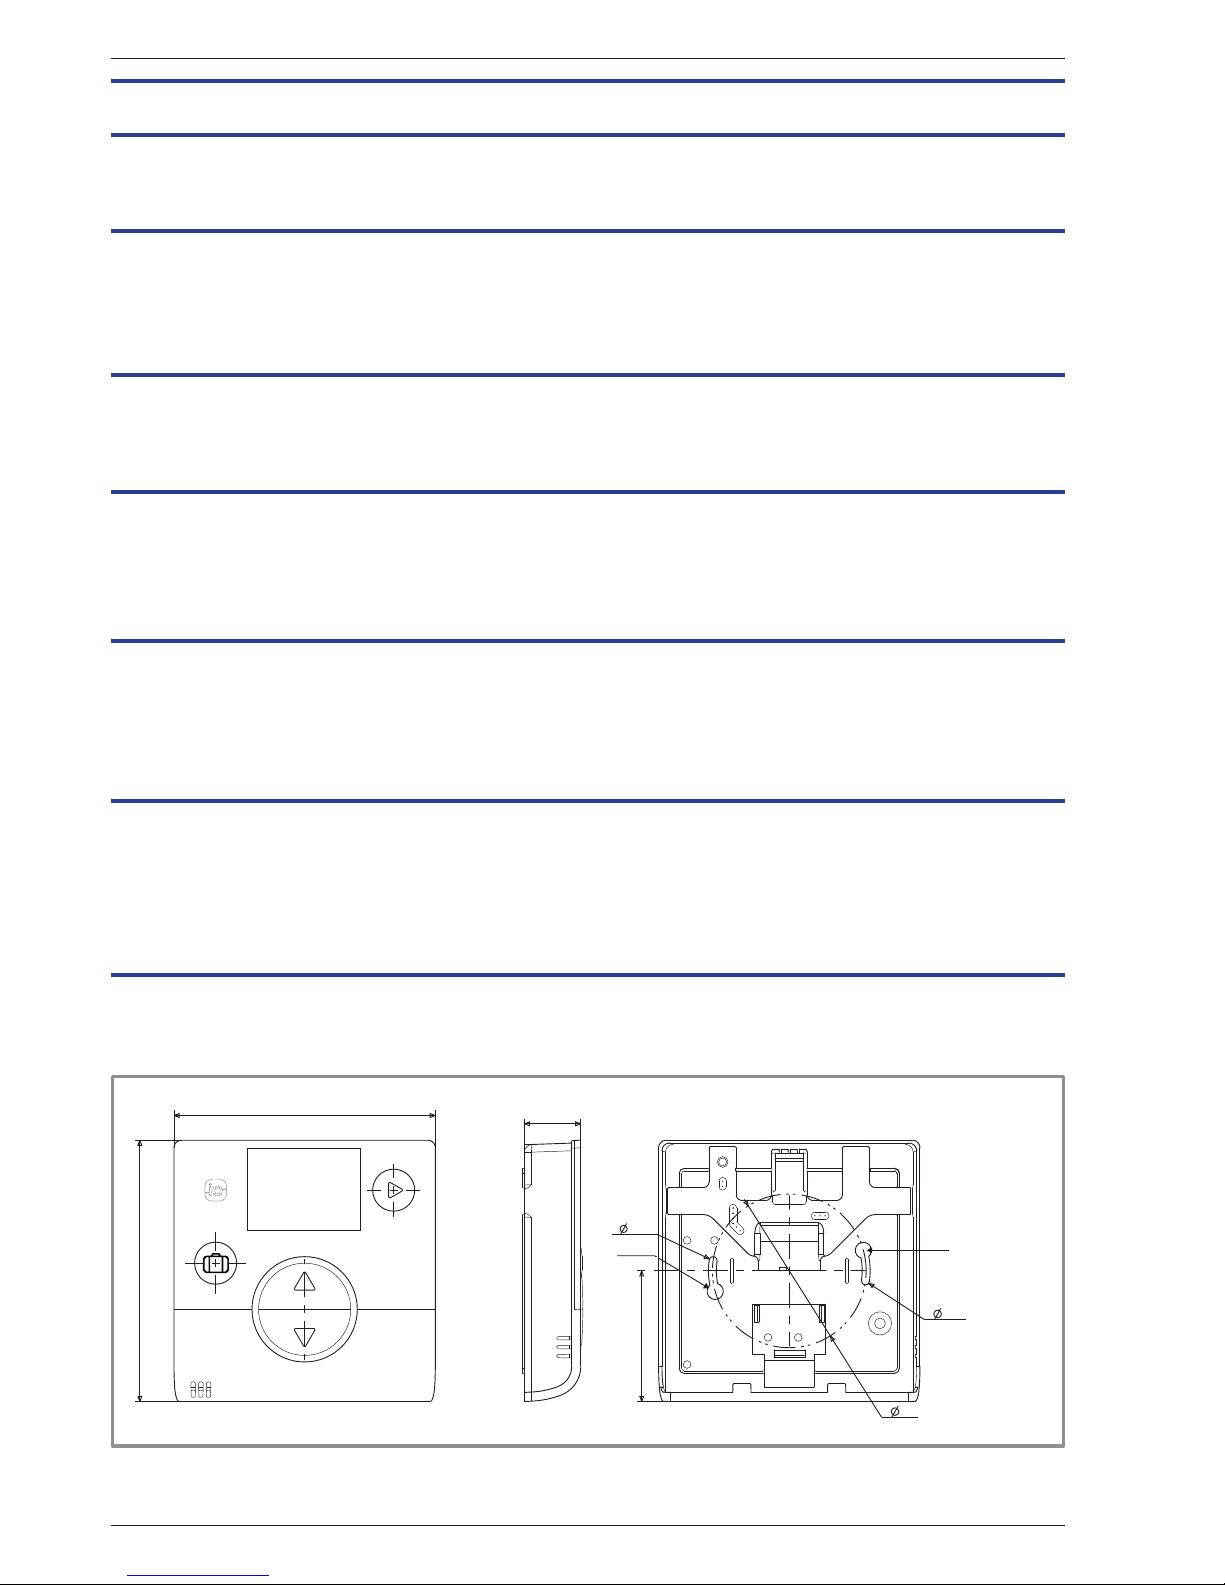
1 Description of the equipment
1.1 General characteristics
Frequency: 868 MHz. Radiofrequency output: 5 mW maximum.
gure 1 - Dimensions in mm
102
102
22
(51)
Trou de
fixation vis
(
)3.1
( )60
( )3.1
Trou de fixation
vis
Contents
Description of the equipment . . . . . . . . . . . . . . . . . . . . . . . . . . 2
General characteristics . . . . . . . . . . . . . . . .2 Display Description . . . . . . . . . . . . . . . . . .3
Assembly and connections . . . . . . . . . . . . . . . . . . . . . . . . . . . 4
Installation . . . . . . . . . . . . . . . . . . . . . . . 4
Opening the sensor . . . . . . . . . . . . . . . . . . 4
Using the sensor with batteries . . . . . . . . . . . . 4
Using the sensor with mains power . . . . . . . . . . 5
Attaching to a wall . . . . . . . . . . . . . . . . . . . 5
WiFi connection . . . . . . . . . . . . . . . . . . . . . . . . . . . . . . . . .7
Room sensor pairing basics . . . . . . . . . . . . . . 7
Pairing a sensor with a HP / Boiler . . . . . . . . . .8
Pairing a 2nd sensor . . . . . . . . . . . . . . . . . 10
Installer Menu . . . . . . . . . . . . . . . . . . . . . . . . . . . . . . . . . 12
Calibration . . . . . . . . . . . . . . . . . . . . . . 13
Pairing a sensor . . . . . . . . . . . . . . . . . . . 14
Resetting . . . . . . . . . . . . . . . . . . . . . . 15
Sending an io-homecontrol® key . . . . . . . . . . 16
Receiving an io-homecontrol® key . . . . . . . . . 17
Version. . . . . . . . . . . . . . . . . . . . . . . . 18
How to Use . . . . . . . . . . . . . . . . . . . . . . . . . . . . . . . . . . . 20
screw hole
Mounting
Mounting
screw hole
Adjusting the setpoint via the Advanced Menu:
Manual mode . . . . . . . . . . . . . . . . . . . . 20
Adjusting the setpoint via the Simplied Menu:
Direct setpoint . . . . . . . . . . . . . . . . . . . . 20
Holiday mode . . . . . . . . . . . . . . . . . . . . 21
Error List . . . . . . . . . . . . . . . . . . . . . . . . . . . . . . . . . . . . 22
Page 3
Reference guide "1846- EN" - 3 -
Navilink A59 Intelligent Room Temperature Controller
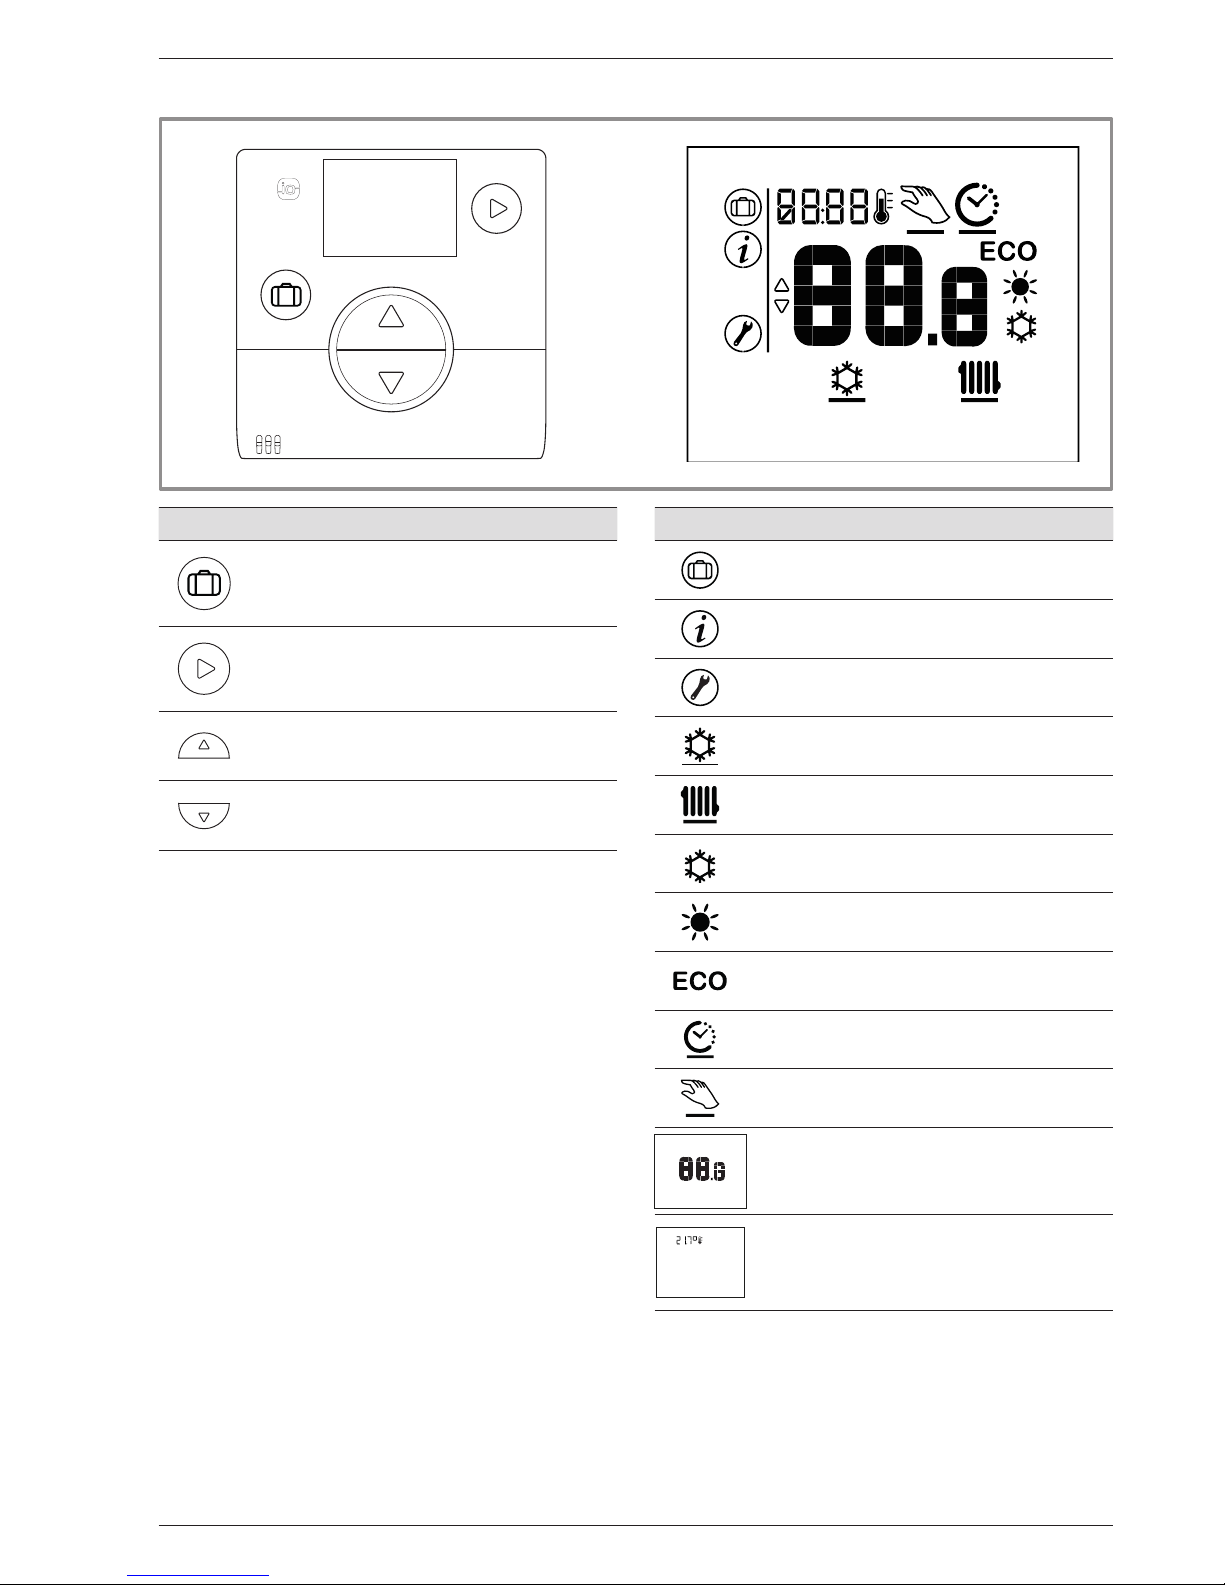
Features
• Holiday mode
• Navigation
• Changing mode
(OFF, Heating, Cooling)
• Increase the setpoint
• Go to next screen
• Reduce the setpoint
• Back to previous screen
1.2 Display Description
Symbols Denitions
• Holiday mode activated
• Information
• Installer menu
• Cooling mode*
• Heating mode
• Comfort mode Cooling activated*
• Comfort mode Heating activated
• ECO mode Heating/Cooling activated
• Timer programming mode
• Manual mode
• Setpoint value
• Screensaver / Ambient temperature
* If installation allows
Page 4
Reference guide "1846- EN"
Navilink A59 Intelligent Room Temperature Controller
- 4 -
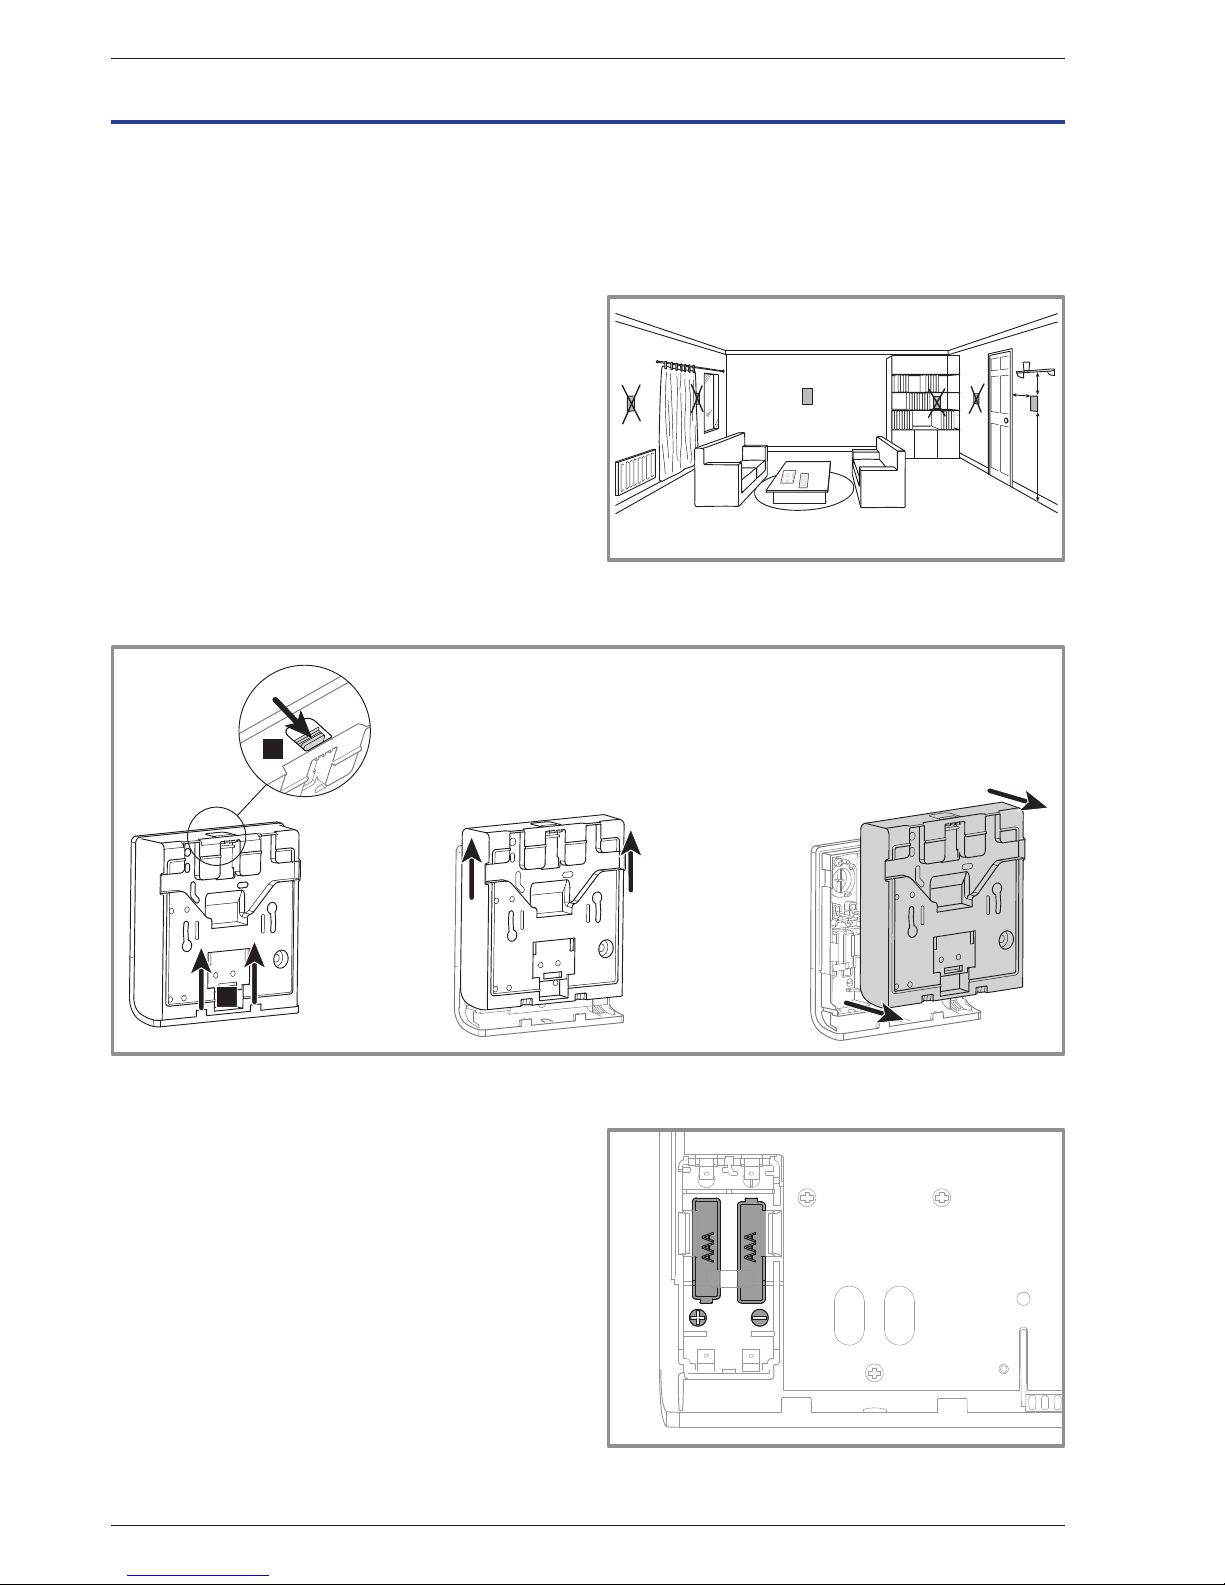
2.1 Installation
The sensor must be installed in the living room area
on an unobstructed wall. It must be installed so as to
be easily accessible. Choose a location with the fewest
possible obstacles to good transmission. Comply with
the following points:
• Avoid proximity to electrical cables, strong magnetic
elds or devices such as computers, televisions or
microwave ovens, etc.
• Avoid any zones of interference caused by large
metallic objects or buildings containing ne metallic
mesh or reinforcing (e.g. glass or special concrete).
• The distance between the transmitter and the receiver
must not exceed 30 m or 2 storeys.
• Do not install the appliance inside a metal casing
(e.g. heat pump).
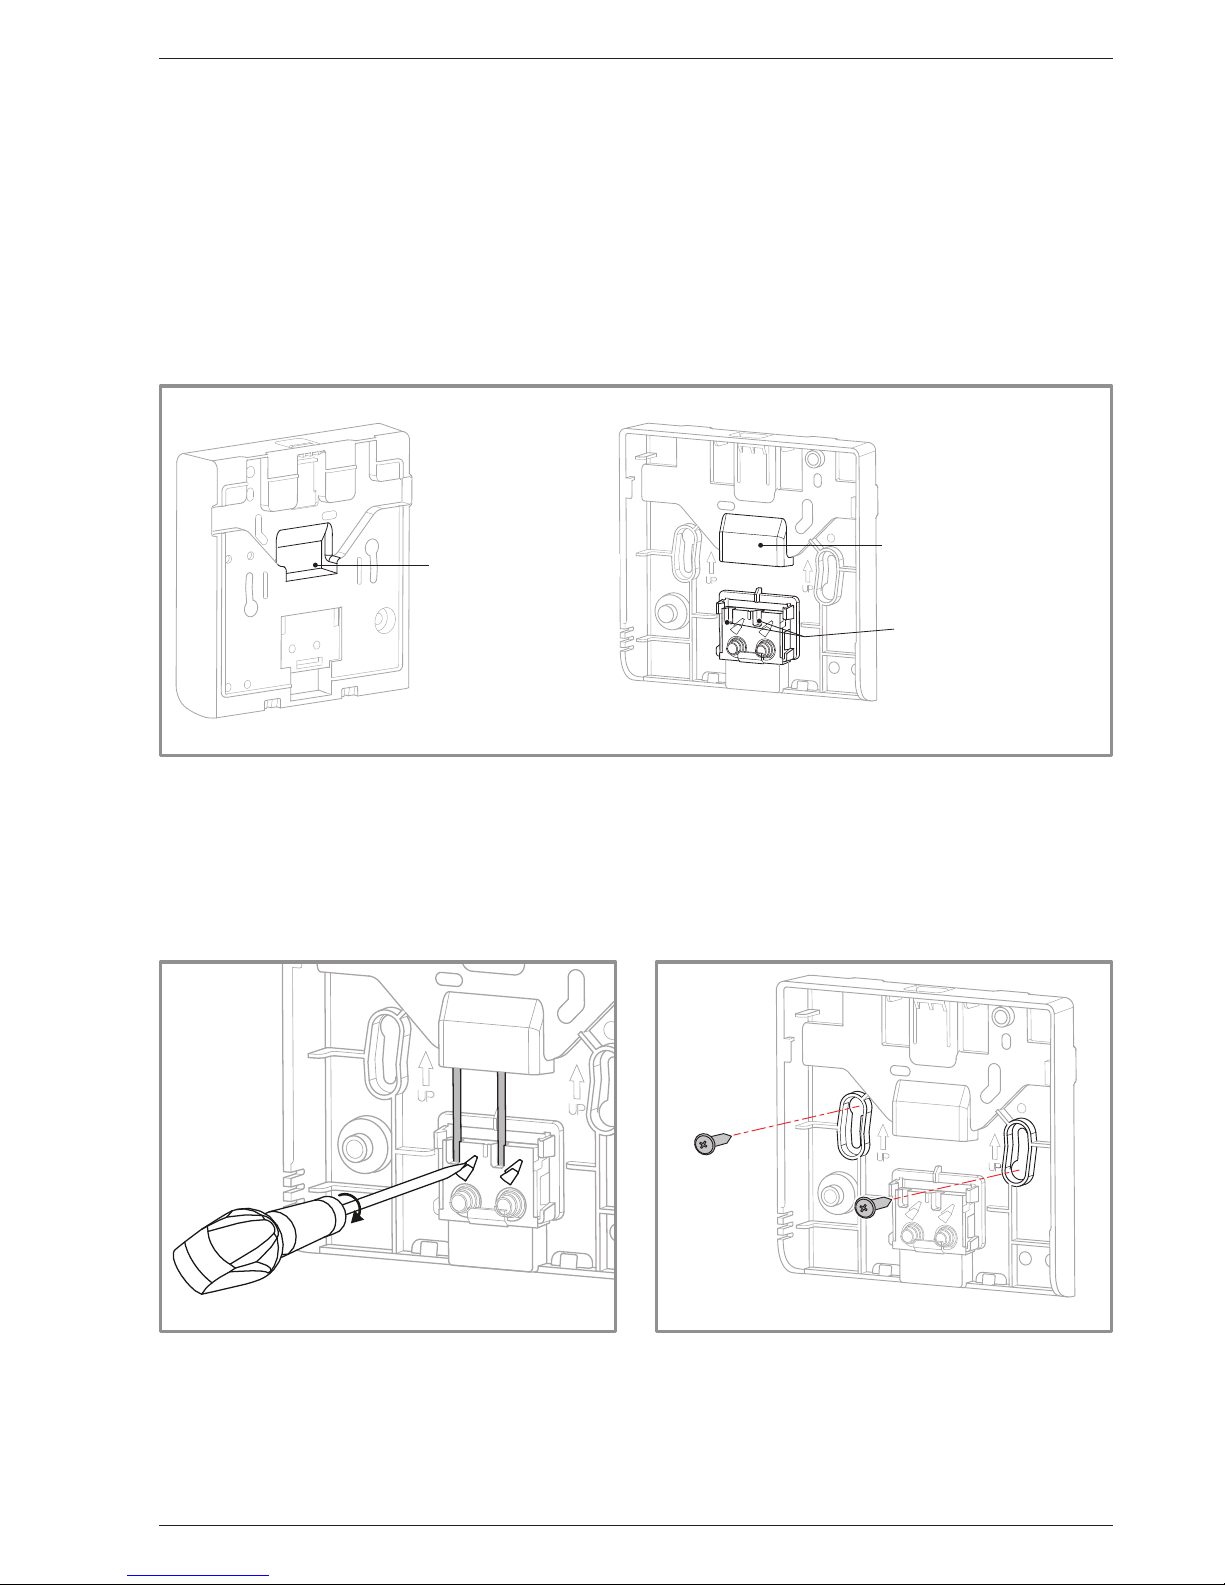
2.2 Opening the sensor
2 Assembly and connections
Clément TAVERNIER
Notices Atlantic
B : 20 cm miniA : 10 cm C : 150 cm
C
B
A
• Avoid direct sources of heat (chimney, television,
cooking surfaces, sun) and draughty areas (ventilation,
door, etc.).
gure 2 - Opening the sensor
A
B
2.3 Using the sensor with batteries
2 AAA LR03 batteries (supplied).
Maintain polarity.
" Do not connect the wires.
gure 3 - Battery-operated sensor
min.
Page 5
Reference guide "1846- EN" - 5 -
Navilink A59 Intelligent Room Temperature Controller
2.4 Using the sensor with mains power
Power rating 12-24V DC.
Type of cable to be used: 0.5 to 1.5 mm
2
rigid or 0.5 to 0.75 mm2 exible with rigid end.
" Do not use batteries.
2.4.1 Cable connection
1. Bare the end of the wires to around 10 mm.
2. Insert the cable ends into the connection terminals ("Push-in" connectors).
gure 4 - Cable connection
Passage des fils
Bornes de connexion
Passage des fils
gure 5 - Cable disconnection gure 6 - Attaching to a wall
2.4.2 Cable disconnection
Use a at-blade screwdriver.
Rotate the small metal plate while pulling on the cable.
2.5 Attaching to a wall
Attach the sensor's rear plate using the screws
(not supplied).
Connection terminals
Cable route
Cable route
Page 6

Reference guide "1846- EN"
Navilink A59 Intelligent Room Temperature Controller
- 6 -
Page 7
Reference guide "1846- EN" - 7 -
Navilink A59 Intelligent Room Temperature Controller
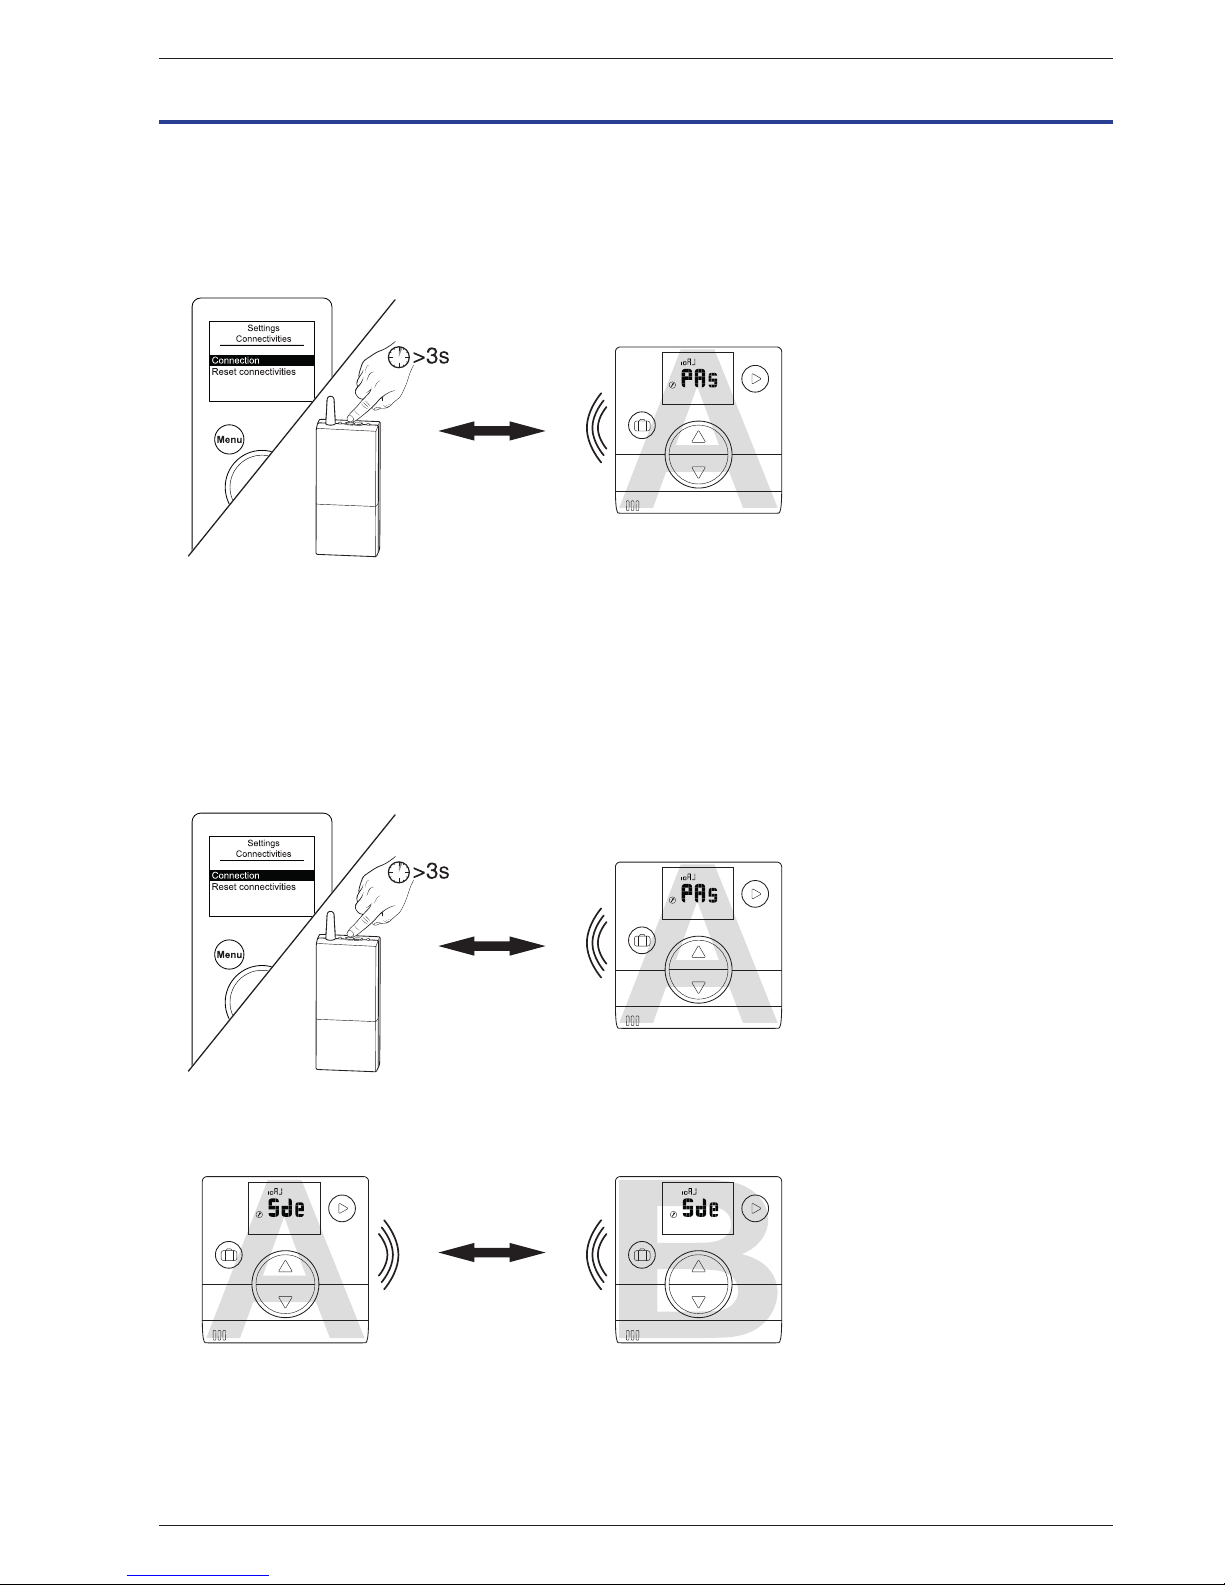
3 WiFi connection
3.1 Room sensor pairing basics
• HP / Boiler --> 1 room sensor
Pair the sensor with the HP / Boiler.
ALFEA
NAIA / NAEMA
• HP / Boiler --> 2 room sensors
Pair the 1st sensor with the HP / Boiler.
ALFEA
NAIA / NAEMA
Pair the 2nd sensor with the 1st sensor.
U0601155-A
ALFEA
NAIA / NAEMA
" To pair two devices (HP / Boiler - Sensor or Sensor - Sensor), both devices must be in pairing mode.
Page 8
Reference guide "1846- EN"
Navilink A59 Intelligent Room Temperature Controller
- 8 -
A
A
A
A
A
A
A
A
A
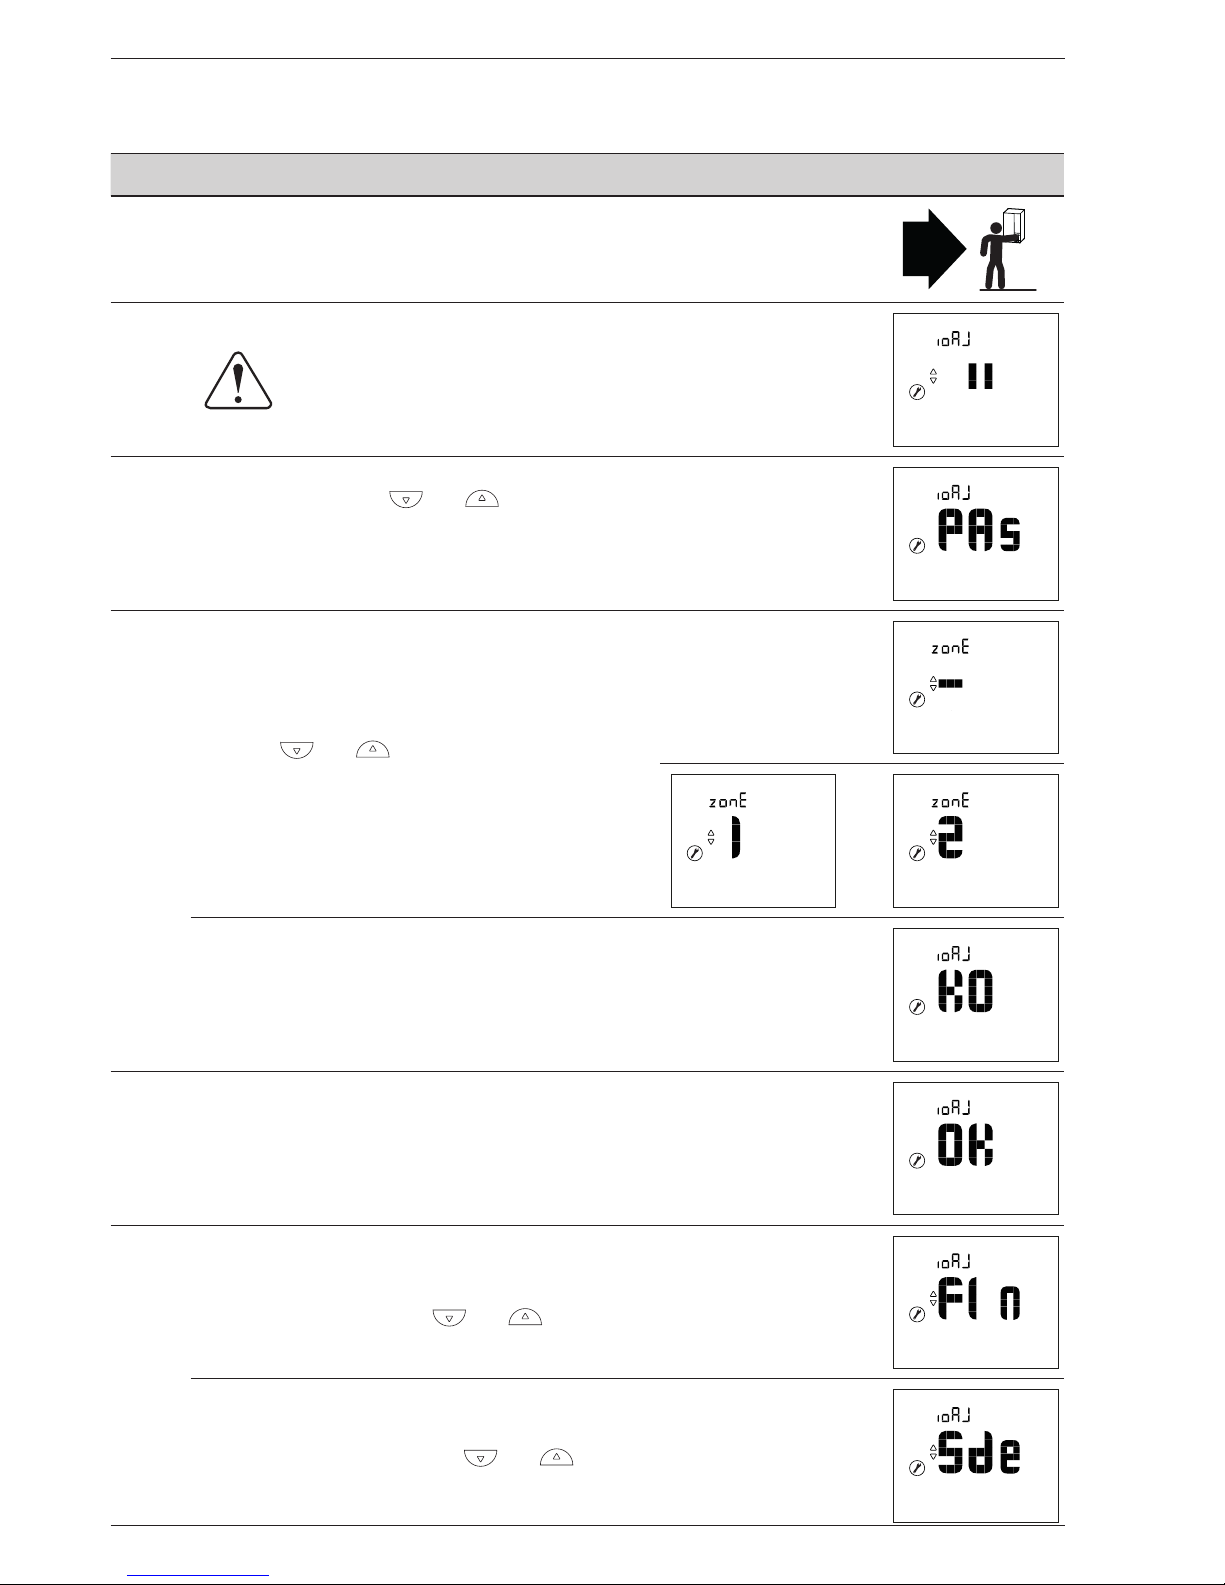
3.2 Pairing a sensor with a HP / Boiler
3.2.1 Pairing a 1st sensor with a HP / Boiler
Action Description Display
1
On the boiler or heat pump, start the pairing procedure.
Please refer to the instructions supplied with the product.
2
Default display when sensor is rst commissioned.
3
Select "PAs" using the and buttons.
Wait 5 seconds.
"PAs" ashes. The sensor waits for pairing for 10 minutes.
4
Select the sensor's zone number
using the and buttons.
Wait 5 seconds.
or
Pairing failed.
Restart the procedure from step 2.
5 Pairing was successful.
6
If only one sensor is to be paired
Select "FIn" (end) using the and buttons.
If a 2nd sensor is to be paired
Select "Sde" (sensor) using the and buttons.
"Sde" ashes. The sensor waits for pairing for 10 minutes.
Page 9

Reference guide "1846- EN" - 9 -
Navilink A59 Intelligent Room Temperature Controller
B
B
B
B
B
B
B
B
3.2.2 Pairing a 2nd sensor
Action Description Display
1
Start the pairing procedure on the 1st sensor.
Use the following procedure to pair the 2nd sensor.
2
Default display when sensor is rst commissioned.
3
Select "Sde" (sensor) using the and buttons.
Wait 5 seconds.
"Sde" ashes. The sensor waits for pairing for 10 minutes.
4
Select the sensor's zone number
using the and buttons.
Wait 5 seconds.
or
Pairing failed.
Restart the procedure from step 2.
5 Pairing was successful.
6
Go back to the main screen using the button.
In the event of a failure, restart the procedure from the
beginning.
Page 10

Reference guide "1846- EN"
Navilink A59 Intelligent Room Temperature Controller
- 10 -
A
A
A
A
A
A
A
B
3.3 Pairing a 2nd sensor
The installation includes a 1st working sensor.
3.3.1 Procedure for pairing with a 1st sensor
Action Description Display
1
Access the Installer Menu by pressing and simultaneously.
2
Select "ioAJ" using the button.
3
Select "oui" (Yes) using the and buttons.
Wait 5 seconds.
4
"Sde" (sensor) ashes. The sensor waits for pairing for 10 minutes.
5
Start the pairing procedure on the 2nd sensor ("Pairing a 2nd sensor", page 11).
6
Pairing was successful.
Pairing failed.
7
Select "FIn" (end) using the and buttons.
Page 11

Reference guide "1846- EN" - 11 -
Navilink A59 Intelligent Room Temperature Controller
B
B
B
B
B
B
B
B
3.3.2 Pairing a 2nd sensor
Action Description Display
1
Start the pairing procedure on the 1st sensor.
Use the following procedure to pair the 2nd sensor.
2
Default display when sensor is rst commissioned.
3
Select "Sde" (sensor) using the and buttons.
Wait 5 seconds.
"Sde" ashes. The sensor waits for pairing for 10 minutes.
4
Select the sensor's zone number
using the and buttons.
Wait 5 seconds.
or
Pairing failed.
Restart the procedure from step 2.
5 Pairing was successful.
6
Go back to the main screen using the button.
In the event of a failure, restart the procedure from the
beginning.
Page 12

Reference guide "1846- EN"
Navilink A59 Intelligent Room Temperature Controller
- 12 -
4 Installer Menu
Access the Installer Menu by pressing and simultaneously.
When the Installer Menu is active, the symbol appears.
Quit the Installer Menu by pressing and simultaneously.
+
+
+
page 13 page 14 page 15 page 16 page 17 page 18
Calibration Pairing Resetting Send key Receive key Version
5 secs. 5 secs. 5 secs. 5 secs. 5 secs.
failed
failed
failed
10 mins.
max.
10 mins.
max.
10 mins.
max.
Page 13

Reference guide "1846- EN" - 13 -
Navilink A59 Intelligent Room Temperature Controller
4.1 Calibration
Action Description Display
1
Access the Installer Menu by pressing and simultaneously.
2
Select "EtAI" (calibration) using the button.
3
Adjust the temperature using the and buttons.
Wait 5 seconds.
4
The sensor is calibrated.
5
Quit the Installer Menu by pressing and simultaneously.
Page 14

Reference guide "1846- EN"
Navilink A59 Intelligent Room Temperature Controller
- 14 -
4.2 Pairing a sensor
Action Description Display
1
Access the Installer Menu by pressing and simultaneously.
2
Select "ioAJ" using the button.
3
Select "oui" (yes) using the and buttons.
Wait 5 seconds.
4
"Sde" (sensor) ashes. The sensor waits for pairing for 10 minutes.
5
Pairing was successful.
Pairing failed.
6
Go back to the main screen using the button.
In the event of a failure, restart the procedure from the beginning.
Page 15

Reference guide "1846- EN" - 15 -
Navilink A59 Intelligent Room Temperature Controller
4.3 Resetting
Action Description Display
1
Access the Installer Menu by pressing and simultaneously.
2
Select "init" (reset) using the button.
3
Select "oui" (yes) using the and buttons.
Wait 5 seconds.
5 The sensor is reset.
Page 16

Reference guide "1846- EN"
Navilink A59 Intelligent Room Temperature Controller
- 16 -
• ADVANCED PARAMETERS - HOME AUTOMATION OPTIONS
Security key:
The io-homecontrol® WiFi protocol has built-in security to avoid interfering with nearby equipment.
Where various io-homecontrol® devices are used, the rst installed device will generate a
unique "security key" for all devices in the house. Existing equipment must share this security key with the
equipment to be added.
This section is reserved for competent users of io-homecontrol® technology and oers various services
covered by this key.
Please refer to the section on pairing io-homecontrol® devices.
4.4 Sending an io-homecontrol® key
Action Description Display
1
Access the Installer Menu by pressing and simultaneously.
2
Select "ioEn" using the button.
3
Select "oui" (yes) using the and buttons.
Wait 5 seconds.
4
The io-homecontrol® key send sequence starts.
5
The io-homecontrol® key was sent successfully.
The io-homecontrol® key was not sent.
6
Go back to the main screen using the button.
In the event of a failure, restart the procedure from the beginning.
Page 17

Reference guide "1846- EN" - 17 -
Navilink A59 Intelligent Room Temperature Controller
4.5 Receiving an io-homecontrol® key
Action Description Display
1
Access the Installer Menu by pressing and simultaneously.
2
Select "iorE" using the button.
3
Select "oui" (yes) using the and buttons.
Wait 5 seconds.
4
The io-homecontrol® key receive sequence starts.
5
The io-homecontrol® key was received successfully.
The io-homecontrol® key was not received.
6
Go back to the main screen using the button.
In the event of a failure, restart the procedure from the beginning.
Page 18

Reference guide "1846- EN"
Navilink A59 Intelligent Room Temperature Controller
- 18 -
4.6 Version
Action Description Display
1
Access the Installer Menu by pressing and simultaneously.
2
Access the "Version" screen using the button.
3
Quit the Installer Menu by pressing and simultaneously.
Page 19

Reference guide "1846- EN" - 19 -
Navilink A59 Intelligent Room Temperature Controller
Page 20

Reference guide "1846- EN"
Navilink A59 Intelligent Room Temperature Controller
- 20 -
5 How to Use
5.1 Adjusting the setpoint via the Advanced Menu: Manual mode
" The exemption allows you to change the setpoint for a period of 24 hours.
Action Description Display
1
Press or .
2
The setpoint ashes.
Adjust the setpoint using the and buttons.
3
Once the setpoint has been selected, wait 5 seconds.
It stops ashing.
The setpoint is changed for a period of 24 hours.
At the end of the exemption period, it returns to the original state and the "hand"
symbol disappears.
5.2 Adjusting the setpoint via the Simplied Menu: Direct setpoint
Action Description Display
1
Press or .
2
The setpoint ashes.
Adjust the setpoint using the and buttons.
3
Once the setpoint has been selected, wait 5 seconds.
It stops ashing.
The setpoint was changed.
Page 21

Reference guide "1846- EN" - 21 -
Navilink A59 Intelligent Room Temperature Controller
5.3 Holiday mode
Action Description Display
1
Press the button.
2
Set the number of days for the holiday period using the and buttons.
3
Wait 5 seconds.
" The number of days remaining is displayed during the holiday period.
" Press the button again to cancel Holiday mode.
Page 22

Reference guide "1846- EN"
Navilink A59 Intelligent Room Temperature Controller
- 22 -
6 Error List
N° Error description Actions
Battery fault if charge <10% Replace the batteries
Temperature sensor fault
Contact your installer
Open circuit
Value below lower limit
Value above upper limit
Short-circuit
WiFi malfunction (if no WiFi signal for more than
16 minutes)
Button malfunction (if button problem detected for
more than 20 seconds)
Check that no buttons are stuck in the depressed
position
Page 23

Reference guide "1846- EN" - 23 -
Navilink A59 Intelligent Room Temperature Controller
Page 24

Commissioning date:
Contact details of your heating engineer or After Sales service.
This appliance is marked with this symbol. It means that all electrical and electronic products must be strictly separated from household waste.
A specic recovery system for this type of product is in place in the countries of the European Union (*), Norway, Iceland and Liechtenstein.
Do not attempt to dismantle this product yourself. This can have adverse eects on your health and on the environment.
Refrigerant liquid, oil and other parts must be reprocessed by a qualied installer in accordance with applicable local and national laws.
In terms of recycling, this appliance must be processed by a specialised service and must not, under any circumstances, be thrown out with household waste, bulky waste or at
a tip.
Please contact your heating engineer or After Sales service for further information.
* Depending on the national regulations of each member state.
The equipment may be modied without prior notice - Non-contractual document
atlantic-comfort.com
Société Industrielle de Chauage
SATC - BP 64 - 59660 MERVILLE - FRANCE
RC Dunkerque - Siren 440 555 886
This equipment complies with:
- Low Voltage Directive 2006/95/EC in accordance with EN 60335-1,
- Electromagnetic Compatibility Directive 2004/108/EC
 Loading...