

Atid Si203 User Manual
Si203 User’s Guide
ATID Co., Ltd.

2
Disclaimer
ATID is registered trade mark of ATID Co., Ltd.
is registered trade mark of ATID Co., Ltd.
All other trademarks and trade names referred to herein are property of their respective
owners.
Microsoft Windows®, Windows® 2000, Windows® CE .NET, Windows® NT, and Windows®
XP are registered trademarks of Microsoft Corporation.
ATID Co., Ltd.
#1205, Byuksan/Gyungln Digital Valley II, #481-10,
Gasan-Dong, Gumchon-Gu, Seoul, Korea
Tel: +82-2-544-1436
Fax: +82-2-2113-0040
www.atid1.com
Si203User’s Guide

3
Table of Contents
Copyright and Agreement ............................................................................................................... 5
Chapter1. Caution when using ....................................................................................................... 6
1. How to use the battery correctly ................................................................................................. 6
2. Caution when using .................................................................................................................... 6
Chapter2. Products compositions ................................................................................................... 7
1. Package components ................................................................................................................. 7
2. Name of Each Part ..................................................................................................................... 8
3. Function of Each Part ................................................................................................................. 9
Chapter3. Basic Functions ........................................................................................................... 10
1. Power and Battery .................................................................................................................... 10
1.1 Switch On Backup Battery .......................................................................................... 10
1.2 Detaching and Attaching Main Battery......................................................................... 11
1.3 Charging..................................................................................................................... 12
1.4 Power On and Off ....................................................................................................... 12
1.5 Checking Battery Gauge ............................................................................................. 14
1.6 Backup Battery ........................................................................................................... 15
1.7 Dispose of Battery ...................................................................................................... 15
2. System Reset........................................................................................................................... 16
2.1 Soft Reset ................................................................................................................ 16
2.2 Hard Reset ................................................................................................................. 16
2.3 Initializing System ....................................................................................................... 17
3. Using Micro SD, SIM, SAM Card .............................................................................................. 19
3.1 Installing Micro SD .......................................................................................................... 19
3.2 Installing SIM Card and SAM Card .................................................................................. 20
4. System Settings ....................................................................................................................... 21
4.1 Setting Brightness ...................................................................................................... 21
4.2 Screen Calibration ...................................................................................................... 21
4.3 Setting Volume and Sounds ........................................................................................ 22
4.4 Setting Data and Time ................................................................................................ 22
5. Using keypad ........................................................................................................................... 24
5.1 Using keypad .............................................................................................................. 24
5.2 Inputting Data ............................................................................................................. 24
5.3 Using <Fun> Button .................................................................................................... 25
6. Using stylus ............................................................................................................................. 25
7. Using ActiveSync Program ....................................................................................................... 26
7.1 Installing Microsoft ActiveSync Program ...................................................................... 26
7.2 Connecting PC to PDA ............................................................................................... 27
7.3 Transmitting Data ....................................................................................................... 28
8. Firmware Upgrade ................................................................................................................... 30
Chapter4. Optional Module .......................................................................................................... 31
1. Using 1D or 2D Barcode Scanner ............................................................................................. 32
1.1 Scanning Barcode ........................................................................................................... 32
1.2 Setting Barcode Emulator ................................................................................................ 32
1.3 Setting Barcode Symbology ............................................................................................ 35
1.4 Barcode Scanning Beam Position ................................................................................... 36
Si203사용자 설명서

4
2. Using Wireless LAN ................................................................................................................. 38
2.1 Connecting to Wlan ......................................................................................................... 38
2.2 Setting Wlan Manually ..................................................................................................... 38
2.3 Checking WLAN Information ........................................................................................... 39
3. Using Bluetooth ........................................................................................................................ 40
3.1 Bluetooth Beginning and Closing ..................................................................................... 40
3.2 Bluetooth Pairing ............................................................................................................. 43
3.3 Bixolon SPP-R200 Printer Demo ..................................................................................... 46
4. Using GPS ............................................................................................................................... 48
4.1 Executing GPS Demo Program ....................................................................................... 48
5. Using Camera .......................................................................................................................... 49
5.1 Using Camera ................................................................................................................. 49
6. Using HF13.56MHz Reader ..................................................................................................... 50
6.1 Executing HF13.56 Demo Program ................................................................................. 50
6.2 Mifare Tag Window .......................................................................................................... 50
6.3 ISO15693 Tag Window .................................................................................................... 51
7. Using 900MHz RFID Tag Reader ............................................................................................. 52
7.1Executing RF900Demo Program ...................................................................................... 52
8. Using Modem ........................................................................................................................... 53
8.1 Modem ON/OFF .............................................................................................................. 53
8.2 Modem Resetting ............................................................................................................ 54
Chapter5. Appendix ..................................................................................................................... 56
Configuration ............................................................................................................................... 56
Si203User’s Guide

5
Copyright and Agreement
- This manual is subject to copyright protection along with all relevant rights.
- No part of this document or the procedures described therein can be copied, reproduced,
changed, translated or transmitted in any form or by any means without prior written
permission of ATID Co., Ltd. or its wholly owned subsidiaries.
- ATID reserves the right to change any contents of this manual at anytime without prior
notice.
- There are maybe some differences between the contents of this manual and the actual
behavior of product.
This manual is written for the person who is responsible for installing, configuring, and maintaining
the PDA. Read and follow all warnings and cautions in this document before you handle and operate
ATID equipment
Safety Information
Read and follow all warnings and cautions in this manual before you handle and operate ATID
equipment. If you do not follow the safety warnings and cautions, you might be seriously injured, and
the equipment and data are also might be damaged.
Warnings!
A warning requires you must pay attention to the operating procedures, practices,
conditions, and statements strictly, or might be injured seriously.
Cautions
A caution alerts you that you must be observe strictly when you operating procedure,
practicing, configuring, for preventing from damage and destruction of equipment, and loss
of data.
Note
A note provides you the information which you must needs while you using
Si203사용자 설명서

6
Chapter1. Caution when using
Before you handle and operate your device, Please read through and familiar with the contents
of this manual.
1. How to use the battery correctly
When you dropped the main body or battery in water, please do not put it on the stove or
heater for drying. Just keep it in natural temperature or contact with purchase place.
Please do not take the metal object to approach to the terminal of battery
If you do not use the battery for a long time after charging, please keep it at room
temperature.
According to the life of battery and the processing time of its using, the buffering time can
be shortened. In this case, please contact your dealer.
You have to charging the device with the provided adaptor from factory.
2. Caution when using
User careless or products repair might damage the stored data. Manufacture is not
responsible for this damage, so important data should be kept separately
If you has problem, do not try to repair or disassemble the product arbitrarily, please
contact customer service center.
Do not use your where have electromagnetic wave or the risk may occur such as hospital,
plane so on.
A high temperature or high humidity environment will causes trouble, Please note that.
Please do not using other sharp object to touch the screen, otherwise it might be get
damaged or not working properly.
Please be careful not to touch the metal paper cutting saw tooth, so as not to get injured
If smell odors, occurs smoke or noise during use product, immediately disconnect the
charger and off the power, then Please contact with customer service center
If you have any other questions during use, please contact the customer service center
Si203User’s Guide
7
Chapter2. Products compositions
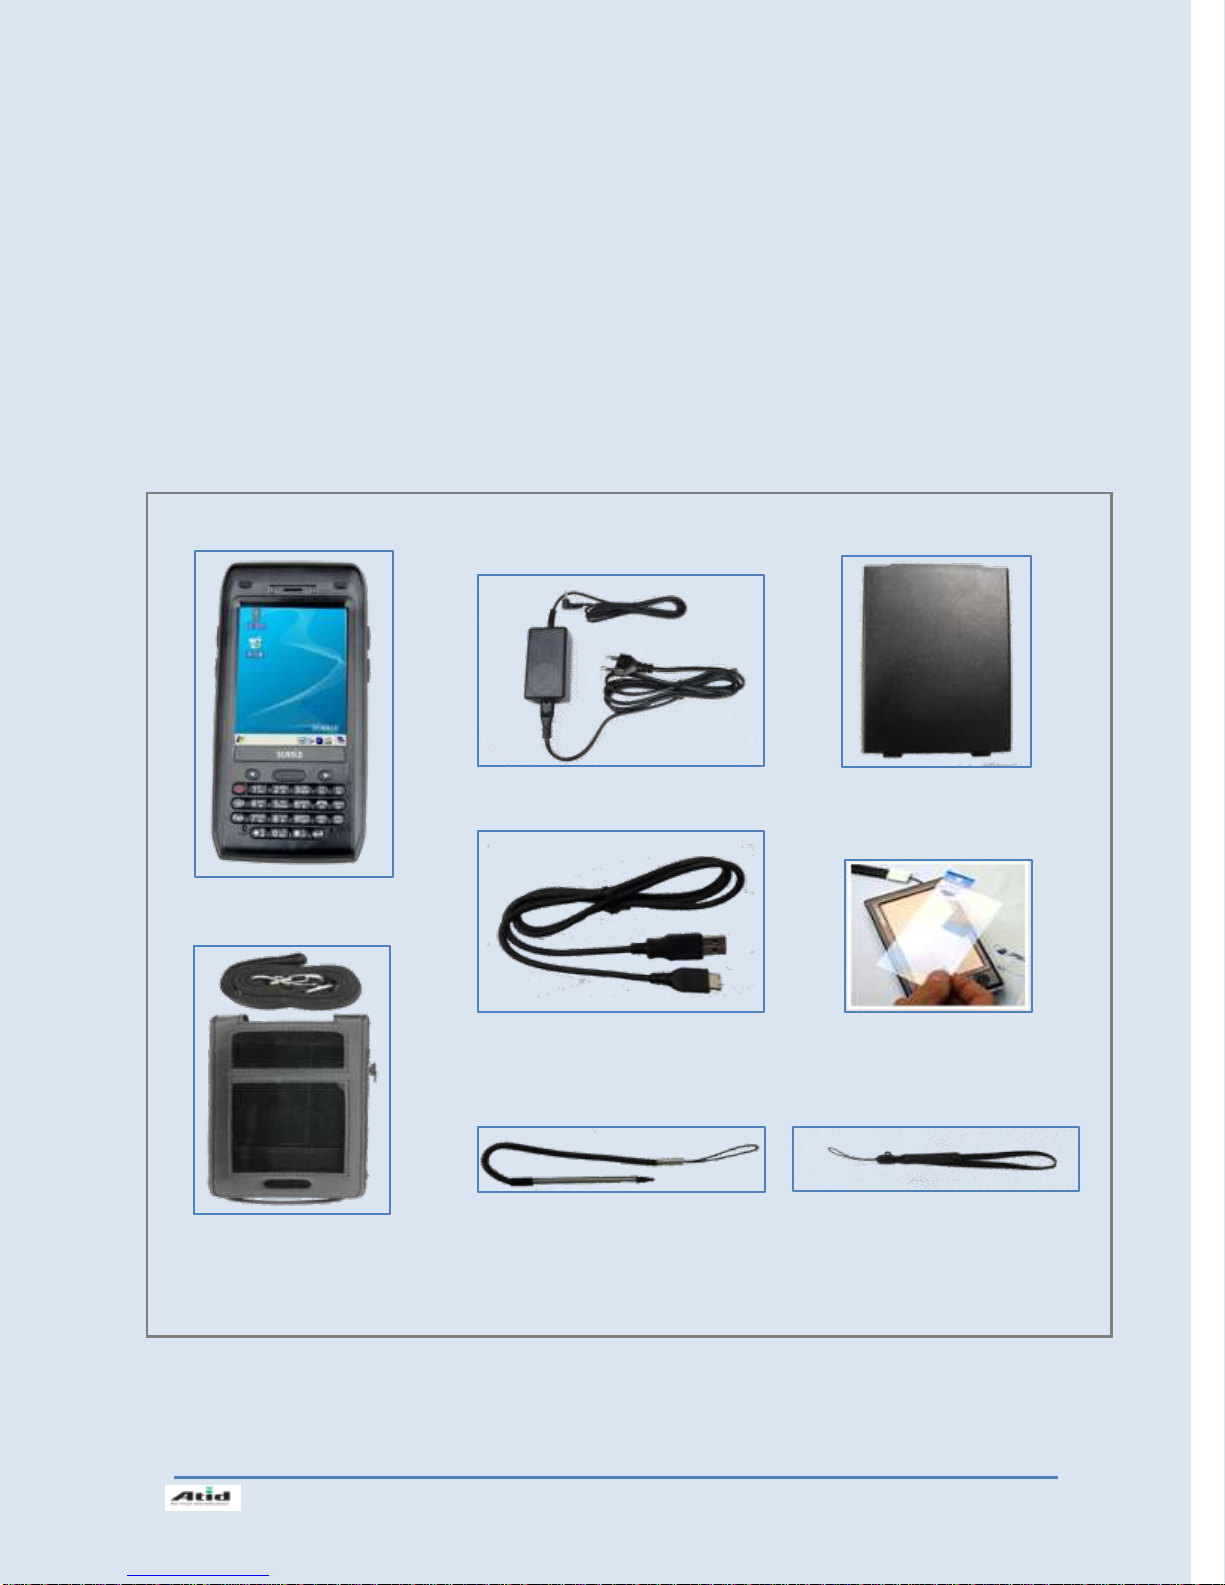
1. SI203 Body
2. Adaptor and AC Cable
3. Main Battery
5. USB Sync Cable
7. Stylus
8. Hand Strap
6. Protective Film
4. Leather Case
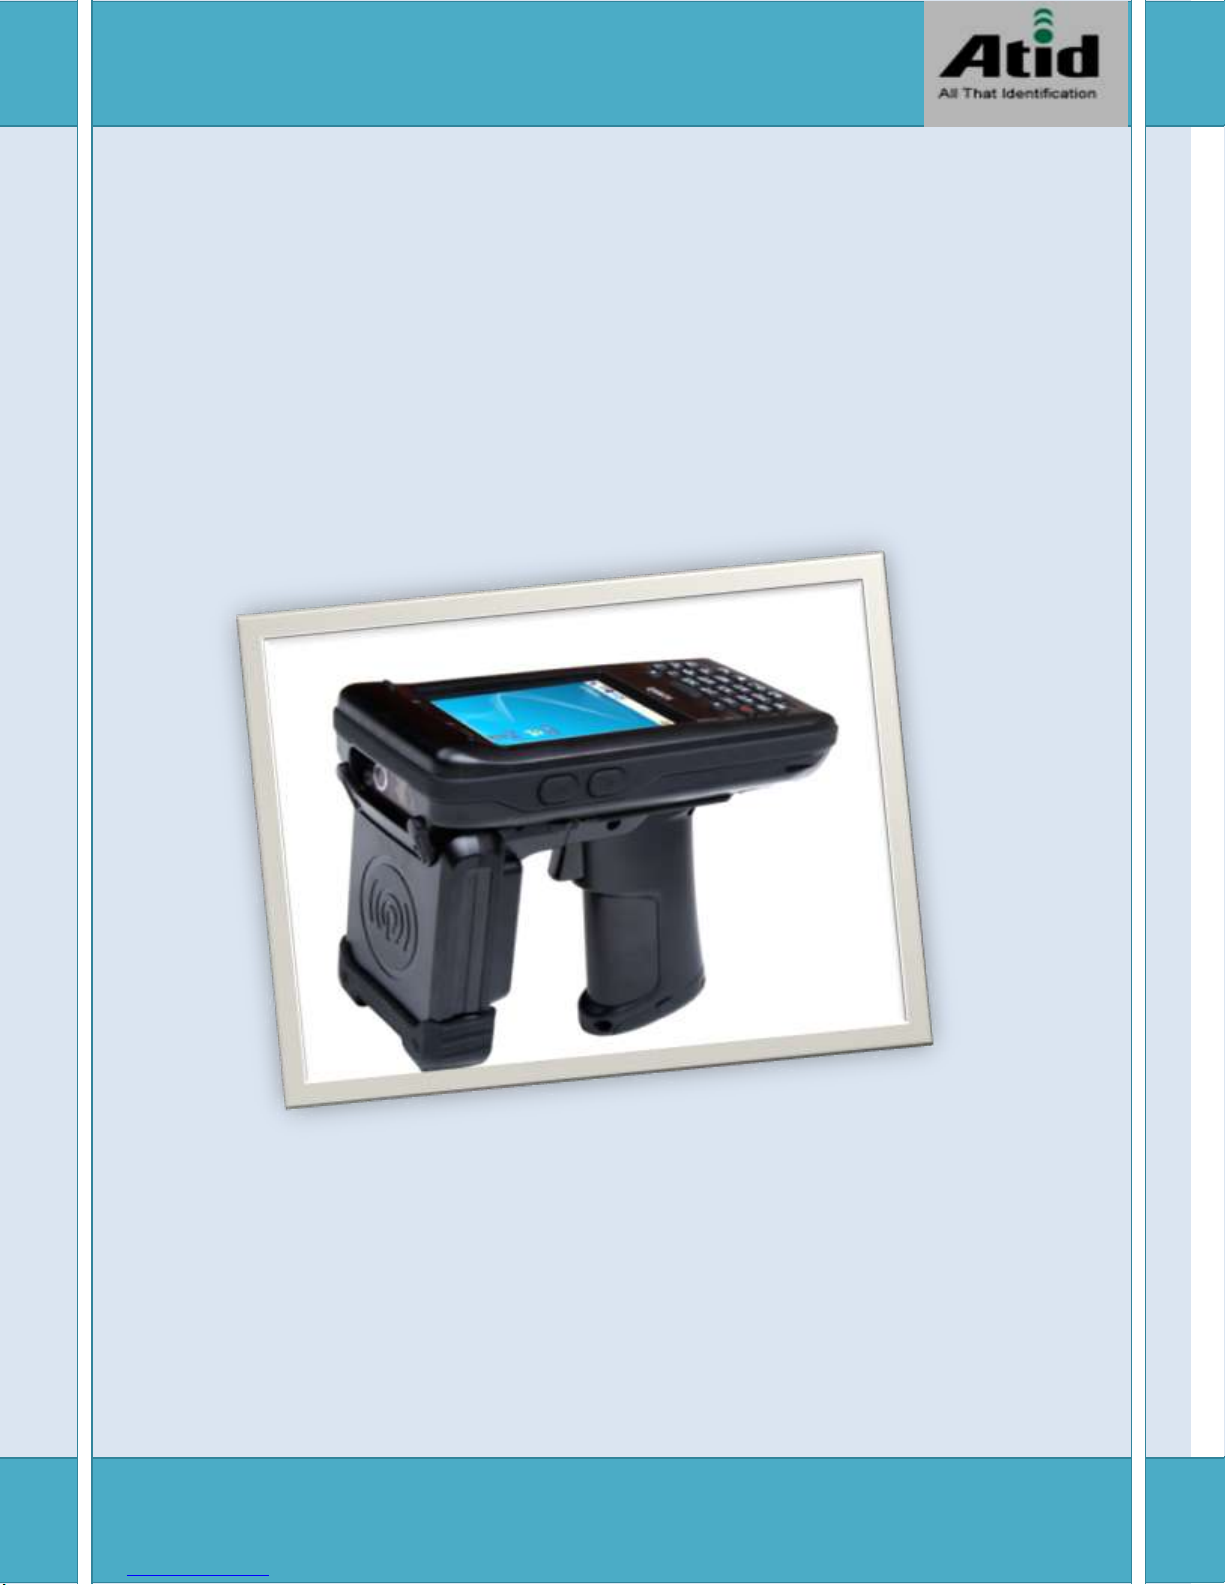
mobile computer is a small, ergonomically designed PDA, which built on the Microsoft window CE
5.0 Operating System. The PDA could equip with Barcode Scanner, RFID Tag Reader, MSR Card
Reader, Printer, Smart Card Reader, Wireless Modem, Camera and so on devices as optional items.
Its various function applied to Industry, Enterprise, Logistics and so on, can be used extensively in
many fields.
1. Package components
After opening the product packaging box, check the items listed as below:
*If there is missing or defective products on the above, please contact the customer support center or your place of purchase.
Si203사용자 설명서
8
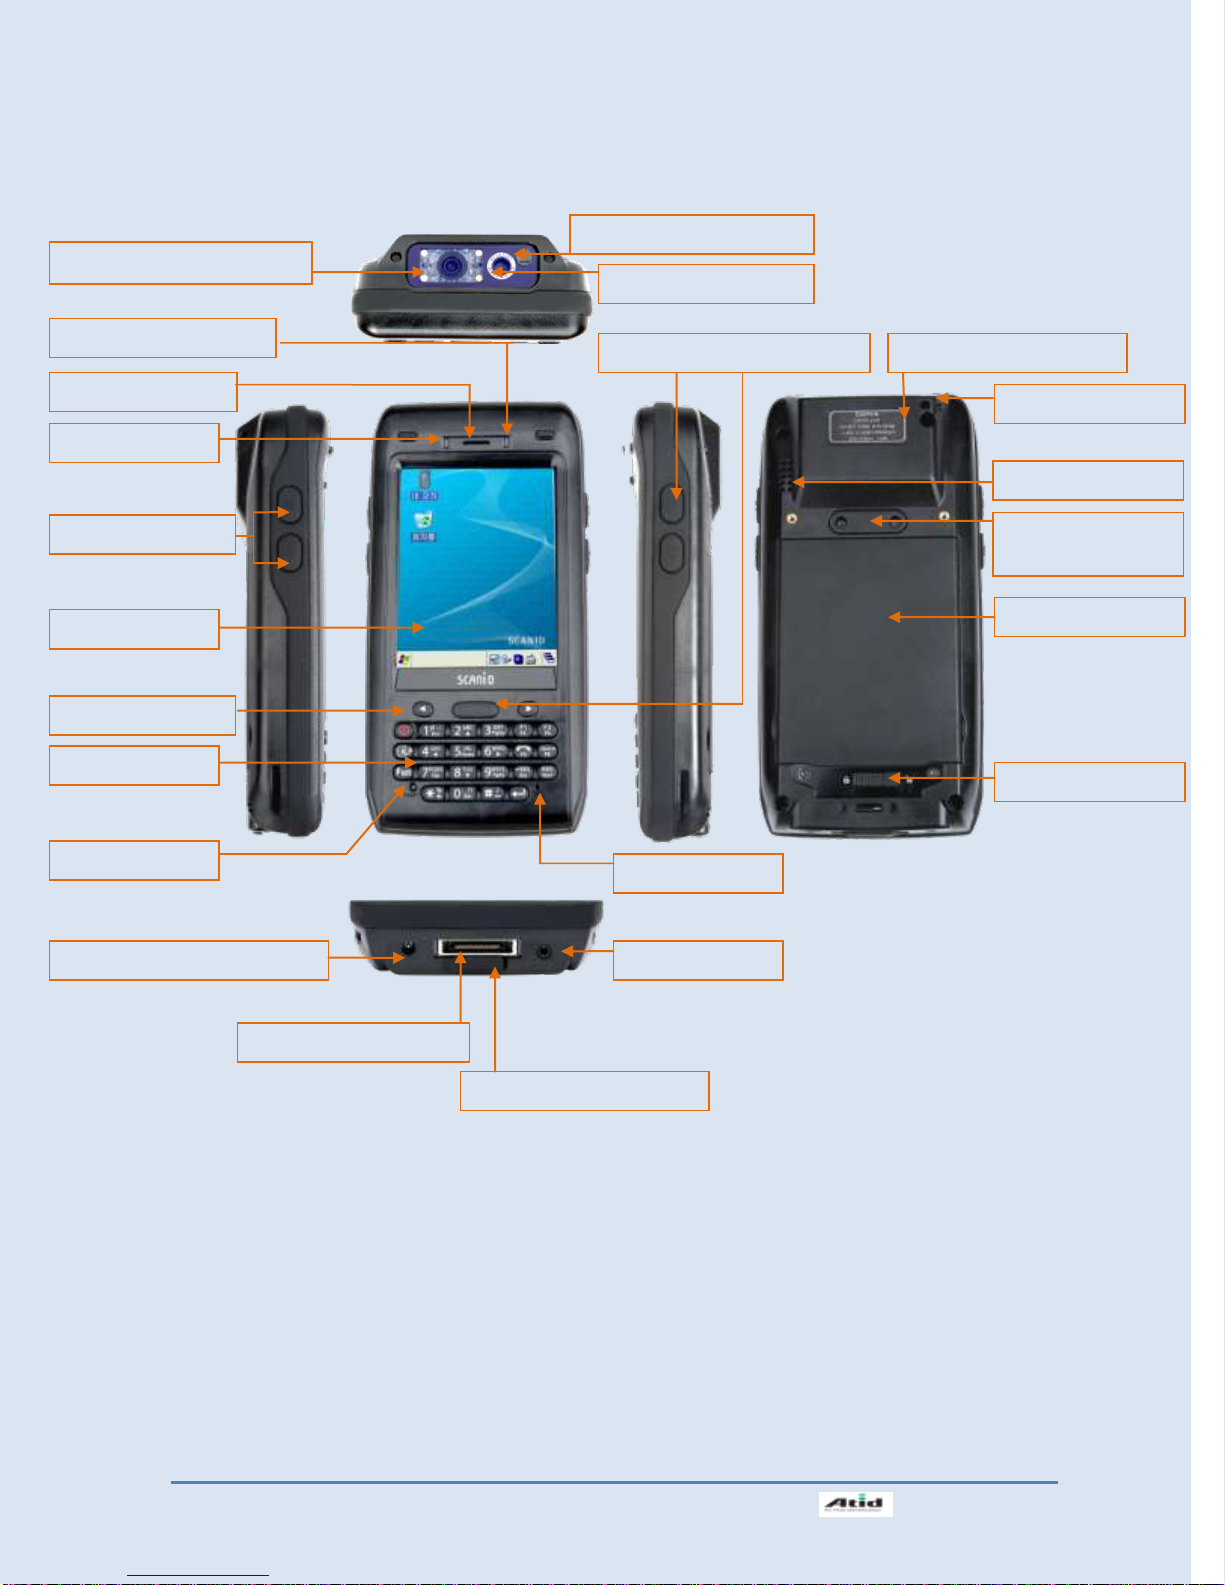
2. Name of Each Part
1D/2D Scanner Window
Camera (Option)
HF Build-in (Option)
Hand Strap Hole
Speaker
Main Battery
Battery Latch
Scan Button F8F7/F9
WLAN (Option) LED
Phone Receiver
Power LED
Volume Buttons
Touch Screen
Keypad
Reset Button
Microphone
Adaptor Connecting Jack
Earphone Jack
Cradle Connector
Sync Cable Connector
L/R Arrow Key
Camera Flash (Option)
UHF Connecting
Port
Si203User’s Guide
9
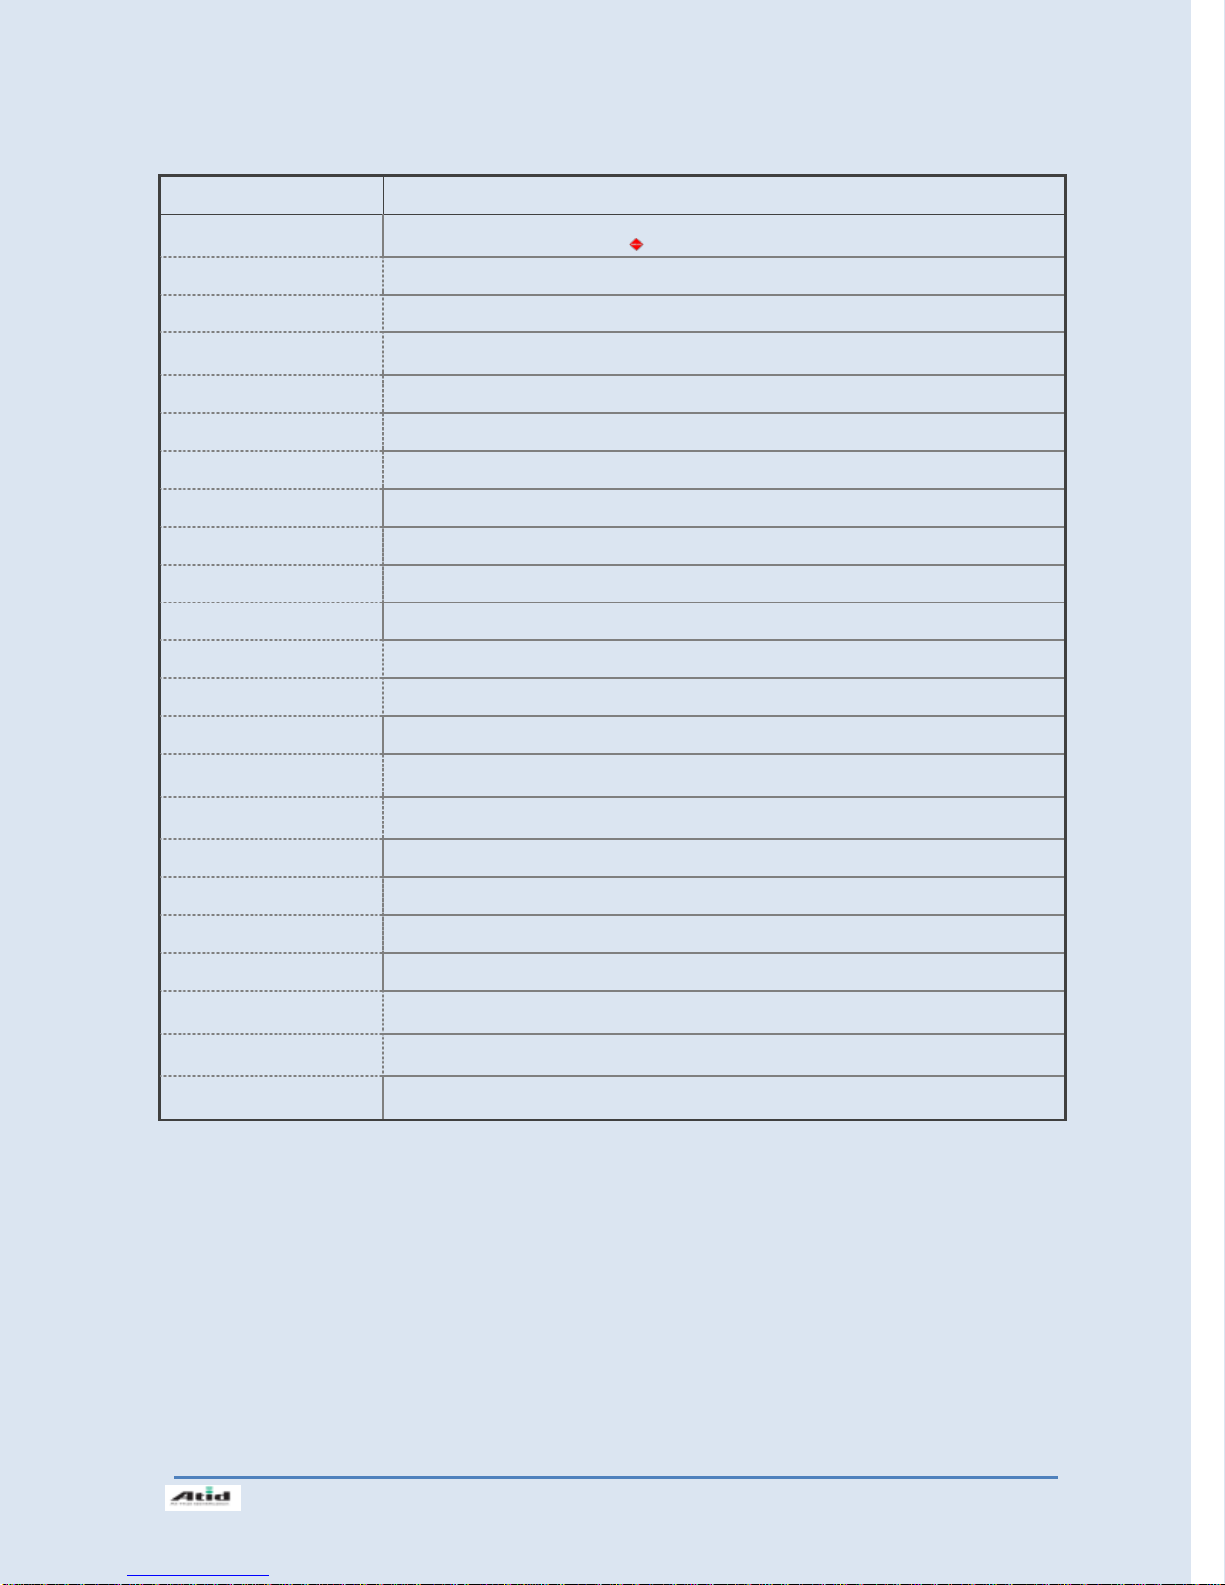
3. Function of Each Part
Part
Descriptions
1D/2D Scanner Window
(Option)
Laser beam emitted through this window. Please be careful the foreign substances and
preventing from the damage. Warning! Do not look at the laser beam directly.
UHF Connecting Port
Enable you to install a UHF 900Mhz tag reader module.
HF (Build-in, Option)
Enable you to install an HF13.56Mhz module.
Reset Button
Enable you to perform a Warm Reset, Press <Power>button simultaneously, enable you to
perform a Hard Reset.
Microphone
Enable you to conduct communication.
WLAN (Option) LED
Indicates WLAN power on-off status.
Battery Latch
Enable you to detaching and attaching the main battery.
Main Battery
Enable to supply the power to the product.
Volume Buttons
Enable you to press <Fun>button simultaneously to adjusting volume.
Scan Buttons (F7, F8)
Enable you to scan Barcode and RFID Tag.
Scan Buttons (F9)
Enable you to scan Barcode and RFID Tag.
Speaker
Build-in speaker, which could emit various sound effects.
Sync Cable Connector
Enable you to connect and send data to PC via USB sync cable.
Earphone Jack
Enable you to connect to earphone.
L/R Arrow Key
Enable you to move the cursor to left and right. And press <Fun>button simultaneously,
could move the cursor to up and down.
Power LED
Power LED will be Red when the battery is charging, or will be green when it is charged
completely.
Adaptor Connecting Jack
Enable you to connect to adaptor which provided from factory.
Camera Flash (Option)
Enable you to use flash while using camera.
Camera (Option)
Enable you to capture and store images.
Cradle Connector
Enable you to connect to PC or charging the battery while using cradle.
Key Pad
Enable you to input key value (number, alphabets, symbol), or executing assigned
programs.
Touch Screen
Display running programs, and could execute, use, and exit programs via using stylus to
touch the screen.
Hand Strap Hole
Enable you to attach a hand strap or a stylus for the convenience of using, while need to
use the device for a long period time.
Si203사용자 설명서
10
Chapter3. Basic Functions
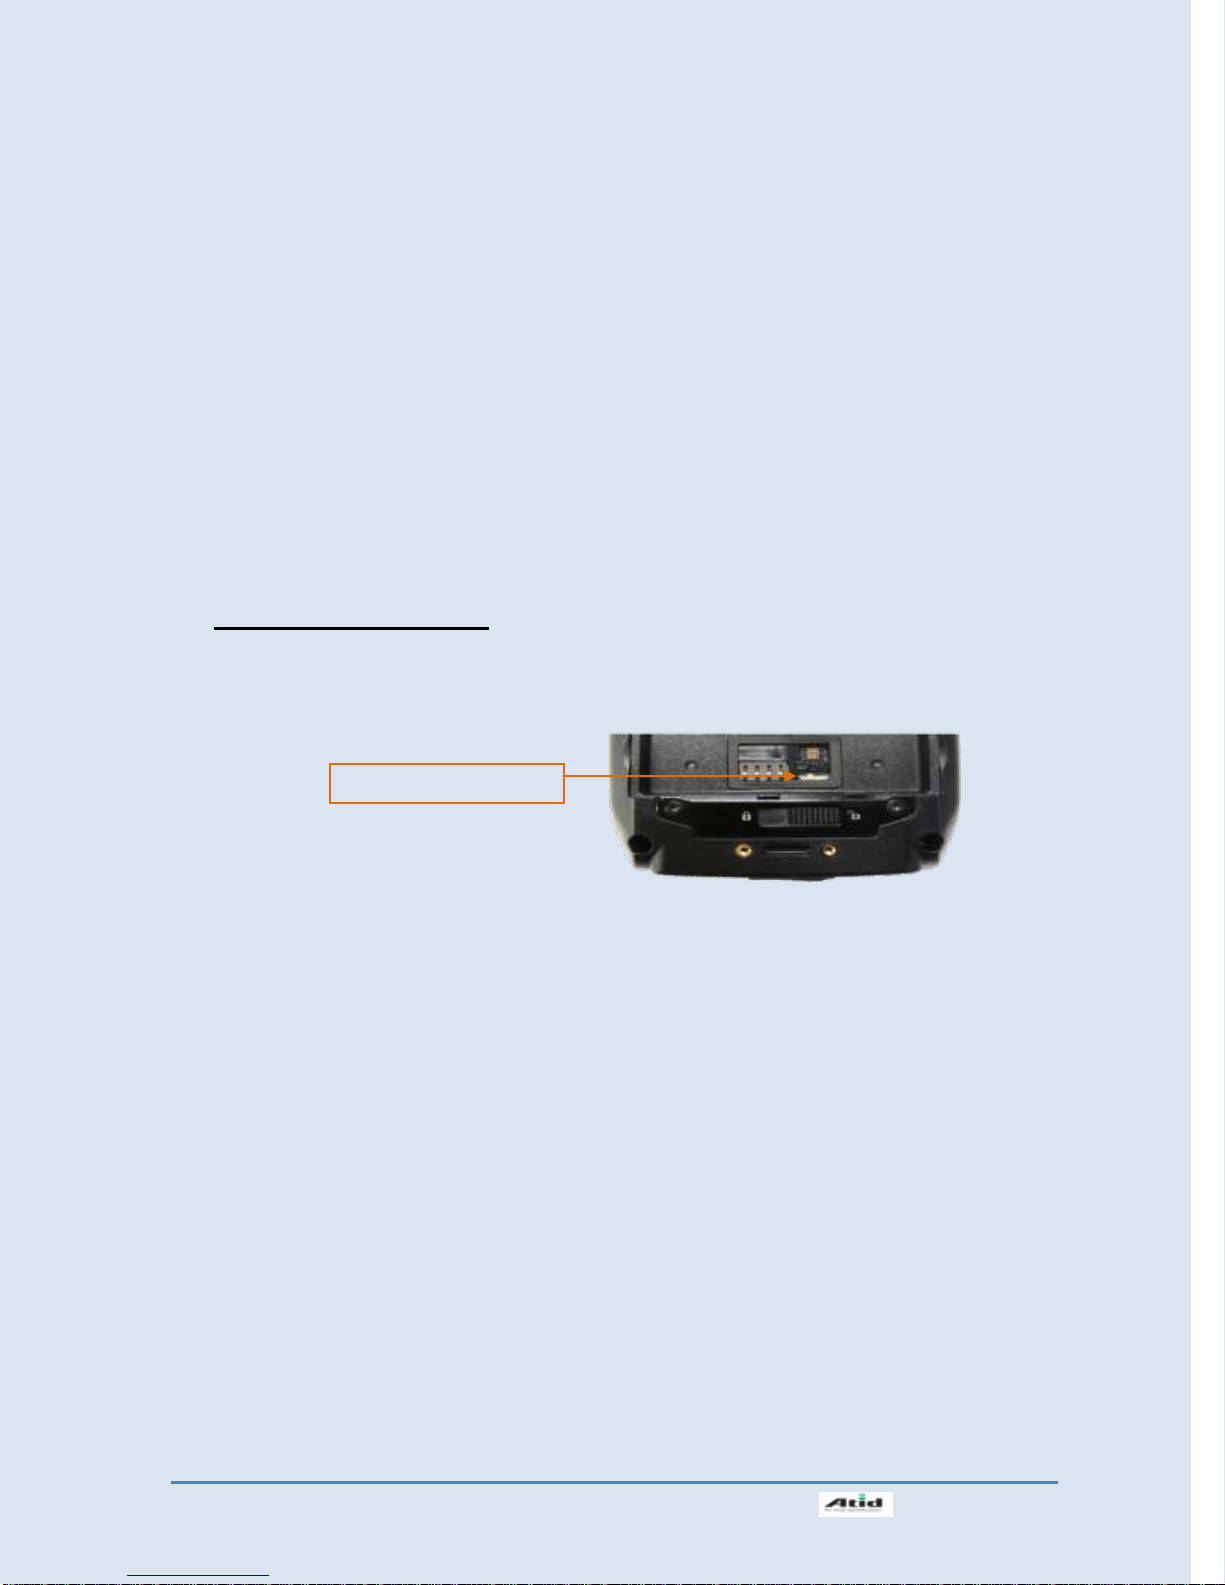
Backup Battery Switch
1. Power and Battery
PDA battery is composed of main battery and backup battery. A main battery supplies the power
to the system and RAM which could keep save the data. A backup battery could keep save the
data of RAM when the main battery discharged completely.
Main Battery: 3.7V 3,000mA Lithium - ion
Backup Battery: 3.7V 105mA Lithium – polymer
Note:
Switch on the backup battery at first beginning of using PDA, and then install the main battery,
charge it completely.
1.1 Switch On Backup Battery
The image as blow shows the battery compartment, which already removed the main battery.
Slide the lever to right to start to supplying power to the system.
To attaching main battery to the back battery compartment of the PDA.
To confirm the battery latch locked firmly.
“Refer to 1.2 Battery attaching and detaching”
Connecting adaptor to the PDA adaptor connecting jack, and check if the “Power LED” is Red,
and then charging the power completely until it get into Green.
Note:
If the window wallpaper has shown on the screen, press the <power> button for a couple of seconds,
so that could shorten the charging times.
Si203User’s Guide
11
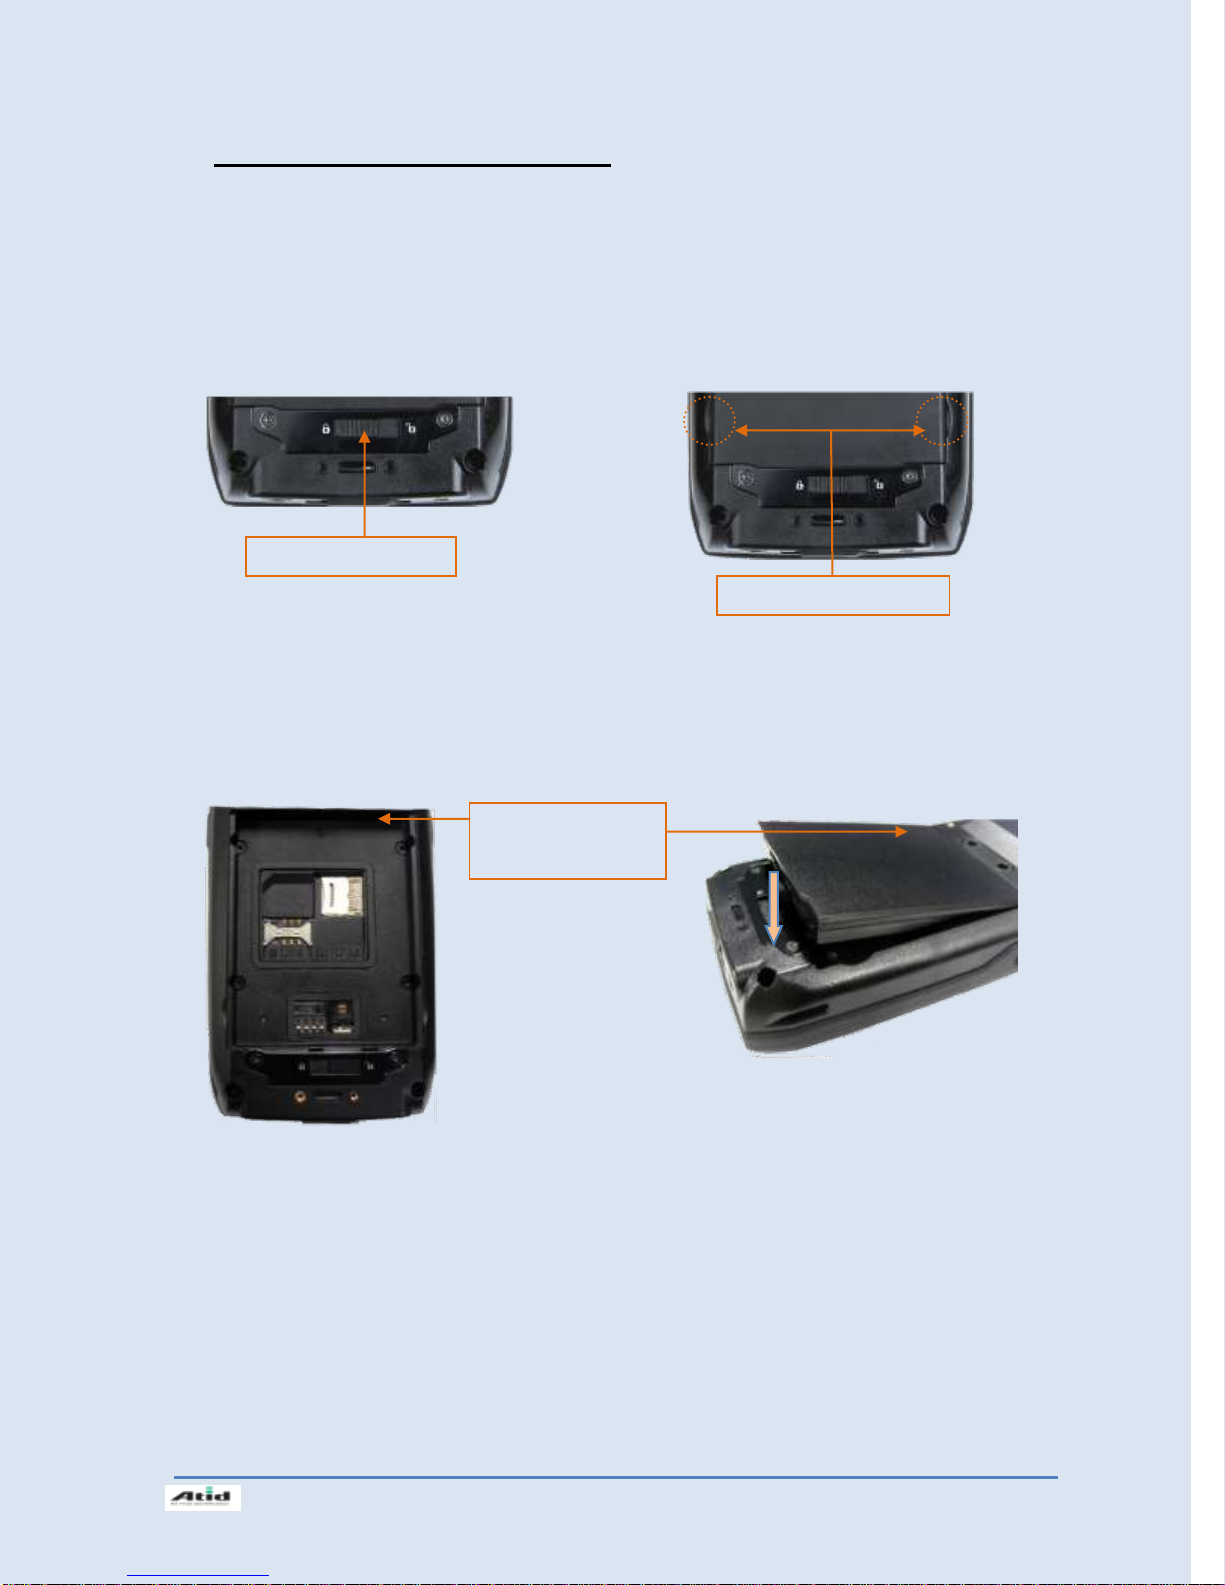
1.2 Detaching and Attaching Main Battery
Battery latch
Both sides of groove
R/L Battery Attaching
Groove
Detaching Battery
These images as below, shows the back bottom of the PDA.
Slide the battery latch to the right (UNLOCK side), and then lift the main battery out of the
compartment along both sides of groove.
Attaching Battery
Put the top part of battery into the upward groove, and then press down the bottom of battery
into the battery compartment, slide battery latch to the left (LOCK side) to attach battery firmly.
Si203사용자 설명서
12
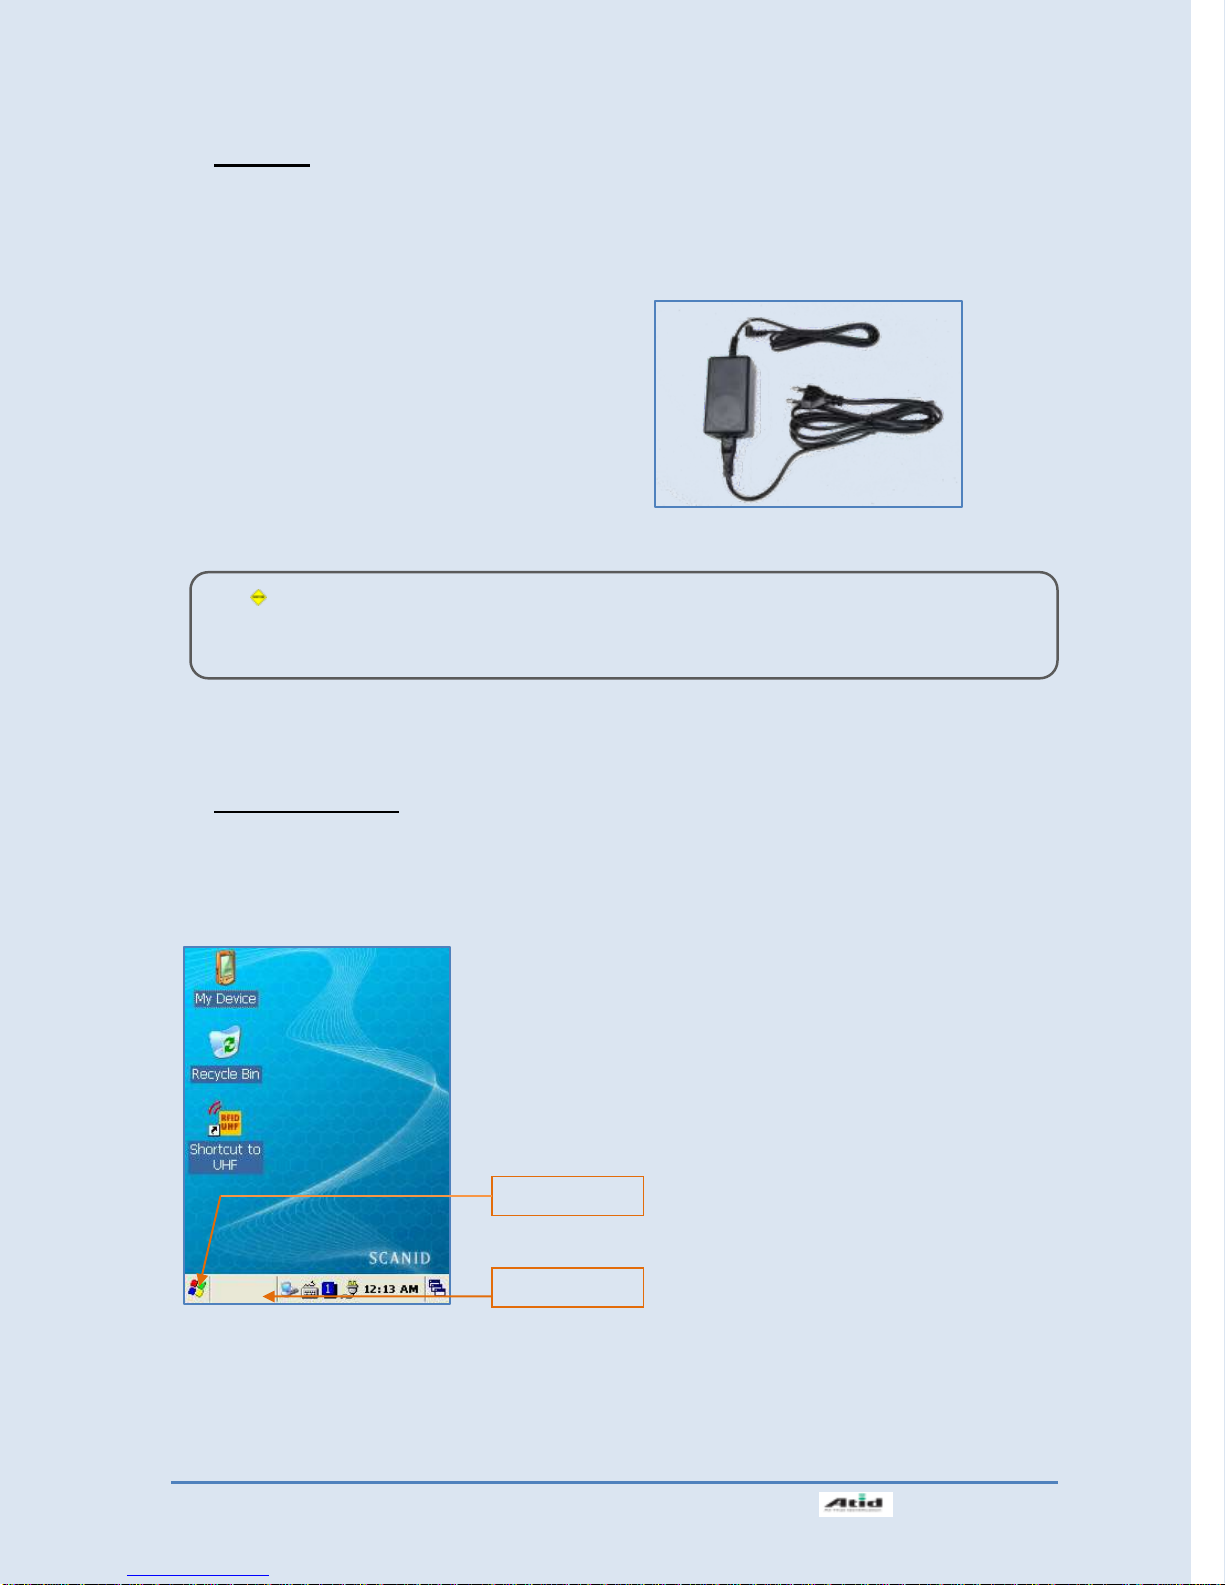
1.3 Charging
Start button
Taskbar
Caution:
You must to charge the battery by using dedicated adapter, which provided from factory, or your
device might get damage.
You have to charge the battery via dedicated adapter, which provided from the factory.
“Power LED” is Red while charging or is Green when charged completely.
Connecting Adapter
1. Plug the adapter cable to 220V socket.
2. Connect adapter DC cable to the “Power
connecting jack” of the main body.
3. “Power LED” is Red while charging.
1.4 Power On and Off
Press <Power> button one time, the device will enter low-Power mode (Sleep Mode) under the
system is started and the following window is displayed on the desktop or other programs is
running in the system. Press <Power> button once again could activate the system.
Taskbar: Display the currently running programs.
Start button: Activates the start menu and then execute a program.
Si203User’s Guide

13
Power On and Off via <Power> Button
Power Button
Power Off:
1. When the system is in booting status, press
<Power> button for a couple of seconds,
then the backlight will be turned off and
enter the low-power mode (sleep mode).
2. You can also press <Start Button> ->
<Suspend> button to turn the device off.
Power On:
1. When the system power is in the off status,
press <Power> button quickly, then
backlight will be turned on and start the
system.
2. Connect to the ActiveSync USB cable; the
power will be turned on automatically.
Power Icon
You can also double click <Power> Icon to enter this
interface.
You can also press the <Power> button to
activate the system, when the device turned off
cause get into the sleep mode.
Note:
Even though the power is in off state, if there was a tiny battery gauge remained, the data of RAM will be saved, and
those programs which have been running for sometime before the power turned off, will be recover rapidly. If the main
battery and backup battery are both in the discharge state, the RAM data will disappear, and the system will be starting
if the power is charged again.
Power off automatically
The device has been powered but has not been used for a period of time, then the system will
enter low-power mode (sleep mode) automatically. You could set the sleep mode time at the
power management so that could save power and prolog the battery life.
[Start Button] -> [Setting] -> [Control Panel] -> [Power Management] -> [Power Off]
Si203사용자 설명서
14
Battery Discharging
If the main battery discharge completely, the system will not turned on, the device will get into
low-power mode (sleep mode) automatically, and even press the <Power> button, the system
will not be turned on. In this case, you should charge the main battery or connect the adaptor to
the adaptor connecting jack of main body, then press the <Power> button to turn on the system.
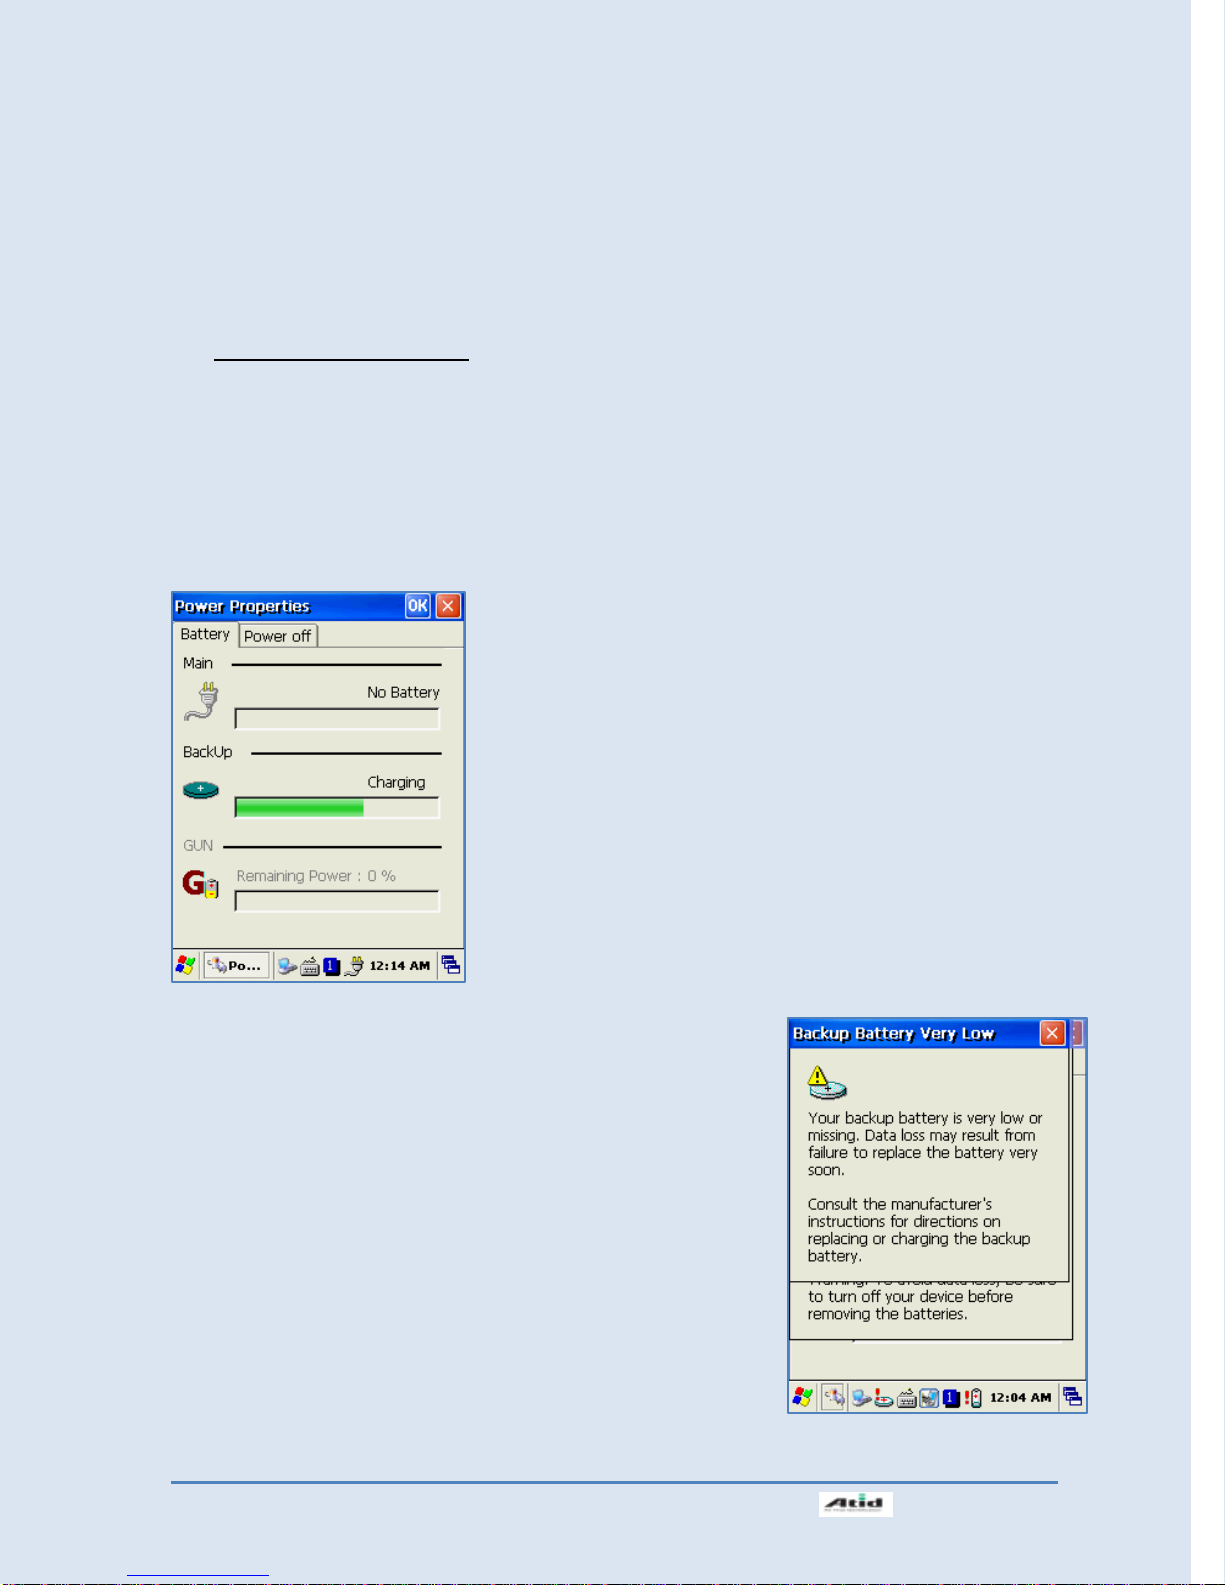
1.5 Checking Battery Gauge
Note:
Battery life is largely affected from the user using method and surrounding environments.
A 2200mA battery is usually needs 6 ~ 12 hours to get charged completely.
Checking Battery Gauge
[Start Button] -> [Setting] -> [Control Panel] -> [Power Management] -> [Battery]
Low Power Warning
If the remaining battery gauge cannot support the system
running any more, a low power warning message window will be
popped up on the screen. In this case, you need to press the
<Power> button to turn off the power, and to charge the battery
as soon as possible.
Si203User’s Guide
15
1.6 Backup Battery
Caution:
If the main battery and the backup battery are both discharged, the RAM date will disappear.
Among the running programs, the RAM data will disappear in which are using, and the system
will not be restore to previous state, but rebooting system after start charging.
A backup battery could safely keep the RAM data, even the main battery discharged completely.
1.7 Dispose of Battery
You need to purchase a new one if the battery damaged or reached its end of life.
Warning!
Please dispose the used batteries in a designated place.
Si203사용자 설명서
16
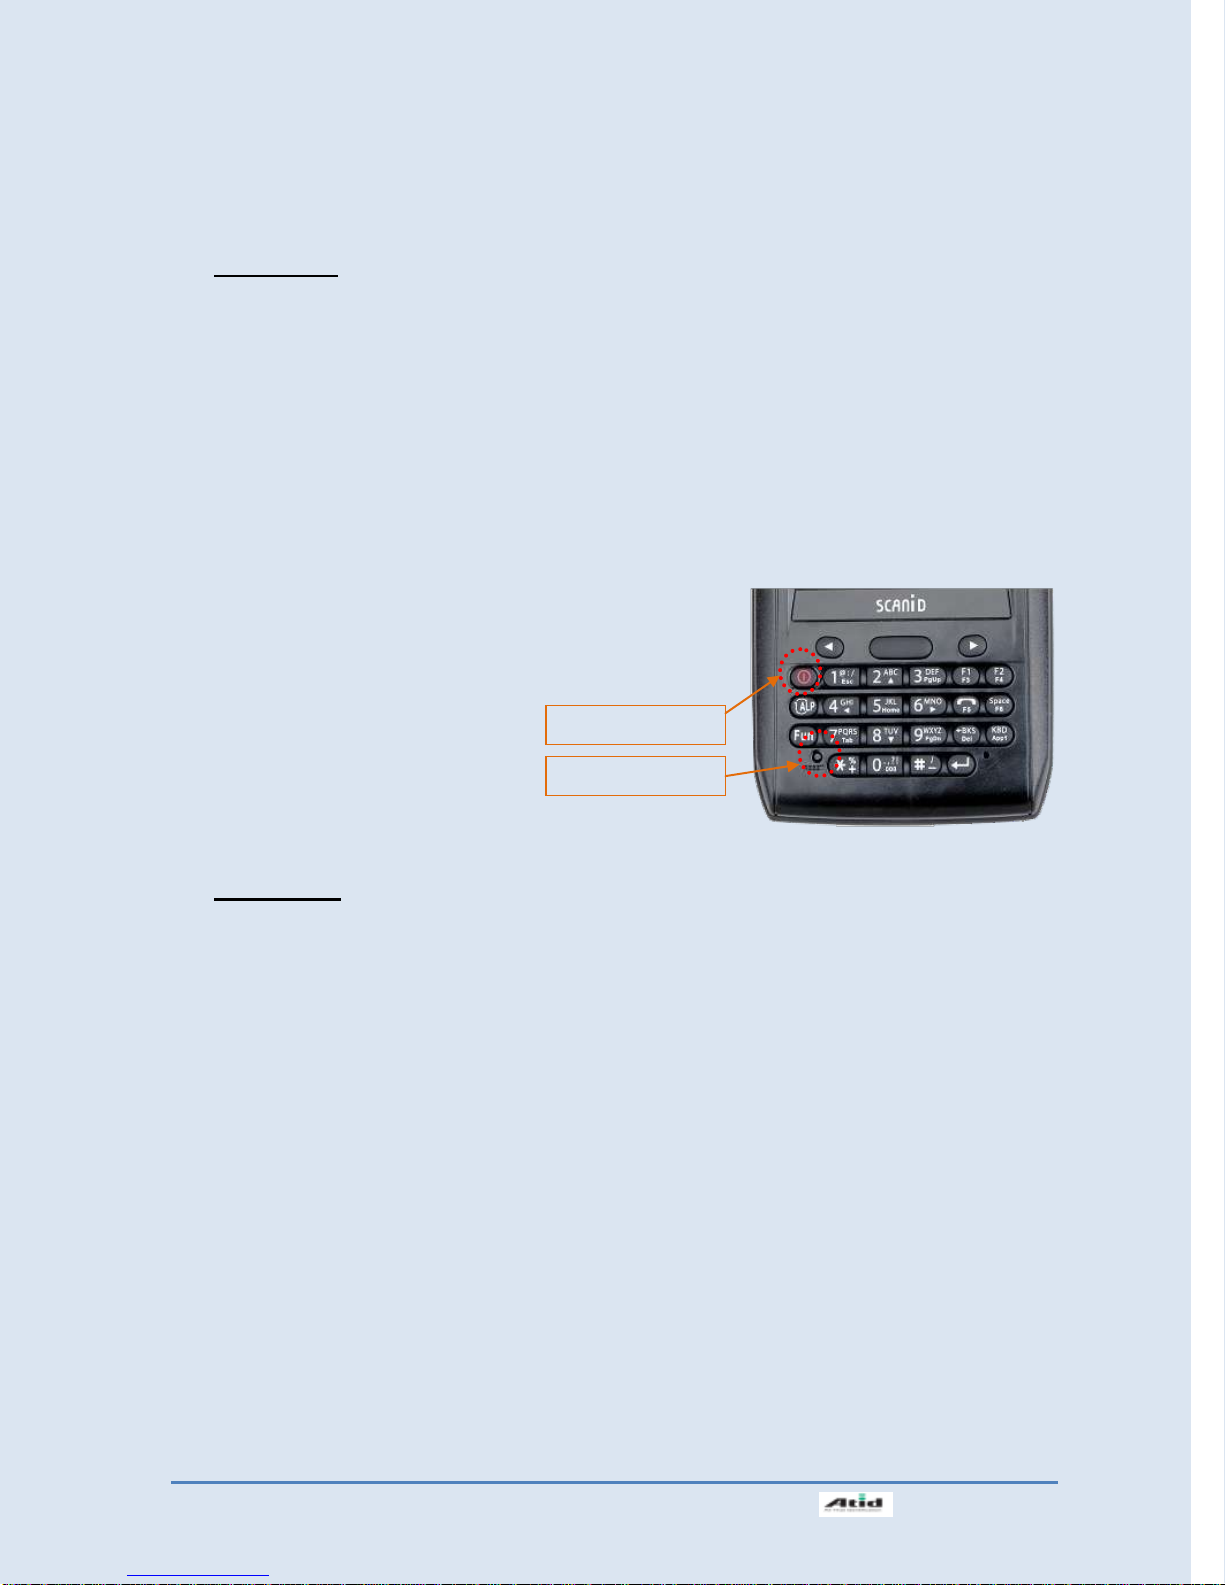
2. System Reset
Reset Button
Power Button
If there is no response from the system or an application is locked up and stops responding,
and when you want to upgrade the firmware, reset the system is maybe necessary.
2.1 Soft Reset
When do you need to perform Soft Reset?
If there is no response for your command from the system, it calls (Hang-up). In this case, you
need to perform a soft reset. Soft reset will end programs and the user memory region will be
deleted, but installed programs and data, and so on, are not affected.
[Soft Reset Procedure]
Using the stylus pen to press <Reset> button briefly, the system will restarting again, after the
screen turns off shortly.
[Soft Reset Result]
System will be restarting.
Operating System will be restarting (Windows CE).
Desktop will appear in about ten seconds.
User’s changed registry information, copied files and
Installed programs will be restored.
2.2 Hard Reset
When do you need to perform Hard Reset?
Hard Reset, which is also called Cold Reset, enables to initialize hardware completely. User’s
installed programs, copied files and registry values will keep remained even performed Hard Reset,
but the real time and date will be initialized. So you need to reset the time and date after performed
Hard Reset.
You need perform Hard Reset when the Soft Reset cannot restore the system.
[Hard Reset Procedure]
Using stylus pen to Press <Power> Button and <Reset> Button simultaneously, the system will
restarting again after the screen turns off shortly.
[Hard Reset Result]
System will be restarting.
Operating System (Windows CE) will be loading and restarting.
Desktop will appear in about ten seconds.
Time and date window will be popped up and need to reset it.
Si203User’s Guide
17
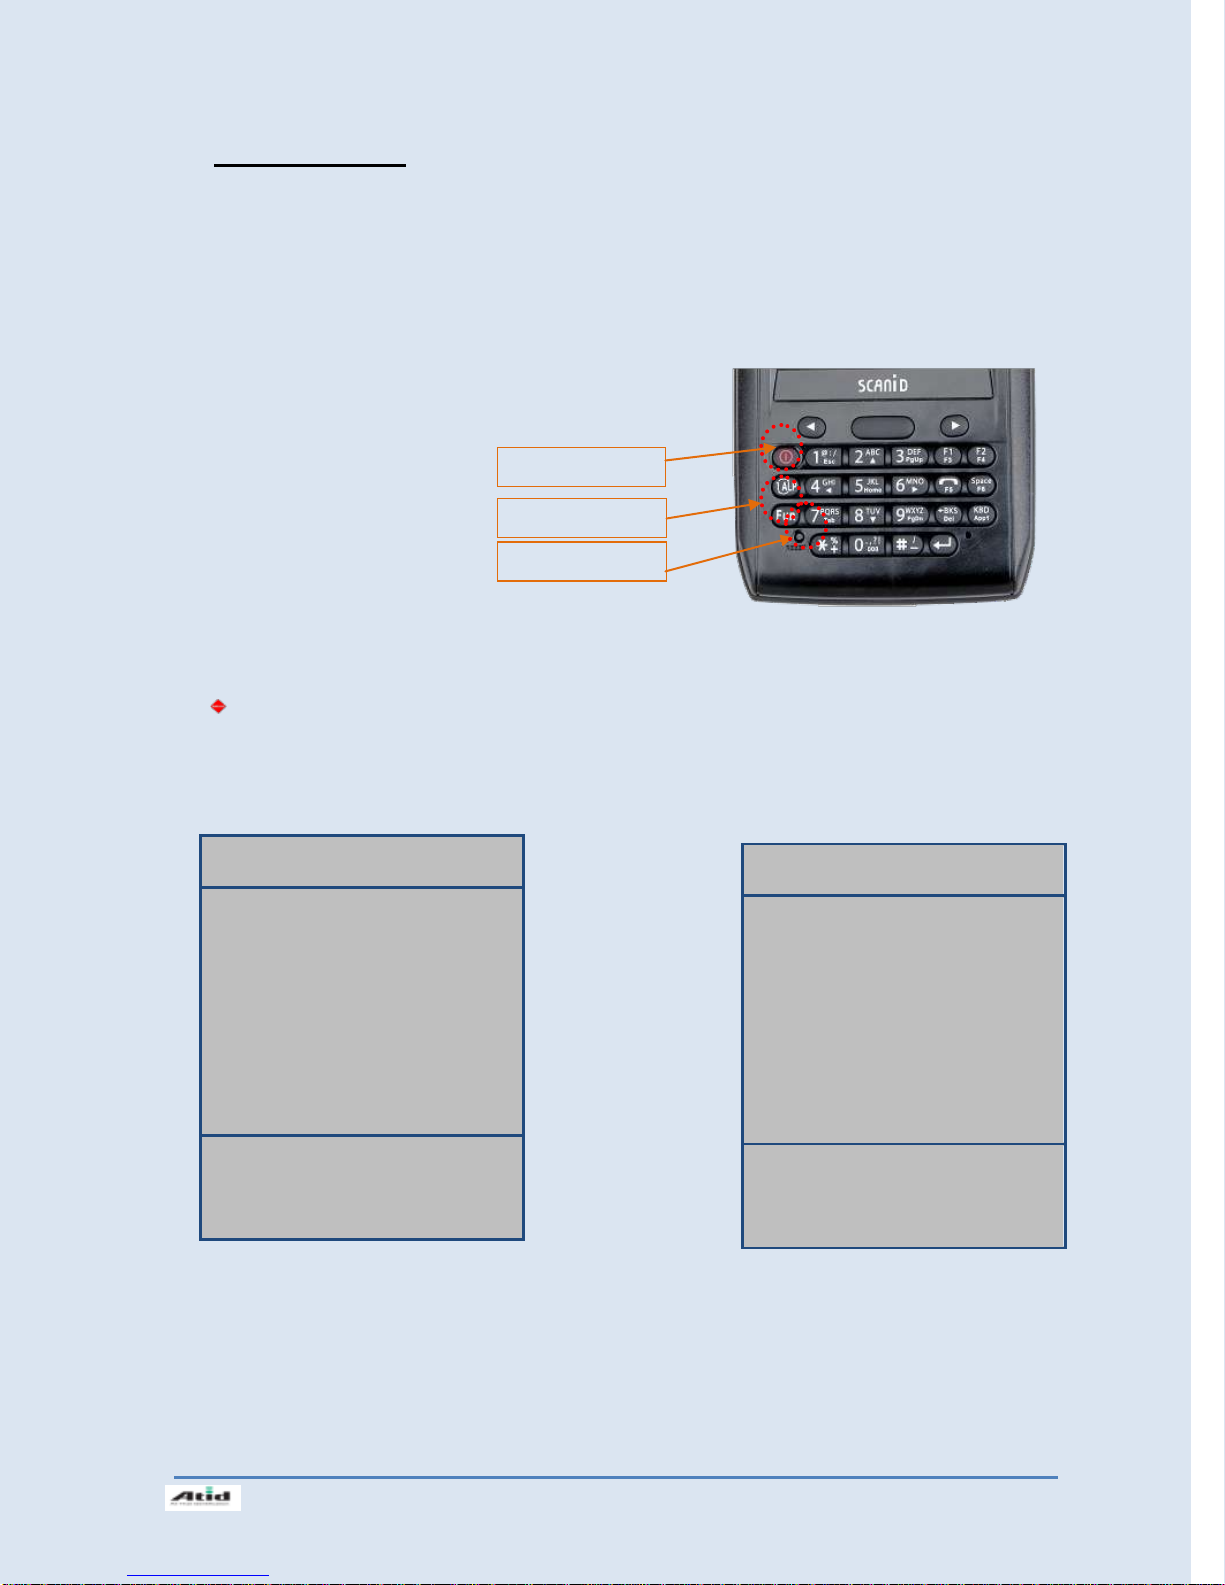
2.3 Initializing System
[Boot Menu]
[System Information]
[Firmware Upgrade]
[Clean System]
[Configuration Setting]
[Exit Boot Menu]
Move : 2(Up)/8(Down)
Select : Enter
[Boot Menu]
[System Information]
[Firmware Upgrade]
[Clean System]
[Configuration Setting]
[Exit Boot Menu]
Move : 2(Up)/8(Down)
Select : Enter
[Boot Menu] Start-up Screen
Using<2>, <8> buttons to select
Clean System, then press <Enter>
button.
Fun Button
Reset Button
Power Button
Enter [Boot Menu] and do what you want, when in the situations as below:
1. When you need to restore the original registry information, which has been changed.
2. When you need to initialize “My device” storage spaces.
3. When you need to initialize “Flash Disk” storage spaces.
4. When you need to initialize system to factory default settings.
You can also press <Power> button and <Fun> button
simultaneously, and then press <Reset> button to perform
Hard Reset.
[Boot Menu] window would appear in a couple of seconds.
Warning!
Except for [Clean System], please do not use other functions.
The system might be work not properly if you use other functions on the [Boot
Menu].
Si203사용자 설명서
18
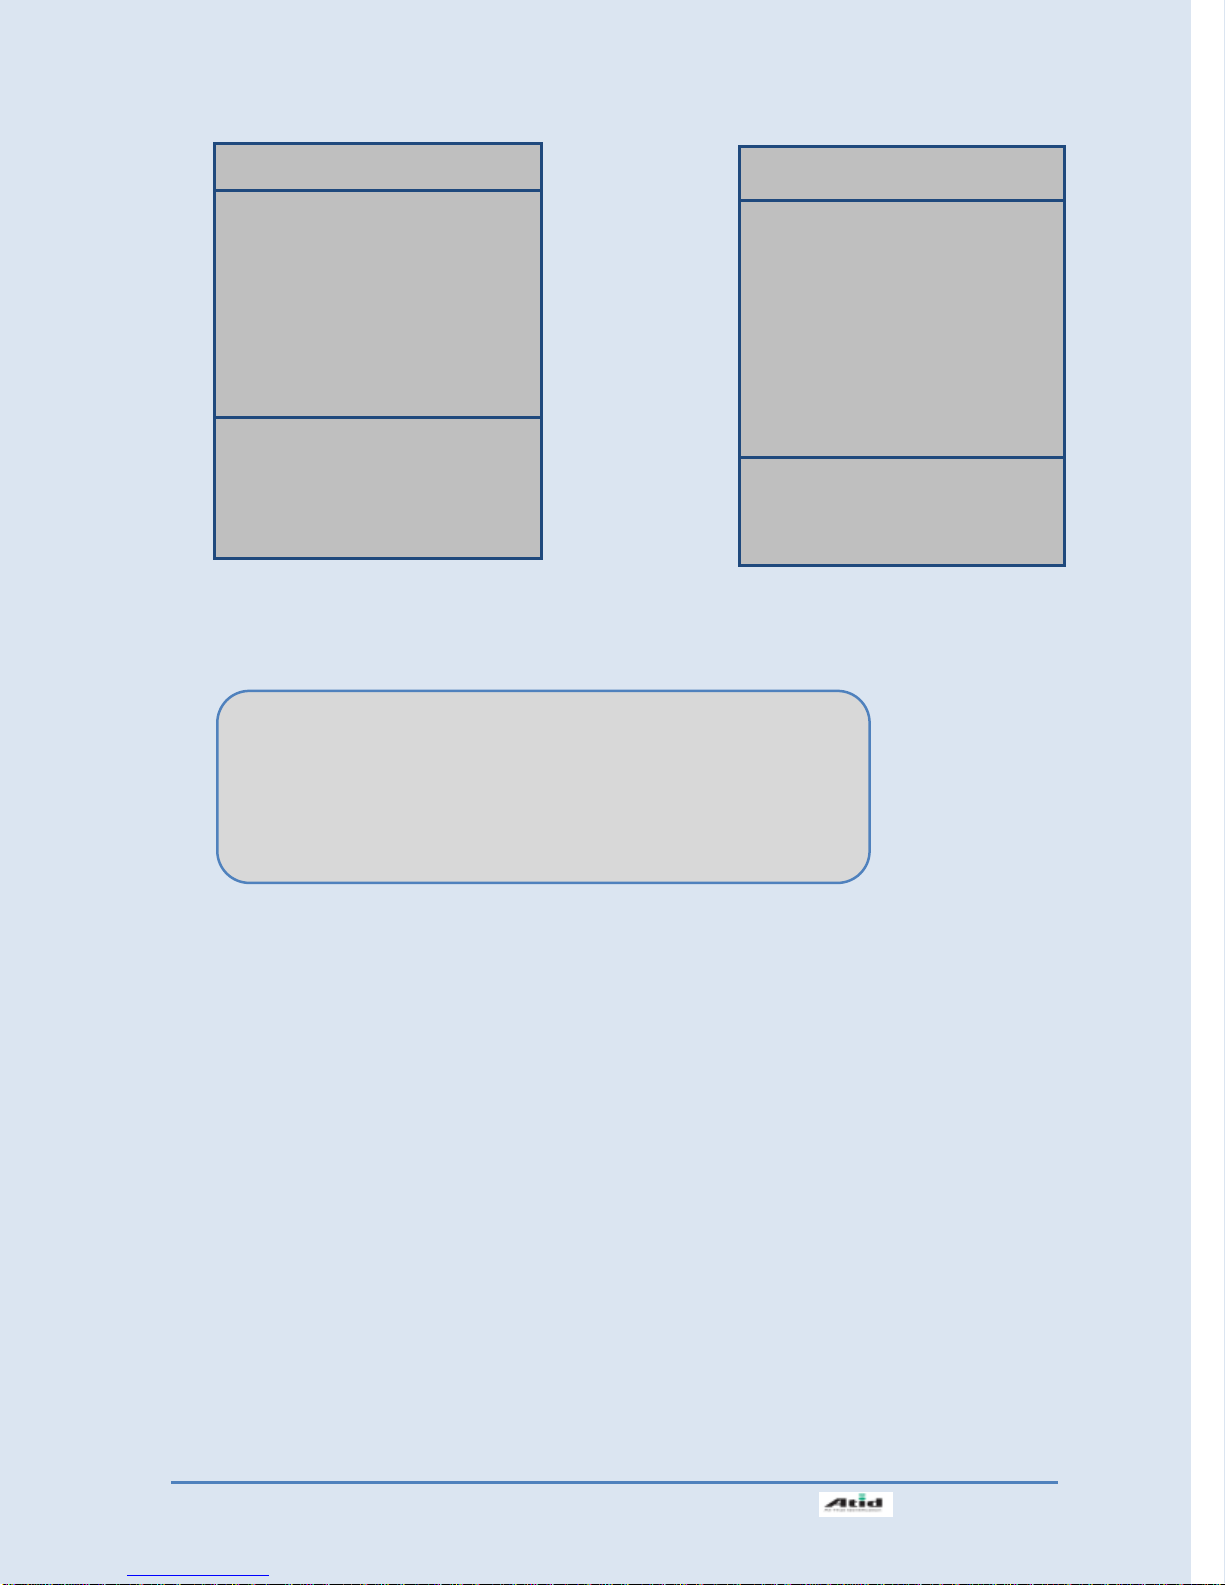
[Boot Menu]
[Clean System]
Clean Registry
Clean OS Root
Clean Flash Disk
Factory Reset
Move : 2(Up)/8(Down)
Preview : <- BKS
Select : Enter
[Boot Menu]
[System Information]
[Firmware Upgrade]
[Clean System]
[Configuration Setting]
[Exit Boot Menu]
Move : 2(Up)/8(Down)
Select : Enter
Clean Registry – Initializing registry.
Clean OS Root – Initializing “Mydevice” region.
Clean Flash Disk – Initializing “Flash Disk” region.
Factory Reset – Initializing to factory default settings.
Using<2>, <8> button to select
your need command.
Press <BKS> button to return to
main menu.
Using<2>, <8> buttons to select
[Exit Boot Menu], then press [Enter]
button to exit [Boot Menu].
Si203User’s Guide
 Loading...