

Page 1
USER GUIDE
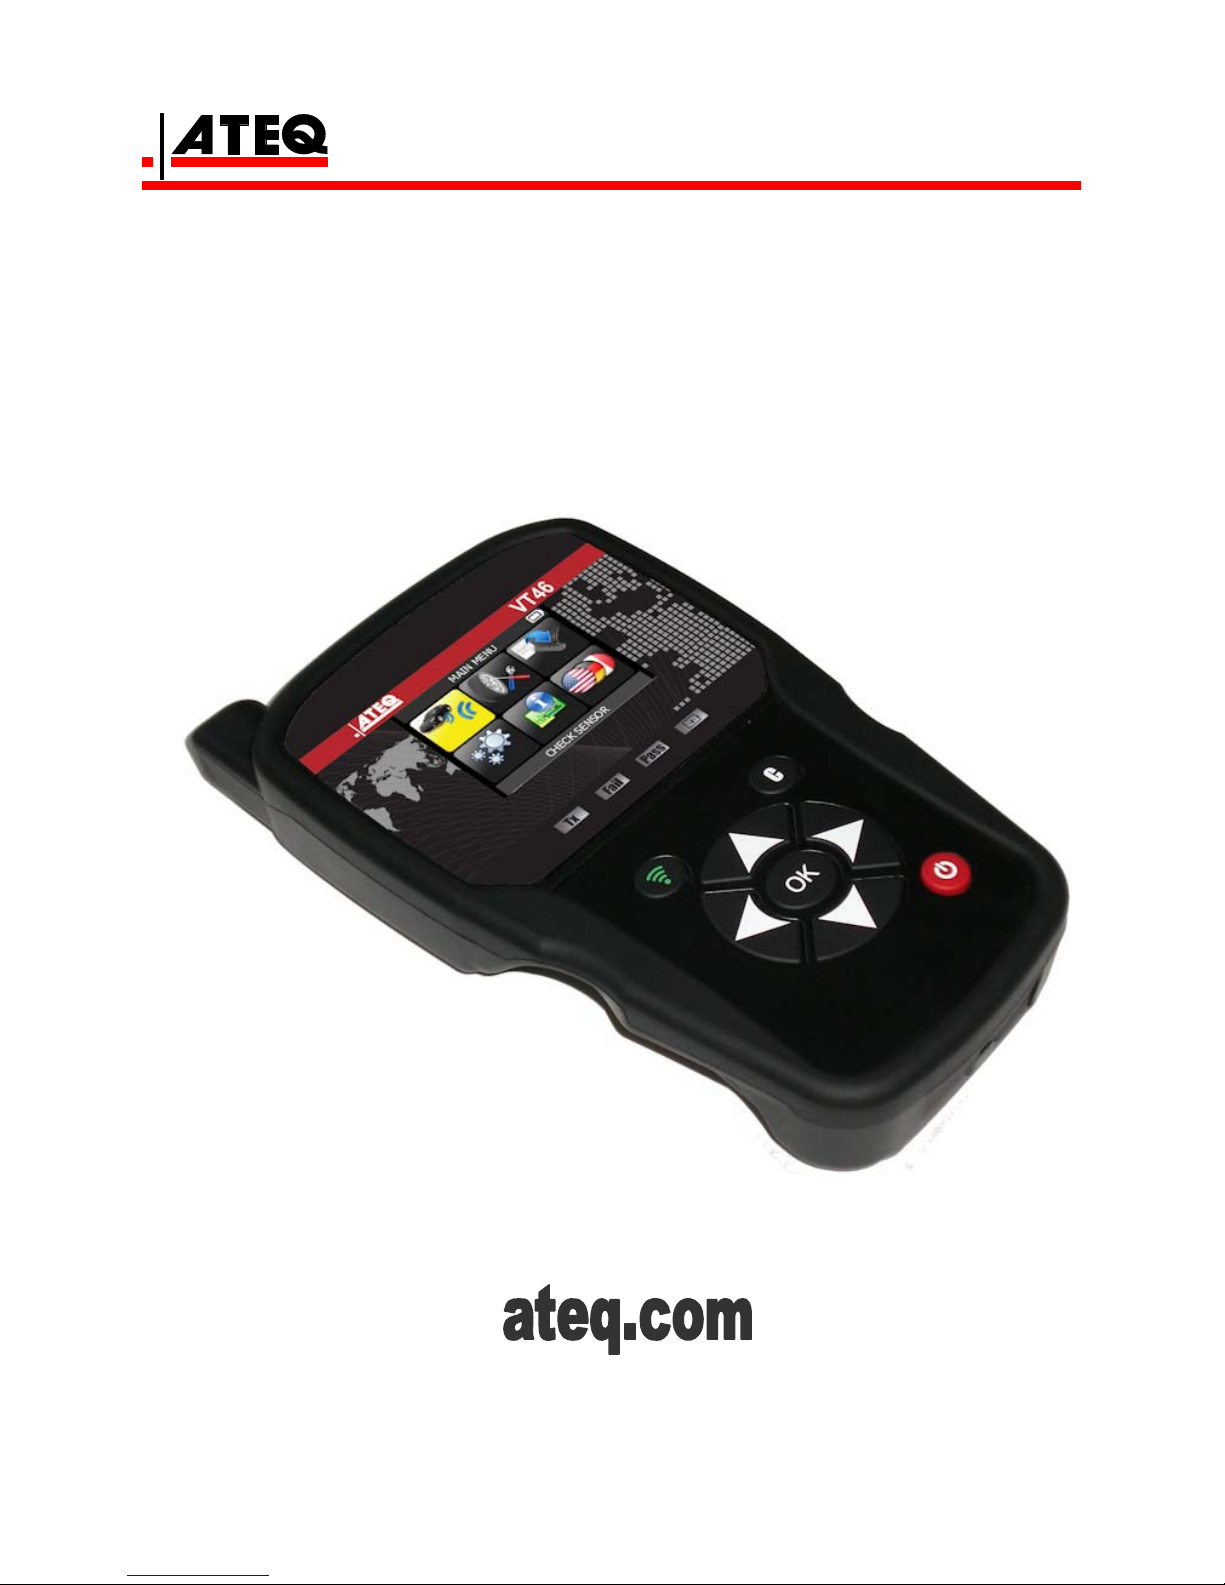
ATEQ VT46
Version JA2-04
Reference: UM-36500A-U
Page 2

REVISION OF THE ATEQ VT46 GUIDE
Due to continuing improvements, the information contained in this user manual, the features and design of
this device are subject to be changed without prior notice.
Edition/
Revision
Reference
Date
(week/year)
Chapters updated
First edition UM-36500A-U 41/2016 -----
Page 3

Table of contents
UM-36500A-U User manual ATEQ TPMS Tool VT46 Page 1/32
TABLE OF CONTENTS
User Guide 2
ATEQ VT46 TPMS TOOL ............................................................................................... 2
1. SPECIFICATIONS ............................................................................................................................... 2
2. IMPORTANT SAFETY INSTRUCTIONS ............................................................................................. 3
3. CAUTION ............................................................................................................................................. 4
4. VT46 OVERVIEW ................................................................................................................................ 5
5. FUNCTION KEYS ................................................................................................................................ 6
6. POWER ON.......................................................................................................................................... 7
7. OPERATING INSTRUCTIONS ............................................................................................................ 8
VT46 USAGE .................................................................................................................. 9
1. CHECK SENSOR ................................................................................................................................ 9
2. SERVICE TPMS ................................................................................................................................. 12
3. PROGRAM BLANK SENSOR ........................................................................................................... 15
SETTINGS ..................................................................................................................... 19
1. ENTER SETTINGS MENU ................................................................................................................. 19
ABOUT .......................................................................................................................... 23
1. ENTER THE ABOUT MENU .............................................................................................................. 23
LANGUAGE .................................................................................................................. 24
1. ENTER LANGUAGE MENU .............................................................................................................. 24
MISCELLANEOUS ....................................................................................................... 25
1. CHARGE ............................................................................................................................................ 25
2. TROUBLESHOOTING ....................................................................................................................... 26
3. TOOL UPDATE .................................................................................................................................. 26
4. LIMITED HARDWARE WARRANTY ................................................................................................ 28
5. SAFETY BATTERY AND CHARGE INFORMATION ....................................................................... 29
6. FCC STATEMENTS ........................................................................................................................... 30
7. RECYCLING ...................................................................................................................................... 31
Index 32
Page 4
VT46 TPMS TOOL - User Guide
UM-36500A-U User manual ATEQ TPMS Tool VT46 Page 2/32
User Guide
ATEQ VT46 TPMS TOOL
1. SPECIFICATIONS
Battery Type: Rechargeable Lithium-Ion
Battery Life: Approximately 300 activations per full charge.
Dimensions (Max. L,W,D): 7.9" x 4.7" x 1.6" (20.0 cm x 12.0 cm x 4.0 cm).
Case Material: High Impact ABS.
Response Frequency: Main frequencies: 315 MHz and 433.92 MHz (supporting
most specific frequencies).
Low Battery Indication: LCD bar graph display.
Weight: Approx. 2 lbs.
Temperature: Operating: -4°F to 131°F (-20°C to +55°C).
Storage: -40°F to 140°F (-40°C to +60°C).
Operating Altitude: Up to 6560 ft (2000 m).
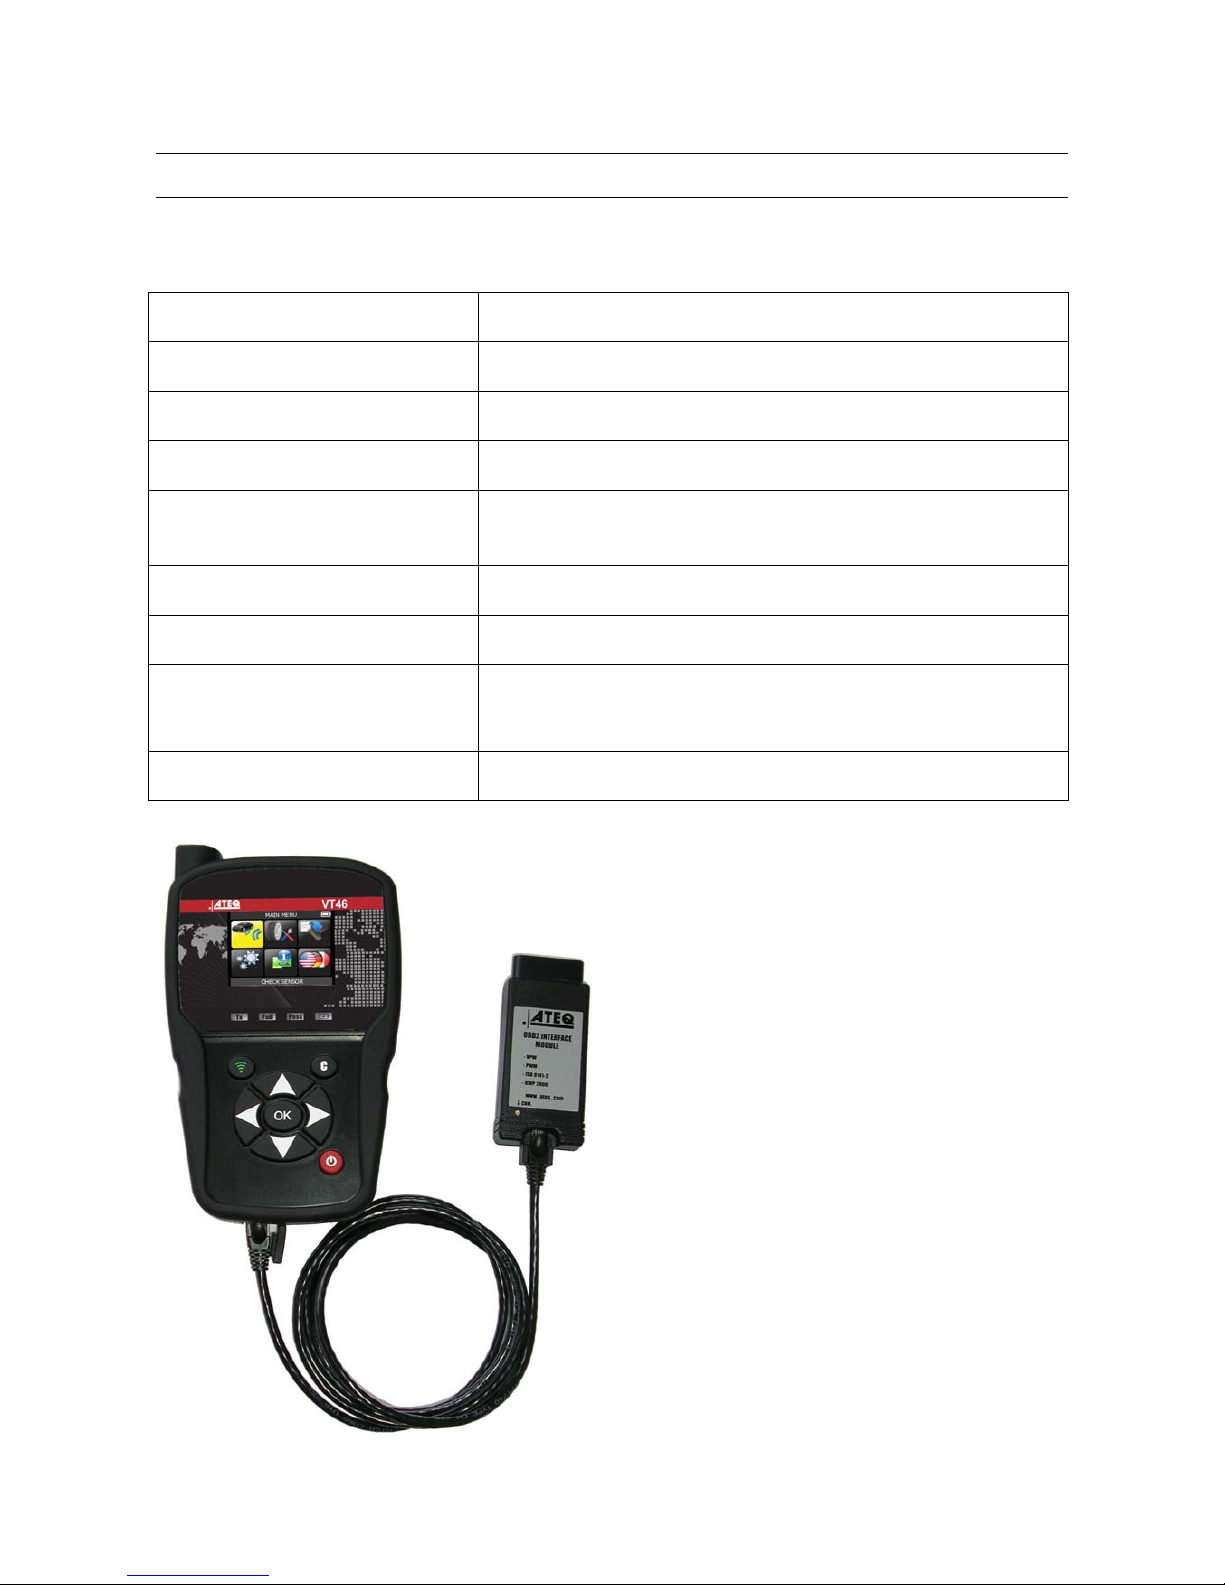
Product content:
VT46 TPMS Instrument.
USB cable.
RJ45 cable.
OBDII Module.
Power supply.
Option accessories:
Re-Learn Magnet (option).
Page 5
VT46 TPMS TOOL - User Guide
UM-36500A-U User manual ATEQ TPMS Tool VT46 Page 3/32
2. IMPORTANT SAFETY INSTRUCTIONS
Do not discard. Retain for future reference.
This device complies with:
- Part 15 of the FCC Rules (FCC ID: 2ABSJ-VT46)
- CE / CEM standards
- ROHS standards
Operation is subject to the following two conditions:
(1) This device will not cause harmful interference, and
(2) This device will accept any interference received, including interference that may
cause undesired or improper operation.
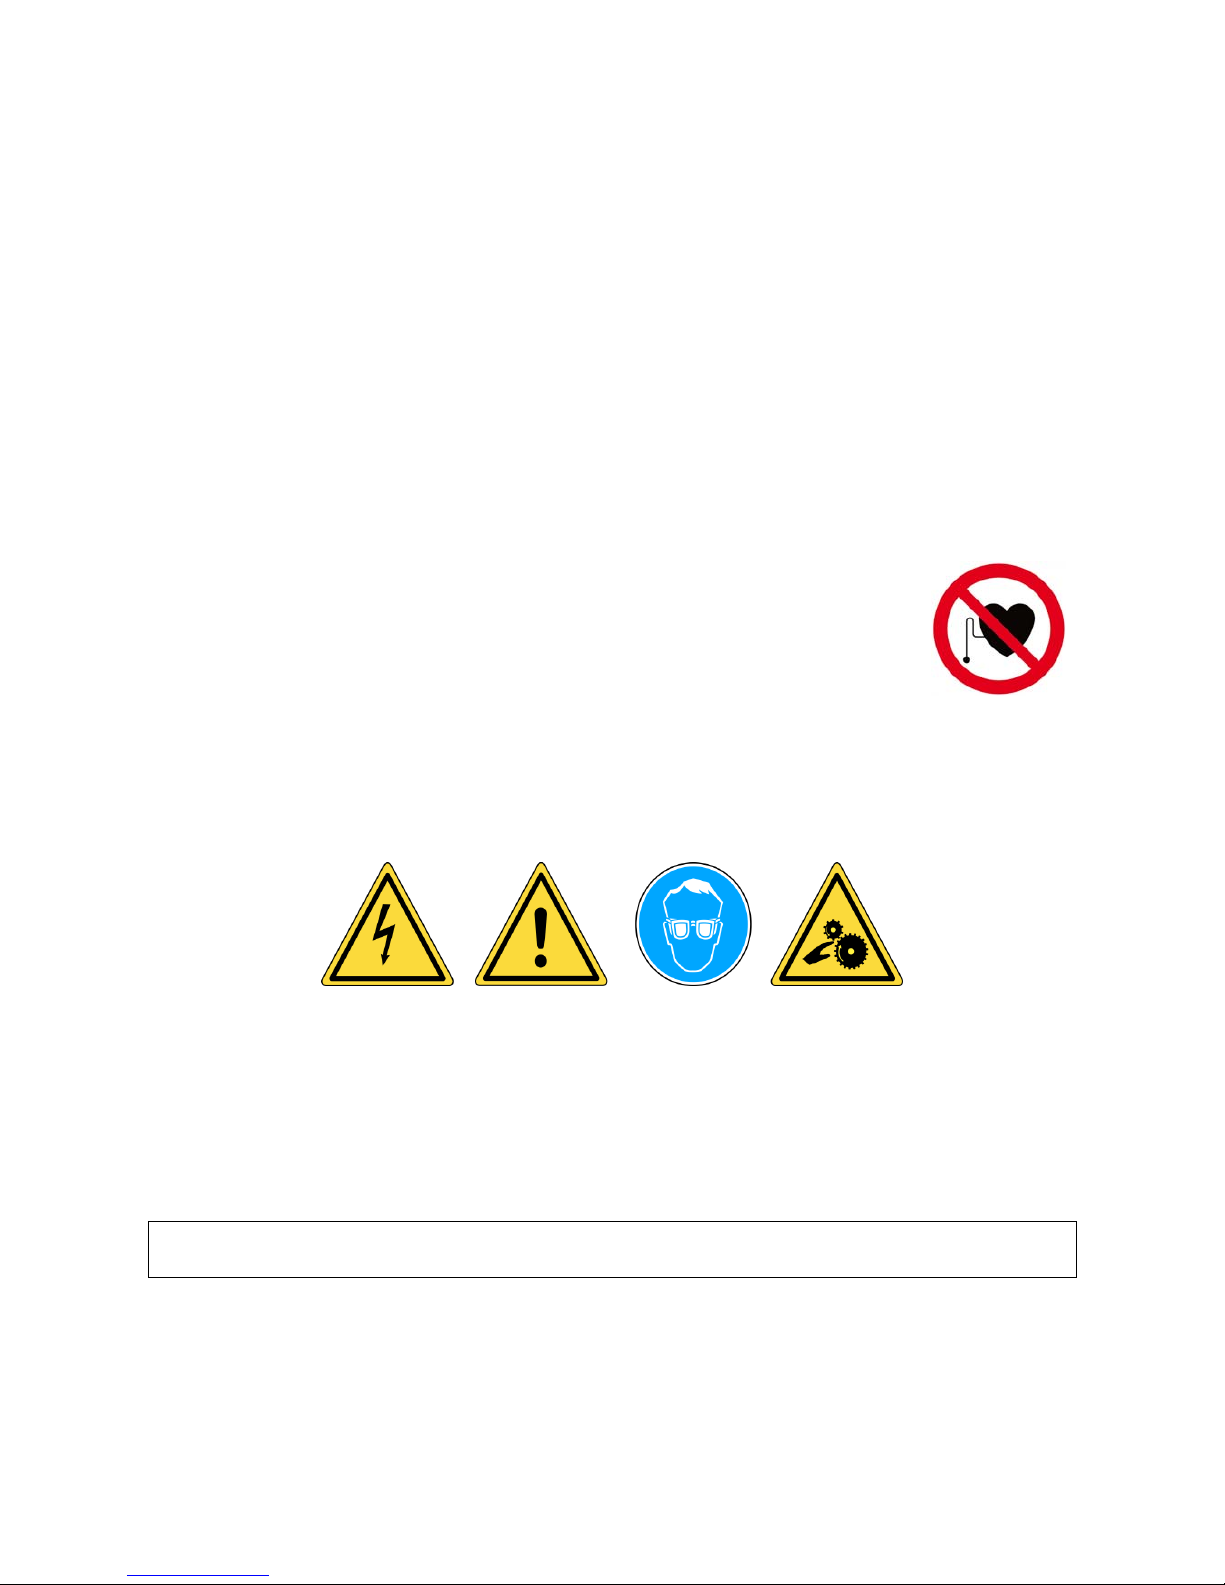
WARNING: This product emits electromagnetic and electronically
generated waves that may interfere with the safe operation of
pacemakers.
Individuals that have pacemakers should never use this product.
WARNING:
Do not use on live electrical circuits.
Please read instructions before use.
Wear safety goggles. (User and bystanders).
Risk of entanglement.
Read the Warranty, Safety, FCC Statements and recycling information
at the end of this user guide.
Page 6

VT46 TPMS TOOL - User Guide
UM-36500A-U User manual ATEQ TPMS Tool VT46 Page 4/32
3. CAUTION
PLEASE READ THESE INSTRUCTIONS BEFORE USE
Your Tire Pressure Monitoring (TPM) tool has been designed to be durable, safe, and
reliable when properly used.
All TPMS TOOLS are intended for use only by qualified and trained automotive
technicians or in a light industrial repair shop environment. Please read all instructions
below before use. Always follow these safety instructions. If you have any questions
pertaining to the safe or reliable use of this tool, please call your local dealer.
1. Read All Instructions
All warnings on the tool and in this manual should be adhered to. All operating instructions
should be followed.
2. Retain Instructions
The safety and operating instructions should be retained for future reference.
3. Heed Warnings
Users and bystanders must wear safety goggles and must read instructions before use.
Do not use on live electrical circuits, risk of entanglement.
4. Cleaning
Clean with a soft dry cloth, or if necessary, a soft damp cloth. Do not use any harsh
chemical solvents such as acetone, thinner, brake cleaner, alcohol, etc as this may
damage the plastic surface.
5. Water & Moisture
Do not use this tool where contact or immersion in water is a possibility. Never spill liquid
of any kind onto the tool.
6. Storage
Do not use or store the tool in an area where it is exposed to direct sunlight or excessive
moisture.
7. Usage
To reduce the risk of fire, do not operate the tool in the vicinity of open containers or
flammable liquids. Do not use if the potential for explosive gas or vapors exists. Keep the
tool away from heat generating sources. Do not operate the tool with the battery cover
removed.
Page 7
VT46 TPMS TOOL - User Guide
UM-36500A-U User manual ATEQ TPMS Tool VT46 Page 5/32
4. VT46 OVERVIEW
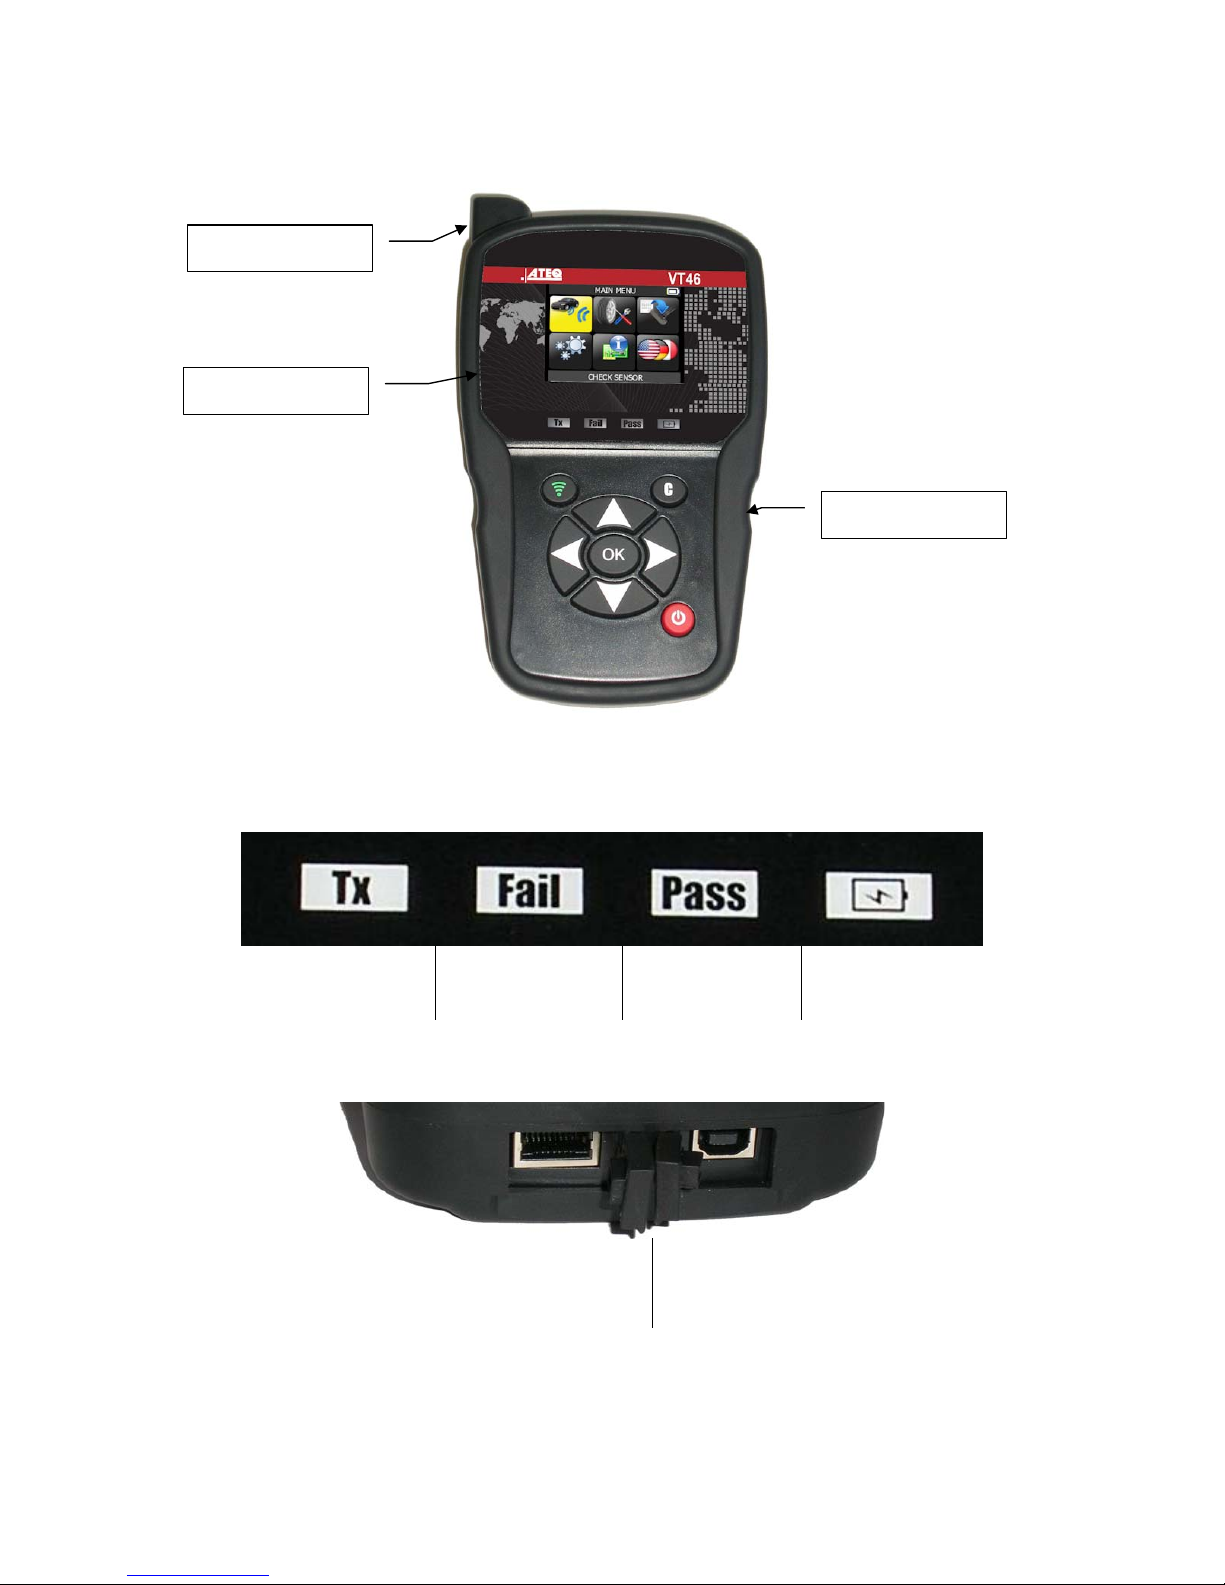
4.1. LIGHTS
Trigger light
Result light
"Fail"
Result light
"Pass"
Battery status
4.2. CONNECTORS
RJ45 connector for OBD
module connection
USB connector for
battery charge and
firmware update.
Display screen
Keyboard
Antenna
Page 8
VT46 TPMS TOOL - User Guide
UM-36500A-U User manual ATEQ TPMS Tool VT46 Page 6/32
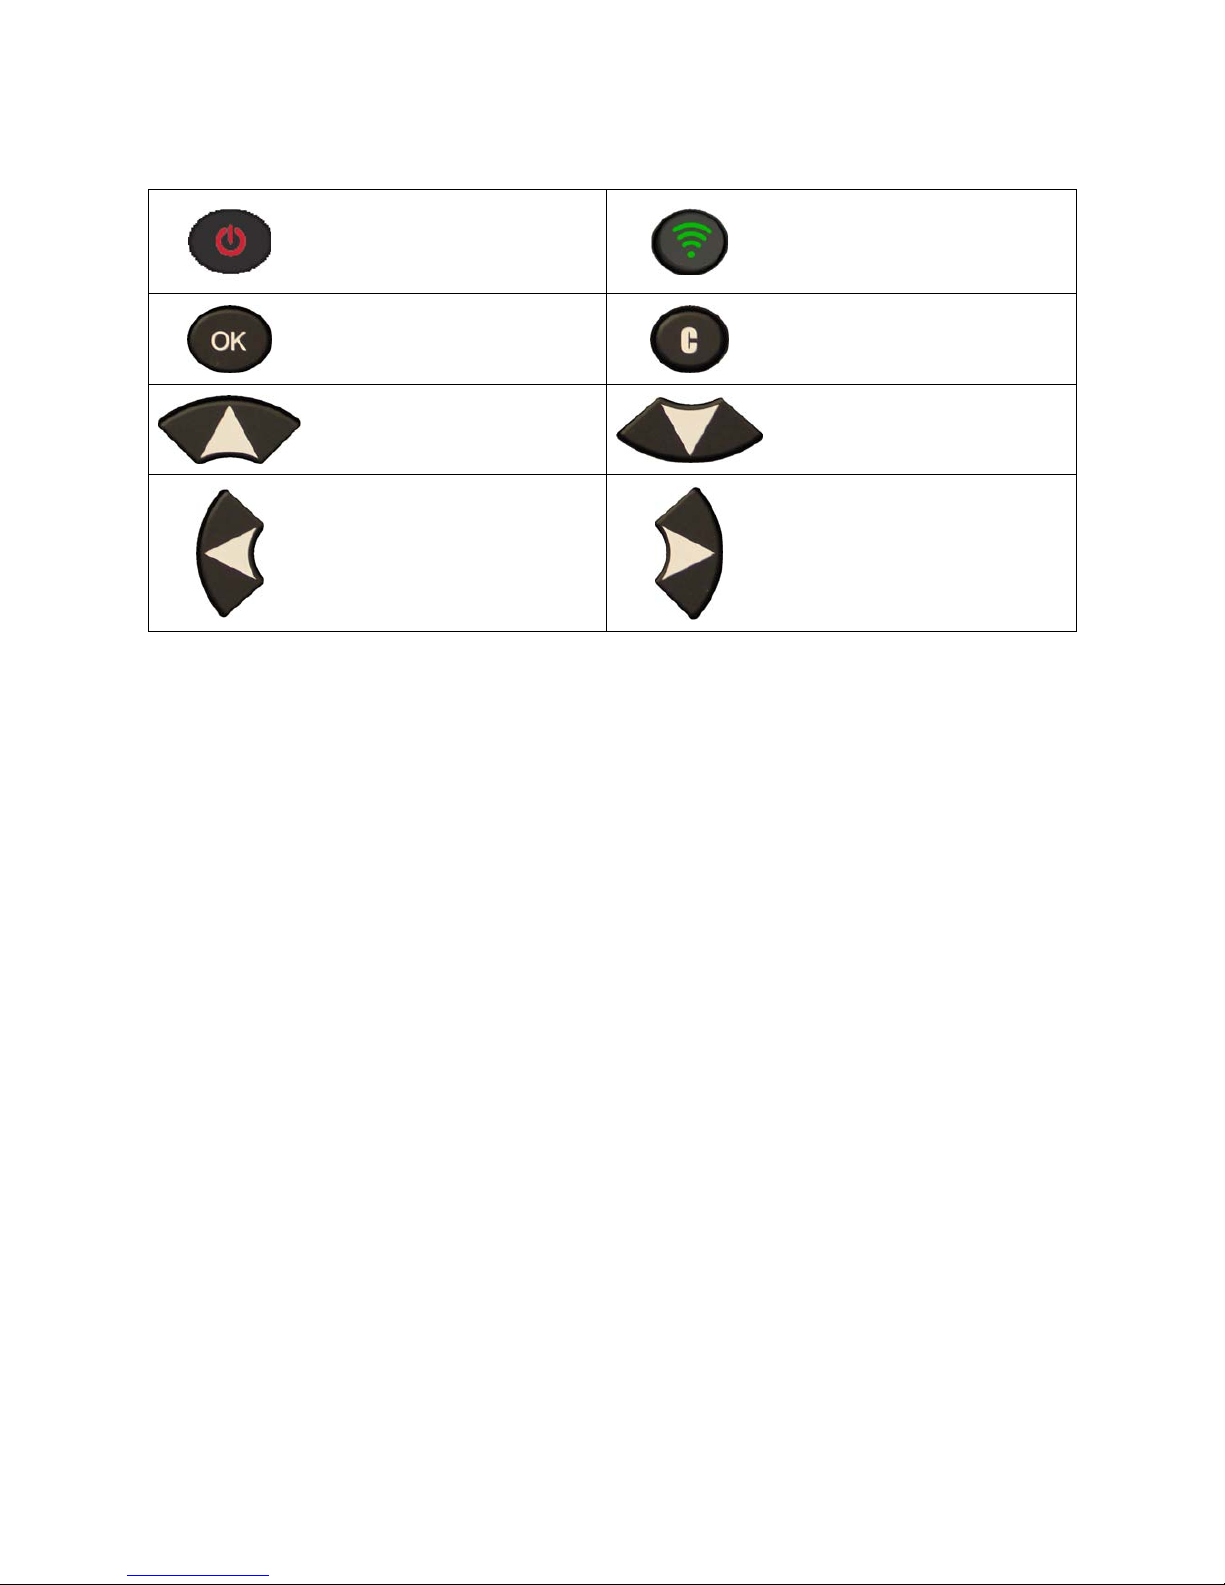
5. FUNCTION KEYS
Power ON/OFF switch
Test or trigger sensor.
Next, continue or confirm.
Cancel, previous step.
Navigate to select "up”. Navigate to select “down”.
Navigate to select “left”.
Navigate to select “right”.
Page 9

VT46 TPMS TOOL - User Guide
UM-36500A-U User manual ATEQ TPMS Tool VT46 Page 7/32
6. POWER ON
Press key to turn on device, the
TPMS TOOL
Displays first the logo as Fig. 1.
Fig. 1
The software version as Fig. 2.
Fig. 2
At first start-up or after a factory reset, you will
be requested to set the work zone as Fig. 3.
Fig. 3
The MAIN MENU will then be displayed as
Fig. 4.
Fig. 4
Page 10
VT46 TPMS TOOL - User Guide
UM-36500A-U User manual ATEQ TPMS Tool VT46 Page 8/32
7. OPERATING INSTRUCTIONS
7.1. TPMS TOOL OVERVIEW
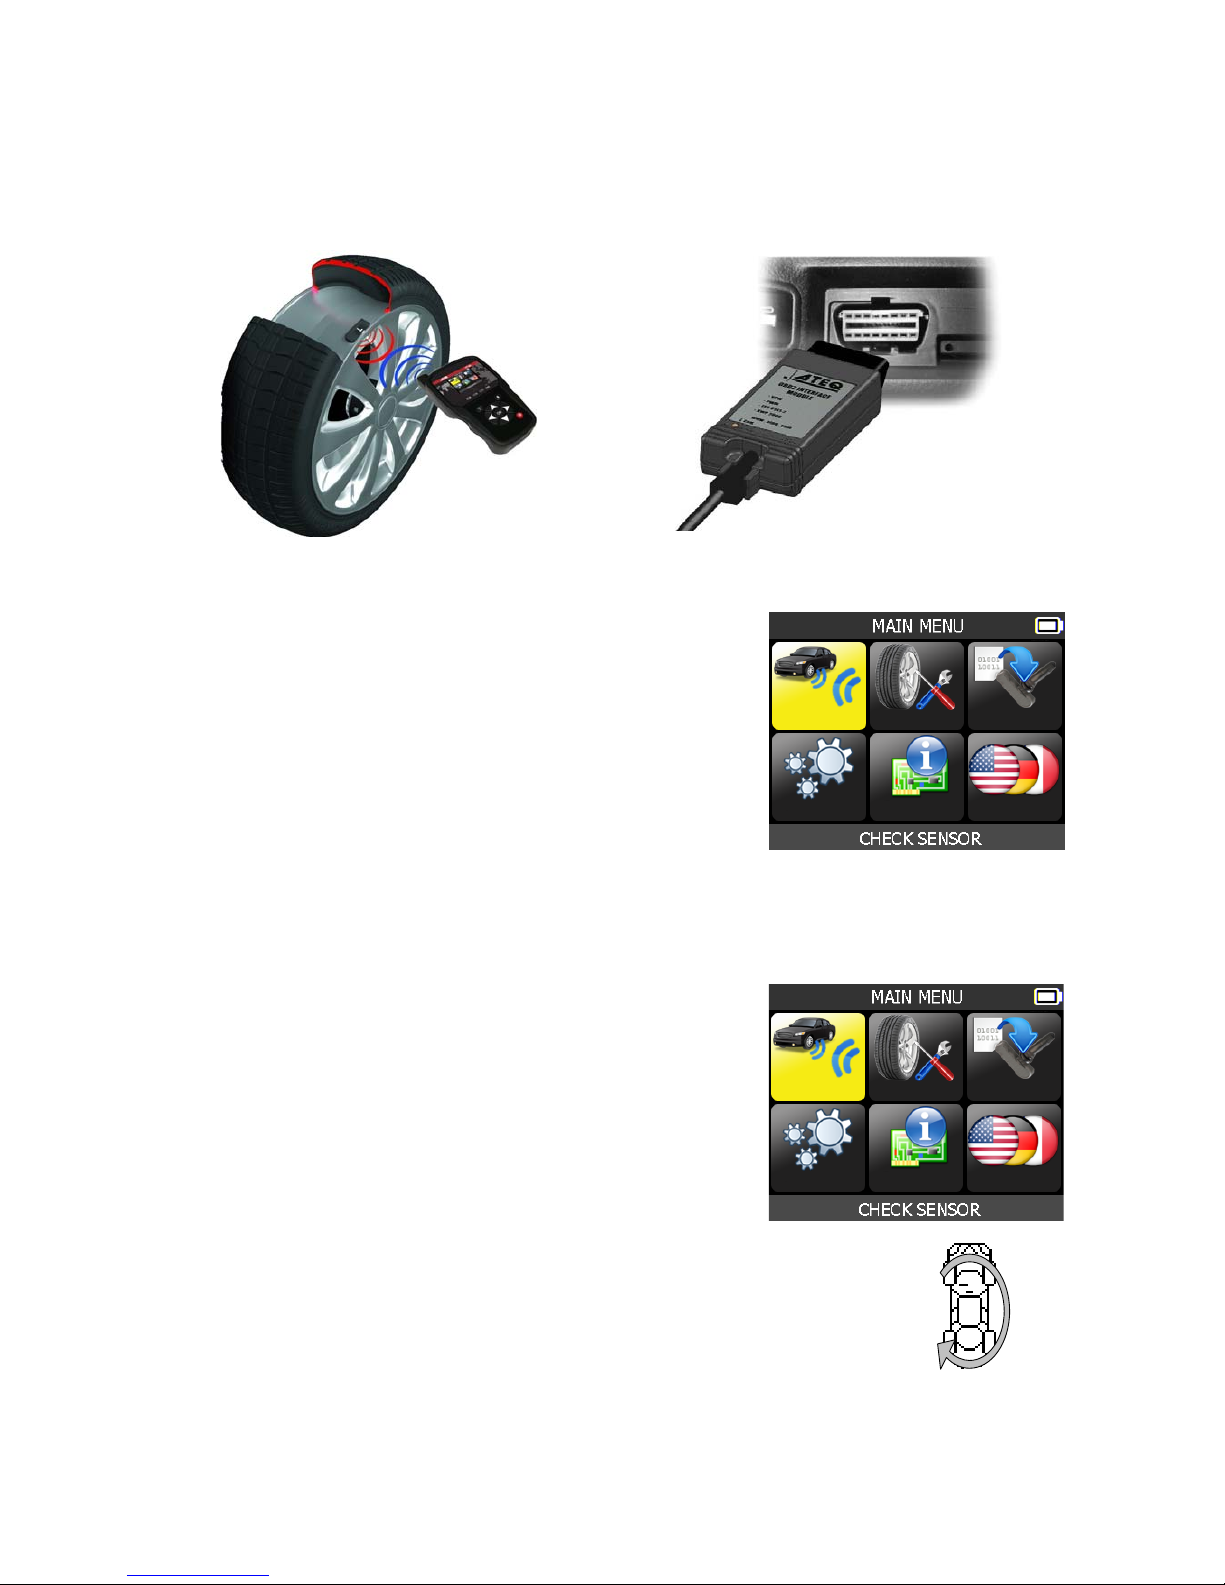
Read and diagnose sensors, OBD2 ECU reset and transfer data to ECU.
Note: With most vehicles, if the vehicle is in “learn mode” the vehicle will also confirm that the TPM
sensor has communicated to the ECM with a series of horn beeps.
Service Procedure
Section 1.0: Read Sensor Test
Before servicing the tires/wheels, using your TPMS TOOL,
trigger each of the vehicle's sensors to make sure they are
working properly.
This will eliminate the liability associated with replacing
previously damaged or defective sensors. This procedure will
not change the vehicle settings because the vehicle has yet to
be put into learn/retraining mode.
This procedure allows you to quickly identify damaged or defective sensors, because some
vehicles do not report a damaged or defective sensor condition on the instrument cluster for up to
20 minutes.
Note: If the sensors do not trigger, please refer to the Troubleshooting section of this Guide.
Perform tire/wheel service.
For vehicles that require retraining, please see to Section 2.0
Section 2.0: Learning TPM System
With the vehicle in learn mode, begin by triggering the driver's front
left (LF) wheel sensor. Many vehicles will provide an audible beep
confirming that the sensor ID has been learned by the vehicle on
board computer.
The communication between the sensor and the on board computer is also
confirmed on LCD display of the TOOL.
The same procedure should be followed on all wheel sensors, in a
clockwise rotation, until all the vehicle sensors have been retrained.
After triggering the driver's rear wheel sensor, some vehicles will beep
twice, indicating that the TPM system has been retrain ed.
1 Start FL
4 End RL
FR 2
RR 3
Fig. 5
For vehicles that do not require retraining, we recommend you trigger each wheel sensor, one final time,
to make sure they are working correctly prior to releasing the vehicle to the customer.
Page 11
VT46 TPMS TOOL - User Guide
UM-36500A-U User manual ATEQ TPMS Tool VT46 Page 9/32
VT46 USAGE
IMPORTANT:
Vehicle specific information in this manual is used as an example and may not
represent specific instructions each make and model may require. When performing
various functions with the tool, it is important to refer to the on-screen prompts
and/or repair manual information.
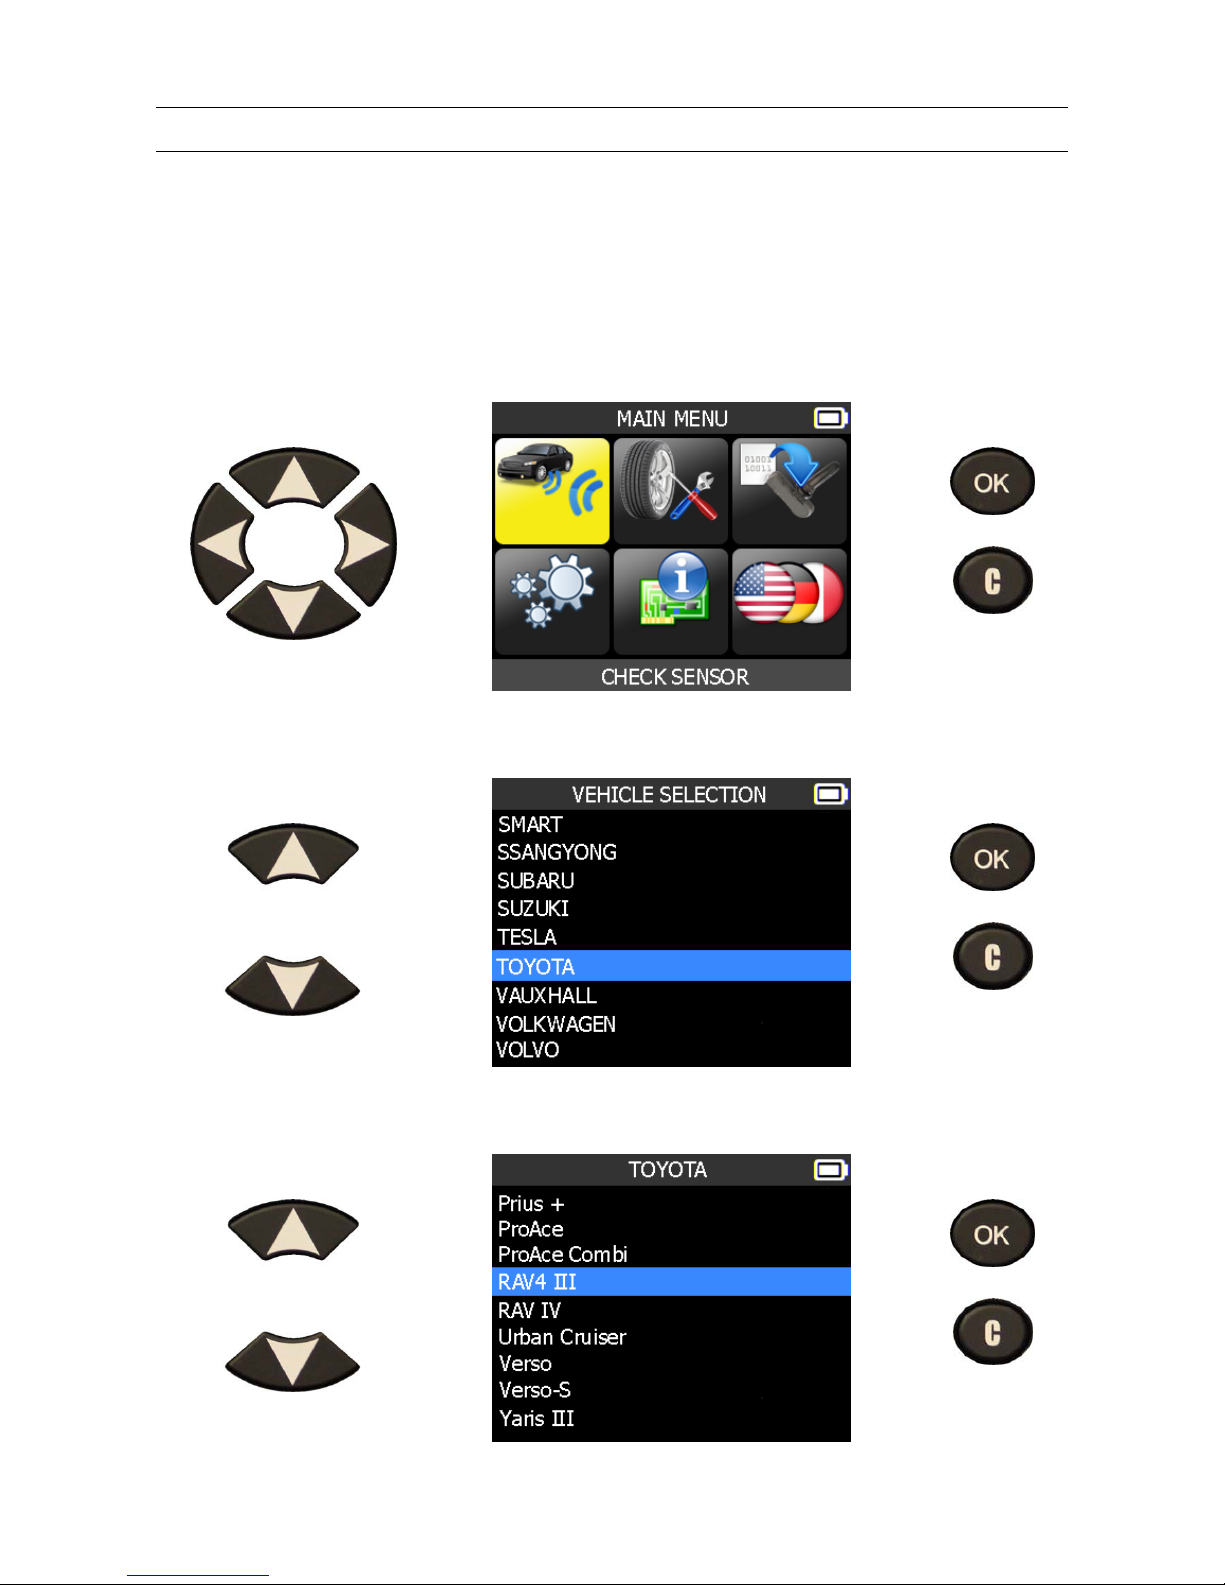
1. CHECK SENSOR
= continue
= Previous
1.1. SELECT CAR MANUFACTURER
= continue
= Previous
1.2. SELECT CAR MODEL
= continue
= Previous
Page 12
VT46 TPMS TOOL - User Guide
UM-36500A-U User manual ATEQ TPMS Tool VT46 Page 10/32
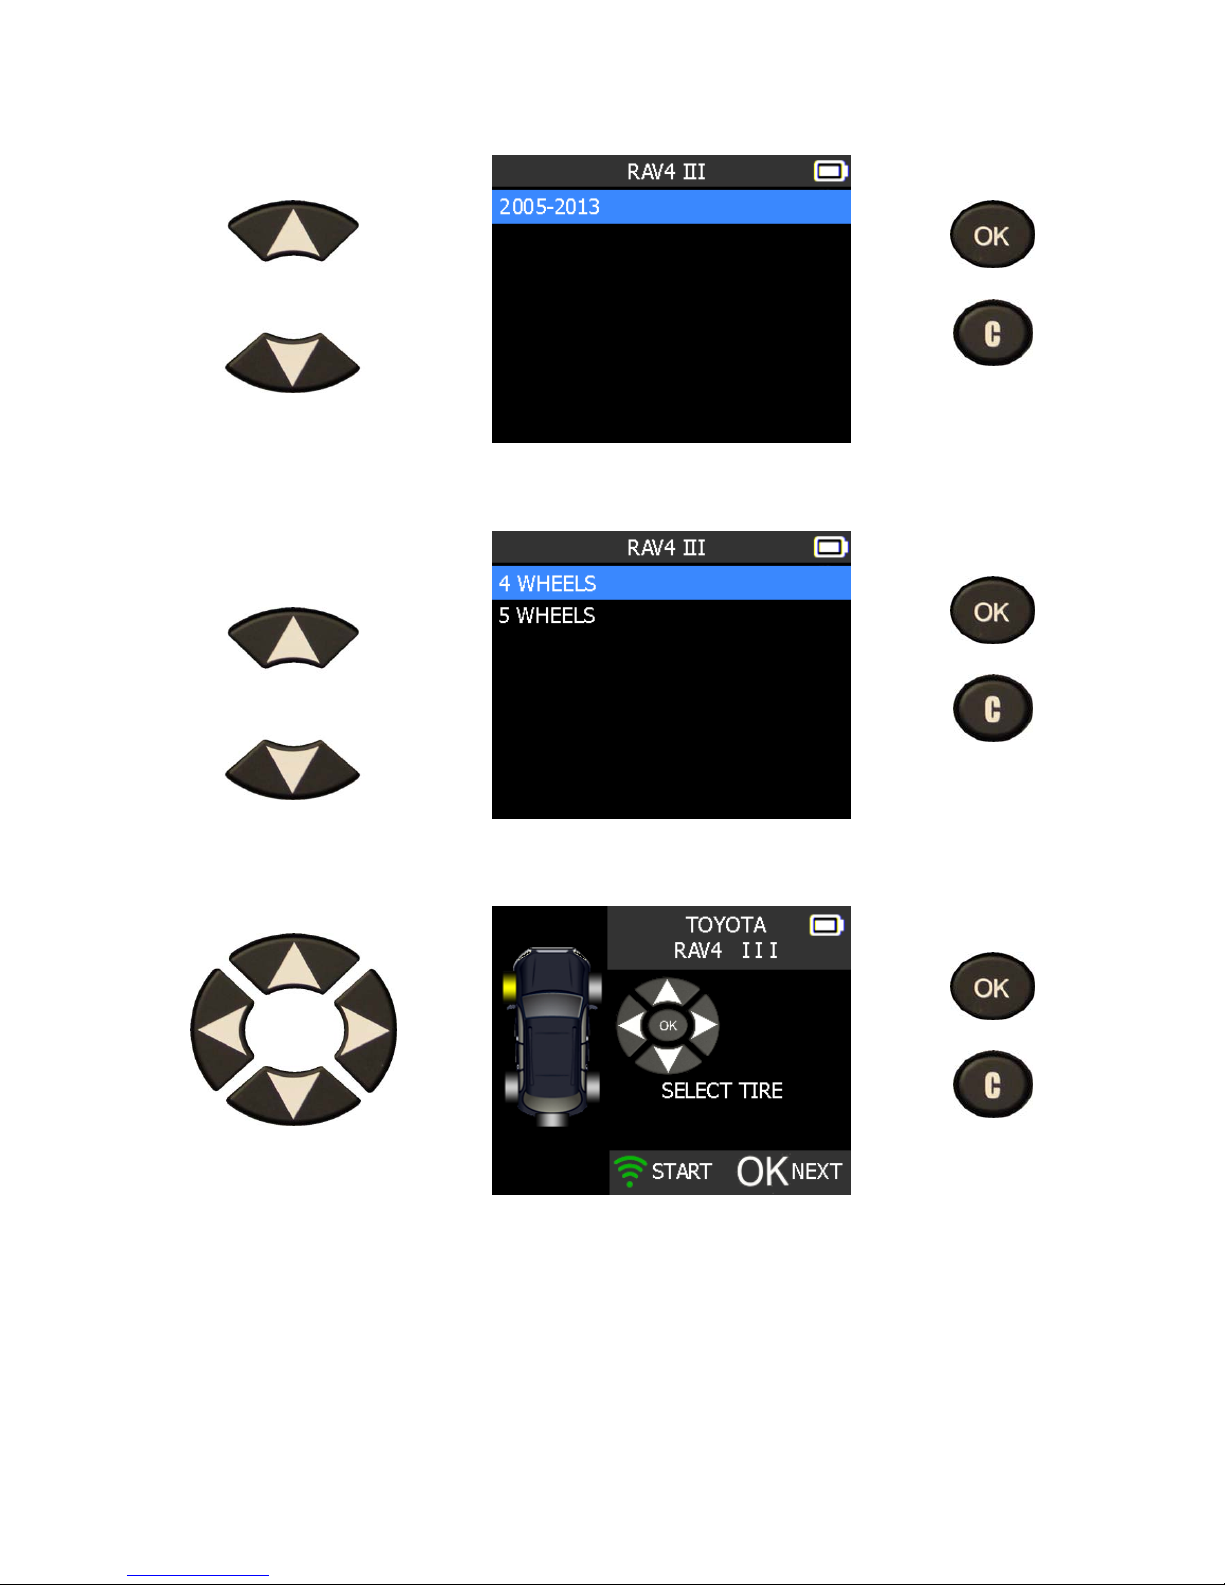
1.3. SELECT YEAR
= continue
= Previous
1.4. SELECT WHEEL NUMBER
This option does not
appear for all vehicles.
= continue
= Previous
1.5. TEST SENSORS (TRIGGER)
Select tire.
= continue
= Previous
Page 13
VT46 TPMS TOOL - User Guide
UM-36500A-U User manual ATEQ TPMS Tool VT46 Page 11/32
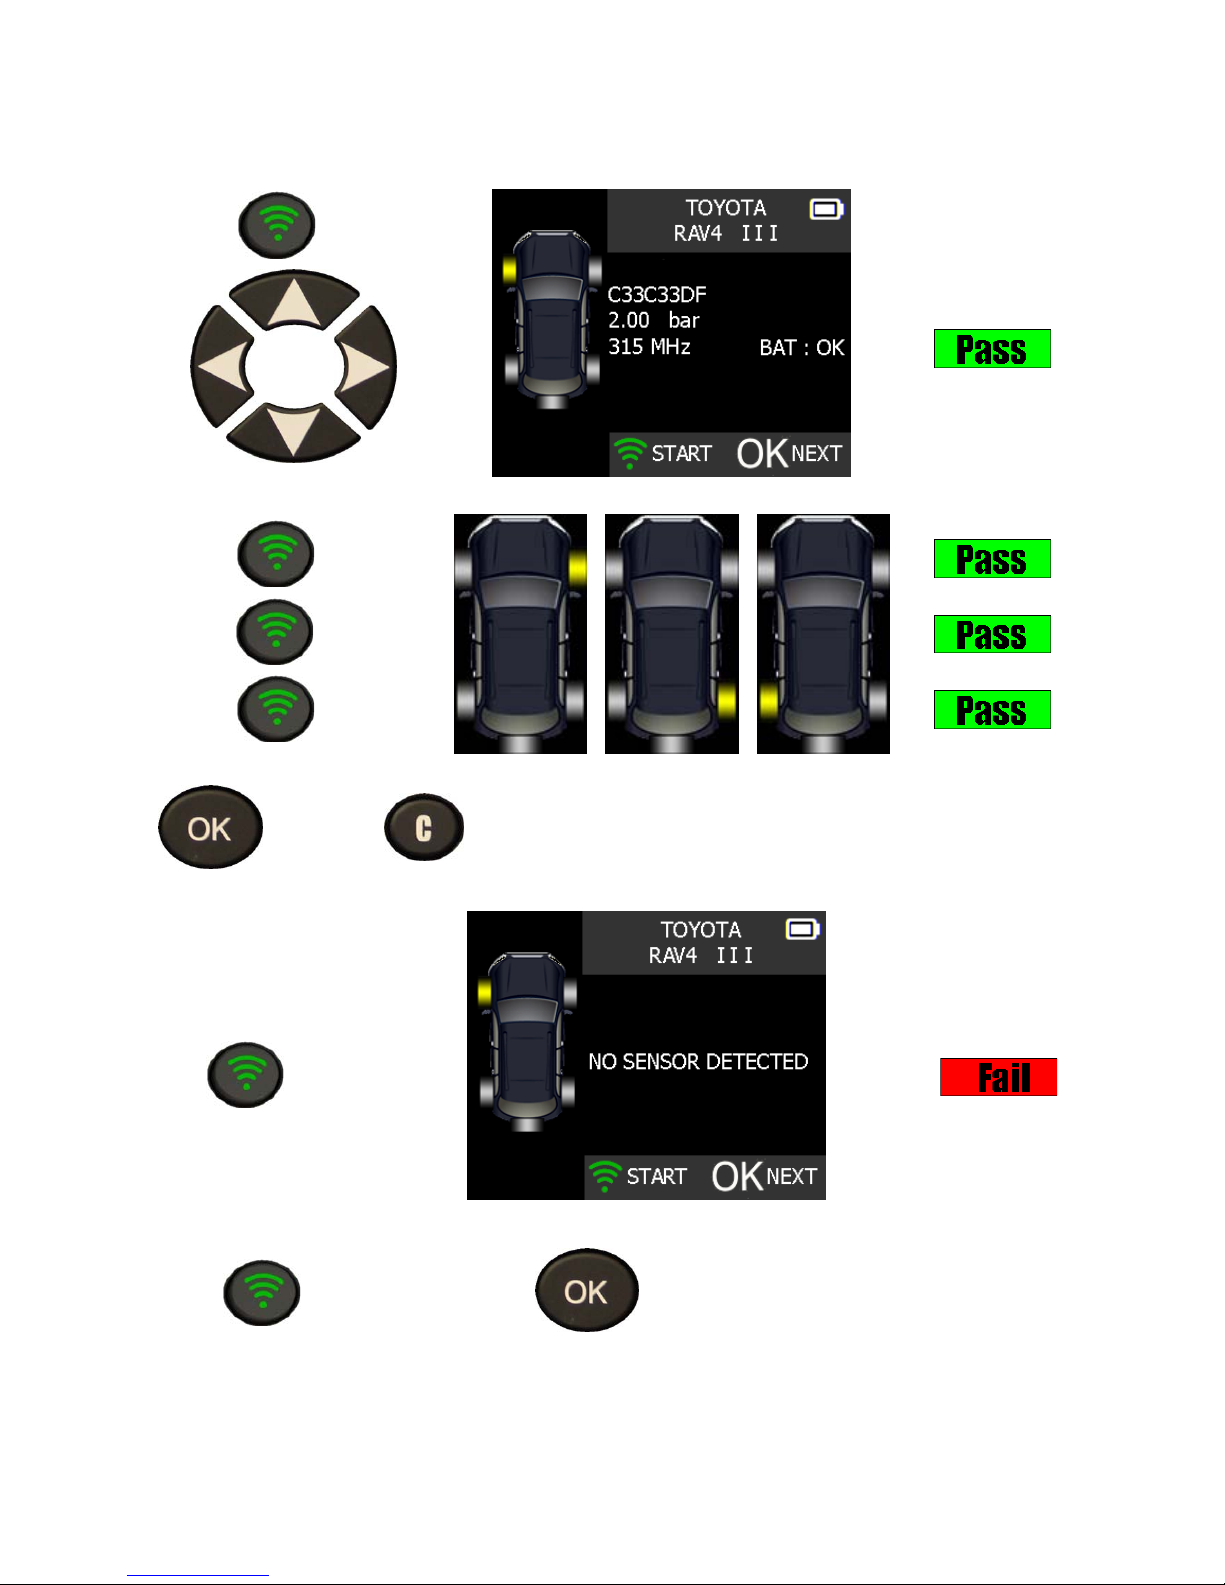
1.6. TEST RESULTS
LF
To change tire
The tool is triggering the sensor.
RF
RR
LR
Trigger all wheels.
= Continue = Previous and erase results
LF
The tool does not detect a sensor
Press to test again. Or press to move on to the next step.
Page 14
VT46 TPMS TOOL - User Guide
UM-36500A-U User manual ATEQ TPMS Tool VT46 Page 12/32
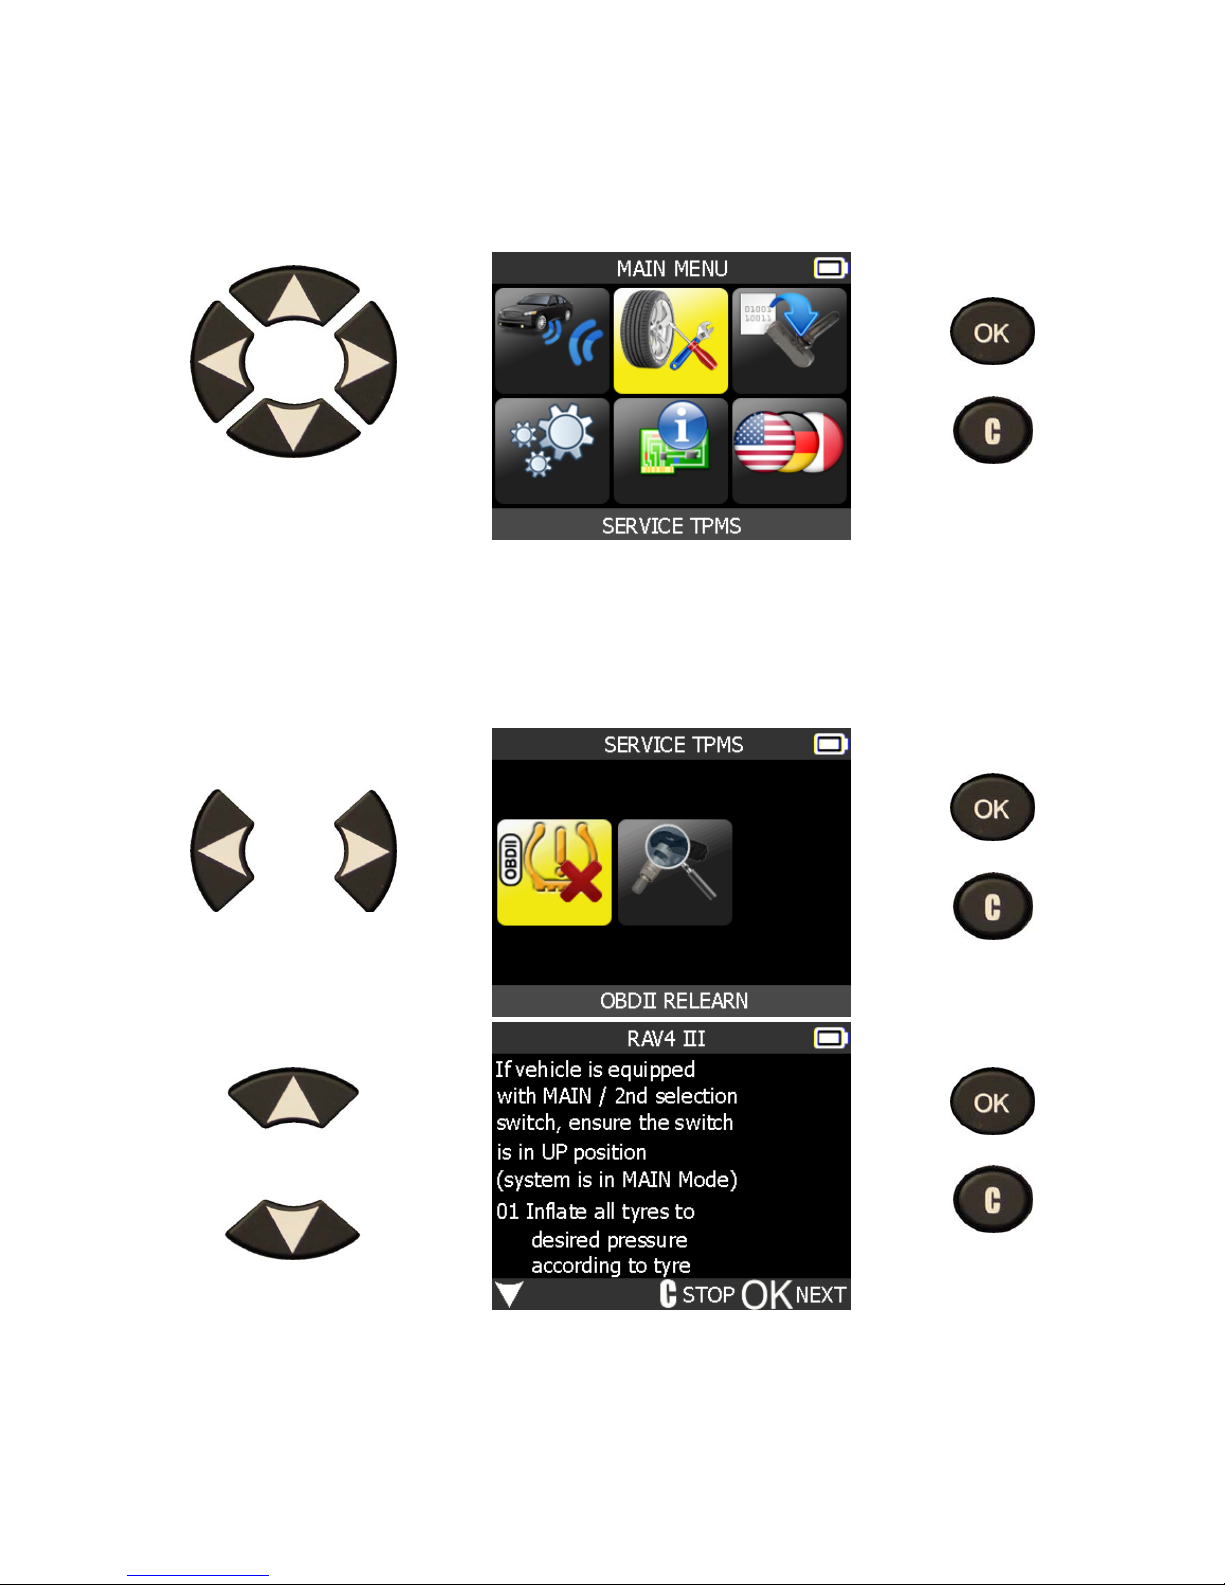
2. SERVICE TPMS
This section details how to relearn the sensor to the ECU with the OBD-II port or to have
the part # lookup for all the sensors available for the vehicle.
Select "SERVICE TPMS"
menu.
= continue
= Previous
Select car manufacturer.
Select car model.
Select year.
2.1. OBD-II RELEARN
Select OBD-II
= continue
= Previous
= continue
= Previous
Select wheel number.
Proceed as "Sensor check" to trigger all the sensors.
Page 15
VT46 TPMS TOOL - User Guide
UM-36500A-U User manual ATEQ TPMS Tool VT46 Page 13/32
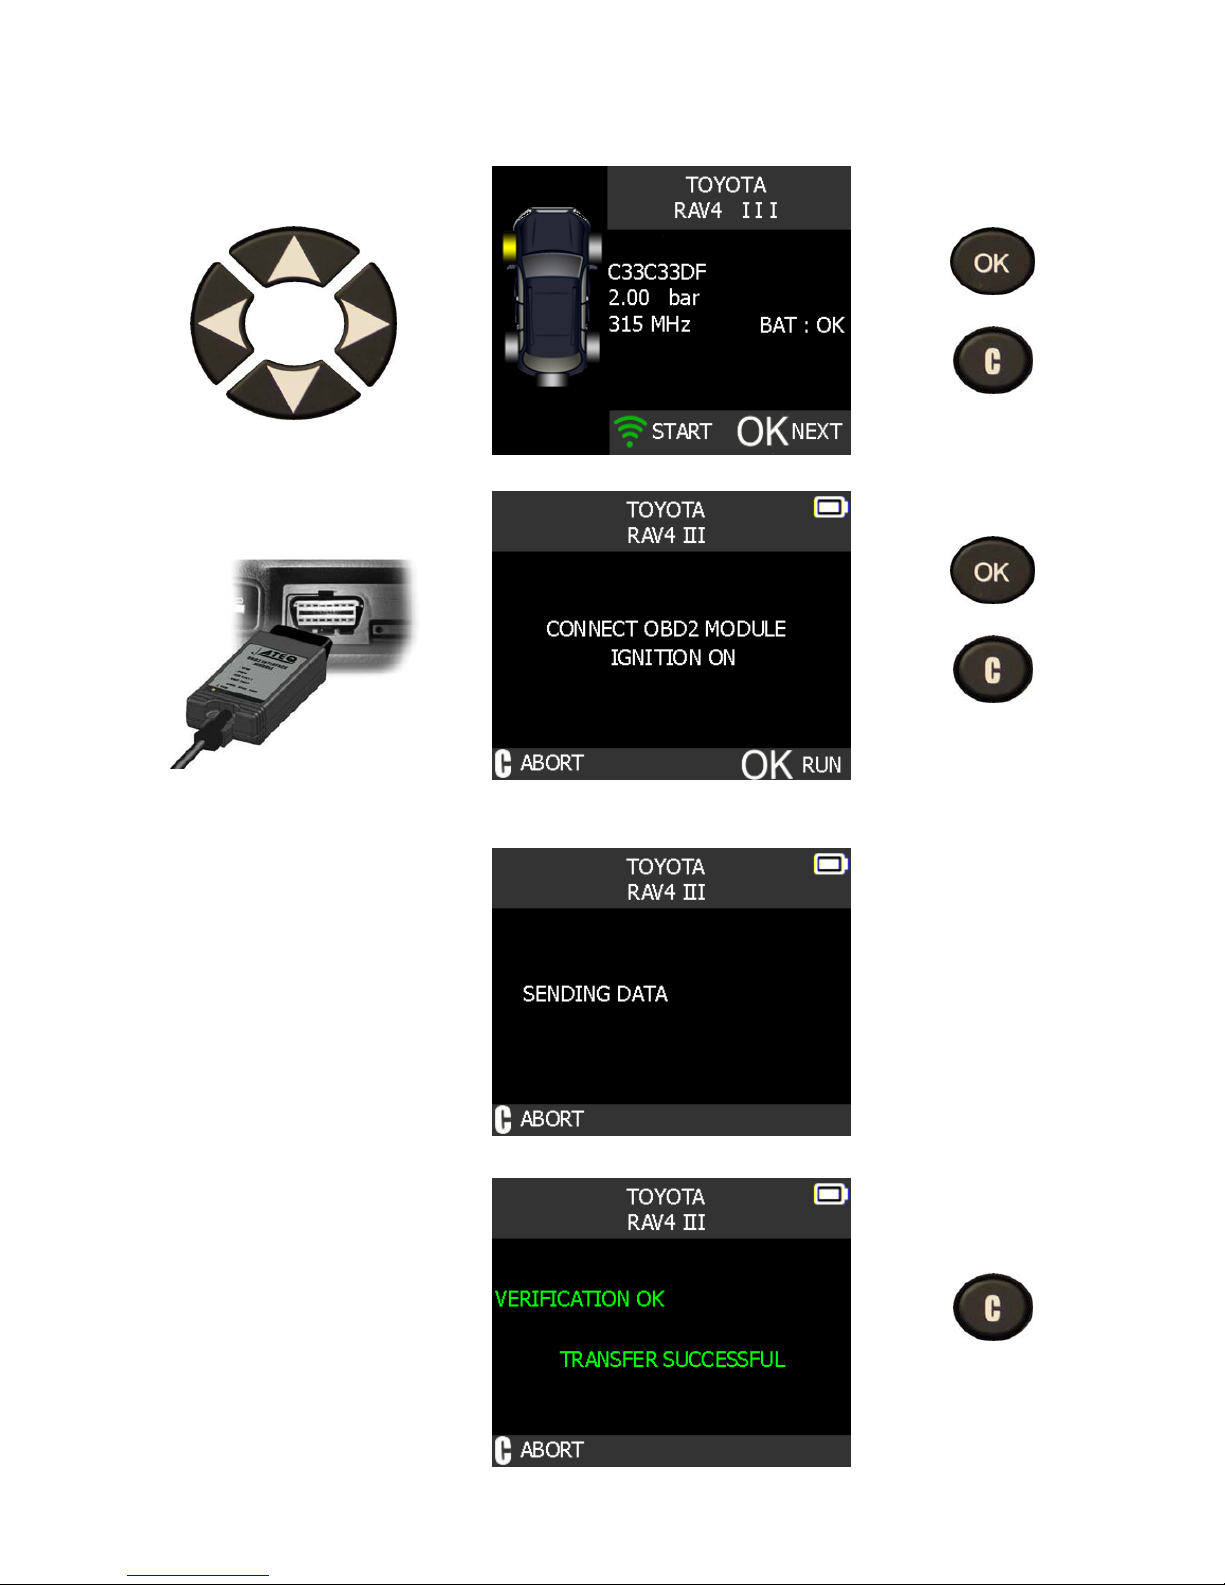
2.1.1. Reprogram ECU through OBD2 Port
The tool is triggering the sensor.
= continue
= Previous
Plug OBD2 module to the
OBD2 port on vehicle.
= continue
= Abort
Note: this following screen message is displayed when all the sensors are triggered and
the OBD2 module is connected to the TPMS TOOL.
Wait a few seconds during
the data upload.
Note: this feature is not supported on all vehicles.
The data is successfully
transferred to the ECU.
OBD-II module can be
unplugged from the ECU.
= Abort
Page 16
VT46 TPMS TOOL - User Guide
UM-36500A-U User manual ATEQ TPMS Tool VT46 Page 14/32
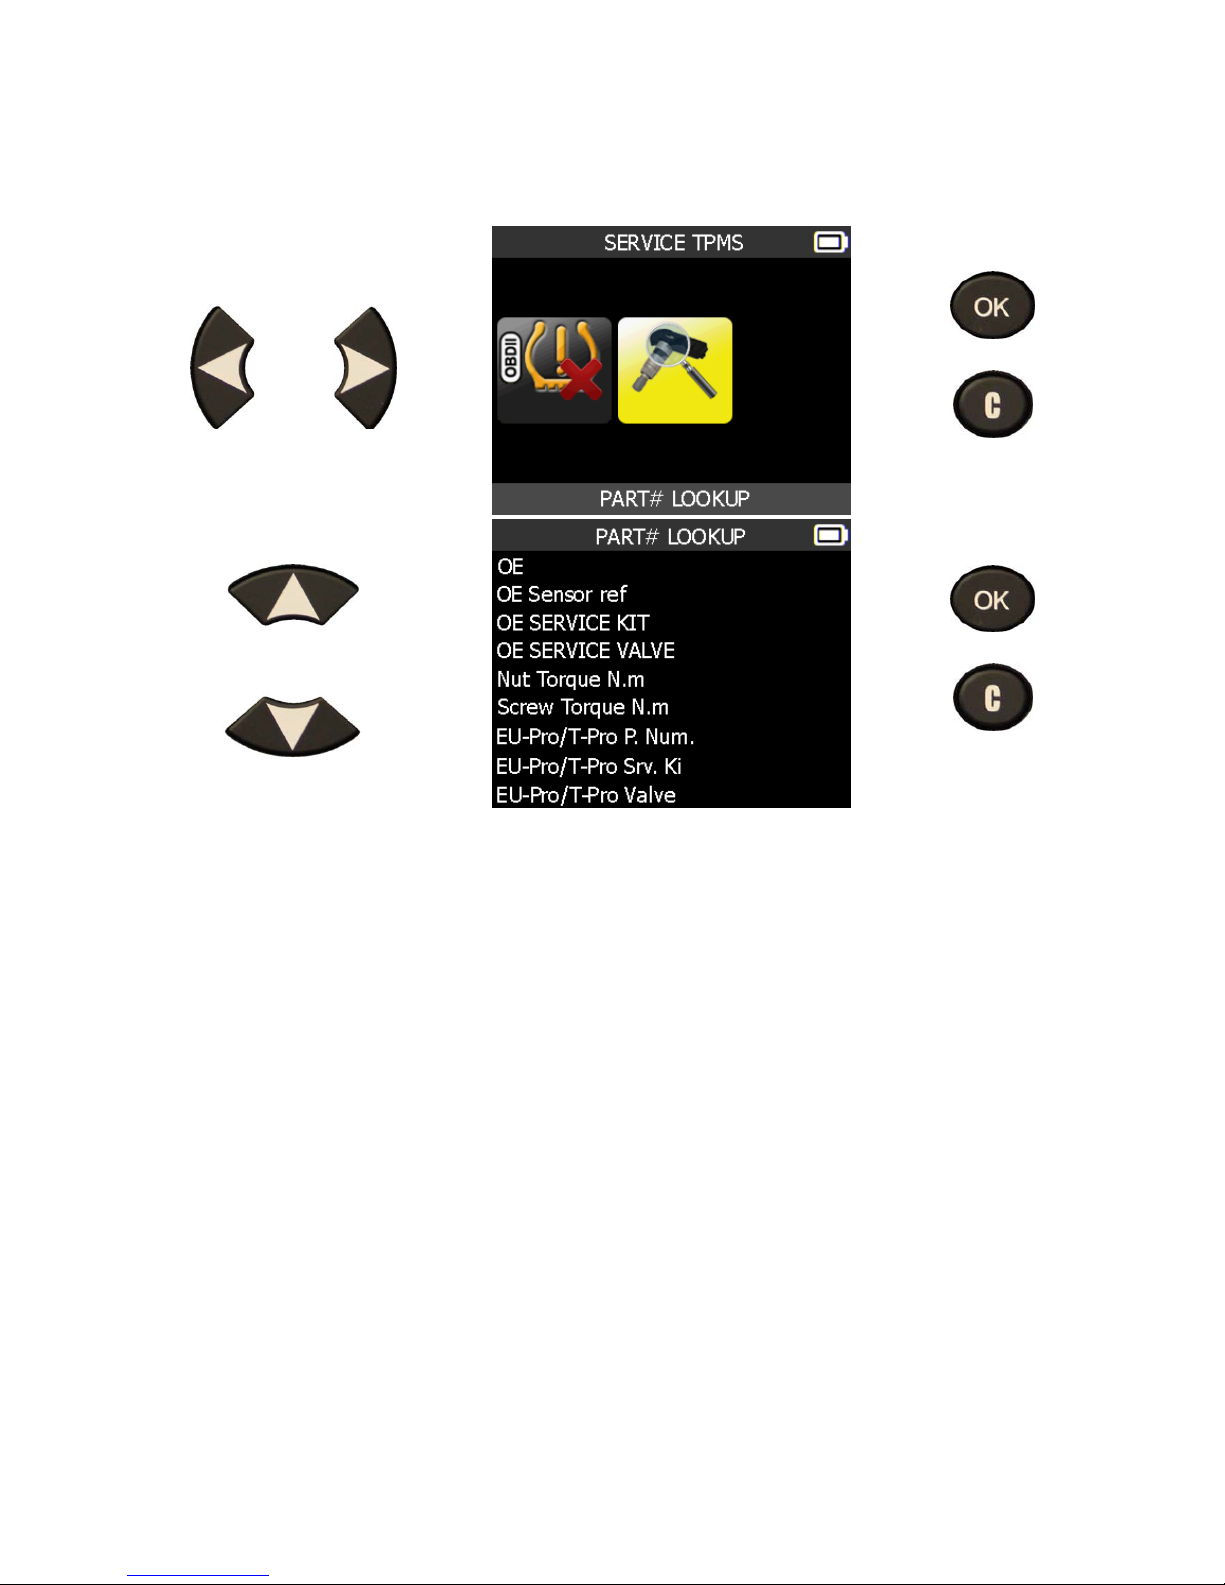
2.2. PART # LOOKUP
This is a spare parts data base for all the sensors available for all cars.
= continue
= Previous
= continue
= Abort
Page 17
VT46 TPMS TOOL - User Guide
UM-36500A-U User manual ATEQ TPMS Tool VT46 Page 15/32
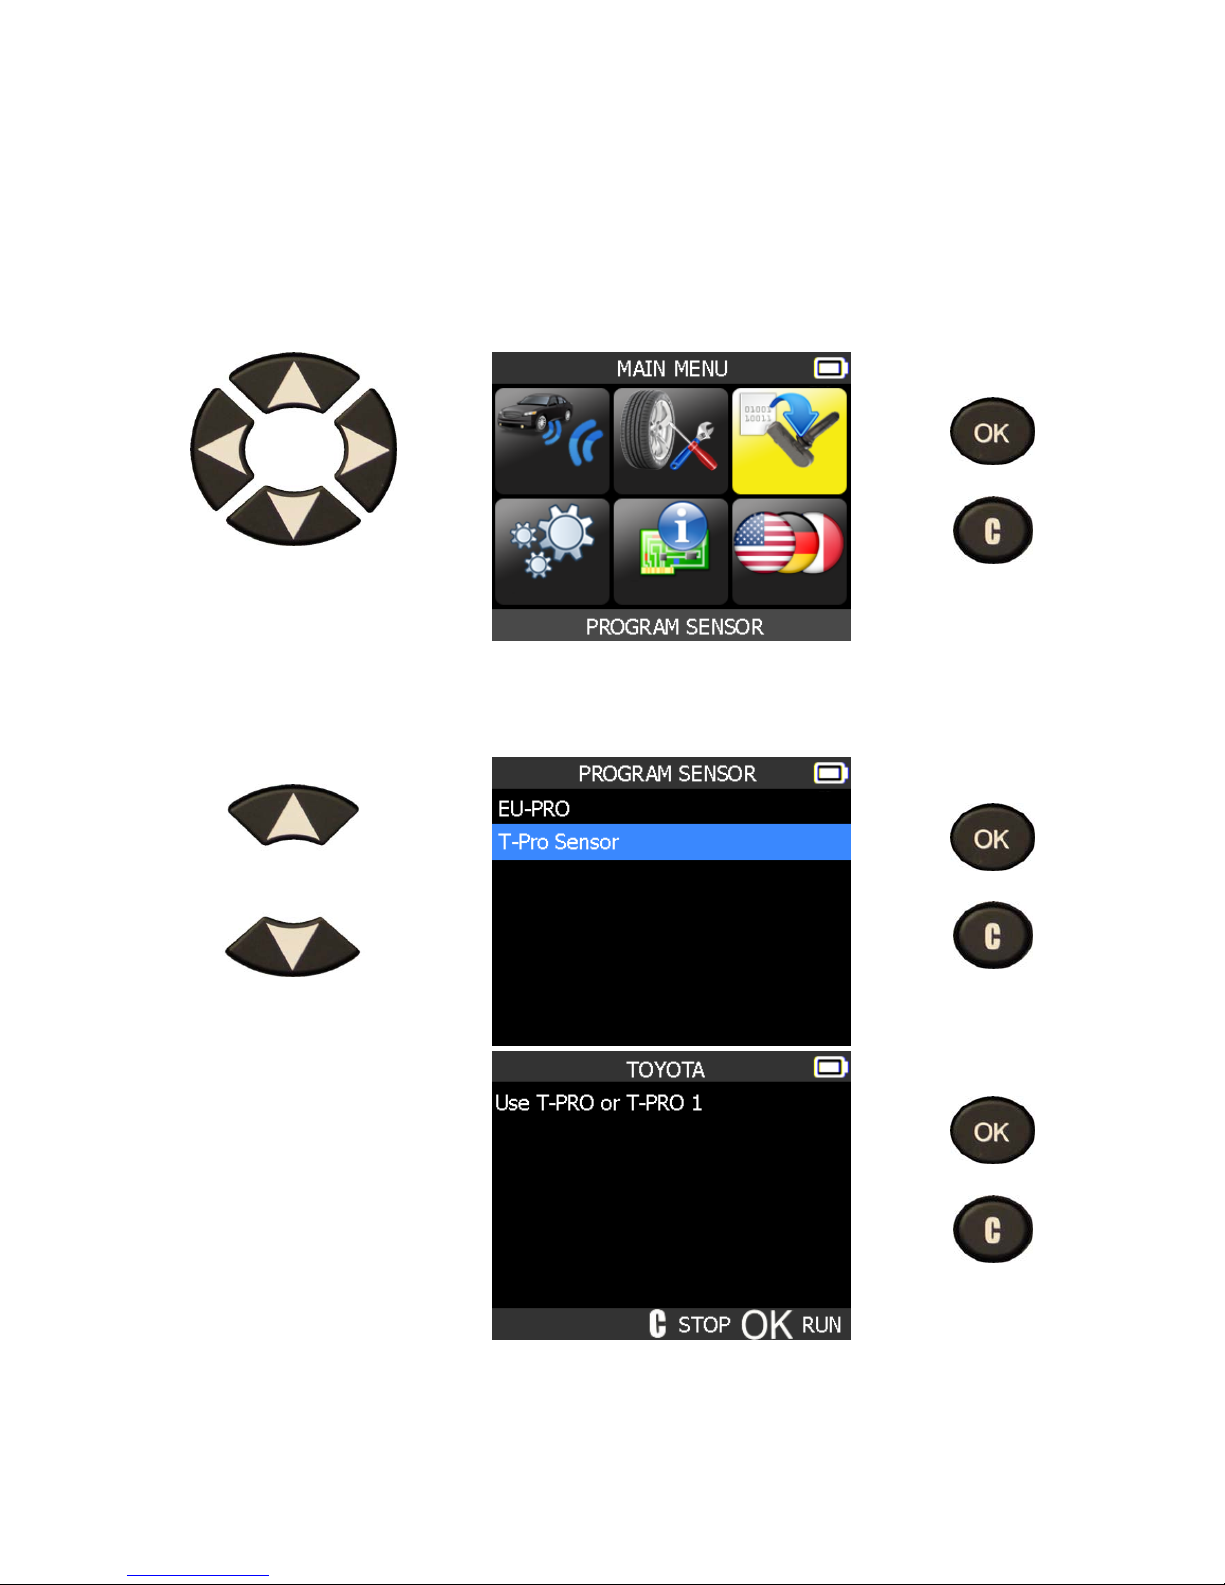
3. PROGRAM BLANK SENSOR
This section is to recover a sensor ID in order to enter it in the spare blank sensor. If the
"old" sensor can be read, use the "COPY ORIGINAL SENSOR" section to recover the ID.
If it cannot be read, use the "CREATE NEW SENSOR" section to create a randomized ID.
This section details how to relearn the sensor to the ECU with the OBD-II port or to have
the part # lookup for all the sensors available for the vehicle.
Select
"PROGRAM SENSOR"
menu.
= continue
= Previous
Select car manufacturer.
Select car model.
Select year.
Select the sensor's brand.
= continue
= Previous
The device displays blank
sensor's reference of the
selected dealer.
= continue
= Previous
Note: You may have to choose a generation of sensors, here is an example.
Page 18
VT46 TPMS TOOL - User Guide
UM-36500A-U User manual ATEQ TPMS Tool VT46 Page 16/32
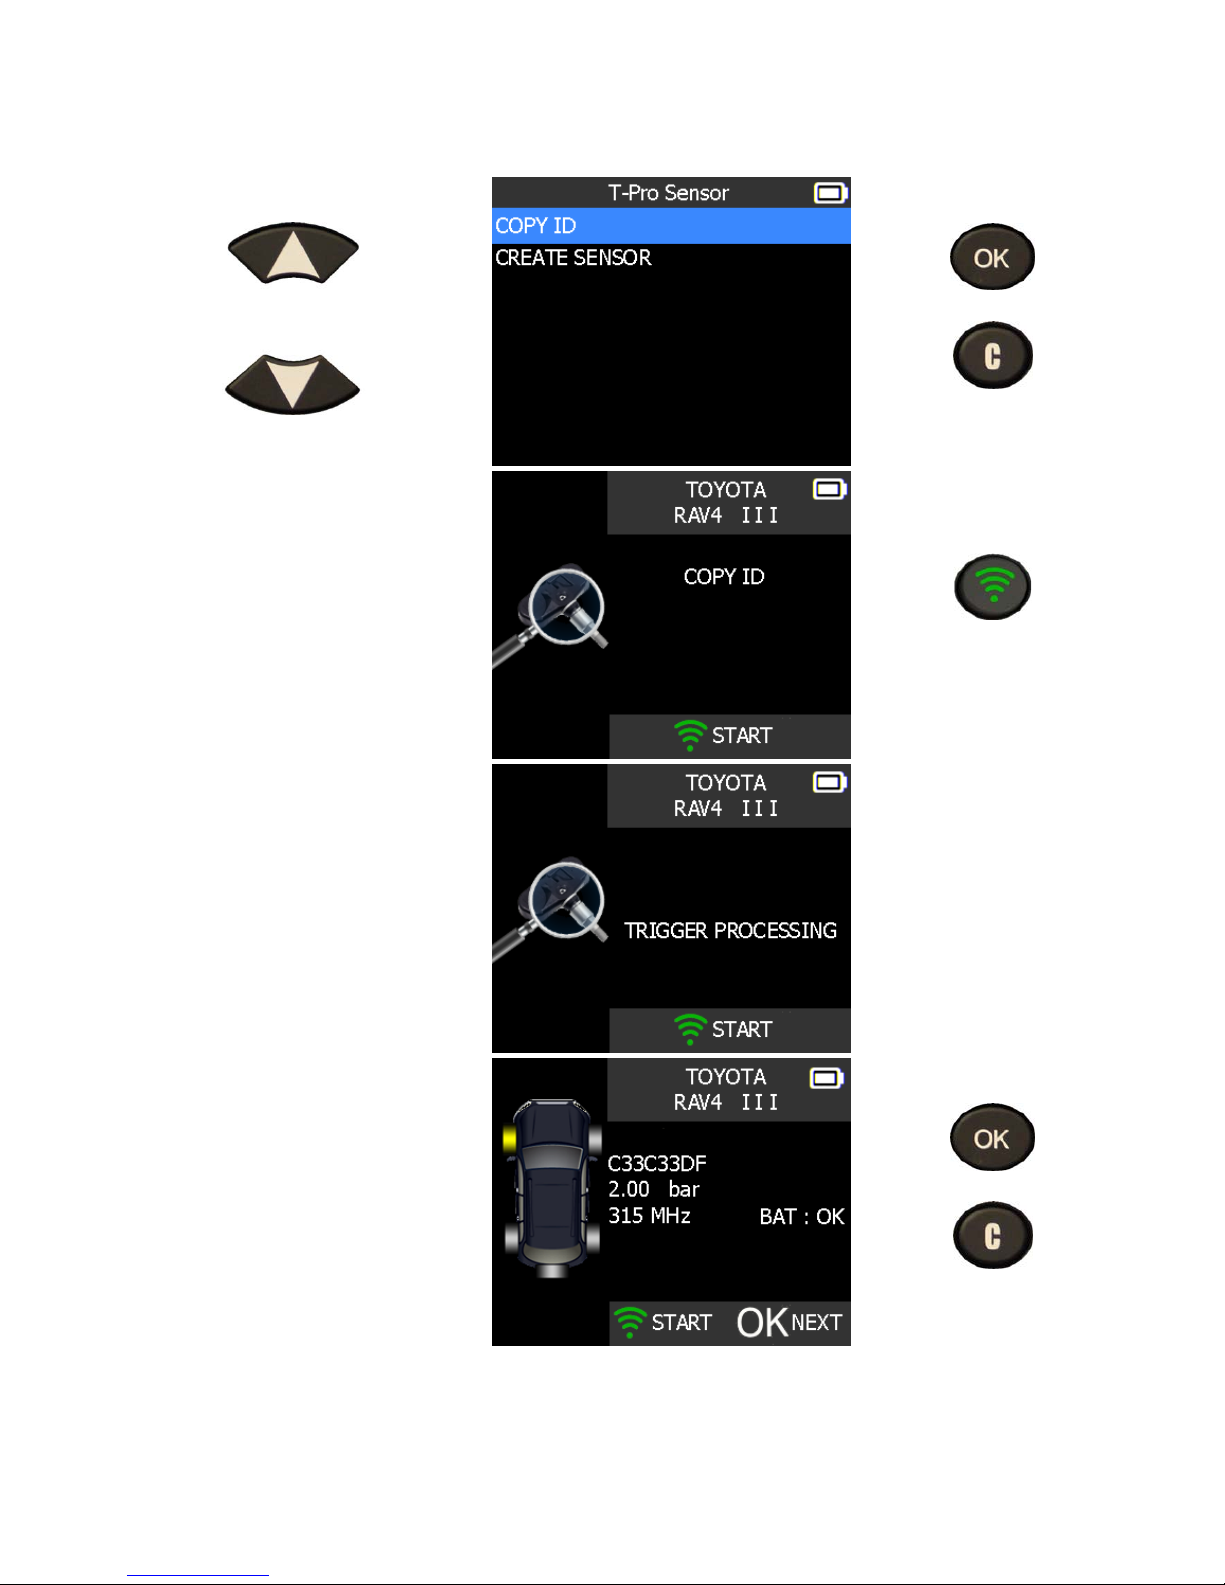
3.1. "COPY ORIGINAL SENSOR" SECTION
= continue
= Previous
To trigger the
original sensor
Wait a few seconds.
ID of the old sensor is
displayed.
= continue
= Previous
Page 19
VT46 TPMS TOOL - User Guide
UM-36500A-U User manual ATEQ TPMS Tool VT46 Page 17/32
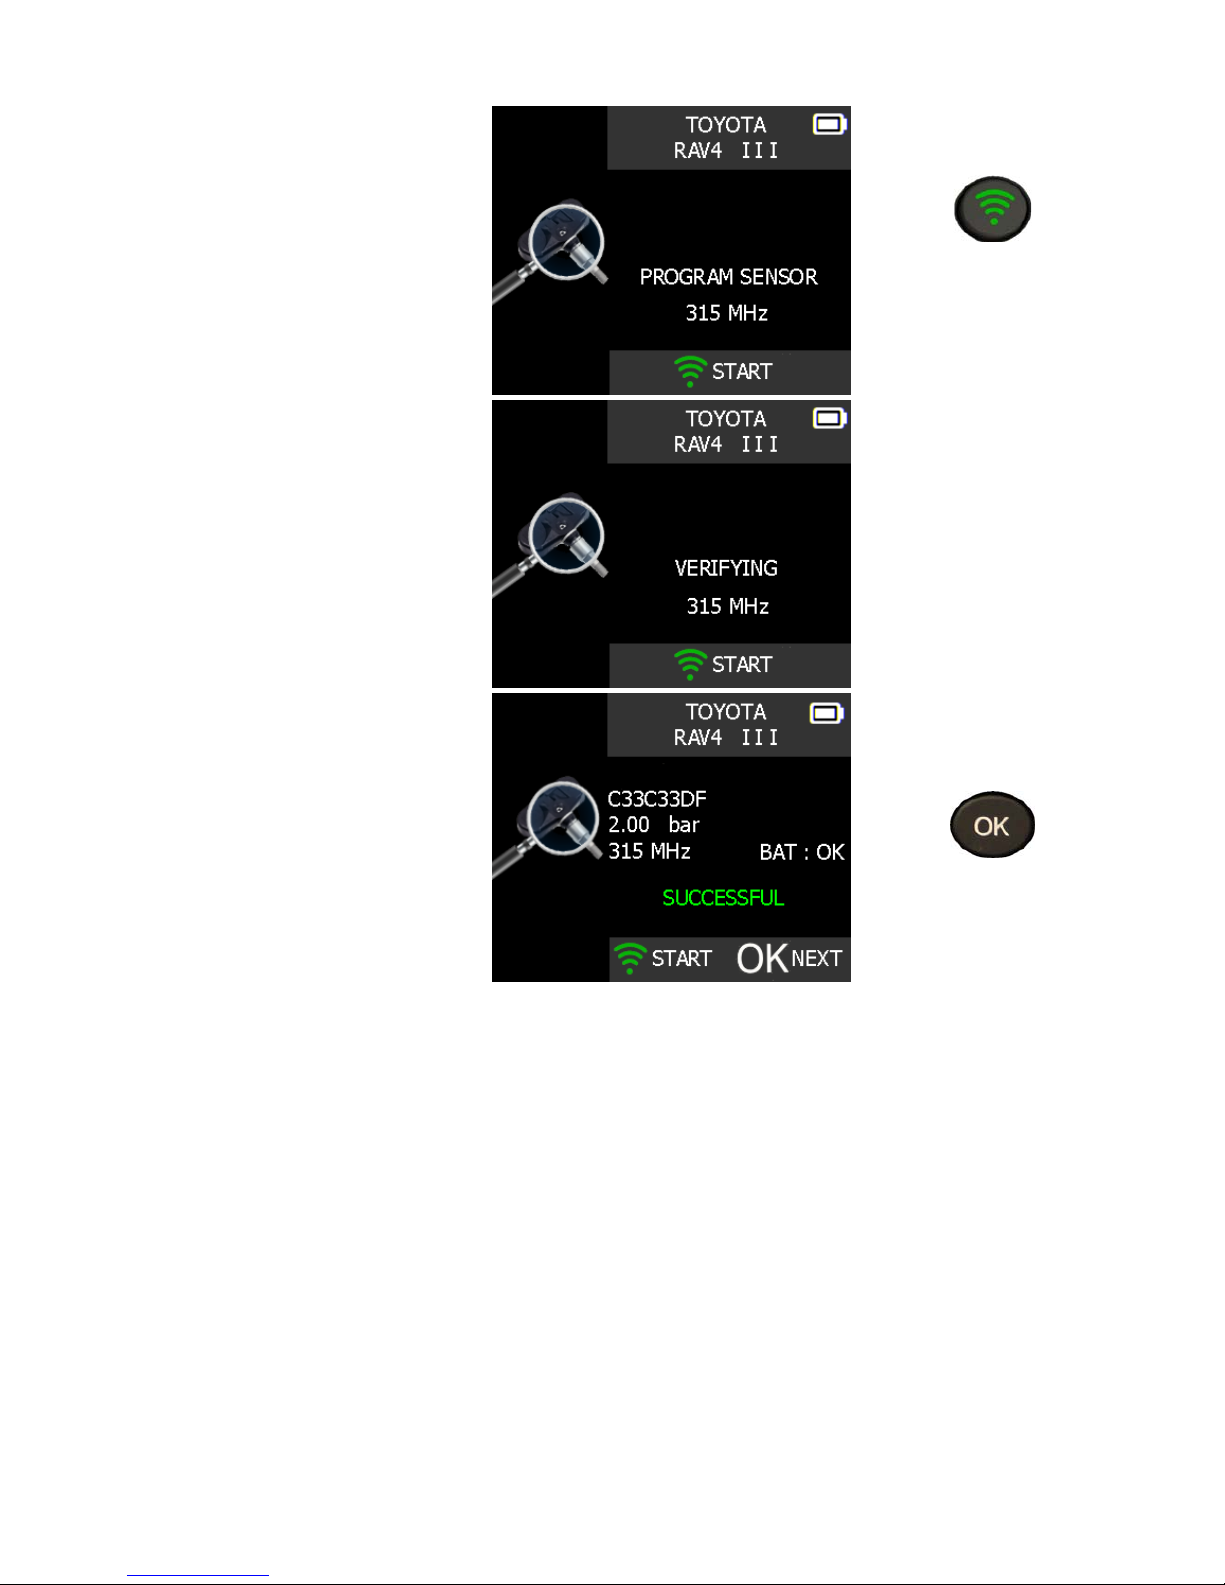
Hold the new
programmable sensor
near the device antenna.
To upload data
to the blank
sensor.
Wait a few seconds.
The data is successfully
uploaded to the sensor.
= continue
Page 20
VT46 TPMS TOOL - User Guide
UM-36500A-U User manual ATEQ TPMS Tool VT46 Page 18/32
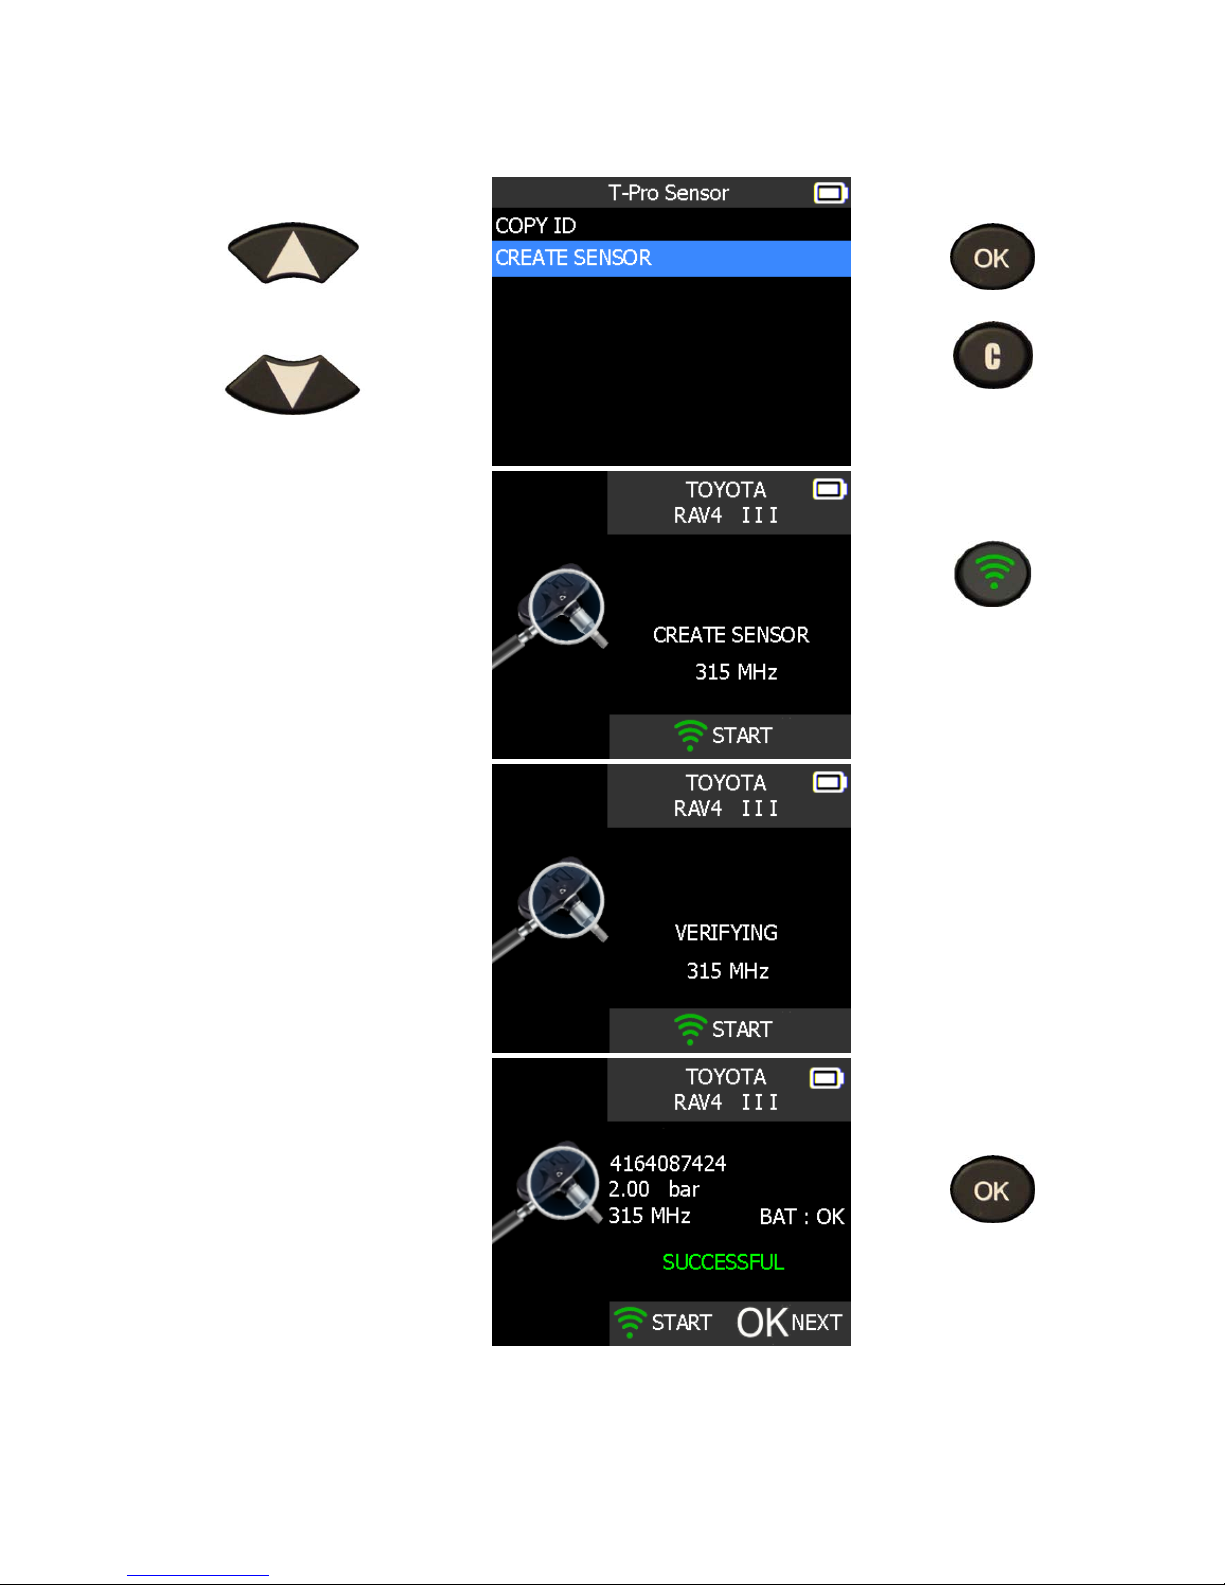
3.2. "CREATE NEW SENSOR" SECTION
= continue
= Previous
Hold the new
programmable sensor
near the device antenna.
To upload data
to the blank
sensor.
Wait a few seconds.
The data is successfully
uploaded to the sensor.
= continue
Page 21
VT46 TPMS TOOL - User Guide
UM-36500A-U User manual ATEQ TPMS Tool VT46 Page 19/32
SETTINGS
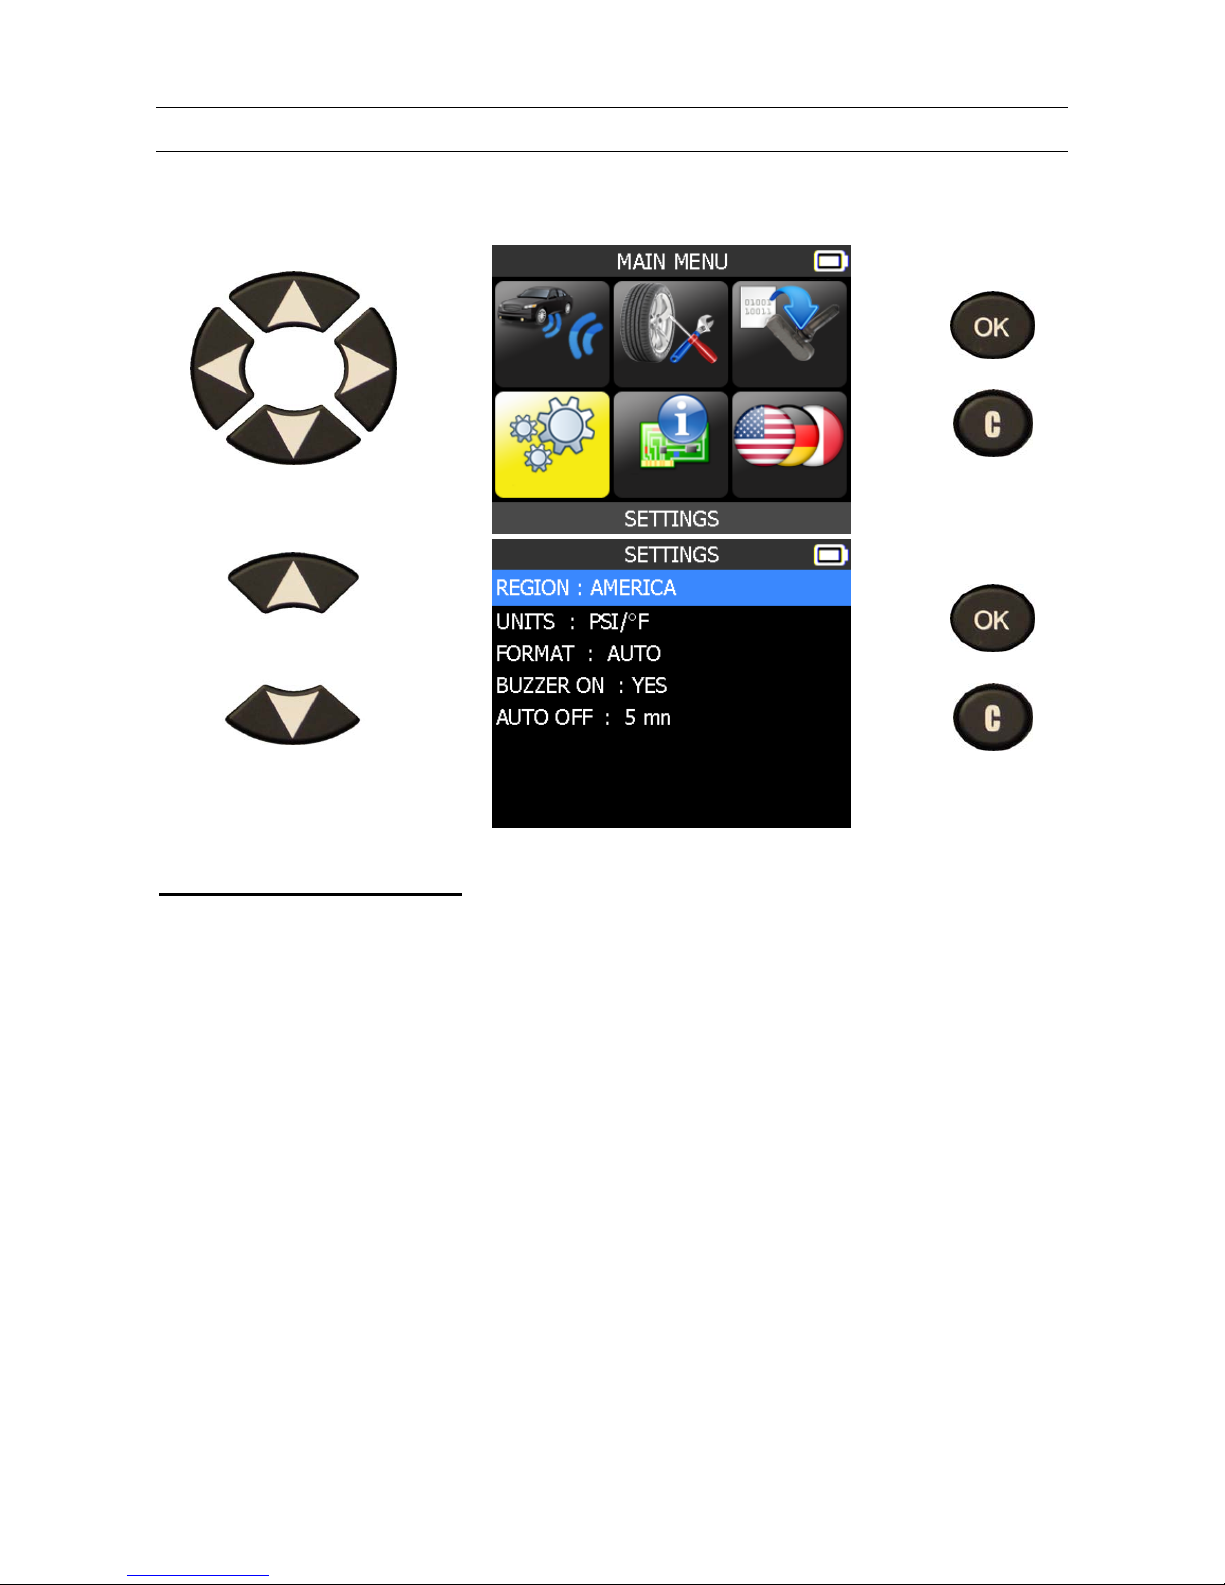
1. ENTER SETTINGS MENU
Select "SETTINGS" menu.
= continue
= Previous
Scroll up and down to
select function or settings.
= continue
= Previous
Key functional descriptions:
REGION: to select the area of work, AMERICA or EUROPE. Be careful, when you change
the zone, a WebVT download or SD card is required to get the zone data.
UNITS: change the air pressure and temperature display (kPa, Bar or PSI with F° or C°).
FORMAT: change the format of sensor ID display.
BUZZER: turn buzzer to ON or OFF (YES or NO).
AUTO OFF: time to turn off the device automatically after not being operated.
Page 22
VT46 TPMS TOOL - User Guide
UM-36500A-U User manual ATEQ TPMS Tool VT46 Page 20/32
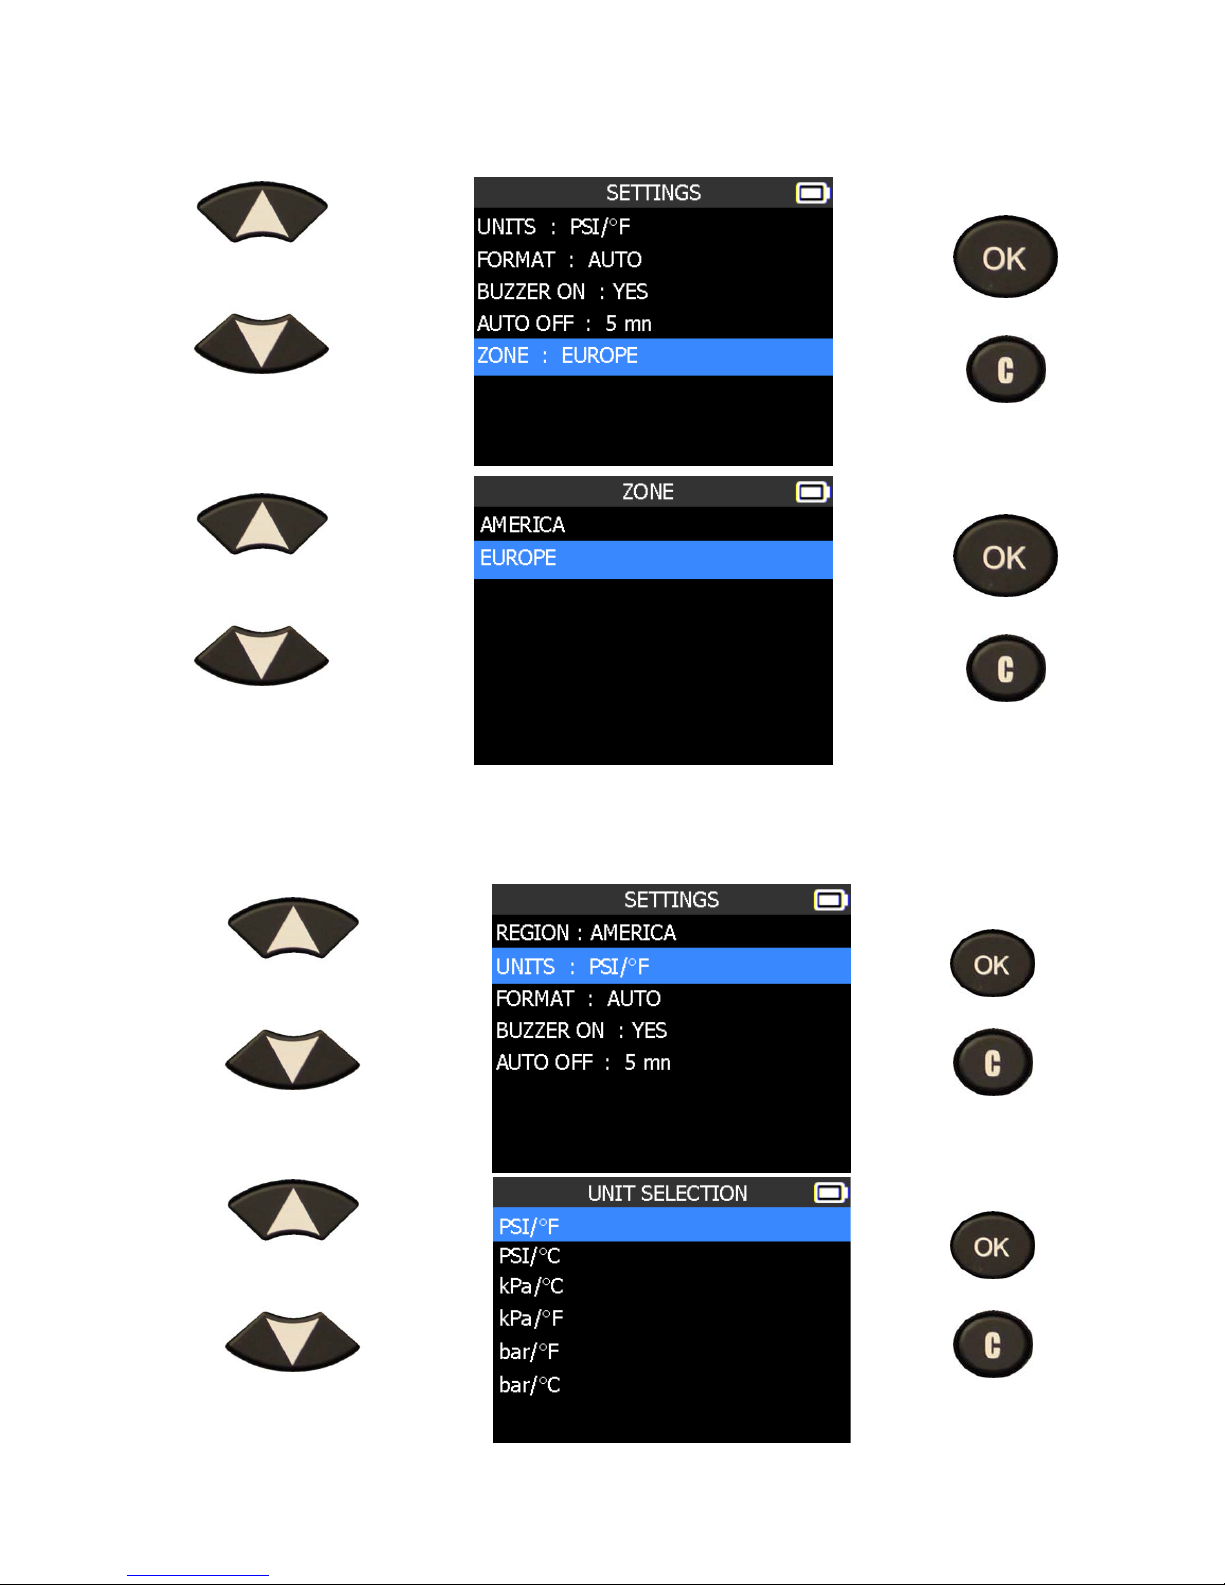
1.1. CHANGE REGION SETTINGS
Scroll up and down
to select the zone
menu.
= Confirm
= Previous
Scroll up and down
to select a zone.
= Confirm
= Previous
The tool will load the new database for the selected zone.
1.2. CHANGE UNITS SETTINGS
Scroll up and down to
select function or settings.
= continue
= Previous
Scroll up and down to
select the units.
= continue
= Previous
Page 23
VT46 TPMS TOOL - User Guide
UM-36500A-U User manual ATEQ TPMS Tool VT46 Page 21/32
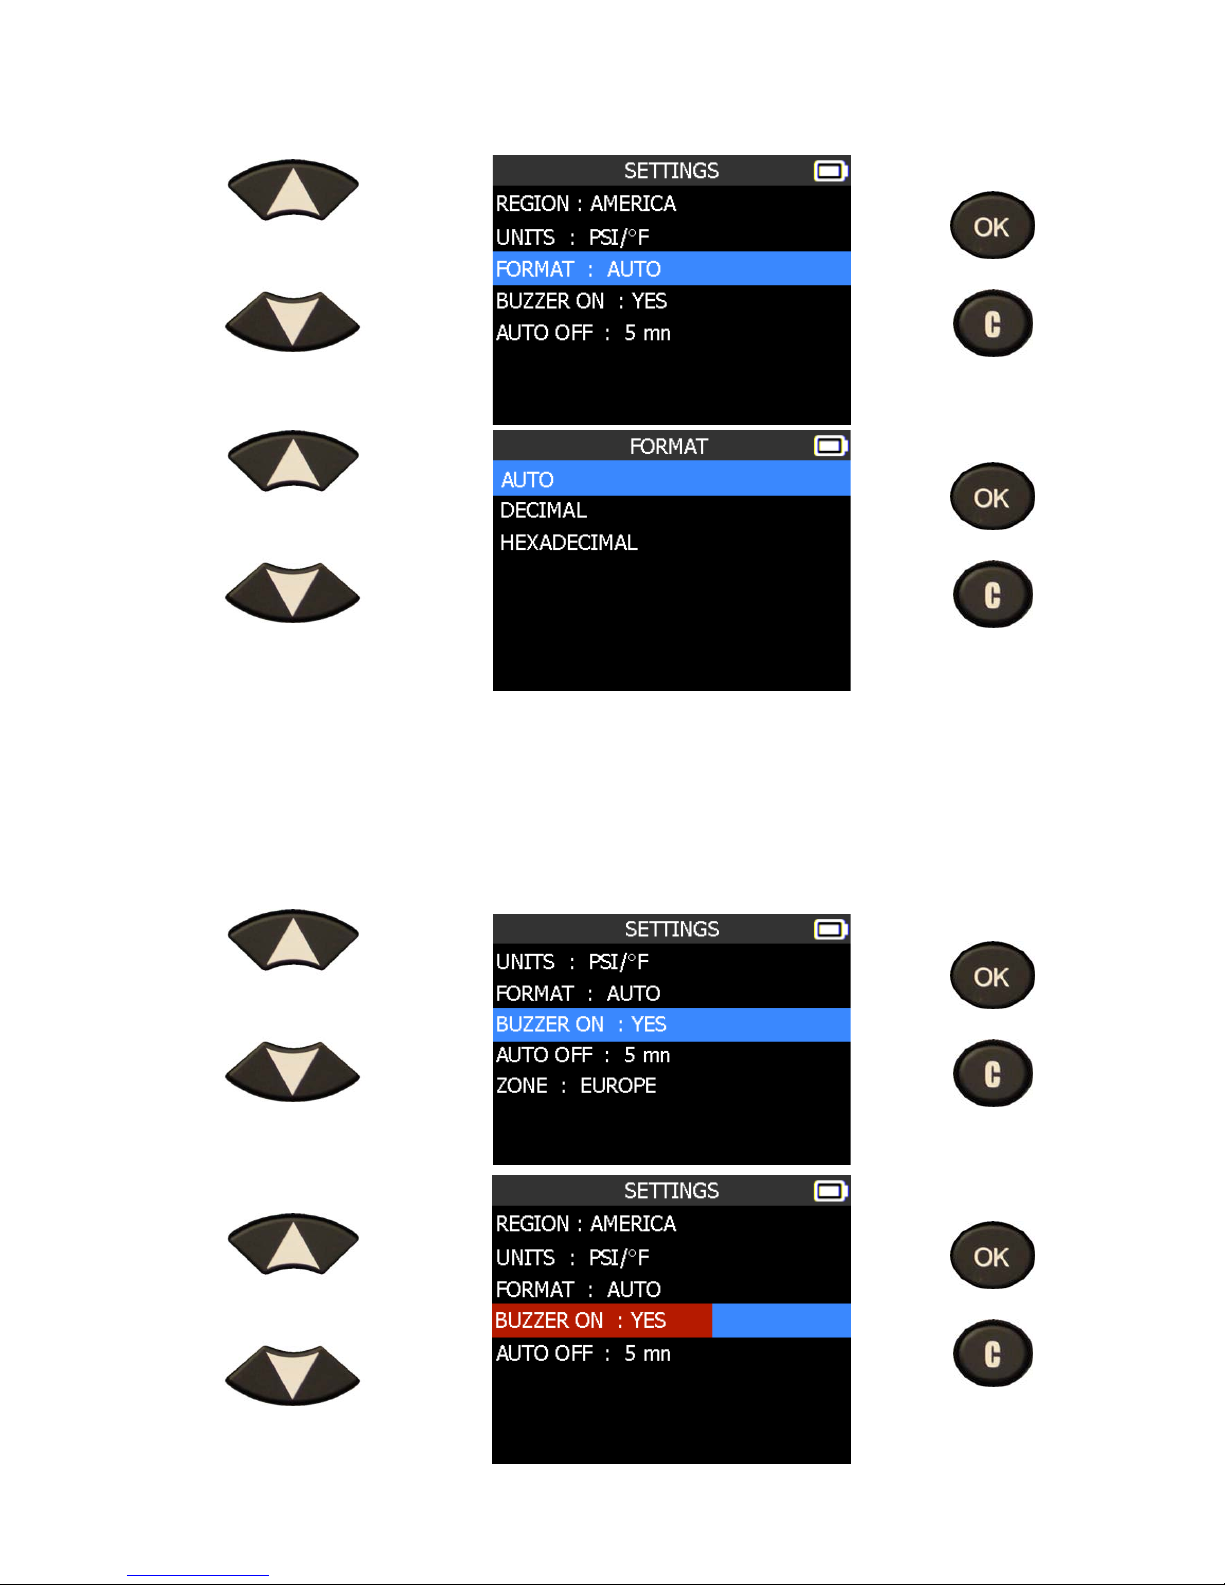
1.3. CHANGE FORMAT SETTINGS
Scroll up and down to
select function or settings.
= continue
= Previous
Scroll up and down to
select the format.
= continue
= Previous
AUTO: display sensor ID format in the way sensor is transmitting.
DECIMAL: force to display sensor ID in decimal (0 to 9).
HEXADECIMAL: force to display sensor ID in hexadecimal (0 to F).
1.4. CHANGE BUZZER ON SETTINGS
When buzzer on is set to YES, a beep is triggered when the sensor ID is detected.
Scroll up and down to
select function or settings.
= continue
= Previous
The selection turns red.
Scroll up and down to
select YES or NO.
= continue
= Previous
Page 24
VT46 TPMS TOOL - User Guide
UM-36500A-U User manual ATEQ TPMS Tool VT46 Page 22/32
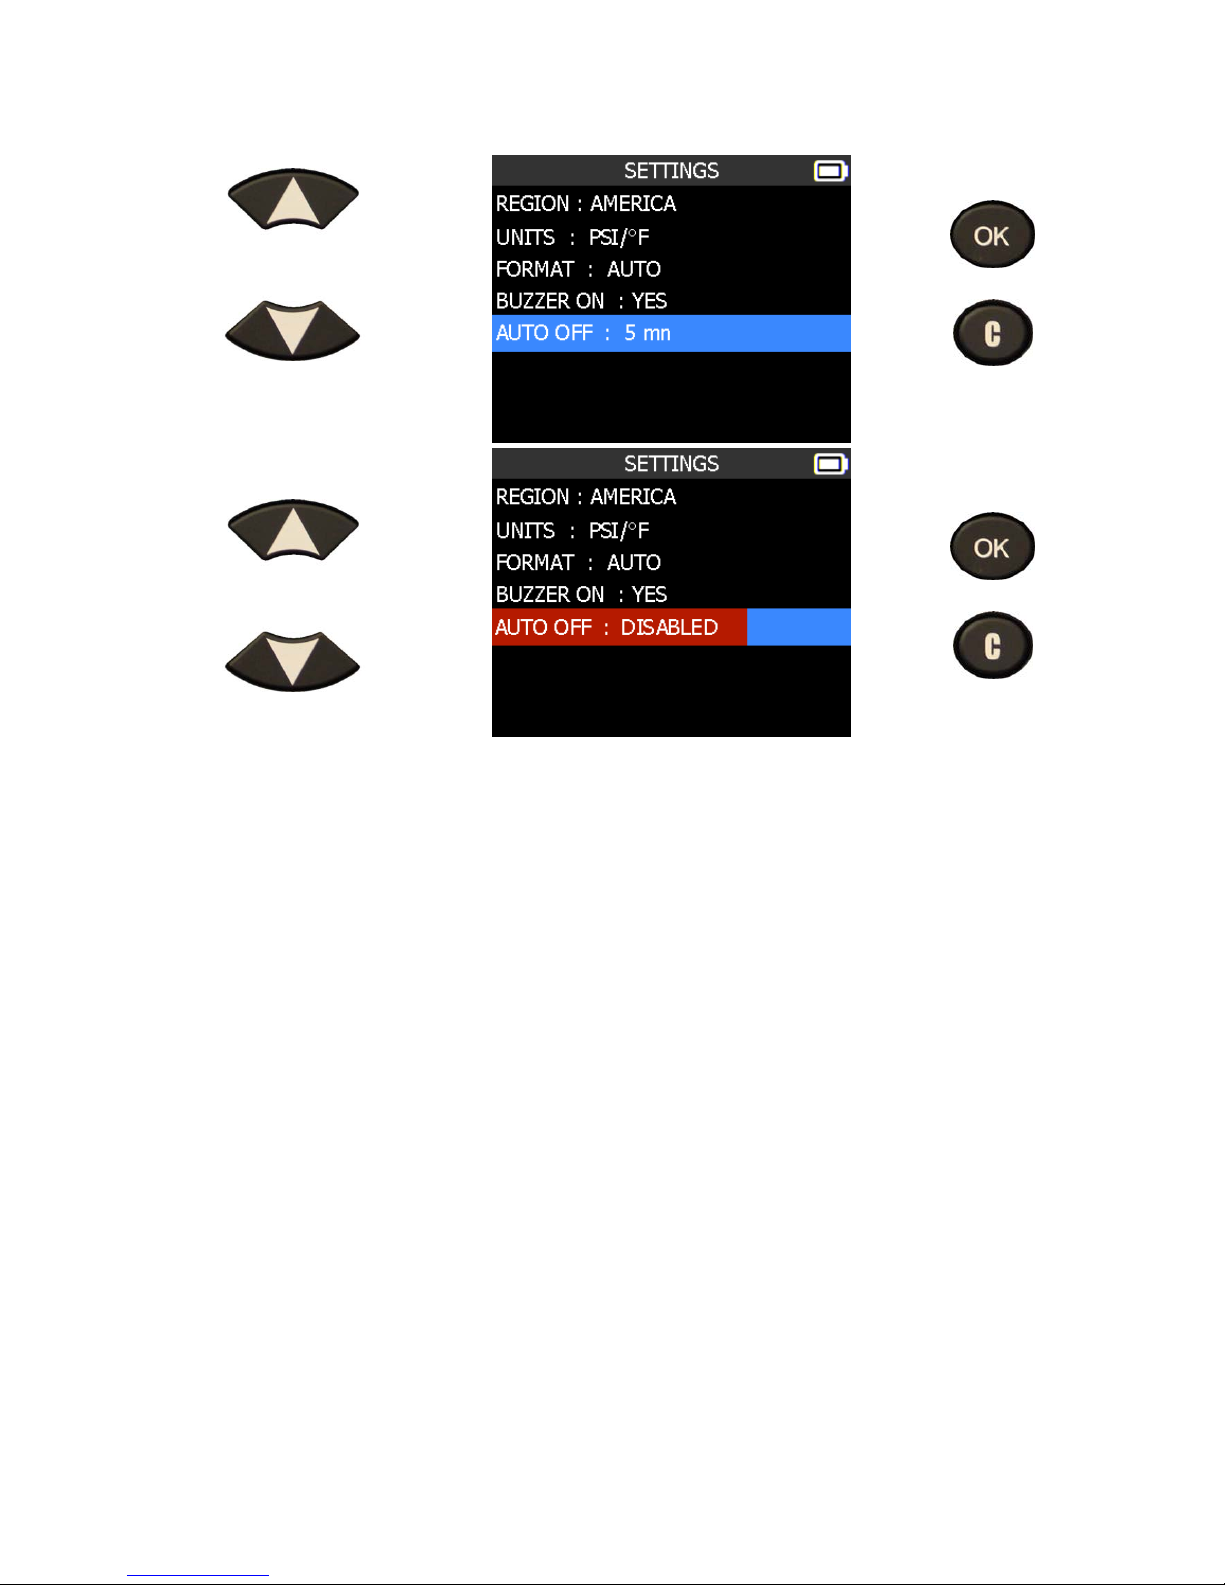
1.5. CHANGE AUTO OFF SETTINGS
Scroll up and down to
select function or settings.
= continue
= Previous
The selection turns red.
Scroll up and down to set
the time.
= continue
= Previous
Change by 60 min (maximum) to DISABLED (never).
Page 25
VT46 TPMS TOOL - User Guide
UM-36500A-U User manual ATEQ TPMS Tool VT46 Page 23/32
ABOUT
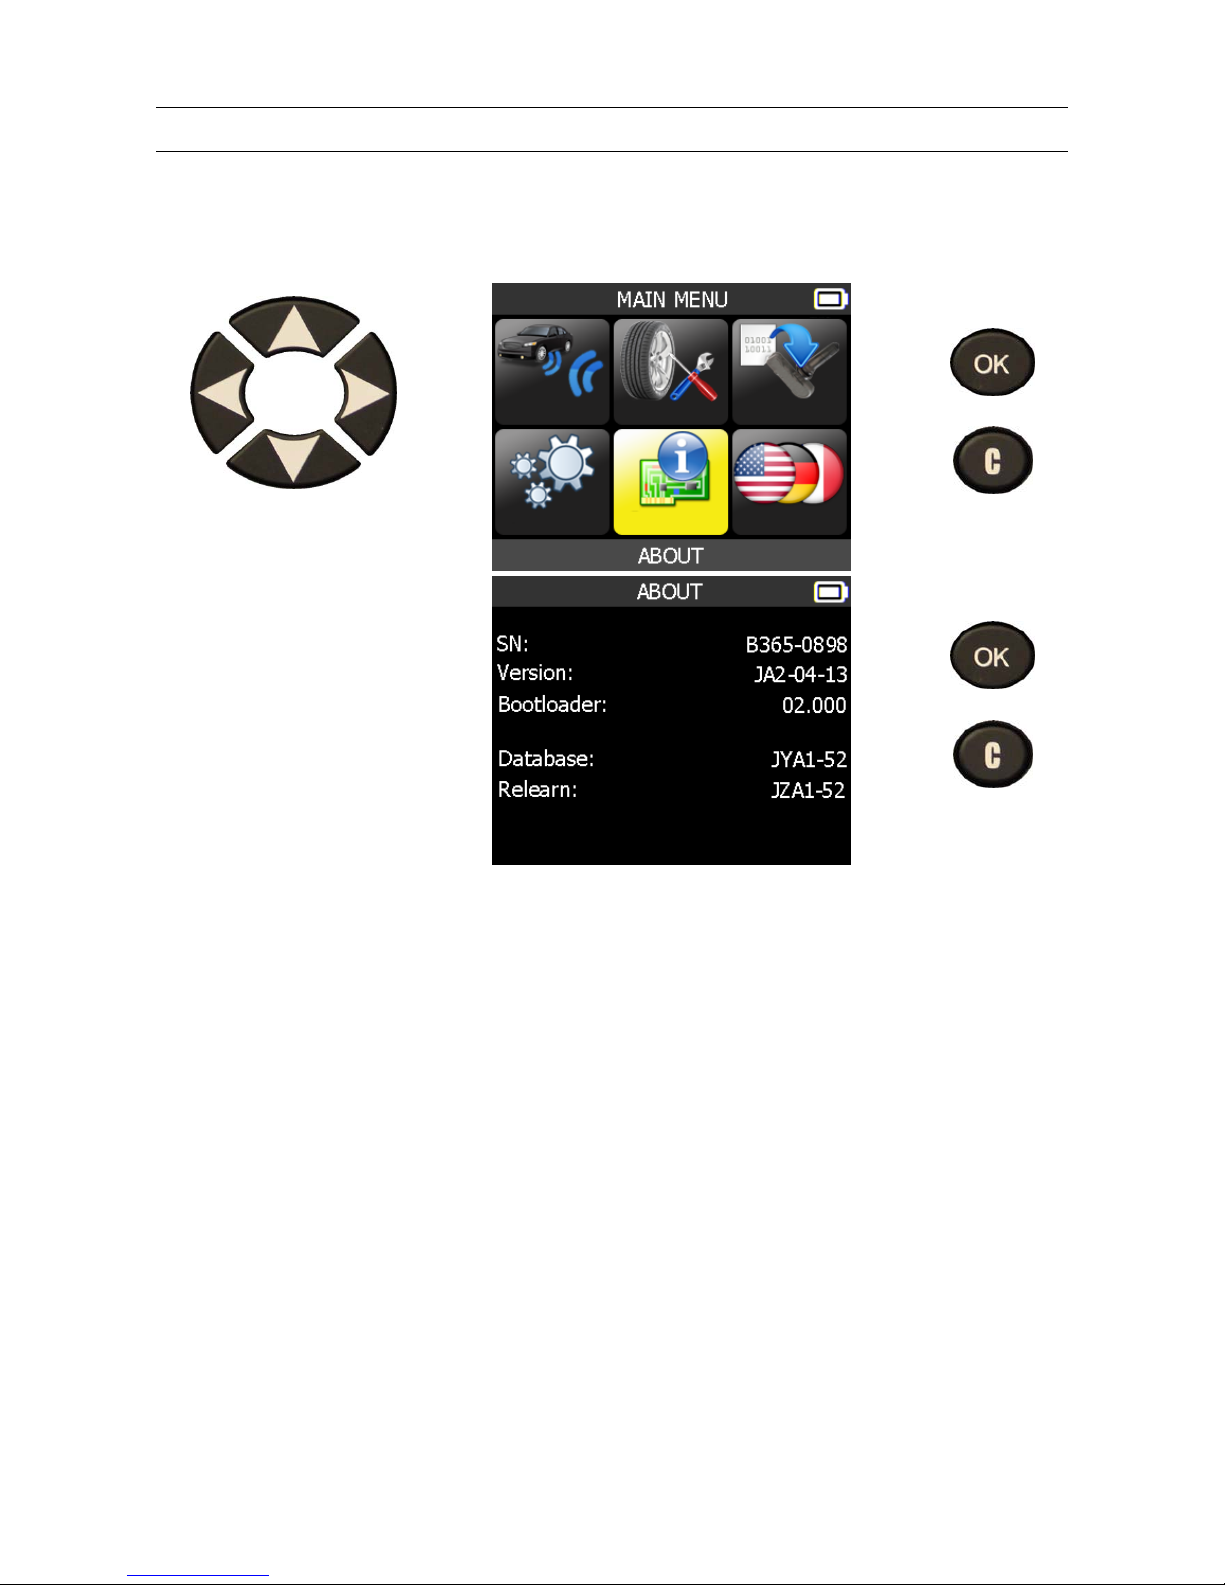
1. ENTER THE ABOUT MENU
This menu displays the current version and information about the device.
Select the "ABOUT"
menu.
= continue
= Previous
= Previous
= Previous
Page 26
VT46 TPMS TOOL - User Guide
UM-36500A-U User manual ATEQ TPMS Tool VT46 Page 24/32
LANGUAGE
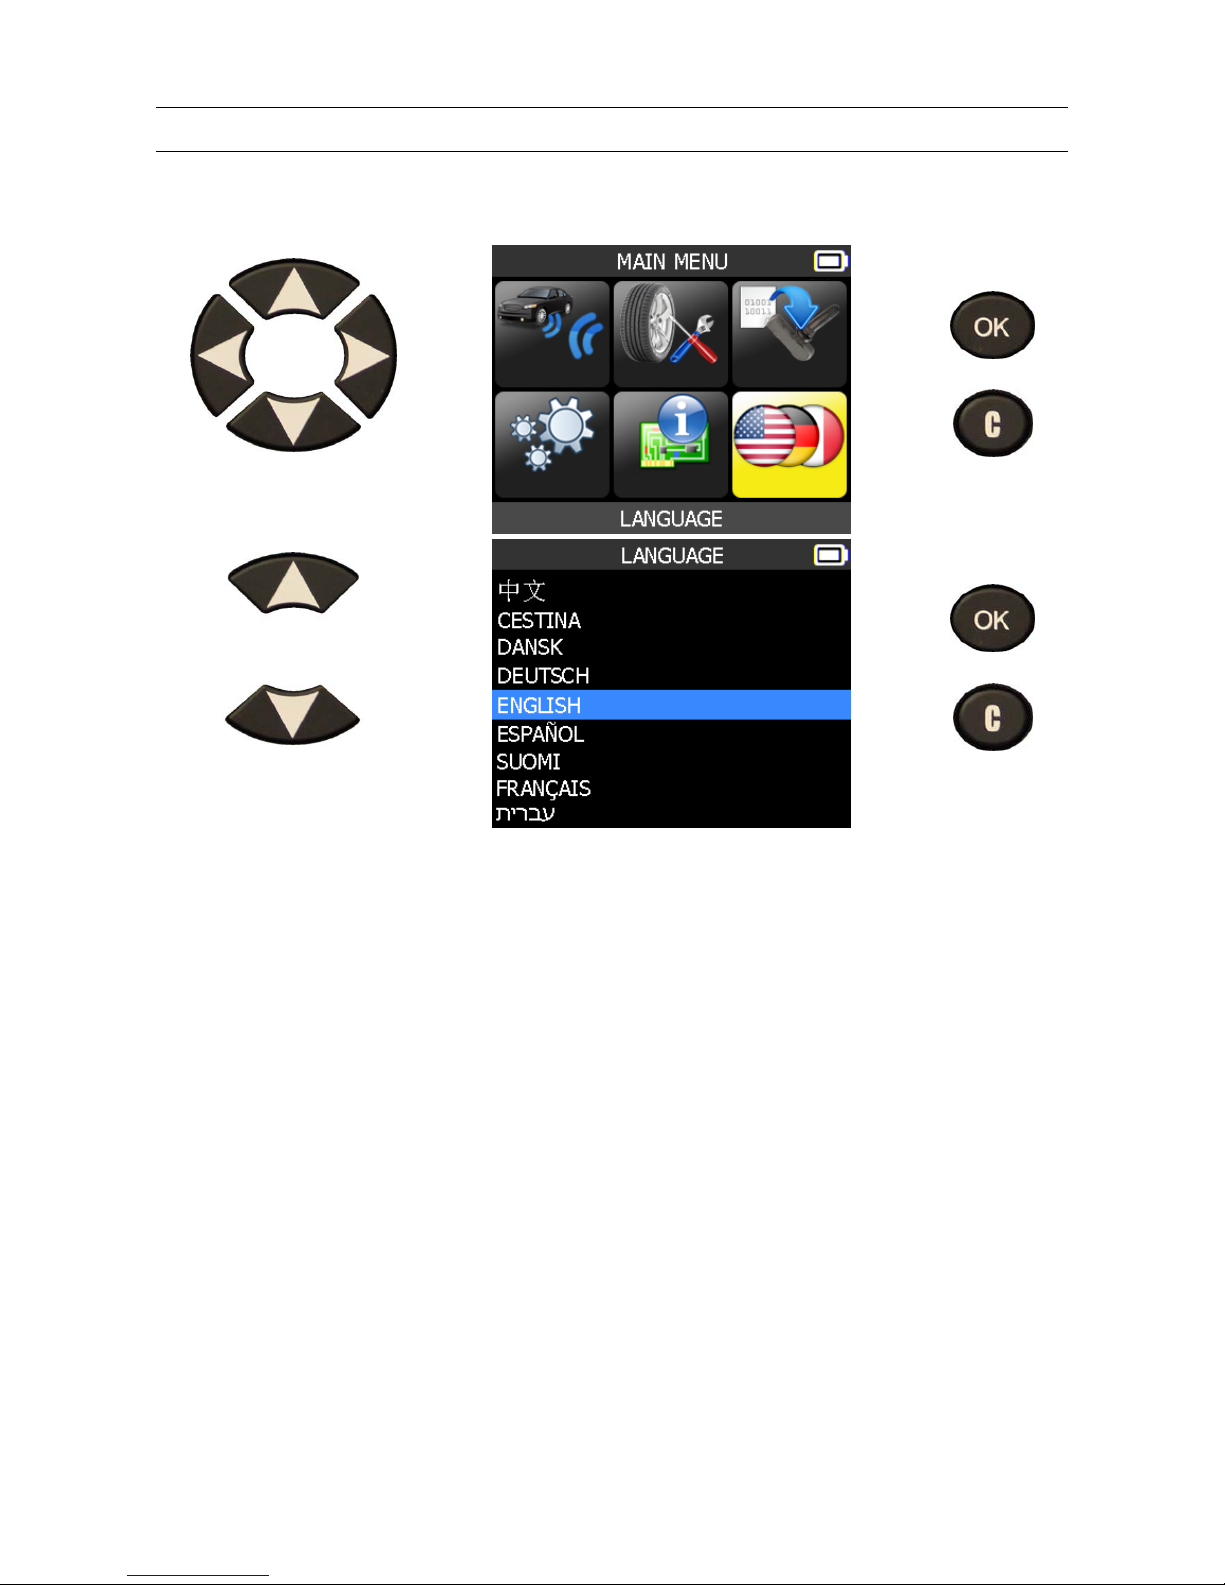
1. ENTER LANGUAGE MENU
Select the "LANGUAGE"
menu.
= continue
= Previous
Scroll up and down to
select the language.
= continue
= Previous
Page 27
VT46 TPMS TOOL - User Guide
UM-36500A-U User manual ATEQ TPMS Tool VT46 Page 25/32
MISCELLANEOUS
1. CHARGE
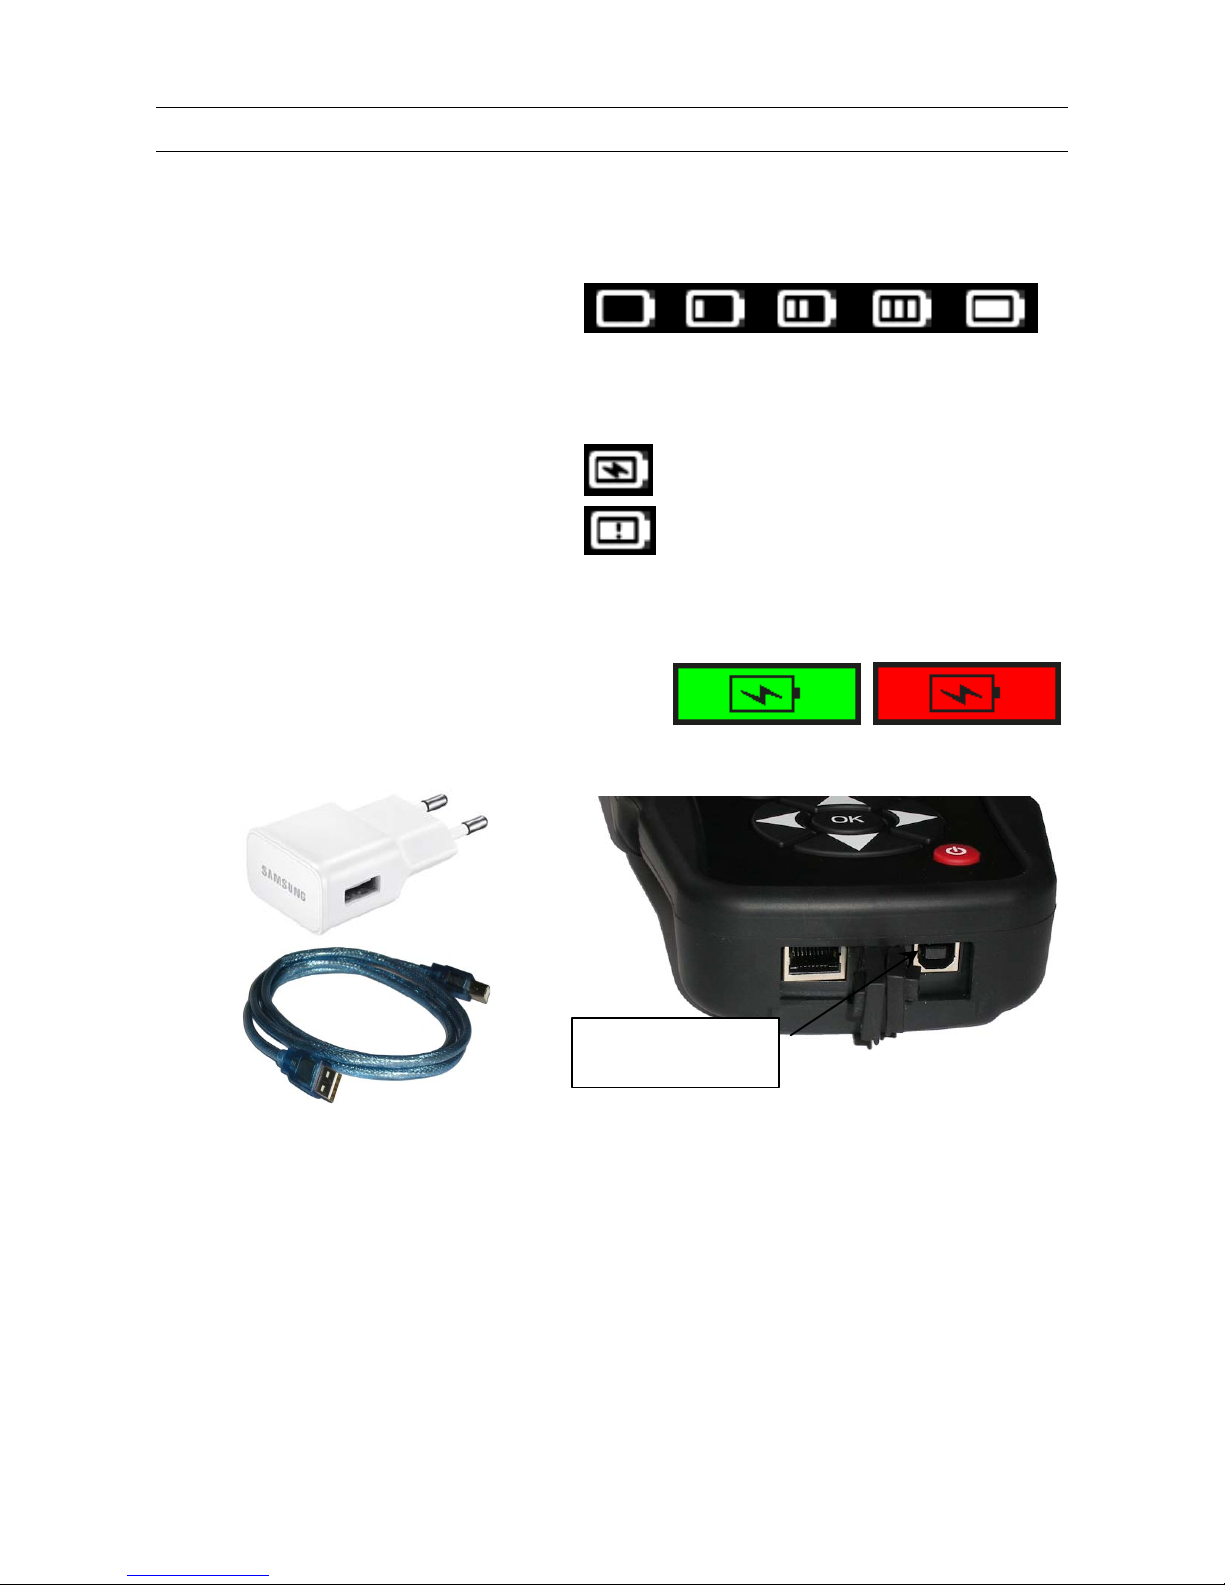
Low Battery Indication
Your TPMS TOOL incorporates a low
battery detection circuit. Battery life is
an average of 300 sensor tests per
battery charge (approximately 60 to 80
vehicles) this may change depending on
the sensor model.
Battery indicator status:
0% 25% 50% 75% 100%
When 0% is flashing, the tool will turn off after
10 seconds.
The battery is charging.
There is an issue with the battery -
please contact after sales service.
DO NOT use the tool with low battery status because the transmission and emission may
not be reliable.
When charging, the battery light is red and
becomes green when the battery is fully
charged.
Fig. 6
When the battery is low, the “status bar” appears every 10 seconds. This display will stop
when the battery loses power.
Plug the USB cable between the tool and the charger adapter, and then plug the charger
adapter into an appropriate outlet. The red LED "CHARGE" light will turn on.
Battery replacement
The tool must be returned to the factory for battery replacement.
Opening the tool or tampering with the seal placed on the tool, if broken, will void
the warranty
USB Power
supply connector
Page 28
VT46 TPMS TOOL - User Guide
UM-36500A-U User manual ATEQ TPMS Tool VT46 Page 26/32
2. TROUBLESHOOTING
If the TPMS TOOL is unable to trigger one or more of the sensors, please use the
following troubleshooting guide:
1) The vehicle does not have a sensor even though a metal valve stem is present. Be
aware of rubber style snap-in stems used on TPMS systems.
2) The sensor itself may be damaged or defective.
3) Wrong make, model, year is selected.
4) Your TPMS TOOL may require a software upgrade.
5) Your TPMS TOOL is damaged or defective.
Please contact your tool supplier for further assistance.
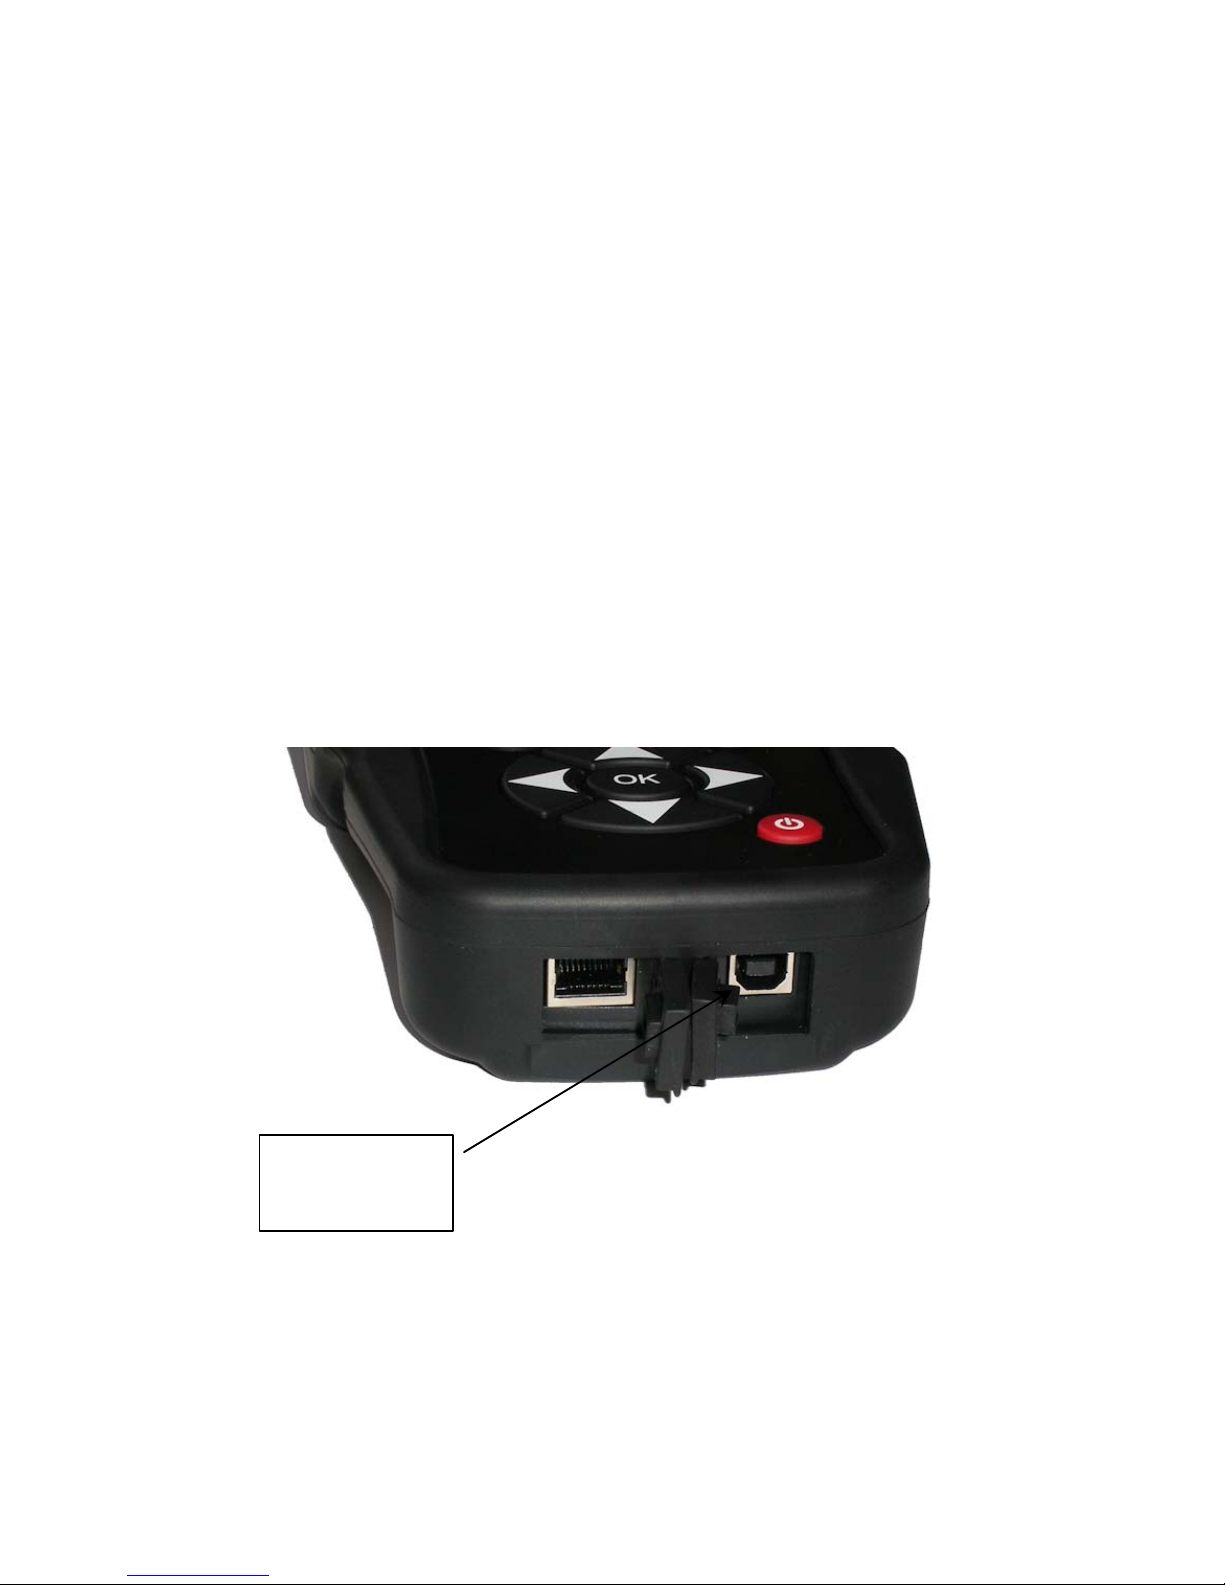
3. TOOL UPDATE
Upgrading Your TPMS TOOL
When a new protocol becomes available, it will become necessary to upgrade your tool.
Please follow the steps below:
IMPORTANT: Temporarily turn off all anti-virus and spam blocking software on your
computer. This is necessary to ensure a successful upgrade.
Fig. 7
USB connector
for Internet
update.
Page 29

VT46 TPMS TOOL - User Guide
UM-36500A-U User manual ATEQ TPMS Tool VT46 Page 27/32
3.1. INSTALL WEBTPM PC SUITE
1) Connect the TPMS tool to the USB port and power the tool ON.
2) Insert the CD supplied with your tool into the PC drive and click on the WebTPM icon
to start the program.
3) A screen will appear that says “Welcome to the Install Shield Wizard for WebTPM.”
Click “Next >”
4) A window will appear for choosing the destination location, click “Next >”
5) Follow the instructions until the window with the “Finish” button appears.
6) Click “Finish” when the WebTPM installation is complete.
Note: To order annual update software part numbers, please see your dealer for
availability and pricing.
3.2. USB INTERNET OPTION UPDATING
Before updating, ensure that the battery is fully charged.
1) Connect the USB cable from the TPMS TOOL to the PC, and turn the device on.
2) Start WebTPM software.
3) A screen will appear indicating “Update Device”.
4) You can also print “Valve IDs” from here as well.
5) Press “Yes” to update to the latest software version. The update will take several
minutes to complete and the status bar will indicate the percentage of update completed.
Warning!
Turn off the screen saver function on your PC and do not disconnect the
TPMS TOOL from the PC or turn off your computer during the update process.
Doing so could result in serious damage to the tool.
Page 30

VT46 TPMS TOOL - User Guide
UM-36500A-U User manual ATEQ TPMS Tool VT46 Page 28/32
4. LIMITED HARDWARE WARRANTY
ATEQ Limited Hardware Warranty
ATEQ warrants to the original purchaser that
your ATEQ hardware product shall be free
from material and workmanship defects for
the length of time identified on your product
package and/or contained in your user
documentation, from the date of purchase.
Except where prohibited by applicable law,
this warranty is nontransferable and is limited
to the original purchaser. This warranty gives
you specific legal rights, and you may also
have other rights that vary under local laws.
Remedies
ATEQ’s entire liability and your exclusive
remedy for any breach of warranty shall be, at
ATEQ’s option, (1) to repair or replace the
hardware, or (2) to refund the price paid,
provided that the hardware is returned to the
point of purchase or such other place as ATEQ
may direct with a copy of the sales receipt or
dated itemized receipt. Shipping and handling
charges may apply except where prohibited by
applicable law. ATEQ may, at its option, use
new or refurbished or used parts in good
working condition to repair or replace any
hardware product. Any replacement hardware
product will be warrantied for the remainder of
the original warranty period or thirty (30) days,
whichever is longer or for any additional period
of time that may be applicable in your
jurisdiction.
This warranty does not cover problems or
damage resulting from (1) accident, abuse,
misapplication, or any unauthorized repair,
modification or disassembly; (2) improper
operation or maintenance, usage not in
accordance with product instructions or
connection to improper voltage supply; or (3)
use of consumables, such as replacement
batteries, not supplied by ATEQ except where
such restriction is prohibited by applicable law.
How to Obtain Warranty Support
Before submitting a warranty claim, we
recommend you visit the support section at
http://www.ateq-tpms.com/
for technical
assistance. Valid warranty claims are generally
processed through the point of purchase during
the first thirty (30) days after purchase;
however, this period of time may vary
depending on where you purchased your
product – please check with ATEQ or the
retailer where you purchased your product for
details. Warranty claims that cannot be
processed through the point of purchase and
any other product related questions should be
addressed directly to ATEQ. The addresses
and customer service contact information for
ATEQ can be found in the documentation
accompanying your product and on the web at
http://www.ateq-tpms.com/
.
Limitation of Liability
ATEQ SHALL NOT BE LIABLE FOR ANY
SPECIAL, INDIRECT, INCIDENTAL OR
CONSEQUENTIAL DAMAGES
WHATSOEVER, INCLUDING BUT NOT
LIMITED TO LOSS OF PROFITS, REVENUE
OR DATA (WHETHER DIRECT OR
INDIRECT) OR COMMERCIAL LOSS FOR
BREACH OF ANY EXPRESS OR IMPLIED
WARRANTY ON YOUR PRODUCT EVEN IF
ATEQ HAS BEEN ADVISED OF THE
POSSIBILITY OF SUCH DAMAGES. Some
jurisdictions do not allow the exclusion or
limitation of special, indirect, incidental or
consequential damages, so the above
limitation or exclusion may not apply to you.
Duration of Implied Warranties
EXCEPT TO THE EXTENT PROHIBITED BY
APPLICABLE LAW, ANY IMPLIED
WARRANTY OR CONDITION OF
MERCHANTABILITY OR FITNESS ON THIS
HARDWARE PRODUCT IS LIMITED IN
DURATION TO THE DURATION OF THE
APPLICABLE LIMITED WARRANTY
PERIOD FOR YOUR PRODUCT. Some
jurisdictions do not allow limitations on how
long an implied warranty lasts, so the above
limitation may not apply to you.
National Statutory Rights
Consumers have legal rights under applicable
national legislation governing the sale of
consumer goods. Such rights are not affected
by the warranties in this Limited Warranty.
No Other Warranties
No ATEQ dealer, agent, or employee is
authorized to make any modification,
extension, or addition to this warranty.
Page 31

VT46 TPMS TOOL - User Guide
UM-36500A-U User manual ATEQ TPMS Tool VT46 Page 29/32
Warranty Periods
Please note that in the European Union, any
warranty period less than two years shall be
increased to two years.
5. SAFETY BATTERY AND CHARGE
INFORMATION
You must read and understand these
safety instructions and warnings before
using or charging your Lithium-Ion
batteries.
Operating environment
Remember to follow any special current
regulations any area, and always switch off
your device when its use is prohibited or
when it may cause interference or danger.
Use the device only in its normal operating
positions.
Your device and its enhancements may
contain small parts. Keep them out of the
reach of small children.
About Charging
Only use the charger supplied with your
device. Using another type of charger will
result in malfunction and/or danger.
When the red LED turns off, the charge is
complete.
About the Charger
Do not use the charger in a high moisture
environment. Never touch the charger when
your hands or feet are wet.
Allow ventilation around the charger when
using it. Do not cover the charger with paper
or other objects that will reduce cooling. Do
not use the charger while it is inside a
carrying case.
Connect the charger to a proper power
source. The voltage requirements are found
on the product case and/or packaging.
Do not use the charger if the wires become
damaged. Do not attempt to service the unit.
There are no serviceable parts inside.
Replace the unit if it is damaged or exposed
to excess moisture.
This charger is not a toy and should not be
used by children or infirm persons without
proper training or supervision.
Do not use it as a power source.
Unplug it before attempting to service or
clean it.
About the Battery
CAUTION: This unit contains an internal
Lithium-Ion battery. The battery can burst or
explode, releasing hazardous chemicals. To
reduce the risk of fire or burns, do not
disassemble, crush, pierce or dispose of the
battery or the instrument in fire or water, do
not short circuit or short the contacts with a
metal object.
Use a specified charger approved by the
ATEQ manufacturer and supplied with the
device.
The tool must be returned to the factory for
battery replacement.
Opening the tool or tampering with the
seal placed on the tool, if broken, will void
the warranty
Safety for Lithium-Ion battery use
NEVER leave the battery unattended during
the charging process. The device must
imperatively be placed on a non-flammable
surface during charging (ceramic platter or
metal box).
Charge the Lithium-Ion battery ONLY with the
charger provided.
NEVER use a Ni-MH (Nickel Metal Hydride)
type battery charger to charge a Lithium-Ion
battery.
If the battery begins to overheat more than
60°C (140°F), STOP CHARGING
IMMEDIATELY. The battery should NEVER
exceed 60°C (140°F) during the charging
process.
NEVER charge the battery immediately after
use and while still hot. Leave it cool down to
ambient temperature.
If you see any smoke or liquid coming from
the battery, stop the charge immediately.
Disconnect the charger and place the tool in
an isolated area for at least 15 minutes. DO
NOT USE THE BATTERY AGAIN. Return
the device to your retailer.
Keep a fire extinguisher for electrical fires
handy while charging the battery. In the
unlikely event that the Lithium-Ion battery
catches fire, DO NOT use water to extinguish
the fire. Take some sand or use a fire
extinguisher as described above.
Page 32

VT46 TPMS TOOL - User Guide
UM-36500A-U User manual ATEQ TPMS Tool VT46 Page 30/32
The Lithium-Ion battery elements must be
neutralized to be made unusable. The
neutralization process must be performed
under strict safety conditions. It is
recommended that you return the tool to us.
We will extract the battery and give it to a
specialized recycler.
Do not dispose of Lithium-Ion batteries
with your general waste.
The Lithium-Ion battery is not suitable for
children under 14 years. Keep all Lithium-Ion
batteries out of the reach of children
To prevent leakage or other hazards, do not
store batteries above 60°C (140°F). Never
leave the battery inside a car (for example)
where the temperature could be very high or
in a place where temperatures could exceed
60°C (140°F). Store the battery in a dry place
to avoid contact with liquid, whatever the
type. Only store the battery on a
nonflammable surface, heat resistant, non
conductive and away from all flammable
materials or sources. Always store the battery
out of the reach of children.
A Lithium-Ion battery should be stored with a
minimum charge of 30%. If you store it
completely discharged, it will quickly become
unusable.
Failure to follow these safety precautions may
cause serious personal injury and damage to
property. You may even cause a fire!
The ATEQ Company disclaims any
responsibility for damage sustained in the
event of non compliance with these safety
instructions.
Using a Lithium-Ion battery has a high risk of
fire and can cause serious damage to
property and persons. The user agrees to
accept the risk and responsibility.
The ATEQ Company is not able to monitor
the proper use of the battery with each
customer (charge, discharge, storage etc.). It
cannot be held responsible for any damage to
persons or property.
6. FCC STATEMENTS
Federal Communication Commission
Interference Statement
This equipment has been tested and found to
comply with the limits for a Class B digital
device, pursuant to Part 15 of the FCC Rules.
These limits are designed to provide
reasonable protection against harmful
interference in a residential installation. This
equipment generates, uses and can radiate
radio frequency energy and, if not installed
and used in accordance with the instructions,
may cause harmful interference to radio
communications. However, there is no
guarantee that interference will not occur in a
particular installation. If this equipment does
cause harmful interference to radio or
television reception, which can be determined
by turning the equipment off and on, the user
is encouraged to try to correct the
interference by one of the following
measures:
- Reorient or relocate the receiving antenna.
- Increase the separation between the
equipment and receiver.
- Connect the equipment into an outlet on a
circuit different from that to which the receiver
is connected.
- Consult the dealer or an experienced
radio/TV technician for help.
FCC Caution: Any changes or modifications
not expressly approved by the party
responsible for compliance could void the
user's authority to operate this equipment.
This device complies with Part 15 of the FCC
Rules. Operation is subject to the following
two conditions: (1) This device may not cause
harmful interference, and (2) this device must
accept any interference received, including
interference that may cause undesired
operation.
Page 33
VT46 TPMS TOOL - User Guide
UM-36500A-U User manual ATEQ TPMS Tool VT46 Page 31/32
7. RECYCLING
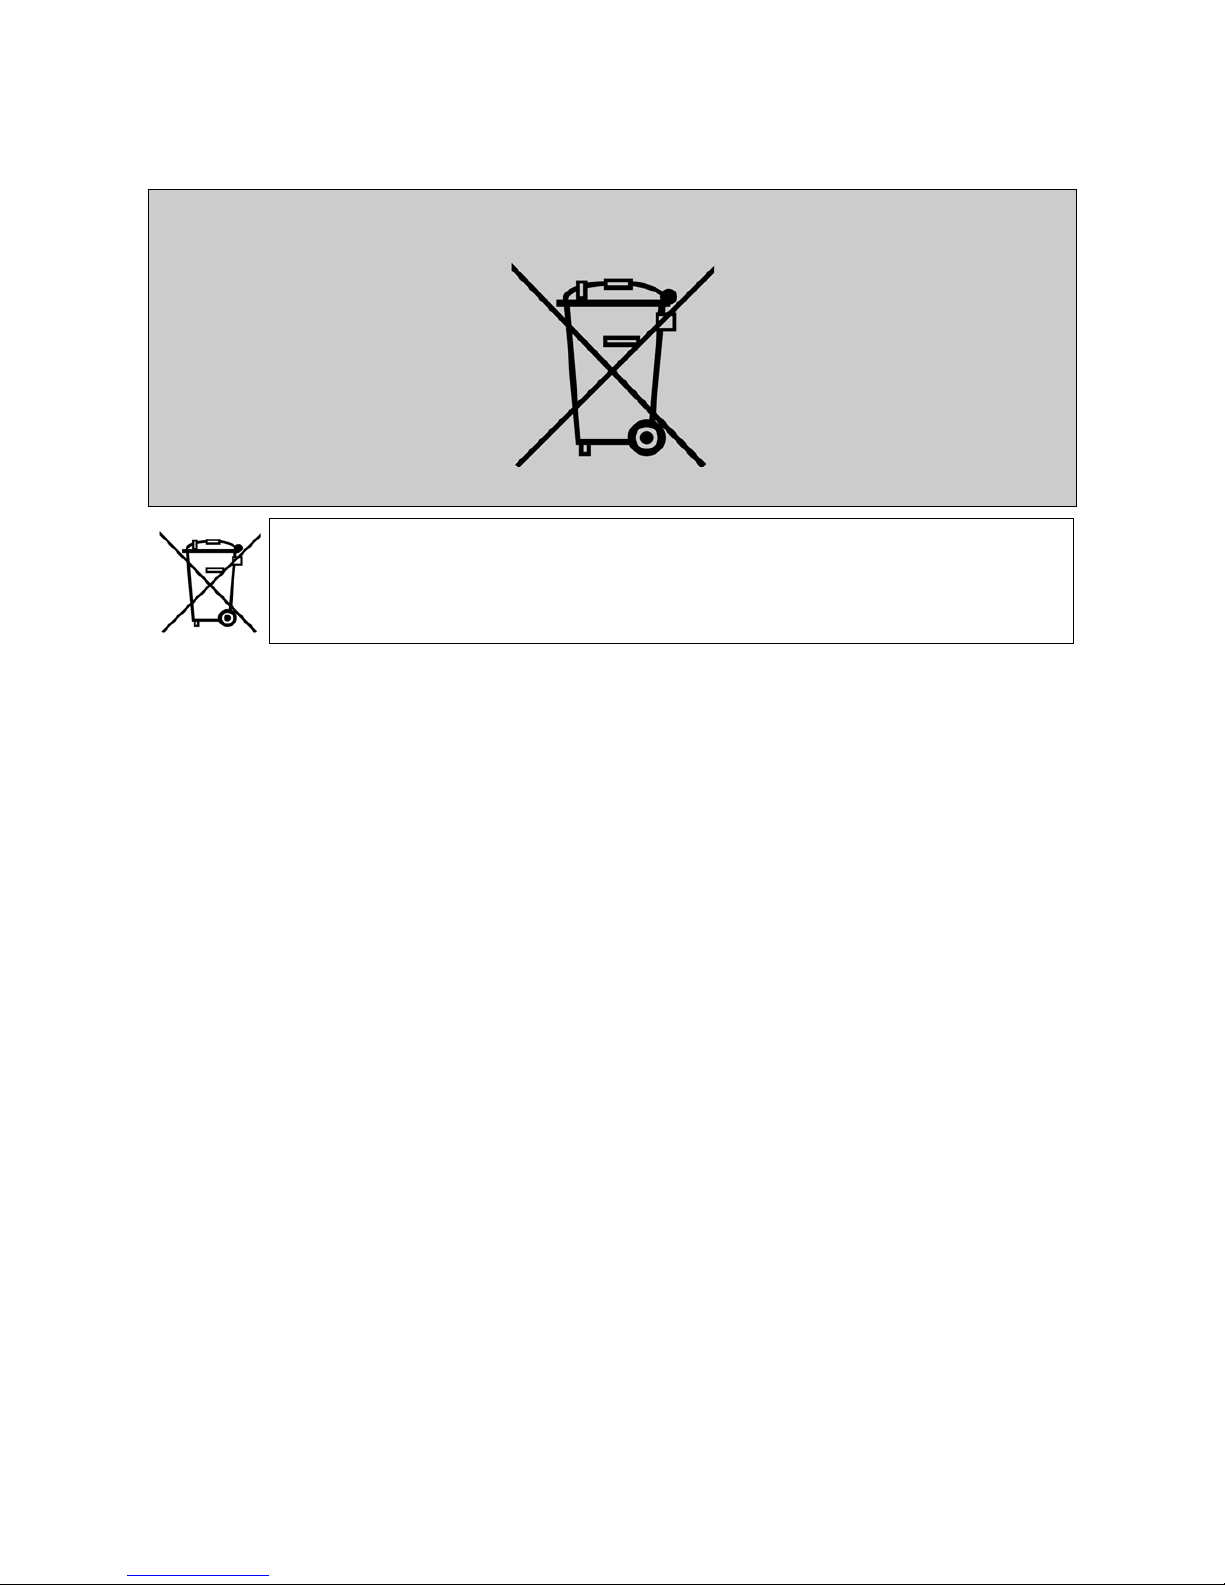
Do not dispose of the rechargeable Lithium-Ion battery or the tool
and/or its accessories in the general waste.
These components must be collected and recycled.
The crossed-out wheeled waste bin means that the product must be taken to
separate collection at the end of the product's service life. This applies to your tool
and also to any enhancements marked with this symbol. Do not dispose of these
products as unsorted municipal waste. For further information, please contact ATEQ.
Page 34

Index
UM-36500A-U User manual ATEQ TPMS Tool VT46 Page 32/32
Index
A
About .................................................. 23
Accessories .......................................... 2
Auto off ............................................... 22
B
Battery ................................................ 29
Buzzer ................................................ 21
C
Caution ........................................... 4, 29
Charge ................................................ 25
Charger .............................................. 29
Charging ....................................... 25, 29
Check Sensor ....................................... 9
Copy original sensor ........................... 16
Create new sensor ............................. 18
E
ECU Reprograming ............................ 13
Environment ....................................... 29
F
FFC Statements ................................. 30
Format ................................................ 21
Function keys ....................................... 6
L
Language............................................ 24
Lights functions ..................................... 5
M
Main Menu ............................................ 9
O
Operating instructions ........................... 8
Overview ............................................... 8
P
Power supply ...................................... 29
Product content ..................................... 2
Program blank sensor ......................... 15
R
Recycling ............................................ 31
S
Safety instructions ................................ 3
Safety precautions .............................. 29
Security ............................................... 29
Settings ............................................... 19
Software installation ............................ 27
Software updating ............................... 27
Specifications........................................ 2
T
Tool update ......................................... 26
Troubleshooting .................................. 26
U
Units ................................................... 21
USB Internet Options .......................... 27
Use Instructions .................................... 4
W
Warning ................................................ 3
Warranty ............................................. 28
WebTPM PC suite .............................. 27
Z
Zone ................................................... 20
Page 35

Page 36

This document is the exclusive property of ATEQ.
It may not be communicated, reproduced or used without prior consent.
 Loading...