

Page 1
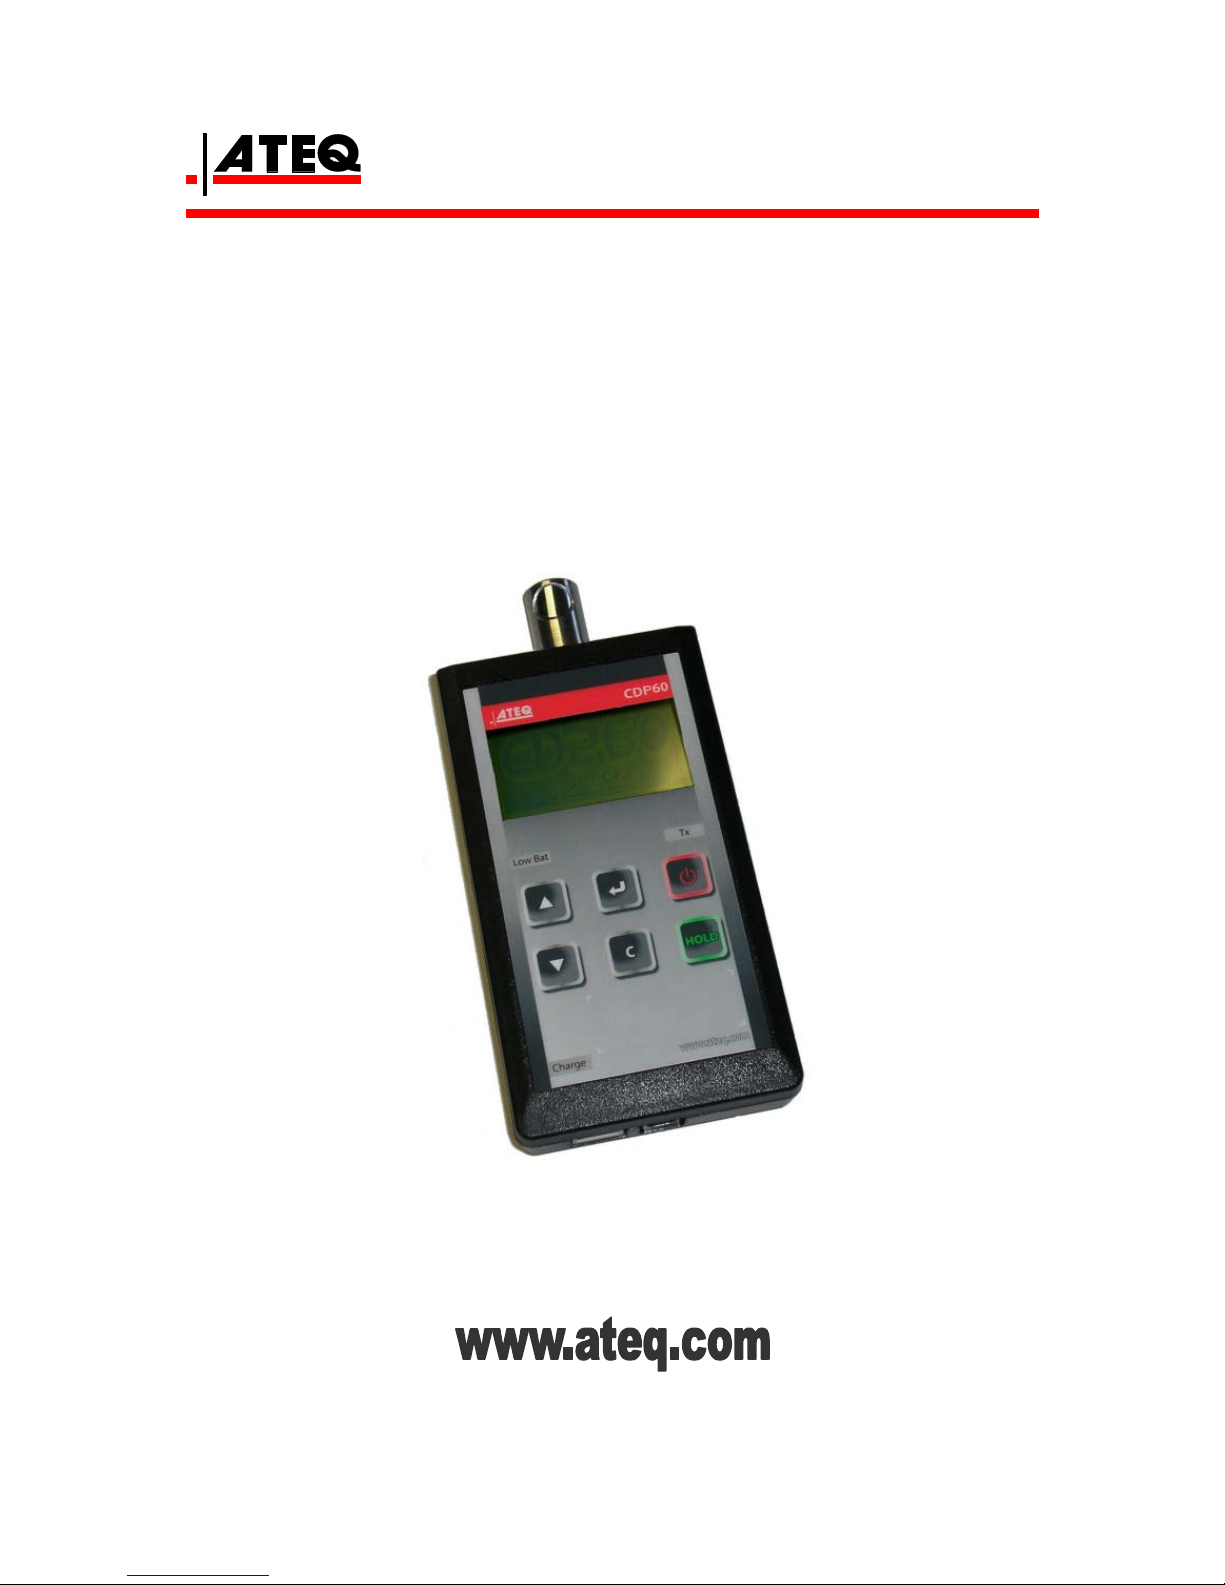
USER MANUAL
ATEQ CDP60
Version 1.03
Reference: UM-24100D-U
Page 2

Page 3
REVISION OF THE CDP60 USER MANUAL
Edition/
Revision
Reference
Date
(week/year)
Chapters updated
First edition UM-24100A-U 25/2007 -----
Second edition UM-24100B-U 11/2008
Modification of the measurement
characteristics in the preamble.
Third edition UM-24100C-U 26/2008 Program evolution to the 1.03 version.
Fourth edition UM-24100D-U 44/2009
Preamble, modification of the principle
scheme. Chapter 5, pressure generator
use.
Page 4

Page 5

Recommendations for leak testing
instruments
0039/Ret-U
Precautions for the test environment
• Keep the test area as clean as possible.
Precautions for the operators
• ATEQ recommends that the operators using the instruments should have a
suitable qualification and training with respect to the work bench requirements.
General precautions
• Read the user manual before using the instrument,
• all electrical connections to the instrument must be equipped with a safety
system (fuse, circuit breaker…) appropriate to its needs and complying with the
standards,
• to avoid electromagnetic interference, the cable connections to the instrument
should be less than two meters in length,
• it is essential that the electrical main is earthed,
• disconnect the electrical connections to the equipment before maintenance,
• cut the air supply for any kinds of operation on the pneumatic assembly,
• do not open the instrument when it is powered up,
• avoid water spillage near of the instrument,
• ATEQ is at your disposal for any further information concerning the use of the
instrument under maximum safety conditions.
We would like to bring to your attention that ATEQ will not be held responsible
for any accident connected to the improper use of the instrument, to the work
bench or to the lack of compliance with safety rules.
ATEQ Company is free from any responsibility for any adjustment of its
instrument which would not have been done by its own technicians.
The ATEQ cannot be held responsible if the instrument (program, mechanics or
electronics) has been modified without prior written consent.
Page 6

Page 7
SAV-Uc/0650
ATEQ, THE ASSURANCE OF A COMPETENT AFTER SALES
SERVICE
THE ATEQ AFTER SALES SERVICE IS :
• a team of qualified technicians,
• a permanent telephone assistance,
• agencies close to you for faster reaction,
• a stock of spare parts available immediately,
• a car fleet for rapid intervention,
• a commitment to quality ...
THE OVERHAUL
ATEQ carries out the overhaul of your instruments at interesting prices.
The overhaul corresponds to the maintenance of the instrument (checking, cleaning, replacing of used
parts) as part of preventive maintenance.
Preventive maintenance is the best way to guarantee reliability and efficiency. It allows the
maintenance of a group of instruments in good operational order and prevent eventual break-downs.
MAINTENANCE KITS
The ATEQ After Sales Service proposes, two kits destined for the preventive maintenance of the
pneumatic circuits of instruments.
CALIBRATION
This may be carried out on site or in our offices.
ATEQ is attached to the COFRAC and delivers a certificate following a calibration.
TRAINING COURSES
In the framework of partnership with our customers, ATEQ offers two types of training in order to
optimise the usage and knowledge of our instruments. They are aimed at different levels of technician:
• method / control training,
• maintenance / upkeep training.
A TARGETED TECHNICAL DOCUMENTATION
A number of technical documents are at your disposal to allow you to intervene rapidly in the event
minor breakdowns:
• problem sheets describing and offering solutions to the main pneumatic and electronic
problems,
• several maintenance manuals.
A QUALITY GUARANTEE
The instruments are guaranteed for parts and labour in our offices:
• 2 years for leak detection equipment,
• 1 year for electrical tests to norms instruments,
• 1 year for the accessories.
Our After Sales Service is capable of rapidly answering all your needs and queries.
We strongly recommend to send the instrument
back to ATEQ once a year for re-calibration
Page 8

Page 9

0650/PREFd-U
PREFACE
Dear Customer,
You have just purchased an ATEQ instrument, we thank you for the trust you have
placed on our brand. This instrument has been designed to ensure a long and
unparalleled life expectancy, and we are convinced that it will give you complete
satisfaction during many long years of operation.
In order to maximise the life expectancy and reliability of your ATEQ instrument, we
recommend that you install this instrument on a secured workbench and advise you to
consult this manual in order to familiarise yourself with the functions and capabilities of
the instrument.
Our ATEQ After Sales Service centre can give you recommendations based on your
specific operation requirements.
ATEQ
Page 10

Page 11

Table of contents
UM-24100D-U User manual ATEQ CDP60 Page 1/36
TABLE OF CONTENTS
PREAMBLE 3
1. DEFINITION OF THE ATEQ CDP60 ...................................................................................................3
2. MEASUREMENTS CHARACTERISTICS ...........................................................................................4
2.1. Pressure ranges...........................................................................................................................4
Chapter 1 INTRUMENT INSTALLATION
1. PRESENTATION OF THE ATEQ CDP60 ...........................................................................................5
2. ATEQ CDP60 INSTALLATION ...........................................................................................................6
2.1. Supply connector 24 V DC...........................................................................................................6
2.2. USB connector .............................................................................................................................6
2.3. RS232 connector .........................................................................................................................6
2.4. Pneumatic connector (first input) .................................................................................................6
2.5. Pneumatic connector (second input) ...........................................................................................6
Chapter 2 USER INTERFACES
1. KEYS....................................................................................................................................................7
1.1. “Start / Information” key................................................................................................................7
1.2. "Cancel" key .................................................................................................................................7
1.3. “HOLD” key ..................................................................................................................................7
1.4. "Enter" key....................................................................................................................................8
1.5. Navigation keys............................................................................................................................8
2. OTHERS ITEMS ..................................................................................................................................9
2.1. LCD display ..................................................................................................................................9
2.2. Lights............................................................................................................................................9
Chapter 3 START UP ADJUST AND MEASURES
1. STARTING THE ATEQ CDP60 .........................................................................................................11
2. MEASURES DISPLAY ......................................................................................................................11
3. PARAMETERS ADJUST...................................................................................................................12
3.1. Filter ...........................................................................................................................................12
3.2. Pressure unit ..............................................................................................................................13
3.3. Back light....................................................................................................................................14
3.4. Automatic power off (auto off) ....................................................................................................15
3.5. RS232 ........................................................................................................................................16
Chapter 4 CDP60 FUNCTIONS
1. MENUS STRUCTURE .......................................................................................................................17
2. SPECIALS CYCLES..........................................................................................................................18
2.1. Auto-zero....................................................................................................................................18
2.2. Measurements print (Print).........................................................................................................19
2.3. Sensors display ..........................................................................................................................20
Page 12
Table of contents
UM-24100D-U User manual ATEQ CDP60 Page 2/36
Chapter 5 ACCESSORIES, SECURITY AND RECYCLING
1. ACCESSORIES .................................................................................................................................21
1.1. Power supply..............................................................................................................................21
1.2. Soft case ....................................................................................................................................21
1.3. USB wire ....................................................................................................................................21
1.4. Test tube ....................................................................................................................................22
1.5. Protection cover (option) ............................................................................................................22
1.6. Hard case (option)......................................................................................................................22
1.7. Pressure generator (option) .......................................................................................................22
2. RECYCLING ......................................................................................................................................23
3. SAFETY INFORMATIONS ................................................................................................................24
Chapter 6 ERROR MESSAGES
1. ERROR MESSAGES .........................................................................................................................25
Chapter 7 PC INSTALLATION
1. PROGRAM AND DRIVERS INSTALLATION ...................................................................................27
1.1. USB connection..........................................................................................................................27
1.2. RS232 connection......................................................................................................................31
1.3. RS232 cable diagram.................................................................................................................31
Appendix ATEQ CDP60
1. TECHNICALS CHARACTERISTICS.................................................................................................33
2. PERSONNAL NOTES .......................................................................................................................34
Index 35
Page 13
Preamble
UM-24100D-U User manual ATEQ CDP60 Page 3/36
PREAMBLE
1. DEFINITION OF THE ATEQ CDP60
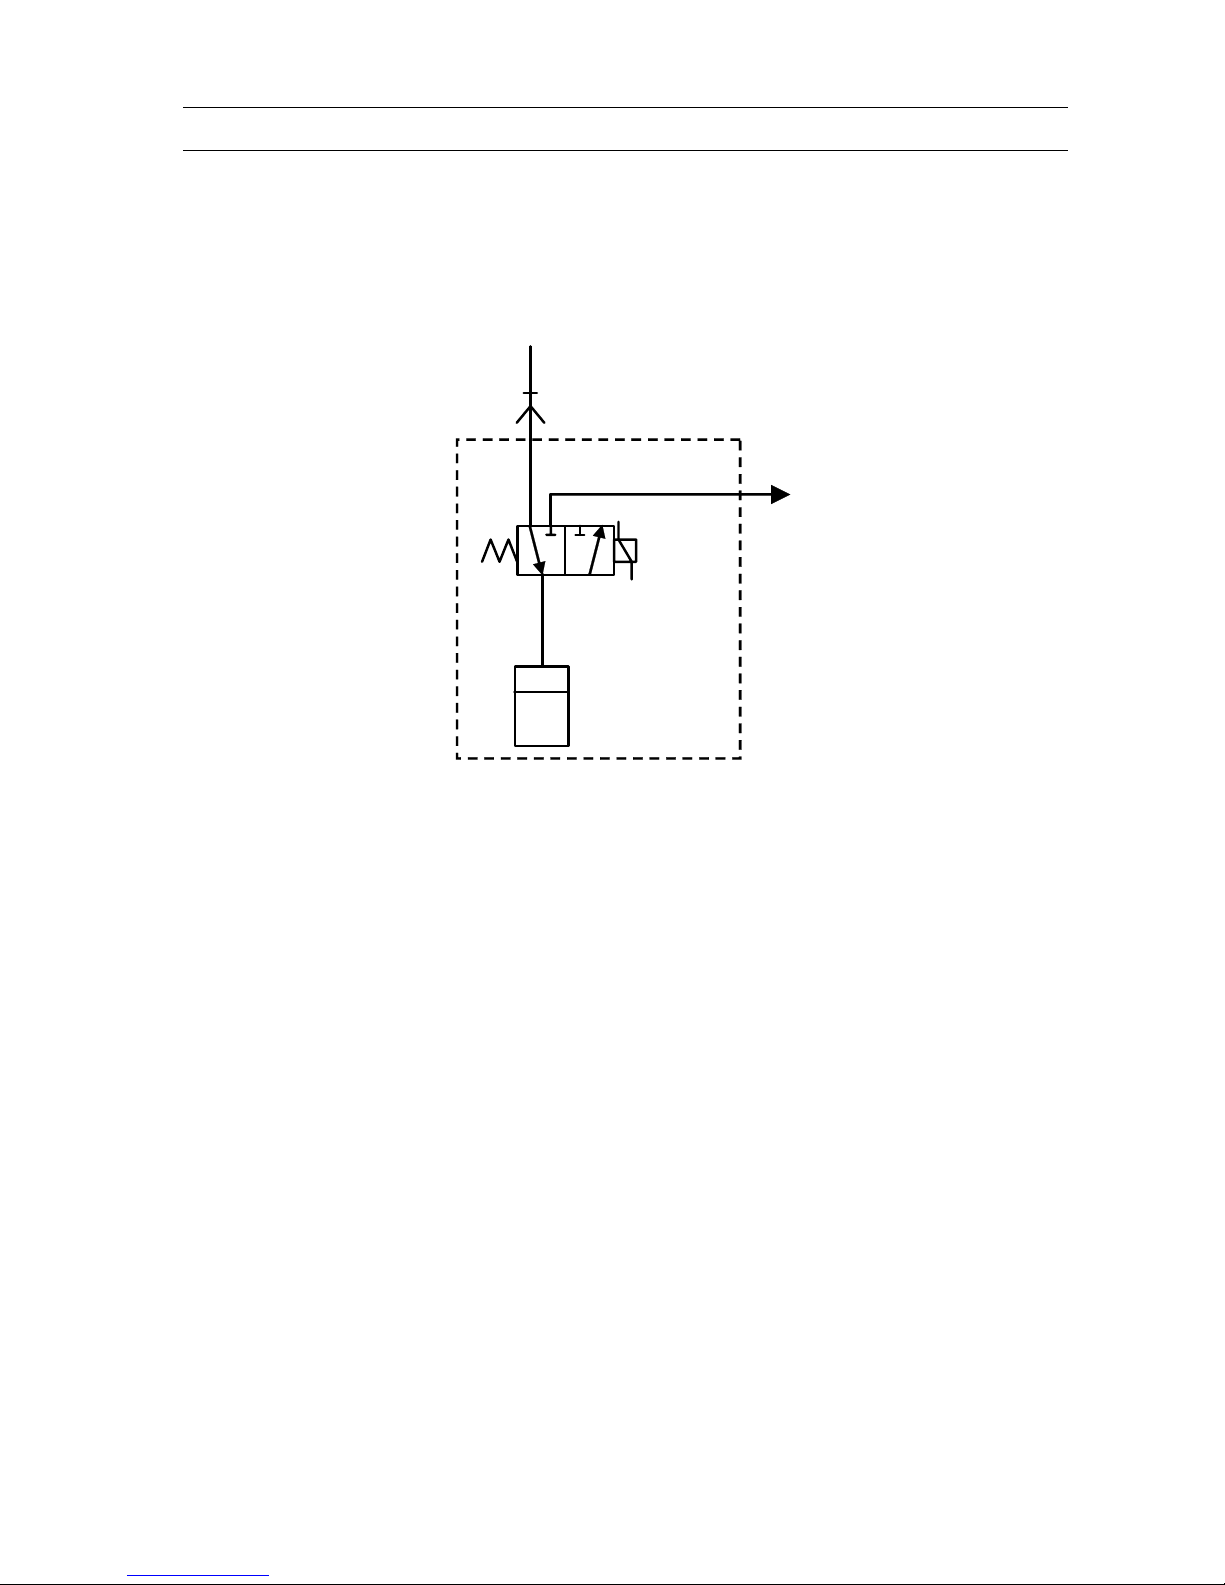
The CDP60 is a master used to adjust or calibrate all kinds of instruments measuring air
pressure.
PRESSURE
SENSOR
ATMOSPHERE
AUTO-ZERO
ELECTROVALVE*
A
TEQ CDP60
* The auto-zero electrovalve is integrated into instruments with a full scale less than 5
bars.
Page 14

Preamble
UM-24100D-U User manual ATEQ CDP60 Page 4/36
2. MEASUREMENTS CHARACTERISTICS
2.1. PRESSURE RANGES
Pressure
ranges
Accuracy
No linearity + Hysteresis +
Repeatability
(extended uncertainty)
Max over
pressure
Long time
drift
(1 year)
T° drift
(ref 25°C)
Max
resolution
500 Pa
1% RV + 1 Pa
0,5% RV + 0,5 Pa*
350 hPa 0,5% RV
0,01% FS/°C
0,1 Pa
5000 Pa
1% RV + 10 Pa
0,5% RV + 5 Pa*
1000 hPa 0,5% RV
0,01% FS/°C
1 Pa
-1000 > 500
hPa
0,20% |RV| + 1 hPa
4000 hPa 0,9% RV
0,01% FS/°C
0,1 hPa
-1000 > 5000
hPa
0,20% |RV| + 5 hPa
7000 hPa 0,5% RV
0,01% FS/°C
1 hPa
-0,1 > 2 MPa
0,20% |RV| + 2 kPa
3 MPa 0,5% RV
0,01% FS/°C
10 hPa
FS = Full scale; RV = Read value.
* Specifications in option (adjusted in our metrology laboratory with COFRAC
agreement).
Note: the zero offset linked to the temperature or the position can be take over by an
auto-zero. It is however advised to realize an auto-zero before a measurement report.
Recommendation of use: according to some use's conditions, the instrument can put
to two hours of time of heating before complete stabilization.
Page 15
Chapter 1 – Instrument installation
UM-24100D-U User manual ATEQ CDP60 Page 5/36
Chapter 1
INTRUMENT INSTALLATION
Before the first use of the instrument, make a complete battery
charging, wait until the CHARGE light is off.
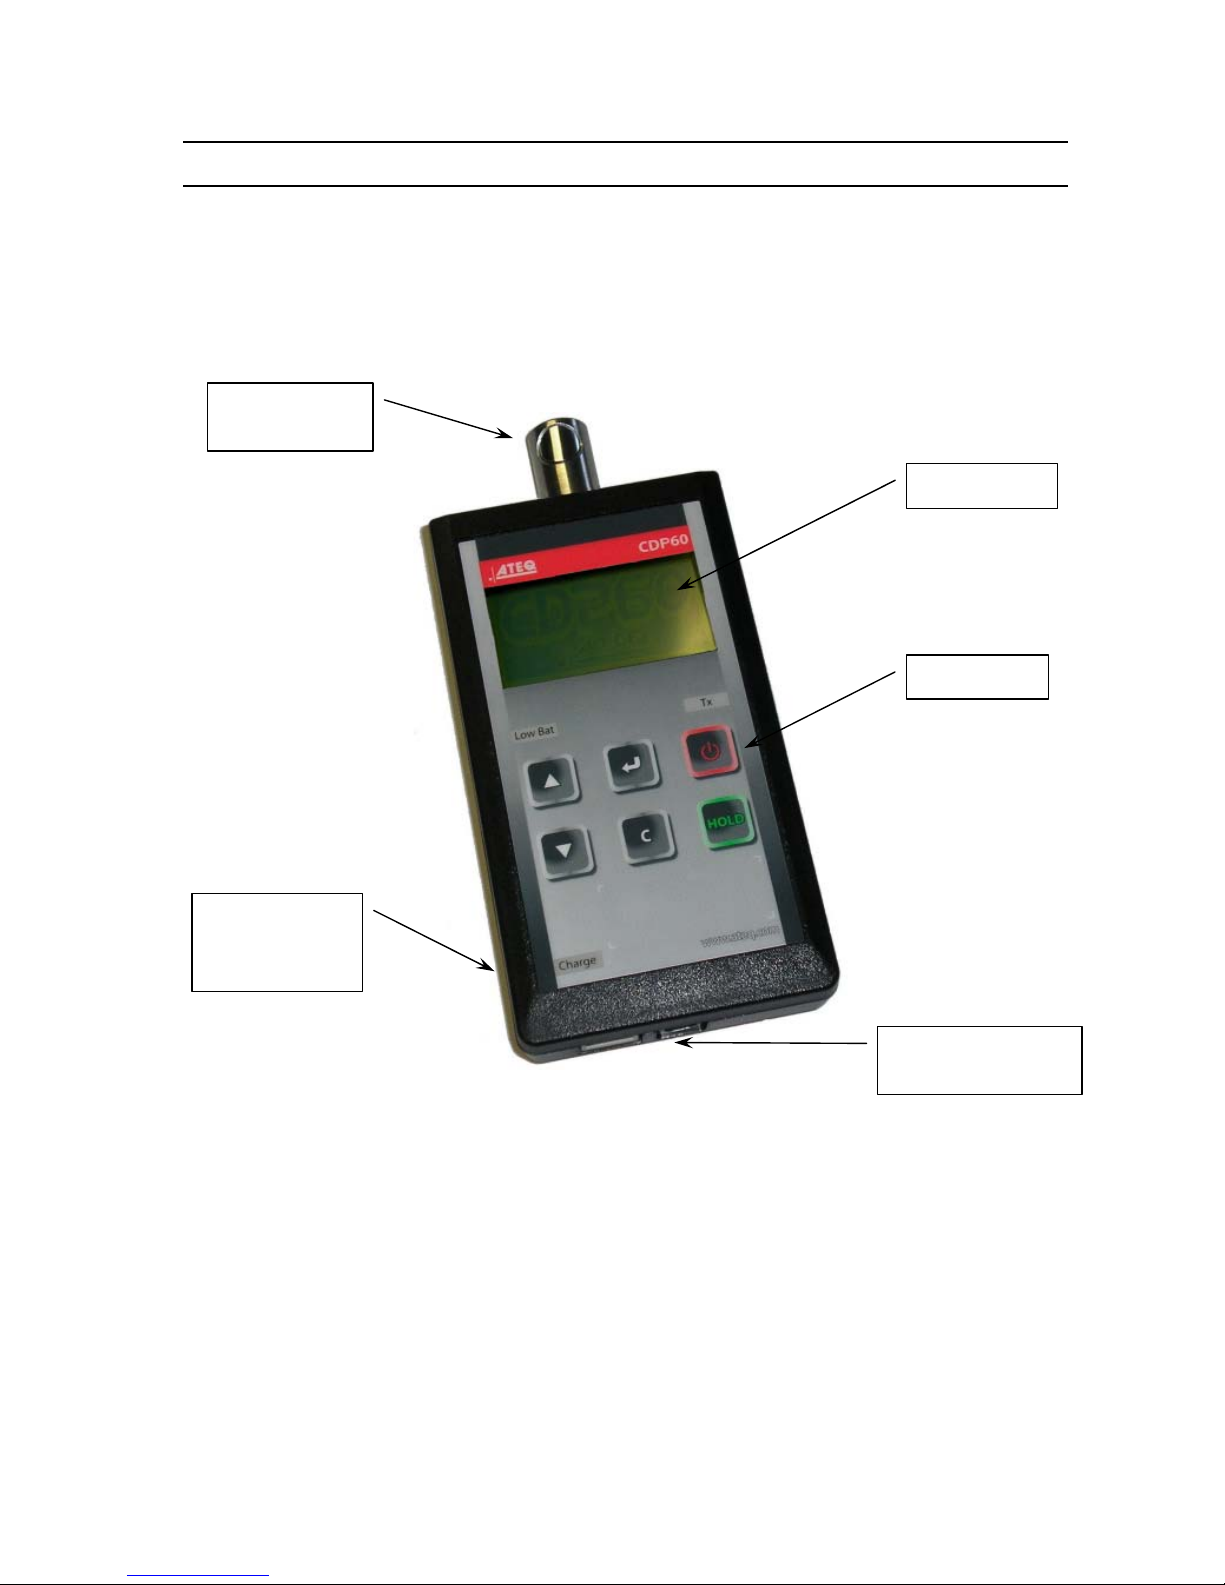
1. PRESENTATION OF THE ATEQ CDP60
The ATEQ CDP60 is according a portable case.
The instrument has a pneumatic quick connector (Staublï kind) for the connection to the
pressure to be measured.
The instrument has three electrics connectors:
¾ 1 connector for the battery charge, the instrument run with lithium-ion batteries
under 12 V DC voltages and it supplies with a specific supply transformer to
charge the batteries.
¾ 1 RS232 connector.
¾ 1 USB connector.
Display
Keyboard
Pneumatic
Connector
Charging
battery
connector
USB and RS232
connectors
Page 16
Chapter 1 – Instrument installation
UM-24100D-U User manual ATEQ CDP60 Page 6/36
2. ATEQ CDP60 INSTALLATION
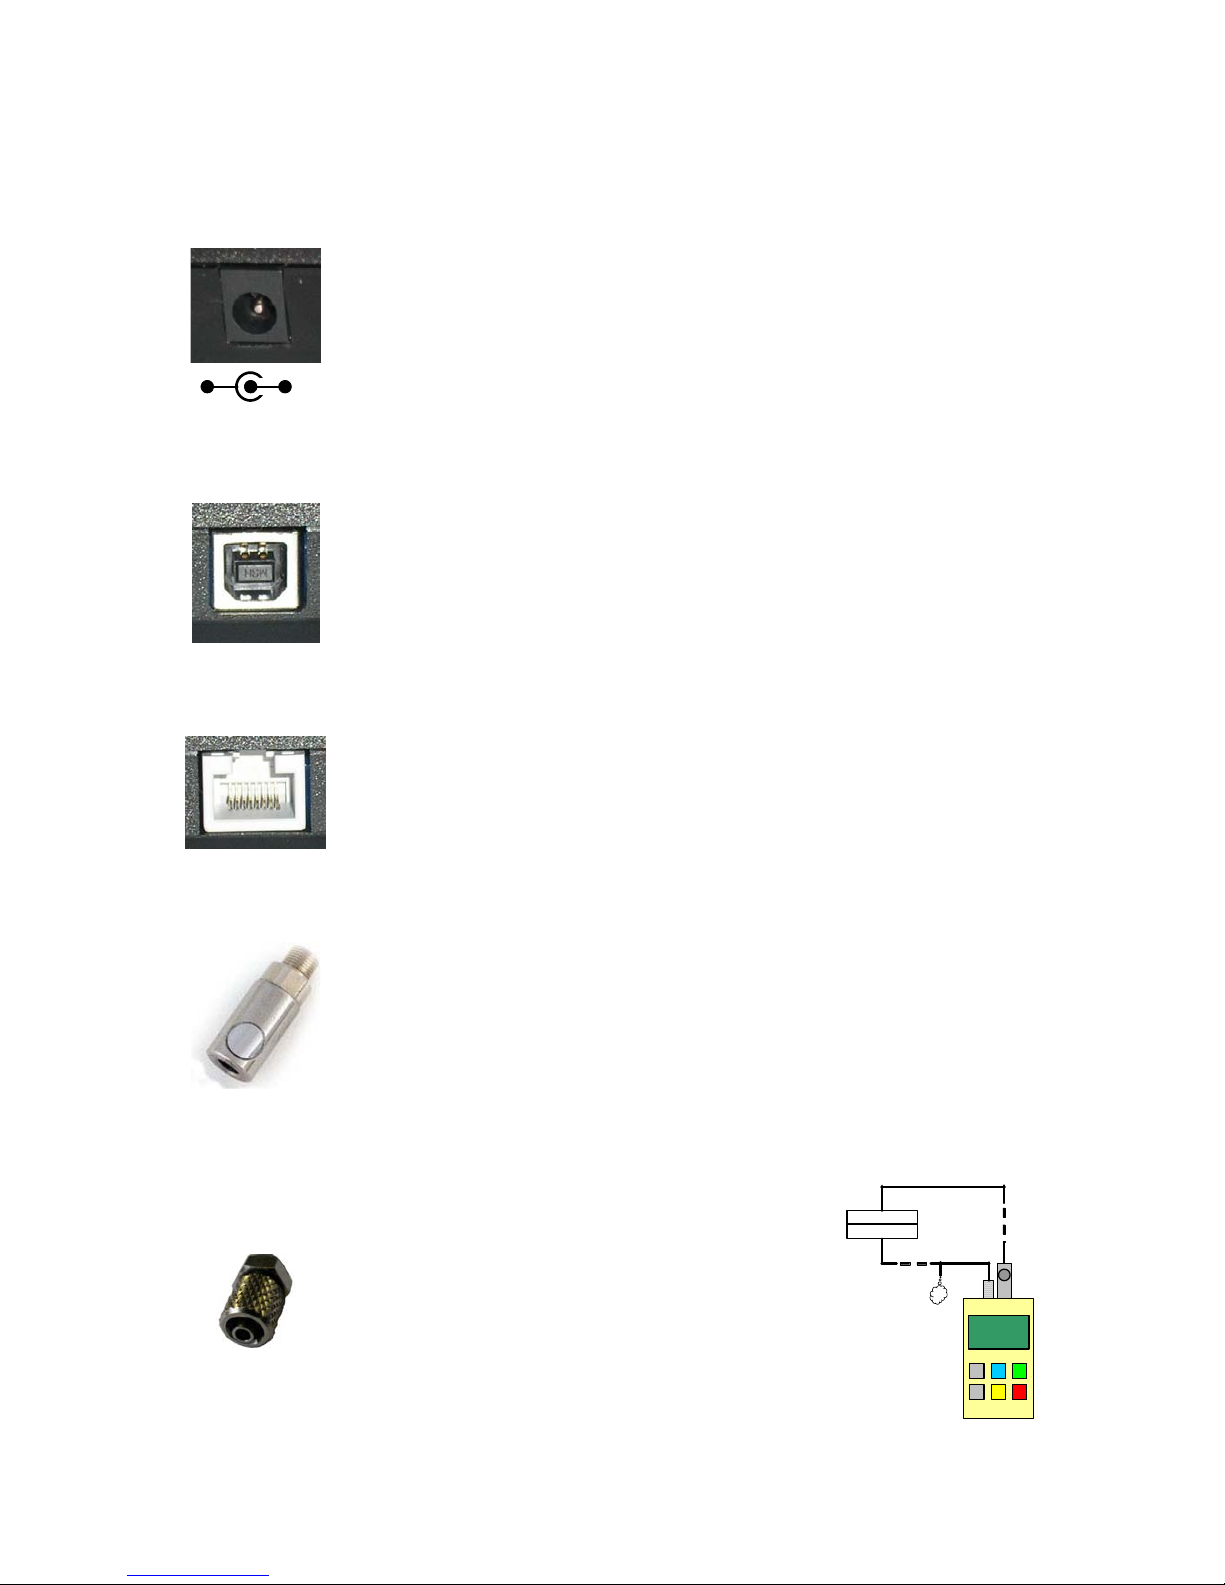
2.1. SUPPLY CONNECTOR 24 V DC
+ 24 V DC 0 V DC
Connector for the 24 V DC supply. For the battery charging. (Jack
connector).
2.2. USB CONNECTOR
Allows the connection to a PC. (Type B USB connector).
2.3. RS232 CONNECTOR
Allows the connection to a PC or a printer with a RS232 connection.
RJ45 type connector. For further information see chapter 7, paragraph
1.2 RS232 connection.
2.4. PNEUMATIC CONNECTOR (FIRST INPUT)
Allows the connection to the pressure to be measured (quick connector
"Staublï" RBE03 female type).
2.5. PNEUMATIC CONNECTOR (SECOND INPUT)
In case of low pressure differential sensor
calibration, allows to put all the reference circuit
to the same atmospheric pressure.
REF
TEST
Page 17
Chapter 2 – User Interfaces
UM-24100D-U User manual ATEQ CDP60 Page 7/36
Chapter 2
USER INTERFACES
1. KEYS
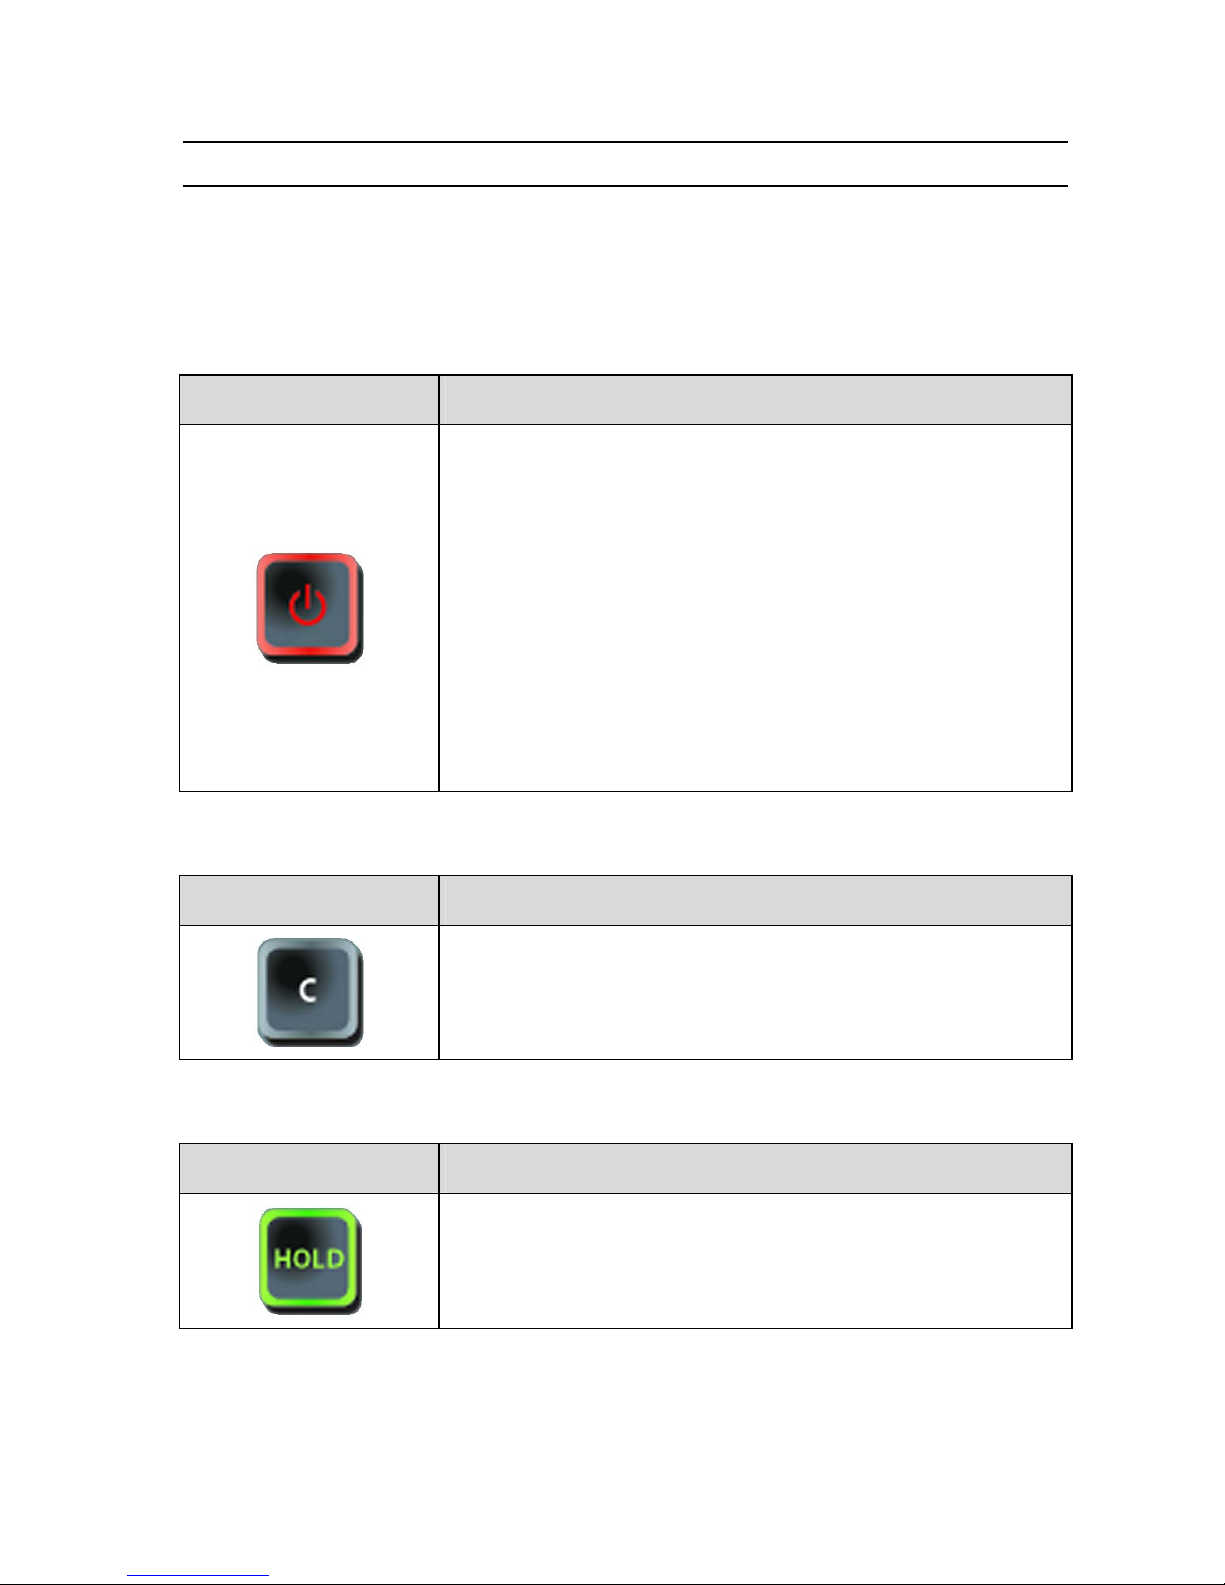
1.1. “START / INFORMATION” KEY
KEY FUNCTION
Switched off instrument: this key switch on the instrument.
Switched on instrument: allows the displaying of:
¾ the program version,
¾ the pressure range,
¾ the battery level.
¾ Press and hold this key to switch of the instrument
(more than 3 seconds).
Press and hold the key to display the battery level.
1.2. "CANCEL" KEY
KEY FUNCTION
Cancel he edition or the modification of the parameters.
Return to the previous menu.
1.3. “HOLD” KEY
KEY FUNCTION
To freeze or unfreeze the measurement display.
Page 18
Chapter 2 – User Interfaces
UM-24100D-U User manual ATEQ CDP60 Page 8/36
1.4. "ENTER" KEY
KEY FUNCTION
ENTER: menus access, parameter edition, parameter
validation.
Menus access: its exists two modes:
1st mode, short press (< 1 second) : allows acceding to the
"special cycles" menu,
2nd mode, press and hold (> 3 seconds) allows acceding to
the "parameters" menu.
1.5. NAVIGATION KEYS
KEY FUNCTION
Scroll up or increase numeric values.
Swing from the single "Pressure" or extended "Pressure
/temperature / Atmospheric pressure" displays.
Scroll down or decrease numeric values.
Swing from the single "Pressure" or extended "Pressure
/temperature / Atmospheric pressure" displays.
Page 19
Chapter 2 – User Interfaces
UM-24100D-U User manual ATEQ CDP60 Page 9/36
2. OTHERS ITEMS
2.1. LCD DISPLAY
Allows the measurements and parameters displaying.
2.2. LIGHTS
Three DEL indicate the instrument state.
Low Bat
Battery level: when this is on, the battery level becoming too low
for reliable operation, indicating that the battery must be
recharged before further use.
Charge
Charge light: this light is glowing red while the battery is being
charged. When charging is finished, the light turns off.
Tx
Not used.
Note: when the device is connected to a PC USB port, the "Charge" light is on.
Page 20

Chapter 2 – User Interfaces
UM-24100D-U User manual ATEQ CDP60 Page 10/36
Page 21
Chapter 3 – Start up, adjust and measures
UM-24100D-U User manual ATEQ CDP60 Page 11/36
Chapter 3
START UP ADJUST AND MEASURES
1. STARTING THE ATEQ CDP60
Before using the CDP60 device, be sure that the battery is correctly charged.
Check the pneumatics and electrics connections before the start up of the CDP60.
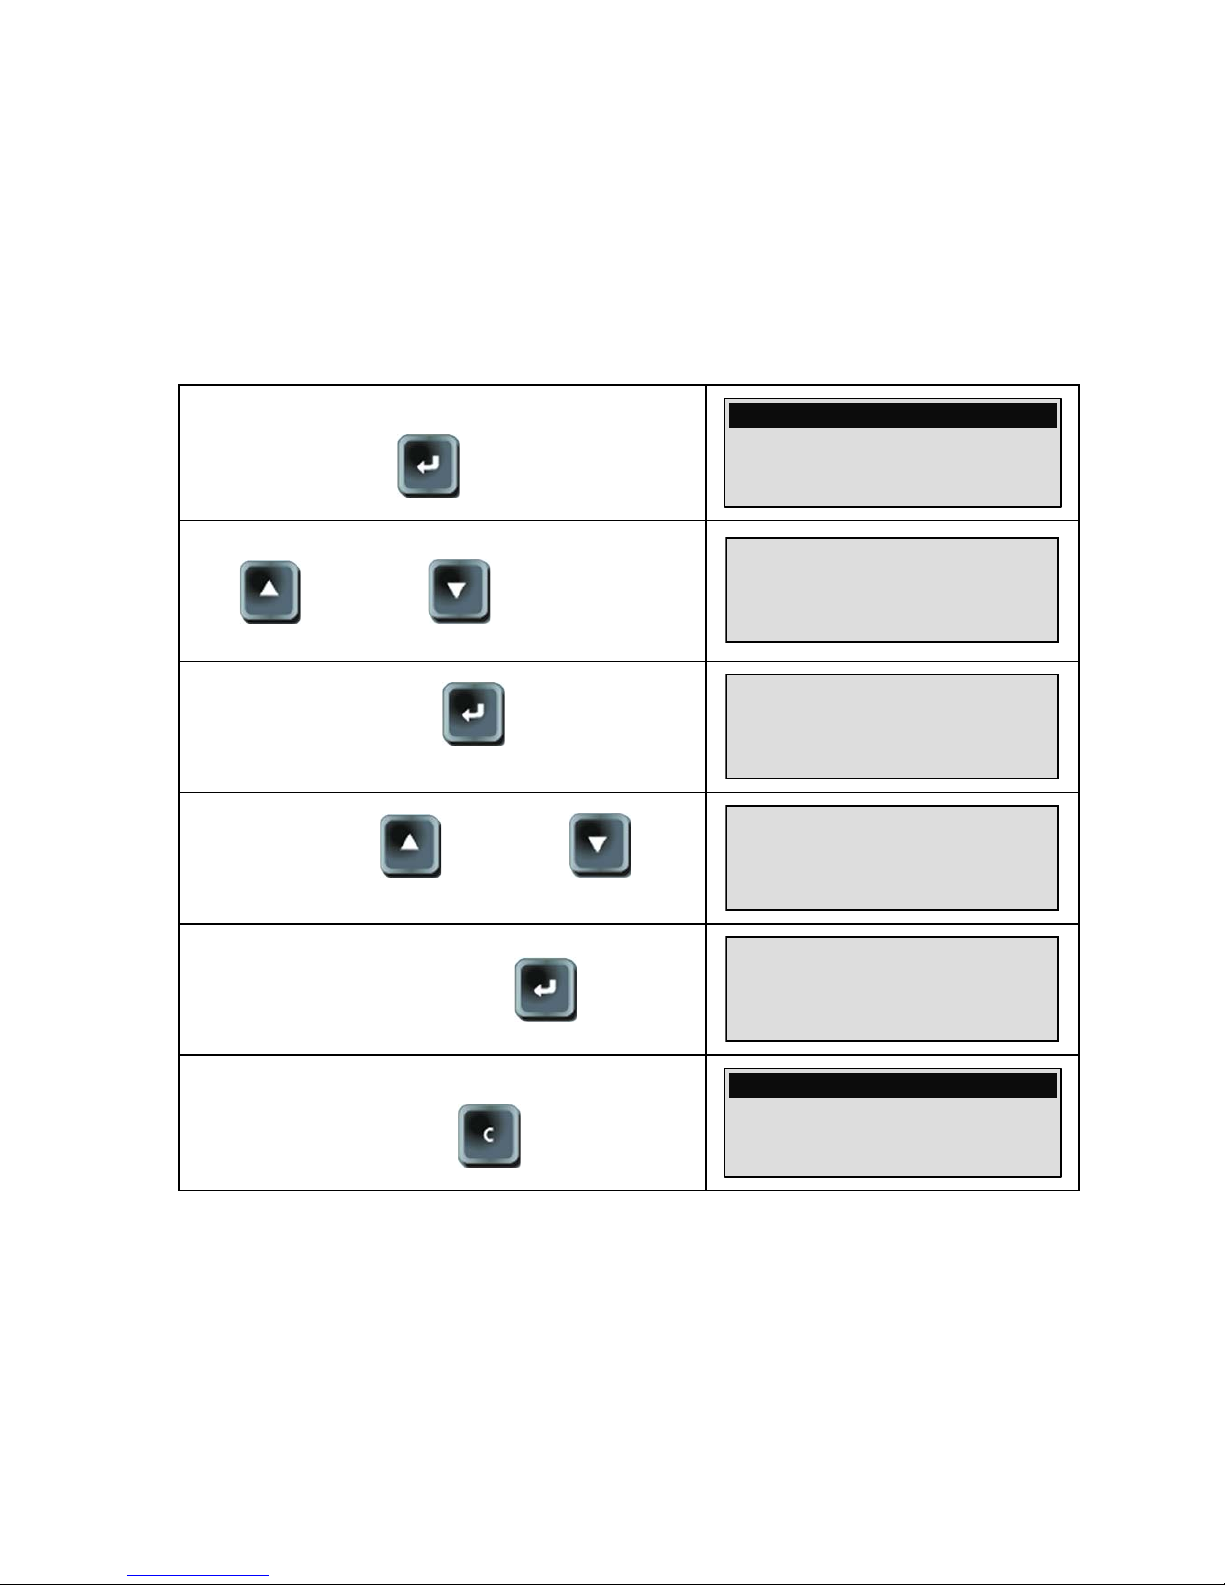
Switches on the instrument.
When this is on, the battery level becoming too low
for reliable operation, the "LOW BAT" light will light
on.
For a full scale superior than 5 bars, the instrument
asks to disconnect all pressure source from the
instrument for making the auto-zero. When it's
disconnect, press the ENTER key.
Switch off pressure
Ent
er If Ok
The instrument starts the auto-zero cycle.
A
UTO Z
E
RO
At the end of the auto-zero cycle, the instrument
indicates the current pressure measured and is
ready for measurement.
5
00.0 P
a
0
00.0
Note: it's important to make an auto-zero cycle before each measure statement.
2. MEASURES DISPLAY
The instrument displays continuously the current pressure. There's no measurement
start cycle.
5
00.0 P
a
0
00.0
Note: the data sending on the RS232 frame are the pressure measurements.
Page 22
Chapter 3 – Start up, adjust and measures
UM-24100D-U User manual ATEQ CDP60 Page 12/36
3. PARAMETERS ADJUST
It's existing three adjusted parameters.
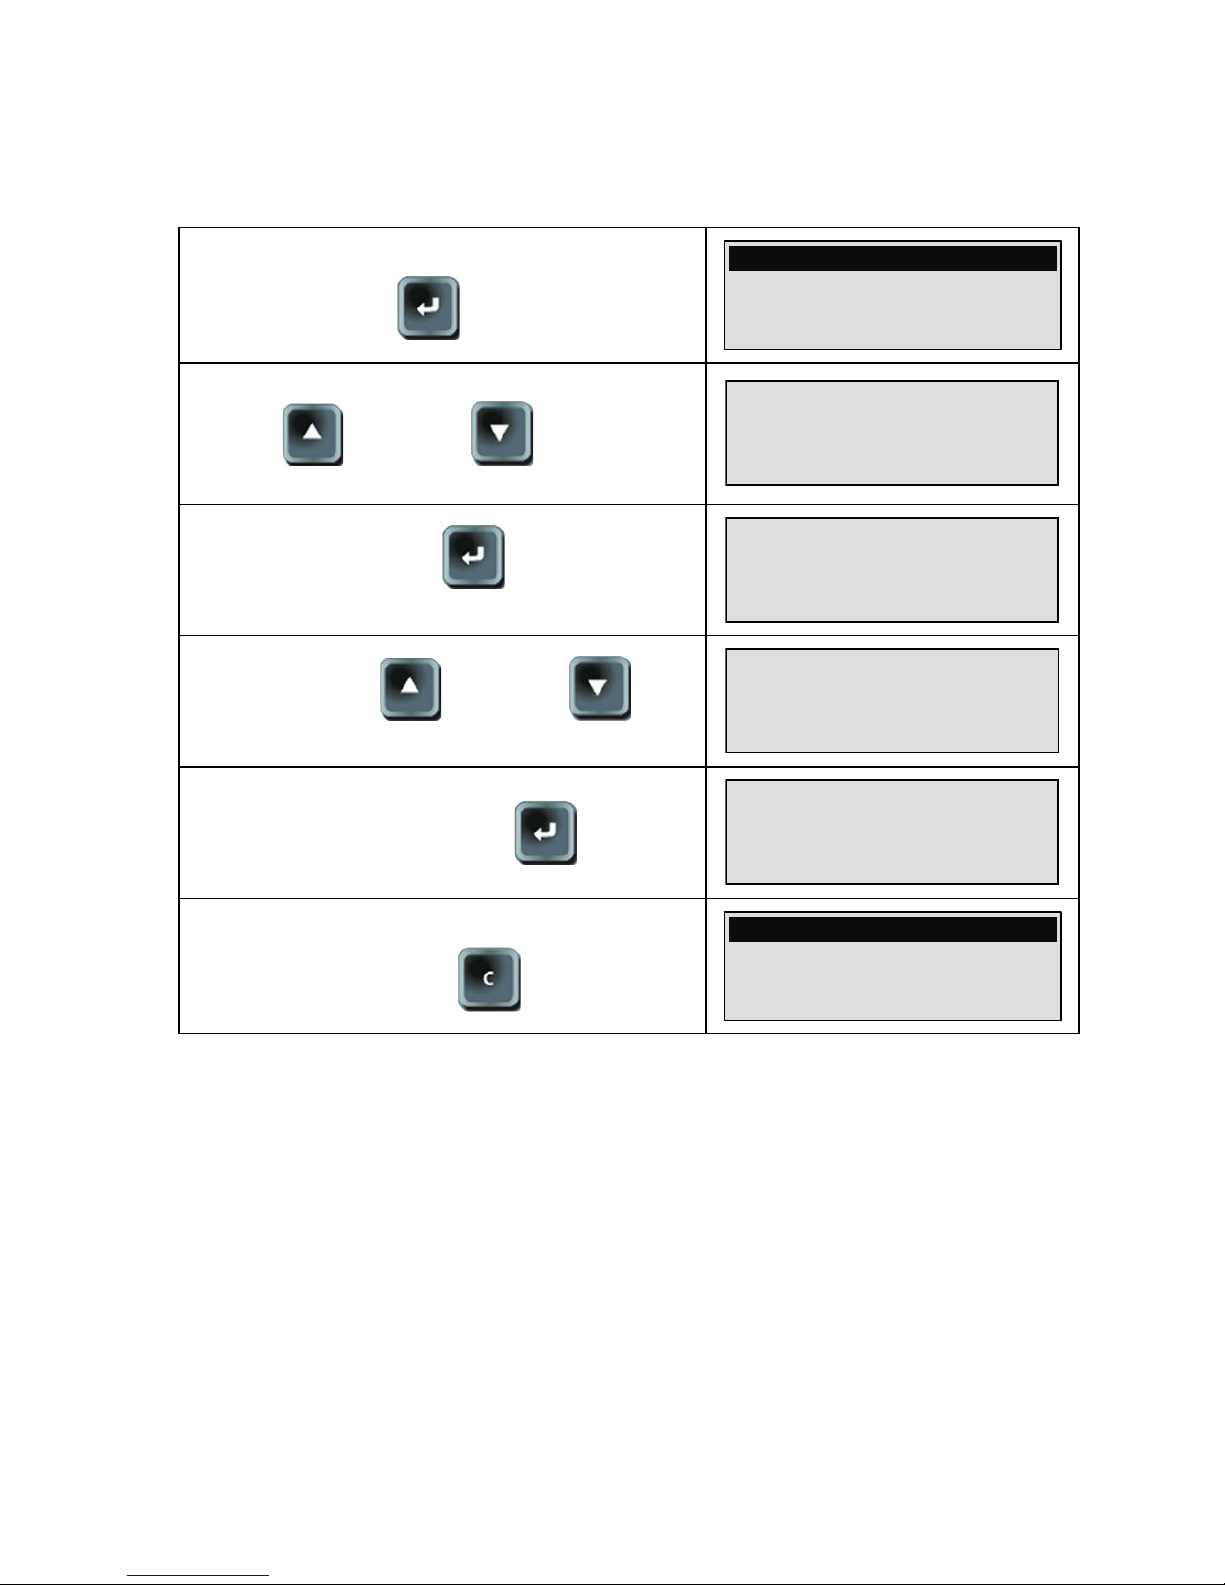
3.1. FILTER
It can be adjusted from 0.1 to 9.9 seconds by 0.1 second of step. It allows making a
mean on the measurement time, making easier the measurement reading.
Enter into the parameters menu, by pressing and
old the ENTER during 3 seconds.
5
00.0 P
a
000.0
The PARAMETER menu is displayed. By using the
UP and DOWN key select FILTER
parameter.
PARAMETER
>FILTER : 0.5 s
PRESS.UNIT.: Pa
B
ACKLIGHT: 100 %
Then press the ENTER key to modify the
parameter (the cursor moves on the right).
PARAMETER
FILTER : 0.5 s <
PRESS.UNIT.: Pa
B
ACKLIGHT: 100 %
By using the UP and DOWN key
modify the parameter to the hoped value.
PARAMETER
FILTER : 1.0 s <
PRESS.UNIT.: Pa
B
ACKLIGHT: 100 %
Validate with the ENTER key.
PARAMETER
>FILTER : 1.0 s
PRESS.UNIT.: Pa
B
ACKLIGHT: 100 %
To return to the measurement mode, press
CANCEL .
5
00.0 P
a
000.0
Page 23
Chapter 3 – Start up, adjust and measures
UM-24100D-U User manual ATEQ CDP60 Page 13/36
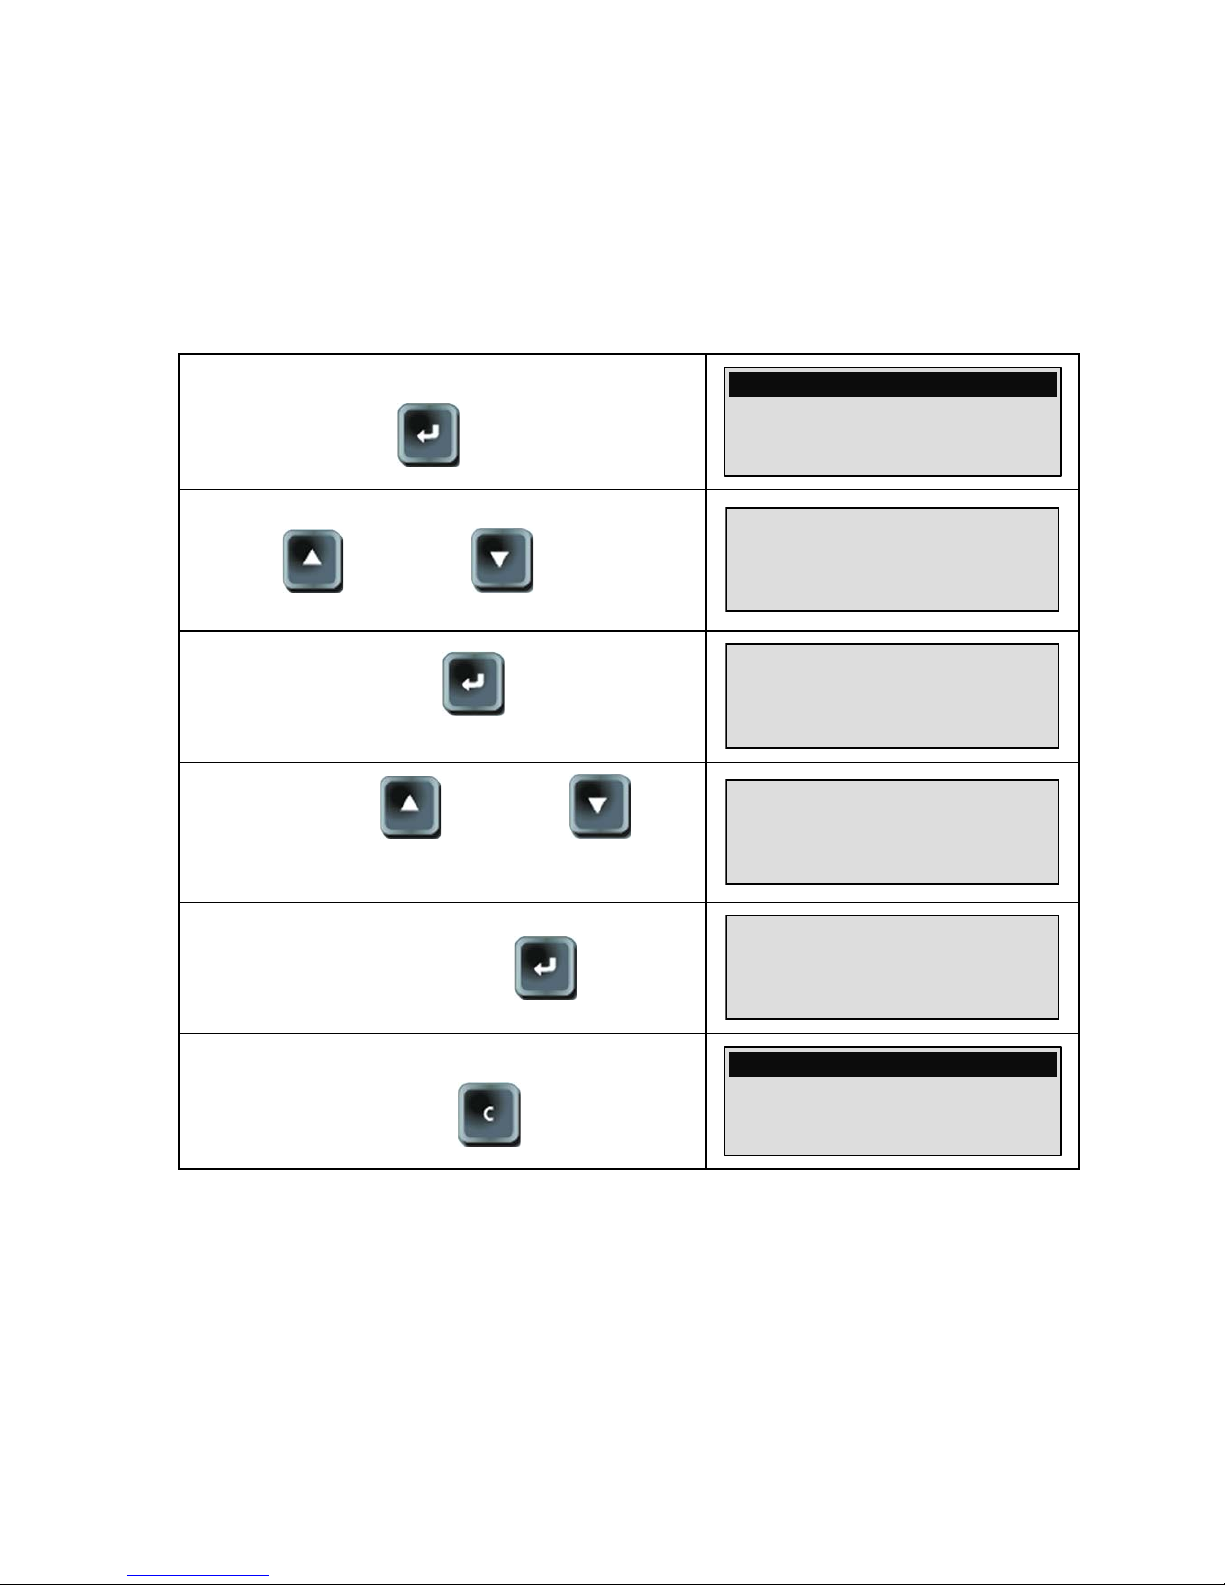
3.2. PRESSURE UNIT
This parameter selects the pressure unit displayed during the measurements.
Enter into the parameters menu, by pressing and
old the ENTER during 3 seconds.
5
00.0 P
a
000.0
The PARAMETER menu is displayed. By using the
UP and DOWN key select
PRESS. UNIT parameter.
PARAMETER
FILTER : 0.5 s
>PRESS.UNIT.: Pa
B
ACKLIGHT: 100 %
Then press the ENTER key to modify the
parameter (the cursor moves on the right).
PARAMETER
FILTER : 0.5 s
>PRESS.UNIT.: Pa
B
ACKLIGHT: 100 %
By using the UP and DOWN key
choose the unit to be displayed.
UNIT
>Pa
mbar
mmHg
Validate with the ENTER key.
PARAMETER
FILTER : 1.0 s
>PRESS.UNIT.: Pa
B
ACKLIGHT: 100 %
To return to the measurement mode, press
CANCEL
.
5
00.0 P
a
0
00.0
Page 24
Chapter 3 – Start up, adjust and measures
UM-24100D-U User manual ATEQ CDP60 Page 14/36
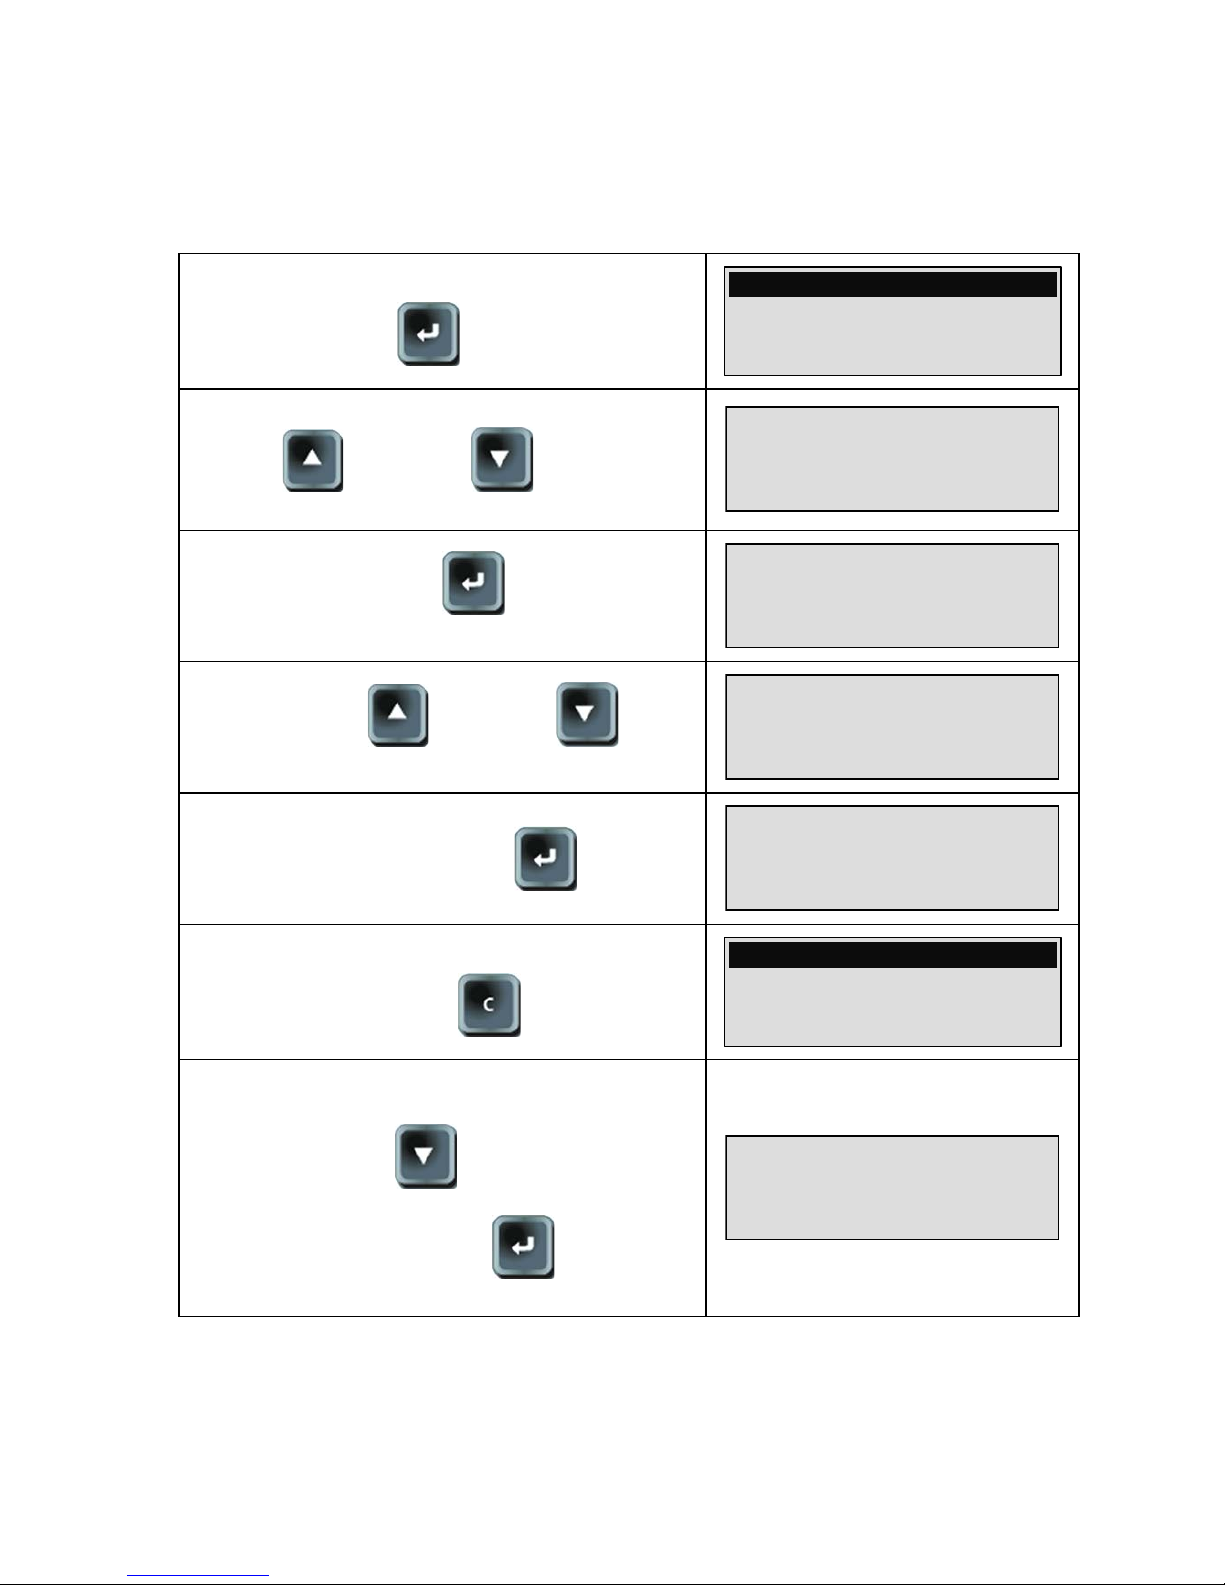
3.3. BACK LIGHT
The brightness of the backlighting can be set so as to suit the backlighting to the
ambient lighting or your personal preferences.
The screen backlighting is programmable and can be altered.
Backlighting of low brightness will save battery power. Specify a setting that suits the
way you use the instrument.
Enter into the parameters menu, by pressing and
old the ENTER during 3 seconds.
5
00.0 P
a
000.0
The PARAMETER menu is displayed. By using the
UP and DOWN key select
BACK LIGHT parameter.
PARAMETER
PRESS.UNIT.: Pa
>BACK LIGHT: 100 %
A
UTO OFF: 05 min
Then press the ENTER key to modify the
parameter (the cursor moves on the right).
PARAMETER
PRESS.UNIT.: Pa
BACK LIGHT: 100 % <
A
U
TO OFF: 05 min
By using the UP and DOWN key
modify the backlight value between 0 % (switched
off) and 100 % (maximum).
PARAMETER
PRESS.UNIT.: Pa
BACK LIGHT: 050 % <
A
U
TO OFF: 07 min
Validate with the ENTER key.
PARAMETER
PRESS.UNIT.: Pa
>BACK LIGHT: 050 %
A
U
TO OFF: 07 min
To return to the measurement mode, press
CANCEL
.
5
00.0 P
a
000.0
Page 25
Chapter 3 – Start up, adjust and measures
UM-24100D-U User manual ATEQ CDP60 Page 15/36
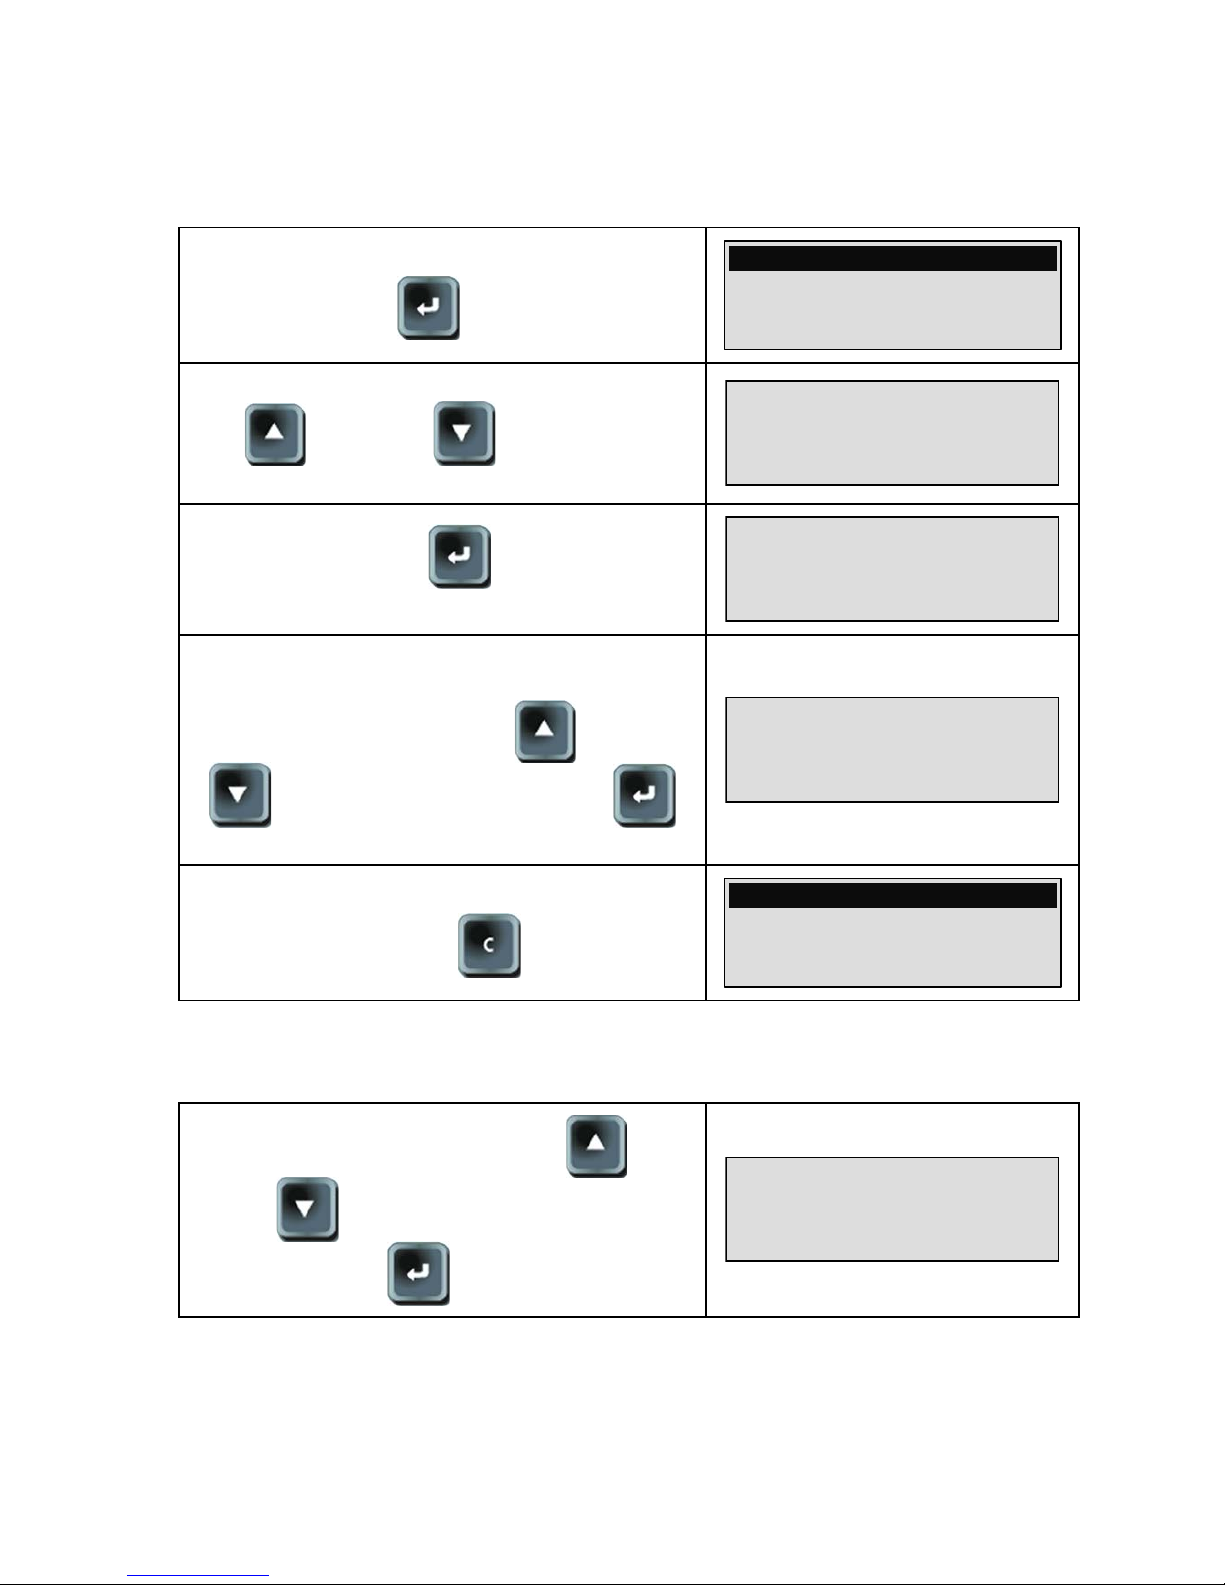
3.4. AUTOMATIC POWER OFF (AUTO OFF)
This feature conserve battery life by automatically turning the instrument off after a
user-defined period of time within there has been no key activity.
Enter into the parameters menu, by pressing and
old the ENTER during 3 seconds.
5
00.0 P
a
000.0
The PARAMETER menu is displayed. By using the
UP and DOWN key select
AUTO OFF parameter.
PARAMETER
PRESS.UNIT.: Pa
BACK LIGHT: 100 %
>
AUTO OFF: 05 min
Then press the ENTER key to modify the
parameter (the cursor moves on the right).
PARAMETER
PRESS.UNIT.: Pa
BACK LIGHT: 100 %
A
U
TO OFF: 05 min
<
By using the UP and DOWN key to
modify the switch off delay value.
PARAMETER
PRESS.UNIT.: Pa
BACK LIGHT: 100 %
A
U
TO OFF: 07 min
<
Validate with the ENTER key.
PARAMETER
PRESS.UNIT.: Pa
BACK LIGHT: 100 %
>AU
TO OFF: 07 min
To return to the measurement mode, press
CANCEL
.
5
00.0 P
a
0
00.0
It's possible to disable the AUTO OFF function and
leave continuously the instrument on, for that by
using the DOWN key go the minimum
(inferior to 1 minute) then appears "DISABLE"
Validate with the ENTER key. The
instrument will be power on continuously.
PARAMETER
PRESS.UNIT.: Pa
BACK LIGHT: 100 %
>AU
TO OFF: Disable
Page 26
Chapter 3 – Start up, adjust and measures
UM-24100D-U User manual ATEQ CDP60 Page 16/36
3.5. RS232
This parameter is configuring the RS232 port.
Enter into the parameters menu, by pressing and
old the ENTER during 3 seconds.
5
00.0 P
a
000.0
The PARAMETER menu is displayed. By using the
UP and DOWN key select RS232
parameter.
PARAMETER
BACK LIGHT: 100 %
AUTO OFF: 05 min
>
RS232
Then press the ENTER key to enter into the
RS232 links parameters configuration menu.
RS232
>BAUDRATE : 57600
BITS COUNT : 8
P
ARITY : NONE
Select and adjust each parameter: BAUDRATE,
BITS COUNT, PARITY, HANDSHAKE and the
EXPORT mode by using the UP and DOWN
key and validate with the ENTER
key.
RS232
BAUDRATE : 19200 <
BITS COUNT : 8
P
ARITY : NONE
To return to the measurement mode, press
CANCEL
.
5
00.0 P
a
0
00.0
The EXPORT mode allows modify the frame format, this is to export the measurements
results to a spreadsheet or not (the character strings are separated by a punctuation
mark).
Select YES or NO by using the UP and
DOWN keys and validate with the ENTER
key.
RS232
PARITY : NONE
HANDSHAKE : NO
>
E
XPORT : YES
Page 27
Chapter 4 - CDP60 Functions
UM-24100D-U User manual ATEQ CDP60 Page 17/36
Chapter 4
CDP60 FUNCTIONS
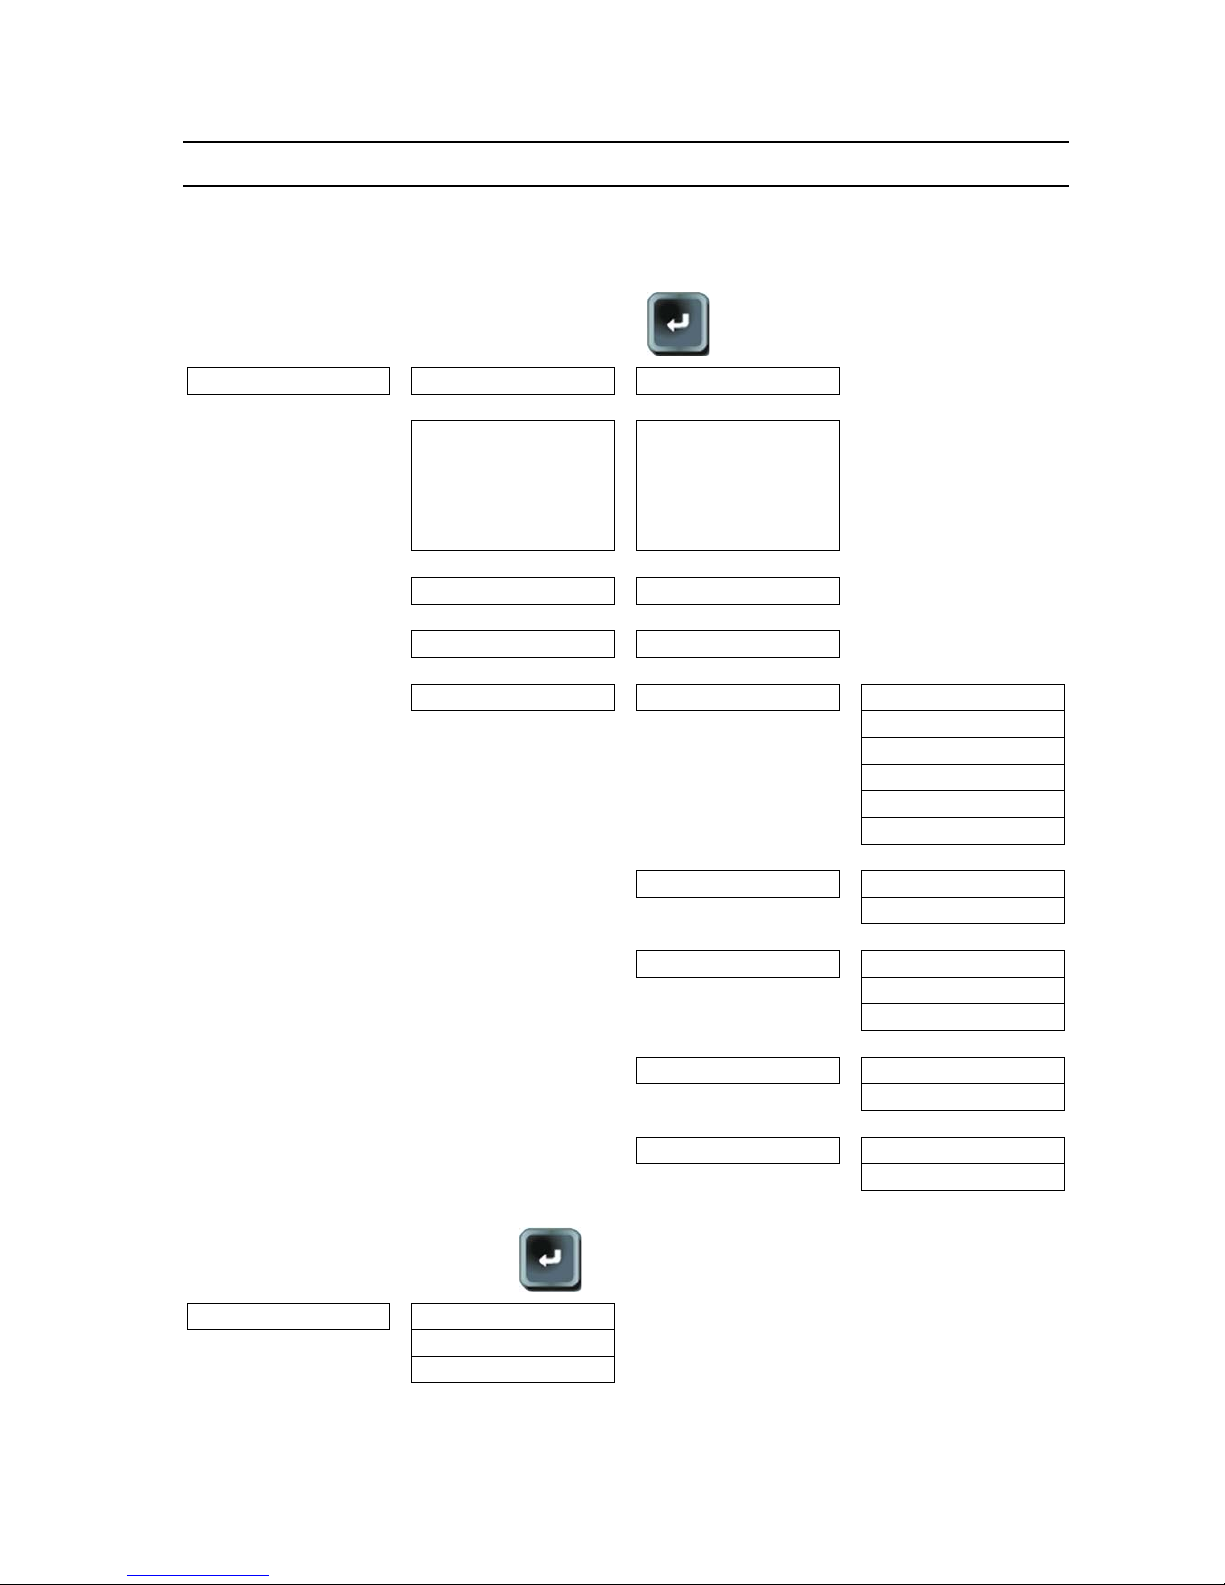
1. MENUS STRUCTURE
Extended menu, access by press and hold
> 3 seconds
PARAMETER
> FILTER > 0.1 à 9.9 s
V
Pressure unit >
Atm* > Bar* >
In H2O* > InHg* >
kg/cm2* > kPa* >
Mbar* > mmH2O* >
mmHg* > MPa* > Pa*
> PSI* > Torr* >
V
Back light > 0 > 100 %
V
Auto off > Disable > 99 min
V
RS232 > Baudrate > 2400
V 4800
V 9600
V 19200
V 38400
V 57600
V
Bits count > 7
V 8
V
Parity > None
V Even
V Odd
V
Handshake > No
V Yes
V
Export > No
Yes
* Only some units are integrated according to the instrument full scale.
Simple menu, access by press
< 1 second
SPECIAL CYCLE
> Auto-zero
Print
Sensor display
Page 28
Chapter 4 - CDP60 Functions
UM-24100D-U User manual ATEQ CDP60 Page 18/36
2. SPECIALS CYCLES
The specials cycles allows doing commands on the instrument.
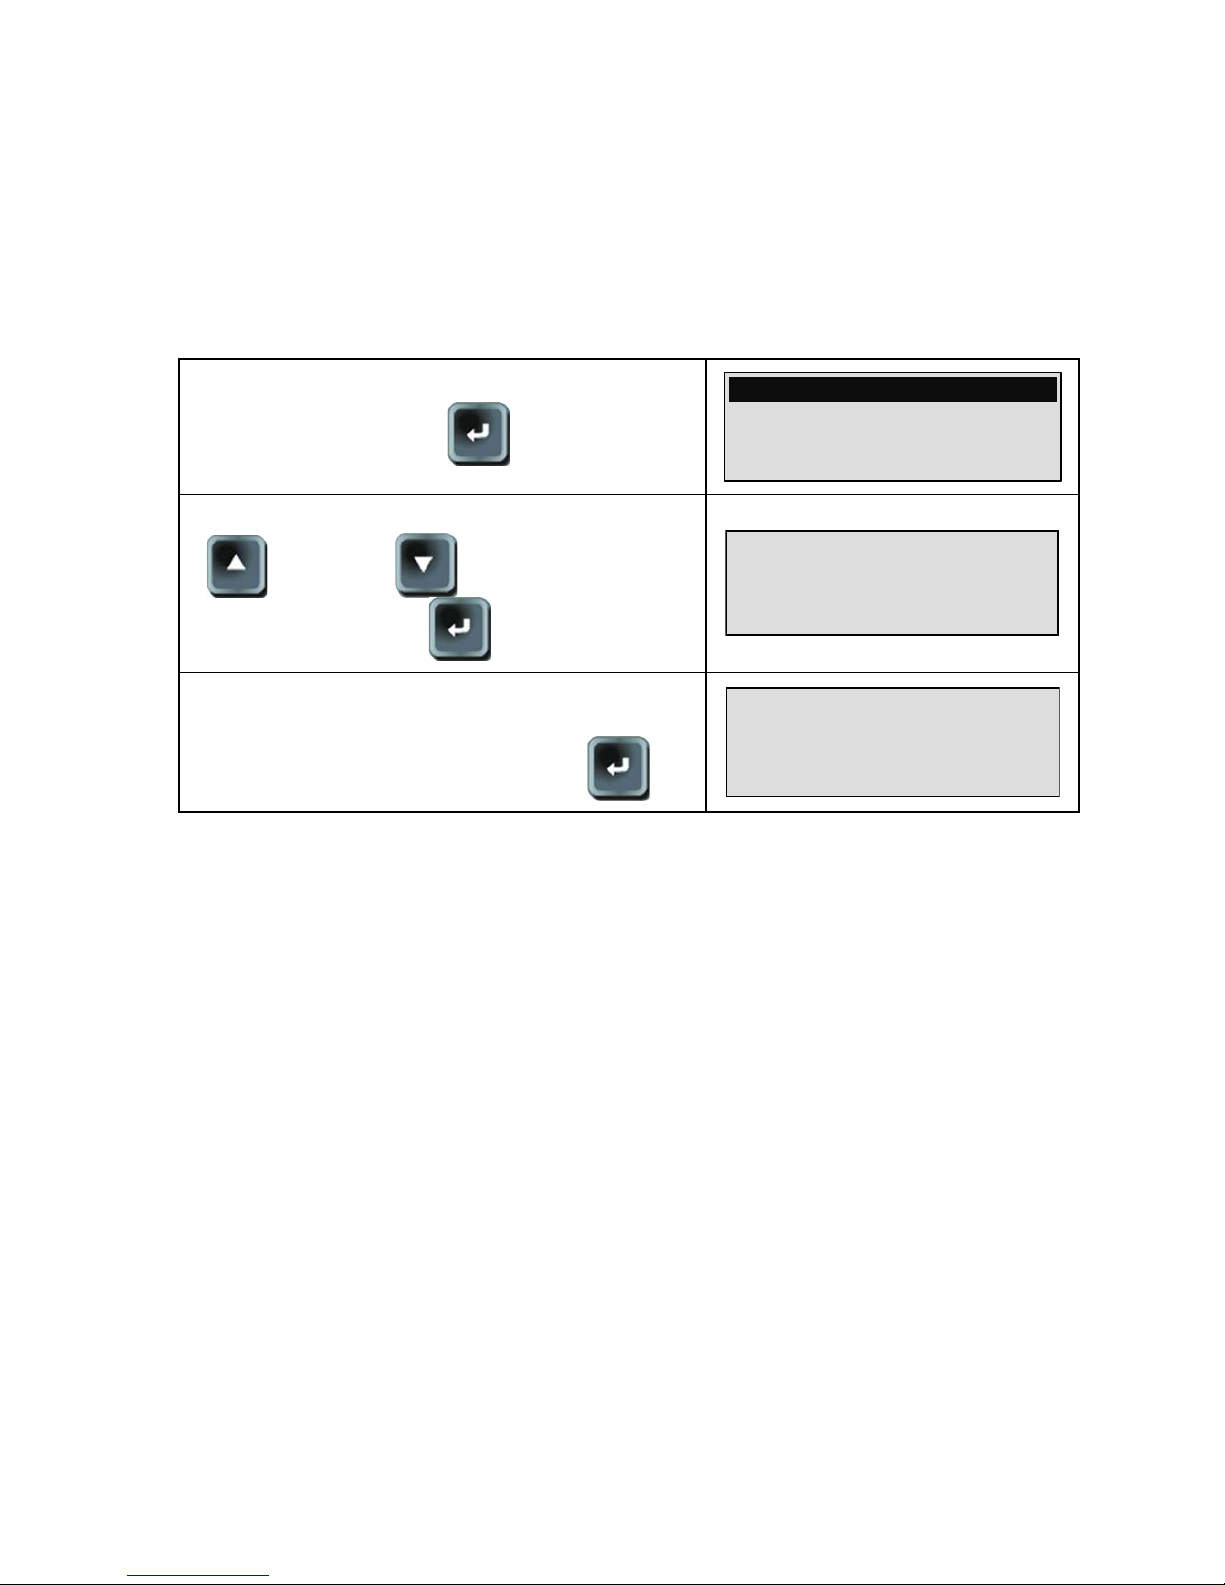
2.1. AUTO-ZERO
This special cycle make a zero sensor according to the atmospheric pressure.
Enter into the parameters menu by short press on
the ENTER key.
5
00.0 P
a
000.0
Select the AUTO ZERO function by using the UP
and DOWN keys validate with the
ENTER key.
SPECIAL CYCLE
>AUTO ZERO
PRINT
S
ENSOR DISPLAY
If the full scale is more than 5 bars, the instrument
ask to disconnect every pressure source from the
connector and validate with the ENTER key.
Switch off pressure
Ent
er If Ok
Note: this cycle allows taking over an offset linked to the temperature, position, etc…
Page 29
Chapter 4 - CDP60 Functions
UM-24100D-U User manual ATEQ CDP60 Page 19/36
2.2. MEASUREMENTS PRINT (PRINT)
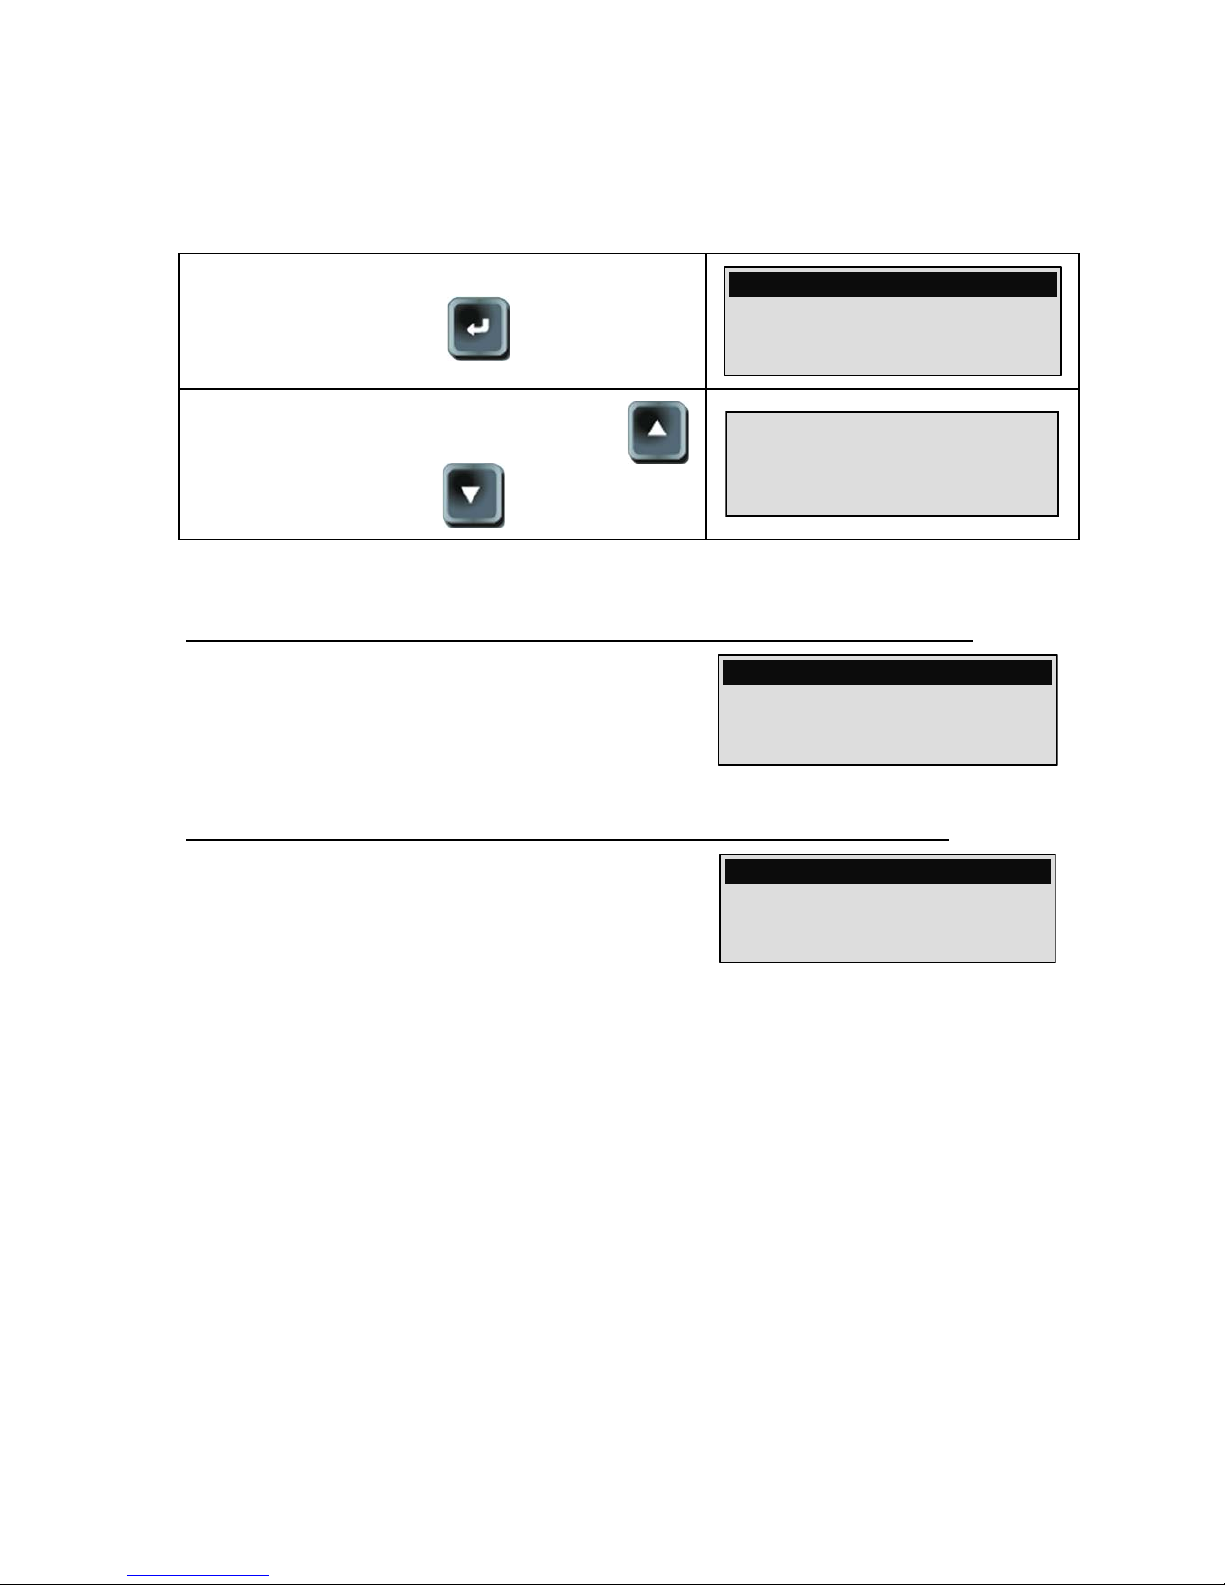
This special cycle send on the USB or RS232 port the measures displayed on the
screen.
Enter into the parameters menu by short press on
the ENTER key.
5
00.0 P
a
000.0
Select the PRINT function by using the UP
and DOWN keys.
SPECIAL CYCLE
AUTO ZERO
>PRINT
S
ENSOR DISPLAY
The frame format is different following if the EXPORT mode is validated or not.
Frame format sent on the USB or RS232 port with no EXPORT mode (no):
PRESS.: 116.0 Pa
5
00.0 P
a
116.0
Frame format sent on the USB or RS232 port with EXPORT mode (yes):
PRESS.:; 1.497 ;bar;
5.000 bar
1.497
In the EXPORT mode, the frames contains punctuation separators and each
measurement result are on the same line (no line feed) this is to easily importing and
treating in a spreadsheet software for example.
Page 30
Chapter 4 - CDP60 Functions
UM-24100D-U User manual ATEQ CDP60 Page 20/36
2.3. SENSORS DISPLAY
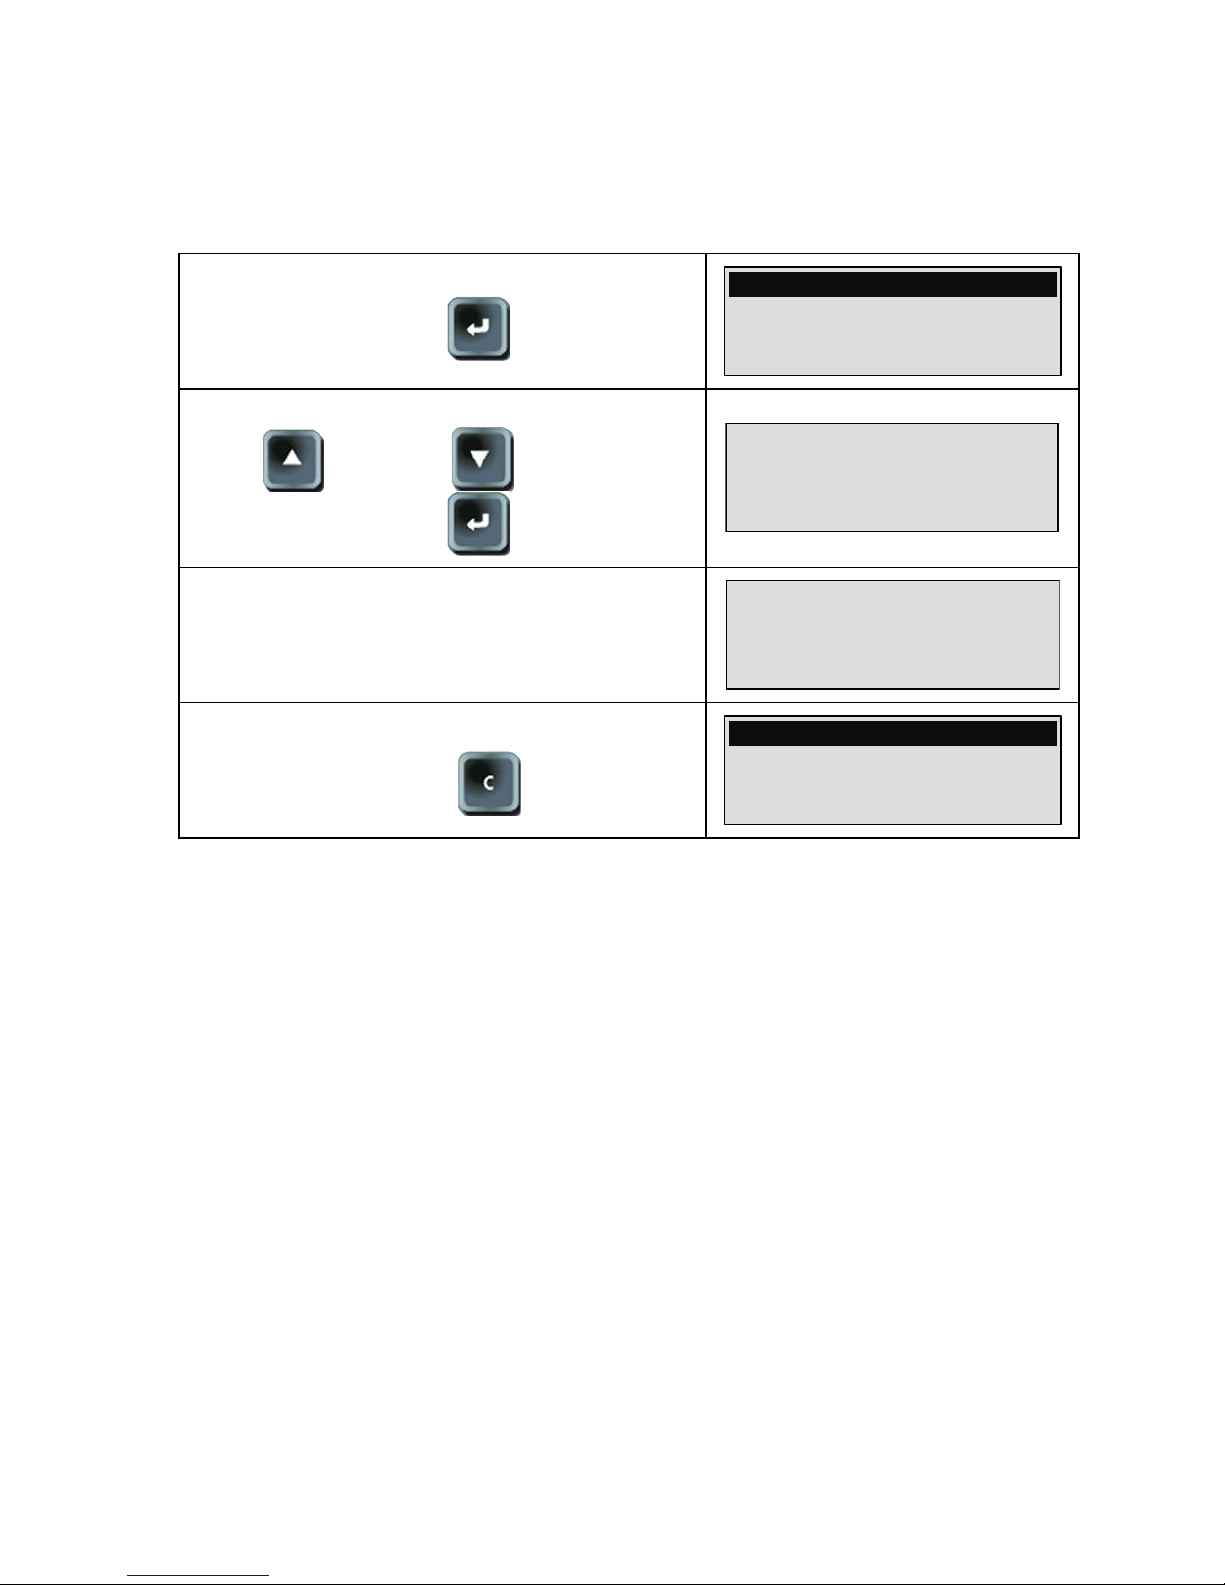
This special cycle displays the raw values of the all sensors. This is to help the after
sales service diagnostic.
Enter into the parameters menu by short press on
the ENTER key.
5
00.0 P
a
000.0
Select the SENSOR DISPLAY function by using
the UP and DOWN keys validate with
the ENTER key.
SPECIAL CYCLE
AUTO ZERO
PRINT
>
S
ENSOR DISPLAY
The instrument displays the sensors points.
U : 051974
PRESS. : 021509
To return to the measurement mode, press
CANCEL .
5
00.0 P
a
0
00.0
Page 31
Chapter5 – Accessories, security and recycling
UM-24100D-U User manual ATEQ CDP60 Page 21/36
Chapter 5
ACCESSORIES, SECURITY AND RECYCLING
1. ACCESSORIES
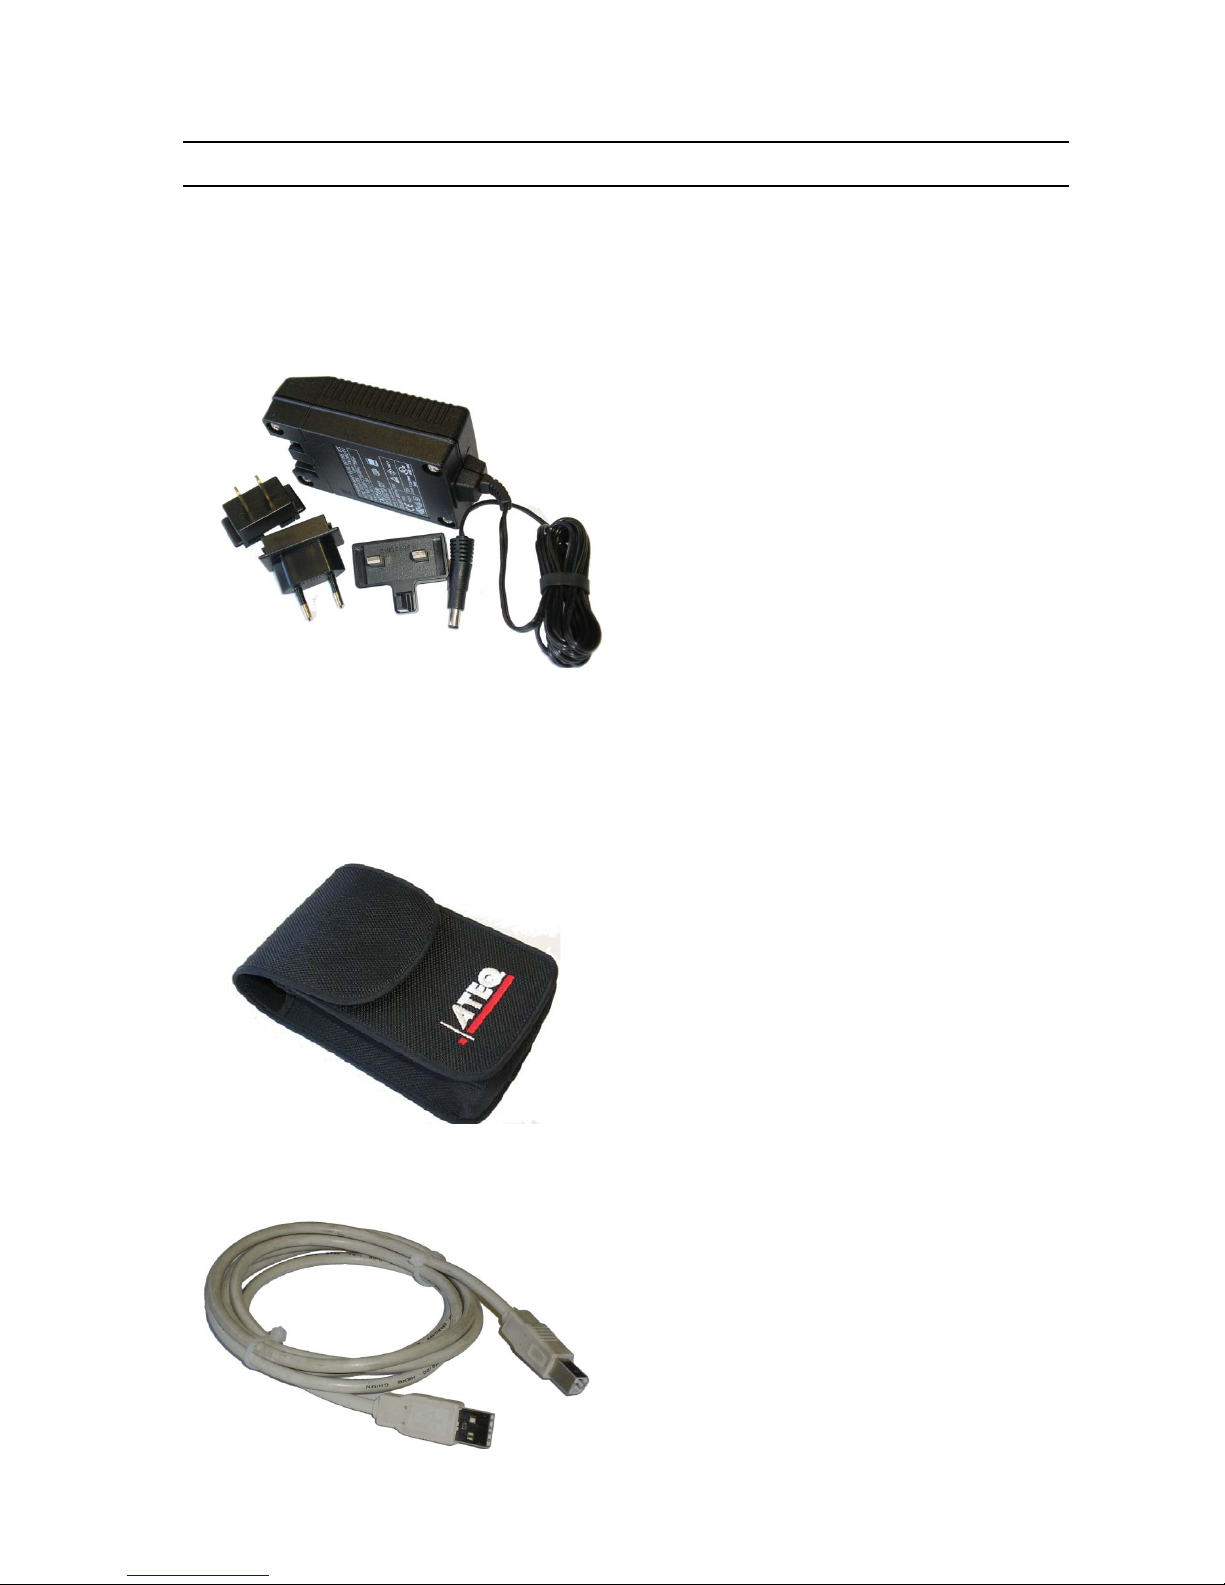
1.1. POWER SUPPLY
The power supply of the CDP60
converts a network voltage (120 to 240
V AC) into a 24 V DC low voltage
supply. It has no power switch and
works as soon as it is plugged in. It
allows supplying the instrument who
manage itself its charge.
It is protected against surges and short
circuits via a thermal fuse.
Do not use any other type of fuse.
Moreover, this supply can be plugged on all types of electrical plugs using different
removable pins.
The instrument is not designed to work during the battery charge.
1.2. SOFT CASE
The soft case is to put away the instrument
when out of use.
1.3. USB
WIRE
To connect the instrument to a PC.
Page 32
Chapter5 – Accessories, security and recycling
UM-24100D-U User manual ATEQ CDP60 Page 22/36
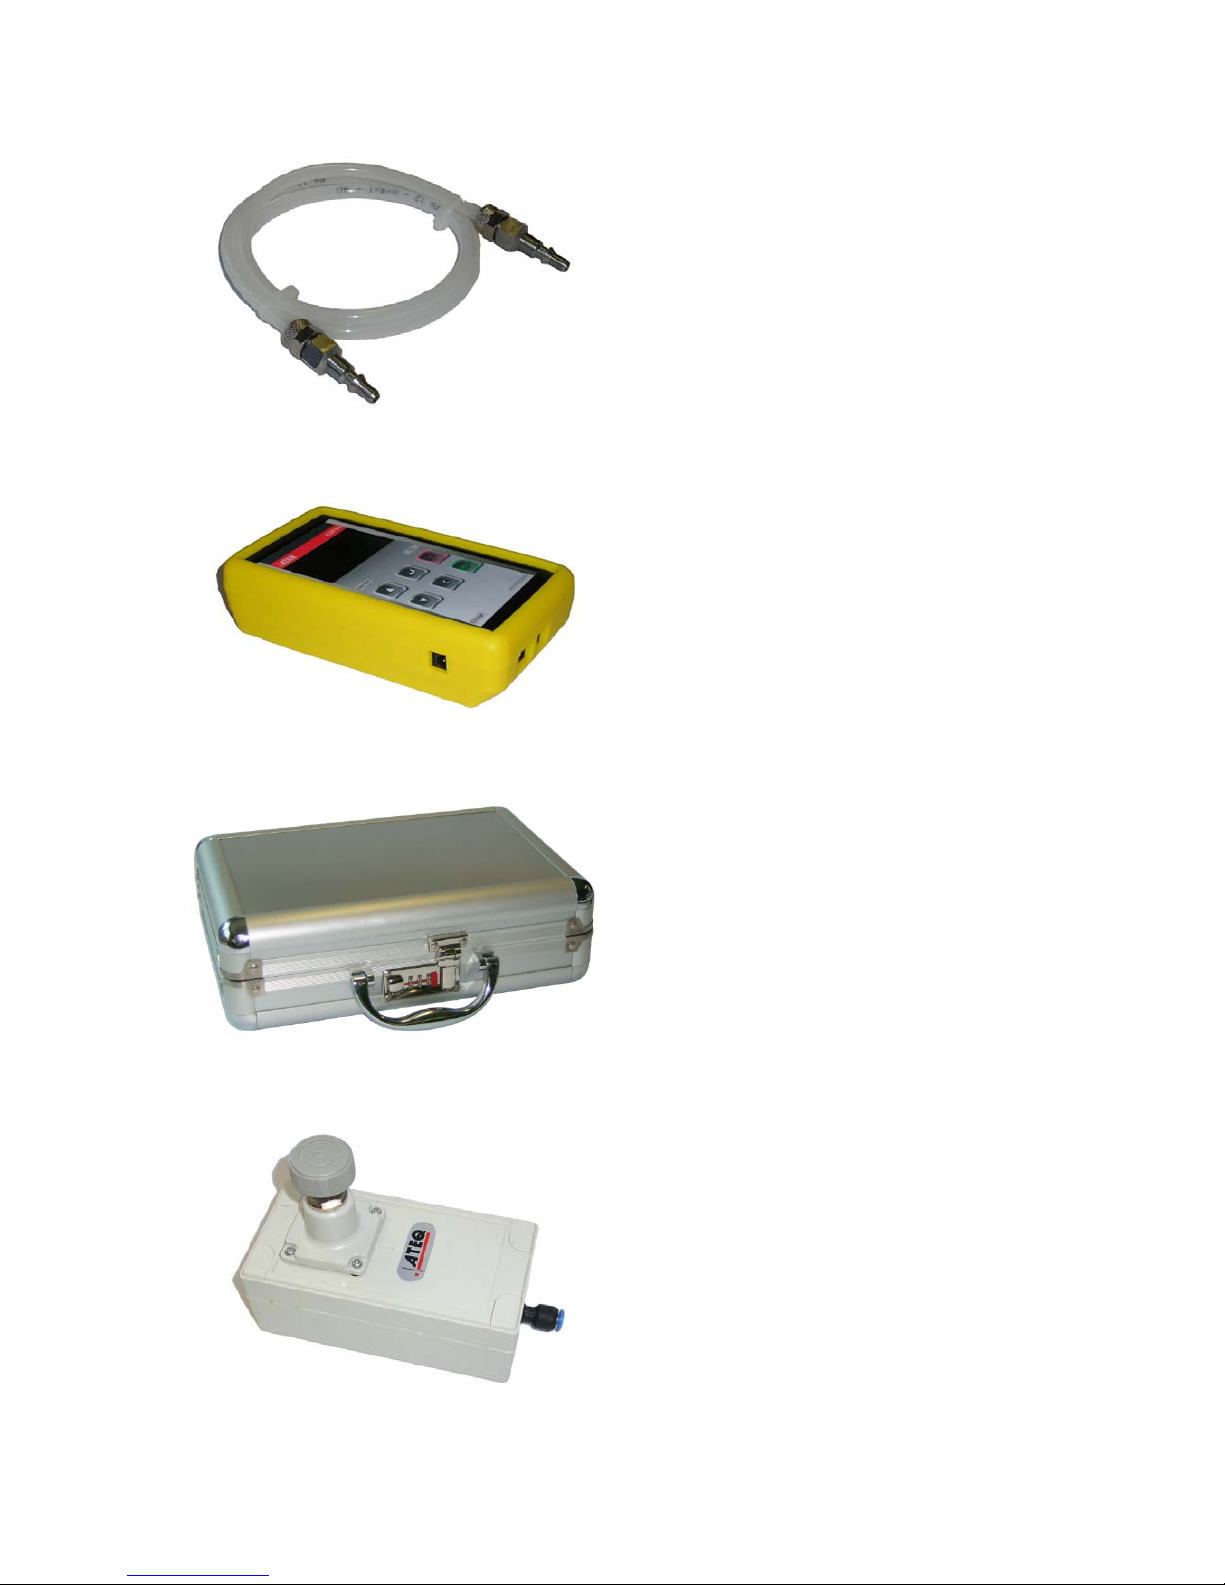
1.4. TEST TUBE
To make the pneumatic connection between
the instrument and the pressure source to
control.
1.5. P
ROTECTION COVER (OPTION)
This cover in rubber material allows protect
the CDP60 and absorb impacts (option).
1.6. HARD CASE (OPTION)
Hard case to put away the CDP60
instrument and its accessories.
1.7. PRESSURE GENERATOR (OPTION)
Full scale: 1000 Pa.
This instrument generates from the 6 bars
network a pressure between 0 and 1000 Pa
(option).
Page 33
Chapter5 – Accessories, security and recycling
UM-24100D-U User manual ATEQ CDP60 Page 23/36
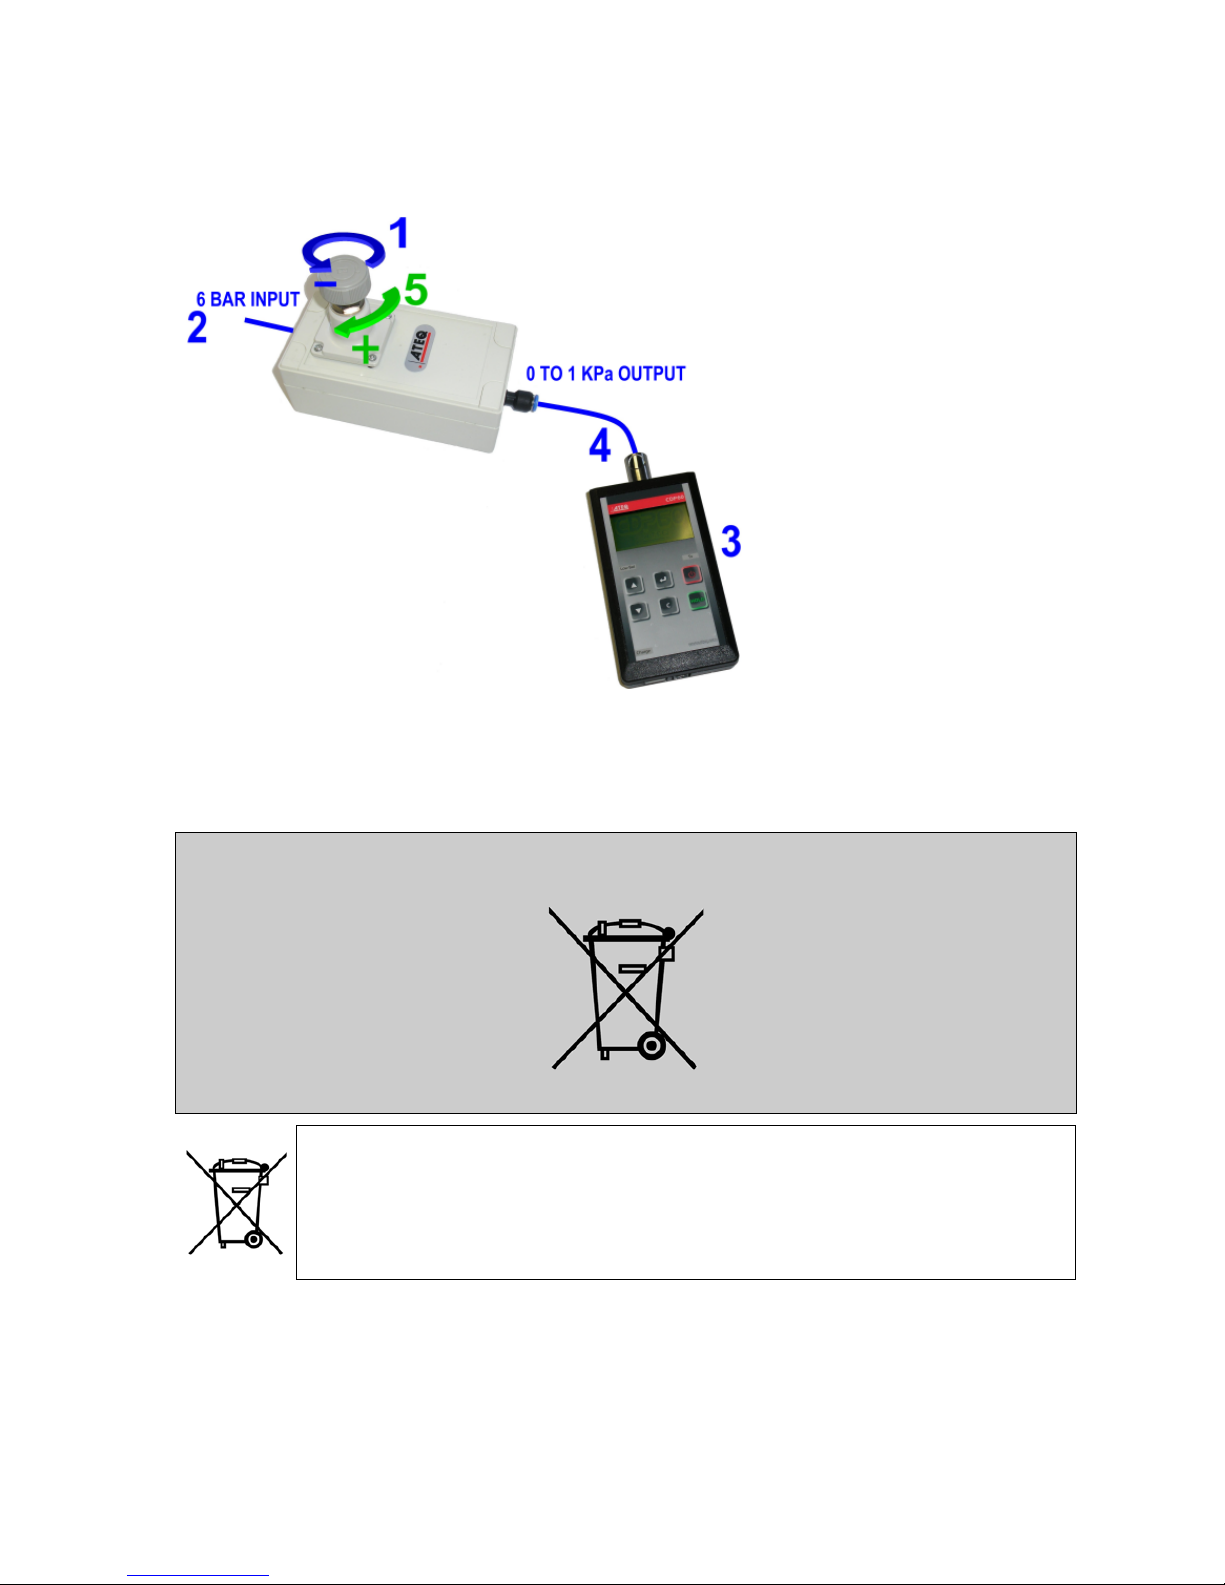
1.7.1. Pressure generator use
Use of the pressure generator with a CDP60 :
1) Adjust the pressure to the
minimum by turning the knob
to the left (watch counter
clockwise).
2) Plug the 6 bar network
pressure to the generator
input.
3) Turn on the CDP60, wait i
twill be ready.
4) Connect the pressure
generator output to the
CDP60 input.
5) Turn the knob to the right
to increase the pressure, the
pressure value is displayed
by the CDP60.
2. RECYCLING
Do not dispose of the rechargeable Lithium-Ion battery or the tool to
the dustbin.
These components must be collected and recycled.
The crossed-out wheeled dustbin means that within the EU the product
must be taken to separate collection at the product end-of life. This applies
to your tool but also to any enhancements marked with this symbol. Do not
dispose of these products as unsorted municipal waste. For further
information, please contact ATEQ.
Page 34

Chapter5 – Accessories, security and recycling
UM-24100D-U User manual ATEQ CDP60 Page 24/36
3. SAFETY INFORMATIONS
Your device and its enhancements may contain small part. Keep them out of the reach of small
children.
Operating environment
Remember to follow any special regulations in force in any area, and always switch off your
device when its use is prohibited or when it may cause interference or danger.
Use the device only in its normal operating positions.
About Charging
Use only the charger supplied with your device. Use of another type of charger will result in
malfunction and/or danger.
Use a specified battery in the equipment.
About the Charger
Do not use the charger in a high moisture environment. Never touch the charger when your
hands or feet are wet.
Allow adequate ventilation around the charger when using it to operate the device or charge the
battery. Do not cover the charger with paper or other objects that will reduce cooling. Do not use
the charger while it is inside a carrying case.
Connect the charger to a proper power source. The voltage requirements are found on the
product case and/or packaging.
Do not use the charger if the cord becomes damaged.
Do not attempt to service the unit. There are no serviceable parts inside. Replace the unit if it is
damaged or exposed to excess moisture.
About the Battery
CAUTION: This unit contains an internal Lithium Ion battery, it is replaceable only by the
competent ATEQ personnel. The battery can burst or explode, releasing hazardous chemicals.
To reduce the risk of fire or burns, do not disassemble, crush, puncture, or dispose of the
battery or the instrument in fire or water, do not short-circuit or connect the contacts with a metal
object.
Use a specified charger approved by the ATEQ manufacturer.
Important instructions (for service personnel only)
CAUTION: Risk of explosion if battery is replaced by an incorrect type. Dispose of used
batteries according to the instructions.
Replace only with the same or equivalent type recommended by the manufacturer.
Use the battery only in the specified equipment.
The battery must be recycled or disposed of properly.
Page 35
Chapter 6 – Error messages
UM-24100D-U User manual ATEQ CDP60 Page 25/36
Chapter 6
ERROR MESSAGES
1. ERROR MESSAGES
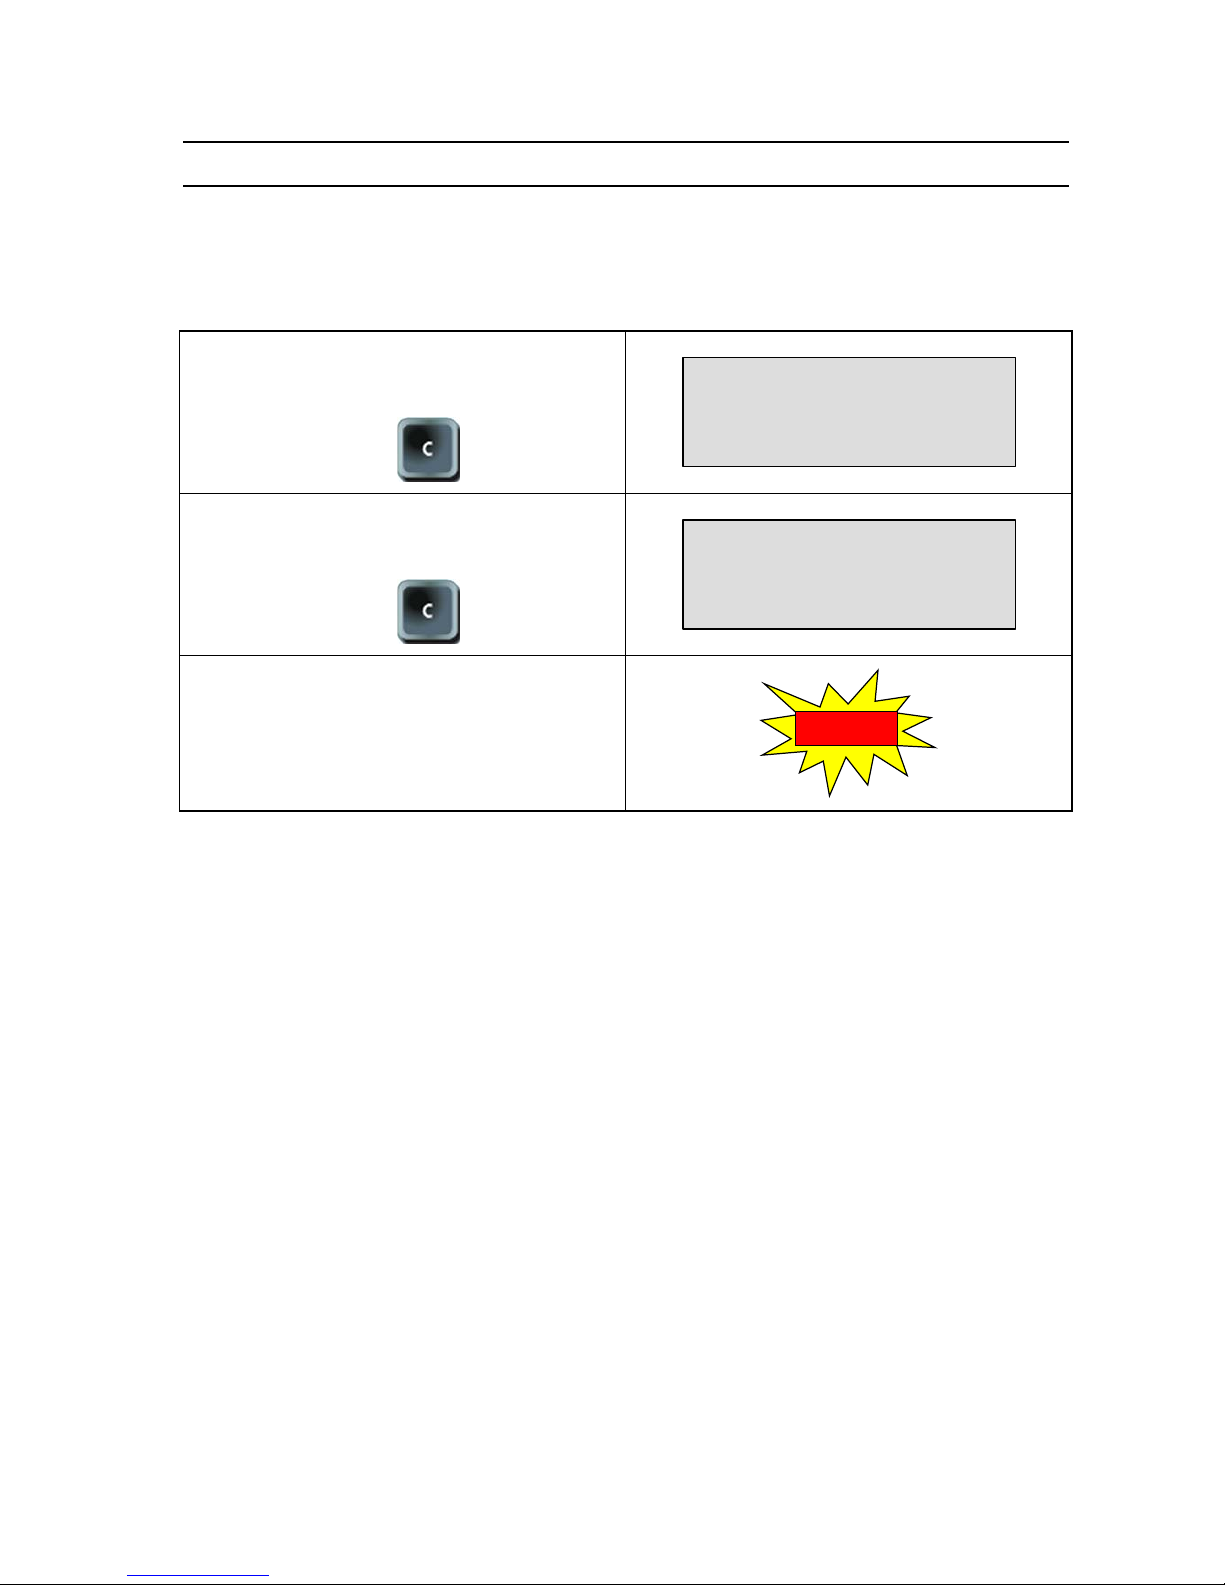
The CDP60 can display the following error messages:
The applied pressure is too high.
Reduce the pressure and press on the
CANCEL key.
PRESSURE OUT OF RANGE
Over Pressure......
Press [C] to return
AUTO ZERO
The applied pressure is too low.
Increase the pressure and press on the
CANCEL key.
PRESSURE OUT OF RANGE
Under Pressure.....
Press [C] to return
AUTO ZERO
The "LOW BAT" light flashes, the battery
level is too low for reliable operation.
When this light is on the instrument will be
quickly turned off automatically.
Charge the instrument.
LOW BAT
Page 36

Chapter 6 – Error messages
UM-24100D-U User manual ATEQ CDP60 Page 26/36
Page 37
Chapter 7 – PC installation
UM-24100D-U User manual ATEQ CDP60 Page 27/36
Chapter 7
PC INSTALLATION
1. PROGRAM AND DRIVERS INSTALLATION
For this device, the connections for update can be carried out by two ways, USB or
RS232 following the user preferences.
1.1. USB CONNECTION
1.1.1. Windows© XP installation
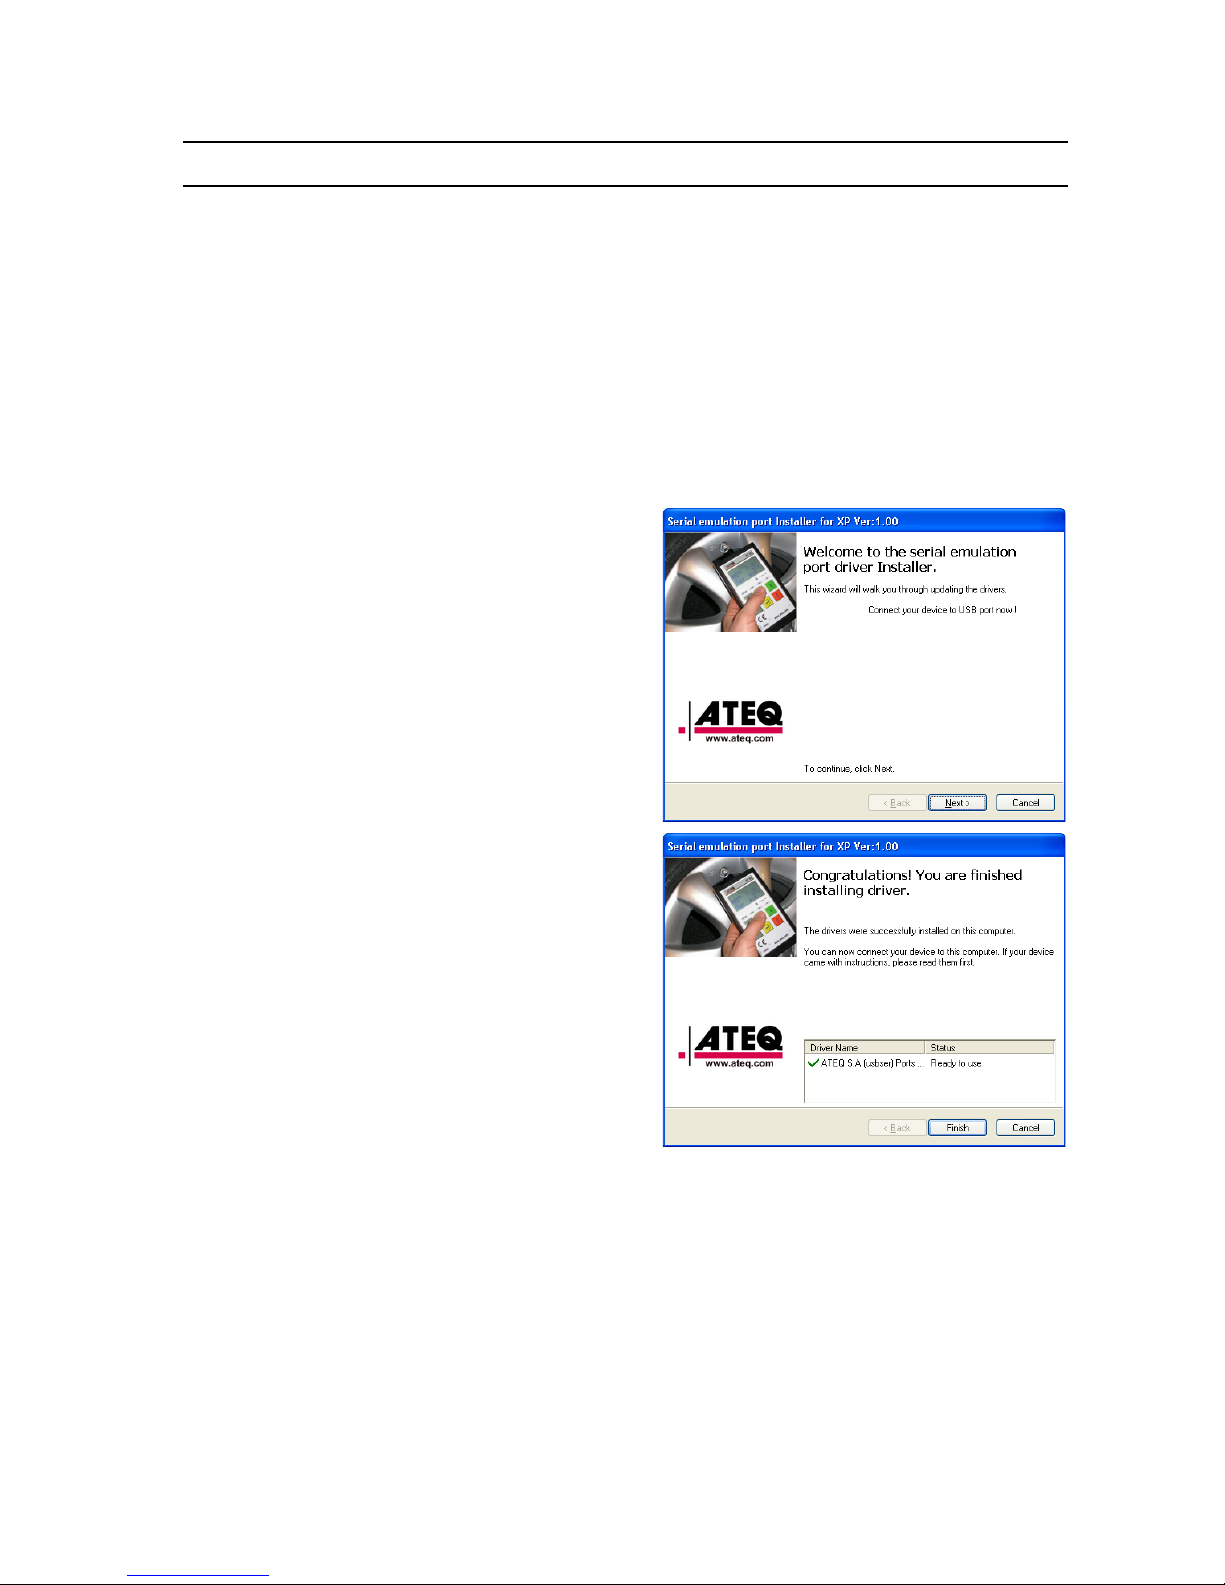
1) Start the installation program:
USB_VIRTUAL_232_XP.EXE, the opposite
window appears.
2) Click on "Next >".
3) The "Serial emulation port" drivers will be
installed, at the end, the opposite window
appears.
4) Click on "Finish".
Page 38
Chapter 7 – PC installation
UM-24100D-U User manual ATEQ CDP60 Page 28/36
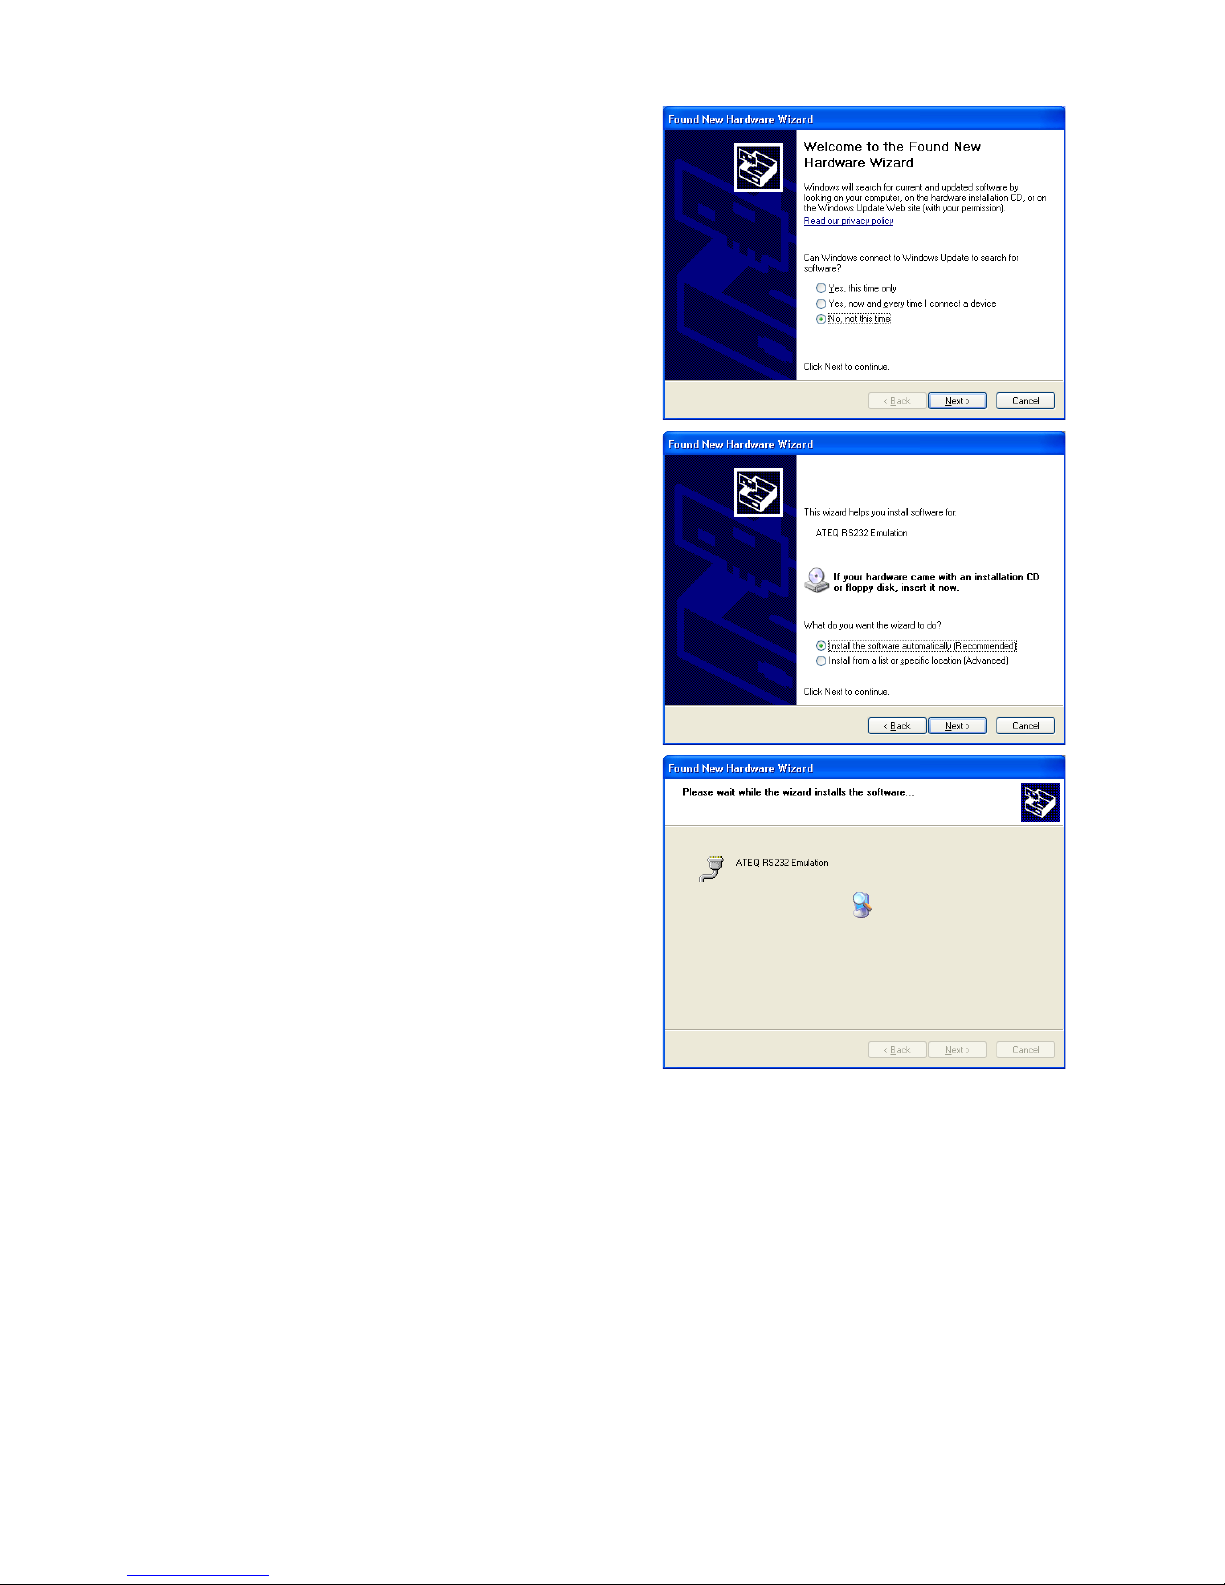
5) Connect the USB wire on the USB port of
your PC and on the CDP60 device.
6) Switch on the CDP60 device.
7) When the CDP60 device is detected, its
installation begins. The opposite window
appears select "No, not this time" and click
on "Next >".
8) Select the "Install the software
automatically (recommended)" option and
click on "Next >".
9) The installation begins…
Page 39
Chapter 7 – PC installation
UM-24100D-U User manual ATEQ CDP60 Page 29/36
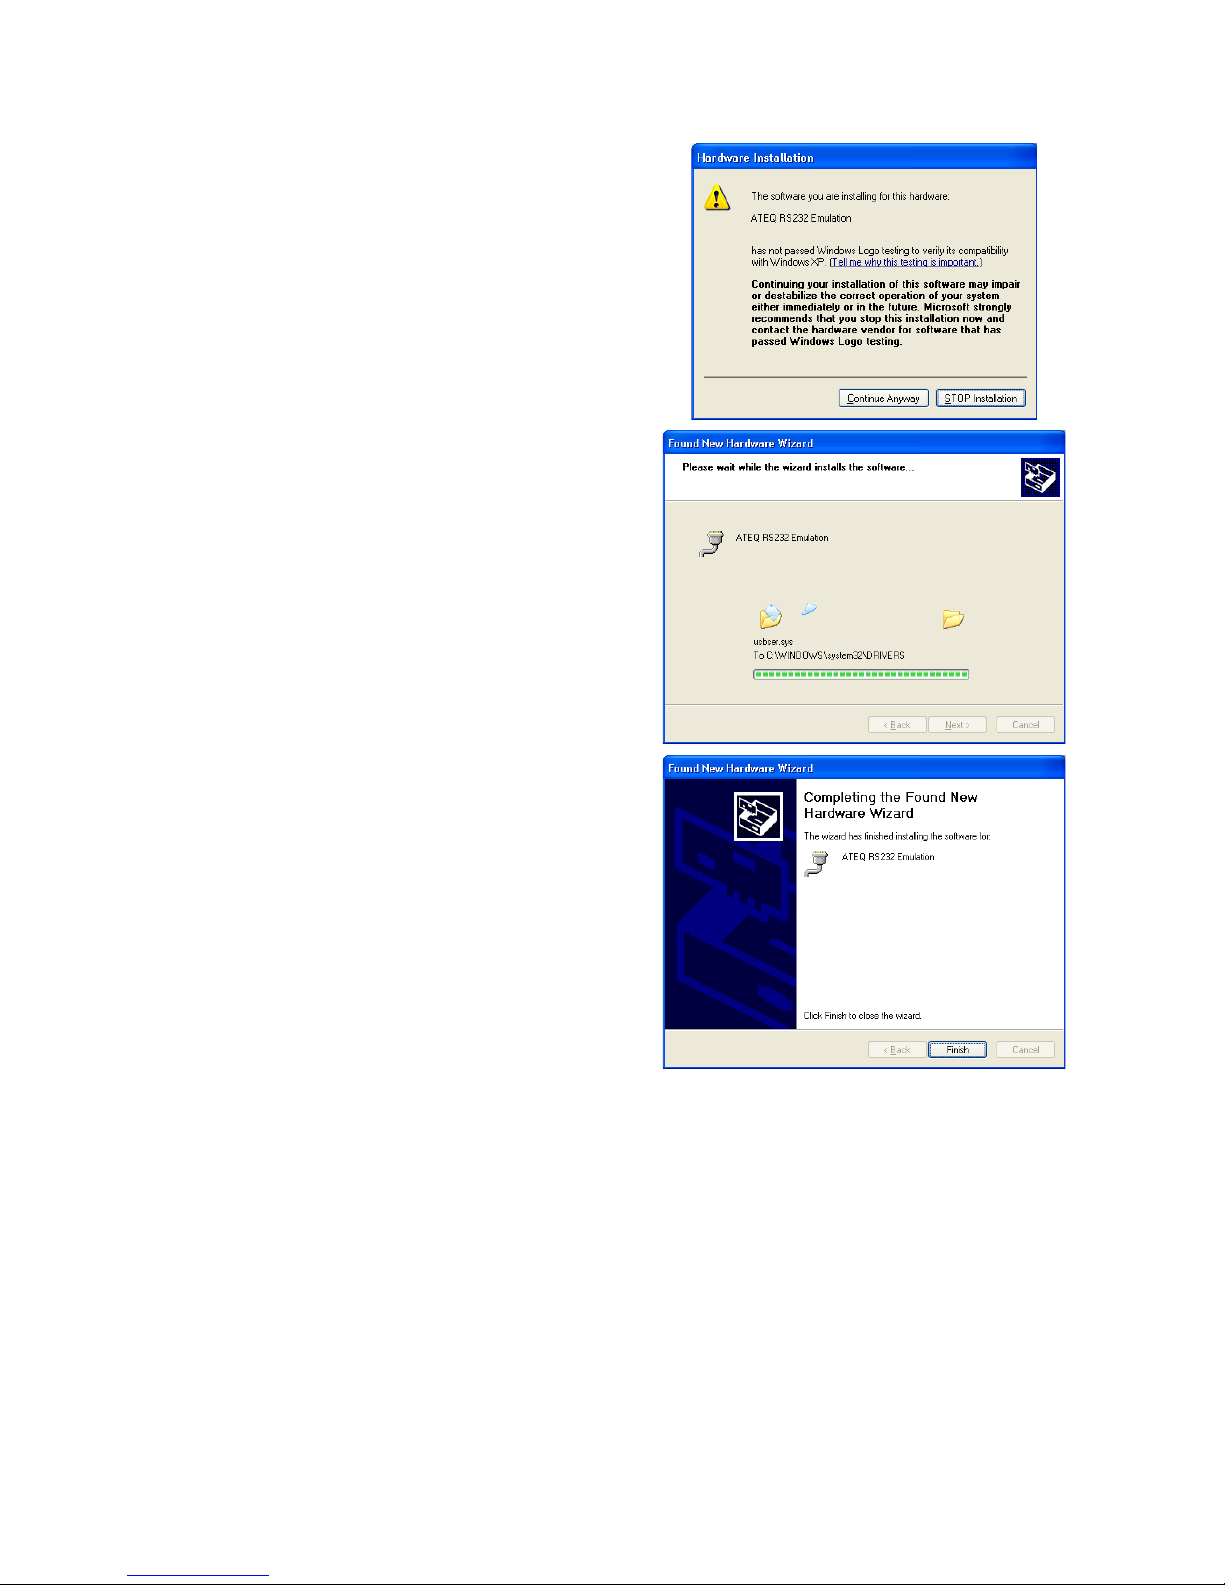
10) When this window appears, click on
"Continue Anyway".
11) The drivers are installed.
12) The "ATEQ RS232 Emulation"
communication port is created; this port will
be used for each communication between the
CDP60 device and the PC through an USB
connector. Click on "Finish".
Page 40
Chapter 7 – PC installation
UM-24100D-U User manual ATEQ CDP60 Page 30/36
1.1.2. Windows© Vista installation
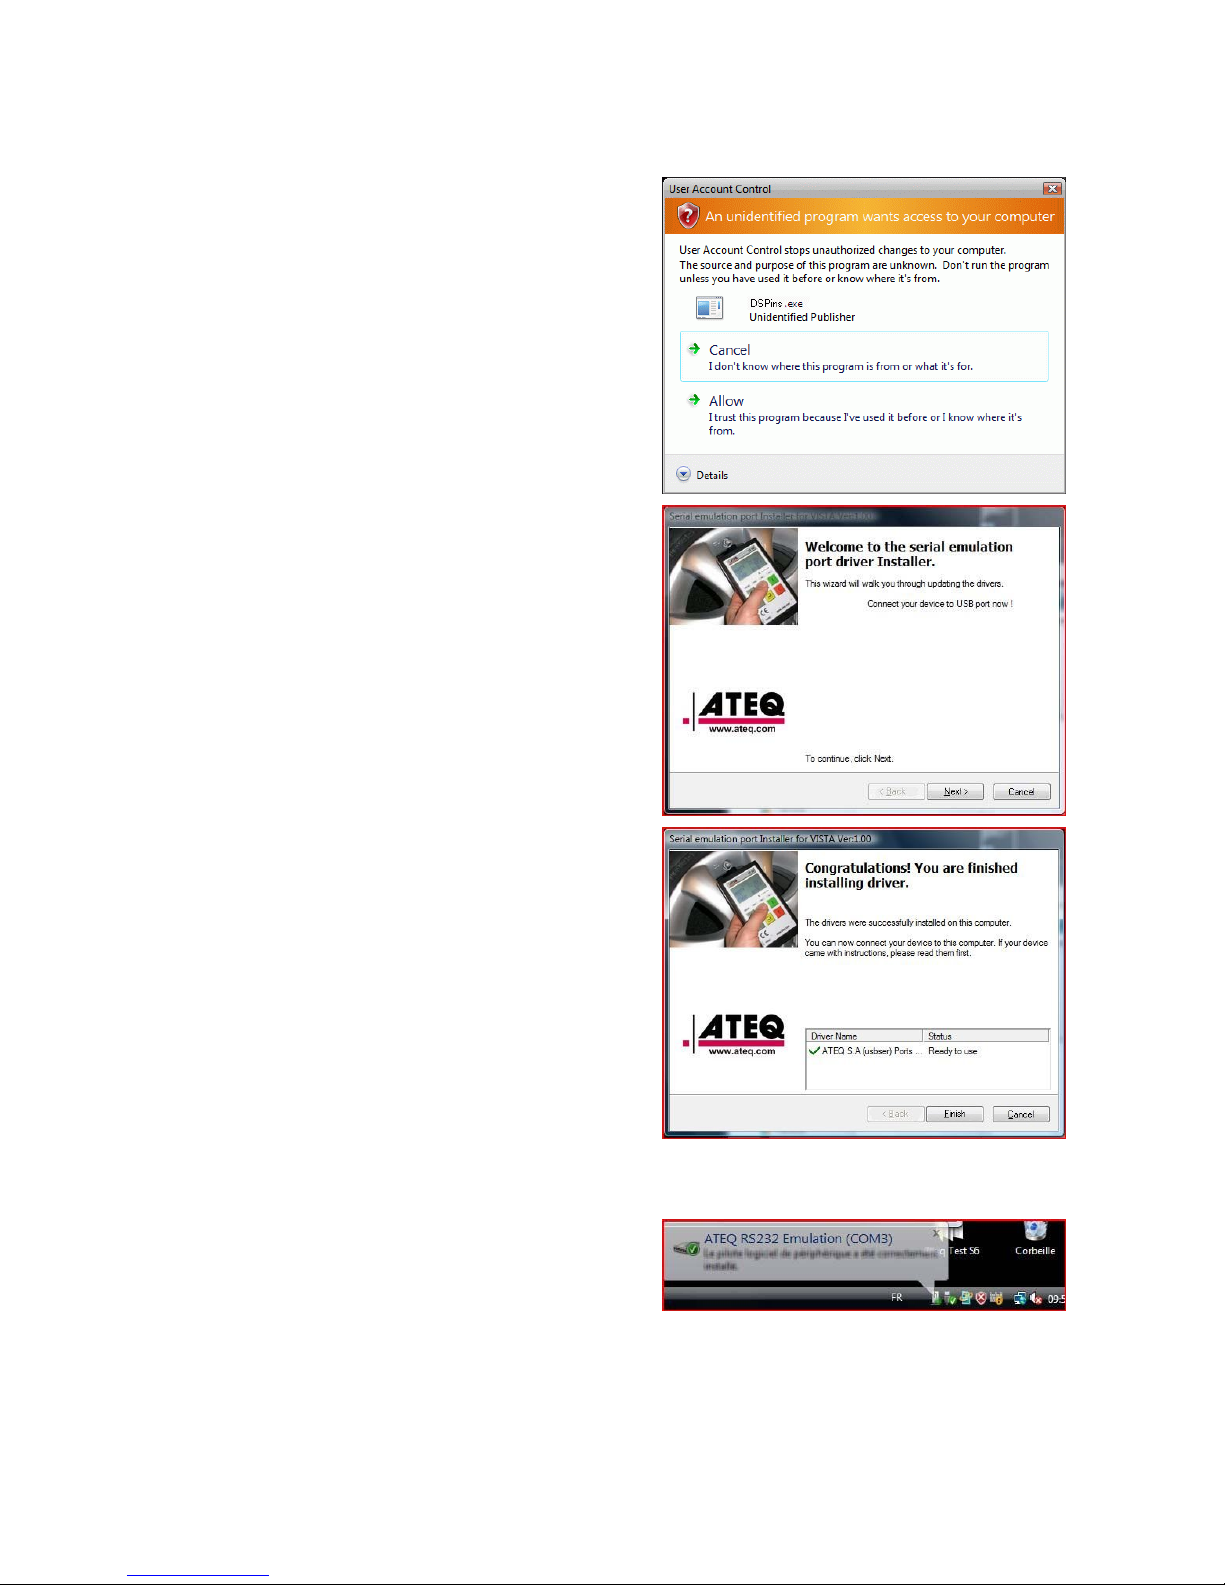
1) Start the:
USB_VIRTUAL_232_VISTA.EXE, program
the opposite window appears.
2) Click on "Allow", to start the installation.
3) The opposite window appears.
4) Cliquer sur "Suivant >".
5) The "Serial emulation port" drivers will be
installed, at the end, the opposite window
appears.
6) Click on "Finish".
7) Connect the USB cable on the PC USB
port and on the CDP60 device.
8) Switch on the CDP60 device the drivers
will automatically installed.
9) The message at the right bottom corner of
the screen "ATEQ RS232 Emulation"
appears, to confirm the correct CDP60
device driver's installation.
Page 41
Chapter 7 – PC installation
UM-24100D-U User manual ATEQ CDP60 Page 31/36
1.2. RS232 CONNECTION
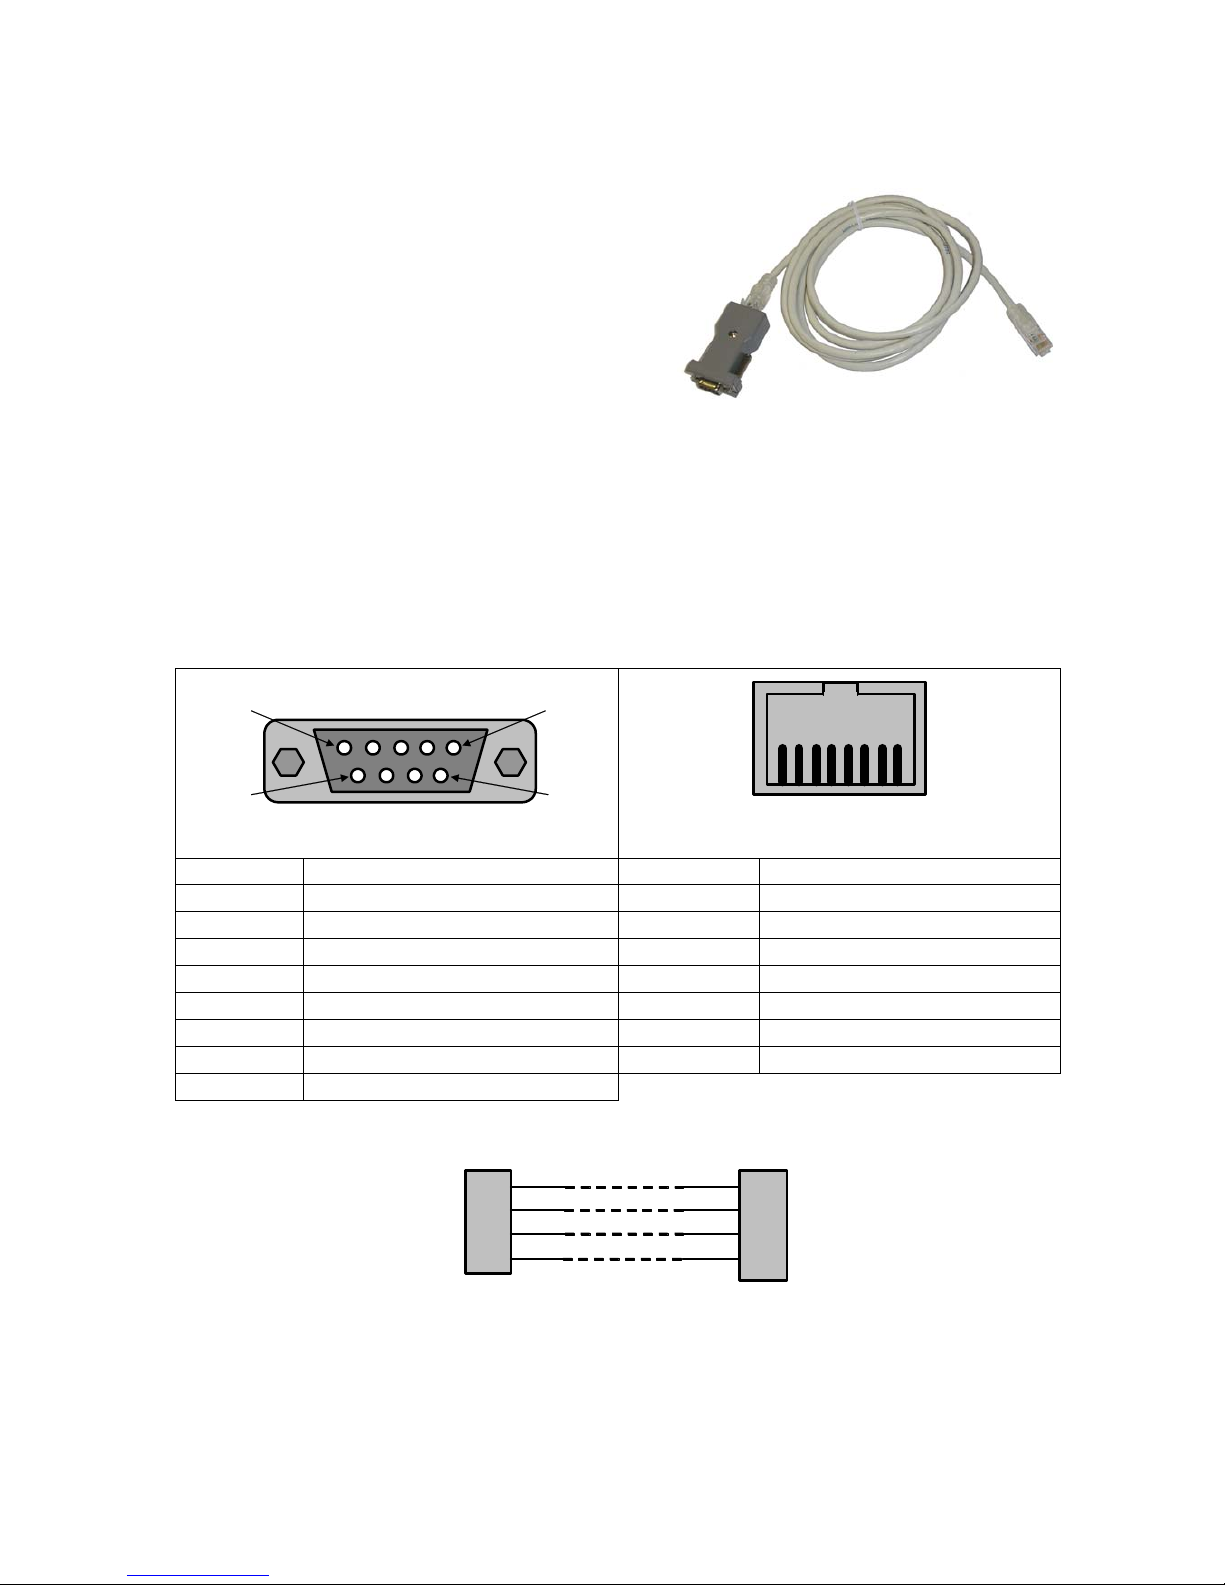
1) To connect the CDP60 to the RS232 port
(PC com1 or com2) it needs the RJ45 wire
and the SubD adapter.
2) Adjust on the CDP60 and in the PC the same RS parameters on each side. For
example:
¾ Baud rate: 19200.
¾ Bits count: 8.
¾ Parity: even.
1.3. RS232 CABLE DIAGRAM
1
6
5
9
SubD (9 pins)
8
4 1
RJ45 (8 pins)
Pin 1 Not used Pin 1 Not used
Pin 2 RXD Data reception Pin 2 Not used
Pin 3 TXD Data emission Pin 3 Not used
Pin 4 Not used Pin 4 Ground
Pin 5 Ground Pin 5 RXD Data reception
Pin 6 Not used Pin 6 TXD Data emission
Pin 7 RTS request to send Pin 7 CTS clear to send
Pin 8 Not used Pin 8 Not used
Pin 9 Not used
7 6 5 4
7 2 3 5
Gnd
Rx data
Tx data
CTS
Gnd
Tx data
Rx data
RTS
SubD9 RJ45
Page 42

Chapter 7 – PC installation
UM-24100D-U User manual ATEQ CDP60 Page 32/36
Page 43
Appendix
UM-24100D-U User manual ATEQ CDP60 Page 33/36
Appendix
ATEQ CDP60
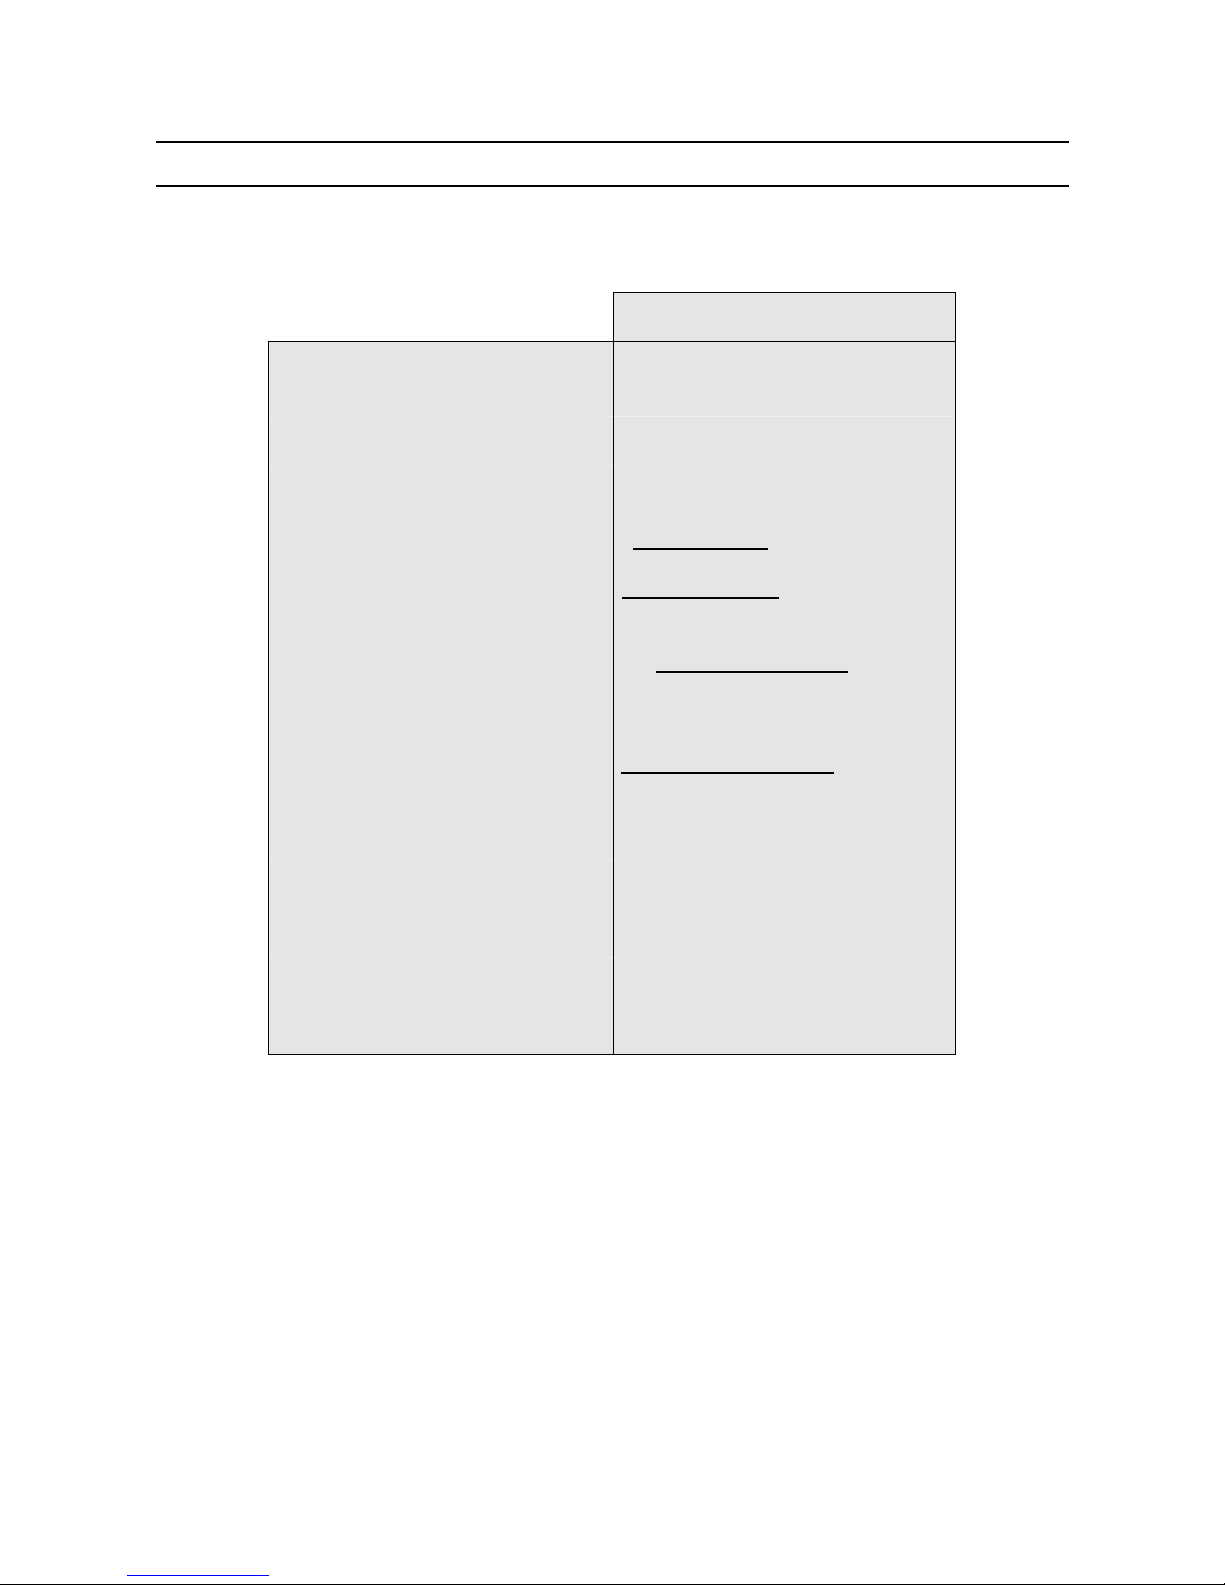
1. TECHNICALS CHARACTERISTICS
* See the security and recycling instructions about this battery type.
CDP60
Dimensions
H x L x P (mm) :
152 x 83 x 36
Battery:
Lithium ion, 12.6 V DC*
Autonomy:
Minimum 6 hours
Electrical connexions:
Power supply: concentric Jack
Communication : USB and RJ45
(RS232)
Pneumatics connexions:
Principal connector: quick
connector Staublï RBE03 female
type.
Secondary connector: 2.7/4 AVS
type (low pressure).
Display:
LCD 4 lines 60 mm x 32 mm
Weight:
About 450 g
Temperatures:
Use: + 0°C to + 50°C
Stock: -10°C to + 70 °C
Page 44

Appendix
UM-24100D-U User manual ATEQ CDP60 Page 34/36
2. PERSONNAL NOTES
________________________________________________________________________
________________________________________________________________________
________________________________________________________________________
________________________________________________________________________
________________________________________________________________________
________________________________________________________________________
________________________________________________________________________
________________________________________________________________________
________________________________________________________________________
________________________________________________________________________
________________________________________________________________________
________________________________________________________________________
________________________________________________________________________
________________________________________________________________________
________________________________________________________________________
________________________________________________________________________
________________________________________________________________________
________________________________________________________________________
________________________________________________________________________
________________________________________________________________________
________________________________________________________________________
________________________________________________________________________
________________________________________________________________________
________________________________________________________________________
________________________________________________________________________
________________________________________________________________________
________________________________________________________________________
________________________________________________________________________
________________________________________________________________________
________________________________________________________________________
________________________________________________________________________
________________________________________________________________________
________________________________________________________________________
________________________________________________________________________
________________________________________________________________________
________________________________________________________________________
________________________________________________________________________
________________________________________________________________________
________________________________________________________________________
________________________________________________________________________
________________________________________________________________________
________________________________________________________________________
________________________________________________________________________
________________________________________________________________________
________________________________________________________________________
________________________________________________________________________
________________________________________________________________________
________________________________________________________________________
________________________________________________________________________
Page 45

Index
UM-24100D-U User manual ATEQ CDP60 Page 35/36
Index
+
+ 24 V DC supply..................................6
A
Auto off ...............................................15
Auto power off ....................................15
Auto-zero............................................ 18
B
Backlight............................................. 14
Battery ................................................24
Brightness...........................................14
C
C key ....................................................7
Caution ............................................... 24
Characteristics....................................33
Charge light .......................................... 9
Charger ..............................................24
Charging............................................. 24
Crossed-out wheeled dustbin ............. 23
D
Definition of the ATEQ CDP60 .............3
Display............................................ 9, 11
E
Electric connector .................................6
ENTER key...........................................8
Environment .......................................24
Error messages .................................. 25
Export ...........................................16, 19
Export mode frame .............................19
Extended menu ..................................17
F
Filter ...................................................12
First pneumatic connector ....................6
H
Hard case ........................................... 22
Hold ......................................................7
hold key ................................................7
I
I key......................................................7
Installation ............................................6
L
Lights.................................................... 9
Low bat light .........................................9
M
Measurements characteristics ..............4
Measurements print ............................19
Menus structure..................................17
N
Navigation keys ....................................8
P
Parameters adjust...............................12
Power supply ................................21, 24
Presentation .........................................5
Pressure generator .............................22
Pressure generator use ......................23
Pressure ranges ...................................4
Pressure unit.......................................13
Print ....................................................19
Protection cover..................................22
R
Recycling ............................................23
Reference .............................................6
RJ45 .....................................................6
RS232.............................................6, 16
RS232 frame.......................................19
RS232 installation...............................31
S
Screen ..................................................9
Second pneumatic connector ..............6
Security...............................................24
Sensor display ....................................20
Simple menu.......................................17
Soft case.............................................21
Specials cycles ...................................19
Start up ...............................................11
Start up key ........................................11
T
Test tube.............................................22
TX light .................................................9
U
USB ......................................................6
USB frame ..........................................19
USB installation ..................................27
USB wire.............................................21
Uses ranges .........................................4
W
Windows© Vista Installation ...............30
Windows© XP Installation...................27
Page 46

Index
UM-24100D-U User manual ATEQ CDP60 Page 36/36
Page 47

Page 48

This document is the exclusive property of ATEQ.
It may not be communicated, reproduced or used without prior consent.
 Loading...