


ATEN Altusen™
KN2100VA / KN4100V-VA /
KN8100V Series / KN1132V
KVM over IP Switch
User Manual

KVM Over IP User Manual
EMC Information
FEDERAL COMMUNICATIONS COMMISSION INTERFERENCE
STATEMENT
This equipment has been tested and found to comply with the limits for a Class
A digital device, pursuant to Part 15 of the FCC Rules. These limits are
designed to provide reasonable protection against harmful interference when
the equipment is operated in a commercial environment. This equipment
generates , uses, and can radiate radio frequency energy and, if not installed and
used in accordance with the instruction manual, may cause harmful
interference to radio communications. Operation of this equipment in a
residential area is likely to cause harmful interference in which case the user
will be required to correct the interference at his own expense.
The device complies with Part 15 of the FCC Rules. Operation is subject to the
following two conditions: (1) this device may not cause harmful interference,
and (2) this device must accept any interference received, including
interference that may cause undesired operation.
FCC Caution
Any changes or modifications not expressly approved by the party responsible
for compliance could void the user's authority to operate this equipment.
Warning
Operation of this equipment in a residential environment could cause radio
interference.
Achtung
Der Gebrauch dieses Geräts in Wohnumgebung kann Funkstörungen
verursachen.
KCC Statement
ii
KVM Over IP User Manual
Industry Canada Statement
This Class A digital apparatus complies with Canadian ICES-003.
RoHS
This product is RoHS compliant.
About This Manual
This User Manual is provided to help you get the most from your KVM over
IP Switch. It covers all aspects of the device, including installation,
configuration, and operation
The KVM over IP Switch models covered in this user manual include:
Models Product Names
KN1132V 1-Local / 1-Remote Access 32-Port Multi-Interface Cat 5 KVM over IP Switch
KN2116VA 1-Local / 2-Remote Access 16-Port Multi-Interface Cat 5 KVM over IP Switch
KN2124VA 1-Local / 2-Remote Access 24-Port Multi-Interface Cat 5 KVM over IP Switch
KN2132VA 1-Local / 2-Remote Access 32-Port Multi-Interface Cat 5 KVM over IP Switch
KN2140VA 1-Local / 2-Remote Access 40-Port Multi-Interface Cat 5 KVM over IP Switch
KN4116VA 1-Local / 4-Remote Access 16-Port Multi-Interface Cat 5 KVM over IP Switch
KN4124VA 1-Local / 4-Remote Access 24-Port Multi-Interface Cat 5 KVM over IP Switch
KN4132VA 1-Local / 4-Remote Access 32-Port Multi-Interface Cat 5 KVM over IP Switch
KN4140VA 1-Local / 4-Remote Access 40-Port Multi-Interface Cat 5 KVM over IP Switch
KN4164V 1-Local / 4-Remote Access 64-Port Multi-Interface Cat 5 KVM over IP Switch
KN8132V 1-Local / 8-Remote Access 32-Port Multi-Interface Cat 5 KVM over IP Switch
KN8164V 1-Local / 8-Remote Access 64-Port Multi-Interface Cat 5 KVM over IP Switch
An overview of the information found in the manual is provided below.
Chapter 1, Introduction, introduces you to the KVM over IP Switch, its
purpose, features and benefits, with its front and back panel components
described.
Chapter 2, Hardware Setup, provides step-by-step instructions for setting
up the KVM over IP Switch
iii

KVM Over IP User Manual
Chapter 3, Super Administrator Setup, explains the procedures that the
super administrator employs to set up the KVM over IP Switch network
environment, and changing the default username and password.
Chapter 4, Logging In, describes how to log in to the KVM over IP Switch
with each of the available access methods: from a local console, an Internet
browser, a standalone Windows application (AP) program, and a standalone
Java application (AP) program.
Chapter 5, The User Interface, describes the layout and components of the
KVM over IP Switch user interface.
Chapter 6, Port Access, describes the Port Access page and how to
configure the options it provides regarding port and power outlet management.
Chapter 7, User Management, shows super administrators and
administrators how to create, modify, and delete users and groups, as well as
assign attributes to them.
Chapter 8, Device Management, shows super administrators how to
configure and control the overall KVM over IP Switch operations.
Chapter 9, Log, explains how to view, clear and export event log
information, and how to set up event notification for the KVM over IP Switch.
Chapter 10, Maintenance, explains how to upgrade the KVM over IP
Switch firmware, as well as the firmware of the KVM Adapter Cables used to
connect its ports to the installed devices.
Chapter 11, Download, describes how to download standalone AP versions
of the Win Client, the Java Client, and the Log Server programs.
Chapter 12, Port Operation, provides detailed information on accessing
and operating the devices connected to the KVM over IP Switch’s ports.
Chapter 13, The Log Server, explains how to install and configure the Log
Server.
Appendix, Provides technical and troubleshooting information at the end of
the manual.
iv

Conventions
This manual uses the following conventions:
Monospaced Indicates text that you should key in.
[ ] Indicates keys you should press. For example, [Enter] means
to press the Enter key. If keys need to be chorded, they appear
together in the same bracket with a plus sign between them:
[Ctrl+Alt].
1. Numbered lists represent procedures with sequential steps.
♦ Bullet lists provide information, but do not involve sequential
steps.
> Indicates selecting the option (such as on a menu or dialog
box), that comes next. For example, Start > Run means to
open the Start menu, and then select Run.
Indicates critical information.
Package Contents
KVM Over IP User Manual
The standard KVM over IP Switch package consists of:
1 KVM over IP Switch (KN2116VA / KN4116VA / KN2124VA /
KN4124VA / KN1132V / KN2132VA / KN4132VA / KN8132V / KN2140VA
/ KN4140VA / KN4164V / KN8164V)
2 Lok-U-Plugs
1 Lok-U-Plug Installation Tool
2 power cords
1 mounting kit
1 foot pad set (4 pcs)
2 SA0142 Serial Adapters (KN2116VA / KN4116VA / KN1132V /
KN2132VA / KN4132VA / KN8132V / KN4164V / KN8164V only)
1 user instructions*
Check to make sure that all of the components are present and in good order.
If anything is missing, or was damaged in shipping, contact your dealer.
v

KVM Over IP User Manual
Read this manual thoroughly and follow the installation and operation
procedures carefully to avoid any damage to the KVM over IP Switch or any
other devices on the installation.
* Features may have been added since this manual was released. Please visit
our website to download the most up to date version of the manual.
Product Information
For information about all ATEN products and how they can help you connect
without limits, visit ATEN on the Web or contact an ATEN Authorized
Reseller. Visit ATEN on the Web for a list of locations and telephone numbers:
International http://www.aten.com
North America http://www.aten-usa.com
User Information
Online Registration
Be sure to register your product at our online support center:
International http://eservice.aten.com
Telephone Support
For telephone support, call this number:
International 886-2-8692-6959
China 86-400-810-0-810
Japan 81-3-5615-5811
Korea 82-2-467-6789
North America 1-888-999-ATEN ext 4988
1-949-428-1111
vi
KVM Over IP User Manual
User Notice
All information, documentation, and specifications contained in this man ual are subject
to change without prior notification by the manufacturer. The manufacturer makes no
representations or warranties, either expressed or implied, with respect to the contents
hereof and specifically disclaims any warranties as to merchantability or fitness for any
particular purpose. Any of the manufacturer's software described in this manual is sold
or licensed as is. Should the programs prove defective following their purchase, the
buyer (and not the manufacturer, its distributor, or its dealer), assumes the entire cost of
all necessary servicing, repair and any incidental or consequential damages resulting
from any defect in the software.
The manufacturer of this system is not responsible for any radio and/or TV interference
caused by unauthorized modifications to this device. It is the responsibility of the user
to correct such interference.
The manufacturer is not responsible for any damage incurred in the operation of this
system if the correct operational voltage setting was not selected prior to operation.
PLEASE VERIFY THAT THE VOLTAGE SETTING IS CORRECT BEFORE USE.
Battery Safety Notice
There is a risk of explosion if the battery is replaced with an
incorrect type. Dispose of used batteries according to the
relevant instructions.
Batterie avis de sécurité
Il existe un risque d'explosion si la batterie est remplacée par
un incorrect tapez. Jeter les piles usagées selon la pertinente
instructions.
Terminology
Throughout the manual we make reference to the terms Local and Remote in
regard to the operators and equipment deployed in a KVM over IP Switch
installation. Depending on the point of view, users and servers can be
considered Local under some circumstances, and Remote under others:
Switch’s Point of View
Remote users – We refer to a user as a Remote user when we think of
him as someone who logs into the switch over the net from a location
that is remote from the switch.
Local Console – The keyboard, mouse and monitor connected directly
to the switch.
Servers – The servers attached to the switch via KVM Adapter Cables.
vii

KVM Over IP User Manual
User’s Point of View
Local client users – We refer to a user as a Local client user when we
think of him as sitting at his computer performing operations on the
servers connected to the switch that is remote from him.
Remote servers – We refer to the servers as Remote servers when we
think of them from the Local Client User’s point of view – since,
although they are locally attached to the switch, they are remote from
him.
When we describe the overall system architecture, we are usually speaking
from the switch’s point of view – in which case the users are considered
remote. When we speak about operations users perform via the browser,
viewers, and AP programs over the net, we are usually speaking from the user’s
point of view – in which case the switch and the servers connected to it are
considered remote.
Content
EMC Information . . . . . . . . . . . . . . . . . . . . . . . . . . . . . . . . . . . . . . . . . . . . ii
RoHS . . . . . . . . . . . . . . . . . . . . . . . . . . . . . . . . . . . . . . . . . . . . . . . . . . . . . ii
About This Manual . . . . . . . . . . . . . . . . . . . . . . . . . . . . . . . . . . . . . . . . . . .iii
Conventions . . . . . . . . . . . . . . . . . . . . . . . . . . . . . . . . . . . . . . . . . . . . . v
Package Contents . . . . . . . . . . . . . . . . . . . . . . . . . . . . . . . . . . . . . . . . . . . v
Product Information . . . . . . . . . . . . . . . . . . . . . . . . . . . . . . . . . . . . . . . . . .vi
User Information . . . . . . . . . . . . . . . . . . . . . . . . . . . . . . . . . . . . . . . . . . . .vi
Online Registration . . . . . . . . . . . . . . . . . . . . . . . . . . . . . . . . . . . . . . . .vi
Telephone Support . . . . . . . . . . . . . . . . . . . . . . . . . . . . . . . . . . . . . . . .vi
User Notice . . . . . . . . . . . . . . . . . . . . . . . . . . . . . . . . . . . . . . . . . . . . vii
Battery Safety Notice . . . . . . . . . . . . . . . . . . . . . . . . . . . . . . . . . . . . . vii
Batterie avis de sécurité . . . . . . . . . . . . . . . . . . . . . . . . . . . . . . . . . . . vii
Terminology . . . . . . . . . . . . . . . . . . . . . . . . . . . . . . . . . . . . . . . . . . . . vii
Content . . . . . . . . . . . . . . . . . . . . . . . . . . . . . . . . . . . . . . . . . . . . . . . . . . viii
Chapter 1.
Overview. . . . . . . . . . . . . . . . . . . . . . . . . . . . . . . . . . . . . . . . . . . . . . . . . . . 1
Features . . . . . . . . . . . . . . . . . . . . . . . . . . . . . . . . . . . . . . . . . . . . . . . . . . . 5
viii
Introduction
Hardware . . . . . . . . . . . . . . . . . . . . . . . . . . . . . . . . . . . . . . . . . . . . . . . 5
Management . . . . . . . . . . . . . . . . . . . . . . . . . . . . . . . . . . . . . . . . . . . . . 5
Easy-to-Use Interface . . . . . . . . . . . . . . . . . . . . . . . . . . . . . . . . . . . . . . 6
Advanced Security . . . . . . . . . . . . . . . . . . . . . . . . . . . . . . . . . . . . . . . . 7
Virtual Media . . . . . . . . . . . . . . . . . . . . . . . . . . . . . . . . . . . . . . . . . . . . . 7
Virtual Remote Desktop . . . . . . . . . . . . . . . . . . . . . . . . . . . . . . . . . . . . 7

KVM Over IP User Manual
New KN Series Exclusive . . . . . . . . . . . . . . . . . . . . . . . . . . . . . . . . . . . 8
System Requirements . . . . . . . . . . . . . . . . . . . . . . . . . . . . . . . . . . . . . . . .9
Remote User Computers . . . . . . . . . . . . . . . . . . . . . . . . . . . . . . . . . . .9
Servers . . . . . . . . . . . . . . . . . . . . . . . . . . . . . . . . . . . . . . . . . . . . . . . . .9
KVM Adapter Cables . . . . . . . . . . . . . . . . . . . . . . . . . . . . . . . . . . . . . 10
Operating Systems . . . . . . . . . . . . . . . . . . . . . . . . . . . . . . . . . . . . . . . 11
Browsers . . . . . . . . . . . . . . . . . . . . . . . . . . . . . . . . . . . . . . . . . . . . . . . 11
Components . . . . . . . . . . . . . . . . . . . . . . . . . . . . . . . . . . . . . . . . . . . . . . . 12
KN2116VA / KN4116VA Front View . . . . . . . . . . . . . . . . . . . . . . . . . . 12
KN2124VA / KN4124VA Front View . . . . . . . . . . . . . . . . . . . . . . . . . . 12
KN1132V / KN2132VA / KN4132VA / KN8132V Front View . . . . . . . 12
KN2140VA / KN4140VA Front View . . . . . . . . . . . . . . . . . . . . . . . . . . 13
KN4164V / KN8164V Front View . . . . . . . . . . . . . . . . . . . . . . . . . . . .13
KN2116VA / KN4116VA Rear View . . . . . . . . . . . . . . . . . . . . . . . . . . 16
KN1132V / KN2132VA / KN4132VA / KN8132V Rear View . . . . . . .16
KN4164V / KN8164V Rear View . . . . . . . . . . . . . . . . . . . . . . . . . . . . 16
KN2124VA / KN4124VA Rear View . . . . . . . . . . . . . . . . . . . . . . . . . . 18
KN2140VA / KN4140VA Rear View . . . . . . . . . . . . . . . . . . . . . . . . . . 18
Chapter 2.
Overview . . . . . . . . . . . . . . . . . . . . . . . . . . . . . . . . . . . . . . . . . . . . . . . . . . 21
Before You Begin . . . . . . . . . . . . . . . . . . . . . . . . . . . . . . . . . . . . . . . . . . . 21
Stacking and Rack Mounting . . . . . . . . . . . . . . . . . . . . . . . . . . . . . . . . . .22
KN2124VA / KN4124VA / KN2140VA / KN4140VA Single Stage Installation
. . . . . . . . . . . . . . . . . . . . . . . . . . . . . . . . . . . . . . . . . . . . . . . . . . . . . . . . . 27
KN2116VA / KN4116VA / KN1132V / KN2132VA / KN4132VA / KN8132V /
KN4164V / KN8164V Single Stage Installation . . . . . . . . . . . . . . . . . . . . 29
Two Stage Installation . . . . . . . . . . . . . . . . . . . . . . . . . . . . . . . . . . . . . . .34
Two Stage Installation with CM1164A & CM1284 . . . . . . . . . . . . . . . . . . 36
Channel Forwarding . . . . . . . . . . . . . . . . . . . . . . . . . . . . . . . . . . . . . . . . .38
PDU Installation . . . . . . . . . . . . . . . . . . . . . . . . . . . . . . . . . . . . . . . . . . . . 40
Hot Plugging . . . . . . . . . . . . . . . . . . . . . . . . . . . . . . . . . . . . . . . . . . . . . . . 43
Hardware Setup
Stacking. . . . . . . . . . . . . . . . . . . . . . . . . . . . . . . . . . . . . . . . . . . . . . . . 22
KN2116VA / KN4116VA / KN2124VA / KN4124VA / KN1132V / KN2132-
VA / KN4132VA / KN8132V / KN2140VA / KN4140VA Rack Mounting
. . . . . . . . . . . . . . . . . . . . . . . . . . . . . . . . . . . . . . . . . . . . . . . . . . . . . . 23
Rack Mounting - Front . . . . . . . . . . . . . . . . . . . . . . . . . . . . . . . . .23
Rack Mounting - Rear . . . . . . . . . . . . . . . . . . . . . . . . . . . . . . . . . . 25
Single Stage Installation Diagram . . . . . . . . . . . . . . . . . . . . . . . . . . . .28
Single Stage Installation Diagram . . . . . . . . . . . . . . . . . . . . . . . . . . . .31
Adapter Cable Connection Diagram . . . . . . . . . . . . . . . . . . . . . . . . . . 32
Adapter Cable Connection Diagram cont. . . . . . . . . . . . . . . . . . . . . .33
Two Stage Installation Diagram . . . . . . . . . . . . . . . . . . . . . . . . . . . . . 35
Two Stage Installation with CM1164A & CM1284 Diagram . . . . . . . .37
Configure Channel Forwarding . . . . . . . . . . . . . . . . . . . . . . . . . . . . . 39
The Adapter ID Function . . . . . . . . . . . . . . . . . . . . . . . . . . . . . . . . . . . 43
ix

KVM Over IP User Manual
Powering Off and Restarting. . . . . . . . . . . . . . . . . . . . . . . . . . . . . . . . . . . 43
Port ID Numbering . . . . . . . . . . . . . . . . . . . . . . . . . . . . . . . . . . . . . . . . . . 44
Port Selection . . . . . . . . . . . . . . . . . . . . . . . . . . . . . . . . . . . . . . . . . . . . . . 44
Chapter 3.
Overview. . . . . . . . . . . . . . . . . . . . . . . . . . . . . . . . . . . . . . . . . . . . . . . . . . 45
First Time Setup . . . . . . . . . . . . . . . . . . . . . . . . . . . . . . . . . . . . . . . . . . . . 45
Moving On . . . . . . . . . . . . . . . . . . . . . . . . . . . . . . . . . . . . . . . . . . . . . . . . 50
Chapter 4.
Overview. . . . . . . . . . . . . . . . . . . . . . . . . . . . . . . . . . . . . . . . . . . . . . . . . . 51
Local Console Login . . . . . . . . . . . . . . . . . . . . . . . . . . . . . . . . . . . . . . . . . 51
Browser Login . . . . . . . . . . . . . . . . . . . . . . . . . . . . . . . . . . . . . . . . . . . . . 52
Windows Client AP Login . . . . . . . . . . . . . . . . . . . . . . . . . . . . . . . . . . . . 53
Java Client AP Login . . . . . . . . . . . . . . . . . . . . . . . . . . . . . . . . . . . . . . . . 57
Chapter 5.
Overview . . . . . . . . . . . . . . . . . . . . . . . . . . . . . . . . . . . . . . . . . . . . . . . . . 61
The Web Browser Main Page. . . . . . . . . . . . . . . . . . . . . . . . . . . . . . . . . . 61
The AP GUI Main Page . . . . . . . . . . . . . . . . . . . . . . . . . . . . . . . . . . . . . . 64
The Local Console GUI Main Page . . . . . . . . . . . . . . . . . . . . . . . . . . . . . 66
The Control Panel . . . . . . . . . . . . . . . . . . . . . . . . . . . . . . . . . . . . . . . . . . 67
Super Administrator Setup
Network Setup . . . . . . . . . . . . . . . . . . . . . . . . . . . . . . . . . . . . . . . . . . 47
Changing the Super Administrator Login . . . . . . . . . . . . . . . . . . . . . . 48
Logging In
The Windows Client AP Connection Screen . . . . . . . . . . . . . . . . . . . 54
Connecting – Windows Client AP . . . . . . . . . . . . . . . . . . . . . . . . . . . 55
The File Menu . . . . . . . . . . . . . . . . . . . . . . . . . . . . . . . . . . . . . . . . . . 56
The Java Client AP Connection Screen . . . . . . . . . . . . . . . . . . . . . . . 58
Connecting – Java Client AP . . . . . . . . . . . . . . . . . . . . . . . . . . . . . . . 59
The User Interface
Page Components . . . . . . . . . . . . . . . . . . . . . . . . . . . . . . . . . . . . . . . 62
Manufacturing Number . . . . . . . . . . . . . . . . . . . . . . . . . . . . . . . . . . . . 62
The Tab Bar . . . . . . . . . . . . . . . . . . . . . . . . . . . . . . . . . . . . . . . . . . . . 63
WinClient Control Panel . . . . . . . . . . . . . . . . . . . . . . . . . . . . . . . . . . . 67
WinClient Control Panel Functions . . . . . . . . . . . . . . . . . . . . . . . . . . 69
Macros . . . . . . . . . . . . . . . . . . . . . . . . . . . . . . . . . . . . . . . . . . . . . . . . 71
Hotkeys . . . . . . . . . . . . . . . . . . . . . . . . . . . . . . . . . . . . . . . . . . . . 71
User Macros . . . . . . . . . . . . . . . . . . . . . . . . . . . . . . . . . . . . . . . . . 73
System Macros . . . . . . . . . . . . . . . . . . . . . . . . . . . . . . . . . . . . . . . 77
Video Settings . . . . . . . . . . . . . . . . . . . . . . . . . . . . . . . . . . . . . . . . . . 80
Bandwidth Considerations. . . . . . . . . . . . . . . . . . . . . . . . . . . . . . . 83
Network Bandwidth Information for KVM Sessions . . . . . . . . . . . . 84
Gamma Adjustment . . . . . . . . . . . . . . . . . . . . . . . . . . . . . . . . . . . 85
The Message Board . . . . . . . . . . . . . . . . . . . . . . . . . . . . . . . . . . . . . . 86
Button Bar . . . . . . . . . . . . . . . . . . . . . . . . . . . . . . . . . . . . . . . . . . 86
Message Display Panel. . . . . . . . . . . . . . . . . . . . . . . . . . . . . . . . . 87
Compose Panel. . . . . . . . . . . . . . . . . . . . . . . . . . . . . . . . . . . . . . . 87
User List Panel . . . . . . . . . . . . . . . . . . . . . . . . . . . . . . . . . . . . . . . 87
x

KVM Over IP User Manual
Virtual Media . . . . . . . . . . . . . . . . . . . . . . . . . . . . . . . . . . . . . . . . . . . 88
Mounting Virtual Media . . . . . . . . . . . . . . . . . . . . . . . . . . . . . . . . .88
Mounting Virtual Media - Drag and Drop . . . . . . . . . . . . . . . . . . . . 90
Zoom . . . . . . . . . . . . . . . . . . . . . . . . . . . . . . . . . . . . . . . . . . . . . . . . . 93
The On-Screen Keyboard . . . . . . . . . . . . . . . . . . . . . . . . . . . . . . . . . 94
Changing Languages. . . . . . . . . . . . . . . . . . . . . . . . . . . . . . . . . . . 94
Selecting Platforms . . . . . . . . . . . . . . . . . . . . . . . . . . . . . . . . . . . .95
Expanded Keyboard . . . . . . . . . . . . . . . . . . . . . . . . . . . . . . . . . . . 95
Mouse Pointer Type . . . . . . . . . . . . . . . . . . . . . . . . . . . . . . . . . . . . . . 96
Extended Displays . . . . . . . . . . . . . . . . . . . . . . . . . . . . . . . . . . . . . . .97
Mouse DynaSync Mode . . . . . . . . . . . . . . . . . . . . . . . . . . . . . . . . . . .98
Automatic Mouse Synchronization (DynaSync). . . . . . . . . . . . . . .98
Mac and Linux Considerations . . . . . . . . . . . . . . . . . . . . . . . . . . . 99
Manual Mouse Synchronization. . . . . . . . . . . . . . . . . . . . . . . . . . . 99
Control Panel Configuration . . . . . . . . . . . . . . . . . . . . . . . . . . . . . . .100
The Java Control Panel . . . . . . . . . . . . . . . . . . . . . . . . . . . . . . . . . . . . . 103
The Web Client Control Panel . . . . . . . . . . . . . . . . . . . . . . . . . . . . . . . . 104
Functions. . . . . . . . . . . . . . . . . . . . . . . . . . . . . . . . . . . . . . . . . . . . . . 104
Web Client Video Settings. . . . . . . . . . . . . . . . . . . . . . . . . . . . . . . . .105
Web Client On-Screen Keyboard . . . . . . . . . . . . . . . . . . . . . . . . . . . 106
Web Client Mouse Pointer Type . . . . . . . . . . . . . . . . . . . . . . . . . . . . 106
Virtual Media . . . . . . . . . . . . . . . . . . . . . . . . . . . . . . . . . . . . . . . . . . . 107
Adding Virtual Media via Internet Explorer . . . . . . . . . . . . . . . . . 108
Web Client Mouse Sync Mode . . . . . . . . . . . . . . . . . . . . . . . . . . . . . 109
Automatic Mouse Synchronization (DynaSync). . . . . . . . . . . . . .109
Mac and Linux Considerations . . . . . . . . . . . . . . . . . . . . . . . . . . 110
Manual Mouse Synchronization. . . . . . . . . . . . . . . . . . . . . . . . . .110
Chapter 6.
Overview . . . . . . . . . . . . . . . . . . . . . . . . . . . . . . . . . . . . . . . . . . . . . . . . . 111
The Sidebar . . . . . . . . . . . . . . . . . . . . . . . . . . . . . . . . . . . . . . . . . . . . . . 113
KVM Devices and Ports – Connections Page . . . . . . . . . . . . . . . . . . . .119
Blade Servers – Connections Page . . . . . . . . . . . . . . . . . . . . . . . . . . . .121
Port Access
Browser GUI . . . . . . . . . . . . . . . . . . . . . . . . . . . . . . . . . . . . . . . . . . .111
AP GUI . . . . . . . . . . . . . . . . . . . . . . . . . . . . . . . . . . . . . . . . . . . . . . .112
The Sidebar Tree Structure. . . . . . . . . . . . . . . . . . . . . . . . . . . . . . . . 113
Scan . . . . . . . . . . . . . . . . . . . . . . . . . . . . . . . . . . . . . . . . . . . . . . . . .114
Array . . . . . . . . . . . . . . . . . . . . . . . . . . . . . . . . . . . . . . . . . . . . . . . . .114
Filter . . . . . . . . . . . . . . . . . . . . . . . . . . . . . . . . . . . . . . . . . . . . . . . . . 115
Sidebar Utilities . . . . . . . . . . . . . . . . . . . . . . . . . . . . . . . . . . . . . . . .116
Port/Outlet Naming . . . . . . . . . . . . . . . . . . . . . . . . . . . . . . . . . . . . . . 117
Device Level . . . . . . . . . . . . . . . . . . . . . . . . . . . . . . . . . . . . . . . . . . .119
Port Level . . . . . . . . . . . . . . . . . . . . . . . . . . . . . . . . . . . . . . . . . . . . . 120
Status . . . . . . . . . . . . . . . . . . . . . . . . . . . . . . . . . . . . . . . . . . . . . 120
Associated Links . . . . . . . . . . . . . . . . . . . . . . . . . . . . . . . . . . . . . 121
The Blade Configuration Page . . . . . . . . . . . . . . . . . . . . . . . . . . . . .121
xi

KVM Over IP User Manual
Associating Ports . . . . . . . . . . . . . . . . . . . . . . . . . . . . . . . . . . . . . . . 122
Main Panel Device View . . . . . . . . . . . . . . . . . . . . . . . . . . . . . . . 122
Main Panel Blade View . . . . . . . . . . . . . . . . . . . . . . . . . . . . . . . . 124
Unassociating Ports . . . . . . . . . . . . . . . . . . . . . . . . . . . . . . . . . . . . . 125
History . . . . . . . . . . . . . . . . . . . . . . . . . . . . . . . . . . . . . . . . . . . . . . . . . . 126
Favorites . . . . . . . . . . . . . . . . . . . . . . . . . . . . . . . . . . . . . . . . . . . . . . . . 127
Adding a Favorite . . . . . . . . . . . . . . . . . . . . . . . . . . . . . . . . . . . . 127
Modifying a Favorite . . . . . . . . . . . . . . . . . . . . . . . . . . . . . . . . . . 128
User Preferences . . . . . . . . . . . . . . . . . . . . . . . . . . . . . . . . . . . . . . . . . . 130
Viewer Preference. . . . . . . . . . . . . . . . . . . . . . . . . . . . . . . . . . . . . . . 132
Adjust Viewer Preference . . . . . . . . . . . . . . . . . . . . . . . . . . . . . . 132
Sessions . . . . . . . . . . . . . . . . . . . . . . . . . . . . . . . . . . . . . . . . . . . . . . . . 133
Access . . . . . . . . . . . . . . . . . . . . . . . . . . . . . . . . . . . . . . . . . . . . . . . . . . 134
Device Level Browser GUI Interface . . . . . . . . . . . . . . . . . . . . . . . . . 134
Port Level Browser GUI Interface . . . . . . . . . . . . . . . . . . . . . . . . . . . 135
Device Level AP GUI Interface . . . . . . . . . . . . . . . . . . . . . . . . . . . . 137
Port Level AP GUI Interface . . . . . . . . . . . . . . . . . . . . . . . . . . . . . . . 138
Saving Changes . . . . . . . . . . . . . . . . . . . . . . . . . . . . . . . . . . . . . . . . 139
Port Configuration . . . . . . . . . . . . . . . . . . . . . . . . . . . . . . . . . . . . . . . . . 140
Device Level . . . . . . . . . . . . . . . . . . . . . . . . . . . . . . . . . . . . . . . . . . . 140
Port Level . . . . . . . . . . . . . . . . . . . . . . . . . . . . . . . . . . . . . . . . . . . . . 142
Port Properties . . . . . . . . . . . . . . . . . . . . . . . . . . . . . . . . . . . . . . 142
Associated Links . . . . . . . . . . . . . . . . . . . . . . . . . . . . . . . . . . . . 144
Multiple View . . . . . . . . . . . . . . . . . . . . . . . . . . . . . . . . . . . . . . . 145
Chapter 7.
Overview. . . . . . . . . . . . . . . . . . . . . . . . . . . . . . . . . . . . . . . . . . . . . . . . . 149
Users . . . . . . . . . . . . . . . . . . . . . . . . . . . . . . . . . . . . . . . . . . . . . . . . . . . 151
Groups . . . . . . . . . . . . . . . . . . . . . . . . . . . . . . . . . . . . . . . . . . . . . . . . . . 156
Users and Groups . . . . . . . . . . . . . . . . . . . . . . . . . . . . . . . . . . . . . . . . . 159
Device Assignment . . . . . . . . . . . . . . . . . . . . . . . . . . . . . . . . . . . . . . . . 163
xii
User Management
Browser GUI . . . . . . . . . . . . . . . . . . . . . . . . . . . . . . . . . . . . . . . . . . . 149
AP GUI . . . . . . . . . . . . . . . . . . . . . . . . . . . . . . . . . . . . . . . . . . . . . . . 149
Adding Users . . . . . . . . . . . . . . . . . . . . . . . . . . . . . . . . . . . . . . . . . . 151
Modifying User Accounts . . . . . . . . . . . . . . . . . . . . . . . . . . . . . . . . . 155
Deleting User Accounts . . . . . . . . . . . . . . . . . . . . . . . . . . . . . . . . . . 155
Creating Groups . . . . . . . . . . . . . . . . . . . . . . . . . . . . . . . . . . . . . . . . 156
Modifying Groups . . . . . . . . . . . . . . . . . . . . . . . . . . . . . . . . . . . . . . . 158
Deleting Groups . . . . . . . . . . . . . . . . . . . . . . . . . . . . . . . . . . . . . . . . 158
Assigning Users to a Group . . . . . . . . . . . . . . . . . . . . . . . . . . . . . . . 159
Removing Users From a Group . . . . . . . . . . . . . . . . . . . . . . . . . . . . 160
Assigning Users to a Group . . . . . . . . . . . . . . . . . . . . . . . . . . . . . . . 161
Removing Users From a Group . . . . . . . . . . . . . . . . . . . . . . . . . . . . 162
Assigning Device Permissions . . . . . . . . . . . . . . . . . . . . . . . . . . . . . 163
Filters. . . . . . . . . . . . . . . . . . . . . . . . . . . . . . . . . . . . . . . . . . . . . . 165
Assigning Device Permissions . . . . . . . . . . . . . . . . . . . . . . . . . . . . . 166

KVM Over IP User Manual
Account Policy . . . . . . . . . . . . . . . . . . . . . . . . . . . . . . . . . . . . . . 167
Chapter 8.
KVM Devices. . . . . . . . . . . . . . . . . . . . . . . . . . . . . . . . . . . . . . . . . . . . . . 169
Blade Servers . . . . . . . . . . . . . . . . . . . . . . . . . . . . . . . . . . . . . . . . . . . . . 201
Device Management
Device Information . . . . . . . . . . . . . . . . . . . . . . . . . . . . . . . . . . . . . .169
General . . . . . . . . . . . . . . . . . . . . . . . . . . . . . . . . . . . . . . . . . . . .170
Environment. . . . . . . . . . . . . . . . . . . . . . . . . . . . . . . . . . . . . . . . .170
Operating Mode . . . . . . . . . . . . . . . . . . . . . . . . . . . . . . . . . . . . . . . .171
Network . . . . . . . . . . . . . . . . . . . . . . . . . . . . . . . . . . . . . . . . . . . . . .174
IP Installer . . . . . . . . . . . . . . . . . . . . . . . . . . . . . . . . . . . . . . . . . .175
Service Ports . . . . . . . . . . . . . . . . . . . . . . . . . . . . . . . . . . . . . . . . 175
NIC Settings . . . . . . . . . . . . . . . . . . . . . . . . . . . . . . . . . . . . . . . .176
Network Transfer Rate. . . . . . . . . . . . . . . . . . . . . . . . . . . . . . . . .178
Finishing Up. . . . . . . . . . . . . . . . . . . . . . . . . . . . . . . . . . . . . . . . .178
ANMS . . . . . . . . . . . . . . . . . . . . . . . . . . . . . . . . . . . . . . . . . . . . . . . . 179
Event Destination . . . . . . . . . . . . . . . . . . . . . . . . . . . . . . . . . . . .179
Authentication . . . . . . . . . . . . . . . . . . . . . . . . . . . . . . . . . . . . . . .182
CC Management Settings . . . . . . . . . . . . . . . . . . . . . . . . . . . . . .184
SNMP Agent . . . . . . . . . . . . . . . . . . . . . . . . . . . . . . . . . . . . . . . .185
Security . . . . . . . . . . . . . . . . . . . . . . . . . . . . . . . . . . . . . . . . . . . . . . 187
Login Failures . . . . . . . . . . . . . . . . . . . . . . . . . . . . . . . . . . . . . . . 187
Filter . . . . . . . . . . . . . . . . . . . . . . . . . . . . . . . . . . . . . . . . . . . . . .188
Login String . . . . . . . . . . . . . . . . . . . . . . . . . . . . . . . . . . . . . . . . .191
Encryption . . . . . . . . . . . . . . . . . . . . . . . . . . . . . . . . . . . . . . . . . . 192
Security Level . . . . . . . . . . . . . . . . . . . . . . . . . . . . . . . . . . . . . . .193
Working Mode . . . . . . . . . . . . . . . . . . . . . . . . . . . . . . . . . . . . . . .194
Private Certificate . . . . . . . . . . . . . . . . . . . . . . . . . . . . . . . . . . . .195
Certificate Signing Request . . . . . . . . . . . . . . . . . . . . . . . . . . . .196
Date/Time . . . . . . . . . . . . . . . . . . . . . . . . . . . . . . . . . . . . . . . . . . . . .198
Time Zone . . . . . . . . . . . . . . . . . . . . . . . . . . . . . . . . . . . . . . . . . .198
Date . . . . . . . . . . . . . . . . . . . . . . . . . . . . . . . . . . . . . . . . . . . . . . .198
Network Time. . . . . . . . . . . . . . . . . . . . . . . . . . . . . . . . . . . . . . . .199
Disclaimer (Browser Interface Only) . . . . . . . . . . . . . . . . . . . . . . . . . 200
Configuration Page . . . . . . . . . . . . . . . . . . . . . . . . . . . . . . . . . . . . . .201
Blade Server Setup . . . . . . . . . . . . . . . . . . . . . . . . . . . . . . . . . . . . .202
Adding a Blade Server . . . . . . . . . . . . . . . . . . . . . . . . . . . . . . . . 202
Modifying / Deleting a Blade Server . . . . . . . . . . . . . . . . . . . . . . . . . 203
Web Access . . . . . . . . . . . . . . . . . . . . . . . . . . . . . . . . . . . . . . . . . . . 203
Chapter 9.
Overview . . . . . . . . . . . . . . . . . . . . . . . . . . . . . . . . . . . . . . . . . . . . . . . . . 205
Log Information . . . . . . . . . . . . . . . . . . . . . . . . . . . . . . . . . . . . . . . . . . .206
Log
Browser GUI . . . . . . . . . . . . . . . . . . . . . . . . . . . . . . . . . . . . . . . . . . .205
AP GUI . . . . . . . . . . . . . . . . . . . . . . . . . . . . . . . . . . . . . . . . . . . . . . .205
Filter . . . . . . . . . . . . . . . . . . . . . . . . . . . . . . . . . . . . . . . . . . . . . . . . . 206
xiii

KVM Over IP User Manual
Log Notification Settings . . . . . . . . . . . . . . . . . . . . . . . . . . . . . . . . . . . . 209
Chapter 10.
Overview. . . . . . . . . . . . . . . . . . . . . . . . . . . . . . . . . . . . . . . . . . . . . . . . . 211
Main Firmware Upgrade . . . . . . . . . . . . . . . . . . . . . . . . . . . . . . . . . . . . 212
Firmware Upgrade Recovery . . . . . . . . . . . . . . . . . . . . . . . . . . . . . . . . . 213
Upgrade Adapters . . . . . . . . . . . . . . . . . . . . . . . . . . . . . . . . . . . . . . . . . 214
Adapter Firmware Upgrade Recovery . . . . . . . . . . . . . . . . . . . . . . . . . . 217
Backup/Restore . . . . . . . . . . . . . . . . . . . . . . . . . . . . . . . . . . . . . . . . . . . 218
Terminal . . . . . . . . . . . . . . . . . . . . . . . . . . . . . . . . . . . . . . . . . . . . . . . . . 220
System Operation . . . . . . . . . . . . . . . . . . . . . . . . . . . . . . . . . . . . . . . . . 222
Chapter 11.
Overview. . . . . . . . . . . . . . . . . . . . . . . . . . . . . . . . . . . . . . . . . . . . . . . . . 223
Chapter 12.
Overview. . . . . . . . . . . . . . . . . . . . . . . . . . . . . . . . . . . . . . . . . . . . . . . . . 225
Connecting to a Port . . . . . . . . . . . . . . . . . . . . . . . . . . . . . . . . . . . . . . . 226
The Port Toolbar . . . . . . . . . . . . . . . . . . . . . . . . . . . . . . . . . . . . . . . . . . 228
Panel Array Mode . . . . . . . . . . . . . . . . . . . . . . . . . . . . . . . . . . . . . . . . . 233
Multiuser Operation . . . . . . . . . . . . . . . . . . . . . . . . . . . . . . . . . . . . . . . . 235
Maintenance
Browser GUI . . . . . . . . . . . . . . . . . . . . . . . . . . . . . . . . . . . . . . . . . . . 211
AP GUI . . . . . . . . . . . . . . . . . . . . . . . . . . . . . . . . . . . . . . . . . . . . . . . 211
Upgrade Adapters. . . . . . . . . . . . . . . . . . . . . . . . . . . . . . . . . . . . . . . 214
Adapter Firmware Info . . . . . . . . . . . . . . . . . . . . . . . . . . . . . . . . . . . 216
Display Information . . . . . . . . . . . . . . . . . . . . . . . . . . . . . . . . . . . . . . 216
Update Adapter Display Info . . . . . . . . . . . . . . . . . . . . . . . . . . . . . . 217
Backup . . . . . . . . . . . . . . . . . . . . . . . . . . . . . . . . . . . . . . . . . . . . . . . 218
Restore . . . . . . . . . . . . . . . . . . . . . . . . . . . . . . . . . . . . . . . . . . . . . . . 219
Clear Port Names: . . . . . . . . . . . . . . . . . . . . . . . . . . . . . . . . . . . . . . 222
Restore Default Values: . . . . . . . . . . . . . . . . . . . . . . . . . . . . . . . . . . 222
Reset on exit: . . . . . . . . . . . . . . . . . . . . . . . . . . . . . . . . . . . . . . . . . . 222
Download
Port Operation
The Toolbar Icons . . . . . . . . . . . . . . . . . . . . . . . . . . . . . . . . . . . . . . 229
Toolbar Hotkey Port Switching . . . . . . . . . . . . . . . . . . . . . . . . . . . . . 230
Auto Scanning. . . . . . . . . . . . . . . . . . . . . . . . . . . . . . . . . . . . . . . 230
Skip Mode . . . . . . . . . . . . . . . . . . . . . . . . . . . . . . . . . . . . . . . . . . 231
Recalling the Port Access Page . . . . . . . . . . . . . . . . . . . . . . . . . . . . 232
GUI Hotkey Summary Table . . . . . . . . . . . . . . . . . . . . . . . . . . . . . . 232
Panel Array Toolbar . . . . . . . . . . . . . . . . . . . . . . . . . . . . . . . . . . . . . 234
Users and Buses . . . . . . . . . . . . . . . . . . . . . . . . . . . . . . . . . . . . . . . 236
Chapter 13.
Installation. . . . . . . . . . . . . . . . . . . . . . . . . . . . . . . . . . . . . . . . . . . . . . . . 237
Starting Up . . . . . . . . . . . . . . . . . . . . . . . . . . . . . . . . . . . . . . . . . . . . . . . 238
The Menu Bar . . . . . . . . . . . . . . . . . . . . . . . . . . . . . . . . . . . . . . . . . . . . 239
xiv
The Log Server
Configure. . . . . . . . . . . . . . . . . . . . . . . . . . . . . . . . . . . . . . . . . . . . . . 239
Events . . . . . . . . . . . . . . . . . . . . . . . . . . . . . . . . . . . . . . . . . . . . . . . . 240

KVM Over IP User Manual
Search: . . . . . . . . . . . . . . . . . . . . . . . . . . . . . . . . . . . . . . . . . . . . 240
Maintenance: . . . . . . . . . . . . . . . . . . . . . . . . . . . . . . . . . . . . . . . . 242
Options . . . . . . . . . . . . . . . . . . . . . . . . . . . . . . . . . . . . . . . . . . . . . . .243
Help . . . . . . . . . . . . . . . . . . . . . . . . . . . . . . . . . . . . . . . . . . . . . . . . .243
The Log Server Main Screen . . . . . . . . . . . . . . . . . . . . . . . . . . . . . . . . .244
Overview . . . . . . . . . . . . . . . . . . . . . . . . . . . . . . . . . . . . . . . . . . . . . . 244
The List Panel . . . . . . . . . . . . . . . . . . . . . . . . . . . . . . . . . . . . . . . . . 245
The Event Panel . . . . . . . . . . . . . . . . . . . . . . . . . . . . . . . . . . . . . . . . 245
Appendix
Safety Instructions. . . . . . . . . . . . . . . . . . . . . . . . . . . . . . . . . . . . . . . . . . 247
General . . . . . . . . . . . . . . . . . . . . . . . . . . . . . . . . . . . . . . . . . . . . . . .247
Rack Mounting . . . . . . . . . . . . . . . . . . . . . . . . . . . . . . . . . . . . . . . . . 249
Consignes de sécurité . . . . . . . . . . . . . . . . . . . . . . . . . . . . . . . . . . . . . . 250
Général . . . . . . . . . . . . . . . . . . . . . . . . . . . . . . . . . . . . . . . . . . . . . . .250
Montage sur bâti . . . . . . . . . . . . . . . . . . . . . . . . . . . . . . . . . . . . . . . .253
Technical Support . . . . . . . . . . . . . . . . . . . . . . . . . . . . . . . . . . . . . . . . .254
International . . . . . . . . . . . . . . . . . . . . . . . . . . . . . . . . . . . . . . . . . . .254
North America . . . . . . . . . . . . . . . . . . . . . . . . . . . . . . . . . . . . . . . . . 254
Specifications . . . . . . . . . . . . . . . . . . . . . . . . . . . . . . . . . . . . . . . . . . . . .255
KN2116VA / KN4116VA . . . . . . . . . . . . . . . . . . . . . . . . . . . . . . . . . . 255
KN2124VA / KN4124VA . . . . . . . . . . . . . . . . . . . . . . . . . . . . . . . . . . 257
KN1132V / KN2132VA / KN4132VA . . . . . . . . . . . . . . . . . . . . . . . .259
KN8132V / KN4164V / KN8164V . . . . . . . . . . . . . . . . . . . . . . . . . . .261
KN2140VA / KN4140VA . . . . . . . . . . . . . . . . . . . . . . . . . . . . . . . . . . 263
Troubleshooting . . . . . . . . . . . . . . . . . . . . . . . . . . . . . . . . . . . . . . . . . . . 265
General Operation . . . . . . . . . . . . . . . . . . . . . . . . . . . . . . . . . . . . . . 265
Mouse Problems . . . . . . . . . . . . . . . . . . . . . . . . . . . . . . . . . . . . . . . 267
Virtual Media . . . . . . . . . . . . . . . . . . . . . . . . . . . . . . . . . . . . . . . . . . 269
Web Browser . . . . . . . . . . . . . . . . . . . . . . . . . . . . . . . . . . . . . . . . . .269
The WinClient ActiveX Viewer and the WinClient AP . . . . . . . . . . . .270
The Java Applet and Java Client AP . . . . . . . . . . . . . . . . . . . . . . . .271
Sun Systems . . . . . . . . . . . . . . . . . . . . . . . . . . . . . . . . . . . . . . . . . . 272
Mac Systems . . . . . . . . . . . . . . . . . . . . . . . . . . . . . . . . . . . . . . . . . .272
Redhat Systems . . . . . . . . . . . . . . . . . . . . . . . . . . . . . . . . . . . . . . . .273
The Log Server . . . . . . . . . . . . . . . . . . . . . . . . . . . . . . . . . . . . . . . . .273
Panel Array Mode . . . . . . . . . . . . . . . . . . . . . . . . . . . . . . . . . . . . . . .273
IP Address Determination . . . . . . . . . . . . . . . . . . . . . . . . . . . . . . . . . . . 276
The Local Console . . . . . . . . . . . . . . . . . . . . . . . . . . . . . . . . . . . . . . 276
IP Installer . . . . . . . . . . . . . . . . . . . . . . . . . . . . . . . . . . . . . . . . . . . . . 276
Browser . . . . . . . . . . . . . . . . . . . . . . . . . . . . . . . . . . . . . . . . . . . . . .277
IPv6 . . . . . . . . . . . . . . . . . . . . . . . . . . . . . . . . . . . . . . . . . . . . . . . . . . . . 278
Link Local IPv6 Address . . . . . . . . . . . . . . . . . . . . . . . . . . . . . . . . . .278
IPv6 Stateless Autoconfiguration . . . . . . . . . . . . . . . . . . . . . . . . . . . 279
Port Forwarding . . . . . . . . . . . . . . . . . . . . . . . . . . . . . . . . . . . . . . . . . . . 280
Keyboard Emulation . . . . . . . . . . . . . . . . . . . . . . . . . . . . . . . . . . . . . . . .281
xv

KVM Over IP User Manual
Mac Keyboard . . . . . . . . . . . . . . . . . . . . . . . . . . . . . . . . . . . . . . . . . 281
Sun Keyboard . . . . . . . . . . . . . . . . . . . . . . . . . . . . . . . . . . . . . . . . . 282
PPP Modem Operation . . . . . . . . . . . . . . . . . . . . . . . . . . . . . . . . . . . . . 283
Basic Setup . . . . . . . . . . . . . . . . . . . . . . . . . . . . . . . . . . . . . . . . . . . 283
Connection Setup Example (Windows XP) . . . . . . . . . . . . . . . . . . . 284
KA7140 Configuration and Operation . . . . . . . . . . . . . . . . . . . . . . . . . . 285
Configuration. . . . . . . . . . . . . . . . . . . . . . . . . . . . . . . . . . . . . . . . . . . 285
Operation . . . . . . . . . . . . . . . . . . . . . . . . . . . . . . . . . . . . . . . . . . . . . 286
KA7140 Pin Assignments . . . . . . . . . . . . . . . . . . . . . . . . . . . . . . . . . 287
Internal Serial Interface Configuration . . . . . . . . . . . . . . . . . . . . . . . . . . 288
Navigation . . . . . . . . . . . . . . . . . . . . . . . . . . . . . . . . . . . . . . . . . . . . 288
Operation . . . . . . . . . . . . . . . . . . . . . . . . . . . . . . . . . . . . . . . . . . . . . 289
Switch Level Configuration . . . . . . . . . . . . . . . . . . . . . . . . . . . . . . . . 289
Port Level Configuration . . . . . . . . . . . . . . . . . . . . . . . . . . . . . . . . . . 290
Additional Mouse Synchronization Procedures . . . . . . . . . . . . . . . . . . . 291
Windows:. . . . . . . . . . . . . . . . . . . . . . . . . . . . . . . . . . . . . . . . . . . . . . 291
Sun / Linux . . . . . . . . . . . . . . . . . . . . . . . . . . . . . . . . . . . . . . . . . . . . 292
Additional Video Resolution Procedures . . . . . . . . . . . . . . . . . . . . . . . . 293
Trusted Certificates . . . . . . . . . . . . . . . . . . . . . . . . . . . . . . . . . . . . . . . . 294
Overview . . . . . . . . . . . . . . . . . . . . . . . . . . . . . . . . . . . . . . . . . . . . . 294
Installing the Certificate . . . . . . . . . . . . . . . . . . . . . . . . . . . . . . . . . . 295
Certificate Trusted . . . . . . . . . . . . . . . . . . . . . . . . . . . . . . . . . . . . . . 296
Mismatch Considerations . . . . . . . . . . . . . . . . . . . . . . . . . . . . . . 297
Self-Signed Private Certificates . . . . . . . . . . . . . . . . . . . . . . . . . . . . . . . 298
Examples . . . . . . . . . . . . . . . . . . . . . . . . . . . . . . . . . . . . . . . . . . . . . 298
Importing the Files . . . . . . . . . . . . . . . . . . . . . . . . . . . . . . . . . . . . . . 298
Fan Location and Speed Information . . . . . . . . . . . . . . . . . . . . . . . . . . . 299
Fan Location . . . . . . . . . . . . . . . . . . . . . . . . . . . . . . . . . . . . . . . . . . 299
KN2116VA / KN4116VA / KN2124VA / KN4124VA / KN1132V /
KN2132VA / KN4132VA / KN8132V / KN2140VA / KN4140VA
. . . . . . . . . . . . . . . . . . . . . . . . . . . . . . . . . . . . . . . . . . . . . . . . . . 299
KN4164V / KN8164V. . . . . . . . . . . . . . . . . . . . . . . . . . . . . . . . . . 299
Clear Login Information . . . . . . . . . . . . . . . . . . . . . . . . . . . . . . . . . . . . . 300
Factory Default Settings . . . . . . . . . . . . . . . . . . . . . . . . . . . . . . . . . . . . 301
Serial Adapter Pin Assignments . . . . . . . . . . . . . . . . . . . . . . . . . . . . . . . 301
Supported KVM Switches . . . . . . . . . . . . . . . . . . . . . . . . . . . . . . . . . . . 302
Supported Power Over the Net™ Units . . . . . . . . . . . . . . . . . . . . . . . . . 302
Supported Power Distribution Units . . . . . . . . . . . . . . . . . . . . . . . . . . . . 302
Virtual Media Support . . . . . . . . . . . . . . . . . . . . . . . . . . . . . . . . . . . . . . 303
WinClient ActiveX Viewer / WinClient AP . . . . . . . . . . . . . . . . . . . . 303
Java Client Viewer / Java Client AP . . . . . . . . . . . . . . . . . . . . . . . . . 303
Limited Warranty. . . . . . . . . . . . . . . . . . . . . . . . . . . . . . . . . . . . . . . . . . . 304
xvi

Chapter 1
Introduction
Overview
The KN2116VA / KN4116VA / KN2124VA / KN4124VA / KN1132V /
KN2132VA / KN4132VA / KN8132V / KN2140VA / KN4140VA / KN4164V
/ KN8164V switches are IP-based KVM control units that allow both local and
remote operators to monitor and access multiple servers from a single console.
This series of KVM ove r IP Switches can control up to 16/24/32/40/64 servers,
and by cascading compatible KVM switches, as many as 512 servers can be
controlled on a complete two stage installation. In addition, up to 4 KVM over
IP Switches can be centralized and controlled by a single CM1164A or
CM1284. Each KVM over IP switch features superior video quality (Full HD
resolution of 1920 x 1200), FIPS 140-2 with level 1 security standards and
virtual media transmissions at twice the speed. The KN series provides local
console and remote over IP access for users to monitor and access their entire
data center over a network. In addition, it offers out-of-band access with
external modem support for BIOS-level troubleshooting when the network is
down.
These KN series of KVM over IP Switches are differentiated according to the
number of buses they support and the number of KVM ports they provide – as
shown below:
Model Bus Support KVM Ports
KN2116VA 1 Local; 2 Remote; 1U 16
KN4116VA 1 Local; 4 Remote; 1U 16
KN2124VA 1 Local; 2 Remote; 1U 24
KN4124VA 1 Local; 4 Remote; 1U 24
KN1132V 1 Local; 1 Remote; 1U 32
KN2132VA 1 Local; 2 Remote; 1U 32
KN4132VA 1 Local; 4 Remote; 1U 32
KN8132V 1 Local; 8 Remote; 1U 32
KN2140VA 1 Local; 2 Remote; 1U 40
KN4140VA 1 Local; 4 Remote; 1U 40
KN4164V 1 Local; 4 Remote; 2U 64
KN8164V 1 Local; 8 Remote; 2U 64
1
KVM over IP User Manual
TCP/IP
TCP/IP
Remote
Remote
Remote
Remote
Local
1 - 64
Remote
Remote
Remote
Remote
KN8164V
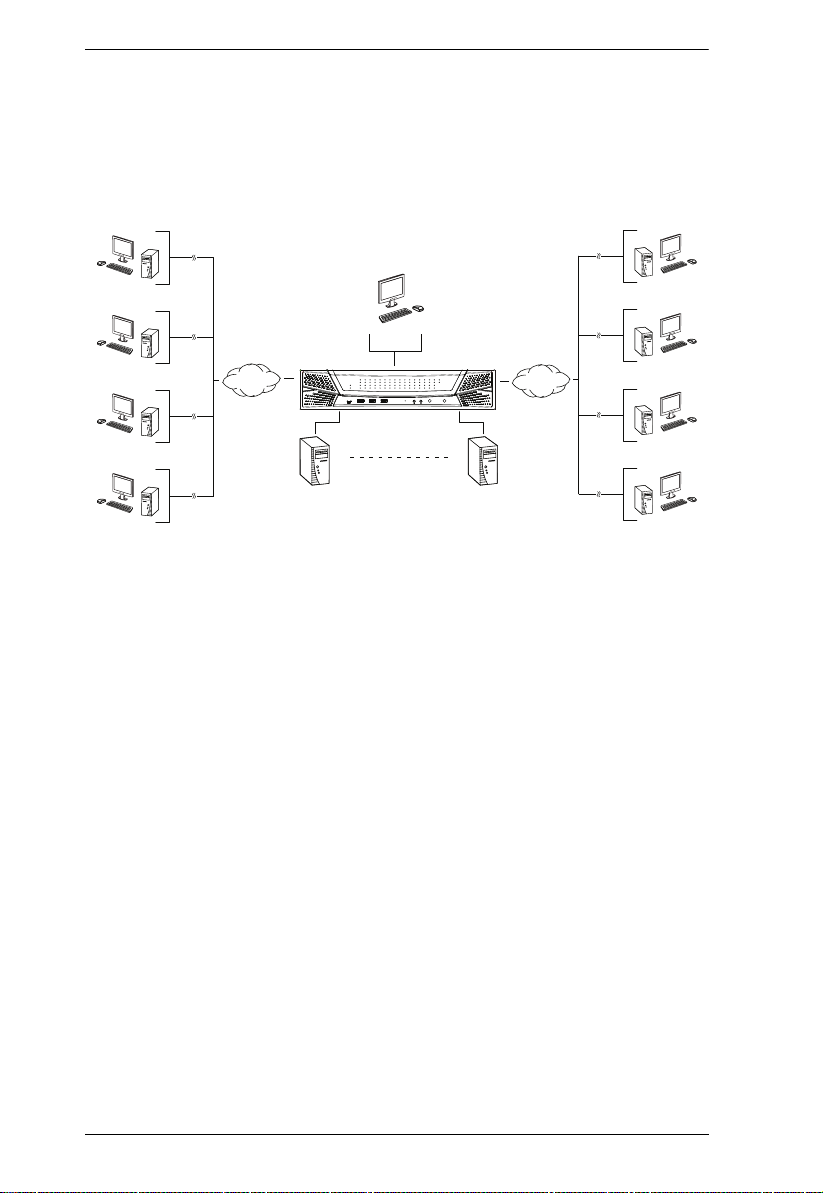
Each bus permits a separate user session so that up to 2 (1 Local; 1 Remote), 3
(1 Local; 2 Remote), 5 (1 Local; 4 Remote), or 9 (1 Local; 8 Remote)
concurrent independent connections to the attached servers can take place. The
diagram on the next page shows how the KN8164V switches can be connected
and accessed via 1 local and 8 remote sessions.
Since the switches use TCP/IP for their communications protocol, they can be
accessed via their IP addresses from anywhere on the LAN, WAN, or Internet
– whether the connecting computer is located down the hall, down the street,
or half-way around the world. Remote operators can log in via their browser or
make use of stand-alone Windows or Java GUI applications. Java allows the
switches to work with JRE (Java Runtime Environment) enabled operating
systems – ensuring multi-platform operability.
The client software allows operators to exchange keyboard, video and mouse
signals with the servers attached to the switches just as if they were present
locally and working on the equipment directly.
Up to 32 users can share the switch’s buses. A Message Board feature allows
them to communicate with each other to facilitate port sharing.
Administrators can handle a multitude of maintenance tasks with ease – from
installing and running GUI applications, to BIOS level troubleshooting, routine
monitoring, concurrent maintenance, system administration, rebooting and
even pre-boot functions.
Local console operation is easily accomplished by entering hotkey
combinations from the keyboard with a full screen GUI display.
Monitoring the installation’s activities couldn’t be easier. A convenient Auto
Scan feature permits automatic switching from port to port at user-specified
2

Chapter 1. Introduction
intervals, while the Panel Array Mode can display the video output of up to 64
servers at the same time.
The switches feature RJ-45 connectors allowing them to use CAT 5e cable to
link to the servers. This space-saving innovation means that a full 16/24/32/40port switch can be conveniently installed in a 1U system rack or a 64-port
switch in a 2U system rack, and the installation can take advantage of the
internal network wiring built into most modern commercial buildings.
Setup is fast and easy – plugging cables into their appropriate ports is all that
is entailed. Because the switch intercepts keyboard input directly, there is no
need to get involved in complex software installation routines, or to be
concerned with incompatibility problems.
Since the firmware is upgradeable over the network, you can stay current with
the latest functionality improvements simply by downloading firmware
updates from our website as they become available.
With its powerful security features, the KVM over IP switch provides the
fastest, most reliable, most cost-effective way to remotely access and manage
widely distributed multiple server installations.
KVM over IP switches have an Adapter ID function that stores port
information like the adapter ID, OS, keyboard language, adapter name,
operation modes and more, so that when you move a KVM Adapter Cable from
one port to another, the switch recognizes the same adapter cable at the new
location. Also , for greater ease o f use when movi ng the adapter cable to another
switch, the adapter ID, OS, keyboard language, adapter name, and operation
modes of the port stay with the adapter.
This KN series of KVM over IP switches support advanced virtual media
functions that allow higher transmission speed and mapping of USB DVD/CD/
hard drives and other storage media directly to a server. Virtual media support
allows you to conduct file transfers, install applications and OS patches and
perform diagnostics remotely. You can upgrade your entire installation from a
single remote console located anywhere in the world.
Each model in this series offers dual power supplies so that if one of the power
supplies fails, the second power supply automatically takes over. In addition to
supporting dual power, they guard against power failure from your server room
outlets. If your server room has more than one power source, connecting the
power supplies to different power sources is a wise choice. If one of the server
room power supplies loses power, the switch will automatically adjust the
power it draws from the second source to keep functioning.
3

KVM over IP User Manual
The KN2116VA / KN4116VA / KN2124VA / KN4124VA / KN1132V /
KN2132VA / KN4132VA / KN8132V / KN2140VA / KN4140VA / KN4164V
/ KN8164V models support temperature sensors that can control internal fans.
The sensors regulate the fans so that they run at optimum speed depending on
the server room temperature – throttling down when necessary, to use energy
more efficiently and prolong the life of both the fans and the switch.
These models of KN series KVM over IP switches are also audio enabled.
Microphone and speakers are supported on the Local Console for the servers;
speakers are supported on the remote users’ computers.
The KN Series can be integrated into ATEN’s CC2000 Management Software.
CC2000 puts administrators in complete control of remote data centers and
branch offices no matter where they are in the world – allowing them to
remotely monitor and control all devices on a network (refer to ATEN’s
website to get more information on CC2000).
The KN series is compatible with ATEN’s KVM over IP Console Station, the
KA82 series. The KA82 series is a hardware-based, standalone console
solution that can centrally manage multiple KN devices. It is especially suitable
for environments where a PC is not allowed (refer to ATEN’s website to get
more information on the KVM over IP Console Station).
To help you manage and control an entire data center, ATEN KVM over IP
switches support blade servers and chassis. With powerful features such as
Power Association – KVM ports can be associated with ATEN PDU power
outlets for power management of servers from the KVM over IP switches’ user
interface.
The KN series now also supports web-friendly KVM-over-IP access with its
Web Client Viewer functionality. Being fully compatible with major web
browsers, the Web Client Viewer runs directly off the browser without Java or
browser plug-in installation. Like the Java or Windows plug-in counterparts,
the Web Client Viewer allows users to remotely access all the servers and PCs
connected to the KN series, but benefiting from a more simultaneous, directaccess option for management and operation.
For added convenience to management, an iPad application – PadClient, is also
available. It has an intuitive interface that makes real-time access and control
of the servers/computers simple and mobile. Refer to ATEN’s website to get
more information on PadClient.
4

Chapter 1. Introduction
Features
Hardware
High port density – RJ-45 connectors and Cat 5e/6 cable connect up to 16-
ports (KN2116VA / KN4116VA), 24-ports (KN2124VA / KN4124VA),
32-ports (KN1132V / KN2132VA / KN4132VA / KN8132V), and 40-ports
(KN2140VA / KN4140VA) in a 1U housing; or 64-ports (KN4164V /
KN8164V) in a 2U housing
Laptop USB Console (LUC) – A dedicated USB port directly connects to
a laptop for easy console operation
One/two/four/eight separate buses for remote KVM over IP access
Two 10/100/1000 Mbps NICs for redundant LAN or two IP operation
Blade server support
Supports PS/2, USB, Sun Legacy (13W3) and serial (RS-232)
connectivity
Local console provides USB keyboard and mouse support
Supports multiplatform server environments: Windows, Mac, Sun, Linux
and VT100 based serial devices
Audio enabled
Dual Power Supply
High video resolution – up to 1920 x 1200 @ 60Hz with 24-bit color depth
at the switch’s local console and on remote session displays
Monitor and control up to 64 computers on a single level, or control up to
512 computers in a cascade*
* Cascade-compatible KVM Switches include the following: CS1308,
CS1316, CS9134, CS9138, KH1508A, KH1516A and KH1532A.
Centralized control by the CM1164A or CM1284 for up to 4 KN Series on
a complete two stage installation*
*Firmware version V2.8.272 is required to be updated on the KVM over
IP Switches to be compatible with the CM1164A and CM1284.
5

KVM over IP User Manual
Management
Supports 64 user accounts and up to 32 users can be logged in at the same
time for control and management
Green IT Fan – auto-fan-speed adjustment responding to temperature
Event logging and Windows-based Log Server support
Critical system event notification via SMTP email; SNMP trap and Syslog
support
Customizable events notification
Firmware upgradeable
Out-of-Band Access-Modem dial-in/dial-out/dial-back support
Adapter ID Function: Stores port information allowing administrators to
relocate the servers to different ports, without having to re-configure the
adapters and switches
Port Share Mode allows multiple users to gain access to a server
simultaneously
Supports integration into ATEN CC2000 Centralized Management
Software and CCVSR Video Session Recording Software
Supports ATEN KVM over IP Console Station (KA8270 / KA8280 /
KA8278 / KA8288)
Power Association enables the switch’s KVM ports to be associated with
ATEN PDUs power outlets for remote power management
IPv6 capable
Supports PadClient application on an iPad for mobile management/control
Easy-to-Use Interface
ATEN Exclusive Panel ArrayTM Mode – monitors all ports in a grid
display (both local and remote screens)
Local Console, browser-based, and AP GUIs offer a unified
Multilanguage interface to minimize the user training time and increase
productivity
Multiplatform client support (Windows, Mac OS X, Linux, Sun)
Multi-browser support: Internet Explorer, Chrome, Firefox, Safari, Opera,
Mozilla, Netscape
Browser-based GUI in pure Web technology – allows administrators to
perform administrative tasks without pre-installed software (e.g. Java)
6

Chapter 1. Introduction
Supports web-friendly KVM-over-IP access with Web Client Viewer –
users can remotely access all the connected servers and PCs directly off
web-browsers without Java or browser plug-in installation
Users can launch multiple virtual remote desktop sessions to control
multiple servers during the same login
Full-screen or sizable and scalable Virtual Remote Desktop
Keyboard/Mouse Broadcast – keyboard and mouse signals can be
duplicated across all servers simultaneously
Video syncing with the local console – local console monitor’s EDID
information stored on the KVM Adapter Cables for display resolution
optimization
Advanced Security
Remote Authentication Support: RADIUS, LDAP, LDAPS, and MS
Active Directory
Supports TLS 1.2 encryption and RSA certificates (encryption key up to
4096 bit) for secured browser logins
Flexible encryption design allows users to choose any combination of 56-
bit DES, 168-bit 3DES, 256-bit AES, 128-bit RC4, or Random for
independent KB/Mouse, video, and virtual media data encryption
Support for IP/MAC filtering
Configurable user and group permissions for server access and control
Automated CSR creation utility and third-party CA certificate
authentication
Virtual Media
Virtual media enables remote file transfers, OS patching, software
installations and diagnostic testing
Virtual Media Auto Mounting – drag and drop storage locations (drives,
folders, removable disks and ISO files) through the remote session
window to mount media
Works with USB enabled servers at operating system and BIOS level
Supports DVD/CD drives, USB mass storage devices, PC hard drives and
ISO images
Supports Smart Card Readers on computers connected with KA7166,
KA7168, KA7169, KA7177, KA7188, or KA7189 Adapter Cables
7

KVM over IP User Manual
Virtual Remote Desktop
Video quality such as monochrome color depth, threshold and noise
settings, bandwidth increment/reduction can be adjusted for optimizing
data transfer speed
Full screen video display or scalable video display
Message Board for communication among remote users
Mouse DynaSync-automatically synchronizes the local and remote mouse
movements
Exit Macros support
On-screen keyboard with multilanguage support
BIOS-level access for trouble shooting
New KN Series Exclusive
High grade security – supports FIPS 140-2 level 1 security standards
Extreme virtual media speed – 2 x faster virtual media transmission speed
Advanced FPGA graphics processor – with an Full HD resolutions of
1920 x 1200
8

Chapter 1. Introduction
System Requirements
Remote User Computers
Remote user computers (also referred to as client computers) are the ones the
users log in to the switch with from remote locations over the Internet (see
Terminology, page vii). The following equipment must be installed on these
computers:
For best results, we recommend computers with at least a P III 1 GHz
processor, with their screen resolution set to 1024 x 768.
IE8 or above web browser.
Browsers must support TLS 1.2 encryption.
For best results, a network transfer speed of at least 512kbps is
recommended.
For the browser-based WinClient ActiveX Viewer, DirectX 8 must be
present, and at least 150MB of memory must be available after
installation.
For the browser-based Java Client Viewer the latest version of the Java
Runtime Environment (JRE) must be installed, and at least 205MB of
memory must be available after installation.
For the Windows Client AP, DirectX 8 must be present, and at least 90MB
of memory must be available after installation.
For the Java Client AP, the latest version of the Java Runtime Environment
(JRE) must be installed, and at least 145MB of memory must be available
after installation.
For the Log Server, you must have the Microsoft Jet OLEDB 4.0 or higher
driver installed.
Servers
Servers are the computers connected to the switch via KVM Adapter Cables
(see Terminology, page vii). The following equipment must be installed on
these servers:
A VGA, SVGA or multisync port.
For USB KVM Adapter Cable Connections: a Type A USB port and USB
host controller.
For PS/2 KVM Adapter Cable Connections: 6-pin Mini-DIN keyboard
and mouse ports.
9

KVM over IP User Manual
KVM Adapter Cables
Cat 5e (or higher) cable is required to connect the KVM over IP switch to
the KVM Adapter Cables (see page 27).
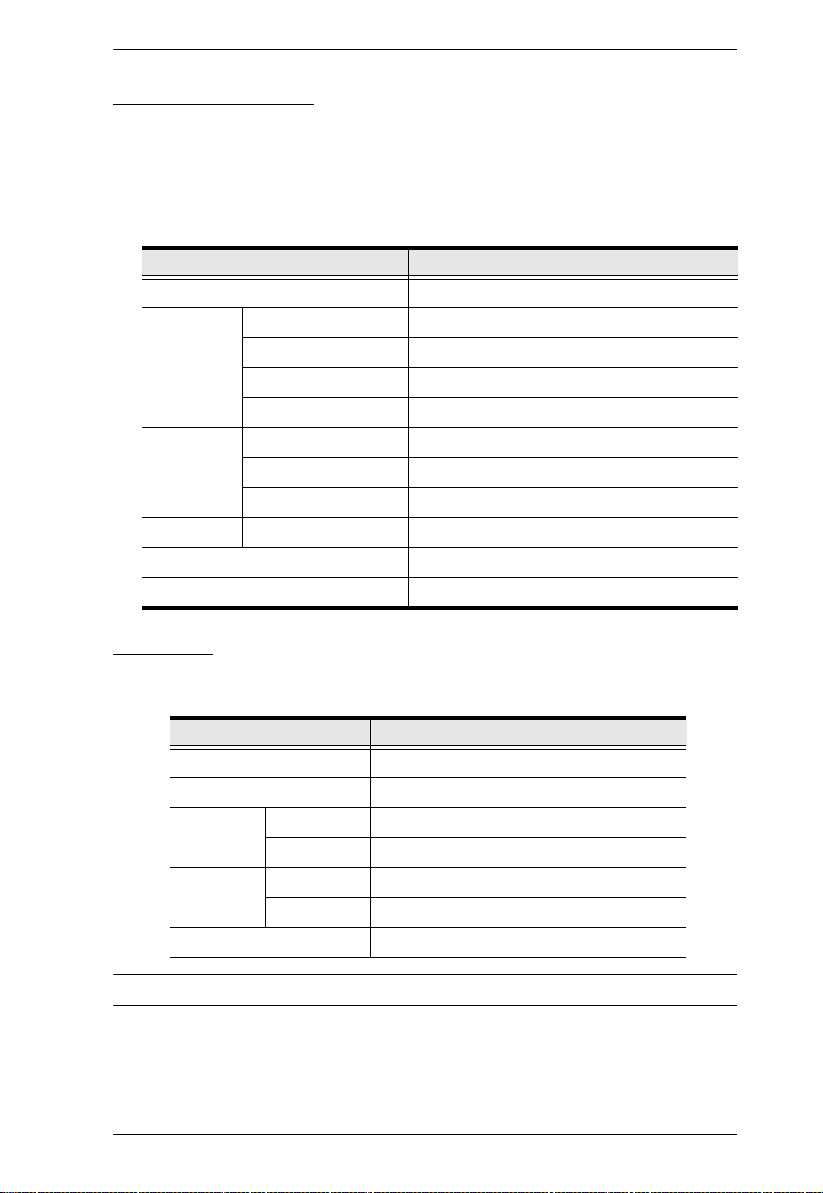
The following KVM Adapter Cables are required for use with the KVM
over IP switch:
Function Module
Connect to devices with PS/2 ports KA7120
Connect to devices with USB ports
(All platforms – PC, Mac, Sun)
Connect to Sun Legacy Computers KA7130
Connect to serial based devices KA7140
For USB computers – DVI output, Virtual
Media and Smart Card Reader support
For USB computers – HDMI output, Virtual
Media and Smart Card Reader support
For USB computers – DisplayPort output,
Virtual Media and Smart Card Reader support
Connect to devices with USB ports and virtual
media support
Connect to devices with USB ports, virtual
media and audio support
Connect to devices with USB ports, with virtual
media, smart card reader support
For USB computers – VGA output, Virtual
Media, audio and dual output support
For USB computers – HDMI output, Virtual
Media, Smart Card Reader, and audio support
For USB computers – DisplayPort output,
Virtual Media, Smart Card Reader, and audio
support
KA7170
KA7166
KA7168
KA7169
KA7175
KA7176
KA7177
KA7178
KA7188
KA7189
Note: If you use Adapter Cables purchased prior to your switch purchase, you
may have to upgrade the Adapter’s firmware. (see page 214).
10
Chapter 1. Introduction
Operating Systems
Supported operating systems for remote user computers include Windows
2000 or later, and those capable of running the Java Runtime Environment
(JRE) 6, Update 3, or higher (Linux, Mac, Sun, etc.).
Supported operating systems for the servers connected to the switch’s
ports are shown in the table, below:
OS Versi on
Windows 2000 or later
Linux RedHat 7.1 or later
Fedora Core 2 or later
SuSE 9.0 or later
Mandriva (Mandrake) 9.0 or later
UNIX AIX 4.3 or later
FreeBSD 4.2 or later
Sun Solaris 8 or later
Novell Netware 5.0 or later
Mac OS 9 or later*
DOS 6.2 or later
Browsers
Supported browsers for users that log into the KVM over IP switch include the
following:
Browser Versi on
IE 8 or later
Chrome 8.0 or later
Firefox Windows 3.5 or later
Linux 3.0 or later
Safari Windows 4.0 or later
Mac 3.1 or later
Opera 10.0 or later
* See Mac Systems, page 272, for further information.
11
KVM over IP User Manual
21 3
555a555a
555b555b
5a5a 5a5f5a5f
5|5y5~5{5P5a5|5y5~5{5P5a
685
7
4
21 3
685 74
21 3
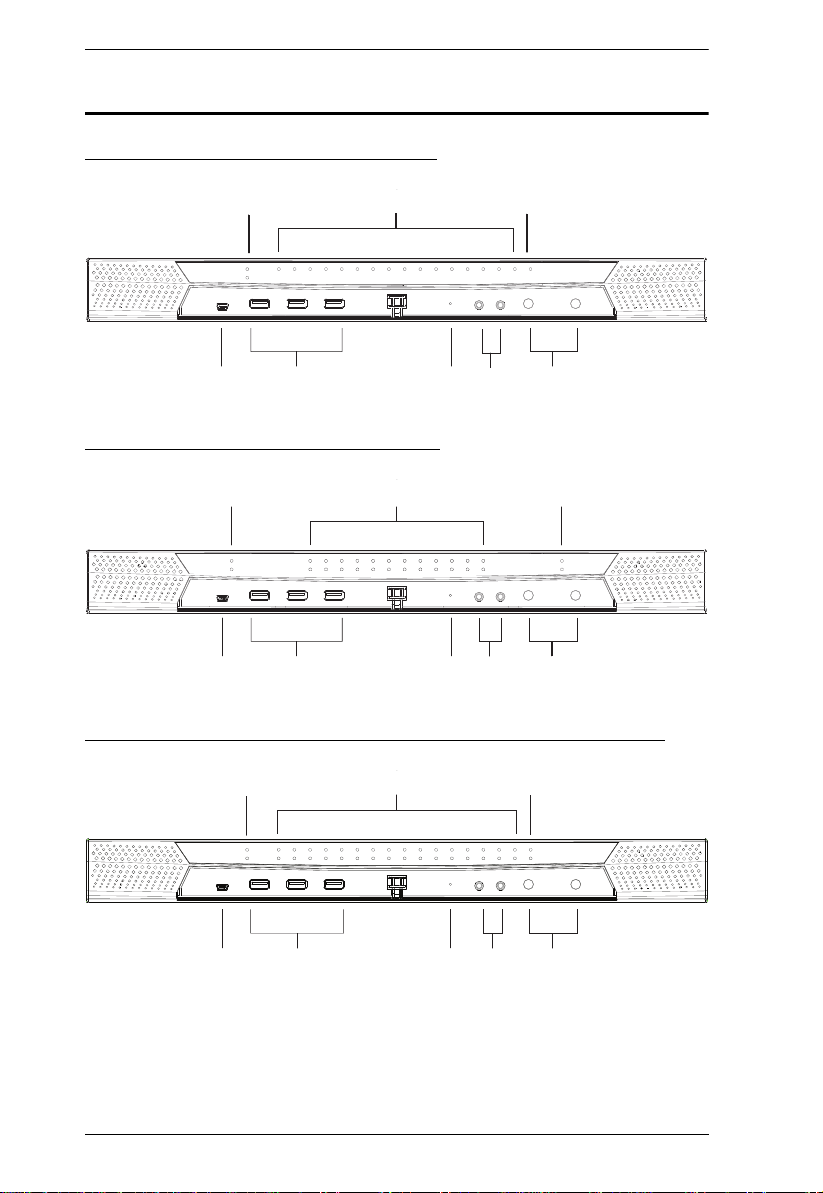
Components
KN2116VA / KN4116VA Front View
KN2124VA / KN4124VA Front View
KN1132V / KN2132VA / KN4132VA / KN8132V Front View
685 74
12
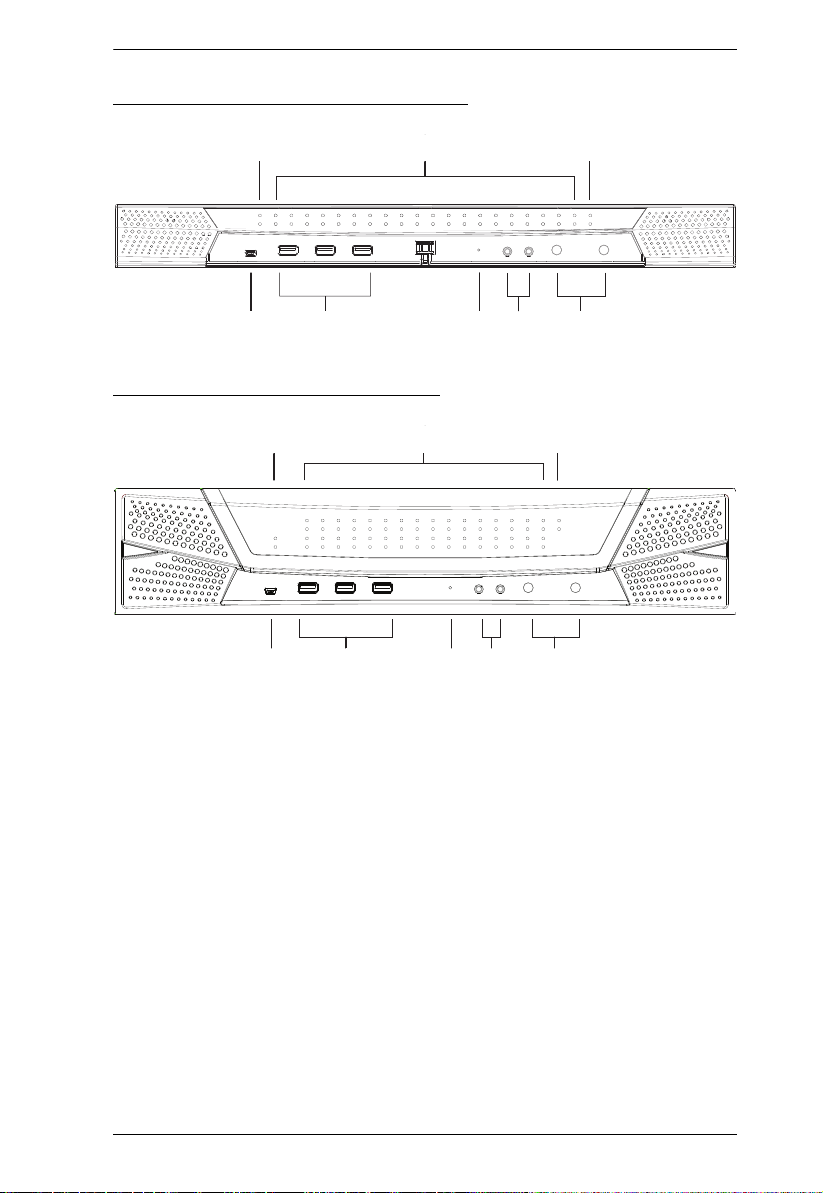
KN2140VA / KN4140VA Front View
21 3
685 74
2
1
3
68
5
7
4
KN4164V / KN8164V Front View
Chapter 1. Introduction
13

KVM over IP User Manual
No. Component Description
1 Power LED Lights BLUE when the unit is powered on and indicates which
2 Port LEDs The Port LEDs provide status information about their
3 LAN LEDs Primary and Secondary 10/100/1000 Mbps LAN LEDs.
4 Laptop USB
Console Port
5 USB Ports A USB keyboard and mouse can plug in here. This can either
6 Reset Switch Note: This switch is recessed and must be pushed with a small
7 Audio Ports Speakers and microphone plug in here.
of the two power sources are available.
corresponding KVM Ports.
GREEN: The computer attached to the port is Online.
RED: The computer attached to the port is Selected (has
KVM focus).
ORANGE: The computer attached to the port is Online and
Selected.
The LEDs are steady under normal conditions. A LED will flash
at half-second intervals, however, when its corresponding port
is accessed under Auto Scan Mode or Skip Mode (see
pages 230 and 231).
RED: 10 Mbps
ORANGE: 100 Mbps
GREEN: 1000 Mbps
Flashes to indicate that the switch is being accessed over
the Net.
A dedicated USB port for directly connecting a laptop to the
switch for easy console operation.
be in place of, or in addition to, plugging a keyboard and mouse
into the ports on the rear panel. This port can also be used to
connect USB storage peripherals (CD/DVD, HD, flash drives,
etc.) on V Series switches.
object, such as the end of a paper clip, or a ballpoint pen.
Pressing and releasing this switch when the unit is running
performs a system reset.
Pressing and holding this switch in for more than three
seconds when the unit is running resets its configuration to
the factory default settings.
Note: This does not clear User Account information.
See Clear Login Information, page 300, for
information on clearing user account information.
Pressing and holding this switch while powering on the
switch returns the unit to its factory default firmware level,
rather than the firmware version that the switch has been
upgraded to. This allows you to recover from a failed
firmware upgrade and gives you the opportunity to try
upgrading the firmware again.
Note: This operation should only be performed in the event
of a firmware upgrade failure that results in the device
becoming inoperable.
14
 Loading...