

Page 1

CS1822 / CS1824
2/4-Port USB3.0 4K HDMI KVMP™ Switch
RS-232 Commands
User Manual
www.aten.com
Page 2
CS1822 / CS4824 RS-232 Commands
EMC Information
FEDERAL COMMUNICATIONS COMMISSION INTERFERENCE
STATEMENT: This equipment has been tested and found to comply with the
limits for a Class A digital device, pursuant to Part 15 of the FCC Rules.
These limits are designed to provide reasonable protection against harmful
interference when the equipment is operated in a commercial environment.
This equipment generates, uses, and can radiate radio frequency energy and, if
not installed and used in accordance with the instruction manual, may cause
harmful interference to radio communications. Operation of this equipment in
a residential area is likely to cause harmful interference in which case the user
will be required to correct the interference at his own expense.
The device complies with Part 15 of the FCC Rules. Operation is subject to
the following two conditions: (1) this device may not cause harmful
interference, and (2) this device must accept any interference received,
including interference that may cause undesired operation.
FCC Caution: Any changes or modifications not expressly approved by the
party responsible for compliance could void the user's authority to operate this
equipment.
Warning: Operation of this equipment in a residential environment could
cause radio interference.
KCC Statement
RoHS
This product is RoHS compliant
2
.
Page 3
CS1822 / CS4824 RS-232 Commands
RJ-11 to DB-9 Adapter
RS-232 Operation
Overview
The CS1822 / CS1824’s built-in bi-directional RS-232 serial interface allows
system control through a high-end controller or PC. RS-232 serial operations
in a CS1822 / CS1824 installation are managed via HyperTerminal sessions on
systems that are running Windows. In order to use this feature to send
commands to the CS1822 / CS1824, you must first download and install a
HyperTerminal application. For detailed instructions and information about
each of the commands provided in this manual, please refer to the CS1822 /
CS1824 user manual.
Setup
Install a HyperTerminal application on a computer that is not part of the
installation, which will be used to control the switch via the RS-232
connection. HyperTerminal applications can be download from the Internet,
and many operating systems are embedded with HyperTerminal applications.
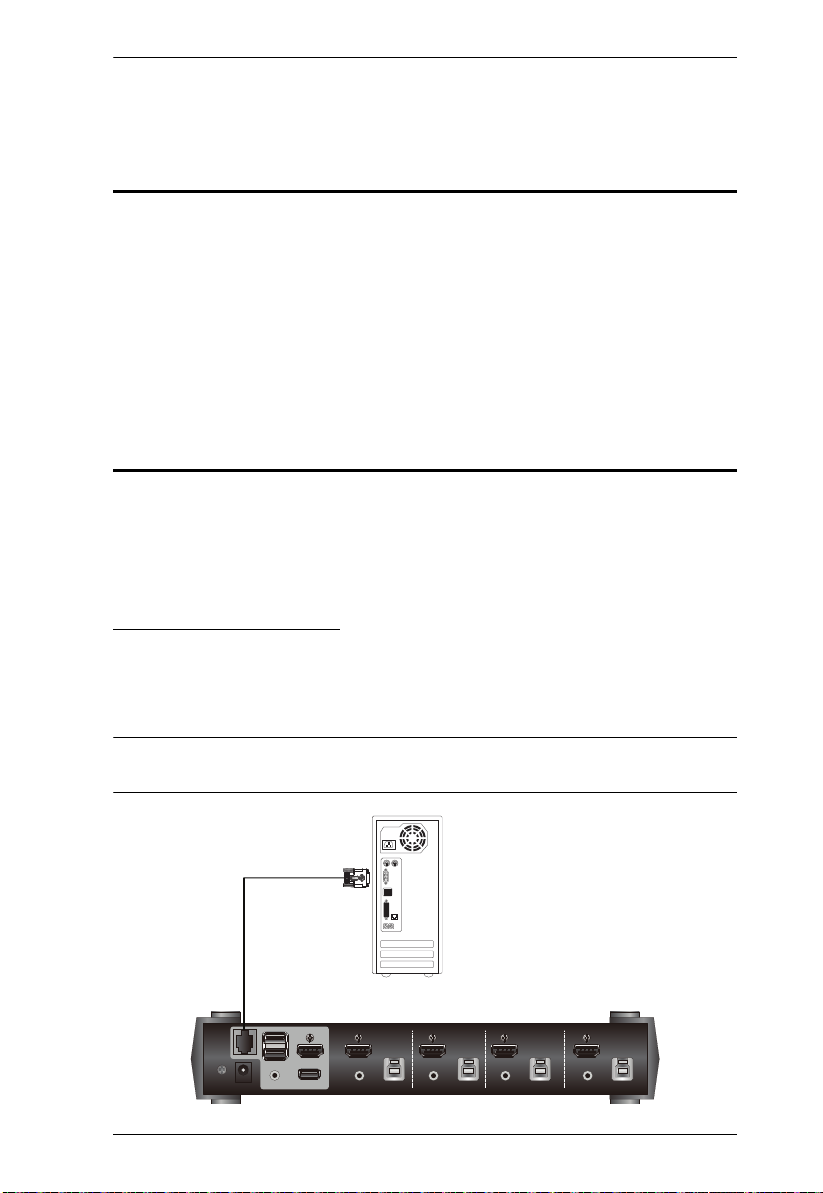
Hardware Connection
Use a RJ-11 to DB-9 serial adapter (LIN5-04A2-J11G) to connect a
computer’s serial port to the serial port on the CS1822 / CS1824, as shown
below:
Note: The unit used in the diagram below is CS1824, the procedure for
connecting CS1822 is identical with fewer KVM ports.
3
Page 4
CS1822 / CS4824 RS-232 Commands
14
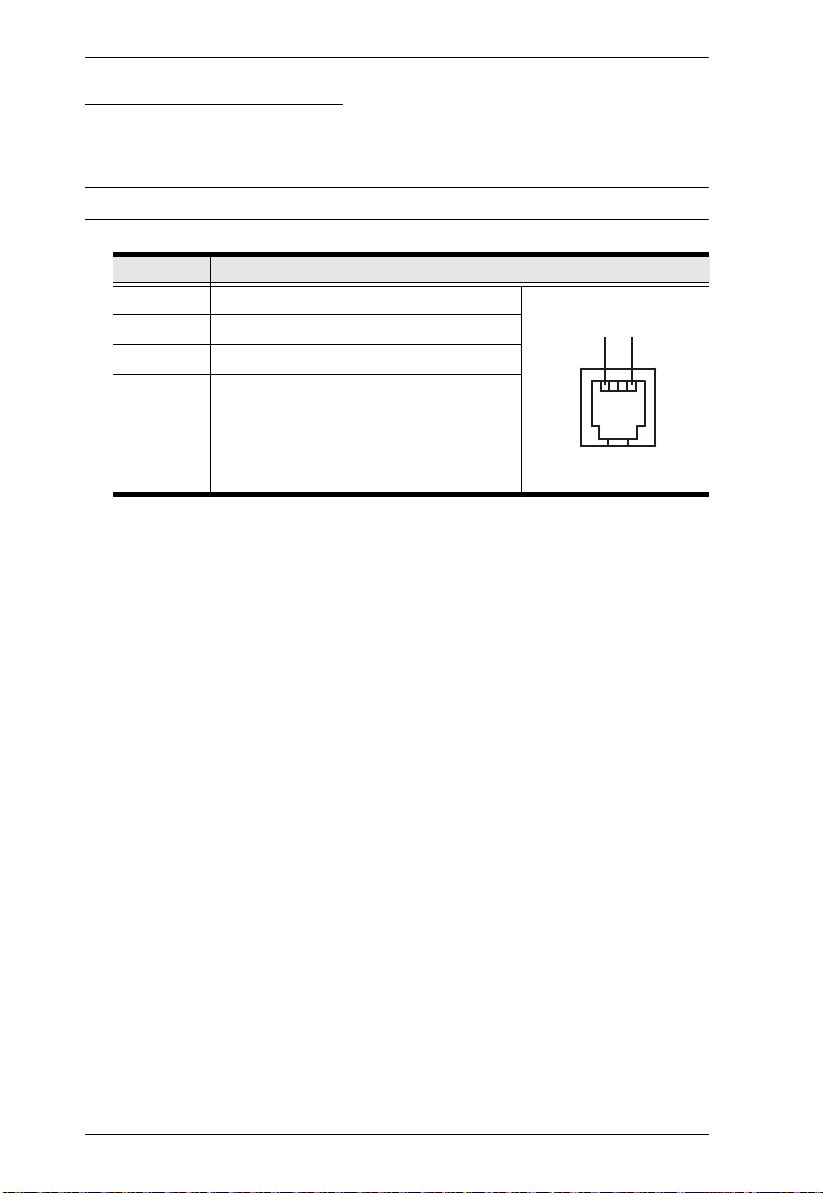
RS-232 Pin Assignments
Pin assignments for the CS1822 / CS1824’s rear RJ-11 Serial Port that is used
for connecting to a serial terminal are given in the table, below:
Note: This RJ-11 female connector is 4P4C.
Pin Assignment
1 TXD: Transmit Data
2 RXD: Receive Data
3N/A
4 GND: Signal Ground
RJ-11 Female
4
Page 5
CS1822 / CS4824 RS-232 Commands
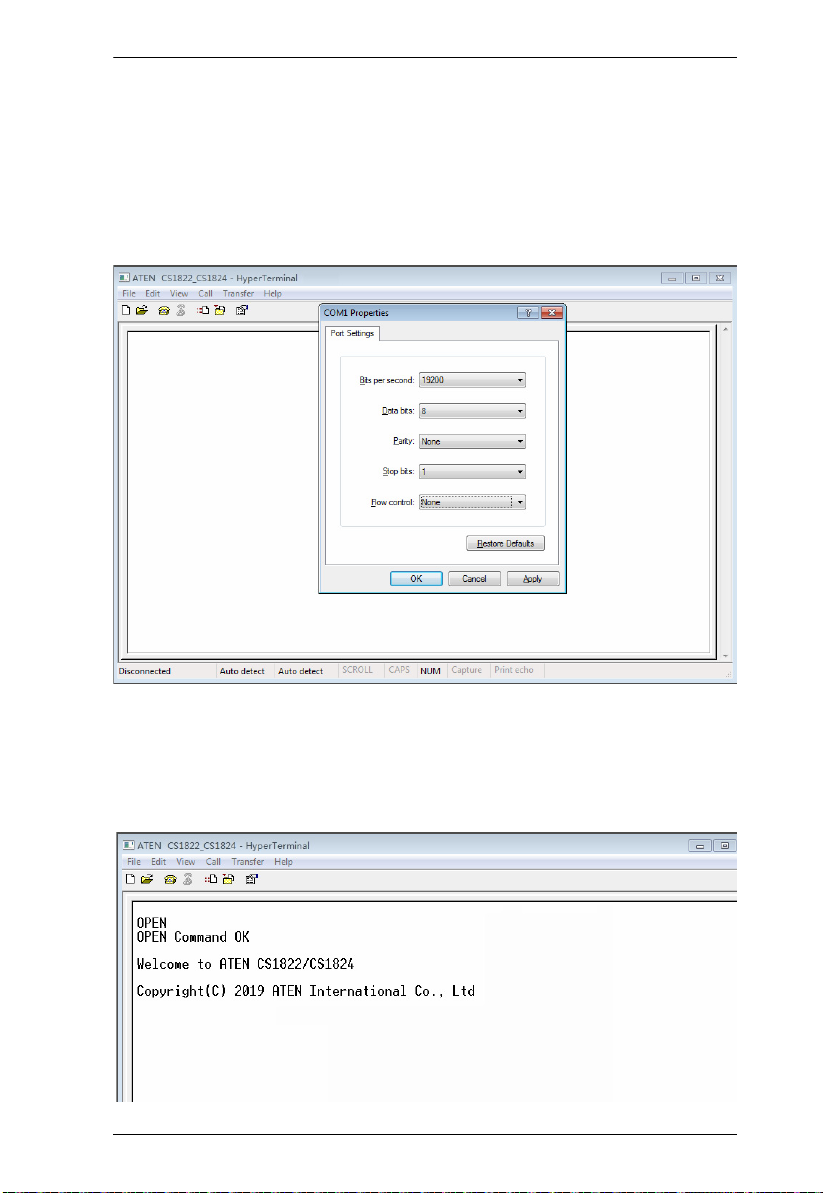
Console Login - HyperTerminal
Once a physical connection from the computer to the CS1822 / CS1824 has
been made, you can establish a HyperTerminal session using the instructions
below.
1. Open the HyperTerminal application, and configure the port settings for
COM1 port, then click OK.
Bits per Second: 19200, Data Bits: 8, Parity: None, Stop bits: 1, Flow Control:
None.
2. After configuring the port settings you must enable serial control on the
switch by typing the command: Open + [Enter].
5
Page 6
CS1822 / CS4824 RS-232 Commands
RS-232 Commands
After you login via HyperTerminal (see Console Login - HyperTerminal) use
the instructions below to send RS-232 commands to control the switch from the
computer.
When RS-232 control is enabled via the Open + [Enter] command, the
CS1822 / CS1824’s front panel pushbuttons and hotkeys (excluding the mouse
cursor shift and monitor layout hotkeys) will be disabled, until the serial
connection is closed.
For detailed information about the controls listed in this guide, please refer to
the CS1822 / CS1824 user manual.
Verification
After entering a command, a verification message appears, as shown below, at
the end of the command line, as follows:
Response Message Description
Command OK Command or parameter is correct.
Command incorrect Command or parameter is incorrect.
With all commands in the sections that follow:
Each command string can be separated with a space.
The [Enter] command can be replaced with the ASCII code: 0x0D0A
6
Page 7

CS1822 / CS4824 RS-232 Commands
Open / Close
The Open and Close commands allows you to start and end the link between
the computer sending RS-232 commands and the CS1822 / CS1824. When the
link is open, the CS1822 / CS1824 only accepts RS-232 commands and will
not respond to front panel pushbuttons and hotkeys (excluding the mouse
cursor shift and monitor layout hotkeys) – until the link is closed. The link
starts with the open command and ends with the close command or after 2
minutes if no command is sent. The default value is close.
Use the Formula - to set Parameters - to create a Command.
Formulas:
Command + [Enter]
Parameters:
Command Description
open Open RS-232 Link command
close Close RS-232 Link command
Enter Description
Enter Enter and send out command
Open/Close RS-232 Link Command
The available formulas for the Open/Close RS-232 Link commands are as
follows:
1. Command + [Enter]
For example, to open the RS-232 link between the computer and CS1822 /
CS1824, type the following:
open [Enter]
2. Command + [Enter]
For example, to close the RS-232 link between the computer and CS1822 /
CS1824, type the following:
close [Enter]
7
Page 8

CS1822 / CS4824 RS-232 Commands
Switch Port
The Switch Port command allows you to switch ports. The default port is 01.
Use the Formula - to set Parameters - to create a Command.
Formula:
Command + Control + [Enter]
Parameters:
Command Description
sw Switch Port Command
Control Description
ixx Input Port Number
xx= 01~02 (CS1822) / 01~04 (CS1824)
Enter Description
Enter Enter and send out command
Switch Port Commands
Some available formulas for the Switch Port commands are as follows:
1. Command + Control + [Enter]
For example, to switch to port 2, type the following:
sw i02 [Enter]
Note: The Control command can be skipped and the default value will be
used.
8
Page 9

CS1822 / CS4824 RS-232 Commands
Set Baud Rate
The Set Baud Rate command allows you to configure the baud rate setting for
the serial port connection. The default baud rate is 19200.
Use the Formula - to set Parameters - to create a Command.
Formula:
Command + Control + [Enter]
Parameters:
Command Description
baud Baud Rate Command
Control Description
19200 Set baud rate to 19200 (Default)
38400 Set baud rate to 38400
9600 Set baud rate to 9600
Enter Description
Enter Enter and send out command
Set Baud Rate Commands
Some available formulas for the Set Baud Rate commands are as follows:
1. Command + Control + [Enter]
For example, to set the baud rate to 19200, type the following:
baud 19200 [Enter]
2. Command + Control + [Enter]
For example, to set the baud rate to 38400, type the following:
baud 38400 [Enter]
9
Page 10

CS1822 / CS4824 RS-232 Commands
Keyboard Language Layout
The Keyboard Language Layout command allows you to change the keyboard
language layout. The default language is English.
Use the Formula - to set Parameters - to create a Command.
Formula:
Command + Control + [Enter]
Parameters:
Command Description
layout Keyboard Language Layout Command
Control Description
en Change the keyboard language layout to
fr Change the keyboard language layout to
jp Change the keyboard language layout to
ge Change the keyboard language layout to
English (Default)
French
Japanese
German
Enter Description
Enter Enter and send out command
Keyboard Language Layout Commands
Some available formulas for Keyboard Language Layout commands are as
follows:
1. Command + Control + [Enter]
For example, to change the keyboard language layout to Japanese, type the
following:
layout jp [Enter]
2. Command + Control + [Enter]
For example, to change the keyboard language layout to French, type the
following:
layout fr [Enter]
10
Page 11

CS1822 / CS4824 RS-232 Commands
Hotkey Setting
The Hotkey Setting command allows you to change the hotkey used to invoke
the HSM (Hotkey Setting Mode). The default hotkey is [Num Lock] + [-].
Use the Formula - to set Parameters - to create a Command.
Formulas:
Command + Control + [Enter]
Parameters:
Command Description
hotkey Hotkey Setting Command
Control Description
num Change the HSM invoke key to:
[Num Lock] + [-] (Default)
f12 Change the HSM invoke key to:
[Ctrl] + [F12]
Enter Description
Enter Enter and send out command
Hotkey Setting Commands
Some available formulas for Hotkey Setting commands are as follows:
1. Command + Control + [Enter]
For example, to change the HSM invoke key to [Num Lock] + [-], type the
following:
hotkey num [Enter]
2. Command + Control + [Enter]
For example, to change the HSM invoke key to [Ctrl] + [F12], type the
following:
hotkey f12 [Enter]
11
Page 12

CS1822 / CS4824 RS-232 Commands
Hotkey Switching
The Hotkey Switching command allows you to change the hotkey used for
switching. The default hotkey is [Scroll][Scroll].
Use the Formula - to set Parameters - to create a Command.
Formulas:
Command + Control + [Enter]
Parameters:
Command Description
switch Hotkey Switching Command
Control Description
scroll Change hotkey switching key to:
[Scroll] [Scroll] (Default)
ctrl Change hotkey switching key to:
[Ctrl] [Ctrl]
Enter Description
Enter Enter and send out command
Hotkey Switching Commands
Some available formulas for Hotkey Switching commands are as follows:
1. Command + Control + [Enter]
For example, to change the hotkey switching mode to [Scroll] [Scroll], type the
following:
switch scroll [Enter]
2. Command + Control + [Enter]
For example, to change the hotkey switching mode to [Ctrl] [Ctrl], type the
following:
switch ctrl [Enter]
12
Page 13

CS1822 / CS4824 RS-232 Commands
USB Reset
The USB Reset command allows you to reset the USB connection. The default
USB reset setting is off.
Use the Formula - to set Parameters - to create a Command.
Formulas:
Command + Control + [Enter]
Parameters:
Command Description
usbreset USB Reset Command
Control Description
on Enable USB reset connection
Enter Description
Enter Enter and send out command
USB Reset Command
The available formula for the USB Reset command is as follows:
1. Command + Control + [Enter]
For example, to reset the USB connection, type the following:
usbreset on [Enter]
13
Page 14

CS1822 / CS4824 RS-232 Commands
Restore Default Settings
The Restore Default Settings command allows you to reset all of the settings
back to the default. The default setting is off.
Use the Formula - to set Parameters - to create a Command.
Formulas:
Command + Control + [Enter]
Parameters:
Command Description
reset Restore Default Settings Command
Control Description
on Enable restore default values
Enter Description
Enter Enter and send out command
Restore Default Value Command
The available formula for the Restore Default Settings command is as follows:
1. Command + Control + [Enter]
For example, to restore all CS1822 / CS1824 settings back to the default, type
the following:
reset on [Enter]
14
Page 15

CS1822 / CS4824 RS-232 Commands
Firmware Upgrade
The Firmware Upgrade command allows you to enable the firmware upgrade
mode. The default setting is off.
Use the Formula - to set Parameters - to create a Command.
Formulas:
Command + Control+ [Enter]
Parameters:
Command Description
upgrade Firmware Upgrade Command
Control Description
on Enable firmware upgrade mode
Enter Description
Enter Enter and send out command
Firmware Upgrade Command
The available formula for the Firmware Upgrade command is as follows:
1. Command + Control + [Enter]
For example, to enable firmware upgrade mode, type the following:
upgrade on [Enter]
15
Page 16

CS1822 / CS4824 RS-232 Commands
KVM Status
The KVM Status command allows you to display read-only information about
the switches’ current configuration status. The default setting is off.
Use the Formula - to set Parameters - to create a Command.
Formulas:
Command + Control + [Enter]
Parameters:
Command Description
status KVM Status Command
Control Description
on Enable KVM status
Enter Description
Enter Enter and send out command
KVM Status Command
The available formula for the KVM Status command is as follows:
1. Command + Control + [Enter]
For example, to display the CS1822 / CS1824’s configuration status, type the
following:
status on [Enter]
A message similar to the one below will then appear:
hotkey: [numlock]+[-] / [scrolllock],[scrolllock]
os setting: pc
keyboard emulation: enabled/disabled
keyboard layout: English
mouse emulation: enabled/disabled
16
Page 17

CS1822 / CS4824 RS-232 Commands
Audio Mixer
The Audio Mixer command allows you to enable / disable the CS1822 /
CS1824’s audio mixer function. The default setting is off.
Use the Formula - to set Parameters - to create a Command.
Formulas:
Command + Control + [Enter]
Parameters:
Command Description
audio Audio Mixer Command
Control Description
off Disable audio mixer (Default)
ron xx yy Select two audio ports for audio mixer
xx, yy= 01, 02 (CS1822) / 01, 02, 03, 04 (CS1824)
pon xx Select a permanent audio port for audio mixer
xx= 01, 02 (CS1822) / 01, 02, 03, 04 (CS1824)
on Enable audio mixer
Enter Description
Enter Enter and send out command
Note: The audio port number for xx cannot be identical to yy.
Audio Mixer Command
The available formula for the Audio Mixer command is as follows:
1. Command + Control + [Enter]
For example, to enable the CS1822 / CS1824’s audio mixer for audio port 01
and audio port 02, type the following:
audio ron 01 02 on [Enter]
17
 Loading...