

Page 1

Watching TV
To configure the menu
To Configure TV Channels
To Select TV/External Input
Adjusting the Picture
Adjusting the Sound
Configuring the PIP/POP/PBP Functions
To Configure the SET UP
External Control Device Setup
Page 2
2-2
Watching TV
Check the antenna connection. (For more information on connection, see
‘1.4 Connecting the LCD TV and Peripheral Devices’.)
1
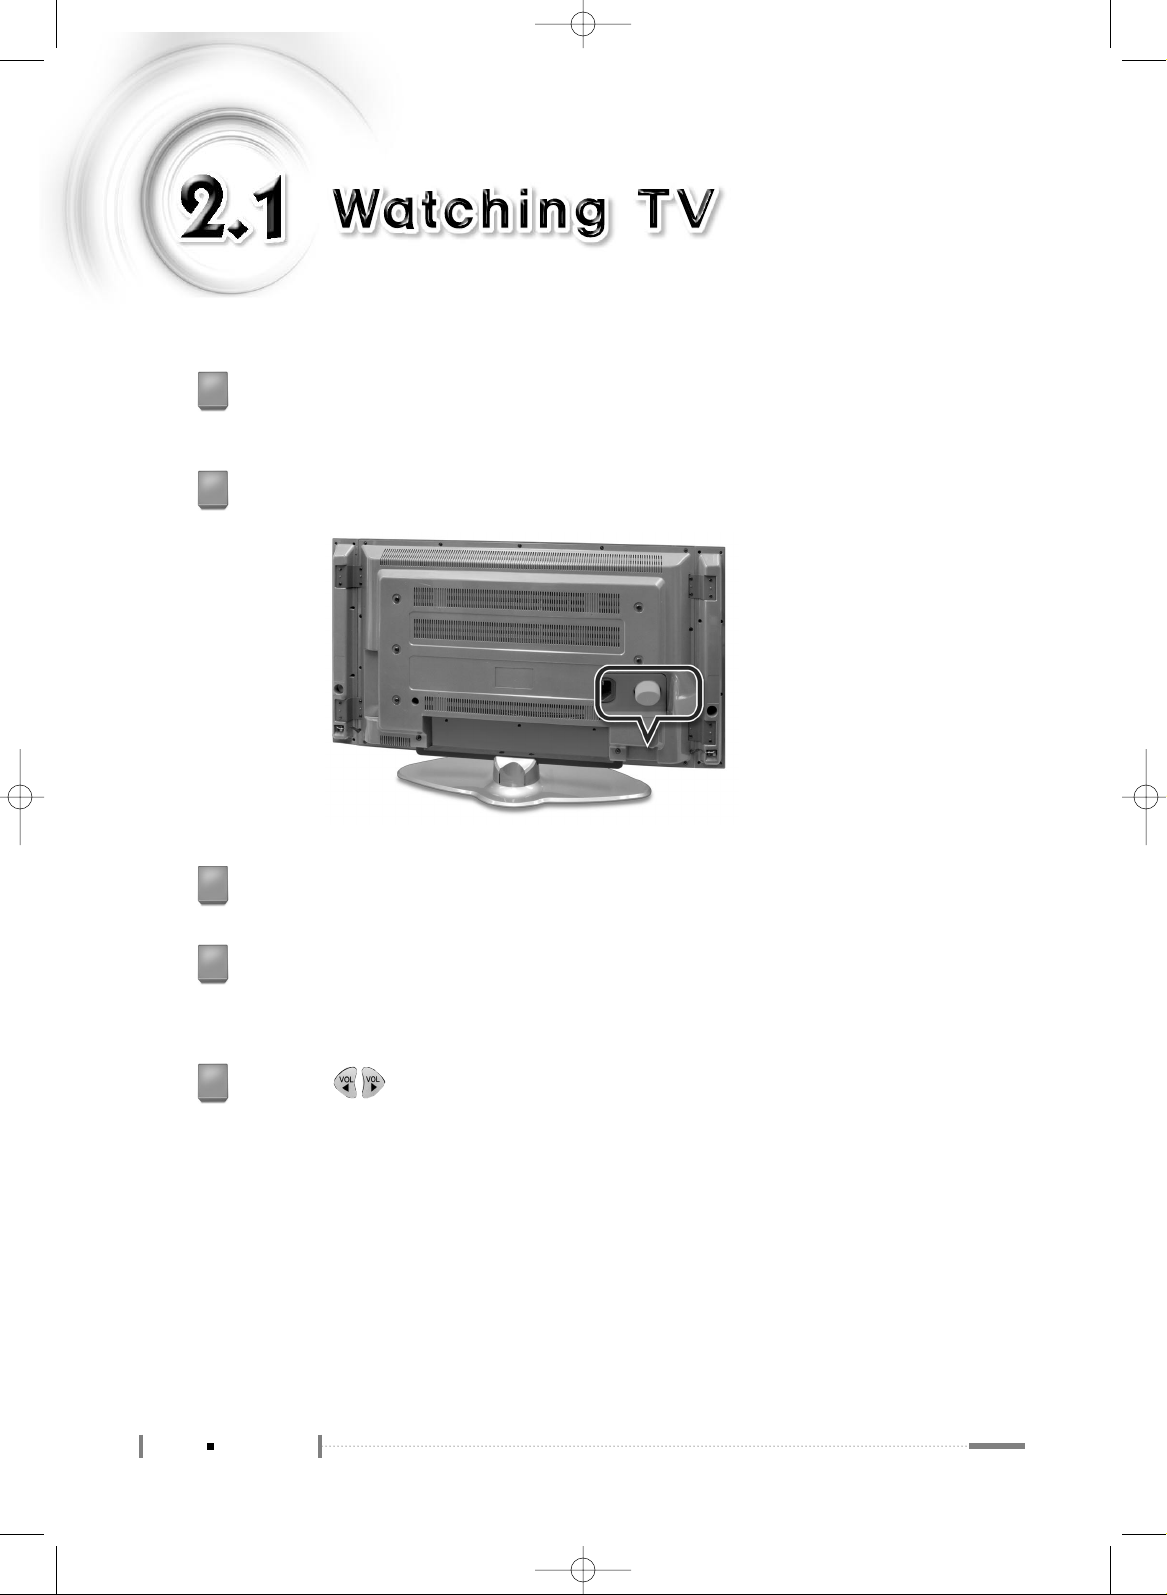
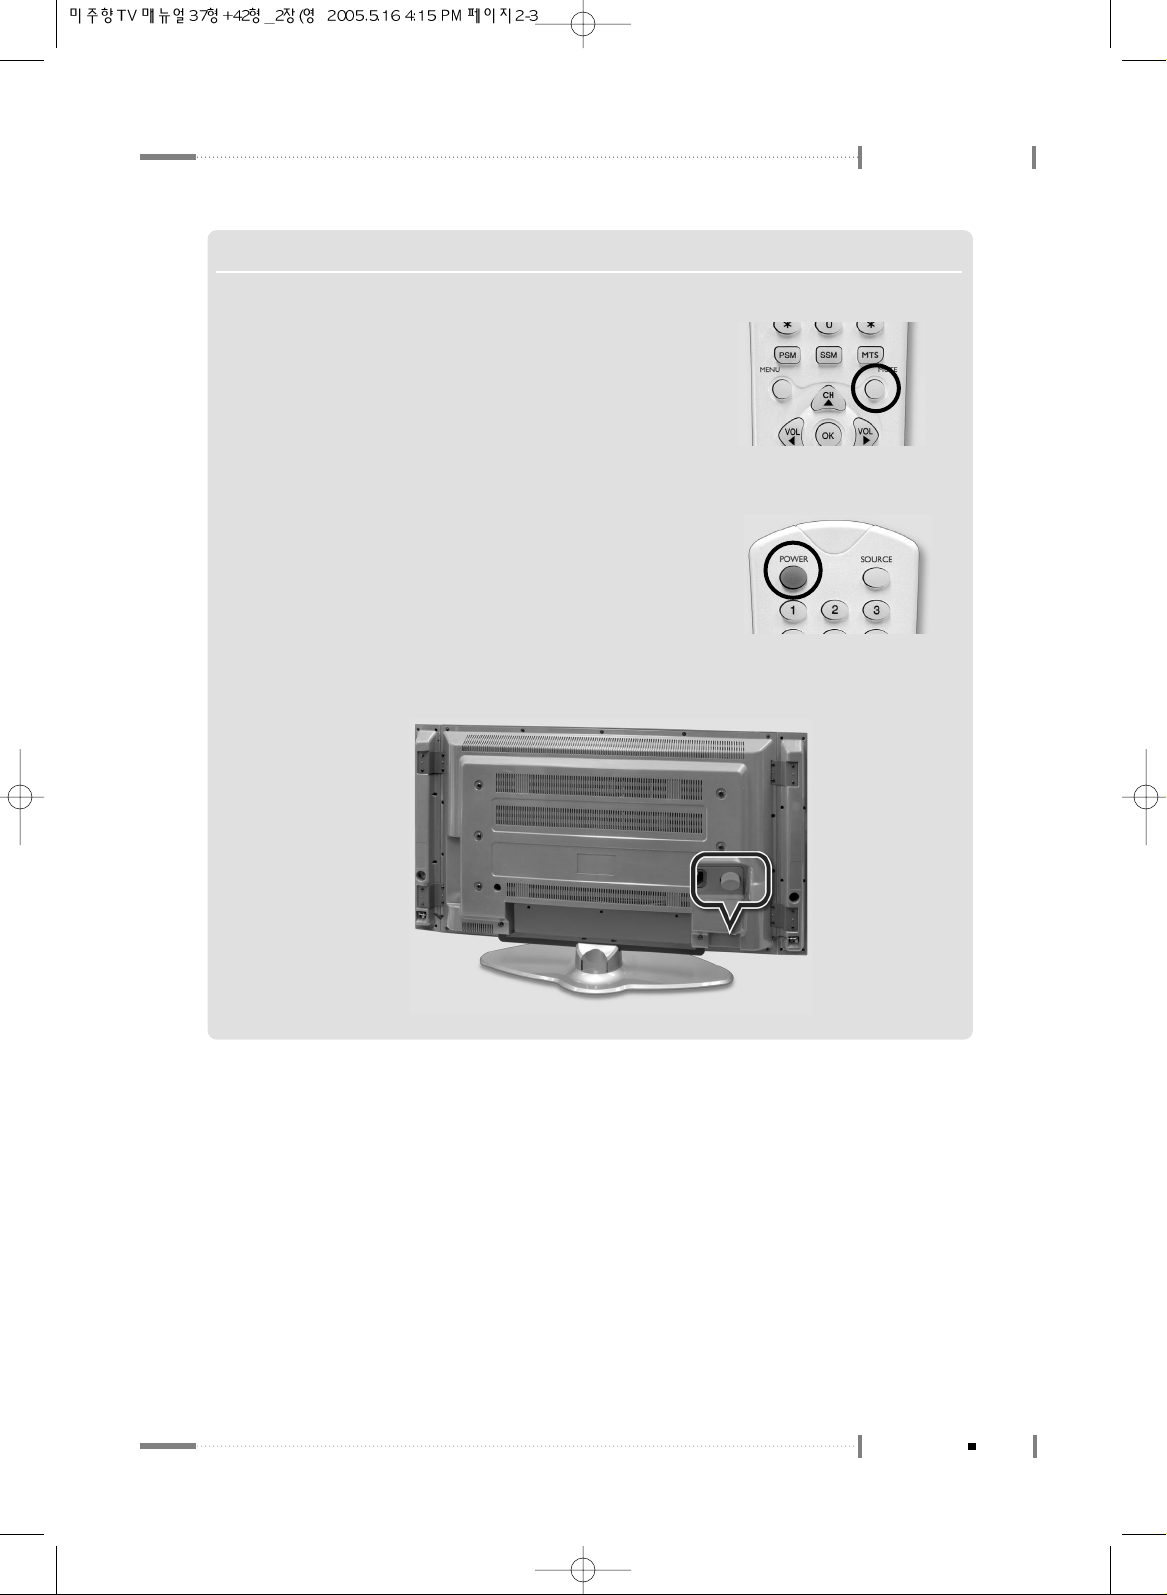
Press the power button on the rear panel of the LCD TV.
2
Press the <POWER> button on the remote control.
3
Press the <TV/AV> button on the remote control, and press the number button
to select a channel (For example, if selecting channel no. 99, press the 9
button twice on the remote control).
4
Press the < > button to adjust the volume.
5
Page 3
2-3
Watching TV
Using the LCD TV
N O T E
▶▶
To mute the LCD TV sound
Press the <MUTE> button on the remote control once to mute the
LCD TV sound. Press the button once again to turn the sound back
on.
▶▶
To completely turn off the LCD TV power.
❶
Press the <POWER> button on the remote control. The
LCD TV will be turned off and remain in standby mode.
❷
Press the power button on the rear panel of the LCD TV (or unplug the power cord from the wall
outlet).
Page 4
2-4
To configure the menu
To configure the LCD TV functions, press the [MENU] button. Knowing the
method for configuring the menu will make using the LCD TV much easier.
Menu Settings
Press the power button on the rear panel of the LCD TV, and press the <POWER>
button on the remote control.
1
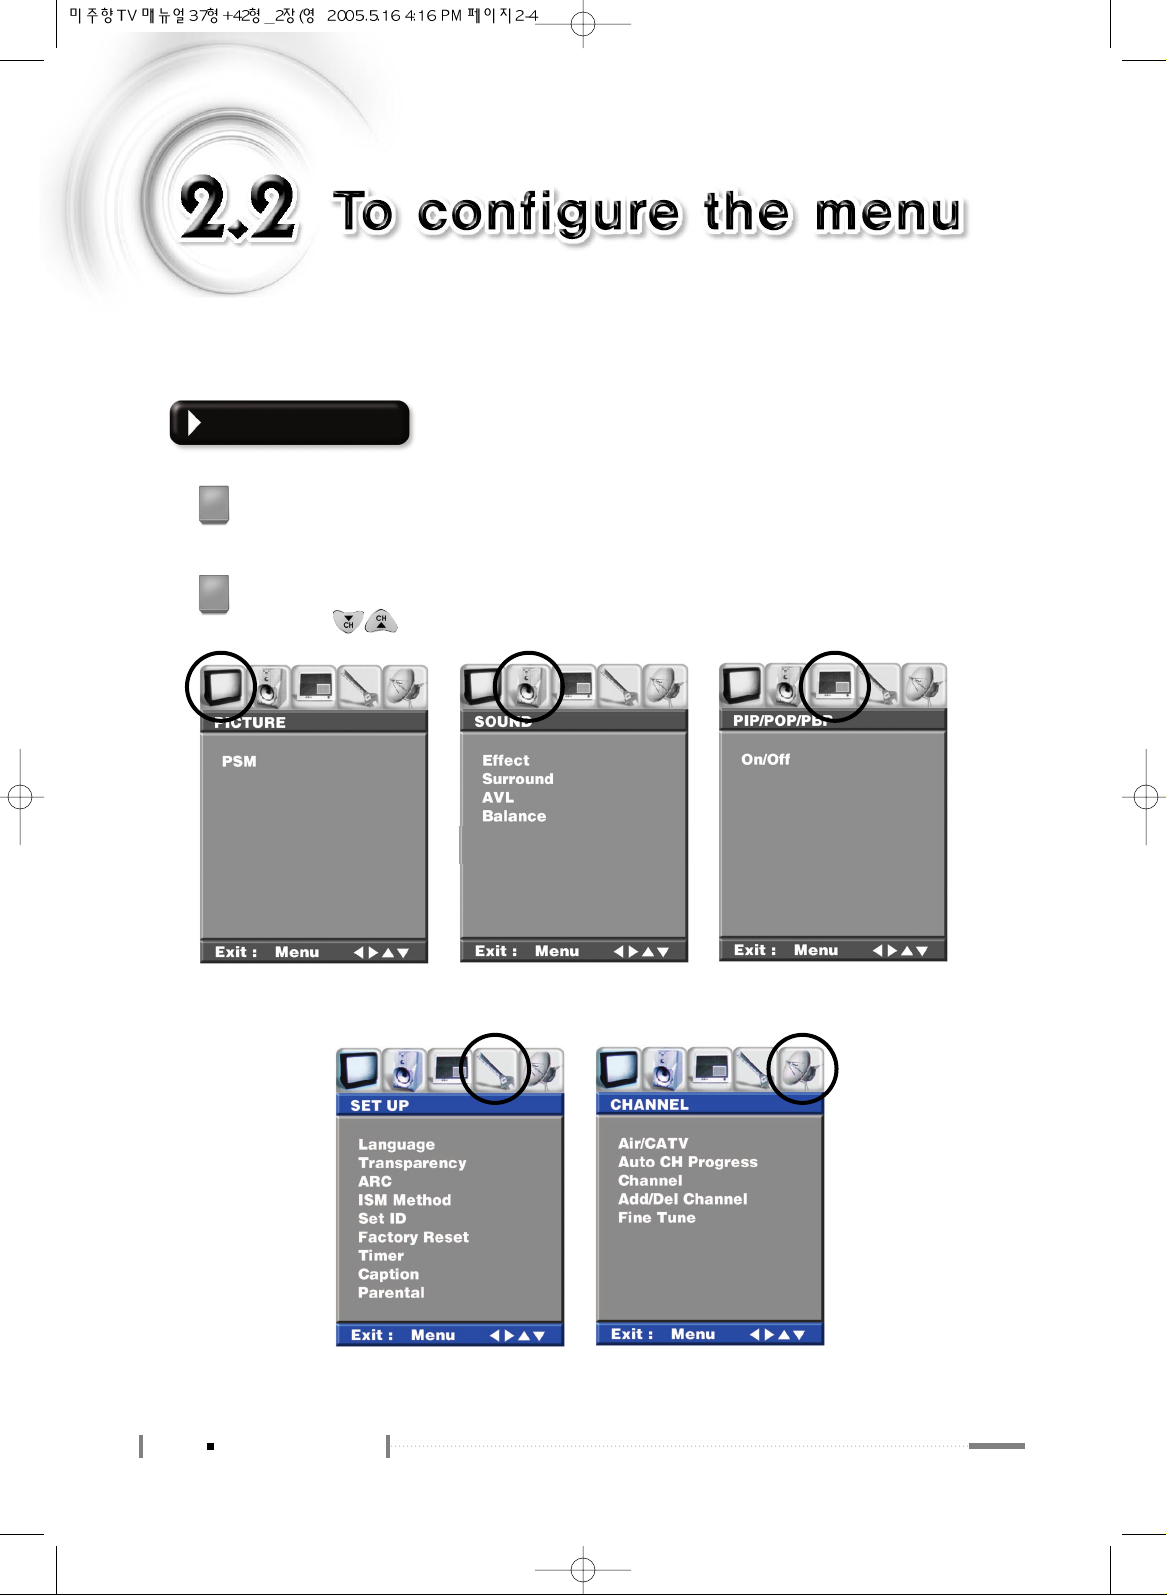
Press the <MENU> button on the remote control.
Press the < > button on the remote control to navigate to different menus.
2
<PICTURE> <SOUND> <PIP/POP/PBP>
<SET UP> <CHANNEL>
Page 5
2-5
To configure the menu
Using the LCD TV
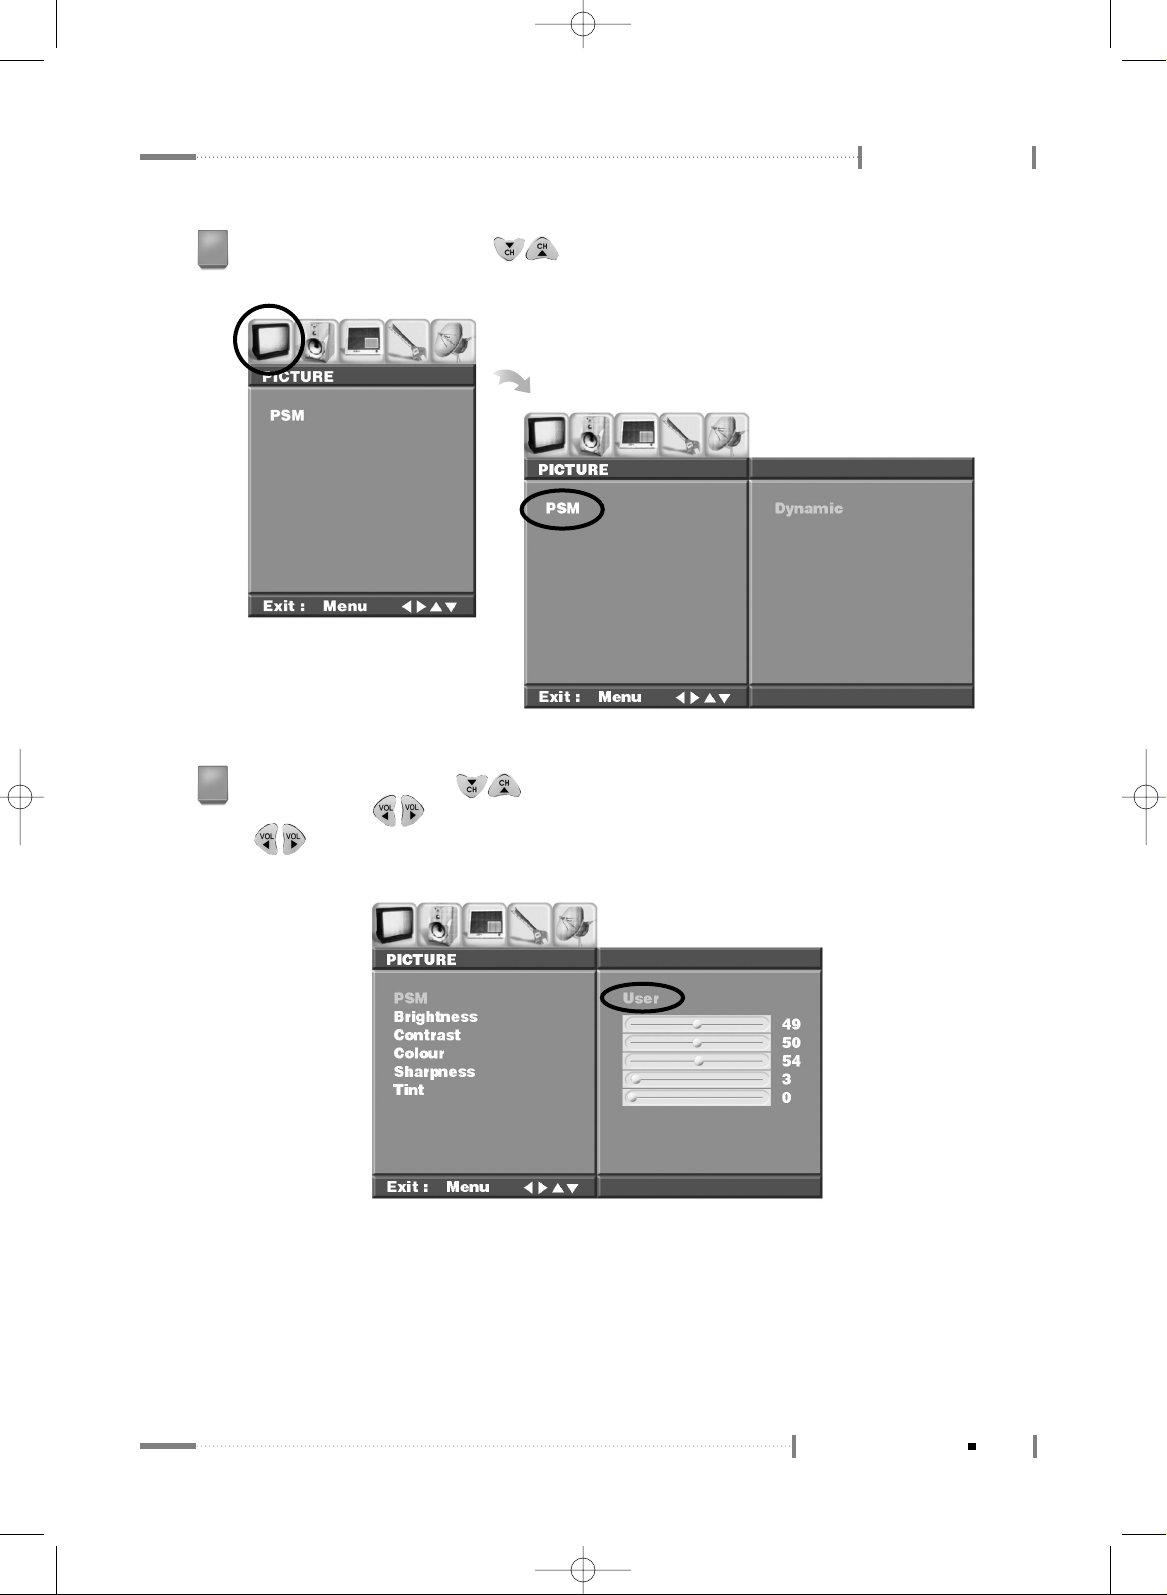
Press the <OK> button or the < > button on the remote control to select the menu
to configure. Submenus will be available for each selection.
3
In the submenus, use the < > button on the remote control to navigate to different
items. Use the < > button to make adjustments. When selecting PIP Source, use the
< > button to make adjustments, and then press the <OK> button on the remote
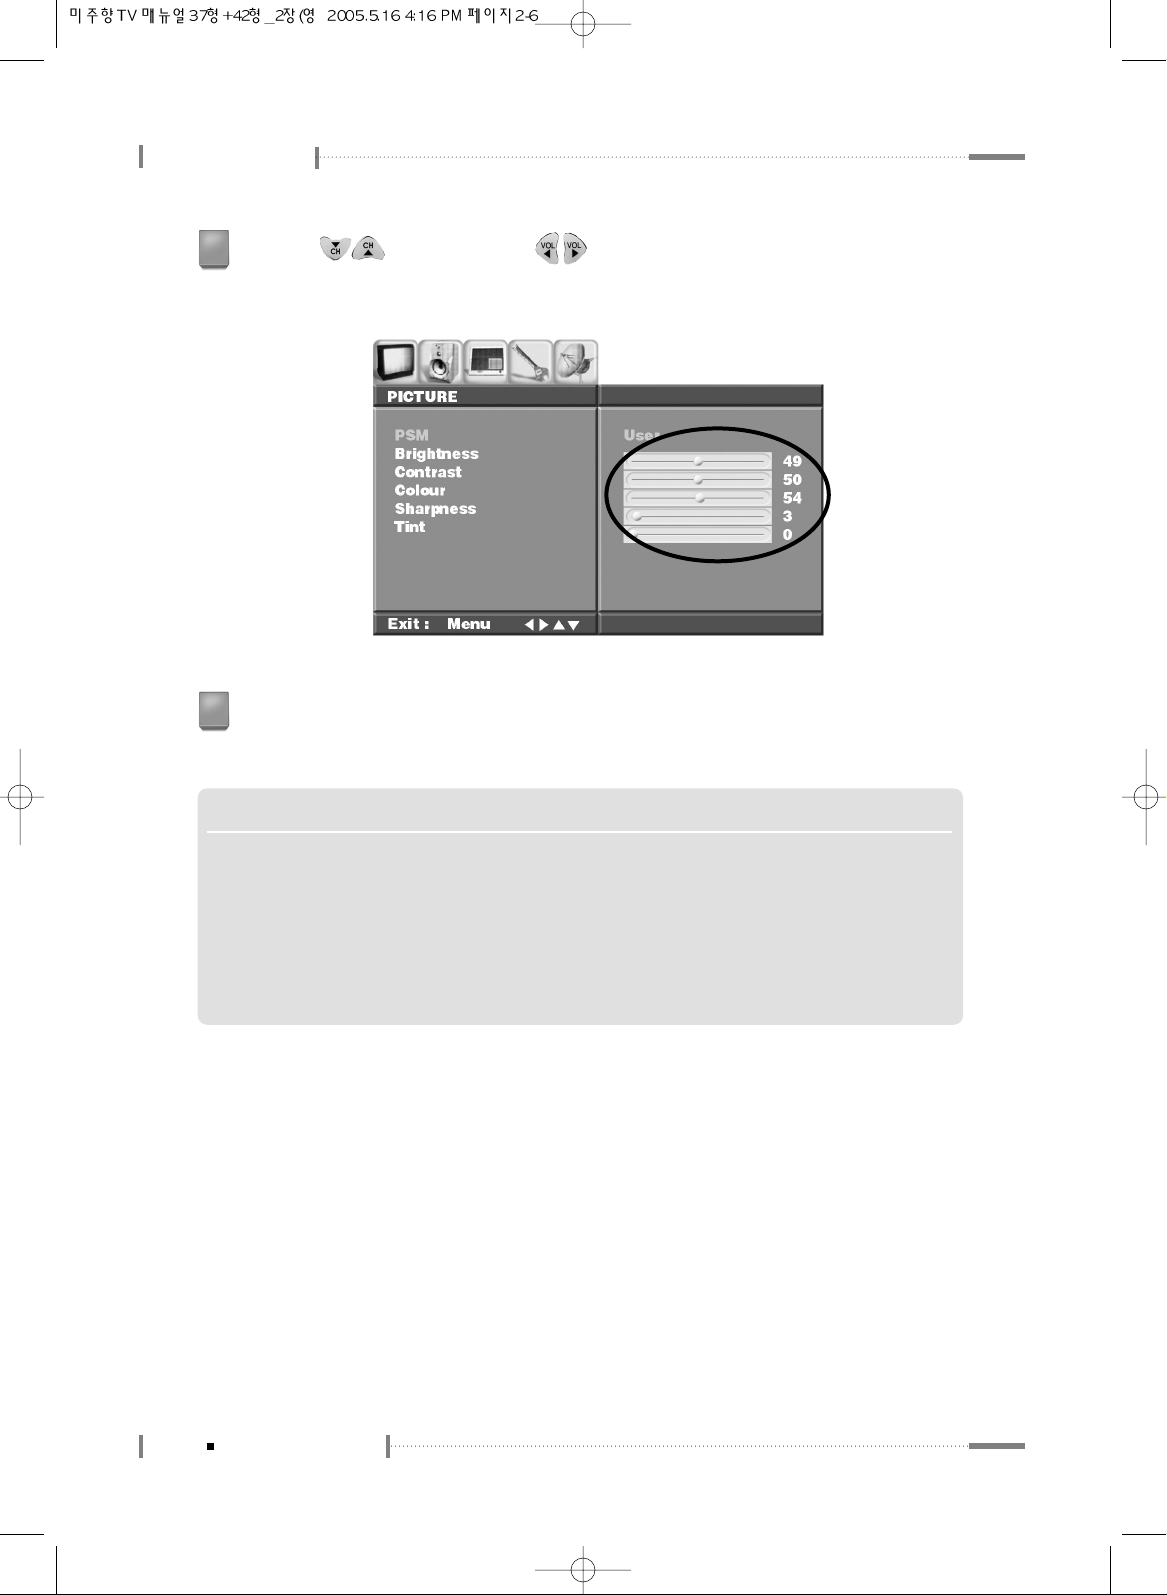
control to make a selection (Select the ‘User’ item under the 'PSM’ submenu).
4
Page 6
Using the LCD TV
2-6
To configure the menu
Use the < > button and the < > button on the remote control to adjust the
settings for different items. (For example, adjustment can be made of items such as
Brightness, Contrast, Color, Sharpness, and Tint.)
5
When adjustments are complete, press the <OK> button once to close the adjustment
screen. Press the <MENU> button once again to close the ‘Menu’ screen.
6
N O T E
▶▶
To configure the menu without using the remote controller
❶
Press the <MENU> button located at the bottom of the LCD TV.
❷
Press the <CH ▲/▼> buttons to navigate to submenus.
❸
Press the <VOL <◀/ ▶> buttons to adjust each item.
❹
If ‘Menu for Local Key’ is on, the <SOURCE> button is used as the <OK> button. When adjustments
have been completed, press the <MENU> button to close the ‘Menu’ screen.
Page 7
2-7
To configure the menu
Using the LCD TV
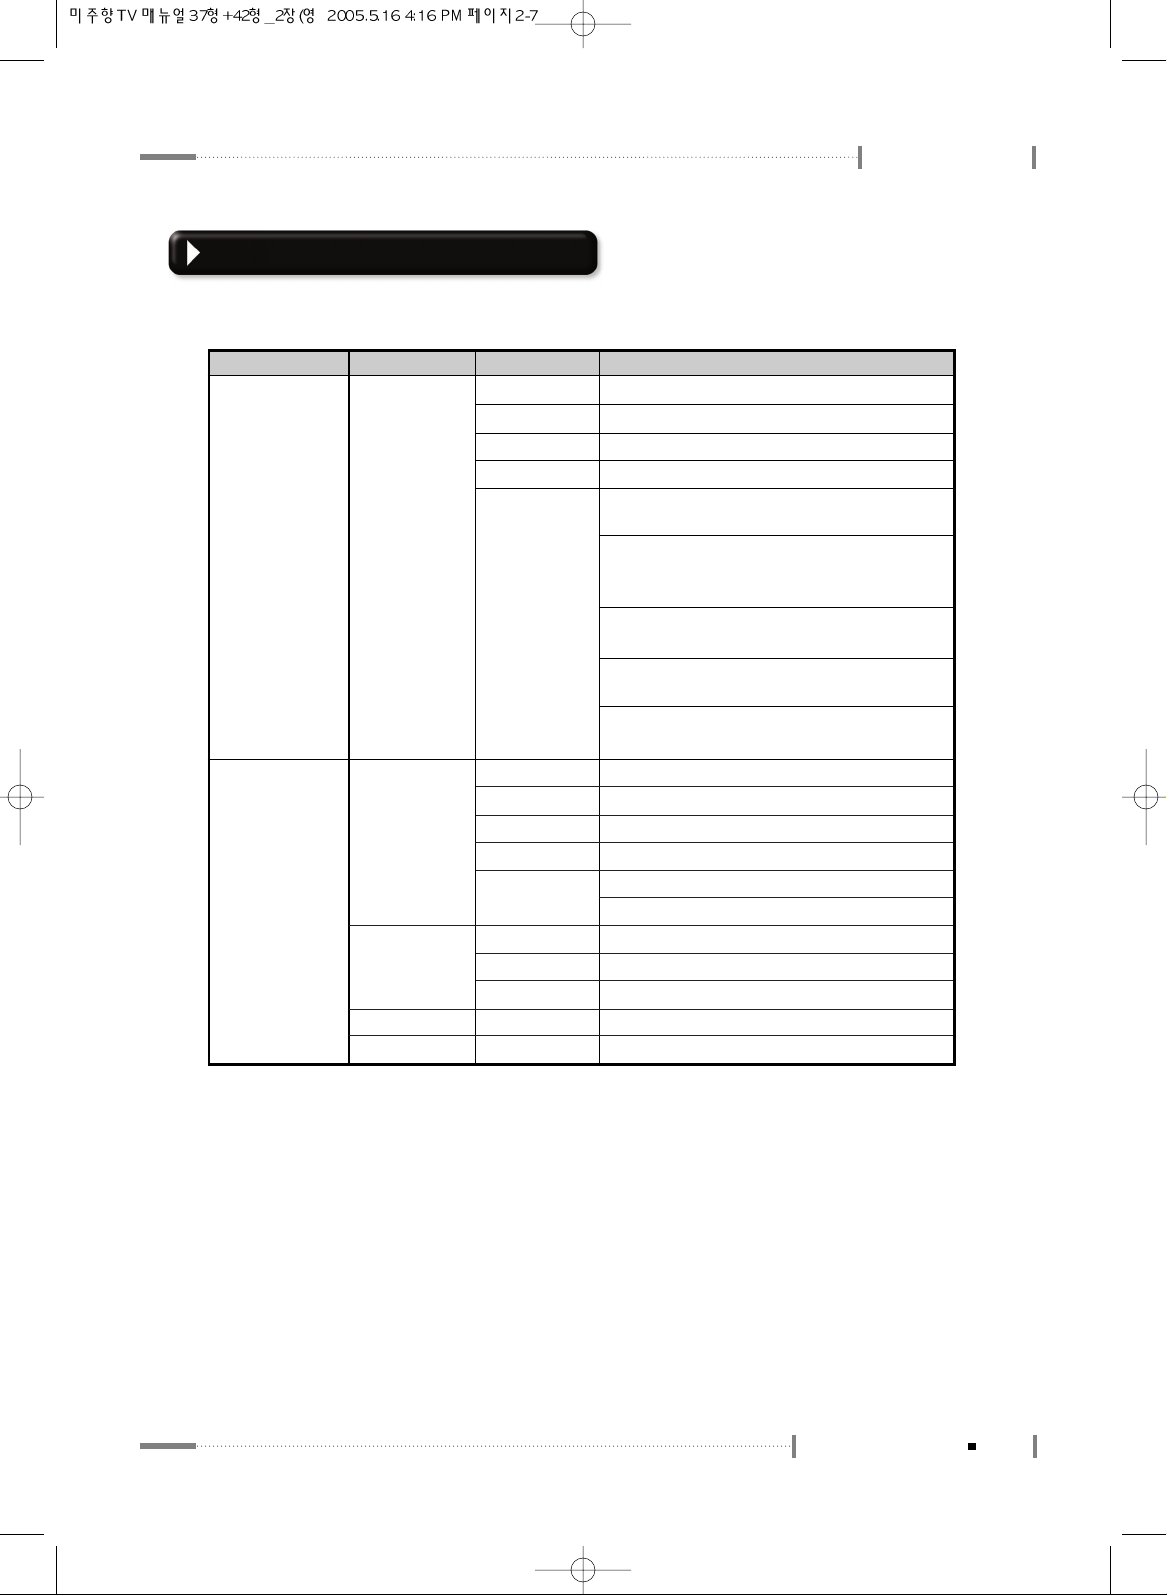
Main Menu
PICTURE
PSM
(Select Screen
View)
Dynamic
Standard
Mild
Game
User
Vivid Picture Appearance
Standard Picture Appearance
Softer Picture Appearance
Select when playing video games on LCD TV
Brightness : Adjust brightness. (Brightness
means the brightness of the screen.)
Contrast : Adjust contrast. (Contrast means
the difference in brightness between an object
and its background.)
Colour : Adjust color (RGB).(Adjusting the
color to make it look more natural.)
Sharpness : Adjust sharpness.(Sharpness
means the sharpness of the object's profile.)
Tint : Adjust color intensity.(Color intensity
indicates color depth.)
SOUND
Effect
Surround
AVL
Balance
Flat
Music
Movie
Speech
User
Off
Normal
Spatial
On/Off
-10 ~ 10
Standard factory settings.
When watching music video or concerts.
When watching movies.
When watching a show that is mostly dialogue.
Bass : Adjust bass.
Treble : Adjust treble.
Surround Output Off
Optimal Surround for Output Condition
Enhanced Surround
AVL Function On/Off
Adjust balance between the left & right speakers.
Sub Menu 1 Sub Menu 2 Sub Menu 3
TV Menu Categories and Items
The Main Menu contains 5 categories, which in turn contain submenus and option items:
Page 8
Using the LCD TV
2-8
To configure the menu
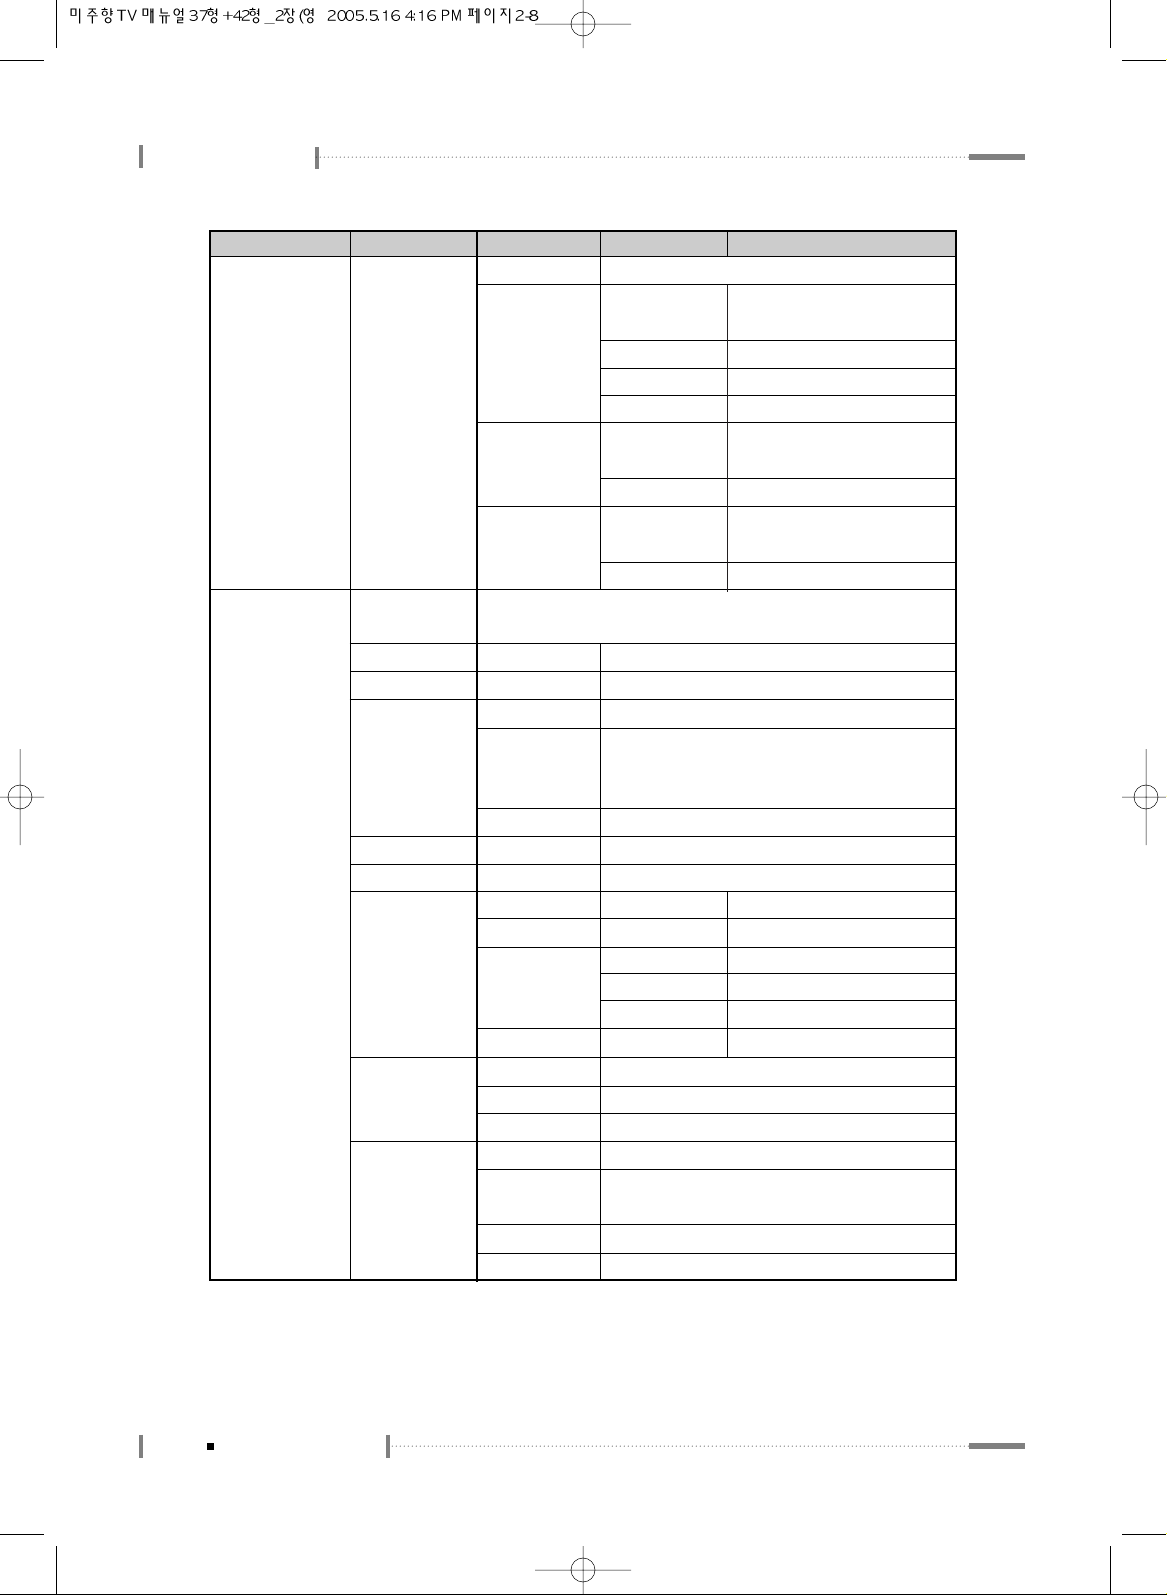
Main Menu
SET UP
Language
Transparency
ARC
ISM Method
Set ID
Factory Reset
Timer
Caption
Parental
English, Deutsch, Français, Español, Italiano, Korean
(Menu Screen Display Language Selection)
0~10
16:9, 14:9, 4:3
Normal
Orbit
White
0~99
Off
Clock
Off Timer
On Timer
Auto Off
TEXT 1~4
Off
CC1~4
Lock On/Off
MPAA
TV Guidelines
Set Password
Adjusts the image transparency
Screen Aspect Selection
Normal screen
Moves the screen up, down, left and right in
small increments to prevent overheating of the
panel during prolonged use.
Sets the whole screen to white.
Set ID Selection
Selects the factory default.
AM, PM
AM, PM, On/Off
AM, PM, On/Off
CHANNEL
Volume
On/Off
Text function support
Caption function Off (when the subtitle function is provided)
Closed Captioning function support
Parental function On/Off
MPAA(Motion Picture Association of America)
Guideline setup available
TV Guidelines function support
Password setup available
Sub Menu 1 Sub Menu 2 Sub Menu 3 Description
Time Selection
TV Off Time Selection
TV On Time Selection
CATV/Air
0~100
TV Off Auto Function Selection
PIP/POP/PBP
On/Off Off
PIP
POP
PBP1~2
PIP/POP/PBP Function Off
Source
Swap
PIP Size
PIP Position
Source
Swap
Source
Swap
TV, AV1~AV3,
Component1~2, RGB, DVI
To Set
Small, Large
PIP Screen Position Selection
TV, AV1~AV3,
Component1~2,
RGB, DVI
To Set
TV, AV1~AV3,
Component1~2, RGB, DVI
To Set
Page 9
2-9
To configure the menu
Using the LCD TV
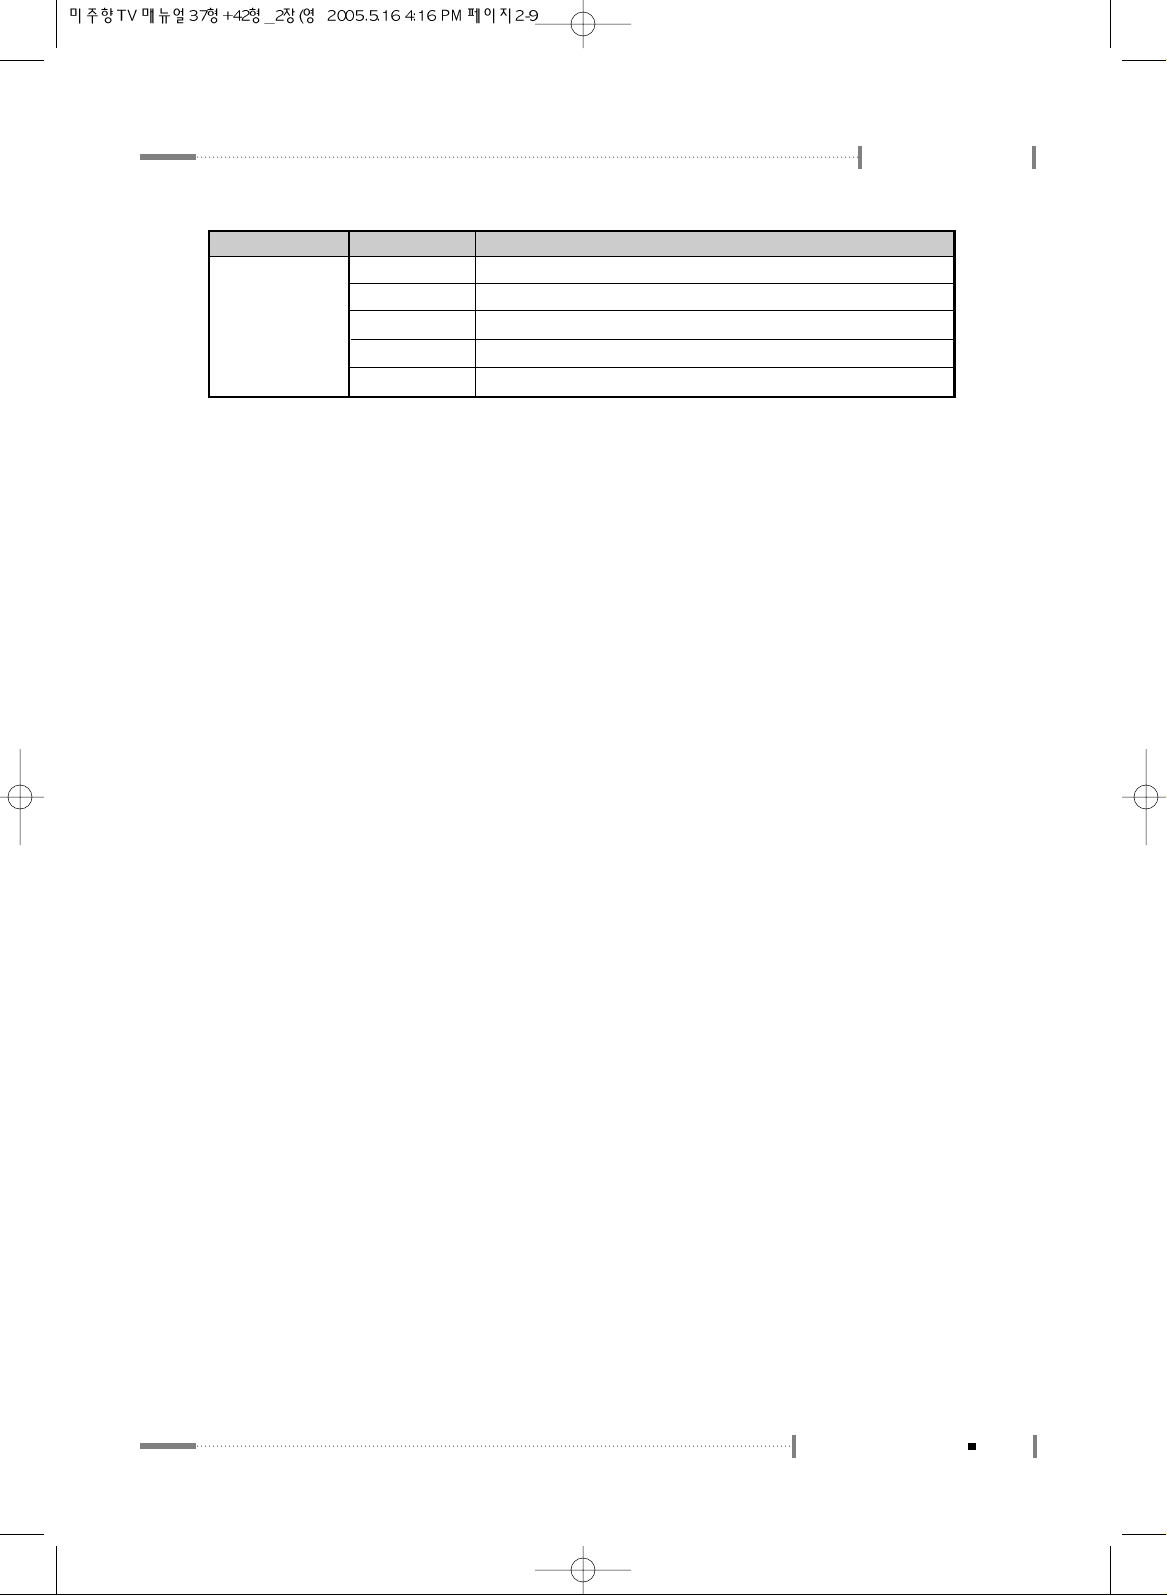
Main Menu
CHANNEL
Air/CATV
Auto CH Progress
Channel
Add/Del Channel
Fine Tune
Scan by broadcasting method
Automatic channel scan
Scans the TV channels and registers the channels on air
Saves the selected channels
Manually fine tune the channels if the channel reception is not good
Sub Menu 1 Sub Menu 2
Page 10

2-10
To Configure TV Channels
To watch TV with the LCD TV, configure the channels. (Always check the TV
connection before use.)
To save TV channels, configure the channels during the broadcasting hours.
Use Automatic Channel Scanning to save all the channels currently airing.
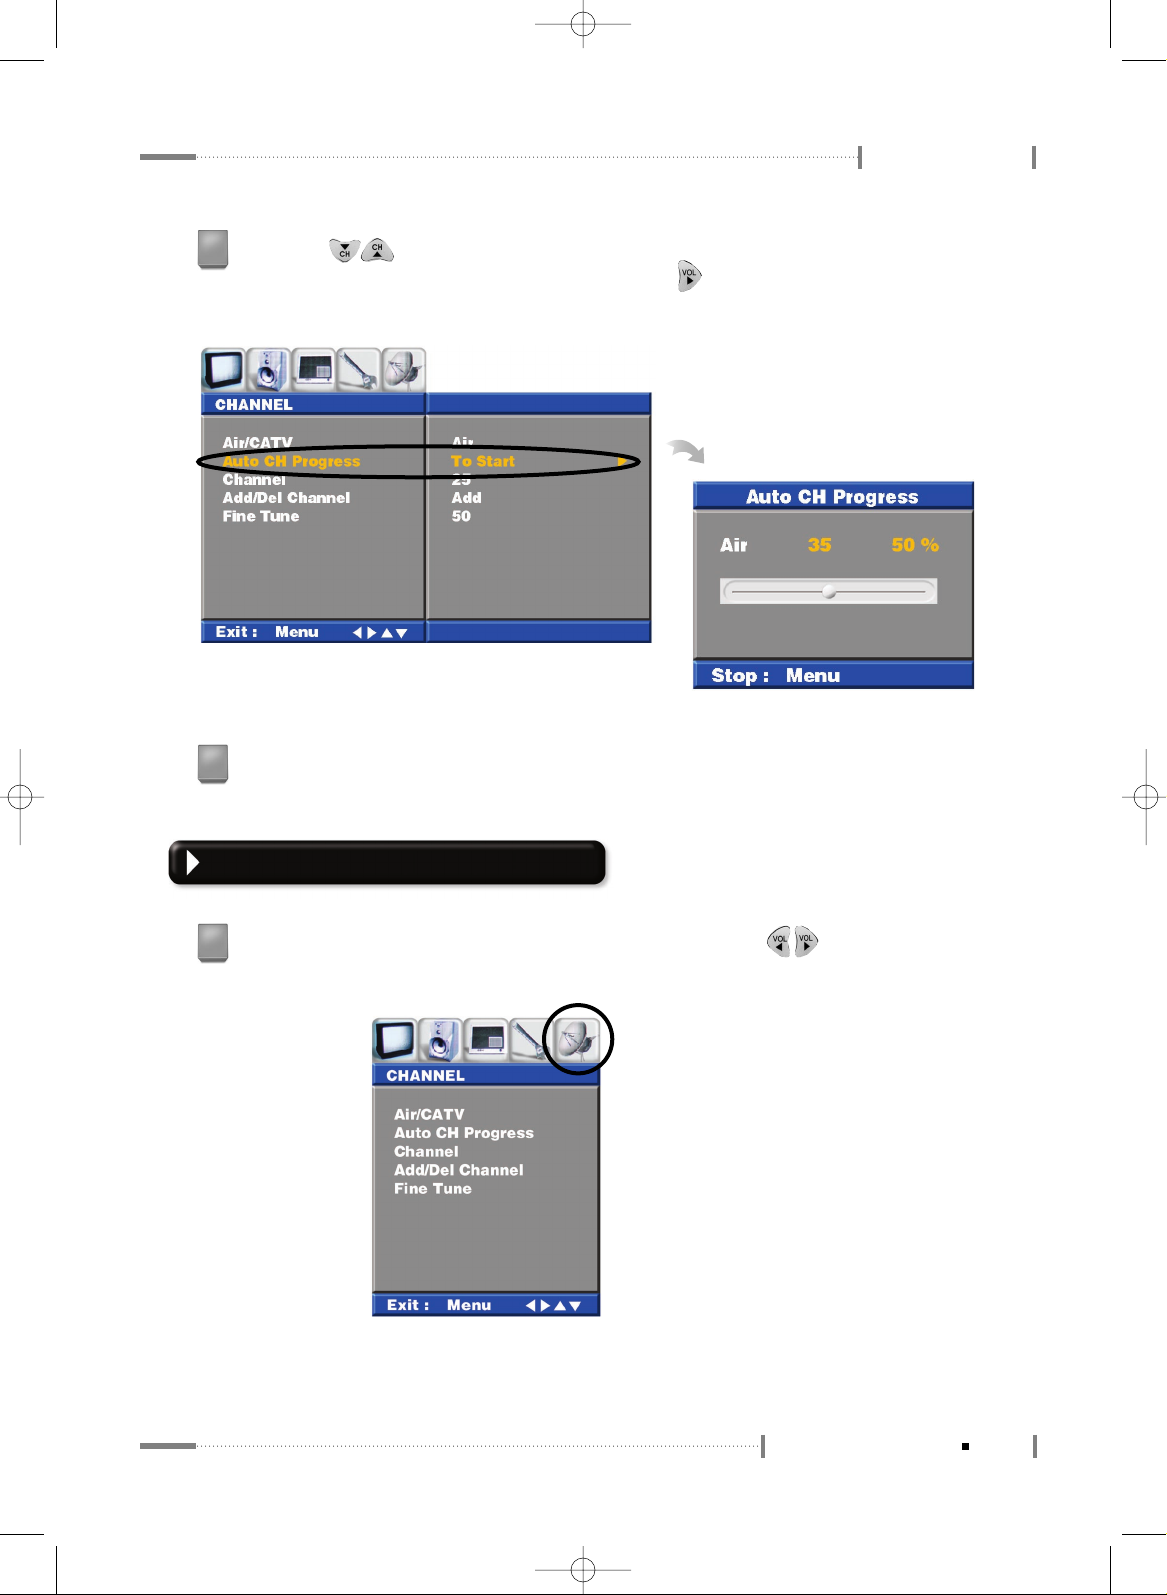
Setting channels automatically
Press the <MENU> button on the remote control, and press the < > button on
the remote control to navigate to the ‘Channel’ menu.
1
Press the < > button on the remote control to select the ‘Air/CATV’ submenu.
Press the < > button on the remote control to select the broadcasting method
(external input).
2
Page 11
2-11
To Configure TV Channels
Using the LCD TV
Press the < > button on the remote control to move to the ‘Auto CH Progress’
submenu. At the ‘Auto CH Progress’ item, press the < > button on the remote
control to run ‘To Start’. Channels will be scanned and saved automatically.
3
Press the <MENU> button on the remote control, and press the < > button on
the remote control to navigate to the ‘CHANNEL’ menu.
1
Press the <MENU> button on the remote control to close the ‘Menu’ screen.
4
Storing the Channel Manually
Page 12
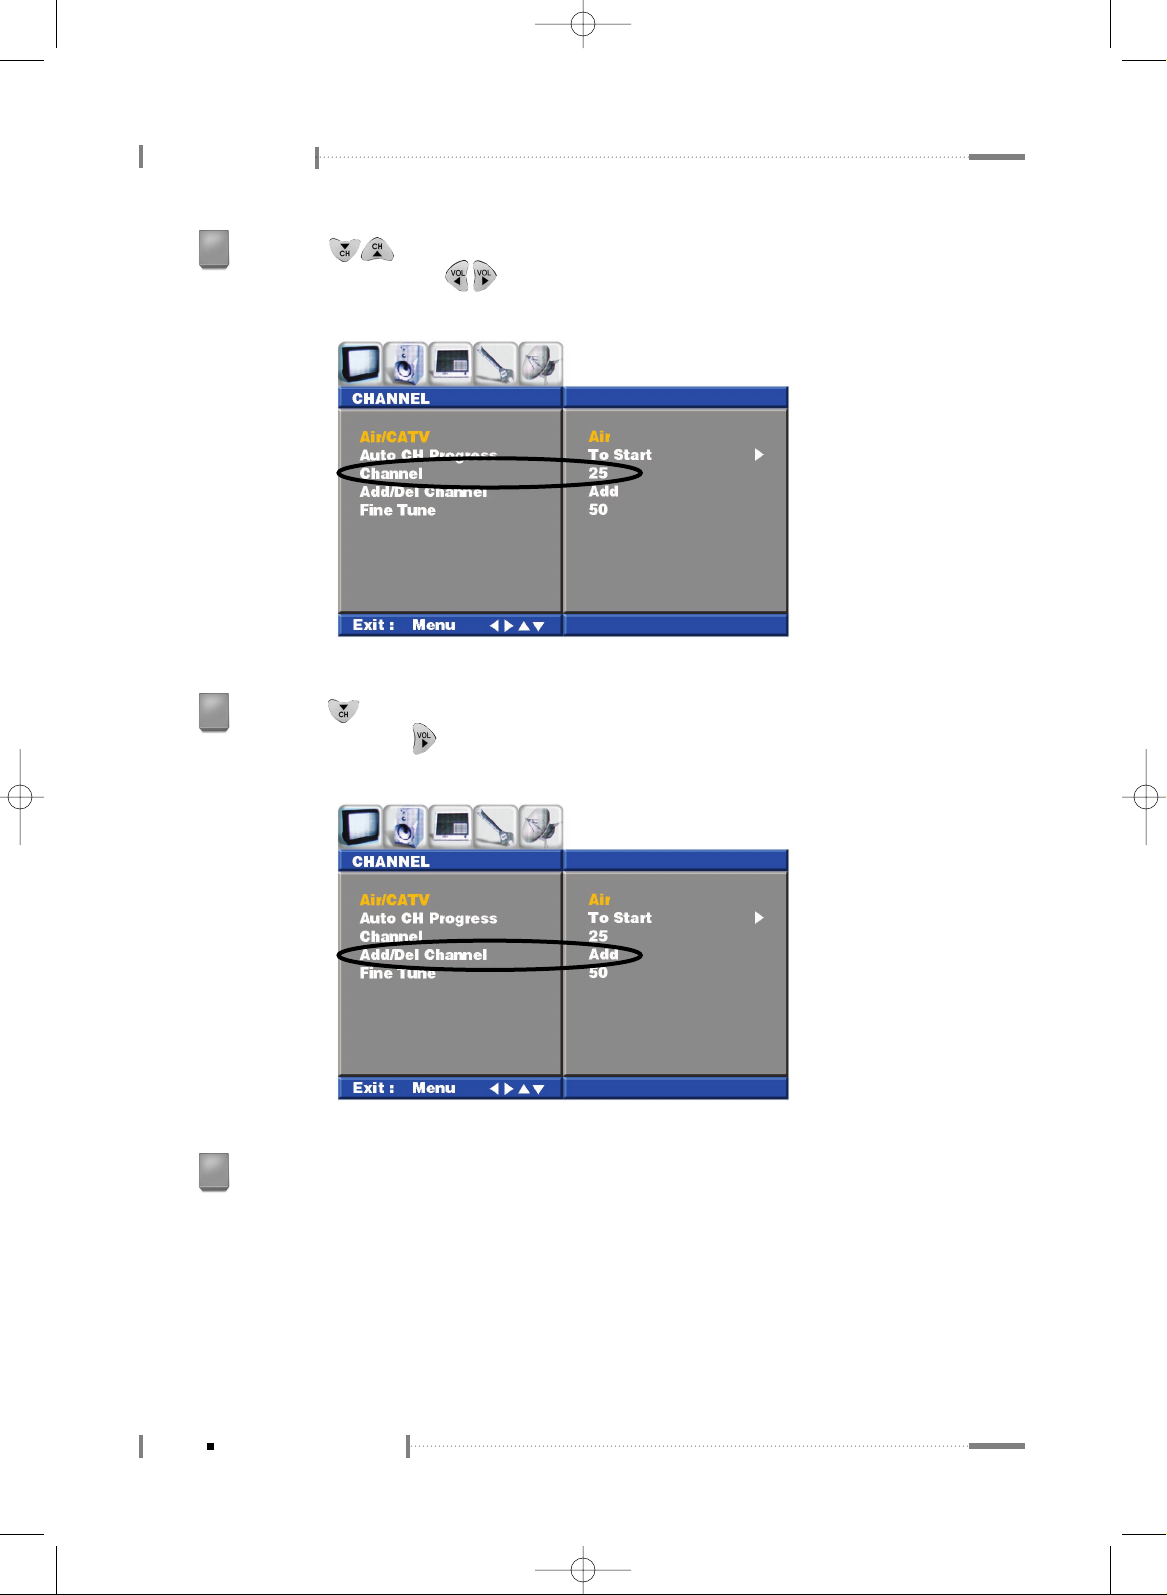
Press the < > button on the remote control to move to the ‘Add/Del Channe’
submenu. Press the < > button on the remote control to select ‘Add’ and press the
<OK> button.
Using the LCD TV
2-12
To Configure TV Channels
Press the < > button on the remote control to move to the ‘Channel’
submenu, and press the < > button to select the channel with the best video
quality from the channels found.
2
3
Press the <MENU> button on the remote control to close the ‘Menu’ screen.
4
Page 13

2-13
To Configure TV Channels
Using the LCD TV
Page 14

2-14
To Select TV/External Input
An external input signal connected to the LCD TV can be selected for viewing.
(VCR, DVD, Camcorder, etc.)
Selecting an External Input Device Connected to the LCD TV for viewing
Press the <SOURCE> button on the remote control.
1
The ‘MAIN SOURCE’ screen will be displayed.
Press the < > button on the remote control to
select the external device connected to the LCD TV,
and press the <OK> button.
2
LCD TV screen will be displayed when you play
the external input device.
3
Selecting External Input Device When Playing PIP/POP/PBP
Check the location of the external input device connected to the LCD TV, and select an
appropriate item. (Connection with cable broadcast, connection with VCR, connection with
DVD, connection with camcorder, etc.)
Press the <MENU> button on the remote control.
1
N O T E
▶
Press the <SOURCE> button at the bottom of the LCD TV to open the 'MAIN SOURCE’ screen.
Use the CH
▲/▼
button to navigate to the 'Connected External Device’ mode, and press the
<SOURCE> button to make a selection.
Page 15
2-15
To Select TV/External Input
Using the LCD TV
Press the < > button on the remote control to navigate to the ‘PIP/POP/PBP’ menu,
and press the < > button to navigate to the ‘On/Off’ submenu.
2
Press the < > button on the remote control. Option items will be displayed according
to the items ‘PIP, POP, PBP1, and PBP2’.
3
Configure settings for each of the items PIP, POP, PBP1, and PBP2. Select the external
input device connected to the LCD TV and configure the appropriate option item
(PIP/POP/PBP).
Using PIP Mode LCD TV Screen
4
Page 16

Using the LCD TV
2-16
To Select TV/External Input
Using POP Mode
Using PBP1 Mode
LCD TV Screen
LCD TV Screen
Using PBP2 Mode
LCD TV Screen
Page 17

2-17
To Select TV/External Input
Using the LCD TV
When option configuration for each item is complete, press the <OK> button on the
remote control.
5
To swap between the main screen and the sub-screen when in PIP, POP, or PBP mode,
press the <SWAP> button on the remote control.
6
Page 18

2-18
Adjusting the Picture
The LCD TV has been configured with optimal contrast, brightness, sharpness,
colors, etc. by factory default, and there is no need for any further user
configuration. However, if you wish to adjust the picture settings, follow the
instructions below.
Press the <MENU> button on the remote control.
1
Press the < > button on the remote control to navigate to the ‘PSM’ submenu. Press
the < > button on the remote control to select options provided in PSM (Picture
Standard Mode).
2
PSM (Picture Standard Mode) provides the following functions:
● Standard : Standard Picture Appearance
● Mild : Softer Picture Appearance
● Game : Select this when playing video games on LCD TV.
● Dynamic : Vivid Picture Appearance
● User : Available user setting items are Brightness, Contrast, Colour, Sharpness, Tint, etc.
3
Page 19

2-19
Adjusting the Picture
Using the LCD TV
- Brightness : Adjust brightness. (Brightness means the brightness of the screen.)
- Contrast : Adjust contrast. (Contrast means the difference in brightness between an object
and its background.)
- Color : Adjust color (RGB). (Adjusting the color to make it look more natural.)
- Sharpness : Adjust sharpness. (Sharpness means the sharpness of the object's profile.)
- Tint : Adjust color intensity. (Color intensity indicates color depth.)
When configuration is complete, press the <OK> button on the remote control, and then
press the <MENU> button on the remote control to close the ‘Menu’ screen.
4
Page 20

2-20
Adjusting the Sound
Press the <MENU> button on the remote control.
1
Press the < > button on the remote control to navigate to the ‘SOUND’ menu.
2
Press the < > button on the remote control to navigate to the ‘Effect’ submenu.
Press the < > button on the remote control to select the options provided in ‘Effect’.
When configuration is complete, press the <OK> button.
- Flat : Standard factory settings.
- Music : When watching music video or concerts.
- Movie : When watching movies.
- Speech : When watching a show that is mostly dialogue.
- User : Available user setting items are Bass, Treble, etc.
3
Page 21

2-21
Adjusting the Sound
Using the LCD TV
● Bass : Adjusts bass
● Treble : Adjusts treble
- Off : Select this if not using the Surround output function.
- Normal : Surround sound optimized to the output conditions will be used.
- Special : Enhances the surround output.
Press the < > button on the remote control to navigate to the ‘Surround’ submenu.
Press the < > button on the remote control to select options provided in ‘Surround’.
When configuration is complete, press the <OK> button.
4
Page 22

Using the LCD TV
2-22
Adjusting the Sound
Press the < > button on the remote control to navigate to the ‘AVL’ submenu.
Press the < > button on the remote control to select whether to use the ‘AVL’ function.
When selection is complete, press the <OK> button.
5
Press the < > button on the remote control to navigate to the ‘Balance’ submenu.
Press the < > button on the remote control to adjust ‘Left and Right Speaker Sound
Balance’. When adjustment is complete, press the <OK> button.
6
When configuration is complete, press the <MENU> button to close the ‘Menu’ screen.
7
Page 23

2-23
Adjusting the Sound
Using the LCD TV
Page 24

2-24
Configuring the PIP/POP/PBP Functions
Two channels can be shown on the TV screen simultaneously. Available screen
division methods are PIP (Picture in a Picture), POP (Picture on a Picture), and
PBP (Picture by a Picture).
PIP Function Settings
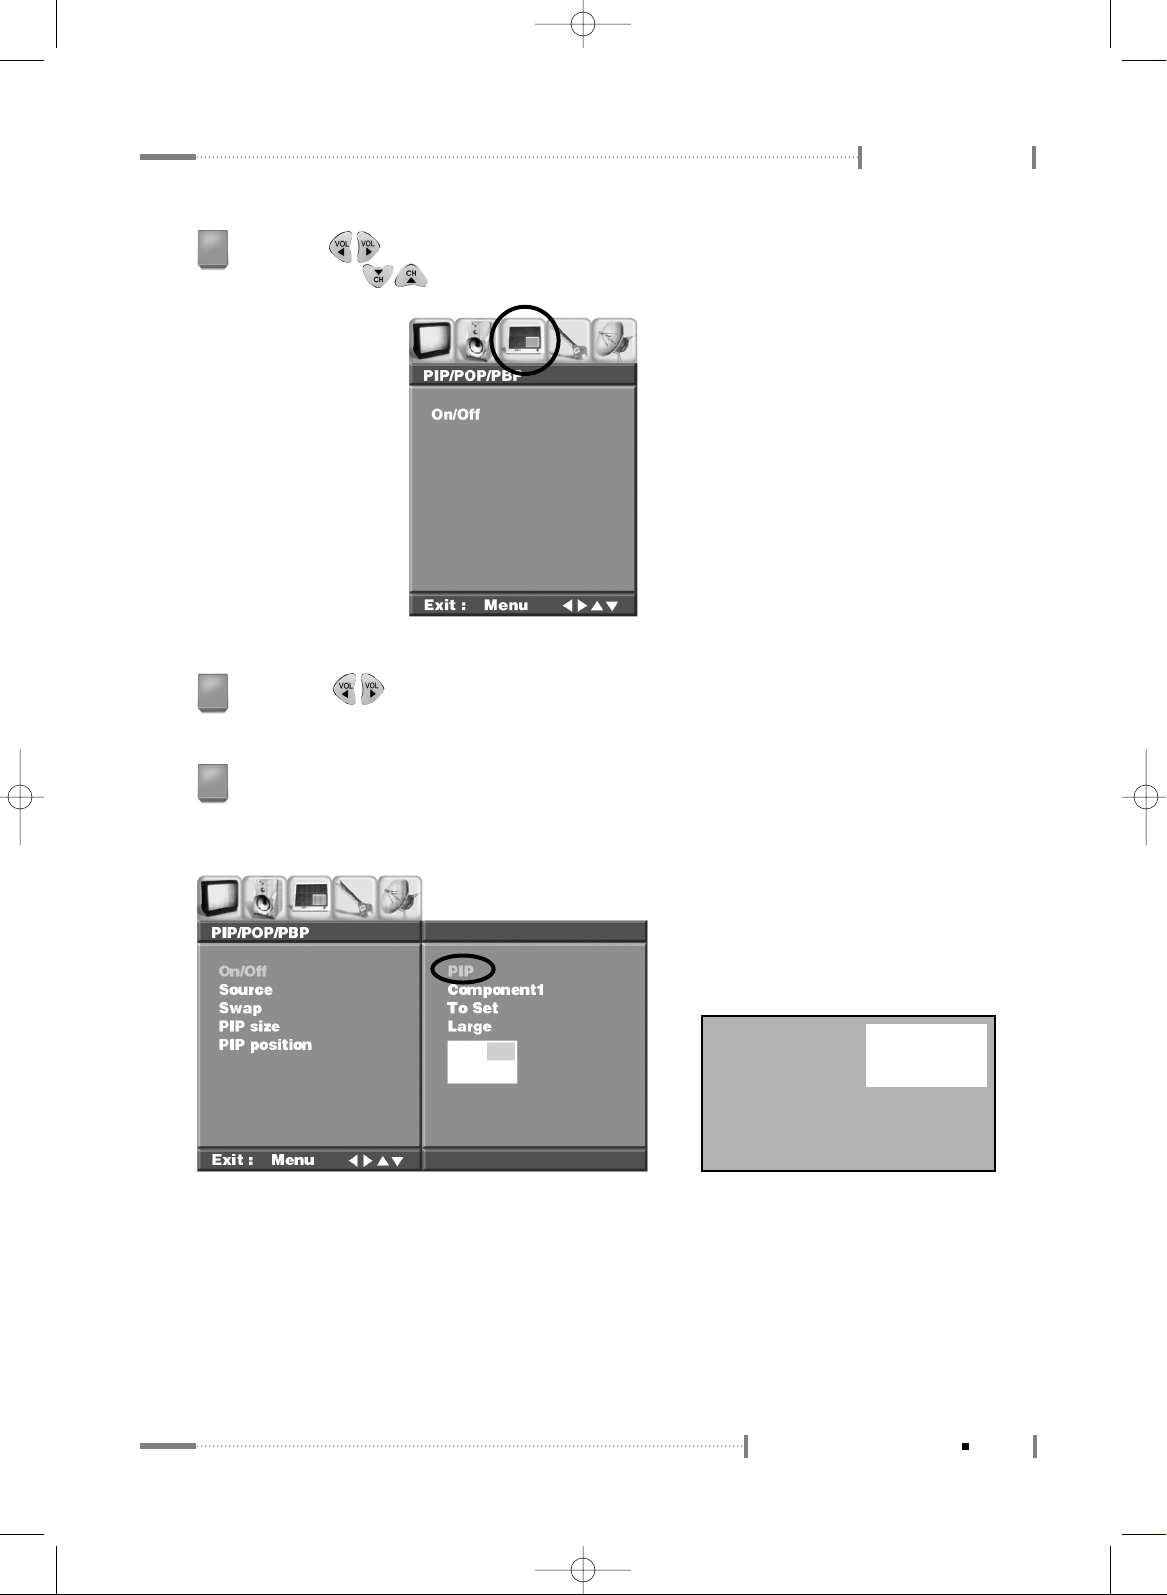
Press the <MENU> button on the remote control.
1
Press the < > button on the remote control to navigate to the ‘PIP/POP/PBP’ menu.
2
Press the < > button on the remote control to navigate to the ‘On/Off’ submenu.
Press the < > button on the remote control to select ‘PIP’. When configuration is
complete, press the <OK> button.
● Source : Select the external input source (TV, AV1~AV3, Component1~2, RGB, or DVI).
● Swap : Swap between the main screen and the sub-screen (To Set).
● PIP size : Select the PIP screen size (Small or Large).
● PIP position : Select the PIP screen position.
3
When configuration is complete, press the <MENU> button to close the ‘Menu’ screen.
4
Page 25

2-25
Configuring the PIP/POP/PBP Functions
Using the LCD TV
POP Function Settings
Press the <MENU> button on the remote control.
1
Press the < > button on the remote control to navigate to the ‘PIP/POP/PBP’ menu.
2
PBP Function Settings
Press the <MENU> button on the remote control.
1
Press the < > button on the remote control to navigate to the ‘PIP/POP/PBP’ menu.
2
Press the < > button on the remote control to navigate to the ‘On/Off’ submenu.
Press the < > button on the remote control to select ‘POP’. When configuration is
complete, press the <OK> button.
● Source : Select the external input source (TV, AV1~AV3, Component1~2, RGB, or DVI).
● Swap : Swap between the main screen and the sub-screen (To Set).
3
When configuration is complete, press the <MENU> button to close the ‘Menu’ screen.
4
Page 26

Using the LCD TV
2-26
Configuring the PIP/POP/PBP Functions
Press the < > button on the remote controller to navigate to the ‘On/Off’ submenu.
Press the < > button on the remote controller to select ‘PBP1 or PBP2’. When
configuration is complete, press the <OK> button.
● Source : Select the external input source (TV, AV1~AV3, Component1~2, RGB, or DVI).
● Swap : Swap between the main screen and the sub-screen (To Set).
3
When configuration is complete, press the <MENU> button to close the ‘Menu’ screen.
4
Page 27

2-27
Configuring the PIP/POP/PBP Functions
Using the LCD TV
Page 28

2-28
To Configure the SET UP
Various functions for watching TV can be configured.
(Language, Transparency, ARC, ISM Method, Timer, Caption, Parental etc.)
Selecting the Main Screen Language
Press the <MENU> button on the remote control.
1
Press the < > button on the remote control to navigate to the ‘SET UP’ menu.
2
Adjusting Image Transparency
Press the <MENU> button on the remote control.
1
Press the < > button on the remote control to navigate to the ‘Setup’ menu.
2
Press the < > button on the remote control to navigate to the ‘Language’
submenu. Press the < > button on the remote control to select the preferred
language. When selection is complete, press the <OK> button.
(English, Deutsch, Français, Español, Italiano, Korean)
3
When configuration is complete, press the <MENU> button to close the ‘Menu’ screen.
4
Page 29

2-29
To Configure the SET UP
Using the LCD TV
Selecting Screen ARC
Press the <MENU> button on the remote control.
1
Press the < > button on the remote control to navigate to the ‘POP/POP/PBP’ menu.
2
Select ‘Off’ in the ‘On/Off’ submenu, and press the <OK> button.
3
Press the < > button on the remote control to navigate to the ‘Transparency’
submenu. Press the < > button on the remote control to adjust the Image
Transparency. When adjustment is complete, press the <OK> button (the settings
possible are 0~10).
<Before Adjusting Image Transparency: 0> <After Adjusting Image Transparency: 10>
3
When configuration is complete, press the <MENU> button to close the ‘Menu’ screen.
4
Page 30

Using the LCD TV
2-30
To Configure the SET UP
Press the < > button on the remote control to navigate to the ‘ARC’ submenu.
Press the < > button on the remote control to select Screen Aspect. When selection
is complete, press the <OK> button (16:9, 14:9 or 4:3).
Supported Only When the PIP/POP/PBP mode is Set to OFF
<16:9> <4:3>
5
When configuration is complete, press the <MENU> button to close the ‘Menu’
screen.
6
Setting Sleep Timer
Set the sleep timer to switch the TV power to the standby mode automatically when a
specified time has elapsed.
Press the <MENU> button on the remote control.
1
Press the < > button on the remote control to navigate to the ‘SET UP’ menu.
2
Press the < > button on the remote control to navigate to the ‘SET UP’ menu.
4
<14:9>
N O T E
▶
Press the <SLEEP TIMER> button on the remote control to set the sleep timer.
Page 31

2-31
To Configure the SET UP
Using the LCD TV
Under ‘Clock’, press the < > button and the < > button on the remote control to
set the current time. (When setting time, press the < > button on the remote control
to set ‘Hour’, press the < > button to move to’Minutes’, press the < > button to
set ‘Minutes’, press the < > button to move to ‘AM/PM’, and press the < >
button to select ‘AM/PM’.)
4
When setting is complete, press the < > button on the remote controller to navigate
to ‘Clock’, and press the < > button to navigate to ‘Off Timer’.
5
In ‘Off Timer’, press the < > button and the < > button on the remote control to set
the ‘TV Off’ timer. (When setting time, press the < > button on the remote control to
set ‘Hour’, press the < > button to move to ‘Minutes’, press the < > button to set
‘Minutes’, press the < > button to move to ‘AM/PM’, and press the < > button to
select ‘AM/PM’.)
6
When configuration is complete, press the < > button on the remote control to navigate
to ‘Off Timer’, and press the < > button on the remote control to navigate to ‘Auto
Off’. Press the < > button on the remote control to select ‘On’.
7
When configuration is complete, press the <MENU> button to close the ‘Menu’ screen.
8
N O T E
▶
To turn the TV off automatically, see the section on ‘Off Timer’ settings for visual settings.
The program channel and volume level can also be configured for cases when the LCD TV is turned on.
Press the < > button on the remote control to navigate to the ‘Timer’ submenu, and
press the < > button on the remote control. The ‘Time Selection’ screen will be
displayed.
3
Page 32

Using the LCD TV
2-32
To Configure the SET UP
Viewing Closed Captions
The LCD TV can decodes and displays the closed caption that are broadcast with
certain TV shows. These captions are usually subtitles for the hearing impaired or
foreign-language translations. All VCRs record the colsed caption signal from
television program, so home-recorded video tapes also provide closed captions. Most
prerecorded commercial video tapes provide closed captions as well. Check for the
closed caption symbol in television schedule and on the tape’s packing : CC
Press the <MENU> button on the remote control.
1
Press the < > button on the remote control to navigate to the ‘SET UP’ menu.
2
Press the < > button on the remote control to navigate to the ‘Caption’
submenu.
3
N O T E
▶
The Caption feature dose not work with PC signals.
Press the < > buttons to select ‘CC1~4’ or ‘TEXT1~4’.
4
Page 33

2-33
To Configure the SET UP
Using the LCD TV
When you have finished, press the <MENU> button to close the ‘Menu’ screen.
5
N O T E S
▶
In Caption mode, captions appear at the bottom of the screen, and they usually cover only a small portion
of the picture.
▶
In TEXT mode, information is not related to the program, such as news or weather, is displayed. Text
often covers a large portion of the screen.
▶
Depending on the particular broadcast, it might be necessary to make changes to Channel and Field.
N O T E
▶
Different Channel and Field display different information :
Field 2 carries additional information that supplements the information in Field 1.(for example, Channel 1
may have subtitles in English, while Channel 2 has subtitles in Spanish.)
Using the Parental
The Parental feature automatically locks out programming that is deemed inappropriate
for childern. The user must enter a PIN(Personal Id Number) before any of the Parental
restriction can be changed.
N O T E
▶
The Parental feature dose not work with PC signals.
Setting Up Your PIN (Personal ID Number)
1
Press the <MENU> button on the remote control.
2
Press the < > button on the remote control to navigate to the ‘SET UP’ menu.
Page 34

Using the LCD TV
2-34
To Configure the SET UP
N O T E
▶
The default PIN number for a new set is ‘1-1-1-1’.
3
Press the < > button on the remote control to navigate to the ‘Parental’ submenu.
4
Press the < > button. The ‘Enter the Password : ----’ screen is displayed.
5
Enter 4-digit PIN number.
Page 35

6
After entering a valid PIN number, the ‘Parental’ menu screen will appear.
Press the < > buttons to select ‘Set Password’.
7
When you have finished, press the <MENU> button to colse the ‘Menu’ screen.
2-35
To Configure the SET UP
Using the LCD TV
How to On/Off the Parental
1
Press the <MENU> button on the remote control.
2
Press the < > button on the remote control to navigate to the ‘SET UP’ menu.
3
Press the < > button on the remote control to navigate to the ‘Parental’ submenu.
Page 36

Using the LCD TV
2-36
To Configure the SET UP
4
Press the < > button. The ‘Enter the Password : ----’ screen is displayed.
5
Enter 4-digit PIN number.
6
After entering a valid PIN number, the Parental menu is displayed and the Parental
Lock will be highlighted.
To On or Off the Parental feature, press the < > buttons to select Parental
Lock On/Off.
7
When you have finished, press the <MENU> button to colse the ‘Menu’ screen.
How to Setup Restriction Using the MPAA
1
Press the <MENU> button on the remote control.
2
Press the < > button on the remote control to navigate to the ‘Setup’ menu.
3
Press the < > button on the remote control to navigate to the ‘Parental’ submenu.
Page 37

7
Press the < > buttons to select particular MPAA category.
The < > buttons will cycle through the MPAA categories.
- G & Above : General audience (no restrictions).
- PG & Above : Parental guidance suggested.
- PG-13 & Above : Parents strongly cautioned.
- R & Above : Restricted. Children under 17 should be accompanied by an adult.
- NC-17 & Above : No Children under age 17.
- X : Adults only
- Unblocked : Not rated
2-37
To Configure the SET UP
Using the LCD TV
4
Press the < > button. The ‘Enter the Password : ----’ screen is displayed.
5
Enter 4-digit PIN number.
6
After entering a valid PIN number, the Parental sub menu screen will appear.
Press the < > buttons to move to ‘MPAA’ sub menu.
8
When you have finished, press the <MENU> button to colse the ‘Menu’ screen.
N O T E
▶
The Parental will automatically block any category that is ‘More restrictive’. For example, if you block the
PG-13 & Above category, then R & Above, NC-17 & Above, and X will be automatically blocked also.
Page 38

Using the LCD TV
2-38
To Configure the SET UP
4
Press the < > button. The ‘Enter the Password : ----’ screen is displayed.
How to Setup Restriction Using the TV Guidelines
1
Press the <MENU> button on the remote control.
2
Press the < > button on the remote control to navigate to the ‘Setup’ menu.
3
Press the < > button on the remote control to navigate to the ‘Parental’ submenu.
5
Enter 4-digit PIN number.
6
After entering a valid PIN number, the Parental sub menu screen will appear.
Press the < > buttons to select ‘TV Guidelines’.
7
Press the < > buttons to move to one of the six age-based categories in column
and press the < > buttons will cycle through the MPAA categories.
- TV-Y : Young Children
- TV-Y7 : Children 7 and Over
- TV-G : General audience
- TV-PG : Parental guidance
- TV-14 : Viewers 14 and Over
- TV-MA : Mature audience
Page 39

To set the FV, D, L, S and V sub-ratings, first select one of these TV-Ratings :
TV-Y7, TV-PG, TV-14 and TV-MA (See step 7).
Next, while the TV-Ratings is selected, repeatedly press the < > button.
This will cycle through the available sub-ratings (FV, D, L, S or V).
Press the <OK> button to change the sub-ratings.
For example, if you block TV-Y category, then TV-Y7 will be automatically blocked.
Similarly, if you block TV-G category, then all the categories in the ‘young adult’ will
be blocked (TV-G, TV-PG, TV-14 and TV-MA). The sub-ratings (FV, V, S, L, D) work
together similarly. (See step 8)
2-39
To Configure the SET UP
Using the LCD TV
N O T E S
▶
These categories consist of two separate groups :
TV-Y and TV-Y7(Young Children through age 7), and TV-G through TV-MA(everybody else).
▶
The restrictions for these two groups work independently :
If a household includes very young children as well as young adults, the TV guidelines must be set
separately for each group.
▶
The TV-Y7, TV-PG, TV-14 and TV-MA have additional options.
- : All
FV : Fantasy Violence
V : Violence
S : Sexual Situation
L : Adult Language
D : Sexual Suggestive Dialog
8
N O T E
▶
The Parental will automatically block certain categories that are ‘More restrictive’.
For example, if you block ‘L’ sub-rating in TV-PG, then the ‘L’ sub-rating in TV-14 and TV-MA will be
automatically blocked.
When you have finished, press the <MENU> button to colse the ‘Menu’ screen.
9
Page 40

2-40
External Control Device Setup
Connect the RS-232C input jack to an external control device (such as a computer or an A/V
control system) and control the Monitor’s functions externally.
1
Connect the serial port of the control device to the RS-232C jack on the Monitor back panel.
2
RS-232C connection cables are not supplied with the Monitor.
3
N O T E
▶▶
Type of Connector : D-Sub 9-pin Male
No. Pin Name
1
2
3
4
5
6
7
8
9
No Connection
RXD (Receive data)
TXD (Transmit data)
DTR (DTE side ready)
GND
DSR (DCE side ready)
RTS (Ready to send)
CTS (Clear to send)
No Connection
Page 41

2-41
External Control Device Setup
Using the LCD TV
N O T E
▶▶
RS-232C Configurations
7-Wire Configuration
(Standard RS-232C cable)
3-Wire Configuration
(Not standard)
Press the <MENU> button and then use the ▲/▼ button to select the SPECIAL menu.
1
Press the ▶ button and then use ▲/▼ button to select Set ID.
2
Press the ▶ button and then use ◀/▶ button to adjust Set ID.to choose the desired
monitor ID number.
• The adjustment range of Set ID. is 0 ~ 99.
3
Set ID
- Use this function to specify a monitor ID number.
- Refer to ‘Real Data Mapping 1’.
Communication Parameters
- Baud rate : 9600 bps (UART)
- Data length : 8 bits
- Parity : None
- Stop bit : 1 bit
- Communication code : ASCII code
Page 42

Using the LCD TV
2-42
External Control Device Setup
• Menu doesn’t display on screen when setting the 4, 12, 13, and 26 ~ 32.
COMMAND 1
Power
Input Select
Volume Mute
Volume Control
Contrast
Brightness
Color
Tint
Sharpness
PIP/POP/PBP
PIP Position
Treble
Bass
Balance
Color Temperature
Red Adjustment
Green Adjustment
Blue Adjustment
PIP Input Source
k
k
k
k
k
k
k
k
k
k
k
k
k
k
k
k
k
k
k
COMMAND 2
a
b
e
f
g
h
i
j
k
n
q
r
s
t
u
v
w
$
y
DATA(Hexadecimal)
0 ~ 1
0 ~ 7
0 ~ 1
0 ~ 64
0 ~ 64
0 ~ 64
0 ~ 64
0 ~ 64
0 ~ 64
0 ~ 4
0 ~ 3
0 ~ 14
0 ~ 14
0 ~ 64
0 ~ 3
0 ~ C8
0 ~ C8
0 ~ C8
0 ~ 7
Command Reference List
Page 43

2-43
External Control Device Setup
Using the LCD TV
N O T E
▶▶
Transmission / Receiving Protocol
Transmission
[Command1][Command2][ ][Set ID][ ][Data][Cr]
[Command 1] : k,
[Command 2] : To control LCD set.
[Set ID] : You can adjust the set ID to choose desired moni-tor ID number in Special menu. Adjustment
range is 0 ~ 99. When selecting Set ID ‘0’, every connected LCD set is controlled. Set ID is
indicated as decimal (0~99) on menu and as Hexa decimal (0x0~0x63) on transmission/receiving
protocol.
[DATA] : To transmit command data.
Transmit ‘FF’ data to read status of command.
[Cr] : Carriage Return ASCII code ‘0x0D’
[ ] : ASCII code ‘space (0x20)’
▶▶
OK Acknowledgement
[Command2][ ][Set ID][ ][OK][Data][x]
The Monitor transmits ACK (acknowledgement) based on this format when receiving normal data. At this
time, if the data is data read mode, it indicates present status data. If the data is data write mode, it returns
the data of the PC computer.
▶▶
Error Acknowledgement
[Command2][ ][Set ID][ ][NG][x]
The Monitor transmits ACK (acknowledgement) based on this format when receiving abnormal data from
non-viable functions or communication errors.
Data 1 : Illegal Code
2 : Not supported function
3 : Wait more time
Power (Command2 : a)
● To control Power On/Off of the Monitor.
- Transmission
[k][a][ ][Set ID][ ][Data][Cr]
Data 0 : Power Off
1 : Power On
- Acknowledgement
[a][ ][Set ID][ ][OK][Data][x]
Page 44

Using the LCD TV
2-44
External Control Device Setup
● To show Power On/Off.
- Transmission
[k][a][ ][Set ID][ ][FF][Cr]
Data 0 : Power Off
1 : Power On
- Acknowledgement
[a][ ][Set ID][ ][OK][Data][x]
In a like manner, if other functions transmit ‘FF’ data based on this format,
Acknowledgement data feedback presents status about each function.
Input Select (Command2 : b) (Main Picture Input)
● To select input source for the Monitor. You can also select an input source using the
INPUTSELECT button on the Monitor’s remote control.
- Transmission
[k][b][ ][Set ID][ ][Data][Cr]
Data 0 : TV 1 : AV1 2 : AV2
3 : AV3 4 : COMPONENT1 5 : COMPONENT2
6 : RGB 7 : DVI
- Acknowledgement
[b][ ][Set ID][ ][OK][Data][x]
Volume Mute (Command2 : e)
● To control volume mute on/off. You can also adjust mute using the MUTE button on
remote control.
- Transmission
[k][e][ ][Set ID][ ][Data][Cr]
Data 0 : Volume mute on (Volume off)
1 : Volume mute off (Volume on)
- Acknowledgement
[e][ ][Set ID][ ][OK][Data][x]
Page 45

2-45
External Control Device Setup
Using the LCD TV
Volume Control (Command2 : f )
● To adjust volume. You can also adjust volume with the volume buttons on remote control.
- Transmission
[k][f][ ][Set ID][ ][Data][Cr]
Data Min : 0 ~ Max : 64
Refer to ‘Real data mapping1’ as shown below.
- Acknowledgement
[f][ ][Set ID][ ][OK][Data][x]
Contrast (Command2 : g)
● To adjust screen contrast. You can also adjust contrast in the Video menu.
- Transmission
[k][g][ ][Set ID][ ][Data][Cr]
Data Min : 0 ~ Max : 64
Refer to ‘Real data mapping1’ as shown below.
- Acknowledgement
[g][ ][Set ID][ ][OK][Data][x]
Real data mapping 1 0 : Step 0
⋯
A : Step 10 (SET ID 10)
⋯
F : Step 15 (SET ID 15)
10 : Step 16 (SET ID 16)
⋯
64 : Step 100
Brightness (Command2 : h)
● To adjust screen brightness. You can also adjust brightness in the Video menu.
- Transmission
[k][h][ ][Set ID][ ][Data][Cr]
Data Min : 0 ~ Max : 64
Refer to ‘Real data mapping 1’.
- Acknowledgement
[h][ ][Set ID][ ][OK][Data][x]
Page 46

Using the LCD TV
2-46
External Control Device Setup
Color (Command2 : i)
● To adjust the screen color. You can also adjust color in the Video menu.
- Transmission
[k][i][ ][Set ID][ ][Data][Cr]
Data Min : 0 ~ Max : 64
Refer to ‘Real data mapping 1’.
- Acknowledgement
[i][ ][Set ID][ ][OK][Data][x]
Tint (Command2 : j)
● To adjust the screen tint. You can also adjust tint in the Video menu.
- Transmission
[k][j][ ][Set ID][ ][Data][Cr]
Data Red : 0 ~ Green : 64
Refer to ‘Real data mapping 1’.
- Acknowledgement
[j][ ][Set ID][ ][OK][Data][x]
Sharpness (Command2 : k)
● To adjust the screen sharpness. You can also adjust sharpness in the Video menu.
- Transmission
[k][k][ ][Set ID][ ][Data][Cr]
Data Min: 0 ~ Max: 64
Refer to ‘Real data mapping 1’.
- Acknowledgement
[k][ ][Set ID][ ][OK][Data][x]
Page 47
2-47
External Control Device Setup
Using the LCD TV
PIP/POP/PBP (Command2 : n)
● To control the PIP (Picture-in-Picture) or Twin Picture. You can also control the
PIP/Twin picture mode using the PIP or TWIN PICTURE button on the remote
control or in the Twin menu.
- Transmission
[k][n][ ][Set ID][ ][Data][Cr]
Data 0 : PIP OFF 1 : PIP
2 : POP 3 : PBP1 4 : PBP2
- Acknowledgement
[n][ ][Set ID][ ][OK][Data][x]
PIP Position (Command2 : q)
● To select sub picture position for PIP. You can also adjust the sub picture position using
Win.position on the remote control or in the Twin menu.
- Transmission
[k][q][ ][Set ID][ ][Data][Cr]
Data 0: Right down on screen
1: Left down on screen
2: Left up on screen
3: Right up on screen
- Acknowledgement
[q][ ][Set ID][ ][OK][Data][x]
Treble (Command2 : r)
● To adjust treble. You can also adjust treble in the Audio menu.
- Transmission
[k][r][ ][Set ID][ ][Data][Cr]
Data Min: 0 ~ Max: 64
Refer to ‘Real data mapping 1’.
- Acknowledgement
[r][ ][Set ID][ ][OK][Data][x]
(Operates only when SSM is set to USER.)
Page 48

Using the LCD TV
2-48
External Control Device Setup
Bass (Command2 : s)
● To adjust bass. You can also adjust bass in the Audio menu.
- Transmission
[k][s][ ][Set ID][ ][Data][Cr]
Data Min: 0 ~ Max: 64
Refer to ‘Real data mapping 1’.
- Acknowledgement
[s][ ][Set ID][ ][OK][Data][x]
(Operates only when SSM is set to USER.)
Balance (Command2 : t)
● To adjust balance. You can also adjust balance in the Audio menu.
- Transmission
[k][t][ ][Set ID][ ][Data][Cr]
Data Min: 0 ~ Max: 64
Refer to ‘Real data mapping 1’.
- Acknowledgement
[t][ ][Set ID][ ][OK][Data][x]
Color Temperature (Command2 : u)
● To adjust color temperature. You can also adjust CSM in the PC menu.
- Transmission
[k][u][ ][Set ID][ ][Data][Cr]
Data 0: Normal 1: Cool
2: Warm 3: User
- Acknowledgement
[u][ ][Set ID][ ][OK][Data][x]
Page 49

2-49
External Control Device Setup
Using the LCD TV
Red Adjustment (Command2 : v)
● To adjust red in color temperature.(Operates only when CSM is set to USER.)
- Transmission
[k][v][ ][Set ID][ ][Data][Cr]
Data 0 ~ FF
- Acknowledgement
[v][ ][Set ID][ ][OK][Data][x]
Green Adjustment (Command2 : w)
● To adjust green in color temperature.(Operates only when CSM is set to USER.)
- Transmission
[k][w][ ][Set ID][ ][Data][Cr]
Data 0 ~ FF
- Acknowledgement
[w][ ][Set ID][ ][OK][Data][x]
Blue Adjustment (Command2 : $)
● To adjust blue in color temperature.(Operates only when CSM is set to USER.)
- Transmission
[k][$][ ][Set ID][ ][Data][Cr]
Data 0 ~ FF
- Acknowledgement
[$][ ][Set ID][ ][OK][Data][x]
PIP Input Select (Command2 : y)
● To select input source for sub picture in PIP mode.
- Transmission
[k][y][ ][Set ID][ ][Data][Cr]
Data 0 : TV 1 : AV1 2 : AV2
3 : AV3 4 : COMPONENT1 5 : COMPONENT2
6 : RGB 7 : DVI
- Acknowledgement
[y][ ][Set ID][ ][OK][Data][x]
 Loading...