

Page 1
ATAG
User
manual
Dishwasher
j
-
~
r r
!fJ,
..r.l\..A
~
~\li
~
/
"'DM'::~.c
....
~;
I
VA6111LT
:
Page 2

2
Conten
ts
Safety information ................................... 2
Unloading the dishwasher .................... 12
Product description ................................ 3 Washing programmes ..................
........ 13
Control panel .......................................... 4
Care and cleaning ................................ 13
First use ....................................
.. ..
......... 5
What to do if ...................................
.. ..
. 15
Set the water softener .............. ...... ........ 5
Techni
cal
data ....................................
..
16
Use of dishwasher salt ........................
....
6
Hints for test institutes .......................... 16
Use of rinse aid ....................................... 7 Installation ............................................ 17
Daily use ................................................. 8
Water connection ................................. 18
Load
cutlery and dishes .......................... 9 Electrical connect ion
.. .. .. ..
..................... 20
Use of detergent ................................... 10
Environment concerns .......................... 20
Select and start a washi
ng
programme
11
(E
Subject to change without notice
ill
Safety informati_o_n
___
_
rn
In
the interest of your safety and to en- • This product should be serviced only by
an
sure the correct use, before installing authorized service engineer, and only
and first usi
ng
the appliance, read this genuine spare parts should be used.
user
manual carefu
lly
, including its hints • Under no circumstances should you at-
and wamings.
To
avoid unnecessary tempt to repair the machine yourself.
Re-
mistakes and accidents, it is important pai
rs
carri
ed
out by inexperienced persons
to ensure that
a
ll
people usi
ng
the appli- could cause injury or serious ma lfunction-
ance
are
thorough
ly
fam
ili
ar wi
th
its ing. Contact your local Service Force Cen-
operation and safety features. Save tre.
Always insist
on
genui
ne
spare parts.
these instructions and make sure that
they remain with the
appliance if it is General safety
mov
ed
or sold, so that everyone usi
ng
it
• Dishwasher detergents can cause chemi-
through its
li
fe
will
be proper
ly
informed
cal
burns to eyes, mouth and throat. Could
on
appliance use and safety. endanger life!
Comp
ly
with the safety in-
structions of the dishwasher detergent
Correct use manufacturer.
• This dishwasher
is
only intended for wash- • The water
in
your dishwasher
is
not for
ing
household utensils suitable for ma- drinking. Detergent
res
idues may st
ill
be
chine washing. present
in
your machine.
•
Do
not put any solvents in the dishwasher. • Ensure that the door of the dishwasher
is
Th
is could cause
an
explosion. always closed when it is not being loaded
•
Knives
and other items with sharp points or unloaded.
In
this way you will avoid any-
must be
loaded in the cutlery basket with body tripping over the open door and hurt-
their points down or
placed in a horizontal i
ng
themselves.
positi
on
in the upper basket. •
Do
not sit or stand on the open door.
•
Onl
y use products (detergent, salt and Child safety
rinse ai
d) suitable for dishwashers.
• Avoid opening the door whilst the appli- • This appliance
is
designed to be operated
ance is
in
operation, hot steam may es- by adults.
Do
not allow children to use the
cape. dishwasher unsupervised.
•
Do
not take any dishes out of the • Keep
all
packaging we
ll
away from chil
-
dishwasher before the end of the w
ashing
dren. There is a risk of suffocation.
cycl
e.
• Keep
all
detergents
in
a safe place out of
• After
use,
isolate the appliance from the children's reach.
power
supply
and
tum off the water sup- • Keep children well away from the
I
dishwasher when the door
is
open.
py
.
Page 3
2
Conten
ts
Safety information ................................... 2
Unloading the dishwasher .................... 12
Product description ................................ 3 Washing programmes ..................
........ 13
Control panel .......................................... 4
Care and cleaning ................................ 13
First use ....................................
.. ..
......... 5
What to do if ...................................
.. ..
. 15
Set the water softener .............. ...... ........ 5
Techni
cal
data ....................................
..
16
Use of dishwasher salt ........................
....
6
Hints for test institutes .......................... 16
Use of rinse aid ....................................... 7 Installation ............................................ 17
Daily use ................................................. 8
Water connection ................................. 18
Load
cutlery and dishes .......................... 9 Electrical connect ion
.. .. .. ..
..................... 20
Use of detergent ................................... 10
Environment concerns .......................... 20
Select and start a washi
ng
programme
11
(E
Subject to change without notice
ill
Safety informati_o_n
___
_
rn
In
the interest of your safety and to en- • This product should be serviced only by
an
sure the correct use, before installing authorized service engineer, and only
and first usi
ng
the appliance, read this genuine spare parts should be used.
user
manual carefu
lly
, including its hints • Under no circumstances should you at-
and wamings.
To
avoid unnecessary tempt to repair the machine yourself.
Re-
mistakes and accidents, it is important pai
rs
carri
ed
out by inexperienced persons
to ensure that
a
ll
people usi
ng
the appli- could cause injury or serious ma lfunction-
ance
are
thorough
ly
fam
ili
ar wi
th
its ing. Contact your local Service Force Cen-
operation and safety features. Save tre.
Always insist
on
genui
ne
spare parts.
these instructions and make sure that
they remain with the
appliance if it is General safety
mov
ed
or sold, so that everyone usi
ng
it
• Dishwasher detergents can cause chemi-
through its
li
fe
will
be proper
ly
informed
cal
burns to eyes, mouth and throat. Could
on
appliance use and safety. endanger life!
Comp
ly
with the safety in-
structions of the dishwasher detergent
Correct use manufacturer.
• This dishwasher
is
only intended for wash- • The water
in
your dishwasher
is
not for
ing
household utensils suitable for ma- drinking. Detergent
res
idues may st
ill
be
chine washing. present
in
your machine.
•
Do
not put any solvents in the dishwasher. • Ensure that the door of the dishwasher
is
Th
is could cause
an
explosion. always closed when it is not being loaded
•
Knives
and other items with sharp points or unloaded.
In
this way you will avoid any-
must be
loaded in the cutlery basket with body tripping over the open door and hurt-
their points down or
placed in a horizontal i
ng
themselves.
positi
on
in the upper basket. •
Do
not sit or stand on the open door.
•
Onl
y use products (detergent, salt and Child safety
rinse ai
d) suitable for dishwashers.
• Avoid opening the door whilst the appli- • This appliance
is
designed to be operated
ance is
in
operation, hot steam may es- by adults.
Do
not allow children to use the
cape. dishwasher unsupervised.
•
Do
not take any dishes out of the • Keep
all
packaging we
ll
away from chil
-
dishwasher before the end of the w
ashing
dren. There is a risk of suffocation.
cycl
e.
• Keep
all
detergents
in
a safe place out of
• After
use,
isolate the appliance from the children's reach.
power
supply
and
tum off the water sup- • Keep children well away from the
I
dishwasher when the door
is
open.
py
.
Page 4
4
CD
Glh
Q7D.
g".
~60·
~5d'
~
_ 5
-------
*
-
-I
CD
D
G,.
"fI
,..
~.
'=I
'"
~..
!!;I
- 5
_
£!::.
~----
*
I I I~
--+j
P
ROGRA
M
RESET
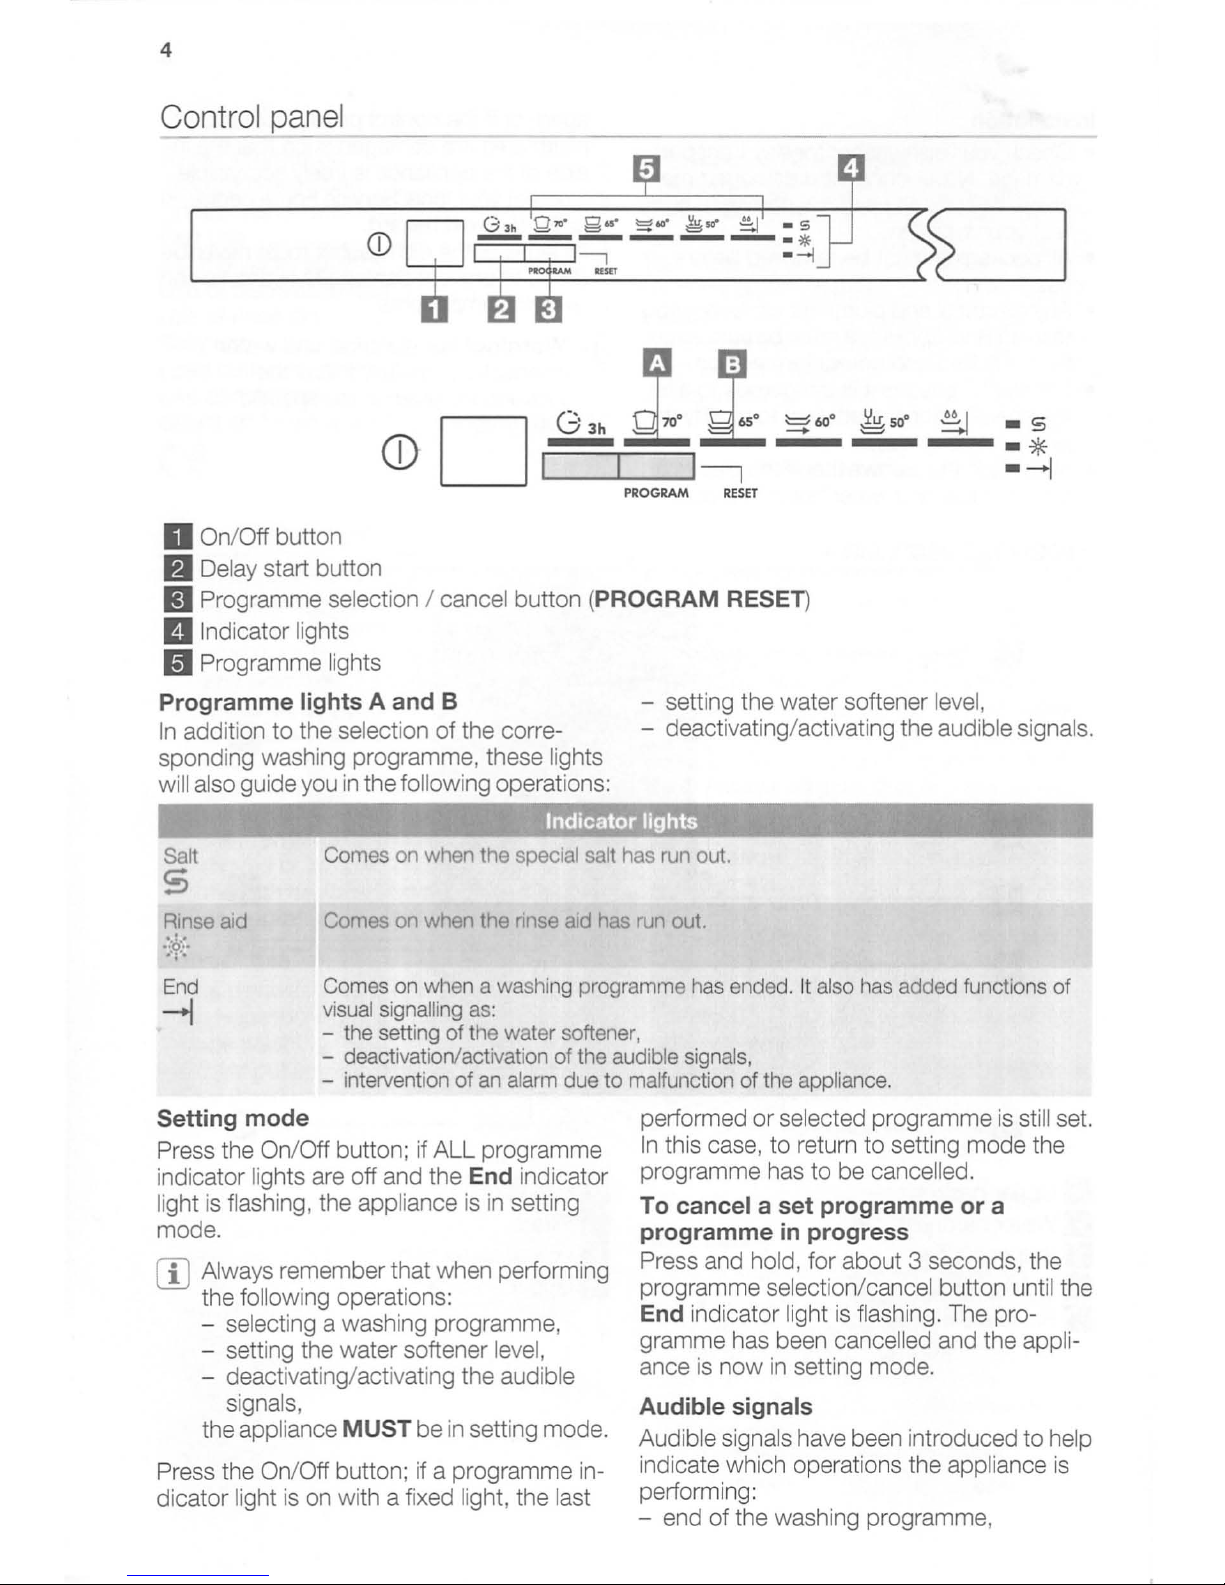
D On/Off button
Ell
Delay start button
II
Programme selection / cancel button (PROGRAM RESET)
II
Indicator lights
1.1
Programme lights
Programme lights A and B
In
addition
to
the selection of the corre-
sponding washing programme, these
lights
will
also guide you
in
the following operations:
- setting the water softener
level,
- deactivating/activating the audible signals.
Salt
Comes on when the special salt has run out.
S
Rinse aid
·;:Y::e
Comes on when the rinse aid has run out.
End
-l
Comes on when a washing programme has ended.
It
also has added functions
of
visual signalling as:
- the setting
of
the water softener,
- deactivation/activation
of
the audible signals,
- intervention
of
an alarm due
to
malfunction
of
the appliance.
Setting mode
Press the On/Off button; if ALL programme
indicator lights are off and the
End indicator
light
is
flashing, the appliance
is
in
setting
mode.
rn
Always remember that when performing
the
following operations:
- selecting a washing programme,
- setting the water softener
level,
- deactivating/activating the audible
signals,
the appliance
MUST
be
in
setting mode.
Press t
he
On/Off button; if a programme in-
dicator light
is
on with a fixed light, the last
performed or selected programme
is
still set.
In
this case, to return to setting mode the
programme has to be cancelled.
To cancel a set programme or a
programme in progress
Press and hold, for about 3 seconds, the
programme selection/cancel button until the
End indicato r light
is
flashing. The pro -
gramme has been
cancelled and the appli-
ance
is
now
in
setting mode.
Audible signals
Audible signals have been introduced to help
indicate which operations the appliance
is
performing:
- end of the washing programme,
Page 5
- intervention of an alarm due to malfunction
of the appliance.
rn
Factory setting: audible signals activated
It
is
possible to deactivate the audible
signals.
Deactivation/activation of the audible
signals
1.
Press the On/Off button. T
he
appliance
must be
in
setting mode.
2.
Press and keep pressed the programme
selection/cancel button until programme
light A flashes and programme light B
comes on with a fixed light.
3.
Press programme selection/cancel but ton again. The programme light A comes
on with a fixed light and programme light
B starts flashing. Wait until programme
First use
Before using your dishwasher for the first
time:
• Ensure that the electrical and water connections comply with the installation instructions
• Remove
all
packaging from inside the ap-
pliance
• Set the water softener level
Set the water softener
The dishwasher
is
equipped with a water
softener designed
to
remove minerals and
salts from the water supply, which would
have a detrimental or adverse effect on the
operation of the appliance.
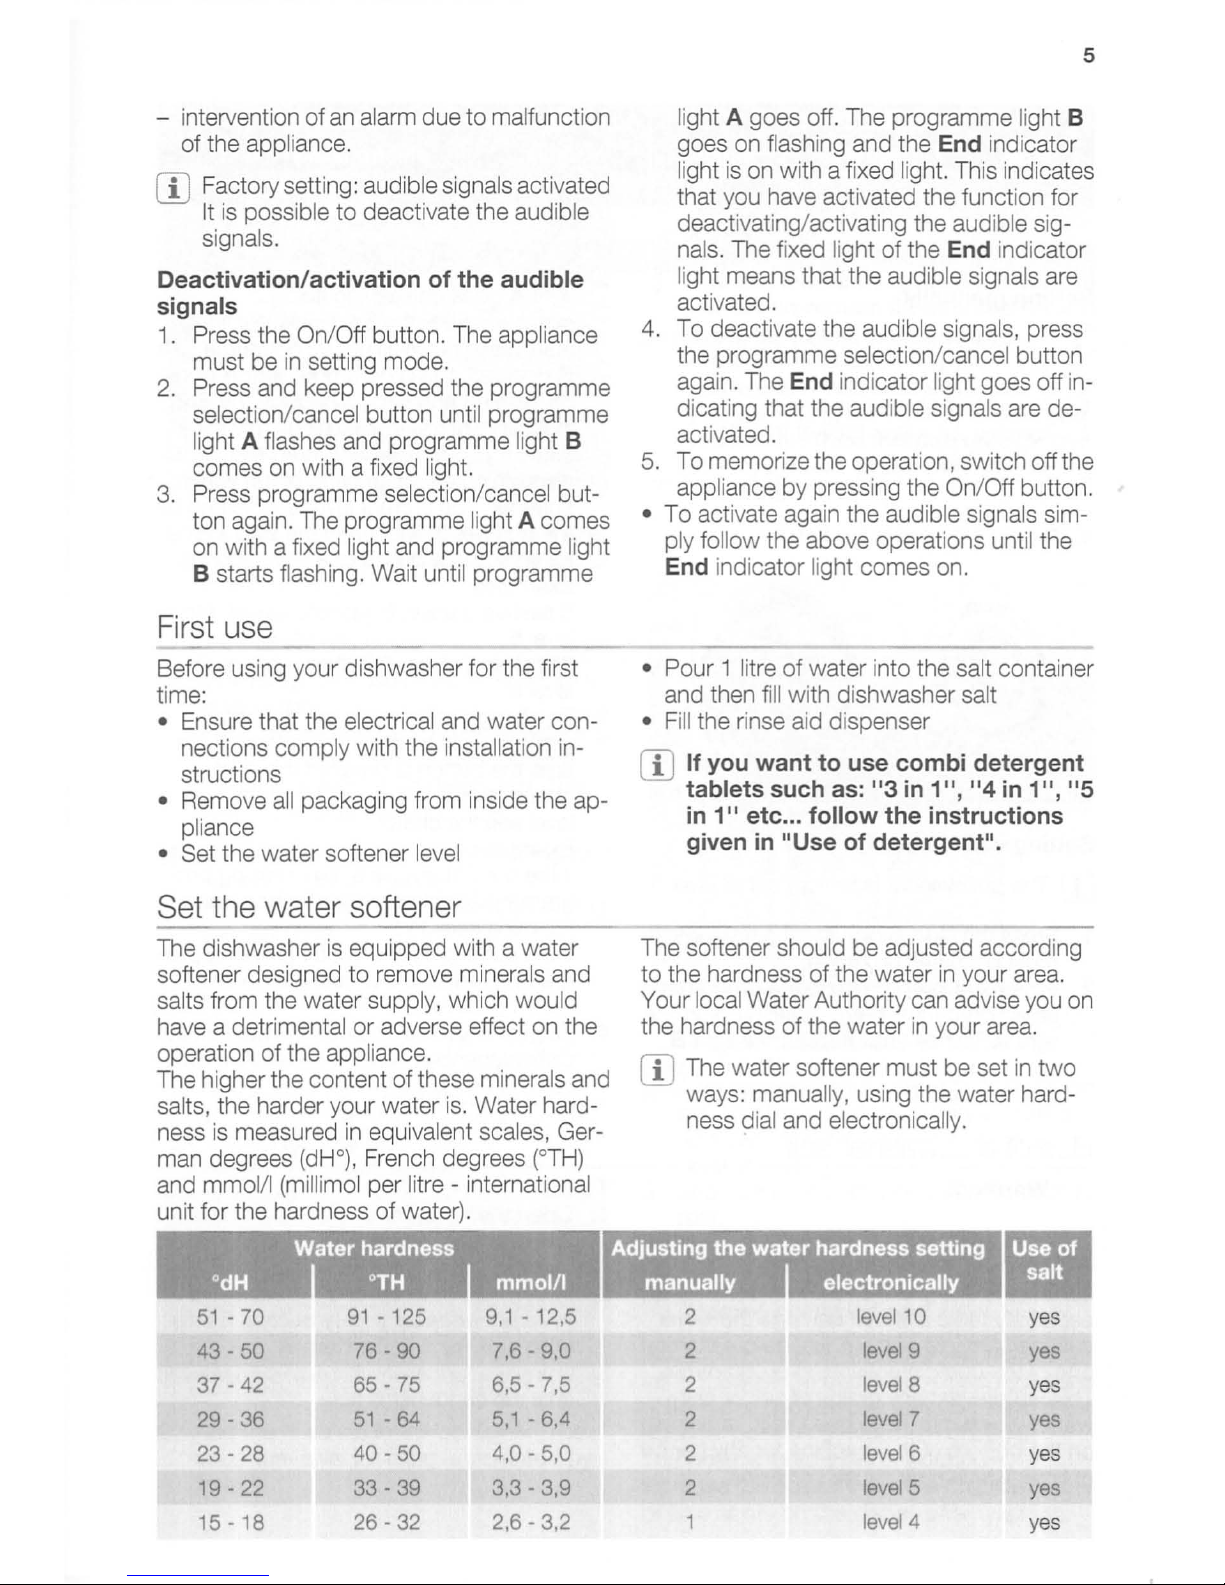
The higher the content of these minerals and
salts, the harder your water
is.
Water hard-
ness
is
measured in equ
iva
lent scales, Ger-
man degrees
(dHO), French degrees (OT
H)
and mmol
/I
(millimol per litre - international
unit for the hardness of water).
!.;:
..
,'¥.'.
:~~~
~e,~
~ardne
~.~
,.1;
",
odH : .,
'J
\;'.,.:
I~TH
,
';f ml1)ol/l
51
- 70
91
- 125
9,1
-12,5
43 - 50 76 -
90
7,6 - 9,0
37 - 42 65
-75
6,5
-7,5
29 - 36
51
- 64
5,1
- 6,4
23 - 28
40 - 50 4,0 - 5,0
19 -
22
33 - 39
3,3 - 3,9
15 - 18
26 - 32 2,6 - 3,2
5
light A goes off. The programme light B
goes on flashing and the
End indicator
light
is
on with a fixed light. This indicates
that you have activated the function for
deact
iv
ating/activating the audible sig-
nals, The fixed
light of the End indicator
light rneans that the audible signals are
activated,
4. To deactivate the audible signals, press
the programme selection
/c
ancel button
again, The
End indicator light goes off
in
dicating that the audible signals are deactivated.
5,
To rnemorize the operation, switch off the
appliance by pressing the
On/Off button.
• To activate again the audible signals simply follow the above operations until the
End indicator light comes on,
• Pour 1 litre of water into the salt container
and then
fill
with dishwasher salt
•
Fill
the rinse aid dispenser
rn
If you want to use combi detergent
tablets such
as:
"3
in
1", "4
in
1", "5
in
1"
etc ... follow the instructions
given
in
"Use of detergent".
The softener should be adjusted according
to the hardness of the water
in
your area,
Your local Water Authority can advise you on
the hardness of the water
in
your area,
rn
The water softener must be set
in
two
ways: manually, using the water hardness dial and electronically.
2
level
10 yes
2
level
9 yes
2
level
8 yes
2
level
7
yes
2
level
6 yes
2
level
5 yes
level
4
yes
Page 6
6
<4
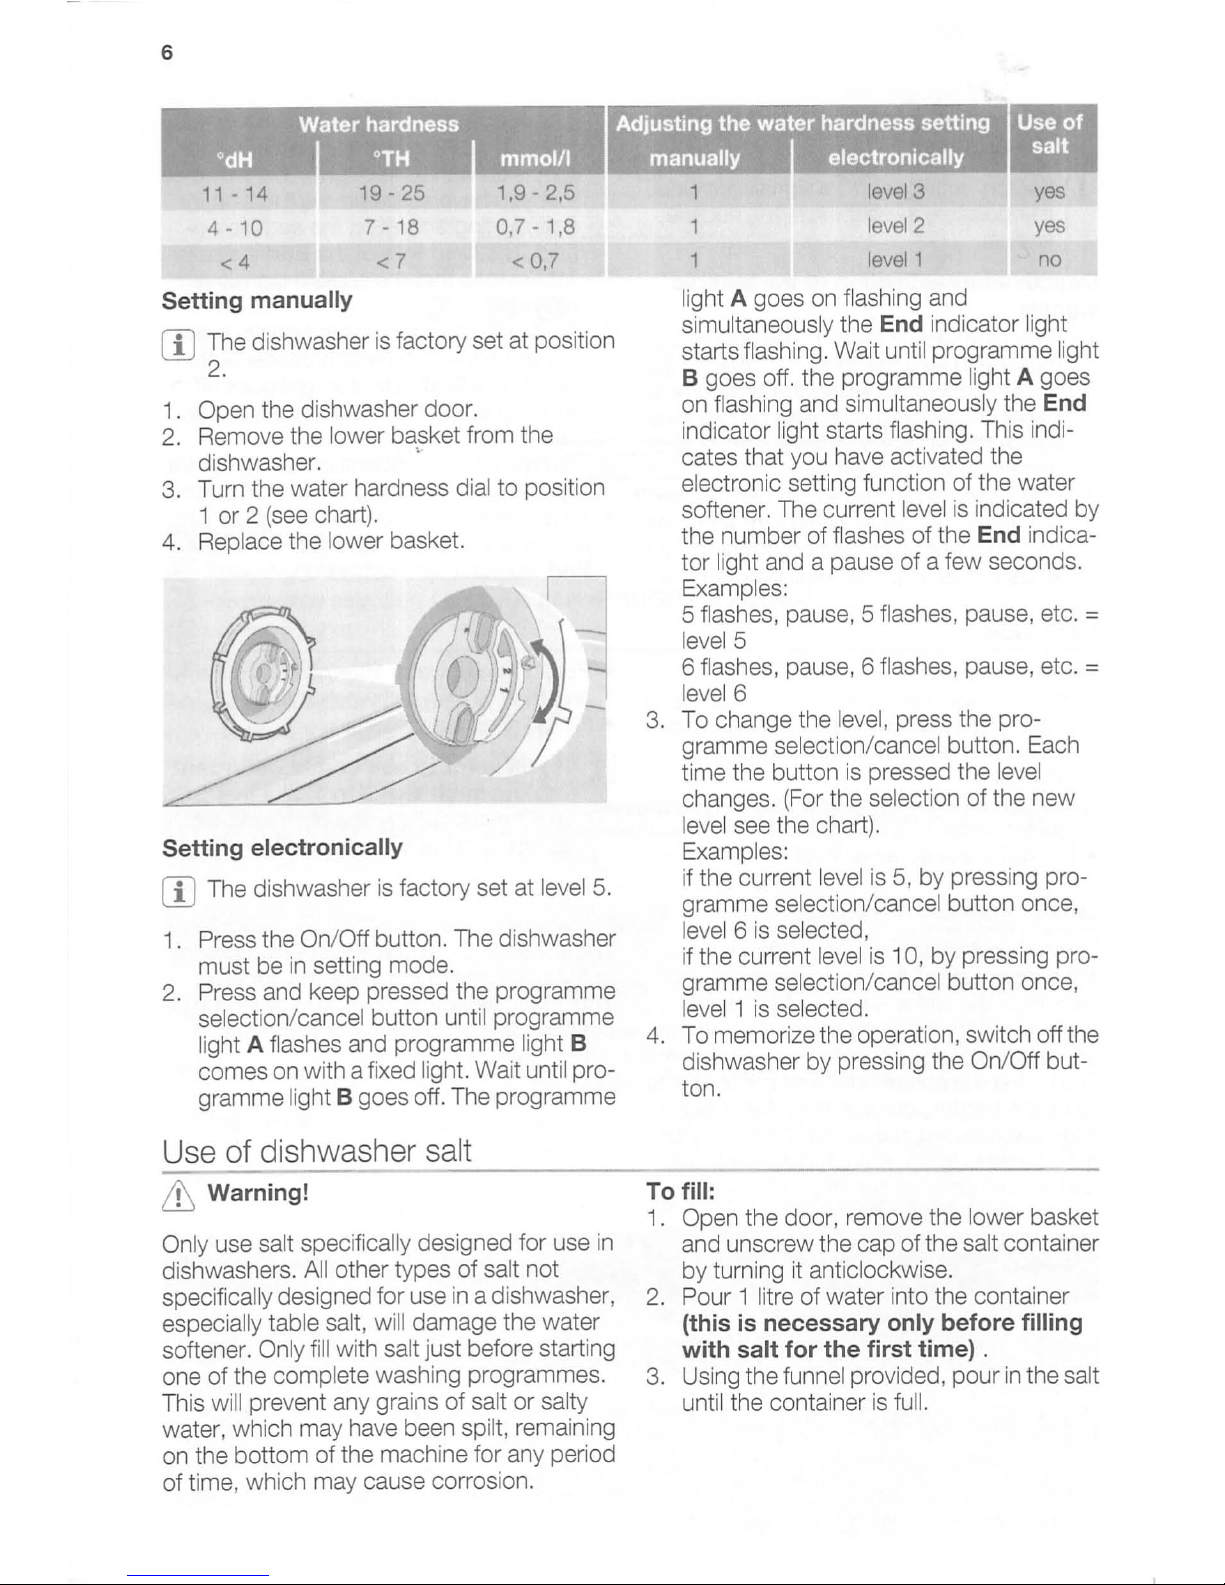
Setting manually
7 -
18
<7
0
,7
- 1,8
< 0,7
rn
The dishwasher
is
factory set at position
2.
1. Open the dishwasher door.
2.
Remove the lower basket from the
dishwasher.
'
3.
Turn the water hardness dial to position
1 or 2
(see
chart).
4.
Replace the lower basket.
Se
ttin g electr
onica lly
rn
The dishwasher is factory set at level
5.
1. Press the On/Off button. The dishwasher
must be
in
setting mode.
2.
Press and keep pressed the programme
selection/cancel button until programme
light A flashes and programme light B
comes on with a fixed
light. Wait until pro-
gramme
light B goes off. The programme
Use of dishwasher sa
lt
ill
Warning!
Only use salt specifically designed for use
in
dishwashers.
All
other types of salt not
specifically designed for use
in
a dishwasher,
especially
table salt, will damage the water
softener.
Only
fill
with salt just before starting
one of the complete washing programmes.
This will prevent any grains of salt or salty
water, which may have been spilt, remaining
on the bottom of the machine for any period
of time, which may cause corrosion.
level
1
yes
no
light A goes on flashing and
simultaneously the End indicator light
starts flashing. Wait until programme light
B goes off. the programme light A goes
on
flashing and simultaneously the End
indicator light starts flashing. This indicates that you have activated the
electronic setting function of the water
softener. The current
level
is
indicated by
the number of
flashes of the End indica-
tor
light and a pause of a few seconds.
Examples:
5
flashes, pause, 5 flashes, pause, etc. =
level 5
6
flashes, pause, 6 flashes, pause, etc. =
level 6
3.
To change the level, press the pro-
gramme
selection/cancel button. Each
time the button
is
pressed the level
changes. (For the selection of the new
level see the chart).
Examples:
if the current
level
is
5,
by pressing pro-
gramme
selection/cancel button once,
level 6
is
selected,
if the current
level
is
10, by pressing pro -
gramme
selection/cancel button once,
level 1
is
selected.
4.
To memorize the operation, switch off the
dishwasher by pressing the
On/Off but-
ton.
To
fill:
1. Open the door, remove the lower basket
and unscrew the cap of the
salt container
by turning it anticlockwise.
2.
Pour 1 litre of water into the container
(this is necessary only before filling
with salt
for
the
first
time
) .
3.
Using the funnel provided, pour
in
the salt
until the container
is
full.
Page 7
4.
Replace the cap making sure that there
is no trace of
salt on the screw thread or
on the gasket.
Use of rinse aid
& Warning! Only use branded rinse aid for
dishwashers.
Never
fi
ll
the rinse aid dispenser with any
other substances (e.g. dishwasher
cleaning agent, liquid detergent
). This
would damage the appliance.
rn
Rinse aid ensures thorough rinsing, and
spot and streak free drying.
Rinse aid is
automatically added during
the
last rinse.
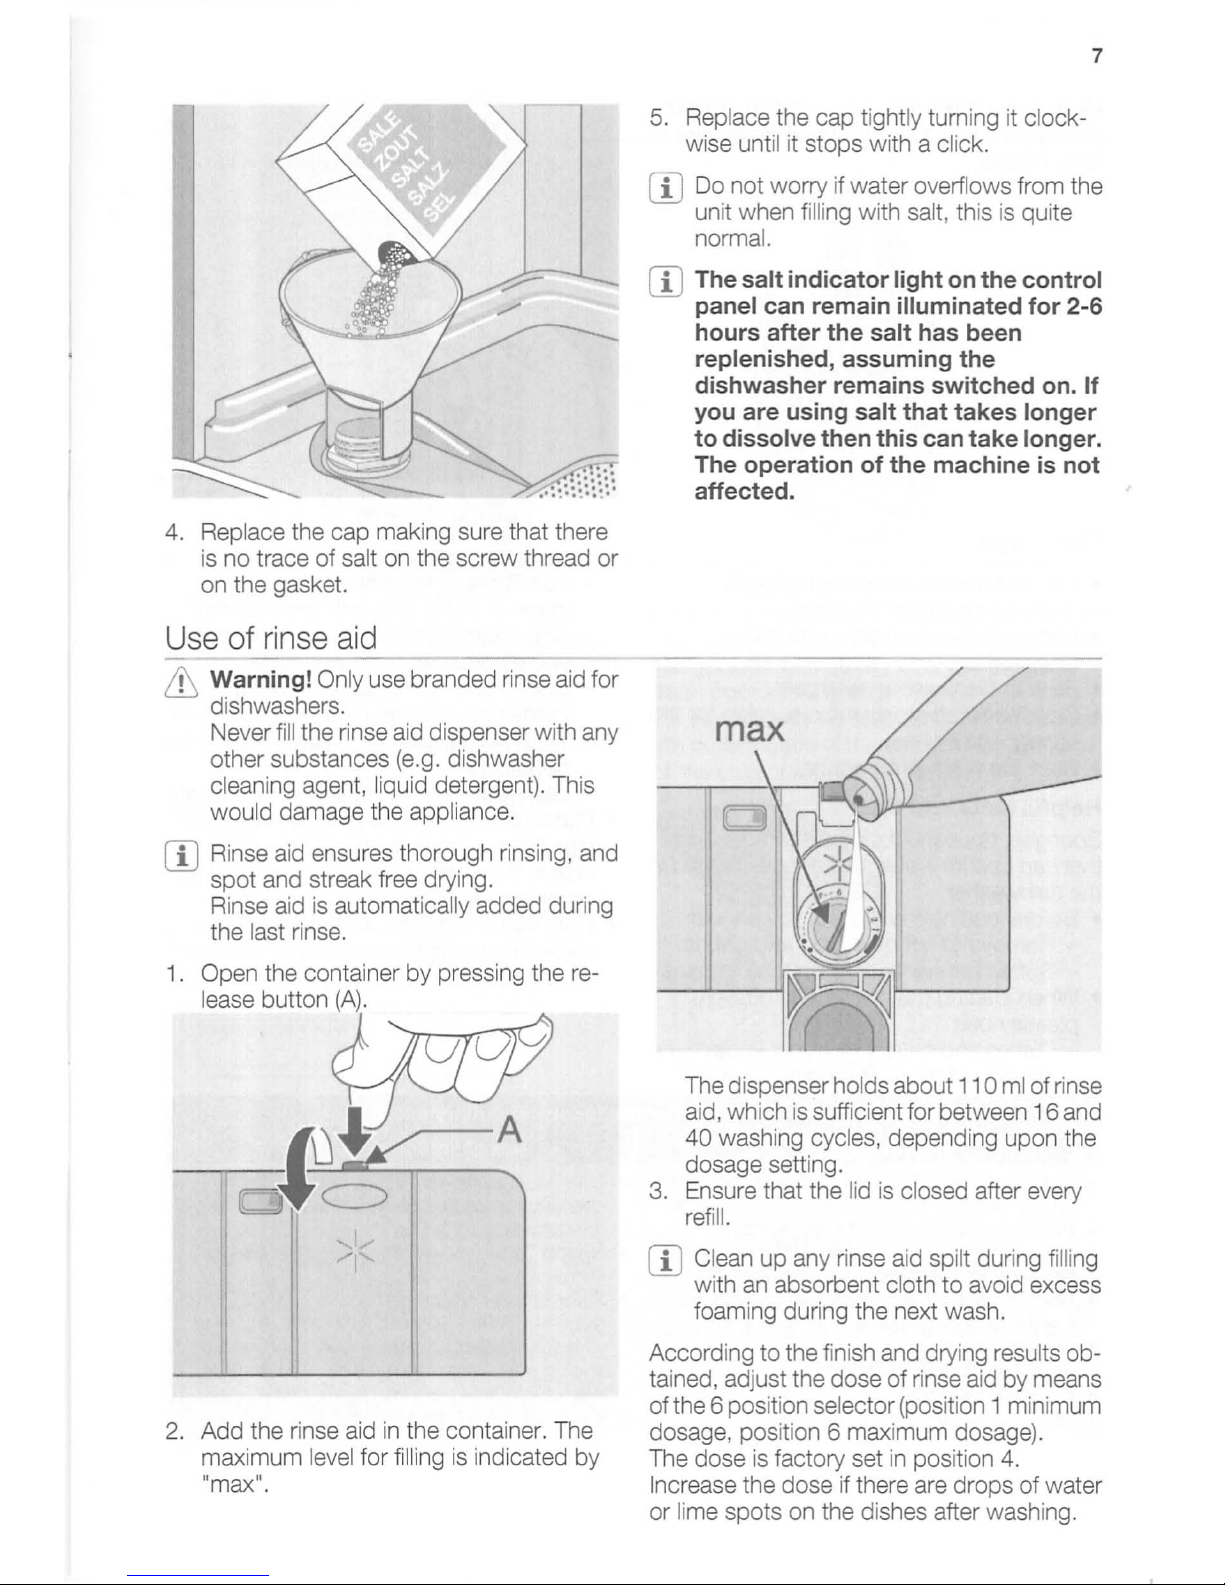
1.
Open the container
by
pressing the re-
lease button
(A).
~jr.
2. Add the rinse aid
in
the container. The
maximum
l
evel
for filling
is
indicated by
"maxI!
,
5.
Replace the cap tight
ly
tuming it clock-
wise unt
il
it stops with a click .
7
rn
Do not worry if water overflows from the
un
it when f
illi
ng with sal
t,
this is quite
normal.
rn
The salt indicator light on the control
panel can remain illuminated for
2-6
hours after the salt has been
replenished, assuming the
dishwasher remains switched on.
If
you are using salt that takes longer
to dissolve then this can
take
longer.
The operation of the machine is not
affected.
The dispenser holds about 110 ml of rinse
aid, which
is
sufficient for between 16 and
40 wash ing cycles, depending upon the
dosage setting.
3.
Ensure that the lid is closed after eve
ry
ref
ill.
rn
Clean up any rinse aid spilt during f
illi
ng
with an absorbent cloth
to
avoid excess
foaming
dur
ing the next wash.
Accord ing
to
the finish and dry ing results ob-
tained, adjust the dose of rinse aid by means
of the 6 position
selector (position 1 minimum
dosage, position 6 maximum dosage).
The dose
is
facto
ry
set in pos ition 4.
Increase the dose if there are drops of water
or
lime spots on the dishes after washing.
Page 8

8
Reduce it if there are sticky whitish streaks
on the dishes or a
bluish film on glassware or
knife
blades.
Da
!!l.u
se
• Check if it's necessary to refill with
dishwasher
salt or rinse aid.
• Load cutlery and dishes into the
dishwasher.
•
Fill
with dishwasher detergent.
• Select a wash programme suitable for the
cutlery and dishes.
• Start the wash programme.
Helpful hints and tips
Sponges, household cloths and any object
that can absorb water may not be washed
in
the dishwasher.
• Before loading the dishes, you should:
- Remove
all
left over food and debris.
-
Soften remnants of burnt food
in
pans
• When loading the dishes and cutlery,
please
note:
- Dishes and
cutlery must not irnpede the
rotation of the spray arms.
• Cutlery with wooden, horn, china or mother-ofpearls handles.
• Plastic items that are not heat resistant.
• Older cutlery with glued parts that are not
temperature resistant.
• Bonded cutlery items or dishes.
• Pewter or copper items.
• Lead crystal glass.
• Steel items prone to rusting.
• Wooden platters.
• Items made from synthetics fibres.
- Load hollow items such as cups,
glasses, pans, etc. with the opening
downwards so that water cannot
collect
in
the container or a deep base.
- Dishes and items of
cutlery must not
lie
inside one another, or cover each other.
- To avoid damage
to
glasses, they must
not touch.
- Lay
small objects
in
the cutlery basket.
• Plastic items and pans with non stick coatings have a tendency to retain water
drops; these items
will not dry as well as
porcelain and steel items.
• Light items (plastic bowls etc.) must be
loaded in the upper basket and arranged
so they do not move.
• Only wash stoneware
in
the dishwasher if it
is
specially marked as being dishwasher-safe by
the manufacturer.
• Glazed patterns may fade
if
machine washed
frequently.
• Silver and aluminium parts have a tendency
to
discolour during washing: Residues, e.
g.
egg
white, egg yolk and mustard often cause discolouring and staining on silver. Therefore always clean left-overs from silver immediately, if
it
is
not
to
be washed straight after use.
Page 9

Load cutlery and dishes
The lower basket
The lower basket
is
designed
to
take sauce-
pan,
lids, plates, salad bowls, cutlery etc.
The rows of prongs on the right side
in
the
lower basket can
lie
flat to allow you
to
load
pots, pans and bowls.
The cutlery basket
ill
Long bladed knives stored
in
an upright
. position are a
potential hazard. Long
and/or sharp items of cutlery such as
caNing knives must be positioned
horizontally in the upper basket. Take
care when
loading or unloading sharp
items such as knives.
Forks and spoons must be
placed
in
the
removable cutlery basket with the handles
facing downwards and the knives with their
handles facing upwards.
9
If
the handles protrude from the bottom of the
basket, obstructing the
lower spray arm, load
the cutlery with the handles facing upwards.
Mix spoons with other
cutlery to prevent
them from sticking together.
For best
results we recommend that you use
the
cutlery grids
(if
the size and dimensions
of the
cutlery allow
it).
For larger utensils use only 1 grid.
The upper basket
The upper basket
is
designed for saucers,
salad bowls, cups, glasses, pots and lids.
Arrange items on and underneath the cup
racks so that water can reach
all
surfaces.
Page 10

10
Glasses with long stems can be placed upside down
in
the cup racks. For taller items
the cup racks can be
folded upwards .
CD
Before closing the door, ensured that
the spray arms can rotate
freely.
Adjusting the height of the upper basket
If
washing
very
large plates you can load
them
in
the lower basket after moving the
upper basket to the higher position.
Use
of
~
etergent
CD
Only use detergents specifically designed for use
in
dishwashers.
Please observe the manufacturer's dosing
and storage recommendations
as
stated on the detergent packaging.
~
Using no more than the correct amount
of detergent contributes to reducing
pol-
lution.
Fill
with detergent
1.
Open the lid.
With
upper basket
raised
With
upper basket
lowered
30
em
29
em
To move to the higher position proceed
as
follows:
1. P
ullout the
basket until
it
stops.
2.
Hold the upper basket by the handle
on
the side.
3.
Carefully lift up the basket until
it
stops.
4.
Lower it vertically. T
he
mechanism will
engage the basket
in
the higher or lower
position.
it
After loading your machine always
close
the door, as an open door can
be a hazard.
Page 11

2. Fill
the detergent dispense r
(1)
with de-
tergen
t.
The marking indicates the dosing
levels:
20 = approximately 20 g of detergent
30
= approximately 30 g of detergent.
3. All
programmes with prewas h need an
additional detergent dose
(5/10
g)
that
must be placed
in
the prewash detergent
chamber
(2).
This detergent will be used during the
prewash phase.
When using detergent tablet
s;
place the
tablet
in
com artment
(1)
4. Close the
lid
and press until it locks
in
place.
rn
Select the washing programme with
the door
slightly opened. The start of
the programme will occur
only after
the
closure of the door. Until then it
is
possible
to
modify the settings.
11
rn
Detergent tablets from different manu-
facturers dissolve
at
different rates. For
this reason, some detergent tablets do
not attain their full cleaning power during
short washing programmes. Therefore,
please use long washing programmes
when using detergent tablets, to ensure
the complete removal of detergent
residuals.
Use of combi detergent tablets
These products are detergents with a com-
bined cleaning, rinsing and salt functions.
They can also contain other different agents
depending on which kind of tablets you
choose
("3
in 1 ",
"4
in 1 ",
"5
in
1" etc
...
).
1. Check whether these detergents are
suitable for your water hardness. See the
manufacturers instructions.
The refilling of the salt container and the
rinse aid dispenser are no longer
necessary.
In
this case the rinse aid indi-
cator light will always remain illuminated
when the machine
is
switched on.
2.
Select the lowest setting for water hardness and rinse aid dosage.
If the drying results are not satisfactory
we
recommend that you:
1.
Fill
up the rinse aid dispenser with rinse
aid.
2.
Set the rinse aid dosage to position 2.
If you decide to turn back to the use of
standard detergent system we advise
that you:
1.
Fill
up the dispensers for salt and rinse aid
again.
2.
Adjust the water hardness setting to the
highest setting and perform 1 normal
washing programme without loading any
dishes.
3.
Adjust the water hardness setting ac cording to the hardness of the water
in
your area.
4.
Adjust the rinse aid dosage.
1. Check that the baskets have been loaded
correctly and that the spray arms are free
to rotate.
2.
Check that the water tap
is
opened.
Page 12

12
3. Press the On/Off button. The dishwasher
must be
in
setting mode.
4. Press the programme
selection/cancel
button until the light corresponding to the
required washing programme comes on
(see "Washing programmes" chart).
Close the dishwasher
door
, the pro-
gramme starts automatically.
Setting and starting the programme with
delay start
CIl
The start
of
the washing programme w
ill
be delayed by 3 hours .
1. Select a washing programme.
2. Press the delay start button. The corre-
sponding indicator
li
ght comes on.
3. Close the dishwasher door. The count-
do
wn starts automat ically.
CIl
Opening the
door
will interrupt the
countdown .
Once the
door
is
closed the
countdown
will continue from the point
at which it was interrupted.
4. Once the countdown has elapsed the
washing programme
w
ill
start
automatica
lly.
Cancel a delay start
in
progress
1. Open the dishwasher door.
2. Press the
delay start button. The corre-
sponding indicator
li
ght goes off.
3.
Close the dishwasher
door
. The washing
programme
will start automatica
lly
.
ill
Warning! Interrupt or cancel a
washing programme
in
progress
ONLY if it's abso lutely necessary.
Attention! Hot steam may escape
when the door
is
opened. Open the
door
carefully.
Unloading the dis
hw
asher
•
Hot
dishes are sensitive to knocks. The
dishes
should therefore be allowed to cool
down
before removing from the appliance.
•
E
mpty
the lower basket first and then the
upper one; th is
will avoid water dripping
from the upper basket onto the dishes in
the lower one.
• Water may appear on the sides and the
door
of
the dishwasher as the stainless
Interrupt a washing programme in
progress
Open the dishwasher
doo
r; the programme
w
ill
stop. Close the door; the programme will
start from the point at which it was interrupted.
Cancel a washing programme
in
progress
• Open the dishwasher door; press the programme
selection/cancel button for about
3 seconds , unt
il
the light of the running
programme goes off and the
End indicator
light flashes. The washing programme has
been
cancelled and the appliance
is
now
in setting mode
..
• If a new washing programme
is
to be se-
lected, check that there
is
detergent in the
detergent dispenser.
End of the washing programme
• The dishwasher will automatically stop and
an
audible signal informs you
of
the end
of
the wash ing programme .
• Open the dishwasher
door
.
• The End
of
programme indicator light is
on.
• The indicator light of the programme just
ended remains on.
1. Switch off the dishwasher by pressing the
On/Off button.
2. Leave the dishwasher
door
ajar and wait
a few minutes before remov ing the
dishes;
in
this way they w
ill
be cooler and
the drying
will be improved.
steel w
ill
eventually become
coo
ler than
the dishes.
CIl
When
the
washing programme has
finished, it
is
recommended that the
dishwasher
is
unplugged and the
water
tap turned off.
Page 13

Washing programmes
Washing programmes
Programme
Q
Intensive 70°
g
Normal 65°
~
-
Quick 60°
1)
~
Eco
50'
2)
~
Rinse and Hold
Heavy soil
Normal soil
Normal
or
light
soil
Normal soil
Any
Type of load
Crockery, cutlery,
pots and pans
Crockery, cutlery,
pots and pans
Crockery and
cutlery
Crockery and
cutlery
Partial load (to be
completed later in
the day).
Programme description
Prewash
Main wash
2 intermediate
rinses
Final
rinse
Drying
Prewash
Main wash
1 intermediate rinse
Final rinse
Drying
Main wash
Final
rinse
Prewash
Main wash
1 Intermediate rinse
Final
nnse
Drying
1 cold rinse (to avoid food scraps from
sticking).
13
This programme does not require the use
of
detergent.
1)
Ideal for washing a partially loaded dishwasher. This
is
the perfect daily programme, made
to
meet
the needs
of
a family of 4 persons who only wish
to
load breakfast and dinner crockery and cutlery.
2)
Test programme for test institut
es
Consumption values
.
..
:
Intensive 70° 120 - 130
Normal 65°
100-110
Quick 60° 30
Eco
50°2)
130 - 140
Rinse and Hold
12
1,8 - 2,0
1,4-1,6
0,9
1,0 -
1.2
0.1
l
ater
consumption
'~
(in
litres)
.
It,i
l)
,
22 -24
19 -
21
9
14 - 16
5
1)
The consumption values are intended
as
a guide and depends on the pressure and the temperature
of
the water and also by the variations
of
the power supply and the amount
of
dishes
2)
Test programme for test institutes
Care and cleaning
Cleaning the filters
The filters must be checked and cleaned
from time
to
time. Dirty filters will degrade the
washing resul
t.
ill
Warning! Before cleaning the filters
ensure that the machine
is
switched off.
1.
Open the door, remove the lower basket.
2.
The dishwasher filter system comprises a
coarse filter (A
),
a microfilter (8) and a flat
filter. Unlock the filter system using the
handle on the microfilter.
Page 14

14
A
-'H-
--B
3. Turn the handle about 1/4 a turn anti-
clockwise and rernove the filter systern
4. Take
hold of the coarse filter
(A)
by the
handle with the hole and rernove from the
microfilter (8
).
5. Clean
all
filters thoroughly under running
water.
6. Remove the flat filter from the base of the
washing compartment and
clean both
faces
thoroughly.
\
7. Put the flat filter back
in
the base
of
the
washing compartment and ensure that it
fits perfectly.
8. Place the coarse filter (A)
in
the microfilter
(8) and press together.
9. Put the
filter combination
in
place and
lock by turning the handle clockwise to
the stop. During this process ensure that
the
flat filter does not protrude above the
base of the washing compartment.
rn
NEVER use the dishwasher without filters. Incorrect repositioning and fitting
of
the filters will produce poor washing results and will result
in
damage
to
the
appliance
rn
NEVER try to remove the spray
arms.
If
residues
of
soil have clogged the holes
in
the spray arms, remove the debris
with a
cocktail stick.
External cleaning
Clean the external surfaces
of
the machine
and
control panel with a
damp
soft cloth.
If
necessary use only neutral detergents. Never
use abrasive products, scouring pads or
sol-
vent (acetone, trichloroethylene etc
...
).
Internal cleaning
Ensure that the seals around the door, the
detergent and rinse aid dispensers are
cleaned regularly with a
damp
cloth.
We recommend every 3 months you run the
wash programme for heavy
soiled dishes us-
ing deterge nt but wit hout dishes.
Prolonged periods of non-operation
If
you are not using the machine for a pro-
longed period
of
time you are advised to:
1.
Unplug the appliance and then turn off
the water.
2.
Leave the door ajar to prevent the forma-
tion
of
any unpleasant smells.
3. Leave the inside
of
the machine clean.
Frost precautions
Avoid placing the machine
in
a location
where the temperature
is
below ao
c.
If
this
is
unavoidable, empty the machine, close the
appliance door, disconnect the wate r inlet
pipe and empty
it.
Moving the machine
If
you ha
ve
to move the machine (moving
house etc
...
):
1.
Unplug it.
2. Turn the water tap off.
Page 15

3.
Remove the water inlet and discharge
hoses.
4.
Pull the machine out together with the
hoses.
What to do
if
...
The dishwasher wi
ll
not start or stops during
operation.
Certain
problems can be due to the lack of
simp le maintenance or oversights, which can
• continuous
flashing
of
the
light of
the
running
programme
• intermittent audible
signal
• 1 flas
h of the
End
indicator
ligh
t
The dishwasher does not fill with water
• continuous
flashing
of
the
tight of the
running
programme
• intermittent audible
signal
• 2
flashes
of
the End indicator
tight
The dishwasher will not drain
• continuous flas
hing
of the lig
ht
of the
running
programme
• intermittent au
dible signal
• 3
flash
es
of
the
End ind
ica
tor
tig
ht
Anti-flood device
is
activated
The programme does not start
Once these checks have been carried out
sw
itch on the appliance.
The programme w
ill
continue from the point
at which it was interrupted.
If
the malfunction or fault code reappears
contact your
local Service Force Centre.
For other fault codes not described in the
above chart,
please contact your local Serv-
ice Force Centre .
15
Avoid over tilting the machine during transportation.
be
solved with the help of the hints described
in
the chart, without calling out
an
engineer.
Switch off the di
sh
washer and carry out the
following suggested corrective actions .
•
The
water tap
is
blocked
or
furred
with
time-
scale
.
Clean the
water
tap.
• T
he
water tap
is
turned
off.
Turn
the water tap on.
• The
filter
(where
present)
in
the
threaded inlet
hose
is blocked.
Clean the
filter.
• The water
inlet
hose
has not
been
correctly
laid
or
it
is kinked
or
squashed.
Check
the
water
Inlet
hose
connect
ion
.
•
The
sink
spigot
IS
blocked.
Clean
out the
Sink
spigot.
•
The
water
drain
hose
has
not
been
correctly
laid
or
It
is
kinked
or
squashed.
Check
the
water
drain
hose
connection.
• Close the water t
ap
and
contact yo
ur loca
l
Service
Force Centre.
•
The
dishwasher door
has
not
been
prop
erly
closed
.
Close t
he
door.
• The main
plug
is
not plugged
in.
Insert
the main
plu
g
•
The fuse h
as
blown out
in
the h
ous
ehold
fuse
box.
Replace the fuse
.
• Delay start h
as been set.
If dishes
are
to be
washed
immediat
ely,
cancel the
delay start.
Contact your local Se
rvi
ce Force Centre,
quoting the
model (Mod.
).
product number
(PNC) and
serial number (S.N.
).
This information can be found on the rating
plate located on the side of the dishwasher
door.
So that you
always have these numbers at
hand, we recommend you
to
make a note of
them here:
Mod.:
...
. .
...
.......
.
....
......
. . . .
PNC: ... . .... . .
...
.. .....
...
..
....
.
Page 16

16
S.N.: .........
.....
. .
......
.
......
.
The dishes are not
clean
The dishes are
wet
and dull
There are streaks,
milky spots or a
bluish coating on
glasses and dishes
Water drops have
dried onto glasses
and dishes
The wash results are not satisfactory
•
The
wrong
programme
has
been
selected.
•
The
dishes
are
arranged
in
such a way
as
to stop water
reaching
all
parts
of a
surface. The
baskets must not
be
overloaded
.
•
The
spray
arms
do not rotate
freely
due
to incorrect arrangement of the
load.
•
The
filters
in
the
base
of t
he
washing
compartment
are
dirty or incorrectly
pos
itioned.
•
Too litt
le
or
no
detergent
has
been
used
.
•
Where
there are limes
cales
deposits
on the
dishes; the
salt
container
is
emp
ty
or incorrect l
eve
l of the water soft
ener
has
been
set.
•
The
drain hose
con
nection
is
not correct.
•
,The
salt container cap
is
not properly
closed.
•
Rinse
aid
was
not
used
.
•
The
rinse
aid
dispenser
is
empty.
•
Decreas
e rin
se
aid dosa
ge.
• I
ncrease
rinse
aid
dosage.
•
The
detergent
may
be the
cause.
Con
tact
the det
ergent
manufacturer
consumer
care line.
If
after a
ll
these checks, the problem pers ists,
contact your
local Service Force Centre.
Technical data
Dimensions
Width
Height
Depth
59,6
cm
81
,8 - 89,8
cm
55
,5
cm
Electrical
connect
ion -Voltage
- Information
on
the
electrical
connect
ion
is
given
on
the rat
ing
plate
Overall
power -
Fuse
on
the
inner
edge
of
the
dishwasher door.
Water
supply
pressure
Capacity
Hints for test institutes
Minimum
Maximum
Testing in accordance with
EN
60704 must
be carried out with
appliance fully loaded and
using the test programme (see
"Consumption values").
Test in accordance with
EN
50242 must be
carried out when the
salt container and rinse
0,05
MPa
(0,5
bar)
0,8
MPa
(8
bar)
12
place sett
ings
.---.-~
aid dispenser have been f
ill
ed with salt and
rinse aid respectively and using the test
pro-
gramme (see "Consumption values").
~'!l""·:~i.~"I.'·l":'
'.
::~ . '~
Fullioad:
12
standard nlace settings
It'h
,
~)
~
t (
~
Amount of detergent
required:
Rinse
aid sett
ing
5 g +
25
g rrype
B)
position
4 rrype
III
)
Page 17

rn
Remove cup racks on the left-hand side
of the upper basket.
Installatio
n
-----
& Warning ! Any electrical and/or
plumbing
work
required to insta
ll
this appliance should be carried out
by a
qualified electrician and/or
plumber or competent person.
Remove
all
packagi ng before positioning the
machine.
If
possible, position the machine next to a
water tap and a drain.
This dishwasher
is
designed to be fitted un-
der a kitchen counter or work surface.
Attention! Carefully follow the instructions
on the
enclosed template for building
in
the
dishwasher and
fitting the fumiture panel.
No further openings for the venting of the
dishwasher are
required, but only to let the
water
fill
and drain hose and power supply
cable pass through.
17
Arrangement lower basket
Arrangement
cutlery basket
The dishwasher incorporates adjustable feet
to
allow the adjustment of the height.
During
all
operations that involve accessibility
to intemal components the dishwasher has
to be
unplugged.
When inserting the machine, ensure that the
water
inlet hose, the drain hose and the sup-
ply cable are not kinked or squashed.
Fixing to the adjacent units
The dishwasher must be secured against tilt ing.
Therefore make sure that the counter it
is
fixed under,
is
suitably secured
to
a fixed
structure (adjacent kitchen units cabinets,
wall).
Leve
lli
ng
Good levelling
is
essential for correct closure
and sealing of the door.
Page 18

18
When the appliance
is
correctly levelled, the
door will not catch on either side of the cabi-
net.
Water connection
Water inlet connection
Th
is
dishwasher may be fed with either hot
(max.
60
°)
or cold water. Nevertheless we
advise you use a cold water supply.
A hot water supply
is
not always efficient with
heavily soiled crockery as it shortens the
washing programmes a lot.
For making the connectlon itself, the coupling nut fitted to the machine's inlet hose
is
designed to screw onto a 3/4" gas thread
spout or to a purpose made quick-coupling
tap such as the Press-block.
The water pressure must be within the limits
given
in
the "Technical data". Your local Wa-
ter Authority will advise you on the average
mains pressure in your area.
The water inlet hose must not be kinked,
crushed, or entangled when it is being connected.
The dishwasher features inlet and drain ho-
ses which can be turned either to the left or
the right to suit the installation by means of
the locknut.
The locknut must be
correctly fitted to avoid
water
leaks.
rn
Attention! NOT
all
models of dishwashers have inlet and drain hoses provided
with a locknut.
In
this case, this facility
is
not available.
If
the machine
is
connected
to
new pipes or
pipes which have not been used for a long
time, you should
run
the water for a few mi-
nutes before connecting the inlet hose.
DO NOT use connection hoses which
have
previously been used on an old
ap-
pliance.
rn
Th
is
appliance has been fitted with
safety features which will prevent the
water used
in
the appliance from return-
ing back into the drinking water system.
This appliance complies with the appli-
cable plumbing regulations.
Water inlet hose with safety valve
After connecting the double-walled water in-
let hose, the safety valve
is
next to the tap.
Therefore the water inlet hose
is
only under
pressure while the water
is
running.
If
the wa-
If
the door does not close correctly, loosen
or tighten the adjustable feet until the machine
is
perfectly level.
ter inlet hose starts to leak during this operation, the safety valve cuts off the running
water.
Please take care when installing the water
inlet hose:
• The electrical cable for the safety valve
is
in
the double-walled water inlet hose. Do
not immerse the water inlet hose or the
safety valve
in
water.
•
If
water inlet hose or the safety valve
is
damaged, remove the mains plug
immediately.
• A water inlet hose with safety valve must
only be replaced by the
Service Force
Centre.
it
Warning! Dangerous voltage
Water drain connection
The end of the drain hose can be connected
in
the following ways:
1.
To the sink outlet spigot, securing it to the
underside of the work surface.
Th
is
will
prevent waste water from the sink running into the machine.
2.
To a stand pipe provided with venthole,
minimum internal diameter 4 crn.
The waste connection must be at a height of
between
30 cm
(mi
nimum) and 100 cm
(maximum) from the bottom of the
dishwasher.
Page 19

I:;::
.
The drain hose can face either
to
the right or
left of the dishwasher
Ensure the drain hose
is
not bent or
squashed as this
could prevent or slow down
t
he
discharge of water.
The sink
plug must not be
in
place when the
machine
is
draining as this could cause the
water to syphon back into the machine.
If
you use a drain hose extension it must be
no
longer than 2 metres and its internal
diameter must be no smaller than the diameter of the hose provided.
Likewise the
internal
diameter of the couplings used for connections to the waste
outlet must be no smaller than the diameter
of the hose provided.
19
When connecting the drain hose
to
an under
sink trap spigot.
the entire plastic
mem-
brane
(A)
must be removed. F
ailure
to r
e-
move
all
the membrane will result
in
food
particles building up over time eventually
blocking
the dishwasher drain hose spigot
A
rn
Our appliances are supplied with a
security device to protect against the
re
-
turn of dirty water back into the machine.
If
the spigot of your sink has a "no retum
valve" incorporated this can prevent the
correct draining of your dishwasher. We
therefore advise you
to
remove
it.
rn
To avoid water leakage after installation
make sure that the water couplings are
tight.
Page 20

20
Electrical connect ion
it
Warning! Safety standards require
the
appliance to be earthed.
Prior to using the
appliance for
the
first time, ensure that the rated voltage and type of supply on the rating
plate match that of the supply where
the
appliance
is
to be installed. The
fuse rating
is
also to be found
on
the
rating
plate.
Always plug
the mains plug into a
correctly installed shockproof
socket.
'
Multi-way plugs,
connectors and ex-
tension
cab les must not be used.
This
could constitute a fire hazard
through overheating.
If necessary, have the domestic wiring system socket
replaced. In case
that the
electrical cable has
to
be
replaced, contact your local Service
Force centre.
The
plug must be accessible after
the
appliance has been installed.
Never unplug the appliance by pull
-
ing
on
the cable. Always pull the
plug.
The manufacturer accepts no
liability for failure to observe the
above safety precautions.
Environment concerns
'~.)
The symbol
)~
on the product or on its
packaging indicates that this product may
not be treated as
household waste. Instead
it should be taken to the appropriate
collection point for the recycling of electrical
and electronic equipment. By ensuring this
product
is
disposed of correctly, you will help
prevent potential negative consequences for
the environment and human health, which
could otherwise be caused by inappropriate
waste handling of this product. For more
detailed information about recycling of this
product, please contact your local council,
your household waste disposal service or the
shop where you purchased the product.
Packaging material
The packaging materials are environmentally
friendly
and can be recycled, The plastic
components are identified by markings, e,g.
>PE
<,
>PS<, etc, Please dispose of the
packaging
materials
in
the appropriate
container at the community waste disposal
facilities,
it
Warning! When a unit
is
no longer being
used:
•
Pull
the plug out of the socket.
• Cut off the cable and plug and dispose
of them,
• Dispose of the door catch, This prevents
ch
ildren
from trapping them-
selves inside and endangering their
lives,
Page 21

Nederland
Home
Product Service (ATAG
)
Postbus 249
6920
AE DUIVEN
tel: 0900
- 5550001
fax: 026 - 8821444
Be
lgie
ATAG
Belgie
NV
9420 Erpe-Mere
tel: 053 - 806208
fax: 053 - 806057
ATAG
Post bus 1033 • 6920 BA Duiven • Nederland
11
7970490 - 00 - 022008
 Loading...