

Page 1

Quick Installation Guide
For Network Attached Storage
Ver.2.3.1111
Page 2

ASUSTOR NAS Quick Installation Guide
Table of Contents
Notices......................................................................................................................... 3
Safety Precautions .......................................................................................................... 4
1. Package Contents ................................................................................................. 5
2. Optional Accessories .............................................................................................. 6
3. Hardware Installation Guide ................................................................................... 7
3.1 Hard Disk Installation ....................................................................................... 7
3.2 Connecting and Powering on the NAS ............................................................... 10
3.3 Upgrading System Memory ............................................................................. 11
3.3.1 Notes and Precautions ................................................................................. 11
3.3.2 Parts and Tools Needed ............................................................................... 12
3.3.3 Removing the Cover .................................................................................... 12
3.3.4 Installing Memory ....................................................................................... 13
3.3.5 Replacing the Cover .................................................................................... 14
3.4 Expansion Card Ins tallat ion ............................................................................. 15
3.5 Rail Kit Installation ......................................................................................... 16
4. Software Installation Guide .................................................................................. 18
4.1 CD Installation ............................................................................................... 18
4.1.1 Windows Users ........................................................................................... 18
4.1.2 Mac Users .................................................................................................. 19
4.2 Web Installation ............................................................................................. 20
4.3 Installation Using a Dir ect Connection............................................................... 20
5. Appendix ........................................................................................................... 21
5.1 LED Indicators ............................................................................................... 21
5.2 Rear Panel .................................................................................................... 22
5.3 Rating Label .................................................................................................. 22
5.4 Troubleshooting ............................................................................................. 23
Page 2 of 25
Page 3
ASUSTOR NAS Quick Installation Guide
Notices
Federal Communications Commission Statement
This device complies with FCC Rules Part 15. Operation is subject to the following two conditions:
• This device may not cause harmful interference.
• This device must accept any interference received, including interference that may cause undesired
operation.
This equipment has been tested and found to com pl y with the limits for a class A dig ita l devic e , purs uan t to Part
15 of the Federal Communications C ommission (FCC) rules. These lim its are designed t o provide reasona ble
protection against harmful interference in a residenti al installation. This equipment g enerates, uses, and can
radiate radio frequenc y energy and, if not installed and use d in accordance with the instruct ions, may cause
harmful interference to r adio c omm unicatio ns. Ho wever, ther e is no guar antee t hat inter f erence will not occ ur in
a particular installatio n. If t his equipm ent does cause h arm ful interf erence to r adio or televisi on recep tion, whi ch
can be determined by turning the equipment off and on, th e us er is enc o urage d to try to correct th e interf er e nc e
by one or more of the following measures:
• Reorient or relocate the receiving antenna.
• Increase the separation between the equipment and receiver.
• Connect the equipment into an outlet on a circuit different from that to which the receiver is connected.
• Consult the dealer or an experienced radio/TV technician for help.
Changes or modific ations not expr essly appro ved b y the party respo nsible for com pliance could void the user's
authority to operate the equipment.
CE Mark Warning
CE marking for devices without wireless LAN/Bluetooth
The shipped version of this device complies with the requirements of the EEC directives 2004/108/EC
"Electromagnetic compatibility" and IEC60950-1:2005 (2nd Edition)+A1:2009 "Information technology
equipment-Safety ".”
Page 3 of 25
Page 4
ASUSTOR NAS Quick Installation Guide
DO NOT throw this product in municipal waste. This product has been designed to enable
Safety Precautions
The following safety precautions will increase the life of the NAS. Follow all precautions and instructions.
Electrical safety
• Unplug this product from the power source before cleaning.
• Use only the bundled power adapter. Using other power adapters may damage your device.
• Ensure that you plug the power adapter to the correct power input rating. Check the label on the power
adapter for the power rating.
Operation safety
• DO NOT place this product in a location where it may get wet.
• Place this product on a flat and stable surface.
• Use this product in environments with an ambient temperature between 5°C and 35°C.
• DO NOT block the air vents on the case of this product. Always provide proper ventilation for this product.
• DO NOT insert any object or spill liquid into the air vents. If you encounter technical problems with this
product, contact a qualified service technician or your retailer. DO NOT attempt to repair this product
yourself.
proper reuse of par ts and r ecycling. T his symbol of the cross ed out whee led bin indicates tha t
the product (electrical and electronic equipment) should not be placed in municipal waste.
Check local regulations for disposal of electronic products.
Page 4 of 25
Page 5
ASUSTOR NAS Quick Installation Guide
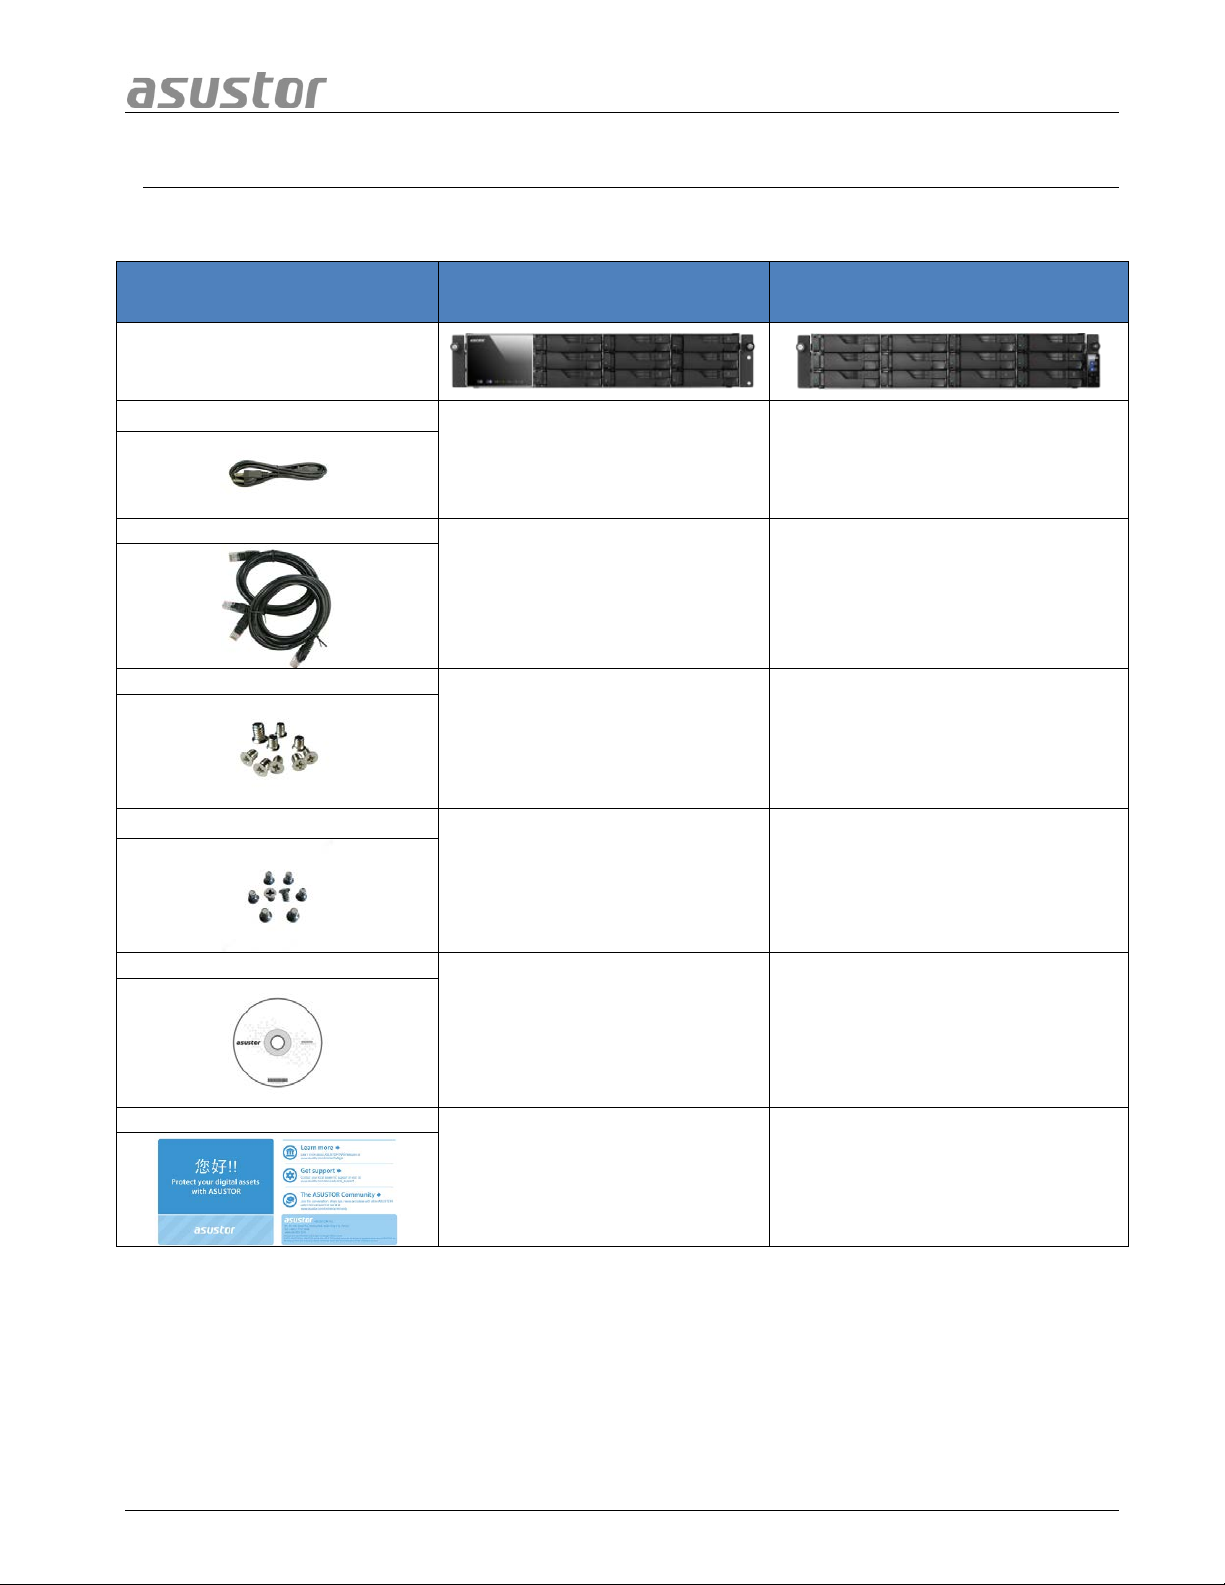
RJ45 network cabl e
Screws for use with 3.5” HDD
Installation CD
Quick Start Guide
1. PPaacckkaaggee CCoonntteennttss
Applicable Models: AS7009RD, AS7009RDX, AS7012RD, AS7012RDX
Contents AS7009RD/RDX AS7012RD/RDX
NAS device
Power cord
Screws for use with 2.5” HDD
2 2
4 4
36 48
36 48
Page 5 of 25
1 1
1 1
Page 6

ASUSTOR NAS Quick Installation Guide
2. OOppttiioonnaall AAcccceessssoorriieess
The items below may be purchased from the ASUSTOR Accessories Store
(http://shop.asustor.com
keyboards, mice and remote controls along with Bluetooth keyboards and mice are purchased
separately.
). Other items such as HDMI cables (2M recommended), wireless RF
Page 6 of 25
Page 7

ASUSTOR NAS Quick Installation Guide
3. HHaarrddwwaarree IInnssttaallllaattiioonn GGuuiiddee
All data stored on the hard disk(s) will be erased and CANNOT be recovered.
Please back up all important data before initializing the system.
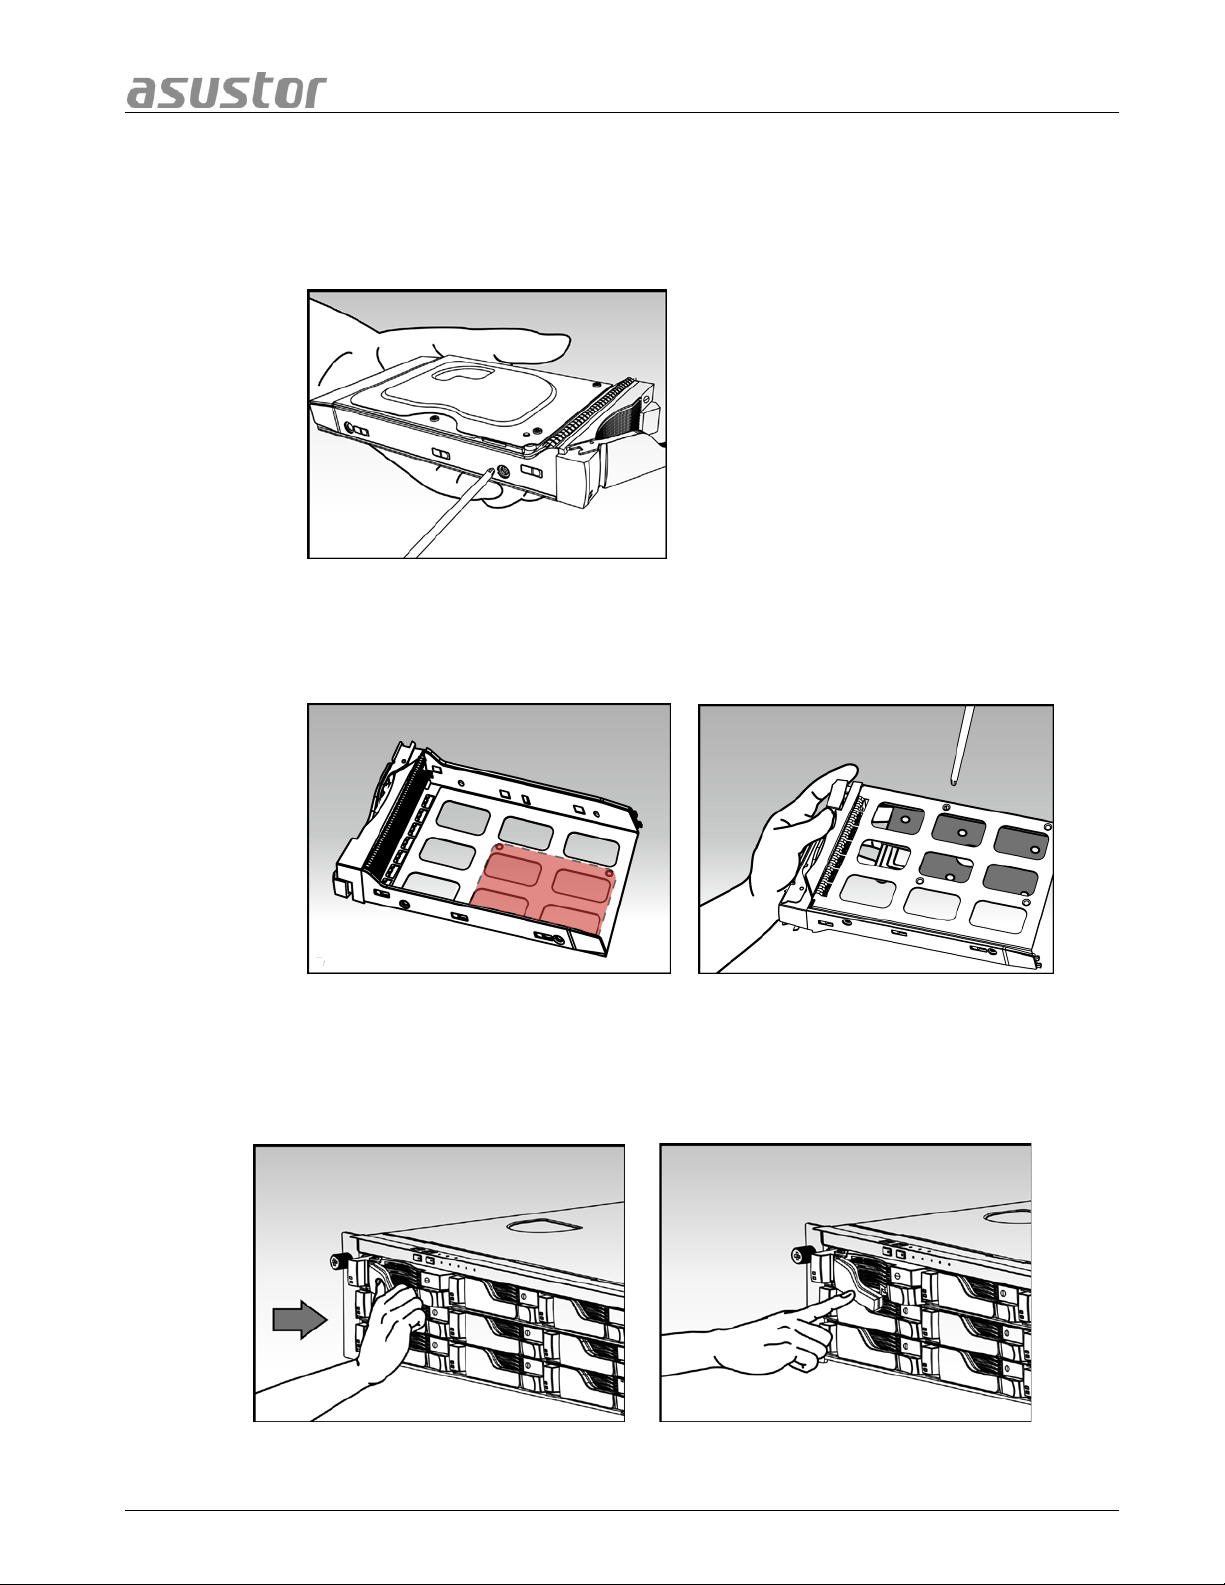
3.1 Hard Disk Installation
• Press the button on the lower portion of the hard disk tray to release the latch.
• Using the latch, gently pull the disk tray out of the disk bay.
Page 7 of 25
Page 8
ASUSTOR NAS Quick Installation Guide
• Mount the hard disk to the disk tray
o 3.5-inch hard disks: Place the hard disk into the disk tray, making sur e that
the mounting holes on the sides of the hard disk and d isk tray are lined up.
Secure the drive with four screws.
o 2.5-inch hard disks and SSD hard disks: Place the hard disk into the area of
the disk tray outlined in red (see picture belo w). Make sure that the mounting
holes on the bottom of the hard disk and disk tray are lined up. Secure the
drive with four screws.
• Slide the disk tray onto the rails of the disk bay. Using the latch, gently push the
disk tray all the way into the disk bay. Secure the disk tra y in place by pushing down
on the latch. The latch should close easily and sna p in with an audible ‘click’. Pleas e
make sure that the disk tray is pushed all the way into the disk bay befo re
attempting to secure the latch.
Page 8 of 25
Page 9
ASUSTOR NAS Quick Installation Guide
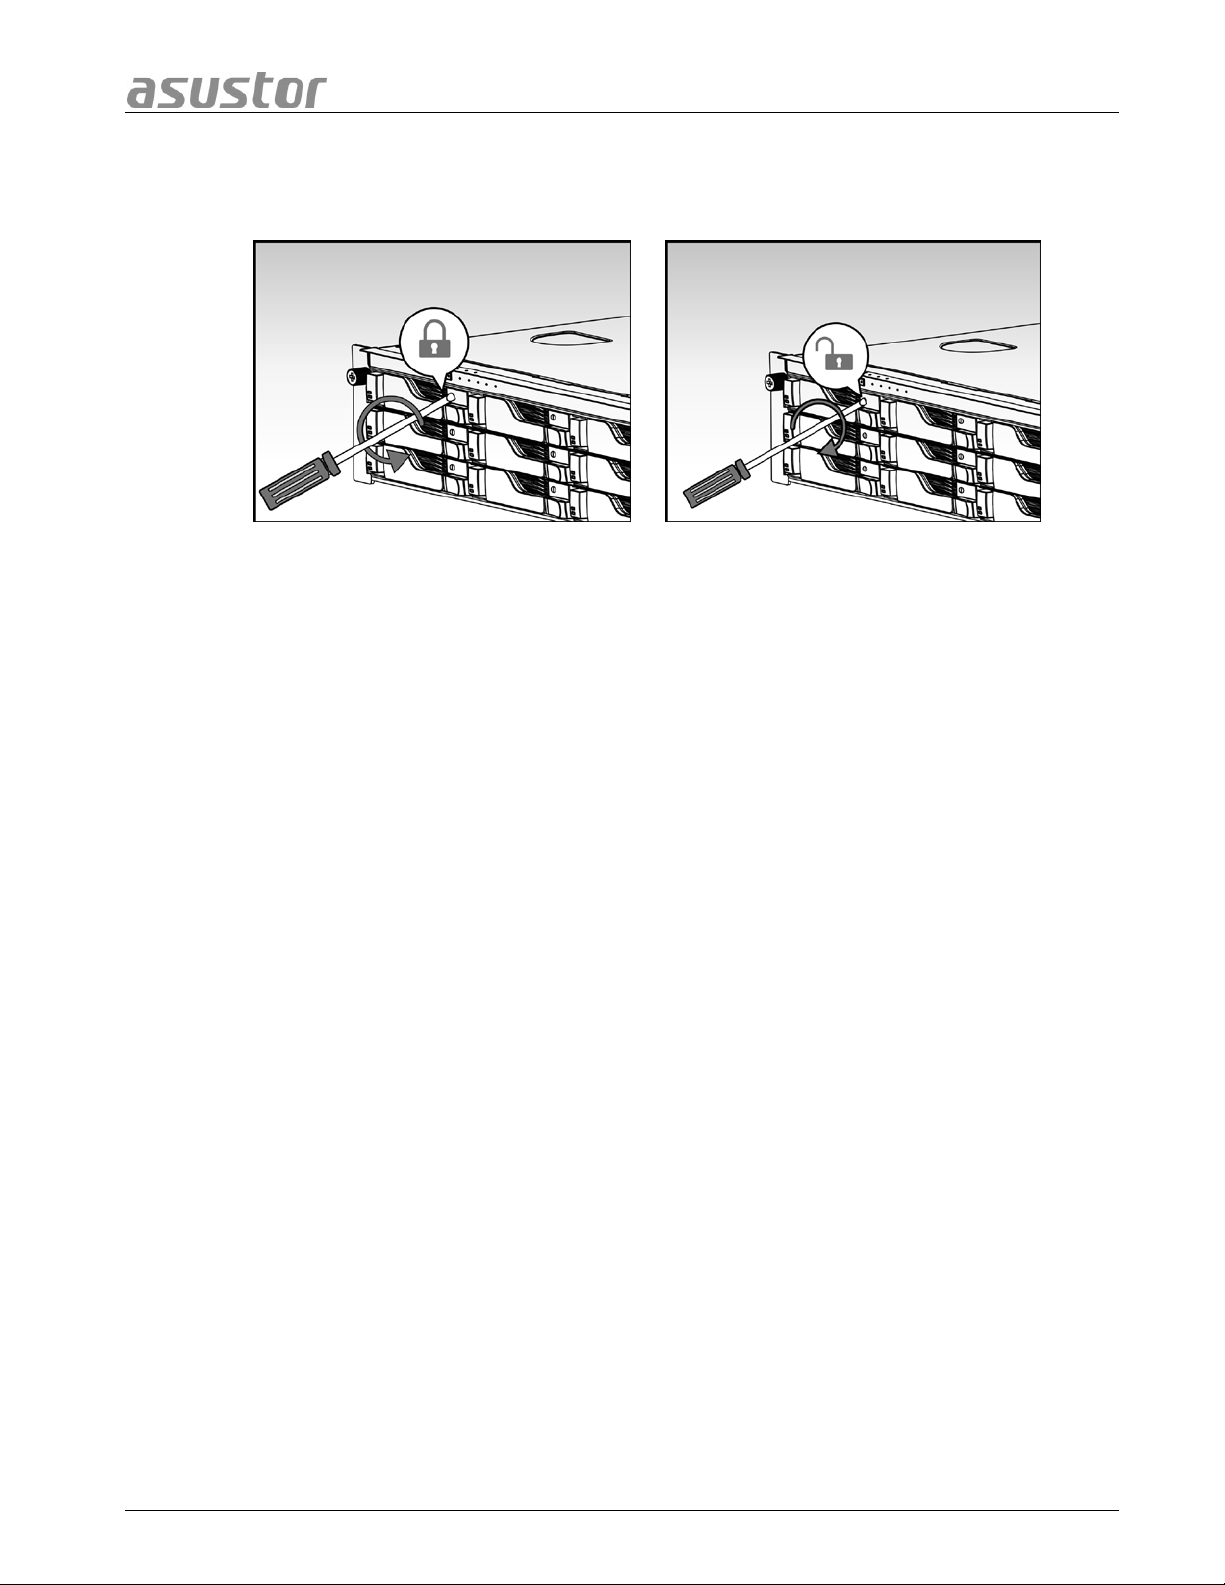
• Once the latch is secure, you can lock it in place using the disk tray lock. Using a
flathead screwdriver, turn the lock counterclockwise to lock the latch mechanism.
Turning the lo ck clockwise will unlock it.
Page 9 of 25
Page 10

ASUSTOR NAS Quick Installation Guide
3.2 Connecting and Powering on the NAS
• Connect the N A S to its power supply.
• Connect the NAS to your router, switch or hub using an Ethernet cable.
• Press and hold down the power button for 1 – 2 seconds until the b lue power LED
indicator is lit. This indicates that the NAS is now powered on. While the NAS is being
powered on, the green system status LED indicato r will flash and the blue network
LED indicator will be lit as well.
• The NAS is ready for operation once the green system status LED indicator has
stopped flashing and remains steadily lit. At this time, you should also hear a ‘beep’
from the system buzzer. Hardware installation is now complete. Please move on to
the software installation guide to configure your system settings.
Page 10 of 25
Page 11

ASUSTOR NAS Quick Installation Guide
3.3 Upgrading System Memory
33..33..11 NNootteess aanndd PPrreeccaauuttiioonnss
All AS70XXRD/RDX Series NAS de vices support up t o 32GB of memory. Before adding or
removing memory modules, please read the following precautions thoroughly.
• Your NAS and memory modules use high precision components and electronic connector
technology. To avoid invalidation of the warranty during your product warranty period, we
recommend that:
You should contact your dealer to install a new memory module.
You should not ins tall a memory module by yourself, if you are not familiar with
upgrading memory on a computer.
You should not touch the connectors or open the me mory module compartment cover.
• Addition or removal of memory modules by yourself may result in an accident or
malfunction of your NAS caused by breakage of the slot and module or a connec t io n
mistake. In this case, a repair fee will be charged.
• Be careful not to injure your hands or fingers with sharp edges of the memory module,
inner components, or circuit boards of your NAS.
• ASUSTOR does not guarantee that third party memory modules w ill work in your NAS.
• Be sure to turn off your NAS and peripherals and disconnect all attachments and
connection cables before adding or removing memory modules.
• To prevent damage from electrostatic discharge to memory modules, follow the
instructions below:
Do not work at a location that produces static electricity easily, such as on a carpet.
Before adding or removing memory modules, touch an external metal object other
than your NAS to ground yourself and eliminate static electricity. Do not touch a ny
metal parts inside the NAS.
• Do not insert a memory module into the slot facing in the wrong direction. It may cause
damage to the module or slot, or cause the circuit board to catch fire.
• Use a screwdriver that matches the size of the screws.
• Do not remove or loosen screws that are not specified to be removed.
Page 11 of 25
Page 12

ASUSTOR NAS Quick Installation Guide
33..33..22 PPaarrttss aanndd TToooollss NNeeeeddeedd
• Phillips head screwdriver
• Memory for AS70 series devices may be purchased from local dealers or the online ASUSTOR
Accessories Store (http://shop.asustor.com)
MMoorree
Memory Compatibility List
33..33..33 RReemmoovviinngg tthhee CCoovveerr
• Shutdown the NAS by selecting [Shut down] from the ADM User Menu.
.
• Disconnect all cables and devices connected to the NAS including the power cord.
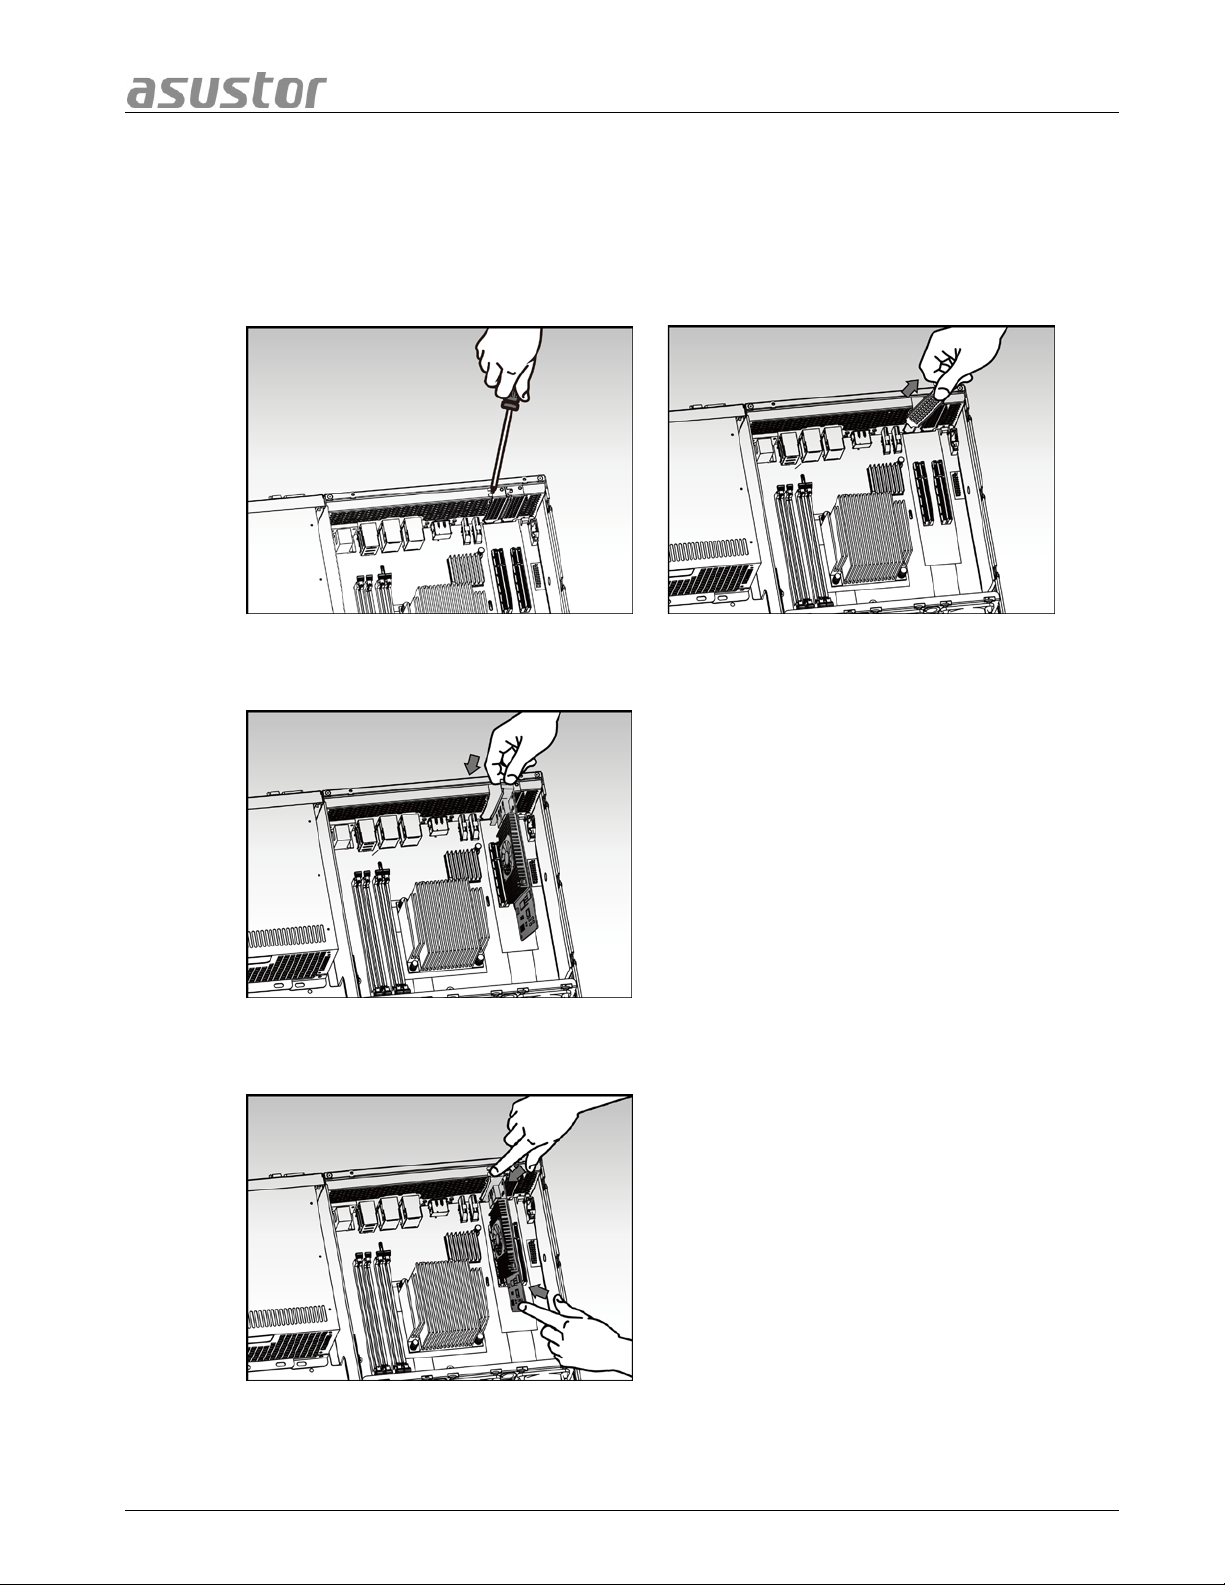
• Use a screwdriver to loosen the three screws found on the rear of the NAS as shown
in the illustration.
• Grip the cover from both sides with two hands and then gently push it back to
remove it from the chassis.
Page 12 of 25
Page 13

ASUSTOR NAS Quick Installation Guide
33..33..44 IInnssttaalllliinngg MMeemmoorryy
• Release the ejector clips by gently pulling them out to the sides of the memory slot.
• When inserting the memory module into the empty slot, please make sure to align
the notches on the module with the notches in the slot.
• Slide in the memory module (as shown in the illustra tion) making sure that the
memory module’s connectors are f u lly inserted into the slot.
• Using two fingers, carefully push down on the memory mo dule until the ejector clips
lock it into place.
Page 13 of 25
Page 14

ASUSTOR NAS Quick Installation Guide
33..33..55 RReeppllaacciinngg tthhee CCoovveerr
• Replace the cover and tighten the three screws that were removed previously.
• Reconnect all cables including the power cord and then start up the NAS.
Page 14 of 25
Page 15
ASUSTOR NAS Quick Installation Guide
3.4 Expansion Card Installation
• Remove the cover of the NAS as shown in sec t ion 3.3.3.
• Unscrew the blanking plate retention screw and then remove the blanking plate for
the expansion slot that you wish to use.
• Carefully insert your expansion c ard into the slot, making sure to line up the
connector on the bottom of the expansion card with the slot.
• Using two fingers, carefully push the expansion card into place and then screw in the
retention screw.
• Replace the cover of the NAS as shown in section 3.3.5.
Page 15 of 25
Page 16
ASUSTOR NAS Quick Installation Guide
3.5 Rail Kit Installation
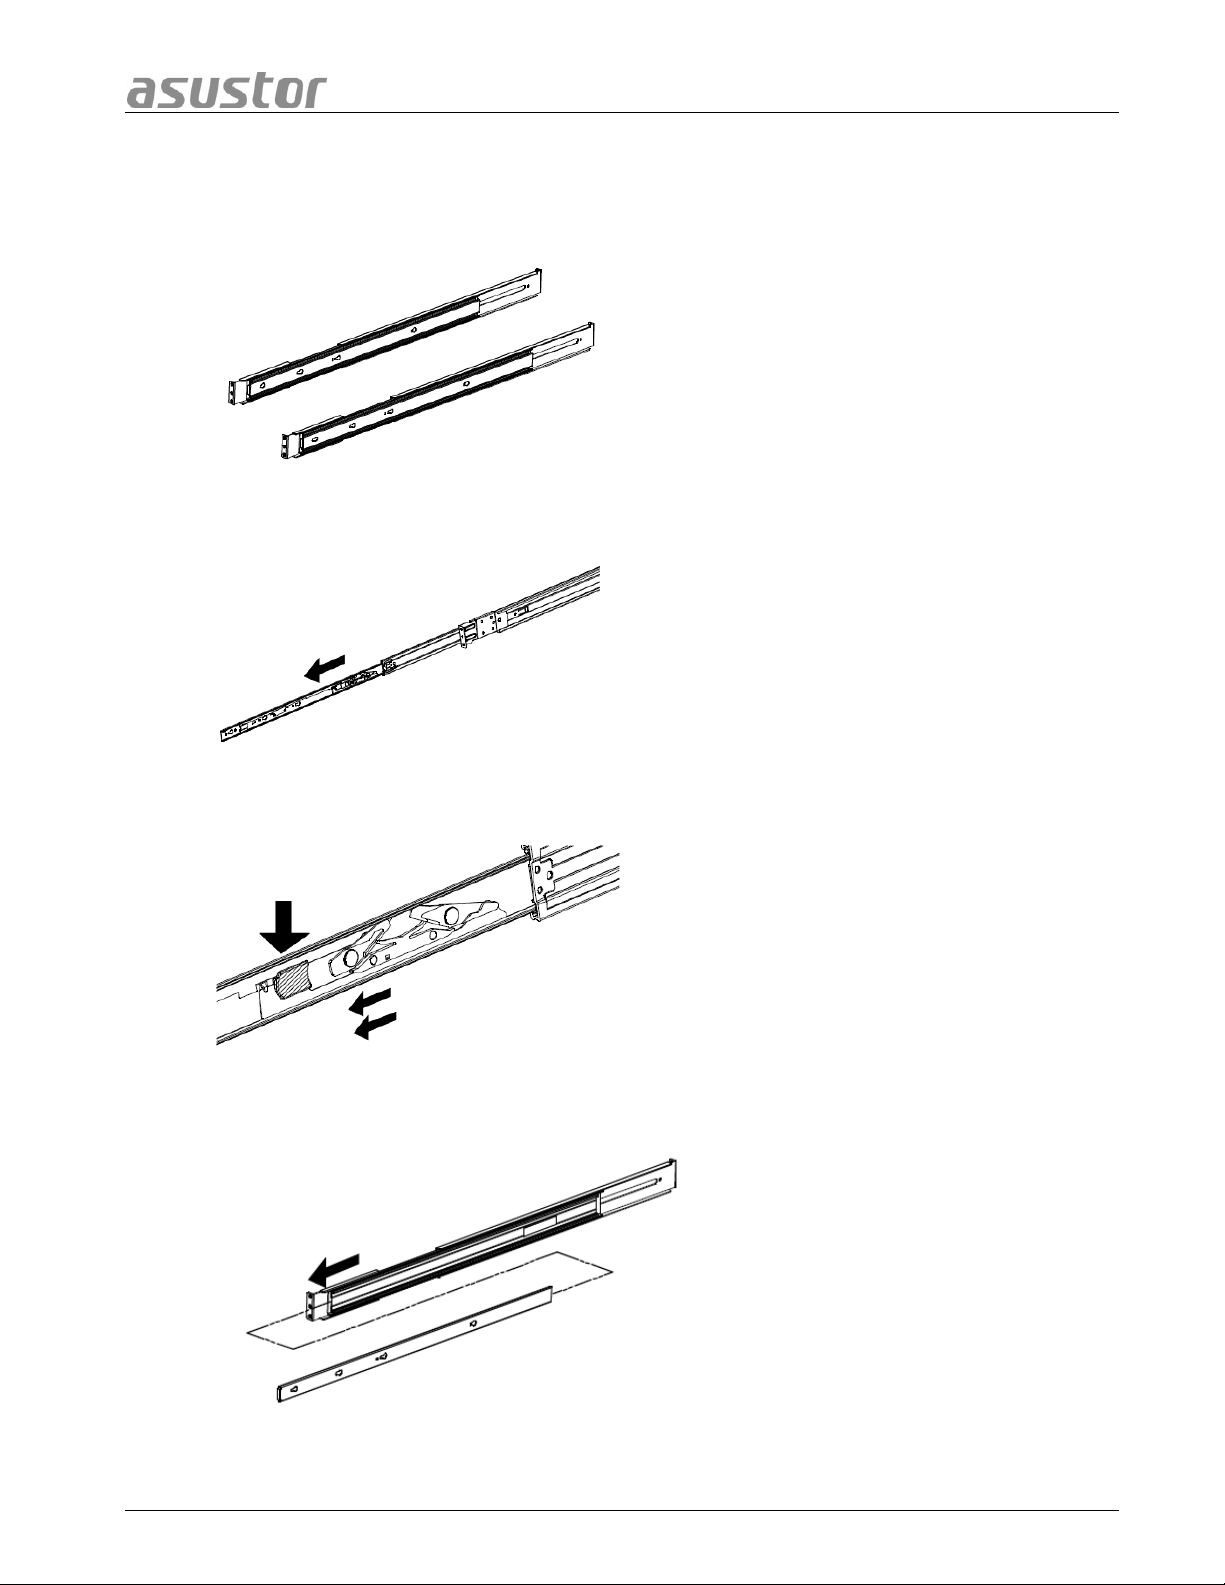
• Take out the two ra il assemblies.
• Fully extend the rail assembly by pulling it outward.
• Press down on the release tab and pull the inner rail out.
• Separate the inner rail from the outer assembly.
Page 16 of 25
Page 17
ASUSTOR NAS Quick Installation Guide
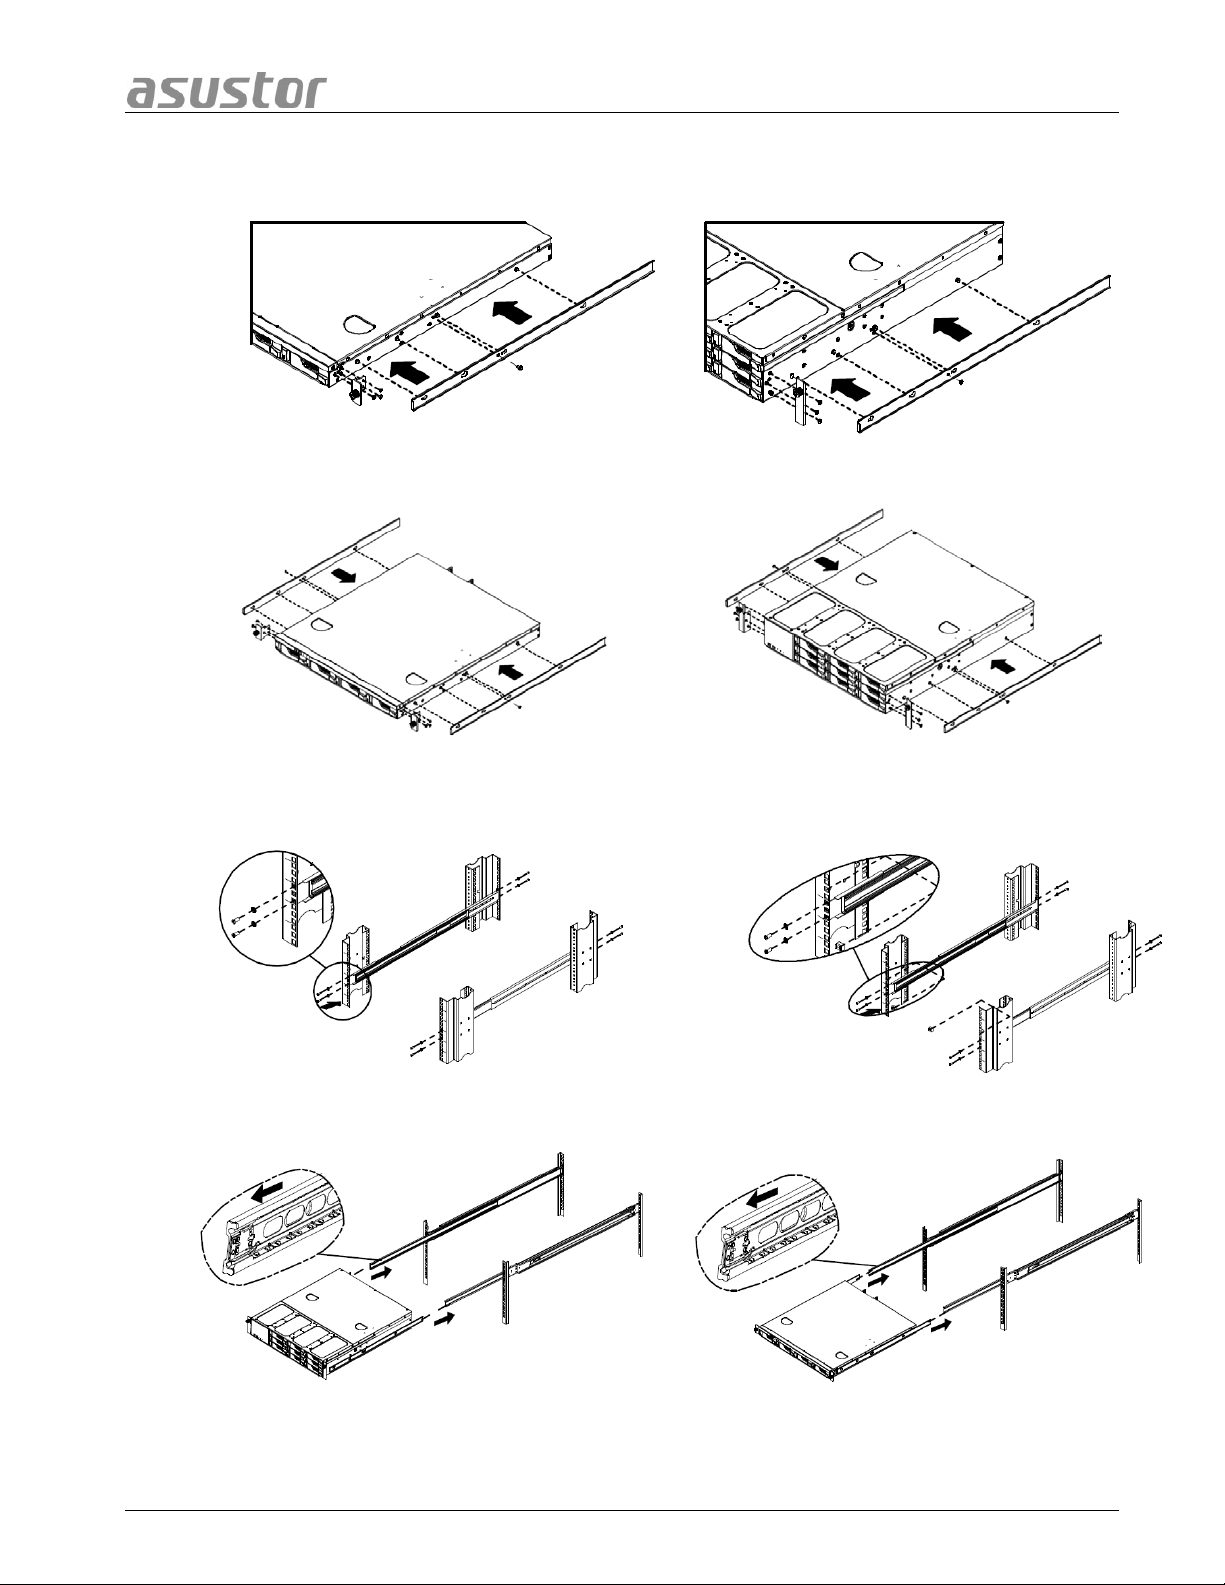
• Line up the holes on the inner rail with the pegs on the system chassis and push the
inner rail all the way in.
• Mount the inner rails to the system chassis using the provided mounting screws.
• Mount the outer rail assembly to your rack. Please note that both the front and back
of the outer rail assembly will need to be fastened to the rack with two screws.
• Align the rails and push the system chassis all the way into the rack.
Page 17 of 25
Page 18
ASUSTOR NAS Quick Installation Guide
4. SSooffttwwaarree IInnssttaallllaattiioonn GGuuiiddee
There are 3 different installation methods that you can ch oo s e f rom. Please select the m et h od
most suita ble for you. If you do n ot have a C D drive, you can g o to the dow nload sect ion of th e
ASUSTOR website (http://www.asustor.com/service/downloads
4.1 CD Installation
) to download the latest software.
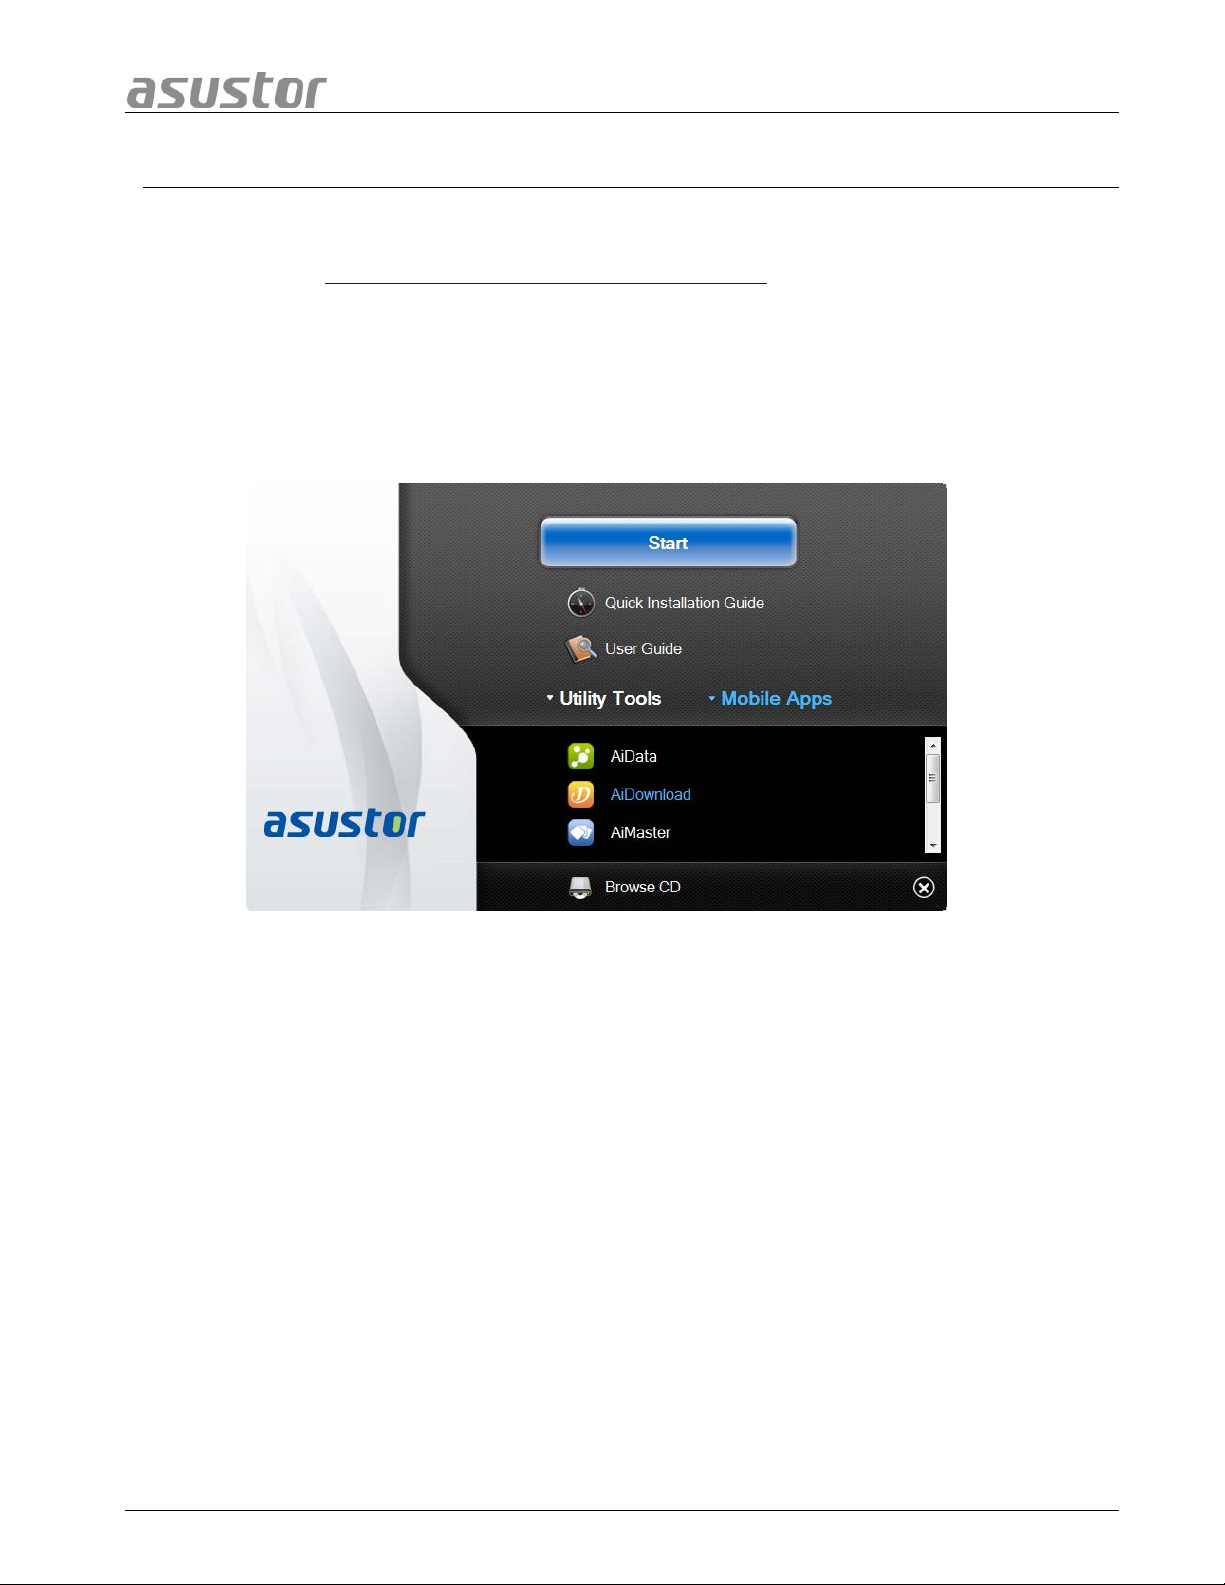
44..11..11 WWiinnddoowwss UUsseerrss
• Insert the installation CD into your computer’s CD drive and then select “Start” from
the autorun CD-menu.
• The installation wizard will install ASUSTOR Control Center onto your computer. After
ASUSTOR Control Center has been installed, it will automatically begin to scan your
network for ASUSTOR NAS devices.
• Select your NAS from the list and follow the in stallation wizard’s inst ructions to
complete the configuration process.
Page 18 of 25
Page 19

ASUSTOR NAS Quick Installation Guide
44..11..22 MMaacc UUsseerrss
• Insert the installation CD into your computer’s CD drive and then select “Quick
Install” from the aut orun CD-menu.
• The installation wizard will install ASUSTOR Control Center onto your computer. At
this time you can also choose whether or not you want to install Download Assistant.
After ASUSTOR Control Center has been installed, it will automatically begin to scan
your network for ASUSTOR NAS devices.
• Select your NAS from the list and follow the in stallation wizard’s inst ructions to
complete the configuration process.
Page 19 of 25
Page 20

ASUSTOR NAS Quick Installation Guide
4.2 Web Installation
• If you already know your NAS’s current IP address, you can open up a web browser
and enter in your NAS’s IP a d dress (for example: http://192.168.1.168:8000) to
begin in itialization.
• Please follow the instructions from the installation wizard to complete the
configuration process.
4.3 Installation Using a Direct Connection
Please see section 5.4 Troubleshooting for installation instructions.
Page 20 of 25
Page 21
ASUSTOR NAS Quick Installation Guide
1. Power LED Indicator
5. AAppppeennddiixx
5.1 LED Indicators
2. Inspection LED Indicator
3. System Status LED Indicator
4. Alert LED Indicator
5. SAS LED Indicator
6. Network LED Indicators
LED
Indicator
Power
Inspection Blue Steadily lit Inspection light activated
Color Description State
Steadily lit Power on
Blue
Flashing Waking from sleep mode (S3)
Steadily lit Sleep mode (S3)
Orange
Flashes every 10 seconds LED night mode
7. Hard Disk LED Indicator
System
Status
Flashing Powering on
Green
Steadily lit System ready
Page 21 of 25
Page 22

ASUSTOR NAS Quick Installation Guide
1. Model Name
1. Service LED
Alert Red Steadily lit Power or fan failure
SAS Green Steadily lit SAS ready
Network
Hard Disk
Blue Steadily lit Network port connected
Steadily lit Hard disk ready
Green
Flashes every 10 seconds Hibernation mode
Red Steadily lit Hard disk abnormality
Flashing Data access in progress
5.2 Rear Panel
2. Reset Button
3. HDMI Port
4. eSATA Port
5. RJ45 & USB 3.0 Port
6. RJ45 Port
7. VGA Port
8. Console Port
9. Power Supply
5.3 Rating Label
2. Power Supply
3. Certification
Page 22 of 25
Page 23
ASUSTOR NAS Quick Installation Guide
5.4 Troubleshooting
Q: Why can’t I detect my ASUSTOR NAS using ASUSTOR Control Center?
A: If you are having trouble detecting your NAS using ASUSTO R Control Center, please do the
following:
1. Please check your network connection:
a. Make sure that your computer and your NAS are part of the same local area
network.
b. Check to see if the network LED indicator is lit. If you find that it is not lit, try
connecting your Ethernet cable to the other network port or try using a different
Ethernet cable.
2. Please first disable any firewalls that may be running on your computer. Then try
scanning for your NAS again using ASUSTOR Control Ce nt er.
3. If you still cannot detect your NAS, please connect your NAS to your computer using
the provided RJ-45 network cab le and change your computer’s IP settings.
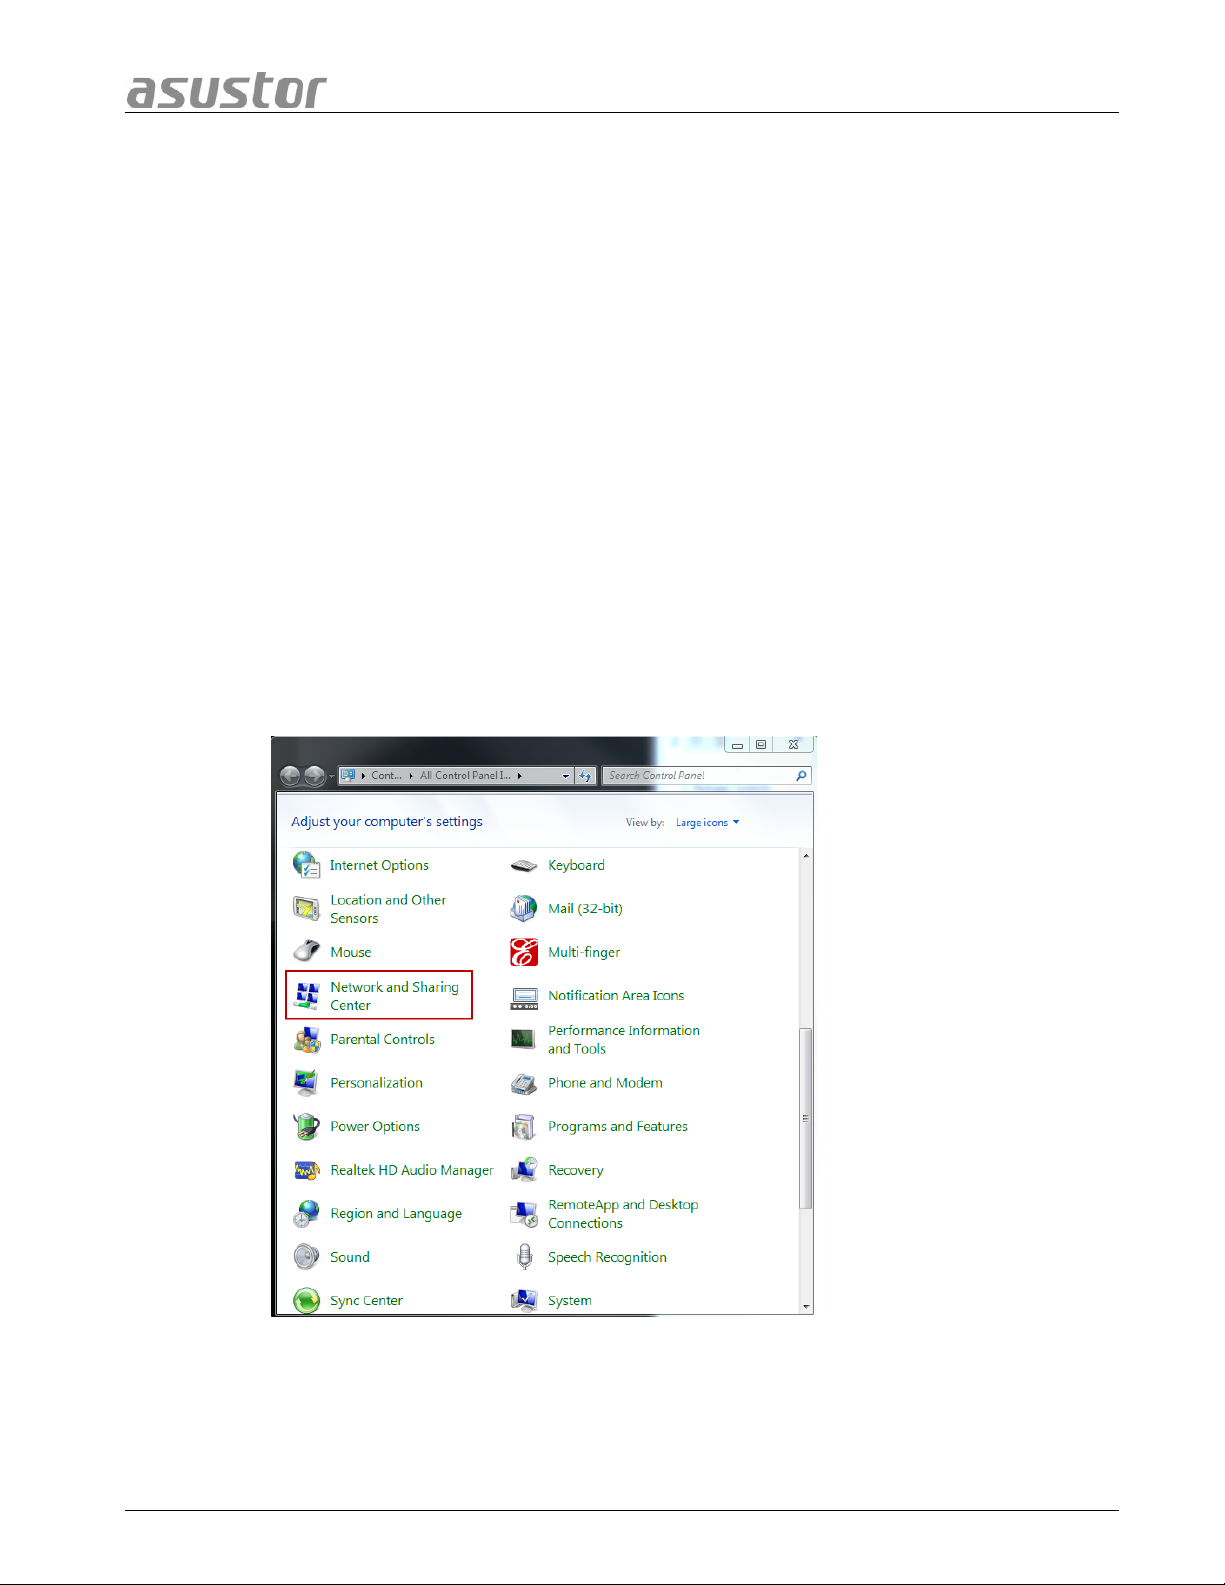
a. Select [Start]->[Control Panel]->[Network and Sharing Center]
Page 23 of 25
Page 24
ASUSTOR NAS Quick Installation Guide
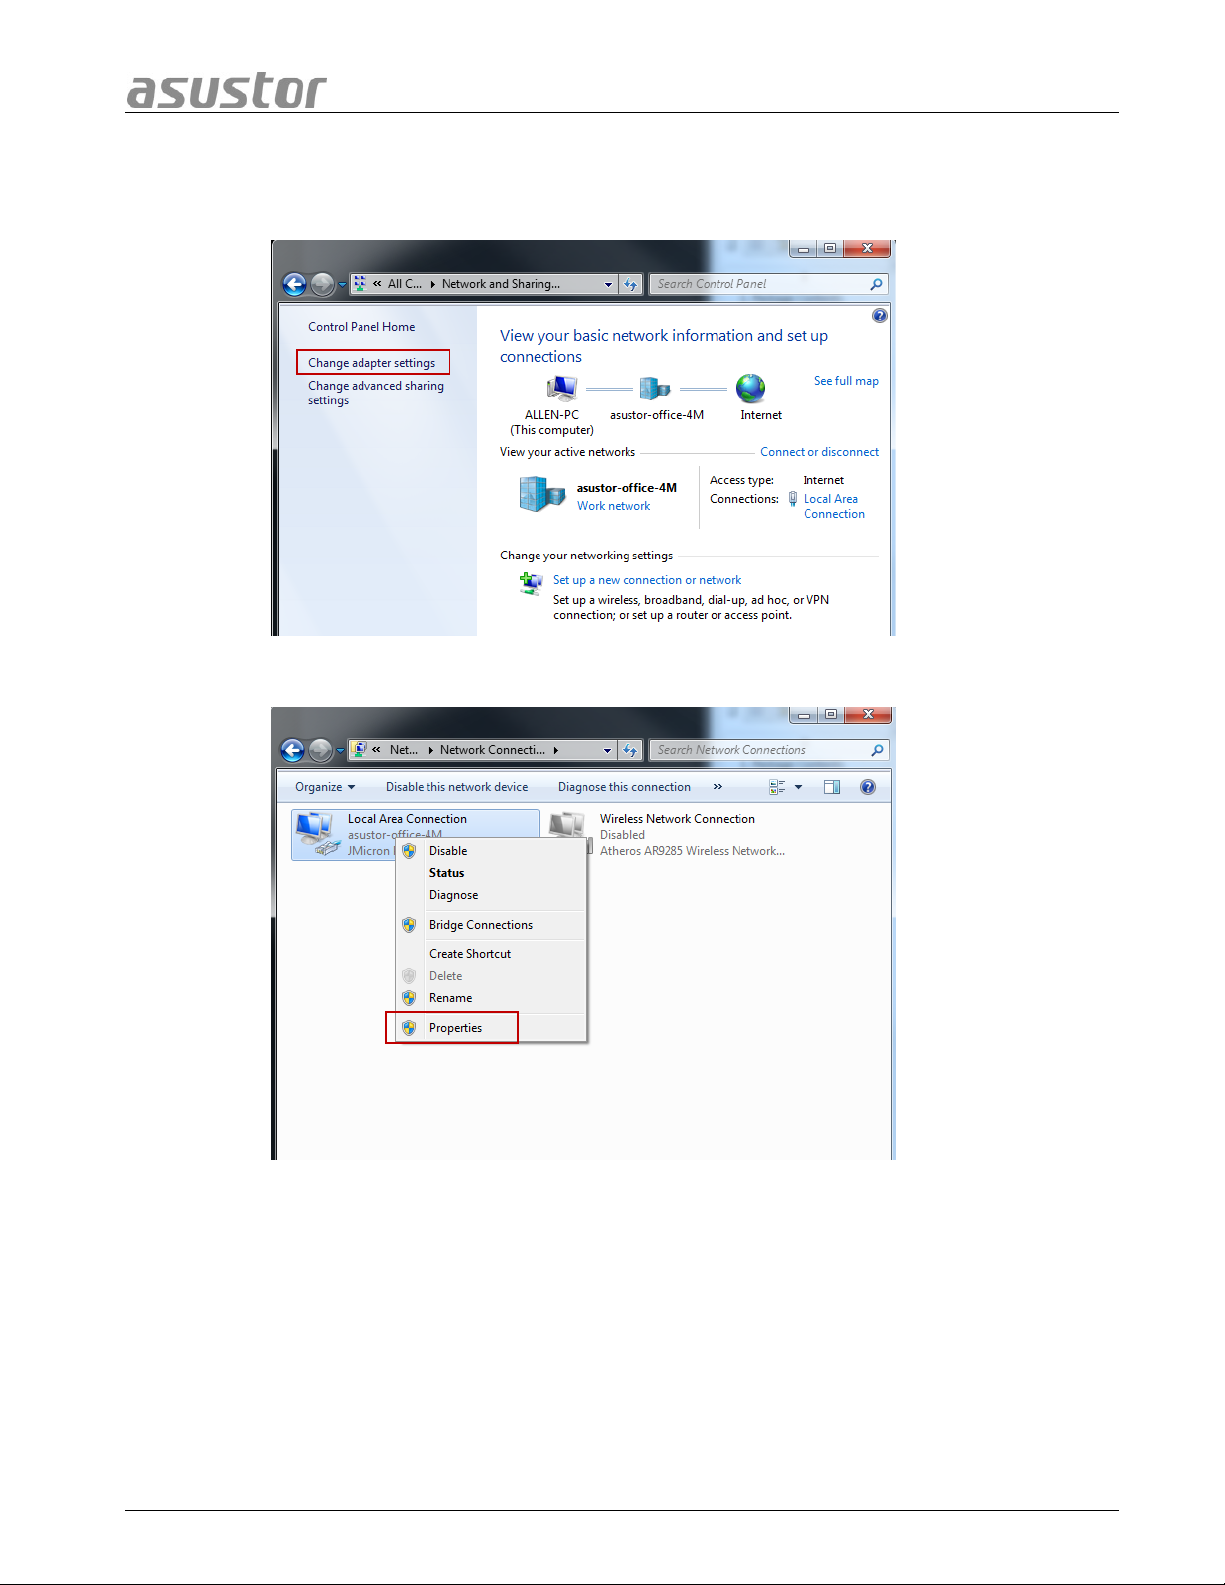
b. Click on [Change adapter settings] in the left hand panel.
c. Right-click on [Local Area Con nection] and select [Properties].
Page 24 of 25
Page 25
ASUSTOR NAS Quick Installation Guide
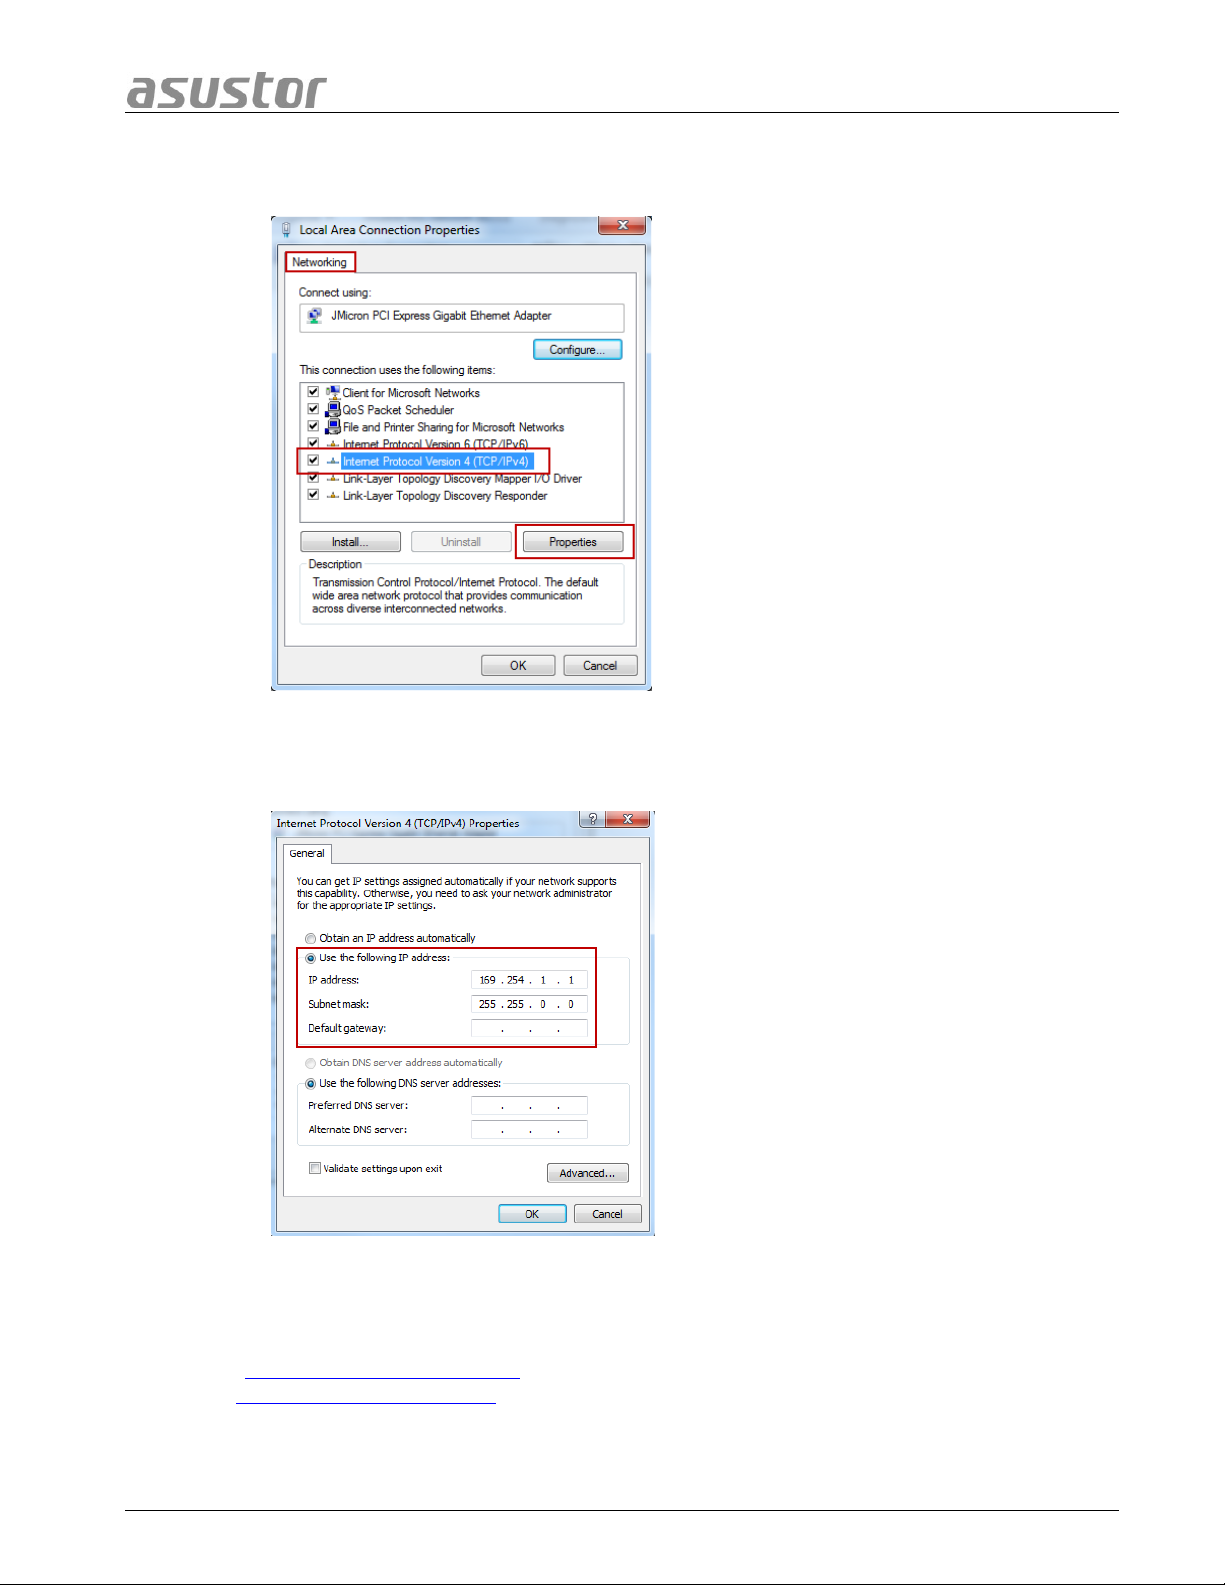
d. Under the [Networking] tab select [Internet Protocol Version 4 (TCP/IPv4)]
and click on [Properties].
e. Under the [General] tab select the [Use the follo wing IP add ress] radio button.
Set the [IP address] to 169.254.1.1 and the [Subnet mask] to 255.255.0.0
and then click on [OK].
f. Open up ASUSTOR Control Center to scan for your NAS.
4. If the above mentioned procedures have not managed to solve your problem, please
contact your local ASUSTOR dealer or ASUSTOR Customer Service
(http://support.asustor.com
).You are also encouraged to browse through the
ASUSTOR Knowledgebase.
Page 25 of 25
 Loading...