How it Works
Log In / Sign Up
Buy Points
How it Works
FAQ
Contact Us
Questions and Suggestions
Users
Asus
Loading...
V
VB195D
23
VB195N
22
VB195S
22
VB195SL
30
VB195T
23
VB195TL
30
VB198
2
VB198D
28
VB198DL
VB198N
29
VB198NL
VB198S
29
VB198SL
VB198T
32
VB198TL
2
VB198T-P
2
VB198(x)L
25
VB199
2
VB199D
29
VB199N
VB199S
VB199T
32
VB199TL
32
VB199T/N
VB199TP
29
VB199T/S
VC133
2
VC209
2
VC209D
12
VC209T
13
VC239
3
VC239H
27
VC239HBk
VC239HE
26
VC239HE-W
26
VC239H-W
26
VC239N
27
VC239N-W
27
VC239-Series
4
VC247-Series
VC279H
13
VC279HE
13
VC279H-W
10
VC279N-W
9
VC60
26
VC60V
VC62B
36
VC65
49
VC65-C
22
VC65-C1
23
VC65R
47
VC66
39
VC66D
VC66R
37
VC68R
24
VC68V
26
VC68V-G085Z
VE172
VE198
5
VE198D
14
VE198D-A
6
VE198D-C
7
VE198N
9
VE198N-A
7
VE198S
13
VE198T
15
VE198TL
5
VE198TL-TAA
VE198T-TAA
VE205
2
VE205N
VE205N-A
VE205S
VE205T
VE208
4
VE208D
14
VE208N
14
VE208N-A
VE208S
13
VE208T
14
VE225
VE225D
11
VE225H
7
VE225N
11
VE225S
11
VE225T
11
VE228
9
VE228D
VE228DE
3
VE228DR
13
VE228H
15
VE228HR
13
VE228N
VE228NE
VE228NR
VE228Q
10
VE228Q-C
VE228S
VE228SE
2
VE228 Series
Loading...
Loading...
Nothing found
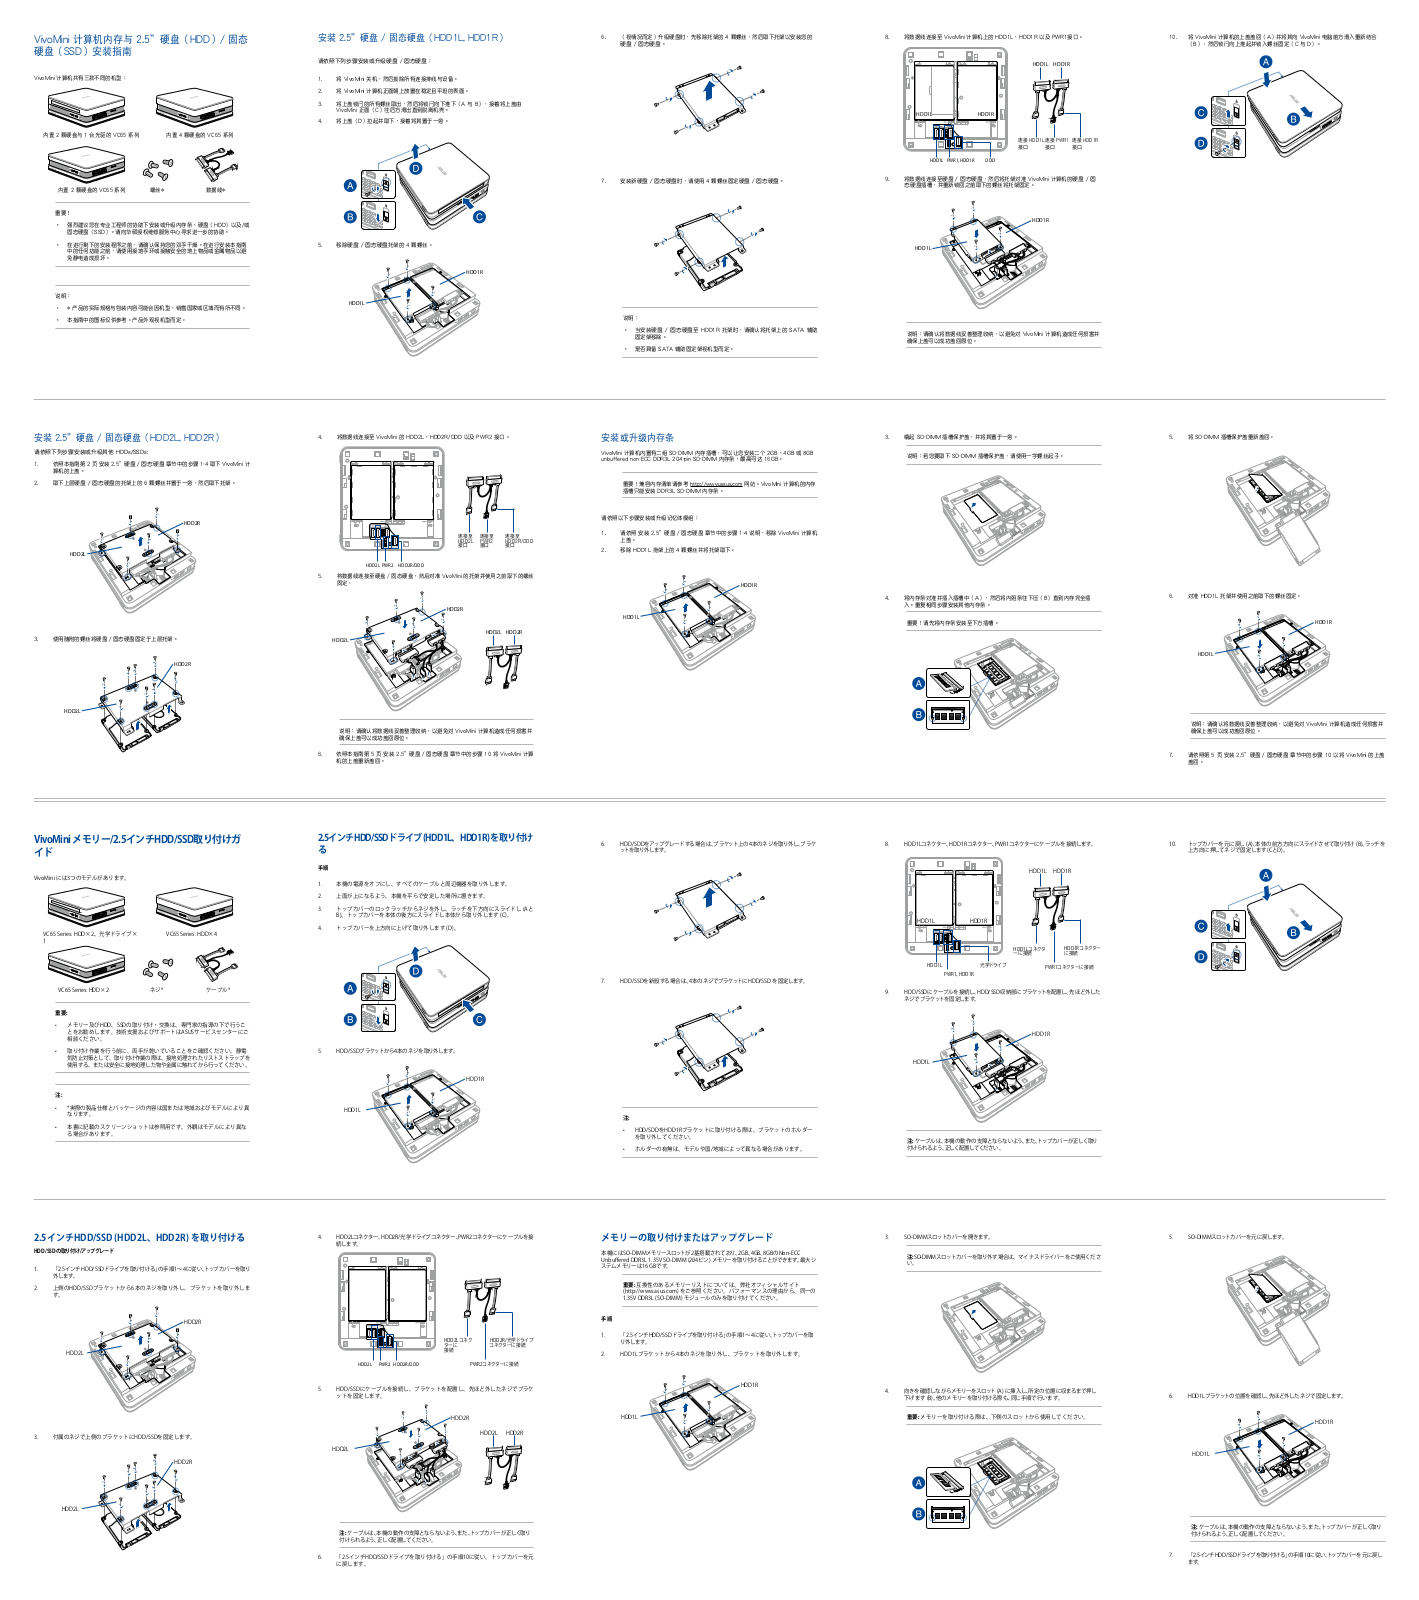
VC65R
memory, and storage installation guide
2 pgs
6.97 Mb
0
Quick Start Guide
2 pgs
545.61 Kb
0
User’s Manual
46 pgs
3.65 Mb
0
User’s Manual
40 pgs
3.43 Mb
0
User’s Manual
46 pgs
3.81 Mb
0
User’s Manual
42 pgs
3.64 Mb
0
User’s Manual
40 pgs
3.63 Mb
0
User’s Manual [ar]
46 pgs
3.6 Mb
0
User’s Manual [cs]
46 pgs
3.63 Mb
0
User’s Manual [cs]
38 pgs
3.41 Mb
0
User’s Manual [da]
46 pgs
3.73 Mb
0
User’s Manual [da]
38 pgs
3.43 Mb
0
User’s Manual [de]
40 pgs
3.45 Mb
0
User’s Manual [el]
46 pgs
3.65 Mb
0
User’s Manual [el]
38 pgs
3.42 Mb
0
User’s Manual [es]
46 pgs
3.65 Mb
0
User’s Manual [es]
40 pgs
3.41 Mb
0
User’s Manual [fi]
46 pgs
3.62 Mb
0
User’s Manual [fi]
38 pgs
3.39 Mb
0
User’s Manual [fr]
86 pgs
6.87 Mb
0
User’s Manual [fr]
46 pgs
3.65 Mb
0
User’s Manual [fr]
40 pgs
3.42 Mb
0
User’s Manual [hu]
46 pgs
3.63 Mb
0
User’s Manual [hu]
38 pgs
3.4 Mb
0
User’s Manual [id]
46 pgs
3.62 Mb
0
User’s Manual [it]
46 pgs
3.67 Mb
0
User’s Manual [it]
40 pgs
3.45 Mb
0
User’s Manual [ja]
48 pgs
3.94 Mb
0
User’s Manual [ko]
46 pgs
3.82 Mb
0
User’s Manual [nl]
46 pgs
3.62 Mb
0
User’s Manual [nl]
38 pgs
3.4 Mb
0
User’s Manual [no ]
46 pgs
3.74 Mb
0
User’s Manual [no ]
38 pgs
3.43 Mb
0
User’s Manual [pt]
46 pgs
3.74 Mb
0
User’s Manual [pt]
38 pgs
3.41 Mb
0
User’s Manual [ru]
46 pgs
3.83 Mb
0
User’s Manual [ru]
40 pgs
3.67 Mb
0
User’s Manual [sk]
46 pgs
3.63 Mb
0
User’s Manual [sk]
38 pgs
3.4 Mb
0
User’s Manual [sv]
46 pgs
3.52 Mb
0
User’s Manual [sv]
38 pgs
3.39 Mb
0
User’s Manual [th]
46 pgs
3.71 Mb
0
User’s Manual [tr]
12 pgs
632.93 Kb
0
User’s Manual [tr]
52 pgs
3.66 Mb
0
User’s Manual [tr]
44 pgs
3.48 Mb
0
User’s Manual [zh]
46 pgs
3.76 Mb
0
VESA Mount installation guide
2 pgs
1.59 Mb
0
Table of contents
Loading...
Asus VC65R, VC65 memory, and storage installation guide
...
Asus memory, and storage installation guide
Download
Specifications and Main Features
Frequently Asked Questions
User Manual
Download
Loading...
+
hidden pages
Unhide
You need points to download manuals.
1 point = 1 manual.
You can buy points or you can get point for every manual you upload.
Buy points
Upload your manuals