

Page 1

V9520 Home Theater
User Guide
Page 2

E1385
Revised Edition V2
July 2003
Copyright © 2003 ASUSTeK COMPUTER INC. All Rights Reserved.
No part of this manual, including the products and software described in it, may be
reproduced, transmitted, transcribed, stored in a retrieval system, or translated into any
language in any form or by any means, except documentation kept by the purchaser for
backup purposes, without the express written permission of ASUSTeK COMPUTER INC.
(“ASUS”).
Product warranty or service will not be extended if: (1) the product is repaired, modified or
altered, unless such repair, modification of alteration is authorized in writing by ASUS; or (2)
the serial number of the product is defaced or missing.
ASUS PROVIDES THIS MANUAL “AS IS” WITHOUT WARRANTY OF ANY KIND, EITHER
EXPRESS OR IMPLIED, INCLUDING BUT NOT LIMITED TO THE IMPLIED WARRANTIES
OR CONDITIONS OF MERCHANTABILITY OR FITNESS FOR A PARTICULAR PURPOSE.
IN NO EVENT SHALL ASUS, ITS DIRECTORS, OFFICERS, EMPLOYEES OR AGENTS BE
LIABLE FOR ANY INDIRECT, SPECIAL, INCIDENTAL, OR CONSEQUENTIAL DAMAGES
(INCLUDING DAMAGES FOR LOSS OF PROFITS, LOSS OF BUSINESS, LOSS OF USE
OR DATA, INTERRUPTION OF BUSINESS AND THE LIKE), EVEN IF ASUS HAS BEEN
ADVISED OF THE POSSIBILITY OF SUCH DAMAGES ARISING FROM ANY DEFECT OR
ERROR IN THIS MANUAL OR PRODUCT.
SPECIFICATIONS AND INFORMATION CONTAINED IN THIS MANUAL ARE FURNISHED
FOR INFORMATIONAL USE ONLY, AND ARE SUBJECT TO CHANGE AT ANY TIME
WITHOUT NOTICE, AND SHOULD NOT BE CONSTRUED AS A COMMITMENT BY ASUS.
ASUS ASSUMES NO RESPONSIBILITY OR LIABILITY FOR ANY ERRORS OR
INACCURACIES THAT MAY APPEAR IN THIS MANUAL, INCLUDING THE PRODUCTS
AND SOFTWARE DESCRIBED IN IT.
Products and corporate names appearing in this manual may or may not be registered
trademarks or copyrights of their respective companies, and are used only for identification or
explanation and to the owners’ benefit, without intent to infringe.
ii
ASUS V9520 Home Theater User Guide
Page 3

Contents
Notices .................................................................................. v
Safety Information.................................................................vi
ASUS Contact Information.................................................. viii
1. Introduction ..................................................................... 1
Highlights ....................................................................................1
Package contents .......................................................................2
2. Hardware setup................................................................ 3
3. Card installation ............................................................... 4
3.1 For systems without an existing VGA card ...........................4
3.2 For systems with an existing VGA card ................................4
4. Display Driver Installation ................................................ 5
4.1 Install ASUS Enhanced Driver ..............................................5
4.1.1 Windows 98SE ............................................................6
Method 1: ASUS Quick Setup Program .......................6
Method 2: Directly executing installer program ............7
Method 3: Plug and Play ..............................................7
Method 4: Display Property Page ................................8
4.1.2 Windows 2000/XP .......................................................9
Method 1: ASUS Quick Setup Program .......................9
Method 2: Plug and Play ............................................10
4.1.3 Windows NT 4.0 ........................................................12
Method 1: Display Property Page ..............................12
5. ASUS VideoSecurity ...................................................... 13
5.1 Installing ASUS VideoSecurity ............................................13
5.2 Using ASUS VideoSecurity .................................................14
6. ASUS GameFace........................................................... 18
6.1 Introduction .........................................................................18
6.2 Installing ASUS GameFace ................................................19
6.3 Using ASUS GameFace .....................................................20
7. ASUS SmartDoctor ........................................................ 24
7.1 Install ASUS SmartDoctor..................................................24
7.2 Using ASUS Tweak Utility...................................................25
8. ASUS Home Theater ..................................................... 27
8.1 Introduction .........................................................................27
8.2 Installing ASUS Home Theater ...........................................30
iiiASUS V9520 Home Theater User Guide
Page 4

9. ASUS PowerDirector Pro ............................................... 31
9.1 Introduction .........................................................................31
9.2 Installing ASUS PowerDirector Pro.....................................33
10. Remote control functions ............................................. 34
11. Resolution Table........................................................... 39
iv
ASUS V9520 Home Theater User Guide
Page 5

Notices
Federal Communications Commission Statement
This device complies with FCC Rules Part 15. Operation is subject to the
following two conditions:
• This device may not cause harmful interference, and
• This device must accept any interference received including interference
that may cause undesired operation.
This equipment has been tested and found to comply with the limits for a
Class B digital device, pursuant to Part 15 of the FCC Rules. These limits
are designed to provide reasonable protection against harmful interference
in a residential installation. This equipment generates, uses and can radiate
radio frequency energy and, if not installed and used in accordance with
manufacturer’s instructions, may cause harmful interference to radio
communications. However, there is no guarantee that interference will not
occur in a particular installation. If this equipment does cause harmful
interference to radio or television reception, which can be determined by
turning the equipment off and on, the user is encouraged to try to correct the
interference by one or more of the following measures:
• Reorient or relocate the receiving antenna.
• Increase the separation between the equipment and receiver.
• Connect the equipment to an outlet on a circuit different from that to
which the receiver is connected.
• Consult the dealer or an experienced radio/TV technician for help.
The use of shielded cables for connection of the monitor to the
graphics card is required to assure compliance with FCC regulations.
Changes or modifications to this unit not expressly approved by the
party responsible for compliance could void the user’s authority to
operate this equipment.
Canadian Department of Communications Statement
This digital apparatus does not exceed the Class B limits for radio noise
emissions from digital apparatus set out in the Radio Interference
Regulations of the Canadian Department of Communications.
This class B digital apparatus complies with Canadian ICES-003.
vASUS V9520 Home Theater User Guide
Page 6

Safety information
Electrical safety
• To prevent electrical shock hazard, disconnect the power cable from
the electrical outlet before relocating the system.
• When adding or removing devices to or from the system, ensure that
the power cables for the devices are unplugged before the signal
cables are connected. If possible, disconnect all power cables from the
existing system before you add a device.
• Before connecting or removing signal cables from the motherboard,
ensure that all power cables are unplugged.
• Seek professional assistance before using an adpater or extension
cord. These devices could interrupt the grounding circuit.
• Make sure that your power supply is set to the correct voltage in your
area. If you are not sure about the voltage of the electrical outlet you
are using, contact your local power company.
• If the power supply is broken, do not try to fix it by yourself. Contact a
qualified service technician or your retailer.
Operation safety
• Before installing the motherboard and adding devices on it, carefully
read all the manuals that came with the package.
• Before using the product, make sure all cables are correctly connected
and the power cables are not damaged. If you detect any damage,
contact your dealer immediately.
• To avoid short circuits, keep paper clips, screws, and staples away from
connectors, slots, sockets and circuitry.
• Avoid dust, humidity, and temperature extremes. Do not place the
product in any area where it may become wet.
• Place the product on a stable surface.
• If you encounter technical problems with the product, contact a
qualified service technician or your retailer.
vi
ASUS V9520 Home Theater User Guide
Page 7
Macrovision Corporation Product Notice
This product incorporates copyright protection technology that is protected
by method claims of certain U.S. patents and other intellectual property
rights owned by Macrovision Corporation and other rights owners. Use of
this copyright protection technology must be authorized by Macrovision
Corporation, and is intended for home and other limited viewing uses only
unless otherwise authorized by Macrovision Corporation
engineering or disassembly is prohibited.
. Reverse
Conventions used in this guide
To make sure that you perform certain tasks properly, take note of the
following symbols used throughout this manual.
WARNING: Information to prevent injury to yourself when
trying to complete a task.
CAUTION: Information to prevent damage to the components
when trying to complete a task.
IMPORTANT: Information that you MUST follow to complete a
task.
NOTE: Tips and additional information to aid in completing a
task.
Where to find more information
Refer to the following sources for additional information and for product
and software updates.
1. ASUS Websites
The ASUS websites worldwide provide updated information on ASUS
hardware and software products. The ASUS websites are listed in the
ASUS Contact Information on page viii.
2. Optional Documentation
Your product package may include optional documentation, such as
warranty flyers, that may have been added by your dealer. These
documents are not part of the standard package.
viiASUS V9520 Home Theater User Guide
Page 8

ASUS contact information
ASUSTeK COMPUTER INC. (Asia-Pacific)
Address: 150 Li-Te Road, Peitou, Taipei, Taiwan 112
General Tel: +886-2-2894-3447
General Fax: +886-2-2894-3449
General Email: info@asus.com.tw
Technical Support
MB/Others (Tel): +886-2-2890-7121 (English)
Notebook (Tel): +886-2-2890-7122 (English)
Desktop/Server (Tel): +886-2-2890-7123 (English)
Support Fax: +886-2-2890-7698
Web Site: www.asus.com.tw
ASUS COMPUTER INTERNATIONAL (America)
Address: 44370 Nobel Drive, Fremont, CA 94538, USA
General Fax: +1-502-933-8713
General Email: tmd1@asus.com
Technical Support
Support Fax: +1-502-933-8713
General Support: +1-502-995-0883
Notebook Support: +1-510-739-3777 x5110
Web Site: usa.asus.com
Support Email: tsd@asus.com
ASUS COMPUTER GmbH (Germany and Austria)
Address: Harkortstr. 25, 40880 Ratingen, BRD, Germany
General Email: sales@asuscom.de (for marketing requests only)
General Fax: +49-2102-9599-31
Technical Support
Support Hotlines: (Components) +49-2102-9599-0
(Notebook PC) +49-2102-9599-10
Support Fax: +49-2102-9599-11
Support Email: www.asuscom.de/kontakt (for online support)
Web Site: www.asuscom.de
viii
ASUS V9520 Home Theater User Guide
Page 9

1. Introduction
Highlights
• Enjoy the ultimate entertainment package
~ Allows you to easily watch TV, listen to MP3s, view DVDs, pictures
and video on your PC.
• Provides you with a complete TV experience on PCs:
~ “Time-Shifting Playback” for temporary leave, “Instant TV Replay”,
“Automatic Channel Scanning”, “Pre-schedule Recording (MPEG1/2)”.
• Advanced remote control kit with built-in wireless mouse
~ Comes with an advanced remote control kit for your convenience.
• ASUS Video Security
~ Allows you to build a security monitoring system.
• ASUS GameFace
~ Allows you to open up a window for video conference or TV viewing
while you are still battling online.
• Powered by the programmable, precise and powerful CineFX
®
GPU: NVIDIA
GeForce FX 5200
~ Delivers cinema-quality video to your PC.
®
• Optimized for DirectX
9.0 and OpenGL® 1.4 features:
~ Ensures broad application support.
• Built-in 128MB Double Data Rate frame buffer:
~ More resolutions and color depths up to 2048 x 1536 @ 85Hz
1. Introudction
Highlights/Models
• AGP 8X support:
~ By adding support for the newest AGP 8X (AGP 3.0) standard, the
V9520 series takes advantage of the new peak AGP bandwidth to offer
higher resolution graphics.
• nVIEW™ display technology:
~ Supports TV encoder at 1024 x 768 resolution and two independent
display pipelines, providing the ultimate multiple display flexibility and
user control.
• Built-in TV Tuner (Microtune)
• Stereo TV-Tuner with 125 channels
• Video-in, Video-out, Stereo Audio supported
• Analog video capture and editing in MPEG-2 format with up to
720 x 480, 30 frames per second resolution.
®
• DVD video playback with Dolby
digital audio
1ASUS V9520 Home Theater User Guide
Page 10

Package Contents
• ASUS V9520 Home Theater Card
• Remote controller
• USB remote control receiver
• AV Breakout box
• ASUS Home Theater software CD
• ASUS PowerDirector software CD
• ASUS V9520 Home Theater driver CD
• ASUS Home Theater user guide
ASUS V9520 Home Theater User Guide2
Page 11
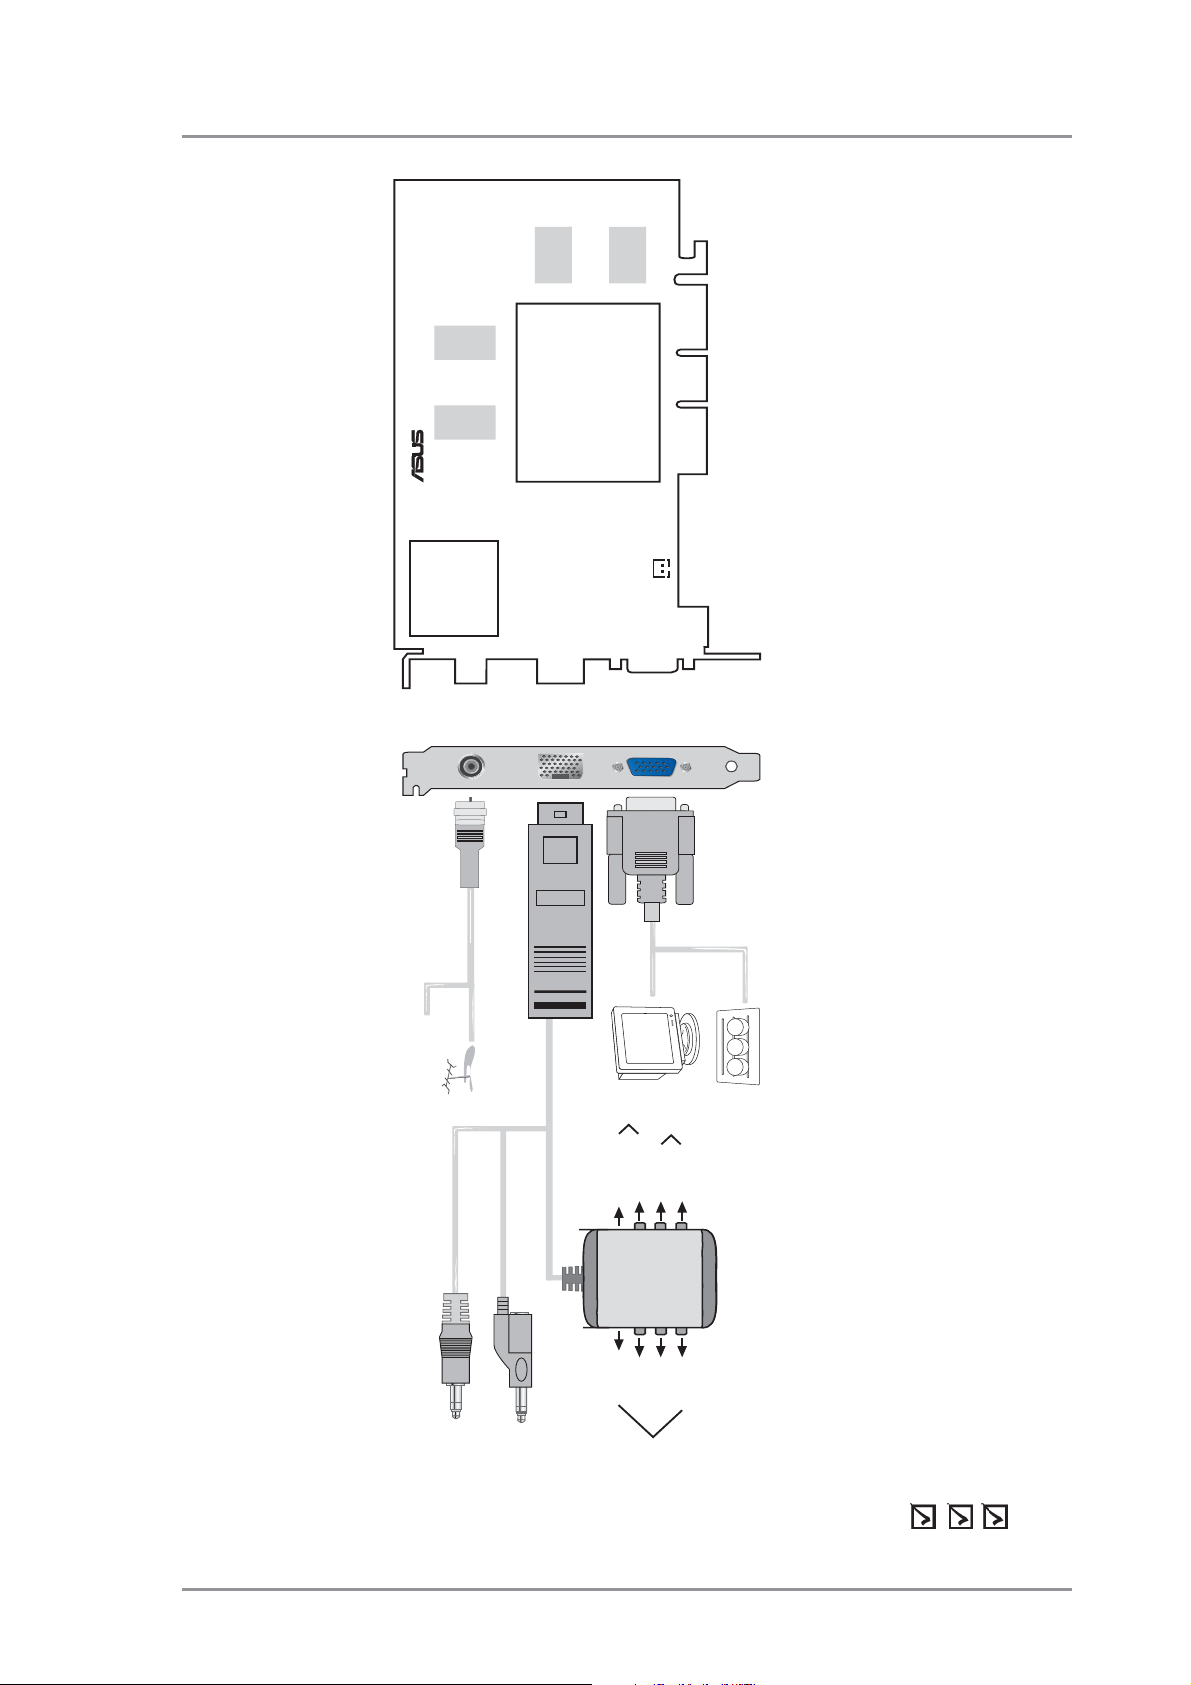
2. Hardware setup
®
Frame
Buffer
(DDR)
VGA Monitor
Output(15pin)
(Standard)
VGA Output
Projector
NVIDIA
TM
GeForce FX
5200
GPU
(Graphics Processing Unit)
RF-in
Microtune
MT2050
Frame
Buffer
(DDR)
Frame
Buffer
(DDR)
Frame
Buffer
(DDR)
CATV
Antenna
PUSH
Composite OUT
Audio OUT-R
Audio OUT-L
Composite IN
Audio IN-R
Audio IN-L
Svideo OUT
Svideo IN
To Speaker
Audio IN
To Sound card IN
To Sound card OUT To Speaker
Audio Adapter
To TV
To Video Camcorder
VIVO
AIAO
Notes
• Use the same TV standard for all devices.
• Drawings are for reference only; actual cards may vary.
128MB DDR Frame Buffer
ASUS V9520 Home Theater Layout
ASUS V9520 Home Theater 128M Graphics Card (PAL or NTSC)
This User’s Manual
ASUS V9520 Home Theater driver and utility CD
Item Checklist
3ASUS V9520 Home Theater User Guide
Page 12

3. Card installation
This VGA card can only be installed on motherboards with an AGP (Accelerated
Graphics Port) slot.
3.1 For systems without an existing VGA card
1. Unplug all power cables from the wall sockets.
2. Remove the system unit cover.
3. Locate the AGP expansion slot on the motherboard. Make sure that the
slot is not obstructed by cables or other components.
4. Remove the metal bracket cover opposite the AGP slot. Save the
screw for later use.
5. Remove your new VGA card from its plastic packaging.
6. Align the card golden connectors over the AGP slot. Insert one end of
the card and press down firmly. Press down the other end until the card
is completely seated on the slot.
7. Anchor the card mounting bracket to the rear of the chassis and secure
it with a screw.
8. Replace the system unit cover.
9. Use a video signal cable to connect your analog monitor VGA
connector (15-pin male) to the connector on the card (15-pin female).
10.Connect the power cables.
11. Proceed to section “4. Drivers Installation”.
3.2 For systems with an existing VGA card
1. Boot your computer.
2. Click on the Start button. Select Settings, then Control Panel.
3. Double-click the System icon in the Control Panel. Select the Device
Manager tab.
4. Double-click the Display adapters icon, highlight the current VGA
driver and click on Remove.
6. Select Standard VGA as your display driver then click Ok to close the
dialog box.
7. Shut down the computer.
8. Unplug all cables from the wall sockets and remove computer cover.
9. Remove existing VGA card.
10. Follow steps #5 to #11 in section 3.1 above to install new VGA card
into the AGP slot.
ASUS V9520 Home Theater User Guide4
Page 13

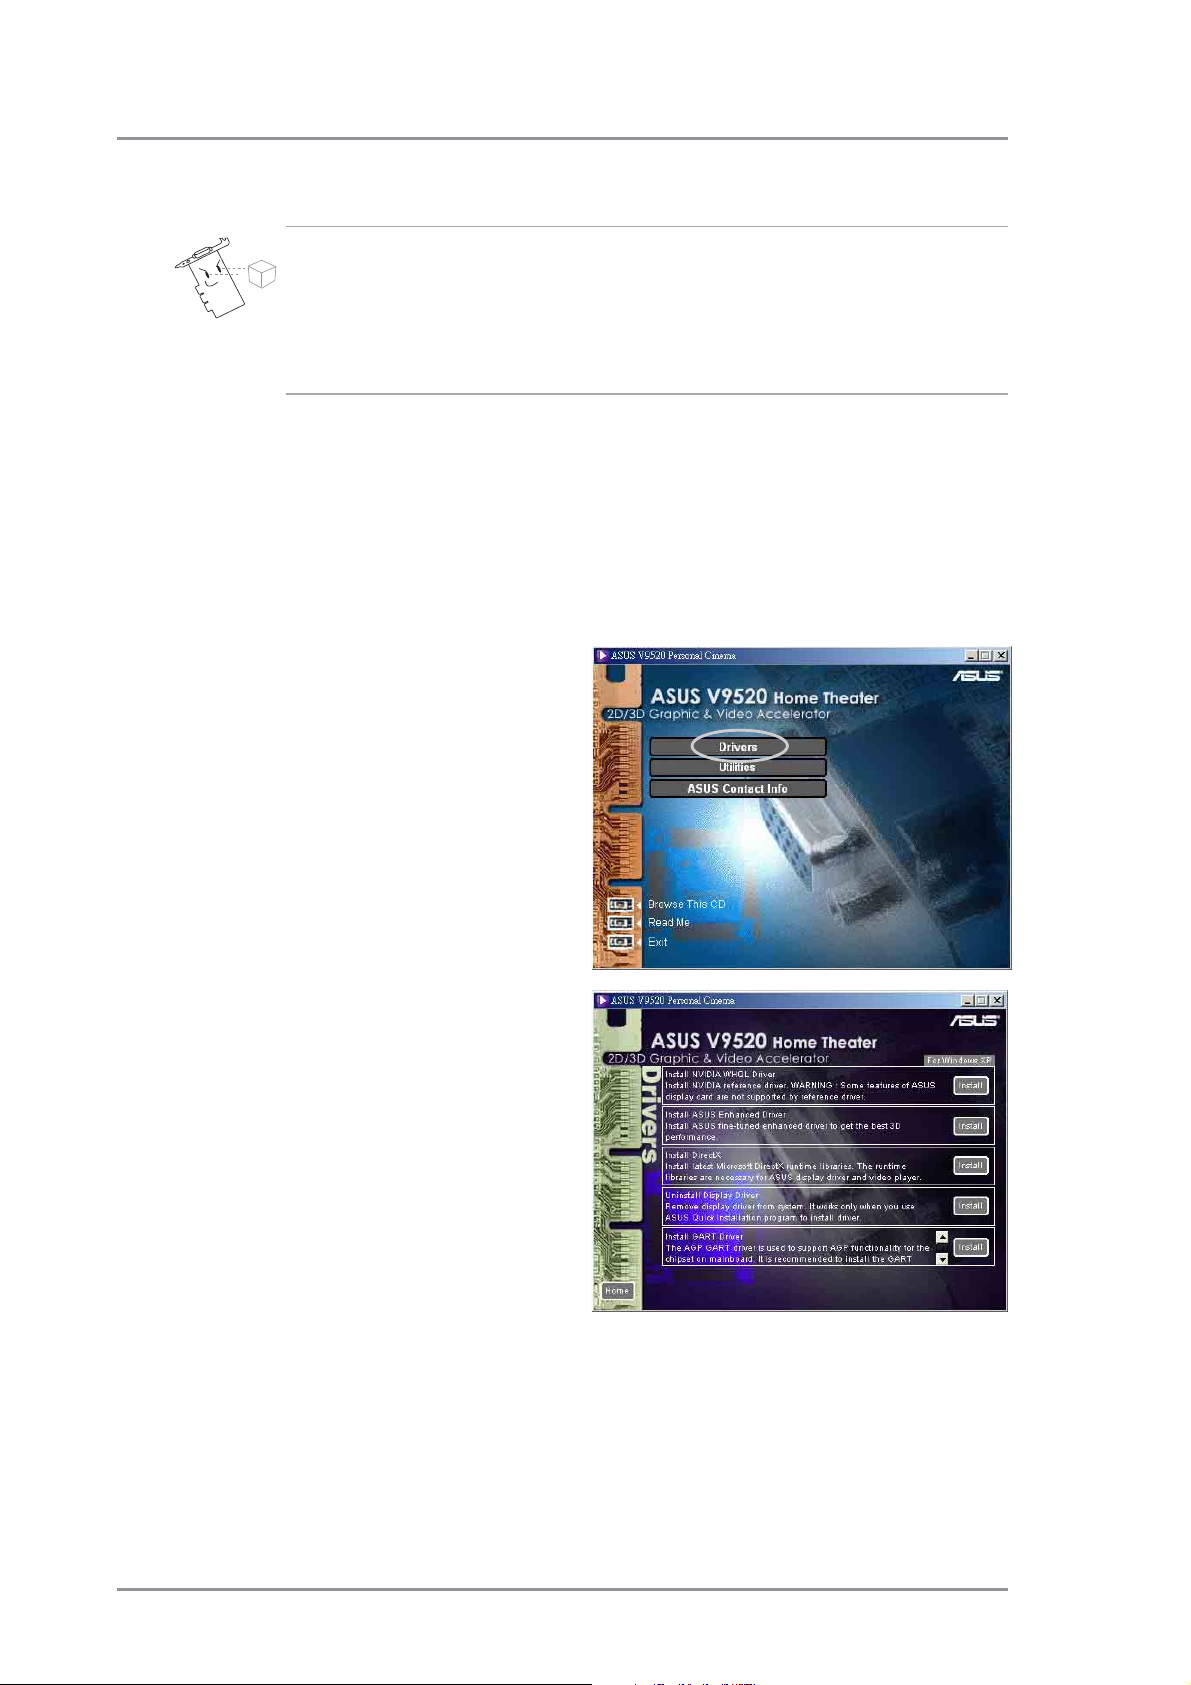
4. Display driver installation
You can use one of the recommended methods to install the display drivers
for your graphics card depending on your operating system.
4.1 Install ASUS enhanced driver
The ASUS fine-tuned enhanced driver delivers the best 3D performance on
your video output.
1. Insert the support CD into your
CD-ROM drive.
2. Double click the CD drive icon
in My Com puter to bring up
the autorun screen or run
Setup.exe in the root directory
of your CD-ROM drive.
3. From the installation menu,
click Drivers.
4. Click Install ASUS Enhanced
Driver from the Drivers dialog
box to copy the necessary files
to your computer.
5. Setup prompts you when it
has finished copying all the
files to your computer. Click
OK to finish the installation.
5ASUS V9520 Home Theater User Guide
Page 14
4.1.1 Windows 98SE
• Installing the AGP GART driver will ensure that the chipset’s AGP
functions are available.
• DirectX must be installed so that your video player can take
advantage of hardware acceleration. Install GART Driver and
Install DirectX later in this manual for the setup steps.
Method 1: ASUS Quick Setup Program
1. Boot your computer.
2. Switch the display to Windows
Standard Display Adapter (VGA)
mode, then reboot computer.
3. Insert the support CD into your
CD-ROM drive.
4. The autorun screen appears.
Click Drivers and click Install
ASUS Enhanced Driver on
the Drivers dialog box.
5. Follow the succeeding screen
instructions.
6. When Setup has finished
installing all the necessary files
to your computer, it prompts you
to restart your computer. Click
Yes... then Finish to restart
your computer.
ASUS V9520 Home Theater User Guide6
Page 15
Method 2: Directly executing installer program
1. Boot your computer.
2. Insert the support CD into the CD-ROM drive.
3. Run the setup utility from support CD from the following path :
\Win9xMe\ANVSetup.exe
4. From the autorun screen, click Drivers then click Install ASUS
Enhanced Driver on the Drivers dialog box.
5. Follow the succeeding instructions from the dialog box and reboot
system after installation is complete.
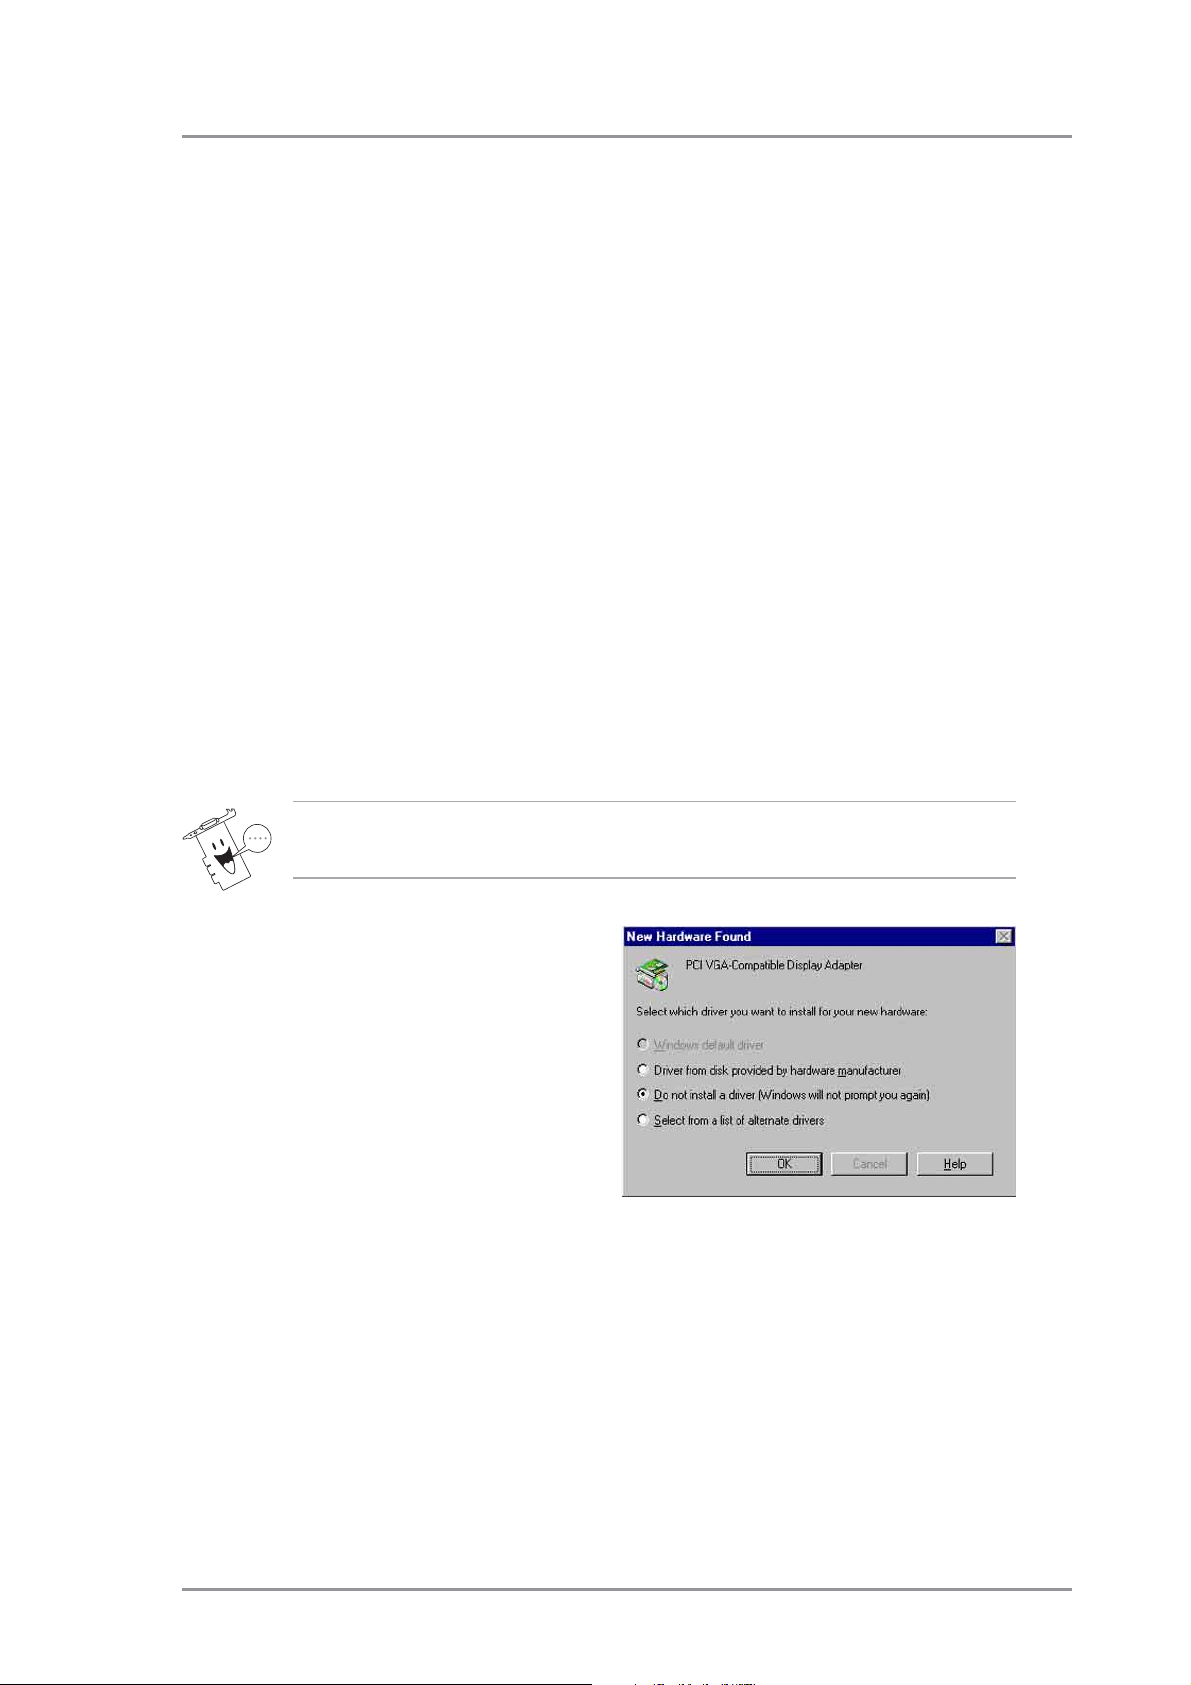
Method 3: Plug and Play
Before proceeding with the following steps, replace your old VGA card
with an ASUS graphic card.
1. Boot the computer.
2. When Windows detects your
ASUS graphics card, the New
Hardware Found dialog box
appears.
3. Click Driver from disk provided
by hardware manufacturer.
4. The Setup prompts you for the location of the driver , type the following
path:
D:\WIN9xMe
to direct Setup to the INF file, then click Finish to install the driver.
5. When Setup has finished installing all the necessary files to your
computer, it prompts you to restart your computer. Click Yes to restart
your computer and to complete setup.
7ASUS V9520 Home Theater User Guide
Page 16

Method 4: Display Property Page
1. Boot your computer.
2. Right-click on the Windows
desktop and click Properties.
3. From the Properties dialog box,
select the Settings tab, then click
Advanced. The Standard
Display Adapter (VGA)
Properties dialog box appears.
4. Click Change on the Adapter tab
to display the Update Device
Driver Wizard dialog box. Click
Next then click Display a list of
all the drivers.
5. From the combo list box, click
Next.
6. Click Show all hardware then
Have Disk... to display Install
From Disk dialog box.
7. T ype the location of the ASUSNV9X.INF file (WIN9X folder) then proceed
to step 12. Otherwise, proceed to the next step.
8. Click Browse to search the CD-ROM drive. From the Drives box of
the Open dialog box, select your CD-ROM drive and click OK.
9. From the Folders box, double-click the WIN9x folder and select
ASUSNV9X.INF in the File name box.
10.Click OK to display the list of compatible video cards. Select your
VGA card type for your operating system and click OK.
11. From the Update Driver Warning box, click Yes to confirm the setting
up of the ASUS enhanced display drivers.
12.Follow succeeding screen instructions.
13.The setup screen prompts you when it has finished installing all the
necessary files to your computer. Click Finish to complete setup.
14.When you are returned to the Standard Display Adapter (VGA)
Properties dialog box, click Close.
15.In the Display Properties box, click Close.
16.The system prompts you to restart your computer. Click Yes to restart
and to complete setup.
ASUS V9520 Home Theater User Guide8
Page 17

IMPORTANT NOTES
• Quick installation works only when the primary display detected is
an ASUS display card.
• For optimum performance, check the following:
- Make sure the DMA mode is enabled when using IDE DMA/33 or
DMA/66 hard disk drives. To set parameters, click on Start->
Control Panel->System->Device Manager->Disk Drives->
Properties->Settings->Options->DMA.
- Run the Disk Defragmenter (defrag.exe), especially when the
hard disk is almost full.
• Make sure the system power supply can provide the minimum
power requirement of the graphic card.
• When using a motherboard with VIA chipset, install VIA VGARTD
in normal mode.
4.1.2 Windows 2000/XP
Method 1: ASUS Quick Setup Program
1. Boot your computer.
2. When Windows detects your
ASUS graphics card, the
Found New Hardware
Wizard dialog box appears.
3. Click Cancel to enter the Windows
desktop.
4. Insert the support CD into your
CD-ROM drive.
5. From the autorun screen, click Drivers then Install ASUS Enhanced
Driver on the Driver dialog box.
6. Follow the onscreen instructions to complete the setup.
7. When Setup has finished installing all the necessary files on your computer , it will prompt you to restart your computer . Click Yes to restart your
computer and to complete Setup.
9ASUS V9520 Home Theater User Guide
Page 18

Method 2: Plug and Play
1. Boot your computer.
2. When Windows detects your
ASUS graphics card, the Found
New Hardware Wizard dialog
box appears.
3. Click Next.
4. From the Found New
Hardware Wizard dialog box,
select Search for a suitable driver
for my device (recommended)
then click Next.
5. Insert the support CD into your
CD-ROM drive to bring up the
Locate Driver Files item of the
Found New Hardware Wizard
dialog box.
6. Check CD-ROM drives, uncheck
all other options then click Next
to search for the drivers of your
graphics card.
ASUS V9520 Home Theater User Guide10
Page 19

7. When the wizard has finished
searching for driver files for
your graphics card, check
Install one of the other
drivers then click Next from the
Driver Files Search Results
item of the Found New
Hardware Wizard dialog box.
8. When prompted to select the
display driver to install in your
system, select the one that is
located in the
D:\WIN2KXP\ASUS
and click Next.
9. Follow succeeding onscreen
instructions.
10. When Setup has finished installing all the necessary files to your
computer, it will prompt you to restart your computer, click OK to
restart your computer and to complete Setup.
11ASUS V9520 Home Theater User Guide
Page 20

4.1.4 Windows NT 4.0
Method 1: Display Property Page
Before installing the display driver in Windows NT 4.0, make sure that
you have installed Windows NT 4.0 Service Pack 3 or later to take
full advantage of the AGP features of your card.
The following steps assume your CD-ROM drive letter is D.
1. Boot Windows NT system and log on as Administrator.
2. Switch display properties to VGA mode (16 colors, 640 x 480 pixels),
then restart your computer.
3. After startup, right-click the Windows NT desktop and click Properties.
4. Select the Settings tab.
5. Select Change Display Type.
6. Select Adapter Type and click Change.
7. Click Have Disk.
8. Insert the support CD.
9. Type D:\NT40 or click Browse to select the path of the display driver for
Windows NT then click OK.
10.Select your ASUS VGA Card model then click OK.
1 1. Windows NT will once again prompt for confirmation. Confirm installation
of display drivers to copy all appropriate files. When all files are copied,
click Close go back to the Display Properties box then click Apply.
12. The System Settings Change dialog box is displayed. Click Yes to reboot
computer.
13.Windows NT will restart with the default settings. The Display applet will
appear to allow for mode selection.
ASUS V9520 Home Theater User Guide12
Page 21

5. ASUS VideoSecurity
5.1 Install VideoSecurity
VideoSecurity is a powerful video stream comparison and detection utility
that helps in detecting potential errors or intrusions at a specific time interval
by using a video capture devices.
1. Insert the support CD into your
CD-ROM drive.
2. Double click the CD drive icon
in My Com puter to bring up
the autorun screen or run
Setup.exe in the root directory
of your CD-ROM drive.
3. From the installation menu,
click Utilities.
4. Click Install VideoSecurity
from the Utilities dialog box
to copy the necessary files to
your computer.
5. From the Welcome screen,
click Next. Follow succeeding
screen instructions.
13ASUS V9520 Home Theater User Guide
Page 22

5.2 Using ASUS V ideoSecurity
The ASUS VideoSecurity lets you detect intruders into your system and
environmental changes and monitor a specified location or any incoming
visitor. If VideoSecurity detects any deviation from the norm that you set, it
may give an error message or not. Regardless of any messages,
VideoSecurity will record:
• The last two detected snapshot image files from the video captured
stream (saved into a access file named watch dog.mdb). Any image
processing or editing software can then be used to view, modify, or
distribute them.
5.2.1 Limitations
Because of differences in hardware sensitivity, VideoSecurity may not completely detect all possible errors. Before you execute VideoSecurity, there
are some limitations you have to understand so that you can appropriately
use it.
• Due to changing temperatures, the captured image of some CCDs will
be twisted, which may give a wrong detection.
• If the features (e.g., color, luminance) of the object are similar to
that of background, the object may not be detected clearly.
• The CCD cannot capture the object smoothly and immediately when
an object moves too fast.
VideoSecurity is designed for
the widest environments
possible and error conditions,
therefore it is necessary to tune
the parameters in VideoSecurity
Setup Wizard to get the best
detection results.
5.2.2 Setup Wizard
Setup Wizard guides you through
setting up the VideoSecurity
features.
1. To open Setup Wizard, click the Start button, and then point to Pro-
grams, ASUS Video Security, and then click Setup Wizard. The
Video Security Setup Wizard dialog box appears.
ASUS V9520 Home Theater User Guide14
Page 23

The following descriptions are only for selected features of the ASUS
VideoSecurity utility. For a full description of the features described in
this manual and other features, refer to the ASUS VideoSecurity
Online Help (HTML) format included with your support CD. You may
also click the Help button to open the online help file.
Detecting Sensibility
This is an important parameter when setting up VideoSecurity. Your
environment may change often but VideoSecurity is concerned only when
there is a change in the environment. Make sure that you select a suitable
sensitivity for your environment.
Detecting Interval(frame/sec)
This sets the scan rate. Default is 2 frames/sec. The higher the scan rate,
the more accurate is the detection. Higher rates, however, entails a higher
CPU usage. Do not use a high rate when you plan to use VideoSecurity
while using other applications.
Working Directory
The Working Directory is the folder where the utility stores its temporary
working and log files. The default is
C:\VIDEOSEC. The directory is user-
configurable. When VideoSecurity is ran, a sub-directory automatically
created under the main directory, using the current date and time as the
folder name. For example, “1999.11.30_12.30.20” means that
VideoSecurity was started on 30 November 1999 at 12:30:20 PM.
Do not change the working folder’s name while VideoSecurity is
running. Otherwise, a fatal runtime error will occur.
Detect Region
• Full window detects all visible area when watchdog function is on.
• User define region detects only the area defined by the user when
watchdog function is on. Feature will take effect only when
VideoSecurity runs the next time.
Window Style
• Normal Window is the default style, that is, VideoSecurity will function
as a standard Windows program.
• Minimized as a tray icon lets you hide the main VideoSecurity
window. This is useful when you don’t want anyone to know you are
monitoring. When this option is selected, the VideoSecurity icon will
appear on the taskbar in the lower-right corner of your screen.
Whenever VideoSecurity detects a problem, it will run. You may also
run VideoSecurity by clicking the icon.
15ASUS V9520 Home Theater User Guide
Page 24

• Always on Top is like a Normal Window except that the main window
and control panel is shown always on top of other programs or
utilities. You may right click to enable or disable this function at the
main window anytime.
Working Mode
Click the Working Mode tab to
define tracing procedure.
VideoSecurity not only detects
errors or problems in your card, but
also detects an intrusion.
This box appears when an error occurs.
Use this Tracing Box to choose the
error processing method for tracing.
Handling Procedure
Click the Handling Procedure tab to
set up personalized handling
procedure through Recording, Send
email, Make phone call or Execute
specific program. VideoSecurity will
execute procedures set up by the
user once any error is detected.
Devices
Click the Devices tab to select
capture
devices and video standard.
Use mouse to fine tune the Video
Security screen and then click OK
when done.
ASUS V9520 Home Theater User Guide16
Page 25

5.2.3 Running ASUS VideoSecurity
Click the ASUS icon on the taskbar’s status area. Clicking this icon opens
the ASUS Control Panel, then click the ASUS VideoSecurity to run
VideoSecurity.
Detect Region
Click the Detect Region button to define your VideoSecurity video window.
Use your mouse to drag your intended rectangular region.
17ASUS V9520 Home Theater User Guide
Page 26

6. ASUS GameFace
6.1 Introduction
The revolutionary ASUS GameFace is a real-time audio/video
communication feature that enhances interactive gaming experience by
enabling point-to-point video conferencing functions and online gaming to
take place simultaneously thus allowing you to see and talk to your
opponents while playing full-screen online games!
Visit the ASUS website (www.asus.com) for more information about the ASUS
GameFace technology.
ASUS V9520 Home Theater User Guide18
Page 27

6.2 Installing ASUS GameFace
Follow the given instructions to install ASUS GameFace.
1. Insert the support CD into your
CD-ROM drive.
2. Double click the CD drive icon
in My Computer to bring up the
autorun screen or run
Setup.exe in the root directory
of your CD-ROM drive.
3. From the installation menu,
click Utilities.
4. Click Install ASUS GameFace
from the Utilities dialog box .
5. From the Welcome box, click
Next to start the installation.
6. Follow succeeding on-screen
instructions.
5. Click Finished after the
installation is complete.
19ASUS V9520 Home Theater User Guide
Page 28

6.3 Using ASUS GameFace
Follow the given instructions to use ASUS GameFace.
STEP 1: Enabling ASUS OSD
1.a Open Display Properties
dialog box from desktop or
control panel.
1.b Select Advanced tab on
Settings page.
1.c Select OSD from in Advanced
tab.
1.d Check the Enable OSD check
box and input the appropriate
hotkey.
You can also enable the OnScreen Display (OSD) in the
GameFace application.
STEP 2: Launch ASUS GameFace
• ASUS GameFace automatically
detects the connected audio/
video WDM capture device
upon start-up. You can change
the input device from Options
in the Tool menu if you have
more than one audio/video
device.
ASUS V9520 Home Theater User Guide20
Page 29

STEP 3: Local Playback Mode
3.a Select Local Play/Stop from
the File menu to start local
playback when local video is not
playing.
3.b Select Local Play/Stop from
the File menu to stop local
playback when playing local
video.
3.c You can also press the
Play/Stop button to start or stop
local playback.
STEP 4: Network Playback Mode
4.a Connect to remote computer:
- Input the computer name
(Local Area Network) or IP
Address in the combo box.
- Select New Call from the
File menu or press the
“Make a Call” button.
- You will see and hear the
remote audio/video signal if
the remote computer
accepts the call.
For computer name and IP
addresses go to Tools->Info
for lists of information.
21ASUS V9520 Home Theater User Guide
Page 30

4.b Waiting for connection:
- Launch ASUS GameFace
- A message box appears on
an incoming call. Click Yes
to accept the call.
- Select End Call from the
File menu or press the
“End the Call” button to
disconnect.
STEP 5: GameFace Settings
5.a Select Option from the Tool menu.
5.b Select GameFace Option Dialogue
5.c Enter GameFace page to adjust transparency, position and hotkey
settings.
ASUS V9520 Home Theater User Guide22
Page 31

STEP 6: Launch Game and show GameFace
6.a Begin your game.
6.b After entering Full-Screen mode, press the hotkey
(default is Ctrl+Alt+V) to activate GameFace.
6.c Press the On-Screen Display hotkey to show the OSD menu.
6.d Use the arrow keys to select the GameFace application page and
adjust the Transparency, Position X, Position Y, Size or toggle to
enable or disable GameFace.
23ASUS V9520 Home Theater User Guide
Page 32

7. ASUS SmartDoctor
7.1 Install ASUS SmartDoctor
The ASUS SmartDoctor monitor the VGA card’ s health and dynamically cool
down VGA chipset. It also provides you access to adjust clock settings.
1. Insert the support CD into your
CD-ROM drive.
2. Double click the CD drive icon
in My Computer to bring up
the autorun screen or run
Setup.exe in the root directory
of your CD-ROM drive.
3. From the installation menu,
click Utilities.
4. Click Install SmartDoctor/
Tweak from the Utilities
dialog box to copy the
necessary files to your
computer.
5. Follow succeeding onscreen
instructions.
6. Click on Finish, after the setup
is complete.
7. Reboot computer to complete
setup.
The Smart Doctor utility is works only for VGA card models with a
built-in monitor chipset. If the monitor chipset is not present, the ASUS
Tweak utility will be installed.
ASUS V9520 Home Theater User Guide24
Page 33

7.2 Using ASUS Tweak Utility
The ASUS Tweak utility is designed to adjust the working frequency of the
graphic engine and video memory.
Use ASUS Tweak Utility with extreme caution and only if you are well
acquainted with your display card. Inappropriate use may damage your
graphic card, its components and even your system.
7.2.1 Functions
• Timing adjustment includes engine and memory clock.
• 2D Test lets you test your settings.
• Timing test run when clock is larger than default setting and use
current setting at next startup.
• GPU Cooling. Tweak automatically reduces the speed of the GPU.
When processing the GPU automatically throttles back to reduce
component temperatures and increase longevity.
• Dynamic Overclocking. Tweak prevents excessive overclocking that
may exhaust and shorten the GPU’s life.
Use overclocking only when you need to run high-speed graphic
applications.
25ASUS V9520 Home Theater User Guide
Page 34

7.2.2 Set/Test
When you click the Set/Test button, the Tweak Utility tests the graphic
card onscreen memory and displays the following screen while
testing.
ASUS V9520 Home Theater User Guide26
Page 35

8. ASUS Home Theater Software
8.1 Introduction
The ASUS Home Theater is an integrated software with various
multimedia applications. It allows you to enjoy multimedia entertainment
such as watching TV, listening to MP3s, playing DVD, sorting and viewing
video or pictures in one friendly user interface. You can easily turn your PC
into a multimedia center with ASUS Home Theater!
A. Watch TV on your PC!
• TV Recording
• Time-shifting Playback function
for temporary leave.
• Multi-channel previewing
• Scheduled recording
• Still image capture
B. Enjoy MP3s on your PC
• Listening to MP3 music
• Radio recording and playback
• Information display
27ASUS V9520 Home Theater User Guide
Page 36

C. Sort Videos on your PC!
• Sort recordings fromt TV/DVD/
Video
• Display recordings from TV/DVD/
Video
• Instant Preview feature
• Still image capture
• Slide show with music
D. Sort pictures on your PC!
• Sort pictures from TV/DVD/Video
• Display pictures from TV/DVD/
Video
• Instant preview feature
• Print pictures
E. Play DVD/VCD on your PC!
• DVD/VCD playback
• Still image capture feature
• 5.1 channel audio support
F. Timeshifting feature!
Don’t you hate that annoying phone call during your favorite TV show or
an important game? ASUS has the perfect answer. The “Timeshifting”
feature allos you to simultaneously watch, replay and record a TV program
on same computer. You can now view, stop and replay any part of a show
without missing the rest due to unexpected interruption.
ASUS V9520 Home Theater User Guide28
Page 37

When do you need Timeshifting?
• Scenario 1
Let’s say you programmed to record a program that starts at 9 o’clock and
ends at 11 o’clock, but you arrived home at 10. With Timeshifting, you
don’t have to wait until 11 o’clock to watch what you recorded because the
feature permits play and record functions at the same time.
• Scenario 2
Five more minutes in the most important game of the year, and your
phone starts ringing and your caller ID indicates that it’s from your boss.
What do you do? Continue to watch the game and lose your job or engage
in a long boring conversation and miss the game. No more dilemna. Click
the Pause
game. Get rid of your boss, click Play
off.
• Scenario 3
Nice play by the goalie! Want to see it again? Timeshifting gives you
instant replay capability without missing a beat, because the feature allows
continous recording even when you select the replay/rewind
button, the computer will continue to record the rest of the
and continue where you left
function.
29ASUS V9520 Home Theater User Guide
Page 38

8.2 Installing ASUS Home Theater
The ASUS Home Theater enables you to watch TV, listen to MP3s, view
DVDs or video clips and browse pictures on your PC.
1. Insert the ASUS Home Theater support CD into your CD-ROM drive.
2. Double click the CD drive icon in My Com puter to bring up the
autorun screen or run Setup.exe in the root directory of your CD-ROM
drive.
3. From the welcome screen, click
Next and follow succeeding
instructions to copy the
necessary files to your
computer.
4. Click on Finish to complete
setup.
ASUS V9520 Home Theater User Guide30
Page 39

9. PowerDirector Pro
9.1 Introduction
Ever thought about directing your own movie? How about having all the
creative controls and being in charge of the entire editing and postproduction process? Well, today's computing technology has made all this
possible for anyone who has recording devices, capture devices, a
computer, and of course, the sensational new software application,
PowerDirector.
Admittedly, video editing software is not without its drawbacks. Since the
advent of computers and its incredible growth in usage and processing
speed power, video editing software applications have taken off to
astronomical heights. Yet, a great inherent limitation, such as requiring a
huge amount of disk space because of the raw video data it captures, still
remains. This is why many still choose to edit with analog devices.
What makes PowerDirector the megastar of its industry in one quick flash
is its ability to save precious producing time because of its Smart Video
Rendering Technology (SVRT). Say goodbye to raw video data, which is
usually captured in .AVI format, and say hello to plenty of hard drive space
with the MPEG and DV AVI formats. No additional compression nor
decompression is required when producing scenes with MPEG or DV AVI
formats that do not contain effects, which saves you huge amounts of time
compared to our competitors that compress and decompress the entire
movie!
31ASUS V9520 Home Theater User Guide
Page 40

Additional SVRT features includes:
• altering video speeds
• detecting scenes
• capturing directly from DV camcorders in real-time or non real-time
• a disc wizard that creates and burns movie discs in a cinch!
• adding titles to clips
• adding audio streams to clips
• picture-in-pictures (adding video or images to an existing video clip)
• a huge collection of transitions, video and titles effects
• master audio files
• watermarks
ASUS V9520 Home Theater User Guide32
Page 41

9.2 Install PowerDirector Pro
Follow the given steps to install PowerDirector Pro.
1. Insert the support CD into your
CD-ROM drive.
2. Double click the CD drive icon
in My Computer to bring up
the autorun screen.
3. Select a language from the
combo list box then click Next.
4. The PowerDirector Pro
Setup window appears. Click
Next to start the installation.
5. Follow the succeeding onscreen instructions to complete
setup.
33ASUS V9520 Home Theater User Guide
Page 42

10. Remote Control Functions
ASUS Remote Controller
ASUS Remote Controller Layout
ASUS V9520 Home Theater User Guide34
Page 43

Remote control button functions
Button Mode 1 Mode 2 Mode 3 Mode 4 Mode 5
TV Mode
-
Close App Close App Close App Close App Close App
- Music
- - Pictures
----
----
---
Mode
--
Mode
- - - Video
Mode
----DVD
Mouse/
Arrow
Keys
LMouse/
Back
OK OK OK OK OK
Mouse/
Arrow
Keys
LMouse/
Back
Mouse/
Arrow
Keys
LMouse/
Back
Mouse/
Arrow
Keys
LMouse/
Back
-
Mode
Mouse/
Arrow
Keys
LMouse/
Back
35ASUS V9520 Home Theater User Guide
Page 44

Remote control button functions (cont’)
Button Mode 1 Mode 2 Mode 3 Mode 4 Mode 5
-
Previous
Chapter
Play/
Pause
Next
Chapter
Rewind - - Rewind Rewind
----
Previous
Chapter
Play/
Pause
Next
Chapter
Previous
Chapter
Play/
Pause
Next
Chapter
Previous
Chapter
Play/
Pause
Next
Chapter
Previous
Chapter
Play/
Pause
Next
Chapter
Stop Stop Stop Stop Stop
Fast
Forward
Volume
Up/Down
Home/
Launch
Channel
Up/Down
--
Volume
Up/Down
Home/
Launch
----
Volume
Up/Down
Home/
Launch
Fast
Forward
Volume
Up/Down
Home/
Launch
Forward
Volume
Up/Down
Home/
Launch
Fast
ASUS V9520 Home Theater User Guide36
Page 45

Remote control button functions (cont’)
Button Mode 1 Mode 2 Mode 3 Mode 4 Mode 5
Mute
Record
Remote
Toggle
1- ---
2- ---
Mute Mute Mute Mute
----
Remote
Toggle
Remote
Toggle
Remote
Toggle
Remote
Toggle
3- ---
4- ---
5----
6- ---
7----
37ASUS V9520 Home Theater User Guide
Page 46

Remote control button functions (cont’)
Button Mode 1 Mode 2 Mode 3 Mode 4 Mode 5
8
9
- Shuffle Shuffle - -
0- ---
- Repeat - Repeat Repeat
----
----
The FM control function is supported only in PC systems with
available FM tuner features.
Features:
1. Innovation design of ASUS Remote Controller for controlling
ASUSDVD XP/PowerVCR II/EPG software with desktop PC.
2. Mouse mode can be used as mouse function while you aren’t in front
of your computer.
3. Receiver with USB Port, it’s easy to connect with your computer.
Specifications:
• Operation Voltage : 3V ; Battery : AAA Battery x 2 (alkaline battery
recommended)
• Receiver Inter face : USB Port
ASUS V9520 Home Theater User Guide38
Page 47

11. Resolution Table
Resolution Vertical Horizontal
Frequency Frequency
640 x 480 60Hz 31.5 √√√
70Hz 34.9 √√√
72Hz 37.9 √√√
75Hz 37.5 √√√
85Hz 43.3 √√√
100Hz 51.0 √√√
120Hz 61.8 √√√
140Hz 72.9 √√√
144Hz 75.2 √√√
150Hz 78.7 √√√
170Hz 90.3 √√√
200Hz 108.0 √√√
240Hz 132.9 √√√
800 x 600 60Hz 37.9 √√√
70Hz 43.8 √√√
72Hz 48.2 √√√
75Hz 46.9 √√√
85Hz 53.7 √√√
100Hz 63.7 √√√
120Hz 77.2 √√√
140Hz 91.1 √√√
144Hz 94.0 √√√
170Hz 112.7 √√√
200Hz 135.1 √√√
240Hz 166.2 √√√
1024 x 768 60Hz 48.4 √√√
70Hz 56.4 √√√
72Hz 57.5 √√√
75Hz 60.0 √√√
85Hz 68.7 √√√
100Hz 81.7 √√√
120Hz 98.8 √√√
140Hz 116.6 √√√
144Hz 120.2 √√√
150Hz 125.7 √√√
170Hz 144.1 √√√
200Hz 172.8 √√√
240Hz 212.1 √√
1152 x 864 60Hz 53.7 √√√
70Hz 62.9 √√√
72Hz 64.9 √√√
75Hz 67.5 √√√
85Hz 77.1 √√√
100Hz 91.3 √√√
120Hz 111.2 √√√
140Hz 131.3 √√√
144Hz 135.2 √√
150Hz 141.4 √√√
170Hz 162.9 √√√
200Hz 194.9 √√
1280 x 960 60Hz 60.0 √√√
70Hz 69.9 √√√
72Hz 72.1 √√√
75Hz 75.2 √√√
85Hz 86.0 √√√
100Hz 101.7 √√√
120Hz 123.5 √√√
140Hz 145.1 √√√
144Hz 150.5 √√
150Hz 157.2 √√√
170Hz 179.8 √√
8bpp = 16bpp = 32bpp =
256 colors 65K colors 16.7M colors
Standard High Color True Color
Color Depth
39ASUS V9520 Home Theater User Guide
Page 48

Resolution Table (cont’)
Resolution Vertical Horizontal
Frequency Frequency
1280 x 1024 60Hz 64.0 √√√
70Hz 74.6 √√√
72Hz 76.8 √√√
75Hz 80.0 √√√
85Hz 91.3 √√√
100Hz 108.5 √√√
120Hz 131.7 √√√
140Hz 155.9 √√√
144Hz 159.6 √√
150Hz 167.3 √√√
170Hz 191.8 √√
1600 x 900 60Hz 55.9 √√√
70Hz 65.6 √√√
72Hz 67.5 √√√
75Hz 70.5 √√√
85Hz 80.4 √√√
100Hz 95.3 √√√
120Hz 115.4 √√√
140Hz 136.8 √√
144Hz 140.4 √√
150Hz 146.8 √√
8bpp = 16bpp = 32bpp =
256 colors 65K colors 16.7M colors
Standard High Color True Color
Color Depth
1600 x 1200 60Hz 75.0 √√√
70Hz 87.5 √√√
72Hz 90.1 √√√
75Hz 94.0 √√√
85Hz 106.1 √√√
100Hz 127.5 √√√
120Hz 154.5 √√
1920 x 1080 60Hz 67.1 √√√
70Hz 78.7 √√√
72Hz 81.1 √√√
75Hz 84.6 √√√
85Hz 96.4 √√√
100Hz 113.9 √√
1920 x 1200 60Hz 74.6 √√√
70Hz 87.4 √√√
72Hz 90.0 √√√
75Hz 94.0 √√√
85Hz 106.7 √√√
100Hz 126.7 √√
1920 x 1440 60Hz 89.4 √√√
70Hz 104.9 √√√
72Hz 108.5 √√
75Hz 112.5 √√√
85Hz 129.4 √√
2048 x 1536 60Hz 95.5 √√√
70Hz 111.9 √√
72Hz 115.3 √√
75Hz 121.3 √√
ASUS V9520 Home Theater User Guide40
 Loading...