


USB-AC51
Table of contents
 Loading...
Asus USB-AC51 User Manual
USB-AC51
®
Dual-band Wireless-AC600
USB Adapter
User Manual

E8743
First Edition
October 2013
Copyright © 2013 ASUSTeK Computer Inc. All Rights Reserved.
No part of this manual, including the products and software described
in it, may be reproduced, transmitted, transcribed, stored in a retrieval
system, or translated into any language in any form or by any means, except
documentation kept by the purchaser for backup purposes, without the
express written permission of ASUSTeK Computer Inc. (“ASUS”).
Product warranty or service will not be extended if: (1) the product is
repaired, modified or altered, unless such repair, modification of alteration
is authorized in writing by ASUS; or (2) the serial number of the product is
defaced or missing.
ASUS PROVIDES THIS MANUAL “AS IS” WITHOUT WARRANT Y OF ANY
KIND, EITHER EXPRESS OR IMPLIED, INCLUDING BUT NOT LIMITED TO THE
IMPLIED WARRANTIES OR CONDITIONS OF MERCHANTABILITY OR FITNESS
FOR A PARTICULAR PURPOSE. IN NO EVENT SHALL ASUS, ITS DIRECTORS,
OFFICERS, EMPLOYEES OR AGENTS BE LIABLE FOR ANY INDIRECT, SPECIAL,
INCIDENTAL, OR CONSEQUENTIAL DAMAGES (INCLUDING DAMAGES FOR
LOSS OF PROFITS, LOSS OF BUSINESS, LOSS OF USE OR DATA, INTERRUPTION
OF BUSINESS AND THE LIKE), EVEN IF ASUS HAS BEEN ADVISED OF THE
POSSIBILITY OF SUCH DAMAGES ARISING FROM ANY DEFECT OR ERROR IN
THIS MANUAL OR PRODUCT.
SPECIFICATIONS AND INFORMATION CONTAINED IN THIS MANUAL ARE
FURNISHED FOR INFORMATIONAL USE ONLY, AND ARE SUBJECT TO CHANGE
AT ANY TIME WITHOUT NOTICE, AND SHOULD NOT BE CONSTRUED AS A
COMMITMENT BY ASUS. ASUS ASSUMES NO RESPONSIBILITY OR LIABILITY
FOR ANY ERRORS OR INACCURACIES THAT MAY APPEAR IN THIS MANUAL,
INCLUDING THE PRODUCTS AND SOFTWARE DESCRIBED IN IT.
Products and corporate names appearing in this manual may or may not
be registered trademarks or copyrights of their respective companies, and
are used only for identification or explanation and to the owners’ benefit,
without intent to infringe.

Table of contents
1. Introduction .........................................................................4
Package contents ....................................................................................... 4
System requirements ................................................................................4
Status indicator ........................................................................................... 4
2. Installing the USB-AC51 driver and utilities .....................5
3. Connecting to a wireless network ......................................
Connecting to a wireless network using WPS ................................. 9
8
4. ASUS WLAN Control Center ..............................................11
ASUS WLAN Adapter Setting Utility .................................................... 11
Survey ............................................................................................................. 12
Conguration ..............................................................................................13
Setting up a Preset Wireless Connection ...................................... 14
Setting up Encryption for a Wireless Connection ..................... 15
5. Using Windows® Network Manager ..................................18
6. Troubleshooting ................................................................19
7. Glossary..............................................................................20
Notices .....................................................................................30

1. Introduction
Package contents
ASUS USB-AC51 Adapter x1
Quick Start Guide x1
Support CD x1
Warranty card x1
If any of the above items is damaged or missing, contact your retailer
immediately.
System requirements
Before using the USB-AC51 Adapter, check if your system meets the following
requirements:
• Windows® XP / Vista / 7 / 8 / Mac OSX / Linux
• 512MB system memory or larger
• USB 2.0 port
• Optical disk drive
Operating and storage environment
1. Operating temperature: ambient temperature between 0˚C ~ 40˚C
2. Storage temperature: ambient temperature between -10˚C ~ 70˚C
3. Humidity: 5% ~ 90% (non-condensing)
Status indicator
LED Status Description
Link On USB-AC51 has connected to a wireless network successfully.
O USB-AC51 is not connected.
Using Wi-Fi Protected Setup (for Windows® OS only)
To enable Wi-Fi Protected Setup (WPS), click WPS on the Wireless Utility window
and select Use the WPS button.
4

2. Installing the USB-AC51 driver and utilities
Install the driver and utilities from the bundled Support CD before
inserting the USB-AC51 into your computer.
To install the driver and utilities for your ASUS USB-AC51:
1. Place the bundled Support CD in the optical drive. An Autorun screen
appears if the Autorun function is enabled on your computer.
If the Autorun function is not enabled on your computer, double-click
SETUP.EXE from the root directory to run the Support CD.
2. From the Autorun screen, select
your language and click Install
ASUS WLAN Card Utilities/Driver.
3. An InstallShield Wizard
appears. Click Next to continue.
screen
5
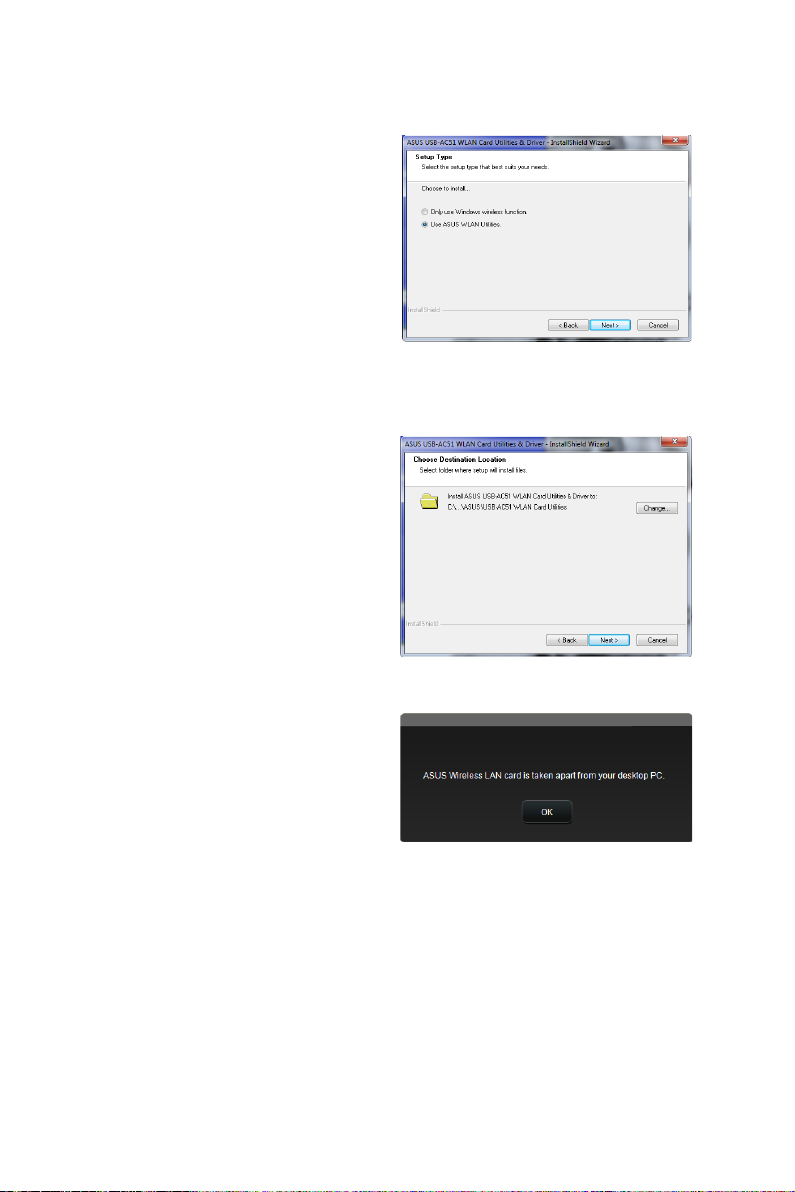
4. Select Use ASUS WLAN Utilities.
5. Select Next to install drivers and
utilities to default destination
folder.
6. Once prompted, insert the ASUS
USB-AC51 Wireless adapter into an
available USB port.
6

7. Click Finish to complete
installation.
A message will appear in the
Windows® notication area
indicating that device drivers have
successfully been installed.
7
3. Connecting to a wireless network
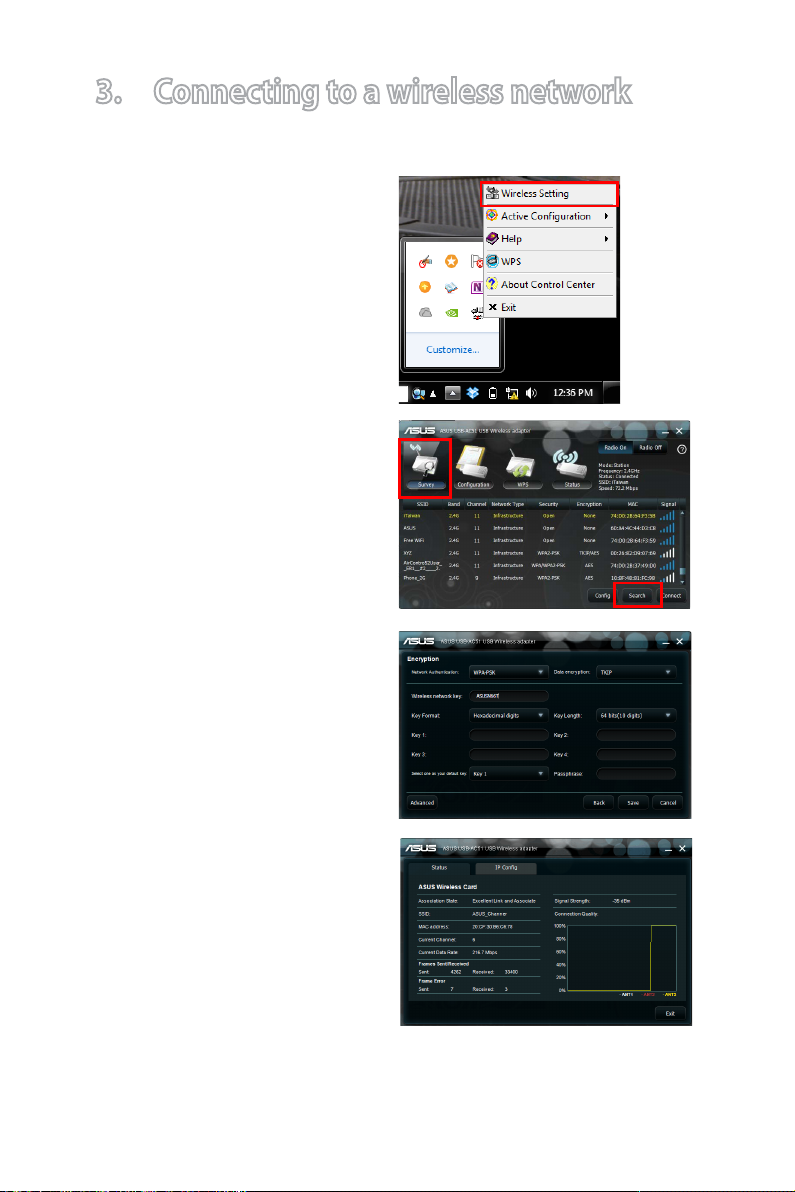
To connect the USB-AC51 Wireless adapter to a station or Access Point:
1. Right-click the ASUS WLAN
Adapter Setting Utility icon in the
Windows® notication area, then
select Wireless Setting.
2. In the WLAN Control Center
window, click Survey > Search
to search for available wireless
networks. Select an Access
Point (AP) from the list and click
Connect.
3. If Security is enabled on the AP
or station, provide the required
password or passkey. Click Save.
4. Setup is complete. Click the
Status page on the main window
to display network information
including signal strength and
network trac.
8

Connecting to a wireless network using WPS
The ASUS USB-AC51 supports Wi-Fi Protected Setup (WPS) for Windows®
operating systems for securing wireless connections.
Ensure that the AP you are trying to connect to supports the WPS
feature.
To connect the USB-AC51 Wireless adapter to a WPS-enabled AP using the
WPS button:
1. Click
2. Select Use the WPS button, then
3. Press the WPS button on the AP
WPS on the main utility
window.
click Next.
or station to establish a secure
connection.
9
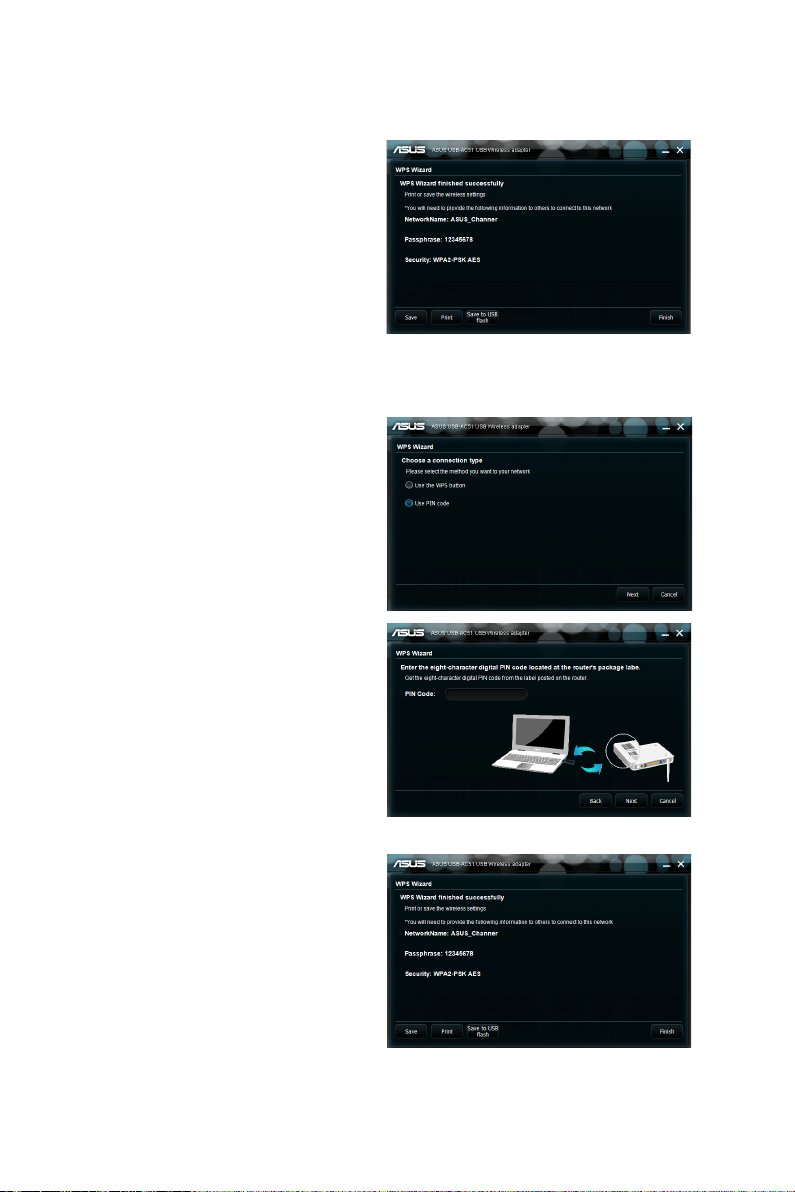
4. Click Finish.
To connect USB-AC51 to a WPS-enabled AP or station using the PIN code:
1. Select Use PIN code.
2. Key in the AP’s eight-digit PIN
code and click Next.
10
3. Click
Finish.
4. ASUS WLAN Control Center
ASUS WLAN Control Center manages your wireless connections using ASUS
USB-AC51.
To launch the ASUS USB-AC51 WLAN Control Center, click Start > All Programs
> ASUS Utility > USB-AC51 WLAN Card Utilities > ASUS USB-AC51 WLAN
Control Center
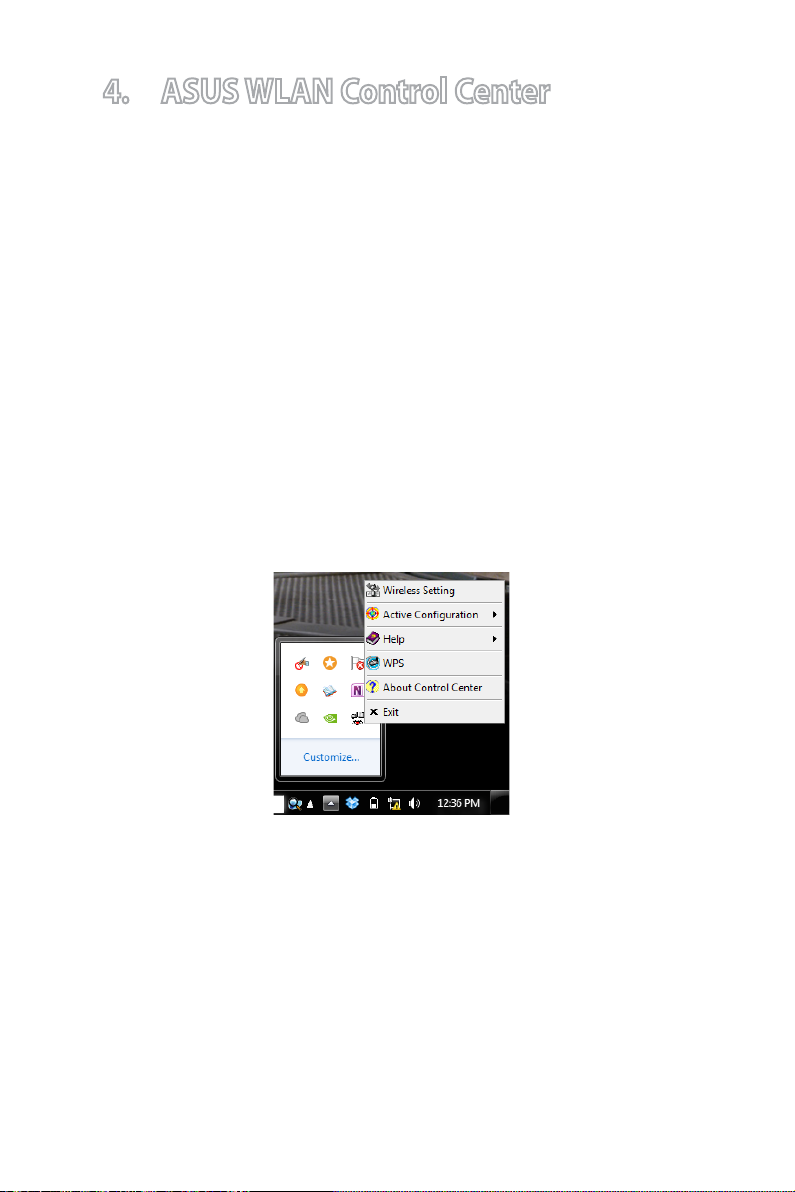
ASUS WLAN Adapter Setting Utility
Right-click the ASUS WLAN Adapter Setting Utility icon on the Windows®
notication area to display the following options:
• Wireless Setting -
• Active Conguration -
the prole Auto Roaming is enabled.
• Help -
• WPS -
• About Control Center -
• Exit -
Launches the help le.
Launches the WPS setup window.
Closes the ASUS WLAN Control Center.
Launches the ASUS WLAN Control Center.
Disable or enable a preset prole. By default,
Displays the version of your Control Center.
11
Loading...