

Page 1
uFOTO
UF735
Quick Start Guide
Page 2

English
SPLENDID MENU
In the package box
Quick Start Guide
uFOTO UF735 Support CDQuick Start Guide
Warranty Card
Power adaptor USB cable Warranty card
Suggested device with photos / MP3 files:
Digital camera
(under mass storage mode)
USB flash disk
computer memory card
System requirements for Sub-Display
function
Minimum requirements
Windows XP
1GHz CPU
512MB RAM
150MB available HD space
2
Quick Start Guide
Recommended specifications
Windows XP
2GHz CPU
1GB RAM
150MB available HD space
Page 3
uFOTO prole
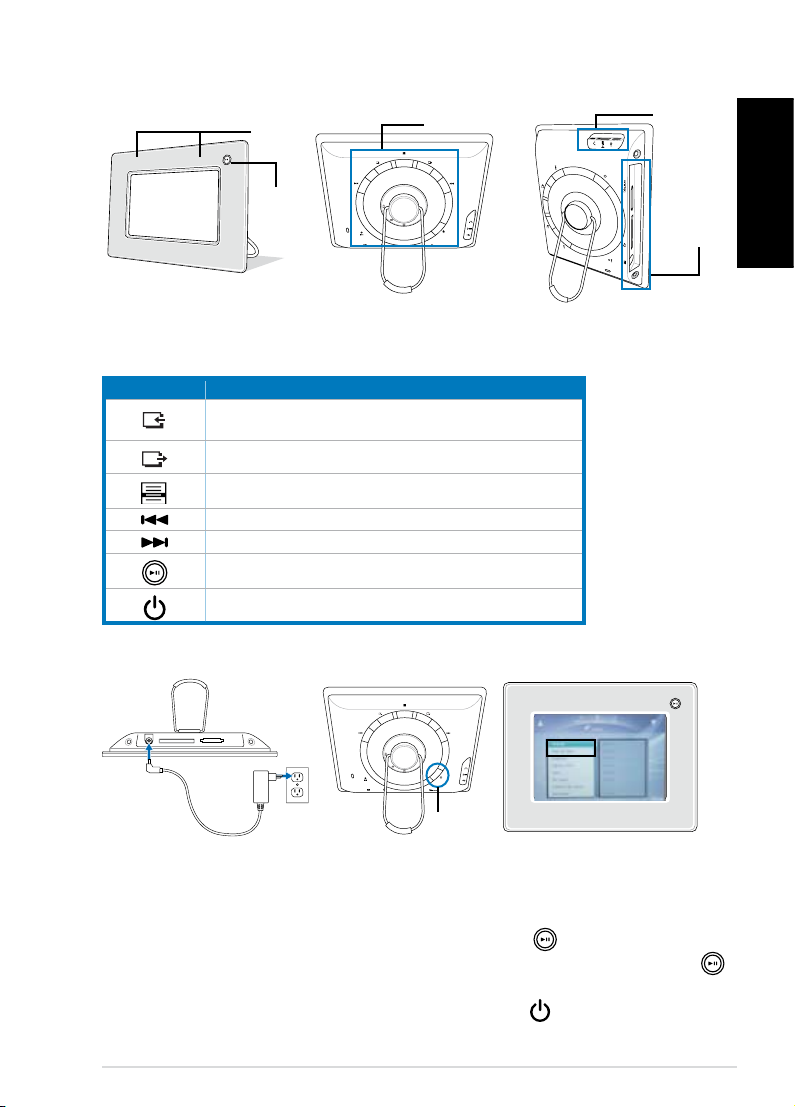
Front view Back view Side view
Stereo
speakers
Conrm
button
Control buttons (in the back panel)
Locate the control buttons in the back panel according to the
following table.
Button Function
Single select, Volume control hotkey, Photo and calendar
selection switch
Exit
Menu for advanced selection
Right / Down
Left / Up
Confirm / Play or Pause / Quick Power On
Power On/Off
Control buttons
Start the device
USB ports/
headphone
jack
Memory
card slots/
DC IN port
English
Connect the bundled
power adaptor from your
uFOTO to a power outlet.
Power
button
Press the power
button to power on
the device.
Quick Start Guide
Go to theto the Setting menu to
set the correct time/date and
your desired language.
• is for quick power on
only; you cannot press
turn off the device. Press
to turn on or off your
uFOTO normally.
3
Page 4

English
uFOTO placement
With a rotating support stand, you can position your uFOTO either
vertically or horizontally on a stable and even surface.
Horizontal placement
Rotate the support stand 90º
clockwise
Vertical placement
• The display automatically rotates 90 degrees
clockwise as you place the UFOTO vertically
on an even surface.
• Make sure that the hook on which you will
hang your uFOTO is firmly fixed on a flat
surface. Otherwise, your uFOTO may drop
down and cause damage!
Hanging on a hook
Installing the ASUS uFOTO Utility
To normally use the Sub-Display function and the Data Synchronization,
make sure to install the ASUS uFOTO Utility
1. Place the support CD into the optical drive.
2. Double-click the ASUS uFOTO Utility icon, then the follow the
on-screen instructions to finish the installation.
3. Restart your computer after the installation.
4
Quick Start Guide
Page 5

Viewing photos
SPLENDID MENU
Viewing photos from your memory card
English
Insert your memory card to the
card slot of the UFOTO.
• Left slot: CF card
Go to the Photo Frame menu to
select your card type, then you will
see the preview window.
Right slot: xD/MMC/SD/MS card
Viewing photos from your USB device
OR
Connect your digital camera
mass storage mode)
/USB flash disk
to the UFOTO.
(under
Go to the Photo Frame menu to
select USB Flash, then you will
see the preview window.
Viewing photos from your computer
Connect the UFOTO to your
computer as a mass storage or a
sub-screen.
Go to the Photo Frame menu
to select My uFOTO Picture,
then you will see the preview
window.
Quick Start Guide
5
Page 6

Listening to MP3s
Connect your USB device, memory card, or computer to your uFOTO
following the instructions on page 4.
English
Music length /
Elapsed time
• When connecting your uFOTO to your computer, go to the Photo Frame
menu to select My uFOTO Music, then you will see the playlist window.
• Press to adjust the volume and playback mode for the currently playing
MP3 file.
• The uFOTO only supports files of .mp3 format.
Calendar
Go to Calendar > Calendar Slideshow and select the photo source. Press
, then the calendar screen appears.
Go to Calendar > Reminiscence to quickly and easily search for a certain
photo accrording to the date when the photo was taken.
Calendar Slideshow Reminiscence
• Use and to select the field (mm / dd / yyyy) and change the values.
Press to confirm the setting.
• Press to adjust settings for the displayed photos and the playing MP3.
6
Quick Start Guide
Page 7

Using the softwares
SPLENDID MENU
Connect your uFOTO to your computer first.
Connect your uFOTO with your
computer using the bundled USB
cable.
• Before using the following
utilities, make sure that you have
installed the ASUS uFOTO Utility.
Data Synchronization
Go to Sub-Display > Mass Storage, then double-click the ASUS uFOTO Utility icon
on the computer desktop to start the ASUS uFOTO Folder Sync utility.
Copy your favorite MP3 files to the My uFOTO Music folder and photos to the My
uFOTO Picture folder.
• Press the Auto button start the synchronization.
• Press the To Sync My uFOTO Photo button to simply synchronize the My
uFOTO Picture folder.
• Press the To Sync My uFOTO Music button to simply synchronize the My
uFOTO Music folder.
Before synchronizing files, make sure to check if the files are already in C:\My
•
Documents\My uFOTO Picture\ or C:\My Documents\My uFOTO Music\.
English
Sub-Display
Go to Sub-Display > Sub-Display, then double-click the Sub-Display icon on the
computer desktop to start the ASUS Sub-Display Utility. The Sub-Display control
panel appears on the computer desktop.
Screen
proportion
Screen
displayed
on your PC
Click Advanced to adjust
the image settings including
Brightness, Constrast, Quality,
Speed, and Display resolution
selection.
Quick Start Guide
Resolution
adjusting buttons
Sub-Display modes
Advanced settings
7
Page 8

English
Duplication mode
In the control panel, select Duplicated, then adjust the position of the window
on your uFOTO by dragging the same screen with the hand-shaped cursor in the
control panel.
Hand-shaped cursor
Selection mode
In the control panel, select Selected, then
move the scroll bar in the preview screen
to select the window you want to display
on the uFOTO.
When decided, check the checkbox on the
down right side of the preview screen.
checkbox
Extension mode
In the control panel, select Extended, then drag the current viewing window
ouside of the computer desktop window. Adjust the position of the window on
your uFOTO by dragging the same screen with the hand-shaped cursor in the
control panel.
You can also extend part of the current viewing window to the uFOTO.
8
Quick Start Guide
Page 9

Troubleshooting
uFOTO does not turn on.
• Check if the adapter is properly plugged.
• Check if your uFOTO is fully charged.
The battery remaining indicator is incorrect
• The phenomenon occurs when you are using your uFOTO in an
extremely hot or cold environment.
• The displayed battery remaining differ from the current one. Fully
discharge and then recharge the built-in battery to correct the display.
• The built-in battery is discharged. Plug the adaptor into your uFOTO for
charging.
I cannot launch the Sub-Display function
• The USB cable is not well connected.
• The ASUS uFOTO utility is not completely installed. Refer to page 4 and
re-install the utility.
• The Sub-Display function cannot work with the Mass Storage mode
simultaneously. Make sure that you are not in the Mass Storage mode
prior to launching the Sub-Display function.
I cannot import photos or MP3 files into uFOTO
• The internal memory is full. Remove some files from your uFOTO.
English
The LCD brightness is not stable
• Check if the AI Light function is enabled. If you enable this function,
the LCD backlight will auto-adjust according to the surrounding
environments.
More help
• Refer to the digital User manual that is in the support CD.
• Go to the ASUS website (http://www.asus.com) for updated information.
Quick Start Guide
9
Page 10

English
10
Quick Start Guide
 Loading...