

Page 1

RT-N56U
®
Extreme Performance in Style
Dual-band Wireless-N Gigabit Router
Quick Start Guide
Page 2
U6485 / Second Edition / January 2012
NOTE: For more details, refer to the user manual included in
the support CD.
English ............................................................................................................................................... 3
Français ............................................................................................................................................. 9
Deutsch .............................................................................................................................................15
Italiano ..............................................................................................................................................21
Русский .............................................................................................................................................27
Български ........................................................................................................................................33
Čeština ...............................................................................................................................................39
Dansk .................................................................................................................................................45
Nederlands ......................................................................................................................................51
Eesti .................................................................................................................................................... 57
Suomi .................................................................................................................................................63
Ελληνικά ............................................................................................................................................69
Magyar ..............................................................................................................................................75
Latviski ..............................................................................................................................................81
Lietuvių .............................................................................................................................................87
Norsk .................................................................................................................................................. 93
Polski ..................................................................................................................................................99
Português .........................................................................................................................................105
Română ............................................................................................................................................. 111
Español .............................................................................................................................................. 117
Svenska ............................................................................................................................................. 123
Slovensky..........................................................................................................................................129
Українська ....................................................................................................................................... 135
Türkçe ................................................................................................................................................ 141
2
Page 3

A quick look
English
1
2
3
4
5
6
USB LED
1)
5) 2.4GHz LED 9) LAN 1 ~ 4 ports*
7
8
12
9
10
11
2) LAN LED 6) Power LED 10) WAN (Internet) port*
3) WAN LED 7) USB 2.0 ports 11) Power (DC-In) port
4) 5GHz LED 8) Reset button 12) WPS button
NOTE: *There are two LEDs in the WAN and LAN ports. Yellow LED means Gigabit
connection. Green LED means 10/100Mb connection.
Package contents
RT-N56U Network cable Support CD (User Manual/utilities)
AC adapter Quick Start Guide Warranty card
NOTES:
• If any of the items is damaged or missing, contact your retailer.
• For more details, refer to the user manual included in the support CD.
3
Page 4

Modem
Getting started
Mo
d
em
1. Unplug and disconnect the wires/cables from your existing modem setup.
English
a
b
WARNING! Ensure that your cable/ADSL modem has been turned o for at least two
minutes.
a: Unplug the AC adapter from the power outlet and disconnect it from your cable/ADSL
modem.
b: Disconnect the network cable from your cable/ADSL modem.
2. Set up your wireless environment.
d
b
c
a
4
Page 5
a: Insert your wireless router’s AC adapter to the DC-In port and plug it to a power outlet.
b: Using the network cable, connect your computer to your wireless router’s LAN port.
IMPORTANT! Ensure that the WAN and LAN LEDs are blinking.
c: Using another network cable, connect your modem to your wireless router’s WAN
port.
d: Insert your modem’s AC adapter to the DC-In port and plug it to a power outlet.
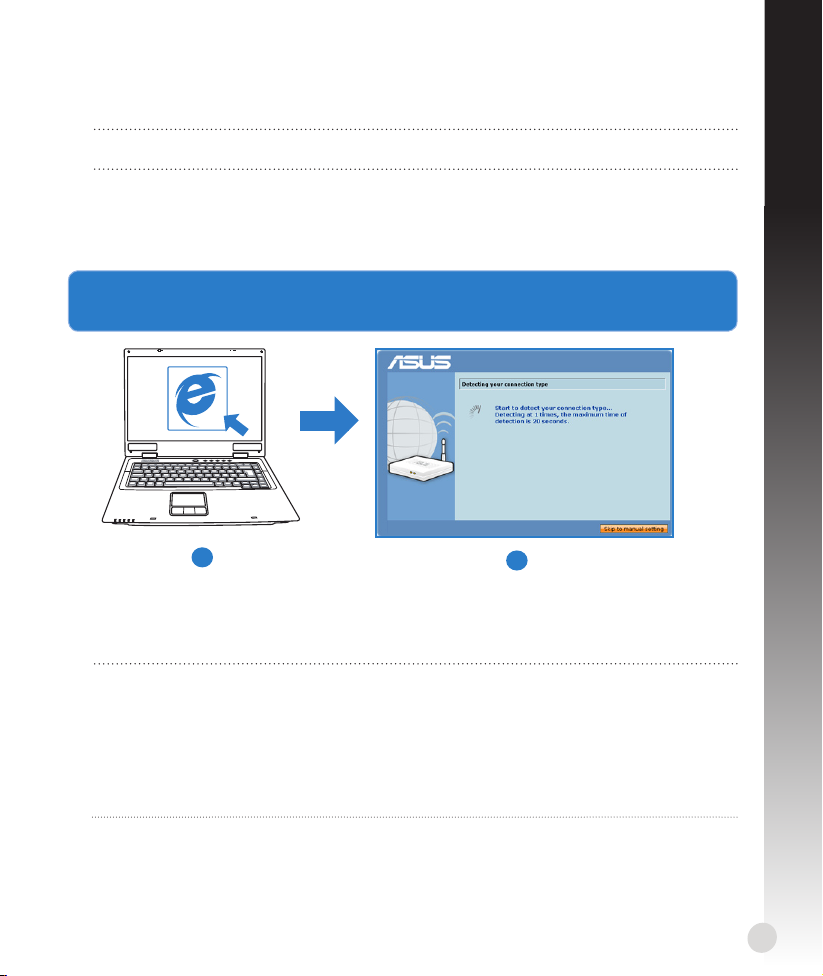
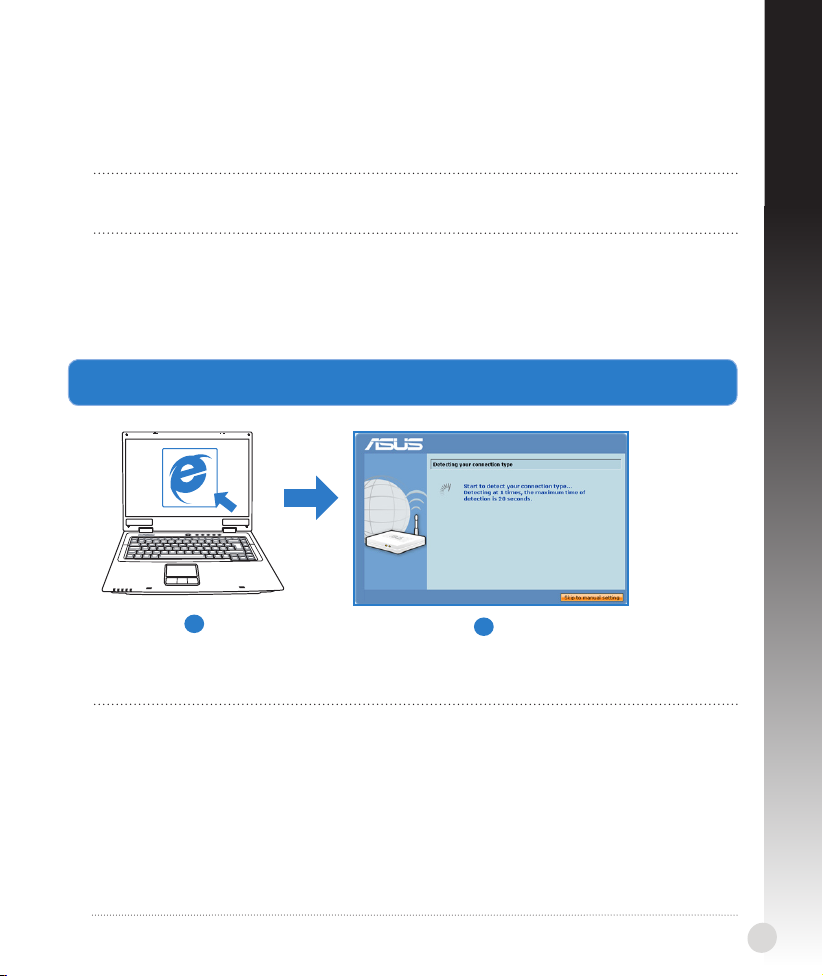
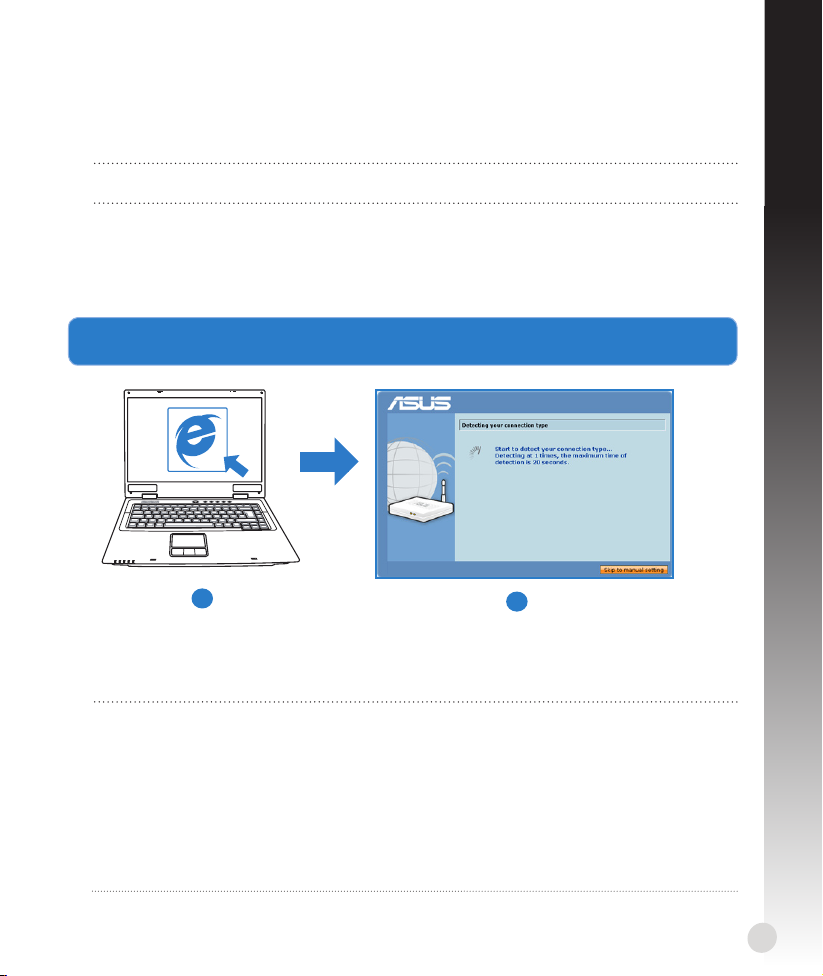
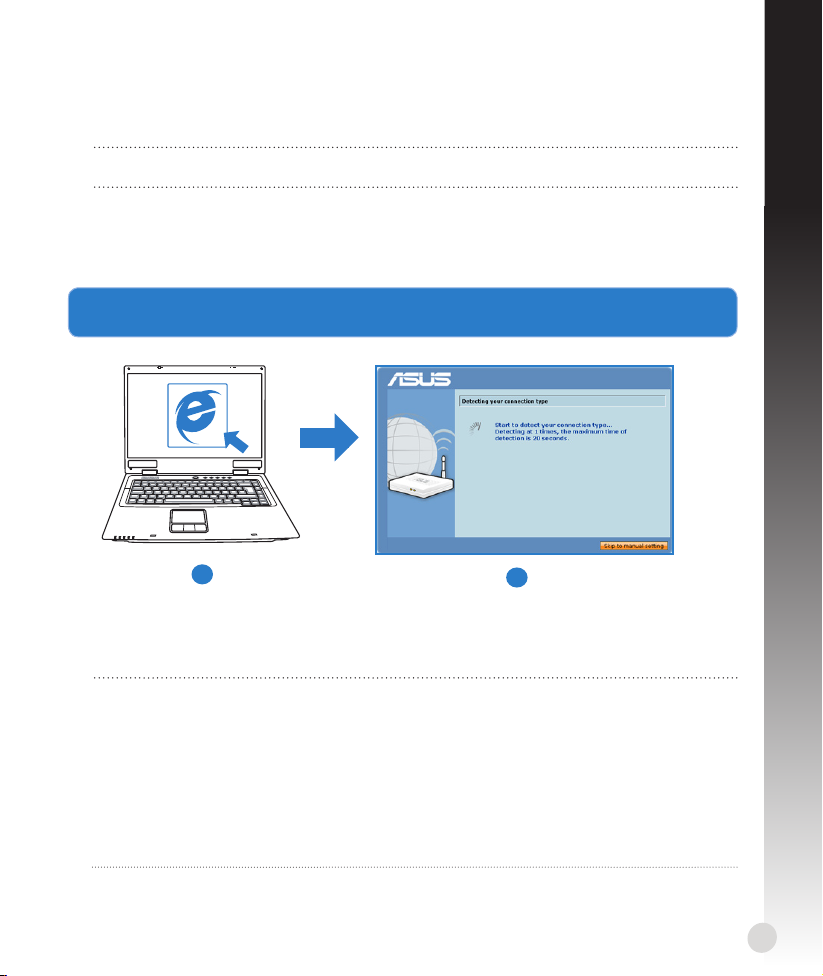
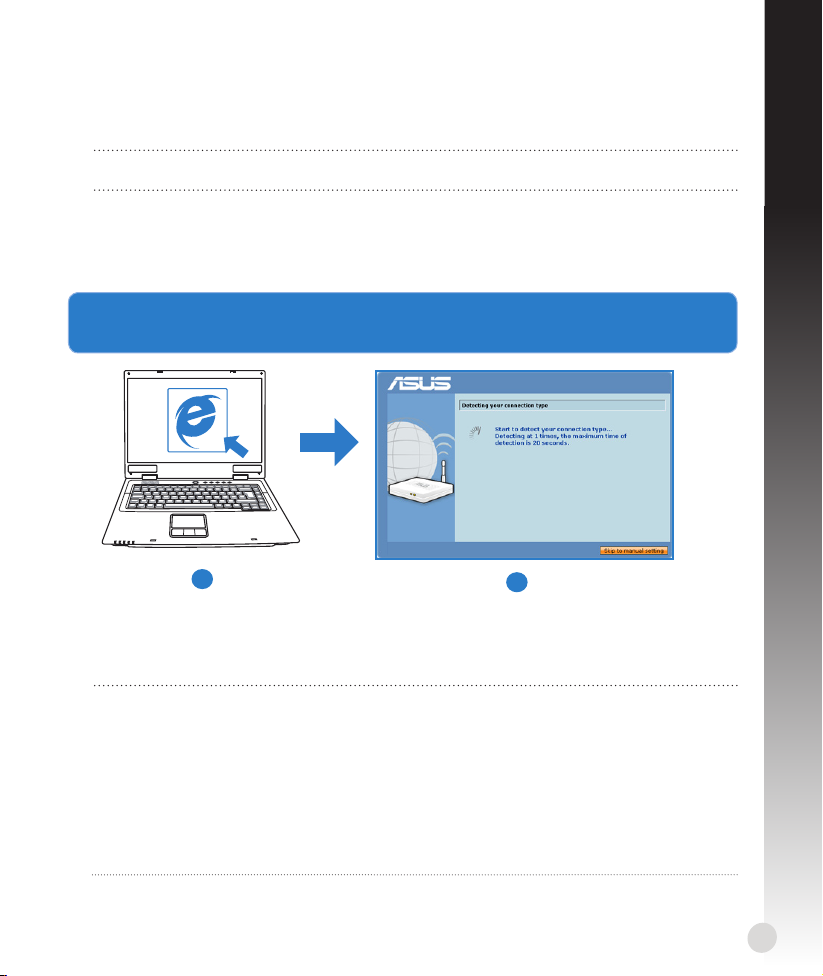
3. Launch the web browser and follow the web graphics user interface (web GUI)
instructions.
English
a
a: Launch your web browser such as Internet Explorer, Google Chrome, or Firefox.
b: Follow the Quick Internet Setup (QIS) steps.
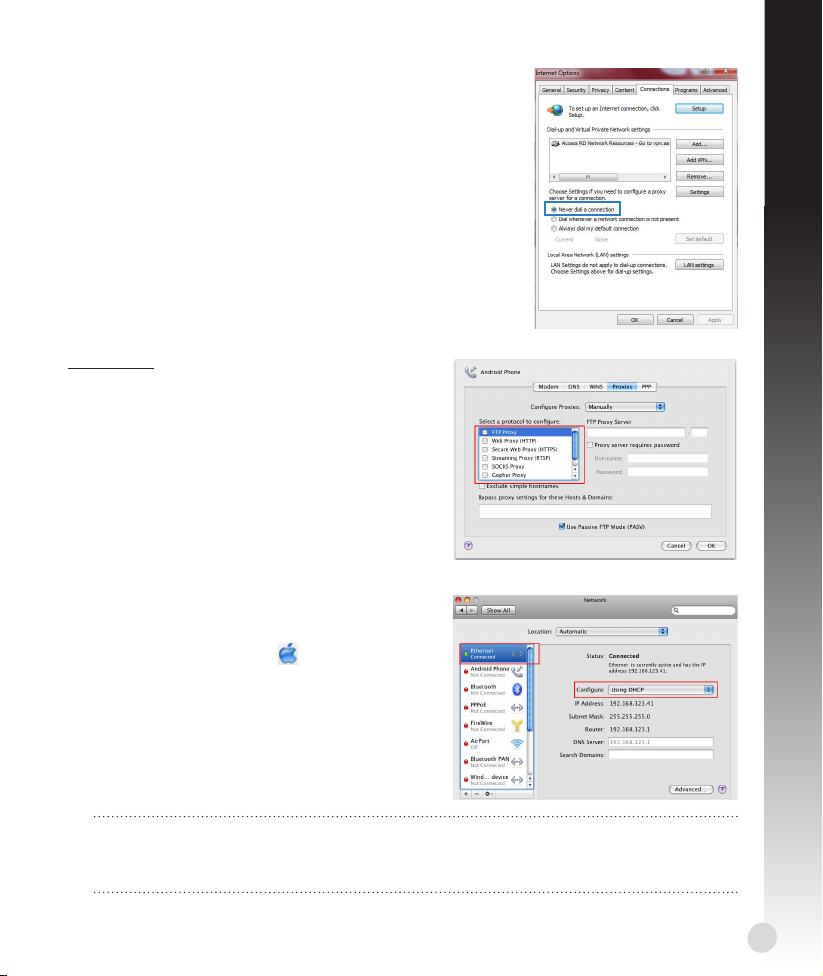
NOTES:
• If your wireless router’s web GUI does not launch, key in http://192.168.1.1 in your
web browser, and log in using the default username: admin and password: admin.
• Disable the proxy settings, dial-up connection, and set your TCP/IP settings to
automatically obtain an IP address. For more details, refer to the
section or use the Setup Wizard in the support CD for auto-diagnosis.
b
Troubleshooting
5
Page 6

Troubleshooting
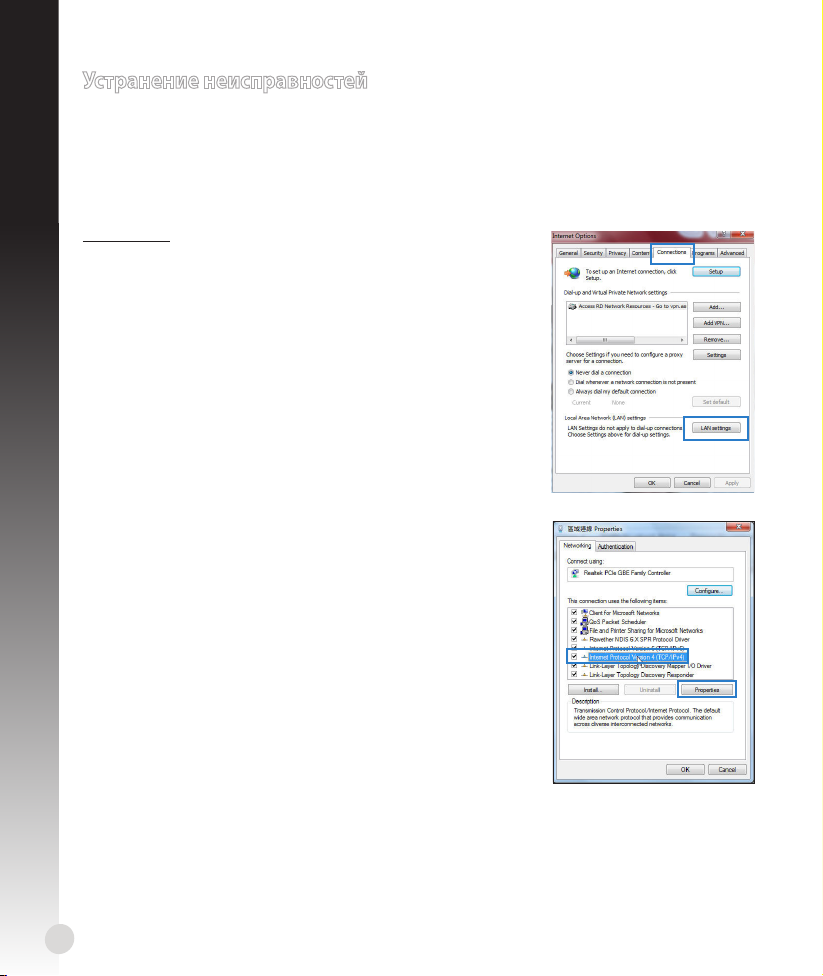
I cannot access the web GUI to congure the wireless router settings.
• Close all running web browsers and launch again.
English
• Follow the steps below to congure your computer settings based on its operating
system.
Windows 7
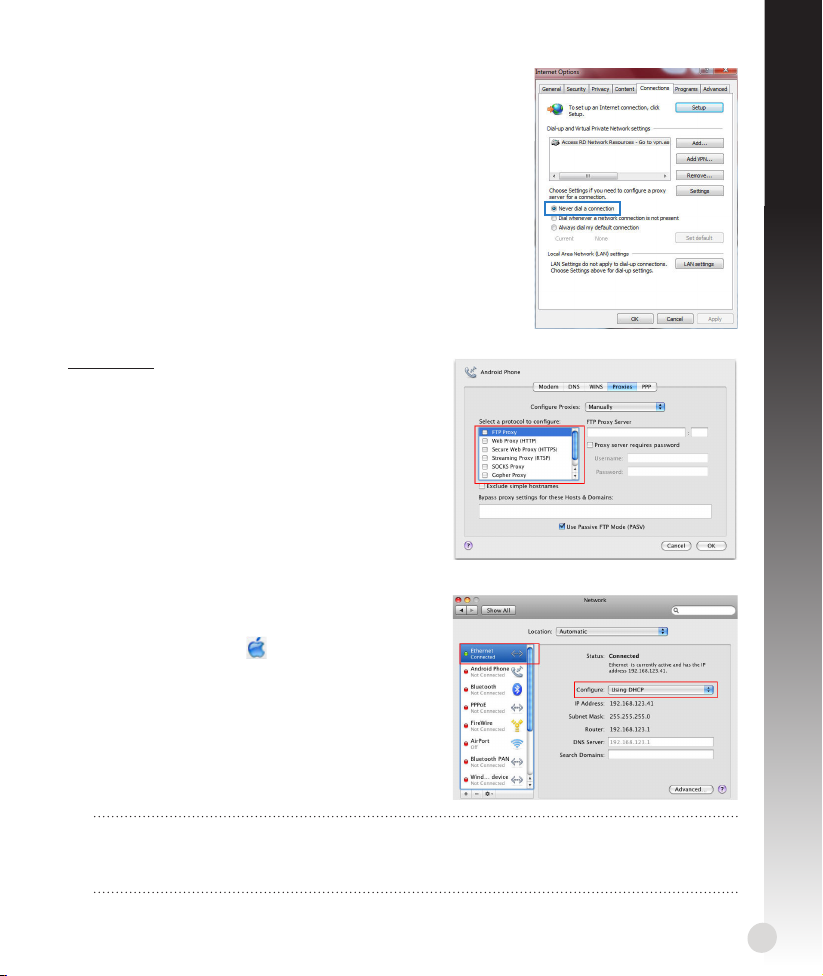
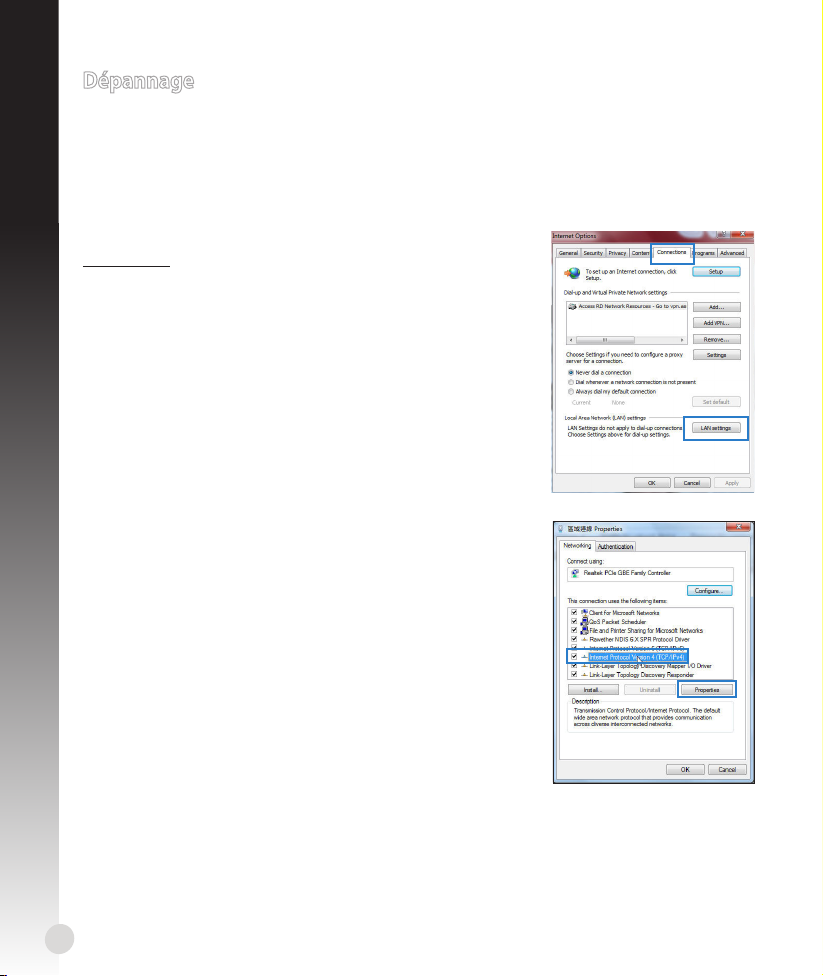
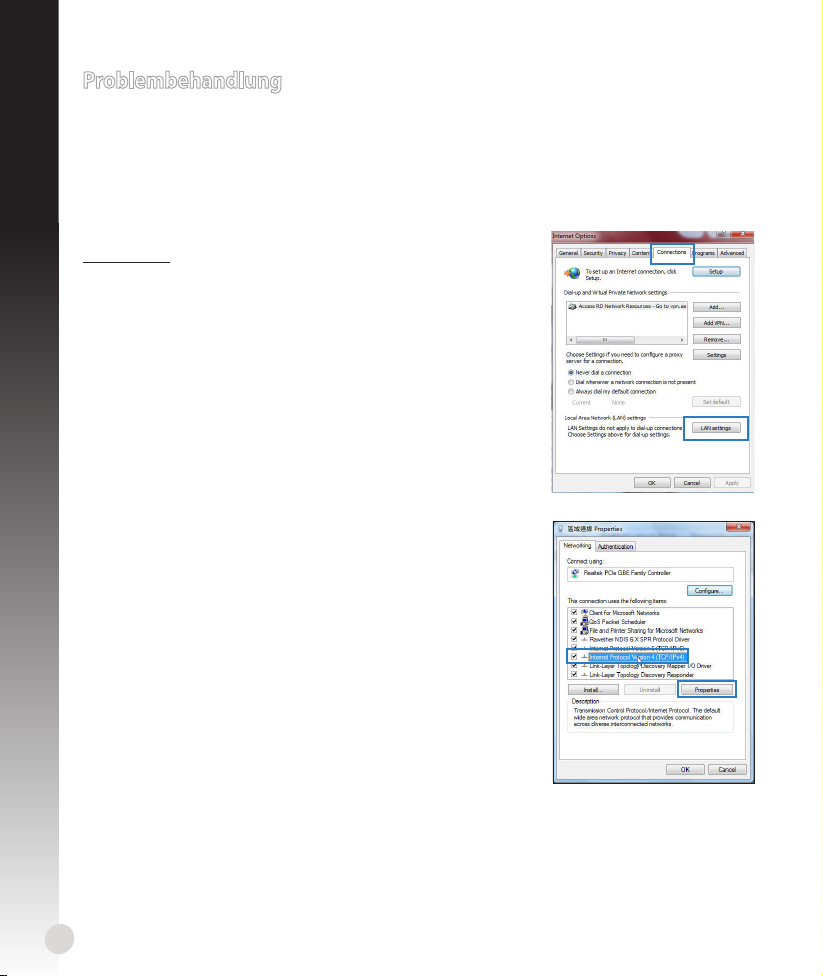
A. Disable the proxy server, if enabled.
1. Click Start > Internet Explorer to launch the web
browser.
2. Click Tools > Internet options > Connections tab > LAN
settings.
3. From the Local Area Network (LAN) Settings screen,
untick Use a proxy server for your LAN.
4. Click OK when done.
B. Set the TCP/IP settings to automatically obtain an IP
address.
1. Click Start > Control Panel > Network and Internet >
Network and Sharing Center > Manage network connections.
2. Select Internet Protocol Version 4 (TCP/IPv4), then
click Properties.
3. Tick Obtain an IP address automatically.
4. Click OK when done.
6
Page 7
C. Disable the dial-up connection, if enabled.
1. Click Start > Internet Explorer to launch the browser.
2. Click Tools > Internet options > Connections tab.
3. Tick Never dial a connection.
4. Click OK when done.
Mac 10.5.8
A. Disable the proxy server, if enabled.
1. From the menu bar, click Safari > Preferences... > Advanced tab.
2. Click Change Settings... in the Proxies eld.
3. From the list of protocols, deselect FTP Proxy
and Web Proxy (HTTP).
4. Click OK when done.
B. Set the TCP/IP settings to automatically
obtain an IP address.
1. Click the Apple icon > System Preferences
> Network.
2. Select Ethernet and select Using DHCP in the
Congure eld.
3. Click Apply when done.
English
NOTE: Refer to your operating system’s help and support feature for details on con-
guring your computer’s TCP/IP settings and disabling the proxy server settings or the
dial-up connection.
7
Page 8

Q2: My wireless connection speed is only 145 Mbps.
• Check if your network card or your computer’s built-in wireless feature has a 300 Mbps
connection capability.
• By default, Wi-Fi certied n products are congured to operate using 20 MHz chan-
English
nels. To change the channel bandwidth from 20 MHz to 20/40 MHz and maximize the
wireless throughput, go to Advanced Setting > Wireless > General in your wireless
router’s web GUI.
Q3: Network name or security keys are forgotten.
• Try setting up the wired connection and congure the the encryption settings again.
• Press the Reset button for more than ve seconds to reset or restore the system to its
factory default settings.
• Factory default settings:
User name / Password:
admin / admin
Q4: Where can I nd more information about the wireless router?
• User Manual in the support CD
• Online FAQ site: http://support.asus.com/faq
• Technical Support site: http://support-org.asus.com/
• Customer Hotline: Refer to the Support Hotline in this Quick Start Guide
IMPORTANT! Write down the information for your wireless settings and keep this in a
secure location.
IP address:
192.168.1.1
SSID: ASUS
2.4GHz Wireless Settings
Network Name (SSID):
Security Key:
5GHz Wireless Settings
Network Name (SSID):
Security Key:
Router Settings
Username:
Password:
8
Page 9
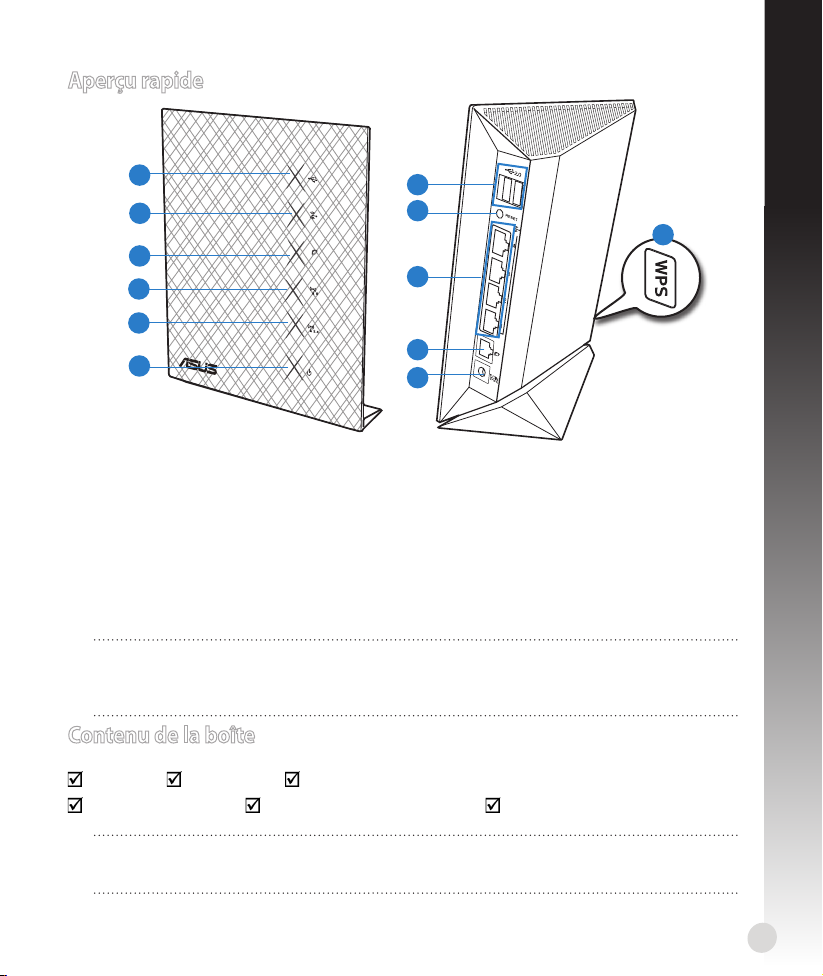
Aperçu rapide
Français
1
2
3
4
5
6
1) LED USB 5) LED 2.4GHz 9)
2) LED réseau local 6)
LED
d’alimentation
3) LED réseau étendu 7) Ports USB 2.0 11)
4) LED 5GHz 8)
Bouton de
réinitialisation
10
11
7
8
12
9
Ports réseau local 1
~ 4*
Port réseau étendu
10)
(Internet) *
Port d’alimentation
(CC)
12) Bouton WPS
REMARQUE : *Les ports de réseau local et étendu possèdent deux voyants lumineux.
La LED jaune indique une connexion Gigabit et la LED verte indique une connexion
10/100Mb.
Contenu de la boîte
RT-N56U Câble réseau CD de support CD (manuel d’utilisation + utilitaires)
Adaptateur secteur Guide de démarrage rapide Carte de garantie
REMARQUE : Contactez votre revendeur si l’un des éléments est manquant
ou endommagé.
9
Page 10

Modem
Mise en route
Mo
d
em
1. Déconnectez tous les câbles de votre conguration modem actuelle.
Français
a
b
VERTISSEMENT ! Assurez-vous que votre modem câble/ADSL est éteint depuis au
moins 2 minutes.
a: Débranchez l’adaptateur secteur de la prise électrique et du modem câble/ADSL.
b: Déconnectez le câble réseau du modem câble/ADSL.
2. Congurez votre environnement réseau sans l.
10
d
b
c
a
Page 11
a : Reliez une extrémité de l’adaptateur secteur au port d’alimentation du routeur et
l’autre extrémité à une prise électrique.
b : À l’aide d’un câble réseau, connectez votre ordinateur au port réseau local (LAN) du
routeur sans l .
IMPORTANT ! Vériez que les LED (voyants lumineux) de réseau étendu et de réseau
local clignotent.
c : À l’aide d’un autre câble réseau, connectez votre modem au port réseau étendu
(WAN) du routeur sans l .
d : Reliez une extrémité de l’adaptateur secteur au port d’alimentation du modem et
l’autre extrémité à une prise électrique.
3. Congurez vos paramètres de réseau sans l via le gestionnaire de conguration Web.
Français
a
a : Ouvrez votre navigateur Internet (ex : Internet Explorer, Google Chrome ou Firefox).
b : Suivez les instructions de conguration Internet rapide.
REMARQUES::
• Si le Gestionnaire de conguration Web ne s’ache pas lors de l’exécution de votreSi le Gestionnaire de conguration Web ne s’ache pas lors de l’exécution de votre
navigateur Internet, entrez http://192.168.1.1 dans la barre d’adresse de votre
explorateur Web, et connectez-vous à l’aide du nom d’utilisateur admin et du mot
de passe admin.
• Désactivez votre serveur proxy et la numérotation de votre connexion à distance (siDésactivez votre serveur proxy et la numérotation de votre connexion à distance (si
disponibles), puis congurez vos paramètres TCP/IP de sorte à obtenir une adresse
IP automatiquement. Pour plus de détails, consultez la section
utilisez l’Assistant de conguration contenu dans le CD de support pour obtenir un
diagnostic de connexion.
b
Dépannage
ou
11
Page 12
Dépannage
Q1 : Je ne parviens pas à accéder au Gestionnaire de conguration Web pour régler les
Français
paramètres sans l du routeur.
• Redémarrez votre explorateur Internet.
• Suivez les étapes suivantes pour congurer votre ordinateur en fonction du système d’
exploitation utilisé.
Windows 7
A. Désactivez le serveur proxy si celui-ci est activé.
1. Cliquez sur Démarrer > Internet Explorer pour lancer le
navigateur.
2. Cliquez sur Outils > Options Internet > onglet
Connexions > Paramètres réseau.
3. À partir de l’écran Paramètres du réseau local, décochez
l’option Utiliser un serveur proxy pour votre réseau
local.
4. Cliquez sur OK une fois terminé.
B. Congurez les paramètres TCP/IP pour l’obtention
automatique d’une adresse IP.
1. Cliquez sur Démarrer > Panneau de conguration
> Réseau et Internet > Centre réseau et partage >
Gérer les connexions réseau.
2. Sélectionnez Protocole Internet version 4 (TCP/IPv4),
puis cliquez sur Propriétés.
3. Cochez l’option Obtenir une adresse IP automatique-
ment.
4. Cliquez sur OK une fois terminé.
12
Page 13

C. Désactivez la numérotation de votre connexion à
distance.
1. Cliquez sur Démarrer > Internet Explorer pour lancer le
navigateur.
2. Cliquez sur Outils > Options Internet > onglet
Connexions.
3. Cochez l’option Ne jamais établir de connexion.
4. Cliquez sur OK une fois terminé.
Mac 10.5.8
A. Désactivez le serveur proxy si celui-ci est
activé.
1. Dans la barre des menus, cliquez sur Safari >
Préférences... > onglet Avancées.
2. Cliquez sur Modier les réglages... dans le
champ Proxies.
3. Dans la liste des protocoles, décochez les
options Proxy FTP et Proxy web sécurisé
(HTTPS).
4. Cliquez sur OK une fois terminé.
B. Congurez les paramètres TCP/IP pour l’ob-
tention automatique d’une adresse IP.
1. Cliquez sur la Pomme > Préférences Système > Réseau.
2. Sélectionnez Ethernet puis Via DHCP dans le
champ Congurer.
3. Cliquez sur Appliquer une fois terminé.
French
REMARQUE : Consultez l’Aide de votre système d’exploitation pour plus de détails sur
la conguration des paramètres TCP/IP de votre ordinateur ainsi que sur la désactivation du serveur proxy et de la numérotation de connexion.
13
Page 14
Q2 : La vitesse de ma connexion sans l n’atteint que 145 Mbps.
• Vériez que la carte réseau sans l de votre ordinateur supporte une vitesse de
connexion de 300 Mbps.
• Par défaut, les produits Wi-Fi certiés avec le standard sans l “n” sont congurés
Français
de sorte à fonctionner sur les canaux de fréquence de 20 MHz. Pour modier le
canal de 20 MHz à 20/40 MHz et ainsi maximiser le débit sans l, allez dans le menu
Paramètres avancés > Sans l > Général du Gestionnaire de conguration de votre
routeur.
Q3 : J’ai oublié le nom ou la clé de sécurité du réseau sans l.
• Établissez une connexion laire au routeur et recongurez les paramètres de sécurité
sans l.
• Appuyez sur le bouton de réinitialisation pendant plus de 5 secondes pour réinitialiser
ou restaurer les paramètres par défaut du routeur.
• Paramètres par défaut :
Nom d’utilisateur /
Mot de passe :
admin / admin
Q4 : Où puis-je obtenir plus d’informations sur le routeur sans l ?
• Manuel d’utilisation contenu dans le CD de support
• FAQ en ligne : http://support.asus.com/faq
• Site de support technique : http://support-org.asus.com/
• Hotline : consultez le Guide additionnel accompagnant votre routeur pour obtenir le
numéro de téléphone approprié à votre pays/région
IMPORTANT ! Notez les informations relatives à vos paramètres de connexion sans l
et gardez-les dans un endroit sûr.
Adresse IP :
192.168.1.1
SSID: ASUS
14
Paramètres sans l 2.4GHz
Nom du réseau (SSID) :
Clé de sécurité :
Paramètres sans l 5GHz
Nom du réseau (SSID) :
Clé de sécurité :
Paramètres du routeur
Nom d’utilisateur :
Mot de passe :
Page 15

Übersicht
Deutsch
1
2
3
4
5
6
7
8
12
9
10
11
1) USB LED 5) 2.4GHz LED 9) LAN-Anschlüsse 1 ~ 4*
2) LAN LED 6) Strom-LED 10) WAN-Anschluss (Internet)*
3) WAN LED 7) USB 2.0-Anschlüsse 11) Netzanschluss (DC-In)
4) 5GHz LED 8) Reset-Taste 12) WPS-Taste
HINWEIS: *Die WAN- und LAN-Anschlüsse haben zwei LEDs. Gelbe LED zeigt eine
Gigabit-Verbindung, grüne LED eine 10/100Mb-Verbindung an.
Paketinhalt
RT-N56U Netzwerkkabel Support-CD (Handbuch/Anwendungen)
AC-Adapter Schnellstarthilfe Garantiekarte
HINWEIS: Sollten Artikel beschädigt oder nicht vorhanden sein, wenden Sie sich an
Ihren Händler.
15
Page 16
Modem
Erste Schritte
Mo
d
em
1. Trennen und entfernen Sie alle Kabel/Leitungen Ihrer alten Modemkonguration.
Deutsch
a
b
WARNUNG! Ihr Kabel/ADSL-Modem sollte für mindestens zwei Minuten ausgeschal-
tet werden.
a: Ziehen Sie den AC-Adapter aus der Steckdose und trennen Sie ihn vom Kabel/ADSL-
Modem.
b: Trennen Sie das Netzwerkkabel vom Kabel/ADSL-Modem.
Richten Sie die Netzwerkumgebung ein.
16
d
b
c
a
Page 17
a: Verbinden Sie den AC-Adapter ihres drahtlosen Routers mit dem DC-In-Anschluss
sowie mit der Stromversorgung.
b: Verwenden Sie ein Netzwerkkabel, um den Computer mit dem LAN-Anschluss Ihres
drahtlosen Routers zu verbinden.
WICHTIG! Die WAN und LAN LEDs sollten blinken.
c: Verwenden Sie ein weiteres Netzwerkkabel, um den Modem mit dem WAN-Anschluss
Ihres drahtlosen Routers zu verbinden.
d: Verbinden Sie den AC-Adapter ihres Modems mit dem DC-In-Anschluss sowie mit der
Stromversorgung.
3. Kongurieren Sie die Drahtloseinstellungen über die webbasierende grasche
Deutsch
a
a: Starten Sie einen Webbrowser wie Internet Explorer, Google Chrome oder Firefox.
b: Folgen Sie den Schritten in der Schnelleinstellung (Quick Internet Setup, QIS).
HINWEISE::
• Falls die web GUI Ihres drahtlosen Routers nicht automatisch geladen wird, gebenFalls die web GUI Ihres drahtlosen Routers nicht automatisch geladen wird, geben
Sie http://192.168.1.1 in Ihren Browser ein und melden Sie sich mit dem Standardbenutzernamen: admin sowie Kennwort: admin an.
• Deaktivieren Sie Proxyeinstellungen, DFÜ-Verbindung und setzen Sie die TCP/IP-Deaktivieren Sie Proxyeinstellungen, DFÜ-Verbindung und setzen Sie die TCP/IPEinstellungen auf automatische IP-Erkennung. Für weitere Details beziehen Sie sich
auf den Abschnitt
stenten auf der Support-CD für eine automatische Diagnose.
Problembehandlung
oder verwenden Sie den Einstellungsassi-
b
17
Page 18
Problembehandlung
Q1: Ich kann nicht auf die web GUI zugreifen, um die Einstellungen des drahtlosen Routers
Deutsch
zu kongurieren.
• Starten Sie alle geöneten Browser wieder neu.
• Um die Computereinstellungen zu kongurieren, folgen Sie, je nach Betriebssystem,
den nachstehenden Anweisungen.
Windows 7
A. Deaktivieren Sie den Proxyserver (falls aktiviert).
1. Klicken Sie auf Start > Internet Explorer, um den Webbrowser zu laden.
2. Klicken Sie auf Extras (Tools) > Internetoptionen (Inter-
net options) > Auswahl Verbindungen (Connections) >
LAN-Einstellungen (LAN settings).
3. Im Fenster Einstellungen für lokales Netzwerk, deaktivieren Sie Proxyserver für LAN verwenden (Use a
proxy server for your LAN).
4. Wenn abgeschlossen, klicken Sie auf OK.
B. Setzen Sie die TCP/IP-Einstellungen auf automa-
tische IP-Erkennung.
1. Klicken Sie auf Start > Systemsteuerung (Control
Panel) > Netzwerk und Internet (Network and Internet) > Netzwerk- und Freigabecenter (Network and
Sharing Center) > Netzwerkverbindungen verwalten
(Manage network connections).
2. Wählen Sie Internetprotokoll Version 4 (TCP/IPv4)
(Internet Protocol Version 4 (TCP/IPv4)) und klicken Sie
dann auf Einenschaften (Properties).
3. Wählen Sie IP-Adresse automatisch beziehen (Obtain
an IP address automatically).
4. Wenn abgeschlossen, klicken Sie auf OK.
18
Page 19

C. Deaktivieren Sie die DFÜ-Verbindung, falls aktiviert.
1. Klicken Sie auf Start > Internet Explorer, um den
Browser zu starten.
2. Klicken Sie auf Extras (Tools) > Internetoptionen (Inter-
net options) > Auswahl Verbindungen (Connections).
3. Wählen Sie Keine Verbindung wählen (Never dial a
connection).
4. Wenn abgeschlossen, klicken Sie auf OK.
Mac 10.5.8
A. Deaktivieren Sie den Proxyserver (falls
aktiviert).
1. Klicken Sie in der Menüleiste auf Safari >
Einstellungen... (Preferences...) > Auswahl
Erweitert (Advanced) tab.
2. Klicken Sie unter Proxies auf Einstellungen
ändern... (Change Settings...).
3. Deaktivieren Sie in der Protokollliste FTP Proxy
und Web Proxy (HTTP).
4. Wenn abgeschlossen, klicken Sie auf OK.
B. Setzen Sie die TCP/IP-Einstellungen auf
automatische IP-Erkennung.
1. Klicken sie auf das Apple-Symbol > Systemeinstellungen... (System Preferences) >
Netzwerk (Network).
2. Wählen Sie Ethernet > Congure (Weitere
Optionen) und wählen Sie dann unter TCP/IP
> Congure IPv4 (IPv4 kongurieren) die
Auswahl DHCP (Using DHCP).
3. Wenn abgeschlossen, klicken Sie auf OK.
Deutsch
HINWEIS: Für Details zur Konguration der TCP/IP-Einstellungen, Deaktivierung der
Proxyserver oder DFÜ-Verbindungen beziehen Sie sich auf Hilfe und Support des
jeweiligen Betriebssystems.
19
Page 20

Q2: Die Geschwindigkeit meiner Drahtlosverbindung beträgt nur 145 Mbps.
• Prüfen Sie, ob die Netzwerkkarte oder die integrierte Drahtlosfunktion Ihres Computers eine 300 Mbps-Verbindung unterstützt.
• Wi-Fi-zertifizierte Produkte werden standardmäßig für den Betrieb mit 20 MHz-
Deutsch
Kanälen konguriert. Um die Kanalbandbreite von 20 MHz zu 20/40 MHz zu ändern
und den Drahtlosdurchsatz zu maximieren, gehen Sie in der web GUI Ihres drahtlosen
Routers zu Erweiterte Einstellungen (Advanced Setting) > Drahtlos (Wireless) >
Allgemein (General).
Q3: Netzwerkname und Sicherheitsschlüssel sind nicht verfügbar.
• Richten Sie eine Kabelverbindung ein und versuchen Sie die Sicherheitseinstellungen
erneut zu kongurieren.
• Drücken Sie die Reset-Taste für mehr als fünf Sekunden, um das System auf dessen
Werkseinstellungen zurückzusetzen.
• Werkseinstellungen:
Benutzername / Kennwort:
admin / admin
Q4: Wo kann ich weitere Informationen über den drahtlosen Router erhalten?
• Benutzerhandbuch auf der Support-CD
• Online FAQ: http://support.asus.com/faq
• Technische Unterstützung: http://support-org.asus.com/
• Kunden-Hotline: Beziehen Sie sich auf die Support-Hotline im Zusatzhandbuch.
WICHTIG! Notieren Sie sich die Einstellungsinfos Ihrer Drahtlosverbindung und bewahren Sie diese an einem sicheren Ort auf.
IP-Adresse:
192.168.1.1
SSID: ASUS
20
2.4GHz Verbindungsinfos
Netzwerkname (SSID):
Sicherheitsschlüssel:
5GHz Verbindungsinfos
Netzwerkname (SSID):
Sicherheitsschlüssel:
Router-Zugang
Benutzername:
Kennwort:
Page 21
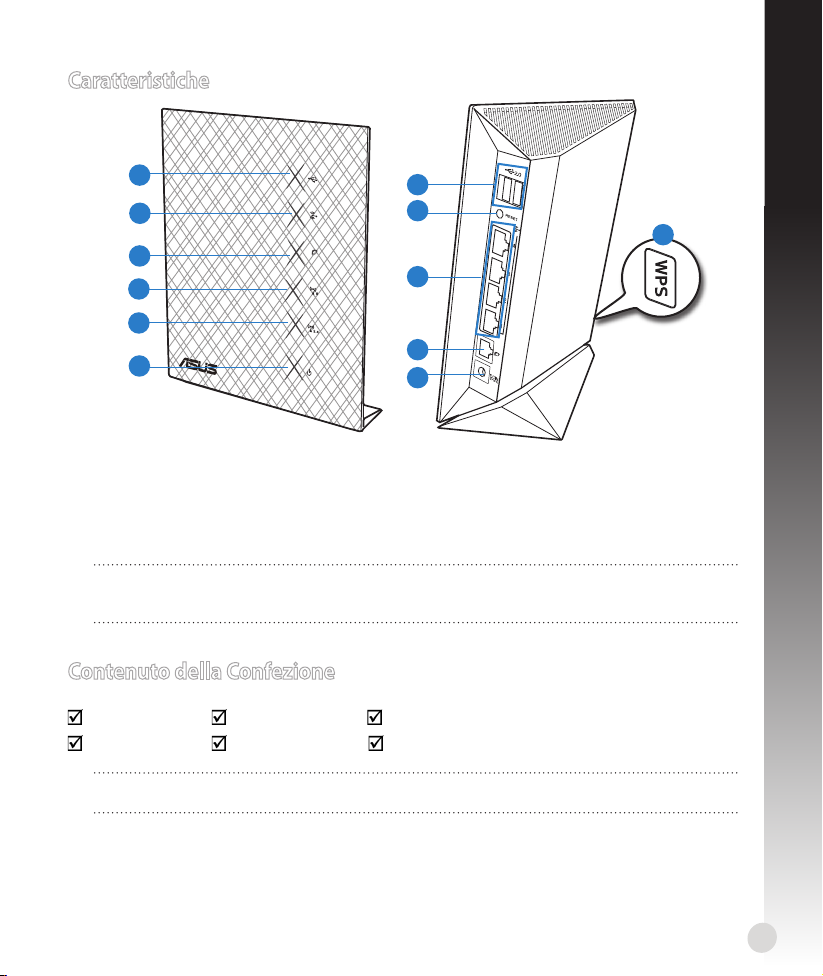
Caratteristiche
Italiano
1
2
3
4
5
6
7
8
12
9
10
11
1) LED USB 5) LED 2.4GHz 9) Porte LAN 1 ~ 4*
2) LED LAN 6) LED Alimentazione 10) Porta WAN (Internet)*
3) LED WAN 7) Porte USB 2.0 11) Porta Aliment. (DC-In)
4) LED 5GHz 8) Pulsante di Reset 12) Pulsante WPS
NOTA: *La porta WAN e la porta LAN sono aancate da una spia LED. Il LED di colore
giallo indica la connessione Gigabit. Il LED verde indica una connessione 10/100Mb.
Contenuto della Confezione
RT-N56U Cavo di rete CD di supporto (manuale, utilità)
Adattatore AC Guida rapida Garanzia
NOTA: In caso di articoli danneggiati o mancanti, contattare il rivenditore.contattare il rivenditore. il rivenditore.
21
Page 22

Modem
Per iniziare
Mo
d
em
1. Disinserire i cavi dal modem
Italiano
a
b
ATTENZIONE! Assicurarsi che il modem via cavo/ADSL sia spento da almeno due
minuti.
a: Disinserire l’adattatore AC dalla presa elettrica e disconnetterlo dal modem via cavo/
ADSL.
b: Disinserire il cavo di rete dal modem via cavo/ADSL.
2. Installazione del router wireless.
22
d
b
c
a
Page 23
a: Inserire l’adattatore AC del router wireless nella porta DC-In e collegarlo ad una presa
elettrica.
b: Mediante il cavo di rete, collegare il computer alla porta LAN del router wireless.
IMPORTANTE! Assicurarsi che il LED WAN e il LED LAN lampeggino.
c: Utilizzando un altro cavo di rete, collegare il modem alla porta WAN del router wireless.
d: Inserire l’adattatore AC del modem alla porta DC-In e collegarlo ad una presa elettrica.
3. Congurazione delle impostazioni wireless tramite interfaccia graca web.
Italiano
a
a: Avviare il browser web (Internet Explorer, Google Chrome o Firefox).
b: Seguire la procedura QIS (Quick Internet Setup).
NOTE::
• Se non si riesce ad avviare l’interfaccia graca web del router wireless, digitareSe non si riesce ad avviare l’interfaccia graca web del router wireless, digitare
http://192.168.1.1 nel browser web ed accedere utilizzando il nome utente:
admin e la password: admin, entrambi predeniti.
• Disattivare le impostazioni proxy, la connessione telefonica e impostareDisattivare le impostazioni proxy, la connessione telefonica e impostare
le impostazioni TCP/IP per ottenere automaticamente un indirizzo IP. Per
approfondimenti, consultare la sezione
programma di congurazione guidata, disponibile nel CD di supporto.
Risoluzione dei problemi
b
oppure utilizzare il
23
Page 24

Risoluzione dei problemi
Q1: Impossibile accedere all’interfaccia graca web per congurare le impostazioni del
Italiano
router wireless.
• Chiudere tutti i browser web in esecuzione e poi riavviarli.
• Seguire la procedura sottostante per congurare le impostazioni del computer in base
al sistema operativo utilizzato.
Windows 7
A. Disattivare il server proxy, se abilitato.
1. Selezionare Start > Internet Explorer per avviare il
browser web.
2. Selezionare Strumenti > Opzioni Internet > scheda
Connessioni > Impostazioni LAN.
3. Dalla schermata Impostazioni rete locale (LAN), deselezionare la casella di controllo Utilizza un server proxy per
le connessioni LAN.
4. Al termine, premere OK.
B. Congurare le impostazioni TCP/IP per ottenere
automaticamente un indirizzo IP.
1. Selezionare Start > Pannello di Controllo > Rete e
Internet > Centro connessioni di rete e condivisione
> Gestisci connessioni di rete.
2. Selezionare Protocollo Internet versione 4 (TCP/IPv4)
e quindi fare clic su Proprietà.
3. Fare clic su Ottieni automaticamente un indirizzo IP.
4. Al termine, premere OK.
24
Page 25
C. Disattivare la connessione telefonica, se abilitata.
1. Selezionare Start > Internet Explorer per avviare il
browser web.
2. Selezionare Strumenti > Opzioni Internet > scheda
Connessioni.
3. Selezionare Non utilizzare mai connessioni remote.
4. Al termine, premere OK.
Mac 10.5.8
A. Disattivare il server proxy, se abilitato.
1. Dalla barra menu, cliccare Safari > Preferenze... > scheda Avanzate.
2. Cliccare Modica impostazioni... nel campo
Proxy.
3. Dall’elenco dei protocolli, deselezionare Proxy
FTP e Proxy Web (HTTPS).
4. Al termine, premere OK.
B. Congurare le impostazioni TCP/IP per ot-
tenere automaticamente un indirizzo IP.
1. Cliccare sull’icona Apple > Preferenze di
Sistema > Network.
2. Selezionare Ethernet e poi Utilizzo di DHCP
nel campo Congura.
3. Al termine, premere Applica.
Italiano
NOTA: consultare la guida e la funzione di supporto del sistema operativo per in-
formazioni dettagliate sulla congurazione delle impostazioni TCP/IP del computer e
disattivare le impostazioni del server proxy o la connessione telefonica.
25
Page 26
Q2: La velocità della connessione wireless è di appena 145 Mbps.
• Controllare che la scheda di rete o la funzione wireless integrata nel computer sia
dotata di una capacità di connessione pari a 300 Mbps.
• Per impostazione predenita, i prodotti Wi-Fi certicati n sono congurati per operare
Italiano
nei canali da 20 MHz. Per modicare la larghezza di banda da 20 MHz a 20/40 MHz e
massimizzare il throughput wireless, selezionare Impostazioni Avanzate > Wireless >
Generale nell’interfaccia graca web del router wireless.
Q3: Non ricordo il nome di rete o le chiavi di protezione.
• Tentare di ricongurare la connessione via cavo e le impostazioni di crittograa.
• Premere il pulsante di reset per oltre cinque secondi per ripristinare le impostazioni
predenite del sistema.
• Impostazioni predenite:
Nome utente /
Password: admin /
admin
Q4: Per ulteriori informazioni sul router wireless, consultare:
• Manuale Utente nel CD di supporto.
• Sito dedicato alle domande ricorrenti: http://support.asus.com/faq
• Sito del supporto tecnico: http://support-org.asus.com/
• Hotline telefonica del supporto tecnico nella guida supplementare.
• Customer Hotline: Refer to the Support Hotline in this Quick Start Guide
IMPORTANTE! Trascrivere a parte le impostazioni wireless del router per futura consultazione.
Nome di rete (SSID):
Chiave di protezione:
Nome di rete (SSID):
Chiave di protezione:
Nome utente:
Password:
Indirizzo IP:
192.168.1.1
Impostazioni wireless 2.4GHz
Impostazioni wireless 5GHz
Impostazioni Router
SSID: ASUS
26
Page 27

Быстрый обзор
Русский
1
2
3
4
5
6
7
8
12
9
10
11
1) Индикатор USB 5) 2.4ГГц индикатор 9) Порты LAN 1 ~ 4*
2) Индикатор LAN 6)
Индикатор
питания
10) Порт WAN (Internet)*
3) WAN индикатор 7) Порты USB 2.0 11) Разъем питания (DC-In)
4) 5ГГц индикатор 8) Кнопка сброса 12) WPS кнопка
Примечание: * WAN и LAN порты оснащены двумя индикаторами. Желтый
индикатор означает гигабитное подключение. Зеленый индикатор означает
10/100Мбит/с подключение.
Комплект поставки
RT-N56U Сетевой кабель Компакт-диск (руководство пользователя / утилиты)
Блок питания Краткое руководство Гарантийный талон
Примечание: Если какие-либо элементы комплекта поставки отсутствуют или
повреждены, обратитесь к продавцу.
27
Page 28

Modem
Начало работы
Mo
d
em
1. Отключите провода/кабели от модема
Русский
a
b
ВНИМАНИЕ! Убедитесь, что кабельный/ADSL модем был выключен в течение не
менее двух минут.
a: Отключите блок питания от розетки и от кабельного/ADS модема.
b: Отключите сетевой кабель от кабельного/ADSL модема.
2. Настройка беспроводной сети.
28
d
b
c
a
Page 29
a: Подключите блок питания роутера к разъему DC и к розетке.
b: С помощью сетевого кабеля подключить компьютер к LAN порту беспроводного
роутера.
ВАЖНО! Убедитесь, что индикаторы WAN и LAN мигают.
c: С помощью другого сетевого кабеля, подключите модем к WAN порту
беспроводного роутера.
d: Подключите блок питания модема к разъему DC-In и к розетке.
3. Сконфигурируйте беспроводное подключение с помощью веб-интерфейса
(web GUI).
Русский
a
a: Запустите браузер, например Internet Explorer, Firefox или Google Chrome.
b: Следуйте инструкциям быстрого подключения к Интернету (QIS).
ПРИМЕЧАНИЯ ::
• Если веб-интерфейс роутера не запускается, введите http://192.168.1.1
в браузере и войдите, используя имя пользователя по умолчанию: admin и
пароль: admin.
• Отключите использование прокси-сервера, подключение удаленногоОтключите использование прокси-сервера, подключение удаленного
доступа, а также настройте TCP/IP для автоматического получения IP адреса.
Для получения подробной информации обратитесь к разделу Устранение
неисправностей или используйте мастер установки с компакт-диска.
b
29
Page 30
Устранение неисправностей
В1: Невозможно получиться к веб-интерфейсу для настройки беспроводного роутера.
• Перезапустите все работающие браузеры.
Русский
• Выполните следующие инструкции для настройки компьютера на основе
настройки его операционной системы.
Windows 7
А. отключите прокси-сервер, если он включен.
1. Нажмите Пуск > Internet Explorer для запуска браузера.
2. Выберите Сервис > Свойства обозревателя > вкладка
Подключения > Настройка локальной сети.
3. На экране настройки локальной сети отключите
использование прокси-сервера для локальной сети.
4. Нажмите OK когда закончите.
B. Установите TCP/IP для автоматического получения
IP адреса.
1. Нажмите Пуск > Панель управления > Сеть и
Интернет > Центр управления сетями и общим
доступом > Управление сетевыми подключениями.
2. Выберите Протокол Интернета версии 4(TCP/IPv4) и
нажмите Свойства.
3. Выберите Получить IP адрес автоматически.
4. Нажмите OK когда закончите.
30
Page 31

С. Отключите подключение удаленного доступа, если
оно включено.
1. Нажмите Пуск > Internet Explorer для запуска
браузера.
2. Выберите Сервис > Свойства обозревателя > вкладка
Подключения.
3. Установите флажок Никогда не использовать
подключение удаленного доступа.
4. Нажмите OK когда закончите.
Mac 10.5.8
А. отключите прокси-сервер, если он
включен.
1. В меню нажмите Safari > Preferences. >
вкладка Advanced.
2. Нажмите Change Settings. в поле Proxies.
3. В списке протоколов снимите флажок FTP
Proxy и Web Proxy (HTTPS)
4. Нажмите OK когда закончите.
B. Установите TCP/IP для автоматического
получения IP адреса.
1. Нажмите иконку Apple System Preferences
> Network.
2. Выберите Ethernet, затем выберите Using
DHCP в поле Congure.
3. Когда закончите, нажмите 'Применить'.
Русский
ПРИМЕЧАНИЕ: Подробную информацию по конфигурации настроек TCP/IP,
отключению прокси-сервера или подключению удаленного доступа смотрите в
справке к Вашей операционной системе.
31
Page 32

В2: Скорость моего беспроводного подключения только 145 Мбит/с.
• Убедитесь, что сетевая карта Вашего компьютера может поддерживает скорость
300 Мбит/с.
• По умолчанию, Wi-Fi продукты сконфигурированы для работы на частоте 20 МГц.
Русский
Для увеличения пропускной способности с 20 МГц на 20/40 МГц перейдите в
Advanced Setting > Wireless > General в веб-интерфейсе.
В3: Забыто название сети или ключи безопасности.
• Попробуйте установить проводное соединение и сконфигурировать шифрование
снова.
• Нажмите и удерживайте кнопку сброса в течение пяти секунд для сброса системы
к заводским настройкам по умолчанию.
• Заводские установки по умолчанию:
Имя пользователя/
Пароль: admin /
admin
В4: Где можно найти подробную информацию о беспроводном роутере?
• Руководство пользователя на компакт-диске
• Сайт с часто задаваемыми вопросами и ответами: http://support.asus.com/faq
• Сайт технической поддержки: http://support-org.asus.com/
• Горячая линия: Горячую линию смотрите в дополнительном руководстве
ВАЖНО! Запишите настройки беспроводной сети и сохраните их в безопасном
месте.
2.4ГГц настройки
Имя сети(SSID):
Ключ безопасности:
Имя сети(SSID):
Ключ безопасности:
Имя пользователя:
Пароль:
IP адрес:
192.168.1.1
5ГГц настройки
Настройки роутера
SSID: ASUS
32
Page 33

Бърз преглед
български
1
2
3
4
5
6
1) USB индикатор 5)
2) LAN индикатор 6)
2.4GHz
индикатор
Индикатор на
захранването
3) WAN индикатор 7) USB 2.0 портове 11)
4) 5GHz индикатор 8)
Бутон за
нулиране
7
8
12
9
10
11
9) LAN 1 ~ 4 порта*
10) WAN (интернет) порт*
Порт на захранването
(вход за прав ток)
12) WPS бутон
ЗАБЕЛЕЖКА: *Има два индикатора за WAN и LAN портовете. Жълтият индикатор
е за Gigabit връзка. Зеленият индикатор означава 10/100Mb връзка.
Съдържание на пакета
RT-N56U Мрежов кабел
Адаптер за
променлив
ток
Ръководство
за бърз старт
Помощен CD диск (Ръководство на
потребителя/помощни програми)
Гаранционна карта
ЗАБЕЛЕЖКА: Ако някой от компонентите е повреден или липсва, свържете се с
Вашия търговски представител.
33
Page 34

Modem
Първи стъпки
Mo
d
em
Изключете и прекъснете връзката с жиците/кабелите на Вашaта съществуваща модемна
1.
инсталация.
български
a
b
ПРЕДУПРЕЖДЕНИЕ! Уверете се, че Вашият кабелен/ADSL модем е бил изключен
най-малко две минути.
а: Изключете адаптера за променлив ток от контакта и го извадете от кабелния/
ADSL модем.
б: Извадете мрежовия кабел от Вашия кабелен/ADSL модел.
2. Конфигурирайте безжичната среда.
34
d
b
c
a
Page 35

а: Свържете своя безжичен рутер с входа за прав ток, след което го включете в контакт.
б: С помощта на мрежов кабел, свържете компютъра си с LAN порта на безжичния рутер.
ВАЖНО! Уверете се, че WAN и LAN индикаторите мигат.
в: С помощта на друг мрежов кабел свържете модема си сWAN порта на безжичния рутер. С помощта на друг мрежов кабел свържете модема си с WAN порта на безжичния рутер.С помощта на друг мрежов кабел свържете модема си с WAN порта на безжичния рутер.
г: Свържете адаптера за променлив ток на модема с входа за прав ток, след което го Свържете адаптера за променлив ток на модема с входа за прав ток, след което гоСвържете адаптера за променлив ток на модема с входа за прав ток, след което го
включете в контакт.
Конфигурирайте своите безжични настройки чрез уеб графичен потребителски интерфейс
3.
(уеб GUI).
български
a
b
а: Стартирайте своя уеб браузър като Internet Explorer, Google Chrome и Firefox.
б: Следвайте стъпките за Бърза интернет настройка (QIS).
ЗАБЕЛЕЖКИ:
• Ако уеб GUI на Вашия безжичен рутер не се стартира, въведете
http://192.168.1.1 в уеб браузъра и влезте с помощта на потребителското име
по подразбиране: admin и парола: admin.
• Деактивирайте настройките на прокси сървъра и комутируемата връзка,
след което конфигурирайте TCP/IP настройките за автоматично получаване на
IP адрес. За повече информация, вижте раздел
на неизправности)
или използвайте Setup Wizard (Съветник за настройка) от
Troubleshooting (Отстраняване
помощния CD диск за автоматична диагностика.
35
Page 36

Отстраняване на неизправности
В1: Не мога да получа достъп до уеб GUI, за да конфигурирам настройките на Не мога да получа достъп до уеб GUI, за да конфигурирам настройките наНе мога да получа достъп до уеб GUI, за да конфигурирам настройките на
безжичния рутер.
• Затворете всички пуснати уеб браузъри и стартирайте отново.
• Следвайте стъпките по-долу, за да конфигурирате настройките на своя компютър
български
съобразно операционната му система.
Windows 7
А. Деактивирайте прокси сървъра, ако е активиран.
1. Щракнете върху Start (Старт) > Internet Explorer, за
да стартирате уеб браузъра.
2. Щракнете върху Tools (Инструменти) > Internet
options (Опции за интернет) > раздел Connections
(Връзки) > LAN settings (LAN настройки).
3. От екрана Local Area Network (LAN) Settings От екрана Local Area Network (LAN) SettingsОт екрана Local Area Network (LAN) Settings
(Настройки на локална мрежа), махнете отметката
в Use a proxy server for your LAN (Използвайте
прокси сървър за Вашата локална мрежа).
4. Щракнете върху OK (ОК), когато сте готови.
Б. Конфигурирайте TCP/IP настройките за
автоматично получаване на IP адрес.
1. Щракнете върху Start (Старт) > Control Panel
(Контролен панел) > Network and Internet
(Мрежа и интернет) > Network and Sharing
Center (Център за мрежи и интернет) > Manage
networkconnections (Управление на мрежовите
връзки).
2. Изберете Internet Protocol Version 4 (TCP/IPv4)
(Интернет протокол версия 4(TCP/IPv4)) и
натиснете Properties (Свойства).
3. Поставете отметка в Obtain an IP address
automatically (Получавай автоматично IP адрес).
4. Щракнете върху OK (ОК), когато сте готови.
36
Page 37

В. Деактивирайте комутируемата връзка, ако е
активирана.
1. Щракнете върху Start (Старт) > Internet Explorer, за
да стартирате уеб браузъра.
2. Щракнете върху Tools (Инструменти) > Internet
options (Интернет опции)> раздел Connections
(Връзки).
3. Сложете отметка в Сложете отметка вСложете отметка в Never dial a connection (Никога не
набирай връзка).
4. Щракнете върху OK (ОК), когато сте готови.
Mac 10.5.8
А. Деактивирайте прокси сървъра, ако е активиран.
1. От лентата с менюто щракнете върху От лентата с менюто щракнете върхуОт лентата с менюто щракнете върху Safari >
Preferences... (Предпочитания...) > раздел
Advanced (Разширени).
2. Щракнете върху Change Settings...
(Промяна на настройки...) в полето Proxies
(Прокси сървъри).
3. От списъка с протоколи премахнете FTP
Proxy (FTP прокси) и Web Proxy (HTTPS)
(Уеб прокси (HTTPS)).
4. Щракнете върху OK (ОК), когато сте готови.
Б. Конфигурирайте TCP/IP настройките за
автоматично получаване на IP адрес.
1. Щракнете върху иконата на Apple
> System Preferences (Системни
предпочитания) > Network (Мрежа).
2. Изберете Ethernet и изберете Using DHCP
(Използване на DHCP) в полето Congure
(Конфигуриране).
3. Щракнете върху Apply (Приложи), когато
сте готови.
български
ЗАБЕЛЕЖКА: Вижте функцията за помощ и поддръжка на своята операционна
система за повече информация относно конфигурирането на TCP/IP настройките
на компютъра и деактивирането на настройките на прокси сървъра или
комутируемата връзка.
37
Page 38

В2: Скоростта на моята безжична връзка е само 145 Mbps.
• Проверете дали Вашата мрежова карта или вградената безжична функция на
компютъра поддържат връзка 300 Mbps.
• По подразбиране, Wi-Fi сертифицираните n продукти са конфигурирани да
работят чрез 20 MHz канали. За да промените пропускателната способност на
български
канала от 20 MHz на 20/40 MHz и да я максимизирате, отидете на Advanced
Setting (Разширени настройки) > Wireless (Безжични) > General (Общи) в
потребителския уеб интерфейс на Вашия компютър.
В3: Забравено е името на мрежата или ключовете за защита.
• Опитайте отново да конфигурирате безжичната мрежа и настройките на
безжичното шифроване.
• Натиснете бутона Reset (Нулиране) за повече от пет секунди, за да нулирате или
възстановите фабричните настройки по подразбиране на системата.
• Фабрични настройки по подразбиране:
Потребителско име/
Парола: admin / admin
IP адрес:
192.168.1.1
SSID: ASUS
В4: Къде мога да намеря допълнителна информация за безжичния рутер?
• В ръководството на потребителя на помощния CD диск
• Онлайн, на сайта с въпроси и отговори: http://support.asus.com/faq
• На сайта за техническа поддръжка: http://support-org.asus.com/
• На горещата линия за обслужване на клиенти: Виж те горещата линия за
поддръжка в Допълнително ръководство.
ВАЖНО! Запишете информацията за Вашите безжични настройки и я пазете на
сигурно място.
38
Име на мрежата (SSID):
2.4GHz безжични настройки
Ключ за защита:
5GHz безжични настройки
Име на мрежата (SSID):
Ключ за защита:
Настройки на рутера
Потребителско име:
Парола:
Page 39

Rychlý přehled
Čeština
1
2
3
4
5
6
Indikátor LED
1)
USB
Indikátor LED
2)
LAN
Indikátor LED
3)
WAN
Indikátor LED
4)
5GHz
Indikátor LED
5)
2.4GHz
Indikátor LED
6)
napájení
7) Porty USB 2.0 11)
Resetovací
8)
tlačítko
7
8
9
10
11
9) Porty místní sítě LAN 1 ~ 4*
10)
Port WAN (Internet) *
Port napájení (vstup
stejnosměrného napájení)
12) WPS tlačítko
12
POZNÁMKA: *V portech WAN a LAN jsou dva indikátory LED. Žlutý indikátor LED
označuje gigabitové připojení. Zelený indikátor LED označuje připojení 10/100 Mb.
Obsah krabice
RT-N56URT-N56U Síťový kabelSíťový kabel Podpůrný disk CD (příručka, nástroje)odpůrný disk CD (příručka, nástroje)
Napájecí adaptérNapájecí adaptér Stručná příručkaStručná příručka Záruční kartaZáruční karta
POZNÁMKA: Pokud je některá z položek poškozena nebo chybí, se obraťte na
prodejce.
39
Page 40

Modem
Začínáme
Mo
d
em
1. Odpojte napájení a vodiče/kabely od stávajícího uspořádání modemu Odpojte napájení a vodiče/kabely od stávajícího uspořádání modemuOdpojte napájení a vodiče/kabely od stávajícího uspořádání modemu
Čeština
a
b
VAROVÁNÍ! Kabelový/ADSL modem musí být vypnutý alespoň dvě minuty.
a: Odpojte adaptér střídavého napájení od elektrické zásuvky a odpojte jej od
kabelového/ADSL modemu.
b: Odpojte síťový kabel od kabelového/ADSL modemu.
2. Nakongurujte bezdrátové prostředí.
40
d
b
c
a
Page 41

a: Připojte adaptér střídavého napájení bezdrátového směrovače ke vstupnímu portu
stejnosměrného napájení a připojte jej k elektrické zásuvce.
b: Pomocí síťového kabelu připojte počítač k portu LAN bezdrátového směrovače.
DŮLEŽITÉ! Zkontrolujte, zda indikátory LED WAN a LAN blikají.
c: Pomocí síťového kabelu připojte počítač k portu WAN bezdrátového směrovače. Pomocí síťového kabelu připojte počítač k portu WAN bezdrátového směrovače.Pomocí síťového kabelu připojte počítač k portu WAN bezdrátového směrovače.
d: Připojte adaptér střídavého napájení modemu ke vstupnímu portu stejnosměrného Připojte adaptér střídavého napájení modemu ke vstupnímu portu stejnosměrnéhoPřipojte adaptér střídavého napájení modemu ke vstupnímu portu stejnosměrného
napájení a připojte jej k elektrické zásuvce.
3. Nakongurujte nastavení bezdrátového připojení prostřednictvím webového grackého Nakongurujte nastavení bezdrátového připojení prostřednictvím webového grackéhoNakongurujte nastavení bezdrátového připojení prostřednictvím webového grackého
uživatelského rozhraní (webové GUI).
Čeština
a
a: Spusťte webový prohlížeč, například Internet Explorer, Google Chrome nebo Firefox.
b: Postupujte podle kroků Rychlého nastavení Internetu (QIS).
POZNÁMKY::
• Pokud se nespustí webové gracké uživatelské rozhraní (GUI) bezdrátovéhoPokud se nespustí webové gracké uživatelské rozhraní (GUI) bezdrátového
prohlížeče, zadejte http://192.168.1.1 do webového prohlížeče a přihlaste se
pomocí výchozího uživatelského jména: admin a hesla: admin.
• Deaktivujte nastavení serveru proxy, telefonické připojení a proveďte nastaveníDeaktivujte nastavení serveru proxy, telefonické připojení a proveďte nastavení
TCP/IP tak, aby byla získána adresa IP automaticky. Další podrobnosti viz část
Odstraňování problémů
pro automatickou diagnostiku.
nebo použijte Průvodce instalací na podpůrném disku CD
b
41
Page 42

Odstraňování problémů
Otázka 1: Nelze přistupovat k webovému grackému uživatelskému rozhraní (GUI) Nelze přistupovat k webovému grackému uživatelskému rozhraní (GUI)Nelze přistupovat k webovému grackému uživatelskému rozhraní (GUI)
Čeština
• Ukončete a znovu spusťte všechny spuštěné webové prohlížeče.
• Podle následujících kroků nakongurujte nastavení počítače podle nainstalovaného
operačního systému.
POZNÁMKA: Viz kopie obrazovek v Doplňkové
příručce.
Windows 7
A. Deaktivujte server proxy, je-li aktivován.
1. Klepnutím na Start > Internet Explorer spusťte webový
prohlížeč.
2. Klepněte na Tools (Nástroje) > Internet options
(Možnosti Internetu) > na kartu Connections
(Připojení) > LAN settings (Nastavení místní sítě).
3. Na obrazovce Nastavení místní sítě (LAN) zrušte Na obrazovce Nastavení místní sítě (LAN) zrušteNa obrazovce Nastavení místní sítě (LAN) zrušte
zaškrtnutí políčka Use a proxy server for your LAN
(Použít pro síť LAN server proxy)Použít pro síť LAN server proxy).
4. Po dokončení klepněte na OK.
B. Proveďte nastavení TCP/IP pro automatické získání
adresy IP.
1. Klepněte na Start > Control Panel (Ovládací panely)
> Network and Internet (Síť a Internet) > Network
and Sharing Center (Centrum sítí a sdílení) > Manage
network connections (Spravovat síťová připojení).
2. Vyberte Internet Protocol Version 4 (TCP/IPv4)Internet Protocol Version 4 (TCP/IPv4)
(Protokol IPv4 (TCP/IPv4))Protokol IPv4 (TCP/IPv4)) a potom klepněte na
Properties (Vlastnosti).
3. Zaškrtněte políčko Obtain an IP address automatically
(Získat adresu IP ze serveru).Získat adresu IP ze serveru).
4. Po dokončení klepněte na OK.
a kongurovat nastavení bezdrátového směrovače.
42
Page 43

C. Deaktivujte telefonické připojení, je-li aktivováno.
1. Click Start > Internet Explorer to launch the browser.
2. Klepněte na Tools (Nástroje) > Internet options
(Možnosti Internetu) > na kartu Connections
(Připojení).
3. Zaškrtěte políčko Zaškrtěte políčkoZaškrtěte políčko Never dial a connection (Nikdy
nevytáčet připojení).
4. Po dokončení klepněte na OK.
Mac 10.5.8
A. Deaktivujte server proxy, je-li aktivován.
1. Na panelu nabídek klepněte na Na panelu nabídek klepněte naNa panelu nabídek klepněte na Safari > Preferences... (Předvolby...)Předvolby...) > na kartu
Advanced (Upřesnit)Upřesnit).
2. Klepněte na Change Settings... (ZměnitZměnit
nastavení...) v poli Proxies (Servery proxy)Servery proxy).
3. V seznamu protokolů zrušte výběr FTP Proxy
(FTP server proxy)FTP server proxy) a Web Proxy (HTTPS)
(Webový server proxy (HTTPS))Webový server proxy (HTTPS)).
4. Po dokončení klepněte na OK.
B. Proveďte nastavení TCP/IP pro automatické
získání adresy IP.
1. Klepněte na ikonu Apple > System Preferences (Systémové předvolby)Systémové předvolby) > Network
(Síť)Síť).
2. Vyberte Ethernet a vyberte Using DHCP
(Pomocí protokolu DHCP)Pomocí protokolu DHCP) v poli Congure
(Kongurovat)Kongurovat).
3. Po dokončení klepněte naPo dokončení klepněte na Použít.
Čeština
POZNÁMKA: Podrobnosti o kongurování nastavení TCP/IP počítače a o deaktivaci
nastavení serveru proxy nebo telefonického připojení viz nápověda k operačnímu
systému a podpůrné funkce.
43
Page 44

Otázka 2: Rychlost bezdrátového připojení je pouze 145 Mb/s.
• Zjistěte, zda síťová karta nebo integrovaná funkce bezdrátového připojení počítače
disponuje kapacitou připojení 300 Mb/s.
Čeština
• Ve výchozí konguraci jsou produkty Wi-Fi s certikací n nakongurovány pro
provoz na kanálech 20 MHz. Chcete-li změnit šířku pásma z 20 MHz na 20/40 MHz a
maximalizovat prostupnost bezdrátového připojení, přejděte na Advanced Setting
(Upřesnit nastavení)Upřesnit nastavení) > Wireless (Bezdrátová síť)Bezdrátová síť) > General (Obecné)Obecné) ve webovém
uživatelském rozhraní (GUI) bezdrátového směrovače.
Otázka 3: Zapomenutý název sítě nebo zabezpečovací klíče.
• Zkuste znovu nakongurovat pevné připojení a nastavení šifrování.
• Stisknutím a podržením tlačítka Reset déle než pět sekund resetujte nebo obnovte
výchozí tovární nastavení systému.
• Výchozí tovární nastavení:
Uživatelské jméno / Heslo:
admin / admin
Adresa IP:
192.168.1.1
SSID: ASUS
Otázka 4: Kde lze najít další informace o tomto bezdrátovém směrovači?
• Uživatelská příručka na podpůrném disku CD
• Server online s odpověďmi na časté dotazy: http://support.asus.com/faq
• Server technické podpory: http://support-org.asus.com/
• Horká linka pro zákazníky: Viz Horká linka odborné pomoci v Doplňkové příručce
DŮLEŽITÉ! Zapište si informace pro vaše bezdrátová nastavení a uschovejte je na
bezpečném místě.
44
Síťový název (SSID):
Nastavení bezdrátového připojení 2,4 GHz
Zabezpečovací klíč:
Nastavení bezdrátového připojení 5 GHz
Síťový název (SSID):
Zabezpečovací klíč:
Nastavení směrovače
Uživatelské jméno ::
Heslo::
Page 45

En hurtig oversigt
Dansk
1
2
3
4
5
6
7
8
12
9
10
11
1) USB LED 5) 2,4GHz LED 9) LAN 1 ~ 4 porte*
2) LAN LED 6) Strøm LED 10) WAN (Internet) port*
3) WAN LED 7) USB 2.0 porte 11) Strømstik (DC-indgang)
4) 5GHz LED 8) Nulstillingsknap 12) WPS knap
BEMÆRK: *Der er to LED lamper i WAN og LAN portene. En gult lysende LED lampe
står for en Gigabit-forbindelse. En grønt lysende LED lampe står for en 10/100Mbforbindelse.
Pakkens indhold
RT-N56U Netværkskabel Support-cd (med brugervejledning/værktøjer)
AC adapter Kvikstartguide Garantibevis
BEMÆRK: Du bedes venligst kontakte din forhandler, hvis nogen af delene mangler
eller er beskadiget.
45
Page 46

Modem
Kom godt i gang
Mo
d
em
Dansk
1. Tag stikkene til ledningerne/kablerne ud af dit nuværende modem Tag stikkene til ledningerne/kablerne ud af dit nuværende modemTag stikkene til ledningerne/kablerne ud af dit nuværende modem
a
b
ADVARSEL! Sørg for, at dit kabel/ADSL modem har været slukket i mindst to minutter.
a: Træk stikket ud af stikkontakten, og træk stikket ud af dit kabel/ADSL modem.
b: Træk netværkskablet ud af dit kabel/ADSL modem.
2. Opsætning af dit trådløst miljø.
46
d
b
c
a
Page 47

a: Slut den ene ende af el-ledningen til DC-in stikket, og den anden til en stikkontakt.
b: Hvis du bruger en netværkskabel, skal du forbinde din computer til LAN porten på din
trådløse router.
VIGTIGT! Sørg for, at WAN og LAN LED lamperne blinker.
c: Hvis du bruger en anden netværkskabel, skal du forbinde dit modem til WAN porten Hvis du bruger en anden netværkskabel, skal du forbinde dit modem til WAN portenHvis du bruger en anden netværkskabel, skal du forbinde dit modem til WAN porten
på din trådløse router.
d: Slut den ene ende af el-ledningen til DC-in stikket på modemmet, og den anden til en Slut den ene ende af el-ledningen til DC-in stikket på modemmet, og den anden til enSlut den ene ende af el-ledningen til DC-in stikket på modemmet, og den anden til en
stikkontakt.
3. Kongurer dine trådløse indstillinger via den graske brugergrænseade på Kongurer dine trådløse indstillinger via den graske brugergrænseade påKongurer dine trådløse indstillinger via den graske brugergrænseade på
internettet (web GUI).
Dansk
a
a: Start din internetbrowser, såsom Internet Explorer, Google Chrome eller Firefox.
b: Følg trinene i hurtigopsætningen (Quick Internet Setup (QIS)).
BEMÆRK:
• Hvis den graske brugergrænseade ikke starter, skal du indtaste
http://192.168.1.1 i din internetbrowser, og log på med standard brugernavnet:
admin og adgangskoden: admin.
• Deaktiver proxyindstillingerne, opkaldsforbindelsen og sæt dine TCP/IP-indstillinger til at hente en IP-adresse automatisk. For yderligere oplysninger, bedes du
venligst se
cd'en for at få en diagnose automatisk.
Fejlnding
afsnittet, eller brug opsætningsvejledningen på support-
b
47
Page 48

Fejlnding
SP1: Jeg kan ikke få adgang til den graske brugergrænseade på nettet, hvor jeg skal Jeg kan ikke få adgang til den graske brugergrænseade på nettet, hvor jeg skalJeg kan ikke få adgang til den graske brugergrænseade på nettet, hvor jeg skal
Dansk
kongurere indstillingerne til den trådløse router.
• Luk for alle dine internetbrowsere og start igen.
• Følg trinene nedenfor for, at kongurere dine computerindstillinger baseret på dit
operativsystem.
BEMÆRK: Se venligst skærmbillederne i den Medføl-
gende vejledning.
Windows 7
A. Deaktiver proxyserveren, hvis den er aktiveret.
1. Klik på Start > Internet Explorer for, at starte internetbrowseren.
2. Klik på Tools (Funktioner) > Internet options (Inter-
netindstillinger) > Connections (Forbindelser) fane >
LAN settings (LAN indstillinger).
3. I LAN Indstillinger-vinduet, skal du fravælge I LAN Indstillinger-vinduet, skal du fravælgeI LAN Indstillinger-vinduet, skal du fravælge Use a proxy
server for your LAN (Brug en proxyserver til LAN).
4. Klik på OK når du er færdig.
B. Indstil TCP/IP indstillingerne til at hente en IP-adres-
se automatisk.
1. Klik på Start > Control Panel (Kontrolpanel) > Network and Internet (Netværk og Internet) > Network
and Sharing Center (Netværks- og delingscenter) >
Manage network connections (Administrer netværksforbindelser).
2. Vælg Internet Protocol Version 4 (TCP/IPv4), og klik
herefter på Properties (Egenskaber).
3. Vælg Obtain an IP address automatically (Hent auto-
matisk en IP-adresse).
4. Klik på OK når du er færdig.
48
Page 49

C. Deaktiver opkaldsforbindelsen, hvis den er aktiveret.
1. Klik på Start > Internet Explorer for, at starte internet-
browseren.
2. Klik på Tools (Funktioner) > Internet options (Inter-
netindstillinger) > Connections (Forbindelser) fanen.
3. Vælg VælgVælg Never dial a connection (Ring aldrig til en
opkaldsforbindelse).
4. Klik på OK når du er færdig.
Mac 10.5.8
A. Deaktiver proxyserveren, hvis den er
aktiveret.
1. I menubjælken, skal du klikke på I menubjælken, skal du klikke påI menubjælken, skal du klikke på Safari >
Preferences... (Indstillinger...) > Advanced
(Avanceret) fanen.
2. Klik på Change Settings... (Skift indstillinger...) i Proxies (Proxyservere) feltet.
3. På listen af protokoller, skal du fravælge FTP
Proxy og Web Proxy (HTTPS).
4. Klik på OK når du er færdig.
B. Indstil TCP/IP indstillingerne til at hente en
IP-adresse automatisk.
1. Klik på Apple ikonet > System Preferences
(Systemindstillinger) >
Network (Netværk).
2. Vælg Ethernet og vælg herefter Using DHCP
(Bruger DHCP) i Congure (Kongurer) feltet.
3. Klik på Apply (Anvend) når du er færdig.
Danish
BEMÆRK: For yderligere oplysninger om hvordan du kongurere computerens TCP/
IP-indstillinger og deaktivere proxyserverindstillingerne eller opkaldsforbindelsen,
bedes du venligst se under hjælpe- og støtterfunktionerne i dit operativsystem.
49
Page 50

SP2: Hastigheden på min trådløse forbindelse er kun på 145 Mbps.
• Tjek om dit netværkskort eller den indbyggede trådløse enhed på din computer kan
klare en hastighedskapacitet på 300 Mbps.
Danish
• Som standard er Wi-Fi certicerede produkter kongureret til at bruge 20 MHz kanaler.
For, at skifte båndbredden fra 20 MHz til 20/40 MHz og få det maksimale ud af din
trådløse forbindelse, skal du gå til Advanced Setting (Avancerede indstillinger)
> Wireless (Trådløs) > General (Generelt) i den graske brugergrænseade til din
trådløse router.
SP3: Jeg har glemt mit netværksnavn eller sikkerhedskode.
• Prøv, at opsætte kabelforbindelsen og kongurere krypteringsindstillingerne igen.
• Hold nulstillingsknappen nede i mere end fem sekunder for, at nulstille eller gendanne
systemet til fabriksindstillingerne.
• Fabriksindstillingerne:
Brugernavn/Adgangskode:
admin / admin
SP4: Hvor kan jeg nde yderligere oplysninger om min trådløs router?
• I brugervejledningen på support-cd'en.
• Ofte stillede spørgsmål på nettet: http://support.asus.com/faq
• Teknisk support: http://support-org.asus.com/
• Kunde hotline: Se venligst Kunde hotline i den medfølgende vejledning
VIGTIGT! Skriv oplysningerne til dine trådløse indstilling ned, og gem dem på et
sikkert sted.
IP-adresse:
192.168.1.1
SSID: ASUS
50
2,4GHz trådløse indstillinger
Netværksnavn (SSID):
Sikkerhedsnøgle:
5GHz trådløse indstillingertrådløse indstillinger
Netværksnavn (SSID):
Sikkerhedsnøgle::
Routerindstillinger
Brugernavn::
Adgangskode::
Page 51

Een snel overzicht
Nederlands
1
2
3
4
5
6
7
8
12
9
10
11
1) USB-LED 5) 2.4GHz LED 9) LAN 1 ~ 4 poorten*
2) LAN-LED 6) Voedings-LED 10) WAN-poort (internet)*
3) WAN-LED 7) USB 2.0-poorten 11)
Voedingsaansluiting
(DC-In)
4) 5GHz LED 8) Reset-knop 12) WPS-knop
OPMERKING: *Er zijn twee LED's in de WAN- en LAN-poorten. De gele LED staat voor
een Gigabit-verbinding. De groene LED staat voor een 10/100Mb-verbinding.
Inhoud verpakking
RT-N56U Netwerkkabel Ondersteuningscd (handleiding, hulpprogramma's)
Wisselstroomadapter Beknopte handleiding Garantiekaart
OPMERKING: als een van de items beschadigd is of ontbreekt, moet u contact opnemen met uw leverancier.
51
Page 52

Modem
Aan de slag
Mo
d
em
1. Koppel de draden/kabels los van uw bestaande modeminstallatie
Nederlands
a
b
WAARSCHUWING! Zorg ervoor dat uw kabel/ADSL-modus minstens twee minuten is
uitgeschakeld.
a: Koppel de wisselstroomadapter los van de voeding en an de kabel/ADSL-modem.
b: Koppel de netwerkkabel los van uw kabel/ADSL-modem.
2. Uw draadloze omgeving instellen.
52
d
b
c
a
Page 53

a: Stop de wisselstroomadapter van uw draadloze router in de gelijkstroomingang en sluit
deze aan op een stopcontact.
b: Sluit uw computer met de netwerkkabel aan op de LAN-poort van uw draadloze router.
BELANGRIJK! Controleer of de WAN- en LAN-LED's knipperen.
c: Sluit uw modem met een andere netwerkkabel aan op de WAN-poort van uw draad-
loze router.
d: Stop de wisselstroomadapter van uw modem in de gelijkstroomingang en sluit deze
aan op een stopcontact.
3. Congureer uw draadloze instellingen via de grasche webgebruikersinterface (web
GUI).
Nederlands
a
a: Start uw webbrowser, zoals Internet Explorer, Google Chrome of Firefox.
b: Volg de stappen voor de snelle internetinstelling (QIS).
OPMERKINGEN::
• Als de grasche webgebruikersinterface van uw draadloze router niet start, typtAls de grasche webgebruikersinterface van uw draadloze router niet start, typt
u http://192.168.1.1 in uw webbrowser en meldt u zich aan met de standaard
gebruikersnaam: admin en het standaard wachtwoord: admin.
• Schakel de proxy-instellingen en de inbelverbinding uit en stel uwSchakel de proxy-instellingen en de inbelverbinding uit en stel uw
TCP/IP-instellingen in om automatisch een IP-adres te verkrijgen.
Raadpleeg de sectie Problemen oplossen of gebruik de installatiewizard op de
ondersteunings-cd voor een autodiagnose.
b
53
Page 54

Problemen oplossen
V1: Ik krijg geen toegang tot de grasche webgebruikersinterface voor het congureren van
de instellingen van de draadloze router.
• Sluit alle actieve webbrowsers en start opnieuw.
• Volg de onderstaande stappen om uw computerinstellingen te congureren op basis
Nederlands
van het besturingssysteem.
Windows 7
A. Schakel de proxyserver uit indien deze is ingeschake-
ld.
1. Klik op Start > Internet Explorer om de webbrowser te
starten.
2. Klik op Tools (Extra) > Internet options (Internetop-
ties) >tabblad Connections (Verbindingen) > LAN
settings (LAN-instellingen).
3. Schakel in het scherm LAN-instellingen het selectievakje
Use a proxy server for your LAN (Een proxyserver voor
het LAN-netwerk gebruiken) uit.
4. Klik op OK wanneer u klaar bent.
B. De TCP/IP-instellingen instellen om automatisch een
IP-adres te verkrijgen.
1. Klik op Start > Control Panel (Conguratiescherm)
> Network and Internet (Netwerk en internet) >
Network and Sharing Center (Netwerkcentrum) >
Manage network connections (Netwerkverbindingen beheren).
2. Selecteer Internet Protocol Version 4 (TCP/IPv4) (Internet Protocol Versie 4 (TCP/IPv4)) en klik vervolgens
op Properties (Eigenschappen).
3. Schakel het selectievakje Obtain an IP address auto-
matically (Automatisch een IP-adres laten toewijzen).
4. Klik op OK wanneer u klaar bent.
54
Page 55

C. Schakel de inbelverbinding uit indien deze is inge-
schakeld.
1. Klik op Start > Internet Explorer om de webbrowser te
starten.
2. Klik op Tools (Extra) > Internet options (Internetop-
ties) > tabblad Connections (Verbindingen).
3. Tik op Never dial a connection (Nooit een verbinding
kiezen).
4. Klik op OK wanneer u klaar bent.
Mac 10.5.8
A. Schakel de proxyserver uit indien deze is
ingeschakeld.
1. Klik in de menubalk op Safari > Preferences...
(Systeemvoorkeuren...) > tabblad Advanced
(Geavanceerd).
2. Klik op Change Settings... (Wijzig instellingen...) in het veld Proxies (Proxy's).
3. Schakel in de lijst van protocollen FTP Proxy
(FTP-proxy) en Web Proxy (HTTPS) (Webproxy (HTTPS)) uit.
4. Klik op OK wanneer u klaar bent.
B. De TCP/IP-instellingen instellen om automa-
tisch een IP-adres te verkrijgen.
1. Klik op het Apple-pictogram > System
Preferences (Systeemvoorkeuren) > Network (Netwerk).
2. Selecteer Ethernet en selecteer vervolgens Using DHCP (Via DHCP) op het tabblad Congure (Congureer).
3. Klik op Apply(Toepassen) wanneer u klaar
bent.
Nederlands
OPMERKING: aadpleeg het Help-bestand en de ondersteuningsfunctie van uw bes-
turingssysteem voor details over het congureren van de TCP/IP-instellingen van uw
computer en het uitschakelen van de proxyserverinstellingen of de inbelverbinding.
55
Page 56

V2: de snelheid van mijn draadloze verbinding is slechts 145 Mbps.
• Controleer of uw netwerkkaart of de ingebouwde draadloze functie van uw computer
een verbindingscapaciteit heeft van 300 Mbps.
• Standaard zijn Wi-Fi-gecerticeerde n-producten gecongureerd om te werken met
20 MHz-kanalen. Om de kanaalbandbreedte te wijzigen van 20 MHz naar 20/40 MHz
en de draadloze doorvoer te maximaliseren, gaat u naar Advanced Setting (Geav-
anceerde instelling) > Wireless (Draadloos) > General
Nederlands
(Algemeen) in de grasche webgebruikersinterface van uw draadloze router.
V3: Ik ben mijn netwerknaam of beveiligingssleutels vergeten.
• Probeer de bekabelde verbinding tot stand te brengen en congureer de coderingsinstellingen opnieuw.
• Houd de Reset-knop gedurende meer dan vijf seconden ingedrukt om het systeem
opnieuw in te stellen of terug te zetten naar de standaard fabriekswaarden.
• Standaard fabrieksinstellingen:
Gebruikersnaam /
wachtwoord:
admin / admin
V4: Waar kan ik meer informatie vinden over de draadloze router?
• Handleiding op ondersteunings-cd
• Online site voor veelgestelde vragen (FAQ): http://support.asus.com/faq
• Site voor technische ondersteuning: http://support-org.asus.com/
• Hotline klantendienst: raadpleeg de nummers voor de ondersteuningshotline in de
Aanvullende handleiding
BELANGRIJK! Noteer de informatie voor uw draadloze instellingen en bewaar deze
op een veilige locatie.
IP-adres:
192.168.1.1
SSID: ASUS
56
2,4GHz draadloze instellingen
Netwerknaam (SSID):
Beveiligingssleutel:
5GHz draadloze instellingen
Netwerknaam (SSID):
Beveiligingssleutel:
Routerinstellingen
Gebruikersnaam:
wachtwoord:
Page 57

Kiire pilguheit
Eesti
1
2
3
4
5
6
1) USB LED indikaator 5)
2) LAN-i LED indikaator 6) Toite LED indikaator 10)
7
8
9
10
11
2.4GHz LED
indikaator
LAN 1 ~ 4
9)
pordid*
WAN port*
(Internet)
12
3) WAN-i LED indikaator 7) USB 2.0 pordid 11) Toiteport (DC-In)
4) 5GHz LED indikaator 8) Lähtestusnupp 12) WPS nupp
MÄRKUS: *WAN ja LAN portidel on kaks LED indikaatorit. Kollane LED indikaator
tähistab Gigabit ühendust. Roheline LED indikaator tähistab 10/100Mb ühendust.
Pakendi sisu
RT-N56U VõrgukaabelVõrgukaabel Tugijuhendi CD (kasutusjuhend/ utiliidid)Tugijuhendi CD (kasutusjuhend/ utiliidid)
VahelduvvooluadapterVahelduvvooluadapter LühijuhendLühijuhend GarantiikaartGarantiikaart
MÄRKUS: Kui mõni artiklitest on kahjustatud või puudub, siis võtke ühendust
jaemüüjaga.
57
Page 58

Modem
Alustamine
Mo
d
em
Eesti
1. Eemaldage ja lahutage modemilt kõik juhtmed/kaablid. Eemaldage ja lahutage modemilt kõik juhtmed/kaablid.Eemaldage ja lahutage modemilt kõik juhtmed/kaablid.
a
b
HOIATUS! Veenduge, et kaabel-/ADSL modem on olnud vähemalt kaks minutit välja
lülitatud.
a: Eemaldage vahelduvvoolu toitejuhe pistikupesast ja lahutage toitejuhtme teine ots
kaabel-/ADSL modemilt.
b: Lahutage kaabel-/ADSL modemilt võrgukaabel.
2. Häälestage traadita keskkond.
58
d
b
c
a
Page 59

a: Sisestage traadita ruuteri vahelduvvoolu adapter DC-In porti ja ühendage see
toitepistikupesasse.
b: Kasutades võrgukaablit, ühendage arvuti traadita ruuteri LAN porti.
OLULINE! Veenduge, et WAN-i ja LAN-i LED indikaatorid vilguvad.
c: Kasutades võrgukaablit, ühendage modem traadita ruuteri WAN porti. Kasutades võrgukaablit, ühendage modem traadita ruuteri WAN porti.Kasutades võrgukaablit, ühendage modem traadita ruuteri WAN porti.
d: Sisestage modemi vahelduvvoolu adapter DC-In porti ja ühendage see Sisestage modemi vahelduvvoolu adapter DC-In porti ja ühendage seeSisestage modemi vahelduvvoolu adapter DC-In porti ja ühendage see
toitepistikupesasse.
3. Kongureerige traadita sätted veebipõhise graalise kasutajaliidese (web GUI) kaudu.Kongureerige traadita sätted veebipõhise graalise kasutajaliidese (web GUI) kaudu.
Eesti
a
a: Käivitage veebibrauser, nt Internet Explorer, Google Chrome või Firefox.
b: Järgige samme utiliidis Quick Internet Setup (QIS) (Kiirhäälestus Interneti kaudu).
MÄRKUSED::
• Kui traadita ruuteri veebipõhine graaline kasutajaliides (web GUI) ei käivitu, siisKui traadita ruuteri veebipõhine graaline kasutajaliides (web GUI) ei käivitu, siis
tippige veebibrauseri aadressireale http://192.168.1.1 ja logige sisse, kasutades
vaikekasutajanime admin ja -parooli admin.
• Keelake puhversätted ja sissehelistusühendus ning seadistage TCP/IP sätteid nii, Keelake puhversätted ja sissehelistusühendus ning seadistageTCP/IP sätteid nii,Keelake puhversätted ja sissehelistusühendus ning seadistage TCP/IP sätteid nii,
et IP-aadressi hankimine toimuks automaatselt. Täiendava teabe saamiseks lugege
jaotist Tõrkeotsing või kasutage tugijuhendi CD häälestusviisardit automaatseks
diagnoosimiseks.
b
59
Page 60

Tõrkeotsing
Eesti
K1: Ma ei saa juurdepääsu veebipõhisele graalisele kasutajaliidesele (web GUI), et kongureerida
traadita ruuteri sätteid.
• Sulgege kõik muud avatud brauserid ja käivitage uuesti.
• Järgige alltoodud samme, et kongureerida arvuti sätteid lähtuvalt selle
operatsioonisüsteemist.
Windows 7
A. Keelake puhverserver, kui see on aktiveeritud. Keelake puhverserver, kui see on aktiveeritud.
1. Klõpsake Start > Internet Explorer, et käivitada
veebibrauser.
2. Klõpsake Tools (Tööriistad) > Internet options
(Interneti-suvandid) > Vahekaart Connections
(Ühendused) > LAN settings (LAN sätted).
3. Ekraanil Local Area Network (LAN) Settings (LAN sätted) Ekraanil Local Area Network (LAN) Settings (LAN sätted)Ekraanil Local Area Network (LAN) Settings (LAN sätted)
eemaldage märge ruudust Use a proxy server for
your LAN (Kasutage oma kohtvõrgu (LAN) puhul
puhverserverit).
B. Seadistage TCP/IP sätteid nii, et IP-aadressi
hankimine toimuks automaatselt.
1. Klõpsake Start > Control Panel (Juhtpaneel) >
Network and Internet (Võrk ja Internet) > Network
and Sharing Center (Võrgu- ja ühiskasutuskeskus)
> Manage network connections (Halda
võrguühendusi).
2. Valige määrang Internet Protocol Version 4 (TCP/IPv4)
(Internet Protocoli versioon 4 (TCP/IPv4)), seejärel
klõpsake valikut Properties (Atribuudid).
3. Tehke märge ruutu Obtain an IP address
automatically (Hangi IP-aadress automaatselt).
4. Kui olete lõpetanud, klõpsake nuppu OK.
60
Page 61

C. Keelake sissehelistusühendus, kui see on
aktiveeritud.
1. Klõpsake Start > Internet Explorer, et käivitada
veebibrauser.
2. Klõpsake vahekaarti Tools (Tööriistad) > Internet
options (Interneti-suvandid) > Connections
(Ühendused).
3. Märkige ruut Märkige ruutMärkige ruut Never dial a connection (Ära helista
kunagi sellel ühendusel).
4. Kui olete lõpetanud, klõpsake nuppu OK.
Mac 10.5.8
A. Keelake puhverserver, kui see on Keelake puhverserver, kui see on
aktiveeritud.
1. Klõpsake menüüribal vahekaarti Klõpsake menüüribal vahekaartiKlõpsake menüüribal vahekaarti Safari >
Preferences... (Eelistused...) > Advanced
(Täpsemalt).
2. Klõpsake käsku Change Settings... (Muuda
sätteid...) väljal Proxies (Puhvrid).
3. Protokollide loendis tühjendage märkeruudud
FTP Proxy ja Web Proxy (HTTPS).
4. Kui olete lõpetanud, klõpsake nuppu OK.
B. Seadistage TCP/IP sätteid nii, et IP-aadressi
hankimine toimuks automaatselt.
1. Klõpsake ikooni Apple > System
Preferences (Süsteemi eelistused) > Network
(Võrk).
2. Valige määrang Ethernet, seejärel valige
ikoon Using DHCP (DHCP kasutamine) väljal
Congure (Kongureeri).
3. Kui olete lõpetanud, klõpsake nuppu3. Kui olete lõpetanud, klõpsake nuppuKui olete lõpetanud, klõpsake nuppu
Apply(Rakenda).
Eesti
MÄRKUS. Täpsemat teavet arvuti TCP/IP sätete kongureerimise ja puhverserveri
sätete või sissehelistusühenduse keelamise kohta leiate rakendusest Spikker ja tugi.
61
Page 62

K2: Minu traadita võrgu kiirus on ainult 145 Mbit/s.
• Kontrollige kas võrgukaardi või arvuti sisseehitatud traadita funktsiooni jõudlus on
Eesti
piisav 300 Mbit/s ühenduskiiruse tagamiseks.
• Vaikimisi on Wi-Fi sertifitseeritud tooted konfigureeritud töötamiseks 20 MHz
sagedusribas. Kanali ribalaiuse muutmiseks 20 megahertsilt 20/40 megahertsile ja
traadita ühenduse läbilaskevõime maksimeerimiseks minge menüüsse Advanced
Setting (Täpsemad sätted) > Wireless (Traadita) > General (Üldine) traadita ruuteri
veebipõhises graalises kasutajaliideses.
K3: Olen unustanud võrgu nime või turvavõtmed.
• Proovige uuesti häälestada traadita ühendus ja kongureerida krüptimissätted.
• Vajutage nuppu Reset (Lähtestamine) rohkem kui viis sekundit süsteemi
lähtestamiseks või selle tehasesätete taastamiseks.
• Tehase vaikesätted:
Kasutajanimi/parool: :
admin / admin
IP-aadress:
192.168.1.1
SSID: ASUS
K4: Kust leida täiendavat teavet traadita ruuteri kohta?
• Juhendite ja toe CD
• KKK võrgus: http://support.asus.com/faq
• Tehnilise toe leht: http://support-org.asus.com/
• Infoliin: Vt lisajuhendi jaotist Tugiliin.
OLULINE! Märkige üles traadita ühenduse sätted ja hoidke seda teavet turvalises
kohas.
Võrgu nimi (SSID):
Turvavõti:
Võrgu nimi (SSID):
Turvavõti:
Kasutajanimi:
parool:
62
2.4GHz traadita sätted
5GHz traadita sätted
Ruuteri sätted
Page 63

Pikasilmäys
Suomi
1
2
3
4
5
6
1) USB LED -valo 5)
2,4 GHz LED
-valo
7
8
12
9
10
11
9) LAN-portit 1–4*
2) LAN LED -valo 6) Virran LED-valo 10) WAN (internet) -portti*
3) WAN LED -valo 7) USB 2.0 -portit 11) Virta (DC-In) -portti
5 GHz LED
4)
-valo
8) Nollauspainike 12) WPS-painike
HUOMAA: *WAN- ja LAN-porteilla on kaksi LED-valoa. Keltainen LED-valo tarkoittaa
gigabitin yhteyttä. Vihreä LED-valo tarkoittaa 10/100 megabitin yhteyttä.
Pakkauksen sisältö
RT-N56U Verkkokaapeli Tuki-CD (käyttöopas, apuohjelmat)
Verkkolaite Pikaopas Takuukortti
HUOMAA: Jos jokin nimike puuttuu tai on vahingoittunut, ota yhteys jälleenmyyjään.
63
Page 64

Modem
Näin pääset alkuun
Mo
d
em
Suomi
1. Irrota johdot/kaapelit olemassa olevasta modeemiasennuksesta
a
b
VAROITUS! Varmista, että kaapeli/ADSL-modeemin virta on katkaistu
vähintään kaksi minuuttia.
a: Irrota verkkolaite virtalähteestä ja irrota se kaapeli/ADSL-modeemista.
b: Irrota verkkokaapeli kaapeli/ADSL-modeemista.
2. Aseta langaton ympäristösi.
64
d
b
c
a
Page 65

a: Liitä langattoman reitittimen verkkolaite DC-In-porttiin ja liitä se virtalähteeseen.
b: Liitä tietokone verkkokaapelilla langattoman reitittimen LAN-porttiin.
TÄRKEÄÄ! Varmista, että WAN- ja LAN LED -valot vilkkuvat.
c: Liitä modeemi toisella verkkokaapelilla langattoman reitittimen WAN-porttiin. Liitä modeemi toisella verkkokaapelilla langattoman reitittimen WAN-porttiin.Liitä modeemi toisella verkkokaapelilla langattoman reitittimen WAN-porttiin.
d: Liitä modeemin verkkolaite DC-In-porttiin ja liitä se virtalähteeseen. Liitä modeemin verkkolaite DC-In-porttiin ja liitä se virtalähteeseen.Liitä modeemin verkkolaite DC-In-porttiin ja liitä se virtalähteeseen.
3. Määritä langattomat asetukset graasella web-käyttöliittymällä (web GUI). Määritä langattomat asetukset graasella web-käyttöliittymällä (web GUI).Määritä langattomat asetukset graasella web-käyttöliittymällä (web GUI).
Suomi
a
a: Käynnistä web-selain, kuten Internet Explorer, Google Chrome tai Firefox.
b: Noudata Quick Internet Setup (Pika-internet-asetus) (QIS) -vaiheita.
HUOMAUTUKSIA::
• Jos langattoman reitittimen graanen web-käyttöliittymä ei käynnisty, näppäile
web-selaimen osoiteriville http://192.168.1.1 ja kirjaudu sisään oletuskäyttäjänimellä: admin ja salasanalla: admin.
• Ota pois käytöstä välityspalvelinasetukset ja modeemiyhteys ja aseta TCP/IP-asetukset hankkimaan IP-osoitteen automaattisesti. Katso lisätietoja
osasta tai käytä tuki-CD-levyn Ohjattu asennus -toimintoa automaattista diagnoosia varten.
b
Vianmääritys
-
65
Page 66

Vianmääritys
Kysymys 1: En voi käyttää graasta web-käyttöliittymää langattoman reitittimen asetusten En voi käyttää graasta web-käyttöliittymää langattoman reitittimen asetustenEn voi käyttää graasta web-käyttöliittymää langattoman reitittimen asetusten
Suomi
• Sulje kaikki käynnissä olevat web-selaimet ja käynnistä selain uudelleen.
• Noudata seuraavia vaiheita määrittäessäsi tietokoneen käyttöjärjestelmään perustuvat
asetukset.
Windows 7
A. Ota välityspalvelin pois käytöstä, jos se on otettu
käyttöön.
1. Käynnistä web-selainta napsauttamalla Start (Käynnistä)
> Internet Explorer.
2. Napsauta Tools (Työkalut) > Internet options (Internet-
asetukset) >
Connections (Yhteydet) -välilehti > LAN settings (Lähiverkon asetukset).
3. Poista Lähiverkkoasetukset (LAN) -näytöstä valintamerkki Poista Lähiverkkoasetukset (LAN) -näytöstä valintamerkkiPoista Lähiverkkoasetukset (LAN) -näytöstä valintamerkki
kohdasta Use a proxy server for your LAN (Käytä väli-
tyspalvelinta lähiverkossa).
4. Napsauta OK, kun olet valmis.
B. Aseta TCP/IP-asetukset hakeaksesi IP-osoitteen
automaattisesti.
1. Napsauta Start (Käynnistä) > Control Panel (Ohjauspaneeli) > Network and Internet (Verkko ja Internet)
> Network and Sharing Center (Verkko ja
jakamiskeskus) > Manage network connections
(Hallitse verkkoyhteyksiä).
2. Valitse Internet Protocol Version 4 (TCP/IPv4) (Internet-protokolla Versio 4 (TCP/IPv4)) ja napsauta sitten
Properties (Ominaisuudet).
3. Aseta valintamerkki kohtaan Obtain an IP address
automatically (Hae IP-osoite automaattisesti).
4. Napsauta OK, kun olet valmis.
määrittämiseen.
66
Page 67

C. Ota modeemiyhteys pois käytöstä, jos se on otettu
käyttöön.
1. Käynnistä web-selainta napsauttamalla Start (Käynnistä) > Internet Explorer.
2. Napsauta Tools (Työkalut) > Internet options (Internet-asetukset) > Connections (Yhteydet) -välilehti.
3. Poista valintamerkki kohdasta Poista valintamerkki kohdastaPoista valintamerkki kohdasta Never dial a connection
(Älä koskaan muodosta yhteyttä puhelinverkon kautta).
4. Napsauta OK, kun olet valmis.
Mac 10.5.8
A. Ota välityspalvelin pois käytöstä, jos se on otettu käyttöön.
1. Osoita valikkopalkin Osoita valikkopalkinOsoita valikkopalkin Safari > Preferences...
(Asetukset...) > Advanced (Lisävalinnat)
-välilehteä.
2. Osoita Change Settings... (Muuta asetuk-
sia...) Proxies (Välityspalvelimet) -kentässä.
3. Poista protokollaluettelosta valinta FTP Proxy
(FTP-välityspalvelin) ja Web Proxy (HTTPS)
(Web-välipalvelin (HTTPS)).
4. Napsauta OK, kun olet valmis.
B. Aseta TCP/IP-asetukset hakeaksesi IP-osoit-
teen automaattisesti.
1. Osoita Apple-kuvake > System Preferences
(Järjestelmäasetukset) > Network (Verkko).
2. Valitse Ethernet ja valitse Using DHCP
(Käyttäen DHCP:tä) Congure (Kytkentä)
-kentässä.
3 Napsauta Apply(Käytä), kun olet valmis.
Suomi
HUOMAUTUS: Katso lisätietoja käyttöjärjestelmäsi Ohje- ja tukitoiminnosta tietoko-
neen TCP/IP-asetusten määrittämisestä ja välityspalvelimen ottamisesta pois käytöstä
tai modeemiyhteydestä.
67
Page 68

Kysymys 2: Langattoman yhteyteni nopeus on vain 145 Mb/s.
• Tarkista onko verkkokortissasi tai tietokoneen sisäänrakennetussa langattomassa
Suomi
ominaisuudessa 300 Mb/s-yhteys.
• Wi-Fi-sertioidut tuotteet on määritetty oletuksena käyttämään 20 MHzin kanavia.
Voit muuttaa kanavan kaistanleveyttä 20 MHzistä 20/40 MHziin ja maksimoida
langattoman läpimenon siirtymällä langattoman reitittimen graasen
web-käyttöliittymän kohtaan Advanced Setting (Lisäasetukset) > Wireless
(Langaton) > General (Yleistä).
Kysymys 3: Verkkonimi tai suojausavain on unohtunut.
• Yritä luoda langallinen yhteys ja määrittää salausasetukset uudelleen.
• Paina nollauspainiketta yli viisi sekuntia nollataksesi tai palauttaaksesi
järjestelmän tehtaan oletusasetuksiin.
• Tehtaan oletusasetukset:
Käyttäjänimi/Salasana: admin / admin
Kysymys 4: Mistä saan lisätietoja langattomasta reitittimestä?
• Tuki-CD-levyllä oleva Käyttäjän käsikirja
• Online-usein kysyttyä-sivusto: http://support.asus.com/faq
• Teknisen tuen sivusto: http://support-org.asus.com/
• Tukipalvelunumero: Katso tukipalvelunumero kohdasta Supplementary Guide
(Lisäopas).
TÄRKEÄÄ! Kirjoita muistiin langattomat asetuksesi ja ja säilytä niitä varmassa paikassa.
IP-osoite:
192.168.1.1
SSID: ASUS
68
2,4 GHzin langattomat asetukset
Verkkonimi (SSID):
Suojausavain:
5GHz langattomat asetuksetlangattomat asetukset
Verkkonimi(SSID):(SSID):
Suojausavain::
Reititinasetukset
Käyttäjänimi::
Salasana::
Page 69

Μια γρήγορη ατιά
Ελληνικά
1
2
3
4
5
6
1) Λυχνία LED USB 5) Λυχνία LED 2.4GHz 9)
2) Λυχνία LED LAN 6)
3) Λυχνία LED WAN 7)
Λυχνία LED
4)
5GHz
Λυχνία LED
Τροφοδοσία
Θύρε USB 2.0
Κουπί
8)
επαναφορά
7
8
9
10
11
Θύρε LAN 1 ~ 4*
10) Θύρε WAN (Internet)*
Είσοδο τροφοδοσία
11)
ρεύατο (DC-In)
12) WPS κουπί
12
ΣΗΜΕIΣΗ: *Υπάρχουν δύο λυχνίε LED στι θύρε WAN και LAN. Η κίτρινη λυχνία
LED σηαίνει σύνδεση Gigabit. Η πράσινη λυχνία LED σηαίνει σύνδεση 10/100Mb.
Περιεχόενα συσκευασία
RT-N56U Καλωδιακού δικτύου CD Υποστήριξης (εγχειρίδιο,
βοηθητικά προγράμματα) Μετασχηματιστής ρεύματος
Οδηγός Γρήγορης Έναρξης Κάρτα εγγύηση
ΣΗΜΕIΣΗ: Εάν απουσιάζει ή εφανίζει βλάβη οποιοδήποτε από τα στοιχεία,
επικοινωνήστε ε το κατάστηα λιανική πώληση.
69
Page 70

Modem
Πώ να ξεκινήσετε
Mo
d
em
1. Βγάλτε από την πρίζα και αποσυνδέσ τε τα καλώδια από την υπάρχουσα
εγκατάσταση
όντε.
Ελληνικά
a
b
ΠΡΟΕΙΟΠΟΙΗΣΗ! Βεβαιωθείτε ότι το καλωδιακό/ADSL όντε έχει απενεργοποιηθεί
για τουλάχιστον δύο λεπτά.
α: Βγάλτε από την πρίζα τον προσαρογέα AC και αποσυνδέστε τον από το καλωδιακό/
ADSL όντε.
β: Αποσυνδέστε το καλώδιο δικτύου από το καλωδιακό/ADSL όντε.
2. Εγκαταστήστε το ασύρατο περιβάλλον.
70
d
b
c
a
Page 71

α: Συνδέστε τον προσαρογέα AC του ασύρατου δροολογητή στη θύρα εισόδου DC
και σε ια πρίζα ρεύατο.
β: Χρησιοποιήστε το καλώδιο δικτύου για να συνδέσετε τον υπολογιστή στη θύρα LAN
του ασύρατου δροολογητή.
ΣΗΜΑΝΤΙΚΟ! Βεβαιωθείτε ότι οι λυχνίε LED WAN και LAN αναβοσβήνουν.
γ: Χρησιοποιήστε ένα άλλο καλώδιο δικτύου για να συνδέσετε το όντε στη θύρα
WAN του ασύρατου δροολογητή.
δ: Συνδέστε τον προσαρογέα AC του όντε στη θύρα εισόδου DC και σε ια πρίζα
ρεύατο.
3. ιαορφώστε τι ασύρατε ρυθίσει έσω τη γραφική διαδικτυακή διεπαφή
χρήστη (web GUI).
Ελληνικά
a
α: Εκκινήστε ια εφαρογή περιήγηση στο διαδίκτυο όπω Internet Explorer, Google
Chrome, ή Firefox.
β: κολουθήστε τα βήατα τη Γρήγορη Εγκατάσταση Internet (Quick Internet Setup -
QIS).
ΣΗΜΕΙΣΕΙΣ::
• Αν η διαδικτυακή διεπαφή χρήστη του ασύρατου δροολογητή (web GUI) δενΑν η διαδικτυακή διεπαφή χρήστη του ασύρατου δροολογητή (web GUI) δεν
εκκινεί, πληκτρολογήστε http://192.168.1.1 στο πρόγραα περιήγηση στο
διαδίκτυο και συνδεθείτε ε το προεπιλεγένο όνοα χρήστη: admin, και κωδικό
πρόσβαση: admin.
• Απενεργοποιήστε τι ρυθίσει του διακοιστή εσολάβηση, τη σύνδεση έσωΑπενεργοποιήστε τι ρυθίσει του διακοιστή εσολάβηση, τη σύνδεση έσω
τηλεφώνου και ορίστε τι ρυθίσει TCP/IP για αυτόατη απόδοση διεύθυνση
ΙΡ. Για περισσότερε λεπτοέρειε, ανατρέξτε στην ενότητα Αντιμετώπιση
προβλημάτων ή χρησιοποιήστε τον Οδηγό εγκατάσταση στο CD υποστήριξη
για αυτόατη διάγνωση.
b
71
Page 72

Αντιετώπιση προβληάτων
ΕΡ1: εν πορώ να αποκτήσω πρόσβαση στη διαδικτυακή διεπαφή χρήστη (web GUI) για να
διαορφώσω τι ρυθίσει του ασύρατου δροολογητή.
• Κλείστε όλε τι ανοικτέ εφαρογέ περιήγηση στο διαδίκτυο και εκκινήστε ξανά την
Ελληνικά
εφαρογή.
• Ακολουθήστε τα παρακάτω βήατα για να διαορφώσετε τι ρυθίσει του
υπολογιστή σα ε βάση το λειτουργικό του σύστηα.
Windows 7
A. Απενεργοποιήστε το διακοιστή εσολάβηση, αν
είναι ενεργοποιηένο.
1. Κάντε κλικ στο κουπί Start (Έναρξη) > Internet Explorer για να εκκινήσετε την εφαρογή περιήγηση στο
διαδίκτυο.
2. Κάντε κλικ στο κουπί Tools (Εργαλεία) > Internet op-
tions (Επιλογέ
Internet) > καρτέλα Connections (Συνδέσει) > LAN
settings (Ρυθίσει LAN).
3. Από την οθόνη Ρυθίσει τοπικού δικτύου (LAN),
καταργήστε την επιλογή Use a proxy server for your
LAN (Χρήση διακοιστή εσολάβηση για το LAN).
4. Κάντε κλικ στο OK όταν τελειώσετε.
B. Ορίστε τι ρυθίσει TCP/IP για αυτόατη απόδοση
διεύθυνση IP.
1. Κάντε κλικ στο κουπί Start (Έναρξη) > Control Panel
(Πίνακα Ελέγχου) > Network and Internet (ίκτυο
και Internet) > Network and Sharing Center (Κέντρο
δικτύου και κοινή χρήση) > Manage network connections (ιαχείριση συνδέσεων δικτύου).
2. Επιλέξτε Internet Protocol Version 4 (TCP/IPv4)
[Πρωτόκολλο Internet Έκδοση 4 (TCP/IPv4)] στη
συνέχεια κάντε κλικ στο Properties (Ιδιότητε).
3. Επιλέξτε Obtain an IP address automatically
(Αυτόατη εξασφάλιση διεύθυνση ΙΡ).
4. Κάντε κλικ στο OK όταν τελειώσετε.
72
Page 73

Γ. Απενεργοποιήστε τη σύνδεση έσω τηλεφώνου, αν
είναι ενεργοποιηένη.
1. Κάντε κλικ στο κουπί Start (Έναρξη) > Internet Explorer για να εκκινήσετε την εφαρογή περιήγηση στο
διαδίκτυο.
2. Κάντε κλικ στο κουπί Tools (Εργαλεία) > Internet op-
tions (Επιλογέ
Internet) > καρτέλα Connections (Συνδέσει).
3. Επιλέξτε Never dial a connection (Να ην γίνεται ποτέ
κλήση ια σύνδεση).
4. Κάντε κλικ στο OK όταν τελειώσετε.
Mac 10.5.8
A. Απενεργοποιήστε το διακοιστή εσολάβηση, αν είναι ενεργοποιηένο.
1. Από τη γραή ενού, κάντε κλικ στο Safari
> Preferences... (Προτιήσει...) > καρτέλα
Advanced (Για προχωρηένου).
2. Κάντε κλικ στο κουπί Change Settings...
(Αλλαγή ρυθίσεων...) στο πεδίο Proxies
(ιακοιστέ εσολάβηση).
3. Από τη λίστα ε τα πρωτόκολλα, καταργήστε
την επιλογή FTP Proxy (ιακοιστή
εσολάβηση FTP) και Web Proxy (HTTPS)
[ιακοιστή εσολάβηση Web (HTTPS)].
4. Κάντε κλικ στο OK όταν τελειώσετε.
B. Ορίστε τι ρυθίσει TCP/IP για αυτόατη
απόδοση διεύθυνση IP.
1. Κάντε κλικ στο εικονίδιο τη Apple > System Preferences (Προτιήσει συστήατο)
> Network (ίκτυο).
2. Επιλέξτε Ethernet και Using DHCP (Χρήση
DHCP) στο πεδίο Congure (ιαόρφωση).
3. Κάντε κλικ στο Apply(Εφαρογή) όταν
τελειώσετε.
Ελληνικά
ΣΗΜΕΙΣΗ: Ανατρέξτε στη λειτουργία βοήθεια και υποστήριξη του λειτουργικού
σα συστήατο για λεπτοέρειε σχετικά ε τη διαόρφωση των ρυθίσεων
TCP/IP του υπολογιστή σα και την απενεργοποίηση των ρυθίσεων του διακοιστή
εσολάβηση ή τη σύνδεση έσω τηλεφώνου.
73
Page 74

ΕΡ2: Η ταχύτητα τη ασύρατη σύνδεσή ου είναι όνο 145 Mbps.
• Ελέγξτε αν η κάρτα δικτύου ή αν η ενσωατωένη ασύρατη λειτουργία του
υπολογιστή διαθέτει δυνατότητα σύνδεση στα 300 Mbps.
• Από προεπιλογή, τα προϊόντα ε πιστοποίηση Wi-Fi τύπου n είναι διαορφωένα
Ελληνικά
να λειτουργούν χρησιοποιώντα κανάλια 20 MHz. Για να αλλάξετε το εύρο
ζώνη καναλιού από τα 20 MHz στα 20/40 MHz και να εγιστοποιήσετε την
ασύρατη ταχύτητα, πηγαίνετε στην επιλογή Advanced Setting (Ρυθίσει
για προχωρηένου) > Wireless (Ασύρατο δίκτυο) > General (Γενικά) στη
διαδικτυακή διεπαφή χρήστη του ασύρατου δροολογητή.
ΕΡ3: Έχω ξεχάσει το όνοα του δικτύου ή κλειδιά ασφαλεία.
• Προσπαθήστε να δηιουργήσετε την ενσύρατη σύνδεση και να διαορφώσετε ξανά
τι ρυθίσει κρυπτογράφηση.
• Πατήστε το κουπί Επαναφορά για περισσότερο από πέντε δευτερόλεπτα για
επαναφορά του δροολογητή στι εργοστασιακέ προεπιλεγένε ρυθίσει.
• Εργοστασιακέ προεπιλεγένε ρυθίσει:
Όνοα χρήστη /
Κωδικό πρόσβαση:
admin / admin
ΕΡ4: Πού πορώ να βρω περισσότερε πληροφορίε για τον ασύρατο δροολογητή;
• Εγχειρίδιο χρήστη στο CD υποστήριξη
• Ιστότοπο για Συχνέ ερωτήσει (FAQ): http://support.asus.com/faq
• Ιστότοπο τεχνική υποστήριξη: http://support-org.asus.com/
• Τηλεφωνική γραή εξυπηρέτηση πελατών: Ανατρέξτε στην τηλεφωνική γραή
υποστήριξη στον Συπληρωατικό Οδηγό.
ΣΗΜΑΝΤΙΚΟ! Σηειώστε σε ένα χαρτί τι πληροφορίε για τι ασύρατε ρυθίσει
σα και φυλάξτε το σε ια ασφαλή τοποθεσία.
ιεύθυνση IP:
192.168.1.1
SSID: ASUS
74
Ασύρατε ρυθίσει 2,4GHz
Όνοα δικτύου(SSID):
Κλειδί ασφαλεία:
Ασύρατε ρυθίσει 5GHz
Όνοα δικτύου (SSID):
Κλειδί ασφαλεία:
Ρυθίσει δροολογητή
Όνοα χρήστη :
Κωδικό πρόσβαση:
Page 75

Gyors áttekintés
Magyar
1
2
3
4
5
6
1) USB LED 5) 2.4GHz LED 9)
2) LAN LED 6) Bekapcsolt állapot LED 10) WAN (Internet) port*
3) WAN LED 7)
4) 5GHz LED 8) Alaphelyzet gomb 12) WPS gomb
portok USB 2.0
10
11
7
8
12
9
LAN portok 1 ~ 4*
Tápcsatlakozó (DC-In)
11)
bemenet
MEGJEGYZÉS: *A WAN és LAN portokon két-két LED található. Sárga LED: Gigabites
kapcsolat. Zöld LED: 10/100Mb-es kapcsolat.
A vezeték nélküli router
RT-N56URT-N56U Hálózati kábel
Hálózati adapterHálózati adapter Gyors üzembe helyezési útmutatóGyors üzembe helyezési útmutató Garanciajegy
Támogató CD (kézikönyv, segédprogramok)
MEGJEGYZÉS: amennyiben a tételek közül bármelyik sérült vagy hiányzik, lépjen
kapcsolatba a forgalmazóval.
75
Page 76

Modem
Első lépések
Mo
d
em
1.
Húzza ki és válassza le a vezetékeket/kábeleket meglévő modemérőlHúzza ki és válassza le a vezetékeket/kábeleket meglévő modeméről
Magyar
a
b
FIGYELEM! Győződjön meg arról, hogy kábel-/ADSL-modeme legalább két perce ki
van kapcsolva.
a: Húzza ki a hálózati adaptert a csatlakozóaljzatból, majd válassza le kábel-/ADSL-
modeméről.
b: Válassza a hálózati kábelt kábel-/ADSL-modeméről.
2. Állítsa be a vezeték nélküli környezetet.
76
d
b
c
a
Page 77

a: Húzza ki a hálózati adaptert a csatlakozóaljzatból, majd válassza le kábel-/ADSL-
modeméről.
b: Válassza a hálózati kábelt kábel-/ADSL-modeméről.
FONTOS! Győződjön meg arról, hogy a WAN és LAN LED-ek villognak.
c: Egy másik hálózati kábel segítségével kösse össze a modemet a vezeték nélküli router
WAN csatlakozójával.
d: Csatlakoztassa a modem hálózati adapterét a DC tápcsatlakozó aljzathoz, majd dugja
a fali aljzatba.
3. Kongurálja a vezeték nélküli beállításokat a web-alapú grakus felhasználói felület Kongurálja a vezeték nélküli beállításokat a web-alapú grakus felhasználói felületKongurálja a vezeték nélküli beállításokat a web-alapú grakus felhasználói felület
(web GUI) segítségével.
Hungarian
a
a: Indítsa el a böngészőprogramot, például Internet Explorer, Google Chrome vagy
Firefox.
b: Kövesse az Quick Internet Setup (QIS) lépéseit.
MEGJEGYZÉSEK::
• Ha nem indul el a vezeték nélküli router GUI-ja, billentyűzze be aHa nem indul el a vezeték nélküli router GUI-ja, billentyűzze be a
http://192.168.1.1 címet a böngészője címsorába és jelentkezzen be az admin
alapértelmezett felhasználónévvel és admin jelszóval.
• Tiltsa le a proxy beállításokat, a betárcsázós kapcsolatot és úgy végezze el a TCP/IPTiltsa le a proxy beállításokat, a betárcsázós kapcsolatot és úgy végezze el a TCP/IP
beállításokat, hogy az IP-címet automatikusan lekérje. További információkért olvassa
el a
Hibaelhárítás
varázslót az automata diagnosztikához.
című fejezetet, vagy használja a támogató CD-n lévő Beállító
b
77
Page 78

Hibaelhárítás
K1: Nem tudom elérni a web GUI-t, amivel kongurálhatnám a vezeték nélküli router Nem tudom elérni a web GUI-t, amivel kongurálhatnám a vezeték nélküli routerNem tudom elérni a web GUI-t, amivel kongurálhatnám a vezeték nélküli router
beállításait.
Magyar
• Zárja be az összes futó böngészőprogramot és indítsa el újra.
• Kövesse az alábbi lépéseket a számítógép beállításainak kongurálásához a rá
telepített operációs rendszernek megfelelően.
MEGJEGYZÉS: Tekintse meg a Kiegészítő útmutatóban
található képernyőképeket.
Windows 7
A. Tiltsa le a proxy-szervert, ha engedélyezve van.
1. Kattintson a Start > Internet Explorer elemre a
böngészőprogram indításához.
2. Kattintson a Tools (Eszközök) > Internet options
(Internetbeállítások) > Connections (Kapcsolatok) fül
> LAN settings (Helyi hálózati beállítások) elemre.
3. A Local Area Network (LAN) Settings (Helyi hálózati [LAN] A Local Area Network (LAN) Settings (Helyi hálózati [LAN]A Local Area Network (LAN) Settings (Helyi hálózati [LAN]
beállítások) képernyőn szüntesse meg a Use a proxy
server for your LAN (Proxykiszolgáló használata a
helyi hálózaton) jelölőnégyzet bejelölését.
4. Kattintson az OK gombra, ha végzett.
B. Végezze el a TCP/IP beállításokat, hogy az IP-címet
automatikusan lekérje.
1. Kattintson a Start > Control Panel (Vezérlőpult)
> Network and Internet (Hálózat és internet) >
Network and Sharing Center (Hálózati és megosztási
központ) > Manage network connections (Hálózati
kapcsolatok kezelése) elemre.
2. Jelölje ki az Internet Protocol Version 4 (TCP/IPv4)
(A TCP/IP protokoll 4-es verziója (TCP/IPv4)) elemet,
majd kattintson a Properties (Tulajdonságok) gombra.
3. Jelölje be az Obtain an IP address automatically (IP-
cím automatikus kérése) jelölőnégyzetet.
4. Kattintson az OK gombra, ha végzett.
78
Page 79

C. Tiltsa le a betárcsázós kapcsolatot, ha engedélyezve
van.
1. Kattintson a Start > Internet Explorer elemre a
böngészőprogram indításához.
2. Kattintson a Tools (Eszközök) > Internet options
(Internetbeállítások) > Connections (Kapcsolatok)
fülre.
3. Jelölje be a Jelölje be aJelölje be a Never dial a connection (Nincs
automatikus tárcsázás) jelölőnégyzetet.
4. Kattintson az OK gombra, ha végzett.
Mac 10.5.8
A. Tiltsa le a proxy-szervert, ha engedélyezve
van.
1. A menüsoron kattintson a A menüsoron kattintson aA menüsoron kattintson a Safari >
Preferences... (Beállítások...) > Advanced
(Speciális) fülre.
2. Kattintson Change Settings... (Beállítások
módosítása...)
3. A protokoll-listán szüntesse meg az FTP Proxy
és Web Proxy (HTTPS) elemek bejelölését.
4. Kattintson az OK gombra, ha végzett.
B. Végezze el a TCP/IP beállításokat, hogy az
IP-címet automatikusan lekérje.
1. Kattinson az Apple ikonra > System
Preferences (Rendszer-beállítások) >
Network (Hálózat) elemre.
2. Jelölje ki az Ethernet elemet, majd a Using
DHCP (DHCP használata) elemet a Congure
(Kongurálás) mezőben.
3. Kattintson az Apply(Alkalmaz) gombra, ha
végzett.
Hungarian
MEGJEGYZÉS: Tekintse meg operációs rendszere súgó és támogatás szolgáltatását a
számítógép TCP/IP beállításainak kongurálását és a proxy szerver beállítások, illetve a
betárcsázós kapcsolat letiltását illetően.
79
Page 80

K2: A vezeték nélküli kapcsolatom sebessége csak 145 Mbps.
• Ellenőrizze, hogy hálózati kártyája vagy számítógépének beépített vezeték nélküli
szolgáltatása képes-e kezelni a 300 Mbps kapcsolatot.
• Alapértelmezésképpen az n minősítésű Wi-Fi termékek 20 MHz-es csatornákon történő
Magyar
kommunikációhoz vannak konfigurálva. Ahhoz, hogy a csatorna sávszélességét
20 MHz-ről 20/40 MHz-re módosítsa és maximális értékre álítsa a vezeték nélküli
átbocsátási képességet, lépjen az Advanced Setting (Speciális beállítások) >
Wireless (Vezeték nélküli) > General (Általános) elemre a vezeték nélküli router
webes GUI-ján.
K3: Elfelejtette a hálózatnevet vagy a biztonsági kulcsokat.
• Próbálkozzon vezetékes kapcsolat létesítésével, majd a titkosítás ismételt beállításával.
• Tartsa lenyomva a Reset (Alaphelyzet) gombot több mint öt másodpercig, hogy a
rendszert alaphelyzetre vagy a gyári alapértelmezett értékekre állítsa vissza.
• Gyári alapbeállítások:
Felhasználónév / jelszó:
admin / admin
IP-cím:
192.168.1.1
SSID: ASUS
K4: Hol találhatok további információt a vezeték nélküli routerrel kapcsolatban?
• Használati utasítás a támogató CD-n
• Online GYIK oldal: http://support.asus.com/faq
• Műszaki támogatás oldal: http://support-org.asus.com/
• Ügyfélszolgálati forróvonal: Tekintse meg a Kiegészítő útmutatóban található
Támogatási forróvonalat
FONTOS! Írja le vezeték nélküli beállításainak részleteit és tartsa biztonságos helyen.
80
Hálózat neve (SSID):
2,4 GHz vezeték nélküli beállítások
Biztonsági kulcs:
5GHz vezeték nélküli beállításokvezeték nélküli beállítások
Hálózat neve (SSID):
Biztonsági kulcs:
Router beállítások
Felhasználónév::
jelszó::
Page 81

Ātrs pārskats
Latvisk
1
2
3
4
5
6
1) USB LED 5) 2,4 GHz LED 9) LAN 1 ~ 4 porti*
2) LAN LED 6) Barošanas LED 10) WAN (Interneta) ports*
3) WAN LED 7) USB 2.0 porti 11)
4) 5 GHz LED 8) Atiestatīšanas poga 12) WPS poga
7
8
12
9
10
11
Barošanas (maiņstrāvas
ievades) ports
PIEZĪME: *WAN un LAN portos ir katrā divas LED (gaismas diodes). Dzeltenā LED
apzīmē gigabitu savienojumu. Zaļā LED apzīmē 10/100 Mb savienojumu.
Iepakojuma saturs
RT-N56U Tīkla kabelis Atbalsta CD (Lietotāja rokasgrāmata/utilītas)
Maiņstrāvas adapteris Padomi ātrai darba uzsākšanai Garantijas karte
PIEZĪME: Ja kāda no šīm lietām ir bojāta vai pazudusi, sazinieties ar pārdevēju.
81
Page 82

Modem
Sākam rīkoties
Mo
d
em
1. Izvelciet un atvienojiet vadus/kabeļus no jūsu esošā modema pieslēguma Izvelciet un atvienojiet vadus/kabeļus no jūsu esošā modema pieslēgumaIzvelciet un atvienojiet vadus/kabeļus no jūsu esošā modema pieslēguma
Latvisk
a
b
BRĪDINĀJUMS! Pārliecinieties, ka jūsu kabeļa/ADSL modems pirms tam bijis izslēgts
vismaz 2 minūtes.
a: Izvelciet maiņstrāvas adapteri no kontaktligzdas un atvienojiet to no jūsu kabeļa/ADSL
modema.
b: Atvienojiet tīkla kabeli no jūsu kabeļa/ADSL modema.
2. Iestatiet savu bezvadu vidi.
82
d
b
c
a
Page 83

a: Ievietojiet sava bezvadu maršrutētāja maiņstrāvas adaptera līdzstrāvas izvadu
maršrutētāja līdzstrāvas ievades portā un pievienojiet adapteri maiņstrāvas
kontaktligzdai.
b: Izmantojot tīkla kabeli, savienojiet savu datoru ar bezvadu maršrutētāja LAN portu.
SVARĪGI IEVĒROT! Pārliecinieties, ka WAN un LAN LED mirgo.
c: Izmantojot tīkla kabeli, savienojiet savu modemu ar bezvadu maršrutētāja WAN portu.
d: Ievietojiet sava modema maiņstrāvas adaptera līdzstrāvas izvadu līdzstrāvas ievades
portā un pievienojiet adapteri maiņstrāvas kontaktligzdai.
3. Kongurējiet savus bezvadu iestatījumus ar tīmekļa graskās saskarnes (web GUI) Kongurējiet savus bezvadu iestatījumus ar tīmekļa graskās saskarnes (web GUI)Kongurējiet savus bezvadu iestatījumus ar tīmekļa graskās saskarnes (web GUI)
palīdzību.
Latvisk
a
a: Palaidiet savu tīmekļa pārlūku, piemēram, Internet Explorer, Google Chrome vai
Firefox.
b: Veiciet ātrās interneta iestatīšanas (Quick Internet Setup = QIS) soļus.
PIEZĪMES::
• Ja jūsu bezvadu maršrutētāja web GUI nav palaižams, ievadietJa jūsu bezvadu maršrutētāja web GUI nav palaižams, ievadiet http://192.168.1.1
tīmekļa pārlūkā, un piesakieties, izmantojot šo noklusējuma lietotājvārdu: admin
un paroli: admin.
• Atspējojiet starpniekswervera iestatījumus, iezvanpieejas savienojumu un Atspējojiet starpniekswervera iestatījumus, iezvanpieejas savienojumu unAtspējojiet starpniekswervera iestatījumus, iezvanpieejas savienojumu un
iestatiet savu TCP/IP automātiskai IP adreses saņemšanai. Sīkāk skatieties
Traucējumnovēršanas
atbalsta CD automātiskai diagnostikai.
sadaļā vai izmantojiet Iestatīšanas vedni (Setup Wizard) no
b
83
Page 84

Traucējumnovēršana
1. jautājums: Es nevaru piekļūt tīmekļa graskajai saskarnei, lai kongurētu maršrutētāja Es nevaru piekļūt tīmekļa graskajai saskarnei, lai kongurētu maršrutētājaEs nevaru piekļūt tīmekļa graskajai saskarnei, lai kongurētu maršrutētāja
Latvisk
• Aizveriet visus atvērtos tīmekļa pārlūkus un palaidiet atkal.
• Veiciet turpmāk norādītos soļus, lai konfigurētu datora iestatījumus, atbilstoši tā
operētājsistēmai.
Windows 7
A. Atspējojiet starpniekserveri, ja tas ir iespējots.
1. Noklikšķiniet uz Start (Sākt) > Internet Explorer, lai
palaistu tīmekļa pārlūku.
2. Noklikšķiniet uz Tools (Rīki) > Internet options
(Interneta opcijas) > Connections (Savienojumi) cilnes
> LAN settings (LAN iestatījumi).
3. Lokālā tīkla (LAN) iestatījumu (Settings) ekrānā noņemiet Lokālā tīkla (LAN) iestatījumu (Settings) ekrānā noņemietLokālā tīkla (LAN) iestatījumu (Settings) ekrānā noņemiet
kāsīti no Use a proxy server for your LAN (Izmantot
starpniekserveri LAN).
4. Noklikšķiniet uz OK, kad tas izdarīts.
B. Iestatiet TCP/IP automātiskai IP adreses saņemšanai.
1. Noklikšķiniet Start (Sākt) > Control Panel (Vadības
panelis) > Network and Internet (Tīkls un Internets) >
Network and Sharing Center (Tīkls un koplietošanas
centrs) > Manage network connections (Pārvaldīt
tīkla savienojumus).
2. Atlasiet Internet Protocol Version 4 (TCP/IPv4)
(Interneta protokola versija 4 (TCP/IPv4)), tad
noklikšķiniet uz Properties (Rekvizīti).
3. Ielieciet kāsīti pie Obtain an IP address automatically
(Automātiski iegūt IP adresi).
4. Noklikšķiniet uz OK, kad tas izdarīts.
iestatījumus.
84
Page 85

C. Atspējot iezvanpieejas savienojumu, ja iespējots.
1. Noklikšķiniet uz Start (Sākt) > Internet Explorer, lai
palaistu tīmekļa pārlūku.
2. Noklikšķiniet uz Tools (Rīki) > Internet options
(Interneta opcijas) > Connections (Savienojumi)
cilnes.
3. Ielieciet kāsīti pie Ielieciet kāsīti pieIelieciet kāsīti pie Never dial a connection (Nekad
nelietot iezvanpieeju).
4. Noklikšķiniet uz OK, kad tas izdarīts.
Mac 10.5.8
A. Atspējojiet starpniekserveri, ja tas ir
iespējots.
1. Izvēlnes joslā noklikšķiniet uz Izvēlnes joslā noklikšķiniet uzIzvēlnes joslā noklikšķiniet uz Safari >
Preferences... > Advanced (Uzlabota) cilnes.
2. Noklikšķiniet uz Change Settings...
(Mainīt iestatījumus...) laukā Proxies
(Starpniekserveri).
3. No protokolu saraksta atatlasiet FTP Proxy
(FTP starpniekserveris) un Web Proxy
(HTTPS) (Tīmekļa starpniekserveris).
4. Noklikšķiniet uz OK, kad tas izdarīts.
B. Iestatiet TCP/IP automātiskai IP adreses
saņemšanai.
1. Noklikšķiniet uz Apple ikonas > System
Preferences (Sistēmas preferences) >
Network (Tīkls).
2. Atlasiet Ethernet un atlasiet Using DHCP
(Lietot DHCP) laukā Congure (Kongurēt).
3. Noklikšķiniet uz Apply(Lietot), kad tas izdarīts.
Latvisk
PIEZĪME: Iepazīstieties ar jūsu operētājsistēmas palīdzības un atbalsta funkciju, lai
uzzinātu sīkāk par jūsu datora TCP/IP iestatījumu kongurēšanu un starpniekservera
iestatījumu vai iezvanpieejas savienojuma atspējošanu.
85
Page 86

2. jautājums: Mana bezvadu savienojuma ātrums ir tikai 145 Mbps.
• Pārbaudiet, vai jūsu tīkla karte vai datorā iebūvētā bezvadu funkcija spēj nodrošināt
300 Mbps savienojumu.
• Pēc noklusējuma Wi-Fi sertificētie n produkti ir konfigurēti darbam, izmantojot 20
Latvisk
MHz kanālus. Lai mainītu kanāla platumu no 20 MHz uz 20/40 MHz un maksimizētu
bezvadu caurlaidību, dodieties uz Advanced Setting (Uzlabotiem iestatījumiem ) >
Wireless (Bezvadu) > General (Vispārējie) sava bezvadu maršrutētāja web GUI.
3. jautājums: Aizmirsu tīkla nosaukumu vai drošības atslēgas.
• Mēģiniet iestatīt tīkla savienojumu ar vadiem un atkal kongurējiet šifrēšanas
iestatījumus.
• Nospiediet pogu Atiestatīt (Reset) ilgāk par 5 sekundēm, lai atiestatītu vai atjaunotu
sistēmu uz rūpnīcas noklusējuma iestatījumiem.
• Rūpnīcas noklusējuma iestatījumi:
Lietotājvārds/Parole:
admin / admin
IP adrese:
192.168.1.1
SSID: ASUS
4. jautājums: Kur es varu atrast plašāku informāciju par bezvadu maršrutētāju?
• Lietotāja rokasgrāmatā atbalsta CD
• Tiešsaistes BUJ (FAQ) vietnē: http://support.asus.com/faq
• Tehniskā atbalsta vietne: http://support-org.asus.com/
• Klientu palīdzības telefons: Lietojiet palīdzības telefonu (Support Hotline), kas norādīts
Papildu rokasgrāmatā (Supplementary Guide).
SVARĪGI IEVĒROT! Pierakstiet ienformāciju par jūsu bezvadu iestatījumiem un turiet
to drošā vietā.
86
Tīkla nosaukums (SSID):
2,4 GHz bezvadu iestatījumi
Tīkla nosaukums (SSID):
5GHz bezvadu iestatījumibezvadu iestatījumi
Tīkla nosaukums (SSID):
Tīkla nosaukums (SSID):
Maršrutētāja iestatījumi
Lietotājvārds::
Parole::
Page 87

Trumpoji apžvalga
Lietuvių
1
2
3
4
5
6
7
8
12
9
10
11
1) USB LED 5) 2,4 GHz LED 9) LAN 1 ~ 4 prievadai*
2) LAN LED 6) Maitinimo LED 10) WAN (interneto) prievadas*
3) WAN LED 7) USB 2.0 prievadai 11)
5 GHz
4)
LED
Paleidimo iš
8)
naujo mygtukas
Maitinimo (nuolatinės srovės įvado)
prievadas
12) WPS mygtukas
PASTABA: * WAN ir LAN prievaduose yra du LED. Geltonas LED žymi gigabitinį ryšį.
Žalias LED žymi 10/100 Mb ryšį.
Pakuotės turinys
RT-N56U Tinklo kabelisTinklo kabelis Pagalbinis kompaktinis diskas (naudotojoPagalbinis kompaktinis diskas (naudotojo
vadovas / paslaugų programos)
Kintamosios srovės adapterisKintamosios srovės adapteris Grei engimo darbui vadovasGrei engimo darbui vadovas Garantijos kortelėGarantijos kortelė
PASTABA: jei kuri nors pakuotės dalis pažeista arba jos nėra, susisiekite su savo
pardavėju.
87
Page 88

Modem
Pradžia
Mo
d
em
1. Iš elektros lizdo ištraukite dabartinio modemo kištuką, nuo modemo atjunkite visus Iš elektros lizdo ištraukite dabartinio modemo kištuką, nuo modemo atjunkite visusIš elektros lizdo ištraukite dabartinio modemo kištuką, nuo modemo atjunkite visus
laidus / kabelius.
Lietuvių
a
b
ĮSPĖJIMAS! Įsitikinkite, ar jūsų kabelinis / ADSL modemas išbuvo išjungtas bent dvi
minutes.
a: Iš lizdo ištraukite kintamosios srovės adapterį, jį atjunkite nuo savo kabelinio / ADSL
modemo.
b: Nuo savo kabelinio / ADSL modemo atjunkite tinklo kabelį.
2. Nustatykite belaidę aplinką.
88
d
b
c
a
Page 89

a: Savo belaidžio maršruto parinktuvo kintamosios srovės adapterį įkiškite į nuolatinės
srovės įėjimo prievadą ir įkiškite į elektros lizdą.
b: Tinklo kabeliu kompiuterį prijunkite prie belaidžio maršruto parinktuvo LAN prievado.
SVARBU! Užtikrinkite, kad WAN ir LAN LED blykčioja.
c: Kitu tinklo kabeliu modemą prijunkite prie belaidžio maršruto parinktuvo WANKitu tinklo kabeliu modemą prijunkite prie belaidžio maršruto parinktuvo WAN
prievado.
d: Savo modemo kintamosios srovės adapterį įkiškite į nuolatinės srovės įėjimo prievadą Savo modemo kintamosios srovės adapterį įkiškite į nuolatinės srovės įėjimo prievadąSavo modemo kintamosios srovės adapterį įkiškite į nuolatinės srovės įėjimo prievadą
ir įkiškite į elektros lizdą.
3. Atlikite belaidžio ryšio sąranką, naudodamiesi saityno grane naudotojo sąsaja Atlikite belaidžio ryšio sąranką, naudodamiesi saityno grane naudotojo sąsajaAtlikite belaidžio ryšio sąranką, naudodamiesi saityno grane naudotojo sąsaja
(saityno GUI).
Lietuvių
a
a: Paleiskite savo saityno naršyklę, pavyzdžiui, „Internet Explorer“, „Google Chrome“ arba
„Firefox“.
b: Atlikite sparčiosios interneto sąrankos (QIS) veiksmus.
PASTABOS::
• Jei nepasileidžia jūsų belaidžio maršruto parinktuvo saityno granė sąsaja, saityno Jei nepasileidžia jūsų belaidžio maršruto parinktuvo saityno granė sąsaja, saitynoJei nepasileidžia jūsų belaidžio maršruto parinktuvo saityno granė sąsaja, saityno
naršyklėje įrašykite http://192.168.1.1 ir prisijunkite, nurodydami kitą numatytąjį
naudotojo vardą admin bei slaptažodį admin.
• Išjunkite tarpinio serverio parametrus ir telefoninį ryšį, nustatykite tokius TCP/IP Išjunkite tarpinio serverio parametrus ir telefoninį ryšį, nustatykite tokius TCP/IPIšjunkite tarpinio serverio parametrus ir telefoninį ryšį, nustatykite tokius TCP/IP
parametrus, kad IP adresas būtų gaunamas automatiškai. Išsamesnės informacijos
rasite skyriuje
kompaktiniame diske, kuris skirtas automatinei diagnostikai, esančiu sąrankos vedliu.
Trikčių šalinimas
, taip pat galite pasinaudoti pagalbiniame
b
89
Page 90

Trikčių šalinimas
1 kl.: Negaliu pasiekti internetinės granės sąsajos ir kongūruoti belaidžio maršruto Negaliu pasiekti internetinės granės sąsajos ir kongūruoti belaidžio maršrutoNegaliu pasiekti internetinės granės sąsajos ir kongūruoti belaidžio maršruto
parinktuvo parametrų.
Lietuvių
• Uždarykite visas veikiančias saityno naršykles ir vėl paleiskite.
• Follow the steps below to congure your computer settings based on its operating
system.
Windows 7
A. Jei įjungtas tarpinis serveris, jį išjunkite.
1. Spustelėkite Start (Pradėti) > Internet Explorer, kad
paleistumėte saityno naršyklę.
2. Spustelėkite Tools (Įrankiai) > Internet options
(Interneto Parinktys) > skirtuką Connections (Ryšiai) >
LAN settings (LAN parametrai).
3. Būdami vietinio tinklo (LAN) parametrų ekrane, nuimkite Būdami vietinio tinklo (LAN) parametrų ekrane, nuimkiteBūdami vietinio tinklo (LAN) parametrų ekrane, nuimkite
žymelę nuo Use a proxy server for your LAN (Naudoti
tarpinį serverį savo LAN).
4. Tai padarę spustelėkite OK (Gerai).
B. TCP/IP parametrus nustatykite taip, kad IP adresas
būtų gaunamas automatiškai.
1. Spustelėkite Start (Pradėti) > Control Panel
(Valdymo skydas) > Network and Internet (Tinklas ir
Internetas) > Network and Sharing Center (Tinklas ir
bendrinimo centras) > Manage network connections
(Tvarkyti tinklo ryšius).
2. Pasirinkite Internet Protocol Version 4 (TCP/IPv4)
(4 interneto protokolo versija) (TCP/IPv4), tada
spustelėkite Properties (Ypatybės).
3. Pažymėkite Obtain an IP address automatically (Gauti
IP adresas automatiškai).
4. Tai padarę spustelėkite OK (Gerai).
90
Page 91

C. Jei įjungtas telefoninis ryšys, jį išjunkite.
1. Spustelėkite Start (Pradėti) > Internet Explorer, kad
paleistumėte saityno naršyklę.
2. Spustelėkite Tools (Įrankiai) > Internet options
(Interneto parinktys) > skirtuką Connections (Ryšiai).
3. Pažymėkite PažymėkitePažymėkite Never dial a connection (Niekada
nesijungti telefonu).
4. Tai padarę spustelėkite OK (Gerai).
Mac 10.5.8
A. Jei įjungtas tarpinis serveris, jį išjunkite.
1. Meniu juostoje spustelėkite Meniu juostoje spustelėkiteMeniu juostoje spustelėkite Safari >
Preferences... (Parinktys...) > skirtuką
Advanced (Papildomos).
2. Laukelyje Proxies (Tarpiniai serveriai)
spustelėkite Change Settings... (Keisti
parametrus...).
3. Protokolų sąraše nuimkite žymelę nuo FTP
Proxy (FTP tarpinis serveris) ir Web Proxy
(HTTPS) (Saityno tarpinis serveris (HTTPS)).
4. Tai padarę spustelėkite OK (Gerai).
B. TCP/IP parametrus nustatykite taip, kad IP
adresas būtų gaunamas automatiškai.
1. Spustelėkite „Apple“ piktogramą > System
Preferences (Sistemos parinktys) > Network
(Tinklas).
2. Pasirinkite Ethernet (Eternetas), tada lauke
Congure (Sąranka) pasirinkite Using DHCP
(Naudojant DHCP).
3. Tai padarę spustelėkite Apply (Taikyti).
Lietuvių
PASTABA: išsamesnės informacijos, kaip atlikti savo kompiuterio TCP/IP parametrų
sąranką, išjungti tarpinio serverio ar telefoninio ryšio parametrus, rasite savo
operacinės sistemos žinyne ir pagalbinių funkcijų aprašymuose.
91
Page 92

2 kl.: mano belaidžio ryšio greitis yra tik 145 MBps.
• Patikrinkite, ar jūsų tinklo tinklo plokštėje arba kompiuteryje esanti belaidžio ryšio
funkcija suderinama su 300 Mbps ryšiu.
• „Wi-Fi“ patvirtintų gaminių numatytasis parametras yra veikti naudojant 20 MHz
Lietuvių
kanalus. Norėdami 20 MHz kanalo pralaidumą pakeisti į 20/40 MHz ir iki maksimumo
padidinti belaidį pralaidumą, savo belaidžio maršruto parinktuvo saityno grafinėje
sąsajoje eikite į Advanced Setting (Papildomi parametrai) > Wireless (Belaidis) >
General (Bendrieji).
3 kl.: pamiršau tinklo pavadinimą arba saugos raktus.
• Pabandykite vėl nustatyti belaidį ryšį ir atlikti šifruotųjų parametrų sąranką.
• Ilgiau kaip penkias sekundes spauskite paleidimo iš naujo mygtuką, kad sistema
pasileistų iš naujo arba būtų atkurti sistemos numatytieji parametrai.
• Gamykloje numatyti parametrai:
Naudotojo vardas /
Slaptažodis: admin / admin
IP adresasadresas:
192.168.1.1
SSID: ASUS
4 kl.: kur galiu rasti daugiau informacijos apie belaidį maršruto parinktuvą?
• Naudotojo vadove, kurį rasite pagalbiniame kompaktiniame diske
• Internetinėje klausimų ir atsakymų svetainėje http://support.asus.com/faq
• Techninės pagalbos svetainėje http://support-org.asus.com/
• Paskambinę į klientų aptarnavimo liniją, žr. pagalbiniame vadove pateiktą informaciją
apie pagalbą telefonu.
SVARBU! Užsirašykite informaciją apie savo belaidžio ryšio parametrus, ją laikykite
saugioje vietoje.
92
Tinklo pavadinimas (SSID):
2,4 GHz belaidžio ryšio parametrai
Saugos raktas:
5 GHz belaidžio ryšio parametrai
Tinklo pavadinimas (SSID):
Saugos raktas:
Maršruto parinktuvo parametrai
Naudotojo vardas::
Slaptažodis::
Page 93

Et overblikk
Norsk
1
2
3
4
5
6
7
8
12
9
10
11
1) USB LED 5) 2,4 GHz LED 9) LAN 1 ~ 4 porter*
2) LAN LED 6) Strøm LED 10) WAN (Internett) port*
3) WAN LED 7) USB 2.0-porter 11) Strømport (DC)
4) 5 GHz LED 8)
Reset (Nullstill)knapp
12) WPS-knapp
MERK: *Det er to LED-lamper i WAN- og LAN-portene. Gul LED betyr Gigabit tilkob-
ling. Grønn LED betyr 10/100 Mb tilkobling.
Innhold i pakken
RT-N56U Nettverkskabel Support CD (Brukerveiledning/verktøy)
AC-adapter Hurtigstartguide Garantikort
MERK: Hvis noen av elementene mangler eller er skadet, kontakt forhandleren din.
93
Page 94

Modem
Komme i gang
Mo
d
em
Norsk
1. Koble fra kablene/ledningene til ditt eksisterende modemoppsett
a
b
ADVARSEL! Sørg for at kabel-/ADSL-modemet har vært slått av i minst to minutter.
a: Koble fra AC-adapteren fra stikkontakten og koble den fra kabel-/ADSL- modemet.
b: Koble nettverkskabelen fra kabel-/ADSL-modemet.
2.
Sett opp det trådløse miljøet.
94
d
b
c
a
Page 95

a: Sett inn den trådløse ruterens AC-adapter i DC-inntaksporten og koble til et strømut-
tak.
b: Med nettverkskabelen, koble datamaskinen til den trådløse ruterens LAN-port.
VIKTIG! Sørg for at WAN og LAN LED-lampene blinker.
c: Med en annen nettverkskabel, koble modemet til den trådløse ruterens Med en annen nettverkskabel, koble modemet til den trådløse ruterensMed en annen nettverkskabel, koble modemet til den trådløse ruterens
WANport.
d: Sett inn modemets AC-adapter i DC-inntaksporten og koble til et strømuttak. Sett inn modemets AC-adapter i DC-inntaksporten og koble til et strømuttak.Sett inn modemets AC-adapter i DC-inntaksporten og koble til et strømuttak.
3. Kongurer de trådløse innstillingene dine via det nettbaserte grensesnittet. Kongurer de trådløse innstillingene dine via det nettbaserte grensesnittet.Kongurer de trådløse innstillingene dine via det nettbaserte grensesnittet.
Norsk
a
a: Start nettleseren din, f.eks. Internet Explorer, Google Chrome eller Firefox.
b: Følg trinnene i Quick Internet Setup (QIS).
MERKNADER:
• Hvis det nettbaserte grensesnittet for den trådløse ruteren ikke starter, taster du
inn http://192.168.1.1 i nettleseren, og logger på med
standardbrukernavn: admin og passord: admin.
• Deaktiver proxy-innstillingene, ekstern oppringing, og sett opp
TCP/IP-innstillingene til å automatisk hente inn en IP-adresse. For mer informasjon,
henvis til
automatisk problemløsning.
Feilsøking
-delen eller bruk oppsettsveiviseren på support CD-en for
b
95
Page 96

Feilsøking
Sp1: Jeg kan ikke få tilgang til det nettbaserte grensesnittet for å kongurere innstillingene Jeg kan ikke få tilgang til det nettbaserte grensesnittet for å kongurere innstillingeneJeg kan ikke få tilgang til det nettbaserte grensesnittet for å kongurere innstillingene
Norsk
på den trådløse ruteren.
• Lukk alle nettlesere som kjører og start dem på nytt.
• Følg trinnene under for å kongurere datamaskininnstillingene dine basert på versjonen av operativsystemet.
Windows 7
A. Deaktiver proxyserveren, hvis denne er aktivert.
1. Klikk på Start > Internet Explorer for å åpne nettleseren.
2. Klikk på Tools (Verktøy) > Internet options (Alternati-
ver for Internett) >
Connections (Tilkoblinger)-kategorien > LAN settings
(LAN-innstillinger).
3. Fra Local Area Network (LAN) Settings (Innstillinger for Fra Local Area Network (LAN) Settings (Innstillinger forFra Local Area Network (LAN) Settings (Innstillinger for
lokalt nettverk)
-skjermen, ern krysset for Use a proxy server for your
LAN (Bruk en proxy-server til lokalnettet).
4. Klikk på OK når du er ferdig.
B. Still inn TCP/IP-innstillingene til å automatisk innhen-
te en IP-adresse.
1. Klikk på Start > Control Panel (Kontrollpanel) >
Network and Internet (Nettverk og Internett) >
Network and Sharing Center (Nettverks- og delingssenter) > Manage network connections (Administrere nettverkstilkoblinger).
2. Velg Internet Protocol Version 4(TCP/IPv4) og klikk
deretter på Properties (Egenskaper).
3. Kryss av for Obtain an IP address automatically
(Motta IP-adresse automatisk).
4. Klikk på OK når du er ferdig.
96
Page 97

C. Deaktver den eksterne oppringingen, hvis denne er
aktivert.
1. Klikk på Start > Internet Explorer for å åpne nettleseren.
2. Klikk på Tools (Verktøy) > Internet options (Alternati-
ver for Internett) > Connections (Tilkoblinger)-kategorien.
3. Kryss av for Kryss av forKryss av for Never dial a connection (Slå aldri opp et
nummer).
4. Klikk på OK når du er ferdig.
Mac 10.5.8
A. Deaktiver proxyserveren, hvis denne er
aktivert.
1. Fra menylinjen, klikk på Fra menylinjen, klikk påFra menylinjen, klikk på Safari > Preferences...
(Valg...) > Kategorien Advanced (Avansert).
2. Klikk på Change Settings... (Endre innstillinger...) i feltet Proxies (Proxyer).
3. Fra listen over protokoller, fravelg FTP Proxy
og Web Proxy (HTTPS).
4. Klikk på OK når du er ferdig.
B. Still inn TCP/IP-innstillingene til å automa-
tisk innhente en IP-adresse.
1. Klikk på Apple-ikonet > System Preferences (Systemvalg) > Network (Nettverk).
2. Velg Ethernet og velg Using DHCP (Med
DHCP) i feltet Congure
(Kongurer).
3. Klikk på Apply (Bruk) når du er ferdig.
Norsk
MERK: Henvis til operativsystemets hjelp og støttefunksjon for detaljer om kongu-
rering av datamaskinens TCP/IP-innstillinger og deaktivering av proxyserverinnstillingene eller den eksterne oppringingen.
97
Page 98

Sp2: Min trådløse tilkoblingshastighet er bare 145 Mbps.
• Sjekk om nettverkskortet eller datamaskinens innebygde trådløse funksjon har en
Norsk
kapasitet på 300 Mbps.
• Som standard, er Wi-Fi-sertifiserte n-produkter bare konfigurert til å bruke 20 MHzkanaler. For å endre kanalbåndbredden fra 20 MHz til 20/40 MHz og dra mest ut av det
trådløse signalet, gå til Advanced Setting (Avansert innstilling) > Wireless (Trådløs)
> General (Generelt) i det nettbaserte grensesnittet til den trådløse ruteren.
Sp3: Nettverksnavn eller sikkerhetsnøkler er glemt.
• Prøv å sette opp den kablede tilkoblingen og kongurer krypteringsinnstillingene på
nytt.
• Trykk på Reset-knappen i mer enn fem sekunder for å nullstille eller gjenopprette
systemet til fabrikkinnstillingene.
• Fabrikkinnstillinger:
Brukernavn/passord:
admin / admin
Sp4: Hvor kan jeg nne mer informasjon om den trådløse ruteren?
• Bruksanvisning i support CD-en
• Online side med spørsmål og svar: http://support.asus.com/faq
• Side for teknisk støtte: http://support-org.asus.com/
• Kundehjelp: Henvis til støttetelefonnummeret i tilleggsguiden
VIKTIG! Skriv ned informasjonen for dine trådløse innstillinger og oppbevar denne
informasjonen på en trygg plass.
Nettverksnavn(SSID):
Sikkerhetsnøkkel:
Nettverksnavn (SSID): (SSID):
Sikkerhetsnøkkel::
Brukernavn::
passord::
IP-adresse:
192.168.1.1
2,4 GHz trådløse innstillinger
5GHz trådløse innstillingertrådløse innstillinger
Ruterinnstillingers
SSID: ASUS
98
Page 99

Szybki przegląd
Polski
1
2
3
4
5
6
7
8
12
9
10
11
1) Dioda LED USB 5) Dioda LED 2.4GHz 9) LAN 1 ~ 4 porty*
2) Dioda LED LAN 6) Dioda LED zasilania 10) Port WAN (Internet)*
3) Dioda LED WAN 7) Porty USB 2.0 11)
Port zasilania (DC-In (Wejście
prądu zmiennego)
4) 5GHz LED 8) Przycisk Reset 12) Przycisk WPS
UWAGA: *W gniazdach sieci WAN i LAN znajdują się dwie diody świecące. Żółta dioda
oznacza połączenie gigabitowe. Zielona dioda oznacza połączenie 10/100Mb.
Zawartość opakowania
RT-N56U
Adapter zasilania Instrukcja szybkiego uruchomienia Karta gwarancyjna Karta gwarancyjna
Kabel sieciowy Pomocniczy dysk CD (podręcznik, narzędzia)
UWAGA: W przypadku uszkodzenia lub braku któregoś z elementów skontaktuj się ze
sprzedawcą.
99
Page 100

Modem
Wprowadzenie
Mo
d
em
1.
Polski
Wyciągnąć wtyczki i odłączyć kable/przewody od istniejącego modemu
a
b
OSTRZEŻENIE! Pamiętać o tym, aby modem kablowy/ADSL był wyłączony przez co
najmniej dwie minuty.
a: Wyłączyć zasilacz z gniazdka sieciowego i odłączyć go od modemu kablowego/ADSL.
b: Odłączyć kabel sieciowy od modemu kablowego/ADSL.
2. Skonguruj środowisko bezprzewodowe.
100
d
b
c
a
 Loading...