

Page 1

Kullanma Kılavuzu
RT-N12 Serisi
Superspeed Kablosuz N Yönlendiricisi
Page 2

TR7901
Birinci Baskı
Aralık 2012
Telif Hakkı © 2012 ASUSTeK COMPUTER INC. Tüm hakları saklıdır.
Bu el kitabının hiçbir bölümü, onun içinde tanımlanan yazılım ve de ürünler
de dahil olmak üzere, ASUSTeK COMPUTER INC. (“ASUS”) rmasının açık bir
biçimde yazılı izni olmaksızın, satın alan kişi tarafından yedekleme amaçlı olarak
tutulan dokümantasyon haricinde yeniden üretilemez, aktarılamaz, kopya
edilemez, bir bilgi işlem sistemi içinde depolanamaz, ya da her hangi bir şekilde
ya da hiçbir biçimde hiçbir dile tercüme edilemez.
Aşağıdaki durumlarda ürün garantisi veya servisi uzatılmayacaktır: (1) ASUS
tarafından yazılı olarak onaylanmadıkça, ürünün onarılması, değiştirilmesi; veya
(2) ürünün seri numarasının okunmaz durumda olması veya hiç olmaması.
ASUS BU EL KİTABINI, BELİRLİ BİR AMAÇ İÇİN TİCARETE ELVERİŞLİ NİTELİĞİN
YA UYGUNLUĞUN ZIMNİ GARANTİLER YA DA KOŞULLARI DA DAHİL OLMAK
ÜZERE YA DA BUNLARLA SINIRLI OLMAMAK KAYDIYLA YA AÇIK BİR ŞEKİLDE
YA DA ZIMNEN HER HANGİ BİR TÜRÜN GARANTİSİ OLMAKSIZIN “OLDUĞU
GİBİ” SAĞLAR. HİÇBİR DURUMDA ASUS, ONUN DİREKTÖRLERİ, MEMURLARI,
ÇALIŞANLARI YA DA ACENTELERİ, BU EL KİTABI YA DA ÜRÜN İÇERİSİNDE HER
HANGİ BİR KUSUR YA DA HATADAN DOĞAN BU TÜR ZARARLARIN MEYDANA
GELME OLASILIĞINI TAVSİYE ETMİŞ OLSA DAHİ, HER HANGİ BİR DOLAYLI,
ÖZEL, TESADÜFİ YA DA SONUÇSAL ZARARLARDAN ( KAR KAYIPLARI, İŞ KAYBI,
KULLANIM YA DA VERİ KAYBI, İŞİN KESİNTİYE UĞRAMASI VE DE BENZERİ GİBİ
ZARARLAR DA DAHİL OLMAK ÜZERE ) ÖTÜRÜ SORUMLU TUTULAMAZ.
BU EL KİTABI İÇİNDE YER ALAN SPESİFİKASYONLAR VE DE BİLGİ SADECE
BİLGİLENDİRME AMAÇLI OLARAK TEDARİK EDİLMİŞTİR VE DE HER HANGİ BİR
BİLDİRİMDE BULUNULMAKSIZIN HER HANGİ BİR ZAMANDA DEĞİŞTİRİLMEYE
TABİİDİR, VE DE ASUS TARAFINDAN BİR TAAHHÜT ŞEKLİNDE YORUMLANAMAZ.
ASUS BU EL KİTABINDA VE DE ONUN İÇİNDE TANIMLANAN YAZILIM VE DE
ÜRÜNLERDE DE DAHİL OLMAK ÜZERE GÖRÜNEN HER HANGİ BİR HATA YA DA
KUSURLARDAN ÖTÜRÜ HİÇBİR YÜKÜMLÜLÜK YA DA SORUMLULUK ÜSTLENMEZ.
Bu el kitabı içinde görünen ürünler ve de kurum isimleri, onların şirketlerinin
tescilli ticari markaları ya da telif hakları olabilir ya da olmayabilir ve de ihlal
amaçlı olmaksızın sadece tanıtım ya da açıklama amaçlı olarak ve de mal
sahibinin yararına kullanılmaktadır.
2
Page 3

İçindekiler Tablosu
1 Hızlı bakış 5
Paket içeriği.................................................................................................... 5
Donanım özellikleri ..................................................................................... 6
2 Kablosuz ağınızı kurma 11
Yönlendiricinizi yerleştirme....................................................................11
İhtiyacınız olanlar .......................................................................................12
Kablosuz yönlendiricinizi kurma ..........................................................12
Wired connection ...............................................................................13
Kablosuz bağlantı ..............................................................................15
Devam etmeden önce ......................................................................17
A. Etkin ise proxy sunucusunu engelleyin. ...........................17
B. Otomatik olarak bir IP adresi almak için TCP/IP ayarlarını
yapın. ................................................................................ 19
C. Etkinse çevirmeli bağlantıyı engelleyin. ...........................21
3 Web GUI üzerinden yapılandırma 22
Eeb GUI oturum açma ..............................................................................22
İnternet bağlantısının ayarlanması .....................................................23
Oto-algılamalı Hızlı İnternet Ayarı (QIS) .....................................24
Kablosuz güvenlik ayarlarını ayarlama ..............................................29
Tx Güç ayarı (Sadece RT-N12 HP için) .................................................31
Konuk Ağınızı Oluşturma ........................................................................32
Trak Yöneticisini Kullanma ...................................................................34
QoS (Hizmet Kalitesi) Bant Genişliğini Yönetme .....................34
Trak İzleme .........................................................................................36
3
Page 4

İçindekiler Tablosu
Gelişmiş ayarların yapılandırılması ......................................................37
DHCP Sunucusunu ayarlama .........................................................37
Ürün yazılımını güncelleştirme .....................................................39
Ayarları Geri Yükleme/Kaydetme/Karşıya Yükleme ................40
4 Programların kullanımı 41
Device Discovery .......................................................................................41
Firmware Restoration ...............................................................................42
5 Sorun giderme 44
Sorun giderme ............................................................................................44
ASUS DDNS Hizmeti .................................................................................48
Sık Sorulan Sorular (SSS'lar) ............................................................48
Ekler 50
Uyarılar ..........................................................................................................50
Ağ Küresel Yardım Hattı Bilgisi ..............................................................64
İrtibat Bilgileri ....................................................................... 66
4
Page 5
1 Hızlı bakış
Paket içeriği
RT-N12 Kablosuz Yönlendirici
Ağ kablosu (RJ-45)
Güç adaptörü
Hızlı Başlangıç Kılavuzu
Garanti kartı
• RT-N12 Serisi kablosuz yönlendiriciye RT-N12 D1 ve RT-N12 HP
modelleri dahildir. Bu kılavuz her iki modelin de özelliklerini
tartışmaktadır.
• Herhangi bir öğe hasar görmüşse veya yoksa, teknik yardım
ve destek almak için ASUS ile temasa geçin, Bu kullanım
kılavuzunun arkasında bulunan ASUS Destek Hattına bakınız.
• Onarım ya da değiştirme gibi garanti hizmetlerinden
faydalanmak isterseniz, ürünün orijinal ambalaj malzemelerini
saklayın.
5
Page 6
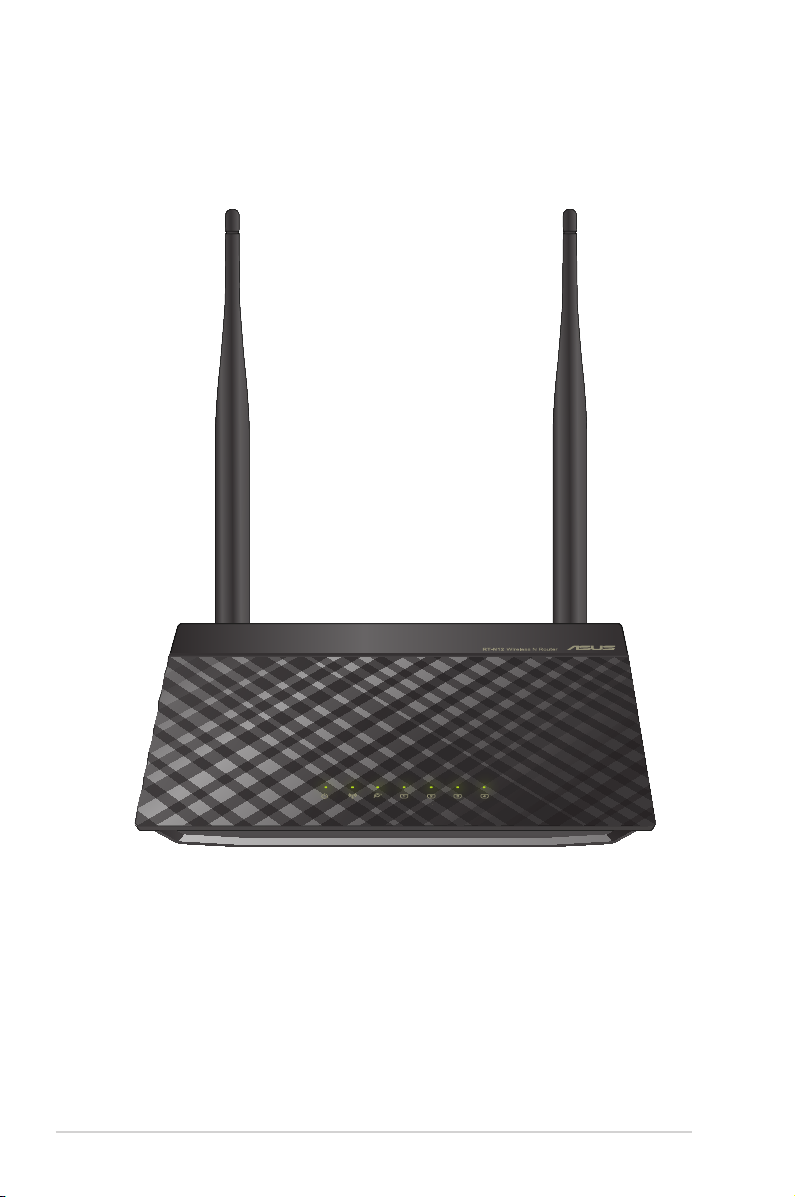
Donanım özellikleri
Ön
6
Page 7
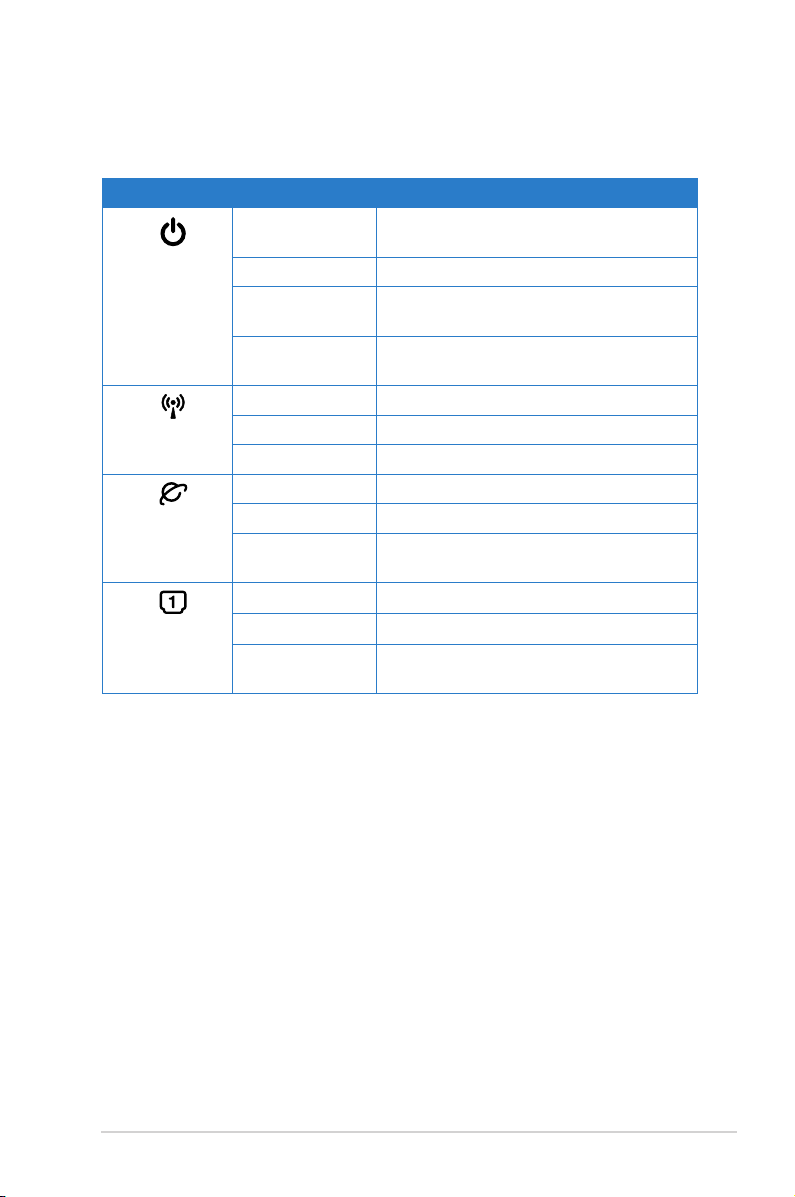
Durum göstergeleri
LED Durum Gösterge
Kapalı Herhangi bir güç veya kablosuz sinyal
Power (Güç)
(Kablosuz)
WAN (Geniş
Ağ Bağlantısı)
LAN 1-4 (Yerel
Ağ Bağlantısı)
Üzerinde Sistem hazır
Yavaş yanıp
sönüyor
Hızlı yanıp
sönüyor
Kapalı Güç yok
Üzerinde Kablosuz sistem hazır
Yanıp Sönüyor Veri iletiyor veya alıyor (kablosuz)
Kapalı Güç veya ziksel bağlantı yok
Üzerinde Ethernet ağı ile ziksel bağlantısı var
Yanıp Sönüyor Veri iletiyor veya alıyor (Ethernet kablosu
Kapalı Güç veya ziksel bağlantı yok
Üzerinde Ethernet ağı ile ziksel bağlantısı var
Yanıp Sönüyor Veri iletiyor veya alıyor (Ethernet kablosu
engellenmedi
Kurtarma modu
WPS işleme
yoluyla)
yoluyla)
7
Page 8
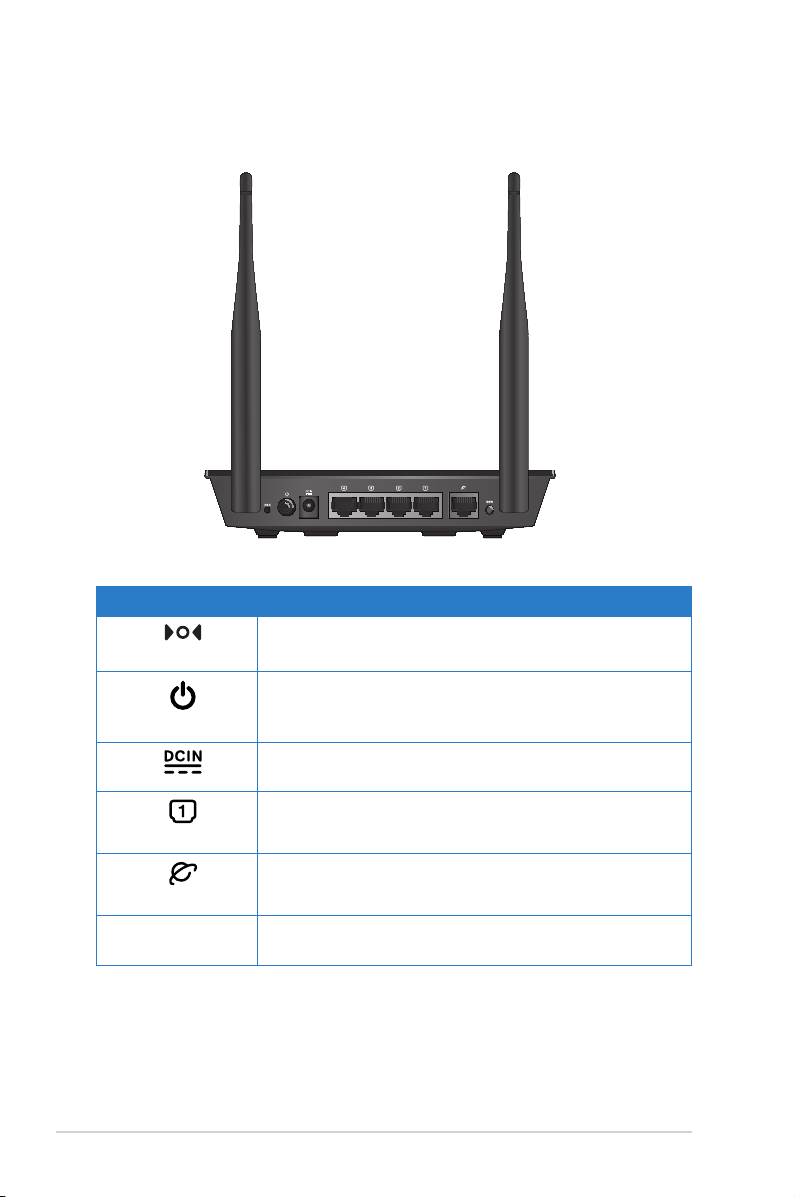
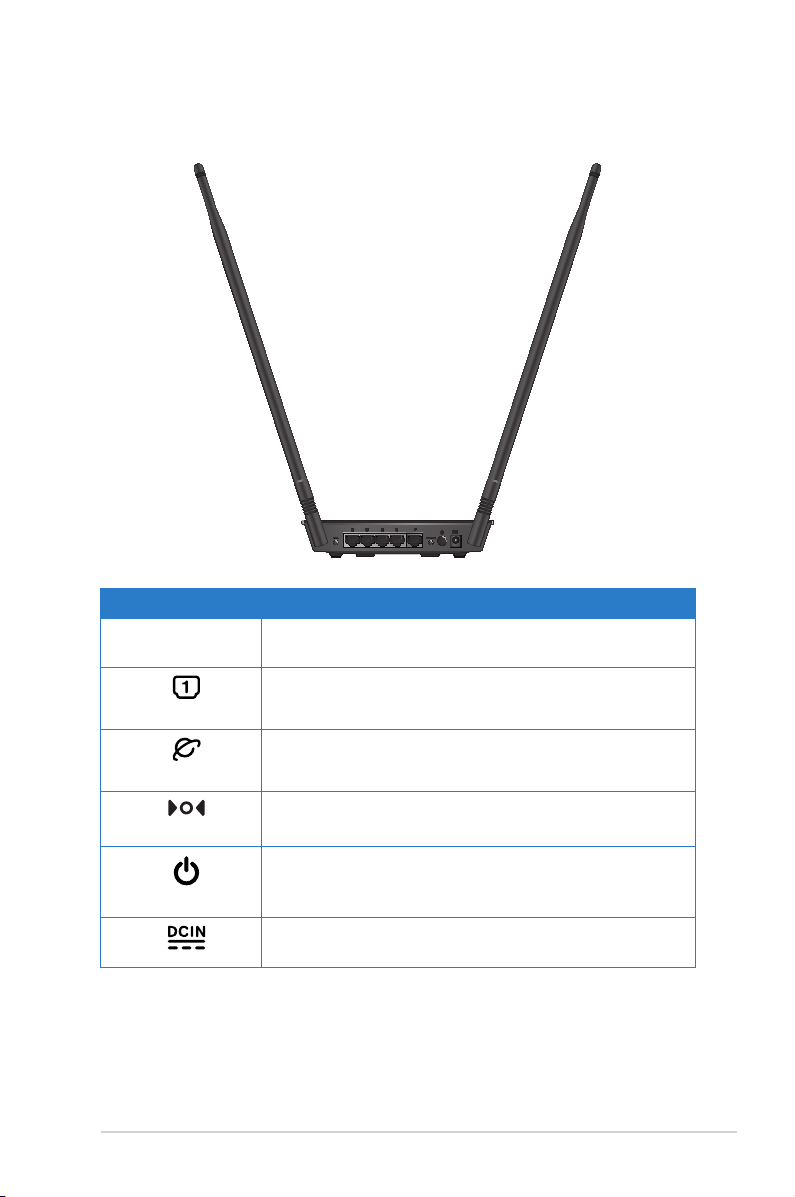
Arka (RT-N12 D1) (RT-N12 D1)
Öğe Açıklama
Sýfýrla
Power (Güç)
LAN1-LAN4
WAN
WPS Bu düğmeye dört saniyeden uzun sure basarak WPS destekli
Sistemi fabrika varsayılan ayarlarına döndürmek için bu
düğmeye beş saniyeden fazla basın.
Kablosuz yönlendiriciyi açmak/kapatmak için bu düğmeye
basın.
Yönlendiricinizi bir güç kaynağına bağlamak için bu bağlantı
noktasına bir AC adaptörü takın.
LAN bağlantısı oluşturmak için bu bağlantı noktalarına RJ-45
Ethernet kabloları takın.
WAN bağlantısı oluşturmak için bu bağlantı noktasına bir
RJ-45 Ethernet kablosu takın.
kablosuz aygıt ile güvenilir kablosuz bağlantı kurun.
8
Page 9
Arka (RT-N12 HP) (RT-N12 HP)
Öğe Açıklama
WPS Bu düğmeye dört saniyeden uzun sure basarak WPS destekli
LAN1-LAN4
WAN
Sýfýrla
Power (Güç)
kablosuz aygıt ile güvenilir kablosuz bağlantı kurun.
LAN bağlantısı oluşturmak için bu bağlantı noktalarına RJ-45
Ethernet kabloları takın.
WAN bağlantısı oluşturmak için bu bağlantı noktasına bir
RJ-45 Ethernet kablosu takın.
Sistemi fabrika varsayılan ayarlarına döndürmek için bu
düğmeye beş saniyeden fazla basın.
Kablosuz yönlendiriciyi açmak/kapatmak için bu düğmeye
basın.
Yönlendiricinizi bir güç kaynağına bağlamak için bu bağlantı
noktasına bir AC adaptörü takın.
9
Page 10
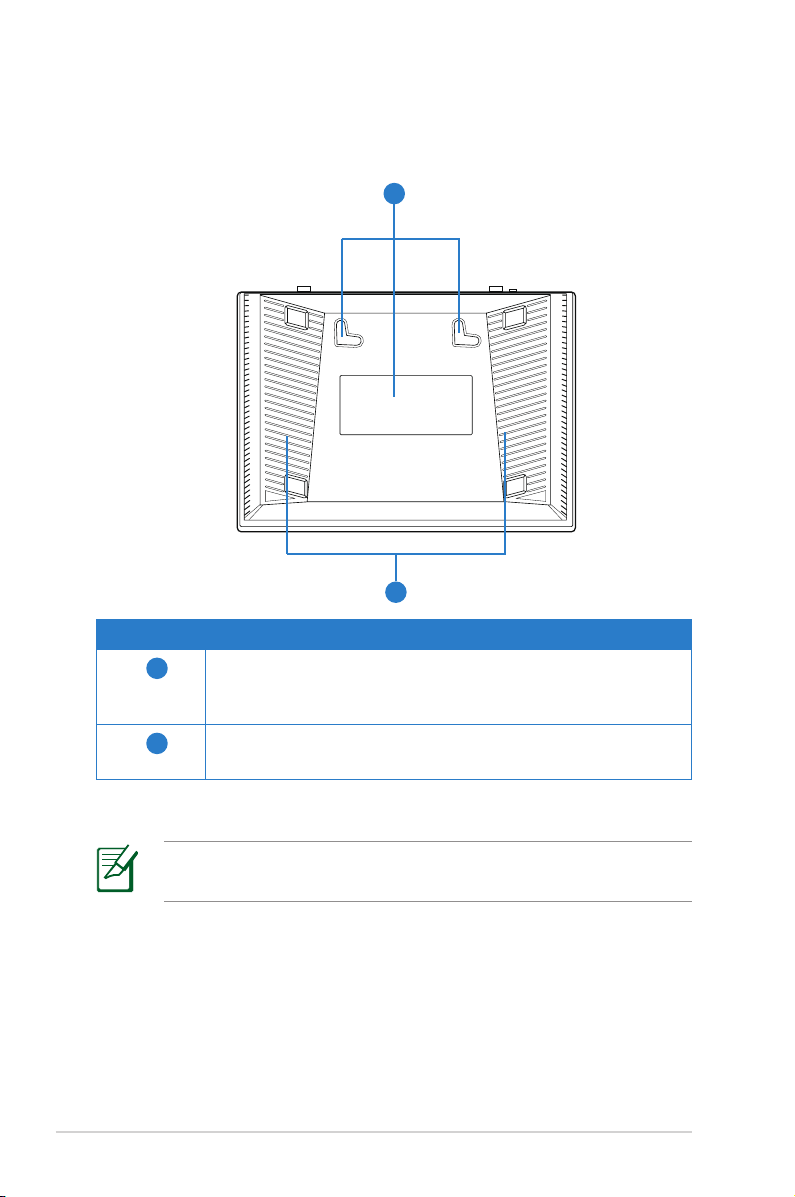
Alt panel
Öğe Açıklama
1
2
Montaj kancaları
Yönlendiricinizi beton veya ahşap yüzeylere monte etmek için iki
yuvarlak başlı vida ile montaj kancalarını kullanın.
Hava delikleri
Bu delikler yönlendiricinizin havalandırılmasını sağlar.
1
2
10
Kablosuz performansını düşüreceğinden duvara monte edilmesi
önerilmemektedir.
Page 11

2 Kablosuz ağınızı kurma
Yönlendiricinizi yerleştirme
Kablosuz yönlendirici ve yönlendiriciye bağlı ağ aygıtları arasında
en iyi kablosuz sinyal aktarımı için aşağıdakileri sağlayınız:
• Ağ aygıtları için maksimum kablosuz kapsama elde etmek
amacıyla kablosuz yönlendiricinizi merkezi bir alana yerleştirin.
• Aygıtı engelleyici metal cisimlerden ve doğrudan güneş
ışığından uzak tutun.
• Aygıtı sadece 802.11g veya 20MHz olan Wi-Fi aygıtlarından,
2,4GHz bilgisayar çevrebirimlerinden, Bluetooth aygıtlarından,
kablosuz telefonlardan, transformatörlerden, ağır görev
motorlarından, örosan ışıklarından, mikrodalga fırınlarından,
soğutuculardan ve diğer endüstriyel ekipmanlardan uzak
tutarak sinyal etkileşimini veya kaybını önleyin.
• En iyi kablosuz sinyalin alındığından emin olmak için,
üç sökülebilir anteni aşağıdaki çizimde gösterildiği gibi
yönlendirin.
• En iyi yukarı ve aşağı kapsama alanı için, kablosuz yönlendiriciyi
eğimli konumda yerleştirin.
• Daima en son aygıt yazılımına yükseltin. En son aygıt yazılımı
güncellemelerini almak için http://www.asus.com adresinden
ASUS web sitesini ziyaret edin.
11
Page 12
İhtiyacınız olanlar
Ağınızı kurmak için aşağıdaki sistem gereksinimlerini karşılayan bir
veya iki bilgisyarınızın olması gereklidir:
• Ethernet RJ-45 (LAN) bağlantı noktası (10Base-T/100BaseTX)
• IEEE 802.11b/g/n kablosuz özelliği
• Kurulu TCP/IP hizmeti
• Internet Explorer, Firefox, Safari veya Google Chrome gibi
web tarayıcısı
• Eğer bilgisayarınızda yerleşik kablosuz özelliği yoksa, ağa
bağlanmak için bilgisayarınıza bir adet IEEE 802.11b/g/n
WLAN adaptörü kurmanız gerekebilir.
• Ağ aygıtlarınızı bağlamak için kullanılan Ethernet RJ-45
kabloları 100 metreyi geçmemelidir.
Kablosuz yönlendiricinizi kurma
12
• Kablosuz belirsizlik sebebiyle muhtemel ayar sorunlarından
kaçınmak için kablosuz yönlendiricinizi ayarlarken kablolu
bağlantı kullanın.
• ASUS kablosuz yönlendiricinizi ayarlamadan önce, şunları
yapın:
• Mevcut bir yönlendiriciyi yerleştiriyorsanız, ağ ile olan
bağlantısını kesin.
• Kabloları/telleri mevcut modem kurulumunuzdan ayırın.
Modeminizde yedek pil varsa, bunu da çıkarın.
• Bilgisayarınızı yeniden başlatın (önerilir).
Page 13
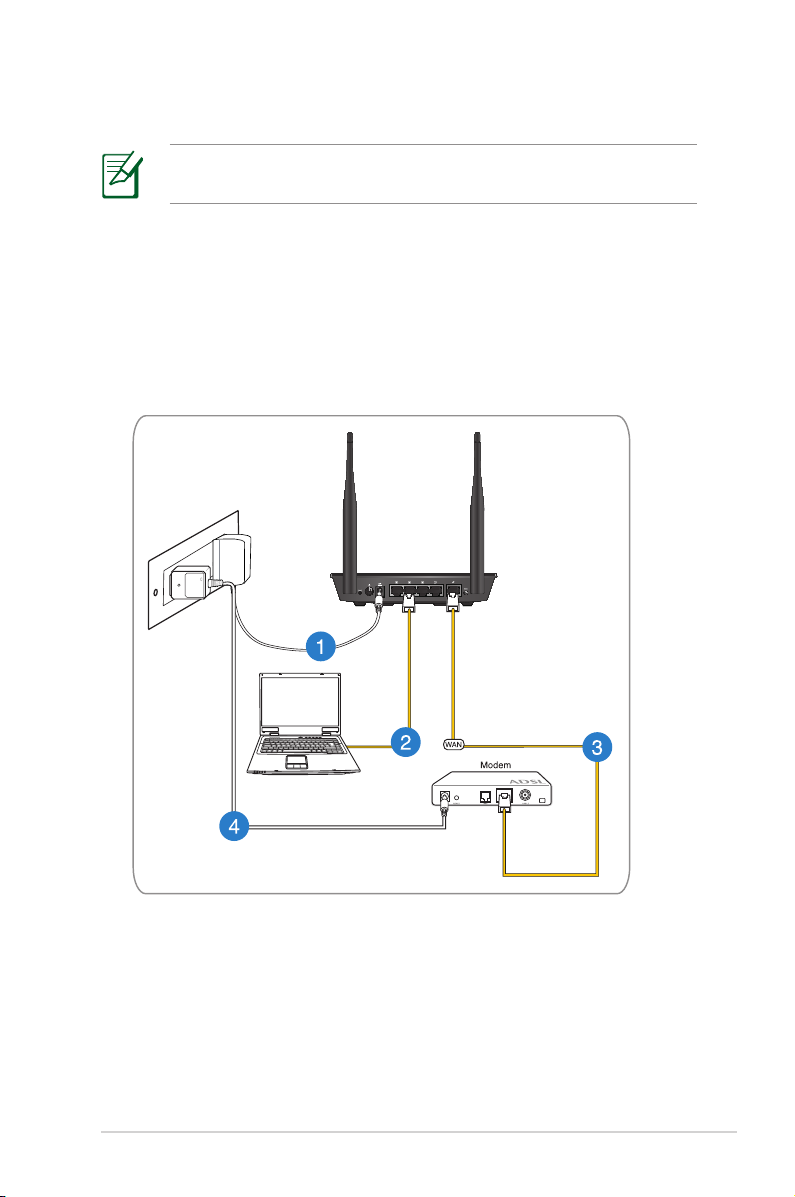
Kablolu bağlantı
RT-N12 D1
Kablolu bir bağlantı kurduğunuzda kablosuz yönlendiriciniz düz
veya çapraz kabloyu destekler.
Kablolu bir bağlantı kullanarak bir ağ ayarlamak için:
1. Kablosuz yönlendiricinizin AC adaptörünü DC Giriş bağlantı
noktasına takın ve elektrik prizine güç vermek için şe takın.
2. Birlikte verilen ağ kablosuyla bilgisayarınızı kablosuz
yönlendiricinin LAN bağlantı noktasına bağlayın.
13
Page 14
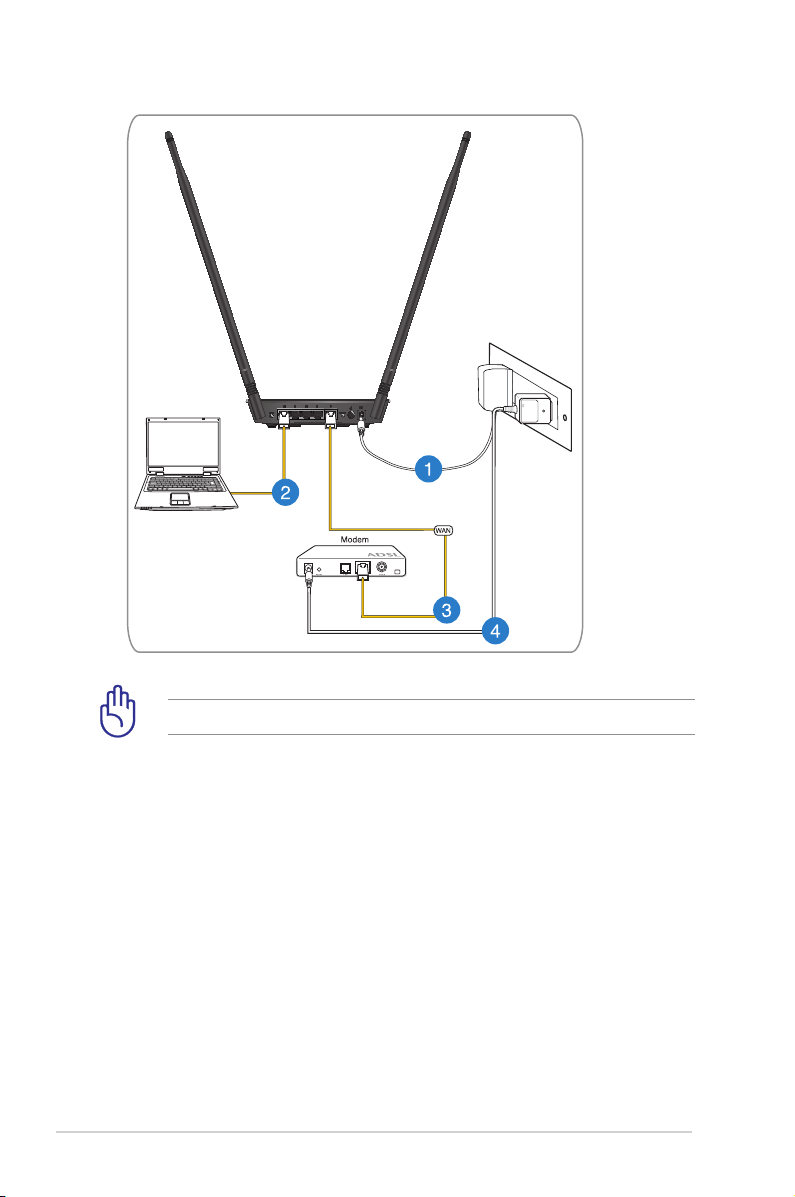
LAN LED’inin yanıp söndüğünden emin olun.
RT-N12 HP
3 Diğer bir ağ kablosunu kullanarak modeminizi kablosuz
yönlendiricinin WAN bağlantı noktasına bağlayın.
4. Modeminizin AC adaptörünü DC Giriş bağlantı noktasına takın
ve elektrik prizine güç vermek için şe takın.
14
Page 15
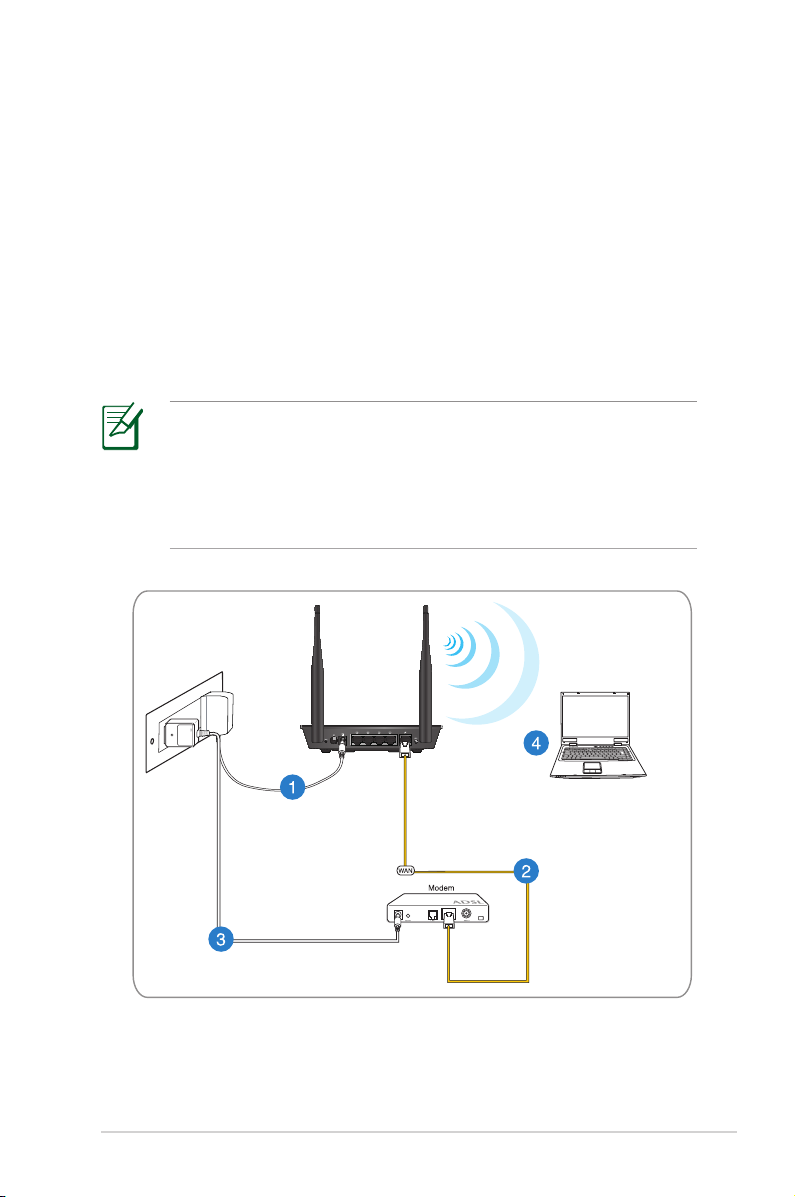
Kablosuz bağlantı
RT-N12 D1
Kablosuz ağınızı kurmak için:
1. Kablosuz yönlendiricinizin AC adaptörünü DC Giriş bağlantı
noktasına takın ve elektrik prizine güç vermek için şe takın.
2 Verilen bir ağ kablosunu kullanarak modeminizi kablosuz
yönlendiricinin WAN bağlantı noktasına bağlayın.
3. Modeminizin AC adaptörünü DC Giriş bağlantı noktasına takın
ve elektrik prizine güç vermek için şe takın.
4. Bilgisayarınıza bir IEEE 802.11b/g/n WLAN adaptörü takın.
• Kablosuz ağın bağlanması hakkında ayrıntılar için WLAN
adaptörünün kullanım elkştabına bakınız.
• Ağınız için güvenlik ayarlarını ayarlamak amacıyla kullanım
elkitabının Kablosuz güvenlik ayarlarını ayarlama
bölümüne bakın.
15
Page 16
16
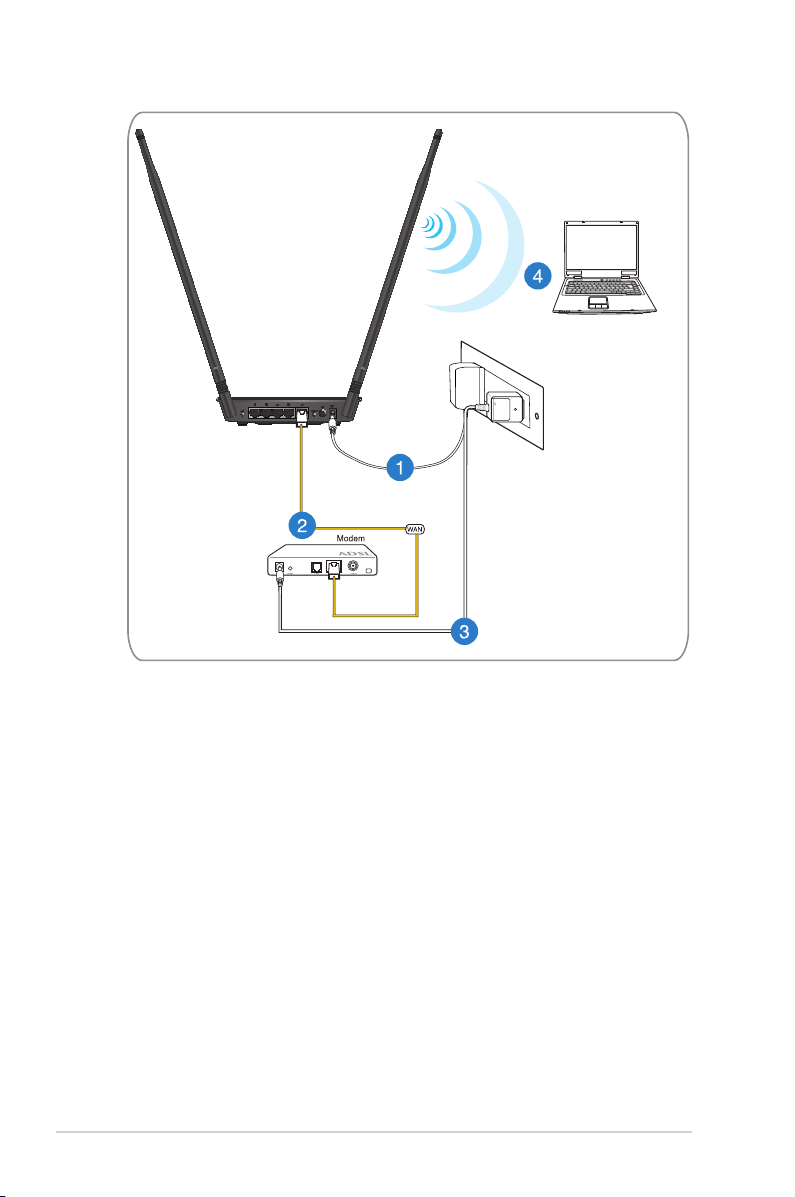
RT-N12 HP
Page 17
Devam etmeden önce
Kablosuz yönlendiricinizi yapılandırmadan önce, bu bölümde
açıklanan adımları ağdaki her bilgisayarda uygulayarak kablosuz
ağ bağlantısı ile ilgili sorunlar ile karşılaşmayın.
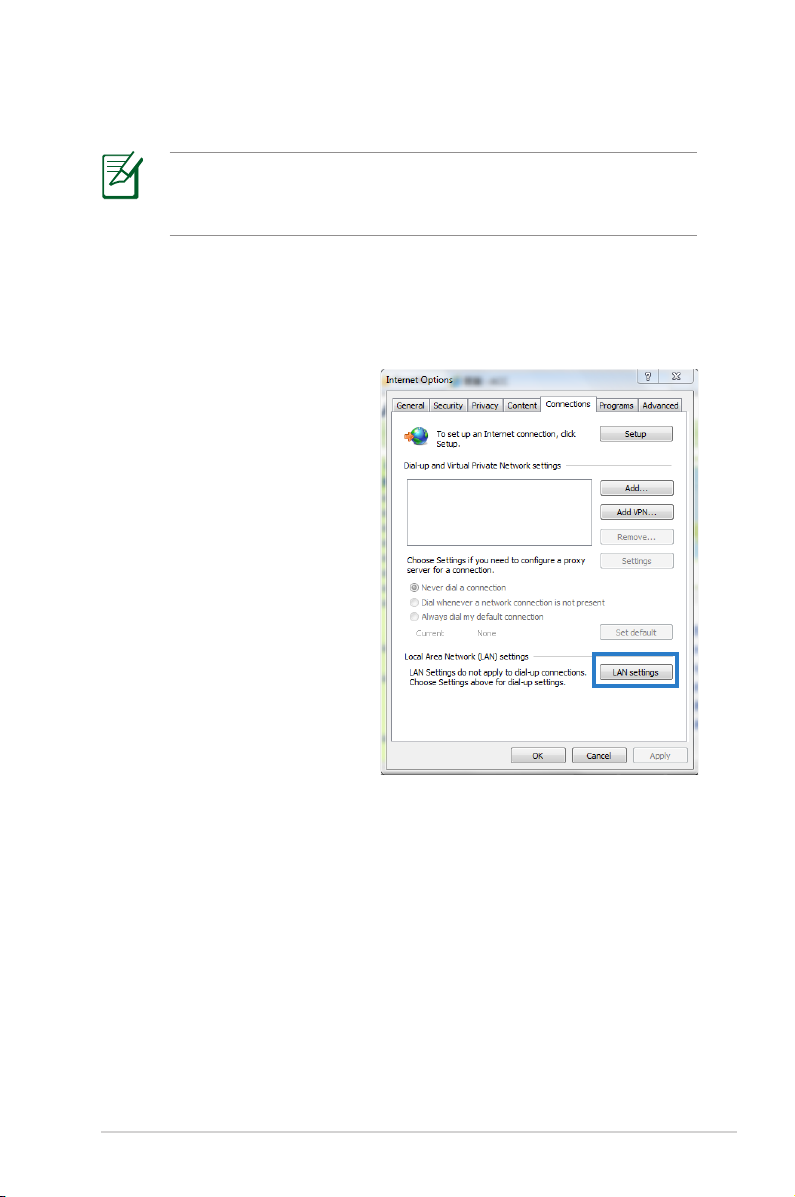
A. Etkin ise pro�y sunucusunu engelleyin.Etkin ise pro�y sunucusunu engelleyin.
Windows® 7
1. Start (Başlat) >
Internet E�plorer
(Internet Gezgini)'ne
tıklayarak.
2. Tools (Araçlar) >
Internet options
(Internet seçenekleri)
> Connections
(Bağlantılar) sekmesi
> LAN settings (Yerel
ağ ayarları)'na tıklayın.
17
Page 18
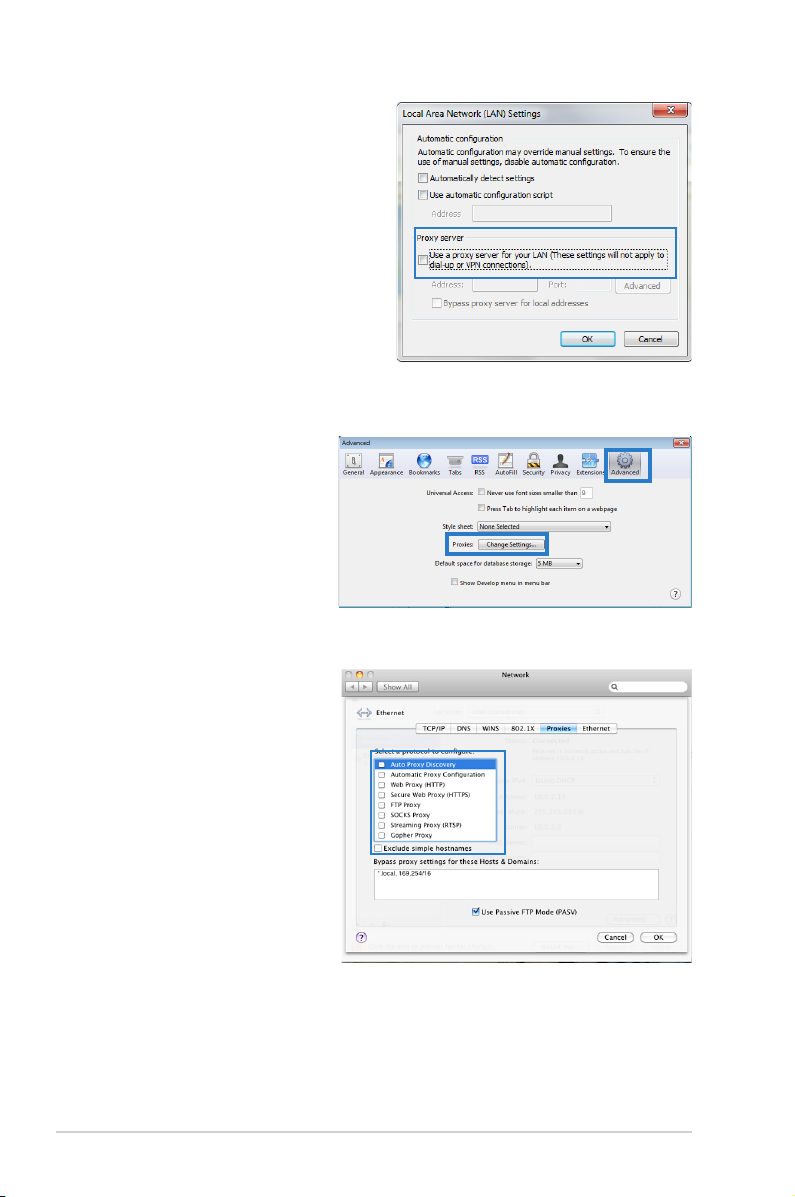
3. Yerel Alan Ağı (LAN) AyarlarıYerel Alan Ağı (LAN) Ayarları
ekranından Use a pro�y
server for your LAN (Yerel
ağınız için bir pro�y
sunucusu kullanın)'ın
işaretini kaldırın.
4. OK (Tamam)’a, ardından
Apply (Uygula)’ya tıklayın.
MAC OSX
1. Apple Safari
tarayıcınızdan Safari
> Preferences
(Tercihler) >
Advanced (Gelişmiş)
Pro�ies (Proksiler)
öğesinden, Change
Settings (Ayarları
Değiştir) üzerine
tıklayın...
2. Ağ ekranından, FTP
Pro�y ve Web Pro�y
(HTTP) seçimini
kaldırın.
3. OK (Tamam)’a,
ardından Apply
(Uygula)’ya tıklayın.
18
Page 19
B. Otomatik olarak bir IP adresi almak için TCP/IP
ayarlarını yapın.
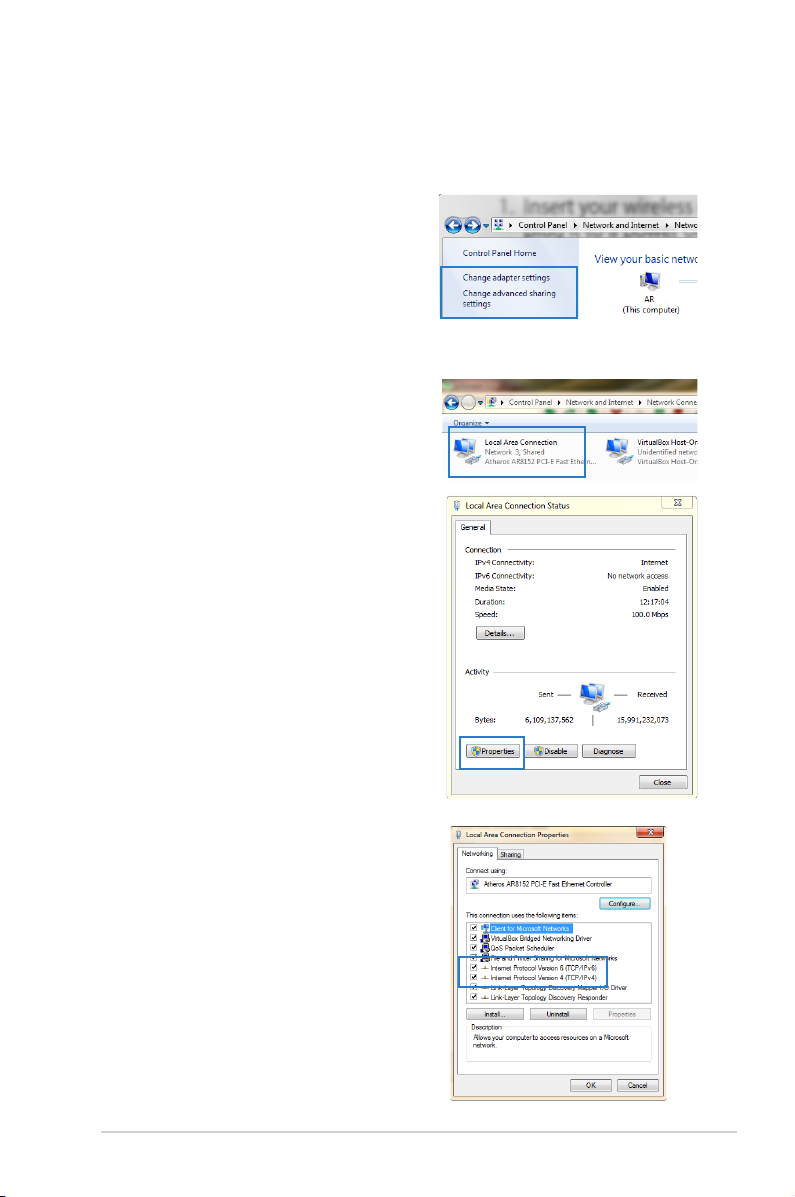
Windows® 7
1. Start (Başlat) > Control Panel
(Denetim Masası) > Network
and Internet (Ağ ve Internet)
> Network and Sharing
Center (Ağ ve Paylaşım
Merkezi) > Change adapter
settings (Adaptör ayarlarını
değiştirin) 'e tıklayın.
2. Ağ Bağlantıları penceresinden,
Local Area Connection (Yerel
Alan Bağlantısı) üzerine
tıklayın.
3. Yerel Alan Bağlantısı Ağ
Durumu penceresinden,
Properties (Özellikler)’e
tıklayın.
4. İnternet Protokolü Sürüm
4 (TCP/IPv4) veya İnternet
Protokolü Sürüm 6 (TCP/
IPv6)’yı seçin, ardından
Properties (Özellikler)
üzerine tıklayın.
19
Page 20
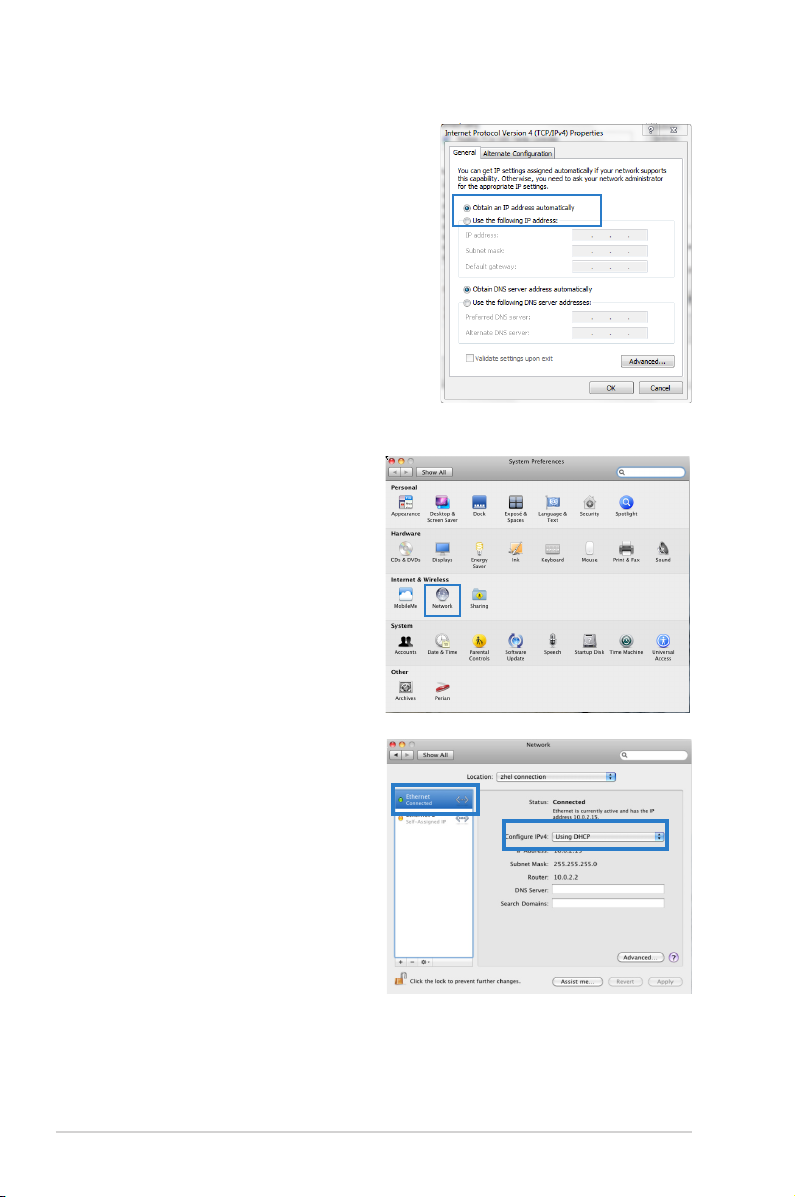
5. Obtain an IP address
automatically (Otomatik
olarak bir IP adresi alın) üzerine
tıklayın.
6. OK (Tamam)'a tıklayın.
MAC OSX
1. Apple Menu (Apple
Menüsü) üzerine
tıklayın>System
Preferences (Sistem
Tercihleri) > Network
(Ağ)
2. Sol panelden Ethernet
üzerine tıklayın.
3. IPv4 Yapılandır
öğesinde Using DHCP
(DHCP Kullanma)
seçeneğini belirleyin.
4. Apply (Uygula)’ya
tıklayın
20
Page 21
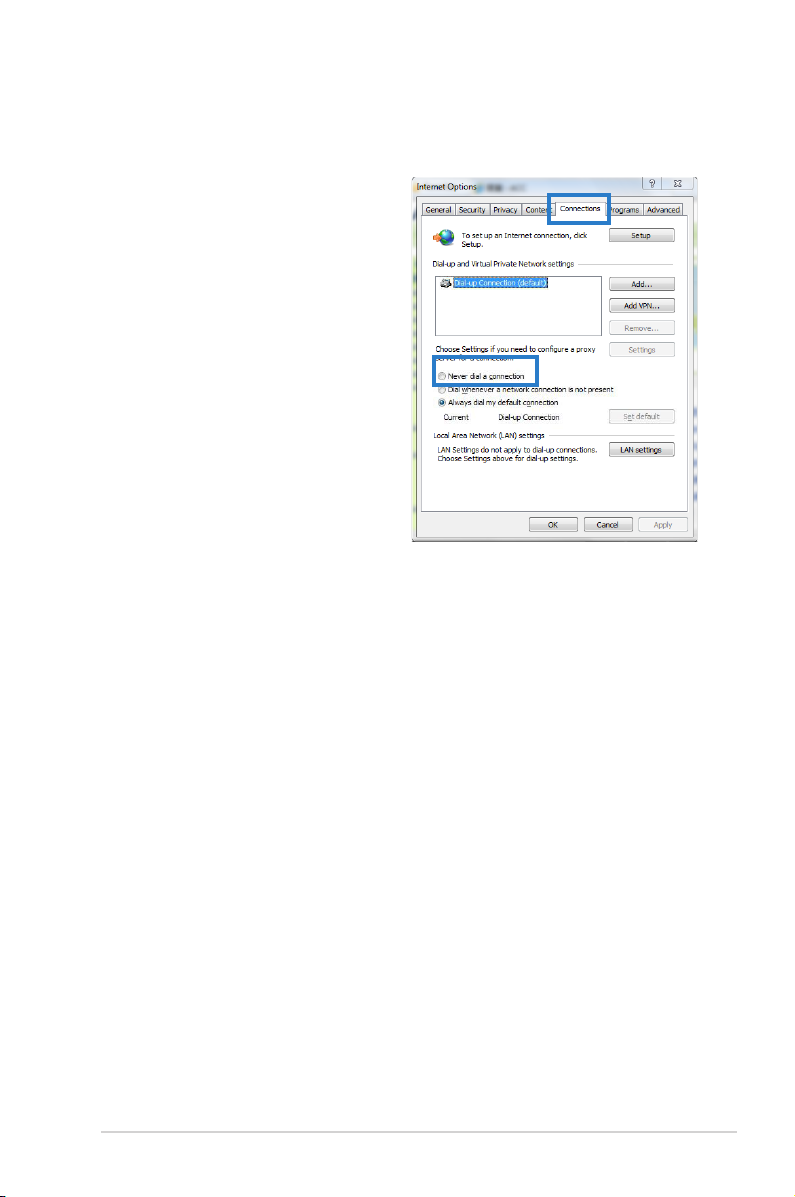
C. Etkinse çevirmeli bağlantıyı engelleyin.Etkinse çevirmeli bağlantıyı engelleyin.
Windows® 7
1. Start (Başlat) > Internet
E�plorer (Internet
Gezgini)'ne tıklayarak.
2. Tools (Araçlar) >
Internet options
(Internet seçenekleri) >
Connections (Bağlantılar)
sekmesine tıklayın.
3. Never dial a connection
(Asla bağlantı numarası
çevirme)'ya tıklayın.
4. OK (Tamam)’a, ardından
Apply (Uygula)’ya tıklayın.
21
Page 22

3 Web GUI üzerinden
yapılandırma
Eeb GUI oturum açma
ASUS Kablosuz Yönlendiriciniz, Internet Explorer, Mozilla
Firefox, Apple Safari veya Google Chrome gibi herhangi bir web
tarayıcısını kullanarak yönlendiriciyi yapılandırmanıza olanak
sağlayan web tabanlı bir kullanıcı arayüzü kullanır.
Web GUI'ye oturum açmak için:
1. Web tarayıcısını başlatın ve kablosuz yönlendiricinizin
varsayılan IP adresini manuel olarak girin: 192.168.1.1
2. Oturum açma sayfasında varsayılan kullanıcı adını (admin) ve
parolayı (admin) girin.
22
Page 23

3. Kablosuz yönlendirici GUI’si çeşitli yapılandırma ayarlarına giriş
sağlar.
İnternet bağlantısının ayarlanması
İnternet bağlantısını ilk kez kurarken, kablosuz
yönlendiricinizdeki Reset (Sıfırla) düğmesine basarak fabrika
varsayılan ayarlarına sıfırlayın.
23
Page 24

Oto-algılamalı Hızlı İnternet Ayarı (QIS)
Hızlı İnternet Ayarı (QIS) işlevi internet bağlantınızı hızlı bir şekilde
yaralamanız için size rehberlik eder.
QIS'i oto-algılama ile birlikte kullanmak için:
1. Internet Explorer gibi bir web tarayıcısı başlatın, Mozilla Firefox,
Apple Safari, veya Google Chrome.
2. Hızlı İnternet Kurulumu otomatik olarak başlayacaktır. Ne�t
(İleri) üzerine tıklayın.
24
• Eğer QIS otomatik olarak başlamazsa, kablosuz
yönlendiricinizin web GUI’sini elle başlatarak QIS sayfasına
giriş yapın. Bunu yapmak için şu adımları izleyin:
1. Web tarayıcınızı açın, http://192.168.1.1 girin
2. Oturum açma sayfasında varsayılan kullanıcı adını admin ve
parolayı admin girin.
3. Gezinti panelinde Quick Internet Setup (Hızlı İnternet
Kurulumu) üzerine tıklayın.
Page 25

3. Yeni yönetici parolasını girerek yönlendiriciye izinsiz girişi
önleyin. Ne�t (İleri)’ye tıklayın.
4. Kablosuz yönlendirici modunu, Yineleyici modunu veya Erişim
Noktası (AP) modunu seçin. Ne�t (İleri)’ye tıklayın.
İnternet erişimine sahip kablosuz ağ kurmak için, Wireless
router mode (Kablosuz yönlendirici modu)’nu kullanın.
25
Page 26

5. Kablosuz yönlendirici bağlantı tipinizi belirlemeye çalışacaktır.
Gerekirse, gerekli bağlantı türünü seçin ve ISP kullanıcı adınız
ve parolanız gibi tüm gerekli bilgileri girin.
İnternet Servis Sağlayıcınızdan internet bağlantı türünüz ve ek
oturum açma bilgileri hakkında gerekli bilgileri elde edin.
• Kablosuz yönlendiricinizi ilk kez yapılandırdığınızda ya da
kablosuz yönlendiriciniz varsayılan ayarlara sıfırlandığında ISP
bağlantı türünüzün oto algılaması yapılır.
26
• Eğer QIS internet bağlantı türünüzü algılarsa, Skip to manual
setting (Manuel ayara geç) üzerine tıklayın ve bağlantı
ayarlarınızı manuel olarak yapılandırın.
Page 27

6. Kablosuz ayar ekranında, network name (ağ adı) (SSID)
seçeneğine giriş yapın ve kablosuz bağlantınız için bir güvenlik
anahtarı atayın. Apply (Uygula)’ya tıklayın
7. Ağ ayarlarınızın bir özeti gösterilecektir. Devam etmek için Ne�t
(İleri)’yi tıklatın.
27
Page 28

8. Kablosuz Ağ Bağlantısı Öğreticisi’ni okuyun. Bitti’ye tıklayın.
28
Page 29

Kablosuz güvenlik ayarlarını ayarlama
Kablosuz ağınızı izinsiz erişimlere karşı korumak için güvenlik
ayarlarınızı yapılandırmanız gereklidir.
Kablosuz güvenlik ayarlarınızı ayarlamak için:
1. Web tarayıcınıza 192.168.1.1 girin.
2. Oturum açma ekranında varsayılan kullanıcı adını (admin) ve
şifreyi (admin) girin, ardından OK (Tamam)'a tıklayın. Kablosuz
yönlendiricinin web GUI'i başlar.
3. Ağ Haritası ekranında, System Status (Sistem Durumu)
alanında SSID (Servis Ayar Tanımlayıcısı), Doğrulama Yöntemi ve
kablosuz ağınızın güvenlik anahtarı ayarları görünmektedir.
29
Page 30

4. Wireless name (SSID) (Kablosuz ad (SSID)) alanında kablosuz
ağınız için benzersiz adı girin.
5. Authentication Method (Doğrulama Yöntemi) indirmeli
listesinden kablosuz ağınız için şifreleme yöntemini seçin.
IEEE 802.11n standardı, tek yöne yayın şifrelemesi olarak WEP
veya WPA-TKP ile birlikte Yüksek Çıkış kullanımını yasaklar. Bu
şifreleme yöntemlerini kullanırsanız veri hızınız IEEE 802.11g
54Mbps bağlantısına düşecektir.
6. Güvenlik geçiş anahtarını girin.
7. Bittiğinde Apply (Uygula)'ya girin.
30
Page 31

T� Güç ayarı (Sadece RT-N12 HP için)
Tx Güç ayarı, kablosuz yönlendiricinin radyo sinyali çıkışına güç
vermek için gerekli olan milliWatt (mW) için geçerlidir. RT-N12 HP
yönlendiricisi maksimum 200 mW değerinde aktarımı destekler.
TX Güç ayarını yapmak için:
1. Gezinti panelinden Wireless (Kablosuz) üzerine tıklayın.
2. Professional (Profesyonel) sekmesine tıklayın.
3. T� Power adjustment (T� Güç ayarı) öğesinde, 0 ve 200 mW
arasında bir değer girin.
Tx Güç ayarı değerlerini artırmanız kablosuz ağın dengesini ve
kablosuz yönlendiricinin ömrünü etkileyebilir.
31
Page 32

Konuk Ağınızı Oluşturma
Konuk Ağı ayarlamak, özel ağınıza erişimi kısıtlandırırken geçici
ziyaretçiler için kablosuz internet bağlantısı sağlar.
Konuk ağınızı oluşturmak için:
1. Navigasyon panelindeki Guest Network (Konuk Ağı) üzerine
tıklayın.
2. Enable (Etkinleştir)'e tıklayın.
3. Ek seçenekleri yapılandırmak için, listelenen öğelerden
herhangi birine tıklayın.
32
Page 33

4. Network Name (Ağ Adı) (SSID) alanındaki geçici ağınız
için bir kablosuz ad atayın.
5. Bir Authentication Method (Doğrulama Yöntemi) seçin.
6. Bir WEP Encryption (WEP Şifreleme) yöntemi seçin.
7. Access time (Erişim Zamanı)’nı belirleyin veya Limitless
(Sınırsız) üzerine tıklayın.
8. Access Intranet (Intranet’e Eriş) öğesinde Engelle veya
Etkinleştir’i seçin.
9. Apply (Uygula)’ya tıklayın
33
Page 34

Trak Yöneticisini Kullanma
QoS (Hizmet Kalitesi) Bant Genişliğini Yönetme
Hizmet Kalitesi özelliği bant genişliği önceliğini ayarlamanızı ve
ağ trağini yönetmenizi sağlar.
QoS'yi kurmak için:
1. Gezinti panelinde Trac Manager (Trak Yöneticisi) üzerine
tıklayın ve QoS sekmesine tıklayın.
2. QoS’i etkinleştirmek için ON (AÇIK) üzerine tıklayın.
3. Save (Kaydet)’e tıklayın.
34
Bant genişliği bilginizi ISP’nizden alabilirsiniz.
Page 35

4. Belirli ağ uygulamalarına ve ağ hizmetlerine öncelik vermek
istiyorsanız, sağ üst köşedeki User-dened Priority (Kullanıcı
tanımlı Öncelik) üzerine tıklayın.
5. Gerektiğinde değerleri ayarlayın. Apply (Uygula)’ya tıklayın
35
Page 36

Trak İzleme
Trac Monitor (Trak Monitörü) sekmesine tıklayarak
internetin, kablolu ve kablosuz bağlantıların gerçek zamanlı veya
geçmiş bant genişliği bilgilerini görüntüleyin.
36
Page 37

Gelişmiş ayarların yapılandırılması
DHCP Sunucusunu ayarlama
Kablosuz yönlendiriciniz DHCP’yi kullanarak ağınızdaki IP
adreslerini otomatik olarak atar. Ağınızdaki istemciler için IP adres
aralığını ve kiralama zamanını belirleyebilirsiniz.
DHCP sunucusunu yapılandırmak için:
1. Gezinti panelinden LAN üzerine tıklayın.
2. DHCP Server (DHCP Sunucusu) sekmesine tıklayın.
3. Enable the DHCP Server (DHCP Sunucusu etkinleştirilsin
mi) alanından Yes (Evet)'e tıklayın.
4. IP Pool Starting Address (IP Havuzu Başlangıç Adresi)
alanında başlangıç IP adresini girin.
5. IP Pool Ending Address (IP Havuzu Bitiş Adresi) alanında
bitiş IP adresini girin.
37
Page 38

6. Lease Time (Kiralama Zamanı) alanından IP adreslerinin sona
ereceği zamanı girin ve kablosuz yönlendirici ağ istemcileri için
yeni IP adreslerini otomatik olarak atar.
• Bir IP adresi aralığı belirlerken ASUS, IP adresi formatını
192.168.1.xxx olarak kullanmanızı önerir (burada xxx 2 ile 254
arasında herhangi bir sayı olabilir).
• IP Havuzu Başlangıç Adresi IP Havuzu Bitiş Adresinden büyük
olmamalıdır.
38
Page 39

Ürün yazılımını güncelleştirme
ASUS web sitesinden (http://support.asus.com) en son ürün
yazılımını indirin
Ürün yazılımını güncelleştirmek için:
1. Gezinti panelinden Administration (Yönetim) üzerine tıklayın.
2. Firmware Upgrade (Ürün Yazılımı Güncelleştirme)
sekmesine tıklayın.
3. Bilgisayarınızdaki ürün yazılımını bulmak için New Firmware
File (Yeni Ürün Yazılımı Dosyası) alanında Browse (Gözat)
düğmesini tıklatın.
4. Upload (Karşıya Yükle) düğmesini tıklatın.
Yükleme işlemi başarısız olursa, kablosuz yönlendirici otomatik
olarak acil durum veya hata moduna girer ve ön paneldeki güç
LED göstergesi yavaş bir şekilde yanıp söner. Sistemi kurtarmak
veya eski durumuna getirmek için Firmware Restoration (Ürün
Yazılımı Kurtarma) yardımcı programını kullanın.
39
Page 40

Ayarları Geri Yükleme/Kaydetme/Karşıya Yükleme
Ayarları geri yüklemek/kaydetmek/karşıya yüklemek için:
1. Gezinti panelinden Administration (Yönetim) üzerine tıklayın.
2. Restore/Save/Upload Setting (Ayarı Geriyükle/Kaydet/
Yükle) sekmesine tıklayın.
4. Gerçekleştirmek istediğiniz görevleri seçin.
• Varsayılan fabrika ayarlarını geri yüklemek için Restore
(Geri Yükle) düğmesini ve onay mesajı geldiğinde OK
(Tamam) düğmesini tıklatın.
• O anki sistem ayarlarını kaydetmek için Save (Kaydet)'i ve
sistem dosyasını tercih ettiğiniz yola kaydetmek için dosya
karşıdan yükleme penceresinde Save (Kaydet)'i tıklatın.
• Önceki sistem ayarlarını geri yüklemek için, geri yüklemek
istediğiniz sistem dosyasını bulmak üzere Browse (Gözat)'ı
ve ardından Upload (Karşıya Yükle)'yi tıklatın.
40
Page 41

4 Programların kullanımı
ASUS kablosuz yönlendiricisi programları http://support.asus.
com sitesinden indirilebilir
ASUS kablosuz programları seçip setup dosyalarını indirdikten ve
kurduktan sonra, Aygıt Kurtarma ve Aygıt Yazılımı Geri Yükleme
programları uygulamalarınıza eklenecektir.
Device Discovery
Device Discovery, bir ASUS kablosuz yönlendiriciyi bulan ve aygıtı
yapılandırmanızı sağlayan bir ASUS WLAN yardımcı programıdır.
Device Discovery yardımcı programını başlatmak için:
41
Page 42

• Bilgisayarınızın masaüstünden Start (Başlat) > All Programs
(Tüm Programlar) > ASUS Utility (ASUS Yardımcı Programı)
> RT-N12 Wireless Router (RT-N12 Kablosuz Yönlendirici) >
Device Discovery öğelerini tıklatın.
Yönlendiricinin Erişim Noktası modunu ayarlarken,
yönlendiricinin IP adresini almak için Aygıt Kurtarma’yı
kullanmanız gereklidir.
Firmware Restoration
Başarısız olan bir aygıt yazılımı yükseltmesinin ardından Aygıt
Yazılımı Geri yükleme bir ASUS Kablosuz Yönlendiricisinde
kullanılacaktır. Bu program bir aygıt yazılımı dosyasını kablosuz
yönlendiriciye yükler. İşlem yaklaşık üç veya dört dakika sürer.
Bellenim Onarımı programını kullanmadan önce kurtarma
modunu başlatın.
Kurtarma modunu başlatmak ve Bellenim Onarımı programını
kullanmak için:
1. Kablosuz yönlendirici şini güç kaynağından çıkarın.
42
Page 43

2. Arka paneldeki Sıfırla düğmesine basılı tutun ve aynı anda
kablosuz yönlendiriciyi güç kaynağına yeniden takın. Ön
paneldeki Güç LED’i yavaşça yanıp söndüğünde Sıfırla
düğmesini bırakın, bu, kablosuz yönlendiricinin kurtarma
modunda olduğunu gösterir.
3. TCP/IP ayarlarınızı oluşturmak için aşağıdakileri kullanın:
IP adresi: 192.168.1.x
Alt ağ maskesi: 255.255.255.0
4. Bilgisayarınızın masaüstünden Start (Başlat) > All Programs
(Tüm Programlar) > ASUS Utility (ASUS Yardımcı Programı)
> RT-N12 Wireless Router (RT-N12 Kablosuz Yönlendirici) >
Firmware Restoration öğelerini tıklatın.
5. Aygıt yazılımı dosyasında dolaşmak için Browse (Gözat)
üzerine tıklayın, ardından Upload (Yükle) üzerine tıklayın.
Bu bir aygıt yazılımı yükseltme programı değildir ve çalışan bir
ASUS Kablosuz Yönlendiricisinde kullanılamaz. Normal aygıt
yazılımı yükseltmeleri web GUI yapılmalıdır . Ayrıntılı bilgi için
Upgrading the rmware (Aygıt Yazılımını Yükseltme) kısmına
bakın.
43
Page 44

5 Sorun giderme
Bu bölümde bahsedilmeyen sorunlar ile karşılaşırsanız, ASUS
Teknik Desteği ile temasa geçiniz.
Sorun giderme
Yönlendiriciyi yapılandırmak için web GUI’ye erişemiyorum.
• Web tarayıcınızdaki tanımlama bilgilerini ve geçici dosyaları
silin.Internet Explorer 8’de bunu yapmak için:
1. Bir web tarayıcısı açın, sonra Tools (Araçlar) > Internet
Options (Internet Seçenekleri)... öğelerini tıklatın
2. Genel sekmede, Gözatma geçmişi altında Delete (Sil)
üzerine tıklayın.
3. Temporary Internet Files (Geçici İnternet Dosyaları) ve
Cookies (Çerezler) üzerine tıklayın. Delete (Sil)’e tıklayın.
Çerezleri ve dosyaları silmek için olan komutlar web tarayıcısına
göre değişmektedir.
• Proxy sunucusu ayarlarını engelleyin, çevirmeli bağlantıyı iptal
edin ve TCP/IP ayarlarını ayarlayarak IP adreslerini otomatik
olarak alın. Daha fazla ayrıntı için, bu kullanma kılavuzundaki
Devam etmeden önce bölümüne bakınız.
İstemci, yönlendiriciyle kablosuz bağlantı kuramıyor.
Kapsama Alanı Dışında:
• Yönlendiriciyi kablosuz istemcinin yakınına koyun.
• Kanal ayarlarını değiştirmeye çalışın.
44
Page 45

Kimlik Doğrulama:
• Yönlendiriciye bağlanmak için kablolu bağlantıyı kullanın.
• Kablosuz güvenlik ayarlarını denetleyin.
• Arka paneldeki Restore (Geri Yükle) düğmesine beş
saniyeden uzun bir süre basın.
Yönlendirici bulunamıyor:
• Arka paneldeki Restore (Geri Yükle) düğmesine beş
saniyeden uzun bir süre basın.
• Kablosuz bağdaştırıcı ayarlarını (ör. SSID ve şifreleme
ayarları) kontrol edin.
LAN bağdaştırıcısıyla Internete erişilemiyor
• Yönlendiriciyi kablosuz istemciye daha yakın bir noktaya
taşıyın.
• Kablosuz bağdaştırıcının doğru kablosuz yönlendiriciye
bağlanıp bağlanmadığını denetleyin.
• Kullanılan kablosuz bağlantı kanalının ülkenizdeki/bölgenizdeki
mevcut kanallarla uyumlu olup olmadığını denetleyin.
• Şifreleme ayarlarını denetleyin.
• ADSL veya Kablo bağlantısının doğru olup olmadığını
denetleyin.
• Başka bir Ethernet kablosu kullanarak tekrar deneyin.
Internete erişilemiyor
• ADSL modem ve kablosuz yönlendiricideki durum
göstergelerini denetleyin.
• Kablosuz yönlendiricideki WAN LED'inin yanıp yanmadığını
denetleyin. LED yanmıyorsa, kabloyu değiştirip tekrar deneyin.
45
Page 46

ADSL Modem “Link” ışığı yanıyorsa (yanıp sönmemeli), bu
Internet Erişiminin mümkün olduğunu gösterir.
• Bilgisayarınızı yeniden başlatın.
• Kablosuz yönlendiricideki WAN LED'inin yanıp yanmadığını
denetleyin.
• Kablosuz şifreleme ayarlarını denetleyin.
• Bilgisayarın IP adresini alıp alamadığını denetleyin (hem
kablolu, hem kablosuz ağ üzerinden).
• Web tarayıcınızın yerel LAN'ı, aynı zamanda bir proxy
sunucusunu kullanacak şekilde yapılandırılmadığından emin
olun.
ADSL "LINK" ışığı sürekli yanıp sönüyorsa veya kapalı ise,
Internet erişimi mümkün değildir; Yönlendirici ADSL ağı ile
bağlantı kuramıyordur.
• Tüm kablolarınızın doğru şekilde bağlandığından emin olun.
• ADSL veya kablo modemin güç kablosunu çıkarın, birkaç
dakika bekleyin, sonra kabloyu tekrar takın.
• ADSL ışığı yanıp sönmeye devam ederse veya kapalı kalırsa,
ADSL servis sağlayıcınıza başvurun.
Ağ adı veya şifreleme anahtarları unutulmuş
• Kablolu bağlantıyı yeniden oluşturmayı ve kablosuz şifrelemeyi
tekrar yapılandırmayı deneyin.
• Kablosuz yönlendiricinin arka panelindeki Restore (Geri Yükle)
düğmesine beş saniyeden uzun bir süre basın.
46
Page 47

Sistemi varsayılan ayarlarına geri yükleme
• Kablosuz yönlendiricinin arka panelindeki Restore (Geri Yükle)
düğmesine beş saniyeden uzun bir süre basın.
• Bu kullanma kılavuzunun 4. Bölümündeki Restoring/Saving/
Uploading settings (Ayarları Geri Yükleme/Kaydetme/
Karşıya Yükleme) bölümüne bakın.
Aşağıdakiler, varsayılan fabrika ayarlarıdır:
Kullanıcı Adı: admin
Parola: admin
DHCP Etkin: Evet (WAN kablosu takılı ise)
IP adresi: 192.168.1.1
Etki Alanı Adı: (Boş)
Alt Ağ Maskesi: 255.255.255.0
DNS Sunucusu 1: 192.168.1.1
DNS Sunucusu 2: (Boş)
SSID: varsayılan
47
Page 48

ASUS DDNS Hizmeti
RT-N12 Serisi yönlendiricileri ASUS DDNS hizmetini destekler.
Eğer ASUS DDNS hizmetine kaydolmuşsanız, fakat aygıtları servis
merkezinde değiştirmeniz gerekiyorsa, ilk alan adını korumak
ve DDNS hizmetini elinizde tutmak istediğinizi servis merkezine
bildirin. Daha fazla bilgi için yerel servis merkezinizi ziyaret edin.
• Etki alanında bir aktivite yoksa - örneğin yönlendiricinin
yeniden yapılandırılması veya kayıtlı etki alanına erişim gibi –
sistem 90 gün içinde kayıtlı bilgileri otomatik olarak siler.
• Aygıtınızı kullanırken herhangi bir sorun veya zorlukla
karşılaşırsanız servis merkeziyle irtibata geçin.
Sık Sorulan Sorular (SSS'lar)
1. Kayıtlı bilgiler kaybolur veya başkaları tarafından
kaydedilir mi?
Kayıtlı bilgileri 90 gün içinde güncellemezseniz, sistem
otomatik olarak kayıtlı bilgileri siler ve etki alanı başkaları
tarafından kaydedilebilir.
2. Altı ay önce satın aldığım yönlendirici için ASUS DDNS
kaydını yapmadım. Hala kayıt yapabilir miyim?
Evet, yönlendiriciniz için hala ASUS DDNS hizmeti kaydı
yapabilirsiniz. DDNS hizmeti yönlendiricinize eklendiğinde,
ASUS DDNS hizmetine istediğiniz zaman kaydolabilirsiniz.
Kaydolmadan önce, ana bilgisayara adının kayıtlı olup
olmadığını kontrol etmek için Query (Sorgula)'yı tıklatın.
Değilse, sistem ana bilgisayar adını otomatik olarak kaydeder.
48
Page 49

3. Önceden bir etki alanı kaydı yaptım ve arkadaşım etki
alanı adıma ulaşamadığını bildirinceye kadar sorunsuz
çalışıyordu.
Aşağıdakileri kontrol edin:
1. Internet düzgün çalışıyor.
2. DNS sunucusu düzgün çalışıyor.
3. Etki alanını yeni güncellediniz.
Hala etki alanınıza erişmede sorun varsa, servis merkezine
başvurun.
4. HTTP ve FTP sunucularıma ayrı ayrı erişmek için iki etki
alanı kaydı yapabilir miyim?
Hayır, yapamazsınız. Bir yönlendirici için yalnızca bir etki alanı
kaydı yapabilirsiniz. Ağda güvenlik uygulaması için bağlantı
noktası eşlemesini kullanın.
5. Yönlendiriciyi yeniden başlattıktan sonra, MS DOS ve
yönlendirici yapılandırma sayfasında neden farklı WAN
IP'leri görüyorum?
Bu normaldir. ISP DNS sunucusu ve ASUS DDNS arasındaki
zaman aralığı MS DOS ve yönlendirici yapılandırma sayfasında
farklı WAN IP'lerine neden olur. Farklı ISP'ler IP güncellemesi için
farklı zaman aralığına sahip olabilir.
6. ASUS DDNS hizmeti ücretsiz mi yoksa sadece bir deneme
sürümü mü?
ASUS DDNS hizmeti bazı ASUS yönlendiricilerine eklenmiş
ücretsiz bir hizmettir. ASUS yönlendiricinizin ASUS DDNS
hizmetini destekleyip desteklemediğini kontrol edin.
49
Page 50

Ekler
Uyarılar
ASUS Recycling/Takeback Services
ASUS recycling and takeback programs come from our
commitment to the highest standards for protecting our
environment. We believe in providing solutions for you to be able
to responsibly recycle our products, batteries, other components,
as well as the packaging materials. Please go to http://csr.asus.
com/english/Takeback.htm for the detailed recycling information
in dierent regions.
REACH
Complying with the REACH (Registration, Evaluation,
Authorisation, and Restriction of Chemicals) regulatory
framework, we published the chemical substances in our products
at ASUS REACH website at
http://csr.asus.com/english/inde�.asp�
Federal Communications Commission Statement
This device complies with Part 15 of the FCC Rules. Operation is
subject to the following two conditions:
• This device may not cause harmful interference.
• This device must accept any interference received, including
interference that may cause undesired operation.
This equipment has been tested and found to comply with the
limits for a class B digital device, pursuant to part 15 of the FCC
Rules. These limits are designed to provide reasonable protection
against harmful interference in a residential installation.
50
Page 51

This equipment generates, uses and can radiate radio frequency
energy and, if not installed and used in accordance with
the instructions, may cause harmful interference to radio
communications. However, there is no guarantee that interference
will not occur in a particular installation. If this equipment does
cause harmful interference to radio or television reception, which
can be determined by turning the equipment o and on, the user
is encouraged to try to correct the interference by one or more of
the following measures:
• Reorient or relocate the receiving antenna.
• Increase the separation between the equipment and receiver.
• Connect the equipment into an outlet on a circuit dierent
from that to which the receiver is connected.
• Consult the dealer or an experienced radio/TV technician for
help.
Any changes or modications not expressly approved by the
party responsible for compliance could void the user’s authority
to operate the equipment.
Prohibition of Co-location
This device and its antenna(s) must not be co-located or operating
in conjunction with any other antenna or transmitter
51
Page 52

Safety Information
To maintain compliance with FCC’s RF exposure guidelines, this
equipment should be installed and operated with minimum
distance 20cm between the radiator and your body. Use on the
supplied antenna.
Declaration of Conformity for R&TTE directive 1999/5/EC
Essential requirements – Article 3
Protection requirements for health and safety – Article 3.1a
Testing for electric safety according to EN 60950-1 has been
conducted. These are considered relevant and sucient.
Protection requirements for electromagnetic compatibility
– Article 3.1b
Testing for electromagnetic compatibility according to EN
301 489-1 and EN 301 489-17 has been conducted. These are
considered relevant and sucient.
Eective use of the radio spectrum – Article 3.2
Testing for radio test suites according to EN 300 328- 2 has been
conducted. These are considered relevant and sucient.
CE Mark Warning
This is a Class B product, in a domestic environment, this product
may cause radio interference, in which case the user may be
required to take adequate measures.
Canada, Industry Canada (IC) Notices
This Class B digital apparatus complies with Canadian ICES-003
and RSS-210.
52
Page 53

Operation is subject to the following two conditions: (1) this
device may not cause interference, and (2) this device must accept
any interference, including interference that may cause undesired
operation of the device.
Radio Frequency (RF) E�posure Information
The radiated output power of the Wireless Device is below the
Industry Canada (IC) radio frequency exposure limits. The Wireless
Device should be used in such a manner such that the potential
for human contact during normal operation is minimized.
This device has been evaluated for and shown compliant with
the IC Specic Absorption Rate (“SAR”) limits when installed in
specic host products operated in portable exposure conditions
(antennas are less than 20 centimeters of a person’s body).
This device has been certied for use in Canada. Status of the
listing in the Industry Canada’s REL (Radio Equipment List) can be
found at the following web address: http://www.ic.gc.ca/app/sitt/
reltel/srch/nwRdSrch.do?lang=eng
Additional Canadian information on RF exposure also can be
found at the following web: http://www.ic.gc.ca/eic/site/smt-gst.
nsf/eng/sf08792.html
Canada, avis d’Industry Canada (IC)
Cet appareil numérique de classe B est conforme aux normes
canadiennes ICES-003 et RSS-210.
Son fonctionnement est soumis aux deux conditions suivantes:
(1) cet appareil ne doit pas causer d’interférence et (2) cet appareil
doit accepter toute interférence, notamment les interférences qui
peuvent a ecter son fonctionnement.
53
Page 54

NCC 警語
經型式認證合格之低功率射頻電機,非經許可,公司、商號或
使用者均不得擅自變更頻率、加大功率或變更原設計之特性及
功能。低功率射頻電機之使用不得影響飛航安全及干擾合法通
信;經發現有干擾現象時,應立即停用,並改善至無干擾時方
得繼續使用。前項合法通信,指依電信法規定作業之無線電通
信。低功率射頻電機須忍受合法通信或工業、科學及醫療用電
波輻射性電機設備之干擾。
Yetkili distribütör türkiye:
BOGAZICI BIL GISAYAR SAN. VE TIC. A.S.
Tel: +90 212 3311000
Address: AYAZAGA MAH. KEMERBURGAZ CAD. NO.10
AYAZAGA/ISTANBUL
CIZGI Elektronik San. Tic. Ltd. Sti.
Tel: +90 212 3567070
Address: CEMAL SURURI CD. HALIM MERIC IS MERKEZI
No: 15/C D:5-6 34394 MECIDIYEKOY/ISTANBUL
54
Page 55

GNU General Public License
Licensing information
This product includes copyrighted third-party software licensed
under the terms of the GNU General Public License. Please see The
GNU General Public License for the exact terms and conditions
of this license. We include a copy of the GPL with every CD
shipped with our product. All future rmware updates will also be
accompanied with their respective source code. Please visit our
web site for updated information. Note that we do not oer direct
support for the distribution.
GNU GENERAL PUBLIC LICENSE
Version 2, June 1991
Copyright (C) 1989, 1991 Free Software Foundation, Inc.
59 Temple Place, Suite 330, Boston, MA 02111-1307 USA
Everyone is permitted to copy and distribute verbatim copies of
this license document, but changing it is not allowed.
Preamble
The licenses for most software are designed to take away your
freedom to share and change it. By contrast, the GNU General
Public License is intended to guarantee your freedom to share
and change free software--to make sure the software is free for all
its users. This General Public License applies to most of the Free
Software Foundation’s software and to any other program whose
authors commit to using it. (Some other Free Software Foundation
software is covered by the GNU Library General Public License
instead.) You can apply it to your programs, too.
55
Page 56

When we speak of free software, we are referring to freedom, not
price. Our General Public Licenses are designed to make sure that
you have the freedom to distribute copies of free software (and
charge for this service if you wish), that you receive source code or
can get it if you want it, that you can change the software or use
pieces of it in new free programs; and that you know you can do
these things.
To protect your rights, we need to make restrictions that forbid
anyone to deny you these rights or to ask you to surrender the
rights. These restrictions translate to certain responsibilities for
you if you distribute copies of the software, or if you modify it.
For example, if you distribute copies of such a program, whether
gratis or for a fee, you must give the recipients all the rights
that you have. You must make sure that they, too, receive or can
get the source code. And you must show them these terms so
they know their rights.We protect your rights with two steps:
(1) copyright the software, and (2) oer you this license which
gives you legal permission to copy, distribute and/or modify the
software.
Also, for each author’s protection and ours, we want to make
certain that everyone understands that there is no warranty for
this free software. If the software is modied by someone else and
passed on, we want its recipients to know that what they have is
not the original, so that any problems introduced by others will
not reect on the original authors’ reputations.
Finally, any free program is threatened constantly by software
patents. We wish to avoid the danger that redistributors of a free
program will individually obtain patent licenses, in eect making
the program proprietary. To prevent this, we have made it clear
that any patent must be licensed for everyone’s free use or not
licensed at all.
The precise terms and conditions for copying, distribution and
modication follow.
56
Page 57

Terms & conditions for copying, distribution, & modication
0. This License applies to any program or other work which
contains a notice placed by the copyright holder saying it may
be distributed under the terms of this General Public License.
The “Program”, below, refers to any such program or work, and
a “work based on the Program” means either the Program or
any derivative work under copyright law: that is to say, a work
containing the Program or a portion of it, either verbatim or
with modications and/or translated into another language.
(Hereinafter, translation is included without limitation in the
term “modication”.) Each licensee is addressed as “you”.
Activities other than copying, distribution and modication are
not covered by this License; they are outside its scope. The act
of running the Program is not restricted, and the output from
the Program is covered only if its contents constitute a work
based on the Program (independent of having been made by
running the Program). Whether that is true depends on what
the Program does.
1. You may copy and distribute verbatim copies of the Program’s
source code as you receive it, in any medium, provided that
you conspicuously and appropriately publish on each copy
an appropriate copyright notice and disclaimer of warranty;
keep intact all the notices that refer to this License and to the
absence of any warranty; and give any other recipients of the
Program a copy of this License along with the Program.
You may charge a fee for the physical act of transferring a
copy, and you may at your option oer warranty protection in
exchange for a fee.
2. You may modify your copy or copies of the Program or any
portion of it, thus forming a work based on the Program, and
copy and distribute such modications or work under the
terms of Section 1 above, provided that you also meet all of
these conditions:
a) You must cause the modied les to carry prominent
57
Page 58

notices stating that you changed the les and the date of any
change.
b) You must cause any work that you distribute or publish, that
in whole or in part contains or is derived from the Program or
any part thereof, to be licensed as a whole at no charge to all
third parties under the terms of this License.
c) If the modied program normally reads commands
interactively when run, you must cause it, when started
running for such interactive use in the most ordinary way, to
print or display an announcement including an appropriate
copyright notice and a notice that there is no warranty (or
else, saying that you provide a warranty) and that users may
redistribute the program under these conditions, and telling
the user how to view a copy of this License. (Exception: if the
Program itself is interactive but does not normally print such
an announcement, your work based on the Program is not
required to print an announcement.)
These requirements apply to the modied work as a whole.
If identiable sections of that work are not derived from the
Program, and can be reasonably considered independent and
separate works in themselves, then this License, and its terms,
do not apply to those sections when you distribute them as
separate works. But when you distribute the same sections
as part of a whole which is a work based on the Program, the
distribution of the whole must be on the terms of this License,
whose permissions for other licensees extend to the entire
whole, and thus to each and every part regardless of who
wrote it.
Thus, it is not the intent of this section to claim rights or contest
your rights to work written entirely by you; rather, the intent is
to exercise the right to control the distribution of derivative or
collective works based on the Program.
In addition, mere aggregation of another work not based on
58
Page 59

the Program with the Program (or with a work based on the
Program) on a volume of a storage or distribution medium
does not bring the other work under the scope of this License.
3. You may copy and distribute the Program (or a work based on
it, under Section 2) in object code or executable form under the
terms of Sections 1 and 2 above provided that you also do one
of the following:
a) Accompany it with the complete corresponding machine-
readable source code, which must be distributed under the
terms of Sections 1 and 2 above on a medium customarily used
for software interchange; or,
b) Accompany it with a written oer, valid for at least three
years, to give any third party, for a charge no more than your
cost of physically performing source distribution, a complete
machine-readable copy of the corresponding source code, to
be distributed under the terms of Sections 1 and 2 above on a
medium customarily used for software interchange; or,
c) Accompany it with the information you received as to the oer
to distribute corresponding source code. (This alternative is
allowed only for noncommercial distribution and only if you
received the program in object code or executable form with
such an oer, in accord with Subsection b above.)
The source code for a work means the preferred form of
the work for making modications to it. For an executable
work, complete source code means all the source code for all
modules it contains, plus any associated interface denition
les, plus the scripts used to control compilation and
installation of the executable. However, as a special exception,
the source code distributed need not include anything that
is normally distributed (in either source or binary form) with
the major components (compiler, kernel, and so on) of the
operating system on which the executable runs, unless that
59
Page 60

component itself accompanies the executable.
If distribution of executable or object code is made by
oering access to copy from a designated place, then oering
equivalent access to copy the source code from the same place
counts as distribution of the source code, even though third
parties are not compelled to copy the source along with the
object code.
4. You may not copy, modify, sublicense, or distribute the
Program except as expressly provided under this License. Any
attempt otherwise to copy, modify, sublicense or distribute
the Program is void, and will automatically terminate your
rights under this License. However, parties who have received
copies, or rights, from you under this License will not have
their licenses terminated so long as such parties remain in full
compliance.
5. You are not required to accept this License, since you have
not signed it. However, nothing else grants you permission to
modify or distribute the Program or its derivative works. These
actions are prohibited by law if you do not accept this License.
Therefore, by modifying or distributing the Program (or any
work based on the Program), you indicate your acceptance
of this License to do so, and all its terms and conditions for
copying, distributing or modifying the Program or works based
on it.
6. Each time you redistribute the Program (or any work based
on the Program), the recipient automatically receives a license
from the original licensor to copy, distribute or modify the
Program subject to these terms and conditions. You may not
impose any further restrictions on the recipients’ exercise of
the rights granted herein. You are not responsible for enforcing
compliance by third parties to this License.
7. If, as a consequence of a court judgment or allegation of patent
infringement or for any other reason (not limited to patent
issues), conditions are imposed on you (whether by court order,
agreement or otherwise) that contradict the conditions of this
60
Page 61

License, they do not excuse you from the conditions of this
License. If you cannot distribute so as to satisfy simultaneously
your obligations under this License and any other pertinent
obligations, then as a consequence you may not distribute
the Program at all. For example, if a patent license would not
permit royalty-free redistribution of the Program by all those
who receive copies directly or indirectly through you, then the
only way you could satisfy both it and this License would be to
refrain entirely from distribution of the Program.
If any portion of this section is held invalid or unenforceable
under any particular circumstance, the balance of the section
is intended to apply and the section as a whole is intended to
apply in other circumstances.
It is not the purpose of this section to induce you to infringe
any patents or other property right claims or to contest
validity of any such claims; this section has the sole purpose
of protecting the integrity of the free software distribution
system, which is implemented by public license practices.
Many people have made generous contributions to the wide
range of software distributed through that system in reliance
on consistent application of that system; it is up to the author/
donor to decide if he or she is willing to distribute software
through any other system and a licensee cannot impose that
choice.
This section is intended to make thoroughly clear what is
believed to be a consequence of the rest of this License.
8. If the distribution and/or use of the Program is restricted in
certain countries either by patents or by copyrighted interfaces,
the original copyright holder who places the Program under
this License may add an explicit geographical distribution
limitation excluding those countries, so that distribution is
permitted only in or among countries not thus excluded. In
such case, this License incorporates the limitation as if written
61
Page 62

in the body of this License.
9. The Free Software Foundation may publish revised and/or new
versions of the General Public License from time to time. Such
new versions will be similar in spirit to the present version, but
may dier in detail to address new problems or concerns.
Each version is given a distinguishing version number. If the
Program species a version number of this License which
applies to it and “any later version”, you have the option of
following the terms and conditions either of that version or of
any later version published by the Free Software Foundation. If
the Program does not specify a version number of this License,
you may choose any version ever published by the Free
Software Foundation.
10. If you wish to incorporate parts of the Program into other free
programs whose distribution conditions are dierent, write to
the author to ask for permission.
For software which is copyrighted by the Free Software
Foundation, write to the Free Software Foundation; we
sometimes make exceptions for this. Our decision will be
guided by the two goals of preserving the free status of all
derivatives of our free software and of promoting the sharing
and reuse of software generally.
62
Page 63

NO WARRANTY
11. BECAUSE THE PROGRAM IS LICENSED FREE OF CHARGE,
THERE IS NO WARRANTY FOR THE PROGRAM, TO THE EXTENT
PERMITTED BY APPLICABLE LAW. EXCEPT WHEN OTHERWISE
STATED IN WRITING THE COPYRIGHT HOLDERS AND/OR OTHER
PARTIES PROVIDE THE PROGRAM “AS IS” WITHOUT WARRANTY
OF ANY KIND, EITHER EXPRESSED OR IMPLIED, INCLUDING,
BUT NOT LIMITED TO, THE IMPLIED WARRANTIES OF
MERCHANTABILITY AND FITNESS FOR A PARTICULAR PURPOSE.
THE ENTIRE RISK AS TO THE QUALITY AND PERFORMANCE OF
THE PROGRAM IS WITH YOU. SHOULD THE PROGRAM PROVE
DEFECTIVE, YOU ASSUME THE COST OF ALL NECESSARY
SERVICING, REPAIR OR CORRECTION.
12 IN NO EVENT UNLESS REQUIRED BY APPLICABLE LAW OR
AGREED TO IN WRITING WILL ANY COPYRIGHT HOLDER, OR
ANY OTHER PARTY WHO MAY MODIFY AND/OR REDISTRIBUTE
THE PROGRAM AS PERMITTED ABOVE, BE LIABLE TO YOU FOR
DAMAGES, INCLUDING ANY GENERAL, SPECIAL, INCIDENTAL
OR CONSEQUENTIAL DAMAGES ARISING OUT OF THE USE
OR INABILITY TO USE THE PROGRAM (INCLUDING BUT NOT
LIMITED TO LOSS OF DATA OR DATA BEING RENDERED
INACCURATE OR LOSSES SUSTAINED BY YOU OR THIRD PARTIES
OR A FAILURE OF THE PROGRAM TO OPERATE WITH ANY OTHER
PROGRAMS), EVEN IF SUCH HOLDER OR OTHER PARTY HAS
BEEN ADVISED OF THE POSSIBILITY OF SUCH DAMAGES.
END OF TERMS AND CONDITIONS
63
Page 64

Ağ Küresel Yardım Hattı Bilgisi
Area Hotline Number
Australia 1300-2787-88 English 8:00-20:00 Mon. to Fri.
Austria 0043-820240513 German 9:00-18:00 Mon. to Fri.
Belgium 0032-78150231 Dutch /French 9:00-17:00 Mon. to Fri.
China 400-620-6655
Denmark 0045-3832-2943 Denish/English 9:00-17:00 Mon. to Fri.
Finland 00358-9693-7969
France 0033-170949400 France 9:00-17:45 Mon. to Fri.
Greece 00800-44-14-20-44 Greek
Hong Kong 3582-4770
Ireland 0035-31890719918 English 9:00-17:00 Mon. to Fri.
Italy 199-400089 Italian
Japan 0800-123-2787 Japanese
+603 2148 0827 (Check
Malaysia
Netherlands
/ Luxembourg
New Zealand
Norway 0047-2316-2682
Philippine
Poland
Portugal 707-500-310 Portuguese 9:00-17:00 Mon. to Fri.
Repair Detail Status
Only)
+603-6279-5077
0031-591-570290 Dutch / English 9:00-17:00 Mon. to Fri.
0800-278-788 /
0800-278-778
+632-636 8504;
180014410573
00225-718-033
00225-718-040
Support
Languages
Simplied
Chinese
Finnish/English/
Swedish
Cantonese/
Chinese/
English
Bahasa Melayu/
English
English 8:00-20:00 Mon. to Fri.
Norwegian
/English
English 9:00-18:00 Mon. to Fri.
Polish
Working
Hour
9:00-18:00
10:00-18:00 Mon. to Fri.
9:00-13:00;
14:00-18:00
10:00-20:00
10:00-17:00 Sat.
09:00-13:00
14:00-18:00
9:00-18:00 Mon. to Fri.
9:00-17:00 Sat. to Sun.
10:00-19:00 Mon. to Fri.
9:00-17:00 Mon. to Fri.
9:00-17:00
8:30-17:30
Working
Day
Mon. to
Sun.
Mon. to Fri.
Mon. to Fri.
Mon. to Fri.
Mon. to Fri.
64
Page 65

Area Hotline Number
Russia
Singapore
Slovak 00421-232-162-621 Czech 8:00-17:00 Mon. to Fri.
Spain 902-88-96-88 Spanish 9:00-18:00 Mon. to Fri.
Sweden 0046-8587-6940
Switzerland
Taiwan
Thailand
Turkey +90-216-524-3000 Turkish 09:00-18:00 Mon. to Fri
United Kingdom
USA/Canada
+8-800-100-ASUS; +7495-231-1999
+65-6720-3835
(Check Repair Detail
Status Only)
-66221701
0041-848111010 German 9:00-18:00 Mon. to Fri.
0041-848111014 French Mon. to Fri.
0041-848111012 Italian Mon. to Fri.
0800-093-456;
02-81439000
+662-679-8367 -70; 001
800 852 5201
0044-870-1208340;
0035-31890719918
1-812-282-2787 English
Support
Languages
Russian/
English
English
Swedish/
English
Traditional
Chinese
Thai/English 9:00-18:00 Mon. to Fri.
English 9:00-17:00 Mon. to Fri.
Working
Hour
9:00-18:00 Mon. to Fri.
11:00-19:00 Mon. to Fri.
9:00-17:00 Mon. to Fri.
9:00-12:00;
13:30-18:00
8:30-12:00am
EST
(5:30am9:00pm PST)
9:00am6:00pm EST
(6:00am3:00pm PST)
Working
Day
Mon. to Fri.
Mon. to Fri.
Sat. to Sun.
Servis merkezi bilgileri için http://support.asus.com adresindeki ASUS
Destek sitesini ziyaret edin.
65
Page 66

İrtibat Bilgileri
ASUSTeK COMPUTER INC. (Asya Pasik)
Adres 15 Li-Te Road, Peitou, Taipei, Taiwan 11259
Web sitesi www.asus.com.tw
Teknik Destek
Telefon +886228943447
Yardım faks +886228907698
Online yardım support.asus.com
ASUS COMPUTER INTERNATIONAL (Amerika)
Adres 800 Corporate Way, Fremont, CA 94539, USA
Telefon +15107393777
Faks +15106084555
Web sitesi usa.asus.com
Online yardım support.asus.com
ASUS COMPUTER GmbH (Almanya ve Avusturya)
Adres Harkort Str. 21-23, D-40880 Ratingen, Germany
Telefon +491805010923*
Faks +492102959911
Web sitesi www.asus.de
Online iletişim www.asus.de/sales
Teknik Destek
Telefon (Parça, Ağı) +491805010923*
Telefon (Sistem/Dizüstü Bilgisayar/Eee/LCD)
+491805010920*
Faks +492102959911
Online yardım support.asus.com
* Bir Almanya sabit hattından arama 0.14 Euro/dakika; cep telefonundan arama 0.42 Euro/
dakika.
66
Page 67

Üretici:
ASUSTeK Computer Inc.
Tel: +886-2-2894-3447
Adres: 4F, No. 150, LI-TE RD., PEITOU,
Yetkili temsilci
Avrupa’da:
ASUS Computer GmbH
Adres: HARKORT STR. 21-23, 40880
EEE Yönetmeliğine Uygundur.
TAIPEI 112, TAIWAN
RATINGEN, GERMANY
67
Page 68

68
 Loading...