

Page 1
ZS673KSZS673KS
ROG PHONE
User Guide
Page 2
E17161
April 2021
First Edition
Care and safety
Guidelines
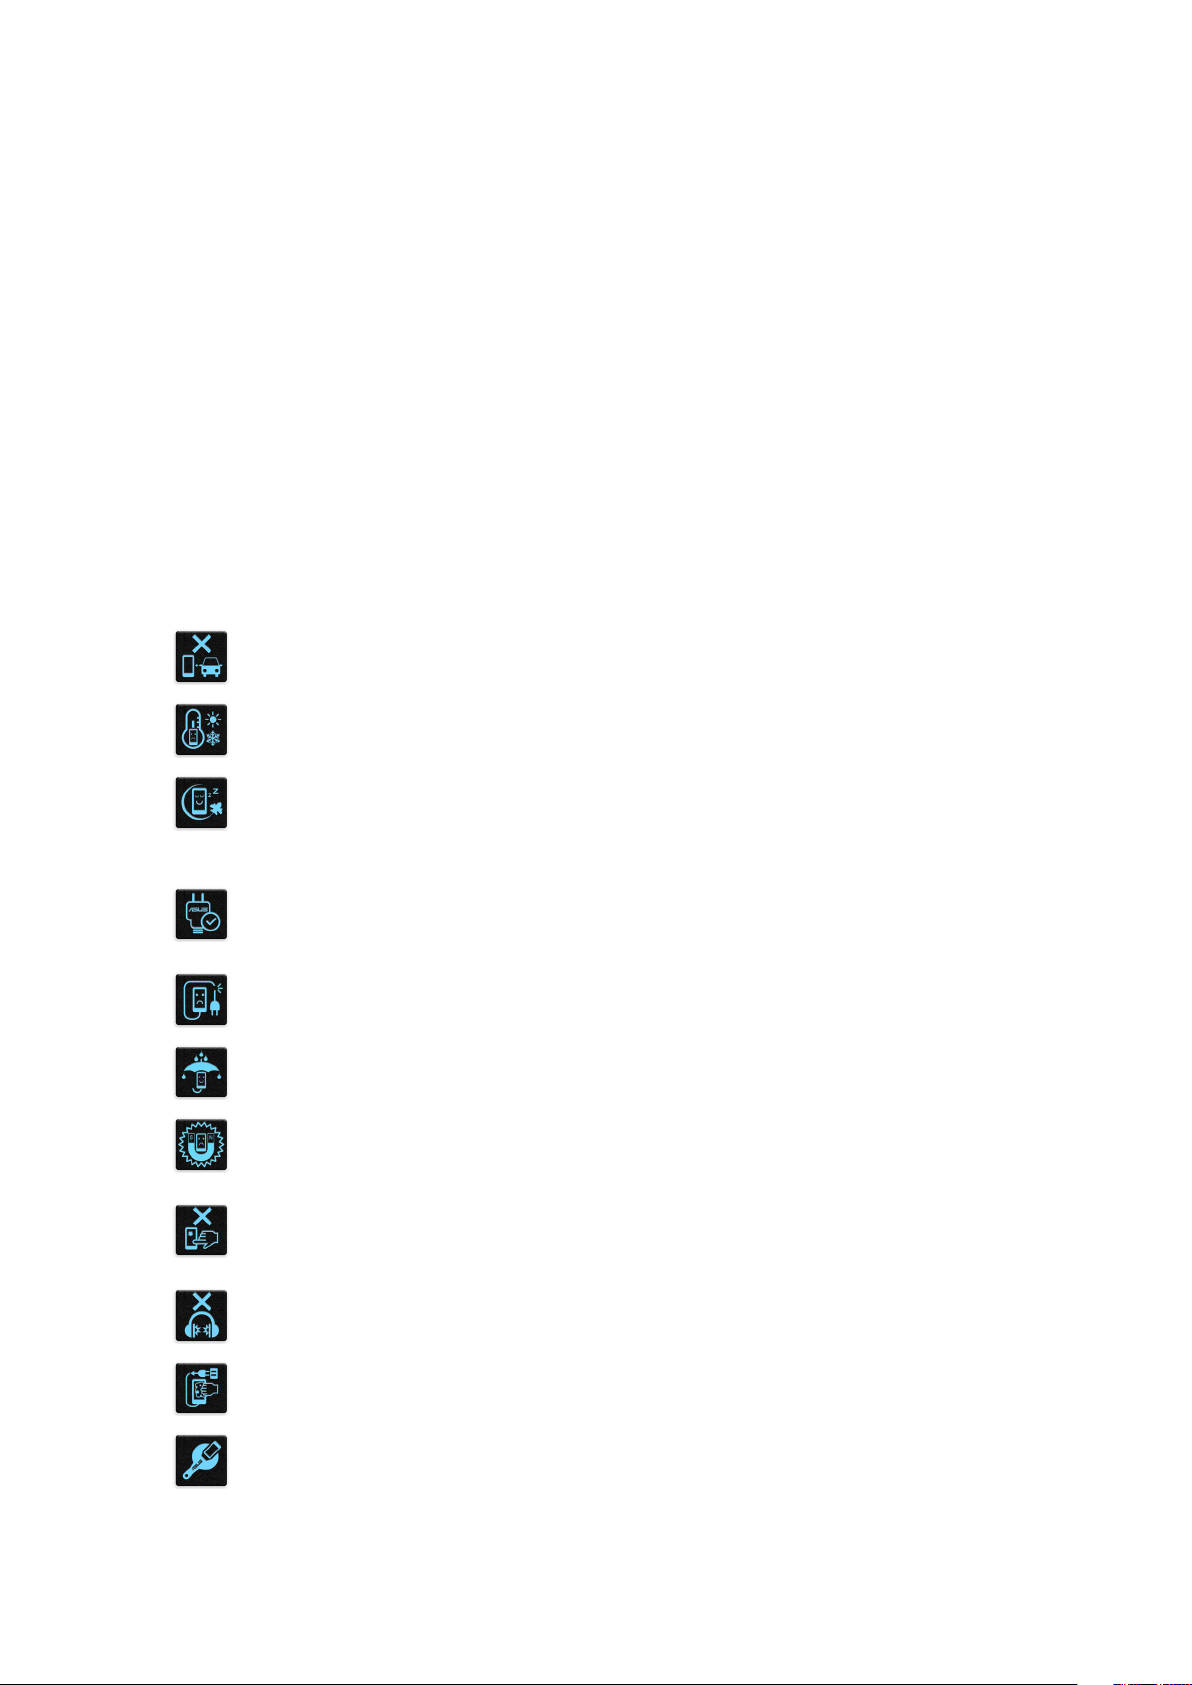
Road safety comes rst. We strongly recommend not to use your device when
driving or operating any type of vehicle.
This device should only be used in environments with ambient temperatures
between 0°C (32°F) and 35°C (95°F).
Turn o your device in restricted areas where the use of mobile devices is prohibited.
Always obey rules and regulations when in restricted areas, such as, in aircraft, movie
theater, in hospitals or near medical equipment, near gas or fuel, construction sites,
blasting sites and other areas.
Use only AC adapters and cables approved by ASUS for use with this device. Refer to
the rating label on the bottom of your device and ensure that your power adapter
complies with this rating.
Do not use damaged power cables, accessories, and other peripherals with your
device.
Keep your device dry. Do not use or expose your device near liquids, rain, or
moisture.
You can put your device through x-ray machines (such as those used in conveyor
belts for airport security), but do not expose the device to magnetic detectors and
wands.
The device screen is made of glass. If the glass gets broken, stop using the device
and do not touch the broken glass parts. Immediately send device for repair to
ASUS-qualied service personnel.
Do not listen at high volume levels for long periods to prevent possible hearing
damage.
Disconnect the AC power before cleaning your device. Use only a clean cellulose
sponge or chamois cloth when cleaning your device screen.
Send device for repair to ASUS-qualied service personnel only.
2
Page 3
Proper disposal
Risk of explosion if battery is replaced by an incorrect type. Dispose of used batteries
according to the instructions.
DO NOT throw the battery in municipal waste. The symbol of the crossed out
wheeled bin indicates that the battery should not be placed in municipal waste.
DO NOT throw this product in municipal waste. This product has been designed to
enable proper reuse of parts and recycling. The symbol of the crossed out wheeled
bin indicates that the product (electrical, electronic equipment and mercurycontaining button cell battery) should not be placed in municipal waste. Check local
regulations for disposal of electronic products.
DO NOT throw this product in re. DO NOT short circuit the contacts. DO NOT
disassemble this product.
WARNING
Cancer and Reproductive Harm-
www.P65Warnings.ca.gov
ZenTalk Fans Forum
(http://www.asus.com/zentalk/global_forward.php)
NOTES:
• For more legal and e-labelling information, check on your device from Settings > System >
Regulatory labels and Settings > System > About phone > Legal information.
• The app descriptions shown in this manual are for reference purposes only, and may not exactly
match what you see on your device.
3
Page 4

Contents
1 Basics
Welcome! .................................................................................................................................................. 7
Get your ROG Phone ready! ............................................................................................................... 8
Starting for the rst time ..................................................................................................................16
Using the touchscreen.......................................................................................................................17
2 There’s no place like Home
Zen Home features .....................................................................................................20
Home screen .........................................................................................................................................20
Quick settings .......................................................................................................................................21
Notications ..........................................................................................................................................22
Personalizing your Home screen ...............................................................................23
Widgets ..................................................................................................................................................23
Wallpapers .............................................................................................................................................24
Editing your Home screen ................................................................................................................25
Setting up the date and time ..........................................................................................................25
Setting up your ringtone and alert sounds................................................................................25
Lock Screen .................................................................................................................26
Customizing your lock screen .........................................................................................................26
Fingerprint ID sensor ..................................................................................................27
Starting your ROG Phone for the rst time ................................................................................27
Setting up ngerprint ID from Settings ......................................................................................28
Face Unlock .................................................................................................................29
Setting up face unlock from Settings ...........................................................................................29
3 Work hard, play harder
Chrome ........................................................................................................................32
Launching Chrome .............................................................................................................................32
Sharing pages .......................................................................................................................................33
Bookmarking pages ...........................................................................................................................33
Clearing the browsing data .............................................................................................................33
Gmail ............................................................................................................................ 34
Google Calendar ......................................................................................................... 35
Creating events ....................................................................................................................................35
Editing or removing events .............................................................................................................35
Creating reminders .............................................................................................................................36
Editing or removing reminders ......................................................................................................36
File Manager................................................................................................................37
ASUS Data Transfer .....................................................................................................38
4 Keeping in touch
Call in style ..................................................................................................................39
Dual SIM feature...................................................................................................................................39
Making calls ........................................................................................................................................... 41
Calling your favorite contacts .........................................................................................................43
4
Page 5

Receiving calls ......................................................................................................................................43
Other call options ................................................................................................................................ 44
Recording calls .....................................................................................................................................45
Managing contacts ..................................................................................................... 46
Contacts Settings ................................................................................................................................46
Setting up your prole ......................................................................................................................46
Adding contacts ...................................................................................................................................47
Marking your favorite contacts ......................................................................................................48
Social networking with your contacts .........................................................................................49
Send messages and more ..........................................................................................50
Messages ................................................................................................................................................50
5 Fun and entertainment
Using a headset ........................................................................................................... 51
Connecting the audio jack ...............................................................................................................51
YT Music .......................................................................................................................52
6 Your precious moments
Capture moments .......................................................................................................53
Launching the Camera app .............................................................................................................53
Photo Locations ...................................................................................................................................54
Advanced camera features ..............................................................................................................54
Time lapse ..............................................................................................................................................55
Using the Gallery ........................................................................................................56
Viewing the photo location .............................................................................................................56
Editing images ......................................................................................................................................56
Sharing les from the Gallery ..........................................................................................................56
Deleting les from the Gallery ........................................................................................................ 57
7 Staying connected
Mobile network ........................................................................................................... 58
Enabling the mobile network .........................................................................................................58
Wi-Fi .............................................................................................................................58
Enabling Wi-Fi .......................................................................................................................................58
Connecting to a Wi-Fi network .......................................................................................................59
Disabling Wi-Fi ......................................................................................................................................59
Bluetooth® ................................................................................................................... 59
Enabling Bluetooth® ...........................................................................................................................59
Pairing your ROG Phone to a Bluetooth® device ......................................................................60
Unpairing your ROG Phone from the Bluetooth® device ......................................................60
Tethering .....................................................................................................................61
Wi-Fi
Hotspot .........................................................................................................................................61
USB Tethering .......................................................................................................................................62
Bluetooth Tethering ............................................................................................................................62
8 Travel and Maps
Weather .......................................................................................................................63
Launching the Weather app ............................................................................................................63
5
Page 6

Weather home screen ........................................................................................................................64
Clock ............................................................................................................................65
Alarm clock ............................................................................................................................................65
World clock ............................................................................................................................................66
Stopwatch .............................................................................................................................................. 66
Timer ........................................................................................................................................................67
9 Zen Everywhere
Special Zen Tools .........................................................................................................68
Calculator ...............................................................................................................................................68
Sound Recorder ...................................................................................................................................69
Mobile Manager .......................................................................................................... 71
10 Maintain your Zen
Keeping your device up-to-date ................................................................................ 72
Updating your system .......................................................................................................................72
Storage ....................................................................................................................................................72
Backup .....................................................................................................................................................72
Reset .........................................................................................................................................................72
Securing your ROG Phone ................................................................................................................73
Appendix
6
Page 7
1 Basics
Basics
1
Welcome!
Explore the intuitive simplicity of ASUS ZenUI!
ASUS ZenUI is a charming and intuitive interface exclusively for ROG Phones. It provides you with
special apps, which are integrated in or with other apps, to t your unique individual needs and
make your life easier while letting you have fun with your ROG Phone.
Camera
With PixelMaster technology, capture those precious moments in vivid and high-quality
photos and videos.
Messages
Messages, an intuitive and delightful app, lets you send/receive SMS/MMS messages,
as well as send group texts, photos, or audio messages. You can add emojis or stickers
to your messages, share your location, archive your messages, and easily block SMS
senders. You can also take photos or record videos and easily share these les.
File Manager
File Manager allows you to easily locate and manage your data on the internal storage
of your ROG Phone and its connected external storage devices.
NOTE: Availability of ASUS ZenUI apps vary per region and ROG Phone model. Swipe up on your Home
screen to check the apps available on your ROG Phone.
Chapter 1: Basics
7
Page 8
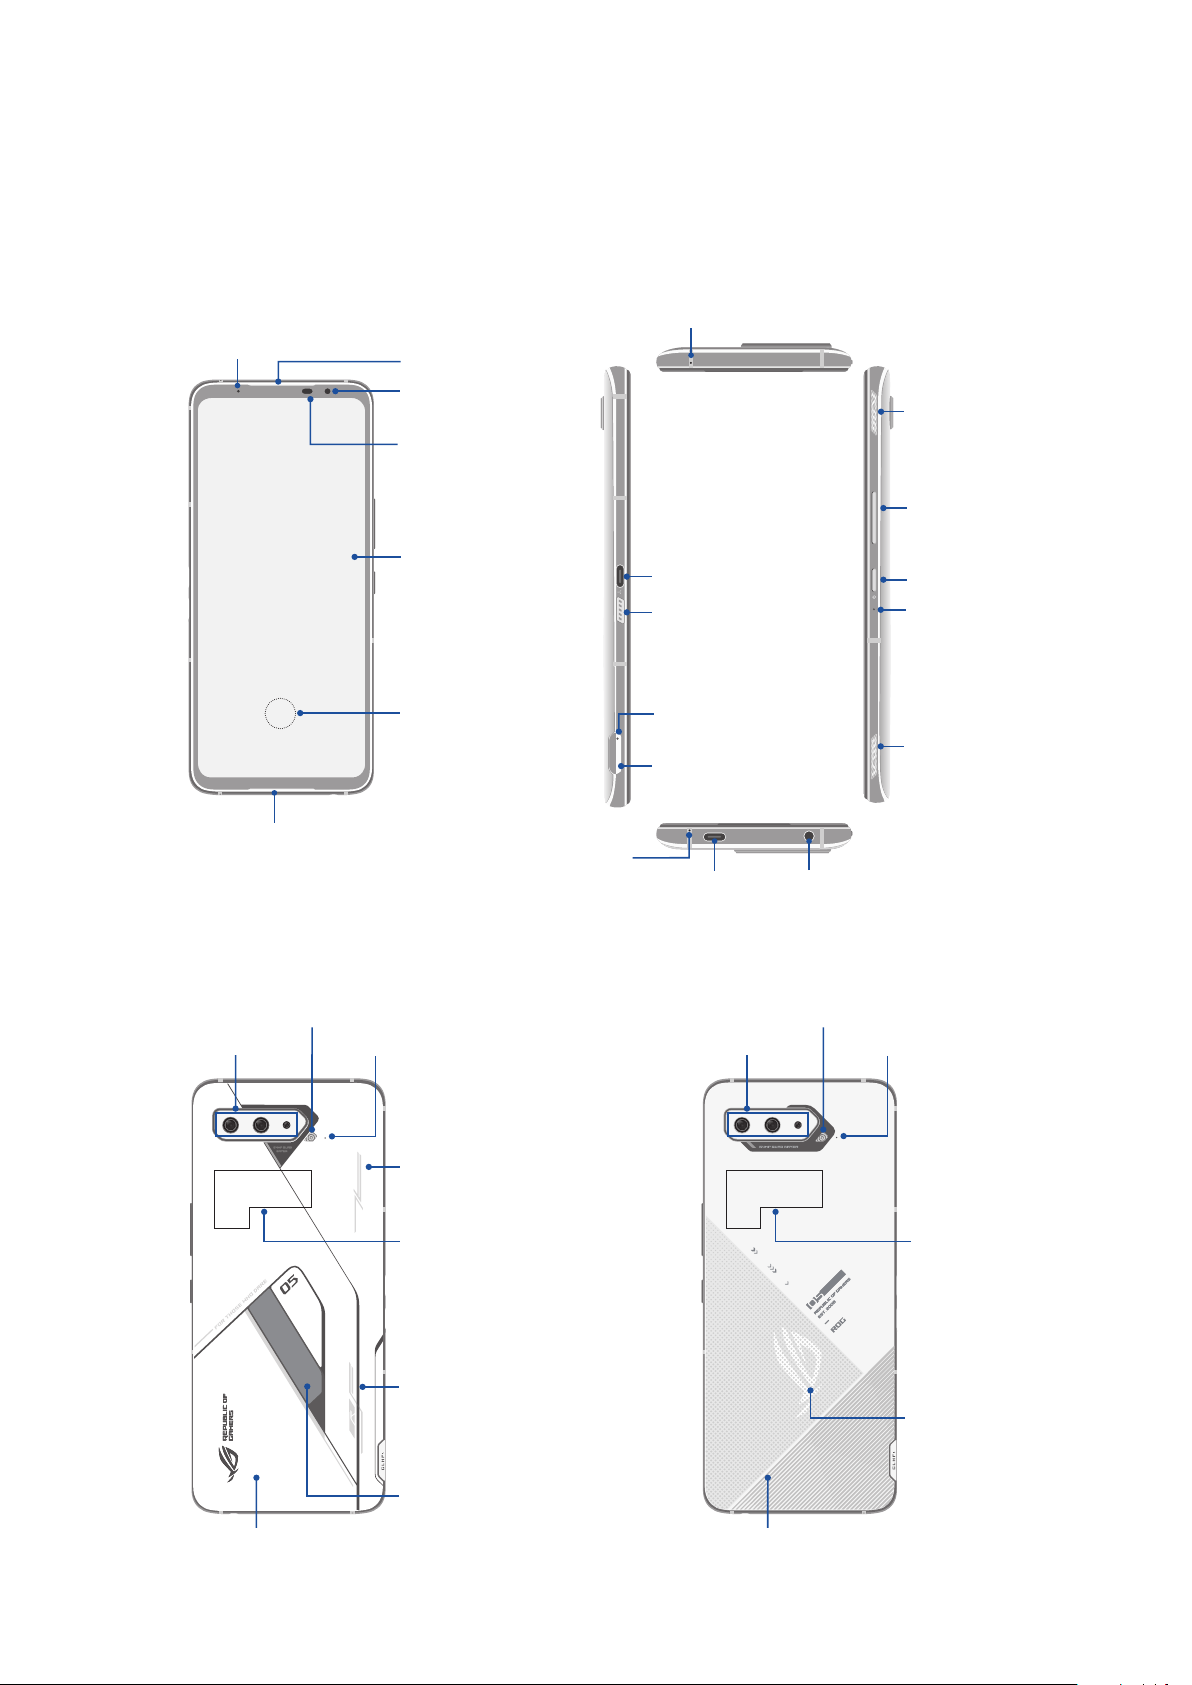
Get your ROG Phone ready!
Parts and features
Take a hold of your device and have it running in a jiy.
ASUS_I005D / ASUS_I005DC
LED indictor
Speaker
Receiver & Speaker
Front camera
Proximity sensor
and light sensor
Touch screen
display
Fingerprint
sensor
Microphone
Microphone
USB Type-C port
Pogo Pin
Nano SIM card
tray eject hole
Nano SIM card slot
USB Type-C port
AirTrigger
touch sensor
Volume key
Power key
Microphone
AirTrigger
touch sensor
Audio jack
ASUS_I005D
Rear cameras
Rear cover
Camera ash
Microphone
Rear Touch
NFC detection
area
Rear Touch
ROG Vision
ASUS_I005DC
Camera ash
Rear cameras
Rear cover
Microphone
NFC detection
area
Aura light
8
Chapter 1: Basics
Page 9
WARNING!
• To avoid network connection and battery issues:
• DO NOT place a metallic sticker on the antenna area.
• DO NOT use a metallic protective frame/case on your ROG Phone.
• DO NOT cover the antenna area with your hands or other objects while using some functions such
as making calls or using the mobile data connection.
• We recommend that you use ASUS-compatible screen protectors. Using non-ASUS-compatible
screen protectors may cause your ROG Phone's sensor to malfunction.
IMPORTANT!
• We do not recommend using a screen protector as it can interfere with the proximity sensor. If you
want to use a screen protector, ensure that it does not block the proximity sensor.
• Keep the device, particularly the touch screen, dry all the time. Water or other liquids can cause the
touch screen to malfunction.
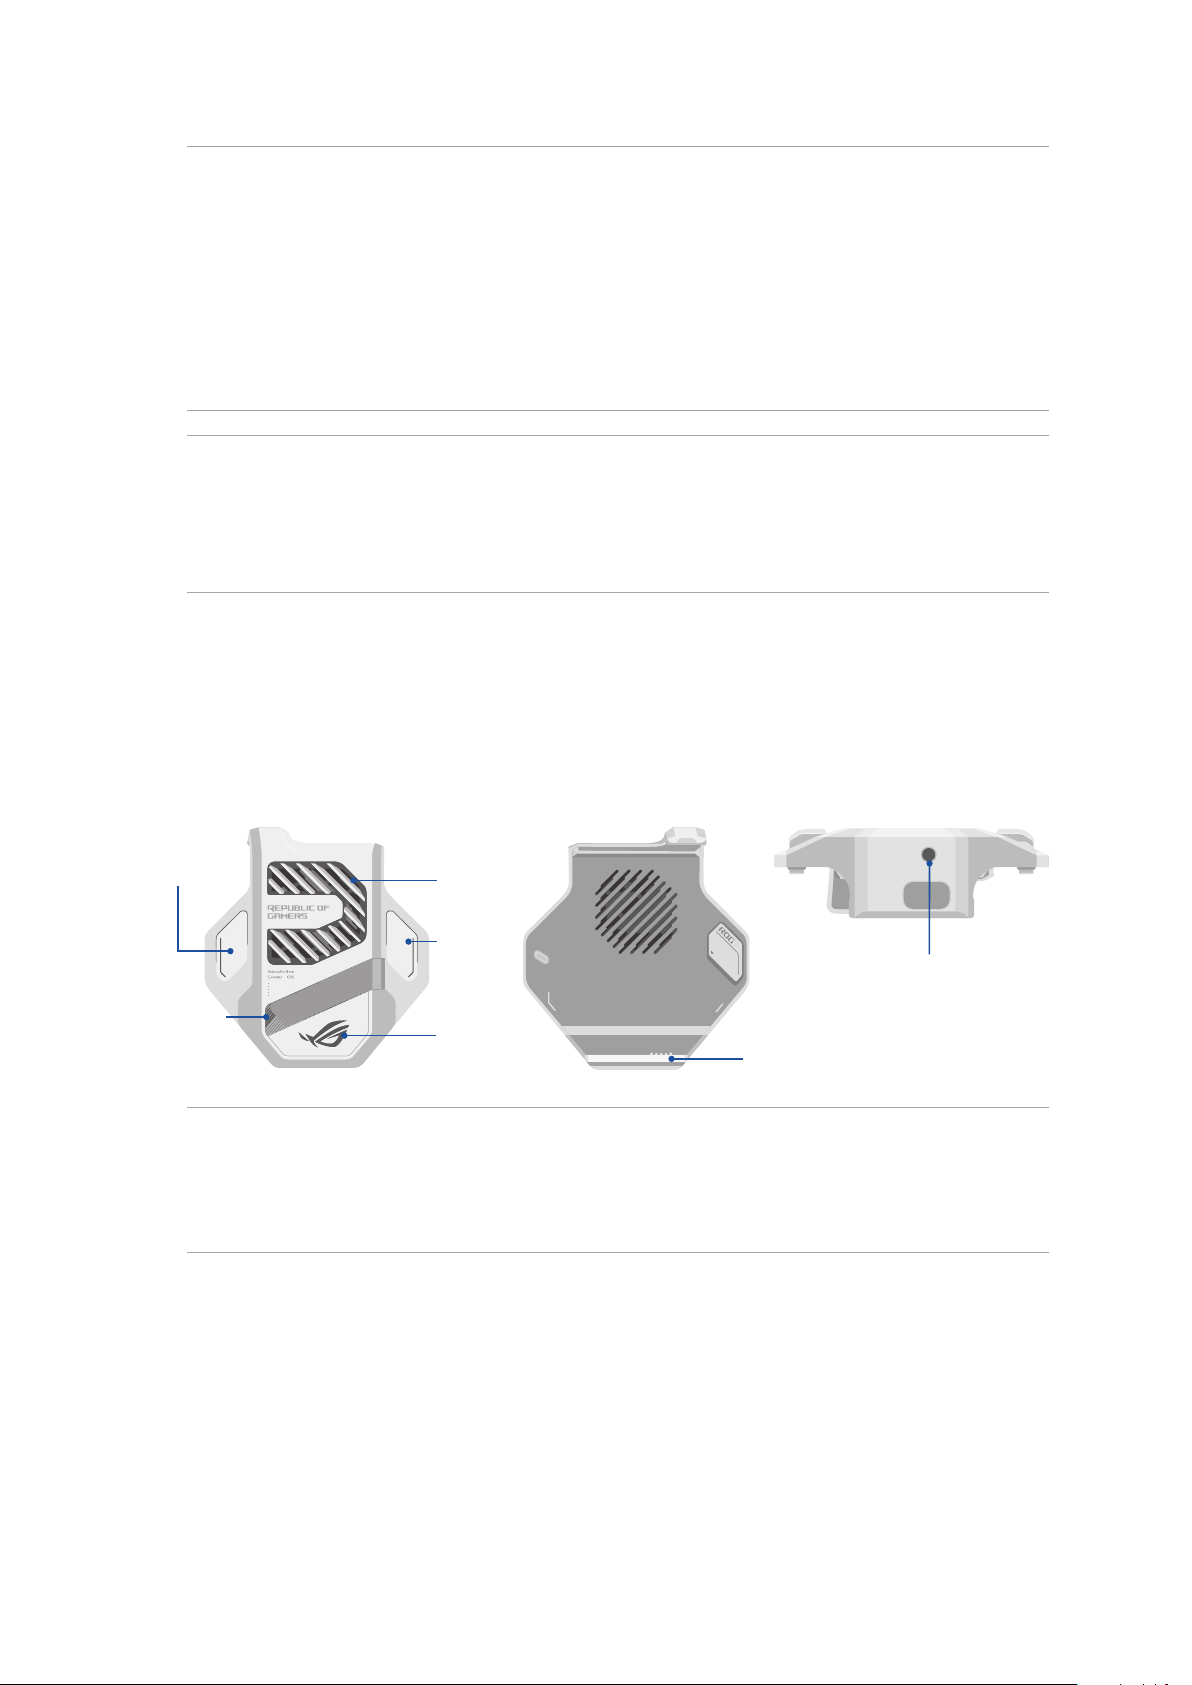
AeroActive Cooler features
Use the AeroActive Cooler to keep your ROG Phone working at a high frequency during heavy
workloads by providing a better thermal solution, and oering the ultimate user experience.
Cooler
button
Kickstand
Fan
Cooler
button
Aura
light
Pogo Pin
NOTES:
• Only ASUS_I005D comes with the AeroActive Cooler.
• Connect your AeroActive Cooler to the Pogo Pin of your ROG Phone.
• You can use your AeroActive Cooler while using the bundled ROG Phone 5 Case.
Audio jack
Chapter 1: Basics
9
Page 10
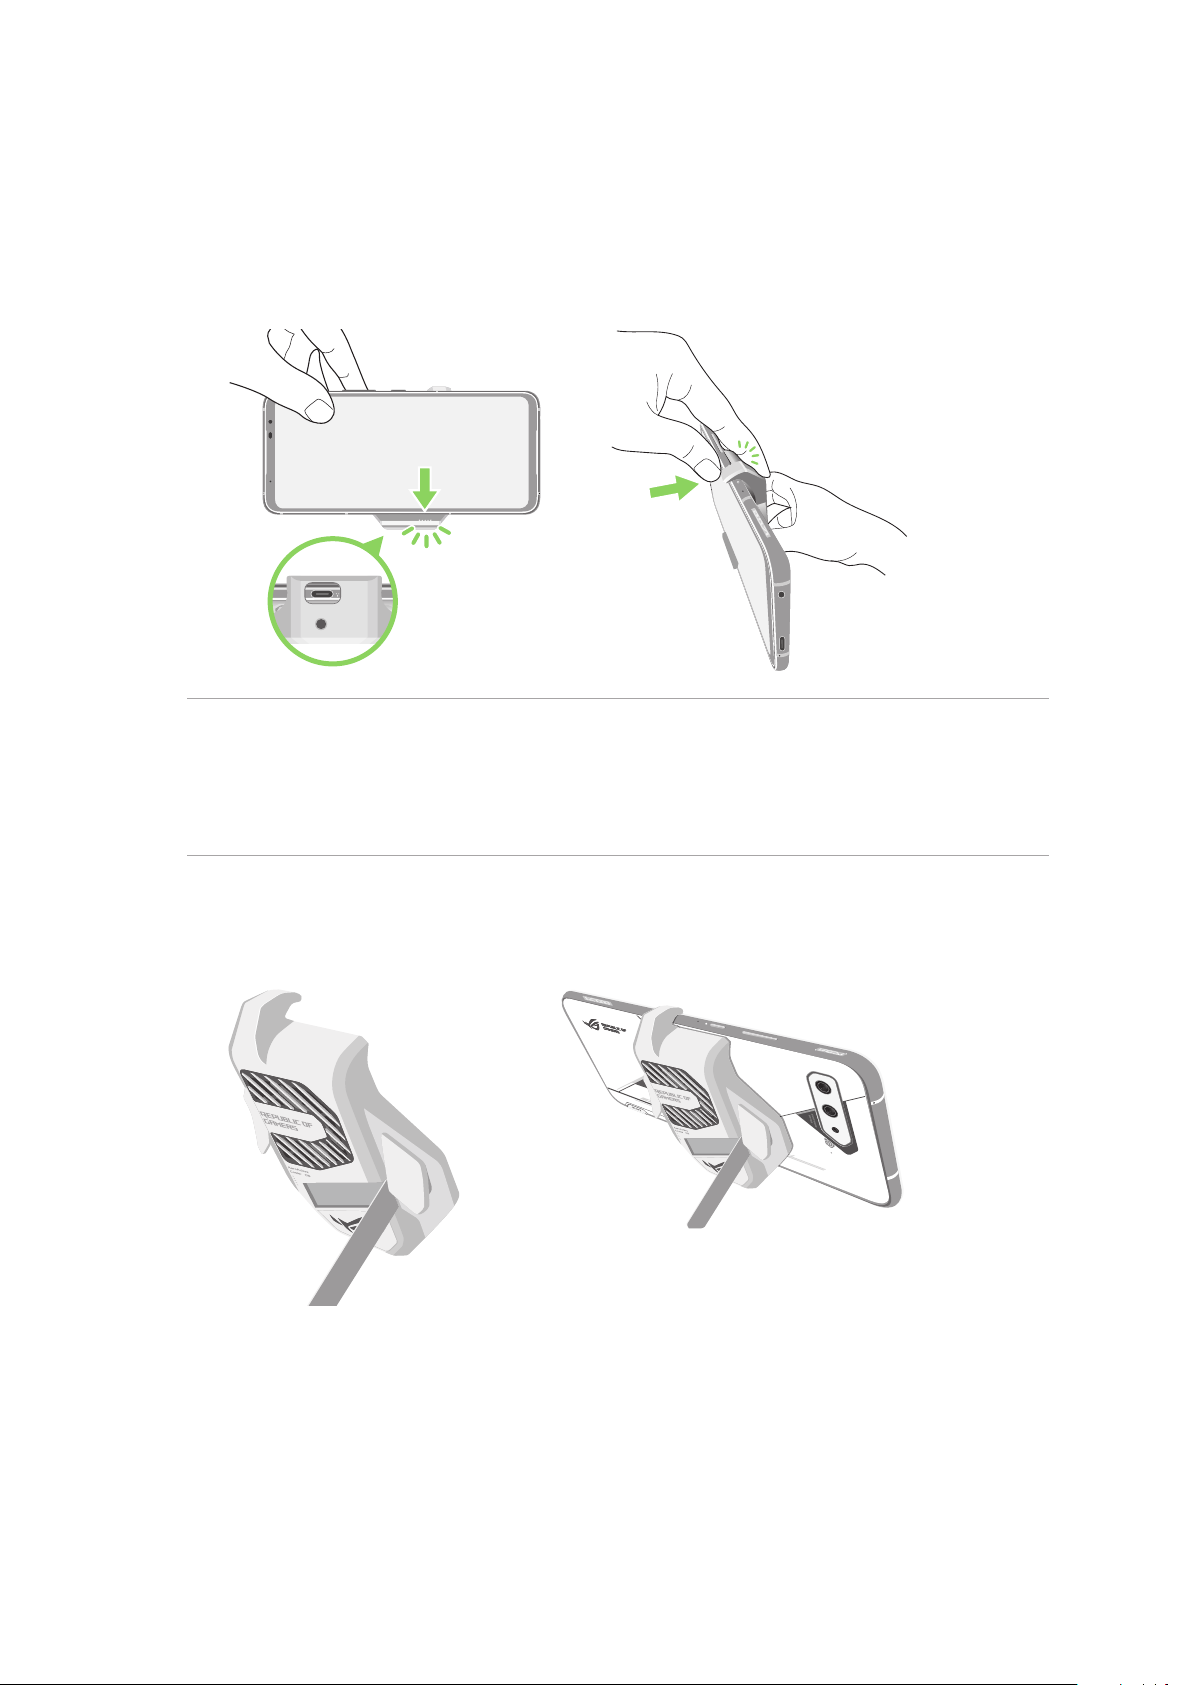
To install AeroActive Cooler:
1. Align the female Pogo Pin on the side of your phone with the male Pogo Pin on the bottom of
your AeroActive Cooler and gently push down your phone.
2. Push your phone backward until you hear a click.
NOTES:
• It is not recommended that you connect other devices to your ROG Phone when you install the
phone on the AeroActive Cooler.
• Docking your ROG Phone on an accessory with fan(s) will impact the audio quality when making
phone calls and recording.
To use the kickstand of AeroActive Cooler:
Open the kickstand on the back of the AeroActive Cooler to get optimal viewing experience.
10
Chapter 1: Basics
Page 11
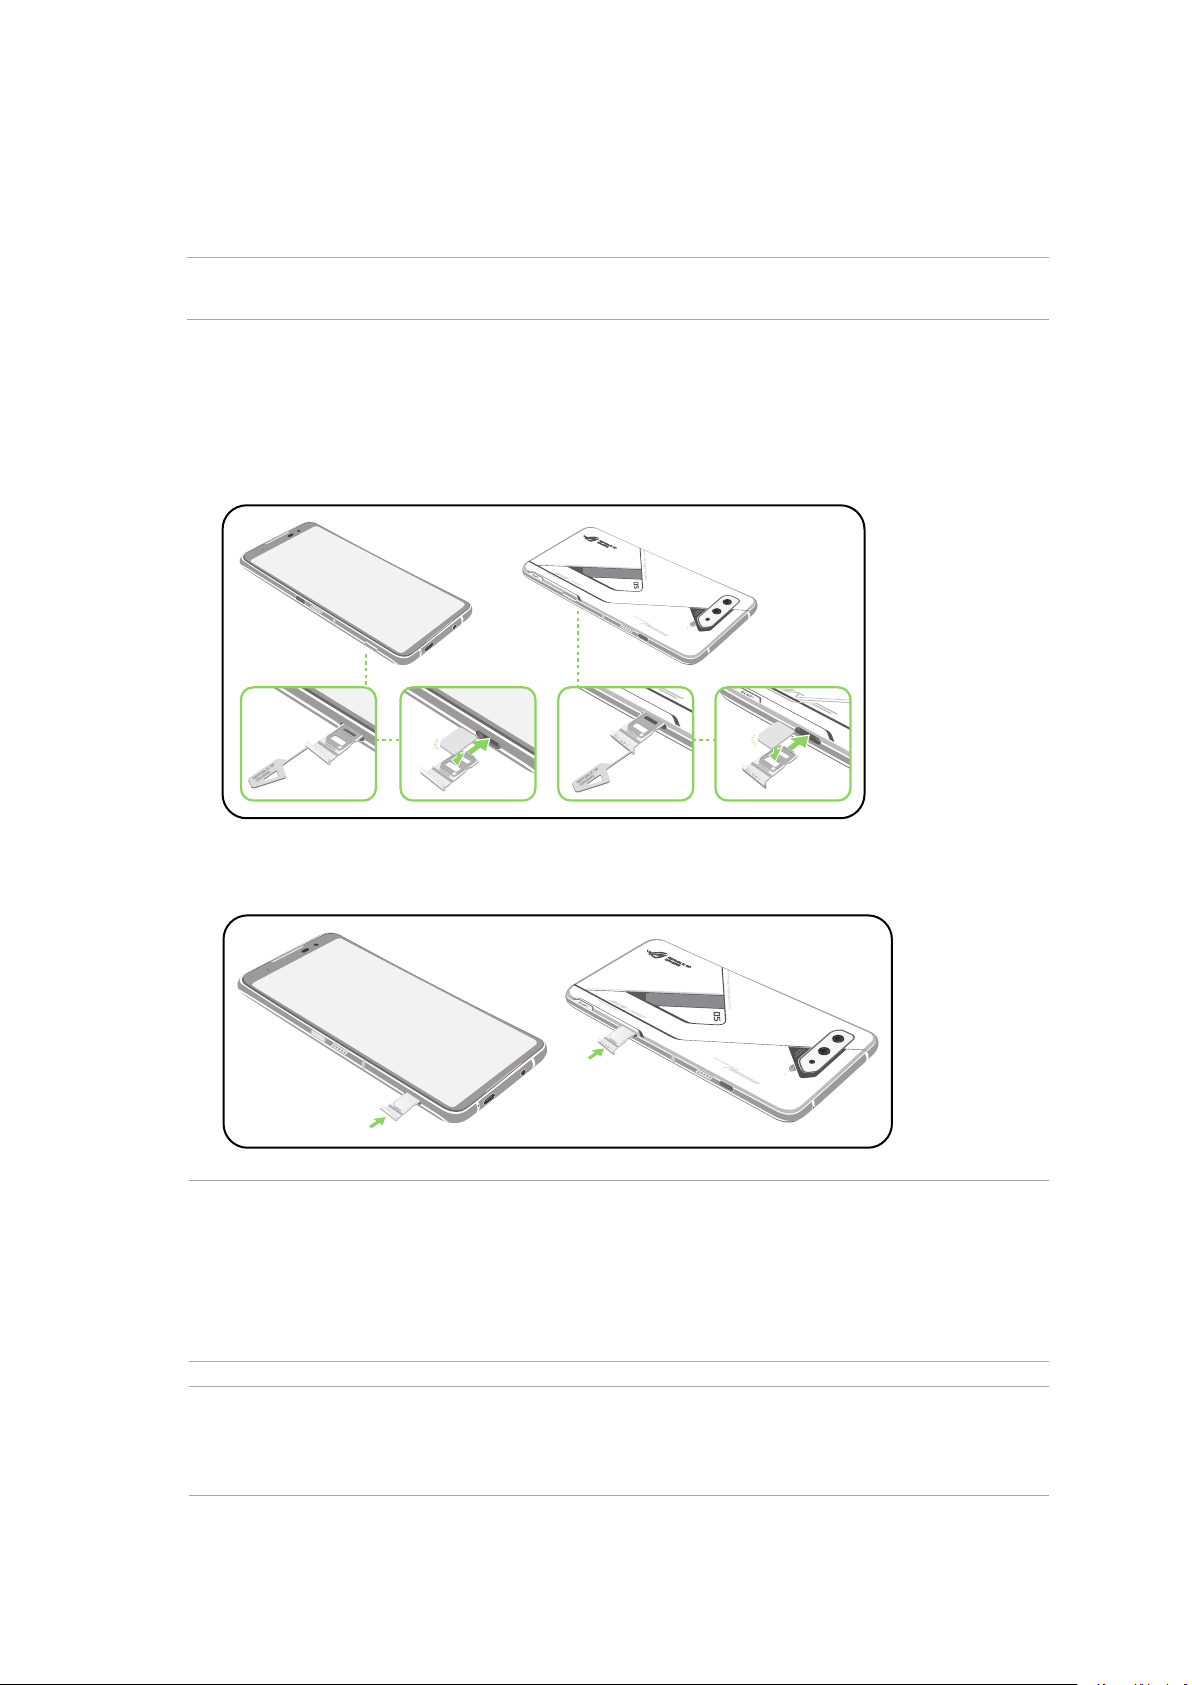
Installing a nano SIM card
Both nano SIM card slots support GSM/GPRS/EDGE, WCDMA/HSPA+/DC-HSPA+, FDD-LTE, TD-LTE,
and 5G NR Sub-6 network bands.
CAUTION! Be extra careful when handling a
damage incurred to your
nano SIM card(s)
nano SIM card
.
. ASUS is not responsible for any data loss or
To install a nano SIM card:
1. Push the bundled eject pin into the hole on the card slot to eject the tray out.
2. Insert the nano SIM card(s) into the card slot(s).
Nano-SIM1
Nano-SIM2
3. Gently push the tray back in until it’s securely closed.
NOTES:
•
Both Nano SIM card slots support GSM/GPRS/EDGE, WCDMA/HSPA+/DC-HSPA+, FDD-LTE, TD-LTE, and 5G
NR Sub-6 network bands. Both Nano SIM cards can connect to VoLTE (4G Calling) service. But only one
can connect to 5G NR Sub-6 data service at a time.
•
Actual network and frequency band usage depends on network deployment in your area. Contact your
telecom carrier if 5G NR Sub-6 support and VoLTE (4G Calling) service are available in your area
CAUTION!
•
Do not use sharp tools or solvent on your device to avoid scratches on it
.
.
•
Use only a standard Nano SIM card on your ROG Phone
.
Chapter 1: Basics
11
Page 12
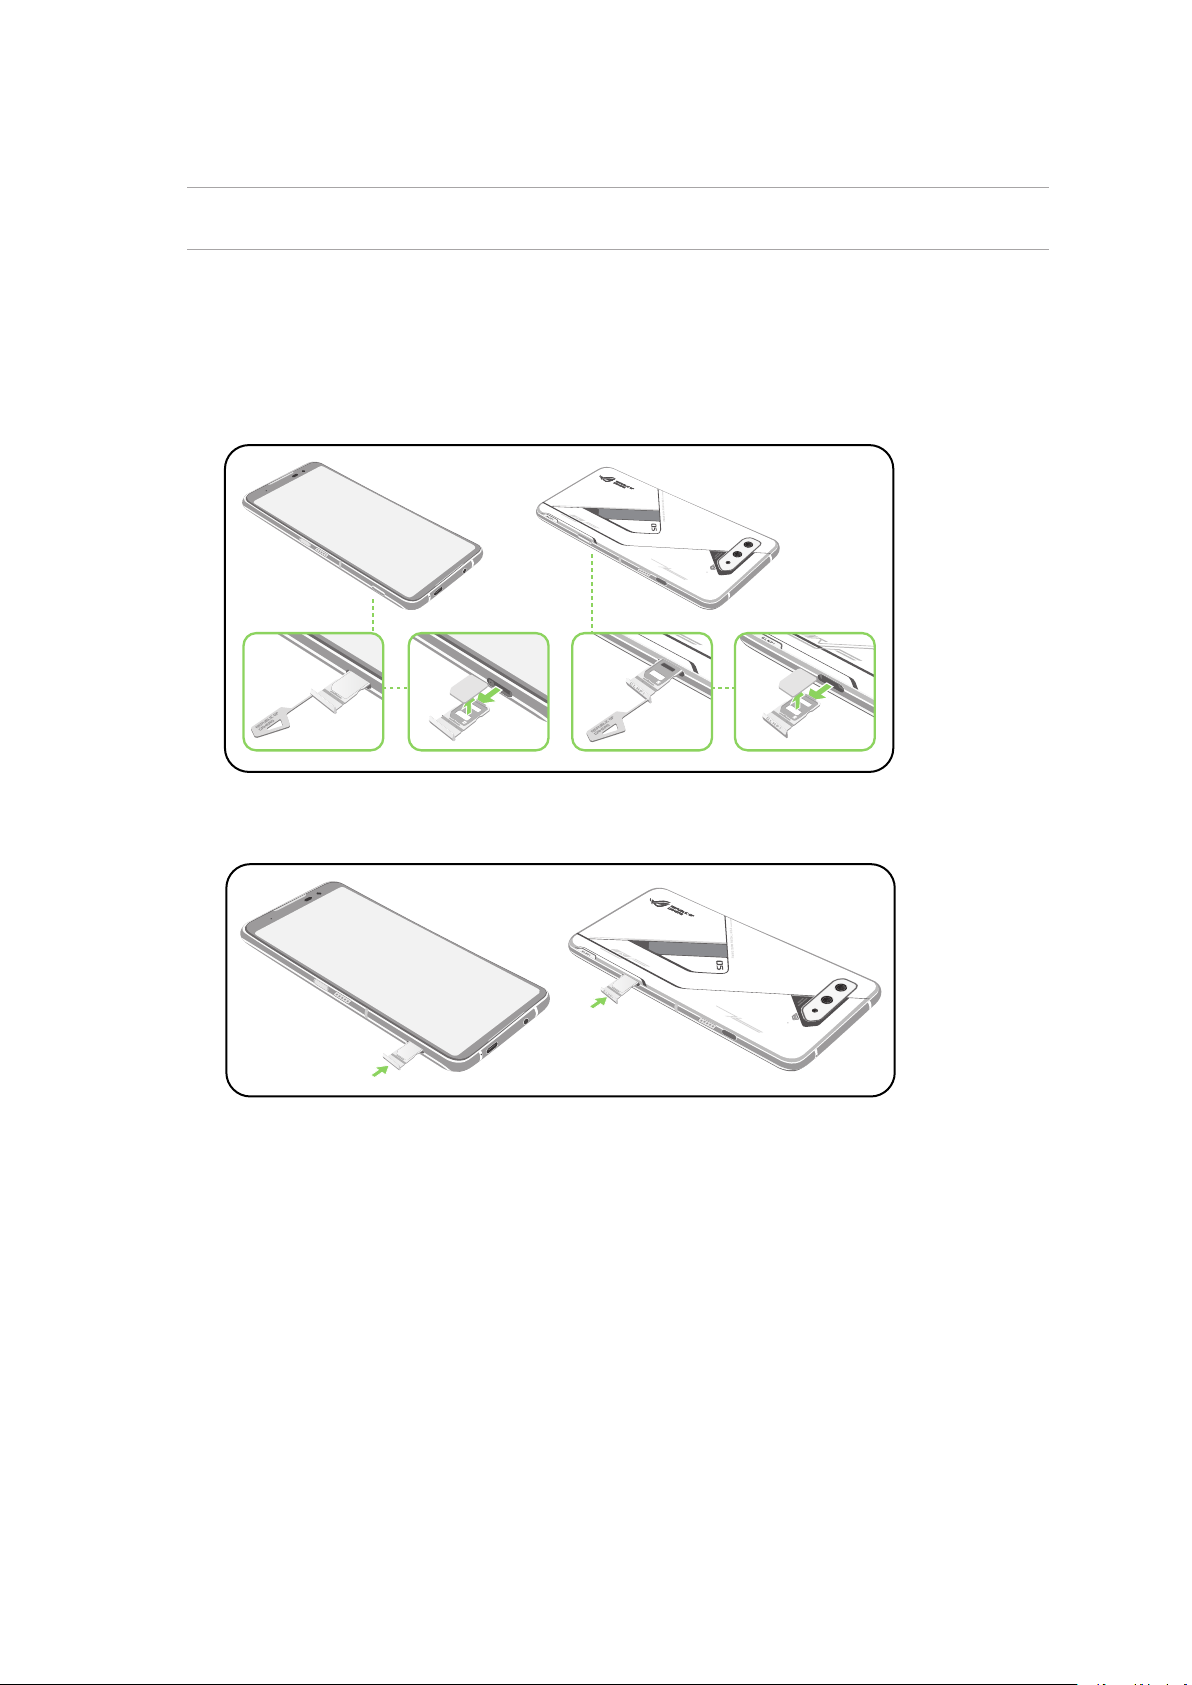
Removing a nano SIM card
CAUTION! Be extra careful when handling a
damage incurred to your
nano SIM card(s)
nano SIM card
.
. ASUS is not responsible for any data loss or
To remove a nano SIM card:
1. Push the bundled eject pin into the hole on the card slot to eject the tray out.
2. Remove the nano SIM card(s) from the card slot(s).
Nano-SIM1
Nano-SIM2
3. Gently push the tray back in until it’s securely closed.
12
Chapter 1: Basics
Page 13
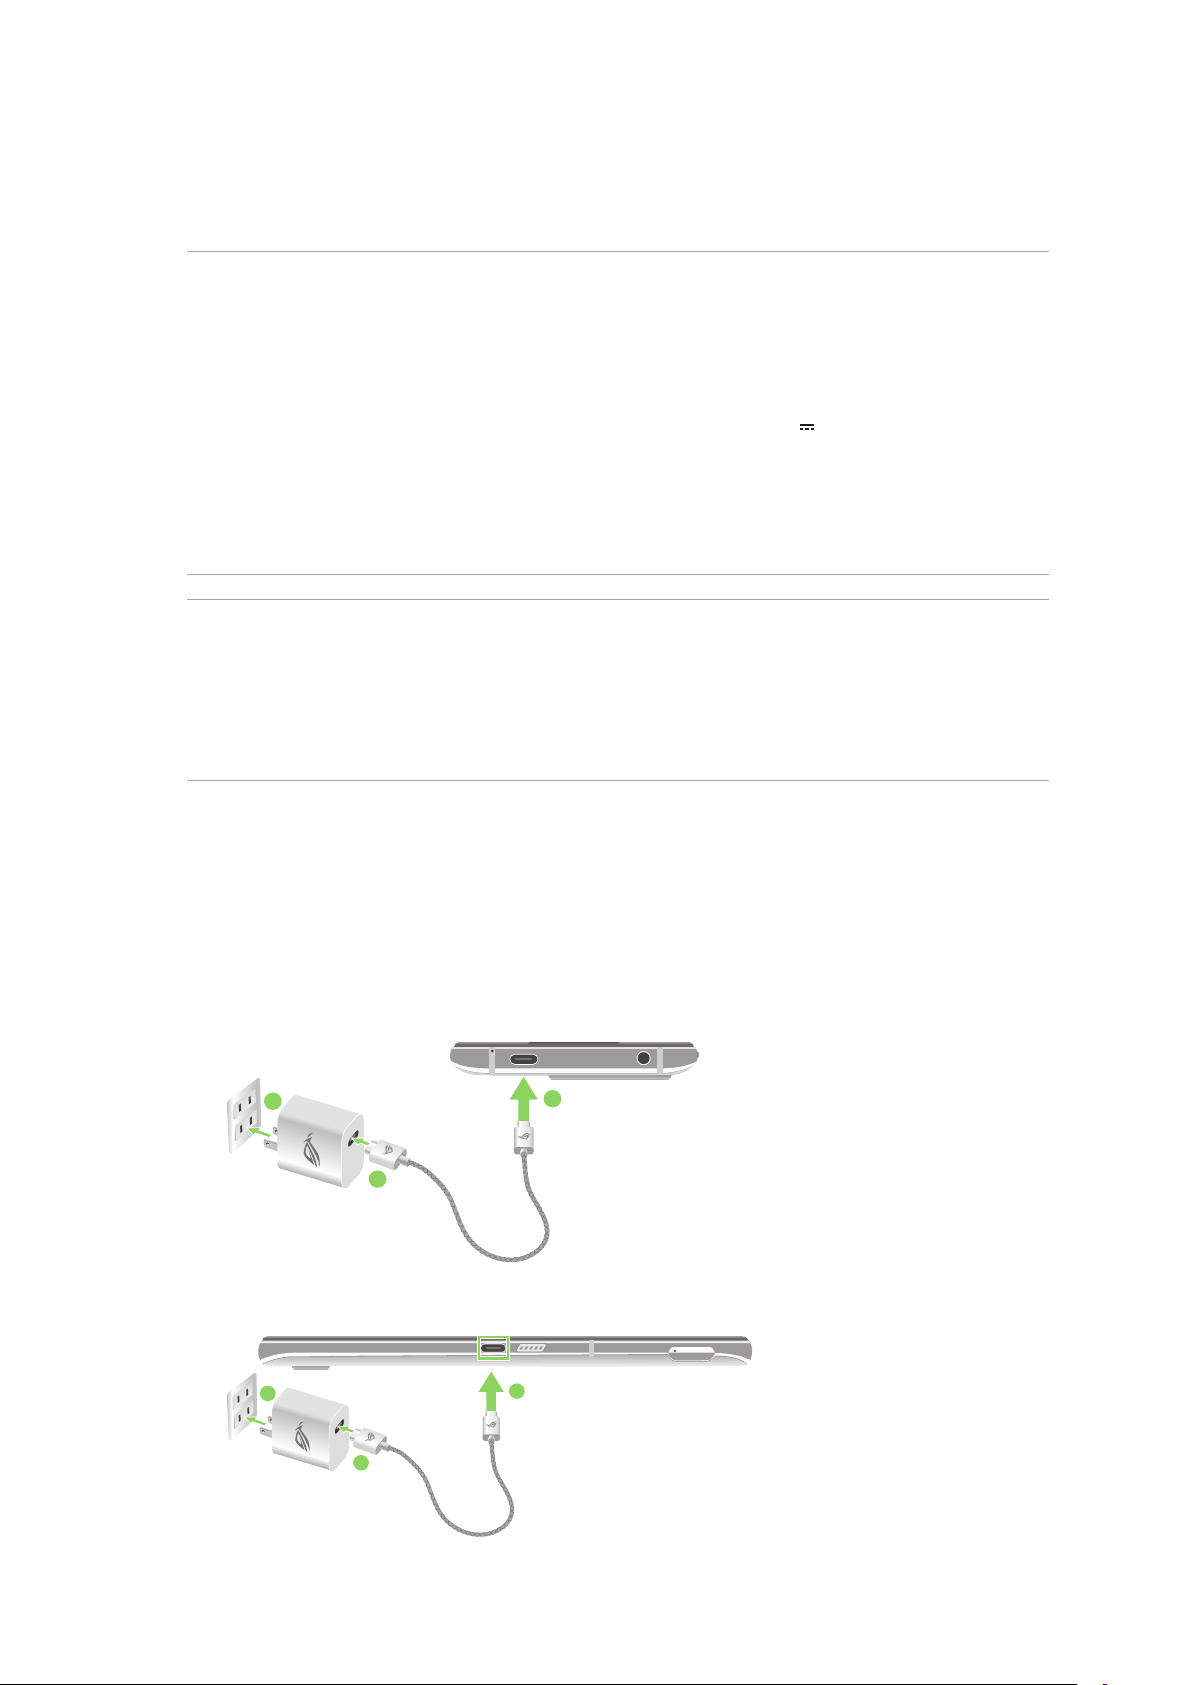
Charging your ROG Phone
Your ROG Phone comes partially charged but you must charge it fully before using it for the rst
time. Read the following important notices and cautions before charging your device.
IMPORTANT!
• Peel o the protective lm on the AC power adapter and USB Type-C cable before using it with your
device.
• Ensure to plug the AC power adapter to a compatible power outlet. You can plug the AC power
adapter to any compatible 100~240 V outlet.
• The output voltage of the AC power adapter for this device is +5V-20V 3A, 60W (WW version).
• When using your ROG Phone while plugged-in to a power outlet, the power outlet must be near
your device and easily accessible.
• To conserve electricity, unplug the AC power adapter from the power outlet when not in use.
• Do not place heavy objects on top of your ROG Phone.
CAUTION!
• While charging, your ROG Phone can become warm. This is normal, however, if your device becomes
unusually hot, disconnect the USB Type-C cable from your device and send the device, including the
AC power adapter and cable to an ASUS-qualied service personnel.
• To prevent any damage to your ROG Phone, AC adapter, or USB Type-C cable, ensure that the USB
Type-C cable, AC adapter, and your device are connected properly before charging.
To charge your ROG Phone:
1. Connect the USB cable to the power adapter.
2. Connect the USB cable to your ROG Phone.
3. Plug the AC power adapter to a grounded power outlet.
3
1
2
or
3
1
2
Chapter 1: Basics
13
Page 14
NOTES:
• We recommend that you charge your ROG Phone through one USB Type-C port at a time.
• Only the USB Type-C port on the left side of your ROG Phone has Display Port functionality.
• If you connect USB Type-C OTG or charging devices to both of the USB Type-C ports on your ROG
Phone, the USB Type-C port on the left side of your ROG Phone will become the master and the
charging current or OTG device on the bottom port will be limited.
IMPORTANT!
• When using your ROG Phone while it is plugged to a power outlet, the grounded power outlet must
be near to the unit and easily accessible.
• When charging your ROG Phone through your computer, ensure that you plug the USB Type-C cable
to your computer’s USB port.
• Avoid charging your ROG Phone in an environment with ambient temperature of above 35oC (95oF).
• Charge your ROG Phone for eight (8) hours before using it in battery mode for the rst time.
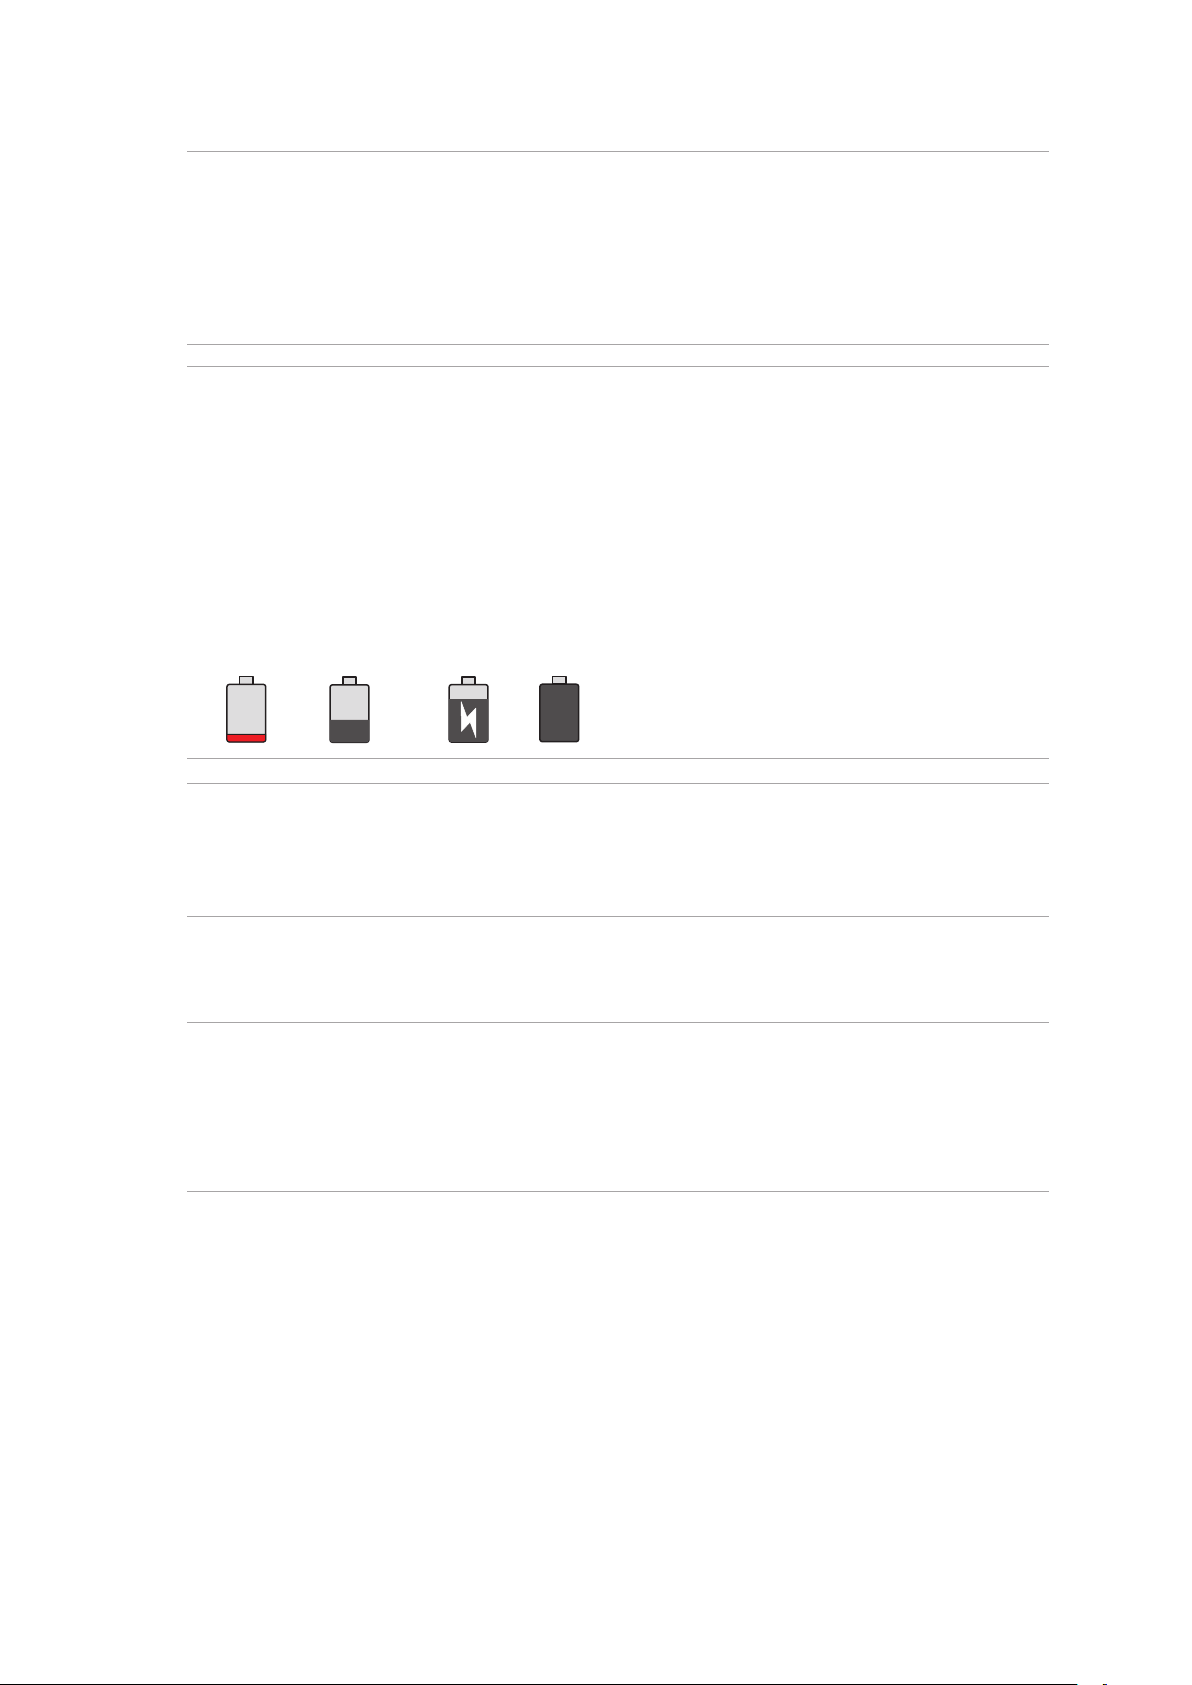
• The status of battery charge is indicated by the following icons:
Low Not Charging Charging Full
NOTES:
• For safety purposes, use ONLY the bundled power adapter and cable to avoid damaging your
device and prevent the risk of injury.
• For safety purposes, use ONLY the bundled power adapter and cable to charge your ROG Phone.
4. When fully-charged, disconnect the USB cable from your ROG Phone rst before unplugging the
AC power adapter from the power outlet.
NOTES:
• You can use your device while charging but it may take longer to fully charge the device.
• Charging your device via USB port of a computer may take longer to fully charge the device.
• If your computer does not provide enough power for charging via USB port, charge your ROG Phone
using the AC power adapter plugged to a power outlet instead.
14
Chapter 1: Basics
Page 15
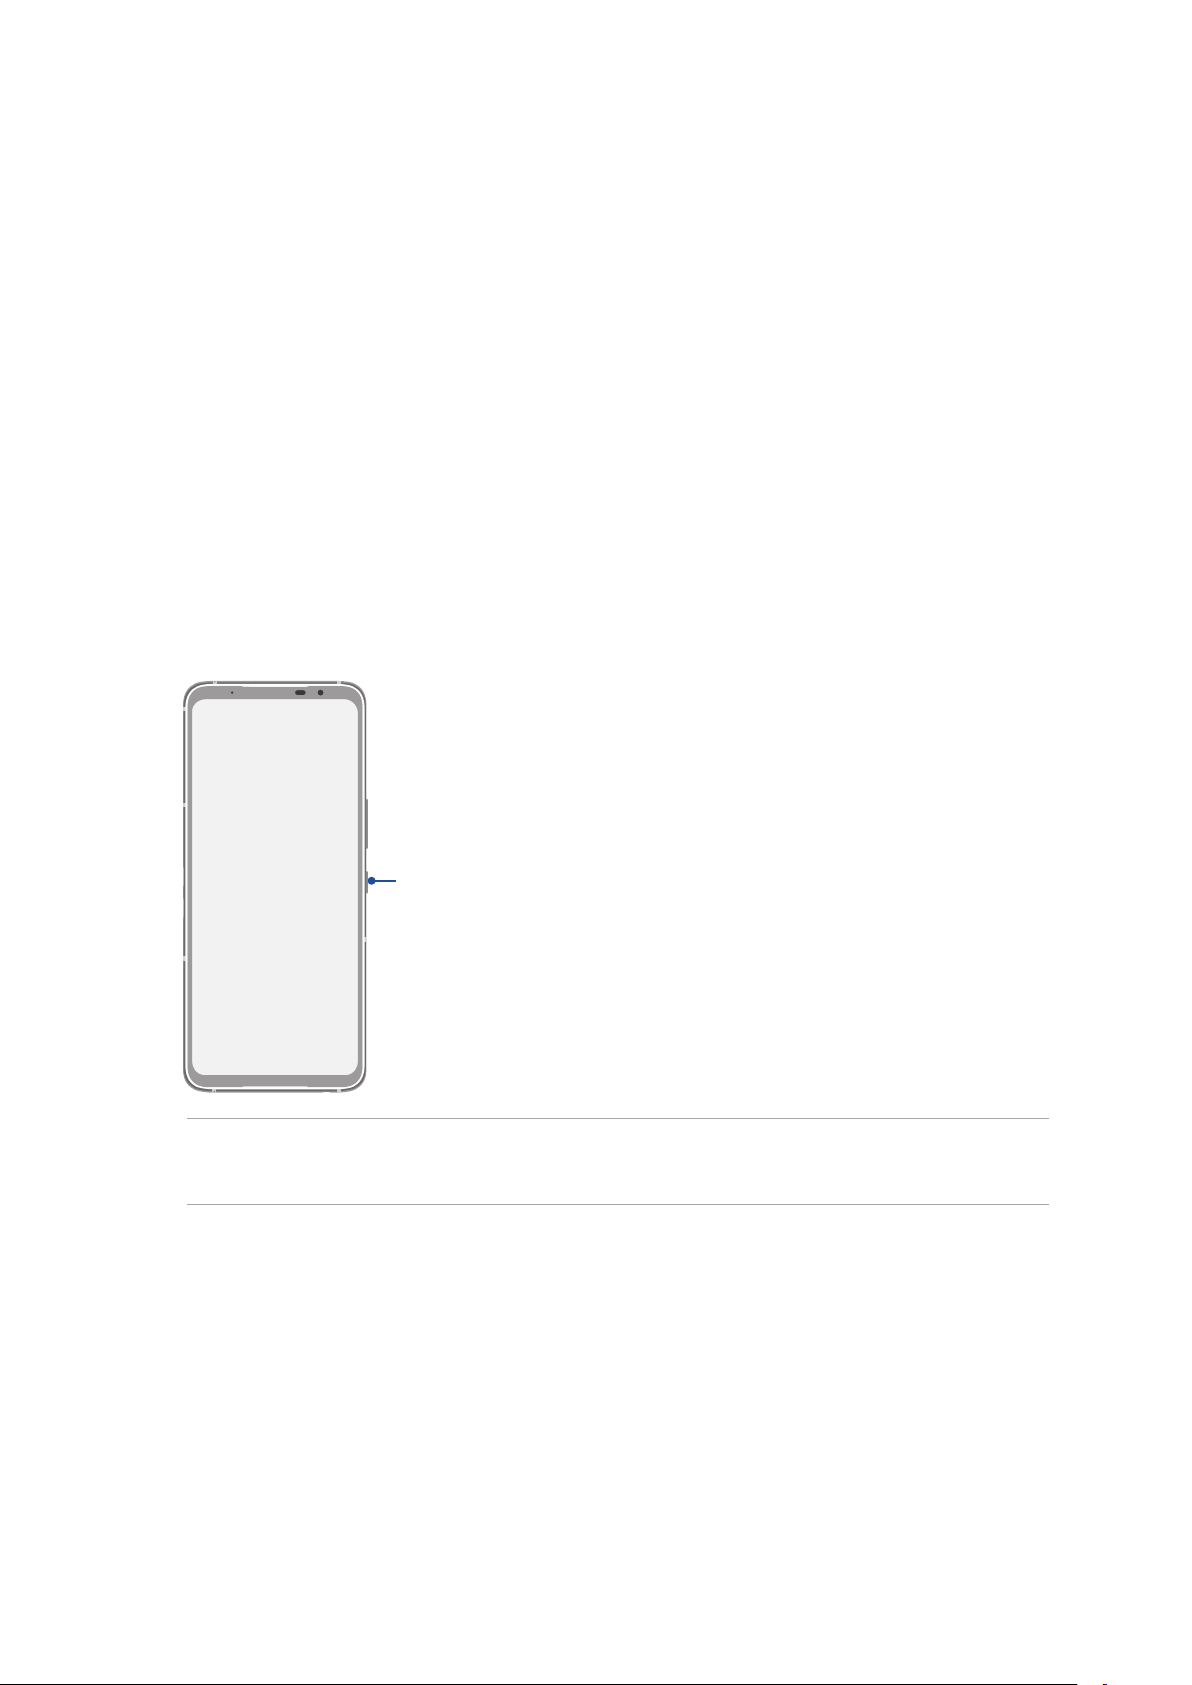
Turning your ROG Phone on or o
Turning your device on
To turn your device on, press and hold the power button until your device vibrates and starts up.
Turning your device o
To turn your device o:
1. If your screen is turned o, press the power button to turn it on. If your screen is locked, unlock
the device screen.
2. Press and hold the power button, then when prompted, tap Power o.
Sleep mode
To put your device in sleep mode, press the power button once until the screen turns o.
Power key
NOTE: When your system is down, press and hold the Volume Down Key + Power Key simultaneously
for 8 seconds to restart your phone. If this doesn't work, try again by pressing and holding the keys
again for 12 seconds.
Chapter 1: Basics
15
Page 16

Starting for the rst time
When you turn your ROG Phone on for the rst time, Setup Wizard will guide you through the setup
process. Follow the onscreen instructions to select your language, set up your mobile network, WiFi and security features, and sync accounts.
Use your Google or ASUS account to set up your device, if you do not have a Google or ASUS
account yet, go ahead and create one.
Google Account
Using a Google account allows you to fully utilize these Android OS features:
• Organize and see all your information from anywhere.
• Automatically backup all your data.
• Leverage Google services conveniently from anywhere.
ASUS Account
Having an ASUS account gets you to enjoy the following perks:
• Personalized ASUS support service and warranty extension for registered products.
• Receive the latest device and rmware updates.
Battery power conservation tips
The battery charge is the lifeline of your ROG Phone. Here are some battery power conservation
tips that helps preserve the power of your ROG Phone battery.
– Close all running apps that are not in use.
– When not in use, press the power button to put the device in sleep mode.
– Decrease brightness of display.
– Keep the speaker volume to a low level.
– Disable Wi-Fi feature.
– Disable Bluetooth feature.
– Disable the screen auto-rotate feature.
– Disable all auto-sync features in your device.
16
Chapter 1: Basics
Page 17
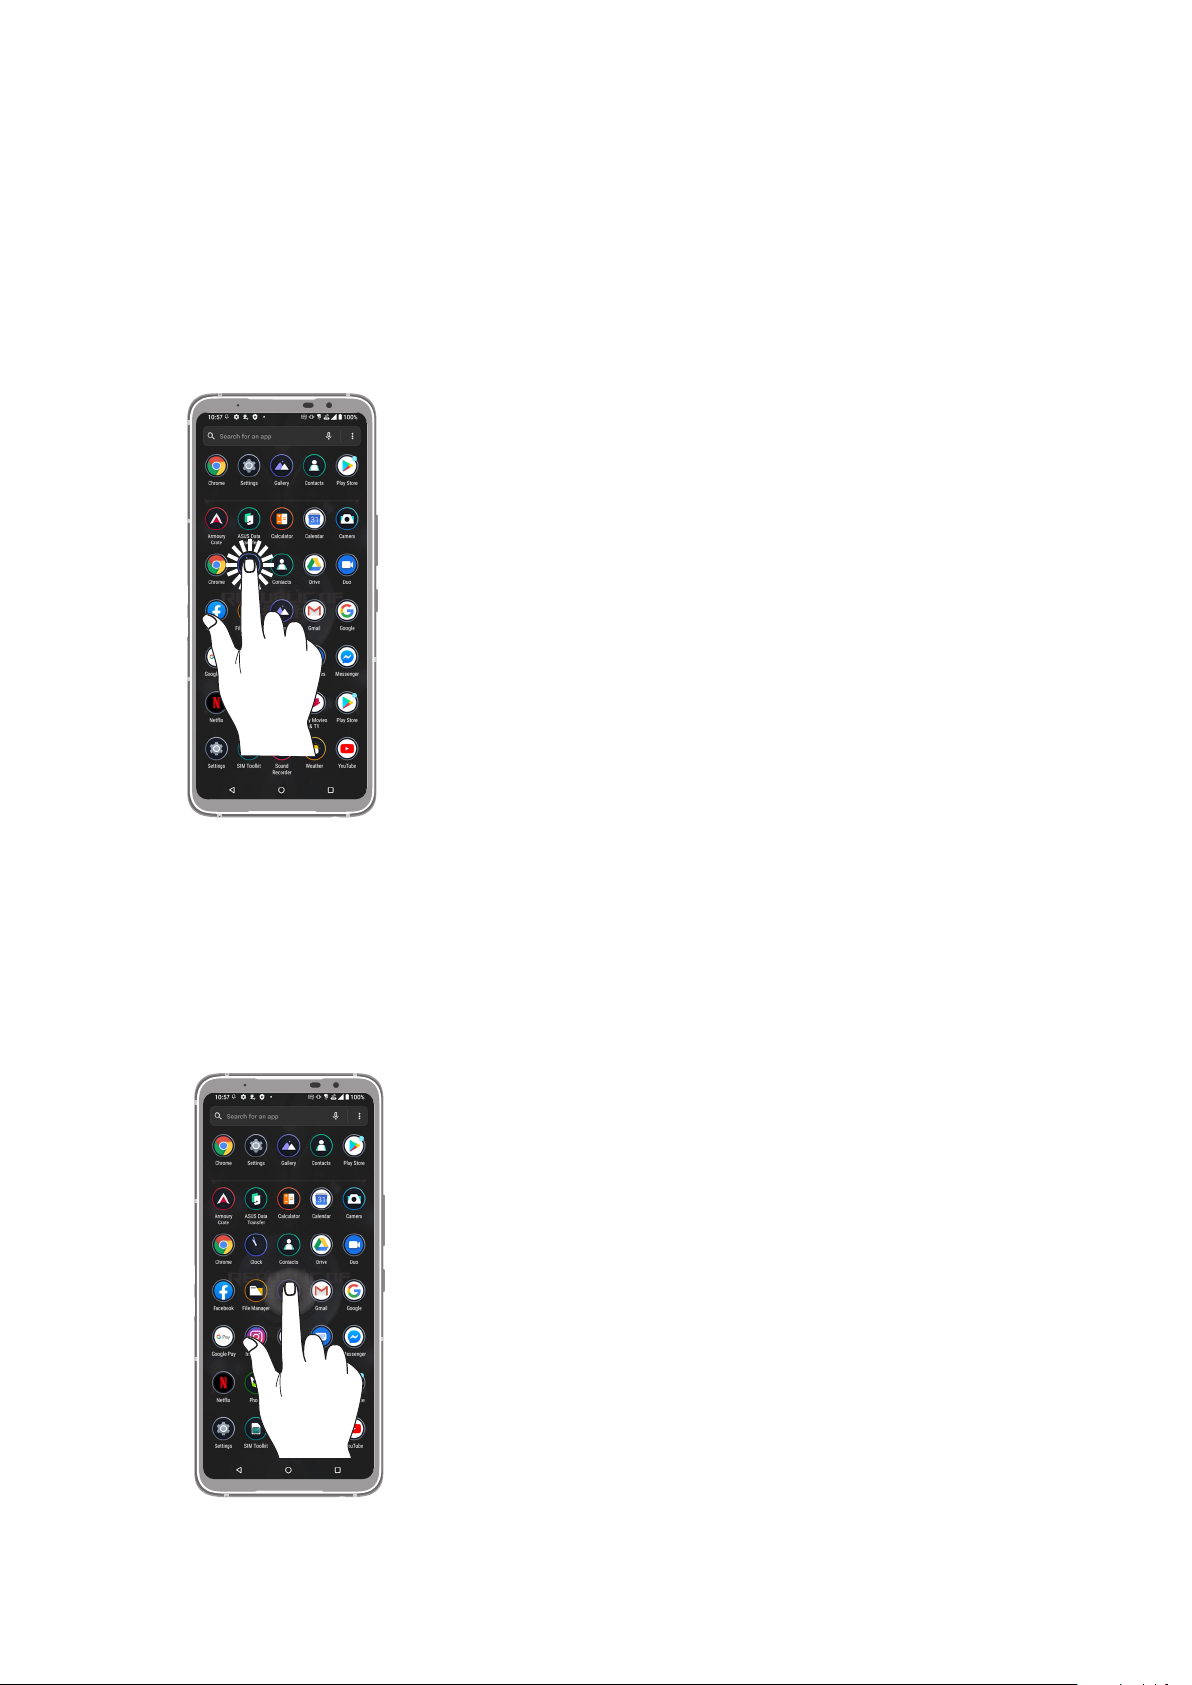
Using the touchscreen
Use these gestures on the touchscreen to launch apps, access some settings, and navigate your
ROG Phone.
Launching apps
To launch an app, simply tap on it.
Moving or deleting items
Do any of the following:
• To move an app or widget, tap and hold then drag it to the location where you want it to be.
• To delete an app or widget , tap and hold it then tap Uninstall.
Chapter 1: Basics
17
Page 18
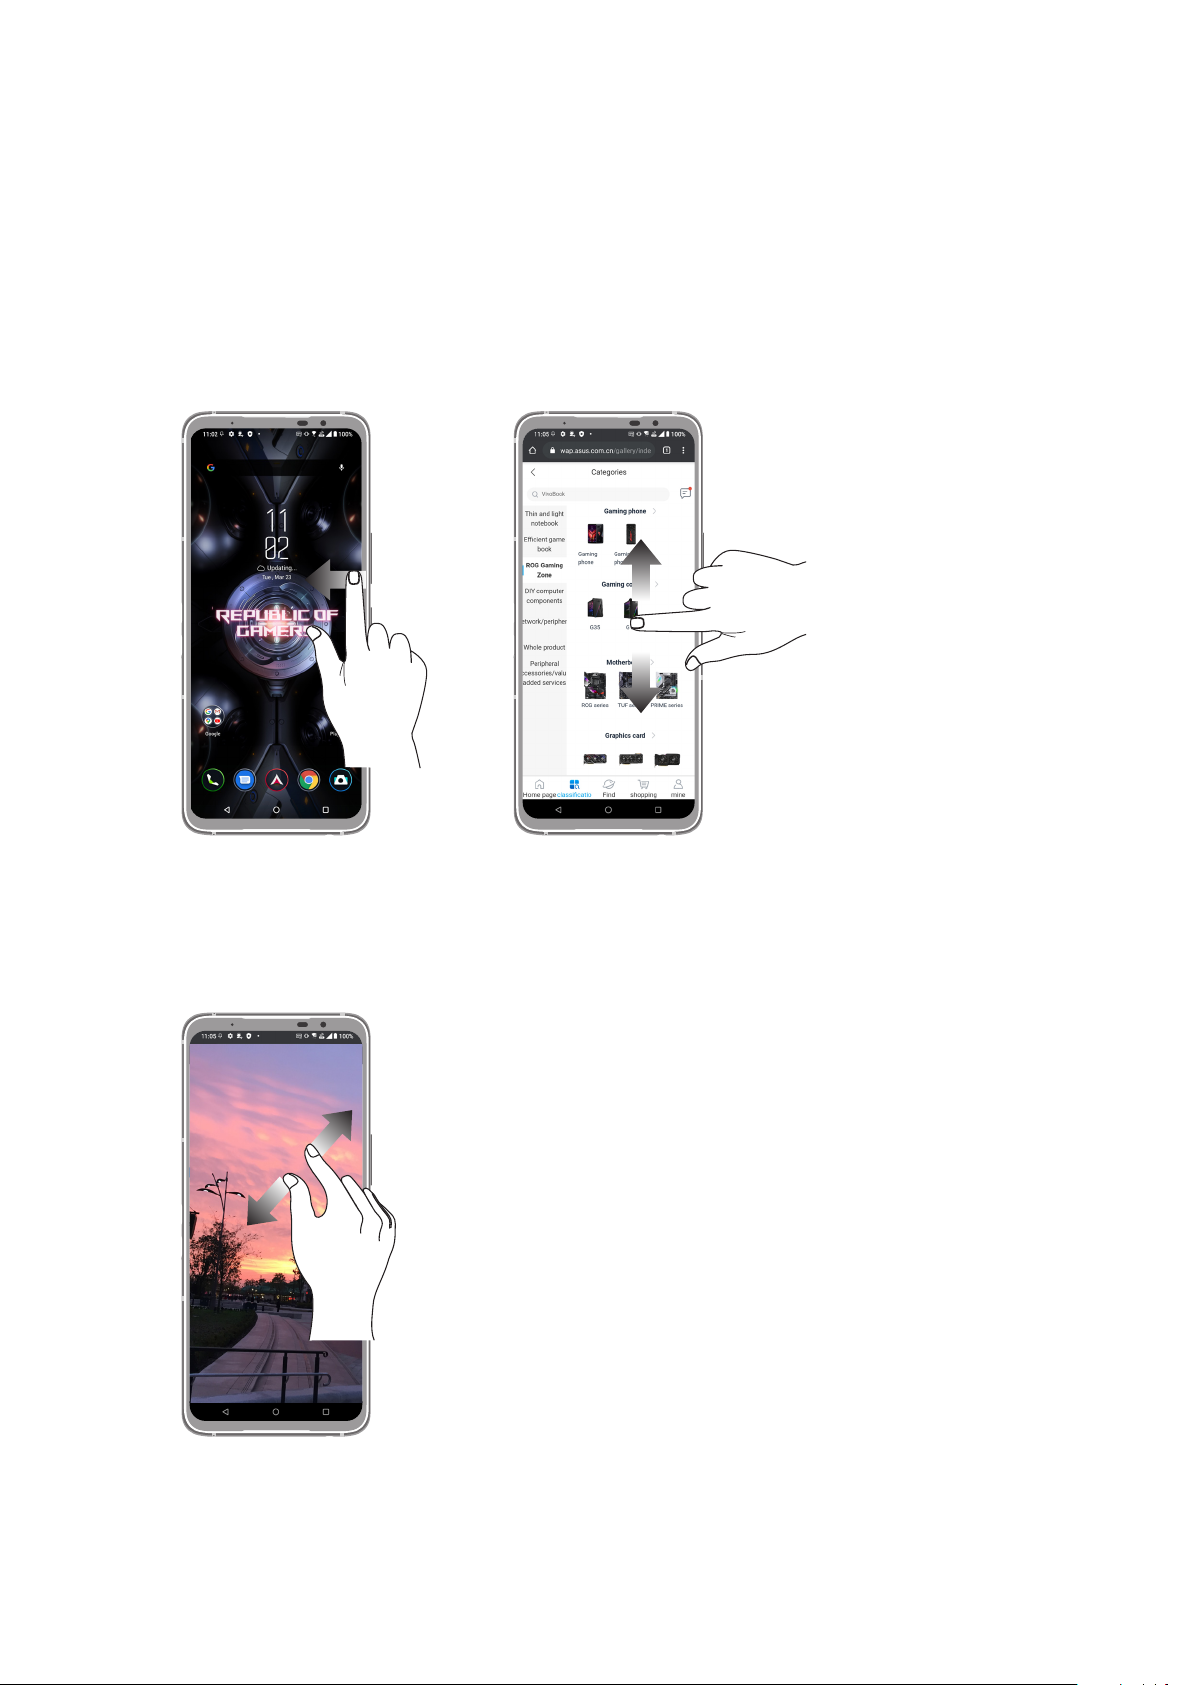
Moving through pages or screens
Do any of the following:
• Swipe your nger to the left or to the right to switch between screens or to open Google Search
page.
• Scroll your nger up or down to go through web pages or list of items.
Zooming in
Spread apart your two ngers on the touch panel to zoom in an image in Photos or Maps, or zoom
in a web page.
18
Chapter 1: Basics
Page 19
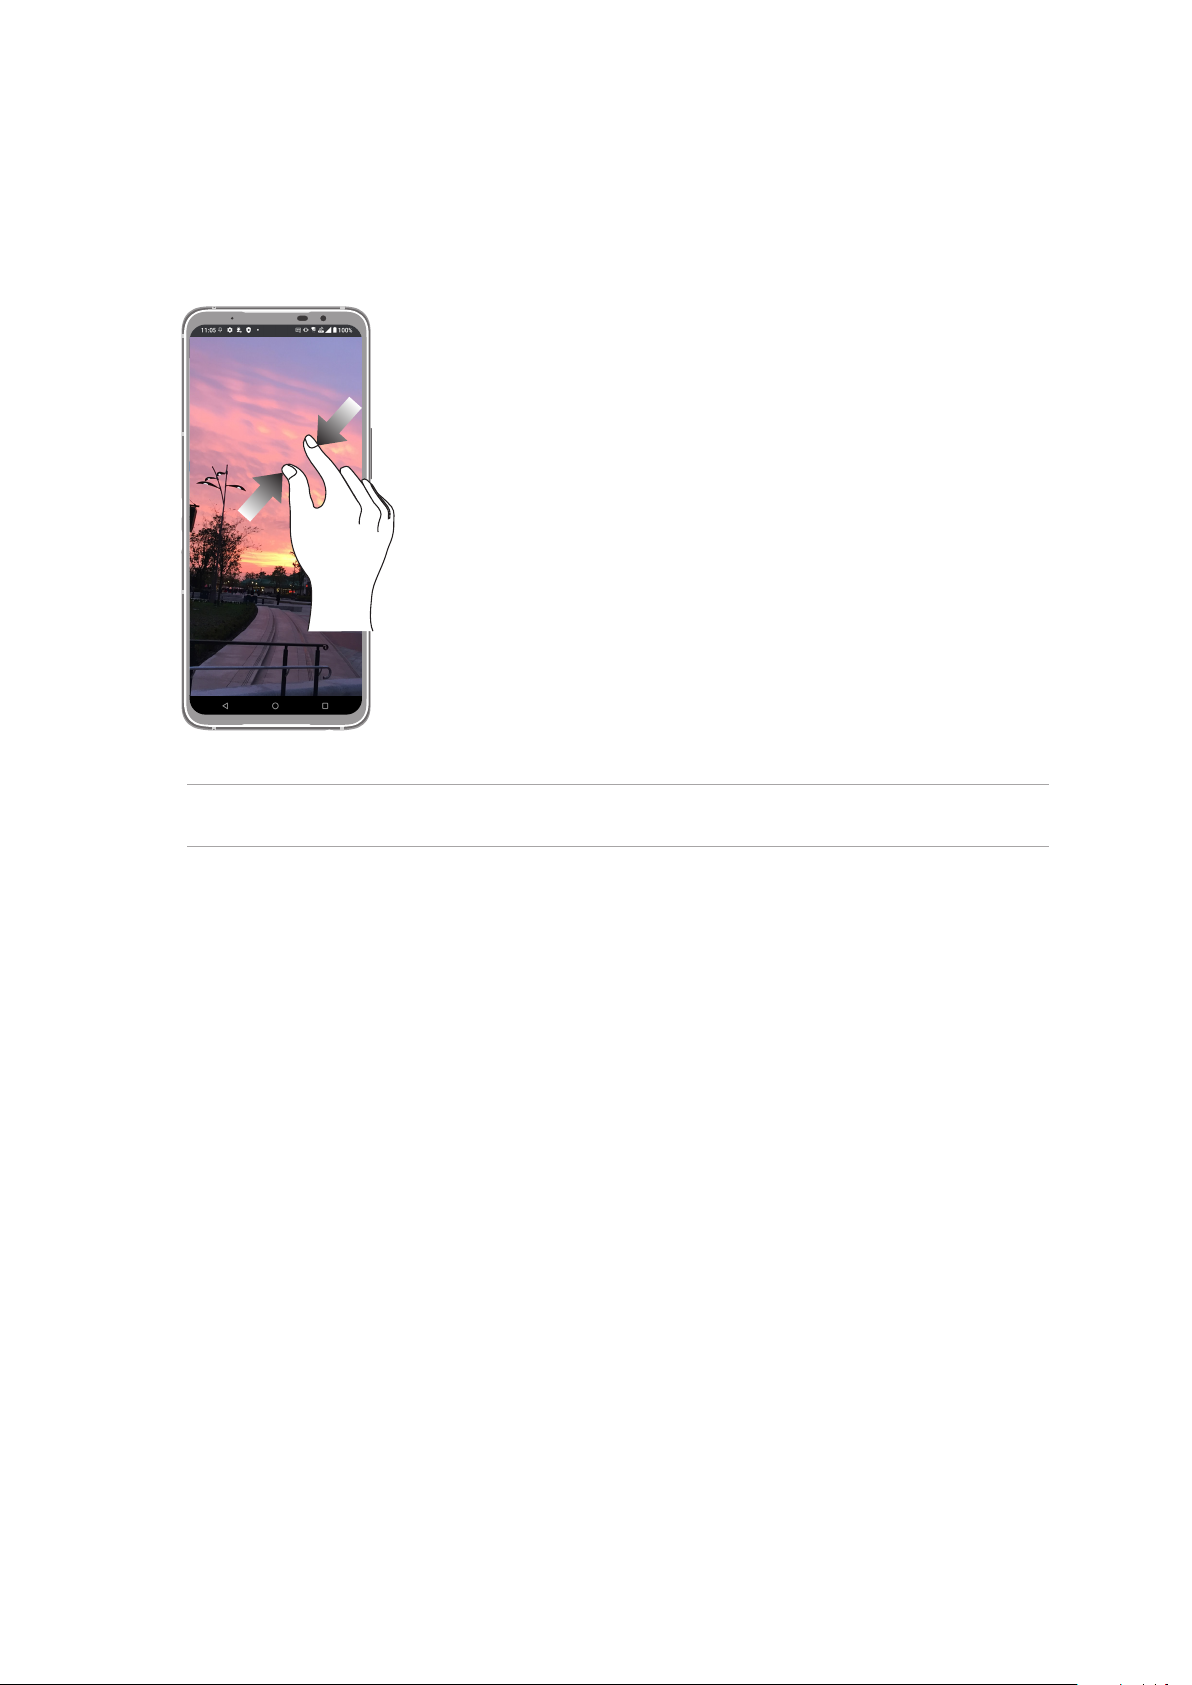
Zooming out
Bring together your two ngers on the touch panel to zoom out an image in Photos or Maps, or
zoom out of a web page.
NOTE: You may not be able to zoom in/out of some web pages as these pages may have been
designed specically to t your mobile screen.
Chapter 1: Basics
19
Page 20
2 There’s no place like Home
There’s no place like Home
2
Zen Home features
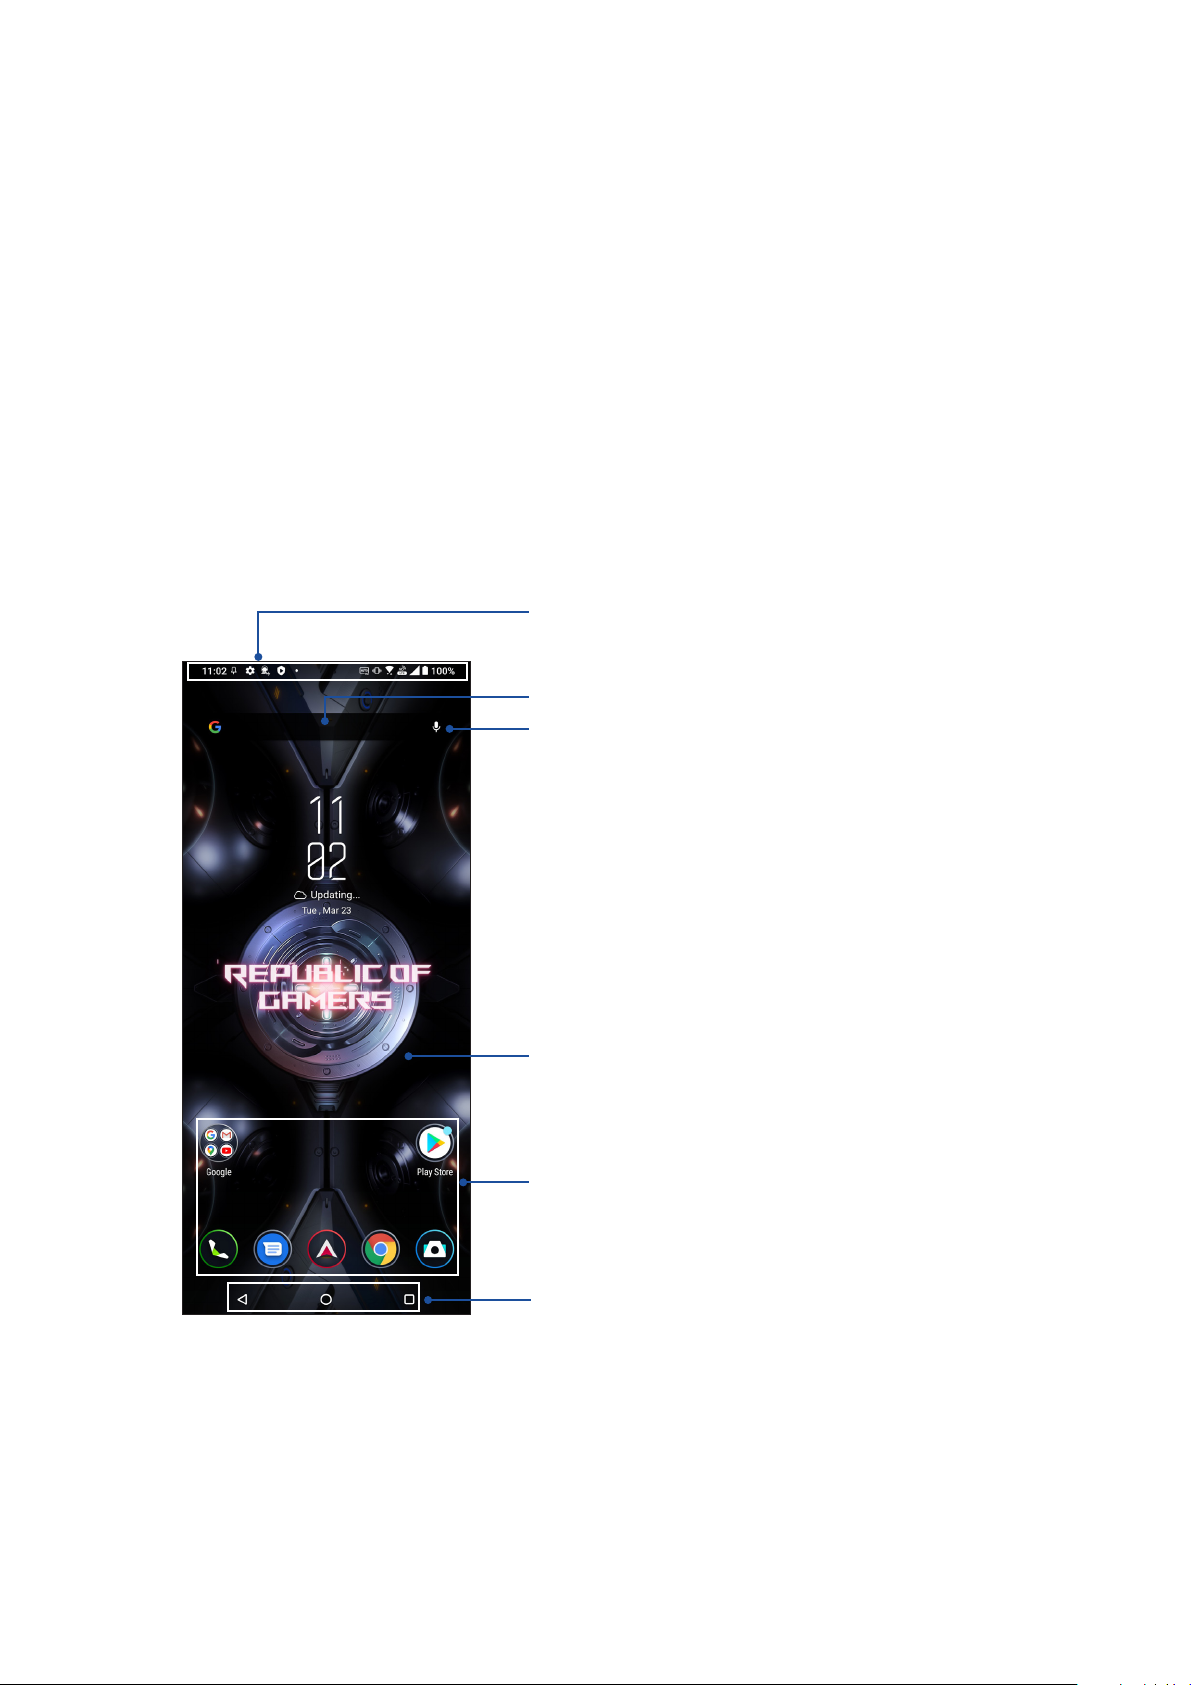
Home screen
Get reminders of important events, app and system updates, weather forecasts, and text messages
from people who really matter to you, right from your Home screen.
Swipe down this area once to display System notications
Swipe down this area twice to display Quick settings
Tap to open Google Search page
Tap to open Voice Search
Swipe up to open the All apps screen
Tap to open an app
20
Chapter 2: There’s no place like Home
Touch keys
Page 21
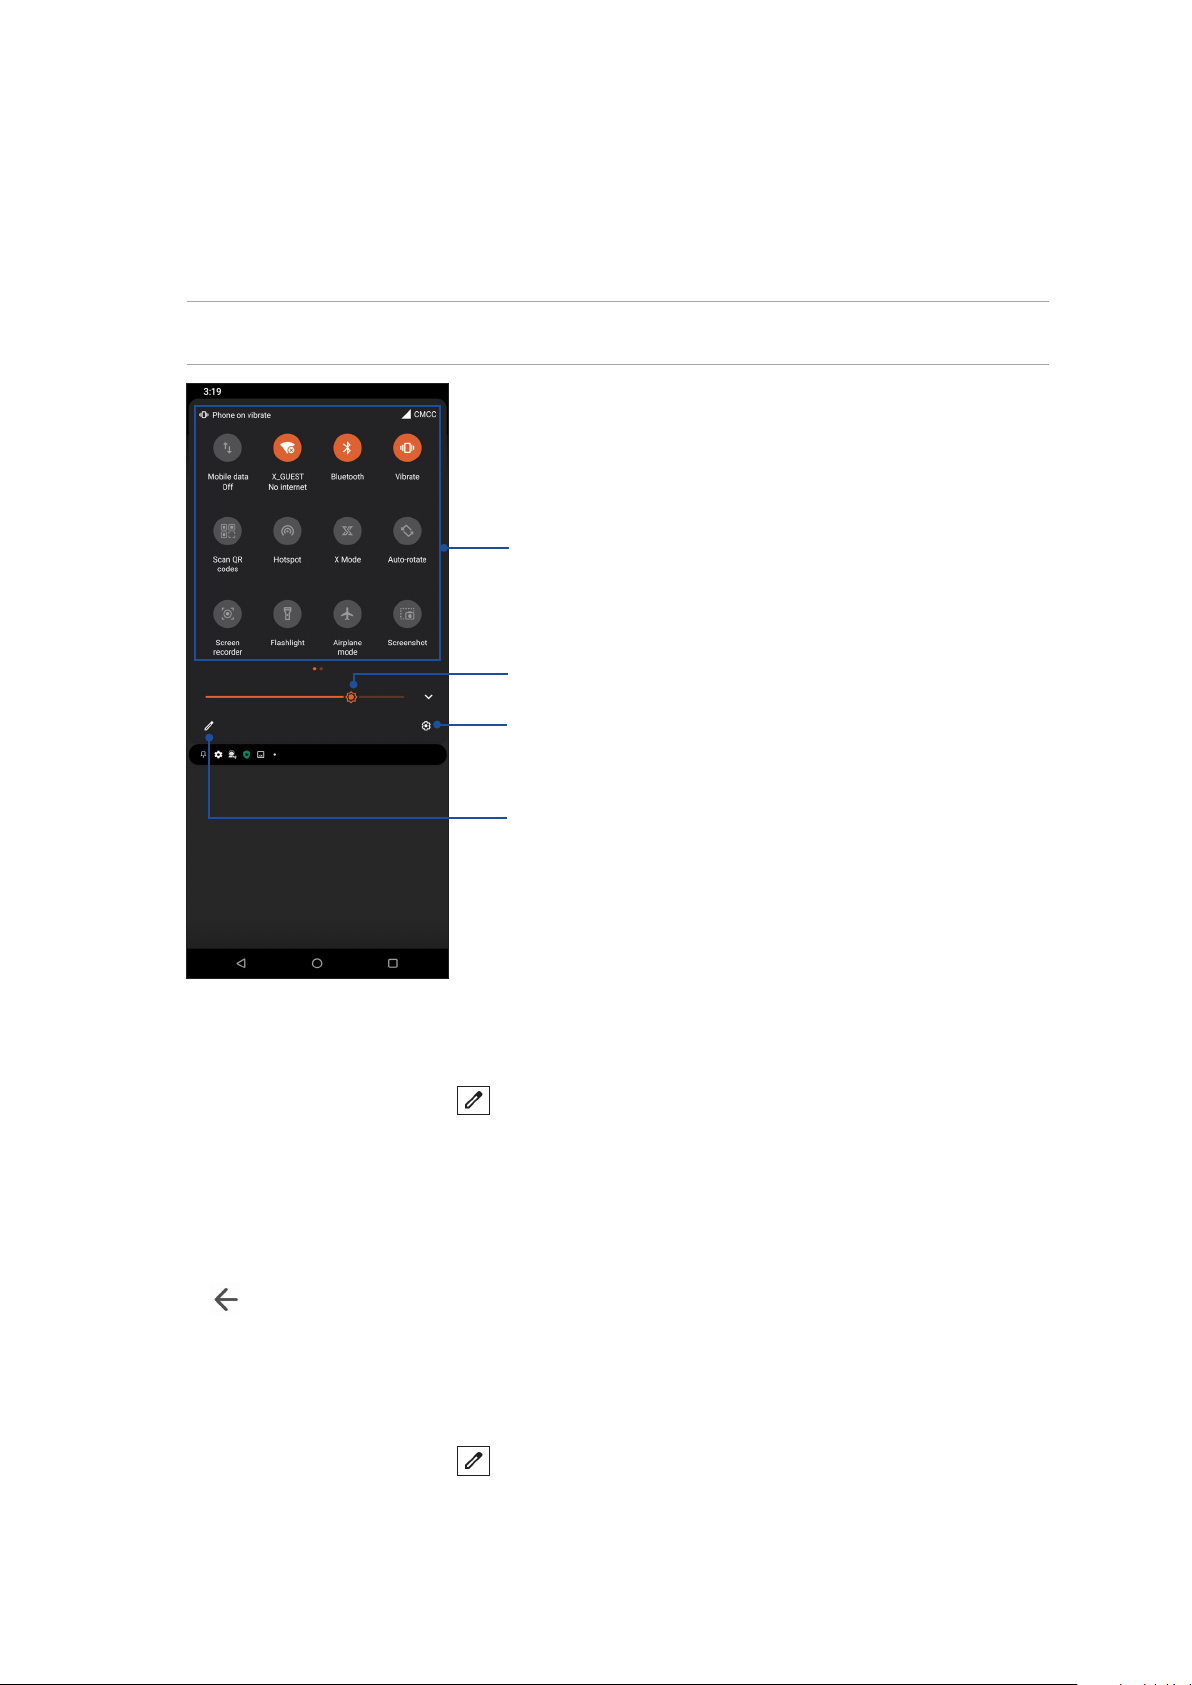
Quick settings
The Quick settings panel provides a one-tap access to some of the wireless features and settings of
your ROG Phone. Each of these features are represented by an icon.
To launch the Quick settings panel, swipe down twice from the top of your screen.
NOTE: A blue icon indicates that the feature is currently enabled while a gray icon indicates a disabled
feature.
Tap these buttons to enable or disable their functions
Slide left or right to adjust the screen’s brightness
Tap to open Settings
Tap to select/deselect items to display in Quick settings
Adding features
To add features from the Quick Settings panel:
1. Launch Quick settings then tap .
2. Swipe up HOLD AND DRAG TO ADD TILES.
3. Under HOLD AND DRAG TO ADD TILES, tap and drag an icon up to add it to the Quick Settings
panel.
4. Tap to go back and view the current Quick Settings panel.
Removing features
To remove existing features from the Quick Settings panel:
1. Launch Quick settings then tap .
2. Tap and drag an icon below HOLD AND DRAG TO REARRANGE TILES to remove it from the
Quick Settings panel.
Chapter 2: There’s no place like Home
21
Page 22
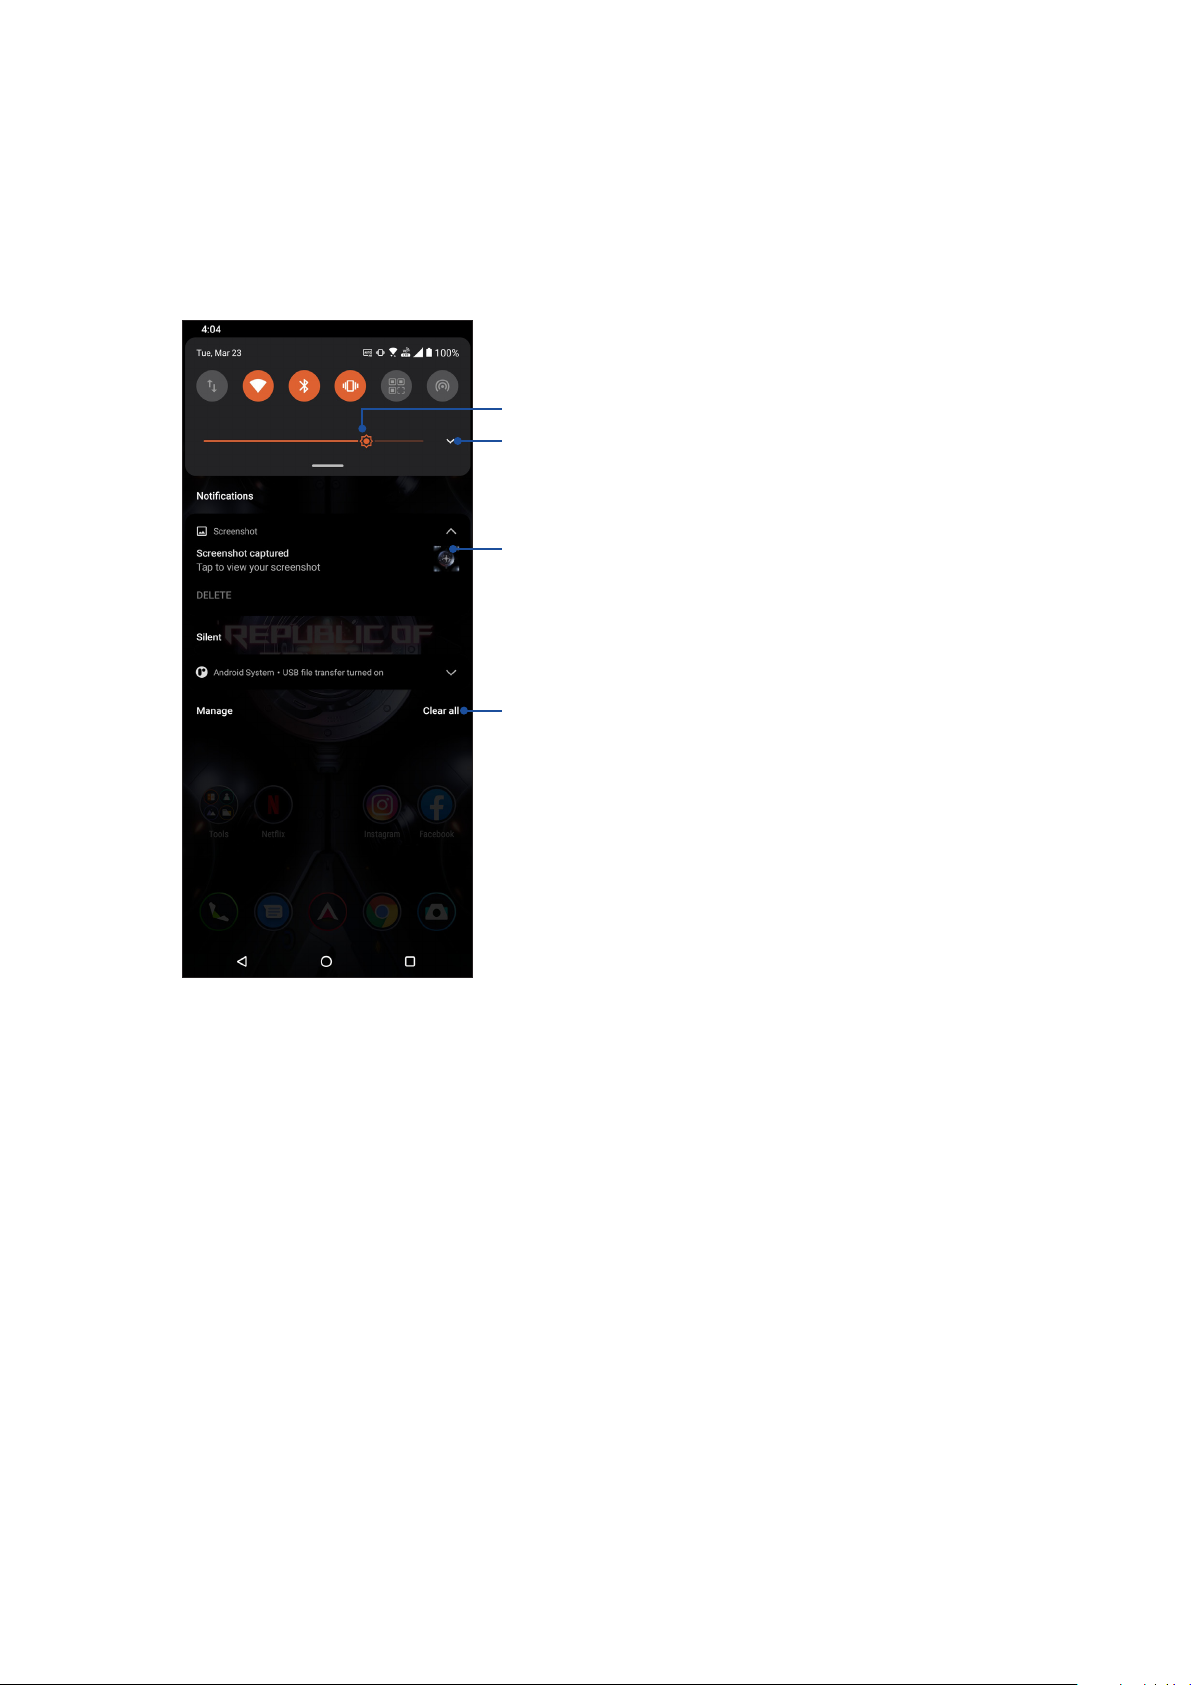
Notications
From the notications panel, you can see the latest updates done and system changes made on
your ROG Phone. Most of these changes are data and system-related.
To launch the notications panel, swipe down from the top of your screen.
Slide left or right to adjust the screen’s brightness
Tap to open Settings
• Swipe to the left or right to set, pin, set alarm to, or remove the
notication from the list
• Tap on the notication to view its details
Tap this to delete all of the listed notications
22
Chapter 2: There’s no place like Home
Page 23
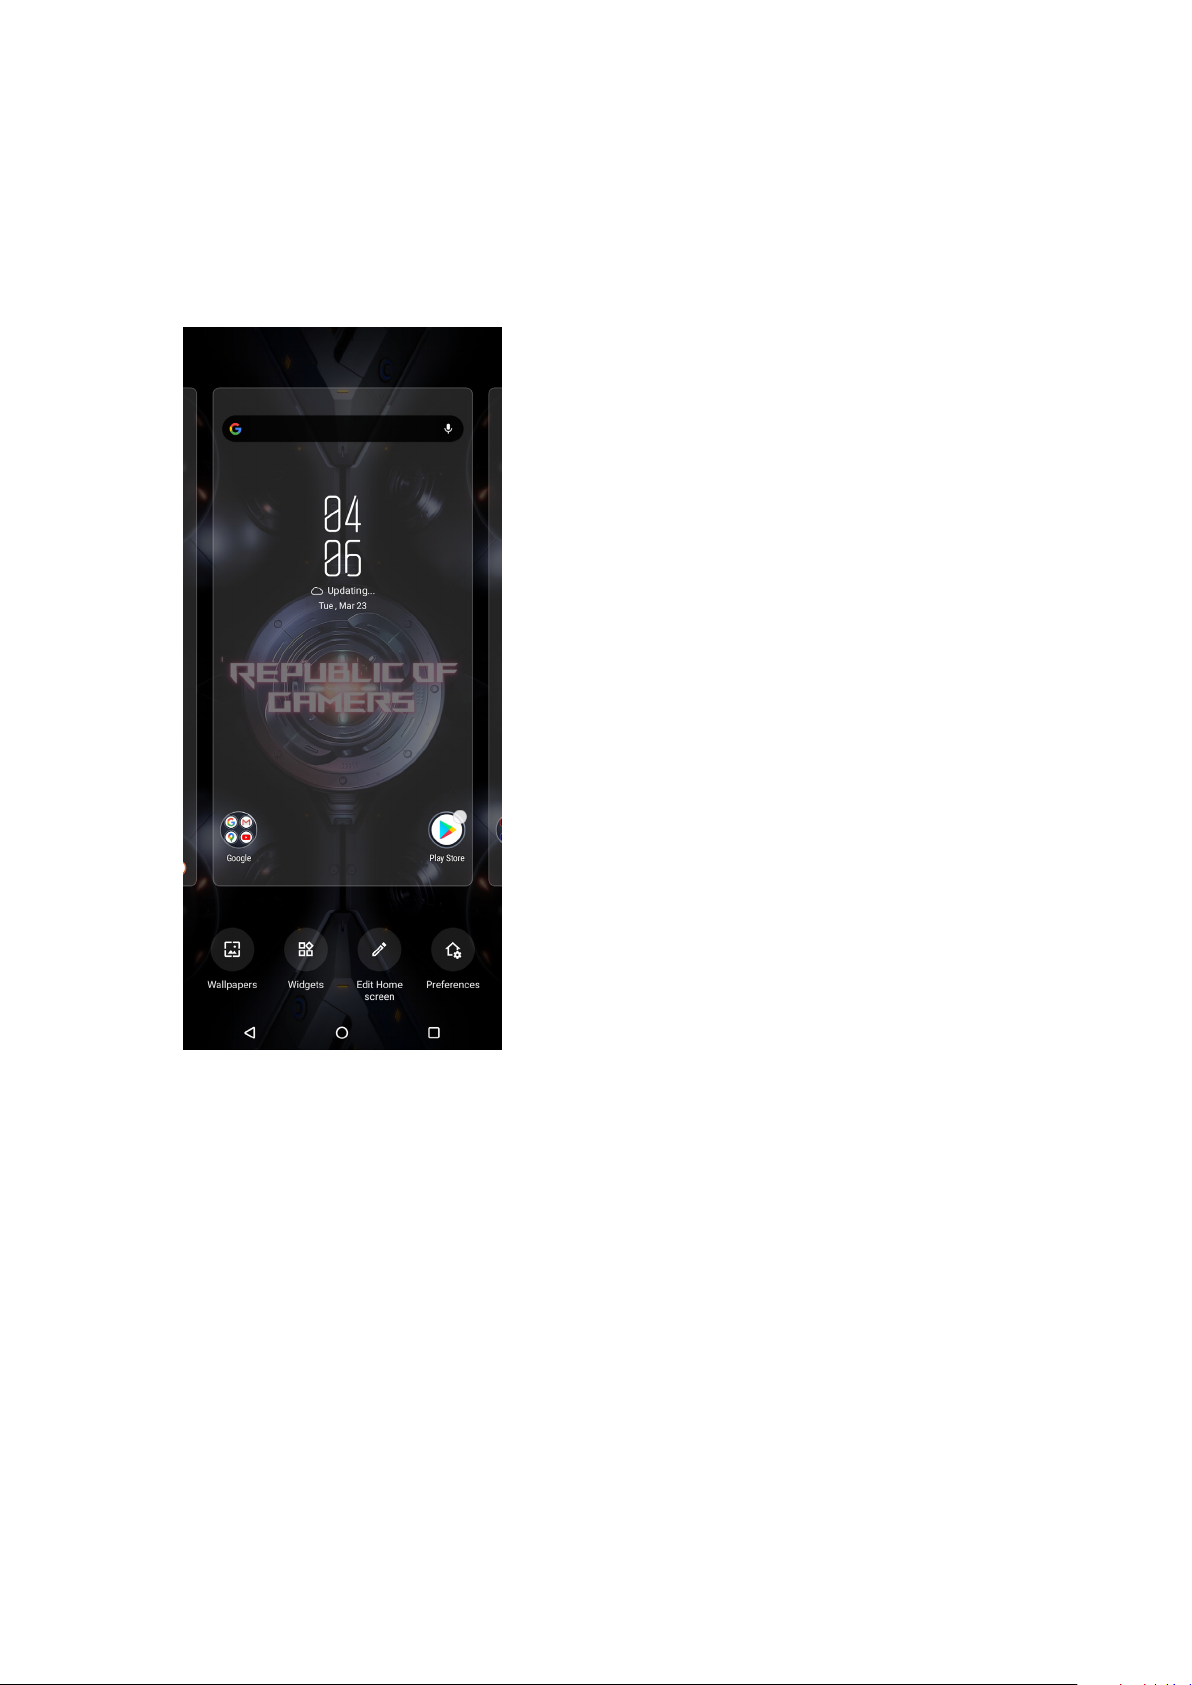
Personalizing your Home screen
Stamp your own personality on your Home screen. Select an attractive design as your wallpaper,
and add widgets for a quick review of important info. You can also add more pages so you can add
and quickly access or view more apps or widgets on your Home screen.
To launch the Manage Home screen, tap and hold an empty area on your Home screen.
Widgets
You can put widgets, which are small dynamic apps, on your Home screen. Widgets provide you
with quick-views of the weather forecast, calendar events information, battery status, and more.
Adding widgets
To add a widget:
1. Tap and hold an empty area on your Home screen and select Widgets.
2. From the Widgets screen, tap and hold a widget, then drag it to an empty area on your Home
screen.
Removing widgets
From your Home screen, tap and hold a widget, then drag it to Remove on top of your screen.
Chapter 2: There’s no place like Home
23
Page 24
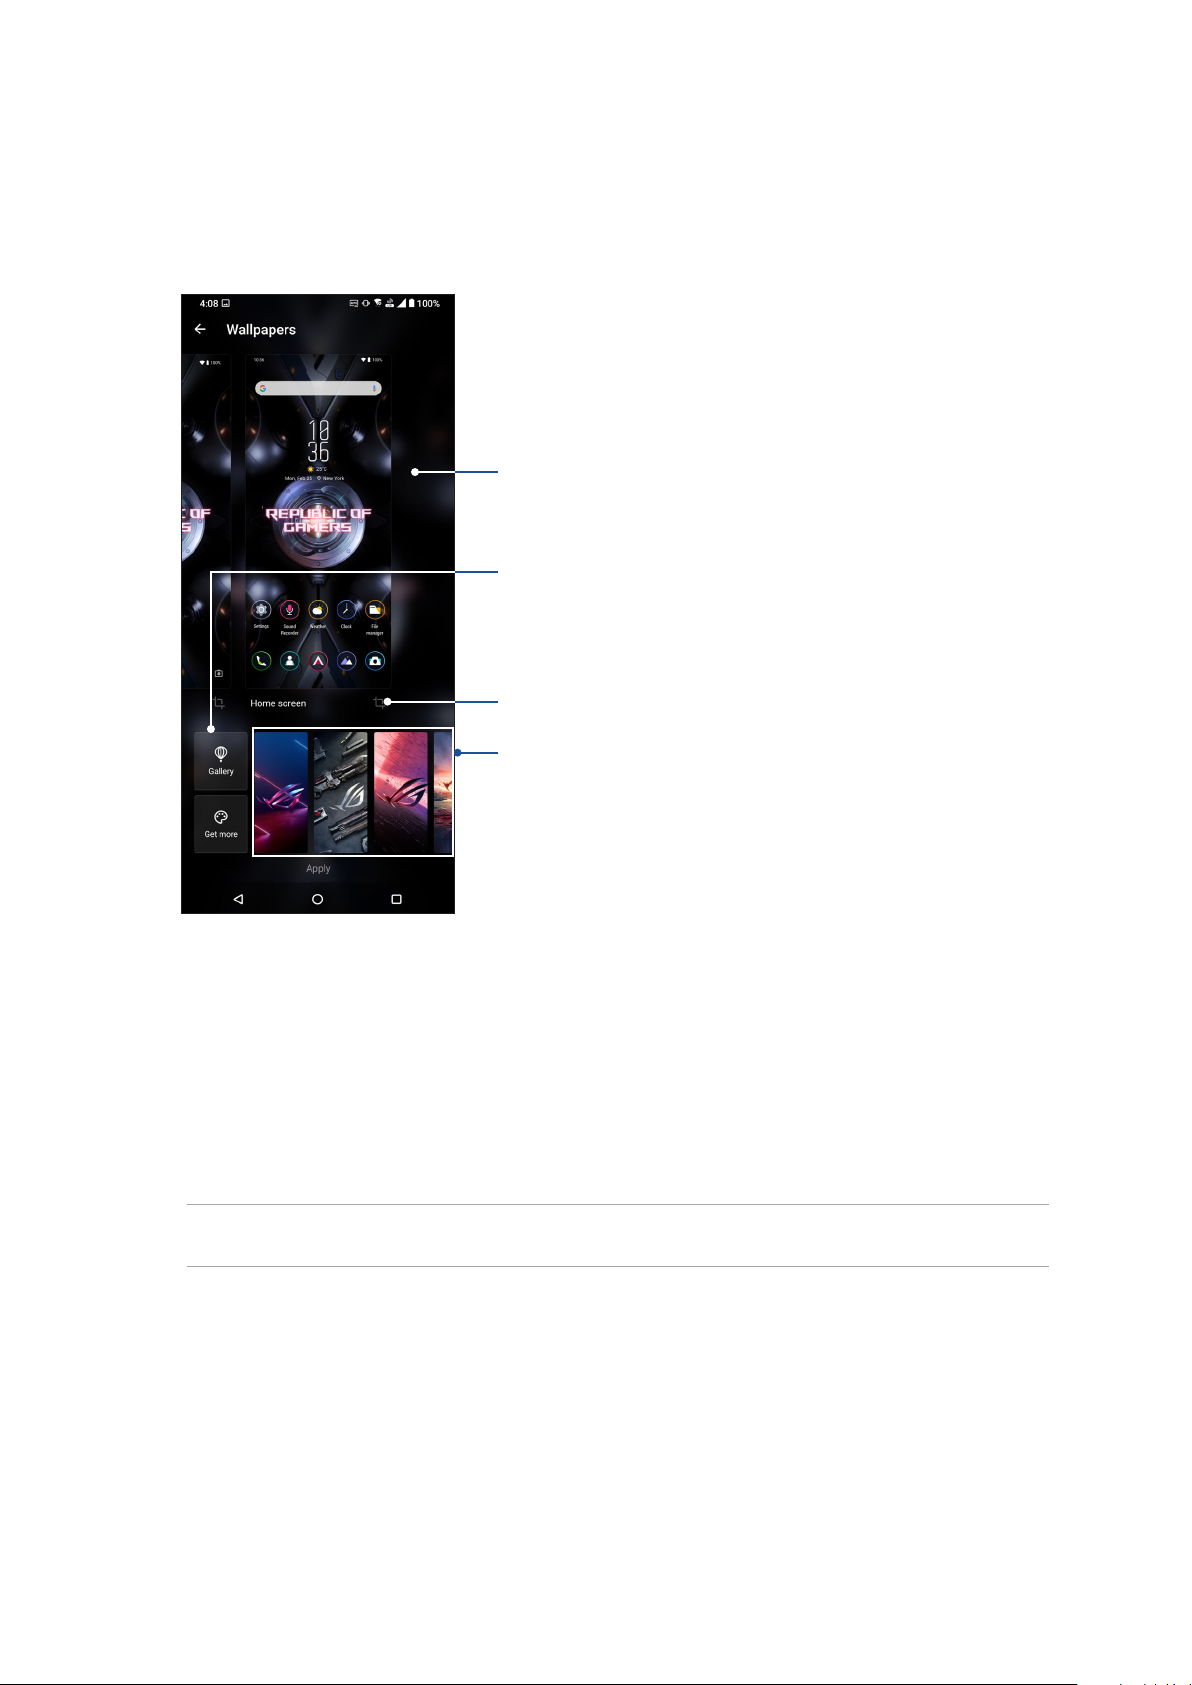
Wallpapers
Let your apps, icons, and other elements sit on an attractively designed wallpaper. You may add
a translucent background tint to your wallpaper for readability and clarity. You can also select an
animated wallpaper to make your screen come alive.
Swipe right or left to select where you want to apply the wallpaper
Tap to select an image from Gallery
Tap to crop the wallpaper
Swipe right or left to select a wallpaper
Applying wallpaper
To apply wallpaper:
1. Tap and hold an empty area on your Home screen and select Wallpapers.
2. Select to set wallpaper to Lock screen or Home screen.
3. Select a wallpaper, and then tap Apply.
NOTE: You can also set up your wallpaper settings from Settings > Themes & wallpapers >
Wallpaper.
24
Chapter 2: There’s no place like Home
Page 25
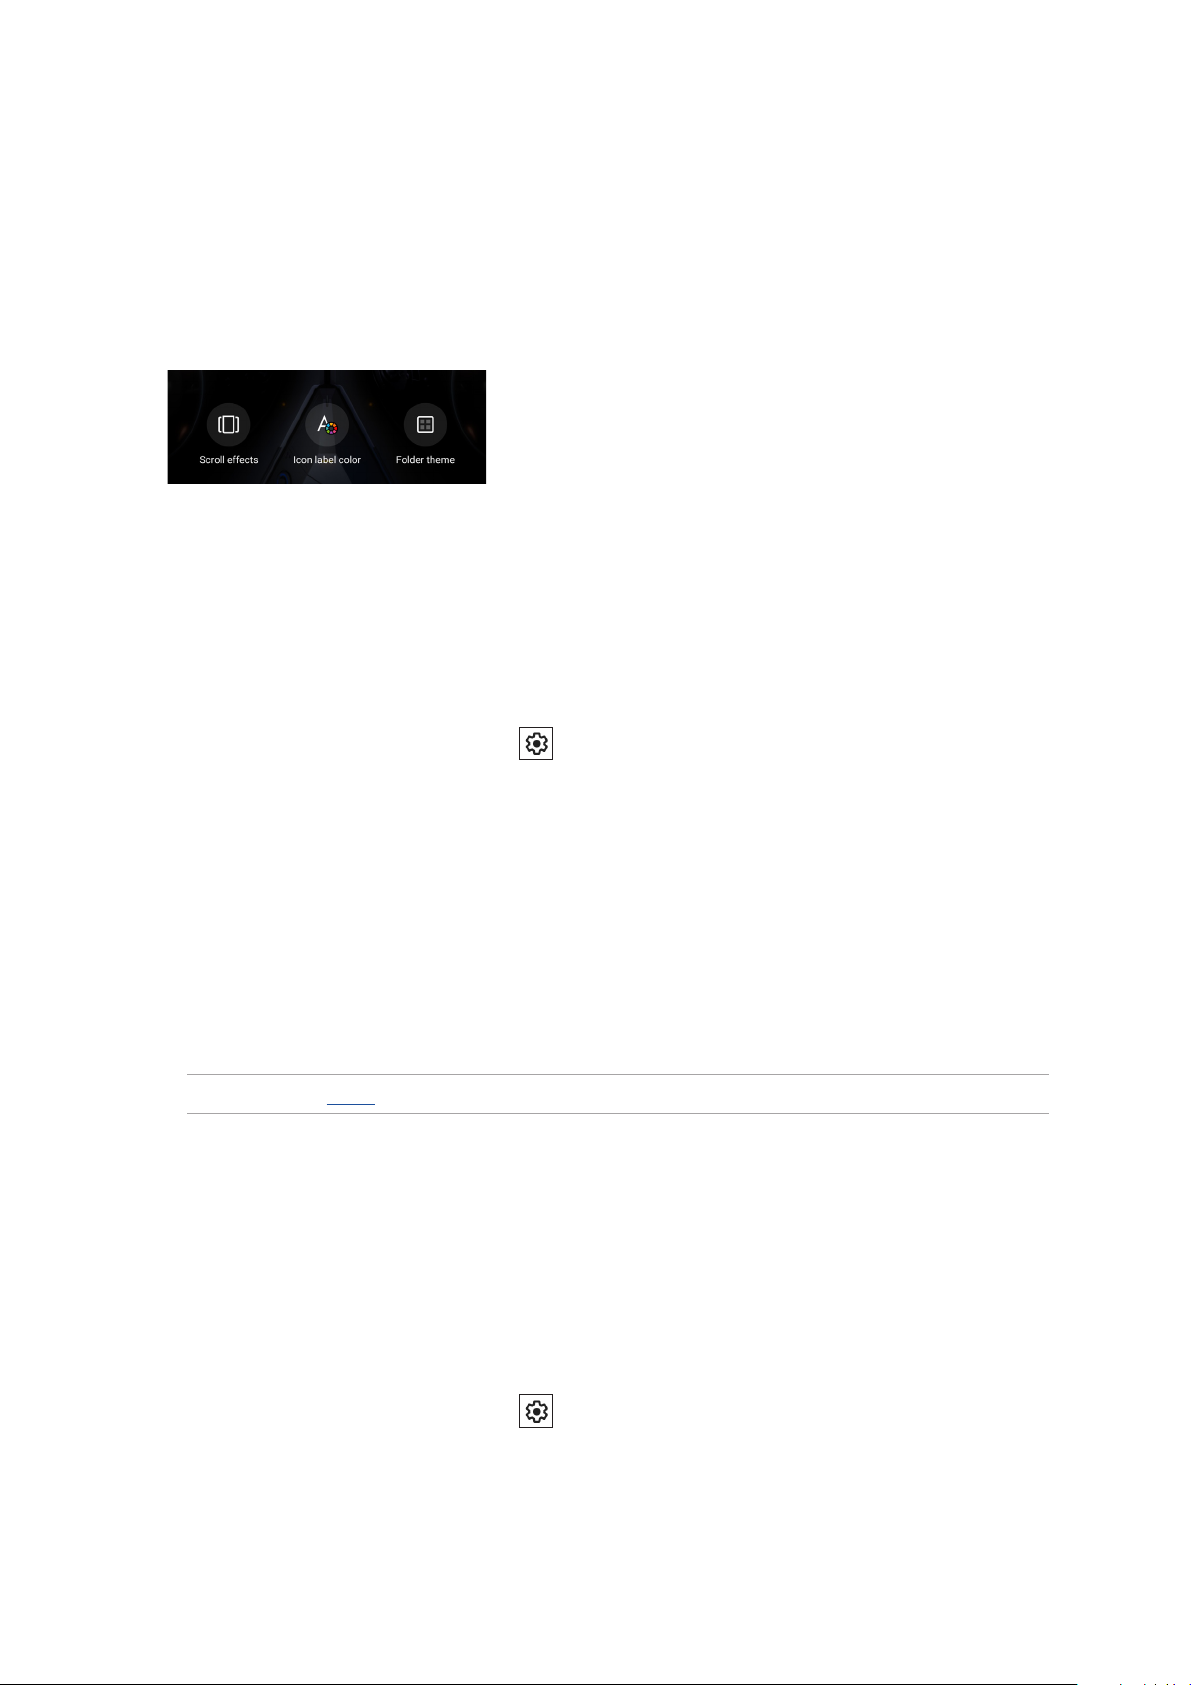
Editing your Home screen
You can extend your Home screen, select a scroll eect, change the icon label color, and select the
folder theme.
1. Tap and hold an empty area on your Home screen and select Edit Home screen.
2. Tap a feature to edit your Home screen.
Setting up the date and time
By default, the date and time displayed on your Home screen automatically syncs with your mobile
provider’s settings.
To change the date and time settings:
1. Launch the Settings screen by doing either of the following:
• Launch Quick Settings then tap .
• Swipe up on your Home screen then tap Settings.
2. Scroll down the Settings screen and select System > Date & time.
3. Slide Use network-provided time and Use network-provided time zone to o.
4. Tap Date and Time to adjust the date and time.
5. Tap Time Zone to select the time zone.
6. You can opt to use the 24-hour format, if you prefer.
NOTE: See also Clock.
Setting up your ringtone and alert sounds
Set up the sound for your phone ringtone, notications such as text messages, emails, and event
alerts. You can also choose to enable or disable the dial pad touch tones, touch sounds, screen lock
sound, or you can choose to have your ROG Phone vibrate when you tap on it.
To set up the sound settings:
1. Launch the Settings screen by doing either of the following:
• Launch Quick Settings then tap .
• Swipe up on your Home screen then tap Settings.
2. Select Sound & vibration and set up your preferred sound settings.
Chapter 2: There’s no place like Home
25
Page 26
Lock Screen
By default, the lock screen appears after turning on your device and while waking it up from sleep
mode. From the lock screen, you can proceed to your device’s Android® system by swiping on your
touch screen panel.
Your device’s lock screen can also be customized to regulate access to your mobile data and apps.
Customizing your lock screen
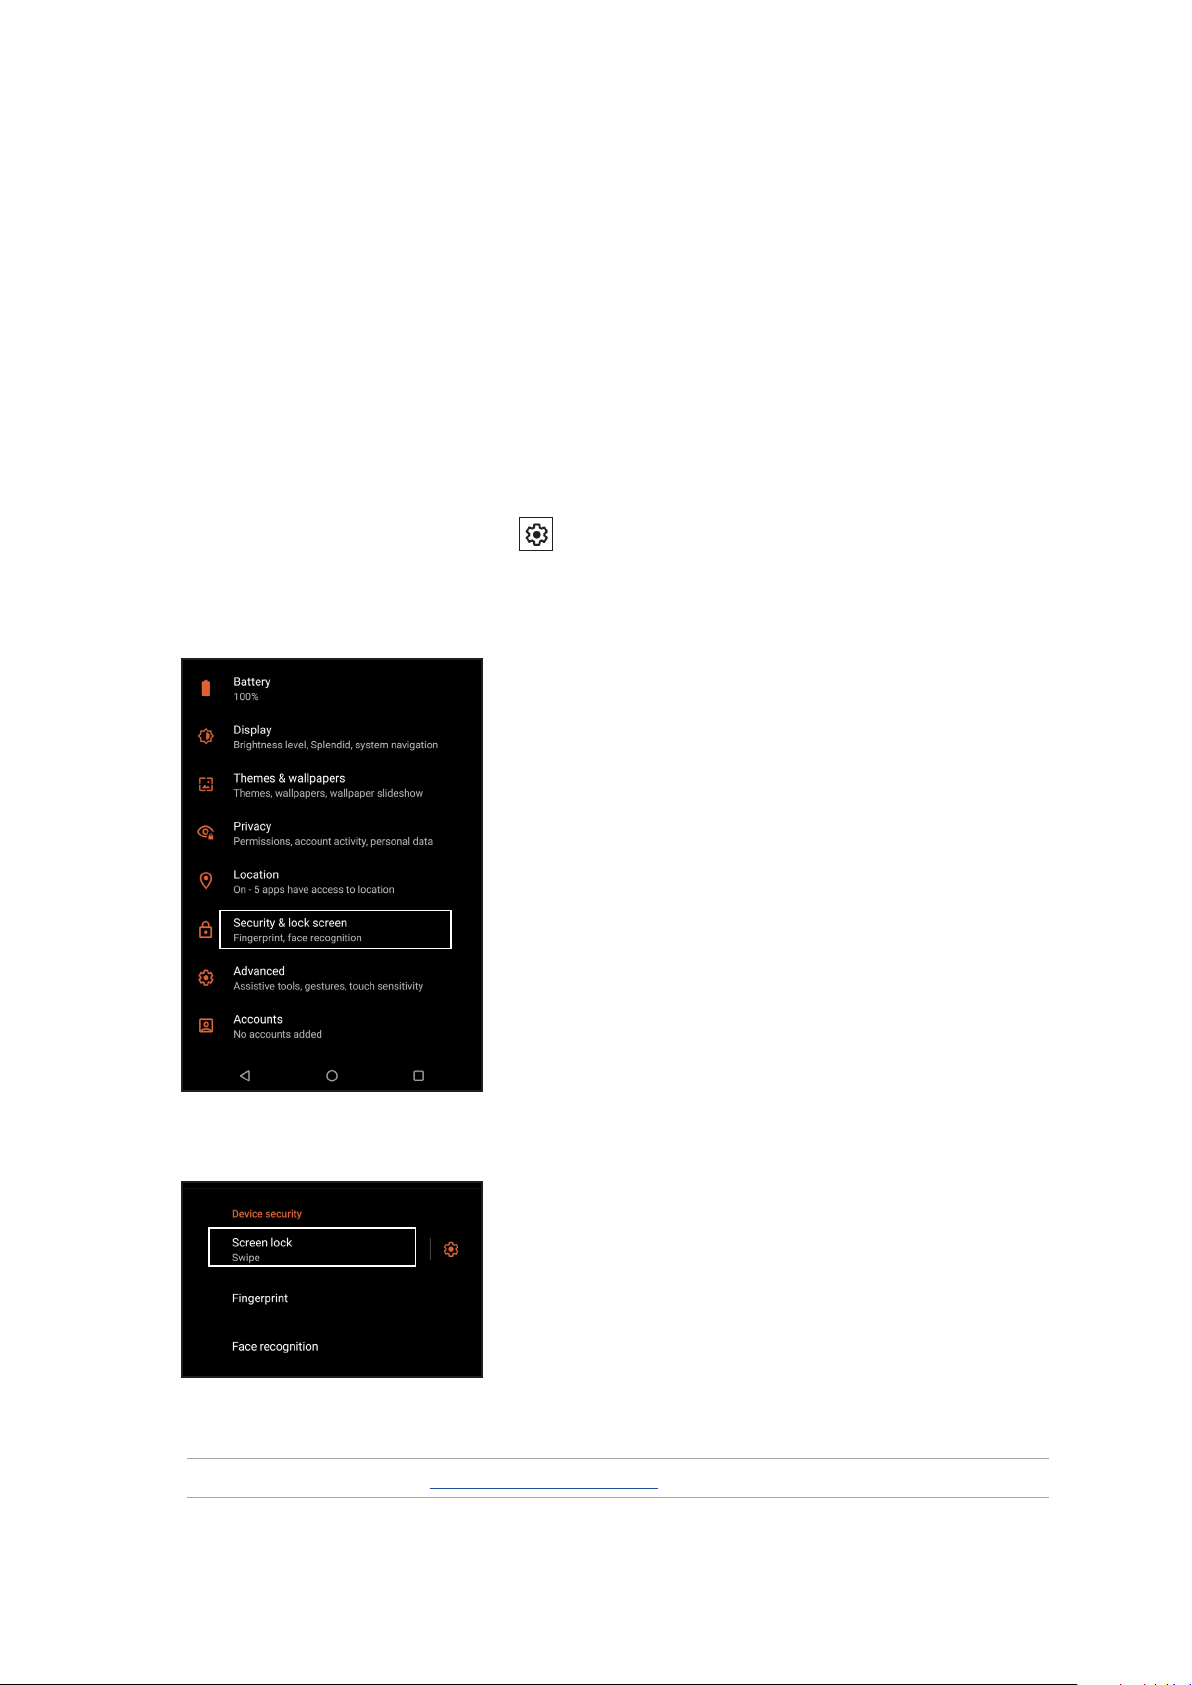
If you want to change your lock screen settings from the default Swipe option, refer to the
following steps:
1. Launch the Settings screen by doing either of the following:
• Launch Quick Settings then tap .
• Swipe up on your Home screen then tap Settings.
2. Select Security & lock screen.
3. In the next screen, tap Screen lock.
4. Tap the screen lock option you would like to use.
NOTE: For more details, see Securing your ROG Phone.
26
Chapter 2: There’s no place like Home
Page 27
Fingerprint ID sensor
Fingerprint ID sensor prevents others from using your ROG Phone without your permission. You
can use your ngerprint to unlock your device, access your phone calls and data. When you set up
your ngerprint ID, you also need to set up your screen lock method for device startup.
Starting your ROG Phone for the rst time
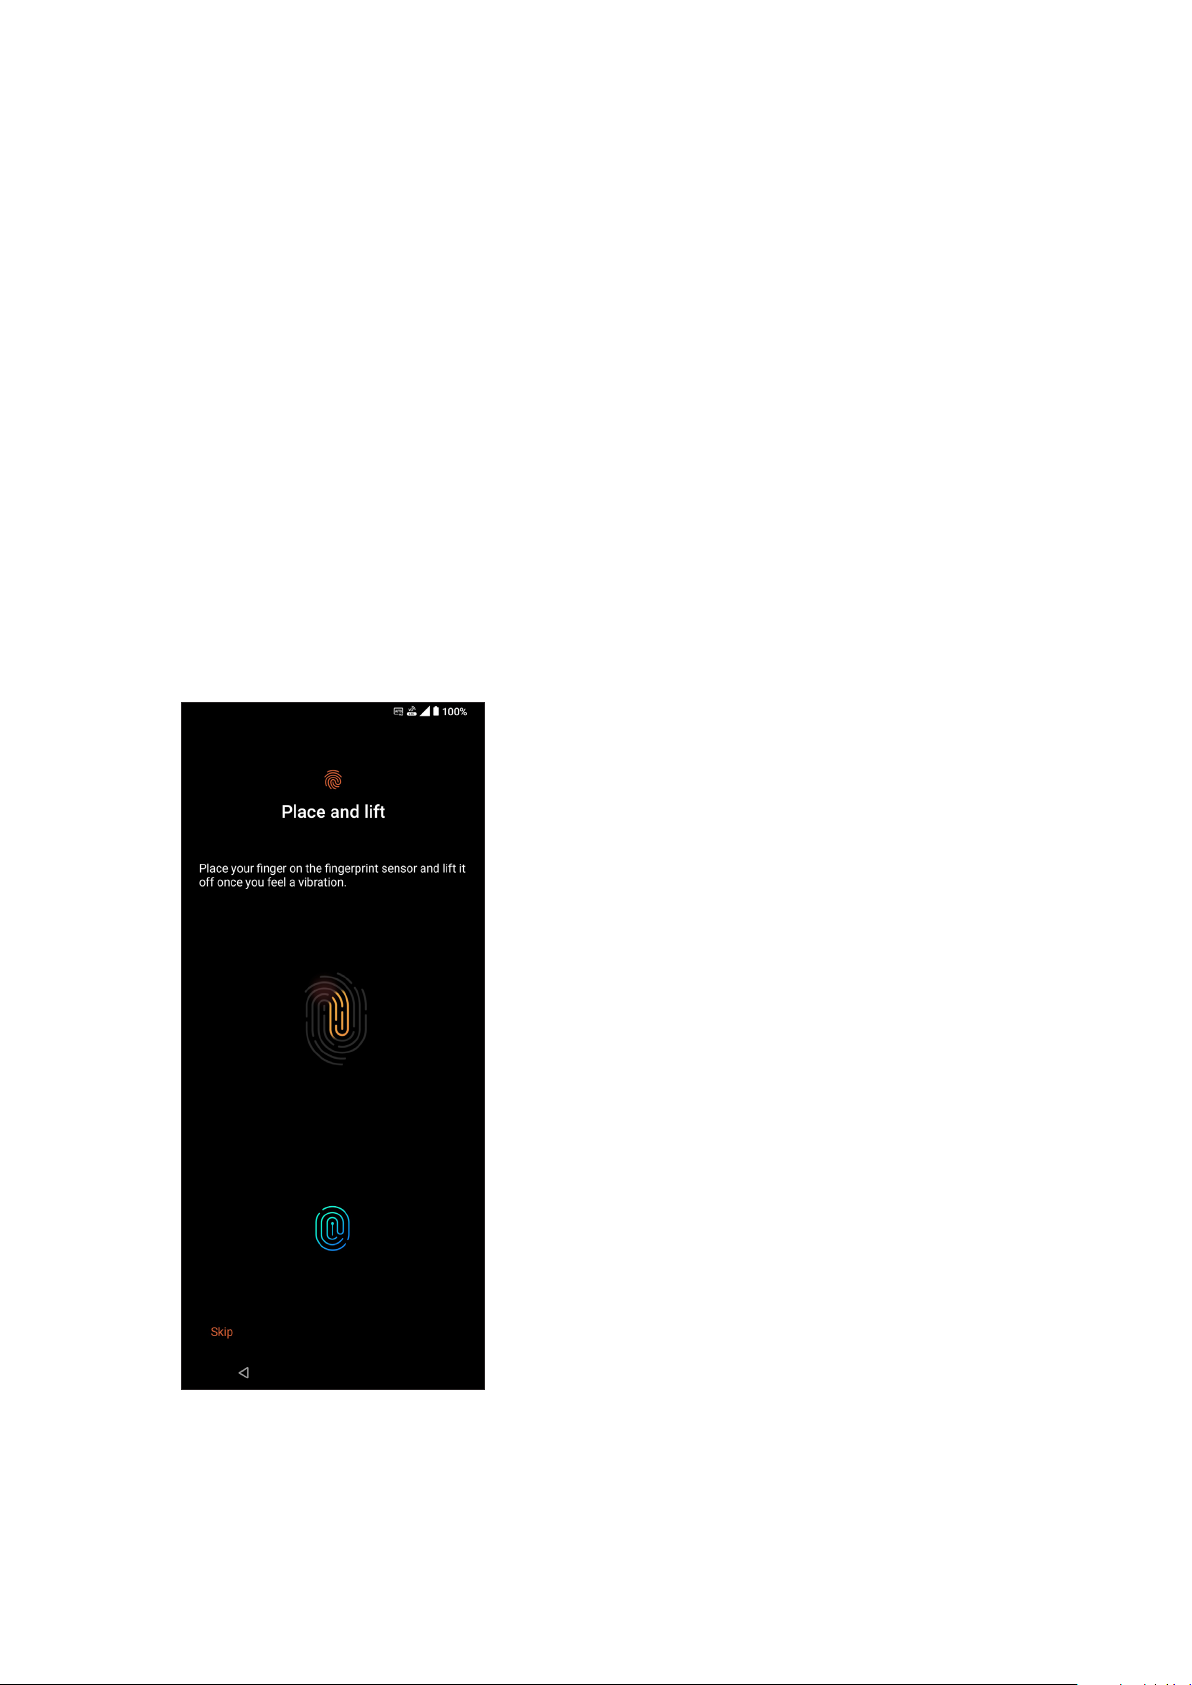
To set up your ngerprint ID when using your ROG Phone for the rst time:
1. Ensure that the ngerprint identication module and your nger are clean and dry.
2. From the Welcome page, follow the on-screen instructions to the Protect your phone page and
tap Set up ngerprint.
3. Tap Continue to choose a screen lock method, and then follow the instructions to the Locate
ngerprint scanner page, and tap Next.
4. Find the ngerprint scanner on the front of your device, adjust your nger and try to cover
dierent areas of your nger repeatedly until your ngerprint is captured.
5. Tap Next to complete the setup.
Chapter 2: There’s no place like Home
27
Page 28
Setting up ngerprint ID from Settings
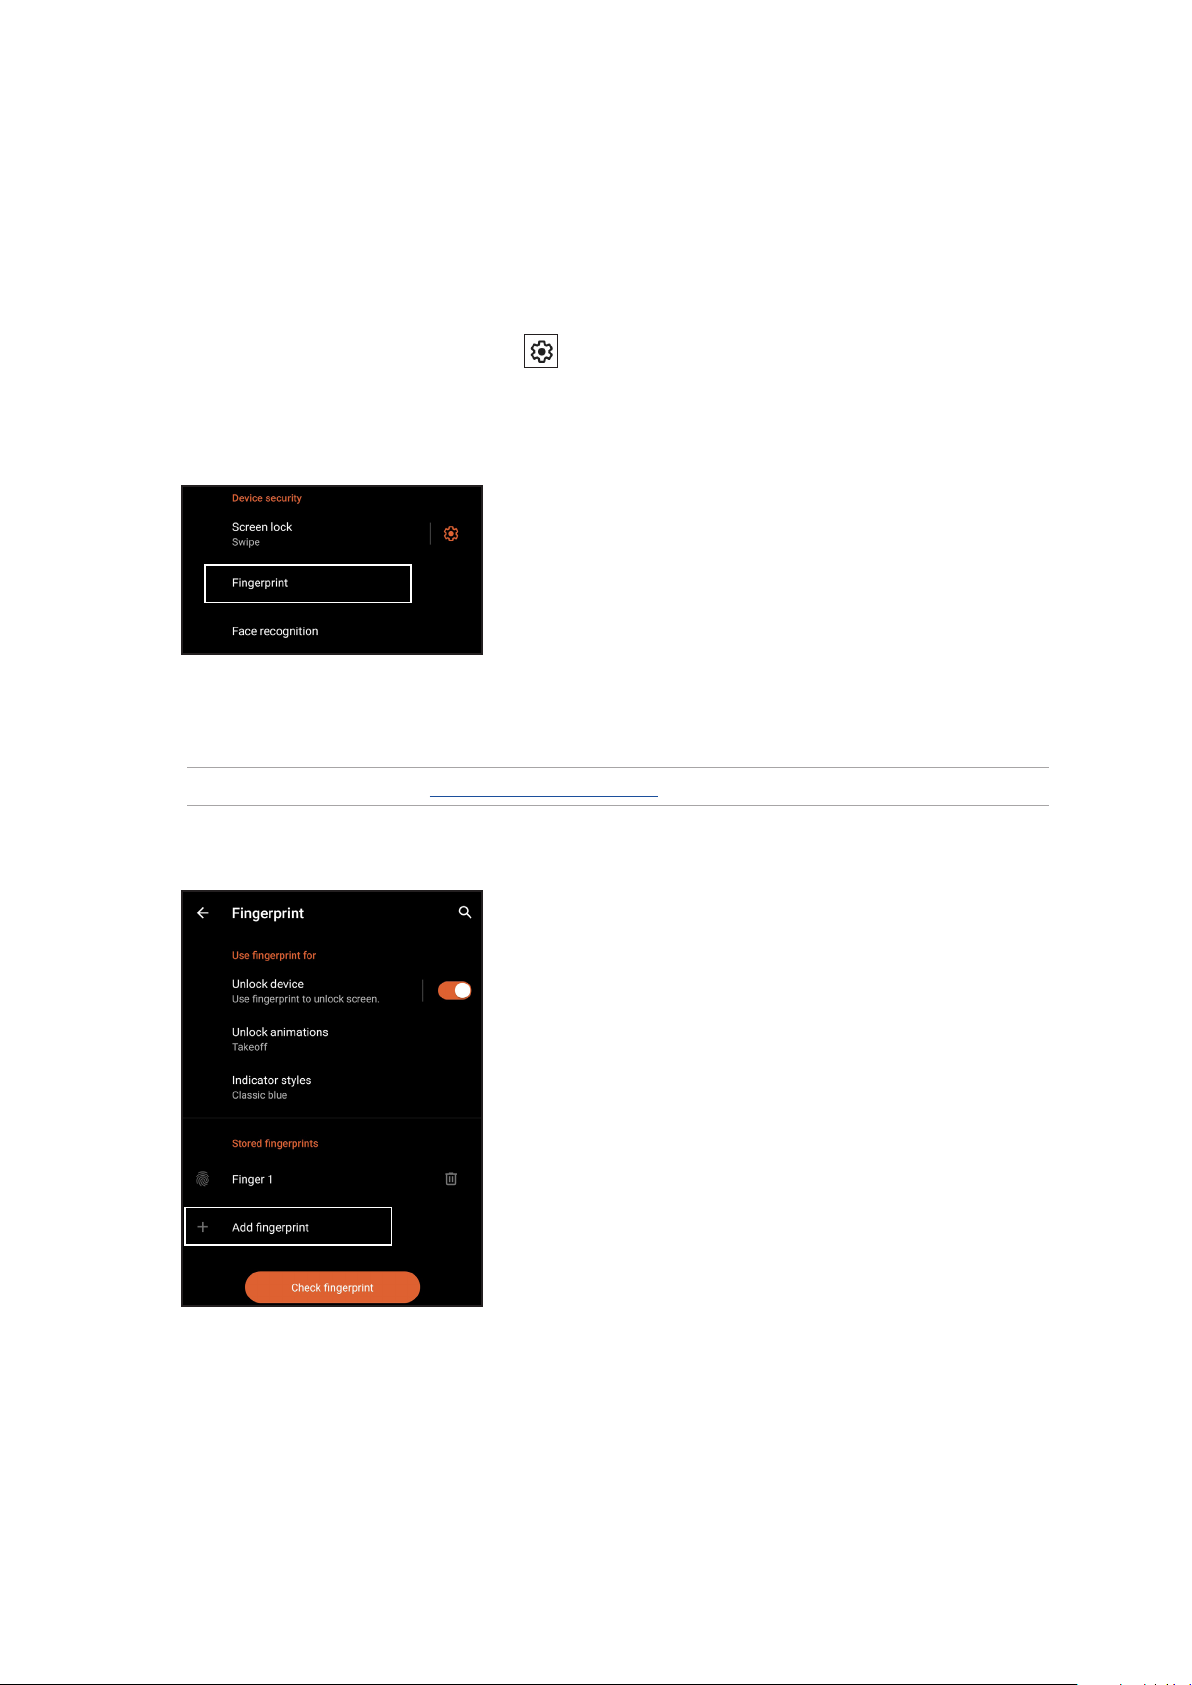
To set up your ngerprint ID from Settings:
1. Ensure that the ngerprint scanner and your nger are clean and dry.
2. Launch the Settings screen by doing either of the following:
• Launch Quick Settings then tap .
• Swipe up on your Home screen then tap Settings.
3. Scroll down the Settings screen and select Security & lock screen > Fingerprint.
4. Unlock your phone if it’s secured. If not, follow the instructions to set up your backup screen lock
method.
NOTE: For more details, see Securing your ROG Phone.
5. Tap Add ngerprint.
6. Repeatedly place-and-lift your nger on the scanner until your ngerprint is captured.
7. Tap Done to complete the setup.
28
Chapter 2: There’s no place like Home
Page 29
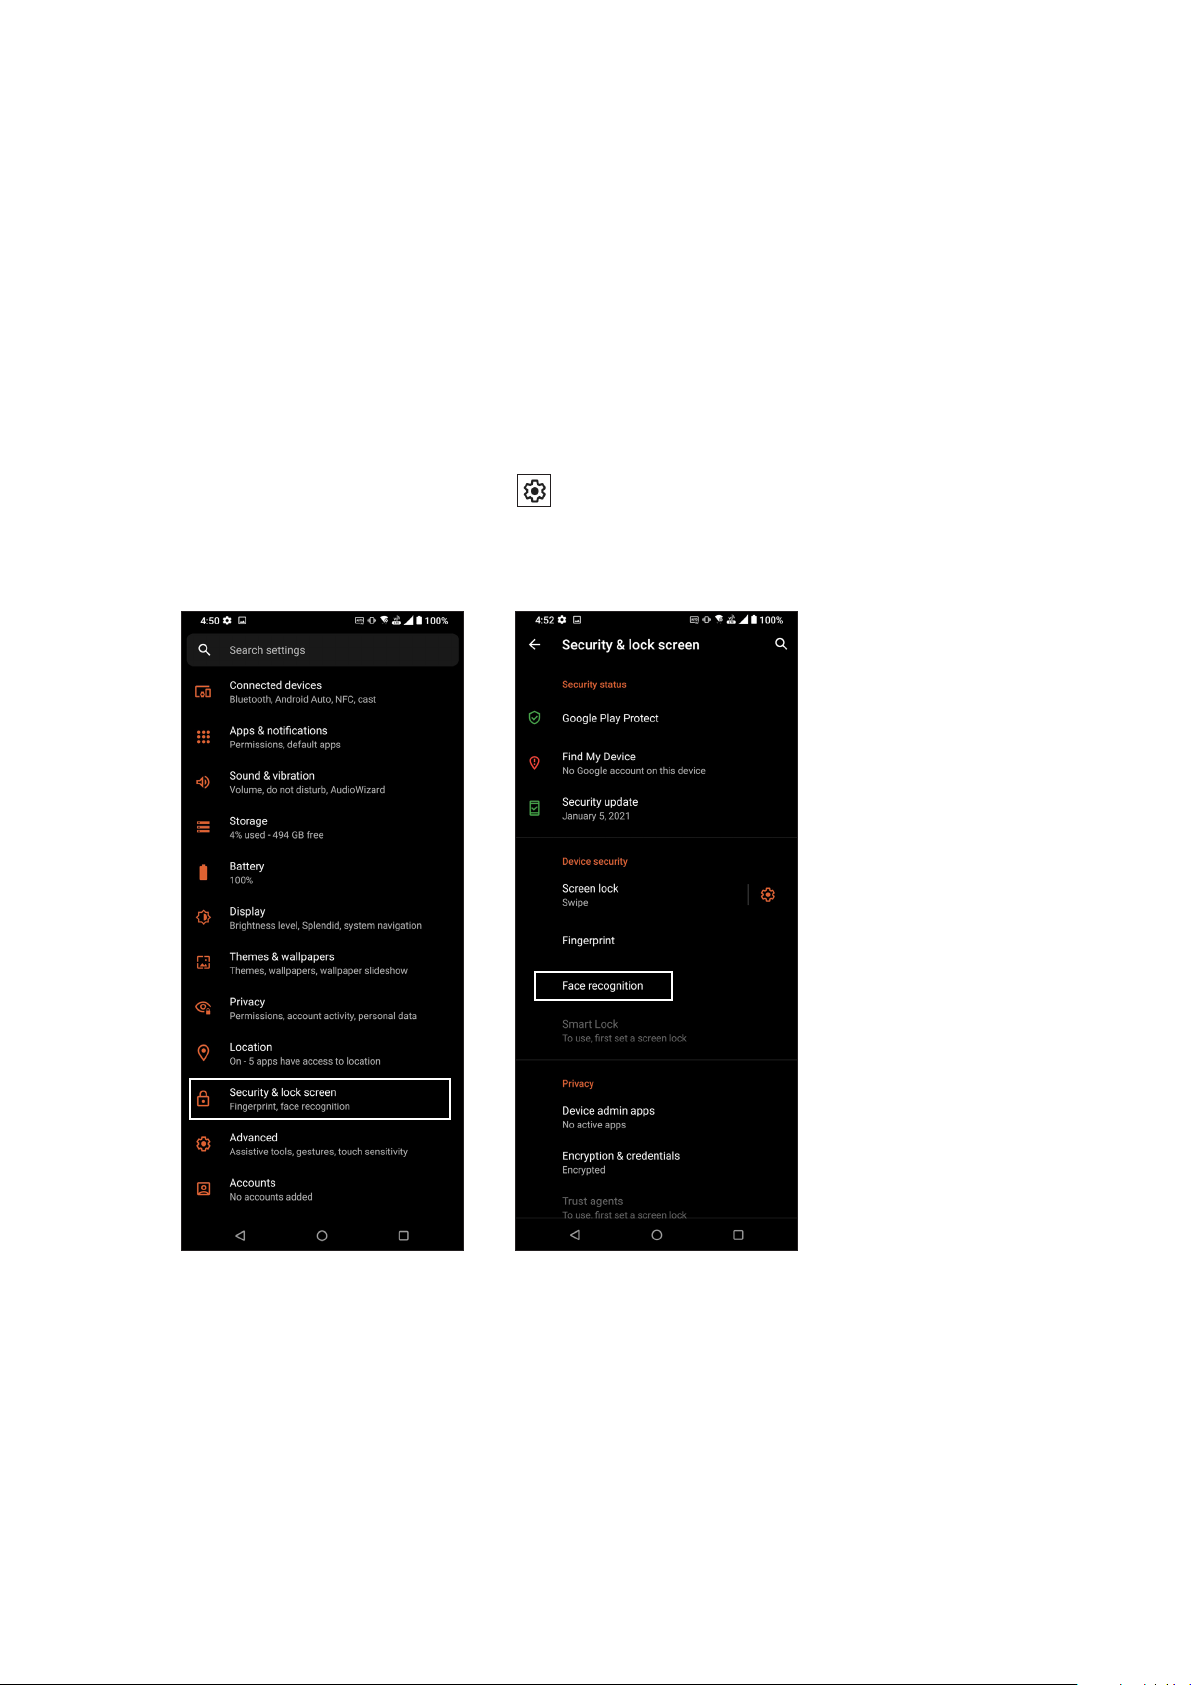
Face Unlock
Face unlock prevents others from using your ROG Phone without your permission eortlessly. You
can light up your ROG Phone’s screen and look at it to unlock your device, access your phone’s
home screen in one second. When you set up your face unlock, you also need to set up your screen
lock method for device startup.
Setting up face unlock from Settings
To set up face unlock from Settings:
1. Launch the Settings screen by doing either of the following:
• Launch Quick settings then tap .
• Swipe up on your Home screen and tap Settings.
2. Scroll down the Settings screen and select Security & lock screen > Face recognition.
3. Tap Continue.
Chapter 2: There’s no place like Home
29
Page 30
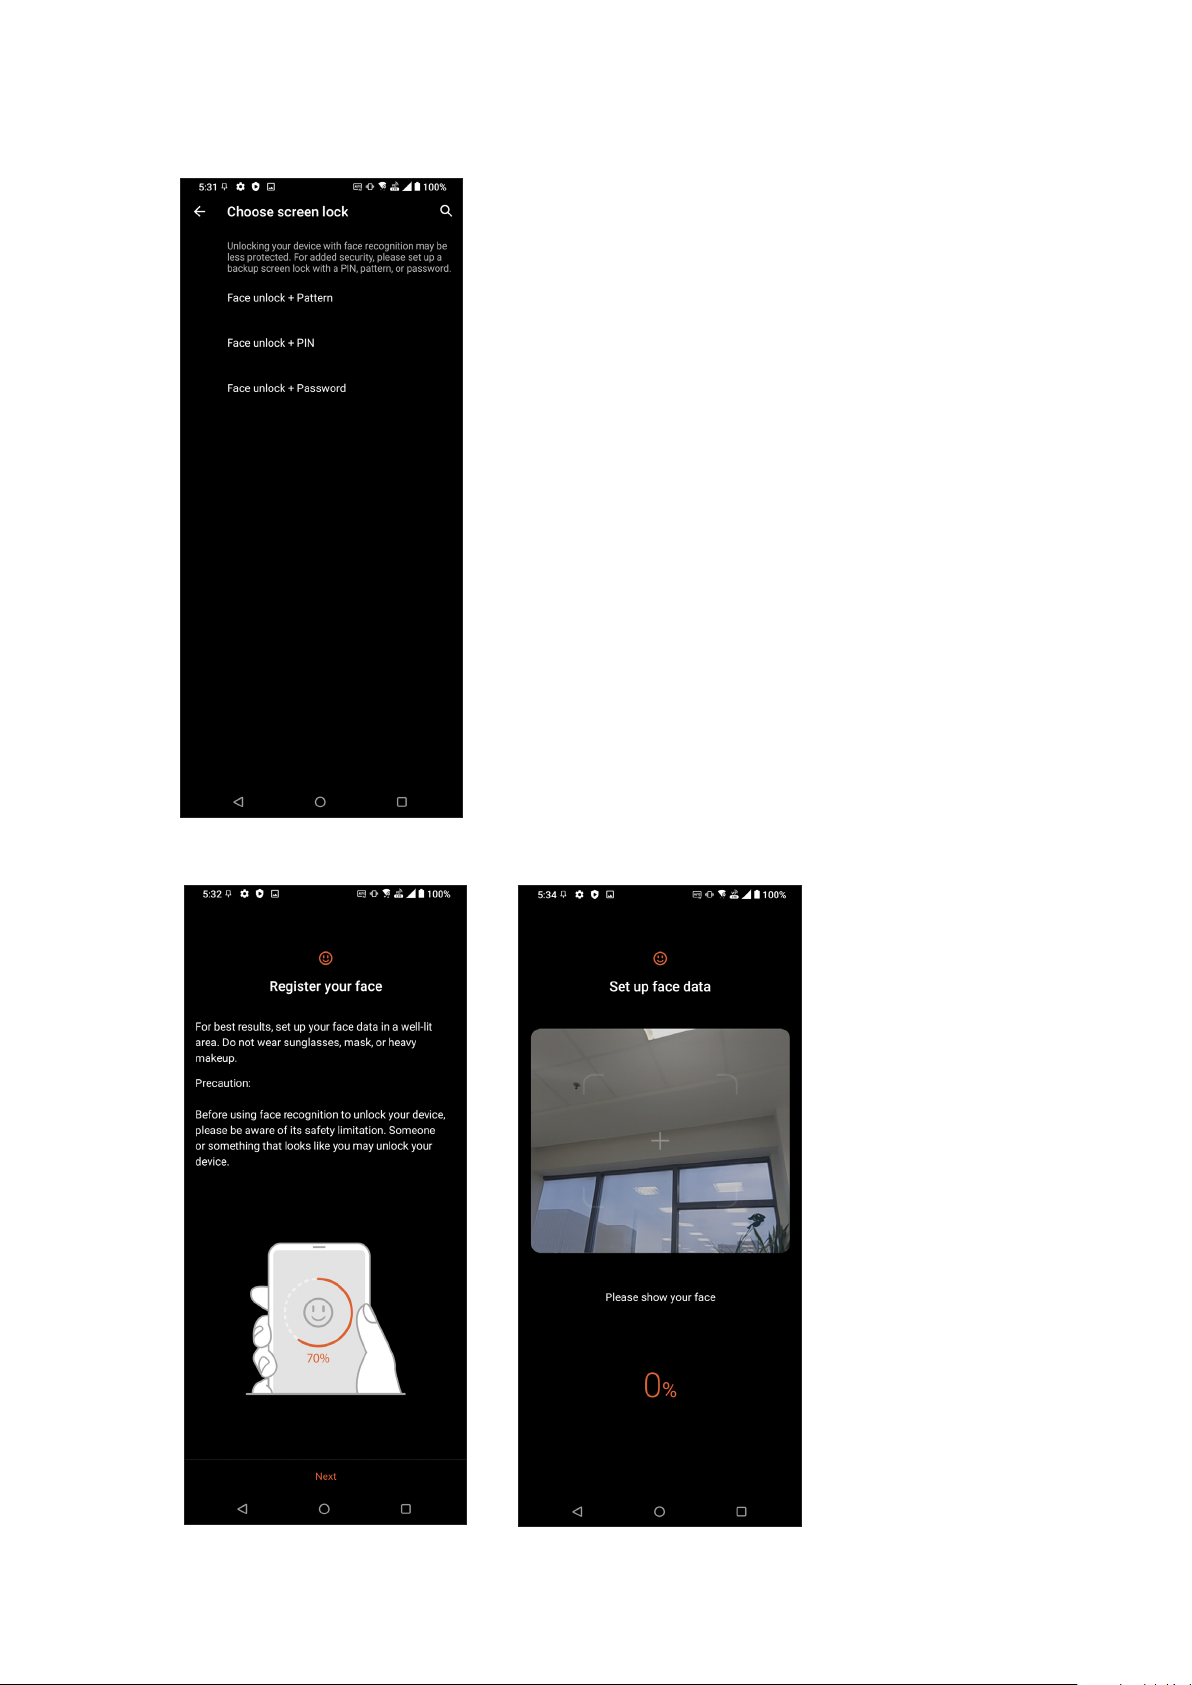
4. Follow the instructions to set up your backup screen lock method.
5. Tap Next and follow the instructions to register your face.
30
Chapter 2: There’s no place like Home
Page 31
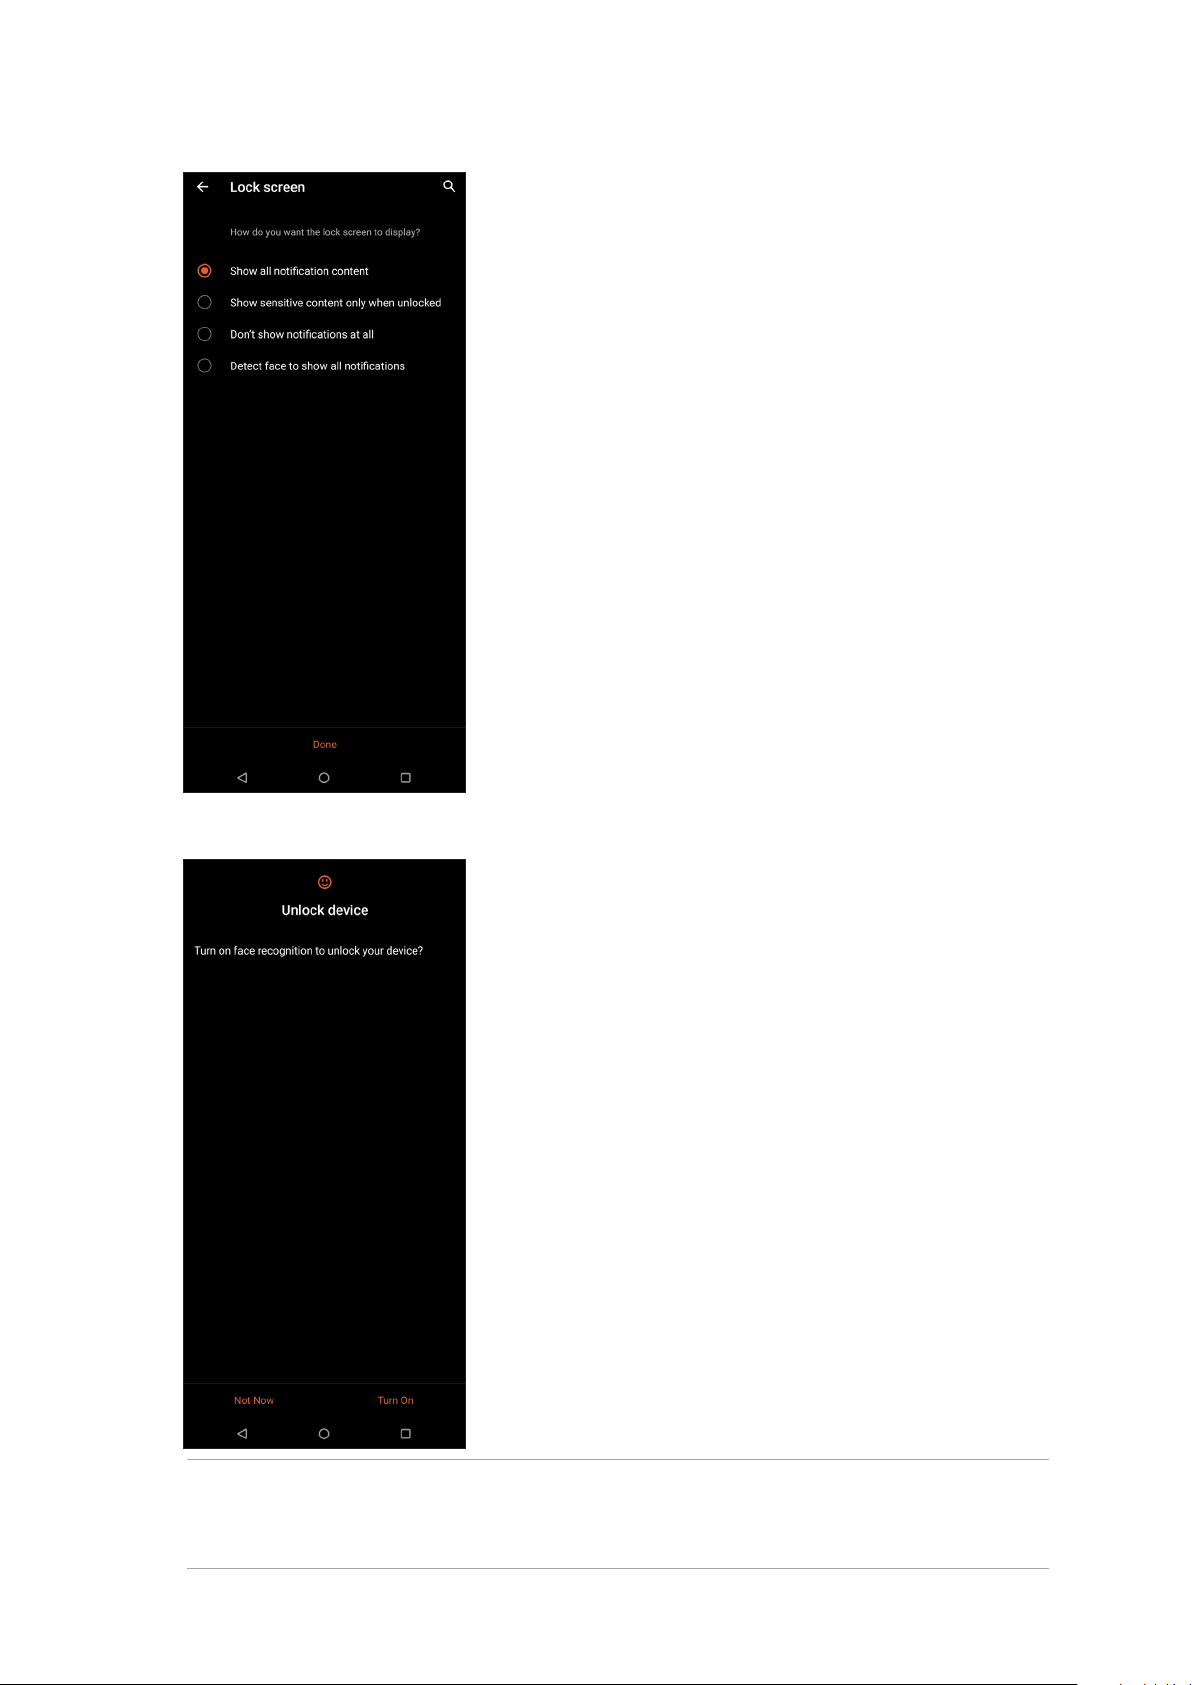
6. Select how you want to display your notications on the lock screen, then tap Done.
7. When nished, tap Turn On to enable face recognition to unlock your phone.
NOTES:
• Show your mouth, nose and opened eyes while using face unlock feature.
• Wearing sunglasses or insucient light will lead to failure of face unlock.
Chapter 2: There’s no place like Home
31
Page 32
3 Work hard, play harder
Work hard, play harder
3
Chrome
Chrome for Android lets you enjoy the same fast, secure and stable web browsing experience
as that on the desktop Chrome. Sign in to your Google account to sync tabs, bookmarks, and
browsing history across all your devices. If you don’t have a Google account, register for one.
NOTE: For details on creating a Google account, see Gmail.
IMPORTANT! Before doing any Internet surng or Internet-related activities, ensure that your ROG
Phone is connected to a Wi-Fi or mobile network. For more details, see Staying connected.
Launching Chrome
From your Home screen, do any of the following to launch Chrome:
• Tap .
• Swipe up on your Home screen then tap Chrome.
32
Chapter 3: Work hard, play harder
Page 33

Sharing pages
Share interesting pages from your ROG Phone to others via an email account, cloud storage
account, Bluetooth, or other ROG Phone apps.
1. Launch Chrome.
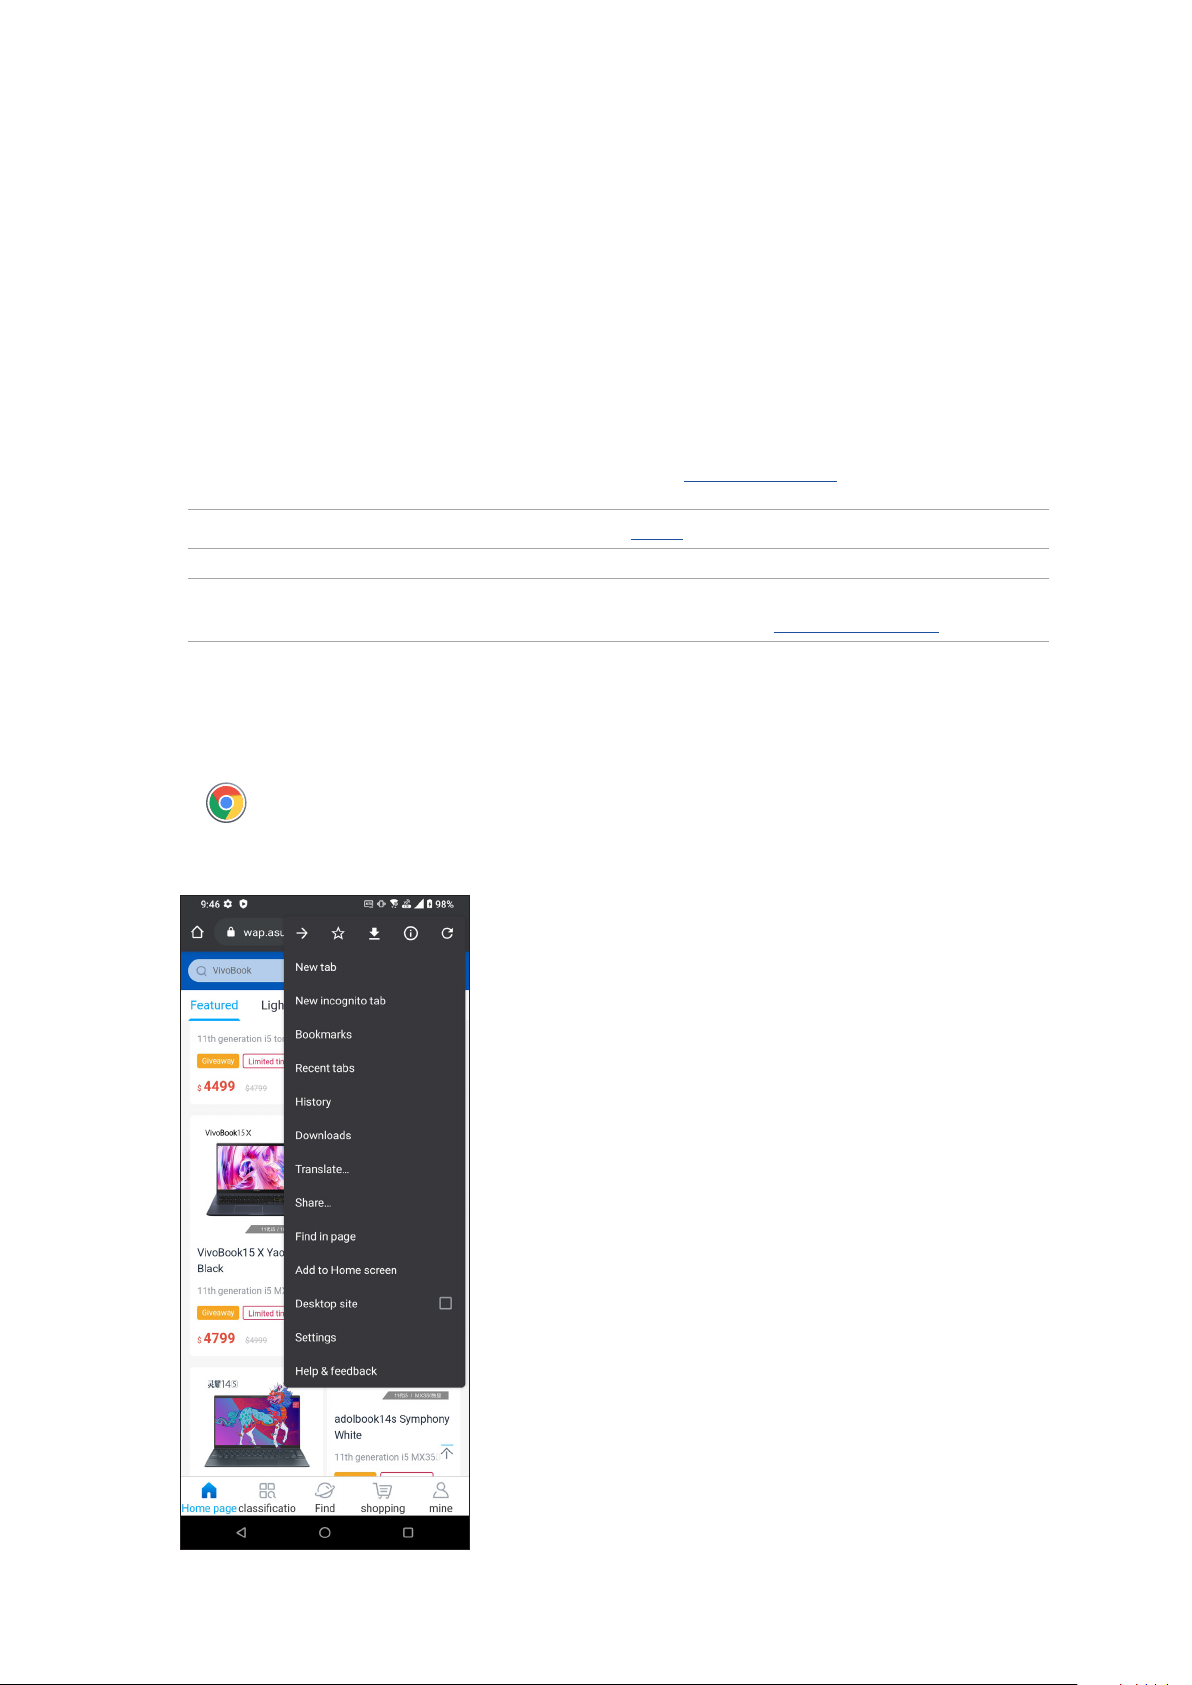
2. From a web page, tap > Share...
3. Tap to select a way to share the page.
Bookmarking pages
Bookmark your favorite pages or websites so you can go back and browse them again.
To bookmark a page:
From the page, tap > . To view your favorite pages, tap > Bookmarks, then select the
page you want to view or access.
Clearing the browsing data
Clear the browsing data that are temporarily stored in your ROG Phone to improve the loading
performance of your Chrome browser. The browsing data includes browsing history, cache,
cookies/site data, saved passwords, and autoll data.
1. Launch the browser.
2. Tap > Settings > Privacy > Clear browsing data.
3. Select the browsing data that you want to delete.
4. When done, tap Clear data.
Chapter 3: Work hard, play harder
33
Page 34
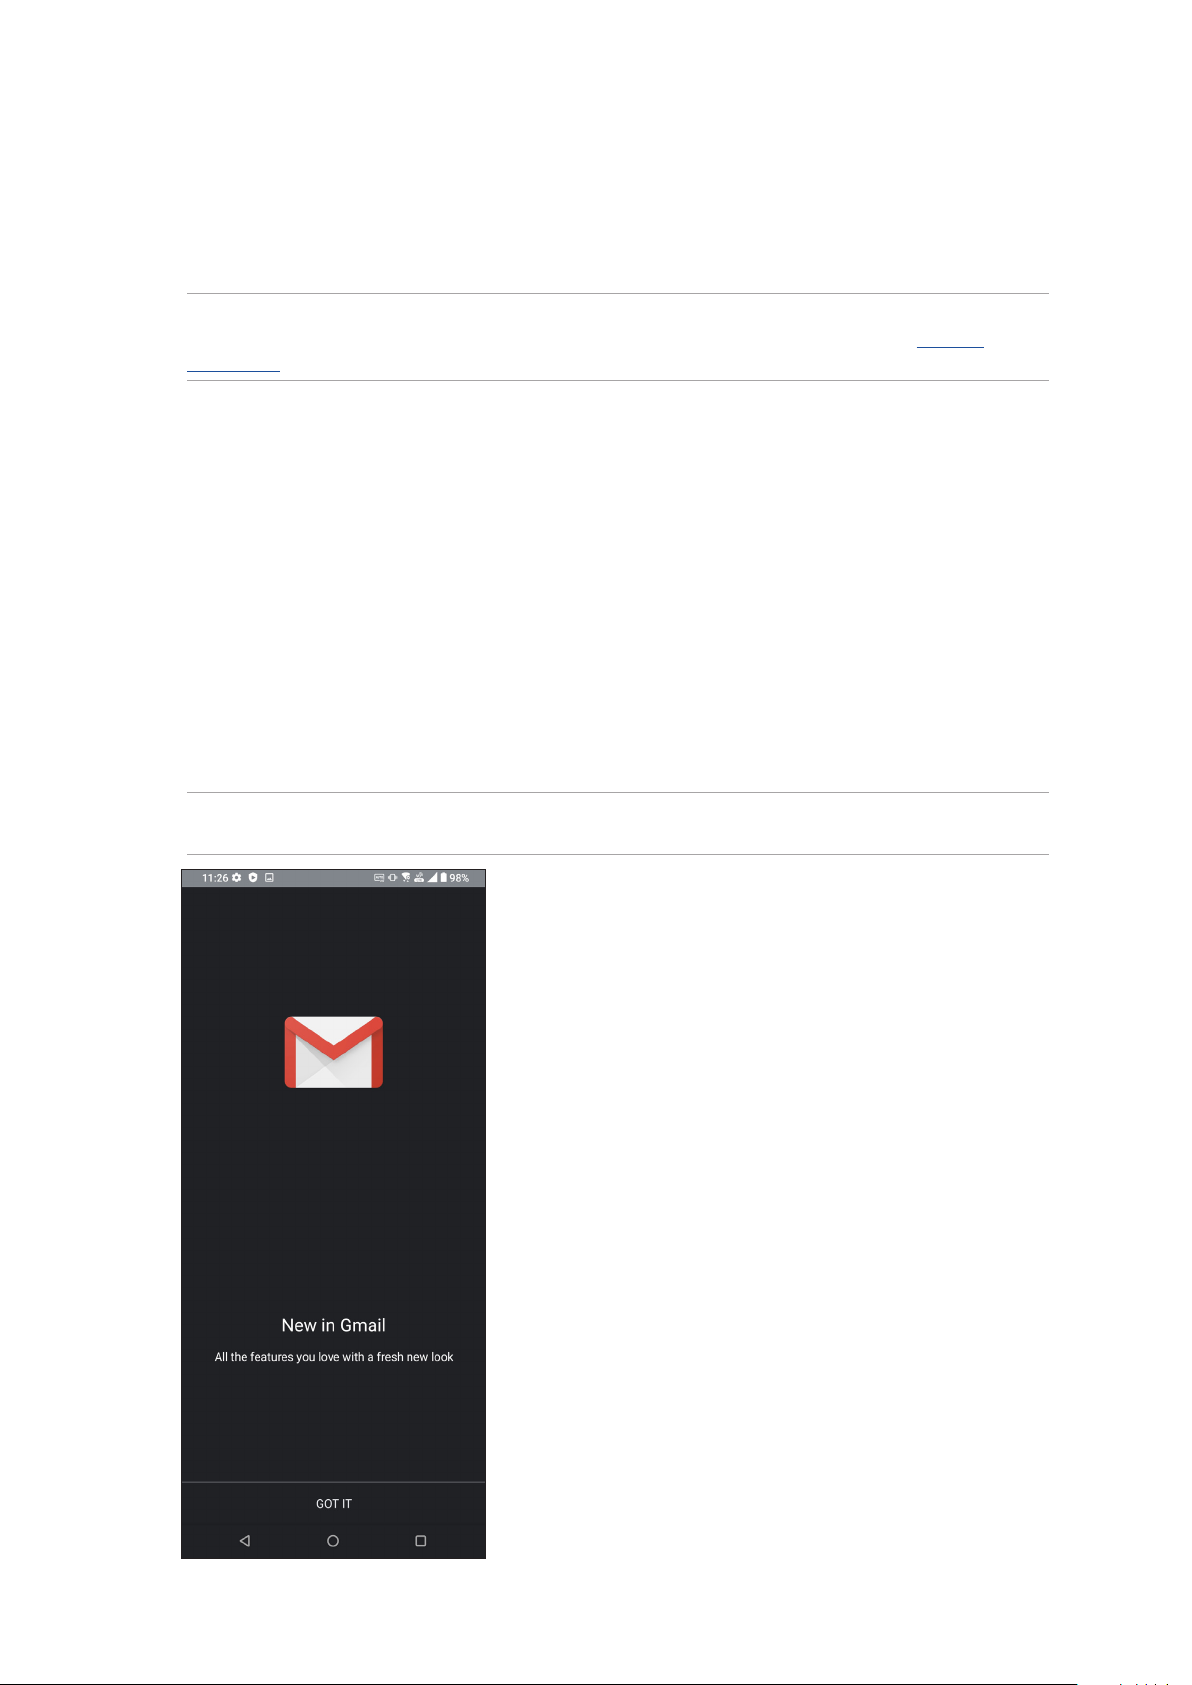
Gmail
Use Gmail to set up your Google account to get into Google-related services and apps as well
as receive, send, and browse emails right from your ROG Phone. You can also set up other email
accounts such as Yahoo or your work email account via Gmail.
IMPORTANT! Your ROG Phone must be connected to a Wi-Fi or mobile network so you can add
an email account or send and receive emails from added accounts. For more details, see Staying
connected.
To set up your Google account:
1. From your Home screen, do either of the following to launch Gmail:
• Tap Google > Gmail.
• Swipe up on your Home screen and tap Gmail.
2. Tap GOT IT and then Add an email address.
3. Select Google.
4. Enter your email address. To create a new Google account, tap Create account.
5. Follow the next steps to sign in to your Google account.
NOTE: If you want to set up your work account on your ROG Phone, ask for the email settings from
your network administrator.
34
Chapter 3: Work hard, play harder
Page 35

Google Calendar
Bring your schedule to life and keep track of all your important events or reminders. Events that you
create or edit will automatically sync with all Google Calendar versions that you’ve logged into.
Creating events
To create an event:
1. From the Home screen, do either of the following to launch Calendar:
• Tap Google > Calendar.
• Swipe up on your Home screen and tap Calendar.
2. Tap then tap Event.
3. Enter your event name, and select the date and time for the event. You may set the event as an
all-day or recurring event.
• All-day event: From the All-day eld, move the slider to the right.
• Recurring event: Tap More options > , then select how often you want the event to
recur or repeat.
4. To set the time zone, tap More options > , then enter the country whose time zone you
want displayed.
5. From the Add location eld, enter the venue or location of the event.
6. Tap , then you may select or set the time or day to get a notication or reminder about the
event.
7. From the Invite people eld, enter the email addresses of your guests to the event.
8. You may also add note or attachment from the Add note or Add attachment eld.
9. Once nished, tap Save.
Editing or removing events
To edit or remove an event:
1. From the Home screen, tap Google > Calendar.
2. Tap the event that you want to edit or delete.
3. To edit the event, tap and make the necessary changes. To remove the event, tap >
Delete, then tap Delete to conrm the deletion.
Chapter 3: Work hard, play harder
35
Page 36

Creating reminders
To create a reminder:
1. From the Home screen, tap Google > Calendar.
2. Tap then tap Reminder.
3. Enter your reminder name.
4. Set the date and time for the reminder. You may set the reminder as an all-day or recurring
reminder.
• All-day reminder: From the All day eld, move the slider to the right.
• Recurring reminder: Tap , then select how often you want the reminder to recur or
repeat.
5. Once nished, tap Save.
Editing or removing reminders
To edit or remove a reminder:
1. Tap Google > Calendar.
2. Tap the reminder that you want to edit or delete.
3. To edit the reminder, tap and make the necessary changes. To remove the reminder, tap
> Delete, then tap Delete to conrm the deletion.
36
Chapter 3: Work hard, play harder
Page 37
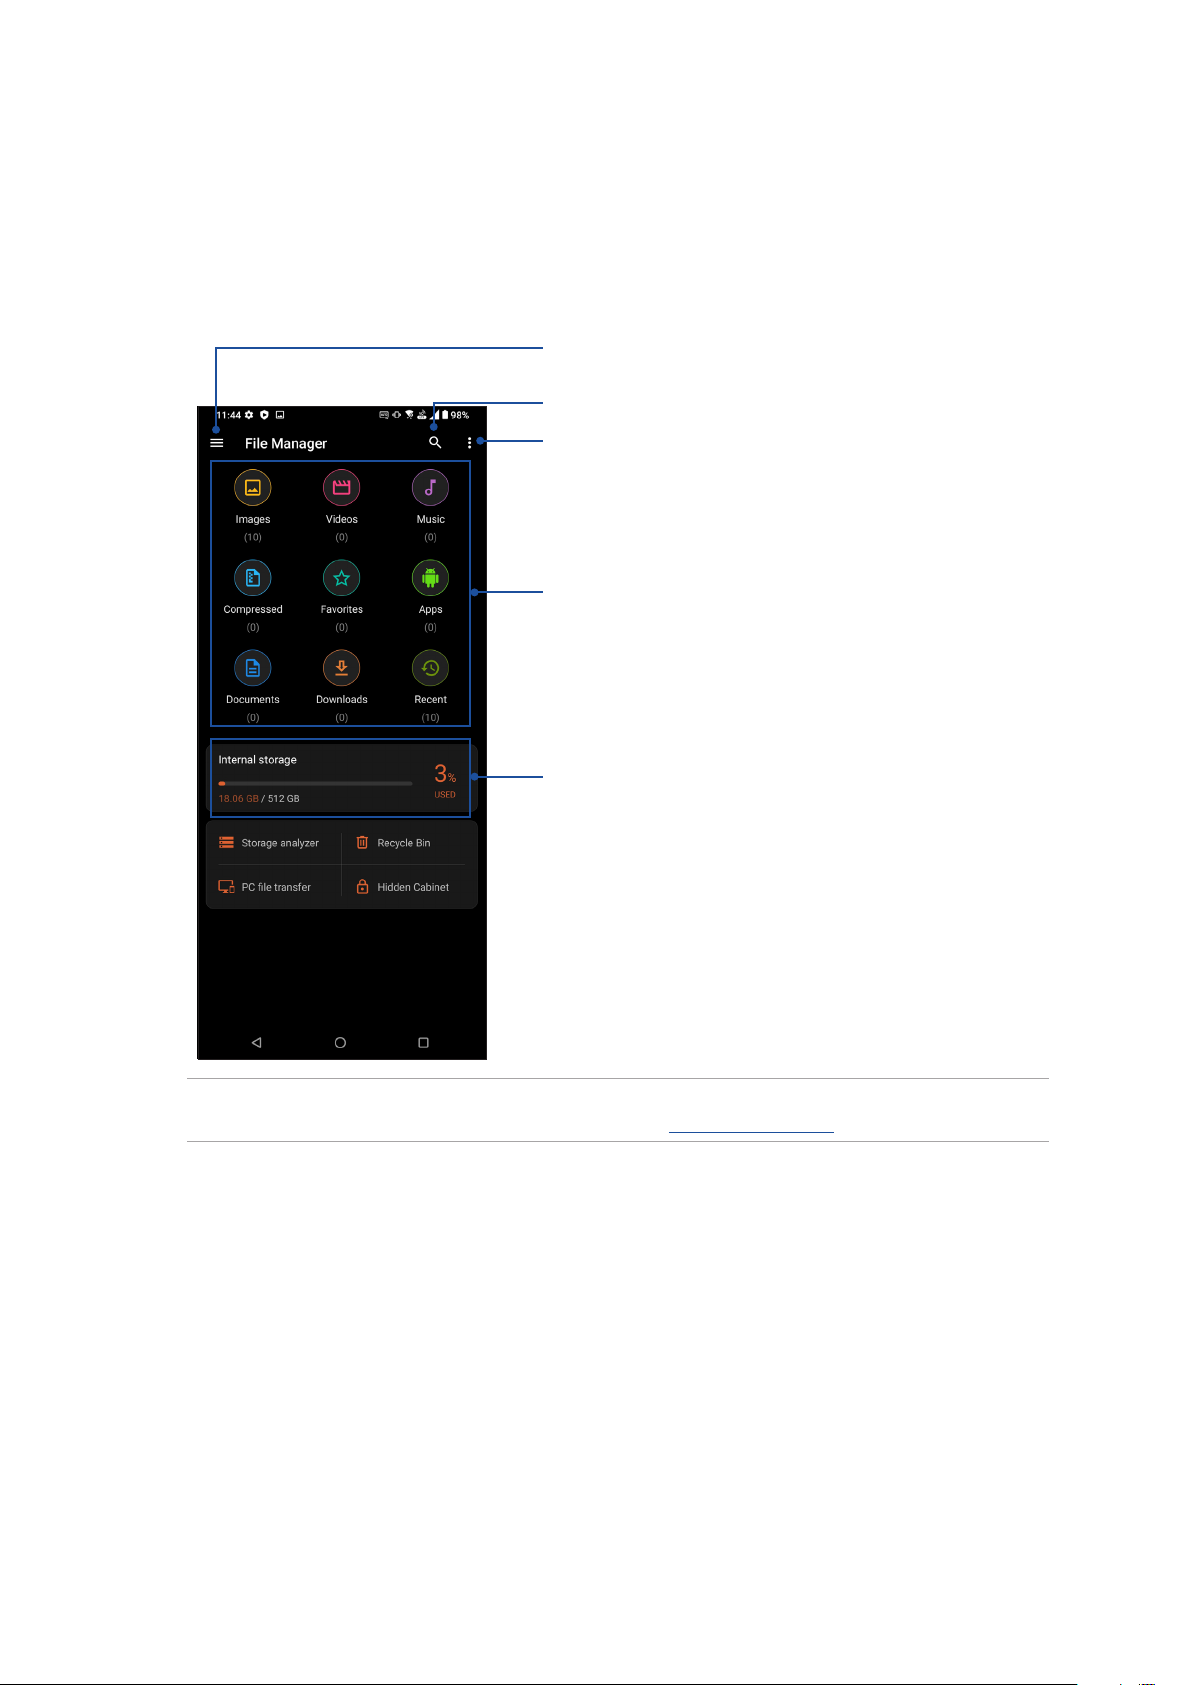
File Manager
Using File Manager allows you to easily locate and manage your data on the internal storage of
your Phone.
To launch File Manager, swipe up on your Home screen then tap File Manager.
Tap to access the internal, network, and cloud
storage
Tap to search for a le
Tap to edit categories and congure settings
Tap to display the les under the category
Displays the usage of the internal storage
IMPORTANT! Before accessing les saved on the network and cloud storage, ensure that Wi-Fi or
mobile network is enabled on your Phone. For details, see Staying connected.
Chapter 3: Work hard, play harder
37
Page 38
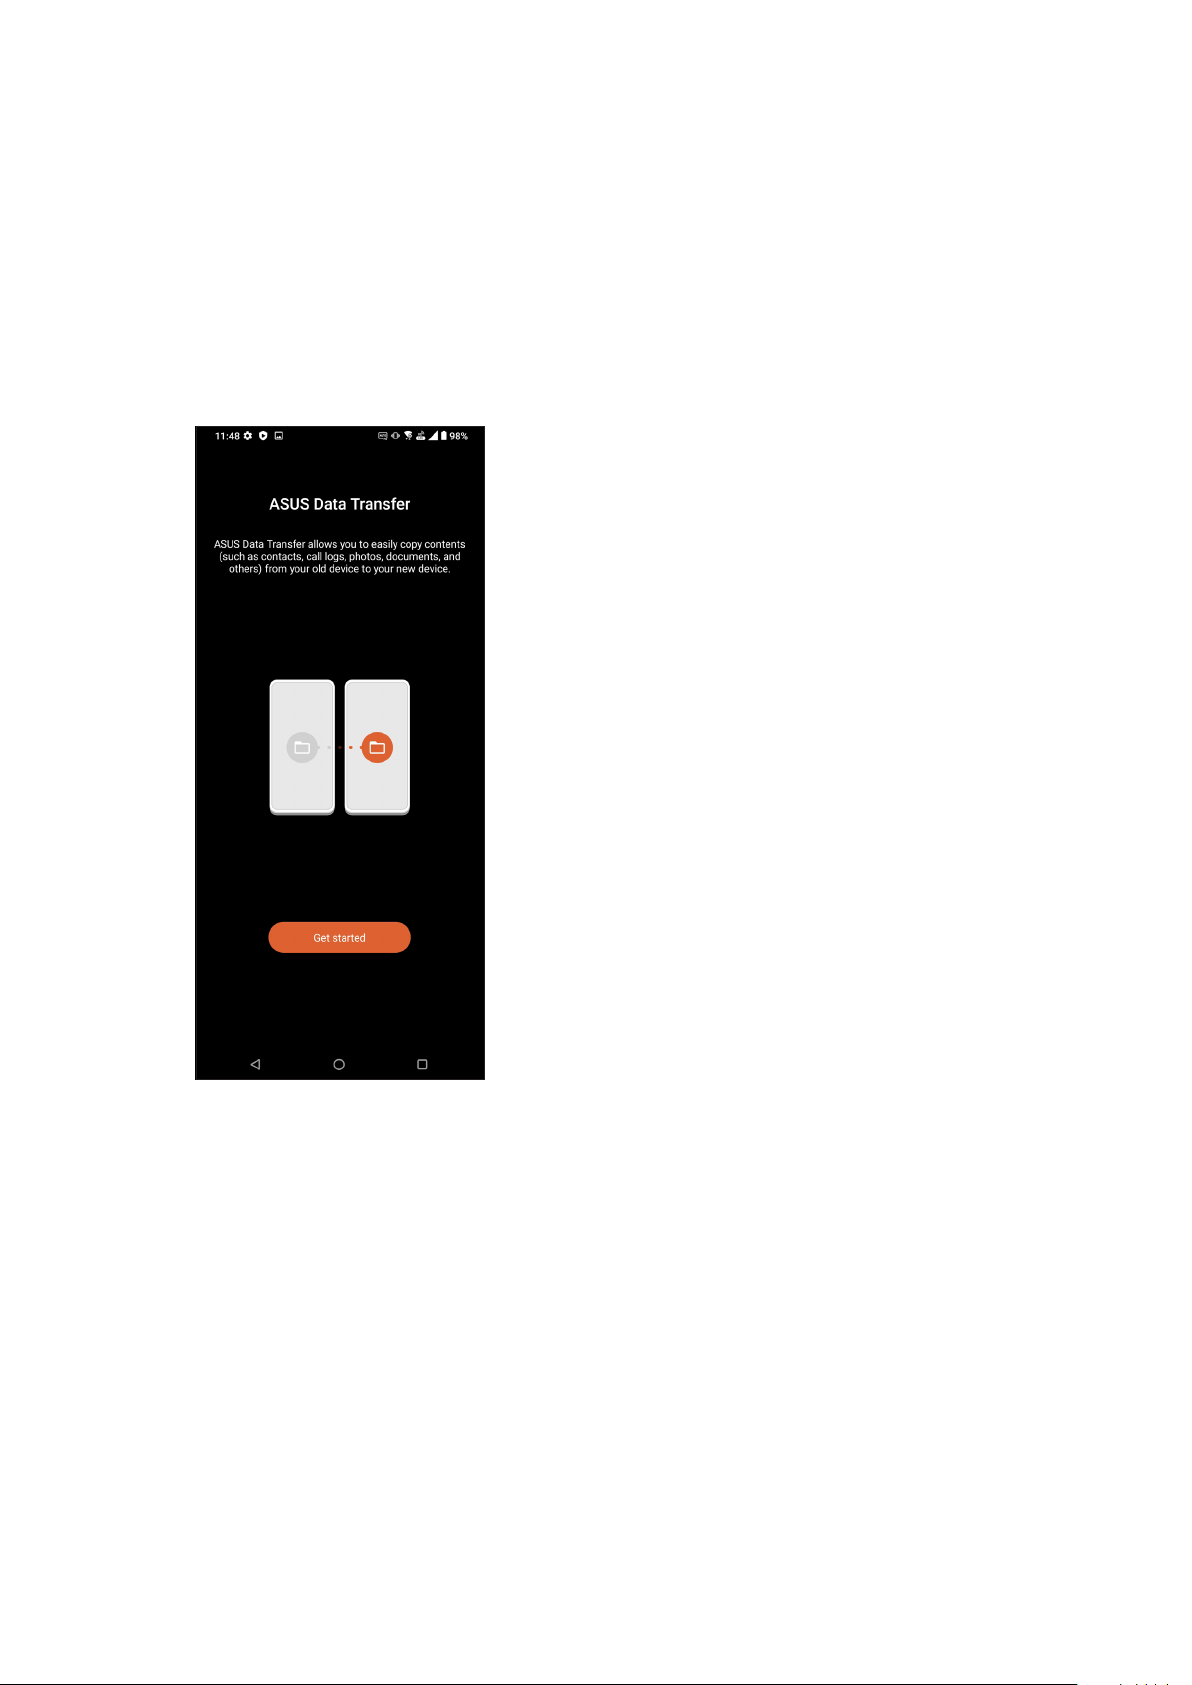
ASUS Data Transfer
Wirelessly transfer your data such as contacts, call logs, or photos from your old mobile device to
your ROG Phone.
To use ASUS Data Transfer:
1. Swipe up on your Home screen then tap ASUS Data Transfer.
2. Tap Get Started then follow the onscreen instructions to complete the data transfer process.
38
Chapter 3: Work hard, play harder
Page 39
4 Keeping in touch
Keeping in touch
4
Call in style
Dual SIM feature
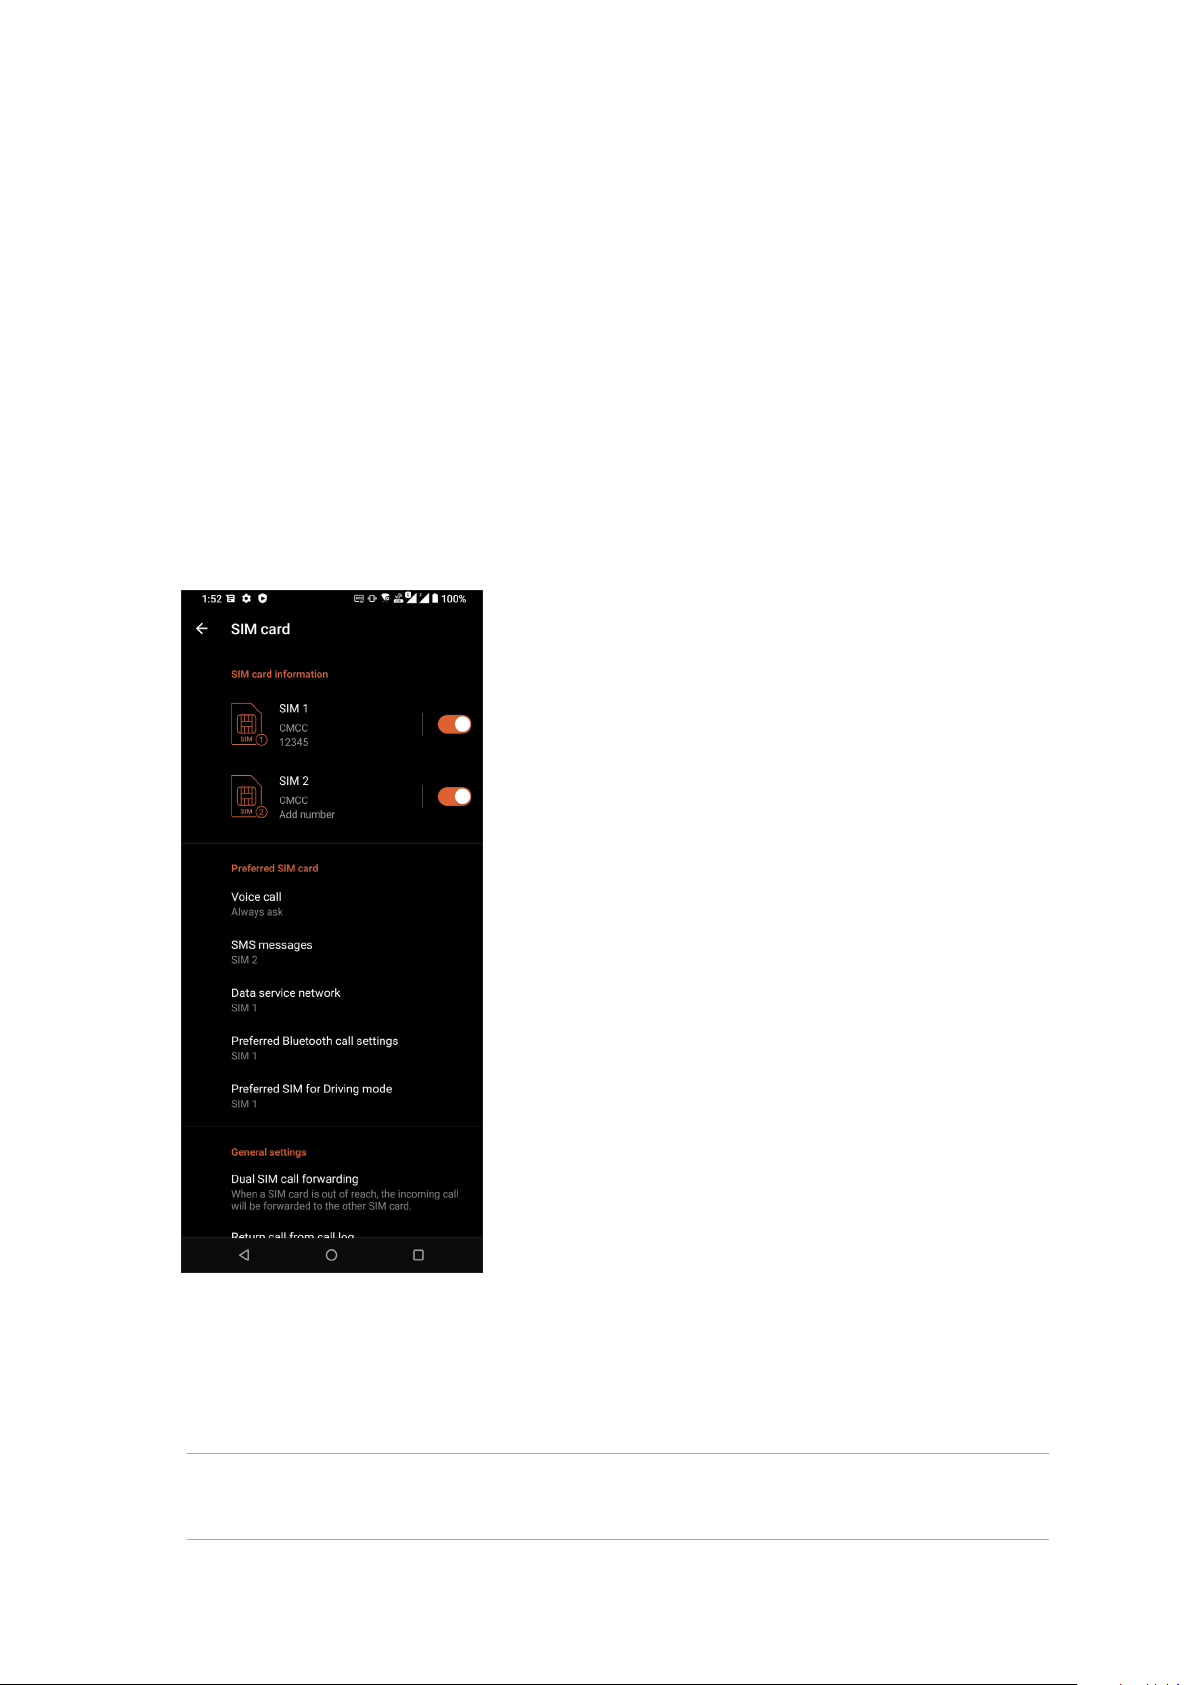
The dual SIM feature of your ROG Phone lets you manage the settings of the installed Nano SIM
cards. With this feature, you can enable/disable Nano SIM cards, assign SIM names, or set one as a
preferred network.
Renaming your Nano SIM cards
Change the names of your Nano SIM cards on your ROG Phone so that you can identify them easily.
To change the names of your Nano SIM cards, tap SIM 1 or SIM 2 then key in the names for your
Nano SIM cards.
NOTE: If your SIMs have dierent mobile service providers, we recommend you to use the names
of these providers for your SIM names. If both SIMs have the same mobile service provider, we
recommend you to use the mobile numbers for your SIM names.
Chapter 4: Keeping in touch
39
Page 40
Assigning a preferred SIM card
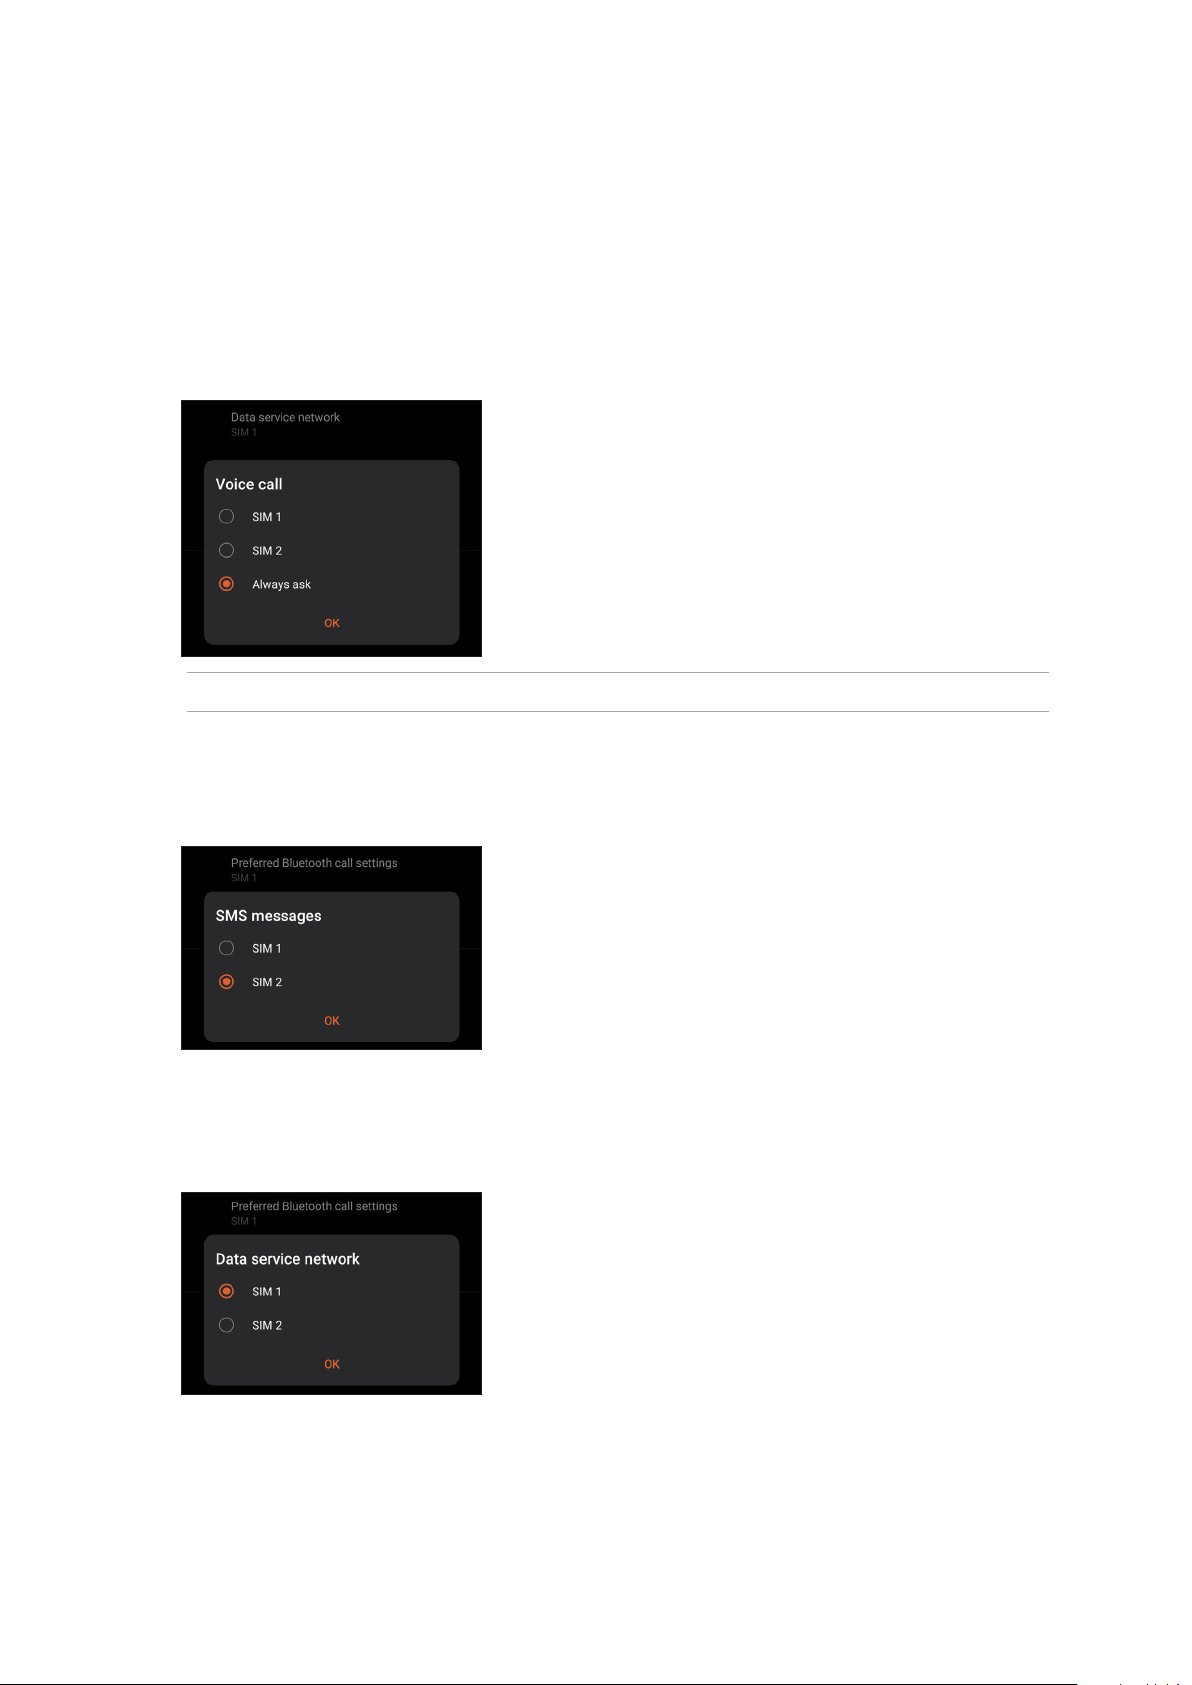
Assign a SIM card as your preferred SIM for voice calls, SMS messages, and data services.
SIM card for voice calls
When you make a call, your ROG Phone automatically uses the preferred SIM card to connect the
call.
To assign a SIM card for voice calls, tap Voice call then tap the SIM that you want to use.
IMPORTANT! You can only use this feature if you make a call from your contacts list.
SIM card for SMS messages
To assign a SIM card for SMS messages, tap SMS messages then select from SIM 1 or SIM 2.
SIM card for data service
To assign a SIM card for data service, tap Data service network then select from SIM 1 or SIM 2.
40
Chapter 4: Keeping in touch
Page 41
Making calls
Your ROG Phone oers you many ways to make a call. Call your friends from your contacts list,
smart dial to quickly place a call, or enter a speed-dial number to call your frequently-called
contact.
NOTE: Organize your contacts in the Contacts app. For details, see Managing contacts.
Launching the Phone app
From your Home screen, do either of the following to launch the Phone app:
• Tap .
• Swipe up on your Home screen then tap Phone.
Dialing a phone number
Use the Phone app to directly dial a phone number.
1. From your Home screen, tap then tap the number keys.
2. Select from call buttons SIM 1 or SIM 2 to dial the number.
NOTE: The labels of the call buttons may vary depending on the setting that you made to your SIM
cards. For more details, see Dual SIM feature.
Dialing an extension number
When you need to call an extension number, you can do any of these steps to skip the voice
prompts.
Prompting for conrmation of an extension number
You can insert a conrmation prompt for the extension number after dialing the main number.
1. From the Phone app, enter the main number.
2. To insert a conrmation prompt, tap and hold # until a semi-colon (;) appears.
3. Enter the extension number.
4. Select from call buttons SIM 1 or SIM 2 to make the call.
5. When prompted, tap Yes to conrm the extension number.
6. Tap to end the call.
Chapter 4: Keeping in touch
41
Page 42

Auto-dialing an extension number
You can insert a short or long pause after dialing the main number, then the extension number is
dialed automatically.
1. From the Phone app, enter the main number.
2. To insert a pause, tap and hold * until a comma (,) appears.
3. Enter the extension number.
4. Select from call buttons SIM 1 or SIM 2 to place the call.
5. Tap to end the call.
Smart dialing your contacts
As you enter the rst few numbers or letters of your contact’s name, Smart Dial lters through your
contacts list or call logs and provides you with possible matches. You can check if the contact you’re
trying to reach is on the list of possible matches, then you can quickly place that call.
1. Launch the Phone app then enter the number or name of the contact in the Search eld.
2. From the list of possible matches, tap the contact you wish to call. If the contact is not on list,
enter the complete number or name of the contact.
3. Select from call buttons SIM 1 or SIM 2 to make the call.
NOTE: The labels of the call buttons may vary depending on the setting that you made to your SIM
cards. For more details, see also Dual SIM feature.
Calling from Contacts app
Use the Contacts app to make a call from your contacts list.
1. Launch the Contacts app.
2. Tap the contact name then tap the number that you wish to dial.
3. If there are two SIM cards installed, tap the SIM card from which you want to make the call.
4. Tap to end the call.
42
Chapter 4: Keeping in touch
Page 43
Calling your favorite contacts
When you add a contact to your Favorites list, you can quickly call the contact from the Contacts
app.
1. Launch the Contacts app.
2. Tap Groups > Favorites to display your Favorites list, then tap your favorite contact whom you
want to call.
3. Tap to end the call.
Receiving calls
The touch screen of your ROG Phone lights up when there is an incoming call. The display of the
incoming call also varies, depending on the status of your ROG Phone.
Answering calls
Slide to to answer or to to reject the call.
Managing your call logs
From your call logs, you can call back your missed calls, save calls to your contacts list, or redial your
recently-called number or contact.
Saving calls to Contacts
You can add a call/number from your call logs to your contacts list.
1. From the Phone app, tap Recents to display your call logs.
2. Tap beside the number that you want to add to your contacts list.
3. Tap at the upper right corner of your screen, and then tap Add to contacts.
4. Tap Create new contact to add a new entry to your contacts list.
Tap Add to an existing contact, select a contact, choose whether to overwrite the contact’s
number with this new one or add a new entry, then tap .
Chapter 4: Keeping in touch
43
Page 44
Redialing your last-called number
To redial your last-called number:
1. From the Phone app, tap Recents to display your call logs.
2. Tap your last-called number to redial the number.
3. If there are two SIM cards installed, tap the SIM card from which you want to redial the number.
4. Tap to end the call.
Other call options
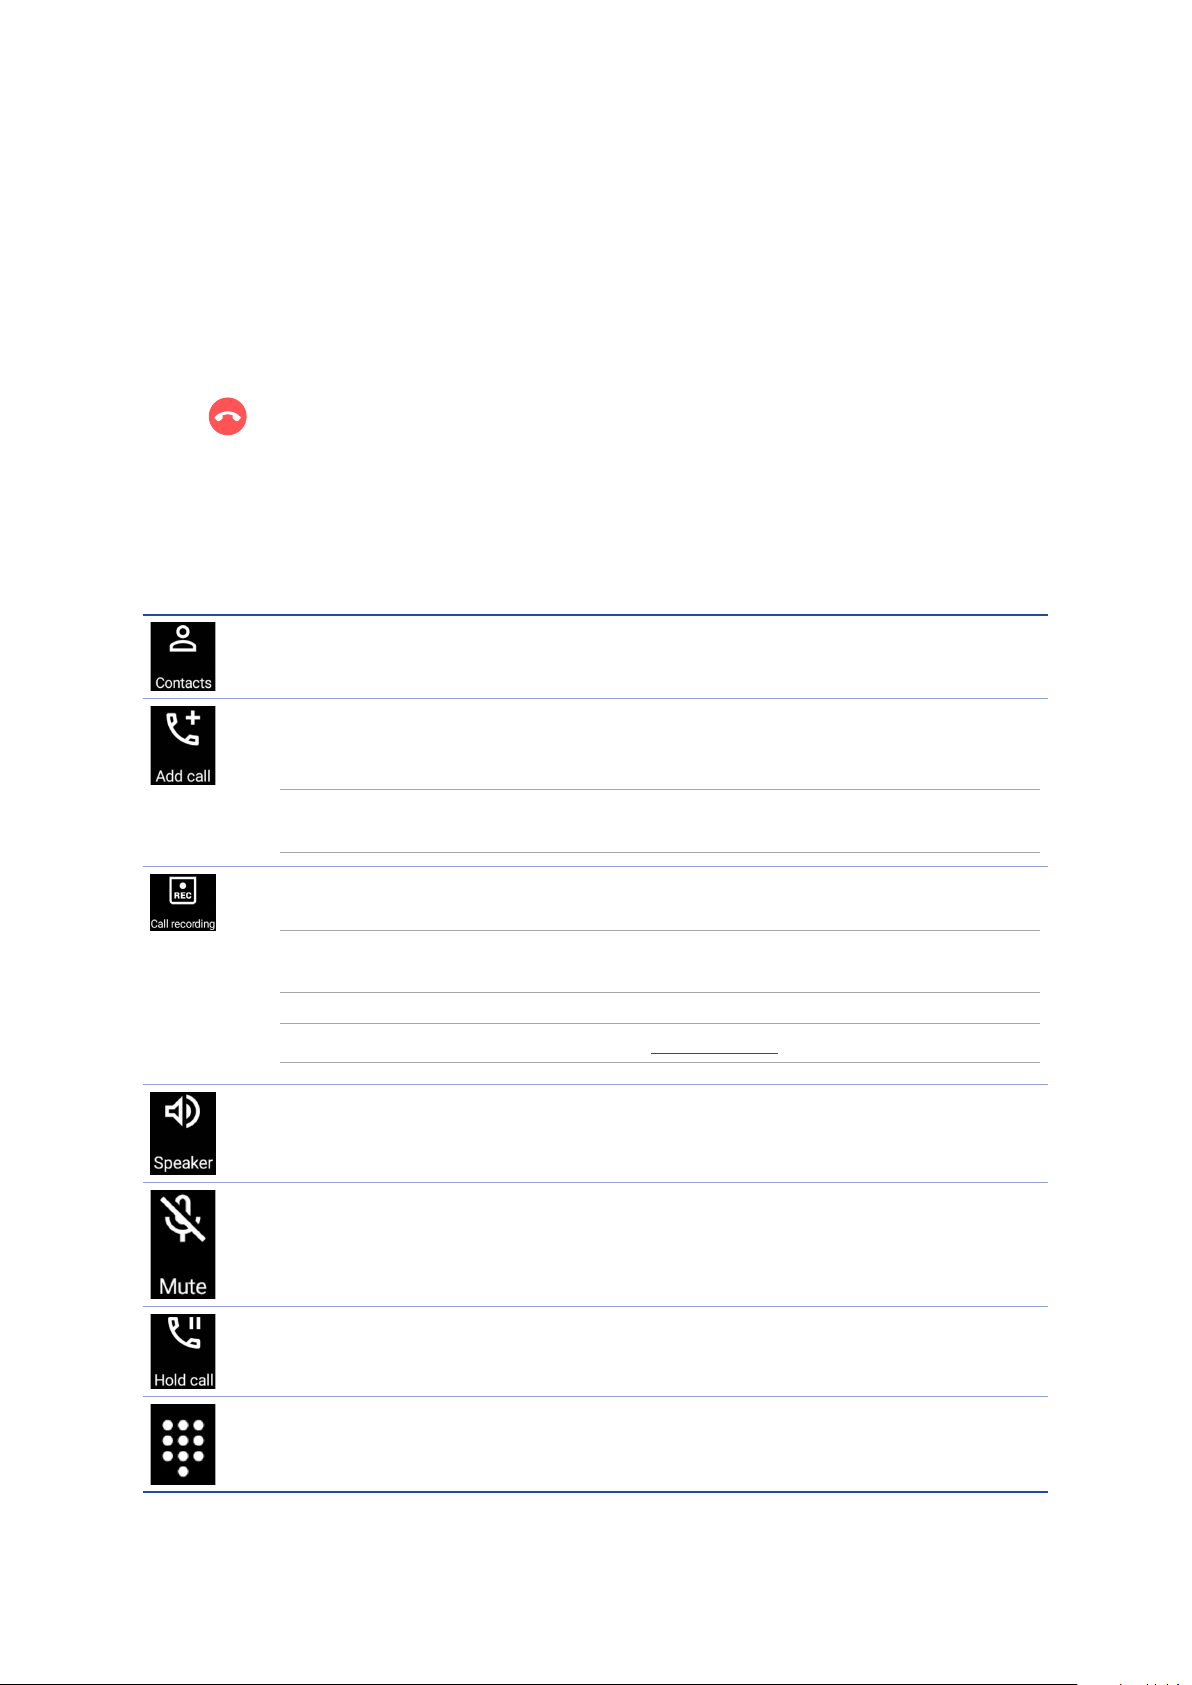
During an active call, tap any of the possible call options for when a call is in progress.
Contacts
Opens the Contacts app.
Conference call
When you have subscribed to a conference call service with your mobile service
provider, this icon allows you to add a contact or contacts in an active call.
NOTE: The number of participants in the conference call depend on your conference call
subscription. You can inquire from your mobile service provider about this service.
Record
Records an active call.
IMPORTANT! Before recording an active call, it is dictated by most local laws to ask
permission from the other person or persons on the other line.
NOTE: For more details, refer to the section Recording calls.
Speakerphone
Turns the speakerphone on or o.
Microphone
Turns the microphone for the active call on or o. When the microphone is o or in
mute mode, you can hear the caller but the caller can’t hear you.
Hold call
Puts an active call on hold.
Keypad
Brings up the keypad.
44
Chapter 4: Keeping in touch
Page 45
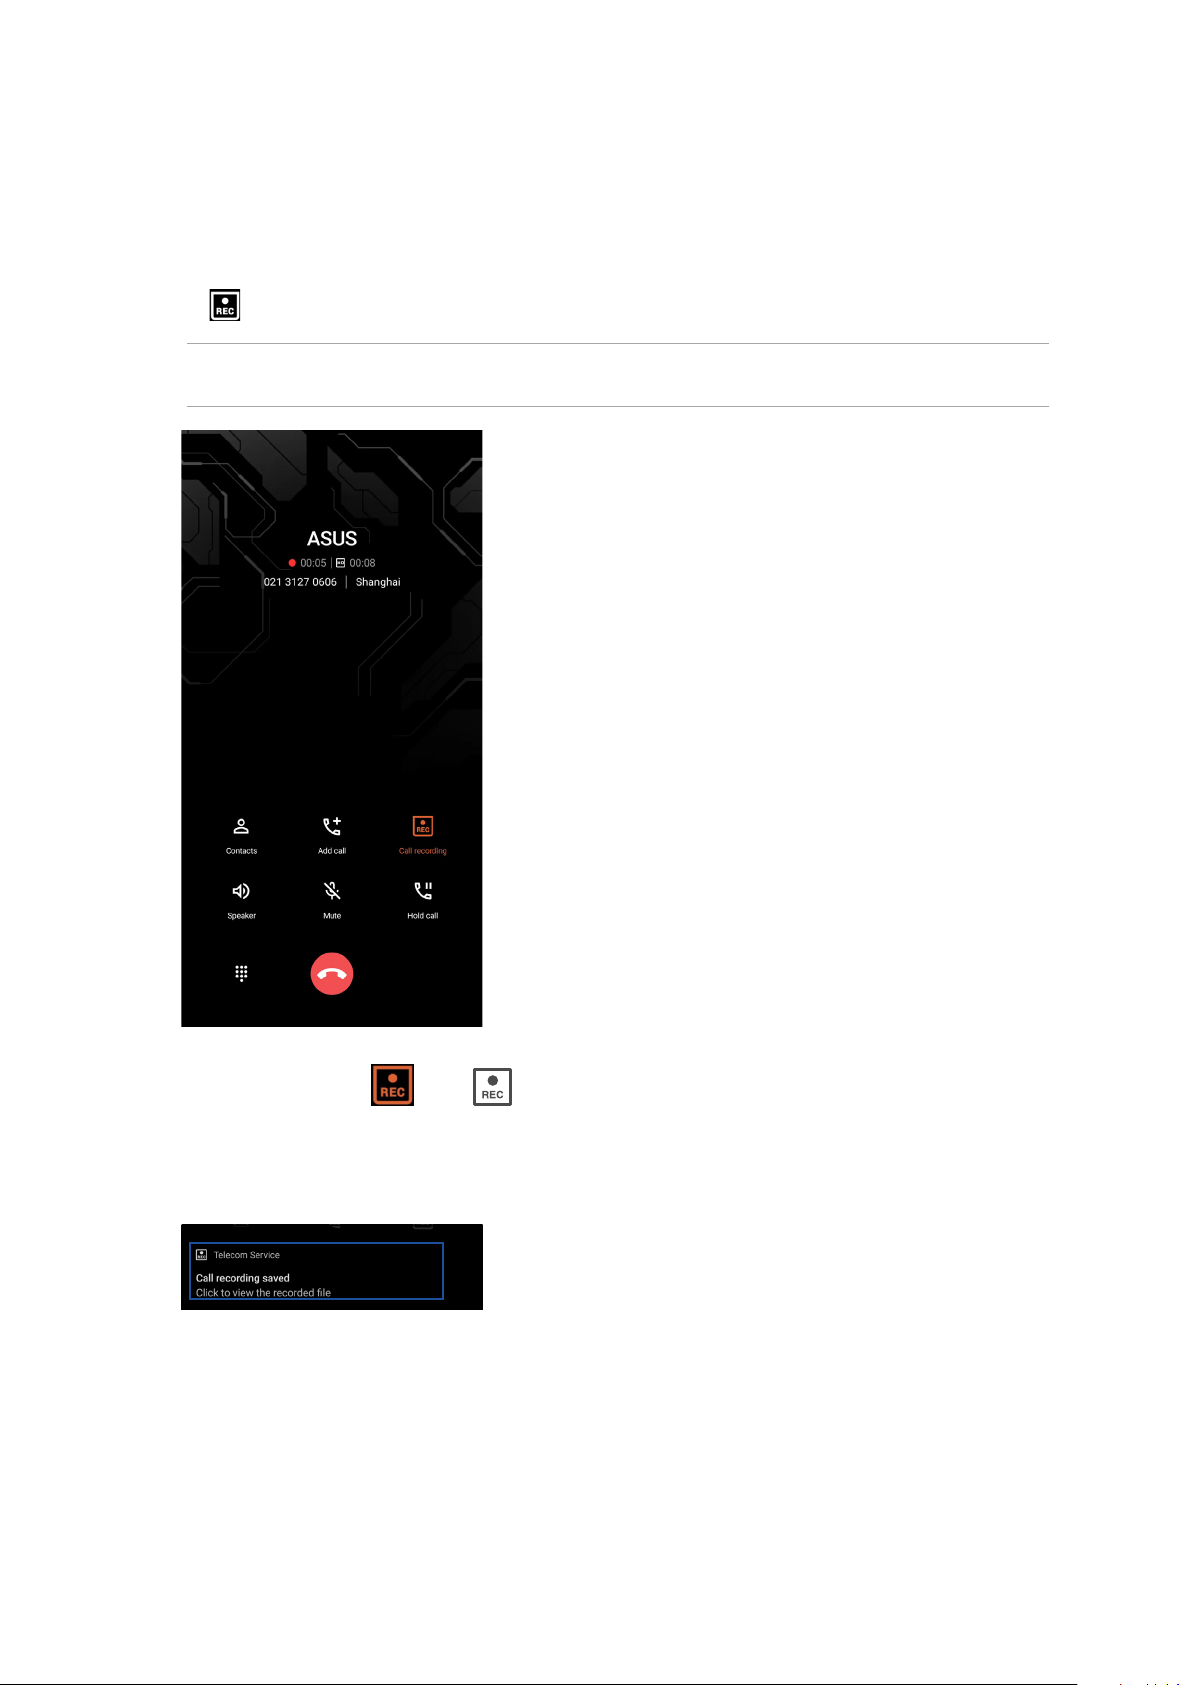
Recording calls
Your ROG Phone allows you to record a conversation for future reference or information.
1. Call a contact or dial a number.
2. Tap to record the call.
IMPORTANT! Before recording a call, ensure that you ask for permission from the other party or
parties.
3. To stop recording, tap . This icon appears on the system notication bar.
4. Swipe down from the top of the screen, and then tap Call recording saved notication to view
the recorded conversation.
Chapter 4: Keeping in touch
45
Page 46

Managing contacts
Organize your contacts and easily stay in touch with them via calls, SMS messages, emails, or social
networks. Group your contacts as Favorites to quickly get in touch with them, or group them as
VIPs to get notied about any upcoming events, missed calls, or unread messages.
You can also sync your contacts with your email or social network accounts, link contacts’ info for
easy access in one place, or lter the contacts you want to keep in touch with.
To launch the Contacts app, swipe up on your Home screen then tap Contacts.
Contacts Settings
Select how you would want to display your contacts from the Contacts settings. Such display
options include displaying only those contacts with phones, sorting list by rst/last name, or
viewing contact names as rst/last names rst. To set up your Contacts settings, tap > Settings
from the Contacts app.
Setting up your prole
Make your ROG Phone truly your own and set up your prole info.
1. Launch the Contacts app then tap Set up my prole or Me.
NOTE: Me appears when you’ve set up your Google account on your ROG Phone.
2. Fill in your info such as mobile or home number. To add other info, tap Add another eld.
3. When you’ve completed your info, tap .
46
Chapter 4: Keeping in touch
Page 47

Adding contacts
Add contacts to your device, corporate, Google, or other email accounts and ll in more important
contact information such as contact numbers, email addresses, special events for VIPs, and more.
1. Launch the Contacts app then tap .
2. Select Device.
NOTES:
• You can also save the contact to your SIM card or an email account.
• If you don't have an email account, tap Add account then create one.
3. Fill in the neccessary information such as name, mobile or home number, and email address.
4. If you want to add other contact information, tap Add another eld.
5. When you’ve completed the info, tap .
Adding an extension number to a contact number
You can add a contact’s extension number to skip the voice prompts when making a call.
1. In the contact’s information screen, enter the contact’s main number and extension number in
either of these two ways:
• Insert a comma (,) after the main number, then enter the contact’s extension number.
There’ll be a short pause before the extension number is dialed automatically. To extend
the pause, tap Pause to insert another comma.
• Insert a semi-colon (;) after the main number, then enter the contact’s extension number.
When dialing the contact number, you’ll be prompted to conrm the extension number.
Tap Ye s on the conrmation message.
2. When you’ve completed the info, tap .
Chapter 4: Keeping in touch
47
Page 48
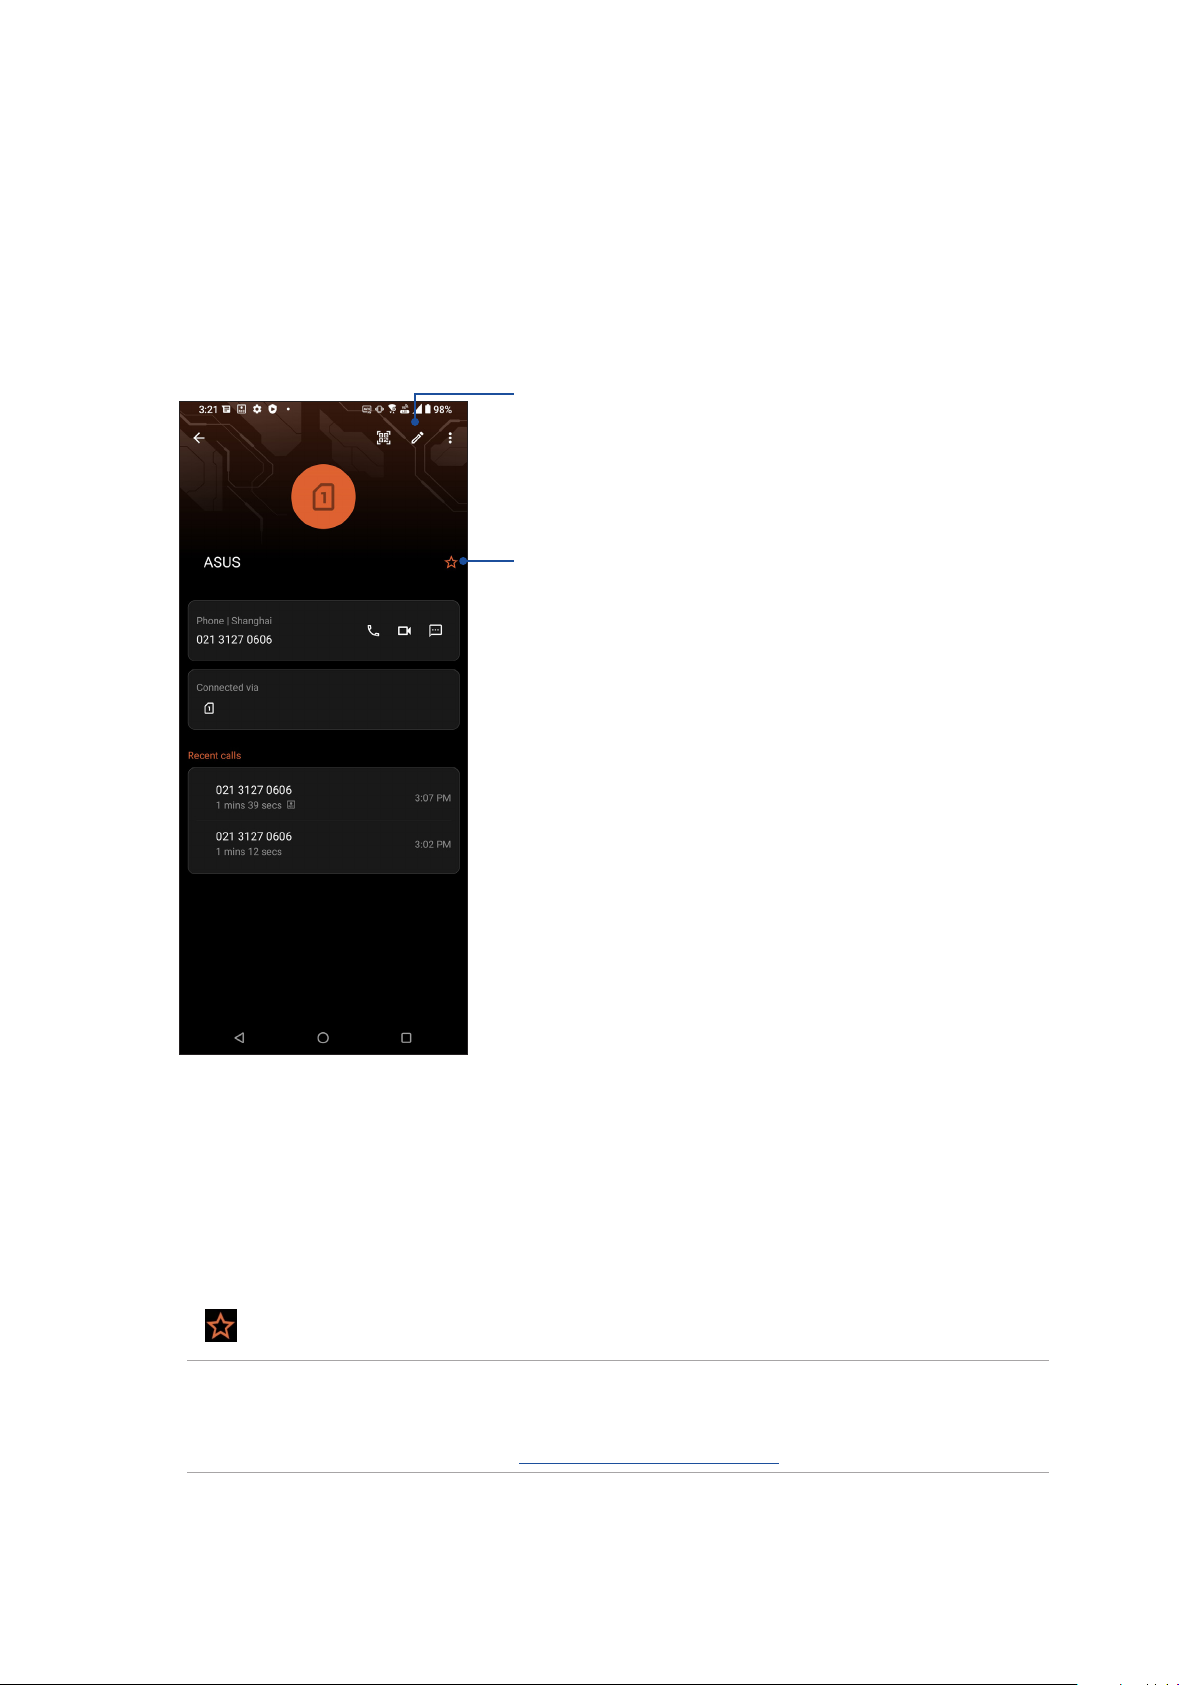
Customizing your contact’s prole
Edit your contact’s info, add a photo, set a ringtone, or take a photo as a cover for your contact’s
prole.
1. Launch the Contacts app then select the contact whose info or prole you want to edit or
customize.
2. Make the changes from the contact’s prole page.
Tap to edit your contact’s info
Tap to add to the Favorites List
Marking your favorite contacts
Set your frequently-called contacts as your favorites to be able to call them quickly from the Phone
app.
1. Swipe up on your Home screen then tap Contacts.
2. Select the contact that you want to mark as a favorite.
3. Tap . The contact is added to your Favorites List in the Contacts app.
NOTES:
• To view your Favorites list, swipe up on your Home screen then tap Contacts > Groups > Favorites.
• For more details, refer to the section Calling your favorite contacts.
48
Chapter 4: Keeping in touch
Page 49
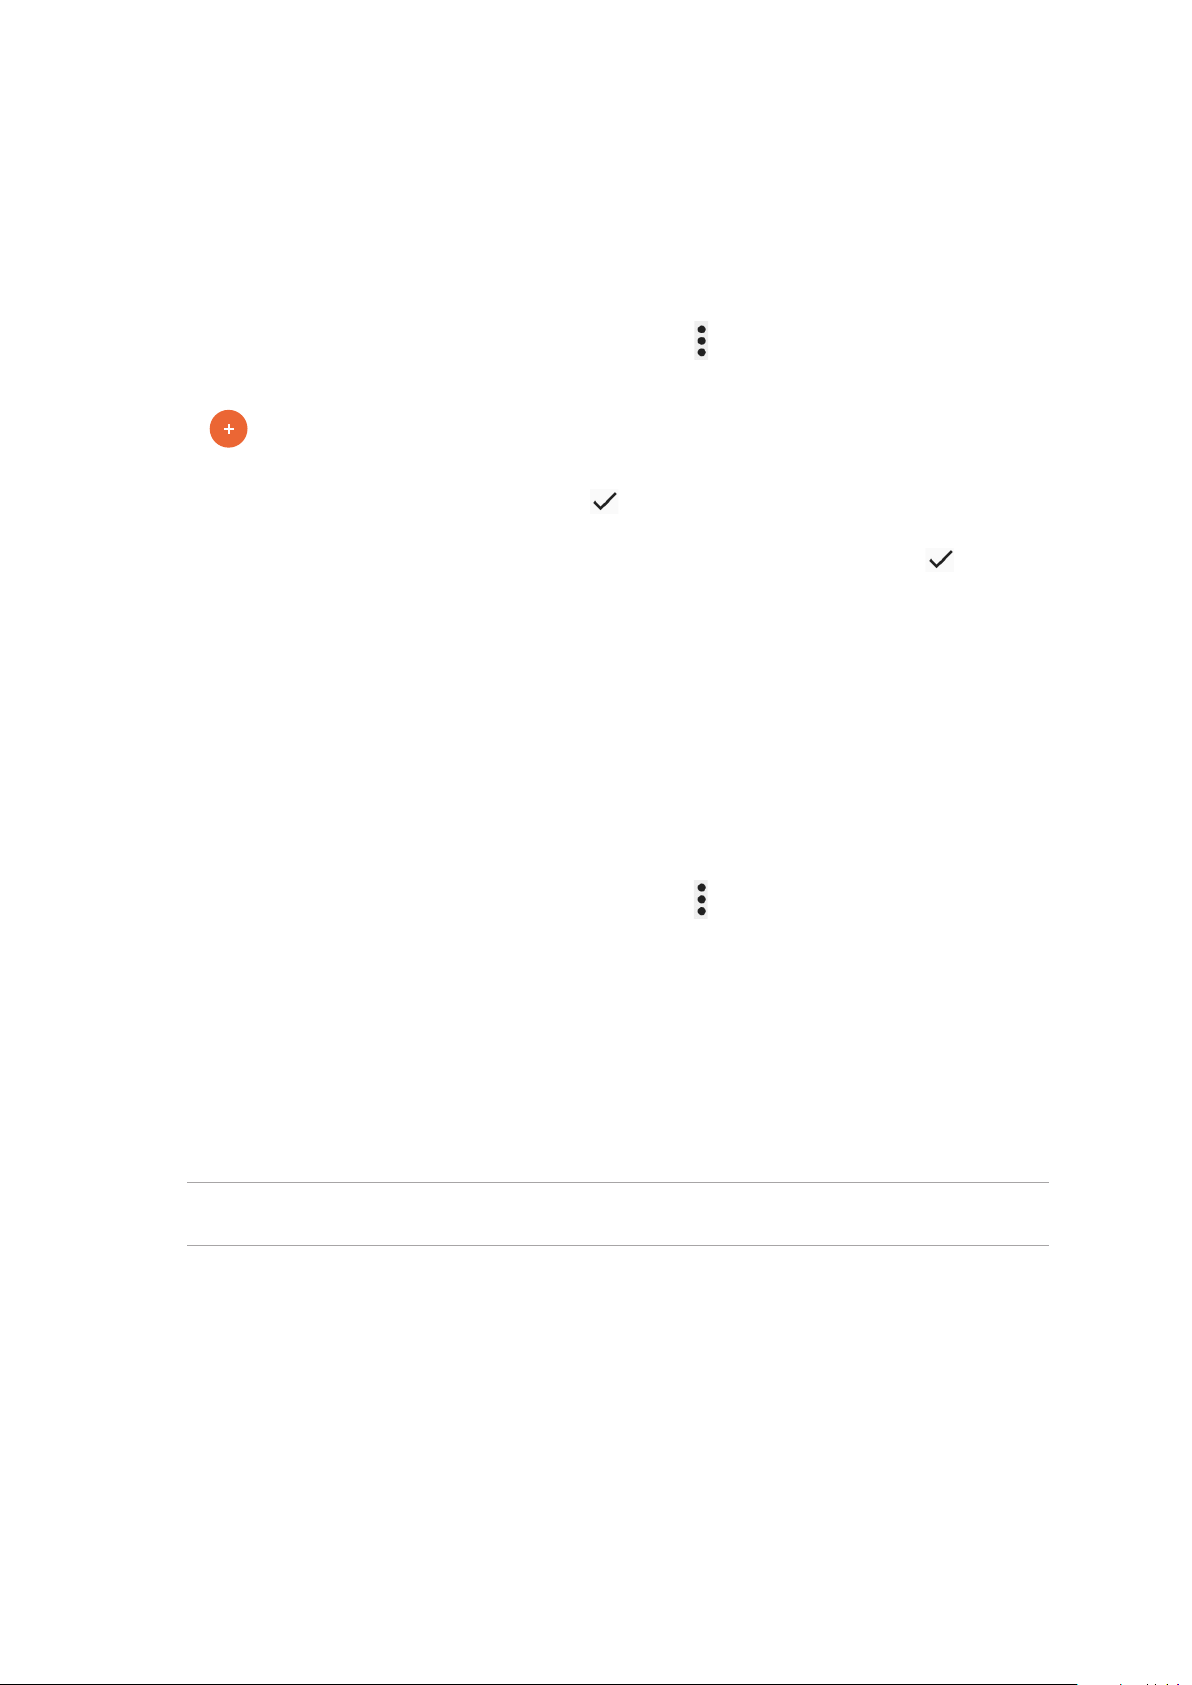
Managing your block list
Blocking numbers
Create your list of blocked numbers to avoid receiving any unwanted calls or messages. Your
blocked calls and messages will be saved to the Block List archive.
1. Swipe up on your Home screen then tap Phone then tap > Settings > Call blocking & block
list > Block List.
2. Tap , then do any of the following:
• To block a contact, tap Choose from contacts, then select the contact you want to block
from your contacts list. When done, tap .
• To block a number from the recent call logs, tap Choose from recent call logs, then
select the contact you want to block from your contacts list. When done, tap .
• To block a number, tap Enter a number then enter the number that you want to block.
When done, tap OK.
• To block a SIP number, tap Enter a SIP number then enter the number that you want to
block. When done, tap OK.
Unblocking numbers
You may remove a blocked number from your list and receive calls or messages from the number
again.
1. Swipe up on your Home screen then tap Phone then tap > Settings > Call blocking & block
list > Block List.
2. Tap the contact or number that you want to unblock then tap Remove from block list. When
done, tap OK.
Social networking with your contacts
Integrating the social network accounts of your contacts makes it easier for you to view their
proles, news, and social feeds. Stay updated with the activities of your contacts in real time.
IMPORTANT! Before you can integrate social network accounts of your contacts, you need to log in to
your social network account and sync its settings.
Chapter 4: Keeping in touch
49
Page 50

Syncing your social network account
Sync your social network account to add the social network accounts of your contacts to your ROG
Phone.
1. Launch the Settings screen by doing either of the following:
• Launch Quick Settings then tap .
• Swipe up on your Home screen then tap Settings.
2. From the Settings screen, tap your social network account under Accounts section.
3. Slide on Automatically sync app data to sync the social network accounts of your contacts.
4. Launch the Contacts app to view your contacts list. Tap the contact, you will see which social
network the contact is from.
Send messages and more
Messages
Messages, an intuitive and delightful app, lets you send/receive SMS/MMS messages, as well as
send group texts, photos, or audio messages. You can add emojis or stickers to your messages,
share your location, archive your messages, and easily block SMS senders. You can also take photos
or record videos and easily share these les.
Sending messages
1. From the Home screen, tap .
2. Tap Start chat, then select the contact whom you want to send a message to.
3. Select the SIM account where you’re going to send your message from.
4 Start composing your message in the message eld.
5. When you’re done, tap to send your message.
Replying to messages
1. Tap your message alert from your Home screen or Lock screen.
2. Select the SIM account where you’re going to send your reply from.
3. Start composing your reply in the message eld.
4. When you’re done, tap to send your reply.
50
Chapter 4: Keeping in touch
Page 51
5 Fun and entertainment
Fun and entertainment
5
Using a headset
Have the freedom to do other things while you’re in a call or enjoy listening to your favorite music,
using a headset.
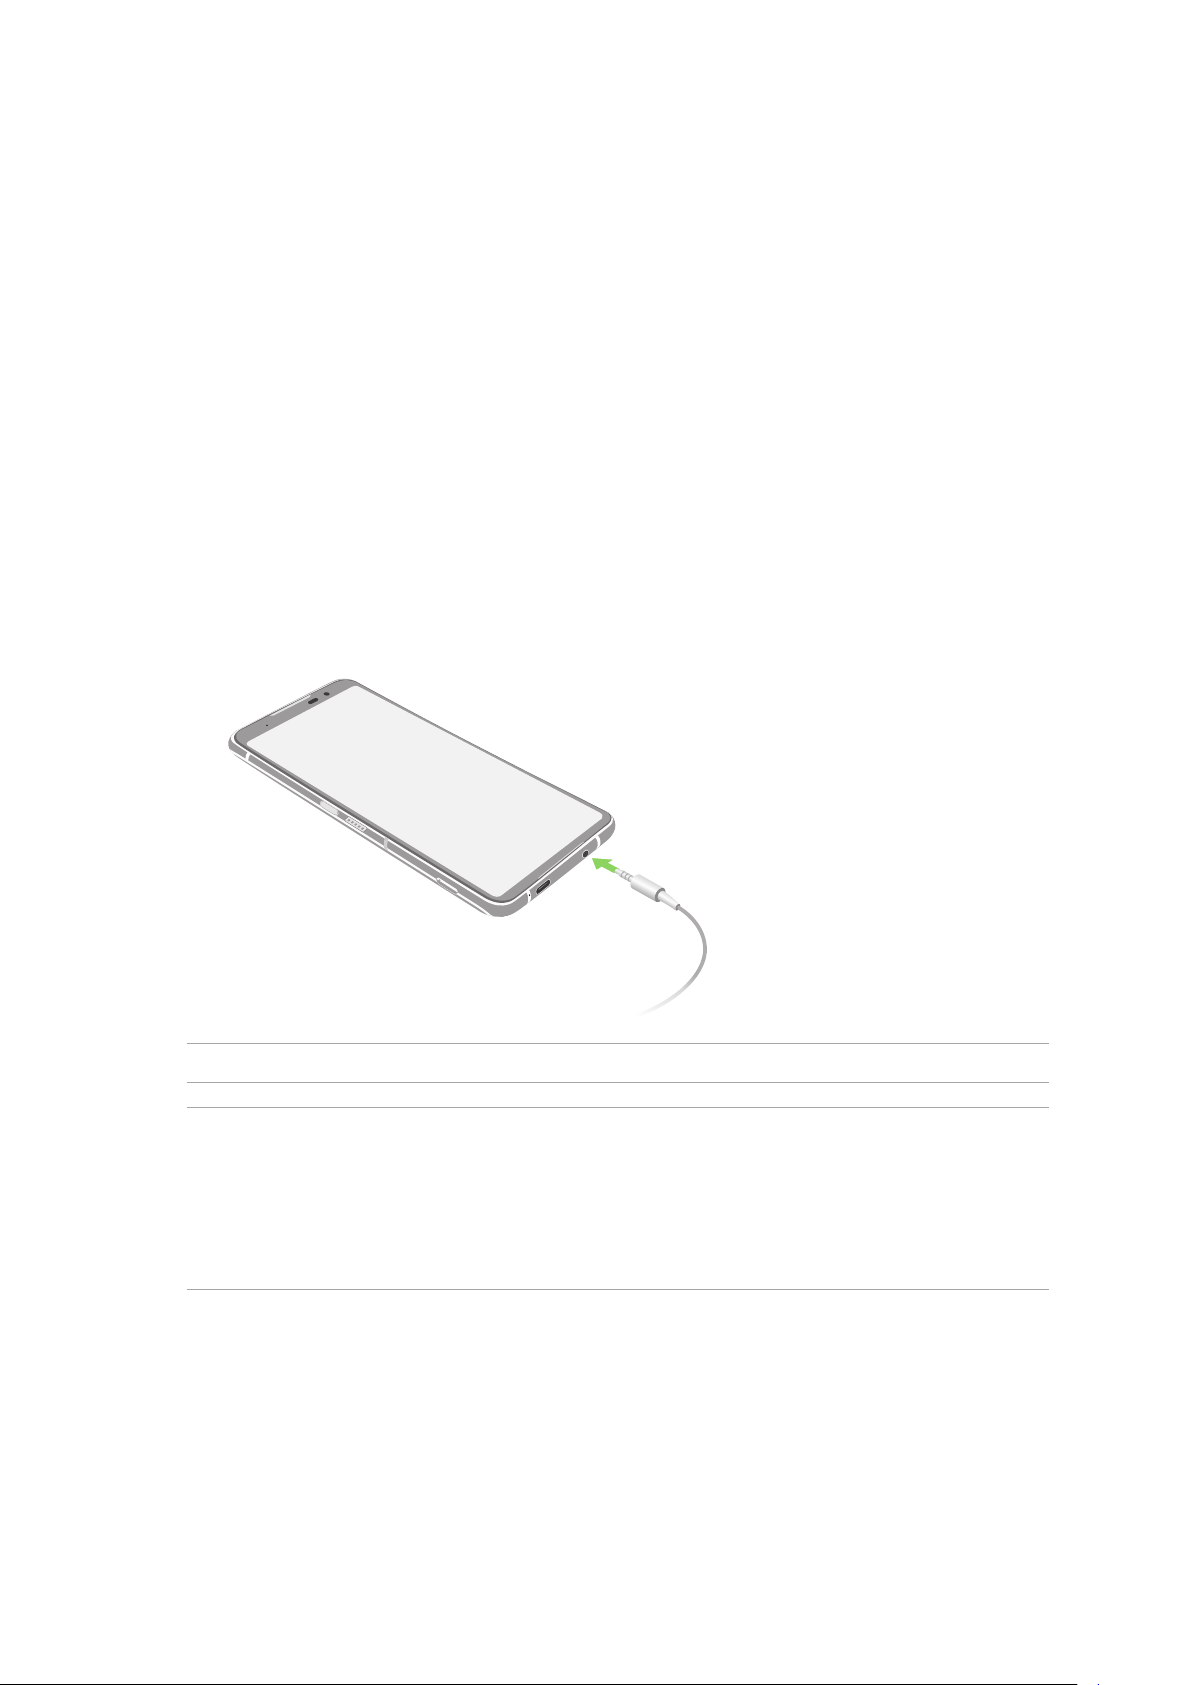
Connecting the audio jack
Connect the 3.5mm audio jack of the headset to your device using a USB Type-C to 3.5mm
headphone jack adapter.
WARNING! Listening at a high volume for long periods can damage your hearing.
NOTES:
• The headset and the USB Type-C to 3.5mm headphone jack adapter are purchased separately.
• We highly recommend to use only compatible headsets.
• Unplugging the audio jack while listening to music, automatically pauses the music played.
• Unplugging the audio jack while watching a video, automatically pauses the video playback.
Chapter 5: Fun and entertainment
51
Page 52

YT Music
With YT Music, you can stream your favorite music, create playlists, or listen to the radio. You can
also subscribe to YT Music for unlimited and ad-free access to millions of music les that you can
add to your own music library.
Setting up your YT Music
Sign in to your Google or Gmail account to be able to use YT Music. Once you’ve signed in to your
acccount, all music les on your ROG Phone, including the uploaded or purchased ones from YT
Music, are added to your library.
To set up your YT Music:
1. From the Home screen, Google > YT Music.
2. Tap SIGN IN > Add account.
3. Follow the next instructions to sign in to your account.
NOTE: YT Music subscription is only available in some countries or regions.
52
Chapter 5: Fun and entertainment
Page 53

6 Your precious moments
Your precious moments
6
Capture moments
Launching the Camera app
Capture images and record videos using your ROG Phone’s Camera app. Refer to any of the steps
below to open the Camera app.
From the lock screen
Swipe up to launch the camera app.
From the home screen
Tap .
Chapter 6: Your precious moments
53
Page 54
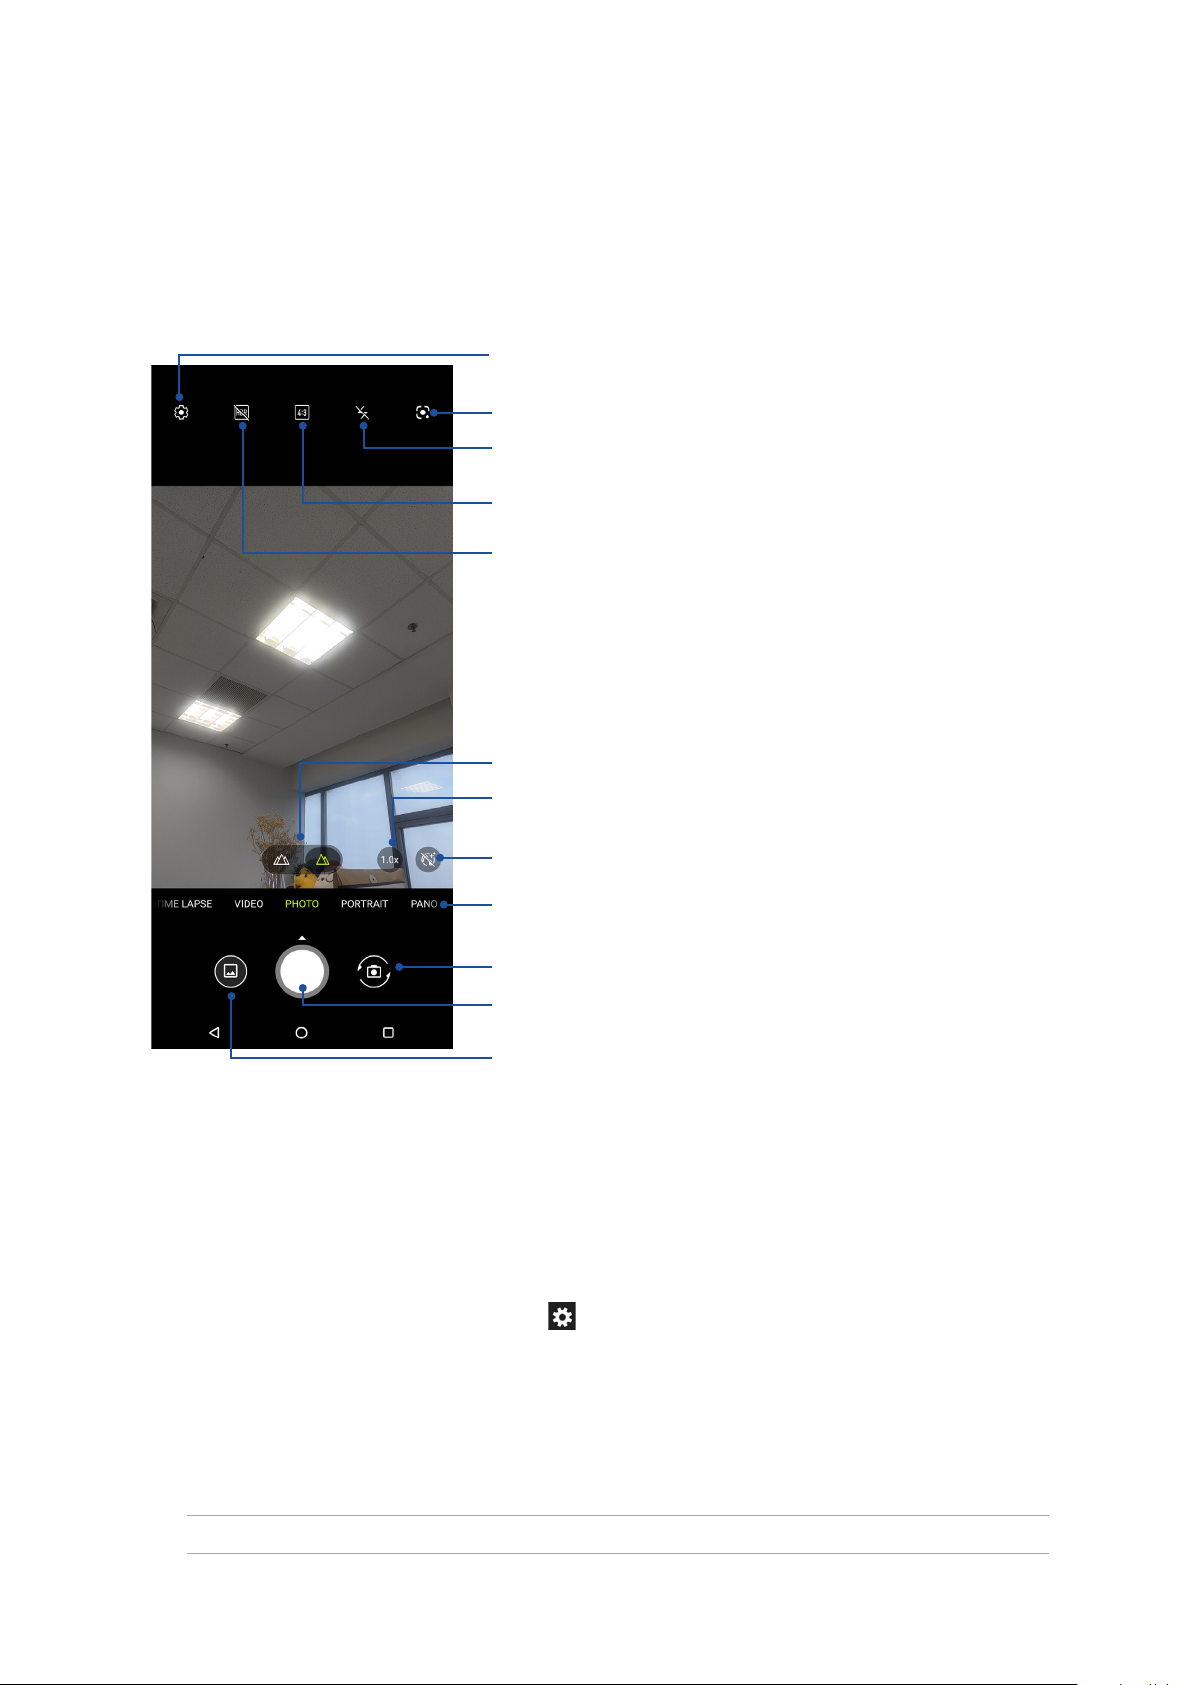
Camera home screen
Your ROG Phone’s camera is equipped with auto-scene detection and auto-image stabilizer
features. It also features a video stabilization function that helps prevent shakiness while video
recording.
Tap the icons to start using your camera and explore the image and video features of your ROG
Phone.
Adjust camera settings
Tap to use Google Lens
Tap to select a ash type or ashlight
Tap to select a screen mode
Tap to select a HDR type
Touch to select Normal mode and Wide Angle mode
Touch to switch between 1.0x and 2.0x optical zoom in Normal mode
Enable or disable the Beauty feature
Swipe to the right/left to use advanced camera settings
Touch to switch between the front and rear camera
• Shutter button
• Slide up to set a countdown before taking photos
See the Gallery
Photo Locations
To enable the location tagging feature, refer to the following steps:
1. Turn on the location access from Settings > Location and slide Use location to on.
2. Ensure that you have shared your location to Google Maps.
3. From the Camera app’s home screen, tap and activate Location services before you take
the photo.
Advanced camera features
Explore new ways of capturing images or videos and make captured extra special moments using
the advanced camera features of your ROG Phone.
IMPORTANT! Apply the settings rst before taking images. Available features may vary per model.
54
Chapter 6: Your precious moments
Page 55

Time lapse
The time lapse video feature of your ROG Phone allows you to capture stills for automatic time
lapse playback. In eect, events seem to move in a fast-forward manner though they actually
occurred and were recorded between long intervals.
Recording Time lapse videos
1. From the Camera app’s home screen, swipe right to Time lapse.
2. Tap on the upper left corner and tap Timer to select the timer lapse interval.
3. Tap and then tap the shutter button to start taking Time lapse videos.
Slow motion
The slow motion video feature allows you to record videos for slow-motion playback.
Recording slow motion videos
1. From the Camera app’s home screen, swipe right to SLO-MO.
2. Tap the shutter button to start taking Slow motion videos.
Night
Take well-lit photos even on night time or on low-light situations using the Night feature of your
ROG Phone.
NOTE: Keep your hands steady while before and while the ROG Phone is capturing the image to
prevent blurry results.
Capturing Night photos
1. From the Camera app’s home screen, swipe left to
2. Tap the shutter button
to start capturing Night photos.
MORE > NIGHT.
Panorama
Capture images from various angles using Panorama. Images captured from a wide angle
perspective are automatically stitched together using this feature.
Capturing panoramic photos
1. From the Camera app’s home screen, swipe left to PANO.
2. Hold the phone steady and tap the shutter button to start auto panorama.
3. Tap when nished.
Chapter 6: Your precious moments
55
Page 56

Using the Gallery
View images and play videos on your ROG Phone using the Gallery app.
This app also allows you to edit, share, or delete image and video les stored in your ROG Phone.
From Gallery, you can display images in a slideshow or tap to view the selected image or video le.
To launch Gallery, Swipe up on your Home screen and tap Gallery.
Viewing the photo location
Enable the location access on your ROG Phone, and get the location details on your photos. Your
photos’ location details include the area where the photos are taken, as well a map of the location
via Google Map or Baidu (in China only).
To view the details of a photo:
1.
Turn on the location access from Settings > Location and slide Use location to on.
2. Ensure that you have shared your location to Google Map or Baidu.
3. Launch the Gallery app, and select the photo whose photo details you want to view.
4. Tap the photo then tap Details.
Editing images
The Gallery also features its own image editing tools that you can use to enhance images saved on
your ROG Phone.
1. Do either of the following:
• From the Gallery > Photos screen, tap the image you want to edit.
• From the Gallery > Albums screen, tap the folder where the les are located. After
opening the folder, tap the image you want to edit.
2. Tap Edit to open the image editing toolbar.
3. Tap any of the icons on the editing toolbar to apply changes to the image.
Sharing les from the Gallery
1. Do either of the following:
• From the Gallery > Photos screen, tap > Select to activate le selection.
• From the Gallery > Albums screen, tap the folder where the les you want to share are
located. After opening the folder, tap > Select to activate le selection.
2. Tap the les you want to share. A check mark appears on top of the image you select.
3. Tap then select from the list where you want to share the images.
56
Chapter 6: Your precious moments
Page 57

Deleting les from the Gallery
1. Do either of the following:
• From the Gallery > Photos screen, tap > Select to activate le selection.
• From the Gallery > Albums screen, tap the folder where the les you want to delete are
located. After opening the folder, tap > Select to activate le selection.
2. Tap the les you want to delete. A check mark appears on top of the image you select.
3. Tap .
Chapter 6: Your precious moments
57
Page 58

7 Staying connected
Staying connected
7
Mobile network
When there’s no available Wi-Fi network that you can connect to, you can enable your mobile
network’s data access for Internet connection.
Enabling the mobile network
1. Do either of the following to launch the Settings screen:
• Launch Quick Settings then tap .
• Swipe up on your Home screen then tap Settings.
2. Tap Network & internet > Mobile network.
3. Slide Mobile data to on, and congure the other mobile network settings, if necessary.
NOTES:
• If you access the Internet via your mobile network, additional charges will be incurred depending on
your data plan.
• For more details on your mobile network charges/fees and setttings, contact your mobile service
provider.
Wi-Fi
The Wi-Fi technology of your ROG Phone gets you connected to the wireless world. Update your
social media accounts, browse the Internet, or exchange data and messages wirelessly from your
ROG Phone.
Enabling Wi-Fi
1. Launch the Settings screen by doing either of the following:
• Launch Quick Settings then tap > Network & internet.
• Swipe up on your Home screen then tap Settings > Network & internet.
2. Slide the Wi-Fi switch to the right to turn on the Wi-Fi.
NOTE: You can also enable the Wi-Fi from Quick Settings screen. Refer to section Quick Settings on
how to launch Quick Settings screen.
58
Chapter 7: Staying connected
Page 59
Connecting to a Wi-Fi network
1. On the Settings screen, tap Network & internet > Wi-Fi to display all detected Wi-Fi networks.
2. Tap a network name to connect to it. For a secured network, you may be prompted to key in a
password or other security credentials.
NOTES:
• Your ROG Phone automatically reconnects to the network that you connected with previously.
• Turn o the Wi-Fi feature when you're not using it to help save battery power.
Disabling Wi-Fi
To disable Wi-Fi:
1. Do either of the following:
• Launch Quick Settings then tap > Network & internet.
• Swipe up on your Home screen then tap Settings > Network & internet.
2. Slide the Wi-Fi switch to the left to turn o the Wi-Fi.
NOTE: You can also disable the Wi-Fi from Quick Settings screen. See Quick Settings on how to
launch Quick Settings screen.
Bluetooth®
Use the Bluetooth feature of your ROG Phone to send or receive les and stream multimedia les
with other smart devices over short distances. With Bluetooth, you can share your media les with
your friends’ smart devices, send data for print with a Bluetooh printer, or play music les with a
Bluetooth speaker.
Enabling Bluetooth®
1. Do either of the following:
• Launch Quick Settings then tap > Connected devices.
• Swipe up on your Home screen then tap Settings > Connected devices.
2. Tap Pair new device or Connection preferences.
3. Slide the Bluetooth switch to the right to turn on the Bluetooth.
NOTE: You can also enable the Bluetooth from Quick Settings screen. See Quick Settings on how to
launch Quick Settings screen.
Chapter 7: Staying connected
59
Page 60

Pairing your ROG Phone to a Bluetooth® device
Before using the Bluetooth feature of your ROG Phone in full scale, you have to pair it rst with the
Bluetooth device. The ROG Phone automatically stores the pairing connection of the Bluetooth
device.
1. On the Settings screen, tap Connected devices > Connection preferences > Bluetooth to
display all available devices.
IMPORTANT!
• If the device that you want to pair is not in the list, ensure to enable its Bluetooth feature make it
discoverable.
• See the user guide that came with your device to learn how to enable its Bluetooth and and set it to
discoverable.
2. Tap > Refresh to scan for more Bluetooth devices.
3. In the list of available devices, tap the Bluetooth device that you want to pair with.
4. Ensure that the same passkey show on both devices, then tap Pair.
NOTE: Turn o the Bluetooth feature when you're not using it to help save battery power.
Unpairing your ROG Phone from the Bluetooth® device
1. On the Settings screen, tap tap Connected devices > Connection preferences > Bluetooth to
display all available and paired devices.
2. In the list of paired devices, tap of Bluetooth device that you want to unpair, then tap
FORGET.
60
Chapter 7: Staying connected
Page 61
Tethering
When Wi-Fi service is not available, you can use your ROG Phone as a modem or turn it into a Wi-Fi
hotspot to get Internet access on your laptop, tablet, and other mobile devices.
IMPORTANT! Most mobile service providers may require a data plan for you to be able to use the
tethering function. Contact your mobile service provider about availing of this data plan.
NOTES:
• Internet access via tethering may be slower than the standard Wi-Fi or mobile connection.
• Only a limited number of mobile devices can tether to your ROG Phone for Internet access.
• Turn o the tethering feature when you're not using it to help save battery power.
Wi-Fi
Turn your ROG Phone into a Wi-Fi Hotspot to share Internet connection with other devices.
1. Do either of the following:
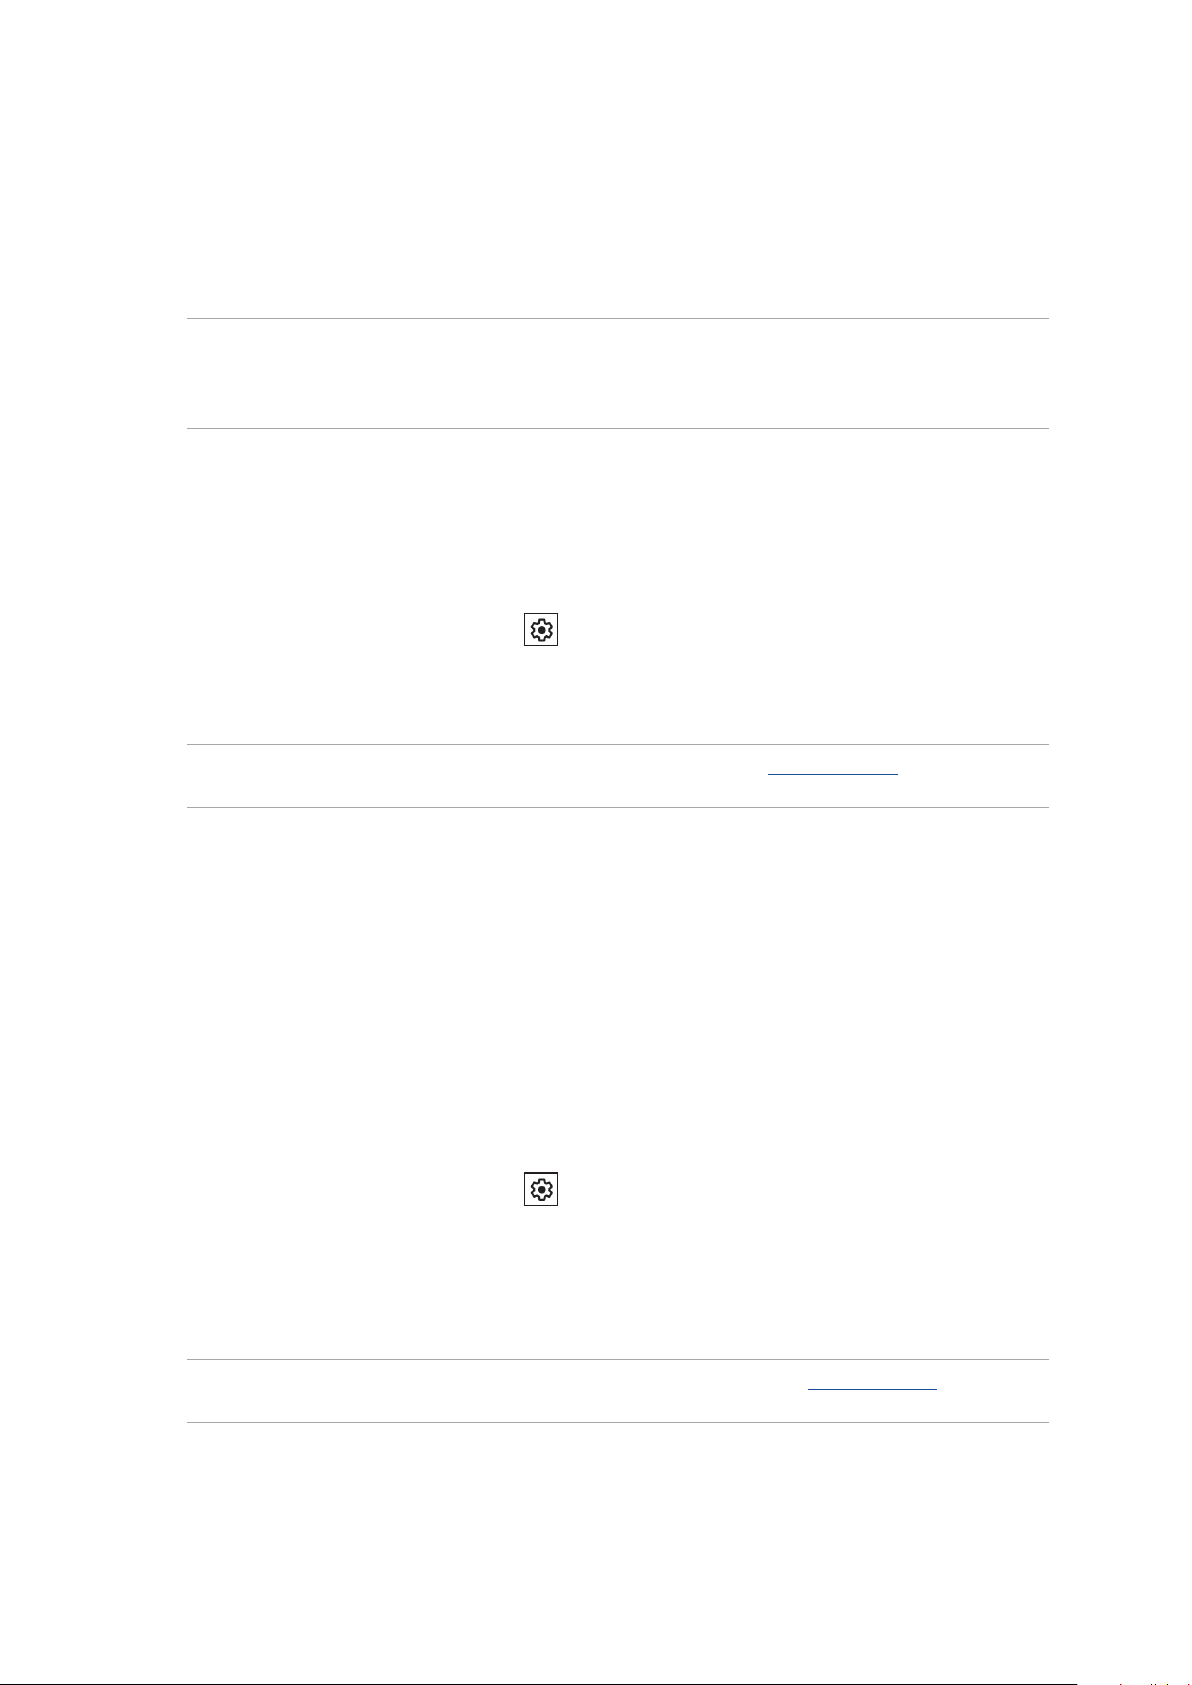
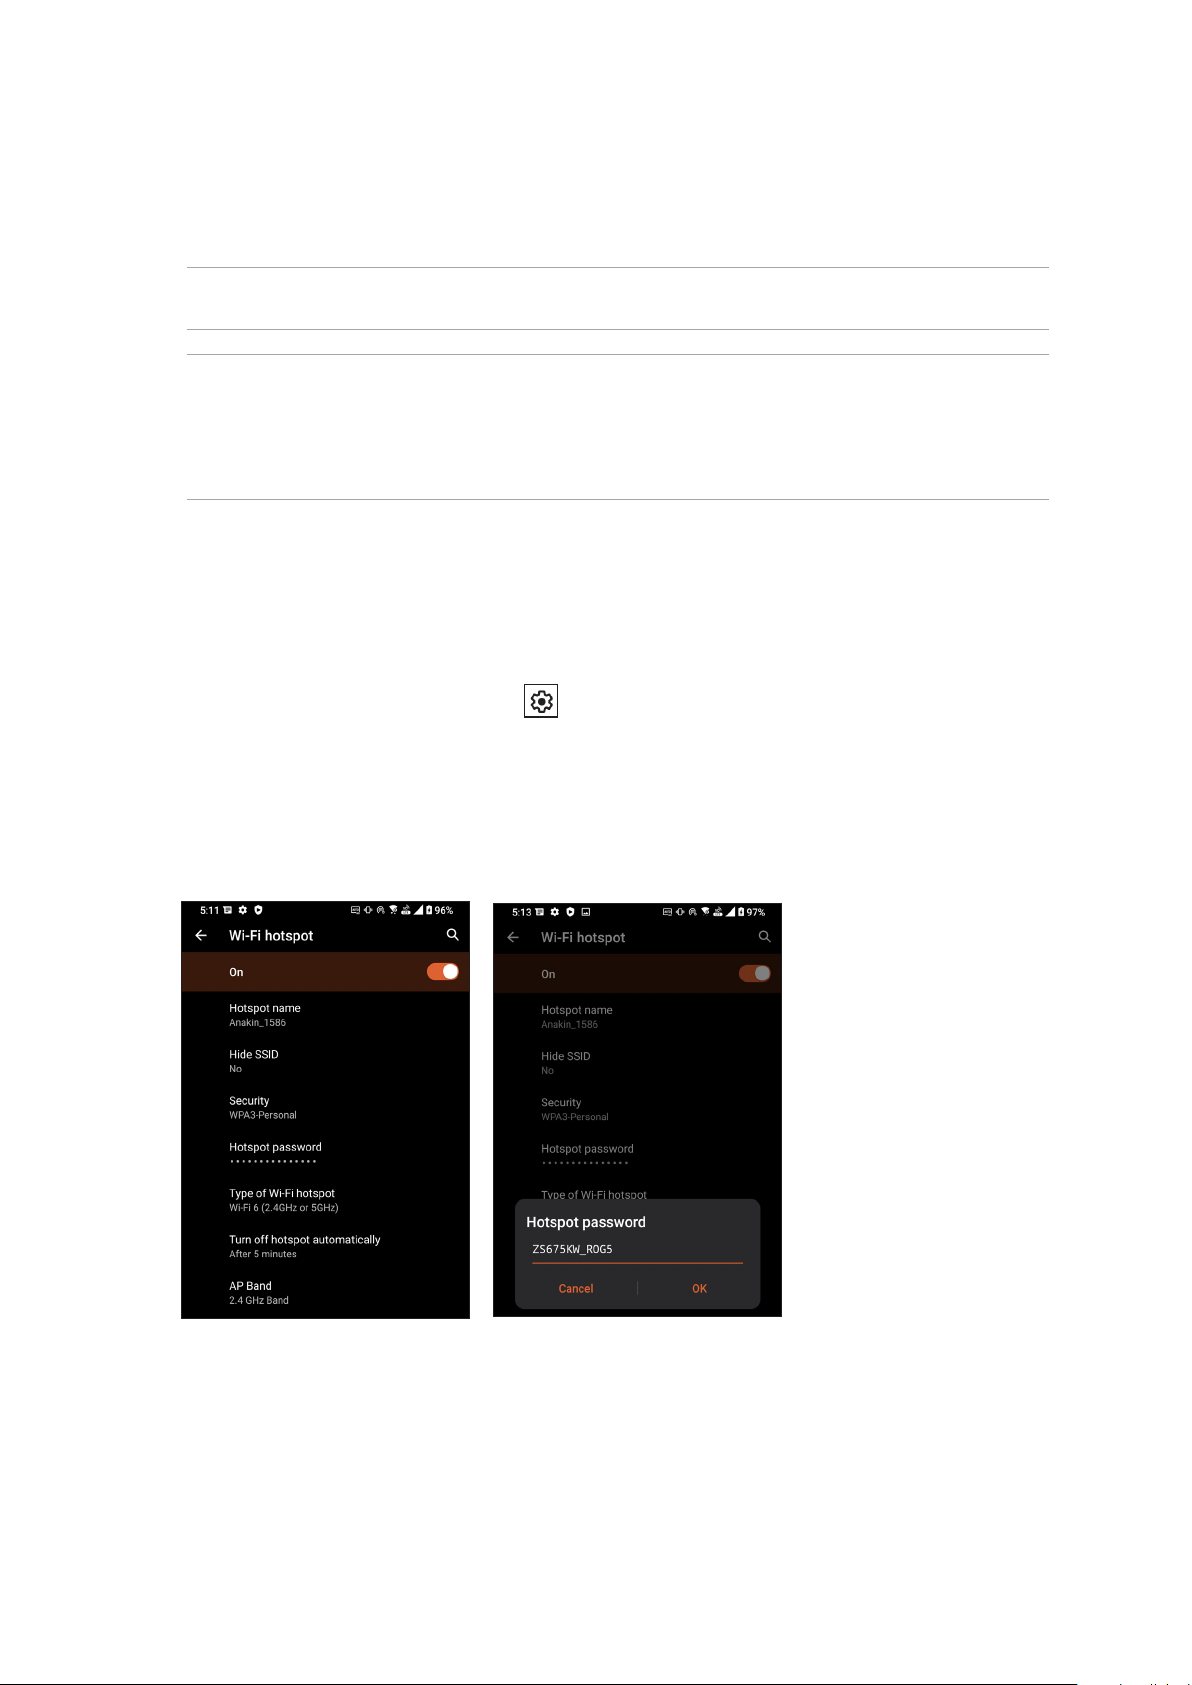
2. Tap Hotspot & tethering then slide on Wi-Fi hotspot.
3. Tap Wi-Fi hotspot > Hotspot name to assign a unique SSID or network name, and tap Hotspot
Hotspot
• Launch Quick Settings then tap > Network & internet.
• Swipe up on your Home screen then tap Settings > Network & internet.
password to assign a strong 8-character password for your Wi-Fi hotspot. When done, tap OK.
4. Connect other devices to your ROG Phone’s hotspot connection the same way you connect to a
Wi-Fi network.
Chapter 7: Staying connected
61
Page 62
USB Tethering
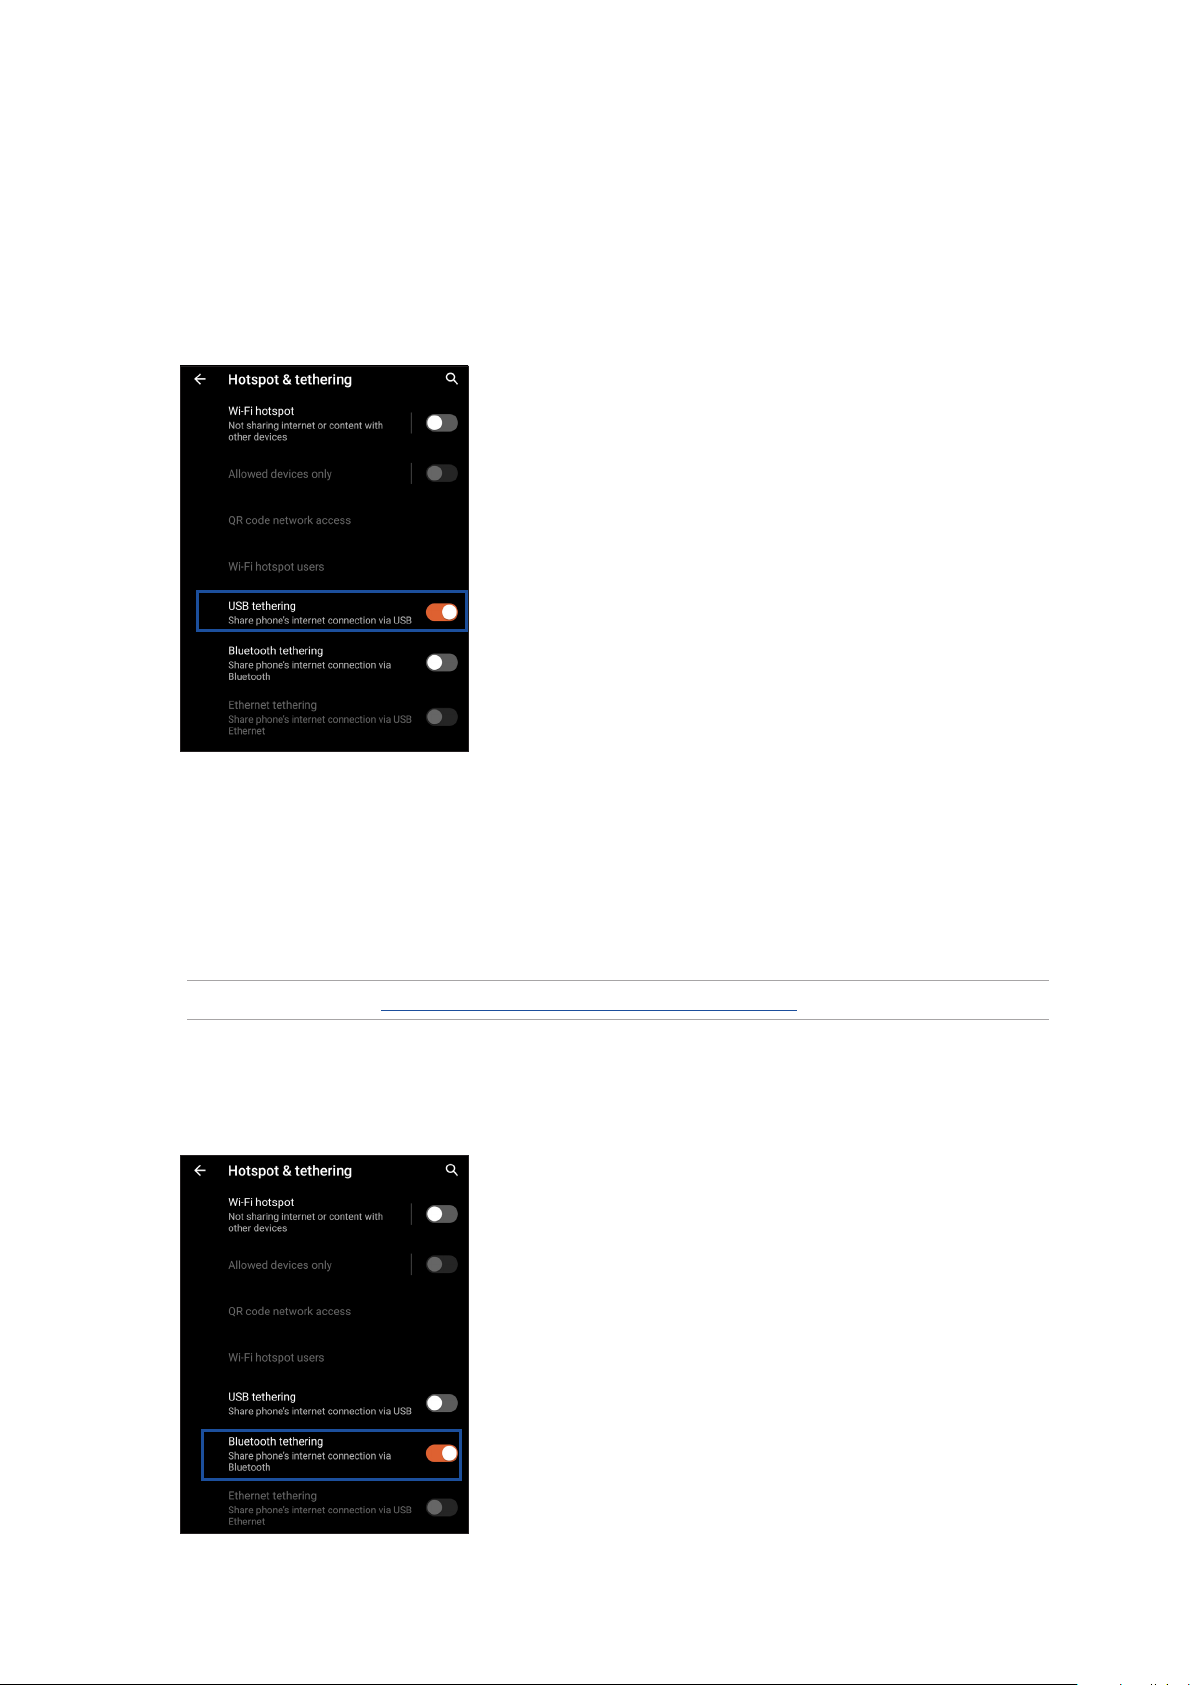
Enable USB tethering on your ROG Phone and share its Internet connection with other devices.
1. Connect your ROG Phone to another device with a USB cable.
2. From the Settings screen, tap Network & internet > Hotspot & tethering, then silde on USB
tethering to enable tethering.
Bluetooth Tethering
Enable Bluetooth tethering on your ROG Phone to share its Internet connection with other devices.
1. Enable Bluetooth on your ROG Phone and the other device.
2. Pair both devices.
NOTE: For details, see Pairing your ROG Phone to a Bluetooth® device.
3. From the Settings screen, tap Network & internet > Hotspot & tethering, then silde on
Bluetooth tethering.
62
Chapter 7: Staying connected
Page 63
8 Travel and Maps
Travel and Maps
8
Weather
Get real-time weather updates straight from your ROG Phone using the weather app. Using
Weather, you can also check other weather details from around the world.
Launching the Weather app
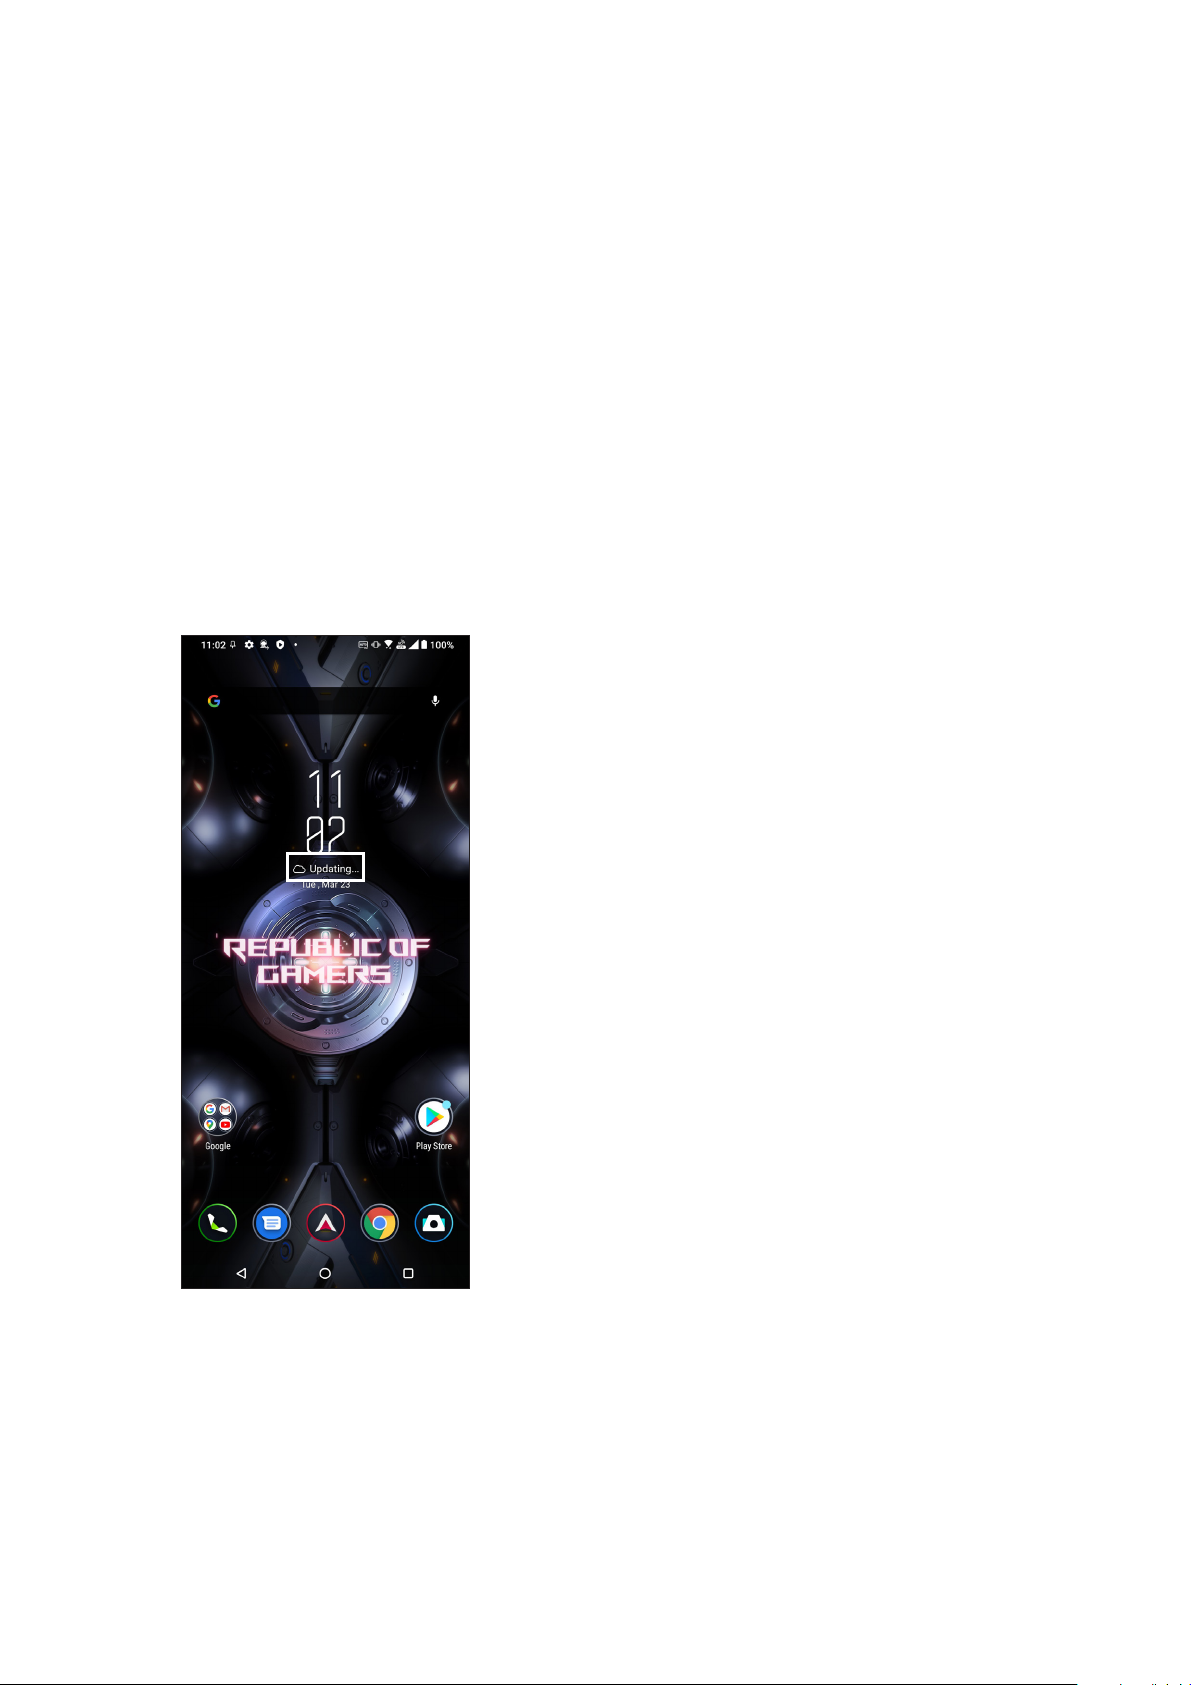
From your Home screen, tap the weather icon to launch the Weather app.
Chapter 8: Travel and Maps
63
Page 64
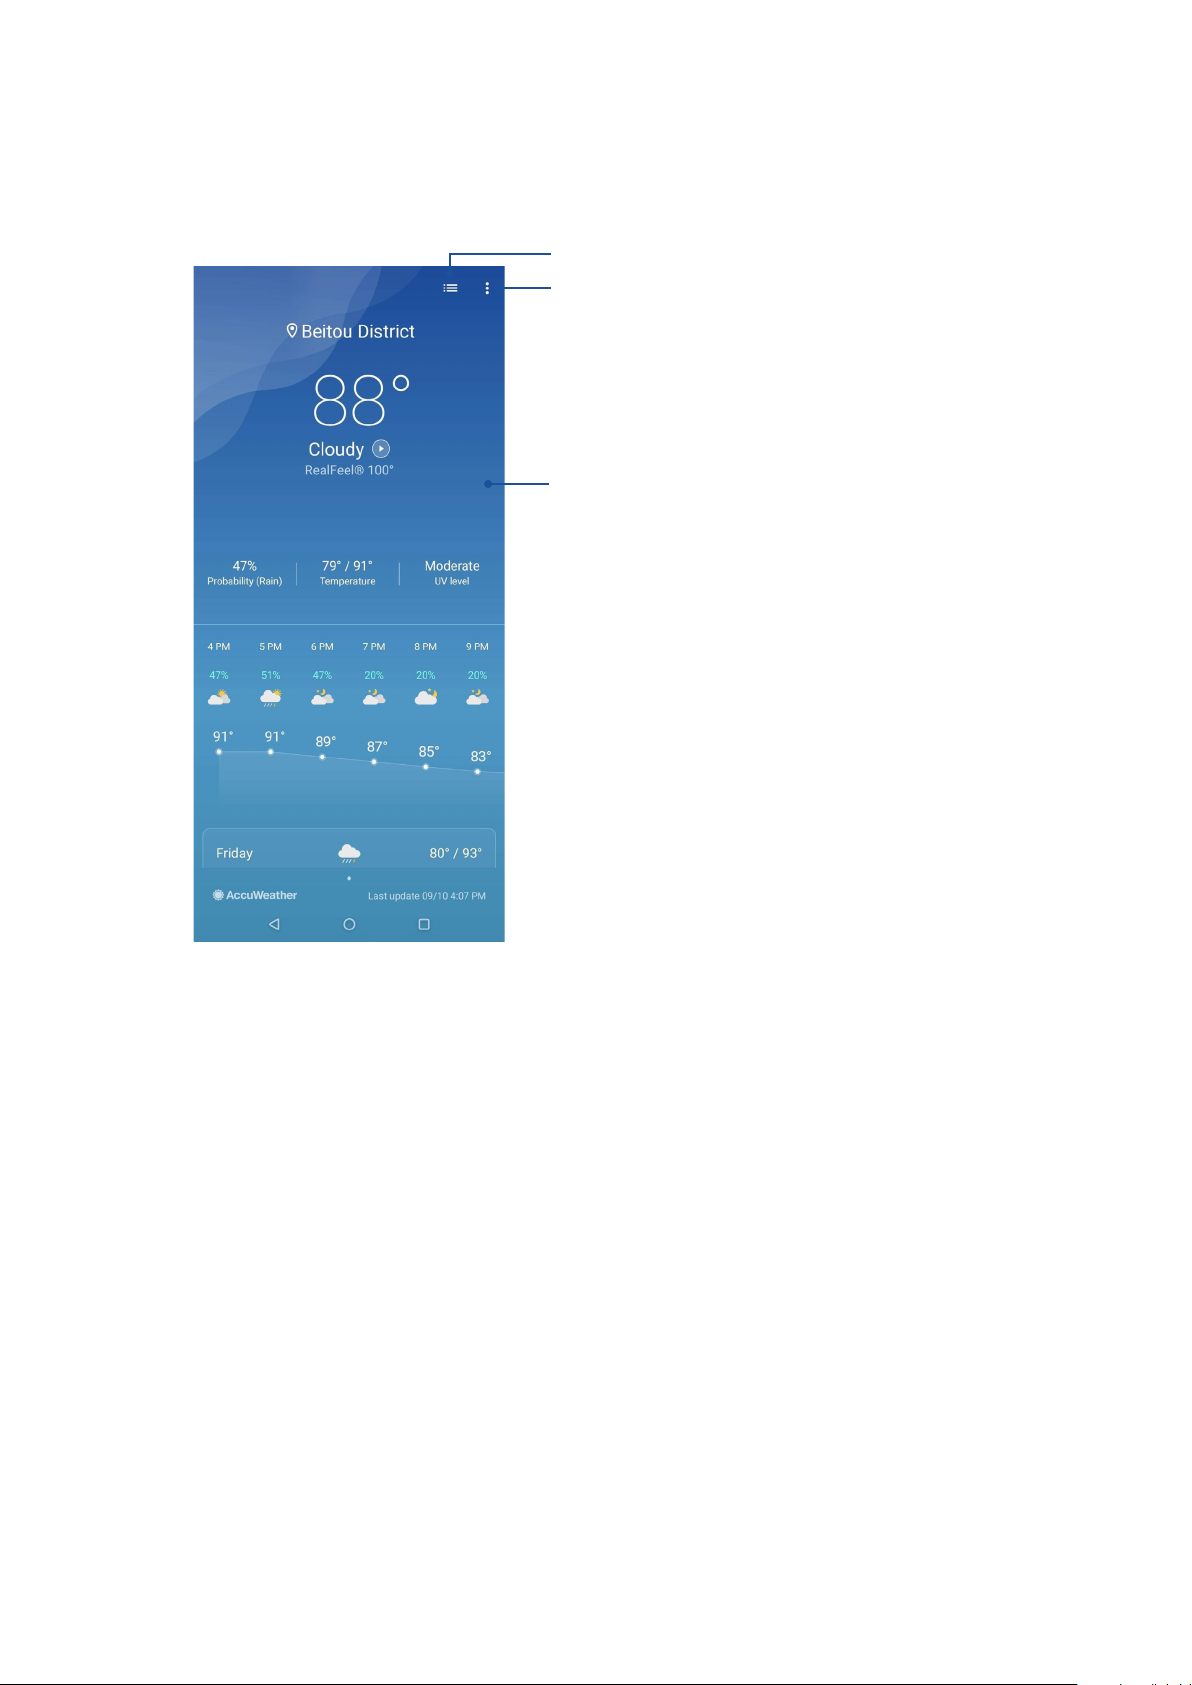
Weather home screen
Set up and get your current location’s weather updates as well as other parts of the world.
Tap to edit the location list
Tap to refresh the weather info, add a city to the location
list, or congure the weather settings
Swipe up to see other weather information
Swipe to the left or right to see the weather information
of other cities in your location list
64
Chapter 8: Travel and Maps
Page 65
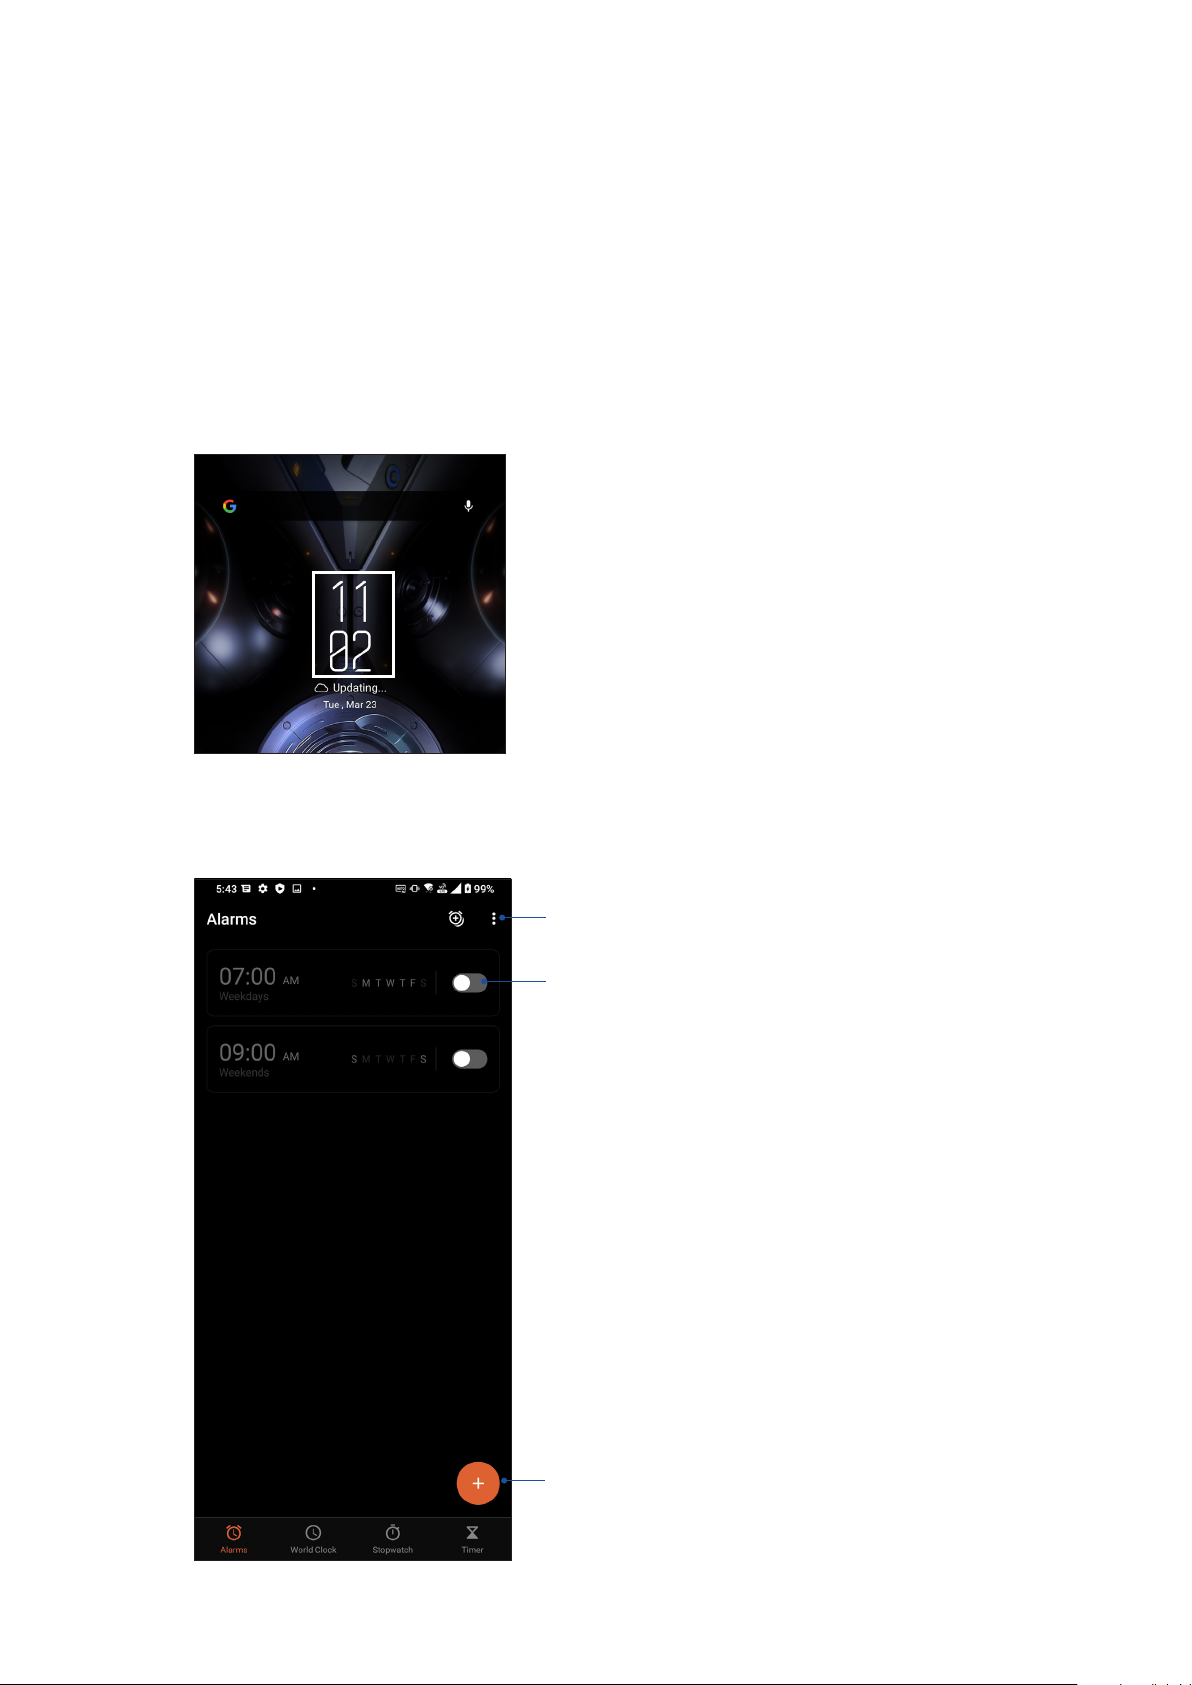
Clock
Customize the time zone settings of your ROG Phone, set alarms, and use your ROG Phone as a stop
watch using the Clock app.
Launching Clock
Launch the Clock app using either of the following options:
• Swipe up on your Home screen then tap Clock.
• From your ROG Phone’s home screen, tap the digital clock display.
Alarm clock
Tap Alarms to access the alarm clock settings of your ROG Phone.
Tap this to access the settings of the alarm clock feature
Slide to trun on/o the alarm
Tap this to set a new alarm time
Chapter 8: Travel and Maps
65
Page 66
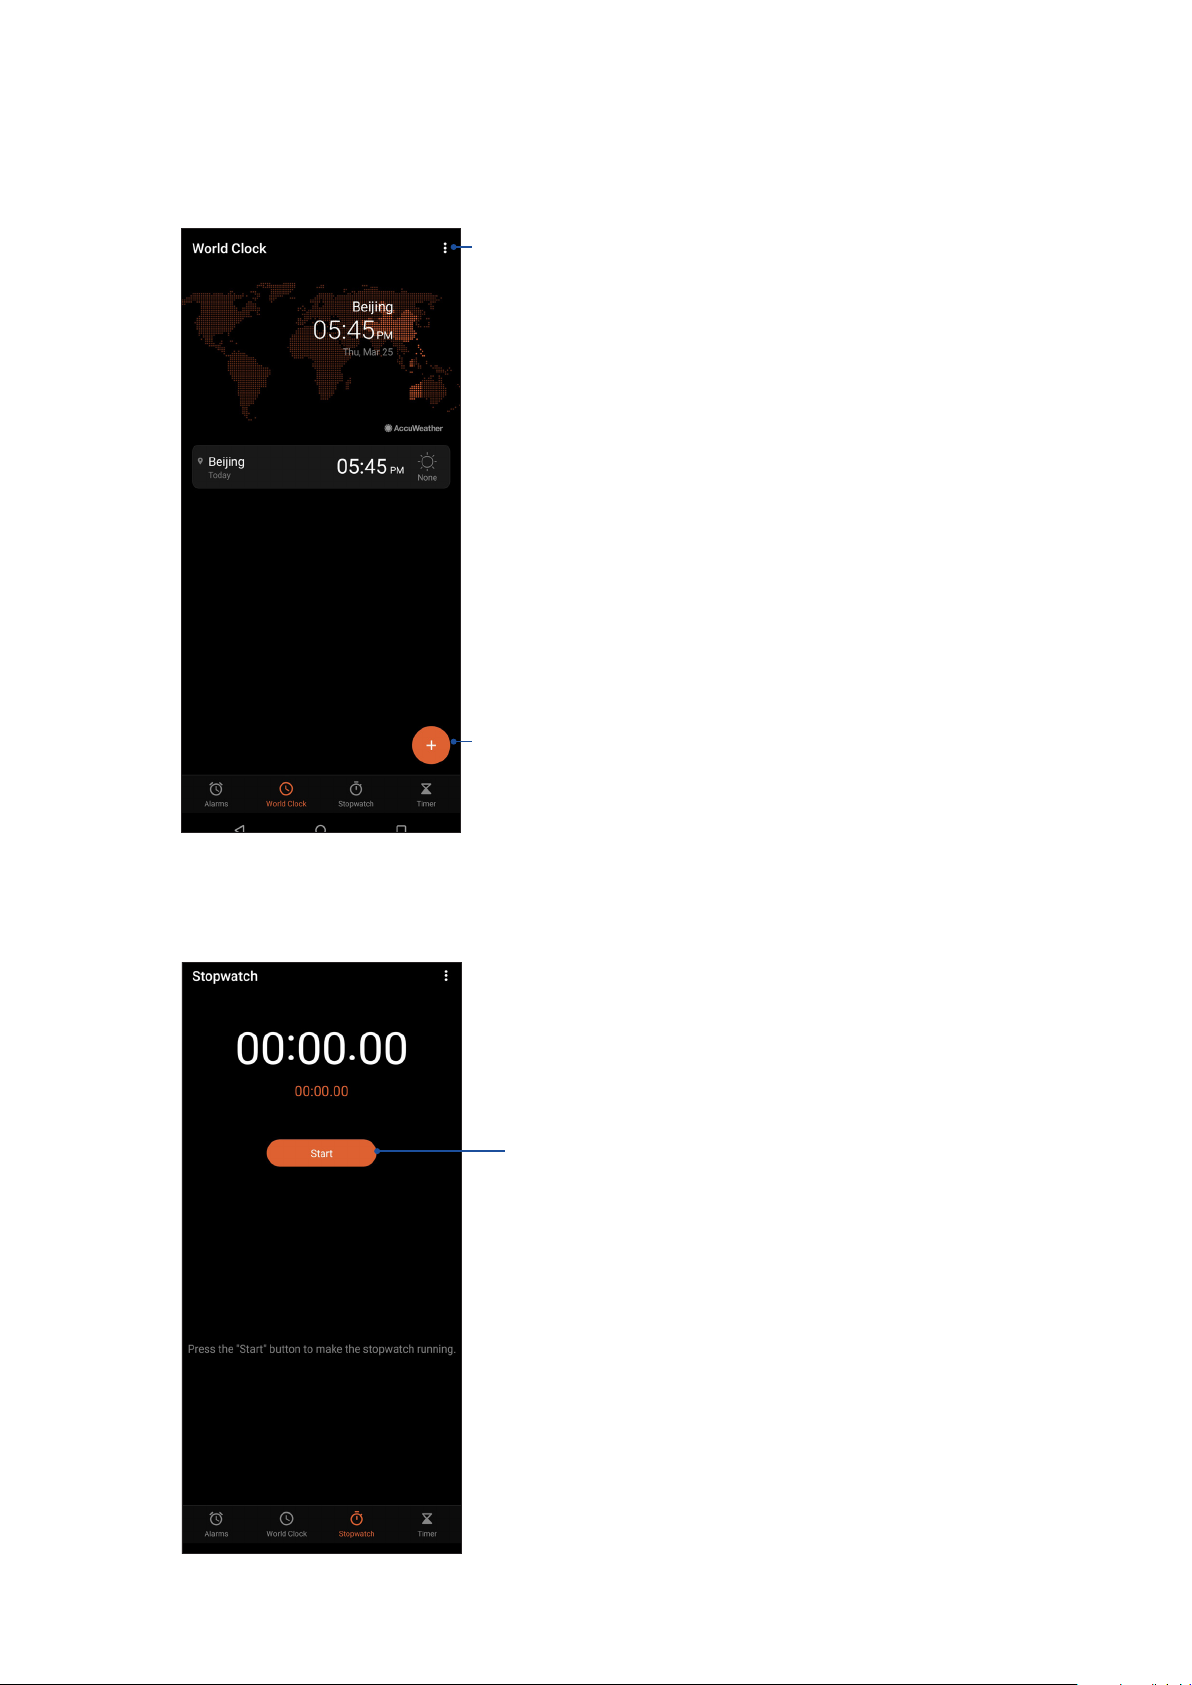
World clock
Tap World Clock to access the world clock settings of your ROG Phone.
Tap this to edit the cities marked on your world clock
Tap this to add a new city to mark on your world clock’s map.
Stopwatch
Tap Stopwatch to use your ROG Phone as a stopwatch.
Tap this button to start running the stopwatch feature
66
Chapter 8: Travel and Maps
Page 67
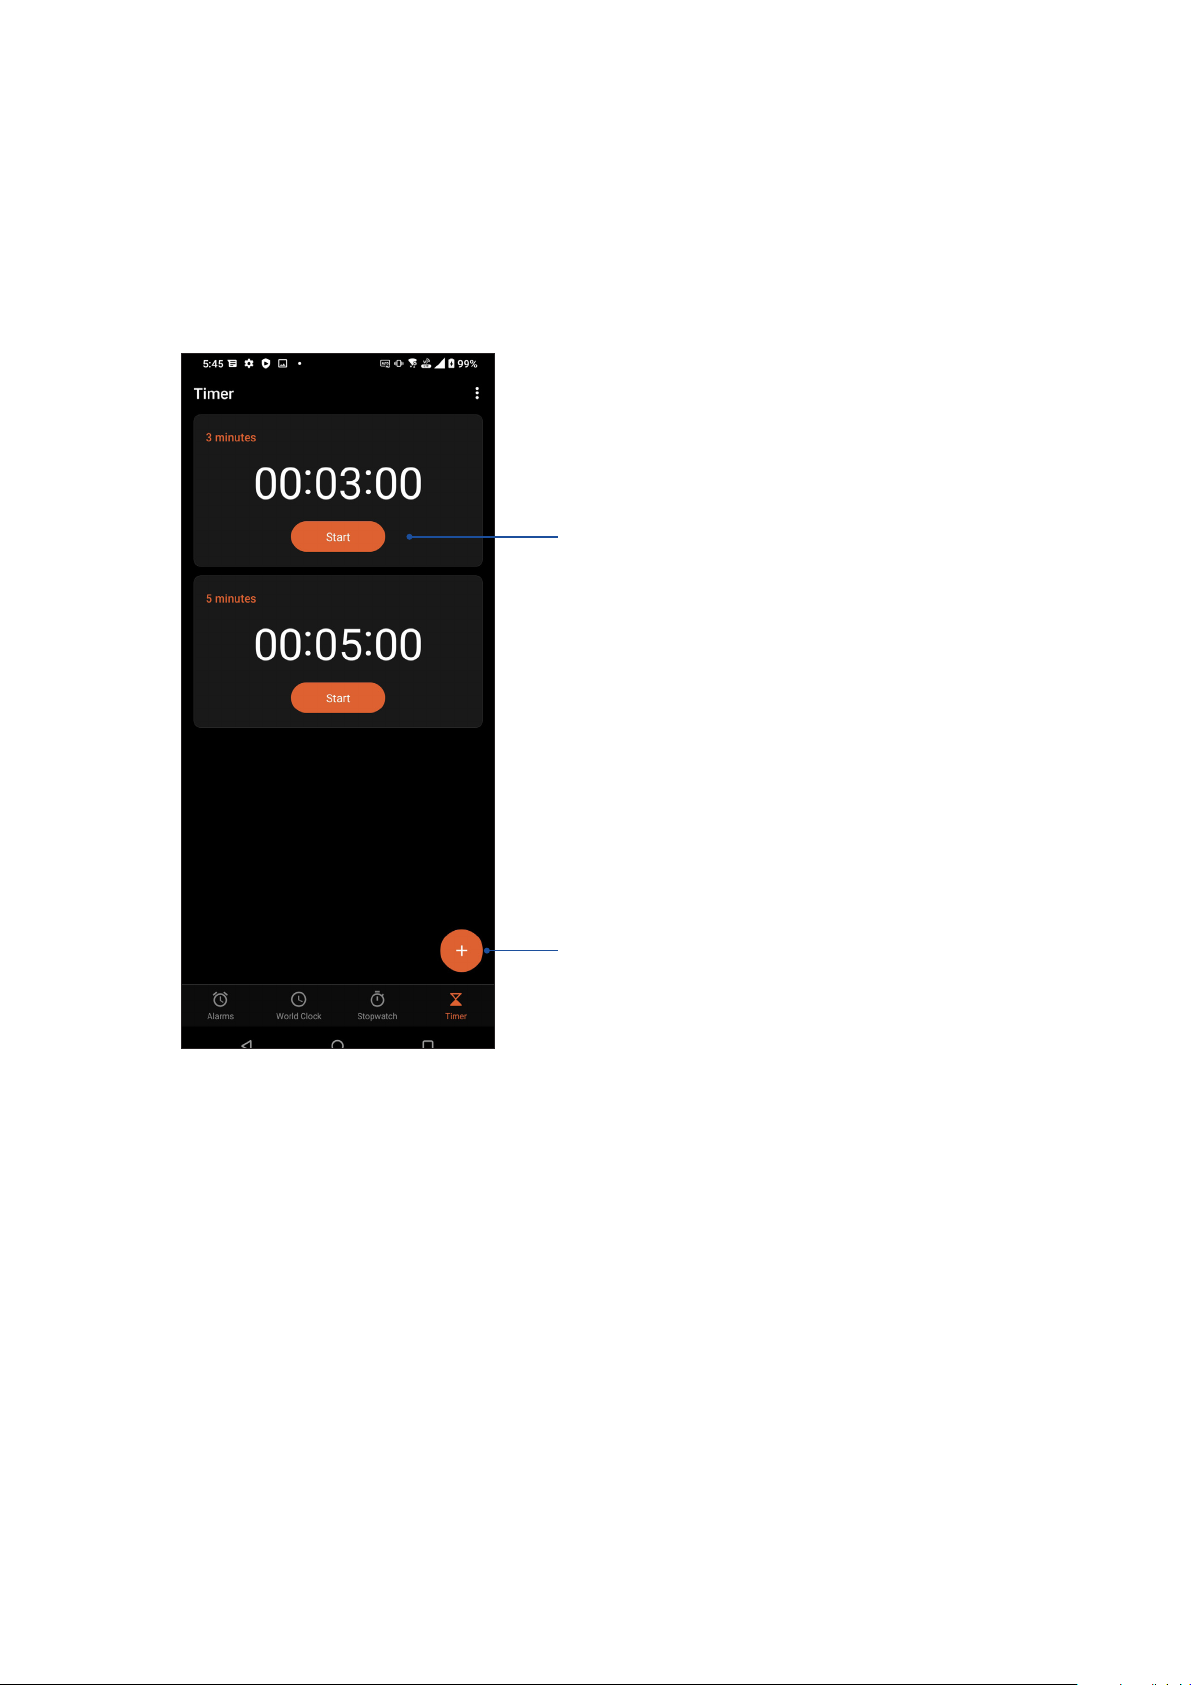
Timer
You may set multiple timer options for your ROG Phone. To do this, follow the steps below:
Setting the timer
Tap Timer to access the timer feature of your ROG Phone.
Tap this button to start running the timer
Tap this to set a new timer
Chapter 8: Travel and Maps
67
Page 68
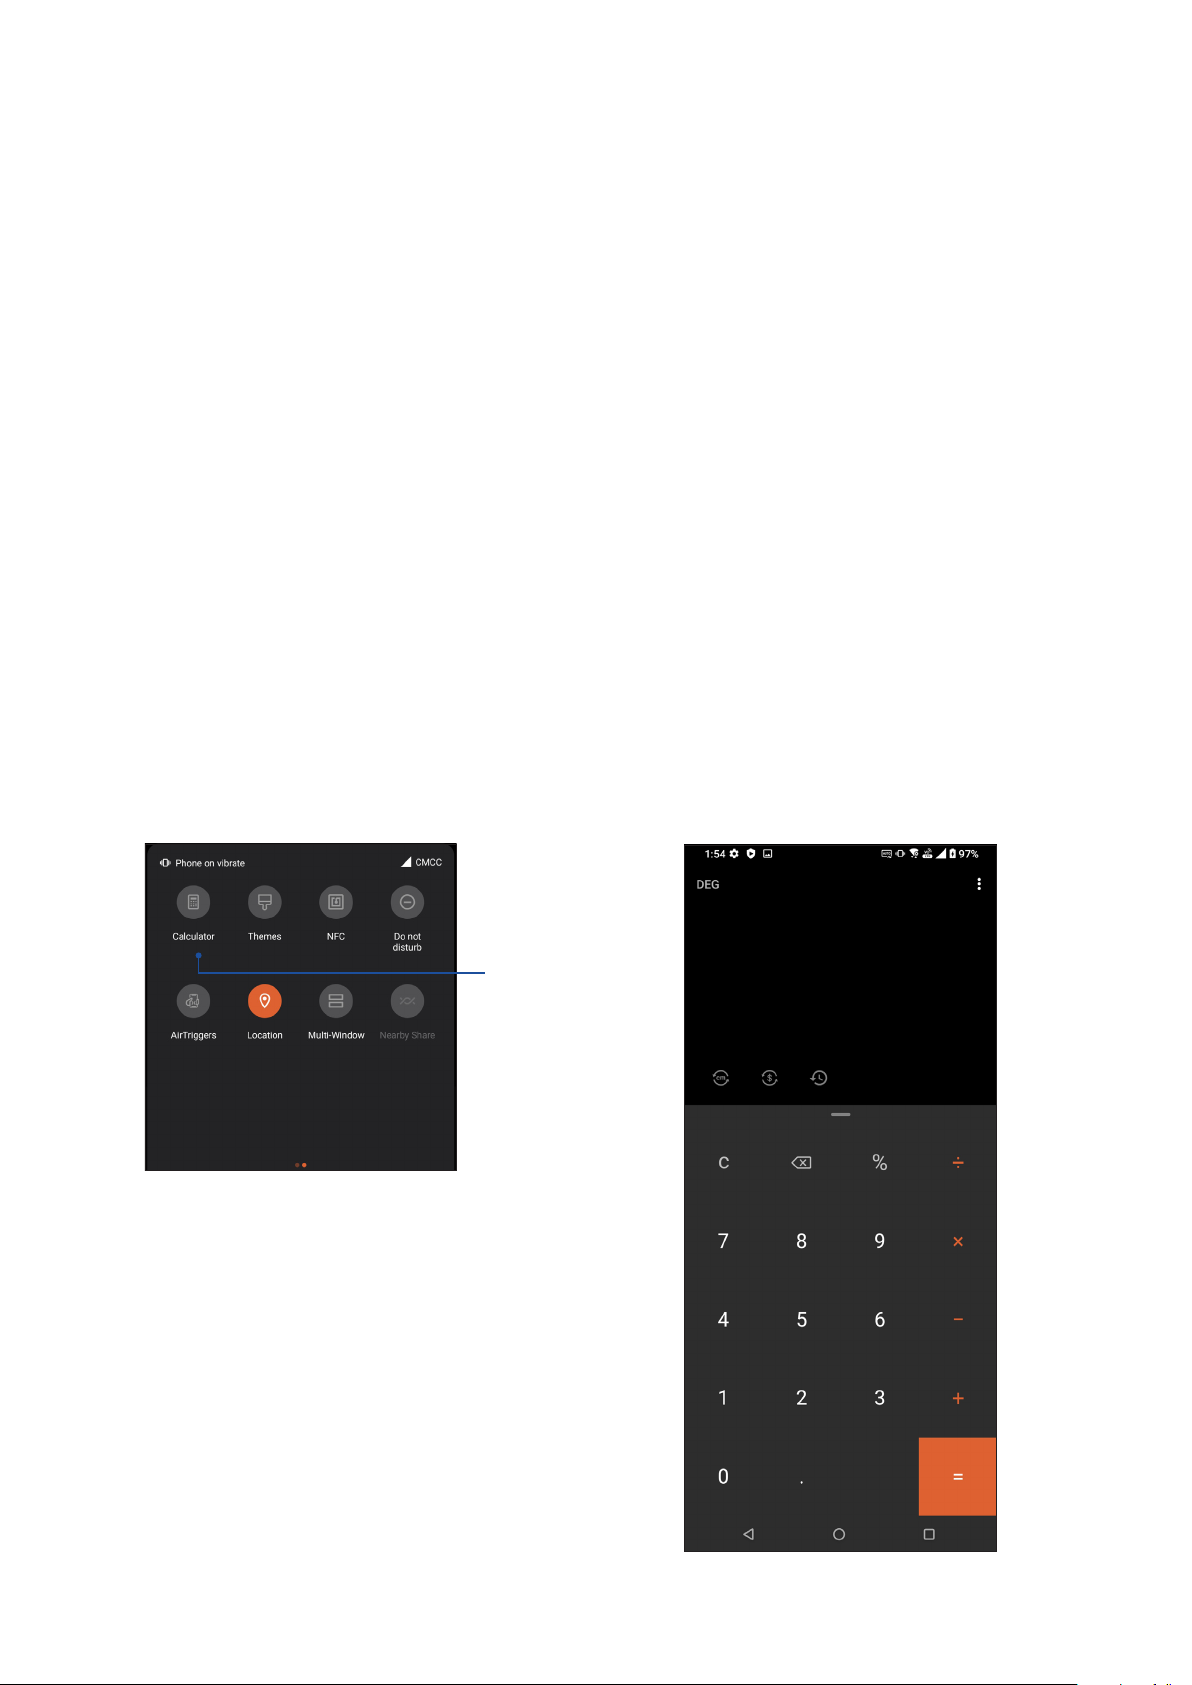
9 Zen Everywhere
Zen Everywhere
9
Special Zen Tools
Calculator
Calculate using your ROG Phone by enabling the Calculator app.
Launching Calculator
Launch Calculator using either of the following options:
• Swipe up on your Home screen then tap Calculator.
• Open the Quick settings panel, the Calculator icon is there visibly on the list. Tap it to get
started with your computations.
Calculator screen
Tap this to enable
the calculator
68
Chapter 9: Zen Everywhere
Page 69
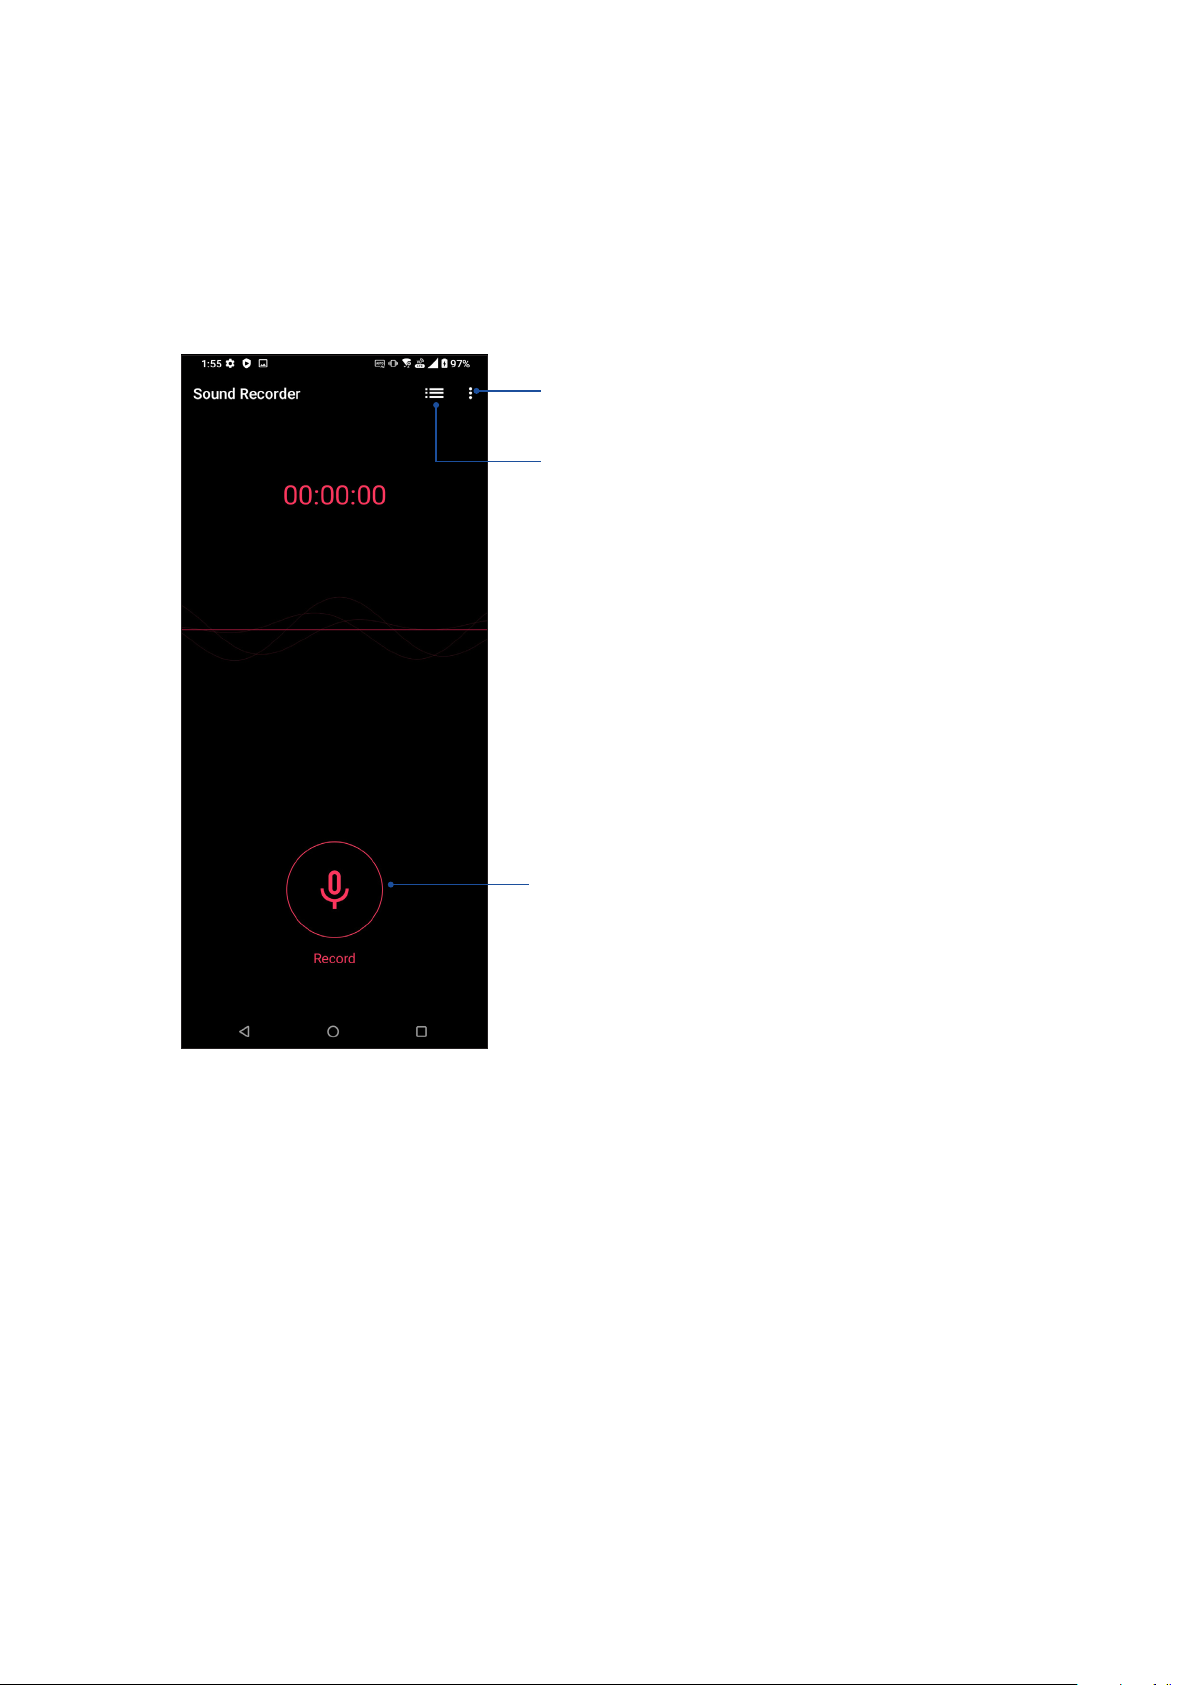
Sound Recorder
Record audio les using your ROG Phone by enabling the Sound Recorder app.
Launching Sound Recorder
To launch Sound Recorder, swipe up on your Home screen then tap Sound Recorder.
Tap to customize the Sound Recorder settings
Tap to view the list of saved audio recording les
Tap to start audio recording
Chapter 9: Zen Everywhere
69
Page 70
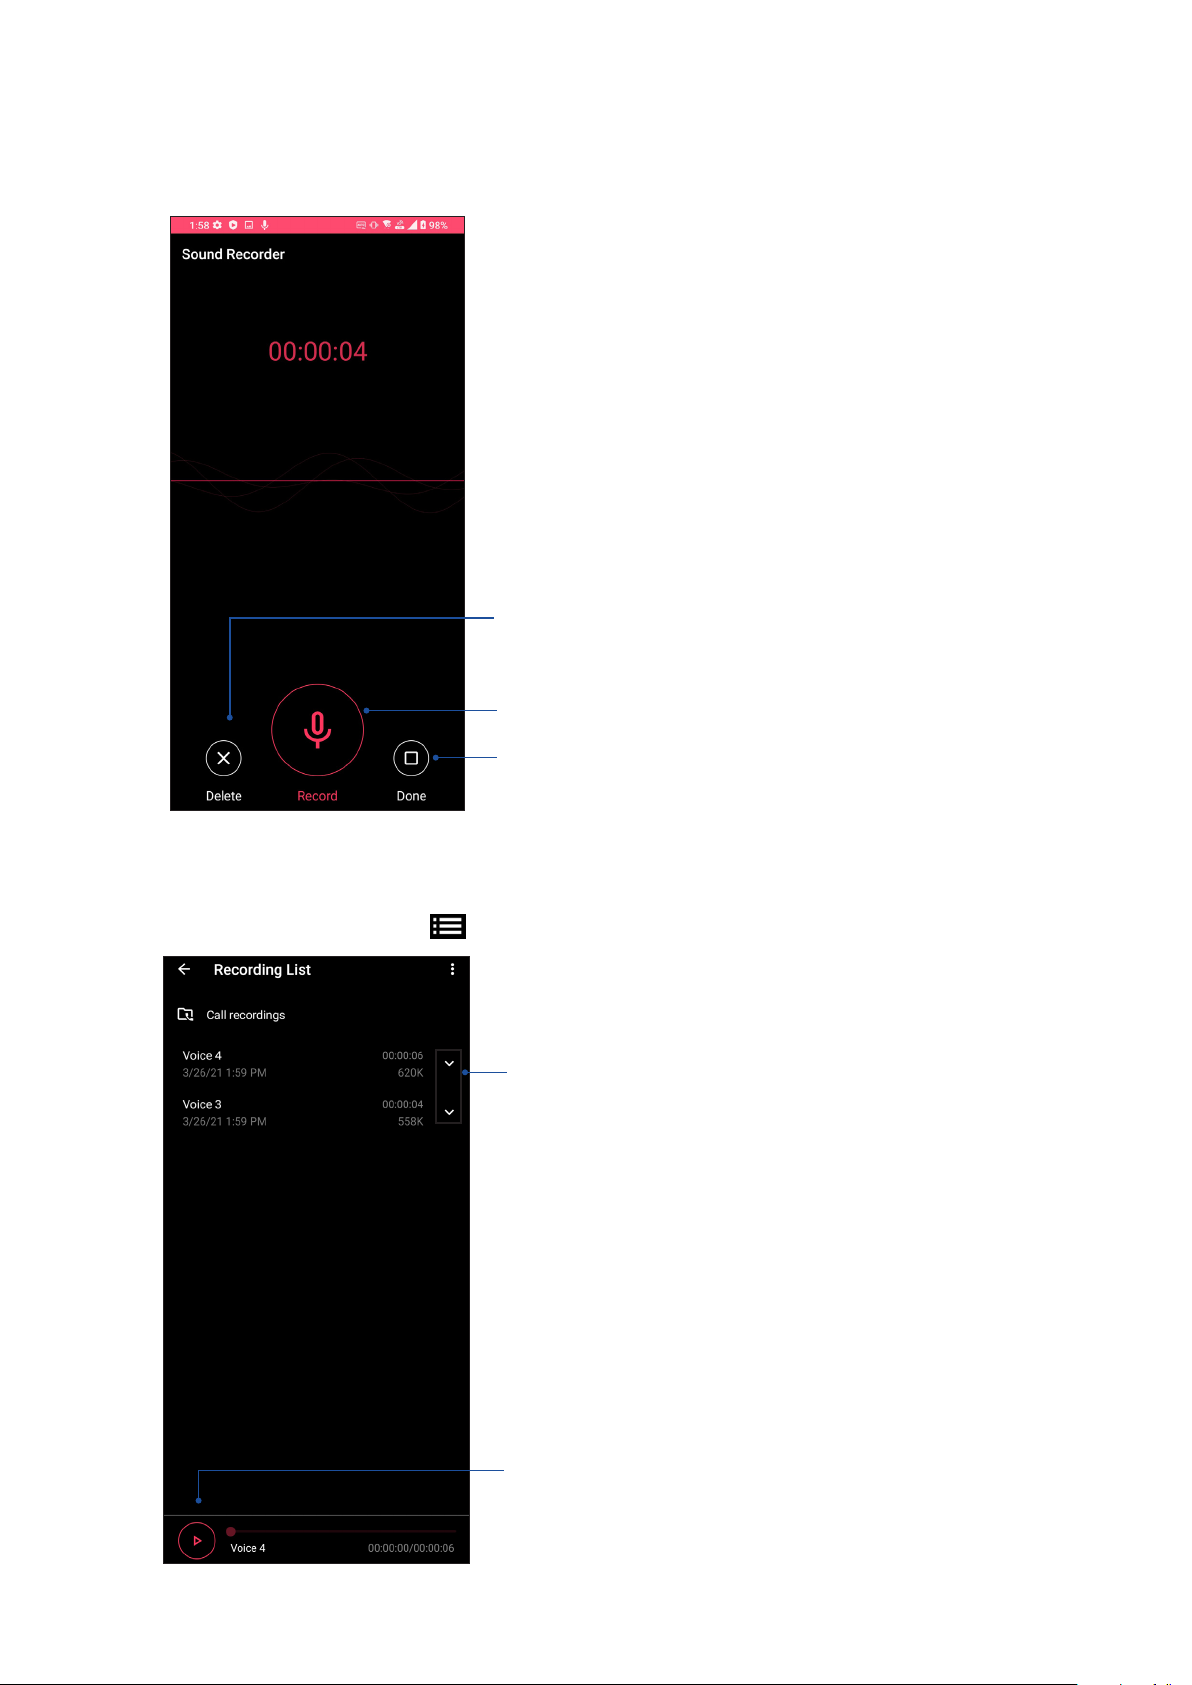
Pausing a recording
During a paused recording, you can choose to resume, delete, or save the recording.
Tap to delete the recording
Tap to resume the recording
Tap to save the recording
Recording List
From the Recording List, you can play, rename, share, or delete a saved audio recording le.
To view your recording list, tap from the Sound Recorder main screen.
Tap to share, rename, or delete your selected recording
70
Chapter 9: Zen Everywhere
Tap to play/pause your selected recording
Page 71
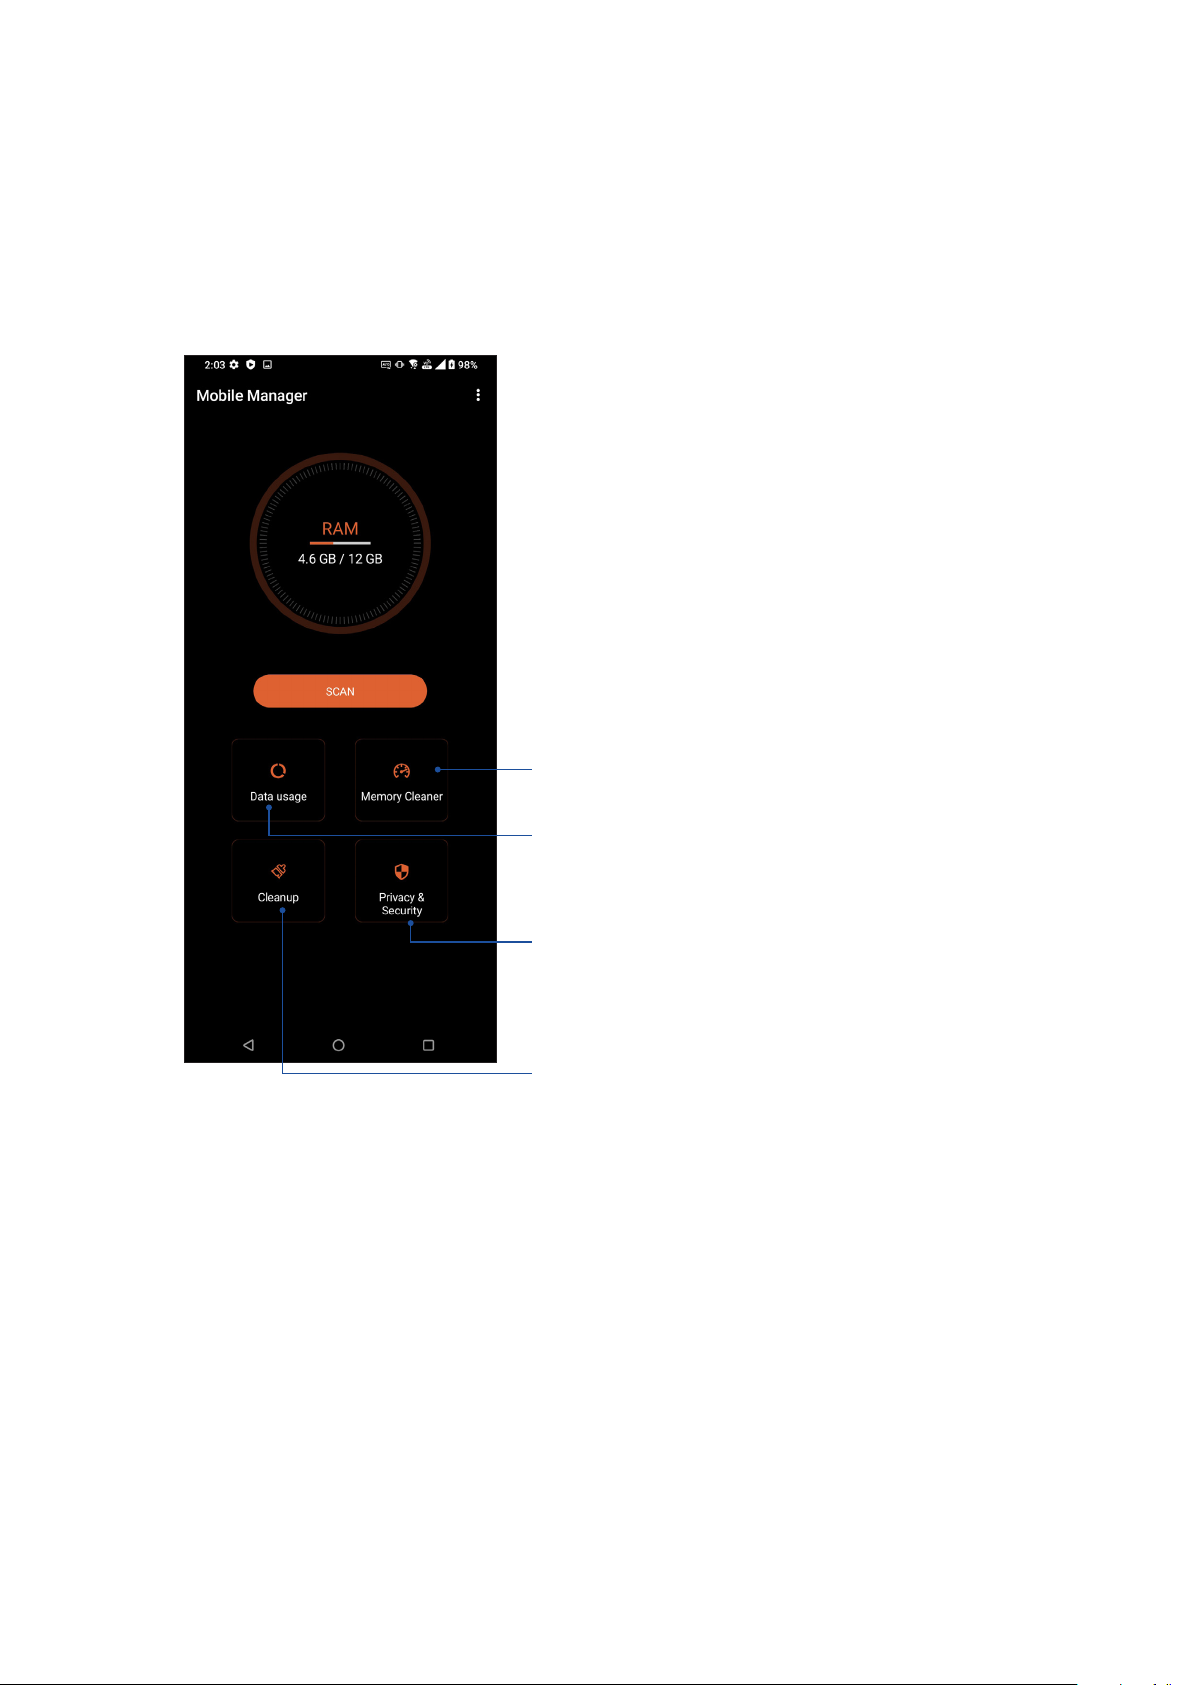
Mobile Manager
Mobile Manager provides an integrated interface for several apps that are designed to optimize
device performance, manage the phone power, and storage usage.
To launch Mobile Manager, swipe up on your Home screen then tap Settings > Advanced >
Mobile Manager.
Close unused processes that are running in the
background to retrieve more system memory
Tap this to view the mobile data usage, set a monthly limit for
mobile data use, and control apps to access the Internet only
over Wi-Fi, only over mobile network, neither or both
Tap this to run privacy and security scan and prevent apps from
using dangerous permissions and starting automatically
Tap this to uninstall the selected unused apps to free up some
storage
Chapter 9: Zen Everywhere
71
Page 72

10 Maintain your Zen
Maintain your Zen
10
Keeping your device up-to-date
Keep your ROG Phone in the loop of Android system updates and upgraded apps and features.
Updating your system
1. Swipe up on your Home screen then tap Settings.
2. On the Settings screen, slide down to display other items then tap System > System update to
check for system updates.
3. Tap on the System updates screen to set up automatic download of system updates.
NOTE: You can preview the last time your ROG Phone’s system was updated at the Last update check
of the System update window.
Storage
You can store data, apps, or les on your ROG Phone (internal storage), on an external storage,
or on an online storage. You need an internet connection to transfer or download your les on
an online storage. Use the bundled USB cable to copy les to or from the computer to your ROG
Phone.
Backup
Back up data, Wi-Fi passwords, and other settings to Google servers using your ROG Phone.
1. Swipe up on your Home screen then tap Settings > System > Backup.
2. From the Backup window, you can:
• Back up to Google Drive: This feature backs up your data, Wif-Fi passwords, and other
settings to Google Drive when enabled.
Reset
Reset network settings and app preferences, or reset factory defaults.
1. Swipe up on your Home screen then tap Settings > System > Reset options.
2. From the Reset window, you can:
72
Chapter 10: Maintain your Zen
Page 73
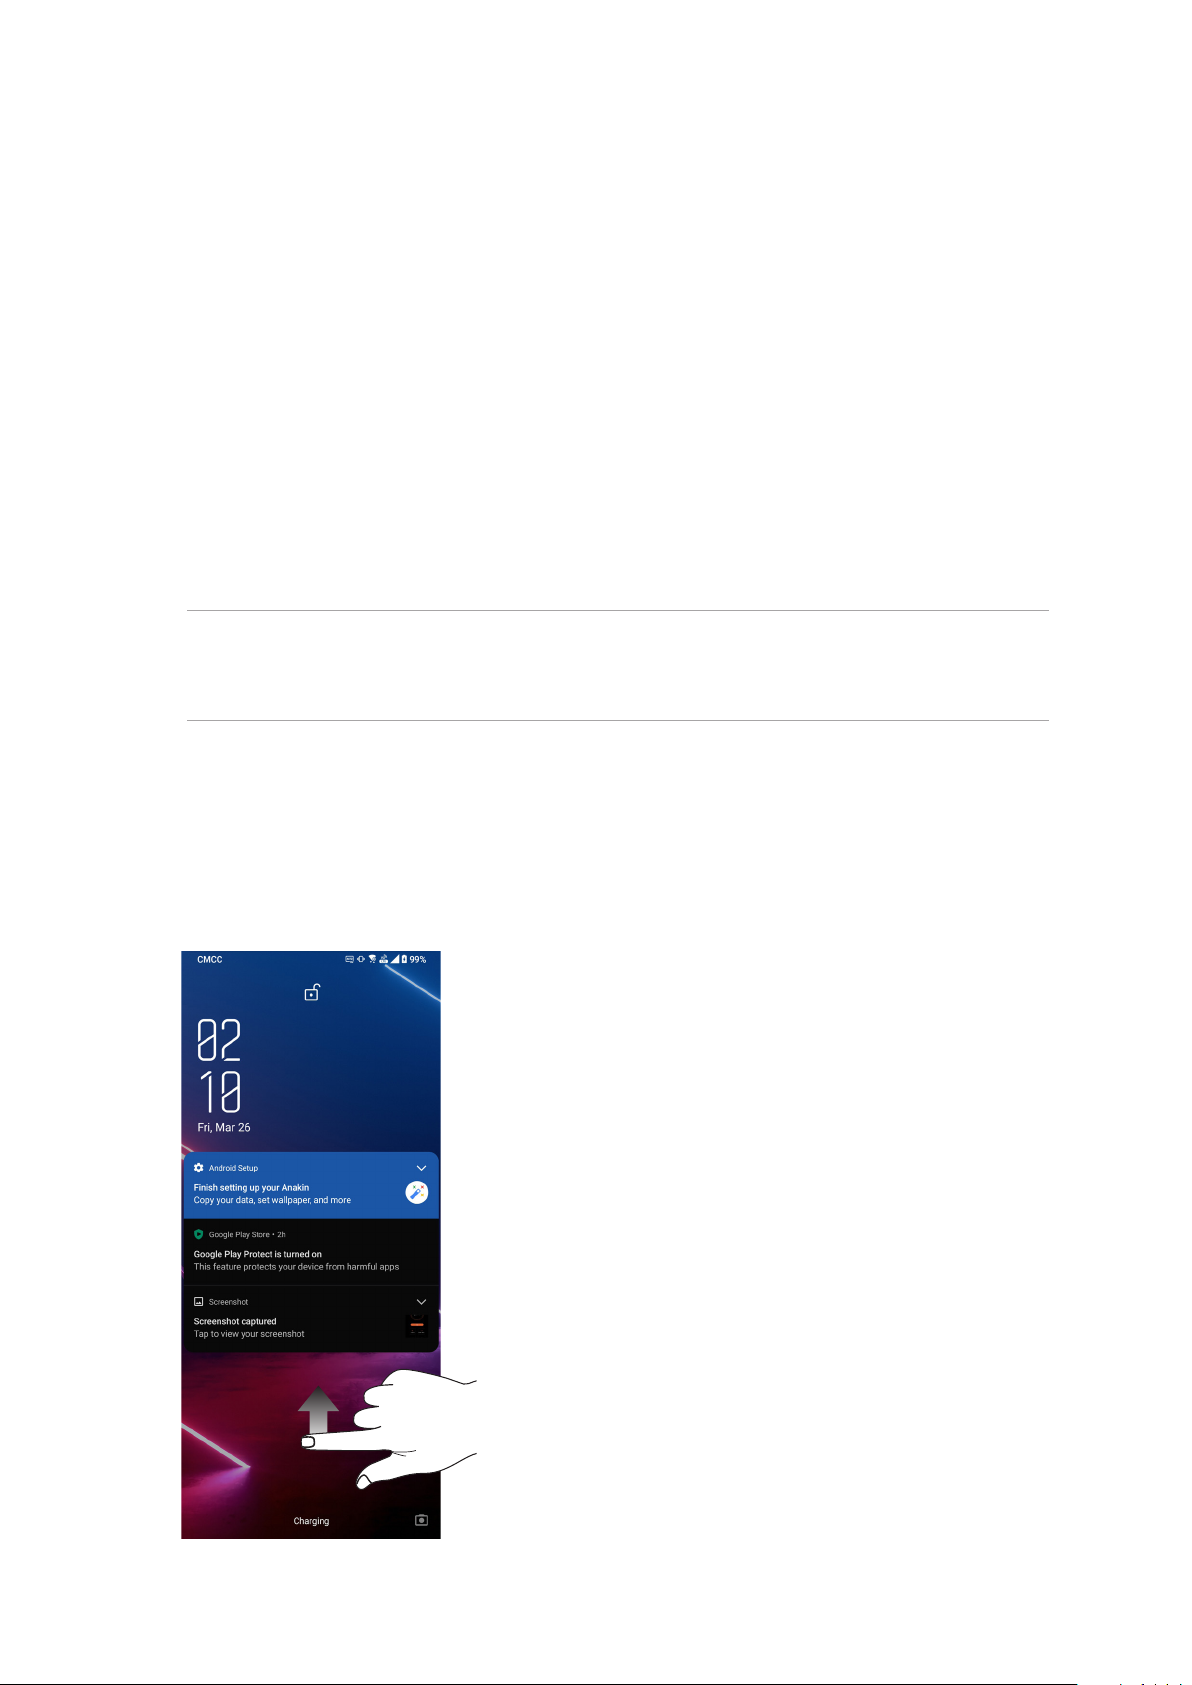
• Reset Wi-Fi, mobile & Bluetooth: This feature restores Wi-Fi passwords, and other
network settings.
• Erase all data (factory reset): Erases all data on phone.
Securing your ROG Phone
Use the security features of your ROG Phone to prevent unauthorized calls or access of information.
Unlocking your screen
When the screen is locked, you can open it with the security unlocking options that the ROG Phone
oers you.
1. Swipe up on your Home screen then tap Settings > Security & lock screen.
2. Tap Screen lock then select an option to unlock your ROG Phone.
NOTES:
• Refer to section Unlock screen options for more information.
• To deactivate the unlock screen option that you set, tap None on Choose screen lock screen.
Unlock screen options
Choose from these options to lock your ROG Phone.
Swipe
Swipe up to unlock your ROG Phone.
Chapter 10: Maintain your Zen
73
Page 74
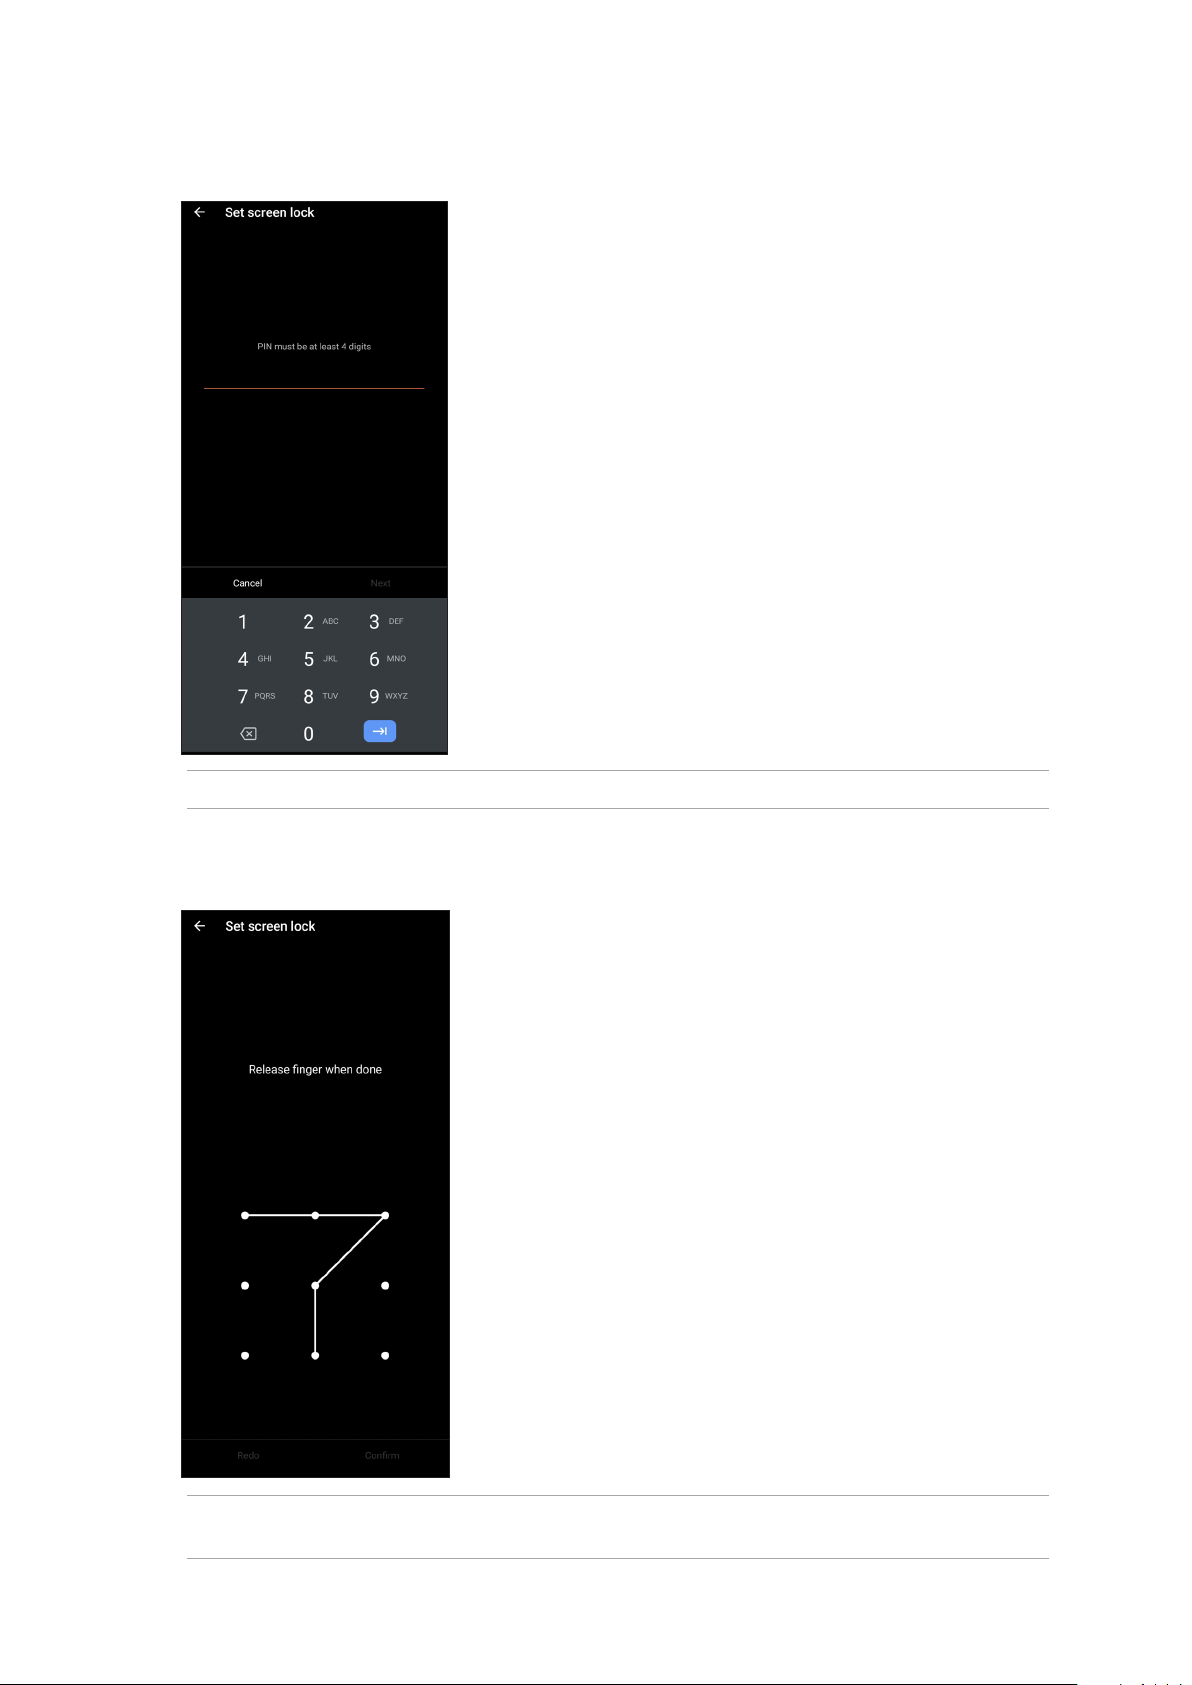
PIN
Key in at least four numbers to set a PIN.
IMPORTANT! Ensure to remember the PIN that you created to unlock your device.
Pattern
Slide your nger on the dots and create a pattern.
IMPORTANT! You can create a pattern with a minimum of four dots. Ensure to remember the pattern
that you created to unlock your device.
74
Chapter 10: Maintain your Zen
Page 75
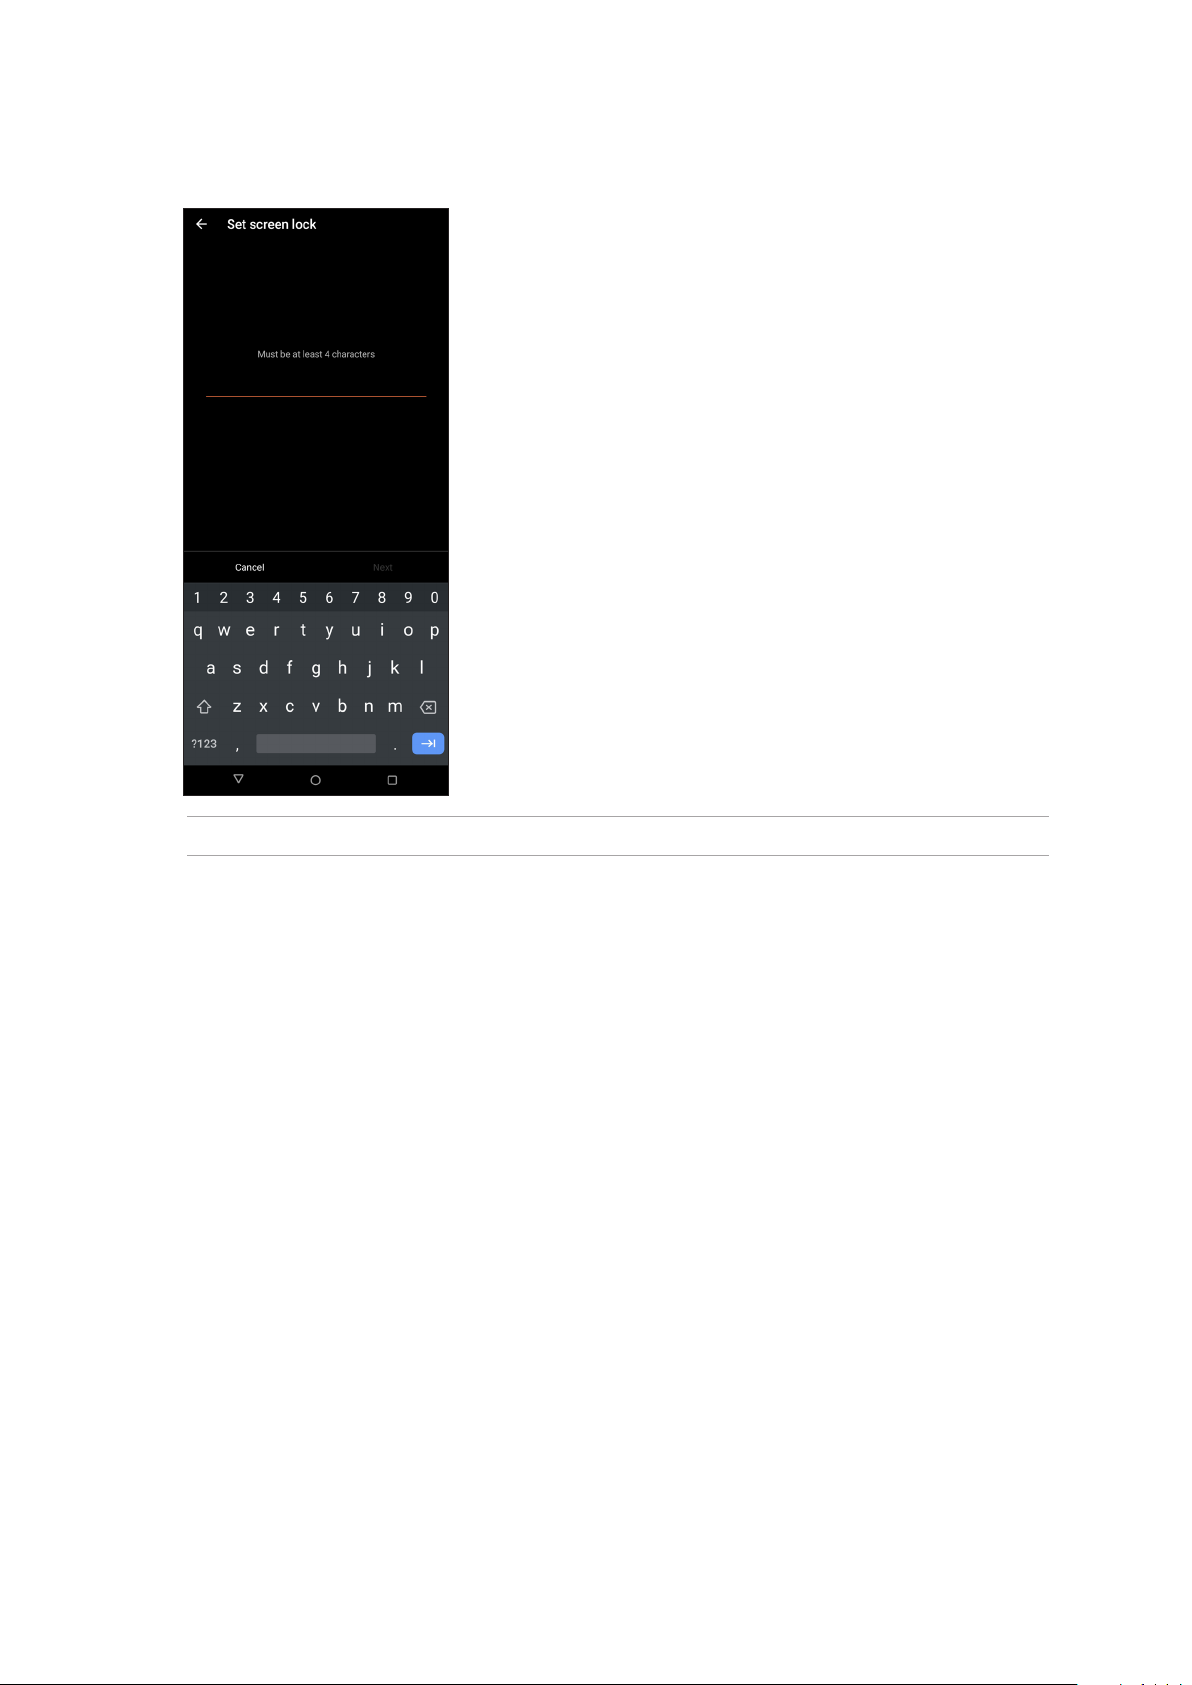
Password
Key in at least four characters to create a password.
IMPORTANT! Ensure to remember the password that you created to unlock your device.
Setting your ROG Phone identity
Know your ROG Phone’s identity such as serial number, IMEI (International Mobile Equipment
Identity) number, or model number.
This is important, as when you may lose your ROG Phone, you can contact your mobile carrier and
provide the information to blacklist the unauthorized use of your ROG Phone.
To display your ROG Phone’s identity:
1. Swipe up on your Home screen then tap Settings.
2. On the Settings screen, slide down to display other items then tap System > About phone. The
About phone screen displays the device name, status, emergency information, legal information,
operating system version, hardware, and software information of your ROG Phone.
3. To see the serial number, SIM status, and IMEI of your ROG Phone, tap Status.
Chapter 10: Maintain your Zen
75
Page 76

Appendix
Appendix
Safety information
CAUTION! Use of controls or adjustments or performance of procedures other than those specied
herein may result in hazardous radiation exposure.
ROG Phone care
• Use your ROG Phone in an environment with ambient temperatures between 0 °C (32 °F) and 35
°C (95 °F).
The battery
WARNING: Disassembling the battery by yourself will void its warranty and may cause serious harm.
Your ROG Phone is equipped with a high performance non-detachable Li-polymer battery. Observe
the maintenance guidelines for a longer battery life.
• Do not remove the non-detachable Li-polymer battery as this will void the warranty.
• Avoid charging in extremely high or low temperature. The battery performs optimally in an
ambient temperature of +5 °C to +35 °C.
• Do not remove and replace the battery with a non-approved battery.
• Use only ASUS battery. Using a dierent battery may cause physical harm/injury and may
damage your device.
• Do not remove and soak the battery in water or any other liquid.
• Never try to open the battery as it contains substances that might be harmful if swallowed or
allowed to come into contact with unprotected skin.
• Do not remove and short-circuit the battery, as it may overheat and cause a re. Keep it away
from jewelry or metal objects.
• Do not remove and dispose of the battery in re. It could explode and release harmful
substances into the environment.
• Do not remove and dispose of the battery with your regular household waste. Take it to a
hazardous material collection point.
• Do not touch the battery terminals.
76
Page 77

• To avoid re or burns, do not disassemble, bend, crush, or puncture the battery.
NOTES:
• Risk of explosion if battery is replaced by an incorrect type.
• Dispose of used battery according to the instructions.
The charger
• Use only the charger supplied with your ROG Phone.
• Never pull the charger cord to disconnect it from the power socket. Pull the charger itself.
Caution
Your ROG Phone is a high quality piece of equipment. Before operating, read all instructions and
cautionary markings on the (1) AC Adapter.
• Do not use the ROG Phone in an extreme environment where high temperature or high
humidity exists. The ROG Phone performs optimally in an ambient temperature between 0 °C (32
°F) and 35 °C (95 °F).
• Do not disassemble the ROG Phone or its accessories. If service or repair is required, return the
unit to an authorized service center. If the unit is disassembled, a risk of electric shock or re may
result.
• Do not short-circuit the battery terminals with metal items.
Operator access with a tool
If a TOOL is necessary to gain access to an OPERATOR ACCESS AREA, either all other compartments
within that area containing a hazard shall be inaccessible to the OPERATOR by the use of the same
TOOL, or such compartments shall be marked to discourage OPERATOR access.
77
Page 78
EU Radio Equipment Directive Compliance
Simplied EU Declaration of Conformity
Hereby, ASUSTek Computer Inc. declares that the radio equipment ASUS_I005D / ASUS_I005DC is
in compliance with Directive 2014/53/EU. Full text of EU declaration of conformity is available at
https://www.asus.com/support/. (Search for ZS673KS)
RF Output Table
Items Maximum Radio-Frequency Output Power Table
Bluetooth
WLAN
2.4GHz
WLAN
5GHz
NFC 13.553-13.567 MHz -16.84 (dBuA/m@ 10m)
GSM
WCDMA
LTE
Bluetooth BR/EDR (2402~2480 MHz) 17 (dBm)
Bluetooth -LE (2402~2480 MHz) 8 (dBm)
2.4GHz 802.11b (2412~2472 MHz) 19 (dBm)
2.4GHz 802.11g (2412~2472 MHz) 20.5 (dBm)
2.4GHz 802.11n HT20 (2412~2472 MHz) 20.5 (dBm)
2.4GHz 802.11ax HE20 (2412~2472 MHz) 20.5 (dBm)
2.4GHz 802.11n HT40 (2422~2462 MHz) 20 (dBm)
2.4GHz 802.11ax HE40 (2422~2462 MHz) 20.5 (dBm)
5GHz 802.11a (5180~5320; 5500~5700 MHz) 19 (dBm)
5GHz 802.11n HT20 (5180~5320; 5500~5700 MHz) 18.5 (dBm)
5GHz 802.11 n HT40 (5190~5310; 5510~5670 MHz) 20 (dBm)
5GHz 802.11ac-VHT20 (5180~5320; 5500~5700 MHz) 18.5 (dBm)
5GHz 802.11ac-VHT40 (5190~5310; 5510~5670 MHz) 20 (dBm)
5GHz 802.11ac VHT80 (5210~5290; 5530~5610 MHz) 20 (dBm)
5GHz 802.11ax-HE20 (5180~5320; 5500~5700 MHz) 19.5 (dBm)
5GHz 802.11ax-HE40 (5190~5310; 5510~5670 MHz) 20 (dBm)
5GHz 802.11ax-HE80 (5210~5290; 5530~5610 MHz) 20 (dBm)
5GHz 802.11ax-HE160 (5250; 5570 MHz) 17 (dBm)
GSM 900 Burst (880~915; 925~960 MHz) 33.5 (dBm)
GSM 1800 Burst (1710~1785; 1805~1880 MHz) 31.5 (dBm)
WCDMA Band I (1920~1980; 2110~2170 MHz) 25.5 (dBm)
WCDMA Band III (1747.4~1782.4; 1805~1880 MHz) 25.5 (dBm)
WCDMA Band V (824~849; 869~894 MHz) 25.5 (dBm)
WCDMA Band VIII (880~915; 925~960 MHz) 25.5 (dBm)
LTE Band 1 (1920~1980; 2110~2170 MHz) 25.5 (dBm)
LTE Band 3 (1710~1785; 1805~1880 MHz) 25.5 (dBm)
LTE Band 5 (824~849; 869~894 MHz) 25.5 (dBm)
LTE Band 7 (2500~2570; 2620~2690 MHz) 25.5 (dBm)
LTE Band 8 (880~915; 925~960 MHz) 25.5 (dBm)
LTE Band 20 (832~ 862; 791~821 MHz) 25.5 (dBm)
LTE Band 28 (703~748; 758~803 MHz) 25.5 (dBm)
LTE Band 34 (2010~2025 MHz) 25.5 (dBm)
LTE Band 38 (2570~2620 MHz) 25.5 (dBm)
LTE Band 40 (2300~2400 MHz) 24.5 (dBm)
LTE Band 41 (2496~2690 MHz) 25.5 (dBm)
LTE Band 42 (3400~3600 MHz) 25.5 (dBm)
78
Page 79
Items Maximum Radio-Frequency Output Power Table
NR n1 (1920~1980; 2110~2170 MHz) 24.5 (dBm)
NR n3 (1710~1785; 1805~1880 MHz) 24.5 (dBm)
NR n5 (824~849; 869~894 MHz) 24.5 (dBm)
NR n7 (2500~2570; 2620~2690 MHz) 24.5 (dBm)
NR n8 (880~915; 925~960 MHz) 24.5 (dBm)
NR n20 (832~862; 791~821 MHz) 24.5 (dBm)
5G
* ROG Phone 5G NR Sub-6/4G LTE band compatibility varies by region, please check compatibility
with your local carriers.
NOTE: This RF output power table is for EU member states, the EEA States, the EFTA States and Turkey
only. The frequency range and the RF output power may dier from other non-EU countries.
The Wi-Fi operating in the band 5150-5350MHz shall be restricted to indoor use for countries listed
in the table below:
NR n28 (703~748; 758~803 MHz) 24.5 (dBm)
NR n38 (2570~2620 MHz) 24.5 (dBm)
NR n40 (2300~2400 MHz) 24.5 (dBm)
NR n41 (2496~2690 MHz) 24 (dBm)
NR n77 (3300~4200 MHz) 24 (dBm)
NR n78 (3300~3800 MHz) 24 (dBm)
NR n79 (4400~5000 MHz) 24.5 (dBm)
AT BE BG CZ DK EE FR
DE IS IE IT EL ES CY
LV LI LT LU HU MT NL
NO PL PT RO SI SK TR
FI SE CH UK HR
RF Exposure Information
This ASUS product has been tested and meets applicable European SAR limits. The SAR limit is 2.0
W/kg in countries that set the limit averaged over 10 grams of tissue. The specic maximum SAR
values for this device are as follows:
• Head: 1.331 W/Kg @10g
• Body: 1.561 W/Kg @10g
When carrying this device or using it while worn on the body, either use an approved accessory
such as a holster or otherwise maintain a distance of 5 mm from the body to ensure compliance
with RF exposure requirements.
CE Marking
Low Blue Light Certication
ROG Phone reduces the blue light emitted by its screen, providing you with a
more comfortable viewing experience.
By default, the screen’s brightness is set to Maximum and the phone is in
compliance with TÜV Rheinland Low Blue Light certication.
79
Page 80
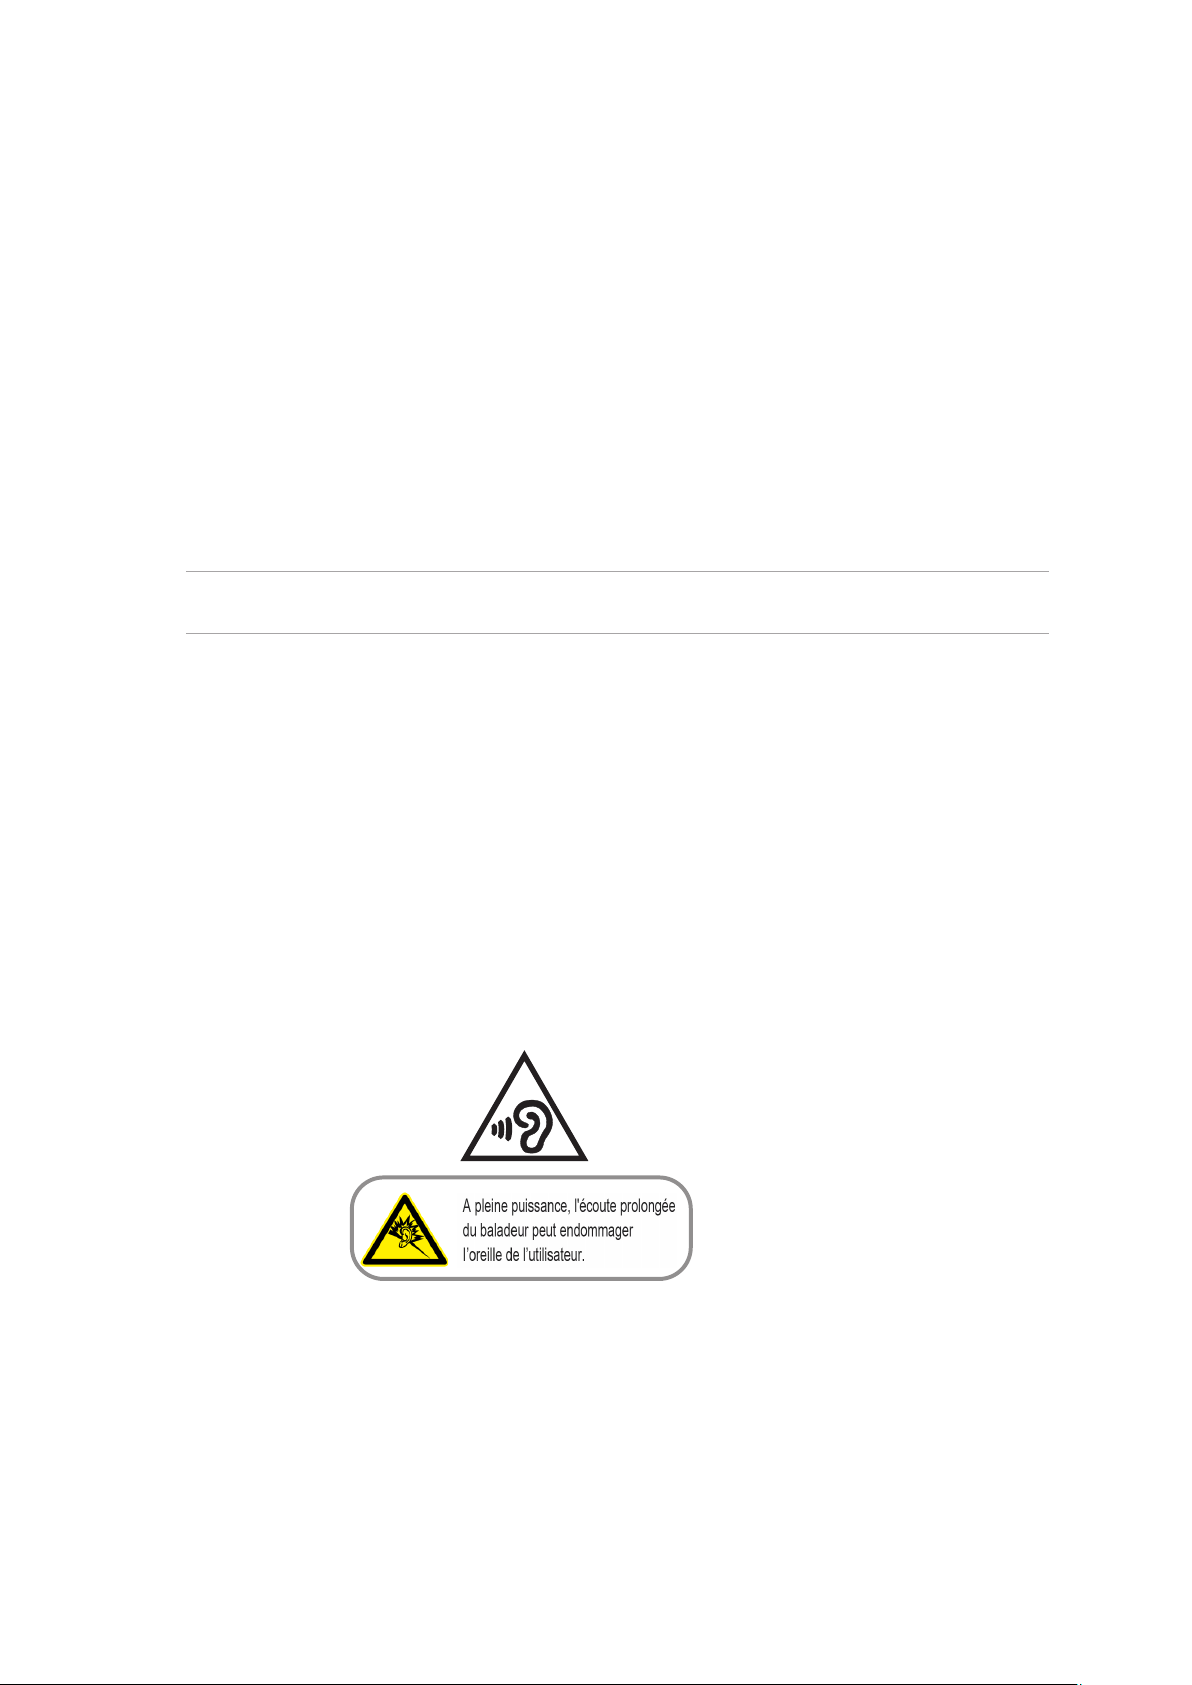
Alleviation of Eye Strain
To alleviate eye strain:
• Take frequent breaks when using your ROG Phone (at least one 10-minute break every half an
hour).
• Regularly focus on distant objects to relax your eyes.
• Do eye exercises often including:
(1) Look up and down without moving your head
(2) Move your eyes from left to right without moving your head
(3) Slowly roll your eyes
(4) Move your eyes diagonally
WARNING: Keep your ROG Phone's screen away from infants and toddlers younger than 2 years.
Children 2 years old and above should get no more than an hour of screen time each day.
Using GPS (Global Positioning System) on your ROG Phone
To use the GPS positioning feature on your ROG Phone:
Ensure that your device is connected to the Internet before using Google Map or any GPS-enabled
apps.
For rst-time use of a GPS-enabled app on your device, ensure that you are outdoors to get the
best positioning data.
When using a GPS-enabled app on your device inside a vehicle, the metallic component of the car
window and other electronic devices might aect the GPS performance.
Prevention of Hearing Loss
To prevent possible hearing damage, do not listen at high volume levels for long periods.
For France, headphones/earphones for this device are compliant with the sound pressure level
requirement laid down in the applicable EN 50332-1:2013 and/or EN50332-2:2013 standard
required by French Article L.5232-1.
General Usage (typical body-worn) (for Japan)
This device ( (front & rear side) should be operated under a separation distance of 15 mm from the
human body.
* The other four sides are not in close proximity to the human body at the general use as described
above.
80
Page 81
5GHz band (W52,W53): Indoor use only (Except for the 5.2GHz transmission with High Power Data
Communication System Base Station or Relay Station).
5.2/5.3GHz 屋内使用限定 (高出力システムと通信する場合を除く).
電波障害自主規制について
この装置は、情報処理装置等電波障害自主規制協議会(VCCI)の基準に基づく クラス B 情報技術
装置です。この装置は、家庭環境で使用することを目的として いますが、この装置がラジオやテレ
ビジョン受信機に近接して使用されると、 受信障害を引き起こすことがあります。 取り扱い説明
書に 従って正しい 取り扱 いをしてください。
この装置は、クラスB情報技術装置です。この装置は、家庭環境で使用することを目的としていま
すが、この装置がラジオやテレビジョン受信機に近接して使用されると、受信障害を引き起こすこ
とが ありま す。
取扱説明書に従って正しい取り扱いをして下さい。VCCI-B
Coating notice
IMPORTANT! To provide electrical insulation and maintain electrical safety, a coating is applied to
insulate the device except on the areas where the I/O ports are located.
Green ASUS notice
ASUS is devoted to creating environment-friendly products and packaging to safeguard consumers’
health while minimizing the impact on the environment. The reduction of the number of the
manual pages complies with the reduction of carbon emission.
For the detailed user manual and related information, refer to the user manual included in the ROG
Phone or visit the ASUS Support Site at https://www.asus.com/support.
ASUS Recycling/Takeback Services
ASUS recycling and takeback programs come from our commitment to the highest standards for
protecting our environment. We believe in providing solutions for you to be able to responsibly
recycle our products, batteries, other components as well as the packaging materials. Please go to
http://csr.asus.com/english/Takeback.htm for detailed recycling information in dierent regions.
ASUSTEK (UK) LIMITED.
1st Floor, Sackville House, 143-149 Fenchurch Street, London, EC3M 6BL
England
United Kingdom
Model name: ASUS_I005D / ASUS_I005DC (ZS673KS)
Manufacturer: ASUSTeK Computer Inc.
Address: 1F., No.15, Lide RD., Beitou Dist., Taipei City 112,
Taiwan
Authorised representative in Europe: ASUS Computer GmbH
Address: HARKORT STR. 21-23, 40880 RATINGEN, GERMANY
81
Page 82

Index
A
Advanced camera features 55
AeroActive Cooler 9
ASUS Phone 8
- charging 13
- nano SIM card 11
- parts and features 8
- turning on/o 15
- launching 65
- stopwatch 66
- timer 67
- world clock 66
Contacts 46
- adding 47
- adding an extension number 47
- contacts settings 46
- customizing your contact’s prole 48
- see also Social networking 49
- setting up your prole 46
D
B
Backup and reset 72
Beauty
- see also Advanced camera features 55
Block list 49
- blocking 49
- unblocking 49
Bluetooth 59
- enabling 59
- pairing 60
- unpairing 60
C
Calculator 68
Call logs 43
- redial your last-called number 44
- saving calls to Contacts 43
Calls 41
- answering 43
- calling from Contacts 42
- calling your favorite contacts 43
- dialing a phone number 41
- launching the Phone app 41
- other call options 44
- receiving 43
- see Call logs 43
- see Extension number 41
- see Smart Dialing 42
Camera 53
- camera home screen 54
- launching 53
- see Advanced camera features 55
Chrome 32
- bookmarking pages 33
- clearing the browser data 33
- launching 32
- sharing pages 33
Clock 65
- alarm clock 65
Data Transfer 38
Date and time 25
- setting up 25
Dual SIM feature 39
- assigning 40
- renaming 39
- SIM card for data service 40
- SIM card for voice calls 40
E
Extension number 41
- auto dialing 42
- conrmation prompt 41
- dialing 41
F
Face Unlock 29
Favorite contacts 43
- calling 43
- marking 48
File Manager 37
- accessing the internal storage 37
Fingerprint 27
- setting up ngerprint ID from Settings 28
- starting your ASUS phone for the rst time
27
- locate nger print scanner 27
- protect your phone 27
G
Gallery 56
- deleting les 57
- editing images 56
- sharing les 56
- viewing the photo location 56
Gmail 34
Google Calendar 35
- creating events 35
- creating reminders 36
Page 83

- editing or removing events 35
- editing or removing reminders 36
H
Headset 51
- connecting 51
Home screen 20
- personalizing 23
- see also Wallpapers 24
L
Lock screen 26
- customizing 26
- see also Securing your ASUS phone 73
M
Managing your call logs 43
- redialing your last-called number 44
- saving to Contacts 43
Messages 50
- replying to messages 50
- sending messages 50
Mobile Manager 71
Mobile network 58
- enabling 58
N
Nano SIM cards 39
- assigning a preferred nano SIM card 40
- renaming 39
- SMS messages 40
Night 55
P
Sound Recorder 69
- launching Sound Recorder 69
- pausing a recording 70
- recording List 70
Storage 72
System 72
- updating 72
System notications 22
T
Tethering 61
- Wi-Fi Hotspot 61
Time lapse
- see also Advanced camera features 55
Touchscreen 17
- launching apps 17
- moving or deleting items 17
- moving through pages or screens 18
- zooming in 18
- zooming out 19
W
Wallpapers 24
Weather 63
- launching 63
- weather home screen 64
Wi-Fi 58
- connecting 59
- disabling 59
- enabling 58
Y
YT Music 52
- Setting up your YT Music 52
Panorama
- see also Advanced camera features 55
Q
Quick settings 21
- adding features 21
- removing features 21
R
Ringtone 25
- setting up 25
- sound 25
S
Security 73
Smart Dialing 42
Social networking 49
Z
ZenUI 7
 Loading...