

Page 1
®
PEB-G21
PCI Express x1
Network Interface Card
User Guide
E1752
First Edition
October 2004
Page 2

No part of this documentation, including the products and software described in it, may be reproduced, transmitted,
transcribed, stored in a retrieval system, or translated into any language in any form or by any means, except
documentation kept by the purchaser for backup purposes, without the express written permission of ASUSTeK
COMPUTER INC. (“ASUS”).
ASUS PROVIDES THIS DOCUMENTATION “AS IS” WITHOUT WARRANTY OF ANY KIND, EITHER EXPRESS OR IMPLIED,
INCLUDING BUT NOT LIMITED TO THE IMPLIED WARRANTIES OR CONDITIONS OF MERCHANTABILITY OR FITNESS FOR
A PARTICULAR PURPOSE. IN NO EVENT SHALL ASUS, ITS DIRECTORS, OFFICERS, EMPLOYEES OR AGENTS BE LIABLE
FOR ANY INDIRECT, SPECIAL, INCIDENTAL, OR CONSEQUENTIAL DAMAGES (INCLUDING DAMAGES FOR LOSS OF PROFITS,
LOSS OF BUSINESS, LOSS OF USE OR DATA, INTERRUPTION OF BUSINESS AND THE LIKE), EVEN IF ASUS HAS BEEN
ADVISED OF THE POSSIBILITY OF SUCH DAMAGES ARISING FROM ANY DEFECT OR ERROR IN THIS DOCUMENTATION
OR PRODUCT.
Product warranty or service will not be extended if: (1) the product is repaired, modified or altered, unless such
repair, modification of alteration is authorized in writing by ASUS; or (2) the serial number of the product is defaced
or missing.
Products and corporate names appearing in this documentation may or may not be registered trademarks or copyrights
of their respective companies, and are used only for identification or explanation and to the owners’ benefit, without
intent to infringe.
For documentation updates, visit the ASUS website at www.asus.com.tw.
The specifications and information contained in this documentation are furnished for informational use only, and are
subject to change at any time without notice, and should not be construed as a commitment by ASUS. ASUS
assumes no responsibility or liability for any errors or inaccuracies that may appear in this documentation, including
the products and the software described in it.
Copyright © 2004 ASUSTeK COMPUTER INC. All Rights Reserved.Copyright © 2004 ASUSTeK COMPUTER INC. All Rights Reserved.
Copyright © 2004 ASUSTeK COMPUTER INC. All Rights Reserved.
Copyright © 2004 ASUSTeK COMPUTER INC. All Rights Reserved.Copyright © 2004 ASUSTeK COMPUTER INC. All Rights Reserved.
ASUS PEB-G21 User GuideASUS PEB-G21 User Guide
ASUS PEB-G21 User Guide
2
ASUS PEB-G21 User GuideASUS PEB-G21 User Guide
Page 3

ContentsContents
Contents
ContentsContents
Introduction ........................................................................................ 5
Package contents ............................................................................... 5
Features .............................................................................................. 8
LED descriptions ................................................................................. 9
System requirements ........................................................................ 10
Installing the network card ............................................................... 11
Connecting the network cable .......................................................... 12
Running the installation program ...................................................... 13
®
Windows
Windows
Server 2003 Advanced Server Driver Software .. 13
®
2000 Driver Software ......................................... 17
Windows NT ® Driver Software............................................. 20
Installing Linux Driver Software ............................................. 23
Novell NetWare Server 4.2/5.x/6.0 Driver Software ............ 26
Novell NetWare Server 6.5 Driver Software .......................... 30
ASUS PEB-G21 User GuideASUS PEB-G21 User Guide
ASUS PEB-G21 User Guide
ASUS PEB-G21 User GuideASUS PEB-G21 User Guide
3
Page 4

Installing Solaris Driver Software ........................................... 32
SCO OpenServer 5.0.7 .......................................................... 35
UnixWare/OpenUnix 8 ........................................................... 38
ASUS Contact Information ................................................................ 42
ASUS PEB-G21 User GuideASUS PEB-G21 User Guide
ASUS PEB-G21 User Guide
4
ASUS PEB-G21 User GuideASUS PEB-G21 User Guide
Page 5

Introduction
Thank you for buying the ASUS PEB-G21 PCI Express x1 Network Interface Card!
This user guide tells you how to install and configure the card. It is assumed that you
have adequate knowledge on PCs and some familiarity with Ethernet networks.
Package contents
Check the following items if present in your package. If you discover damaged or
missing items, contact your retailer.
1 x ASUS PEB-G21 PCI Express x1 Network Interface Card
1 x Support CD
1 x User Guide
ASUS PEB-G21 User GuideASUS PEB-G21 User Guide
ASUS PEB-G21 User Guide
ASUS PEB-G21 User GuideASUS PEB-G21 User Guide
5
Page 6
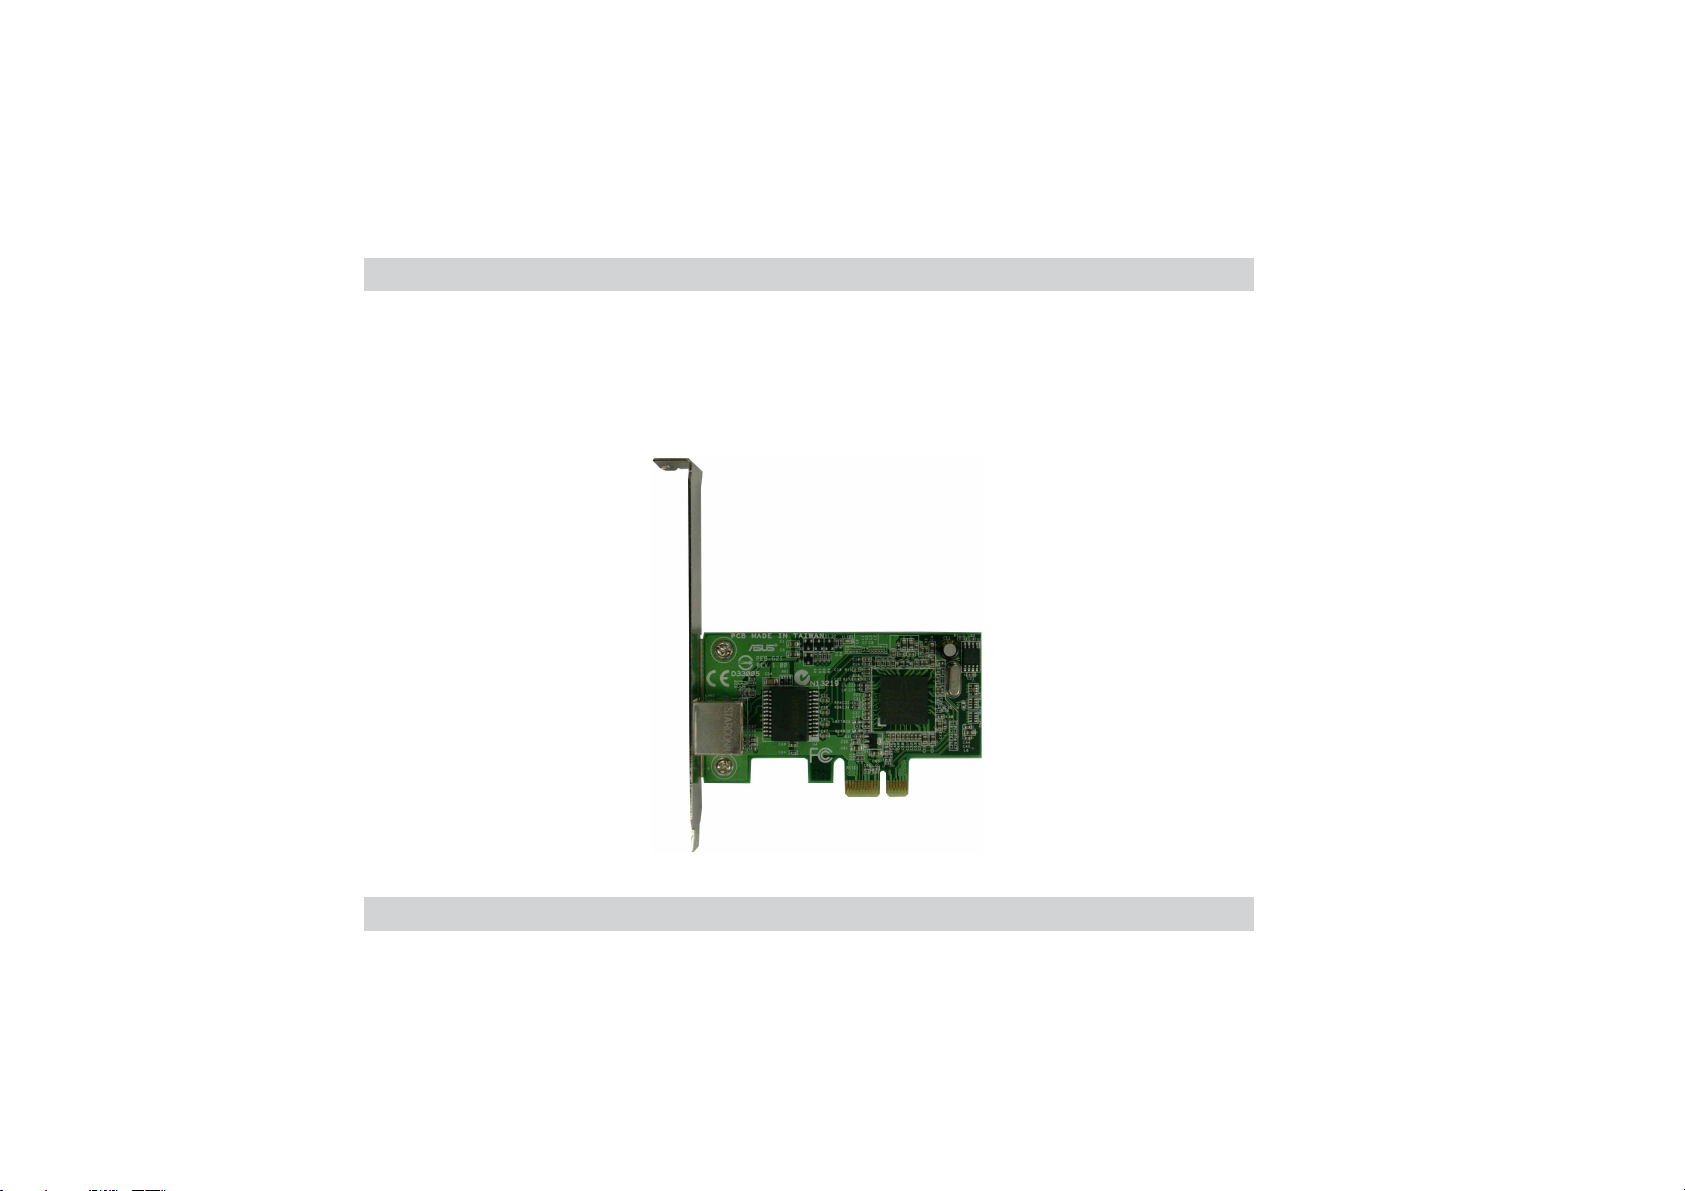
Models
The ASUS PEB-G21 network interface card comes with a standard bracket for regular
PCs.
ASUS PEB-G21 User GuideASUS PEB-G21 User Guide
ASUS PEB-G21 User Guide
6
ASUS PEB-G21 User GuideASUS PEB-G21 User Guide
Page 7
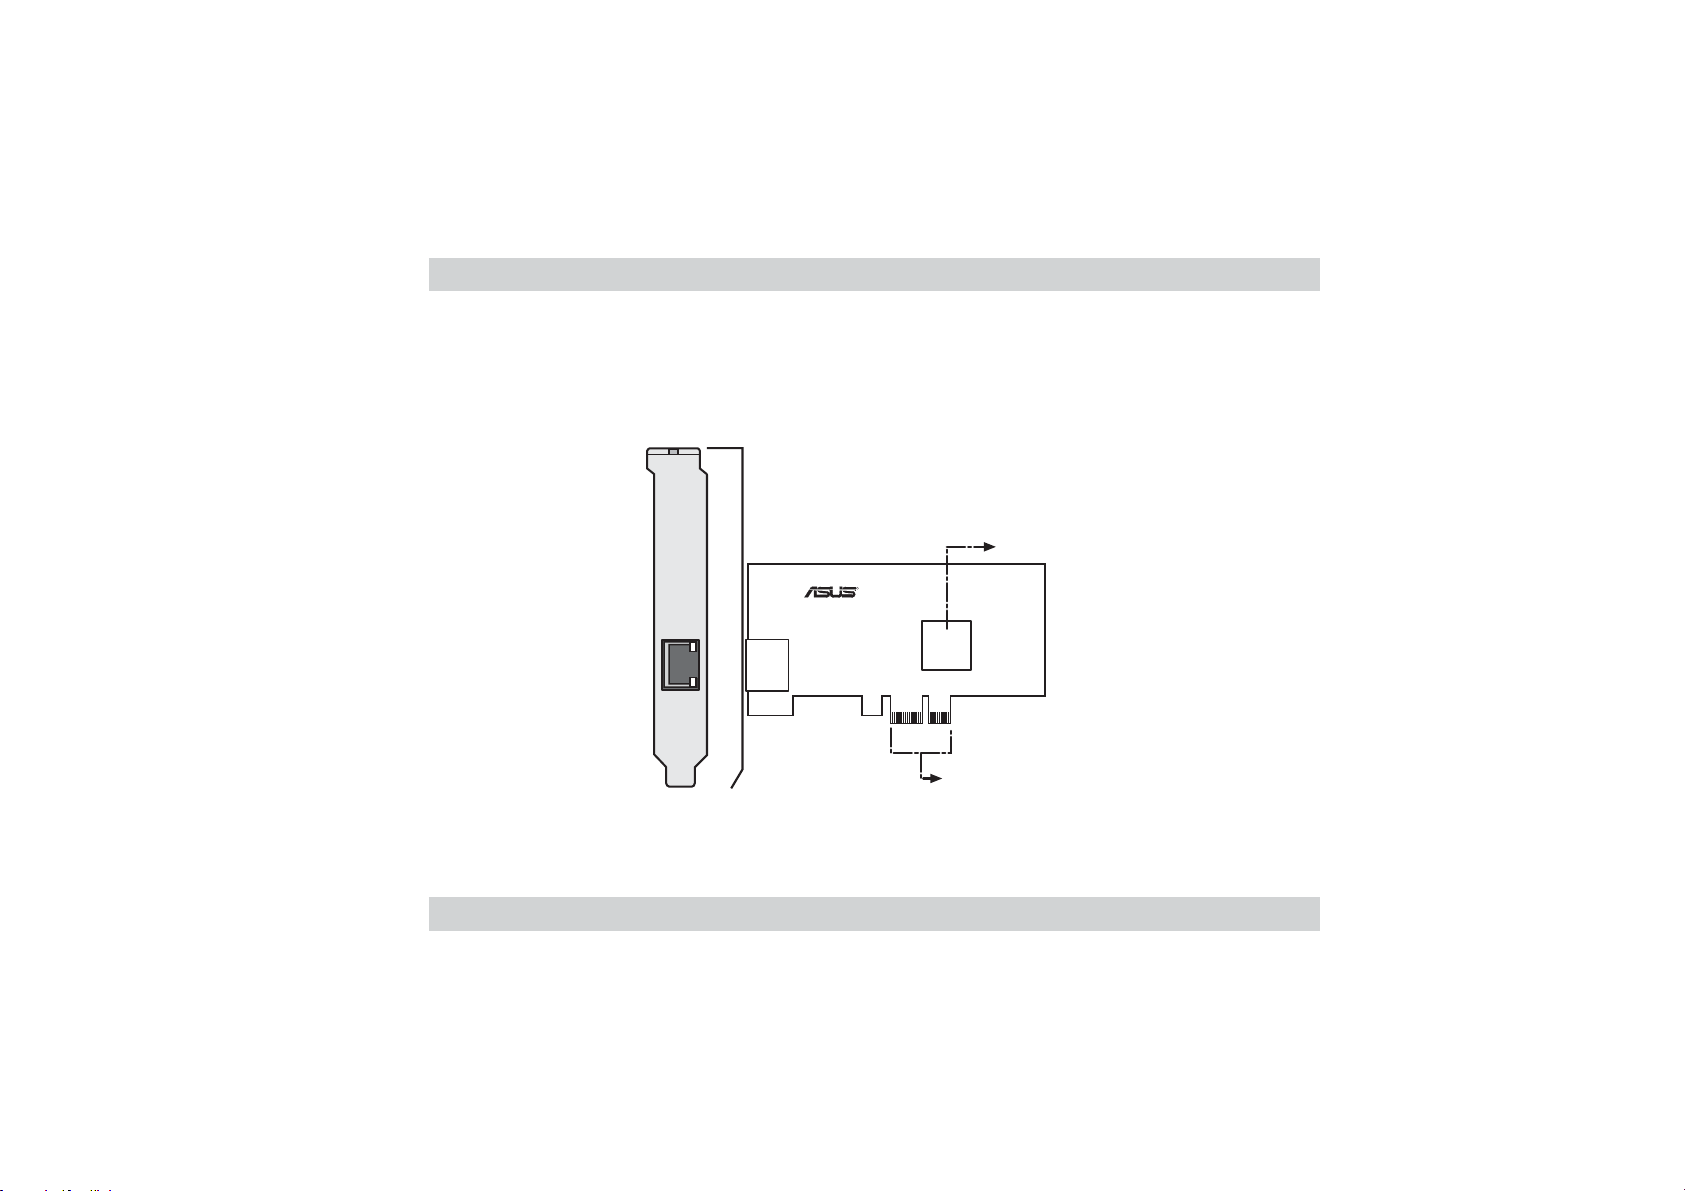
Layout
ACT/LNK
10=OFF
100=ORG
1000=GRN
PEB-G21
LAN controller
R
BROADCOM
BCM5721
PCI-Express interface
ASUS PEB-G21 User GuideASUS PEB-G21 User Guide
ASUS PEB-G21 User Guide
ASUS PEB-G21 User GuideASUS PEB-G21 User Guide
7
Page 8

Features
PCI-Express x1 InterfacePCI-Express x1 Interface
PCI-Express x1 Interface
PCI-Express x1 InterfacePCI-Express x1 Interface
• PCI Express 1.0a host interface compliant
• x1 PCI Express lane
• Supports PXE, RPL, ASF 2.0
• ACPI and Wake-on-LAN support
Network InterfaceNetwork Interface
Network Interface
Network InterfaceNetwork Interface
• Broadcom® BCM5721 PCI Express Gigabit Ethernet controller
• 10/100/1000 BASE-T controller with integrated transceiver
• RJ-45 LAN port
ASUS PEB-G21 User GuideASUS PEB-G21 User Guide
ASUS PEB-G21 User Guide
8
ASUS PEB-G21 User GuideASUS PEB-G21 User Guide
Page 9
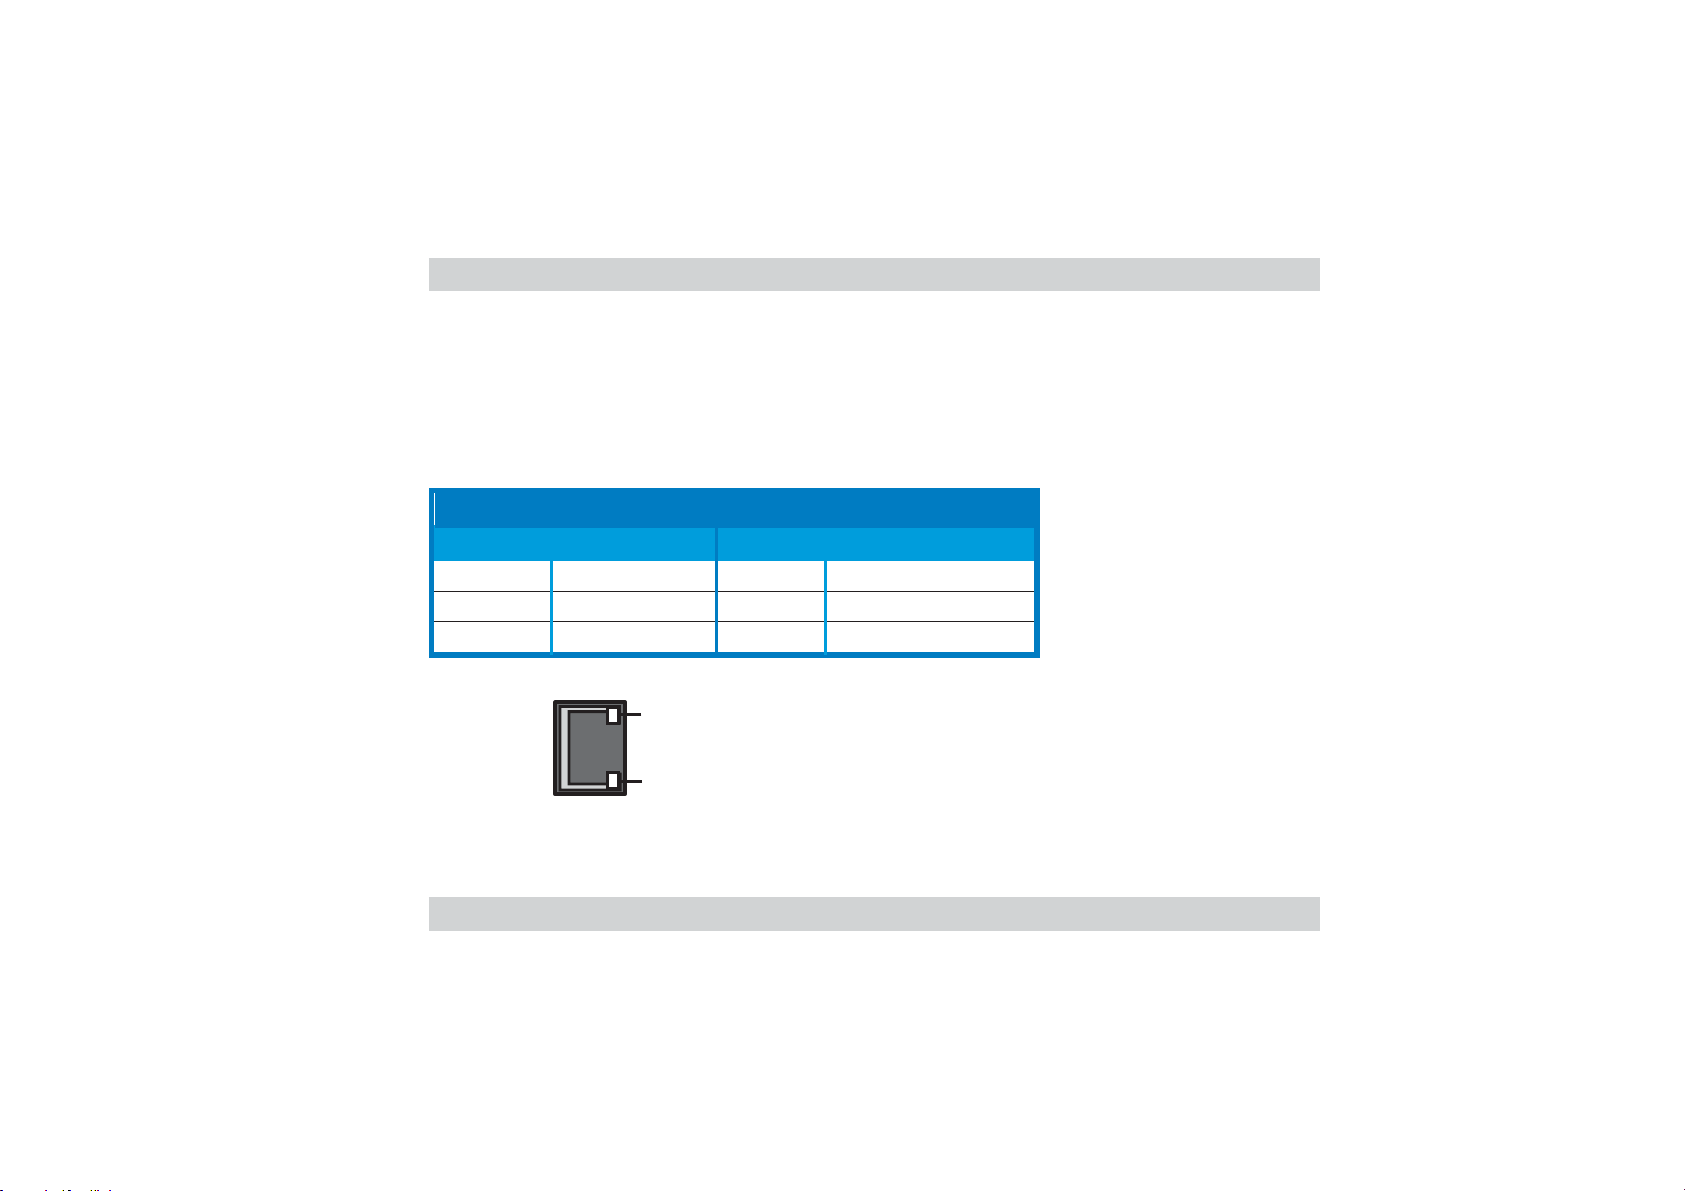
LED descriptions
The RJ-45 LAN port allows Gigabit connection to a Local Area Network (LAN). Refer
to the table below for the LAN port LED indications.
LAN port LED indicationsLAN port LED indications
LAN port LED indications
LAN port LED indicationsLAN port LED indications
ACT/LINK LED ACT/LINK LED
ACT/LINK LED
ACT/LINK LED ACT/LINK LED
StatusStatus
Status
StatusStatus
OFF No link OFF 10 Mbps connection
GREEN Linked ORANGE 100 Mbps connection
BLINKING Data activity GREEN 1 Gbps connection
ASUS PEB-G21 User GuideASUS PEB-G21 User Guide
ASUS PEB-G21 User Guide
ASUS PEB-G21 User GuideASUS PEB-G21 User Guide
DescriptionDescription
Description
DescriptionDescription
ACT/LINK
LED
SPEED
LED
RJ-45 portRJ-45 port
RJ-45 port
RJ-45 portRJ-45 port
SPEED LED SPEED LED
SPEED LED
SPEED LED SPEED LED
StatusStatus
Status
StatusStatus
DescriptionDescription
Description
DescriptionDescription
9
Page 10

System requirements
Your PC or server should meet the following system requirements before installing
the ASUS PEB-G21 network interface card:
• PCI Express x1, x4, x8 or x16 slot (PCI Express 1.0a host interface)
• optical drive
• at least 10 MB free hard disk space
• supported operating system (any of the following)
- Windows Server 2000/2003, Windows 2003 64-bit
- Red Hat Enterprise Linux ES 3.0 64-bit, Red Hat Enterprise Linux AS 3.0,
Red Hat 9.0
- SuSE Linux 9.1, SuSE Linux Enterprise 8.0
- NetWare 6.5
- Solaris 9.0
- UnixWare 7.1.3
- Open Server 5.0.7
10
ASUS PEB-G21 User GuideASUS PEB-G21 User Guide
ASUS PEB-G21 User Guide
ASUS PEB-G21 User GuideASUS PEB-G21 User Guide
Page 11
Installing the network card
Follow these steps to install the card into your PC.
CAUTION!CAUTION!
CAUTION! Before handling the network card, touch a bare metal portion of your
CAUTION!CAUTION!
PC to discharge the static electricity from your body. Wear a wrist strap grounded
to the PC chassis when handling the card.
1. Unplug the power cord from the electrical socket.
2. Remove the PC cover.
3. Locate an empty, PCI Express x1 slot and remove its slot cover. Save the
screw for later use.
IMPORTANT! IMPORTANT!
IMPORTANT! Do not install the network card in a shared PCI Express x1 slot.
IMPORTANT! IMPORTANT!
Check your PC documentation to ensure that you install the card into the correct
slot.
4. Carefully insert the card into the PCI Express x1 slot.
5. Secure the card with the screw that you removed earlier.
6. Replace the PC cover and plug in the power cord.
ASUS PEB-G21 User GuideASUS PEB-G21 User Guide
ASUS PEB-G21 User Guide
ASUS PEB-G21 User GuideASUS PEB-G21 User Guide
11
Page 12

Connecting the network cable
Follow these steps to connect the card to the network.
The RJ-45 port on the network card provides a 10, 100, or 1000 Mbps connection,
depending on the speed of the connected hub or switch.
1. Plug the RJ-45 connector of the twisted-pair network cable into the RJ-45 port
on the card backplate.
2. Connect the other end of the network cable to an active network port.
3. Turn on the PC.
12
ASUS PEB-G21 User GuideASUS PEB-G21 User Guide
ASUS PEB-G21 User Guide
ASUS PEB-G21 User GuideASUS PEB-G21 User Guide
Page 13

Running the installation program
The support CD that came with the PCI Express card package contains the drivers
that you have to install to avail all the features of this card.
®®
®
WindowsWindows
Windows
WindowsWindows
Installing the Driver SoftwareInstalling the Driver Software
Installing the Driver Software
Installing the Driver SoftwareInstalling the Driver Software
When the Windows Server 2003 system first boots up after installing a new
hardware device, such as a ASUS PEB-G21 PCI Express x1 Network Interface Card,
the system automatically detects the new hardware and prompts you to install the
driver software for that device.
®®
Server 2003 Advanced Server Driver SoftwareServer 2003 Advanced Server Driver Software
Server 2003 Advanced Server Driver Software
Server 2003 Advanced Server Driver SoftwareServer 2003 Advanced Server Driver Software
A network device driver must be installed before the ASUS PEB-G21 PCI Express x1
Network Interface Card can be used with your Windows Server 2003 system.
ASUS PEB-G21 User GuideASUS PEB-G21 User Guide
ASUS PEB-G21 User Guide
ASUS PEB-G21 User GuideASUS PEB-G21 User Guide
13
Page 14

Using the Driver InstallerUsing the Driver Installer
Using the Driver Installer
Using the Driver InstallerUsing the Driver Installer
To install the adapter software for Windows Server 2003, do the following
Before beginning this procedure, verify that the Windows Server 2003 system has
been upgraded to the latest version with the latest service pack applied. The
following instructions are based on the latest beta versions of Server 2003.
1. Start Windows Server 2003 and log in. Note that you must have Administrator
privileges to install the driver software.
When you boot up the Windows Server 2003 system after installing the adapter
card, a series of Found New Hardware windows are displayed.
2. Place the Support CD into the optical drive. The CD automatically displays the
Drivers Drivers
Drivers menu if Autorun is enabled in your computer.
Drivers Drivers
If Autorun is not enabled in your computer, browse the contents of the
Support CD to locate the file
ASSETUP.EXEASSETUP.EXE
ASSETUP.EXE file to run the installation program.
ASSETUP.EXEASSETUP.EXE
ASSETUP.EXEASSETUP.EXE
ASSETUP.EXE in the BIN folder. Double-click the
ASSETUP.EXEASSETUP.EXE
OR
14
ASUS PEB-G21 User GuideASUS PEB-G21 User Guide
ASUS PEB-G21 User Guide
ASUS PEB-G21 User GuideASUS PEB-G21 User Guide
Page 15

From the Windows
command line,
(Assuming that
The following screen appears.
StartStart
Start menu, click
StartStart
d:\BIN\ASSETUP.EXEd:\BIN\ASSETUP.EXE
d:\BIN\ASSETUP.EXE then press the Enter key.
d:\BIN\ASSETUP.EXEd:\BIN\ASSETUP.EXE
d:\d:\
d:\ is your optical drive)
d:\d:\
Run Run
Run and type the following on the
Run Run
3. From the
ASUS PEB-G21 User GuideASUS PEB-G21 User Guide
ASUS PEB-G21 User Guide
ASUS PEB-G21 User GuideASUS PEB-G21 User Guide
Drivers Drivers
Drivers tab, click the
Drivers Drivers
PEB-G21 LAN cardPEB-G21 LAN card
PEB-G21 LAN card item.
PEB-G21 LAN cardPEB-G21 LAN card
15
Page 16

The following describes the items on the menu:
PEB-G21 LAN Card
Installs the PEB-G21LAN card driver.
PEB-G21 LAN Card Driver Disk Image
Allows you to create a driver disk for the PEB-G21 LAN card.
Broadcom Software Utility
Installs the Broadcom® software utility.
4. Follow the succeeding screen instructions.
16
ASUS PEB-G21 User GuideASUS PEB-G21 User Guide
ASUS PEB-G21 User Guide
ASUS PEB-G21 User GuideASUS PEB-G21 User Guide
Page 17

®®
®
WindowsWindows
Windows
WindowsWindows
Installing the Driver SoftwareInstalling the Driver Software
Installing the Driver Software
Installing the Driver SoftwareInstalling the Driver Software
When the Windows 2000 system first boots up after installing a new hardware
device, such as a Gigabit Ethernet Adapter, the system automatically detects the
new hardware and prompts you to install the driver software for that device.
A network device driver must be installed before the Gigabit Ethernet Adapter can
be used with your Windows 2000 system.
Installing the Adapter SoftwareInstalling the Adapter Software
Installing the Adapter Software
Installing the Adapter SoftwareInstalling the Adapter Software
To install the adapter software for Windows 2000:
®®
2000 Driver Software2000 Driver Software
2000 Driver Software
2000 Driver Software2000 Driver Software
The ASUS PEB-G21 PCI Express x1 Network Interface Card must be physically
installed in your system prior to installing the driver software. See Installing the
Hardware for details.
Before beginning this procedure, verify that the Windows 2000 system has been
upgraded to the latest version with the latest service pack applied.
ASUS PEB-G21 User GuideASUS PEB-G21 User Guide
ASUS PEB-G21 User Guide
ASUS PEB-G21 User GuideASUS PEB-G21 User Guide
17
Page 18

When updating the adapter software on existing ASUS devices, the Advanced
Property settings may not be updated unless the existing ASUS device is removed
by following the instructions in the Removing the Driver Software section. You must
then perform a scan for hardware changes in the device manager, followed by
reinstalling the ASUS device with the current adapter software as described in the
Installing the Driver Software section. Prior to uninstalling the Broadcom device,
ensure to capture all Advanced Property settings because the properties will be lost.
1. Start your Windows 2000 system and log in. You must have Administrator
privileges to install the driver software.
When you boot up the Windows 2000 system after installing the adapter card,
a series of Found New Hardware Wizard windows are displayed.
2. In the Install Hardware Device Drivers window, click Search for a suitable driver
for my device (recommended), then click Next.
3. In the Locate Driver Files window, select the applicable search location check
boxes, then click Next.
4. When prompted, insert the media to be searched into your CD-ROM drive, type
the path to the driver, and select OK.
18
ASUS PEB-G21 User GuideASUS PEB-G21 User Guide
ASUS PEB-G21 User Guide
ASUS PEB-G21 User GuideASUS PEB-G21 User Guide
Page 19

Example: e:\
Where "e" is the designation of the CD-ROM drive on your system.
5. In the Driver Files Search Results window, verify that the correct path to the
driver software is shown, then click Next.
If the Insert Disk screen appears, do not insert the Windows 2000 disk. Some early
versions of Windows 2000 may display a spurious message prompting you to
insert the Windows 2000 disk. If this occurs, leave the software and drivers
CD-ROM in the drive and click OK. If asked to specify the location of the
Windows 2000 CD-ROM instead, click Browse (do not use the text field) and
locate the path to the ASUS PEB-G21 PCI Express x1 Network Interface Card
drivers.
ASUS PEB-G21 User GuideASUS PEB-G21 User Guide
ASUS PEB-G21 User Guide
ASUS PEB-G21 User GuideASUS PEB-G21 User Guide
19
Page 20

®®
®
Windows NTWindows NT
Windows NT
Windows NTWindows NT
Installing the Driver SoftwareInstalling the Driver Software
Installing the Driver Software
Installing the Driver SoftwareInstalling the Driver Software
• The ASUS PEB-G21 PCI Express x1 Network Interface Card must be physically
•A network device driver must be installed before the Gigabit Ethernet Adapter
• We recommend using Internet Explorer 5.0 to view help files.
• Hot Plug installation is not supported on dual port devices with Windows NT4.
• We recommend using Internet Explorer 5.0 to view help files.
To install the adapter software for Windows NT:
1. Verify that the Windows NT system is upgraded with Service Pack 4 or later.
2. Start your Windows NT system and log in. You must have System
Administrator privileges to install the driver software.
®®
Driver Software Driver Software
Driver Software
Driver Software Driver Software
installed in your system prior to installing the driver software. See "Installing
the Hardware" for details.
can be used with your Windows NT system. BACS2 Help files require Internet
Explorer 4.0 or later to work properly.
20
ASUS PEB-G21 User GuideASUS PEB-G21 User Guide
ASUS PEB-G21 User Guide
ASUS PEB-G21 User GuideASUS PEB-G21 User Guide
Page 21

3. Open the Control Panel.
4. In the Control Panel, double-click the Network icon.
5. When the Network window opens, select the Adapters tab.
6. To install a new adapter, select the adapter and click Add .
All previously installed drivers are listed under Network Adapters.
7. When the Select Network Adapter window opens, click Have Disk....
ASUS PEB-G21 User GuideASUS PEB-G21 User Guide
ASUS PEB-G21 User Guide
ASUS PEB-G21 User GuideASUS PEB-G21 User Guide
21
Page 22

8. When prompted, insert the driver installation media, or choose a location to
install the driver from. Type the path to the driver, and click OK.
For example, to install the adapter driver software for Windows NT, type e:\ in the
Insert Disk location box (where "e:" is the designation of the CD-ROM drive on your
system).
If you acquired the adapter software on floppy disk or from the ASUS support
website, enter the path to where the adapter driver files reside on your system.
9. With Gigabit Ethernet Controller highlighted in the Select OEM Option window,
click OK.
The adapter files are installed, then the Network window appears showing the newly
installed adapter.
10. Click Close, then the Microsoft TCP/IP Properties window appears.
11. Configure the TCP/IP protocol and click OK.
12. When prompted to restart your computer, click Yes.
22
ASUS PEB-G21 User GuideASUS PEB-G21 User Guide
ASUS PEB-G21 User Guide
ASUS PEB-G21 User GuideASUS PEB-G21 User Guide
Page 23

Installing Linux Driver SoftwareInstalling Linux Driver Software
Installing Linux Driver Software
Installing Linux Driver SoftwareInstalling Linux Driver Software
Installing Source RPM PackageInstalling Source RPM Package
Installing Source RPM Package
Installing Source RPM PackageInstalling Source RPM Package
1. Install the source RPM package:
rpm -ivh bcm5700-<version>.src.rpmrpm -ivh bcm5700-<version>.src.rpm
rpm -ivh bcm5700-<version>.src.rpm
rpm -ivh bcm5700-<version>.src.rpmrpm -ivh bcm5700-<version>.src.rpm
2. Change the directory to the RPM path and build the binary driver for your
kernel:
cd /usr/src/{redhat,OpenLinux,turbo,packages,rpm ..}cd /usr/src/{redhat,OpenLinux,turbo,packages,rpm ..}
cd /usr/src/{redhat,OpenLinux,turbo,packages,rpm ..}
cd /usr/src/{redhat,OpenLinux,turbo,packages,rpm ..}cd /usr/src/{redhat,OpenLinux,turbo,packages,rpm ..}
rpm -bb SPECS/bcm5700.spec or rpmbuild -bb SPECS/rpm -bb SPECS/bcm5700.spec or rpmbuild -bb SPECS/
rpm -bb SPECS/bcm5700.spec or rpmbuild -bb SPECS/
rpm -bb SPECS/bcm5700.spec or rpmbuild -bb SPECS/rpm -bb SPECS/bcm5700.spec or rpmbuild -bb SPECS/
bcm5700.specbcm5700.spec
bcm5700.spec
bcm5700.specbcm5700.spec
Note that the RPM path is different for different Linux distributions.
3. Install the newly built package (driver and man page):
rpm -ivh RPMS/i386/bcm5700-<version>.i386.rpmrpm -ivh RPMS/i386/bcm5700-<version>.i386.rpm
rpm -ivh RPMS/i386/bcm5700-<version>.i386.rpm
rpm -ivh RPMS/i386/bcm5700-<version>.i386.rpmrpm -ivh RPMS/i386/bcm5700-<version>.i386.rpm
Note that the force option is needed if installing on some distributions that may
already contain an older version of the driver.
ASUS PEB-G21 User GuideASUS PEB-G21 User Guide
ASUS PEB-G21 User Guide
ASUS PEB-G21 User GuideASUS PEB-G21 User Guide
23
Page 24

The driver will be installed in one of the following paths:
• 2.2.x kernels:
/lib/modules/<kernel_version>/net/bcm5700.o/lib/modules/<kernel_version>/net/bcm5700.o
/lib/modules/<kernel_version>/net/bcm5700.o
/lib/modules/<kernel_version>/net/bcm5700.o/lib/modules/<kernel_version>/net/bcm5700.o
• 2.4.x kernels:
/lib/modules/<kernel_version>/kernel/drivers/net/bcm5700.o/lib/modules/<kernel_version>/kernel/drivers/net/bcm5700.o
/lib/modules/<kernel_version>/kernel/drivers/net/bcm5700.o
/lib/modules/<kernel_version>/kernel/drivers/net/bcm5700.o/lib/modules/<kernel_version>/kernel/drivers/net/bcm5700.o
• 2.4.x kernels with bcm5700 driver patched in:
/lib/modules/<kernel_version>/kernel/drivers/net/bcm//lib/modules/<kernel_version>/kernel/drivers/net/bcm/
/lib/modules/<kernel_version>/kernel/drivers/net/bcm/
/lib/modules/<kernel_version>/kernel/drivers/net/bcm//lib/modules/<kernel_version>/kernel/drivers/net/bcm/
bcm5700.obcm5700.o
bcm5700.o
bcm5700.obcm5700.o
or
/lib/modules/<kernel_version>/kernel/drivers/addon//lib/modules/<kernel_version>/kernel/drivers/addon/
/lib/modules/<kernel_version>/kernel/drivers/addon/
/lib/modules/<kernel_version>/kernel/drivers/addon//lib/modules/<kernel_version>/kernel/drivers/addon/
bcm5700/bcm5700.obcm5700/bcm5700.o
bcm5700/bcm5700.o
bcm5700/bcm5700.obcm5700/bcm5700.o
2. Load the driver:
insmod bcm5700insmod bcm5700
insmod bcm5700
insmod bcm5700insmod bcm5700
3. To configure the network protocol and address, refer to Linux-specific
documentation.
24
ASUS PEB-G21 User GuideASUS PEB-G21 User Guide
ASUS PEB-G21 User Guide
ASUS PEB-G21 User GuideASUS PEB-G21 User Guide
Page 25

Building Driver From TAR FileBuilding Driver From TAR File
Building Driver From TAR File
Building Driver From TAR FileBuilding Driver From TAR File
1. Create a directory and extract the TAR files:
tar xvzf bcm5700-<version>.tar.gztar xvzf bcm5700-<version>.tar.gz
tar xvzf bcm5700-<version>.tar.gz
tar xvzf bcm5700-<version>.tar.gztar xvzf bcm5700-<version>.tar.gz
2. Build the driver bcm5700.o as a loadable module for the running kernel:
cd bcm5700-<version>/srccd bcm5700-<version>/src
cd bcm5700-<version>/src
cd bcm5700-<version>/srccd bcm5700-<version>/src
makemake
make
makemake
3. Test the driver by loading it:
insmod bcm5700.oinsmod bcm5700.o
insmod bcm5700.o
insmod bcm5700.oinsmod bcm5700.o
4. Install the driver and man page:
make installmake install
make install
make installmake install
See the RPM instructions above for the location of the installed driver.
5. To configure network protocol and address, refer to the manuals supplied with
your operating system.
ASUS PEB-G21 User GuideASUS PEB-G21 User Guide
ASUS PEB-G21 User Guide
ASUS PEB-G21 User GuideASUS PEB-G21 User Guide
25
Page 26

Installing Novell NetWare Server 4.2/5.x/6.0 DriverInstalling Novell NetWare Server 4.2/5.x/6.0 Driver
Installing Novell NetWare Server 4.2/5.x/6.0 Driver
Installing Novell NetWare Server 4.2/5.x/6.0 DriverInstalling Novell NetWare Server 4.2/5.x/6.0 Driver
SoftwareSoftware
Software
SoftwareSoftware
The following instructions outline the installation of Novell NetWare Server 4.2, 5.x,
or 6.0 driver software. If you need instruction on installing Novell NetWare Server
6.5 driver software, proceed to Installing Novell NetWare Server 6.5 Driver
Software.
Ensure that the server has the latest support pack available installed. The latest
support packs can be found at: http://support.novell.com/misc/patlst.htm. You may
want to create an archive disk by copying all the files from the
CDROM\NetWare\Driver directory onto a floppy disk. If you choose to use the
CDROM directly, ensure that the CDROM.NLM is loaded and that you are aware of the
NetWare Volume name for the CD ROM that you just installed.
1. From the NetWare Server console, type LOAD NWCONFIG (or just NWCONFIG)
and press Enter.
2. From the Configuration Options screen, select Driver options and press Enter.
3. Select the Configure network drivers option and press Enter.
26
ASUS PEB-G21 User GuideASUS PEB-G21 User Guide
ASUS PEB-G21 User Guide
ASUS PEB-G21 User GuideASUS PEB-G21 User Guide
Page 27

4. Choose the Load an additional driver option and press Enter.
5. Insert the CD or driver disk created using the Broadcom MakeDisk utility, and
select the Install an unlisted driver option, by pressing Insert.
6. If you are using the archive disk that you created, insert the disk into drive A:
and press Enter. If you have the CD ROM mounted as a NetWare volume, press
F3 and enter <Volume Name>: NetWware\Driver as the source path. Where
<Volume Name> is the name of the NetWare Volume for the CD ROM and
NetWare\Driver is the directory of the specific files on the CD ROM needed for
this installation.
7. The name of the driver displays.
8. Press Enter to select the highlighted driver.
9. A copy the driver prompt appears.
10. Select Yes and press Enter.
11. Select Yes and press Enter to copy the .LDI file. This is the installation script
for the driver.
12. Follow the instructions for the installation.
13. Select Save parameters and load driver to continue.
14. Choose Exit to return to the server console prompt.
ASUS PEB-G21 User GuideASUS PEB-G21 User Guide
ASUS PEB-G21 User Guide
ASUS PEB-G21 User GuideASUS PEB-G21 User Guide
27
Page 28

If you are performing an initial installation of NetWare 4.2/5.x/6.0 and have more
than two adapters installed, the install program will allow you to allocate the actual
number of packet receive buffers needed by the adapter. During installation, the
RxBuffers value should be set to 32, the minimum number of buffers the driver
requires for each adapter. Although this setting affects adapter performance, it
allows installation of the operating system and up to eight adapters during initial
install. After installation is complete, you need to increase the number of buffers
allocated to the driver.
15. After NetWare 5.x/6.0 has been successfully installed, set the minimum packet
receive buffers parameter in the startup.ncf file to 1500 for each adapter in
the system. Set the maximum packet receive buffers to three times the
minimum packet receive buffers. Typically 4 MB of RAM is required per 1000
receive buffers.
16. In the autoexec.ncf file, delete the packet receive buffers parameter
(RxBuffers=32) in the load statement for this adapter. Deleting the receive
buffers phrase from the load statement resets the receive buffers parameter
to the default value of 200 for this adapter.
The server must be restarted for the new configuration.
28
ASUS PEB-G21 User GuideASUS PEB-G21 User Guide
ASUS PEB-G21 User Guide
ASUS PEB-G21 User GuideASUS PEB-G21 User Guide
Page 29

Example: The default maximum number of receive buffers for the system is 500; the
default minimum is 128. Edit the startup.ncf file to have the following entries. The
actual numbers will be a function of the number of ports in the system. The following
is an example for a system with 8 ports installed:
set maximum packet receive buffers = 36000set maximum packet receive buffers = 36000
set maximum packet receive buffers = 36000
set maximum packet receive buffers = 36000set maximum packet receive buffers = 36000
set minimum packet receive buffers = 12000set minimum packet receive buffers = 12000
set minimum packet receive buffers = 12000
set minimum packet receive buffers = 12000set minimum packet receive buffers = 12000
ASUS PEB-G21 User GuideASUS PEB-G21 User Guide
ASUS PEB-G21 User Guide
ASUS PEB-G21 User GuideASUS PEB-G21 User Guide
29
Page 30

Installing Novell NetWare Server 6.5 Driver SoftwareInstalling Novell NetWare Server 6.5 Driver Software
Installing Novell NetWare Server 6.5 Driver Software
Installing Novell NetWare Server 6.5 Driver SoftwareInstalling Novell NetWare Server 6.5 Driver Software
The following instructions outline the installation of Novell NetWare Server 6.5
driver software. If you need instruction on installing Novell NetWare Server 4.2,
5.x, or 6.0 driver software, please proceed to Installing Novell NetWare Server 4.2/
5.x/6.0 Driver Software.
Please ensure that the server has the latest support pack available installed. The
latest support packs can be found at: http://support.novell.com/misc/patlst.htm.
You may want to create an archive disk by copying all the files from the
CDROM\NetWare\Driver directory onto a floppy disk. If you choose to use the CDROM directly, ensure that the CDROM.NLM is loaded and that you are aware of the
NetWare Volume name for the CD ROM that you just installed.
1. From the NetWare Server console, type HDETECT and press Enter.
2. From Options, press Enter to accept Platform Support Module and HotPlug
Support Module and continue detecting devices.
3. From Options, scroll down to select Modify and press Enter to change focus to
detected devices.
30
ASUS PEB-G21 User GuideASUS PEB-G21 User Guide
ASUS PEB-G21 User Guide
ASUS PEB-G21 User GuideASUS PEB-G21 User Guide
Page 31

4. Scroll down to Network boards and press Enter.
5. From Additional Driver Options, scroll down to Modify and press Enter.
6. Insert the CD or driver disk created using the Broadcom MakeDisk utility, and
select the Add option, by pressing Insert.
7. Select the Install an unlisted driver option, by pressing Insert.
8. If you are using the archive disk that you created, insert the disk into drive A:
and press Enter. If you have the CD ROM mounted as a NetWare volume, press
F3 and enter <Volume Name>: NetWare\Driver as the source path. Where
<Volume Name> is the name of the NetWare Volume for the CD-ROM and
NetWare\Driver is the directory of the specific files on the CD-ROM needed for
this installation.
9. The name of the driver displays.
10. Press Down Arrow or Tab to switch back to Additional Driver Options.
11. Choose Return to driver summary and press Enter.
12. Choose Continue in Options .
13. Choose Continue from Protocol Options unless you want to configure and bind
protocols before continuing. Installation is now complete.
ASUS PEB-G21 User GuideASUS PEB-G21 User Guide
ASUS PEB-G21 User Guide
ASUS PEB-G21 User GuideASUS PEB-G21 User Guide
31
Page 32

Installing Solaris Driver SoftwareInstalling Solaris Driver Software
Installing Solaris Driver Software
Installing Solaris Driver SoftwareInstalling Solaris Driver Software
The driver for Solaris 8.0 is released in three formats:
1. BRCMbcme.pkg : Datastream format
2. BRCMbcme.tar.Z : Compressed and TAR file system format
3. bcmedu.img : Driver Update (DU) binary image which is used to create DU
diskette.
Installing the DriverInstalling the Driver
Installing the Driver
Installing the DriverInstalling the Driver
1. Change directory to where BRCMbcme.pkg resides
2. pkgadd -d BRCMbcme.pkg
or
Copy BRCMbcme.tar.Z to /tmp
cd /tmp
uncompress BRCMbcme.tar.Z
tar xvf BRCMbcme.tar
pkgadd -d /tmp
32
ASUS PEB-G21 User GuideASUS PEB-G21 User Guide
ASUS PEB-G21 User Guide
ASUS PEB-G21 User GuideASUS PEB-G21 User Guide
Page 33

3. Execute prtconf to determine instance number of the NIC.
4. ifconfig bcme[instance_number] plumb
5. ifconfig bcme[instance_number] ip_address netmask....
To make these changes permanent, follow these steps:
1. Use a text editor (e.g., vi) and create a file named
hostname.bcme[instance_number] in the /etc directory. Add the IP address of
the interface to this file, then save and exit.
2. Add a proper subnet mask to the file /etc/netmasks.
In Solaris 7.0 (Intel platform), the operating system only allocates 36 pages of 4K
physically contiguous memory. The driver needs about 130K of physically contiguous
memory per NIC. In order to use more than one NIC the O/S has to allocate more
memory. This can be done by setting an O/S system variable "lomempages" in /etc/
system. For instance, when 4 NICs are installed in a Solaris 7 system, the physically
contiguous memory is calculated as follows:
4 NICs * 130K = 520 K ==> 130 pages of 4K is required.
ASUS PEB-G21 User GuideASUS PEB-G21 User Guide
ASUS PEB-G21 User Guide
ASUS PEB-G21 User GuideASUS PEB-G21 User Guide
33
Page 34

Since this memory might be used by other driver in the system, 200 of 4K of
memory is allocated. Add the following line in file /etc/system:
set lomempages=200set lomempages=200
set lomempages=200
set lomempages=200set lomempages=200
34
ASUS PEB-G21 User GuideASUS PEB-G21 User Guide
ASUS PEB-G21 User Guide
ASUS PEB-G21 User GuideASUS PEB-G21 User Guide
Page 35

Installing the UNIX Driver Software: Installing the UNIX Driver Software:
Installing the UNIX Driver Software:
Installing the UNIX Driver Software: Installing the UNIX Driver Software:
OverviewOverview
Overview
OverviewOverview
This procedure describes the installation of the SCO OpenServer driver. This driver is
released as a media image file containing the driver package. The media image file
can be copied to the target machine directly for installation, or from an installation
diskette that you can create.
Creating a DisketteCreating a Diskette
Creating a Diskette
Creating a DisketteCreating a Diskette
1. Copy the file VOL.000.000 to an SCO system.
2. Create a diskette using: dd if=VOL.000.000 of=/dev/rfd0135ds18.
Installing the DriverInstalling the Driver
Installing the Driver
Installing the DriverInstalling the Driver
1. Use custom or scoadmin software to install the SCO OpenServer driver from
the media image or from the floppy created above.
2. After the package is installed, use netconfig to add the new network adapter.
SCO OpenServer 5.0.7SCO OpenServer 5.0.7
SCO OpenServer 5.0.7
SCO OpenServer 5.0.7SCO OpenServer 5.0.7
ASUS PEB-G21 User GuideASUS PEB-G21 User Guide
ASUS PEB-G21 User Guide
ASUS PEB-G21 User GuideASUS PEB-G21 User Guide
35
Page 36

3. After added, modify the hardware configuration in Advanced Options to change
the Line Speed and Flow Control if desired. The settings for these properties
are listed below:
Line Speed
• AutoNegotiate (default) (all speeds advertised)
• Fixed HalfDuplex10
• Auto HalfDuplex10 (only 10 Mbps half-duplex advertised)
• Fixed FullDuplex10
• Auto FullDuplex10 (only 10 Mbps full-duplex advertised)
• Fixed HalfDuplex100
• Auto HalfDuplex100 (only 100 Mbps half-duplex advertised)
• Fixed FullDuplex100
• Auto FullDuplex100 (only 100 Mbps full-duplex advertised)
• Auto HalfDuplex1000 (only 1000 Mbps half-duplex advertised)
• Fixed FullDuplex1000 (NOTE 1)
• Auto FullDuplex1000 (only 1000 Mbps full-duplex advertised)
36
ASUS PEB-G21 User GuideASUS PEB-G21 User Guide
ASUS PEB-G21 User Guide
ASUS PEB-G21 User GuideASUS PEB-G21 User Guide
Page 37

1000 Mbps (1 Gbps) full-duplex fixed speed is only valid for fiber connections. For
copper, twisted-pair connections, 1 Gbps can only be set through auto-negotiation
with a 1 Gbps partner.
Flow Control
• Off
• AutoNegotiate (Symmetric Pause advertised) (NOTE 2) (default)
• RxPause
• TxPause
• RxPause/TxPause
1. Auto-negotiation of Flow Control is only valid when the Line Speed is set to
AutoNegotiate (all speeds advertised or single speed advertised).
2. A kernel relink and reboot is required before the new configuration will take
effect.
ASUS PEB-G21 User GuideASUS PEB-G21 User Guide
ASUS PEB-G21 User Guide
ASUS PEB-G21 User GuideASUS PEB-G21 User Guide
37
Page 38

Installing the UNIX Driver Software: UnixWare/OpenUnix 8Installing the UNIX Driver Software: UnixWare/OpenUnix 8
Installing the UNIX Driver Software: UnixWare/OpenUnix 8
Installing the UNIX Driver Software: UnixWare/OpenUnix 8Installing the UNIX Driver Software: UnixWare/OpenUnix 8
OverviewOverview
Overview
OverviewOverview
This procedure describes the installation procedure for the UnixWare driver. The
driver is released as an installable package in datastream format.
Installing the DriverInstalling the Driver
Installing the Driver
Installing the DriverInstalling the Driver
1. Do the following to install the bcme package on the Unixware system:
pkgadd -d <install-path>.
Where <install-path> is the full path name of the installable package bcme-
<version>.pkg.
2. After the package is installed, use netcfg or scoadmin network to add the new
network adapter.
3. When prompted, select the Line Speed and then select Advanced Option for
Flow Control, MAC Address , and Jumbo MTU Size settings, if desired. The
settings for these properties are listed below:
Line Speed
• Auto-Negotiate (default) (all speeds advertised)
38
ASUS PEB-G21 User GuideASUS PEB-G21 User Guide
ASUS PEB-G21 User Guide
ASUS PEB-G21 User GuideASUS PEB-G21 User Guide
Page 39

• 10 Mbps Half-Duplex Fixed
• 10 Mbps Half-Duplex Auto (only 10 Mbps half-duplex advertised)
• 10 Mbps Full-Duplex Fixed
• 10 Mbps Full-Duplex Auto (only 10 Mbps full-duplex advertised)
• 100 Mbps Half-Duplex Fixed
• 100 Mbps Half-Duplex Auto (only 100 Mbps half-duplex advertised)
• 100 Mbps Full-Duplex Fixed
• 100 Mbps Full-Duplex Auto (only 100 Mbps full-duplex advertised)
• 1000 Mbps Half-Duplex Auto (only 1000 Mbps half-duplex advertised)
• 1000 Mbps Full-Duplex Fixed (NOTE 1)
• 1000 Mbps Full-Duplex Auto (only 1000 Mbps full-duplex advertised)
1000 Mbps (1 Gbps) full-duplex, fixed speed is only valid for fiber connections. For
copper, twisted-pair connections, 1 Gbps can only be set through auto-negotiation
with a 1 Gbps link partner.
ASUS PEB-G21 User GuideASUS PEB-G21 User Guide
ASUS PEB-G21 User Guide
ASUS PEB-G21 User GuideASUS PEB-G21 User Guide
39
Page 40

Flow Control
•Disabled
• Auto Negotiation (Symmetric Pause advertised) (NOTE 2) (default)
• Receive Pause
• Transmit Pause
• Receive & Transmit Pause
40
ASUS PEB-G21 User GuideASUS PEB-G21 User Guide
ASUS PEB-G21 User Guide
ASUS PEB-G21 User GuideASUS PEB-G21 User Guide
Page 41

Page 42

ASUS Contact Information
ASUSTeK COMPUTER INC. (Asia-Pacific)
Marketing Technical Support
Address: 15 Li-Te Road MB/Others (Tel): +886-2-2890-7121 (English)
Peitou, Taipei, Taiwan 112 Notebook (Tel): +886-2-2890-7122 (English)
General Tel.: +886-2-2894-3447 Desktop/Server (Tel): +886-2-2890-7123 (English)
General Fax: +886-2-2894-3449 Support Fax: +886-2-2890-7698
Web Site: www.asus.com.tw
ASUS COMPUTER INTERNATIONAL (America)
Marketing Technical Support
Address: 44370 Nobel Drive, Fremont, Support Fax: +1-502-933-8713
CA 94538, USA General Support: +1-502-995-0883
General Fax: +1-502-933-8713 Web Site: usa.asus.com
General Email: tmd1@asus.com Support E-mail: tsd@asus.com
ASUS COMPUTER GmbH (Germany and Austria)
Marketing Technical Support
Address: Harkortstr. 25 D-40880 Ratingen, Support Hotline: +49-2102-95990 (Components)
BRD, Germany +49-2102-959910 (Notebook PC)
General Fax: +49-2102-9599-31 Support Fax: +49-2102-959911
General Email: sales@asuscom.de Support (Email): www.asuscom.de/support
(for marketing requests only) (for online support)
Web Site: www.asuscom.de
15-06509100015-065091000
15-065091000
15-06509100015-065091000
 Loading...