

Page 1
Welcome
OK
ABC
GHI
PQRS
CLEAR ENTER
TUV WXYZ
JKL MNO
DEF
1 2 3
4 5 6
7 8 9
0 #
Quick Guid
e
Congratulations on your purchase of the ASUS NOVA P20/P22.
The following sections provides information on how to use your
new ASUS NOVA P20/P22. For more details, refer to the user
manual in the support DVD.
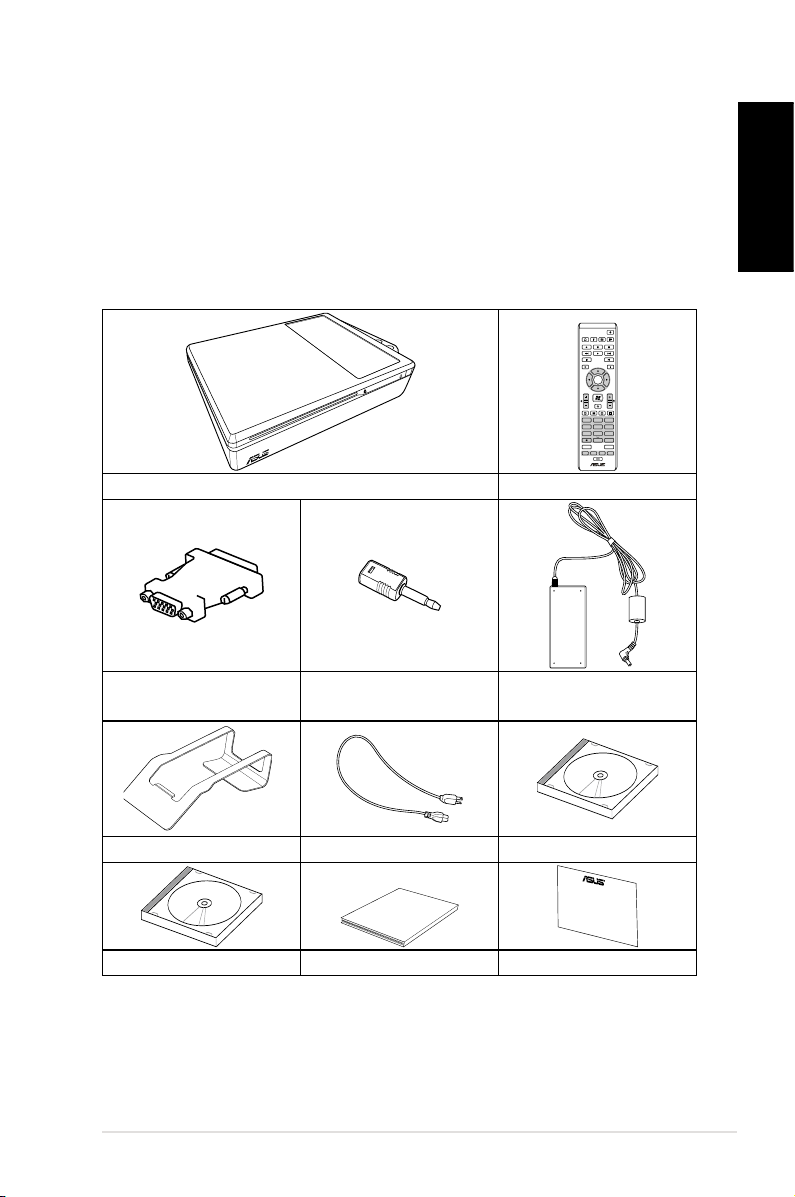
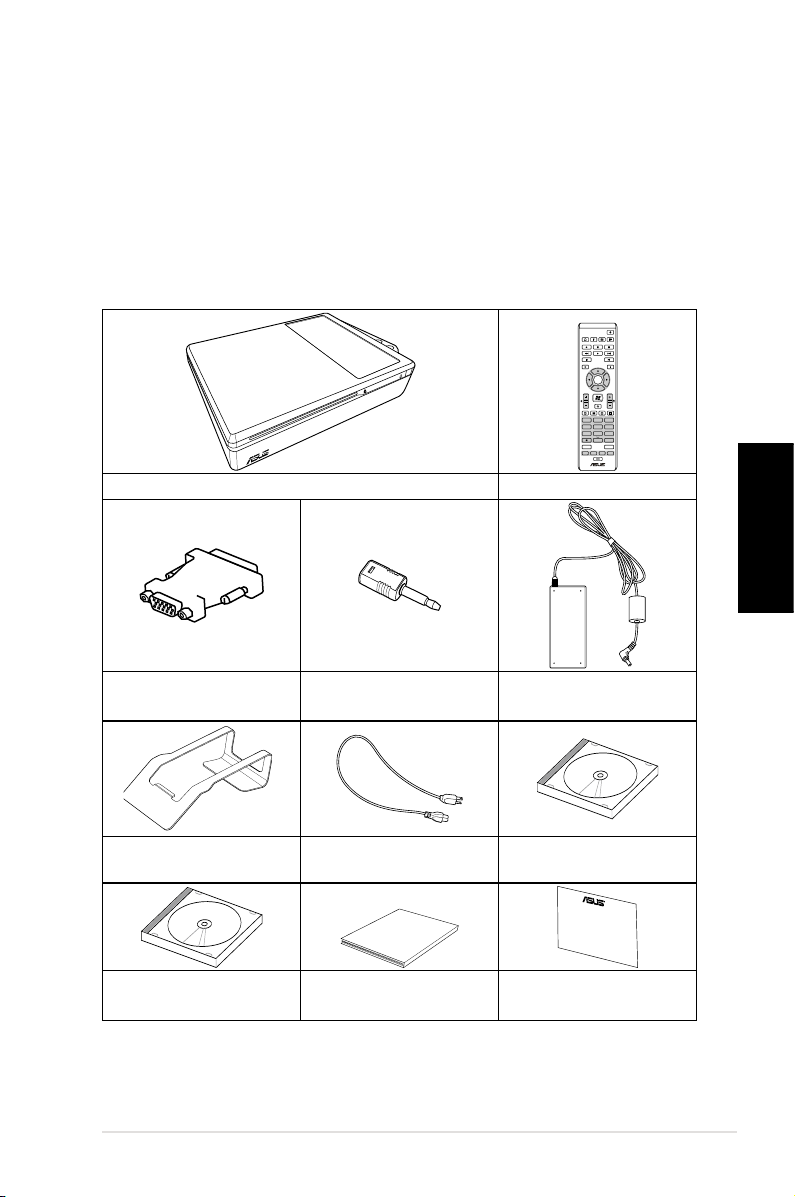
Package contents
P20/P22 Remote control
English
DVI-D-Sub adapter
Stand
mini jack-S/PDIF
adapter
Power cord
AC adapter
Support DVD
Recovery DVD Quick guide Warranty card
*For more information on how to use your ASUS NOVA, refer
to the detail user manual in the support DVD.
ASUS NOVA P20/P22
1
Page 2

Preparing your ASUS NOVA
CENTER/BASS FRONT
DVI
SURROUND
S/PDIF
OUT
S/PDIF
IN
DCIN
FRONT
CENTER/BASS
DVI
SURROUND
S/PDIF
OUT
S/PDIF
IN
DCIN
I
English
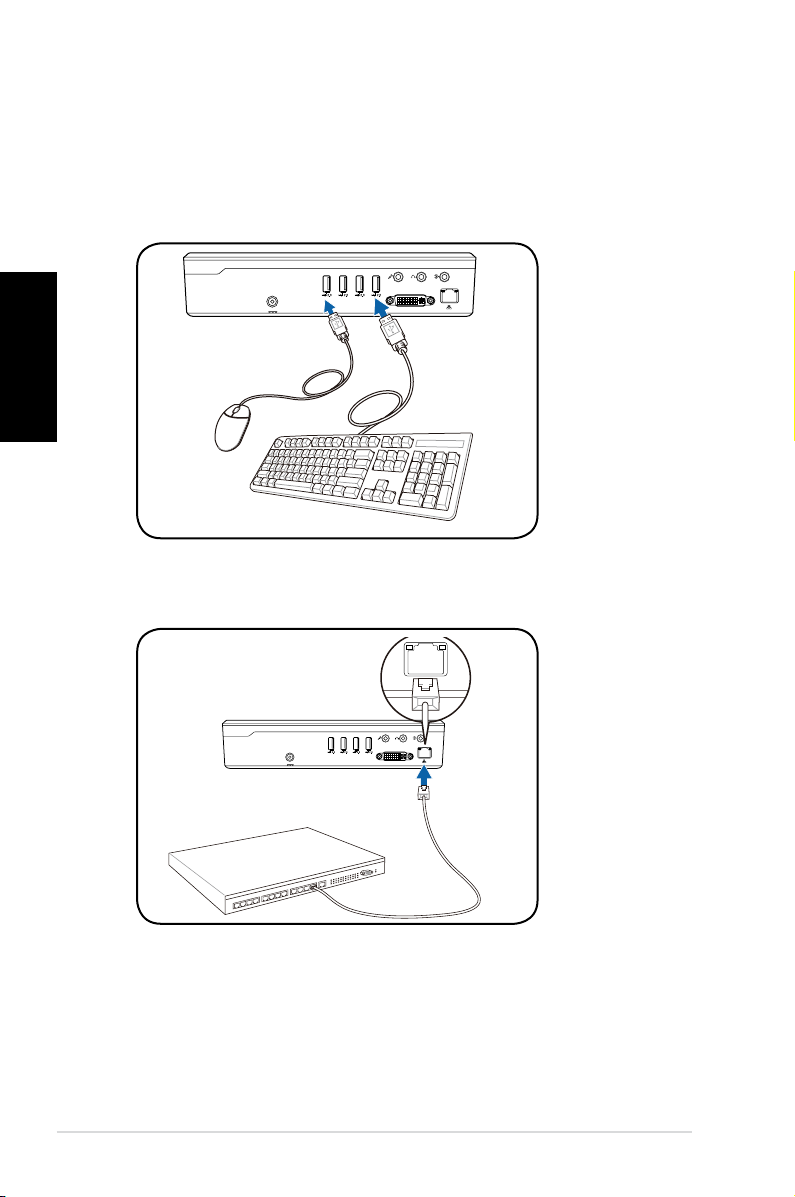
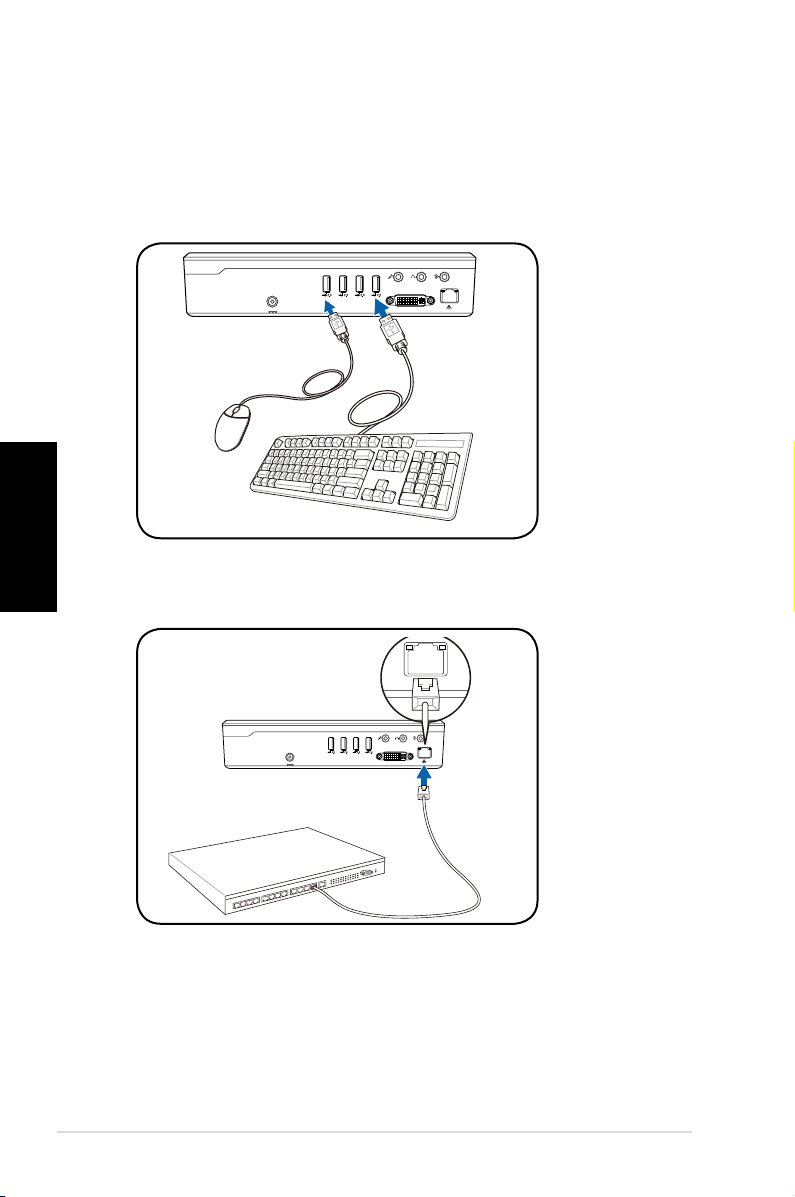
These are quick instructions for using your ASUS NOVA.
1. Connect the USB keyboard and mouse*
2. Connect the Ethernet cable
* The package contents does not include USB keyboard and
mouse. Purchase USB peripherals based on your needs.
Quick Start Guide
2
Page 3
FRONT
CENTER/BASS
DVI
SURROUND
S/PDIF
OUT
S/PDIF
IN
DCIN
1
2
3
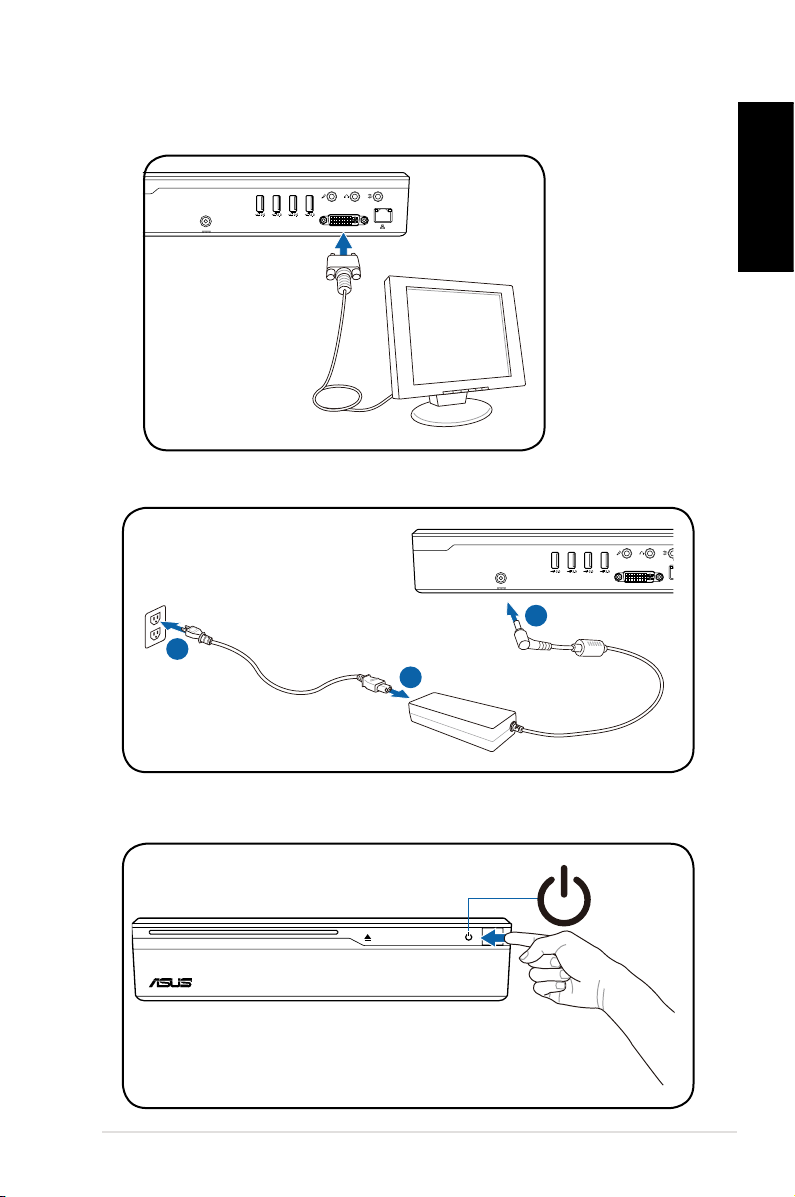
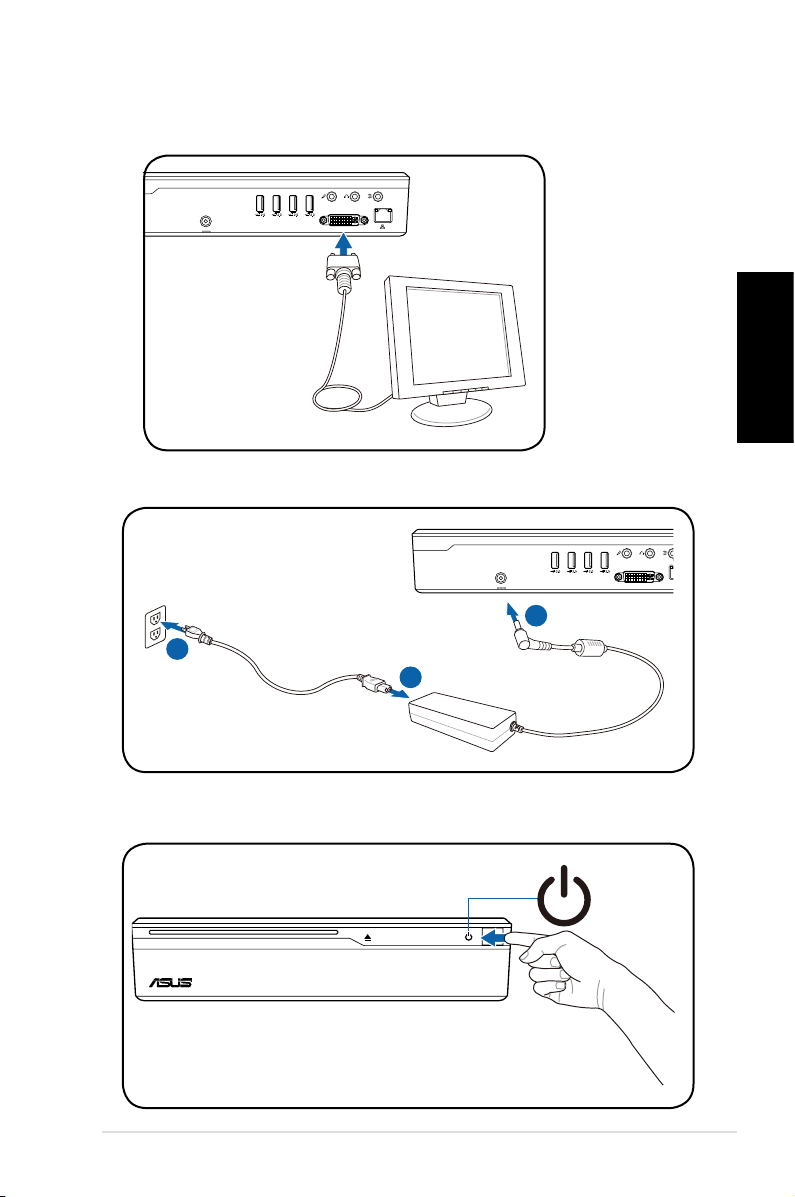
3. Connect the monitor.
FRONT
CENTER/BASS
DVI
SURROUND
S/PDIF
OUT
S/PDIF
IN
DCIN
4. Connect the AC adapter
English
5. Start up your ASUS NOVA
ASUS NOVA P20/P22
3
Page 4
Knowing Component parts
CENTER/BASS FRONT
DVI
SURROUND
S/PDIF
OUT
S/PDIF
IN
DCIN
English
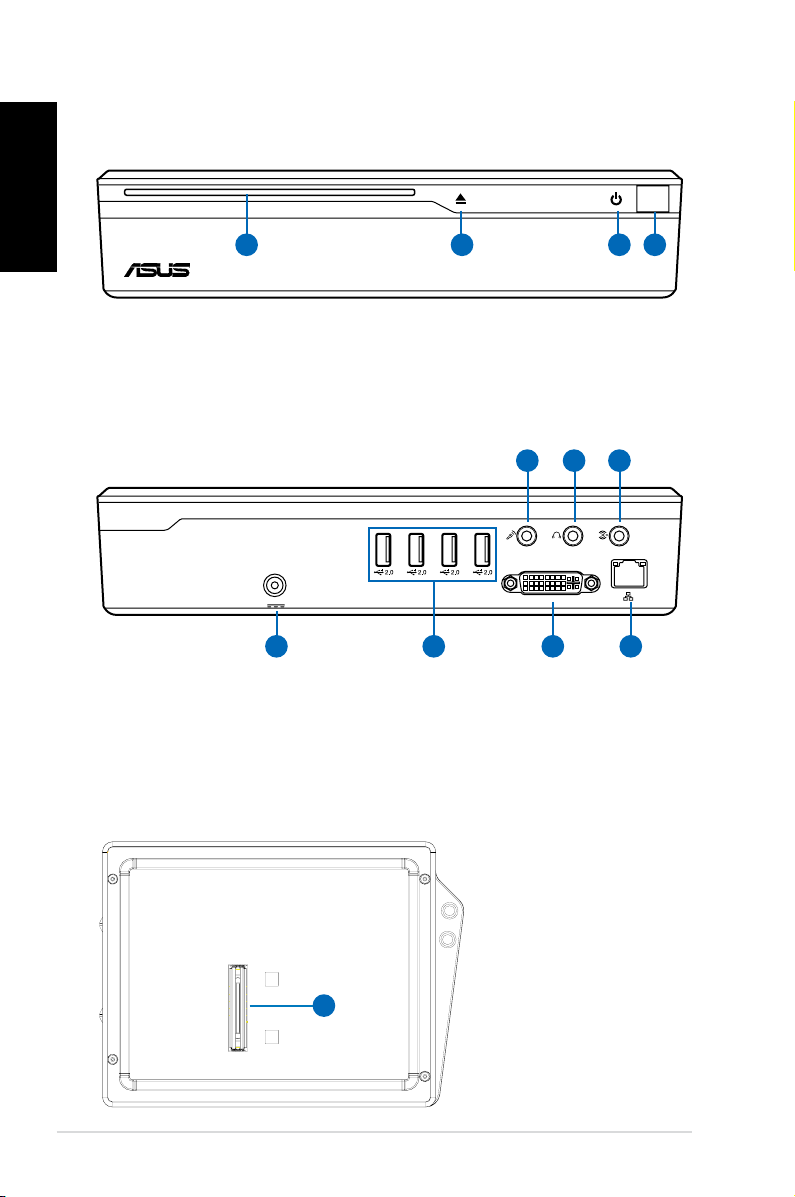
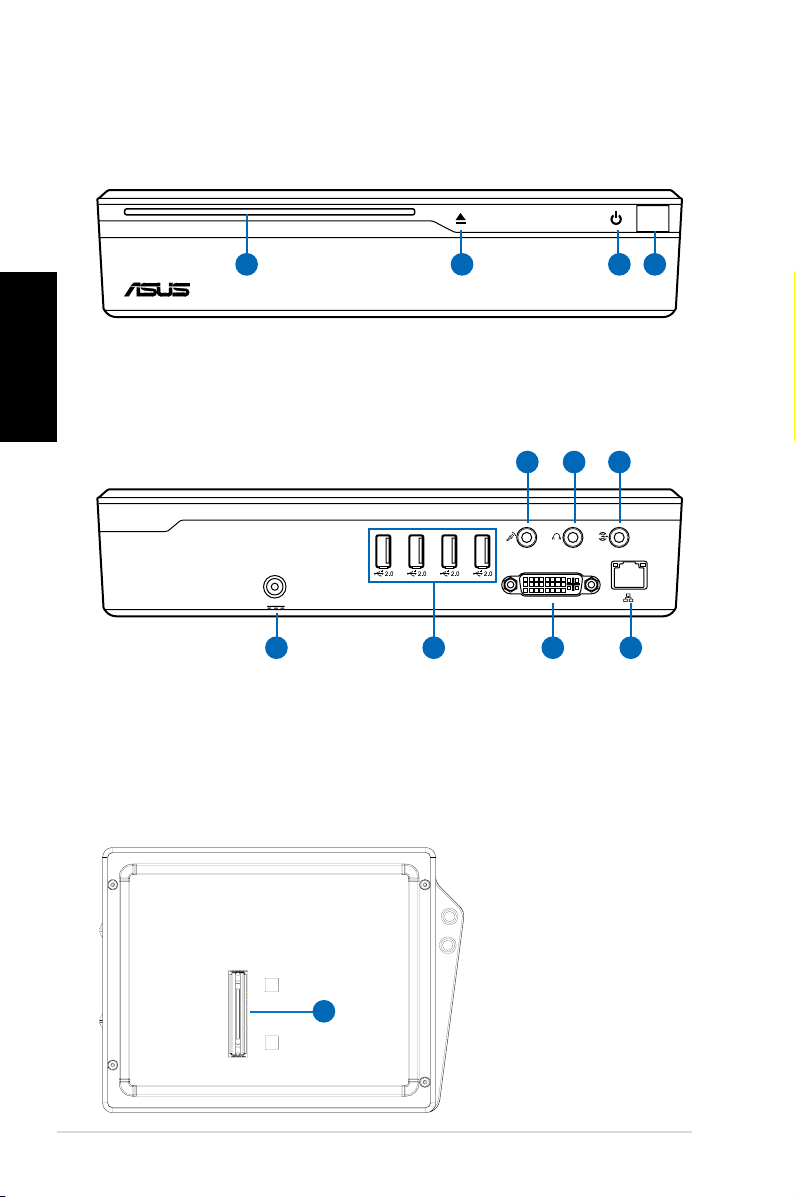
Front view
1 3 42
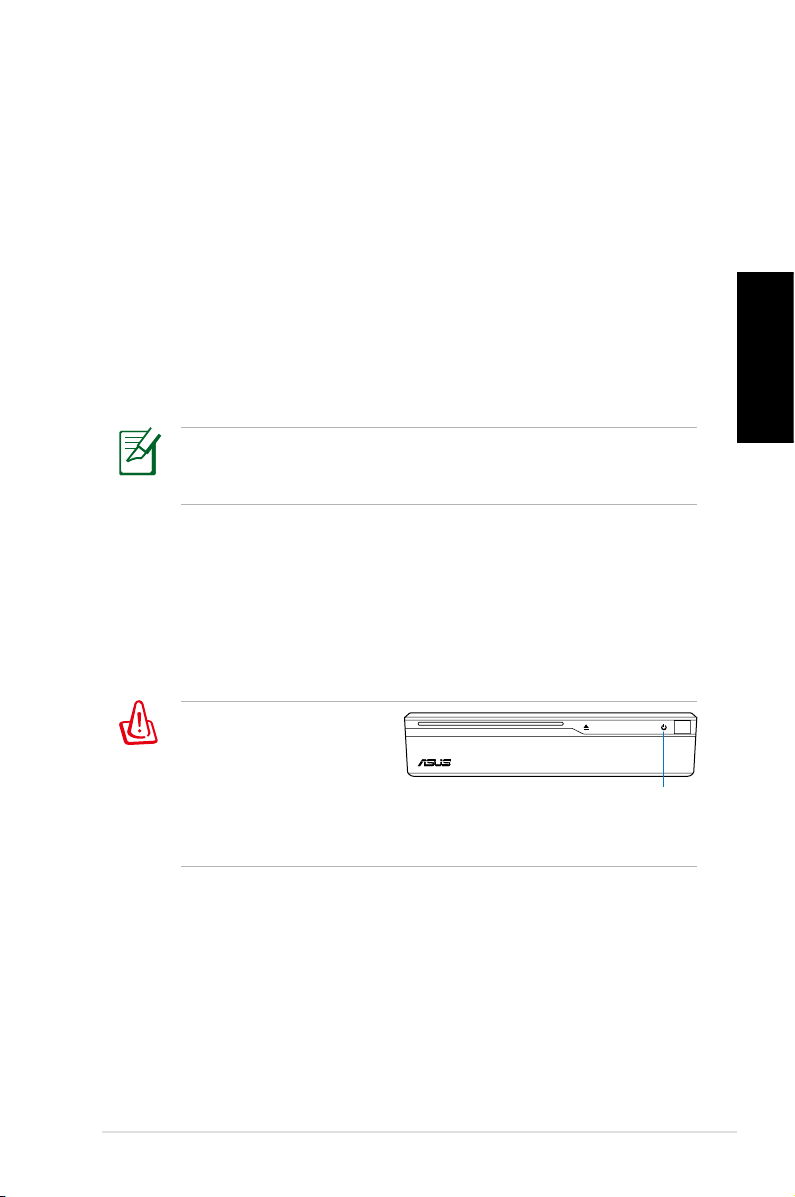
1. Slot-in optical drive
2. Optical Drive Electronic Eject (touch-sensitive)
3.
Power switch (touch-sensitive)
4.
Infrared port
Rear view
5 6 7 8
5. Power (DC) Input
6. USB Port (2.0/1.1)
7. Display (Monitor) Output
8. LAN Port
9. Line in port (S/PDIF in port)
10. Headphone Output Jack
11. Microphone Jack
11 10
9
Bottom view
Quick Start Guide
4
12
12. Docking
Connector*
*The optional
docking allows
future capabilities
expansion to ASUS
NOVA.
Page 5
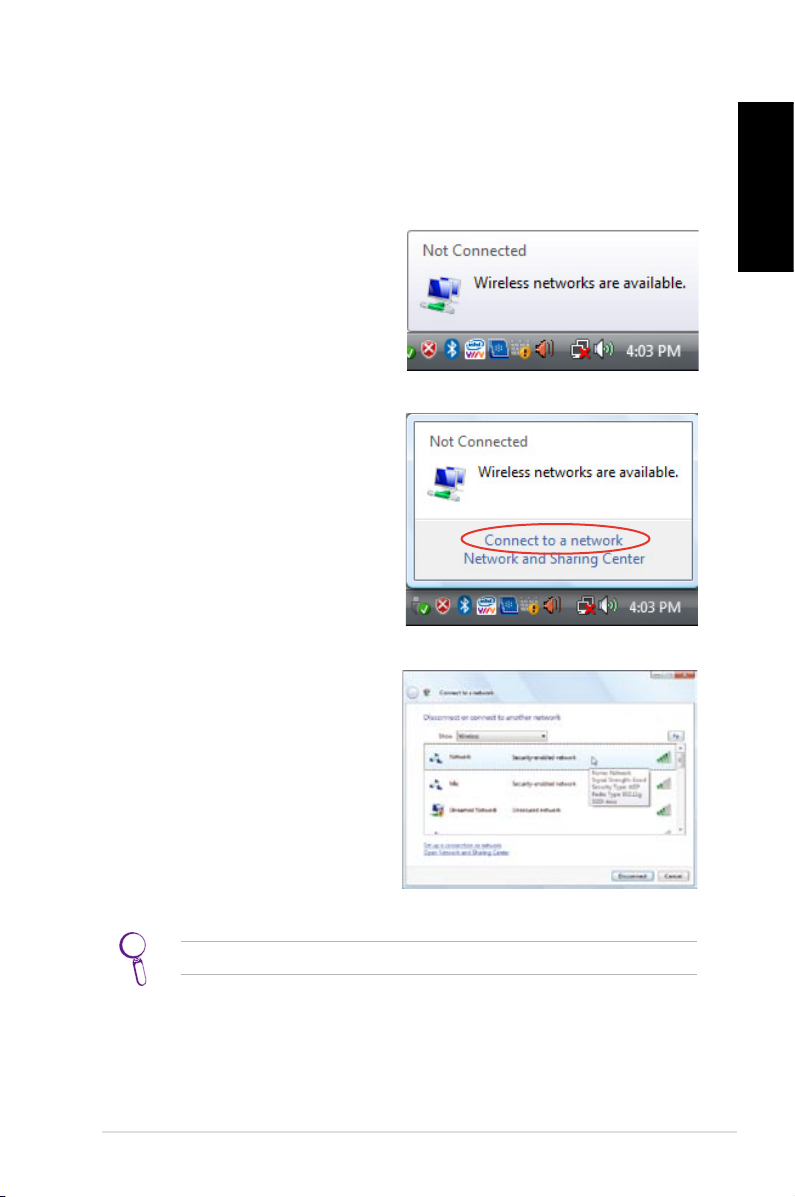
Conguring wireless connection
Wireless Network connection
To connect to a wireless network, follow the instructions below.
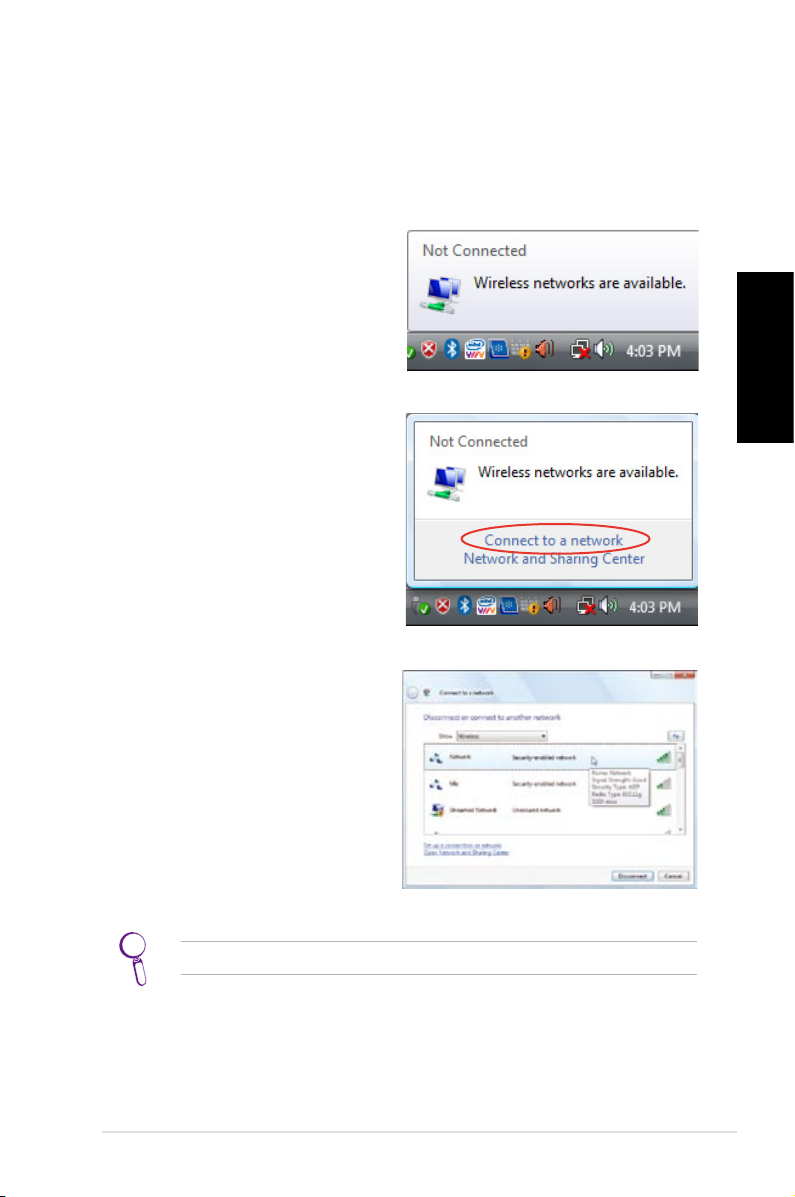
1. Move the cursor to the
network icon on the taskbar
and you will see Not
Connected.
2. Right-click on the network
icon and select Connect to a
network.
English
3. Select the wireless network
you want to connect to
from the list.
Select Show Wireless if you have many networks in your area.
ASUS NOVA P20/P22
5
Page 6
English
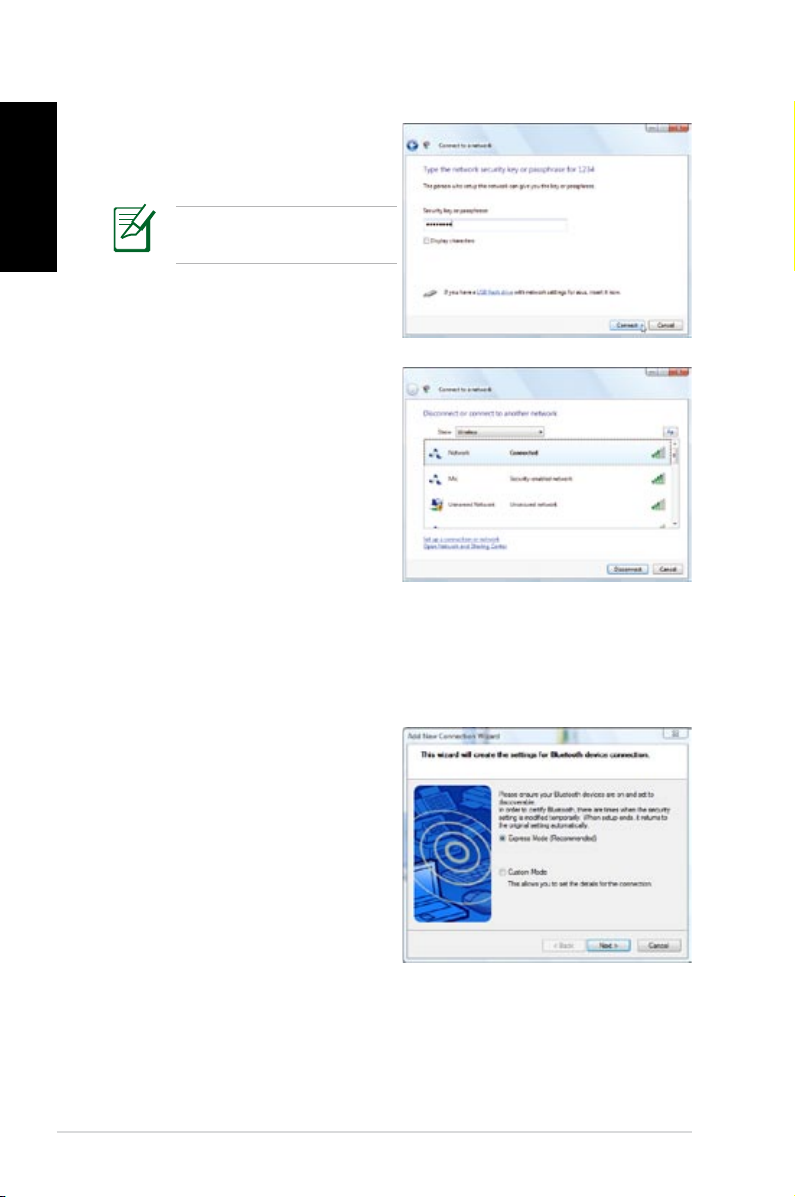
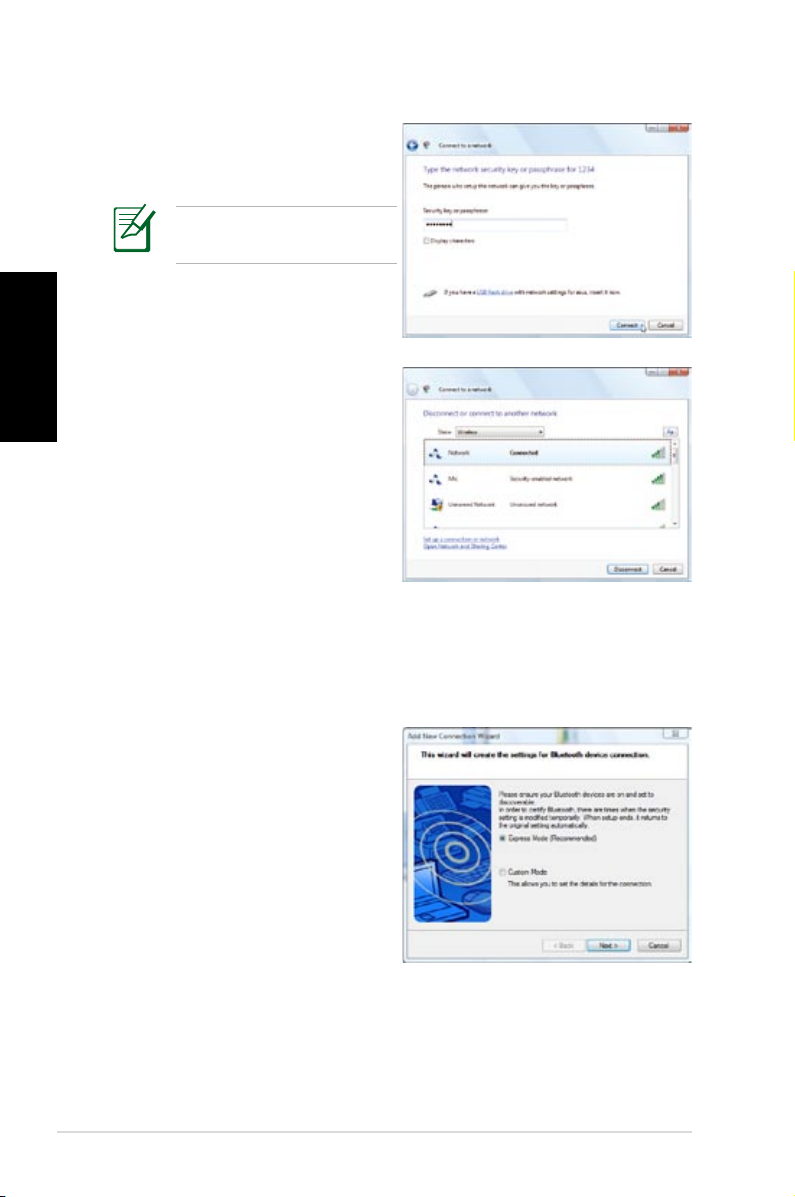
4. When connecting, you may
have to enter a password.
This screen will no appear
if no password needed.
5. After connection has been
established, Connected will
be shown.
Bluetooth wireless connection
Follow the instructions below to build Bluetooth wireless
connection.
1. Double-click the Bluetooth
icon on the Windows
taskbar to start the
connection wizard.
Quick Start Guide
6
Page 7
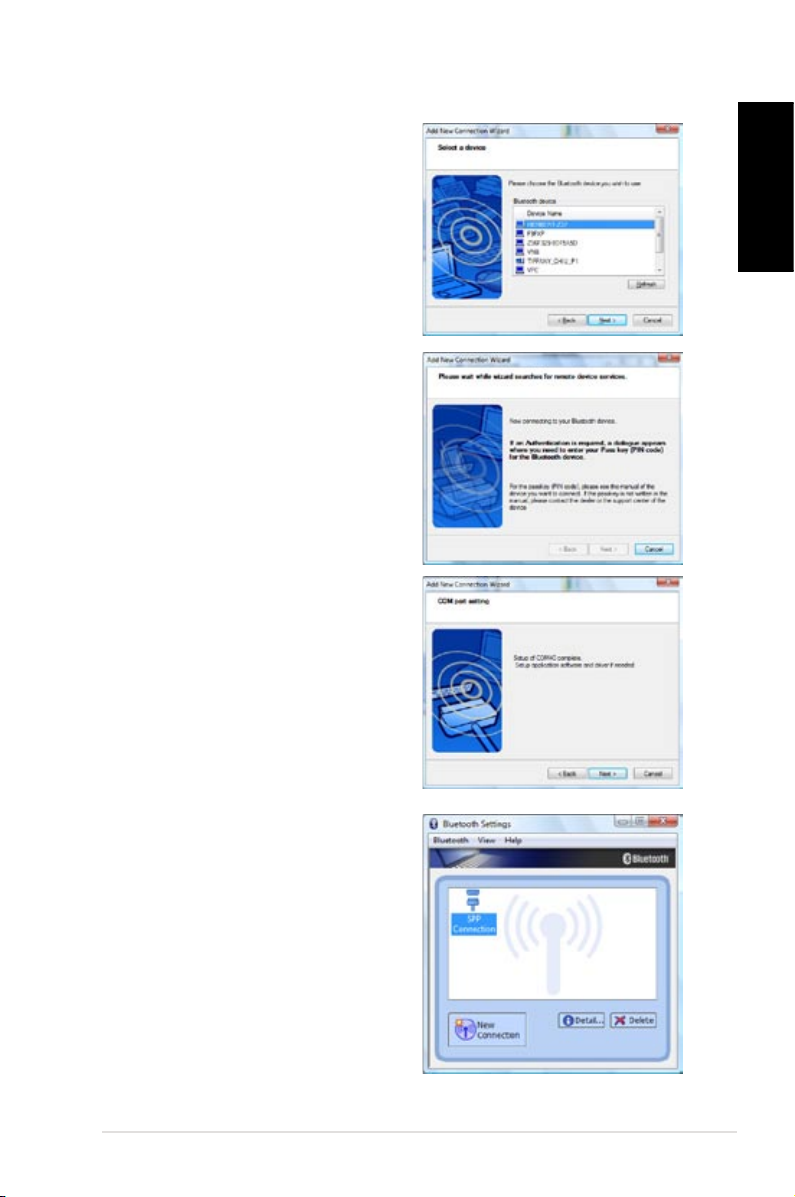
2. Select the Bluetooth device
you want to connect to from
the list and click Next to
continue.
3. You may need to enter
the password if the device
requires authentication.
4. After the setup completes,
click Next to continue.
English
5. The device you connect to
will be shown.
ASUS NOVA P20/P22
7
Page 8
FRONT
S/PDIF
OUT
FRONT
S/PDIF
OUT
SURROUND
S/PDIF
IN
CENTER/BASS
Conguring audio output
English
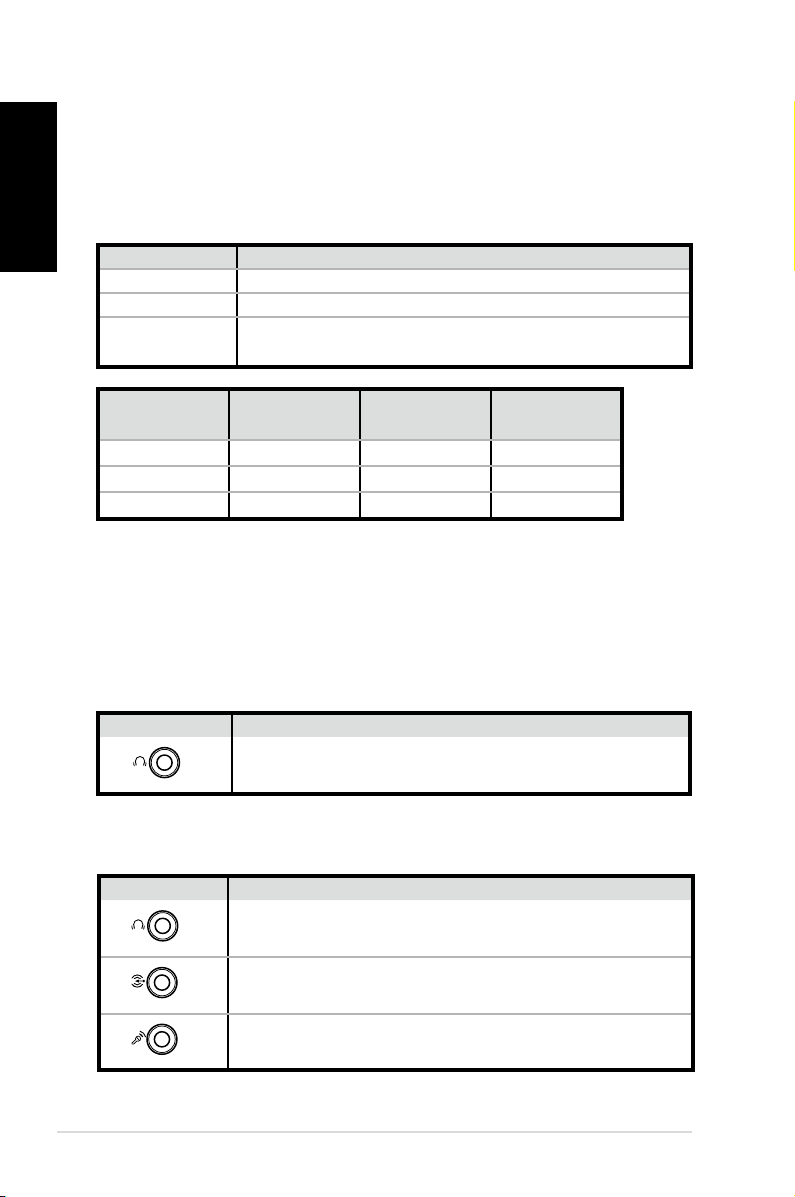
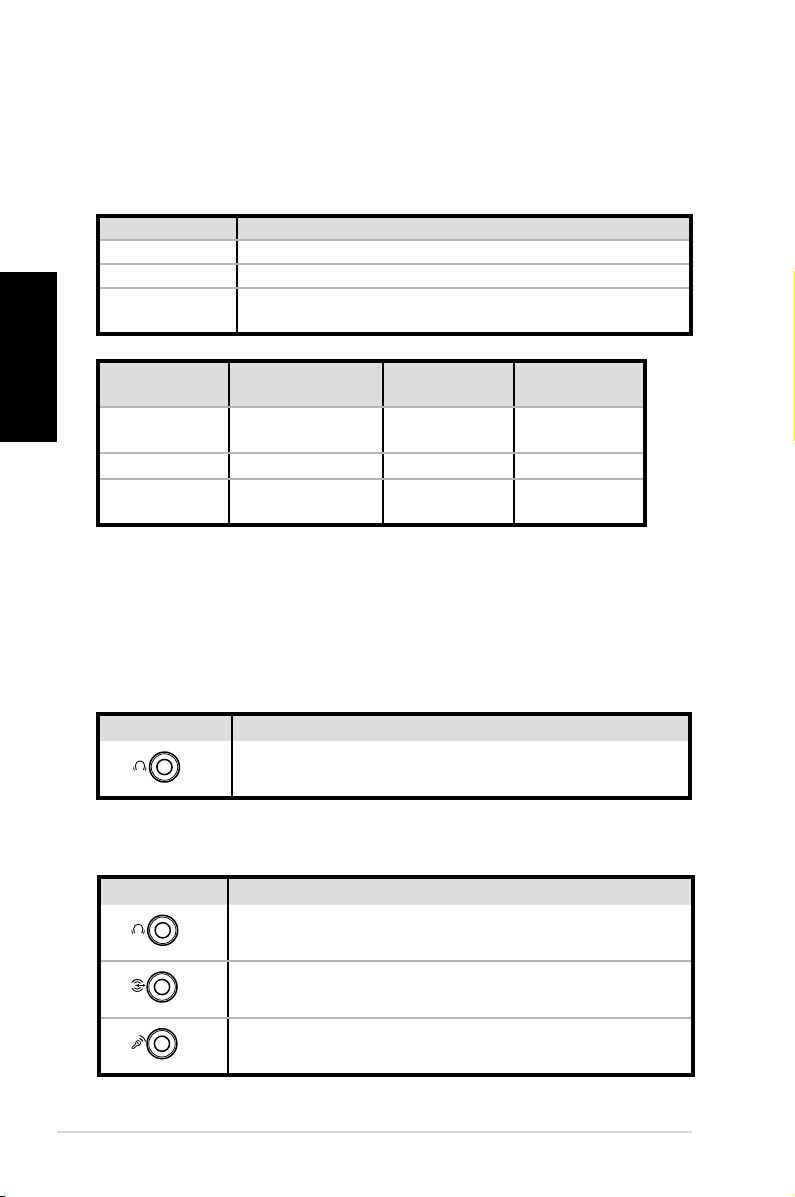
Speaker configurations
You may set up the system with the following speaker
configurations:
Name Speaker system
2 (stereo) Left speaker, right speaker.
4 Two front speakers, two rear speakers.
5.1
Port
Two front speakers, two rear speakers, a center
speaker, and a subwoofer.
Headset
2-speaker
6-speaker S/PDIF
Light Blue Line In Surround S/PDIF in
Lime Line Out Front S/PDIF out
Pink Mic In Center/Bass Mic
Connecting to analog speakers
Refer to the table below for the audio connectors on the rear
panel and their functions.
For stereo speakers
P20/P22 Description
Front connects to stereo speakers.
For a multi-channel audio speaker system
P20/P22 Description
FRONT connects to the FRONT port on the sub-
woofer.
SURROUND connects to the REAR port on the
subwoofer.
CENT/BASS connects to the SUB/CENTER port on
the subwoofer.
Quick Start Guide
8
Page 9
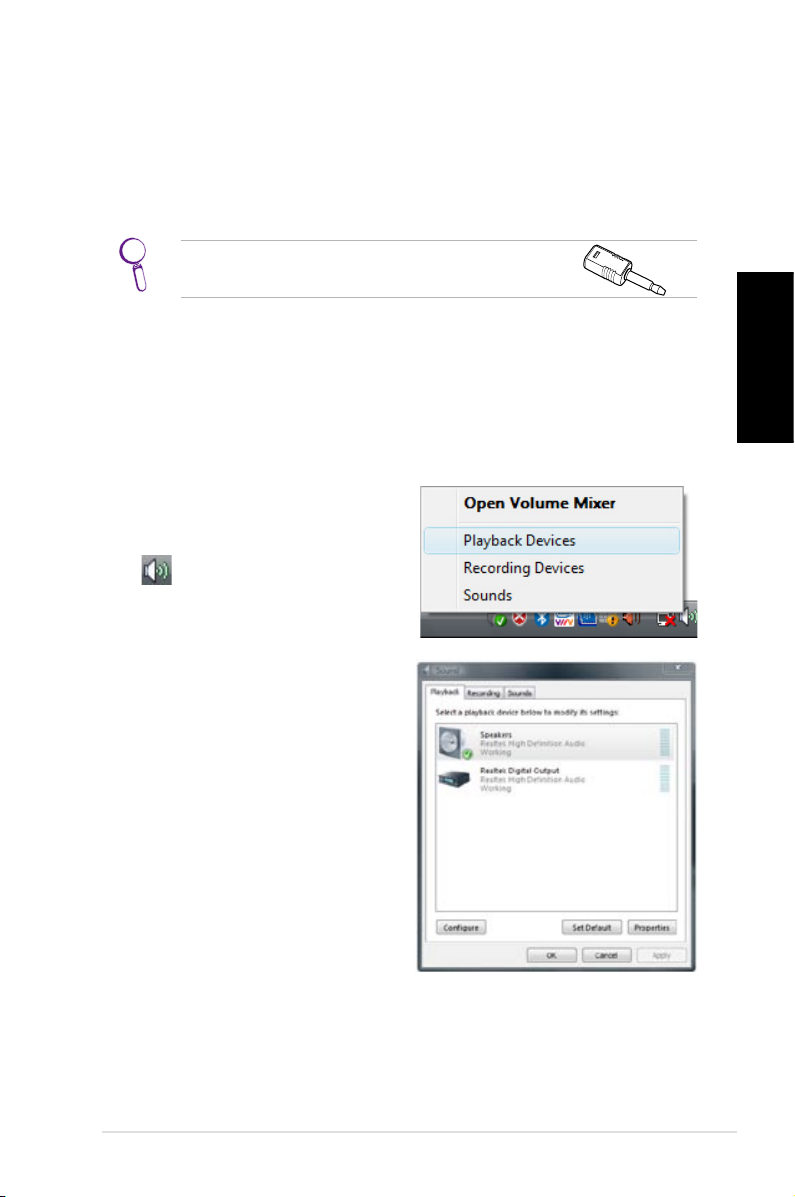
Connecting to digital speakers
• Digital output: Plug an audio cable with a mini jack-s/PDIF
adapter from the S/PDIF Out port on the system rear panel to
your amplifier.
Connect the mini jack-S/PDIF adapter before
connecting digital speakers.
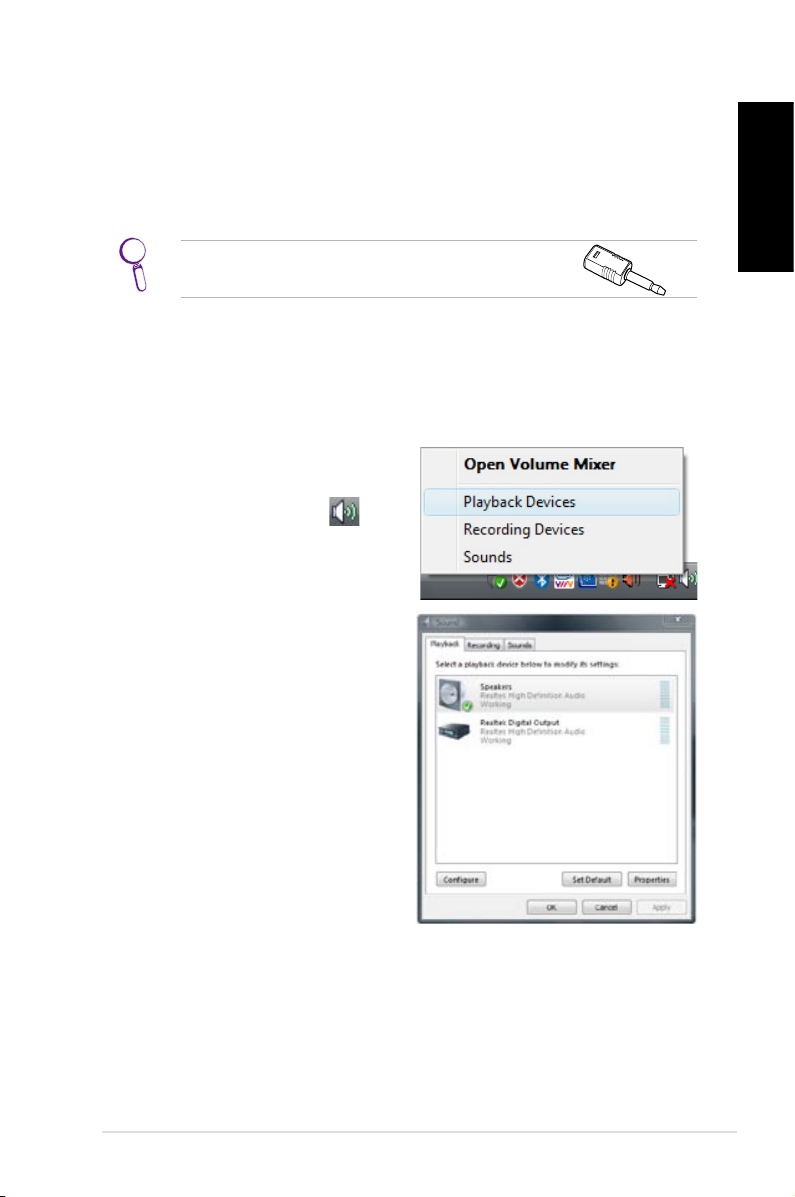
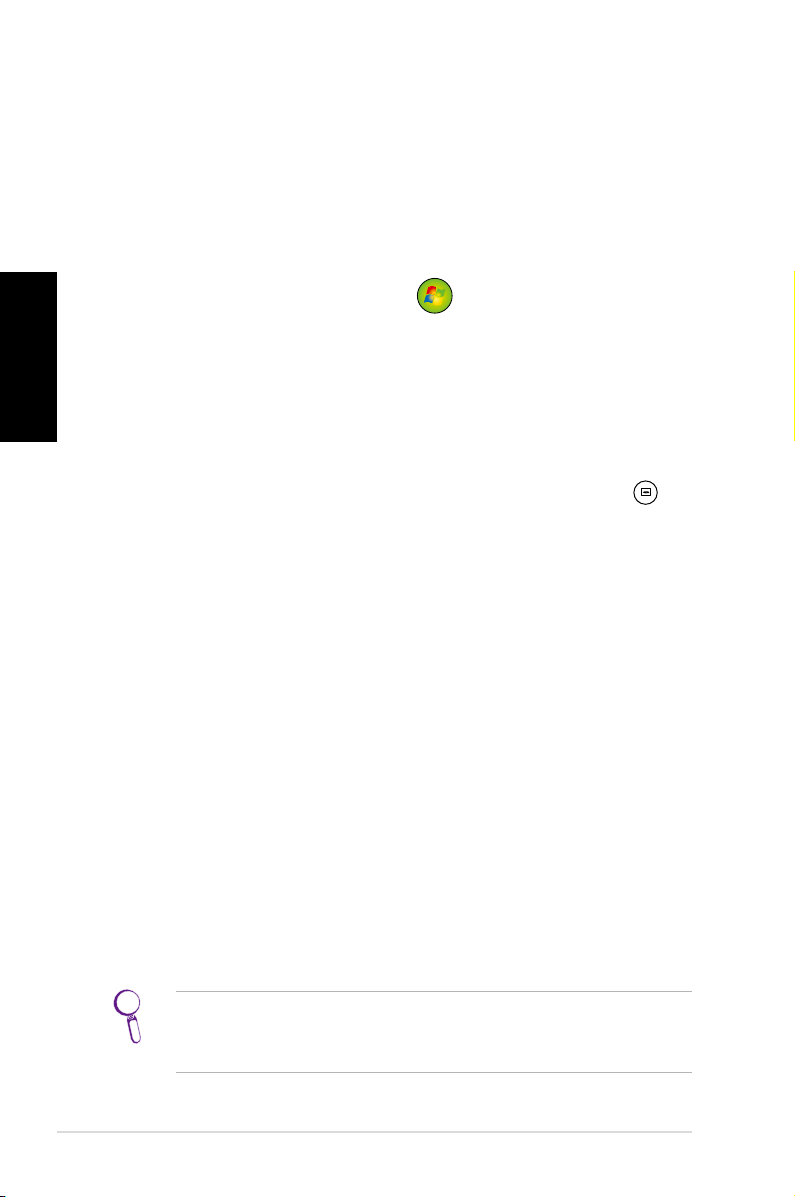
Configuring audio output settings
After connecting a speaker system to your NOVA P20/P22, follow
the steps below to configure audio output:
1. From the Windows® Vista™
taskbar, right-click on the
volume control icon
and then select Playback
Devices.
2. Under the Playback
window, select Speakers
and click Set Default if you
are using analog speakers.
Select Realtek Digital
Output if you are using
digital speakers.
English
3. Click
Configure after selecting Speakers and follow the on-
screen instructions to configure the settings. Click
Properties to configure your digital output preferences if
you select Realtek Digital Output.
ASUS NOVA P20/P22
9
Page 10
Using Windows Media Center
English
Starting Windows Media Center
You can take full control of the Windows Media Center using your
wireless keyboard and either of your remote controls.
To start Windows Media Center, do one of the following:
• Press the Media Center button
remote.
• From the Windows® desktop, click
Windows Media Center.
on your Media Center
Start > All Programs >
Watching DVDs
Insert a DVD into the Super Multi Drive and the DVD will be
played automatically. You can also press the DVD button on
the remote to play it.
Music
Music provides you with a complete music experience. You can
listen to CDs or other music files, create your own playlists, view
album information, and listen to music by albums, genres, artists,
etc. Refer to the user manual in the support DVD for detailed
instructions.
Pictures + Videos
Enjoy and manage your digital photos/videos or downloaded
pictures/videoclips using Pictures + Videos. You can browse the
pictures individually or playing them as a slide show with music
background. Refer to the user manual in the support DVD for
detailed instructions.
Refer to the user manual in the support DVD for the functions
and button definitions of the remote control.
Quick Start Guide
10
Page 11
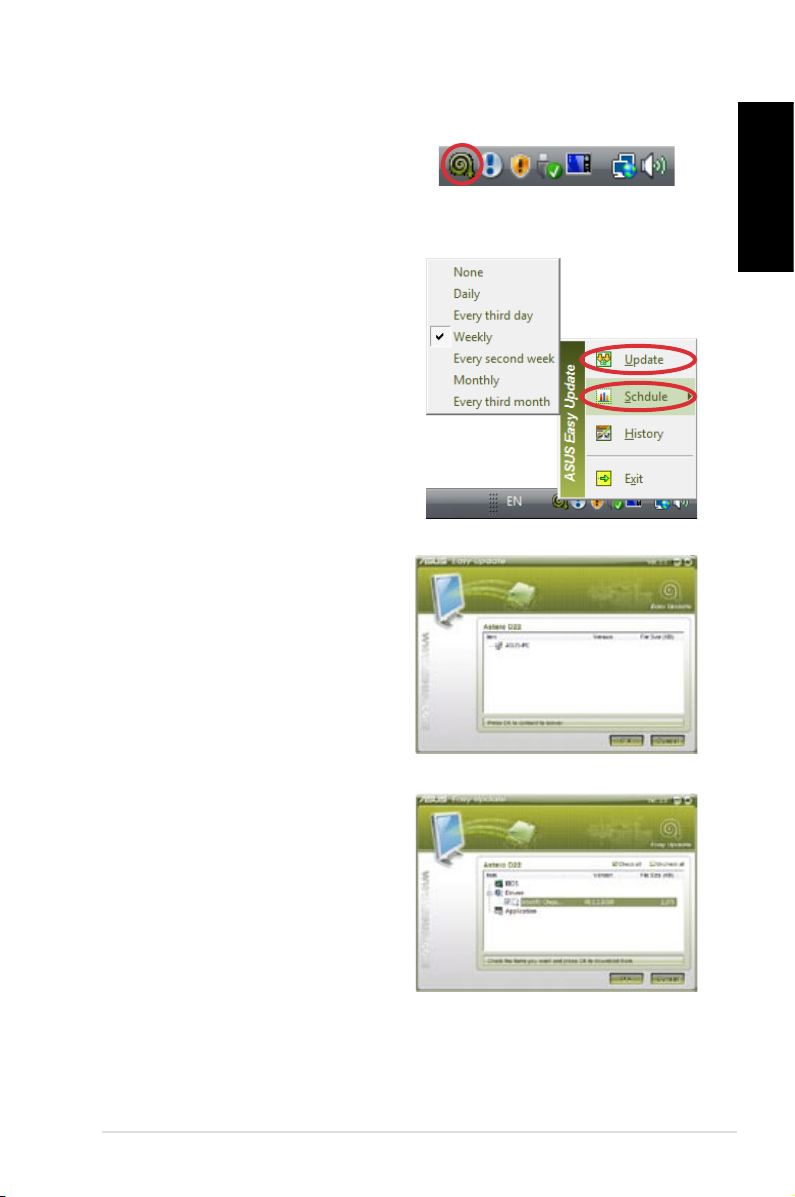
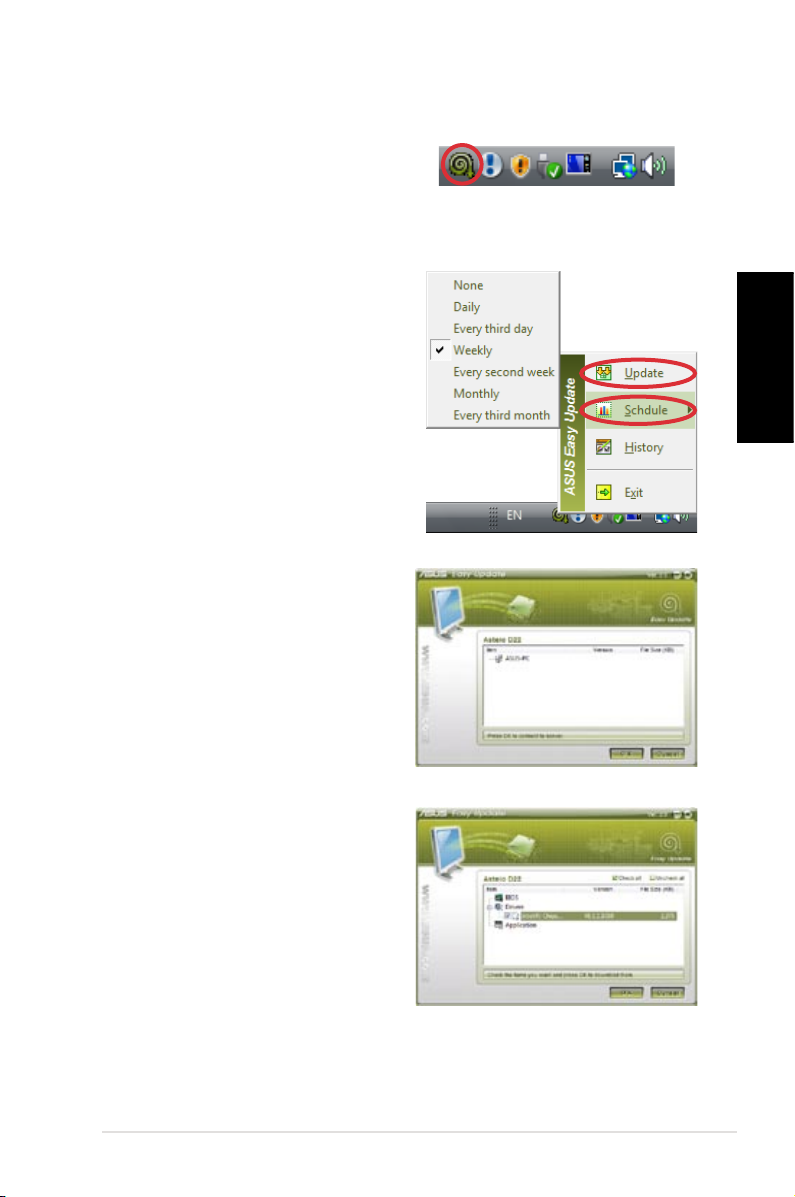
ASUS Easy Update
1. From the Windows® taskbar,
right-click on the ASUS Easy
Update icon.
2. Select Schedule to set how
often you want to update
your system.
3. Select
the update.
Update to activate
English
4. Click
5. Check the item(s) you want
OK to display the items
you can download.
to download, and then click
OK.
ASUS NOVA P20/P22
11
Page 12

Recovering your system
English
Using the Recovery DVD
The Recovery DVD includes an image of the operating system,
installed on your system at the factory. The Recovery DVD, working
with the Support DVD, provides a comprehensive recovery
solution that quickly restores your system to its original working
state, provided that your hard disk drive is in good working order.
Before using the Recovery DVD, copy your data files (such as
Outlook PST files) to floppy disks or to a network drive and make
note of any customized configuration settings (such as network
settings).
1. Insert the Recovery DVD into the optical drive (System needs
to be powered ON).
2. Restart the system and press
BIOS setup. Go to Boot > Boot Device Priority and select
the optical drive (may be labeled as “CDROM:XXXX”) as the
1st Boot Device.
3. Press
4.
Recover system to a partition only.
<F10> to save the configuration and reboot from the
Recovery DVD.
Select a partition option and click Next. Partition options:
<DEL> on bootup to enter the
This option will delete only the partition you select from
below, allowing you to keep other partitions, and create a
new system partition as drive “C”.
Recover system to entire HD.
This option will delete all partitions from your hard disk drive
and create a new system partition as drive “C”.
5. Follow the on-screen instructions to complete the recovery
process.
You will lose all your data during the system recovery. Ensure
to back up your important data before recovering your
system.
Quick Start Guide
12
Page 13
6. After the system recovery is completed, eject the the
Recovery DVD from the optical drive.
7. Restart the system and press
<DEL> on bootup to enter the
BIOS setup. Go to Boot > Boot Device Priority and reset the
hard disk drive (may be labeled as “HDD:XXXX”) as the 1st
Boot Device.
8. Press
<F10> to save the configuration and reboot the
system.
9. Insert the Support DVD into the optical drive.
10. Click
ASUS InstAll - Drivers Installation Wizard from the
Drivers tab and install all the drivers.
It may take some time to reinstall all the drivers. If the
screensaver starts, press any key to bring back the installation
screen.
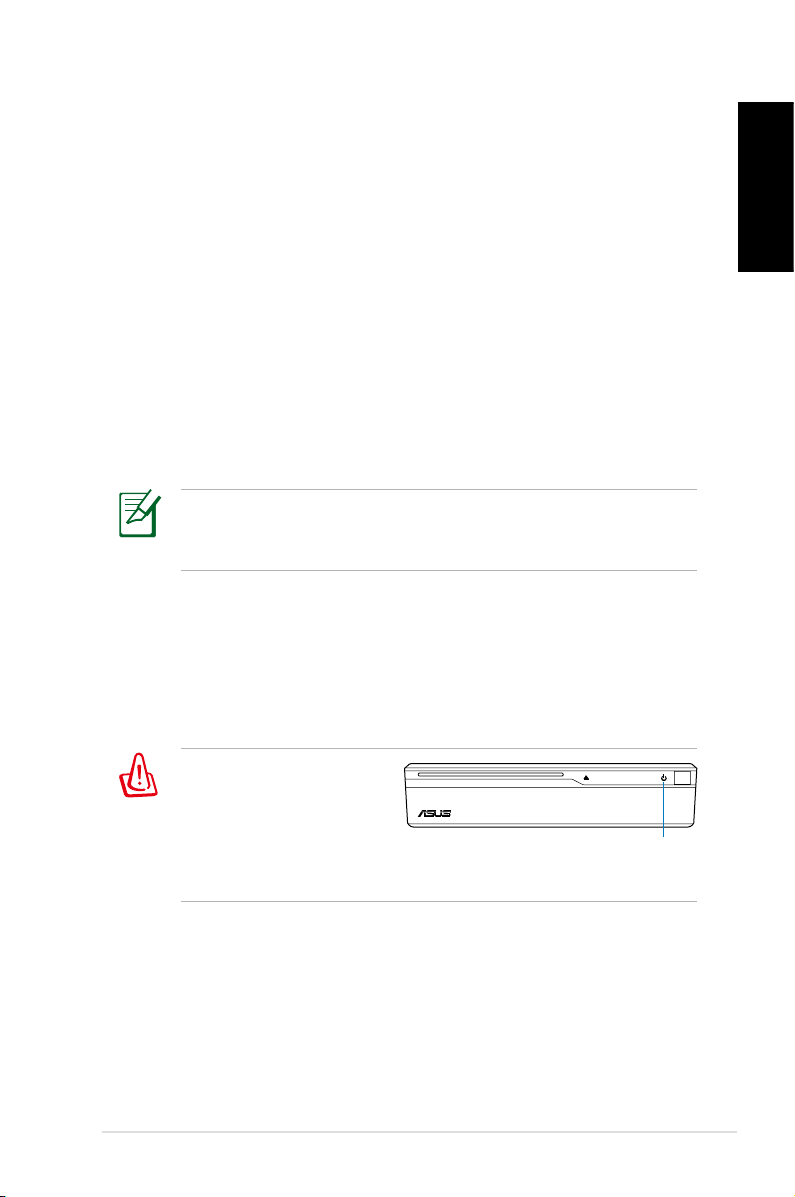
Crashfree BIOS
ASUS Crashfree BIOS allows you to restore the original BIOS data
from the support DVD in case when the BIOS update fails or the
BIOS codes and data are corrupted. Change the boot priority and
boot from your support DVD to restore your BIOS.
English
When you notice the
power LED blinks white
and hear two short
beeps followed by one
continuous beep at the
system startup, your BIOS codes are damaged.
power LED
Follow the instructions below to restore your BIOS:
1. Insert the Support DVD. The system will give two short beeps
and start restoring the BIOS. (No display on screen)
2. When the power LED stops blinking, the restoration is
completed.
3. Press the power switch to start the system. If the system
enters Windows OS, the BIOS has been restored.
ASUS NOVA P20/P22
13
Page 14

English
Using the Hidden Partition
The Recovery Partition includes an image of the operating
system, drivers, and utilities installed on your system at the
factory. The Recovery Partition provides a comprehensive
recovery solution that quickly restores your system’s software to
its original working state, provided that your hard disk drive is in
good working order. Before using the Recovery Partition, copy
your data files (such as Outlook PST files) to floppy disks or to a
network drive and make note of any customized configuration
settings (such as network settings).
DO NOT delete the partition named “RECOVERY.” The
Recovery Partition is created at the factory and cannot
be restored by the user if deleted. Take your system to an
authorized ASUS service center if you have problems with the
recovery process.
1. Press <F9> during bootup (requires a Recovery Partition)
2. Press
3. Read the “ASUS Preload Wizard” screen and click
4. Select a partition option and click
Recover Windows to a partition only.
<Enter> to select Windows Setup [EMS Enabled]
Next.
Next. Partition options:
This option will delete only the partition you select from
below, allowing you to keep other partitions, and create a
new system partition as drive “C”.
Recover Windows to entire HD.
This option will delete all partitions from your hard disk drive
and create a new system partition as drive “C”.
5. Follow the on-screen instructions to complete the recovery
process.
6. Reboot and insert the Support DVD into the optical drive.
7. Click
ASUS InstAll - Drivers Installation Wizard from the
Drivers tab and install all the drivers.
Quick Start Guide
14
Page 15

Bienvenido
OK
ABC
GHI
PQRS
CLEAR ENTER
TUV WXYZ
JKL MNO
DEF
1 2 3
4 5 6
7 8 9
0 #
Quick Guid
e
Enhorabuena por la compra del dispositivo ASUS NOVA P20/P22. La
siguiente ilustración muestra el contenido del paquete del nuevo
dispositivo ASUS NOVA P20/P22. Si alguno de los artículos siguientes
falta o está dañado, póngase en contacto son su distribuidor.
Contenido del paquete
P20/P22 Mando a distancia
Español
Adaptador
DVI-D-SUB
Base
Adaptador
miniconector-S/PDIF
Cable de
alimentación
Adaptador de CA
DVD de soporte
DVD de recuperación Guía rápida Tarjeta de garantía
ASUS NOVA P20/P22
15
Page 16
Preparar el dispositivo ASUS NOVA
CENTER/BASS FRONT
DVI
SURROUND
S/PDIF
OUT
S/PDIF
IN
DCIN
FRONT
CENTER/BASS
DVI
SURROUND
S/PDIF
OUT
S/PDIF
IN
DCIN
I
A continuación se exponen instrucciones rápidas para usar la
unidad ASUS NOVA.
1. Conecte el ratón y el teclado USB*
Español
2. Conecte el cable Ethernet
* El paquete no incluye el teclado ni el ratón USB. Adquiera
periféricos USB en función de sus necesidades.
Guía de inicio rápido
16
Page 17
FRONT
CENTER/BASS
DVI
SURROUND
S/PDIF
OUT
S/PDIF
IN
DCIN
1
2
3
3. Conecte el monitor.
FRONT
CENTER/BASS
DVI
SURROUND
S/PDIF
OUT
S/PDIF
IN
DCIN
4. Conecte el adaptador de CA
Español
5. Inicie la unidad ASUS NOVA
ASUS NOVA P20/P22
17
Page 18
Reconocer los componentes del
CENTER/BASS FRONT
DVI
SURROUND
S/PDIF
OUT
S/PDIF
IN
DCIN
dispositivo
Vista frontal
Español
1. Unidad óptica de inserción automática
2.
3. Conmutador de alimentación (sensible al tacto)
4. Puerto de infrarrojos
1 3 42
Expulsión electrónica de la unidad óptica (sensible al tacto)
Panel posterior
5 6 7 8
5. Entrada de alimentación (CC)
6. Puerto USB (2.0/1.1)
7. Salida de visualización
(monitor)
8. Puerto LAN
Vista inferior
12
11 10
9
9. Puerto de entrada de línea
(puerto de entrada S/PDIF)
10. Conector de salida de
auriculares
11. Conector de micrófono
12. Base de
conexiones*
*La base de
conexiones
opcional permite
expandir la
funcionalidad de la
unidad ASUS NOVA
cuando lo desee.
Guía de inicio rápido
18
Page 19
Congurar la conexión inalámbrica
Conexión de red inalámbrica
Para conectar el dispositivo a una red inalámbrica, siga estas instrucciones.
1. Mueva el cursor al icono de
red de la barra de tareas;
aparecerá el mensaje No
conectado.
2. Haga clic con el botón
secundario en el icono de
red y seleccione Conectarse
a una red.
Español
3. En la lista, seleccione la red
inalámbrica a la que desea
conectarse.
Seleccione Mostrar inalámbricas si tiene varias redes en su área.
ASUS NOVA P20/P22
19
Page 20
4. Cuando se conecte, puede
Español
5. Una vez establecida la
Conexión inalámbrica Bluetooth
Siga las instrucciones que se indican a continuación para crear una
conexión inalámbrica Bluetooth.
que tenga que insertar una
contraseña.
Esta pantalla no aparecerá
si no se necesita contraseña.
conexión, aparecerá el
mensaje Conectada.
1. Haga doble clic en el icono
Bluetooth de la barra de
tareas de Windows para iniciar
el asistente de conexión.
Guía de inicio rápido
20
Page 21

2. En la lista, seleccione el
dispositivo Bluetooth que
desee conectar y haga clic
en Siguiente para continuar.
3. Puede que tenga que
insertar la contraseña si
el dispositivo requiere
autenticación.
4. Cuando la pantalla de
configuración se complete,
haga clic en Siguiente para
continuar.
Español
5. Se mostrará el dispositivo
conectado.
ASUS NOVA P20/P22
21
Page 22
FRONT
S/PDIF
OUT
FRONT
S/PDIF
OUT
SURROUND
S/PDIF
IN
CENTER/BASS
Congurar la salida de audio
Configuraciones de los altavoces
Puede definir las siguientes configuraciones de altavoces en el sistema:
Nombre Sistema de altavoces
2 (estéreo) Altavoz izquierdo y altavoz derecho.
4 Dos altavoces frontales y dos traseros.
Español
5.1
Dos altavoces frontales, dos altavoces posteriores,
un altavoz central y un amplificador de graves.
Puerto
Azul claro Entrada de línea Envolvente
Auriculares
2 altavoces
6 altavoces S/PDIF
Entrada
S/PDIF
Lima Salida de línea Frontal Salida S/PDIF
Rosa
Entrada de
micrófono
Central/
Graves
Micrófono
Conectar altavoces analógicos
Consulte la tabla siguiente para obtener una descripción de los
conectores de audio situados en el panel posterior y de sus funciones.
Para altavoces estéreo
P20/P22
Para un sistema de altavoces de audio multicanal
P20/P22
Descripción
Frontal conecta altavoces estéreo.
Descripción
FRONTAL se conecta al puerto FRONTAL del
amplificador de graves.
ENVOLVENTE se conecta al puerto POSTERIOR
del amplificador de graves.
CENTRAL/GRAVES se conecta al puerto AMPLIFICA-
DOR DE GRAVES/CENTRAL del amplificador de graves.
Guía de inicio rápido
22
Page 23
Conectar altavoces digitales
• Salida digital: Enchufe un cable de audio con adaptador mini-
conector-S/PDIF entre el puerto Salida S/PDIF del panel posterior y el sistema al amplificador.
Enchufe el adaptador miniconector-S/PDIF
antes de conectar los altavoces estéreo.
Definir la configuración de salida de audio
Después de conectar un sistema de altavoces al dispositivo
NOVA P20/P22, siga los pasos que se indican a continuación para
configurar una salida de audio:
1. En la barra de tareas de Windows® Vista™, haga clic con el
botón secundario en el icono
del control de volumen y, a
continuación, seleccione Dis-
positivos de reproducción.
2. En la ventana Reproducción,
seleccione Altavoces y haga
clic en Establecer como
predeterminado si usa
altavoces analógicos. Seleccione Salida digital Realtek
si usa altavoces digitales.
Español
3. Haga clic en
Configurar después de seleccionar Altavoces y
siga las instrucciones de la pantalla para definir la configuración.
Haga clic en Propiedades para configurar las preferencias de la
salida digital si selecciona Salida digital Realtek.
ASUS NOVA P20/P22
23
Page 24
Usar Windows Media Center
Iniciar Windows Media Center
Puede controlar completamente Windows Media Center con el teclado
inalámbrico y cualquiera de los controles del mando a distancia.
Para iniciar Windows Media Center, realice el siguiente procedimiento:
Español
• Presione el botón Media Center situado en el mando a
• En el escritorio de Windows®, haga clic en
Ver DVD
Inserte un DVD en la unidad multiformato. El DVD se reproducirá
automáticamente. También puede presionar el botón DVD del
mando a distancia para reproducirlo.
Música
La función Música le proporciona una experiencia musical
completa. Puede escuchar CD u otros archivos de música, crear
sus propias listas de reproducción, ver información del álbum y
escuchar la música por álbumes, géneros, artistas, etc. Consulte el
manual del usuario incluido en el DVD de soporte para obtener
instrucciones detalladas.
Imágenes + Vídeos
Disfrute de las fotografías digitales y los vídeos o de las fotografías y clips de vídeo descargados con la función Imágenes +
Vídeos. Puede examinar las imágenes individualmente o reproducirlas como una presentación de diapositivas con música
de fondo. Consulte el manual del usuario incluido en el DVD de
soporte para obtener instrucciones detalladas.
distancia de Media Center.
Inicio > Todos los
programas > Windows Media Center.
Guía de inicio rápido
24
Consulte el manual del usuario incluido en el CD de soporte
para conocer las funciones y las definiciones de los botones
del mando a distancia.
Page 25
Actualización sencilla de ASUS
1. En la barra de tareas de Windows®,
haga clic con el botón secundario
del ratón en el icono Actualización
sencilla de ASUS.
2. Seleccione Programar para
establecer la frecuencia con
la que desea actualizar el
sistema.
3. Seleccione
activar la actualización.
Actualizar para
Español
4. Haga clic en
mostrar los elementos que
puede descargar.
5. Seleccione los elementos
que desea descargar y haga
clic en Aceptar.
Aceptar para
ASUS NOVA P20/P22
25
Page 26

Recuperar el sistema
Utilizar el DVD de recuperación
El DVD de recuperación incluye una imagen del sistema operativo,
instalada en el equipo portátil en la propia fábrica. El CD de recuperación,
junto con el DVD de soporte, proporciona una solución de recuperación
total que restaura rápidamente sistema a su estado de trabajo original
siempre que la unidad de disco duro se encuentre en buen estado
Español
de funcionamiento. Antes de utilizar el DVD de recuperación, copie
los archivos de datos (como por ejemplo los archivos PST de Outlook)
en los disquetes o en una unidad de red y anote las configuraciones
personalizadas (como por ejemplo la configuración de red).
1. Inserte el DVD de recuperación en la unidad óptica (es
2. Reinicie el sistema y presione la tecla
3. Presione
4.
necesario que el sistema esté ENCENDIDO).
<SUPR> durante el
arranque para entrar en la configuración del BIOS. Vaya a
Arranque del sistema > Prioridad de dispositivos de
arranque y selecciona la unidad óptica (puede tener la etiqueta
“CDROM:XXXX”) como el primer dispositivo de arranque.
<F10> para guardar la configuración y reiniciar el
sistema desde el DVD de recuperación.
Seleccione una opción de partición y haga clic en Siguiente.
Opciones de partición:
Recuperar el sistema solamente en una partición.
Esta opción eliminará solamente la partición seleccionada,
permitiendo conservar otras opciones y creará una nueva
partición del sistema como unidad “C”.
Recuperar el sistema en toda la unidad de disco duro.
Esta opción eliminará todas las particiones de la unidad de
disco duro y creará una nueva partición como unidad “C”.
5. Siga las instrucciones que aparezcan en la pantalla para
completar el proceso de recuperación.
Se perderán todos los datos durante la recuperación del
sistema. Asegúrese de realizar una copia de seguridad de los
datos importantes antes de recuperar el sistema.
Guía de inicio rápido
26
Page 27
6. Una vez recuperado el sistema, expulse el DVD de recuperación
de la unidad óptica.
7. Reinicie el sistema y presione la tecla <SUPR> durante el
arranque para entrar en la configuración del BIOS. Vaya a
Arranque del sistema > Prioridad de dispositivos de
arranque y restablezca la unidad de disco duro (puede tener la
etiqueta “HDD:XXXX”) como el primer dispositivo de arranque.
8. Presione <F10> para guardar la configuración y reiniciar el sistema.
9. Inserte el DVD de soporte en la unidad óptica.
10. En la ficha
Controladores, haga clic en Instalar ASUS -
Asistente para la instalación de controladores e instale
todos los controladores.
La reinstalación de todos los controladores puede tardar
varios minutos. Si se inicia el protector de pantalla, presione
cualquier tecla para recuperar la pantalla de instalación.
Crashfree BIOS
La utilidad ASUS Crashfree BIOS permite restaurar los datos
del BIOS originales desde el DVD de soporte en caso de que la
actualización del BIOS no se pueda realizar o de que los códigos y
los datos del BIOS estén dañados. Cambie la prioridad de arranque
e inicie la unidad desde el DVD de soporte para restaurar el BIOS.
Español
Si observa que el LED de
alimentación parpadea
en color blanco y escucha
dos pitidos breves
seguidos de un pitido
continuo durante el arranque del sistema, significa que los
códigos del BIOS están dañados.
LED de alimentación
Siga las instrucciones siguientes para restaurar el BIOS:
1. Inserte el DVD de soporte. El sistema emitirá dos pitidos
breves e iniciará el restablecimiento del BIOS. (No se muestra
nada en la pantalla)
2. Cuando el LED de alimentación deje de parpadear, la
restauración se habrá completado.
3. Presione el conmutador de encendido para arrancar el
sistema. Si el sistema entra en el sistema operativo Windows,
el BIOS se habrá restaurado.
ASUS NOVA P20/P22
27
Page 28

Utilizar la partición oculta
La partición de recuperación incluye una imagen del sistema
operativo, los controladores y las utilidades instalados en el sistema
en la propia fábrica. La partición de recuperación proporciona una
solución de recuperación total que restaura rápidamente el software
del sistema a su estado de trabajo original siempre que la unidad de
disco duro se encuentre en buen estado de funcionamiento. Antes
Español
de utilizar la partición de recuperación, copie los archivos de datos
(como por ejemplo los archivos PST de Outlook) en los disquetes o
en una unidad de red y anote las configuraciones personalizadas
(como por ejemplo la configuración de red).
1. Presione la tecla <F9> durante el arranque (requiere una
2. Presione
3. Lea la pantalla “Asistente de precarga de ASUS” y haga clic en
4. Seleccione una opción de partición y haga clic en
Recuperar Windows solamente en una partición.
NO elimine la partición denominada “RECOVERY.” La partición
de recuperación se crea en la propia fábrica y no se podrá
restaurar si el usuario la elimina. Lleve el sistema a un centro de
servicio técnico de ASUS autorizado si tiene problemas con el
proceso de recuperación.
partición de recuperación)
<Entrar> para seleccionar Configuración de
Windows [EMS habilitado]
Siguiente.
Siguiente.
Opciones de partición:
Esta opción eliminará solamente la partición seleccionada,
permitiendo conservar otras opciones y creará una nueva
partición del sistema como unidad “C”.
Recuperar Windows en toda la unidad de disco duro.
Esta opción eliminará todas las particiones de la unidad de
disco duro y creará una nueva partición como unidad “C”.
5. Siga las instrucciones que aparezcan en la pantalla para
completar el proceso de recuperación.
6. Reinicie el sistema e inserte el DVD de soporte en la unidad
óptica.
7. En la ficha Controladores, haga clic en Instalar ASUS - Asistente para
la instalación de controladores e instale todos los controladores.
Guía de inicio rápido
28
Page 29
Bienvenue
OK
ABC
GHI
PQRS
CLEAR ENTER
TUV WXYZ
JKL MNO
DEF
1 2 3
4 5 6
7 8 9
0 #
Quick Guid
e
Félicitations pour l’achat du ASUS NOVA P20/P22. Les illustrations suivantes font état du contenu de la boîte de votre ASUS
NOVA P20/P22. Pour plus de détails, reportez-vous au manuel
d'utilisation contenu dans le DVD de support.
Contenu de la boîte
P20/P22 Télécommande
Français
Adaptateur DVI-D-
Sub
Socle
DVD de restauration
Adaptateur mini
jack-S/PDIF
Cordon
d’alimentation
Guide de démarrage
rapide
Adaptateur secteur
DVD de support
Carte de garantie
ASUS NOVA P20/P22
29
Page 30
Preparer votre ASUS NOVA
CENTER/BASS FRONT
DVI
SURROUND
S/PDIF
OUT
S/PDIF
IN
DCIN
FRONT
CENTER/BASS
DVI
SURROUND
S/PDIF
OUT
S/PDIF
IN
DCIN
I
Suivez les instructions ci-dessous pour utiliser votre ASUS NOVA.
1. Connectez un clavier et une souris USB*.
Français
2. Connectez le câble Ethernet.
* La boîte de votre produit n'inclut pas de clavier/souris USB.
Veuillez faire l'achat de ces périphériques selon vos besoins.
Guide de démarrage rapide
30
Page 31

FRONT
CENTER/BASS
DVI
SURROUND
S/PDIF
OUT
S/PDIF
IN
DCIN
1
2
3
3. Connectez un moniteur.
FRONT
CENTER/BASS
DVI
SURROUND
S/PDIF
OUT
S/PDIF
IN
DCIN
4. Connectez l'adaptateur secteur.
Français
5. Démarrez votre ASUS NOVA.
ASUS NOVA P20/P22
31
Page 32

Introduction
CENTER/BASS FRONT
DVI
SURROUND
S/PDIF
OUT
S/PDIF
IN
DCIN
Vue avant
1 3 42
1. Lecteur optique
2. Capteur d'éjection du lecteur optique (tactile)
3. Capteur d’alimentation (tactile)
4. Port infrarouge
Français
Vue arrière
5. Port d’alimentation (CC)
6. Port USB (2.0/1.1)
7. Port DVI
8. Port LAN
Dessous
11 10
9
5 6 7 8
9. Port d'entrée audio (port
S/PDIF in)
10. Port casque
11. Port microphone
12. Connecteur pour
station d'accueil*
*La station d'accueil op-
12
tionnelle permet d'accueillir de futures mises
à niveau matérielles
pour le ASUS NOVA.
Guide de démarrage rapide
32
Page 33

Congurer u réseau sans l
Connexion à un réseau sans fil
Suivez les instructions ci-dessous pour vous connecter à un
réseau sans fil:
1. Déplacez le curseur de la
souris sur l'icône réseau de
la barre des tâches pour
visualiser le message Non
Connecté.
2. Faites un clic droit sur l'icône réseau et sélectionnez
Connexion à un réseau.
Français
3. Sélectionnez le réseau sans
fil auquel vous souhaitez
vous connecter depuis la
liste des réseaux sans fil disponibles.
Sélectionnez Afficher: Sans fil pour n'afficher que les réseaux
sans fil.
ASUS NOVA P20/P22
33
Page 34

4. La saisie d'un mot de passe
peut être nécessaire.
Cet écran n'apparaîtra pas
si la saisie d'un mot de
passe n'est pas requise.
5. Une fois la connexion éta
Français
Connexion Bluetooth
Suivez les instructions ci-dessous pour créer une connexion sans
fil Bluetooth.
1. Double-cliquez sur l'icône
-
blie, le statut Connecté
apparaîtra.
Bluetooth de la barre des tâches de Windows pour lancer l'assistant de connexion.
Guide de démarrage rapide
34
Page 35

2. Sélectionnez le périphérique Bluetooth auquel vous
souhaitez vous connecter et
cliquez sur Next (Suivant)
pour continuer.
3. La saisie d'un mot de passe
peut être nécessaire si le
périphérique requiert une
authentification.
4. Une fois l'installation
terminée, cliquez sur Next
(Suivant) pour continuer.
Français
5. Le périphérique auquel vous
êtes connecté apparaît à
l'écran.
ASUS NOVA P20/P22
35
Page 36

FRONT
S/PDIF
OUT
FRONT
S/PDIF
OUT
SURROUND
S/PDIF
IN
CENTER/BASS
Congurations audio
Configurations de haut-parleurs
Les configurations de haut-parleurs suivantes sont disponibles:
Nom Système de haut-parleur
2.0 (stéréo) Haut-parleur gauche, Haut-parleur droit.
4.0
5.1
2 haut-parleurs avants, 2 haut-parleurs arrières.
2 haut-parleurs avants, 2 haut-parleurs arrières, 1
haut-parleur central et un caisson de basse.
Port
Bleu clair Entrée audio Surround Entrée S/PDIF
Français
Vert Sortie audio H-P avant Sortie S/PDIF
Rose Entrée micro
Connecter des haut-parleurs analogiques
Référez-vous au tableau ci-dessous pour la description des
connecteurs audio du panneau arrière.
Pour les haut-parleurs stéréo
Pour un système de haut-parleurs multi-canaux
Casque
2 canaux
P20/P22 Description
Front est dédié à la connexion de haut-parleurs
stéréo.
P20/P22 Description
FRONT se connecte au port FRONT du caisson de
basse.
SURROUND se connecte au port REAR du caisson
de basse.
CENT/BASS se connecte au port SUB/CENTER du
caisson de basse.
6 canaux S/PDIF
H-P central/
Basse
Micro
Guide de démarrage rapide
36
Page 37

Connecter des haut-parleurs numériques
• Sortie numérique: connectez, à l’aide d’un câble audio, le
port S/PDIF Out de votre système à votre amplificateur.
N'oubliez pas d'utiliser l'adatateur mini jack
vers S/PDIF avant de connecter des hautparleurs stéréo.
Configurer les paramètres de sortie audio
Après avoir connecté un système de haut-parleurs à votre
NOVA P20/P22, suivez les étapes ci-dessous pour configurer les
paramètres audio:
1. Dans la barre des tâches
de Windows® Vista™, faites
un clic droit sur l’icône de
contrôle du volume et
sélectionnez Périphériques
de lecture.
2. Depuis l’onglet Lecture,
sélectionnez Haut-parleurs
et cliquez sur Par défaut
si vous utilisez des hautparleurs analogiques. Sélectionnez Realtek Digital
Output si vous utilisez des
haut-parleurs numériques.
Français
3. Cliquez sur
Configurer après avoir sélectionné votre système
de haut-parleurs et suivez les instructions apparaissant à
l’écran pour terminer la configuration. Cliquez sur Propriétés
pour configurer vos préférences de sortie numérique si vous
avez précédemment sélectionné Realtek Digital Output.
ASUS NOVA P20/P22
37
Page 38

Utiliser Windows Media Center
Démarrer Windows Media Center
Vous pouvez totalement contrôler Windows Media Center à l'aide
d'un clavier sans fil et de l'une des télécommandes fournie.
Vous pouvez lancer Windows Media Center des deux manières
suivantes:
•
•
Regarder un DVD
Français
Insérez un DVD dans le lecteur optique de votre PC Multimédia
pour en lancer automatiquement la lecture. Vous pouvez aussi
appuyez sur le bouton DVD de la télécommande.
Musique
La fonction Musique vous offre une expérience d’écoute complète. Vous pouvez écouter des CD ou tout autre fichier audio,
afficher les informations des artistes, créer vos propres listes
de lecture, classer et écouter vos fichiers par genre, artiste, etc.
Reportez-vous au manuel d’utilisation contenu dans le DVD de
support pour plus d’informations.
Appuyez sur le bouton de la télécommande Media Center.
Dans le bureau de Windows®, cliquez sur Démarrer > Tous les
programmes > Windows Media Center.
Images + vidéos
La fonction Images + vidéos vous permet de visualiser et de vos
photos numériques/vidéos. Vous pouvez visualiser les photos
individuellement ou en diaporama avec de la musique. Reportezvous au manuel d’utilisation contenu dans le DVD de support
pour plus d’informations.
Référez-vous au manuel d'utilisation contenu dans le DVD de
support pour une description des boutons et des fonctions
de la télécommande.
Guide de démarrage rapide
38
Page 39

ASUS Easy Update
1. Dans la barre des tâches Windows®, faites un clic droit sur
l’icône ASUS Easy Update.
2. Sélectionnez Schedule
(Programmer) pour
déterminer à quelle
fréquence vous souhaitez
que le système soit mis à jour.
3. Sélectionnez
à jour) pour activer la mise à
jour.
Update (Mettre
4. Cliquez sur
les éléments que vous
souhaitez télécharger.
5. Cochez le(s) élément(s) que
vous souhaitez télécharger,
puis cliquez sur OK.
OK pour afficher
Français
ASUS NOVA P20/P22
39
Page 40

Restaurer le système
Utiliser le DVD de restauration
Le DVD de restauration contient une image du système
d'exploitation installé sur votre système en usine. Le DVD de
restauration, en plus du DVD de support, offre une solution de
restauration complète permettant de restaurer rapidement votre
système dans son état de fonctionnement d'origine, à condition
que votre disque dur soit en bon état. Avant d'utiliser le DVD de
restauration, copiez vos données sur une disquette ou un lecteur
réseau et prenez note de tous vos paramètres de configuration
personnalisés (tels que vos paramètres réseau).
1. Insérez le DVD de restauration dans le lecteur optique (le
Français
2. Redémarrez le système et appuyez sur
3. Appuyez sur
4.
système doit être sous tension).
<Suppr> au démarrage
pour accéder au BIOS. Allez sur Boot > Boot Device Priority
et sélectionnez le lecteur optique (normalement identifié
“CDROM:XXXX”) comme périphérique de boot primaire.
<F10> pour sauvegarder la configuration et
redémarrer à partir du DVD de restauration.
Sélectionnez une option de partitionnage et cliquez sur
Next. Options de partitionnage:
Recover system to a partition only.
(Restaurer le système sur une seule partition)
Cette option ne supprimera que la partition sélectionnée, vous
permettant ainsi de conserver d’autres partitions et de créer
une nouvelle partition système nommée Lecteur (C:).
Recover system to entire HD.
(Restaurer la totalité du disque dur)
Cette option supprimera toutes les partitions de votre disque dur
pour créer une nouvelle partition système nommée Lecteur (C:).
Toutes vos données seront perdues lors du processus
de restauration. Assurez-vous d'avoir fait une copie de
sauvegarde de vos données avant de restaurer le système.
Guide de démarrage rapide
40
Page 41

5. Suivez les instructions apparaissant à l’écran pour terminer le
processus de restauration.
6. Une fois terminé, éjectez le DVD de restauration.
7. Redémarrez le système et appuyez sur
<Suppr> au démarrage
pour accéder au BIOS. Allez sur Boot > Boot Device Priority
et reconfigurez le disque dur (normalement identifié “HDD:
XXXX”) comme périphérique de boot primaire.
8. Appuyez sur
<F10> pour sauvegarder la configuration et
redémarrer le système.
9. Insérez le DVD de restauration dans le lecteur optique.
10. Cliquez sur
ASUS InstAll - Drivers Installation Wizard
depuis l'onglet Drivers pour installer tous les pilotes.
Le processus d'installation des pilotes peut prendre plusieurs
minutes. Si l'économiseur d'écran se lance, appuyez sur n'importe
quelle touche de votre clavier pour afficher l'écran d'installation.
Crashfree BIOS
ASUS Crashfree BIOS permet de restaurer le BIOS à partir du DVD
de support au cas où une erreur surviendrait lors de sa mise à jour
ou si celui-ci est corrompu. Modifiez la priorité de boot du système
et démarrez depuis le DVD de support pour restaurer le BIOS.
Lorsque la LED
d'alimentation clignote
en blanc et deux bips
courts suivis d'un bip
continu se font entendre
au démarrage du système, le BIOS est corrompu.
Suivez les instructions ci-dessous pour restaurer le BIOS:
1. Insérez le DVD de support. Le système émettra deux bips courts
et lancera la restauration du BIOS. (Pas d'affichage à l'écran).
2. Lorsque la LED d'alimentation arrête de clignoter, le proces
sus de restauration est terminé.
3. Appuyez sur l'interrupteur d'alimentation pour démarrer le
système. Si le système peut accéder au système d'exploitation Windows, la restauration du BIOS a réussie.
LED d'alimentation
-
ASUS NOVA P20/P22
Français
41
Page 42

Utiliser la partition cachée
La partition de restauration contient une image du système
d'exploitation, des pilotes et des utilitaires installés sur votre
système en usine. La partition de restauration offre une
solution de restauration complète permettant de restaurer
rapidement la partie logicielle de votre système dans son état de
fonctionnement d'origine, à condition que votre disque dur soit
en bon état. Avant d'utiliser la partition de restauration, copiez
vos données sur une disquette ou un lecteur réseau et prenez
note de tous vos paramètres de configuration personnalisés (tels
que vos paramètres réseau).
Français
1. Appuyez sur <F9> lors du démarrage (requiert une partition
2. Appuyez sur <Entrée> pour sélectionner Windows Setup
3. Lisez l'écran “ASUS Preload Wizard” et cliquez sur
4. Sélectionnez une option de partitionnage et cliquez sur
NE PAS supprimer la partition nommée “RECOVERY.” La partition
de restauration est créée en usine et ne pourra être restaurée
par l'utilisateur si celle-ci est supprimée. Amenez votre système
à l'un des centres de service agréés par ASUS si vous rencontrez
des problèmes lors du processus de restauration.
de restauration)
[EMS Enabled]
Next.
Next. Options de partitionnage:
Recover system to a partition only.
(Restaurer le système sur une seule partition)
Cette option ne supprimera que la partition sélectionnée, vous
permettant ainsi de conserver d’autres partitions et de créer
une nouvelle partition système nommée Lecteur (C:).
Recover system to entire HD.
(Restaurer la totalité du disque dur)
Cette option supprimera toutes les partitions de votre disque dur
pour créer une nouvelle partition système nommée Lecteur (C:).
5. Suives les instructions apparaissant à l’écran pour terminer le
processus de restauration.
6. Redémarrez et insérez le DVD de support dans le lecteur optique.
7. Cliquez sur
ASUS InstAll - Drivers Installation Wizard
depuis l'onglet Drivers pour installer tous les pilotes.
Guide de démarrage rapide
42
Page 43

Benvenuto
OK
ABC
GHI
PQRS
CLEAR ENTER
TUV WXYZ
JKL MNO
DEF
1 2 3
4 5 6
7 8 9
0 #
Quick Guid
e
Complimenti per l' acquisto di ASUS NOVA P20/P22. I capitoli
seguenti forniscono informazioni sulle modalità di utilizo del
nuovo ASUS NOVA P20/P22. Per uleriori dettagli, riferirsi al
manuale utente nel DVD di supporto.
Contenuto della Confezione
P20/P22 Telecomando
Adattatore DVI /
D-Sub
Adattatore per
mini jack-S/PDIF
Adattatore AC
Supporto di sostegno Cavo Alimentazione DVD di Supporto
DVD di Recupero Guida Rapida Garanzia
ASUS NOVA P20/P22
Italiano
43
Page 44

Italiano
CENTER/BASS FRONT
DVI
SURROUND
S/PDIF
OUT
S/PDIF
IN
DCIN
FRONT
CENTER/BASS
DVI
SURROUND
S/PDIF
OUT
S/PDIF
IN
DCIN
I
Preparazione di ASUS NOVA
Di seguito sono indicate alcune rapide istruzioni per l' utilizzo di
ASUS NOVA.
1. Collegare il muose e la tastiera USB *
2. Collegare il cavo Ethernet
* Il contenuto della confezione non comprende il mouse e la
tastiera USB. Acquistare le periferiche USB in base alle proprie
esigenze.
Guida Rapida
44
Page 45

FRONT
CENTER/BASS
DVI
SURROUND
S/PDIF
OUT
S/PDIF
IN
DCIN
1
2
3
3. Collegare il monitor.
FRONT
CENTER/BASS
DVI
SURROUND
S/PDIF
OUT
S/PDIF
IN
DCIN
4. Collegare l' adattatore AC
Italiano
5. Attivare ASUS NOVA
ASUS NOVA P20/P22
45
Page 46

Descrizione dei Componenti
CENTER/BASS FRONT
DVI
SURROUND
S/PDIF
OUT
S/PDIF
IN
DCIN
Lato Frontale
1 3 42
1. Unità Ottica Slot-in
2. Espulsione Elettronica dell' Unità Ottica (a sensibilità tattile)
3.
Pulsante di Accensione (a sensibilità tattile)
4. Porta a Infrarossi
Italiano
Lato Posteriore
5 6 7 8
5. Ingresso Alimentazione (DC)
6. Porta USB
(2.0/1.1)
7. Uscita Display (Monitor)
8. Porta LAN
Lato Inferiore
12
11 10
9
9. Porta Line in (porta S/PDIF in)
10. Jack Uscita Cuffie
11. Jack Microfono
12. Connectore
Docking *
*Il docking
consente future
possibilità di
espansione di
ASUS NOVA.
46
Guida Rapida
Page 47

Congurazione Connessione
Wireless
Connessione di Rete senza Fili
Per stabilire una connessione di rete senza fili, seguire le istruzioni
sottostanti.
Muovere il cursore sull'
1.
icona di rete sulla barra delle
applicazioni ed appare il
messaggio Not Connected
(Non collegato).
2. Cliccare con il tasto di
destra sull' icona di rete e
selezionare Connect to a
network (Connetti ad una
rete).
3. Selezionare dall' elenco
la rete senza fili a cui
connettersi.
Selezionare Show Wireless (Mostra Wireless) ,in presenza di
molte reti nella zona.
ASUS NOVA P20/P22
Italiano
47
Page 48

Italiano
4. In fase di connessione,
potrebbe essere richiesta
Questa scherm a ta non
appare se la pa s sword
non è necessaria .
Allo stabilirsi della
5.
connessione, appare il
messaggio Connected
(Collegato).
Connessione senza Fili Bluetooth
Seguire le sottostanti istruzioni per stabilire una connessione
senza fili Bluetooth.
48
Cliccare due volte sull' icona
1.
Bluetooth, sulla barra delle
applicazioni di Windows,
ed avviare il programma di
connessione guidata.
Guida Rapida
Page 49

2. Selezionare dall' elenco il
dispositivo Bluetooth a cui
collegarsi e cliccare Next
(Avanti) per continuare.
3. In caso di richiesta di
autenticazione, è necessario
inserire la password.
4. Al termine della
configurazione, cliccare
Next (Avanti) per
continuare.
5. Sarà visualizzato il
dispositivo connesso.
ASUS NOVA P20/P22
Italiano
49
Page 50

Congurazione dell' Uscita Audio
FRONT
S/PDIF
OUT
FRONT
S/PDIF
OUT
SURROUND
S/PDIF
IN
CENTER/BASS
Configurazioni degli Altoparlanti
Il sistema può essere configurato nei seguenti modi:
Nome Sistema di Altoparlanti
2 (stereo) Altoparlante sinistro, altoparlante destro.
4 Due altoparlanti frontali e due posteriori.
5.1
Due altoparlanti frontali , due posteriori, uno centrale e un subwoofer.
Italiano
Porta
2-altoparlanti
cuffie
6-altoparlanti S/PDIF
Blu chiaro Line In Surround S/PDIF in
Lime Line Out Frontale S/PDIF out
Rosa Mic In Centro/Basso Mic
Connessione con Altoparlanti Analogici
Riferirsi alle tabelle sottostanti per i connettori audio sul pannello
posteriore e per le rispettive funzioni.
Altoparlanti Stereo
P20/P22 Descrizione
Front: collega con altoparlanti stereo.
Sistema di Altoparlanti con Audio Multi-Canale
P20/P22 Descrizione
FRONT collega alla porta FRONT sul subwoofer.
SURROUND collega alla porta REAR (posteriore)
sul subwoofer.
CENT/BASS collega alla porta SUB/CENTER sul
subwoofer.
50
Guida Rapida
Page 51

Connessione con Altoparlanti Digitali
• Uscita Digitale: Inserire un cavo audio, con un adattatore mini
jack-s/PDIF, dalla porta S/PDIF Out, sul pannello posteriore del
sistema, in un amplificatore.
Prima di collegare gli altoparlanti stereo,
inserire l' adattatore mini jack-S/PDIF .
Configurazione Impostazioni Uscita Audio
Dopo aver collegato un sistema di altoparlanti a NOVA P20/P22,
seguire la procedura sottostante e configurare l' uscita audio:
1. Dalla barra delle
applicazioni Windows®
Vista™, cliccare con il tasto
di destra sull’ icona per la
regolazione del volume
e poi selezionare Playback
Devices (Dispositivi di
Riproduzione).
2. Con altoparlanti analogici,
alla pagina Playback
(Riproduzione), selezionare
Speakers (Altoparlanti)
e poi cliccare Set Default
(Imposta Predefiniti).
Con altoparlanti digitali,
selezionare Realtek Digital
Output (Uscita Digitale
Realtek) e poi cliccare
Set Default (Imposta
Predefiniti).
Italiano
3. Dopo aver selezionato
Speakers (Altoparlanti), cliccare
Configure (Configura) e seguire le istruzioni sullo schermo
per la configurazione delle impostazioni. Selezionando
Realtek Digital Output, cliccare Properties (Proprietà) per
configurare le preferenze per l’ uscita digitale.
ASUS NOVA P20/P22
51
Page 52

Windows Media Center
Avvio di Windows Media Center
Assumere il comando di Windows Media Center tramite la
tastiera senza fili e uno dei telecomandi.
Per avviare Windows Media Center, operare in uno dei seguenti
modi:
Italiano
• Premere il pulsante Media Center
Center .
• Dal desktop Windows® , cliccare
(Programmi) > Windows Media Center.
sul telecomando Media
Start > All Programs
Come Guardare DVD
Inserire un DVD in Super Multi Drive ed esso sarà riprodotto
automaticamente. La riproduzione di DVD è inoltre possibile
premendo il pulsante DVD sul telecomando.
Musica
Musica offre un’ esperienza musicale completa. E’ possibile
ascoltare CD o altri file musicali, creare i propri elenchi,
visualizzare le informazioni su album ed ascoltare musica per
album, generi, artisti,ecc. Riferirsi al manuale utente nel DVD di
supporto per istruzioni dettagliate.
Foto + Video
Divertitevi a guardare e a ordinare foto/video digitali o immagini
/videoclip scaricati da internet, con Pictures + Videos (Foto
+ Video). E’ possibile scorrere le immagini una ad una oppure
realizzarne una presentazione con sottofondo musicale. Riferirsi
al manuale utente nel DVD di supporto per istruzioni dettagliate.
52
Riferirsi al manuale utente nel DVD di supporto per le
funzioni e le definizioni dei pulsanti del telecomando.
Guida Rapida
Page 53

ASUS Easy Update
1. Dalla barra delle applicazioni
Windows®, cliccare con il
tasto destro sull’ icona ASUS
Easy Update.
2. Selezionare Schedule
(Pianifica) per impostare la
frequenza di aggiornamento
del sistema.
3. Selezionare
(Aggiorna) per attivare l’
aggiornamento.
Update
4. Cliccare
gli elementi da scaricare.
5. Selezionare gli elementi da
scaricare e poi cliccare OK.
OK per visuallizzare
ASUS NOVA P20/P22
Italiano
53
Page 54

Italiano
Ripristino del Sistema
Tramite DVD di Recupero
Il DVD di Recupero contiene un' immagine del sistema operativo,
installato sull' apparecchio dal fabbricante. Il DVD di recupero,
insieme al DVD di Supporto, offre una soluzione completa per
il recupero del sistema, che è così riportato rapidamente allo
stato operativo originario, purchè il disco rigido sia in buone
condizioni. Prima di utilizzare il DVD di Recupero, copiare i file
dati (p.e. file PST Outlook) su floppy disk o su un disco di rete e
annotare le impostazioni di configurazione personalizzate (p.e.
impostazioni di rete).
1. Inserire il DVD di Recupero nell’ unità ottica (Il sistema deve
essere ACCESO).
2. Riavviare il sistema e premere <DEL> al momento del
caricamento, per accedere alla configurazione del BIOS.
Cliccare Boot > Boot Device Priority e selezionare l' unità
ottica (probabilmente denominata “CDROM:XXXX”), come
dispositivo da avviare per primo.
3. Premere <F10> per salvare la configurazione e riavviare dal
DVD di Recupero.
4.
Selezionare un’ opzione di partizione e cliccare Next (Avanti).
Le opzioni di partizione sono le seguenti:
Recover system to a partition only.
Questa opzione eliminerà soltanto una delle partizioni da
selezionare di seguito, mantenendo le altre e creerà una
nuova partizione del sistema, come il disco “C”.
Recover system to entire HD.
Questa opzione eliminerà tutte le partizioni dall’ unità disco
rigido e creerà una nuova partizione del sistema, come il
disco “C”.
5. Seguire le istruzioni sullo schermo per completare il processo
di recupero.
54
In fase di ripristino del sistema, saranno persi tutti i dati. Prima
dell' operazione, assicurarsi di eseguire una copia di riserva
dei dati importanti ..
Guida Rapida
Page 55

6. Al termine del recupero del sistema, estrarre il DVD di
Recupero dall' unità ottica.
7. Riavviare il sistema e premere
<DEL> all' avvio per accedere
alla configurazione del BIOS. Cliccare su Boot > Boot Device
Priority ed eseguire il reset del disco rigido (probabilmente
denominato “HDD:XXXX”), in quanto dispositivo da avviare
per primo.
8. Premere
<F10> per salvare la configurazione e riavviare il
sistema.
9. Inserire il DVD di Supporto nell' unità ottica.
10. Cliccare
ASUS InstAll - Drivers Installation Wizard
(programma di installazione guidata dei driver) dalla scheda
Drivers e installare tutti i driver.
Installare di nuovo tutti i driver richiede un certo tempo. All'
apparire dello screensaver, premere un tasto qualunque per
ritornare alla schermata di installazione.
Crashfree BIOS
ASUS Crash free BIOS permet te il ripr istino dei dati del
BIOS originale dal DVD di supporto, in caso di mancato
aggiornamento del BIOS o corruzione dei dati e codici del BIOS.
Per ripristinare il BIOS, modifcare la priorità di avvio ed avviare dal
DVD di supporto.
All' avvio del sistema,
quando il LED power
lampeggia di luce
bianca e si sentono due
beep brevi seguito da
uno continuo, i codici BIOS sono stati danneggiati.
LED power
Italiano
Per ripristinare il BIOS, attenersi alle seguenti istruzioni:
1. Inserire il
DVD di Supporto. Il sistema emette due brevi beep
ed inizia il ripristino del BIOS (Nessuna immagine visualizzata).
2. Quando il LED power termina di lampeggiare, il ripristino è
stato completato.
3. Premere il pulsante di accensione per avviare il sistema. Se il
sistema ha accesso a Windows OS, il BIOS è stato ripristinato.
ASUS NOVA P20/P22
55
Page 56

Italiano
Tramite Partizione di Recupero
La Partizione di Recupero contiene un’ immagine del sistema
operativo, i driver e le utilità installate nel sistema dal fabbricante.
La Partizione di Recupero offre una soluzione completa per
il recupero del software del sistema, che è così ripor tato
rapidamente allo stato operativo originario, purchè il disco
rigido sia in buone condizioni. Prima di utilizzare la Partizione di
Recupero, copiare i file dati (p.e. file PST Outlook) su floppy disk o
su un disco di rete e annotare le impostazioni di configurazione
personalizzate (p.e.impostazioni di rete).
NON eliminare la partizione denominata “RECOVERY”. La
Partizione Recovery è stata creata dal fabbricante e, se
eliminata, non può essere più ripristinata dall’ utente. In caso
di problemi, durante il processo di recupero, portare il sistema
presso un centro di assistenza autorizzato ASUS.
1. Premere <F9> in fase di caricamento iniziale (richiede una
Partizione di Recupero).
2. Premere <Enter> per selezionare Windows Setup [EMS
Enabled]
3. Leggere la pagina “ASUS Preload Wizard” e cliccare
(Avanti).
4. Selezionare una delle opzioni di partizione e cliccare Next
(Avanti). Le opzioni di partizione sono le seguenti:
Recover Windows to a partition only.
Questa opzione eliminerà soltanto una delle partizioni da
selezionare di seguito, mantenendo le altre e creerà una
nuova partizione del sistema, come il disco “C”.
Recover Windows to entire HD.
Questa opzione eliminerà tutte le partizioni dall’ unità disco
rigido e creerà una nuova partizione del sistema, come il
disco “C”.
5. Seguire le istruzioni sullo schermo per completare il processo
di recupero.
6. Riavviare e
7. Cliccare
inserire il DVD di Supporto nell' unità ottica.
ASUS InstAll - Drivers Installation Wizard dalla
scheda Drivers e installare tutti i driver.
Next
56
Guida Rapida
Page 57

Welcome
OK
ABC
GHI
PQRS
CLEAR ENTER
TUV WXYZ
JKL MNO
DEF
1 2 3
4 5 6
7 8 9
0 #
Quick Guid
e
Wir gratulieren Ihnen zum Kauf des ASUS NOVA P20/P22. Die
folgenden abschnitte zeigen Ihnen, wie Sie Ihren neuen ASUS
NOVA P20/P22 benutzen können. Mehr Details finden Sie im
Benutzerhandbuch auf der Hilfs-CD.
Verpackungsinhalt
P20/P22 Fernbedienung
DVI-D-Sub-Adapter Mini-S/PDIF-Adapter Netzteil
Ständer Netzkabel Hilfs-DVD
Wiederherstellungs-
DVD
Schnellstartanleitung Garantiekarte
ASUS NOVA P20/P22
Deutsch
57
Page 58

Vorbereiten Ihres ASUS NOVA
CENTER/BASS FRONT
DVI
SURROUND
S/PDIF
OUT
S/PDIF
IN
DCIN
FRONT
CENTER/BASS
DVI
SURROUND
S/PDIF
OUT
S/PDIF
IN
DCIN
I
Dies ist eine Schnellanleitung für die Benutzung Ihres ASUS NOVA.
1. Schließen Sie die USB-Tastatur und-Maus an*
2. Schließen Sie das Netzwerkkabel an
Deutsch
* USB-Tastatur und USB-Maus sind nicht im Lieferumfang
inbegriffen. Bitte kaufen Sie sich die USB-Geräte entsprechend
Ihren Bedürfnissen.
Schnellstartanleitung
58
Page 59

FRONT
CENTER/BASS
DVI
SURROUND
S/PDIF
OUT
S/PDIF
IN
DCIN
1
2
3
3. Anschließen des Monitors.
FRONT
CENTER/BASS
DVI
SURROUND
S/PDIF
OUT
S/PDIF
IN
DCIN
4. Anschließen des Netzteils.
5. ASUS NOVA starten.
Deutsch
ASUS NOVA P20/P22
59
Page 60

Kennenlernen des Gerätes
CENTER/BASS FRONT
DVI
SURROUND
S/PDIF
OUT
S/PDIF
IN
DCIN
Frontansicht
1 3 42
1. Optisches Slot-In-Laufwerk
2. Elektronischer Disk-Auswurf (Sensortaste)
3.
Stromschalter (Sensortaste)
4.
Infrarot-Anschluss
Rückseite
5. Gleichstromeingang
6. USB-Port (2.0/1.1)
7. Anzeige (Monitor) -Ausgang
8. LAN-Port
Deutsch
Unteransicht
11 10
9
5 6 7 8
9. Line-In-Port (S/PDIF-Eingang)
10. Kopfhörerausgang
11. Mikrofonbuchse
12. Docking-Anschluss*
* Die optionale
12
Docking-Fähigkeit
ermöglicht
eine zukünftige
Erweiterung des
ASUS NOVA.
Schnellstartanleitung
60
Page 61

Wireless-Verbindung kongurieren
Wireless-Netzwerkverbindung
Um sich mit einem Wireless-Netzwerk zu verbinden, führen Sie
die folgenden Anweisungen aus.
1. Bewegen Sie den
Mauszeiger über das
Netzwerksymbol in der TaskLeiste und Sie sehen "Nicht
verbunden".
2. Rechtsklicken Sie auf das
Netzwerksymbol und
wählen Sie „Connect to
a network“ (Mit einem
Netzwerk verbinden).
3. Wählen Sie das gewünschte
Wireless-Netzwerk aus der
Liste aus.
Wählen Sie Show Wireless, wenn Sie viele Netzwerke in Ihrer
Umgebung haben.
ASUS NOVA P20/P22
Deutsch
61
Page 62

4. Zum Herstellen der
Verbindung müssen Sie ein
Passwort eingeben.
Diese Anzeige erscheint
nicht, wenn kein Passwort
benötigt wird.
5. Nachdem die Verbindung
hergestellt wurde wird
Connected (Verbunden)
angezeigt.
Bluetooth Wireless-Verbindung
Folgen Sie den Anweisungen, um eine Bluetooth WirelessVerbindung herzustellen.
1. Doppelklicken Sie auf das
Deutsch
Schnellstartanleitung
62
Bluetooth-Symbol in der
Windows-Task-Leiste, um
den Verbindungsassistenten
zu starten.
Page 63

2. Wählen Sie in der Liste das
Bluetooth-Gerät, mit dem
Sie sich verbinden wollen,
und klicken Sie auf Next
(Weiter), um fortzufahren.
3. Eventuell müssen Sie
das passwort eingeben,
wenn das Gerät eine
Authentifikation erfordert.
4. Nachdem die Einstellungen
abgeschlossen sind,
klicken Sie auf Next, um
fortzufahren.
5. Hier wird das verbundene
Gerät angezeigt.
ASUS NOVA P20/P22
Deutsch
63
Page 64

FRONT
S/PDIF
OUT
FRONT
S/PDIF
OUT
SURROUND
S/PDIF
IN
CENTER/BASS
Konguration der Audio-Ausgabe
Lautsprecherkonfigurationen
Sie können bei Ihrem System die folgenden
Lautsprecherkonfigurationen konfigurieren:
Name Lautsprechersystem
2 (Stereo)
4
5.1
Linker & rechter Lautsprecher
Zwei Front- & zwei Rücklautsprecher
Zwei Front- & zwei Rücklautsprecher, einen
Mittenlautsprecher und einen Subwoofer.
Port
Hellblau Line-In
Hellgrün Line-Out
Pink
Anschluss von analogen Lautsprechern
Beziehen Sie sich auf die folgende Tabelle, um die Audioanschlüsse
an der Rückseite und deren Funktionen kennenzulernen.
Für Stereolautsprecher
Deutsch
Für ein Mehrkanallautsprechersystem
P20/P22
P20/P22
Kopfhörer
2-Lautsprecher
Mikrofoneingang Mitten/Bass
6-Lautsprecher
Surround
Front
S/PDIF
S/PDIF-Eing.
S/PDIF-Ausg.
Mikrofon
Beschreibung
Front mit den Stereolautsprechern verbinden.
Beschreibung
FRONT mit dem FRONT-Anschluss des
Subwoofers verbinden.
SURROUND mit den REAR-Anschluss des
Subwoofers verbinden.
CENT/BASS mit den SUB/CENTER-Port des
Subwoofers verbinden.
Schnellstartanleitung
64
Page 65

Anschluss von digitalen Lautsprechern
• Digitaler Ausgang: Stecken Sie ein Audiokabel mit einer
Mini-S/PDIF-Adapter vom S/PDIF-Ausgang an der Rückseite
in Ihren Heimkinoverstärker.
Verbinden Sie den Mini-S/PDIF-Adapter bevor
Sie die Stereolautprecher anschließen.
Konfigurieren der Audioausgangseinstellungen
Nachdem Sie die Lautsprecher an Ihren NOVA P20/P22
angeschlossen haben, führen Sie die folgenden Schritte aus, um
den Audioausgang zu konfigurieren:
1. Rechtsklicken Sie in der
Windows® Vista™-Taskleiste
auf die Lautstärkeregelung
und wählen Sie
dann Playback Devices
(Wiedergabegeräte)
2. Wählen Sie im Fenster für
die Wiedergabe Speakers
(Lautsprecher) und klicken
Sie auf Set Default
(Standardeinstellung), wenn
Sie analoge Lautsprecher
benutzen.
Wählen Sie Realtek Digital
Output, wenn Sie digitale
Lautsprecher benutzen.
Deutsch
3. Klicken Sie auf
Configure, nachdem Sie die Lautsprecher
ausgewählt haben und folgen Sie den Bildschirmanweisungen,
um die Einstellungen vorzunehmen. Klicken Sie auf Properties
(Eigenschaften), um Ihren digitalen Ausgang zu konfigurieren,
wenn Sie Realtek Digital Output gewählt haben
ASUS NOVA P20/P22
65
Page 66

Windows Media Center benutzen
Windows Media Center starten
Sie können mittels Ihrer drahtlosen Tastatur oder der Fernbedienung
die volle Kontrolle Ihres Windows Media Centers übernehmen.
Um Windows Media Center zu starten, führen Sie einen der
folgenden Schritte aus:
•
Drücken Sie die Taste Media Center auf Ihrer Media
Center-Fernbedienung.
•
Klicken Sie auf dem Windows® Desktop Start > All Programs
> Windows Media Center.
DVDs abspielen
Legen Sie eine DVD in das Super Multi-Laufwerk ein und diese
wird automatisch abgespielt. Sie können auch die Taste DVD
auf Ihrer Fernbedienung drücken, um die DVD abzuspielen.
Musik
Music bietet Ihnen ein komplettes Musikerlebnis. Sie können
CDs oder andere Musikdateien anhören, Ihre eigenen
Wiedergabelisten erstellen, Albuminformationen anschauen und
Musik, sortiert nach Alben, Generes Künstler usw., anhören.
Bilder + Videos
Deutsch
Genießen und verwalten Sie Ihre digitalen Fotos/Videos oder
heruntergeladenen Bilder/Videoclips mit Pictures + Videos.
Sie können die Bilder individuell durchsuchen und diese als
Diavortrag mit Hintergrundmusik abspielen. Mehr Details
darüber finden Sie im Benutzerhandbuch auf der Hilfs-DVD.
Schnellstartanleitung
66
Beziehen Sie sich auf das Benutzerhandbuch auf der HilfsDVD, um mehr über die Funktionen und die Tasten der
Fernbedienung zu erfahren.
Page 67

ASUS Easy Update
1. Rechtsklickne Sie in der
Windows® Task-Leiste auf
das Symbol ASUS Easy
Update.
2. Wählen Sie Schedule, um
einzustellen, wie oft Sie Ihr
System aktualisieren wollen.
3. Wählen Sie
Aktualisierungsfunktion zu
aktivieren.
Update, um die
4. Klicken Sie auf
Elemente anzuzeigen die Sie
herunterladen können.
5. Markieren Sie die Elemente
die Sie herunterladen wollen
und klicken Sie dann auf OK.
OK, um die
ASUS NOVA P20/P22
Deutsch
67
Page 68

System wiederherstellen
Benutzen der Wiederherstellungs-DVD
Die Wiederherstellungs-DVD beinhaltet ein Abbild I hres
Betriebssystems, welches werkseitig auf Ihrem System installiert
wurde. Die Wiederherstellungs-DVD bietet zusammen mit der
Support-DVD eine zuverlässige Wiederherstellungslösung, die
Ihr System schnell zum Original-Arbeitsstatus zurückversetzt
und Ihre Festplatte in gutem Arbeitszustand hält. Bevor Sie
die Wiederherstellungs-DVD benutzen, kopieren Sie Ihre
persönlichen Daten (z.B. Outlook-PST-Dateien) auf Disketten oder
Netzwerklaufwerke und notieren Sie sich die von Ihnen eingestellten
Konfigurationen (z.B. Netzwerkeinstellungen).
1. Legen Sie die Wiederherstellungs-DVD in das optische
2. St ar ten Sie da s Sy ste m neu und dr ück en Sie be im
3. Drücken Sie
4.
Recover system to a partition only.
Deutsch
Diese Option wird nur die Partition löschen die Sie ausgewählt
Recover system to entire HD.
Diese Option wird alle Partitionen auf Ihrer Festplatte löschen
5. Befolgen Sie die Bildschirmanweisungen, um den
Laufwerk (Das System muss eingeschaltet sein).
Startvorgang die Taste <Entf>, um in die BIOS-Einstellungen
zu gelangen. Gehen Sie zu Boot > Boot Device Priority und
wählen Sie das optische Laufwerk (evtl. als “CDROM:XXXX”
beschriftet) als 1. Boot-Laufwerk (1st Boot Device) aus.
<F10>, um die Konfiguration zu speichern und
starten Sie das System von der Wiederherstellungs-DVD.
Wählen Sie eine Partitionsoption und klicken Sie auf Next.
Partitionsoptions sind:
haben, beläßt die anderen Partitionen in deren Zustand und
erstellt eine neue Systempartition als Laufwerk “C”.
und eine neue Systempartition als Laufwerk “C” erstellen.
Wiederherstellungsvorgang abzuschließen.
Sie werden alle Daten verlieren, wenn Sie das System
wiederherstellen. Sichern Sie Ihre wichtigen Daten, bevor Sie
die Systemwiederherstellung starten.
Schnellstartanleitung
68
Page 69

6. Nachdem die System wiederhergestellt ist, entfernen Sie die
Wiederherstellungs-DVD aus dem optischen Laufwerk.
7. Starten Sie das System neu und drücken Sie während des BootVorgangs <Entf>, um in die BIOS-Einstellungen zu gelangen.
Gehen Sie zu Boot > Boot Device Priority und stellen Sie
die Boot-Priorität wieder auf das Festplattenlaufwerk (evtl. als
“HDD:XXXX” beschriftet) als 1. Boot-Laufwerk zurück.
8. Drücken Sie
<F10>, um die Konfiguration zu speichern und
das System neu zu starten.
9. Legen Sie die Support-DVD in das optische Laufwerk ein.
10. Klicken Sie im Tab
Drivers (Treiber) auf ASUS InstAll -
Drivers Installation Wizard und installieren Sie alle Treiber.
Die Treiberinstallation kann einige Zeit dauern. Wenn während
der Installation der Bildschirmschoner startet, drücken Sie eine
beliebige Taste, um wieder den Bildschirm anzuzeigen.
Crashfree BIOS
ASUS Crashfree BIOS ermöglicht Ihnen die originalen BIOS-Daten von
der Hilfs-DVD wiederherzustellen, falls das BIOS-Update fehlgeschlagen
ist oder der Code bzw. die Daten beschädigt sind. Ändern Sie die BootPriorität auf das DVD-Laufwerk und stellen Sie Ihr BIOS wieder her.
Wenn Sie während
des Systemstarts
feststellen, dass die
Strom-LED blinkt und
Sie zwei kurze Pieptöne, gefolgt von einen
durchgehenden Ton hören, ist Ihr BIOS-Kode beschädigt.
Strom-LED
Folgen Sie den Anweisungen, um Ihr BIOS wiederherzustellen:
1. Legen Sie die Hilfs-DVD ein. Das System piept zweimal kurz
und startet die BIOS-Wiederherstellung. (Keine Anzeige)
2. Wenn die Strom-LED nicht mehr blinkt ist der Vorgang
abgeschlossen.
3. Drücken Sie die Stromtaste, um das System zu starten.
Wenn das Betriebssystem geladen wird, wurde das BIOS
wiederhergestellt.
ASUS NOVA P20/P22
Deutsch
69
Page 70

Benutzen der versteckten Partition
Die Wiederherstellungs-Partition enthält ein Abbild des
Betriebssystems, der Treiber und der vom Hersteller in Ihren
System installierten Programme. Die Wiederherstellungs-Partition
bietet somit eine umfangreiche Wiederherstellungslösung, die Ihre
Systemsoftware schnell in den originalen Arbeitszustand zurück
versetzt und Ihre Festplatte in ordnungsgemäßen Betriebszustand
hält. Bevor Sie die Wiederherstellungspartition benutzen, kopieren
Sie Ihre persönlichen Dateien (z.B. Outlook PST-Dateien) auf
Disketten, Netzwerklaufwerke, CDs oder DVDs und notieren Sie
sich Benutzereinstellungen (z.B. Netzwerkeinstellungen).
1. Drücken Sie während des Bootvorgangs <F9> (erfordert
2. Drücken Sie die <Eingabetaste>, um Windows Setup [EMS
3. Lesen Sie die Mitteilung
4. Wählen Sie eine Partitionsoption und klicken Sie auf Next.
Recover Windows to a partition only.
Deutsch
Diese Option wird nur die Partition löschen die Sie gewählt
Recover Windows to entire HD.
Diese Option wird alle Partitionen auf Ihrer Festplatte löschen
5. Befolgen Sie die Bildschirmanweisungen, um den
6. Starten Sie Ihr System neu und legen Sie die Support-DVD in
7. Klicken Sie im Tab Drivers auf ASUS InstAll - Drivers
Löschen Sie NICHT die Partition mit dem Namen “RECOVERY“.
Die Wiederherstellungspartition wurde werkseitig erstellt und
kann, wenn vom Benutzer gelöscht, NICHT wieder hergestellt
werden. Bringen Sie Ihr System zu einem ASUS Kundendienst,
wenn Sie mit der Wiederherstellung Probleme haben.
eine Wiederherstellungspartition)
Enabled] auszuwählen.
ASUS Preload Wizard und klicken
Sie auf Next.
Partitionsoptionen sind:
haben, beläßt die anderen Partitionen in deren Zustand und
erstellt eine neue Systempartition als Laufwerk “C”.
und eine neue Systempartition als Laufwerk “C” erstellen.
Wiederherstellungsvorgang abzuschließen.
das optische Laufwerk ein.
Installation Wizard und installieren Sie alle Treiber.
Schnellstartanleitung
70
Page 71

Καλωσόρισμα
OK
ABC
GHI
PQRS
CLEAR ENTER
TUV WXYZ
JKL MNO
DEF
1 2 3
4 5 6
7 8 9
0 #
Quick Guid
e
Συγχαρητήρια για την αγορά σας του ASUS NOVA P20/
P22. Το σχήμα που ακολουθεί απεικονίζει τα περιεχόμενα
της συσκευασίας του καινούργιου σας ASUS NOVA P20/
P22. Εάν απουσιάζει ή εμφανίζει βλάβη οποιοδήποτε από
τα στοιχεία αυτά επικοινωνήστε με τον μεταπωλητή σας.
Περιεχόμενα συσκευασίας
P20/P22 Τηλεχειριστήριο
Προσαρμογέας DVI
σε D-Sub
Στήριγμα
Προσαρμογέας mini
jack σε S/PDIF
Καλώδιο
τροφοδοσίας
Μετασχηματιστής
AC
DVD Υποστήριξης
DVD Επαναφοράς Σύντομος Οδηγός Κάρτα Εγγύησης
ASUS NOVA P20/P22
Ελληνικά
71
Page 72

Προετοιμασία του ASUS NOVA
CENTER/BASS FRONT
DVI
SURROUND
S/PDIF
OUT
S/PDIF
IN
DCIN
FRONT
CENTER/BASS
DVI
SURROUND
S/PDIF
OUT
S/PDIF
IN
DCIN
I
Οι ακόλουθες είναι σύντομες οδηγίες χρήσης του ASUS
NOVA.
1. Συνδέστε το πληκτρολόγιο USB και το ποντίκι*
2. Συνδέστε το καλώδιο Ethernet
Ελληνικά
* Το περιεχόμενο της συσκευασίας δεν περιλαμβάνει
πληκτρολόγιο και ποντίκι USB. Αγοράστε ξεχωριστά τα
περιφερειακά USB με βάση τις ανάγκες σας.
Οδηγός Γρήγορης Έναρξης
72
Page 73

FRONT
CENTER/BASS
DVI
SURROUND
S/PDIF
OUT
S/PDIF
IN
DCIN
1
2
3
3. Συνδέστε την Οθόνη.
FRONT
CENTER/BASS
DVI
SURROUND
S/PDIF
OUT
S/PDIF
IN
DCIN
4. Συνδέστε το μετασχηματιστή AC
5. Εκκινήστε το ASUS NOVA
Ελληνικά
ASUS NOVA P20/P22
73
Page 74

Γνωριμία με τα εξαρτήματα
CENTER/BASS FRONT
DVI
SURROUND
S/PDIF
OUT
S/PDIF
IN
DCIN
Πρόσοψη
1 3 42
1. Θυρίδα εισόδου οπτικού δίσκου
2. Ηλεκτρονική εξαγωγή της μονάδας οπτικού δίσκου
(λειτουργεί με αφή)
3. Διακόπτης λειτουργίας (λειτουργεί με αφή)
4. Θύρα υπερύθρων
Πίσω πλευρά
5 6 7 8
5. Είσοδος Τροφοδοσίας
Ρεύματος (DC)
6. Θύρα USB (2.0/1.1)
7. Έξοδος Οθόνης (Μόνιτορ)
8. Θύρα LAN
11 10
9. Θύρα γραμμής εισόδου
(Θύρα εισόδου S/PDIF)
10. Υποδοχή Εξόδου Ακουστικών
11. Υποδοχή Μικροφώνου
9
Κάτοψη
Ελληνικά
Οδηγός Γρήγορης Έναρξης
74
12
12. Σύνδεση σταθμού
υποδοχής*
*Ο προαιρετικός
σταθμός υποδοχής
επιτρέπει
μελλοντικές
δυνατότητες
επέκτασης για το
ASUS NOVA.
Page 75

Διαμόρφωση ασύρματης σύνδεσης
Σύνδεση σε ασύρματο δίκτυο
Για να συνδεθείτε σε ένα ασύρματο δίκτυο, ακολουθήστε
τις παρακάτω οδηγίες.
1. Μετακινήστε τον δείκτη
πάνω στο εικονίδιο δικτύου
στη γραμμή εργασιών και
θα δείτε την ένδειξη Δεν
έγινε σύνδεση.
2. Κάντε δεξί κλικ στο
εικονίδιο δικτύου και
επιλέξτε Σύνδεση σε
δίκτυο.
3. Επιλέξτε από τη λίστα
το ασύρματο δίκτυο
στο οποίο θέλετε να
συνδεθείτε.
Επιλέξτε Εμφάνιση
δίκτυα στην περιοχή σας.
Ασύρματων
εάν έχετε πολλά
ASUS NOVA P20/P22
Ελληνικά
75
Page 76

4. Κατά τη σύνδεση, ίσως
χρειαστεί να εισάγετε
κωδικό πρόσβασης.
Η οθόνη αυτή δεν θα
εμφανιστεί εάν δεν
απαιτείται κωδικός
πρόσβασης.
5. Αφού δημιουργηθεί η
σύνδεση, θα εμφανιστεί η
ένδειξη
Έγινε Σύνδεση
.
Ασύρματη Σύνδεση Bluetooth
Ακολουθήστε τις παρακάτω οδηγίες για να
δημιουργήσετε μια ασύρματη σύνδεση Bluetooth.
1. Κάντε διπλό κλικ στο
Ελληνικά
Οδηγός Γρήγορης Έναρξης
76
εικονίδιο Bluetooth
στη γραμμή εργασιών
των Windows για να
εκκινήσετε τον οδηγό
σύνδεσης.
Page 77

2. Επιλέξτε από τη λίστα
τη συσκευή Bluetooth
στην οποία θέλετε να
συνδεθείτε και κάντε
κλικ στο
Επόμενο
για να
συνεχίσετε.
3. Ίσως χρειαστεί να
εισάγετε τον κωδικό
πρόσβασης εάν η
συσκευή απαιτεί έλεγχο
ταυτότητας.
4. Αφού ολοκληρωθεί η
εγκατάσταση, κάντε
κλικ στο
Επόμενο
για να
συνεχίσετε.
5. Θα εμφανιστεί η
συσκευή στην οποία
συνδέεστε.
ASUS NOVA P20/P22
Ελληνικά
77
Page 78

FRONT
S/PDIF
OUT
FRONT
S/PDIF
OUT
SURROUND
S/PDIF
IN
CENTER/BASS
Διαμόρφωση εξόδου ήχου
Διατάξεις ηχείων
Μπορείτε να εγκαταστήσετε το σύστημα με τις
ακόλουθες διατάξεις ηχείων:
Ονομασία Σύστημα ηχείων
2
(στερεοφωνικά)
4 Δύο μπροστινά ηχεία, δύο πίσω ηχεία.
5.1
Αριστερό ηχείο, δεξί ηχείο.
Δύο μπροστινά ηχεία, δύο πίσω ηχεία, ένα
κεντρικό ηχείο και ένα ηχείο υπογούφερ.
Θύρα
Γαλάζιο
Ανοιχτό
πράσινο
Ροζ Είσοδος
Σύνδεση σε αναλογικά ηχεία
Ανατρέξτε στον πίνακα που ακολουθεί για τις συνδέσεις
ήχου στην πίσω πλευρά και τη λειτουργία τους.
Για στερεοφωνικά ηχεία
Για πολυκάναλο σύστημα ηχείων
Ελληνικά
Ακουστικά
2 Ηχεία
Γραμμή
εισόδου
Γραμμή
εξόδου
P20/P22 Περιγραφή
Η υποδοχή Μπροστά συνδέει σε
στερεοφωνικά ηχεία.
P20/P22 Περιγραφή
Η υποδοχή ΜΠΡΟΣΤΑ συνδέει στη
ΜΠΡΟΣΤΙΝΗ θύρα στο υπογούφερ.
Η υποδοχή SURROUND συνδέει στην ΠΙΣΩ
θύρα στο υπογούφερ.
Η υποδοχή ΚΕΝΤΡ./ΜΠΑΣΟ συνδέει στη
θύρα SUB/CENTER στο υπογούφερ.
6 Ηχεία S/PDIF
Surround
Μπροστά
Κεντρ./
Μπάσο
S/PDIF
Είσοδος
Έξοδος
S/PDIF
Μικρόφωνο
Οδηγός Γρήγορης Έναρξης
78
Page 79

Σύνδεση σε ψηφιακά ηχεία
• Ψηφιακή έξοδος: Συνδέστε ένα καλώδιο ήχου με τον
προσαρμογέα mini jack σε s/PDIF από τη θύρα Εξόδου S/PDIF
στην πίσω πλευρά του συστήματος στον ενισχυτή σας.
Συνδέστε τον προσαρμογέα mini jack σε
S/PDIF πριν συνδέσετε τα στερεοφωνικά
ακουστικά.
Διαμόρφωση ρυθμίσεων εξόδου ήχου
Αφού συνδέσετε το ηχητικό σύστημα στο NOVA
P20/P22, ακολουθήστε τα παρακάτω βήματα για να
διαμορφώσετε την έξοδο ήχου:
1. Από τη γραμμή εργαλείων
των Windows® Vista™,
κάντε δεξί κλικ στο
εικονίδιο έντασης ήχου
και στη συνέχεια στο
Συσκευές Αναπαραγωγής.
2. Στο παράθυρο
Αναπαραγωγή, επιλέξτε
Ηχεία και κάντε κλικ στο
Καθορισμός Προεπιλογής
εάν χρησιμοποιείτε
αναλογικά ηχεία.
Επιλέξτε Ψηφιακή
Έξοδος Realtek εάν
χρησιμοποιείτε ψηφιακά
ηχεία.
3. Κάντε κλικ στο
Διαμόρφωση αφού επιλέξετε Ηχεία
και ακολουθήστε τις οδηγίες που εμφανίζονται
στην οθόνη για να διαμορφώσετε τις ρυθμίσεις.
Κάντε κλικ στο Ιδιότητες για να διαμορφώσετε
τις προτιμήσεις σας για την ψηφιακή έξοδο εάν
επιλέξετε Ψηφιακή Έξοδος Realtek.
ASUS NOVA P20/P22
Ελληνικά
79
Page 80

Χρήση του Windows Media Center
Ξεκινώντας το Windows Media Center
Μπορείτε να ελέγχετε πλήρως το Windows Media Center
από το ασύρματο πληκτρολόγιο ή το τηλεχειριστήριο.
Για να εκκινήσετε το Windows Media Center, κάντε ένα
από τα ακόλουθα:
• Πατήστε το κουμπί Media Center
• Από την επιφάνεια εργασίας των Windows
Παρακολούθηση DVD
Εισάγετε ένα δίσκο DVD στην πολλαπλή μονάδα (Super
Multi Drive) και θα ξεκινήσει αυτόματα η αναπαραγωγή
DVD. Μπορείτε επίσης να πατήσετε το κουμπί DVD
στο τηλεχειριστήριο για να το αναπαράγετε.
Μουσική
Η Μουσική σάς προσφέρει μια ολοκληρωμένη μουσική
εμπειρία. Μπορείτε να ακούσετε CD ή άλλα μουσικά αρχεία,
να δημιουργήσετε τις δικές σας λίστες αναπαραγωγής, να
προβάλλετε πληροφορίες για το άλμπουμ και να ακούσετε
μουσική διαλέγοντας από άλμπουμ, είδη, καλλιτέχνες, κλπ.
Ανατρέξτε στο εγχειρίδιο χρήστη που βρίσκεται στο DVD
υποστήριξης για λεπτομερείς οδηγίες.
Φωτογραφίες + Βίντεο
Απολαύστε και διαχειριστείτε τις ψηφιακές σας
φωτογραφίες/βίντεο ή κάντε λήψη φωτογραφιών/βίντεο
κλιπ χρησιμοποιώντας την επιλογή
Μπορείτε να πλοηγηθείτε στις φωτογραφίες ανεξάρτητα ή
να τις αναπαράγετε με τη μορφή παρουσίασης (slide show)
Ελληνικά
με μουσική υπόκρουση.
στο τηλεχειριστήριο
του Media Center.
στο
Έναρξη > Προγράμματα > Windows Media Center
Φωτογραφίες + Βίντεο
®
, κάντε κλικ
.
.
Ανατρέξτε στο εγχειρίδιο χρήστη που βρίσκεται
στο DVD υποστήριξης για τις λειτουργίες και τους
ορισμούς των πλήκτρων του τηλεχειριστήριου.
Οδηγός Γρήγορης Έναρξης
80
Page 81

Εύκολη Ενημέρωση ASUS
1. Από τη γραμμή λειτουργιών των Windows®, κάντε
δεξί κλικ στο εικονίδιο
Εύκολη Ενημέρωση ASUS.
2. Επιλέξτε Προγραμματισμός
για να καθορίσετε πόσο
συχνά θέλετε να ενημερώνετε το σύστημά σας.
3. Επιλέξτε
να ενεργοποιήσετε την
ενημέρωση.
Ενημέρωση για
4. Κάντε κλικ στο
προβάλλετε τα στοιχεία
τα οποία μπορείτε να
κατεβάσετε.
5. Επιλέξτε τα στοιχεία που
θέλετε να κατεβάσετε,
και στη συνέχεια κάντε
κλικ στο ΟΚ.
ΟΚ για να
ASUS NOVA P20/P22
Ελληνικά
81
Page 82

Επαναφορά του συστήματος
Χρήση του DVD Επαναφοράς
Το DVD Επαναφοράς περιλαμβάνει μια ‘εικόνα’ του
λειτουργικού συστήματος, που εγκαταστάθηκε στο σύστημά
σας στο εργοστάσιο. Το DVD Επαναφοράς, σε συνεργασία με το
DVD Υποστήριξης, παρέχει μια συνεκτική λύση επαναφοράς που
επαναφέρει γρήγορα το σύστημά σας στην αρχική κατάσταση
λειτουργίας με την προϋπόθεση ότι ο σκληρός σας δίσκος είναι
σε καλή λειτουργική κατάσταση. Πριν χρησιμοποιήσετε το DVD
Επαναφοράς, αντιγράψτε τα αρχεία δεδομένων σας (όπως τα
αρχεία Outlook PST ) σε δισκέττες ή σε ένα δίσκο του δικτύου
και σημειώστε οποιεσδήποτε προσαρμοσμένες ρυθμίσεις
διαμόρφωσης έχουν γίνει (όπως ρυθμίσεις δικτύου).
1. Εισάγετε το DVD Υποστήριξης στη μονάδα οπτικού δίσκου
2. Κάντε επανεκκίνηση του συστήματος και πατήστε
3. Πατήστε
4.
Επαναφορά συστήματος μόνο σε ένα διαμέρισμα.
Η επιλογή αυτή θα διαγράψει μόνο το διαμέρισμα που
Επαναφορά συστήματος σε ολόκληρο το Σκληρό Δίσκο.
Η επιλογή αυτή θα διαγράψει όλα τα διαμερίσματα από το
5. Ακολουθήστε τις οδηγίες που εμφανίζονται στην οθόνη
Ελληνικά
(το σύστημα πρέπει να είναι ΕΝΕΡΓΟΠΟΙΗΜΕΝΟ).
<DEL>
στη ρύθμιση του BIOS. Πηγαίνετε στο
Προτεραιότητα Συσκευής Εκκίνησης
στην οθόνη εκκίνησης για να εισαχθείτε
Εκκίνηση >
και επιλέξτε τη
μονάδα οπτικού δίσκου (πιθανή μορφή ονομασίας
“CDROM:XXXX”) ως την 1η Συσκευή Εκκίνησης.
για να αποθηκεύσετε τη διαμόρφωση
<F10>
και να κάνετε επανεκκίνηση από το DVD Επαναφοράς.
Κάντε μια επιλογή διαμερίσματος και κάντε κλικ στο
Επόμενο
. Επιλογές διαμερίσματος:
επιλέγετε κάτω, επιτρέποντάς σας να κρατήσετε τα άλλα
διαμερίσματα και να δημιουργήσετε ένα νέο διαμέρισμα
του συστήματος ως μονάδα σκληρού δίσκου “C”.
σκληρό σας δίσκο και θα δημιουργήσει ένα νέο διαμέρισμα
του συστήματος ως μονάδα σκληρού δίσκου “C”
για να ολοκληρώσετε τη διαδικασία επαναφοράς.
Θα χάσετε όλα σας τα δεδομένα κατά τη διάρκεια της
επαναφοράς του συστήματος. Σιγουρευτείτε ότι έχετε
κρατήσει αντίγραφα ασφαλείας όλων των σημαντικών
δεδομένων σας πριν κάνετε επαναφορά του συστήματός σας.
6. Αφού ολοκληρωθεί η επαναφορά του συστήματος, εξάγετε το
DVD Επαναφοράς από τη μονάδα οπτικού δίσκου.
Οδηγός Γρήγορης Έναρξης
82
Page 83

7. Κάντε επανεκκίνηση του συστήματος και πατήστε
<DEL>
στη ρύθμιση του BIOS. Πηγαίνετε στο
Προτεραιότητα Συσκευής Εκκίνησης
στην οθόνη εκκίνησης για να εισαχθείτε
Εκκίνηση >
και επαναφέρετε
τη μονάδα σκληρού δίσκου (πιθανή μορφή ονομασίας
“HDD:XXXX”) ως την 1η Συσκευή Εκκίνησης.
8. Πατήστε
για να αποθηκεύσετε τη διαμόρφωση
<F10>
και να κάνετε επανεκκίνηση τους συστήματος.
9. Εισάγετε το DVD Υποστήριξης στη μονάδα οπτικού δίσκου.
10. Κάντε κλικ στο
εγκατάστασης προγραμμάτων οδήγησης
καρτέλα
Προγράμματα Οδήγησης
Εγκατάσταση ASUS - Οδηγός
από την
και εγκαταστήστε
όλα τα προγράμματα οδήγησης.
Ίσως να πάρει κάποιο χρόνο η επανεγκατάσταση όλων
των προγραμμάτων οδήγησης. Εάν εκκινήσει η προστασία
οθόνης, πατήστε οποιοδήποτε πλήκτρο για να επαναφέρετε
την οθόνη εγκατάστασης.
Crashfree BIOS
Το ASUS Crashfree BIOS σας επιτρέπει να επαναφέρετε τα
αρχικά δεδομένα του BIOS από το DVD υποστήριξης σε
περίπτωση αποτυχίας της ενημέρωσης του BIOS ή όταν
οι κωδικοί και τα δεδομένα του BIOS έχουν καταστραφεί.
Αλλάξτε την προτεραιότητα εκκίνησης και κάντε εκκίνηση
από το DVD υποστήριξης για να επαναφέρετε το BIOS.
Όταν παρατηρήσετε τη
λυχνία LED λειτουργίας
να αναβοσβήνει με
λευκό χρώμα και
ακούσετε δύο κοφτά
μπιπ τα οποία ακολουθεί
ένα συνεχόμενο μπιπ κατά την εκκίνηση του συστήματος,
σημαίνει ότι έχουν καταστραφεί οι κωδικοί του BIOS.
Λυχνία LED Λειτουργίας
Ακολουθήστε τις παρακάτω οδηγίες για να επαναφέρετε
το BIOS:
1. Εισάγετε το DVD υποστήριξης. Το σύστημα θα δώσει
δύο κοφτά μπιπ και θα ξεκινήσει την επαναφορά του
BIOS. (Καμία προβολή στην οθόνη)
2. Όταν η λυχνία LED λειτουργίας σταματήσει να αναβο
σβήνει, η επαναφορά έχει ολοκληρωθεί.
3. Πατήστε το διακόπτη λειτουργίας για να εκκινήσετε
το σύστημα. Εάν το σύστημα εισαχθεί στο Λειτουργικό
Σύστημα Windows, σημαίνει ότι έχει πραγματοποιηθεί η
επαναφορά του BIOS.
ASUS NOVA P20/P22
-
Ελληνικά
83
Page 84

Χρήση του Κρυφού Διαμερίσματος
Το Διαμέρισμα Επαναφοράς περιλαμβάνει μια ‘εικόνα’ του
λειτουργικού συστήματος, των προγραμμάτων οδήγησης και
των βοηθητικών προγραμμάτων που εγκαταστάθηκαν στο
σύστημά σας στο εργοστάσιο. Το Διαμέρισμα Επαναφοράς
παρέχει μια συνεκτική λύση επαναφοράς που επαναφέρει το
λογισμικό του συστήματός σας στην πρωτότυπη κατάσταση
λειτουργίας του, με την προϋπόθεση ότι ο σκληρός σας δίσκος
είναι σε καλή λειτουργική κατάσταση. Πριν χρησιμοποιήσετε
το Διαμέρισμα Επαναφοράς, αντιγράψτε τα αρχεία δεδομένων
σας (όπως τα αρχεία Outlook PST ) σε δισκέττες ή σε ένα δίσκο
του δικτύου και σημειώστε οποιεσδήποτε προσαρμοσμένες
ρυθμίσεις διαμόρφωσης έχουν γίνει (όπως ρυθμίσεις δικτύου).
ΜΗΝ διαγράφετε το διαμέρισμα που ονομάζεται “ΕΠΑΝΑΦΟΡΑ”. Το
Διαμέρισμα Επαναφοράς έχει δημιουργηθεί στο εργοστάσιο και δεν
μπορεί να επαναφερθεί από το χρήστη εάν διαγραφεί. Πηγαίνετε
το σύστημά σας σε εξουσιοδοτημένο κέντρο επισκευών ASUS εάν
έχετε προβλήματα με τη διαδικασία επαναφοράς.
1. Πατήστε
2. Πατήστε
3. Διαβάστε την οθόνη “Οδηγός προ-φόρτωσης ASUS” και
4. Κάντε μια επιλογή διαμερίσματος και κάντε κλικ στο
Επαναφορά των Windows μόνο σε ένα διαμέρισμα.
Η επιλογή αυτή θα διαγράψει μόνο το διαμέρισμα που
Επαναφορά των Windows σε ολόκληρο το Σκληρό Δίσκο.
Η επιλογή αυτή θα διαγράψει όλα τα διαμερίσματα
5. Ακολουθήστε τις οδηγίες που εμφανίζονται στην οθόνη
Ελληνικά
6. Εισάγετε το DVD Υποστήριξης στη μονάδα οπτικού δίσκου.
7. Κάντ ε κλικ σ το
κατά τη διάρκεια της εκκίνησης
<F9 >
(απαιτείται Διαμέρισμα Επαναφοράς)
<Enter>
Windows [EMS Enabled
κάντε κλικ στο
Επόμενο
. Επιλογές διαμερίσματος:
για να επιλέξετε
]
Επόμενο.
Εγκατάσταση
επιλέγετε κάτω, επιτρέποντάς σας να κρατήσετε τα άλλα
διαμερίσματα και να δημιουργήσετε ένα νέο διαμέρισμα
του συστήματος ως μονάδα σκληρού δίσκου “C”.
από το σκληρό σας δίσκο και θα δημιουργήσει ένα νέο
διαμέρισμα του συστήματος ως μονάδα δίσκου “C”.
για να ολοκληρώσετε τη διαδικασία επαναφοράς.
Εγκα τάσταση AS US - Οδηγ ός
εγκατάστασης προγραμμάτων οδήγησης
καρτέλα
Προγράμματα Οδήγησης
και εγκαταστήστε
από την
όλα τα προγράμματα οδήγησης.
Οδηγός Γρήγορης Έναρξης
84
Page 85

Добро пожаловать
OK
ABC
GHI
PQRS
CLEAR ENTER
TUV WXYZ
JKL MNO
DEF
1 2 3
4 5 6
7 8 9
0 #
Quick Guid
e
Поздравляем вас с приобретением ASUS NOVA P20/P22. На
иллюстрации показан комплект поставки вашего ASUS NOVA P20/P22.
Если что-то повреждено или отсутствует, обратитесь к продавцу.
Комплект поставки
P20/P22 Пульт управлеения
РУсский
Переходник DVI-D-Sub
Переходник mini
jack-S/PDIF
Блок питания
Подставка Шнур питания DVD с ПО
DVD восстановления Краткое руководство Гарантийный талон
ASUS NOVA P20/P22
85
Page 86

Подготовка ASUS NOVA
CENTER/BASS FRONT
DVI
SURROUND
S/PDIF
OUT
S/PDIF
IN
DCIN
FRONT
CENTER/BASS
DVI
SURROUND
S/PDIF
OUT
S/PDIF
IN
DCIN
I
Русский
Инструкции для использования вашего ASUS NOVA.
1. Подключите USB клавиатуру и мышь*
2. Подключите сетевой кабель.
* USB клавиатура или мышь не входят в комплект поставки.
Периферийные USB устройства приобретаются отдельно.
Руководство по быстрой установке
86
Page 87

FRONT
CENTER/BASS
DVI
SURROUND
S/PDIF
OUT
S/PDIF
IN
DCIN
1
2
3
3. Подключите монитор.
FRONT
CENTER/BASS
DVI
SURROUND
S/PDIF
OUT
S/PDIF
IN
DCIN
4. Подключите блок питания
РУсский
5. Включите ваш ASUS NOVA
ASUS NOVA P20/P22
87
Page 88

Изучение частей ASUS NOVA
CENTER/BASS FRONT
DVI
SURROUND
S/PDIF
OUT
S/PDIF
IN
DCIN
Русский
Вид спереди
1 3 42
1. Щель оптического привода
2. Кнопка извлечения оптического диска(сенсорная)
3.
Кнопка питания (сенсорная)
4.
ИК-порт
Вид сзади
5 6 7 8
5. Вход питания (постоянный ток)
6. USB порт (2.0/1.1)
7. Выход на монитор
8. LAN порт
9. Линейный вход (S/PDIF in)
10. Разъем для наушников
11. Разъем для подключения
микрофона
11 10
9
Вид снизу
Руководство по быстрой установке
88
12
12. Разъем для
подключения докстанции*
*Дополнительная
док-станция
позволяет
расширить
возможности ASUS
NOVA.
Page 89

Подключение к беспроводной сети
Для подключения к беспроводной сети выполните следующие
инструкции:
1. Наведите курсор на значок
сеть в панели задач и вы
увидите Not Connected.
2. Щелкните правой кнопкой
по значку сеть и выберите
Connect to a network.
3. Выберите беспроводную
сеть, к которой вы желаете
подключиться.
РУсский
Если имеется несколько беспроводных сетей выберите Show
Wireless.
ASUS NOVA P20/P22
89
Page 90

Русский
4. Возможно, что при
подключении вам нужно
ввести пароль.
Если ввод пароля не
требуется, этот экран не
появится.
5. После успешного
подключения появится
Connected.
Bluetooth соединение
NOVA P20/P22 может подключаться к Bluetooth-совместимым
устройствам. Для подключения к Bluetooth устройству выполните
следующие инструкции:
1. Для запуска мастера
подключений дважды
щелкните на значке Bluetooth
в панели задач.
Руководство по быстрой установке
90
Page 91

2. Выберите Bluetooth
устройство для подключения
и нажмите Next.
3. Если устройство требует
аутентификацию, вам
потребуется ввести пароль.
4. После завершения установки
нажмите Next.
РУсский
5. Появится устройство,
к которому вы
подключились.
ASUS NOVA P20/P22
91
Page 92

Настройка ауидовыхода
FRONT
S/PDIF
OUT
FRONT
S/PDIF
OUT
SURROUND
S/PDIF
IN
CENTER/BASS
Русский
Конфигурация колонок
Система поддерживает следующие конфигурации колонок:
Название Аудиосистема
2 (стерео)
4
5.1
Левая колонка, правая колонка.
Две передних колонки и две тыловых колонки.
Две передних колонки, две тыловых колонки,
центральная колонка и сабвуфер.
Порт 2-колонки 6-колонок S/PDIF
Голубой Line In Surround S/PDIF in
Белый Line Out Front S/PDIF out
Розовый Mic In Center/Bass Mic
Подключение аналоговых колонок
Смотрите таблицу внизу для аудио соединителей на задней панели и
их функции.
Для стереоколонок
P20/P22 Описание
Front подключение стереоколонок.
Для многоканальной аудиосистемы
P20/P22 Description
FRONT подключается к FRONT раззъему сабвуфера.
SURROUND подключается к REAR раззъему
сабвуфера.
CENT/BASS подключается к SUB/CENTER разъему
сабвуфера.
Руководство по быстрой установке
92
Page 93

Подключение цифровых колонок
• Digital output: Подключите цифровой аудиокабель к разъему
S/PDIF Out на задней стороне системы и вашему услилителю.
Подключите переходник S/PDIF перед
подключением колонок.
Настройка аудиопараметров
После подключение колонок к NOVA P20/P22, следуйте
нижеследующим инструкциям для настройки аудиопараметров:
1. На рабочем столе Windows®
дважды щелкните иконку
затем выберите Playback
Devices.
2. В окне Playback выберите
Speakers и нажмите если
вы используете аналоговые
колонки. Выберите Realtek Digital
Output если вы используете
цифровые колонки.
РУсский
3. Нажмите Configure после выбора Speakers и следуйте
экранными инструкциями чтобы конфигурировать параметры.
Нажмите Properties чтобы конфигурировать ваш цифровой
выход если вы выберите Realtek Digital Output.
ASUS NOVA P20/P22
93
Page 94

Запуск Windows Media Center
Русский
Вы можете управлять Windows Media Center с помощью клавиатуры
и пульта ДУ
Вы можете запустить Windows Media Center одним из следующих
способов:
• На пульте нажмите кнопку Media Center
®
• На рабочем столе Windows
нажмите Start > All Programs >
.
Windows Media Center.
Просмотр DVD
Вставьте DVD в привод и DVD будет воспроизводиться
автоматически. Также для воспроизведения можно нажать кнопку
DVD на пульте.
Музыка
Music позволяет вам слушать музыку. Вы можете слушать компакт-
диски, просматривать информацию об артисте, создавать свой
список воспроизведения, распределять и прослушивать музыку по
жанрам и т.д. Смотрите руководство в диске DVD поддержки для
получения подробных инструкций.
Картинки и видео
Просматривайте и управляйте вашими цифровыми фотографиями/
видео или загружайте картинки/видеоролики, используя Pictures
+ Videos. Вы можете просматривать картинки индивидуально или
как слайдшоу с воспроизведением музыки. Смотрите руководство в
диске DVD поддержки для получения подробных инструкций.
Для ознакомления с функциями и кнопками пульта обратитесь к
руководству на диске.
Руководство по быстрой установке
94
Page 95

ASUS Easy Update
1. В панели задач Windows®
щелкните правой кнопкой по
иконке ASUS Easy Update.
РУсский
2. Выберите
как часто вы желаете
обновлять вашу систему.
3. Выберите
обновления.
4. В меню ASUS Easy Update
нажмите OK для отображения
элементов, которые вы
можете загрузить.
5. Установите галочки для
элементов, которые вы
желаете загрузить, затем
нажмите OK.
Schedule и укажите
Update для запуска
ASUS NOVA P20/P22
95
Page 96

Восстановление системы
Русский
Использование диска восстановления
Диск восстановления включает образ операционной системы,
драйвера и утилиты, установленные в вашу систему на заводе. Диск
восстановления предоставляет возможность быстрого восстановления
программного обеспечения в его оригинальное рабочее состояние.
Перед использованием диска восстановления, скопируйте ваши данные
(например файлы Outlook ) на дискеты или сетевой диск и запишите
параметры конфигурации (например сетевые параметры).
Инструкции по использованию диска восстановления:
1. Вставьте диск восстановления в оптический привод. (Включите
вашу систему).
2. Перезагрузите систему и при загрузке нажмите
входа в BIOS. Перейдите Boot > Boot Device Priority и выберите
оптический привод (может быть помечен как “CDROM:XXXX”)
как первое устройство для загрузки.
3. Нажмите
диска восстановления.
4.
Выберите раздел и нажмите Next. Доступны следующие опции:
Recover system to a partition only.
Эта опция удалит только один раздел, который вы выбрали
ниже, позволив вам сохранить другие разделы и создаст новый
системный раздел как диск “C”.
<F10> для сохранения конфигурации и перезагрузки с
<DEL> для
Recover system to entire HD.
Эта опция удалит все разделы на вашем жестком диске и
создаст новый системный раздел как диск “C”.
5. Следуйте экранным инструкциям для завершения процесса.
Во время восстановления вы можете потерять все данные.
Перед восстановлением системы сохраните ваши данные.
Руководство по быстрой установке
96
Page 97

6. После завершения восстановления извлеките диск из
оптического привода.
7. Перезагрузите систему и при загрузке нажмите
<DEL> для
входа в BIOS. Перейдите Boot > Boot Device Priority и выберите
жесткий диск (может быть помечен как “HDD:XXXX”) как первое
устройство для загрузки.
8. Нажмите
<F10> для сохранения конфигурации и перезагрузки
системы.
9. Вставьте Support DVD в оптический привод.
10. Нажмите
ASUS InstAll - Drivers Installation Wizard на вкладке
Drivers и установите все драйвера.
Установка драйверов может занять некоторое время. При
появлении хранителя экрана нажмите любую клавишу для
возврата к экрану установки.
Crashfree BIOS
ASUS Crashfree BIOS позволяет вам восстановить оригинальный
BIOS с диска в случае неудачного обновления или повреждения.
Для восстановления BIOS измените приоритет загрузки и
загрузитесь с оптического диска.
Когда вы заметите,
что индикатор питания
мигает белым цветом и
при загрузке системы
услышите два коротких и
один длинный звуковых сигнала, ваш BIOS поврежден.
индикатор питания
РУсский
Для восстановления BIOS следуйте следующим инструкциям:
1. Вставьте оптический диск. Система подаст два
звуковых сигнала
и начнет восстанавливать BIOS. (Нет
коротких
изображения на экране)
2. Когда индикатор питания перестанет мигать, восстановление
завершено.
3. Нажмите кнопку питания для запуска системы. Если система
загрузит ОС, BIOS восстановлен.
ASUS NOVA P20/P22
97
Page 98

Русский
Использование раздела восстановления
Раздел восстановления включает образ операционной
системы, драйвера и утилиты, установленные на заводе.
Раздел восстановления предоставляет возможность быстрого
восстановления программного обеспечения на системе в его
оригинальное рабочее состояние. Перед использованием раздела
восстановления, скопируйте ваши данные (например файлы Outlook)
на дискеты или сетевой диск и запишите параметры конфигурации
(например сетевые параметры).
Не удаляйте раздел с названием “RECOVERY”. Раздел
восстановления создан на заводе и при удалении не может
быть восстановлен пользователем. Если у вас есть проблемы с
процессом восставновления, обратитесь в сервис-центр ASUS.
Использование раздела восстановления:
1. В о вре мя загр уз ки на жм ите[
восстановления)
2. Нажмите [
Enter] для выбора Windows Setup [EMS Enabled]
3. Прочитайте экран “ASUS Preload Wizard” и нажмите
4. Выберите раздел и нажмите
Next. Опции раздела:
Recover Windows to a partition only.
Эта опция удалит только один раздел, который вы выбрали
ниже, позволив вам сохранить другие разделы и создаст новый
системный раздел как диск “C”.
Recover Windows to entire HD.
Эта опция удалит все разделы на вашем жестком диске и
создаст новый системный раздел как диск “C”.
5. Следуйте экранным инструкциям для завершения процесса.
F9 ] (т ре буе тс я ра зде л
Next.
6. Перезагрузитесь и вставьте Support DVD в оптический привод.
7. Нажмите
ASUS InstAll - Drivers Installation Wizard на вкладке
Drivers и установите все драйвера.
Руководство по быстрой установке
98
Page 99

Bem-vindo
OK
ABC
GHI
PQRS
CLEAR ENTER
TUV WXYZ
JKL MNO
DEF
1 2 3
4 5 6
7 8 9
0 #
Quick Guid
e
Parabéns por ter comprado o PC NOVA P20/P22 da ASUS. A
imagem seguinte ilustra o conteúdo da embalagem do seu novo
NOVA P20/P22 da ASUS. Caso qualquer um dos itens abaixo esteja
danificado ou em falta, contacte a loja onde adquiriu o produto.
Conteúdo da embalagem
P20/P22 Controlo remoto
Português
Adaptador DVI – D Sub
Suporte Cabo de alimentação DVD de suporte
DVD de recuperação
Adaptador para mini
tomadas S/PDIF
Guia de consulta rápida
Transformador a.c.
Certificado de garantia
ASUS NOVA P20/P22
99
Page 100

Preparação do seu NOVA da ASUS
CENTER/BASS FRONT
DVI
SURROUND
S/PDIF
OUT
S/PDIF
IN
DCIN
FRONT
CENTER/BASS
DVI
SURROUND
S/PDIF
OUT
S/PDIF
IN
DCIN
I
Este é o guia de consulta rápida do seu NOVA da ASUS.
1. Ligue o teclado e o rato USB*
Português
2. Ligue o cabo Ethernet
* A embalagem não inclui o teclado e o rato USB. Os periféricos
USB devem ser comprados em separado conforme as suas
necessidades.
Guia de consulta rápida
100
 Loading...