

Page 1
Eee Note
User Manual
E6284 / December 2010
Page 2

Table of contents
1 A quick look 5
Package contents .............................................................................................. 5
Your Eee Note ..................................................................................................... 6
2 Getting started 8
Charging your device ........................................................................................ 8
Turning your device ON/OFF ............................................................................9
Using the Wacom pen ......................................................................................10
Installing a microSD card into your device ....................................................11
Getting connected wirelessly .........................................................................11
3 Using your device 12
The Home screen .............................................................................................12
Using Notes ......................................................................................................14
Using the Reader .............................................................................................17
Using the camera ............................................................................................. 19
Recording a voice memo .................................................................................19
Writing a text memo ........................................................................................20
Viewing photos in Photo Album ....................................................................21
Using the Music Player .................................................................................... 21
Using the Calculator ........................................................................................ 22
Using the Dictionary ....................................................................................... 22
Setting ..............................................................................................................23
Trash Bin ...........................................................................................................25
Web Browser ....................................................................................................25
Bubble Breaker ................................................................................................25
Sudoku .............................................................................................................25
4 Using Eee Note Sync 26
Installing Eee Note Sync utility on your computer .......................................26
Copying les to or from your device ..............................................................27
Using the card reader mode ...........................................................................28
Using the digitizer mode ................................................................................29
Using the Eee Note mode ................................................................................29
2
Page 3

Table of contents
5 Accessories 30
Eee Note case ...................................................................................................30
6 Troubleshooting 31
Appendices 3
Notices ..............................................................................................................32
Safety information ..........................................................................................34
ASUS Contact information ..............................................................................38
2
3
Page 4
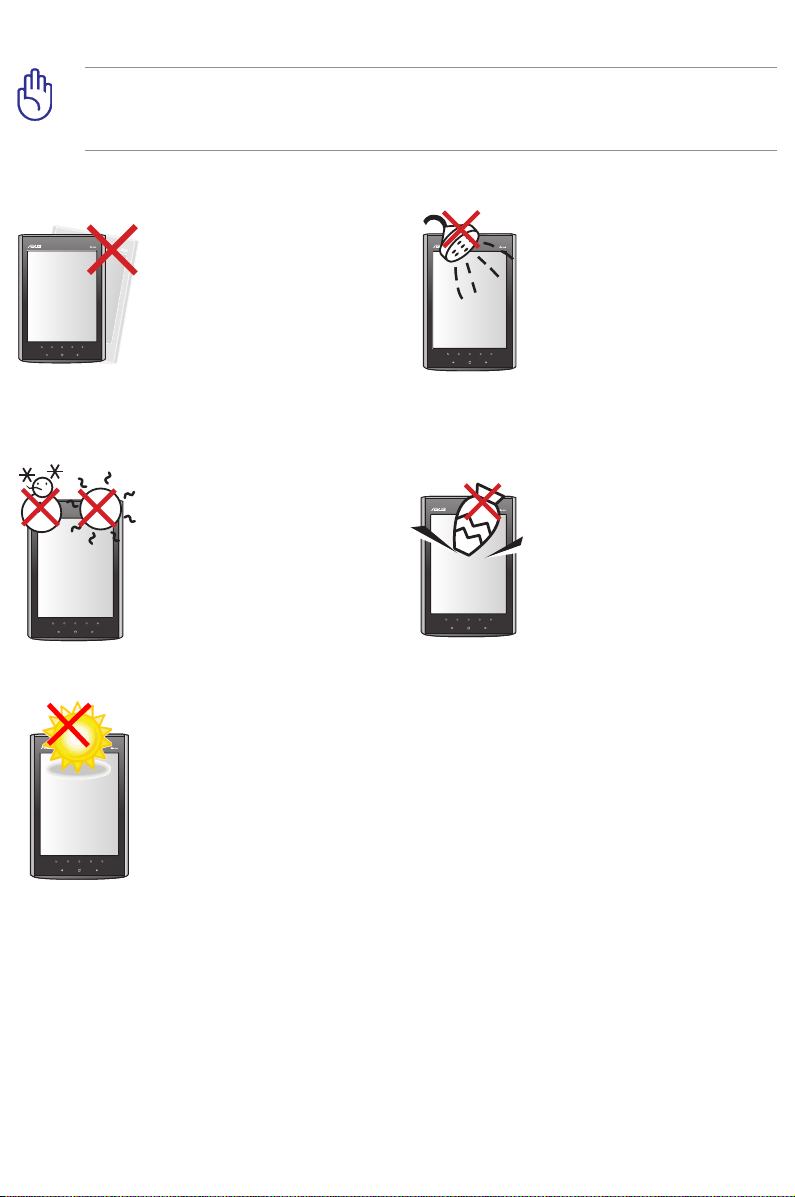
Safety precautions
IMPORTANT! Wipe the device using a clean cellulose sponge or chamois cloth
dampened with a solution of nonabrasive detergent and a few drops of warm
water then remove any extra moisture with a dry cloth.
DO NOT place on
uneven or unstable work
surfaces. Seek servicing
if the casing has been
damaged. Refer all
servicing to qualied
service personnel.
SAFE TEMP: This device
should only be used
in environments with
ambient temperatures
between 5oC (41oF) and
35oC (95oF).
DO NOT expose
to extreme high
temperature or to direct
sunlight.
DO NOT expose to or
use near liquids, rain, or
moisture.
DO NOT place or drop
items that may damage
or scratch the device.
4
Page 5
1 A quick look
Quick Start Guide
Eee Note
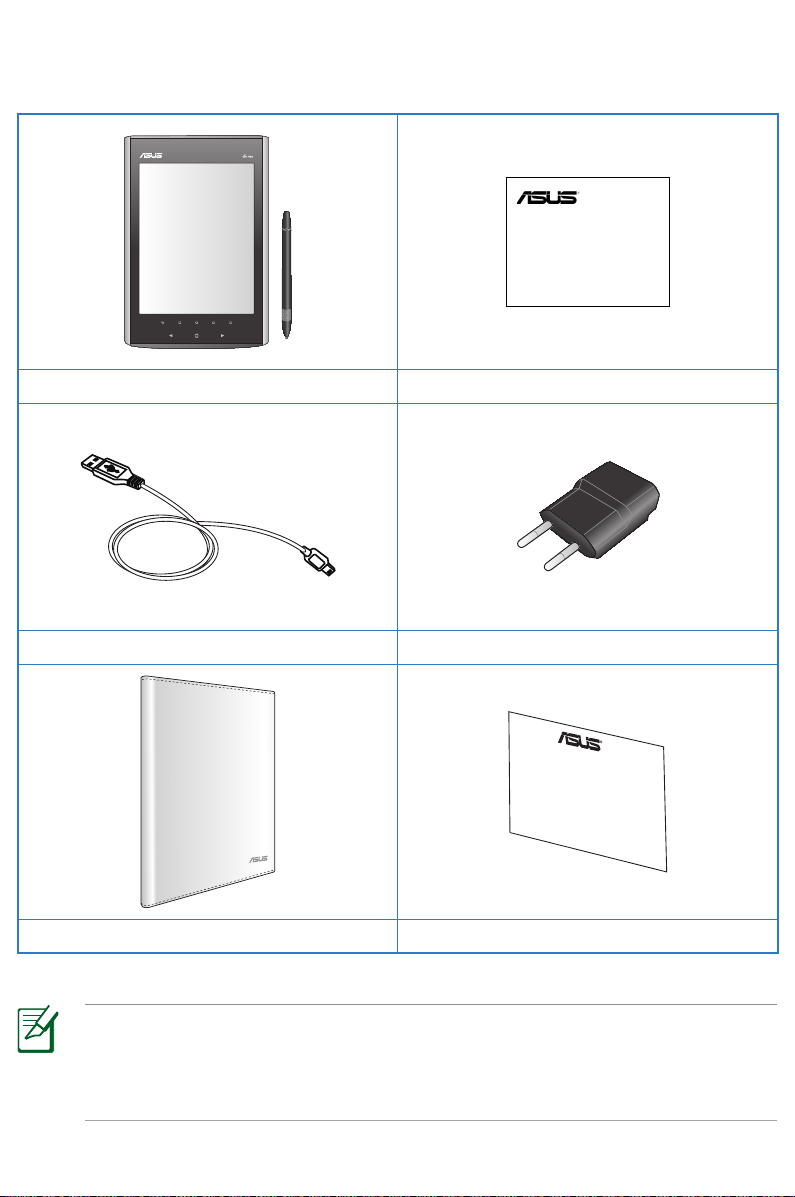
Package contents
Eee Note and Wacom pen Quick Start Guide
micro-USB cable USB charger
Book case Warranty card
NOTES:
• If any of the items is damaged or missing, contact your retailer.
• The USB charger varies with regions.
5
Page 6
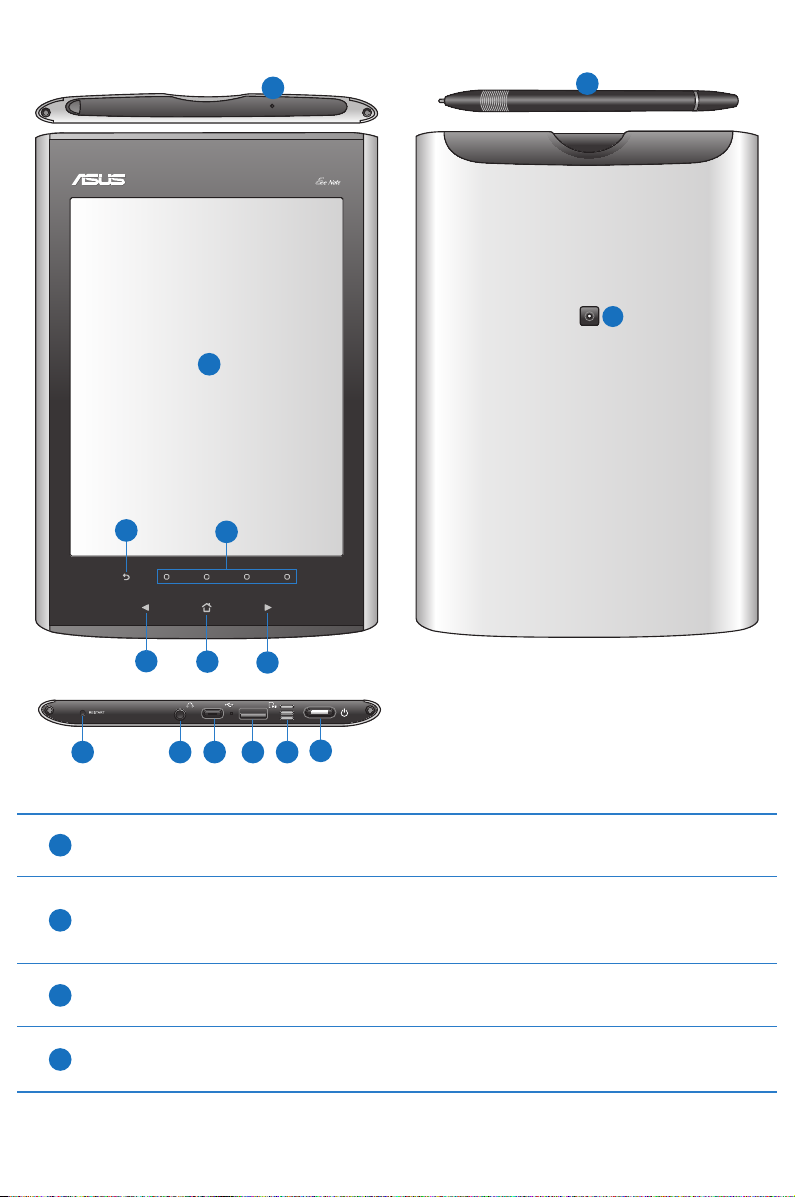
Your Eee Note
1
2
3
5
4
6
5
13
14
7
1
Built-in microphone
9
12
118
10
The built-in microphone can be used for audio recordings.
Pen operation area
2
Using the Wacom pen, lightly touch the screen to navigate through the
features and functions of your device.
3
Back key
Press to go back to the previous screen.
4
Soft keys
Press to perform the command indicated above the keys.
6
Page 7
Navigation keys
5
Press the / keys to navigate through menus.
Press the / keys to go to the next page or go back to the previous page
while reading a book.
10
11
12
13
14
6
Home key
Press to go to the Home screen.
7
Restart button
Using the Wacom pen, press this button to restart your device.
Earphone jack
8
Insert your headphone connector into this jack. Using this jack
automatically disables the built-in speaker.
9
micro-USB port
Insert the micro-USB cable into this port.
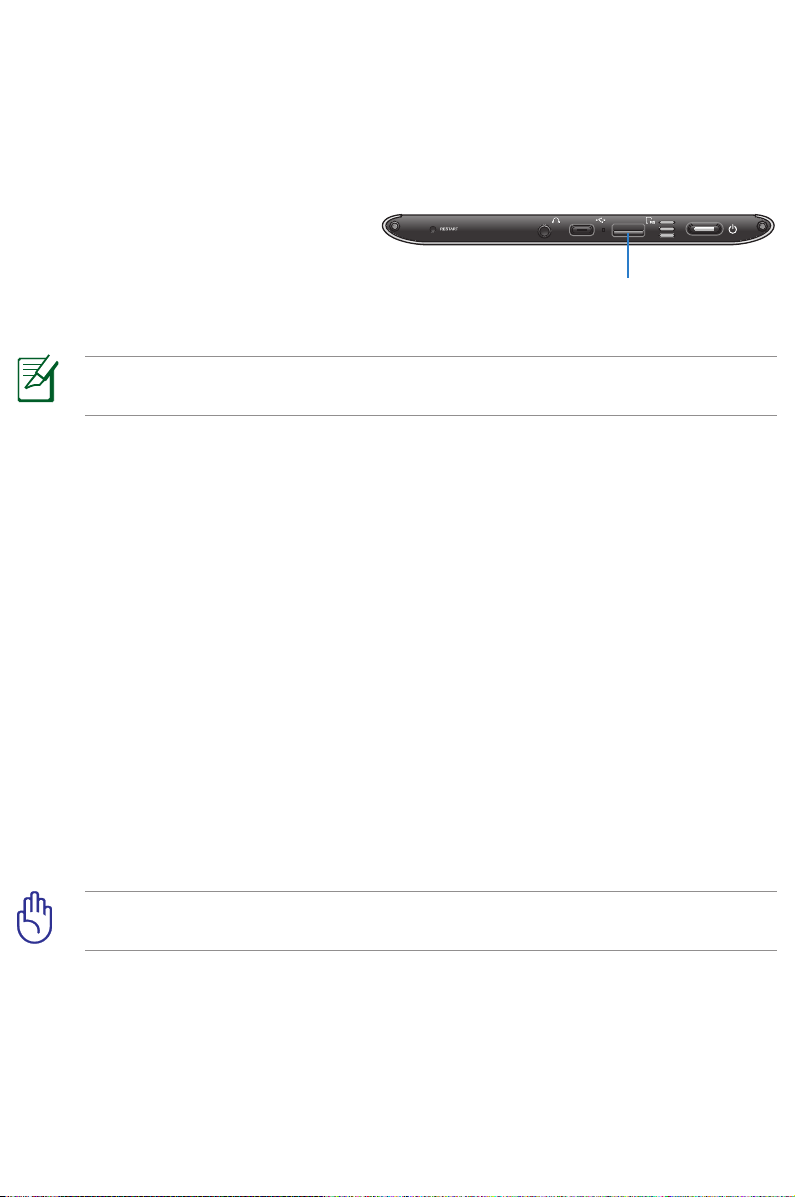
microSD card slot
Insert a microSD card into this slot.
Built-in speaker
The device is equipped with a built-in high quality stereo speaker.
Power key
Turns your device on/o.
Wacom pen
Use the Wacom pen to write, draw, or make selections on the pen
operation area.
Camera lens
The built-in camera allows picture taking.
7
Page 8
2 Getting started
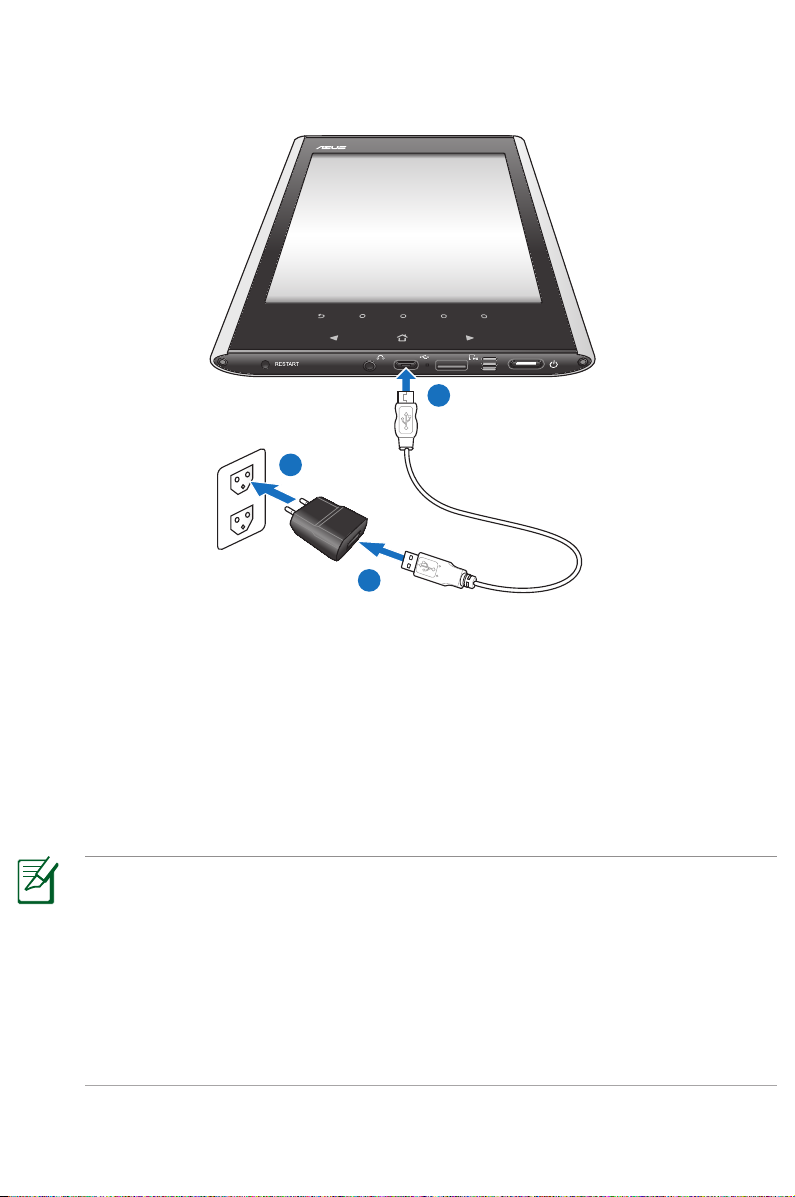
Charging your device
3
1
2
To charge your device:
1. Connect the USB cable’s micro-USB connector to the micro-USB port of your
device.
2. Connect the micro-USB cable to the USB charger.
3. Connect the USB charger to a power outlet (100V–240V).
NOTES:
• You may also connect the micro-USB cable to your computer’s USB port to
charge your device.
• Use only the USB charger that comes with your device. Using a dierent USB
charger may damage your device.
• Your device allows you to read e-books or add/edit notes for thirteen hours
after fully charging it.
8
Page 9
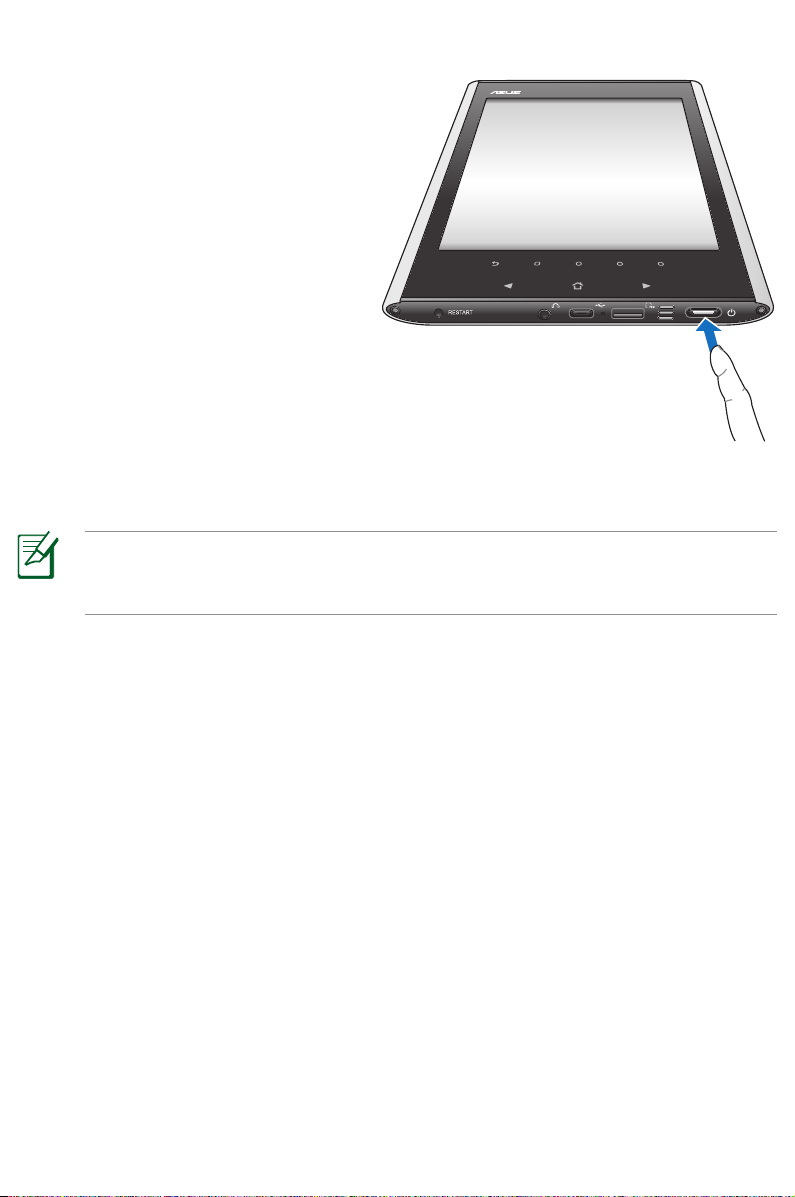
Turning your device ON/OFF
• Long press the Power key for
about three seconds to turn on
your device.
• Long press the Power key for
about three seconds to shut down
your device.
To put your device on the sleep mode:
NOTE: By default, the sleep mode function is enabled on your device. After
some period of inactivity or when you press the Power key, your device will
automatically be put on sleep mode.
1. From the home screen, tap Setting > Auto sleep mode > Set up.
2. From the Auto sleep mode menu, tap your preferred option, then tap
To wake up your device from the sleep mode:
• Short press the Power key to wake up the system.
OK.
9
Page 10
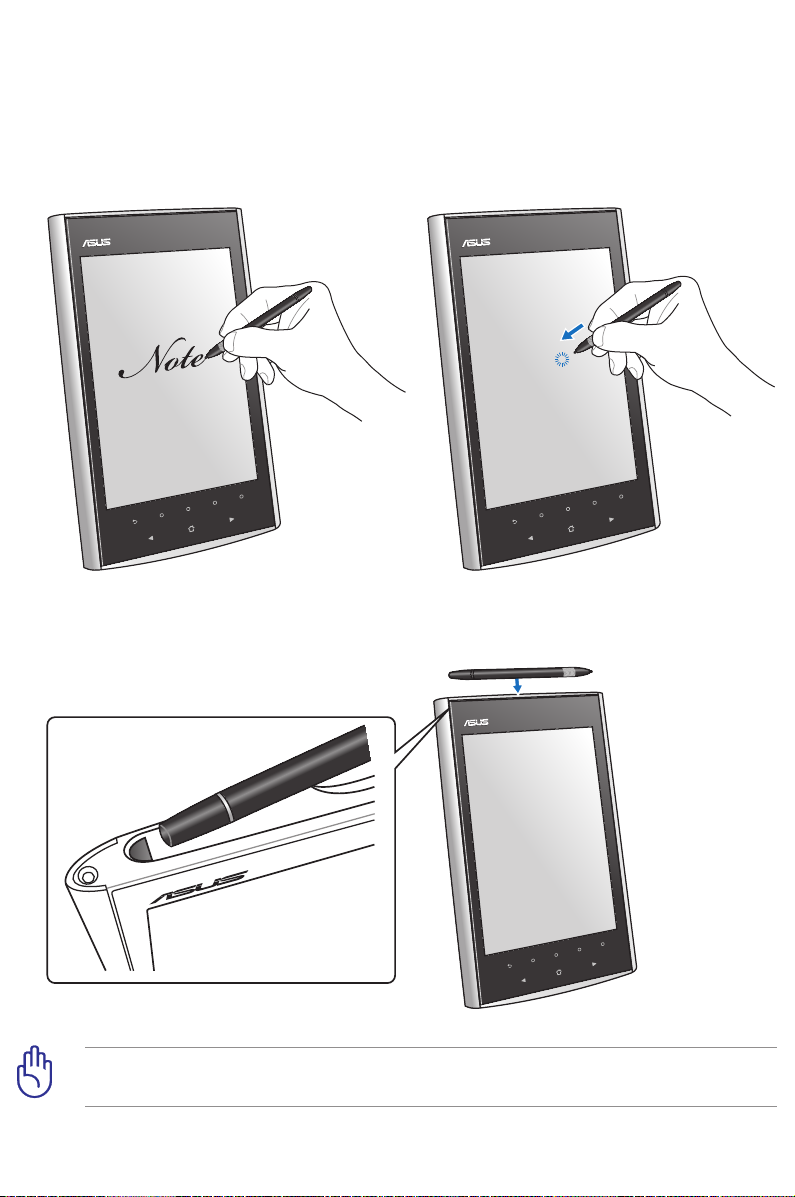
Using the Wacom pen
The Wacom pen is a pen-like device found on the top of your device.
• Use the Wacom pen to write, draw, or select items on the pen operation area.
• Single-tap an item to select it.
To store the Wacom pen on the top of your device:
IMPORTANT! Ensure that you do not accidentally drop the Wacom pen to avoid
damaging it.
10
Page 11
Installing a microSD card into your device
Your device is equipped with a microSD card slot. A microSD card provides you
with extended memory where you can store your data.
To insert a microSD card:
1. Locate the microSD card slot at
the bottom of the device.
2. Insert the microSD card into the
card slot.
NOTE: For details on using your device as a card reader, refer to the section
Using the card reader mode.
microSD card slot
Getting connected wirelessly
Use your device’s built-in Wi-Fi capability to connect to a wireless network. This
enables you to wirelessly access websites or Internet-related applications.
To use the Wi-Fi function:
1. From the home screen, tap Setting > Wi-Fi networks > Set up.
2. The device searches for available networks.
3. From the list of networks, tap the network that you want to connect to.
4. If required, key in the password or passkey, then click
Try.
IMPORTANT! Tap the password eld to display the virtual keyboard. Use the
virtual keyboard to key in the network’s password.
11
Page 12
3 Using your device
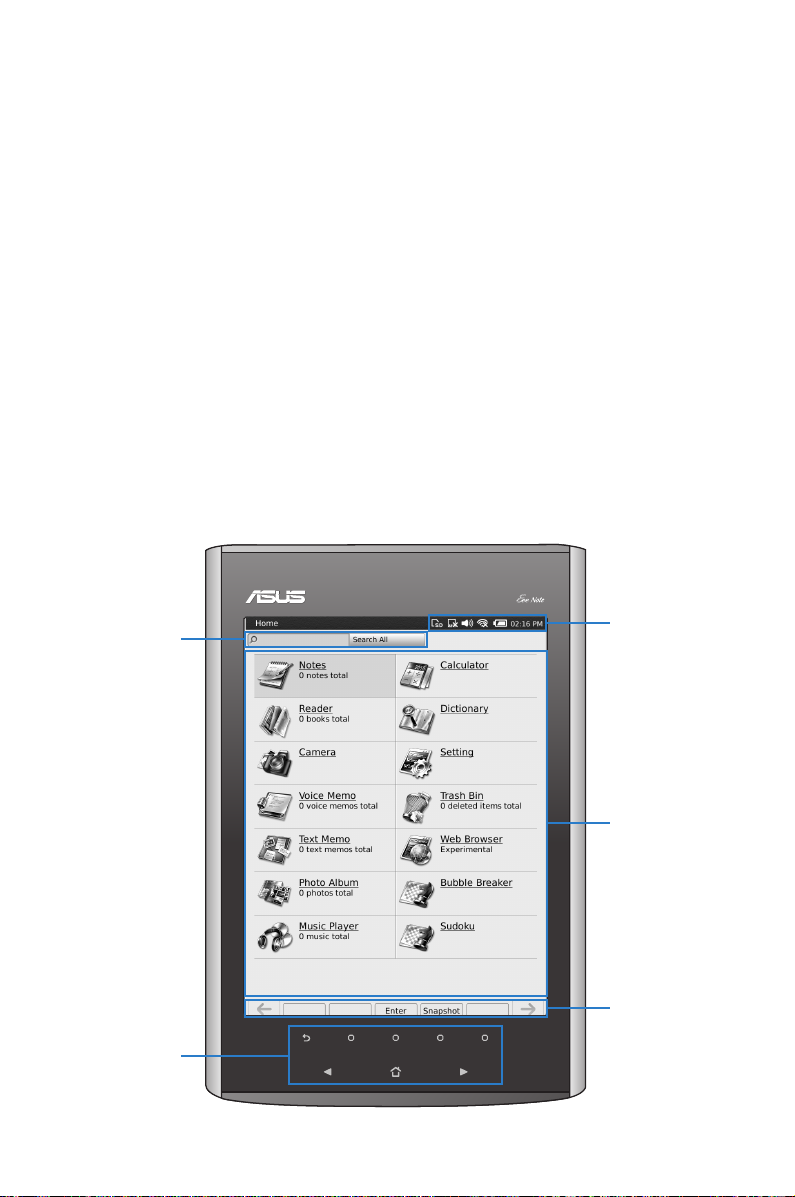
The Home screen
With the tap of the Wacom pen on the pen operation area, the Home screen
enables you to quickly access Notes, Reader, Camera, Voice Memo, Text
Memo, Photo Album, Music Player, Calculator, Dictionary, Setting, Trash
Bin, Web Browser, Bubble Breaker, and Sudoku.
Use the Wacom pen to tap the status bar, search bar, application menu, or the
command bar. Use your nger to press the touchpad keys.
•
Status bar: Tap the icons to proceed with the corresponding settings of your
device or display the status of your device.
Search bar: Tap to search for the documents in your device.
•
Application menu: Tap an application to launch it.
•
Command bar: Tap a command button to perform its corresponding
•
function.
Search bar
Touchpad keys
12
Status bar
Application menus
Command bar
Page 13

Status bar
This icon appears when a microSD card is installed. Tap Scan now to
scan the les in the microSD card. Tap Eject safely to safely remove the
microSD card.
Disables or enables the touch sensor keys.
Drag the slider to adjust the volume.
Enables or diables the Wi-Fi function. Tap Wi-Fi networks to connect to
a wireless network.
Tap to display the remaining battery power.
Tap to display or change the date and time.
13
Page 14

Using Notes
Adding/Editing a note
To add/edit a note:
1. From the home screen, tap Notes.
2. Do any of the following:
• Tap
Add new note to create a
new note.
• Tap an existing note to edit it.
TIP: You may tap Sort in the
command bar to sort the existing
notes by name or date.
3. Tap an icon in the function bar to use its corresponding function. Refer to
the table on the next page for detailed information about each icon in the
function bar.
Function
bar
4. Tap Save to save the changes.
14
Page 15

Function bar
Goes to the desired page.
Saves the current note as a GIF format le to the microSD card. Install a
microSD card into your device before using this function.
Tagging notes provides you with an easy way to search your notes. Key
in a tag name and tap Add to create a tag for the note.
Tap Photos to insert a photo from the photo album or Camera to
capture an image that can be inserted into the note. You can edit the
inserted photo, and drag it to the desired location of the note.
Undoes the previous change.
Redoes the action you just undid.
Selects the pen stroke color.
Tap to use the eraser function and select the eraser size.
Selects the pen stroke type.
Deletes the current page.
Selects the note style.
Tap to add a page.
Displays the date that the note was last edited or tap to change the
note’s name.
15
Page 16

Managing a note
To manage a note, tap :
•
Lock/Unlock: Locks or unlocks a
note. Before using this function, tap
Setting > Security > Set up to set
up a password.
Merge...: Merges notes in your
•
device.
Rename: Changes the note’s name.
•
Delete: Deletes a note.
•
Add to Evernote: Uploads a note to the Evernote website. Before using this
•
function, obtain a free Evernote ID at http://www.evernote.com, and then
tap Setting > Service accounts > Set up to set up the Evernote account in
your device.
16
Page 17

Using the Reader
Reading an e-book
NOTES:
• Your device supports the e-books in PDF or ePub formats.
• Some e-books or digital publications that you have purchased or downloaded
online may contain Digital Rights Management (DRM) protection. You need to
activate your digital reader using an Adobe ID to access DRM-protected les.
• Get a free Adobe ID at
set up your Adobe account in your device, tap Setting > Service accounts >
Set up.
• To use your device to buy e-books, tap
need to have an account for the bookstore where you want to buy e-books.
https://www.adobe.com/cfusion/membership/. To
Reader > Buy more books. You might
To read an e-book:
1. From the home screen, tap Reader.
2. Press the
/ keys to navigate through the book list, and press the Enter
key to open the selected e-book.
Tap the Wacom pen on your selected e-book to open it. Tap
an e-book.
TIP: You may tap Sort in the command bar to sort the book lists by name or
date.
3. When reading an e-book, do any of the following:
• Press the
/ keys to go to the next page or go back to the previous page.
• Use the Wacom pen to draw or write notes on pages.
to manage
• Tap an icon in the function bar to use its corresponding function. Refer to
the table on the next page for detailed information about each icon in the
function bar.
Function bar
17
Page 18

Function bar
Views the table of content, annotation list, bookmark list, remark list, or
content percentage of the open e-book. When Content (%) is selected,
drag the slider at the bottom of the screen to go to the desired content
percentage.
Saves the current page as a snapshot to the photo album folder in your
device.
When the displayed page exceeds the screen of your device, tap to use
the drag function to view the whole page.
Tap to zoom in/zoom out.
Tagging e-books provides you with an easy way to search your e-books.
Key in a tag name and tap Add to create a tag for the e-book.
Tap to add a bookmark to the current page. Tap the icon again to
remove the bookmark from the page.
Tap to use the remark function and select the remark type. You can tap
Eraser to erase the remarks.
Tap to use the annotation function. Tap this icon, the line that you want
to annotate, and then the annotation icon at the left side of the line that
you tapped. Use the virtual keyboard to write notes and tap Close to
save the annotation.
Managing an e-book
To manage an e-book, tap :
•
Lock/Unlock: Locks or unlocks an e-book. Before using this function, tap
Setting > Security > Set up to set up a password.
Rename: Changes the e-book’s name.
•
Delete: Deletes an e-book.
•
18
Page 19

Using the camera
Your device allows you to capture images using the built-in camera.
To capture an image:
1. From the home screen, tap Camera.
2. Tap
3. Tap
4. Tap
Zoom to select the zoom level.
Capture to capture an image.
Save to save the captured image, or Close to abort it.
Recording a voice memo
Your device allows you to record voice reminders or messages using the built-in
microphone.
To record a voice memo:
1. From the home screen, tap Voice Memo.
2. Tap
3. From the New Voice memo screen,
When recording, you can tap
Record new voice memo.
tap to start recording.
to pause recording. To resume
recording, tap .
4. Tap
save it, or Cancel to abort it.
to stop recording. You can tap Play to play the recorded le, Save to
Managing a voice memo
To manage a voice memo, tap :
•
Rename: Changes the voice memo’s name.
Delete: Deletes the voice memo.
•
19
Page 20

Writing a text memo
Your device allows you to write short messages or reminders.
To create a text memo:
1. From the home screen, tap Text Memo.
2. Tap
3. Use the virtual keyboard to key in
4. When done, tap
Add new Text Memo.
the text.
Save.
Managing a text memo
To manage a text memo, tap :
•
Rename: Changes the text memo’s name.
Delete: Deletes the text memo.
•
20
Page 21

Viewing photos in Photo Album
You can view the images captured from the built-in camera or via tapping
Snapshot in the command bar.
To view a photo:
1. From the home screen, tap Photo Album.
2. Press the
key to open the selected photo. You can also tap the Wacom pen on your
selected photo to open it.
TIP: You may tap Sort in the command bar to sort the photo list by name or
date.
/ keys to navigate through the photo list, and press the Enter
Managing a photo
To manage a photo, tap :
•
Rename: Changes the photo’s name.
Delete: Deletes the photo.
•
Using the Music Player
Your device allows you to play MP3 les. Tap Music Player from the home
screen, and then tap to open a music le from the list.
TIP: You may tap Sort in the command bar to sort the music list by name or
date.
Managing a music le
To manage a music le, tap :
•
Rename: Changes the music le’s name.
Delete: Deletes the music le.
•
21
Page 22

Using the Calculator
From the home screen, tap Calculator
to start using the calculation function.
Using the Dictionary
From the home screen, tap Dictionary
to start using the dictionary function.
Tap to select the dictionary
you want to use, and then use the virtual
keyboard to key in the word that you
want to search.
22
Page 23

Setting
From the home screen, tap Setting to
enter the setting menus.
About this device
Tap Details to view the device information. You can use the virtual keyboard to
key in a new device name in the Device Name column.
WiFi networks
Tap Set up to congure and connect to a wireless network.
Service accounts
Tap Set up to set up the Evernote or Adobe ID account in your device.
Scan for media
Tap Scan to scan the device storage and the installed microSD card.
Default note background
Tap Choose to select the default note background.
23
Page 24

Security
Tap Set up to set up a password for the device.
Date and Time
Tap Set up to set up the date and time for the device.
Auto sleep mode
Tap Set up to select the preferred option.
Customize your pen
Tap Set up to calibrate your Wacom pen or restore to the default settings.
Reset to default
Tap Reset to reset your device to the factory default settings.
IMPORTANT! Reverting to factory default deletes all contents in your device.
We recommend that you backup the les beforehand.
Terms of Use
Tap Details to display the Terms of Use and Copyright information.
24
Page 25

Trash Bin
Trash Bin allows you to permanently delete les or recover accidently deleted
les and restore them to their original locations.
From the home screen, tap Trash Bin to enter the Trash Bin screen. Tap the les
and Delete to delete them permanently, or Restore to restore them to their
original locations. Tap Clean Up to permanently delete all les in the Trash Bin.
Web Browser
From the home screen, tap Web Browser to open the web browser screen.
Before using this function, ensure that your device is connected to a wireless
network.
Bubble Breaker
From the home screen, tap Bubble Breaker to start playing the game.
Sudoku
From the home screen, tap Sudoku to enter the Sudoku main screen.
25
Page 26

4 Using Eee Note Sync
Eee Note Sync helps you to easily manage Eee Note contents, backup and
restore your important data, upgrade and maintain your system, and even use
your device as a digitizer.
Installing Eee Note Sync utility on your computer
• Eee Note Sync can only be installed on a computer running on Windows®.
• Close Internet Explorer on your computer before the Eee Note Sync
installation.
• Ensure to remove other Wacom pen tablet drivers that have been installed on
your computer before the Eee Note Sync installation.
To install Eee Note Sync utility on your computer:
1. Turn on your device.
2. Using the micro-USB cable, connect your device to your computer’s USB port.
3. Tap
4. The
Eee Note Sync and Wacom Pen Tablet driver on your device.
AutoPlay screen appears on your computer. Click Run setup.exe to
start installing Eee Note Sync utility to your computer. Follow the onscreen
instructions to complete the installation.
• If the AutoPlay screen does not appear on your computer, go to Computer,
and then double-click Eee Note Sync Installer to start the installation.
• We recommend that you also install
Driver during the Eee Note Sync installation. PDFCreater converts Micorsoft
Oce Word, PowerPoint, and Excel les to PDF les automatically so that you
can open these les in your Eee Note. Installing the Wacom Pen Tablet Driver
allows you to use your Eee Note as a digitizer.
26
PDFCreator and Wacom Pen Tablet
Page 27

Copying les to or from your device
1. Ensure that your device is connected to your computer, and the Eee Note
Sync utility is installed to your computer.
2. Tap
3. The
Eee Note Sync Mode on your device.
Eee Note Sync main screen appears on your computer. If the screen does
not appear on your computer, double-click the Eee Note Sync icon on your
computer's desktop to open the utility.
To view your device’s information:
• Click System Information to display your device’s information.
To copy the les to your preferred destination path, do any of the following:
• Click Content Management > Import to copy the les from your computer
to your device.
• Click
Content Management > Export to PC to copy the les from your
device to your computer.
• Click
Content Management > Move to SD Card to copy the les from your
device to your SD card.
Your device supports the following le formats: ePub, PDF, MP3, JPG, BMP, GIF,
and PNG. The txt, doc, docx, xls, xlsx, ppt, and pptx les are supported if the
PDFCreator is installed to your computer and these les are imported from the
Eee Note Sync utility.
To use backup and restore function:
• Click
Backup and Restore > Backup > Browse to back up your device’s data.
Ensure to backup the important data periodically.
• Click
Backup and Restore > Restore to restore your device’s data.
• You have to install the Adobe Digital Editions software to open the ePub
les exported from your device. Visit http://www.adobe.com/products/
digitaleditions/ to obtain the software.
• You have to install the AMR Player to open the recorded audio les exported
from your device. Visit http://www.amrplayer.com/ to obtain the software.
• You cannot open the note les exported from your device. However, you can
double-click a note le, save it as a PNG le to open or print it.
27
Page 28

Using the card reader mode
You may use your device as a card reader.
To use the card reader mode:
1. Ensure that your device is connected to your computer, the Eee Note Sync
utility is installed to your computer, and the microSD card in inserted to your
device.
2. Tap
3. The
Entering SD Card Reader Mode on your device.
AutoPlay screen appears on your computer. Click Open folder to view
les to open the microSD card folder.
If the AutoPlay screen does not appear on your computer, go to Computer,
locate the microSD card, and then double-click it to open the microSD card
folder.
4. Copy the les to the below indicated folders:
book folder: ePub/PDF les
•
music folder: MP3 les
•
photo folder: JPG/BMP/GIF/PNG les
•
28
Page 29

Using the digitizer mode
You may set your device to Digitizer Mode, which enables you to draw images
from your device to your screen.
• Under this mode, all other functions of the device are not available.
• Use this mode on a computer running on Windows®.
To use the digitizer mode:
1. Ensure that your device is connected to your computer, and the Wacom Pen
Tablet Driver is installed to your computer.
2. Tap
3. Tap
4. Now you can use your device as a digital board.
Windows PC Digitizer Mode on your device.
Digitizer Mode (left-hand side) or Digitizer Mode (right-hand side)
according to your habit.
Using the Eee Note mode
The Eee Note Mode allows you to charge and use your device at the same time.
To use the Eee Note mode:
1. Ensure that your device is connected to your computer, and the Eee Note
Sync utility is installed to your computer.
2. Tap
3. Your device is being charged, and you can use your device at the same time.
Eee Note Mode on your device.
29
Page 30

5 Accessories
1
2
3
4
Eee Note case
Your device comes with the durable Eee Note case for easy storage and to
protect your device from scratches and dents.
To store your device:
1. Open the Eee Note case.
2. Place and secure your device into the Eee Note case.
30
Page 31

6 Troubleshooting
Q. The device does not respond or hangs for a long time.
• Long press the Home key ( ) to force quit the running application.
• Use the Wacom pen to press the Restart button to restart your device.
31
Page 32

Appendices
Notices
Federal Communications Commission Statement
This device complies with Part 15 of the FCC Rules. Operation is subject to the
following two conditions:
• This device may not cause harmful interference.
• This device must accept any interference received, including interference that
may cause undesired operation.
This equipment has been tested and found to comply with the limits for a class
B digital device, pursuant to part 15 of the FCC Rules. These limits are designed
to provide reasonable protection against harmful interference in a residential
installation.
This equipment generates, uses and can radiate radio frequency energy and, if
not installed and used in accordance with the instructions, may cause harmful
interference to radio communications. However, there is no guarantee that
interference will not occur in a particular installation. If this equipment does
cause harmful interference to radio or television reception, which can be
determined by turning the equipment o and on, the user is encouraged to try
to correct the interference by one or more of the following measures:
• Reorient or relocate the receiving antenna.
• Increase the separation between the equipment and receiver.
• Connect the equipment into an outlet on a circuit dierent from that to
which the receiver is connected.
• Consult the dealer or an experienced radio/TV technician for help.
CAUTION: Any changes or modications not expressly approved by the party
responsible for compliance could void the user’s authority to operate the
equipment.
Prohibition of Co-location
This device and its antenna(s) must not be co-located or operating in
conjunction with any other antenna or transmitter.
32
Page 33

Safety Information
To maintain compliance with FCC’s RF exposure guidelines, this equipment
should be installed and operated with minimum distance 20cm between the
radiator and your body. Use on the supplied antenna.
Declaration of Conformity for R&TTE directive 1999/5/EC
Essential requirements – Article 3
Protection requirements for health and safety – Article 3.1a
Testing for electric safety according to EN 60950-1 has been conducted. These
are considered relevant and sucient.
Protection requirements for electromagnetic compatibility – Article 3.1b
Testing for electromagnetic compatibility according to EN 301 489-1 and EN 301
489-17 has been conducted. These are considered relevant and sucient.
Eective use of the radio spectrum – Article 3.2
Testing for radio test suites according to EN 300 328- 2 has been conducted.
These are considered relevant and sucient.
CE Mark Warning
This is a Class B product, in a domestic environment, this product may cause
radio interference, in which case the user may be required to take adequate
measures.
REACH
Complying with the REACH (Registration, Evaluation, Authorisation, and
Restriction of Chemicals) regulatory framework, we published the chemical
substances in our products at ASUS REACH website at
http://csr.asus.com/english/REACH.htm.
GOST-R Certicate of Conformity (Russia)
This product complies with Russia’s GOST-R Certicate of
Conformity.
33
Page 34

Safety information
Safety precautions for direct sunlight
Keep this product away from excessive moisture and extreme temperatures.
Do not leave the product inside a vehicle or in places where the temperature
may exceed 60°C (140°F), such as on a car dashboard, window sill, or behind a
glass that is exposed to direct sunlight or strong ultraviolet light for extended
periods of time.
Prevention of hearing loss
Permanent hearing loss may occur if earphones or headphones are used at high
volume for prolonged periods of time.
Potentially explosive environments
Turn your device o in any area with a potentially explosive environment and
obey all signs and instructions.
Sparks in such areas could cause an explosion or re resulting in bodily injury or
even death.
Areas with a potentially explosive environment are often, but not always,
clearly marked. They include fuelling stations such as gas stations, below decks
on boats, fuel or chemical transfer or storage facilities, vehicles using liquied
petroleum gas (such as propane or butane), areas where the air contains
chemicals or articles, such as grain, dust, or metal powders, and any other area
where you could normally be advised to turn o your vehicle’s engine.
Damage requiring service
Unplug the product from the electrical outlet and refer servicing to an
authorized service technician or provider under the following conditions:
• Liquid has been spilled or an object has fallen onto the product.
The product has been exposed to rain or water.
•
The product has been dropped or damaged.
•
There are noticeable signs of overheating.
•
34
Page 35

Avoid hot or wet areas
• The product should be placed away from heat sources such as radiators, heat
registers, stoves, or other products (including ampliers) that produce heat.
• Never use the product in a wet location.
Avoid using your device after a dramatic change in temperature
When you move your device between environments with very dierent
temperature and/or humidity ranges, condensation may form on or within the
device. To avoid damaging the device, allow sucient time for the moisture to
evaporate before using the device.
35
Page 36

Copyright © 2010 ASUSTeK Computer Inc. All Rights Reserved.
No part of this manual, including the products and software described in it, may be reproduced,
transmitted, transcribed, stored in a retrieval system, or translated into any language in any form
or by any means, except documentation kept by the purchaser for backup purposes, without
the express written permission of ASUSTeK Computer Inc. (“ASUS”). Nothing in this manual gives
you a right to use any of ASUS trademarks, service marks, product, or service names, slogans,
logos, or images unless you obtain the prior written consent from ASUS.
Product warranty or service will not be extended if: (1) the product is repaired, modied or
altered, unless such repair, modication of alteration is authorized in writing by ASUS; or (2) the
serial number of the product is defaced or missing.
ASUS PROVIDES THIS MANUAL “AS IS” WITHOUT WARRANTY OF ANY KIND, EITHER EXPRESS
OR IMPLIED, INCLUDING BUT NOT LIMITED TO THE IMPLIED WARRANTIES OR CONDITIONS
OF MERCHANTABILITY OR FITNESS FOR A PARTICULAR PURPOSE. IN NO EVENT SHALL ASUS,
ITS DIRECTORS, OFFICERS, EMPLOYEES OR AGENTS BE LIABLE FOR ANY INDIRECT, SPECIAL,
INCIDENTAL, OR CONSEQUENTIAL DAMAGES (INCLUDING DAMAGES FOR LOSS OF PROFITS,
LOSS OF BUSINESS, LOSS OF USE OR DATA, INTERRUPTION OF BUSINESS AND THE LIKE), EVEN IF
ASUS HAS BEEN ADVISED OF THE POSSIBILITY OF SUCH DAMAGES ARISING FROM ANY DEFECT
OR ERROR IN THIS MANUAL OR PRODUCT.
SPECIFICATIONS AND INFORMATION CONTAINED IN THIS MANUAL ARE FURNISHED FOR
INFORMATIONAL USE ONLY, AND ARE SUBJECT TO CHANGE AT ANY TIME WITHOUT NOTICE, AND
SHOULD NOT BE CONSTRUED AS A COMMITMENT BY ASUS. ASUS ASSUMES NO RESPONSIBILITY
OR LIABILITY FOR ANY ERRORS OR INACCURACIES THAT MAY APPEAR IN THIS MANUAL,
INCLUDING THE PRODUCTS AND SOFTWARE DESCRIBED IN IT.
Products and corporate names appearing in this manual may or may not be registered
trademarks or copyrights of their respective companies, and are used only for identication or
explanation and to the owners’ benet, without intent to infringe.
Third Party Copyright Notice
All title and intellectual property rights in and to any third party contents and softwares
in Eee Note are the properties of the respective content owners and licensors, and may be
protected by applicable copyright or other intellectual property laws and treaties.
• Eee Note contains Adobe
®
Reader® Mobile software under license from Adobe Systems
Incorporated. Copyright © 1995-2009 Adobe Systems Incorporated. All Rights Reserved.
Adobe and Reader are trademarks of Adobe Systems Incorporated.
• Copyright © 2005 - 2010 XCome Technology Ltd. All Rights Reserved.
• SVOX TTS software under license from SVOG AG, Copyright © 2001-2010 SVOG AG. All Rights
Reserved. SVOX is a trademark of SVOX AG.
36
Page 37

Oer to Provide Source Code of Certain Software
This product contains copyrighted software that is licensed under the General Public License
(“GPL”), under the Lesser General Public License Version (“LGPL”) and/or other Free Open Source
Software Licenses. Such software in this product is distributed without any warranty to the
extent permitted by the applicable law. Copies of these licenses are included in this product.
Where the applicable license entitles you to the source code of such software and/or other
additional data, such data should have been shipped along with this product.
You may also download it for free from http://support.asus.com/download. The source
code is distributed WITHOUT ANY WARRANTY and licensed under the same license as the
corresponding binary/object code.
ASUSTeK is eager to duly provide complete source code as required under various Free
Open Source Software licenses. If however you encounter any problems in obtaining the full
corresponding source code we would be much obliged if you give us a notication to the email
address gpl@asus.com, stating the product and describing the problem (please do NOT send
large attachments such as source code archives etc to this email address).
37
Page 38

ASUS Contact information
ASUSTeK COMPUTER INC. (Asia Pacic)
Address 15 Li-Te Road, Peitou, Taipei, Taiwan 11259
Website www.asus.com.tw
Technical Support
Telephone +886228943447
Support Fax +886228907698
Online support support.asus.com
ASUS COMPUTER INTERNATIONAL (America)
Address 800 Corporate Way, Fremont, CA 94539, USA
Telephone +15029550883
Fax +15029338713
Website usa.asus.com
Online support support.asus.com
ASUS COMPUTER GmbH (Germany and Austria)
Address Harkort Str. 21-23, D-40880 Ratingen, Germany
Fax +492102959911
Website www.asus.de
Online contact www.asus.de/sales
Technical Support
Telephone (Component) +491805010923*
Telephone
(System/Notebook/Eee/LCD) +491805010920*
Fax +492102959911
Online support support.asus.com
* EUR 0.14/minute from a German xed landline; EUR 0.42/minute from a mobile phone.
38
 Loading...