


®
CD-R/CD-RW Drive
ATAPI / Enhanced IDE Interface
E542

No part of this manual, including the products and software described in it, may be reproduced, transmitted, transcribed, stored in a retrieval system, or translated into any language
in any form or by any means, except documentation kept by the purchaser for backup purposes, without the express written permission of ASUSTeK COMPUTER INC. (“ASUS”).
ASUS PROVIDES THIS MANUAL “AS IS” WITHOUT WARRANTY OF ANY KIND,
EITHER EXPRESS OR IMPLIED, INCLUDING BUT NOT LIMITED TO THE IMPLIED
W ARRANTIES OR CONDITIONS OF MERCHANTABILITY OR FITNESS FOR A PARTICULAR PURPOSE. IN NO EVENT SHALL ASUS, ITS DIRECTORS, OFFICERS,
EMPLOYEES OR AGENTS BE LIABLE FOR ANY INDIRECT, SPECIAL, INCIDENTAL, OR CONSEQUENTIAL DAMAGES (INCLUDING DAMAGES FOR LOSS OF
PROFITS, LOSS OF BUSINESS, LOSS OF USE OR DAT A, INTERRUPTION OF BUSINESS AND THE LIKE), EVEN IF ASUS HAS BEEN ADVISED OF THE POSSIBILITY
OF SUCH DAMAGES ARISING FROM ANY DEFECT OR ERROR IN THIS MANUAL
OR PRODUCT.
Product warranty or service will not be extended if: (1) the product is repaired, modified or
altered, unless such repair, modification of alteration is authorized in writing by ASUS; or
(2) the serial number of the product is defaced or missing.
Products and corporate names appearing in this manual may or may not be registered trademarks or copyrights of their respective companies, and are used only for identification or
explanation and to the owners’ benefit, without intent to infringe.
The product name and revision number are both printed on the product itself. Manual revisions are released for each product design represented by the digit before and after the period
of the manual revision number. Manual updates are represented by the third digit in the
manual revision number.
For previous or updated manuals, BIOS, drivers, or product release information, contact ASUS
at http://www.asus.com.tw or through any of the means indicated on the following page.
SPECIFICATIONS AND INFORMATION CONTAINED IN THIS MANUAL ARE FURNISHED FOR INFORMATIONAL USE ONLY, AND ARE SUBJECT TO CHANGE AT
ANY TIME WITHOUT NOTICE, AND SHOULD NOT BE CONSTRUED AS A COMMITMENT BY ASUS. ASUS ASSUMES NO RESPONSIBILITY OR LIABILITY FOR
ANY ERRORS OR INACCURACIES THAT MA Y APPEAR IN THIS MANUAL, INCLUDING THE PRODUCTS AND SOFTWARE DESCRIBED IN IT.
Copyright © 2000 ASUSTeK COMPUTER INC. All Rights Reserved.
Product Name ASUS CD-R/RW Drive
Manual Revision 1.00 E542
Release Date June 2000
2
ASUS CD-R/RW Drive User’s Manual

ASUS CONTACT INFORMATION
ASUSTeK COMPUTER INC. (Asia-Pacific)
Marketing
Address: 150 Li-Te Road, Peitou, Taipei, Taiwan 112
Telephone: +886-2-2894-3447
Fax: +886-2-2894-3449
Email: info@asus.com.tw
Technical Support
MB/Others (Tel): +886-2-2890-7121 (English)
Notebook (Tel): +886-2-2890-7122 (English)
Desktop/Server (Tel): +886-2-2890-7123 (English)
Fax: +886-2-2895-9254
Email: tsd@asus.com.tw
WWW: www.asus.com.tw
FTP: ftp.asus.com.tw/pub/ASUS
ASUS COMPUTER INTERNATIONAL (America)
Marketing
Address: 6737 Mowry Avenue, Mowry Business Center, Building 2
Newark, CA 94560, USA
Fax: +1-510-608-4555
Email: tmd1@asus.com
Technical Support
Fax: +1-510-608-4555
Email: tsd@asus.com
WWW: www.asus.com
FTP: ftp.asus.com/Pub/ASUS
ASUS COMPUTER GmbH (Europe)
Marketing
Address: Harkortstr. 25, 40880 Ratingen, BRD, Germany
Fax: +49-2102-442066
Email: sales@asuscom.de (for marketing requests only)
Technical Support
Hotline: MB/Others: +49-2102-9599-0 Notebook: +49-2102-9599-10
Fax: +49-2102-9599-11
Support (Email): www.asuscom.de/de/support (for online support)
WWW: www.asuscom.de
FTP: ftp.asuscom.de/pub/ASUSCOM
ASUS CD-R/RW Drive User’s Manual 3

CONTENTS
I. INTRODUCTION.................................................................................... 7
Features ...................................................................................................................7
Unpacking ...............................................................................................................8
II. INSTALLATION .................................................................................... 9
ASUS CD-R/RW Drive Parts ................................................................................. 9
Front Visew ................................................................................................................ 9
Rear View................................................................................................................... 9
Installation ............................................................................................................ 10
Precautions ............................................................................................................... 10
Safety Precautions .................................................................................................... 10
Installing the Drive....................................................................................................11
III. CONTROLS ....................................................................................... 16
Summary of Controls and Connectors..................................................................16
Front View................................................................................................................ 16
Rear View................................................................................................................. 17
IV. OPERA TION/TESTING ..................................................................... 18
Operating/Testing Your ASUS CD-R/RW Drive .................................................. 18
Loading and Unloading a Disc................................................................................. 18
Operating the ASUS CD-R/RW Drive ..................................................................... 19
Software Installation ................................................................................................ 19
V . ADDITIONAL INFORMATION............................................................ 20
Additional Information ......................................................................................... 20
Care of Discs ............................................................................................................ 20
Emergency Eject ...................................................................................................... 21
Interface Pin Table ................................................................................................... 22
VI. APPENDIX ........................................................................................ 23
Jumper Block ........................................................................................................23
Auto Selftest ......................................................................................................... 24
Basic Principles of CD-R and CD-RW Media......................................................25
A Cross-section: A CD-R Disc................................................................................. 25
The Additional CD-R/RW Area of a CD-R and CD-RW Disc ............................. 26
A Cross-section: Blank CD-R or CD-RW Disc ....................................................... 26
A Cross-section: Partially Recorded CD-R or CD-RW Disc ................................... 26
A Cross-section: Fully Recorded CD-R or CD-RW Disc ........................................ 27
CD-RW .................................................................................................................28
The Best Way to Create Your Own CDs —With Re-usable CD-RW ...................... 28
Multiread: Making CD-RW Media Compatible with CD-ROM and DVD-ROM .. 28
CD-R .....................................................................................................................29
What is CD-Recordable? ......................................................................................... 29
What is the Orange Book? ....................................................................................... 29
What does Orange Book-certified Media Mean and Why? ..................................... 29
What is Multisession CD?........................................................................................ 30
What is the Recording Speed of CD-R? .................................................................. 30
What is the Difference Between CD-R “Fixation” And “Finalization”? ................. 31
What is “Disc At Once”? ......................................................................................... 31
What is “Track At Once”?........................................................................................ 32
What is “Incremental” or “Packet” Writing? ........................................................... 32
What is the Difference Between a “Multisession” Disc and a “Multitrack” Disc? . 32
4
ASUS CD-R/RW Drive User’s Manual

COMPLIANCE
Federal Communications Commission Statement
This device complies with FCC Rules Part 15. Operation is subject to the following
two conditions:
• This device may not cause harmful interference, and
• This device must accept any interference received, including interference that
may cause undesired operation.
This equipment has been tested and found to comply with the limits for a Class B
digital device, pursuant to Part 15 of the FCC Rules. These limits are designed to
provide reasonable protection against harmful interference in a residential installation. This equipment generates, uses and can radiate radio frequency energy and, if
not installed and used in accordance with manufacturer’s instructions, may cause
harmful interference to radio communications. However, there is no guarantee that
interference will not occur in a particular installation. If this equipment does cause
harmful interference to radio or television reception, which can be determined by
turning the equipment off and on, the user is encouraged to try to correct the interference by one or more of the following measures:
• Reorient or relocate the receiving antenna.
• Increase the separation between the equipment and receiver.
• Connect the equipment to an outlet on a circuit different from that to which
the receiver is connected.
• Consult the dealer or an experienced radio/TV technician for help.
WARNING! Any changes or modifications to this product not expressly ap-
proved by the manufacturer could void any assurances of safety or performance
and could result in violation of Part 15 of the FCC Rules.
Canadian Department of Communications Statement
This digital apparatus does not exceed the Class B limits for radio noise emissions
from digital apparatus set out in the Radio Interference Regulations of the Canadian Department of Communications.
This Class B digital apparatus complies with Canadian ICES-003.
Cet appareil numérique de la classe B est conforme à la norme NMB-003 du Canada.
Electromagnetic Compatibility/Low Voltage Directives
This digital apparatus is in conformity with the EMC directive and
low-voltage directive.
ASUS CD-R/RW Drive User’s Manual 5
LASER SAFETY
This unit employs a laser. Do not remove the cover or attempt to service this device when
connected due to the possibility of eye damage.
LASER-SICHERHEIT
In das Gerät ist ein Laser eingebaut. Nehmen Sie die Abdeckung nicht ab und versuchen
Sie nicht, das Gerät zu reparieren, solange es angeschlossen ist. Es besteht die Gefahr einer
Augenverletzung.
CAUTION
USE OF CONTROLS OR ADJUSTMENTS OR PERFORMANCE OF PROCEDURES
OTHER THAN THOSE SPECIFIED HEREIN MAY RESULT IN HAZARDOUS LASER
RADIATION EXPOSURE.
WARNUNG
DIE VORNAHME VON REGELUNGEN ODER EINSTELLUNGEN ODER DIE
DURCHFÜHRUNG VON VERFAHREN, DIE NICHT IN DIESEM DOKUMENT
(DIESER BESCHREIBUNG; IM NACHSTEHENDEN TEXT) ANGEGEBEN SIND,
KANN EINE GEFÄHRLICHE EINWIRKUNG VON LASERSTRAHLUNG ZUR
FOLGE HABEN.
CLASS 1
LASER PRODUCT
KLASS 1
LASERAPPARAT
DANGER VISIBLE AND INVISIBLE LASER RADIATION WHEN OPEN AVOID EXPO-
SURE TO BEAM
VARO! AVATT AESSA OLET ALTIINA NÄKYMÄTTÖMÄLLE LASER SÄTTEILYLLE
ÄLÄ KATSO SÄTEESEN
VARNING OSYNLIG LASERSTRÅLNING NÄR DENNA DEL ÄR ÖPPNAD BETRAKTA
EJ STRÅLEN
ADVERSEL USYNLIG LASERSTRÅLING VED ÅBNING. UNDGÅ UNSAETTELSE FOR
STRÅLING
DANGER INVISIBLE LASER RADIATION WHEN OPEN AVOID DIRECT EXPOSURE
TO BEAM
VORSICHT INSICHTBARE LASERSTRAHLUNG WENN ABDECKUNG GEÖFFNET
NICHT DEM STRAHL AUSSETSEN
LUOKAN I
LASERLAITE
KLASSE 1
LASER-PRODUKT
Laser
Type Semiconductor laser GaAlAs
Wave length 780–800 nm (at 25° C)
Output Power (measured above the objective lens)
1 mW (Read)
20 mW (Write)
Beam divergence 60 degrees
6
ASUS CD-R/RW Drive User’s Manual

I. INTRODUCTION
Introduction
The ASUS CD-R/RW Drive is a new generation half height 5.25” internal CD-Recordable/ ReWritable drive with the popular Enhanced IDE interface.
The drive is in fact a multi-function device, since it can be used as:
• Fast CD-ROM reader
• CD-Recorder, e.g., to record your own CD-ROMs or Audio-CDs
• CD-ReWritable device to use as your personal storage medium, by using
Incremental Packet Writing
The ASUS CD-R/RW Drive is the ideal tool for publishing large amounts of data in
compact form on CD. The new Incremental Packet Writing function will make this
drive attractive to the general desktop PC-user for personal data storage.
CD-Recordable discs can be recorded at the supported speed of your drive, and in
all standard formats, e.g., CD-Audio, CD-ROM (XA), CD-i and Video-CD. Since
these discs are recorded in accordance with the Orange Book (Part II) specification,
these discs can be played back on all compatible CD-players.
CD-ReWritable is a new feature that allows reuse of previously written discs by
rewriting portions or the complete disc in accordance with the Orange Book (Part
III) specification. These discs can also be recorded at the supported speed of your
drive in all standard formats.
Features
I. INTRODUCTION
Features
• Multi-function device (CD-ROM reader , CD-Recorder and CD-ReWritable
drive)
• Supports Incremental Packet W riting for data storage applications and “drag
& drop” File System support through the CD-UDF standard (endorsed by
Optical Storage Technology Association or OSTA)
• Supports standardised Multi Media Commandset (MMC) as standardised
by the American National Standards Institute (ANSI)
• Plug & Play read compatibility under W indows 95/98/2000 and Windows NT
• Interfaces directly to low cost standardized Enhanced IDE connector on
PC motherboard
• Supports Fast Format (Background Formatting) depending on the application software, which reduces formatting time of a CD-RW disc to only a
few minutes.
ASUS CD-R/RW Drive User’s Manual 7

I. INTRODUCTION
I. Intr oduction
Unpacking
Unpacking
If the ASUS CD-R/R W Drive package shows evidence of rough handling or damage
and the drive does not function properly on initial startup, return the drive and damaged package to your supplier and request a replacement.
Lift out the ASUS CD-R/RW Drive and remove the packing materials. Check that
the package contains the following items :
• ASUS CD-R/RW Drive
• Mounting Screws
• Jumper (Factory-mounted on jumper block)
• IDE Ribbon Cable
• Audio Cable
• This User’s Manual
8 ASUS CD-R/RW Drive User’s Manual
II. INSTALLATION
ASUS CD-R/RW Drive Parts
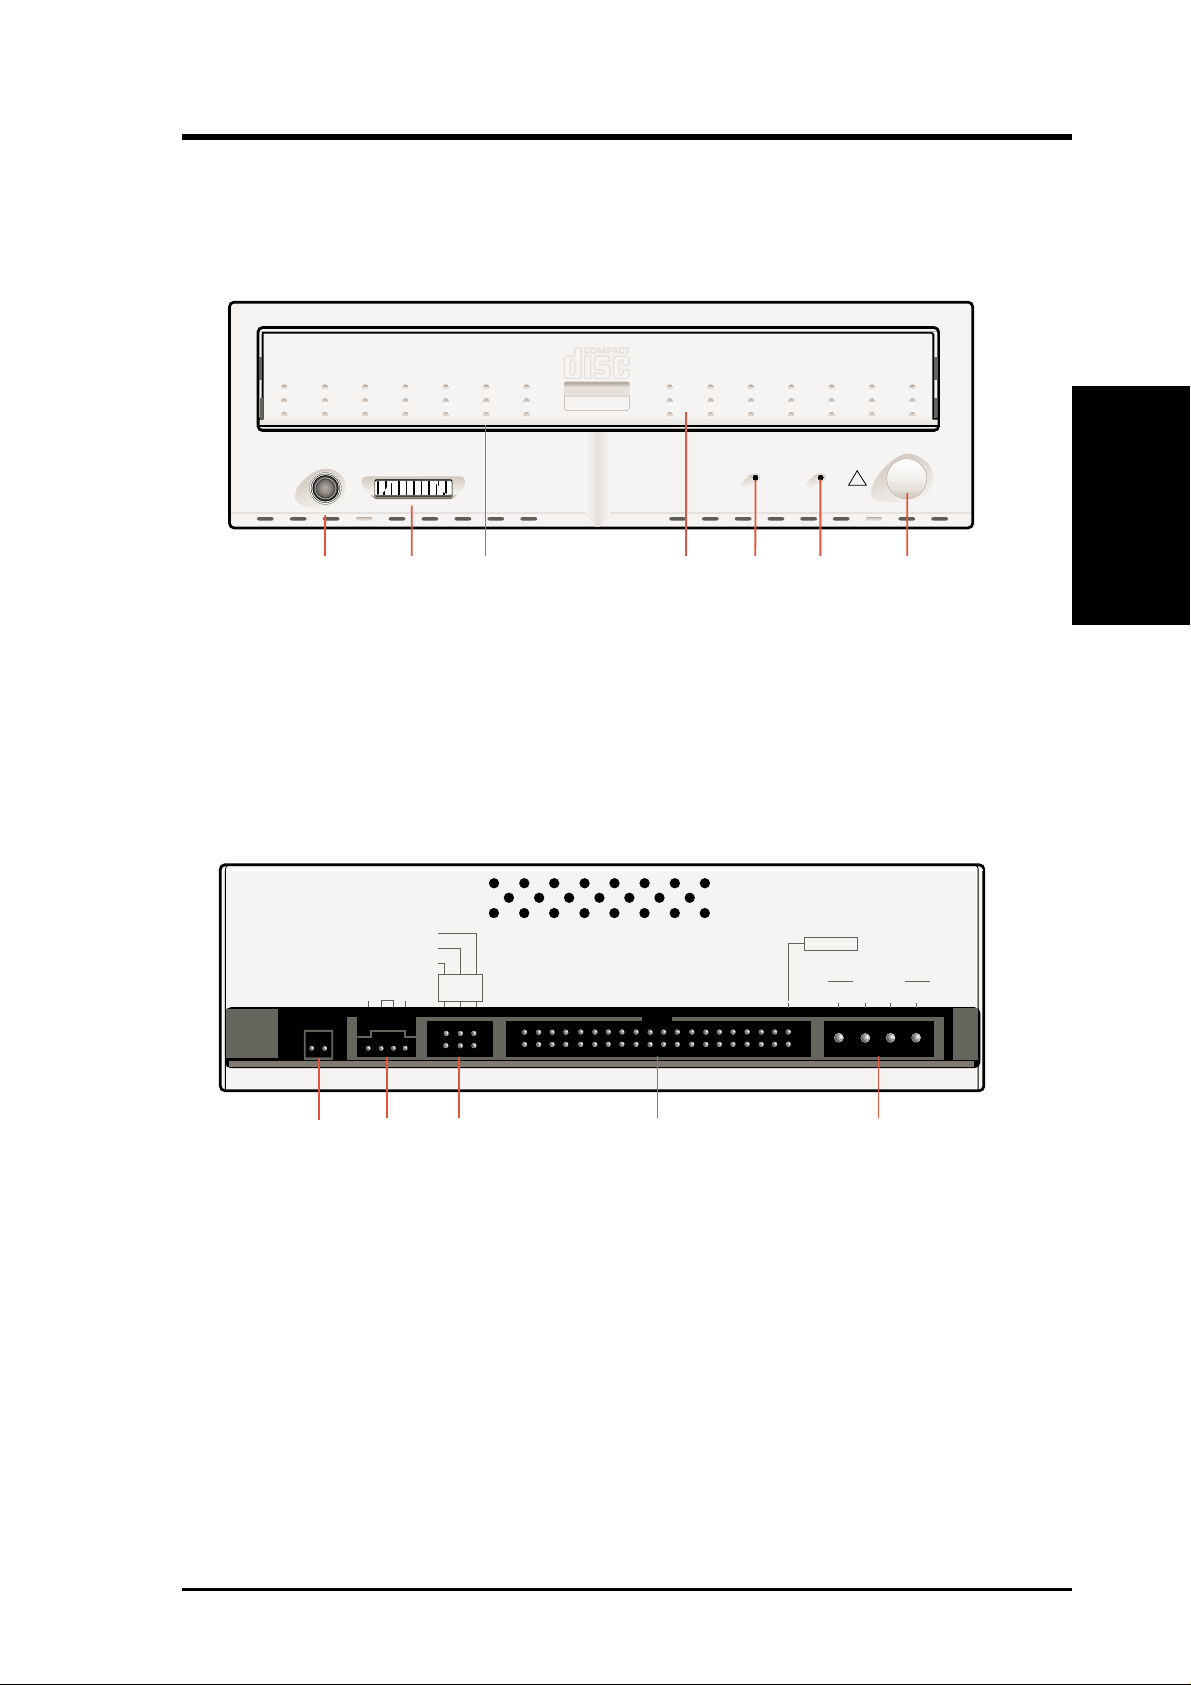
Front View
Recordable
ReWritable
PHONES
VOLUME
123 4567
1 Headphone Plug
2 Headphone Volume Control
3 Emergency Eject
4 Disc Tray
Rear View
MASTER
SLAVE
CABLE SELECT
AUDIO OUT
R GND L
CSM
SLA
ACTIVE
OPEN/CLOSE
!
DISC INWRITING
5 Write Indicator
6 Disc In/Active/Error Indicator
7 Open/Close Button
IDE PIN 1
DC INPUT
GND
+5 +12
Parts
II. INTSTALLATION
8 9 10 11 12
8 Digital Audio Out
9 Audio Line Out Connector
10 Jumper Block
ASUS CD-R/RW Drive User’s Manual 9
11 IDE Connector
12 Host DC Power Connector

II. INSTALLATION
Installation
Precautions
This CD-Recordable/Rewritable drive, like all electronic equipment, is static sensitive.
• T ake the proper precautions when handling the drive, for example by touching the PC chassis before touching the drive.
II. Installation
Precautions
• A void touching the IDE connector pins, audio-connector pins, and jumper
pins.
• Keep the drive in its conductive wrapping until you are ready to install the
drive in your computer.
Safety Precautions
• Europe: This drive shall be installed only with an EN60950 (IEC950) approved Power supply.
• USA/Canada: This drive is for use only with IBM compatible UL listed
Personal Computers or Macintosh UL listed workstations weighing less
than 18 kg.
IMPORTANT: It is a criminal offence, under applicable copyright laws, to make unauthorized copies of copyright-protected material, including computer programs, films, broadcasts and sound recordings. This equipment should not be used for such purposes.
10 ASUS CD-R/RW Drive User’s Manual

II. INSTALLATION
Installing the Drive
1. Turn off your computer, monitor and other peripherals. T o disconnect your configuration completely from the mains, the mains plug has to be disconnected.
NOTE: Open the cover flap of this booklet for locating the drive connectors and their orientation.
2. Remove the cover from your computer. Consult the manuals that came with
your computer for specific details.
Drive
II. INSTALLATION
3. To mount the drive inside your PC (or other type of computer), locate a free
5.25” bay and follow the instructions, as provided with your computer systems,
for installing the drive.
ASUS CD-R/RW Drive User’s Manual 11

II. Installation
Drive
II. INSTALLATION
When you are planning to use 8 cm discs your drive should be mounted
horizontaly or you should use an adapter (for information contact your local
supplier).
4. You have several possibilities to install your IDE data cable depending on your
existing configuration:
A) Hard disk connected as Master to Primary IDE Port, CD-ROM connected
as Master to Secondary IDE Port: Connect the CD-R/RW Drive as Slave
to Secondary IDE Port.
JUMPER
BLOCK
Existing PC
Configuration
Master Slave
Primary Port Hard Disk —
Secondary Port CD-ROM —
CSM
S
PC Configuration
After Installation
Master Slave
Primary Port Hard Disk —
Secondary Port CD-ROM CD-R/RW Drive
B) Single hard disk connected as Master to Primary IDE Port: Connect the
CD-R/RW Drive as Master to Secondary Port.
JUMPER
BLOCK
Existing PC
Configuration
PC Configuration
After Installation
Master Slave
Primary Port Hard Disk —
Secondary Port ——
CSM
S
Primary Port Hard Disk —
Secondary Port CD-R/RW Drive
Master Slave
12 ASUS CD-R/RW Drive User’s Manual

II. INSTALLATION
C) Hard-disc connected as Master to Primary IDE Port, CD-ROM connected
as Slave to Primary IDE Port: Connect the CD-R/RW Drive as Master to
Secondary IDE Port.
JUMPER
BLOCK
Existing PC
Configuration
Master Slave
Primary Port Hard Disk —
Secondary Port ——
CSM
S
PC Configuration
After Installation
Master Slave
Primary Port Hard Disk CD-ROM
Secondary Port CD-R/RW Drive —
NOTE: Installation A is preferred for systems with an ID hard disk and CD-ROM drives.
For systems with only and IDE hard disk drive, Installation B is preferred.
5. Locate the free end of the IDE data cable and thread it out through the open
drive bay. Do the same with the power cable and the (optional) audio cable
(digital or analog). Your system will either be equipped with an analog or digital
soundcard connector. Use the appropriate connector on the drive recognizable
with the amount of pins.
POWER
CABLE
Drive
II. INSTALLATION
IDE DATA
CABLE
AUDIO
CABLE
(Analog)
AUDIO
CABLE
(Digital)
ASUS CD-R/RW Drive User’s Manual 13

II. Installation
Drive
II. INSTALLATION
6. Connect your (optional) audio cable, IDE data cable and the power cable into
the back of the ASUS CD-R/RW Drive. Make sure you correctly align pin 1 of
the cable to pin 1 of the connectors.
POWER
CABLE
AUDIO CABLE
(Digital or Analog)
IDE DATA
CABLE
7. Insert the ASUS CD-R/RW Drive into the drive bay. Using all the screws included in the bag to secure the ASUS CD-R/RW Drive into the bay.
14 ASUS CD-R/RW Drive User’s Manual

II. INSTALLATION
8. Replace the cover. Connect the mains plug of your configuration. When you
have successfully installed the drive and established all connections, turn on the
PC. You are ready to run the selftest (see Appendix) and then install the software
(refer to the software documentation for installation procedures).
Drive
I. INSTALLATION
ASUS CD-R/RW Drive User’s Manual 15

III. CONTROLS
Summary of Controls and Connectors
Front View
Recordable
ReWritable
ACTIVE
OPEN/CLOSE
!
PHONES
123 4567
VOLUME
DISC INWRITING
1 Headphone Plug
Connect your headphone to listen to audio or music discs (or tracks).
2 Headphone Volume Control
Front
III. Controls
Turn the volume control to the right to increase the audio volume of your
headphone.
3 Emergency Eject
In case you are not able to power up your PC, and want to take the disc out of
the drive, push with a rod (paperclip) of about 5 cm long through the hole in
the front to disengage the gears inside. Then pull the tray out. After taking the
disc, gently push it back to its original position.
CAUTION: This is only in case of emergency, not meant for normal operations.
4 Disc Tray
5 Write Indicator
Lights ORANGE when writing of a disc occurs. Flashes ORANGE during write
emulation.
6 Disc In/Active/Error Indicator (Dual Color LED)
Lights GREEN when a disc is present. Flashes GREEN asymmetrically when
data is being read from disc or written to the disc. Flashes GREEN symmetrically when starting up a disc. Lights RED upon error (e.g., after failed selftest).
7 Open/Close Button
Press the OPEN/CLOSE button to open the disc loading tray. T o close the disc
loading tray , gently push the front of the tray or press the OPEN/CLOSE button.
Using the open/close button to close the tray will calibrate the movement of the
tray in case this deviates from the original setting due, for instance, to ageing.
16 ASUS CD-R/RW Drive User’s Manual

Rear View
III. CONTROLS
MASTER
SLAVE
CABLE SELECT
AUDIO OUT
CSM
R GND L
SLA
8 9 10 11 12
8 Digital Audio Out
Pin number Definition
1 Digital Audio signal
2 Ground
9 Audio Line Out Connector
1: Left 3: GND
IDE PIN 1
+5 +12
DC INPUT
GND
Rear
III. CONTROLS
2: GND 4: Right
10 Jumper Block
These jumpers are used to select Master/Slave mode and Cable Select (see Appendix for more information).
11 IDE Connector
40-pin IDE ribbon cable connector (see Appendix for more information).
12 Host DC Power Conector (Type AMP 00641737-1)
1: +12V 3: GND
2: GND 4: +5V
ASUS CD-R/RW Drive User’s Manual 17

IV. OPERATION/TESTING
Operating/Testing Your ASUS CD-R/RW
Drive
Loading and Unloading a Disc
1. To open the tray: Press the OPEN/CLOSE button.
2. Load a disc, with the label facing upwards. The tray accommodates discs with 8
cm diameter (CD-Single) or the more usual 12 cm discs (the 8 cm disc can only
be used in drives mounted horizontally).
12CM (5”)DISC
8CM (3”)DISC
IV. Operation/Testing
Loading/Unloading
3. To close the tray, either push gently at the front of the tray or press the OPEN/
CLOSE button.
NOTES: 1. For optimal results, use reliable CD-R or CD-RW media.
OPEN/CLOSE
BUTTON
2. Don’t use general purpose commercial head cleaning discs.
3. 8-cm R- and RW-discs cannot be recorded in this drive.
4. Do not switch off the computer and/or the drive during the recording process
because this might result in an unreadable disc. Make sure that the computer has finished the recording process and that the write indicator on the
front of the drive is off before switching off your computer or drive.
18 ASUS CD-R/RW Drive User’s Manual

IV. OPERATION/TESTING
Operating the ASUS CD-R/RW Drive
Specific application software running on the computer platform in use, designed to
work with the ASUS CD-R/R W Drive, must be used to be able to operate the ASUS
CD-R/RW Drive correctly.
Software Installation
The installation and operation of the necessary software is dependent of the computer configuration in which the ASUS CD-R/RW Drive is to be used, e.g., PCs,
Windows 95/98/2000, Windows NT, UNIX or other Operating Systems. Contact
your supplier for the full list of supported host configurations and available software
packages.
All trademarks acknowledged.
Software
IV. Operation/Testing
ASUS CD-R/RW Drive User’s Manual 19

V. ADDITIONAL INFORMA TION
Additional Information
Care of Discs
• When loading a disc, allow time for the door to open and then gently insert the
disc.
• Handle discs only by the outer and inner edges.
• Never write with a ballpoint on the surface of the disc.
• Do not store a disc in places with high temperature and humidity. Do not place
the disc under direct sunlight.
• Store discs in their cases to prevent dust contamination, scratches, bending and
other damages.
• When a disc becomes dirty , clean it with a cleaning cloth. W ipe the disc from the
centre out. Do not use solvents, such as benzine, thinner, commercially available cleaners, or anti-static fluids. Using fluids of these types may damage the
disc.
V. Additional Info
Care of Discs
• Blank discs are available separately through your dealer or other sources.
• To get the best operating environment for your drive, you should close your PC
after installing the drive. In this way the central fan will help cool your drive and
keep performance according to specifications.
• Unloading a disc after recording might take some time, because the drive has to
update the TOC before the disc can be ejected.
20 ASUS CD-R/RW Drive User’s Manual

V. ADDITIONAL INFORMA TION
Emergency Eject
In case of power failure or if the tray of your CD-R/RW Drive won’t open using the
Open/Close button or your software, you may have to manually eject the tray.
NOTE: Use the manual method only when necessary or as a last resort. Do not use this
method in lieu of the Open/Close button when, for example, you forgot to eject the tray while
the computer is on. T urn your computer back on to eject the tray, if possible.
To manually eject the tray:
1. Turn off your computer.
WARNING! If you don’t turn off your computer before you attempt to eject the tray using the
steps below, you may damage your CD-R/RW Drive.
2. Locate the Emergency Eject hole of your CD-R/R W Drive. See ASUS CD-R/
RW Drive Parts for the location or see illustration below.
3. Insert the end of a large straightened paper clip about 3 cm (1.25 inches) into the
Emergency Eject hole.
Recordable
ritable
ReW
VOLUME
PHONES
OPEN/CLOSE
DISC INWRITING
!
ACTIVE
4. Push gently but firmly until the disc tray door is released, then carefully pull the
tray open.
WARNING! Do not force the tray open; wait until the paper clip has dislodged it to be sure
you don’t break the tray’s front.
5. Remove the CD disc, turn on your computer, and press the Open/Close button
of your CD-R/RW Drive to see if it is working properly.
NOTE: If ejecting the tray using a paper clip does not work, your CD-R/RWDrive may be
damaged. Contact your dealer for further assistance.
V. Additional Info
Emergency Eject
ASUS CD-R/RW Drive User’s Manual 21

V. ADDITIONAL INFORMA TION
Interface Pin Table
Signal Pin Number Signal Pin Number
RESET 01 DMA REQUEST 21
GROUND 02 GROUND 22
–DB(7) 03 I/O WRITE 23
–DB(8) 04 GROUND 24
–DB(6) 05 I/O READ 25
–DB(9) 06 GROUND 26
–DB(5) 07 I/O READY 27
–DB(10) 08 SPSYNC:CSEL 28
–DB(4) 09 DMACK– 29
–DB(11) 10 GROUND 30
–DB(3) 11 INTRQ 31
–DB(12) 12 16 BIT I/O 32
Interface Pin Table
V. Additional Info
–DB(2) 13 DA1 33
–DB(13) 14 PDIAG– 34
–DB(1) 15 DA0 35
–DB(14) 16 DA2 36
–DB(0) 17 CHIP SELECT 0 37
–DB(15) 18 CHIP SELECT 1 38
GROUND 19 DASP– 39
Removed 20 GROUND 40
22 ASUS CD-R/RW Drive User’s Manual

VI. APPENDIX
Jumper Block
JUMPER BLOCK
MASTER
SLAVE
CABLE SELECT
AUDIO OUT
R GND L
CSM
SLA
CSSM
IDE PIN 1
DC INPUT
+5 +12
GND
• When a shorting jumper is in the “CS” (CSEL) position, the device will use the
host interface signal CSEL to configure the device.
CSM
S
• When the shorting jumper is placed in the “M” (MASTER) or “S” (SLAVE), the
drive will be configured accordingly.
VI. Appendix
Jumper Block
CSM
S
or
CSM
S
ASUS CD-R/RW Drive User’s Manual 23

VI. APPENDIX
Auto Selftest
VI. Appnedix
Auto Selftest
• The auto selftest will execute a number of diagnostic tests and will be activated
by pushing and holding Open/Close button for one complete Open/Close cycle
of the tray.
• The auto selftest can also be executed by holding the Open/Close button for
about 4 seconds during power-up.
• The disc-in LED and the write-LED will be tested before the actual selftest:
— The disc-in LED will flash three times: The first time RED, the second
time GREEN and the last time ORANGE.
— The write-LED will flash ORANGE.
This is repeated once.
• During execution of a particular test 0, the right LED is ORANGE. After execution of this test, the right LED will flash a number of times.
If this part of the test failed, then the LED will flash RED a number of times. The
number of flashes, corresponds to the sequence number of the test.
• In case of a failing selftest, it may helpful to report the number of the failing test.
Example: Execution of Test 4
• Disc-in LED is ORANGE
— Test 4 is being executed
• Disc-in LED flashes 4 times GREEN
— Test 4 is executed succesfully
or
• Disc-in LED flashes 4 times RED
— Test 4 failed
• After completion of the whole selftest, a final indication of the testresults will be
given: The LED will flash GREEN-ORANGE for about 3 seconds if the test is
successful. Otherwise, the LED will be RED untill a new command has to be
executed.
24 ASUS CD-R/RW Drive User’s Manual

VI. APPENDIX
Basic Principles of CD-R and CD-RW Media
A blank CD-R or CD-RW disc is divided into areas (see illustration below). This
differs from a prerecorded disc by the additional CD-R/R W area, which lies in front
of the lead-in area.
HOLE
ADDITIONAL CD-R AREA
LEAD-IN AREA
PROGRAM AREA
LEAD-OUT TRACK
VI. Appendix
CD-R/RW Media
A Cross-section: A CD-R Disc
A disc comprises different layers.
PROTECTIVE AREA
REFLECTIVE LA YER (GOLD)
RECORDING LAYER
PLASTIC SUBSTRATE
PREFORMED TRACKS
• Transparent plastic material (the same as conventional CDs) is used as the substrate.
• Onto this a special greenish tinged translucent layer is applied. The substrate has
already been provided with a preformed track spiral into which the data will be
written during recording.
• On top of the green recording layer is a reflective gold layer and a protective
layer of plastic material.
ASUS CD-R/RW Drive User’s Manual 25

VI. APPENDIX
CD-R/RW Disc
VI. Appnedix
The Additional CD-R/R W Area
of a CD-R and CD-RW Disc
The additional CD-R/RW area is divided into two areas:
• The Program Memory Area (PMA) which mainly contains the track numbers of
the tracks recorded with respective start and stop points.
• The Program Calibration Area (PCA). Disc space for the CD writer to calibrate
the laser energy needed for recording on the disc by means of a trial recording.
A Cross-section: Blank CD-R or CD-RW Disc
Next to the centre hole is an area for the mechanical clamping of the disc in the
player. Adjacent to this is the unrecorded area of the blank CD-R or CD-RW disc.
max. 60mm
max. 59mm
22.35mm
7.5mm
CENTER
HOLE
AREA FOR
MECHANICAL
CLAMPING
BLANK AREA FOR RECORDING
A Cross-section: Partially Recorded CD-R or CD-RW Disc
After the first recording the recording area is divided (see figure below).
max. 60mm
max. 59mm
25.00mm
23.00mm
22.35mm
CENTER
HOLE
PCA
PMA
LEAD-
• The “Lead-in”, “program area” and “Lead-out” areas are present on every
conventional prerecorded CD.
RECORDED AREA UNRECORDED AREA
IN
LEAD-
OUT
• For the partially recorded CD-R or CD-R W disc, the PCA and PMA areas
are incorporated in front of the Lead-in.
• Track numbers with associated absolute start and stop times are stored in
the PMA.
26 ASUS CD-R/RW Drive User’s Manual

VI. APPENDIX
The possibility exists of making further recordings later . It would also be possible to
declare the disc as fully recorded. In which case, the definitive table of contents
(TOC) is written into the Lead-in.
A Cross-section: Fully Recorded CD-R or CD-RW Disc
The fully recorded CD-R or CD-R W disc has a program of 74 or 80 minutes playing
time, a lead-in area with table of contents and a lead-out area.
max. 59mm
max. 58mm
25.00mm
23.00mm
RECORDED AREA
LEAD-IN LEAD-OUT
• The areas specific to the CD recorder, the PCA and PMA, are still present but
are simply not used by conventional CD players.
• When the lead-in area is provided with the table of contents, the CD recorder
uses the information stored here and not the data from the PMA area.
• Identification of the end of the disc is stored in the Lead-out. The CD player
stops playback of a disc when reaching this area.
VI. Appendix
CD-R/RW Disc
ASUS CD-R/RW Drive User’s Manual 27

VI. APPENDIX
VI. Appnedix
Glossary
CD-RW
The Best Way to Create Your Own CDs
—With Re-usable CD-RW
• CD-ReWritable (CD-RW) gives you the opportunity to create your own
CDs, in the best and most cost-effective way. CD-RW is, in fact, the logical extension of CD-Recordable (CD-R). Together, they give you the opportunity to run the media that best suits the job in hand.
• CD-R W supports the recording of small packages of data, using incremental packet writing in the universal (UDF) file format. As with floppy discs,
you have the option of writing a disc all at once, or building it up bit by bit
- and re-using the disc later for other data.
• CD-R W media can be rewritten hundreds, or even thousands of times. This
means that the overall running costs, for hardware and software together,
can be very economical indeed.
• CD-R W will greatly extend your personal short-term storage capacity , providing space for large-volume files like Internet downloads, backups, and
hard disc dumps. It is also excellent for low-quantity multimedia applications, from one-off disc testing to small-scale distribution.
Multiread: Making CD-RW Media Compatible with
CD-ROM and DVD-ROM
• CD-R W media reflects less laser light than the other CD media. To play all
CD media, drives must be able to adapt to these different reflectivities.
• For compatibility , drives need to do this in a standard way. They also need
to interface and interact with their host computer systems in a standard
way.
• That standard way is MultiRead. And any CD drive can play all CD media
—CD-Digital Audio, CD-ROM, CD-R, and CD-R W—provided that it sup-
ports MultiRead.
• What is more, MultiRead extends the same compatibility to DVD. All DVD
equipment that supports MultiRead will also be able to retrieve CD-RW
data. This means that you can go ahead now with storing valuable data on
CD-RW media, safe in the knowledge that it will be future-proof.
28 ASUS CD-R/RW Drive User’s Manual

VI. APPENDIX
CD-R
Copyright acknowledgment: This part contain materials from “OSTA - Optical Storage Technology Association”. Published with permission.
Optical Storage Technology Association
311 East Carrillo Street
Santa Barbara, CA 93101 - USA
Tel.: (805) 963 3853
Fax.: (805) 962 1541
WWW: http://www.osta.org
What is CD-Recordable?
• CD-Recordable is compact disc technology that allows the user to create
their own CD’s. This is done by means of a recording system that uses
“Write once” type optical discs and documented in the “Orange Book, Part
II” and a CD recording device that is connected to a host system.
T ypically , the host system is a personal computer that also contains recording software.
What is the Orange Book?
• The Orange Book is a document that describes the specification for CDWrite Once (CD-Recordable) technology.
• It defines both the physical structure and dimensions of a CD-R disc as
well as the use of certain portions of the recording surface:
• To record information (the Program area),
• T o calibrate the recorder laser power (Power Calibration area or PCA),
• T o record track information for all sessions (the Program Memory area
or PMA),
• To record the Lead-in Lead-out areas that preceed and follow , respec-
tively, the Program area.
• There are several “parts” to the Orange Book. Part II refers to CD-Recordable.
Glossary
VI. Appendix
What does Orange Book-certified Media Mean and
Why?
• The Orange Book, Part II is the primary specification for CD-R media.
Accordingly, all CD-R media should meet the Orange Book criteria for
recordability and playback.
• Philips and Sony , the orginators of the Orange Book, provide Orange Book
certification of CD-R media.
ASUS CD-R/RW Drive User’s Manual 29

VI. APPENDIX
VI. Appnedix
Glossary
What is Multisession CD?
The principal purpose of multiple sessions is to allow additional data to be appended
to a previously recorded disc.
NOTE: Some older cd readers can read only the first session of a multisession disc.
A session is defined as an area including lead-in, program data and lead-out.
• A CD-R recorder that supports multisession recording can write a disc that
will have multiple sessions linked together, each containing their own leadin, program and lead out.
• Any multisession-supported CD reader can access the data, whether it was
written in the first session or a subsequent session.
Contrast this to the recording structure of a pressed CD-ROM or a CD-R written in
“Disc at Once” mode that contains just one lead-in area and one lead-out area.
What is the Recording Speed of CD-R?
The “speed” rating of a CD-Recordable/Rewritable determines how fast it can record
data to blank CD-R media.
Speed designators, such as “1X”, “2X”, “4X” and “6X” define multiples of the
original playback speed of first generation CD-ROM players:
• For a CD-ROM player or CD-Recordable/Rewritable, a 1X speed translates to 153,600 Bytes per second. This is usually rounded down to 150 Kb
per second. Therefore, a “1X” recorder writes 150 Kb per second to the
CD-R media.
• Likewise, a “4X” recorder records at 600 Kb per second.
NOTES: 1. There are some variations in measuring speed, because there are recording
modes that provide more than 2,048 data bytes per block (audio is recorded
at 2,352 bytes per block).
2. Some CD-Recordable/Rewritables have a different reading speed than their
rated recording speed. For instance, a “4x4x32” CD-Recordable/Rewritable
can write at 4x speed and read back at 32x speed.
30 ASUS CD-R/RW Drive User’s Manual

VI. APPENDIX
Compact Disc Average Transfer Rates
NOTES: 1. The normal CD (at n=1) transfer rate from the disc is 75 blocks per second.
2. The average transfer rates shown are in Bytes Per Second.
Read/Write Audio CD-ROM Mode 1 CD-ROM Mode 2
Speed (2,352 Bytes/Block) (2,048 Bytes/Block) (2,336 Bytes/Block)
1X 176,000 153,600 175,200
2X 352,800 307,200 350,400
4X 705,800 614,400 700,800
8X 1,411,200 1,228,800 1,401,600
24X 4,233,600 3,686,400 4,204,800
32X 5,644,800 4,915,200 5,606,400
Glossary
VI. Appendix
What is the Difference Between CD-R “Fixation” And
“Finalization”?
• Fixation is the process of writing the lead-in and lead-out information to
the disc. This process finishes a writing session and creates a table of contents.
• Fixation is required for a CD-ROM or CD-Audio player to play the disc.
Discs which are “fixated for append” can have additional sessions recorded,
with their own session lead-in and lead-out, creating a multisession disc.
• When a disc is “finalized” the absolute lead-in and lead-out for the entire
disc is written, along with information, which tells the reader not to look
for subsequent sessions.
This final table of contents (TOC) conforms to the ISO 9660 file standard.
What is “Disc At Once”?
• Disc at Once is a writing mode that requires data to be written continuously, without any interruptions, until the entire data set is transferred to
the CD-R.
• The lead-in, program and lead-out are written in a single event. All of the
information to be recorded needs to be staged on the computer’s hard disc
prior to recording in the Disc at Once mode.
• This mode is usually preferred for discs that are sent to a CD-ROM replication facility when CD-R is the source media.
ASUS CD-R/RW Drive User’s Manual 31

VI. Appnedix
Glossary
VI. APPENDIX
• Recording in the Disc at Once mode eliminates the linking and run-in and
run-out blocks associated with multisession and packet recording modes,
which often are interpreted as uncorrectable errors during the glass mastering process.
What is “Track At Once”?
• Track at Once is a writing mode that allows a session to be written in a
number of discrete write events, called tracks.
• The disc may be removed from the writer and read in another writer (given
proper software) before the session is fixated.
The written sessions contain complete “tracks” of information.
What is “Incremental” or “Packet” Writing?
• Track at Once writing is a form of incremental write which mandates a
minimum track length of 300 blocks and a maximum of 99 tracks per disc.
• A track written “at once” has 150 blocks of overhead for run-in, run-out,
pre-gap and linking. Packet write, on the other hand, is a method whereby
several write events are allowed within a track, thus reducing the overhead.
These “packets” are bounded by 7 blocks for run-in (4), run-out (2) and link (1).
What is the Difference Between a “Multisession” Disc
and a “Multitrack” Disc?
• A “session” is a unity on a CD which is bounded by lead-in and lead-out. A
session contains one or several (up to 99 per disc) tracks.
• There are two types of tracks. A Red Book audio track is usually written in
disc at once mode along with several other tracks in one session.
These tracks have index numbers in the subchannel which differentiate
one from the other and which allow selective playback.
• The other type of track is the incrementally written type described above.
32 ASUS CD-R/RW Drive User’s Manual
 Loading...