

Page 1
®
High-Speed CD-ROM Drive
ATAPI / Enhanced IDE Interface
With Quick Installation Guides in 9 different languages
E458
ASUS CD-ROM Awards
USER’S MANUAL
USER’S MANUAL
Page 2
I. H/W INST ALLATION
Rear Panel/Setting
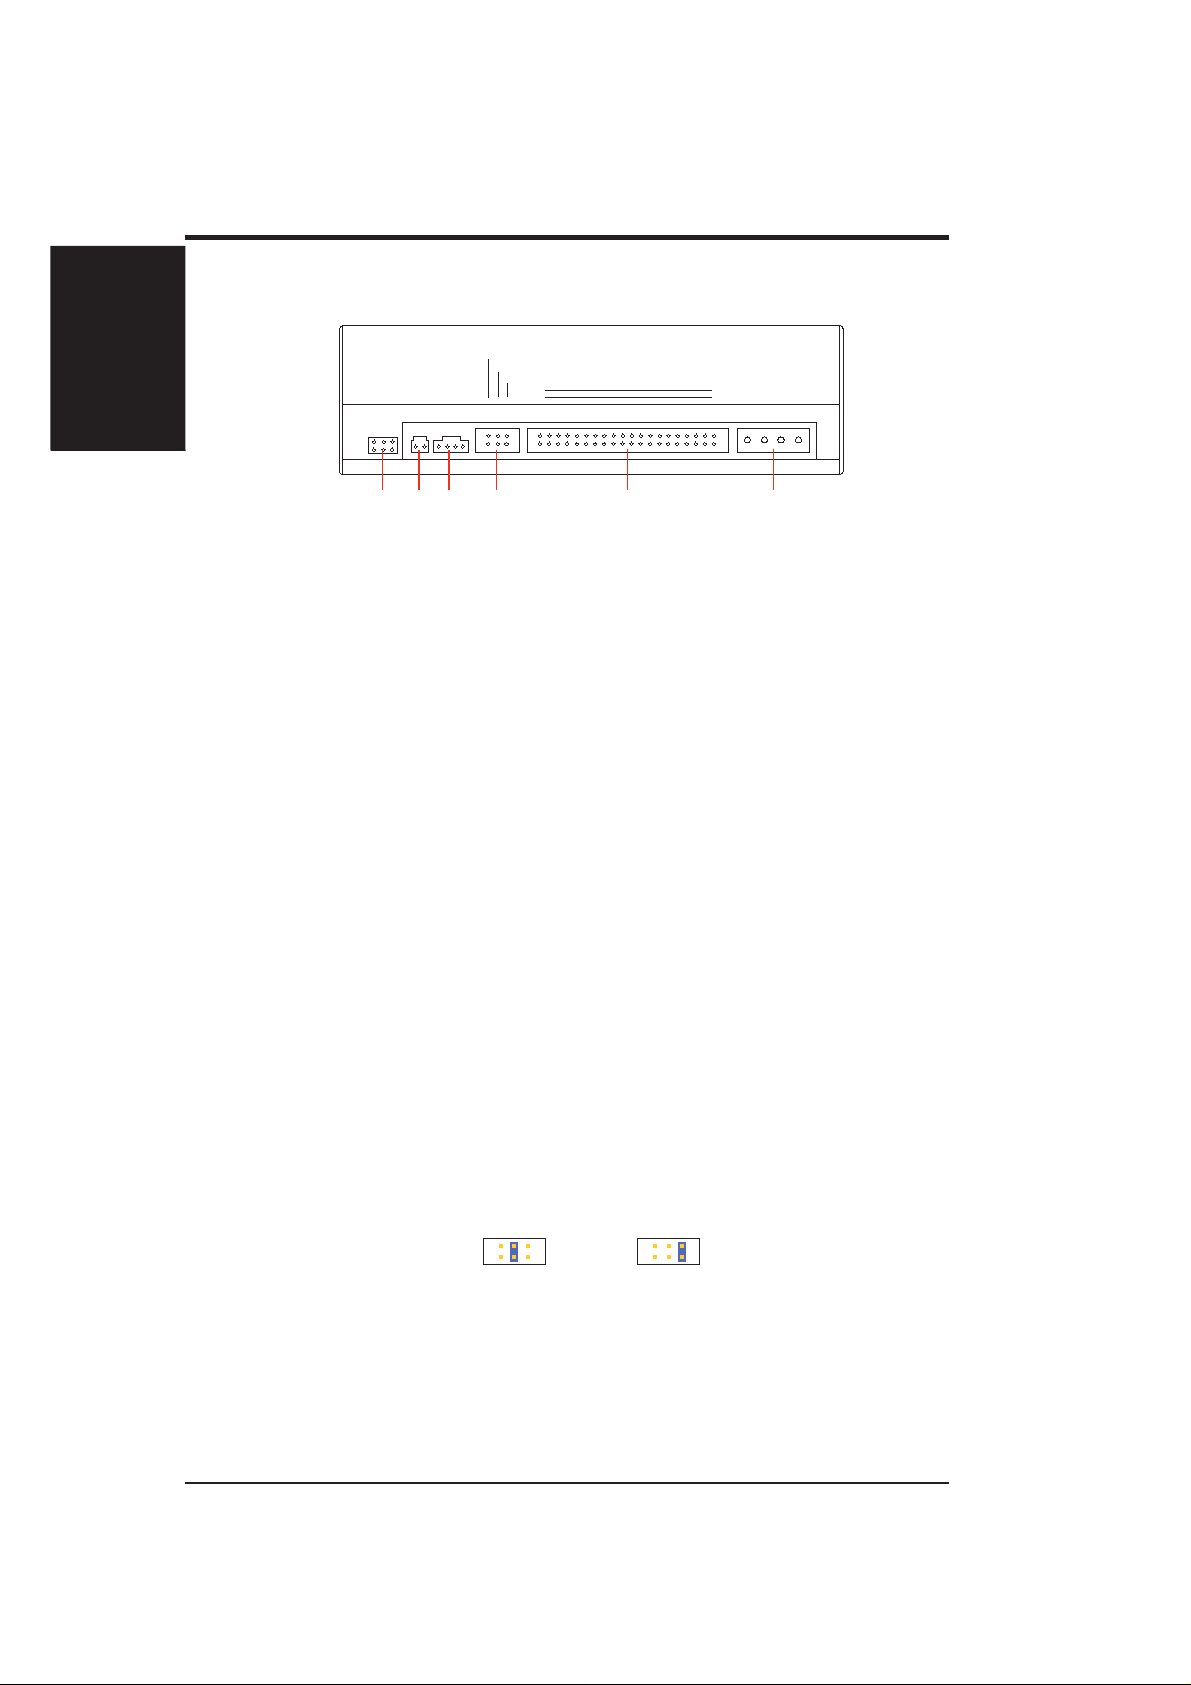
Rear Panel Features
I. HARDWARE INSTALLATION
CABLE SELECT
DIGITAL
AUDIO
DOG
ANALOG
AUDIO
O
SLAVE
MASTER
L
GOROG
O
O
OO
O
39
40
IDE INTERFACE
1
+5VOGOGO+12V
2
POWER
O
➅
➄
D: Digital; G: Ground; R: Right audio channel; L: Left audio channel
➃
➂
➁
➀
NOTE: The pin settings or definitions of the connectors and jumpers are also engraved on
the Rear Panel of your CD-ROM Drive.
Power Supply connector connects to the computer’s power supply.
➀
➁
IDE Interface connector connects to a 40-pin IDE interface cable. Make sure that the red
stripe on the cable is oriented with Pin 1 of the CD-ROM Drive’s IDE Interface connector.
➂
Device configuration jumper allows you to set your CD-ROM Drive as the Master or
Slave drive. The default setting is Slave, wherein the jumper is on “SLAVE”. “CABLE SELECT” is reserved and should not be used.
Analog Audio line out connector has two channels, right (“R”) and left (“L”) audio out-
➃
puts, and allows you to direct audio output from your CD-ROM Drive to your sound card, if
available, when connected using a CD audio cable. “G” is for Ground.
NOTES: (1) If the pin definitions on your sound card are not the same as that on your CDROM Drive, check with your dealer for a compatible cable; (2) If you do not have a sound
card, plug earphones, headphones, or powered/self-amplified speakers to the Headphones
Jack on your CD-ROM’s front panel (see Front Panel Controls). Set the volume controls of
your drive and powered/self-amplified speakers to minimum before starting or restarting your
computer. This is to prevent possible damage to the earphones, headphones, or speakers.
➄
Digital Audio output connector offers high quality audio ef fect by outputting digital signal to a
D/A converter or for recording to a digital audio tape (DAT) or professional audio recording
system. The connector follows the EBU-IEC958 standard set by the European Broadcast Union.
Testing jumpers are reserved for manufacturer’s internal testing/diagnostic purposes.
➅
Installing Your CD-ROM Drive
Before installing your CD-ROM Drive into your computer (see Quick Installation Guide
for instructions on installing your CD-ROM Drive), set your drive as either the Master or
Slave (default) drive by placing the jumper cap on the desired jumper ➂.
Slave Drive (Default) Master Drive
NOTE: If your computer only allows you to connect a maximum of two devices and you
have two hard disks, remove the Slave hard disk—you need the other IDE connector for
your CD-ROM Drive. If you only have one hard disk, set your CD-ROM Drive as Slave. If
your computer has two IDE connectors and two hard disks installed, either set your CDROM Drive as Master on the secondary IDE connector or remove the Slave hard disk and
replace it with your CD-ROM Drive. Refer to your computer’s manual for your system’s
configuration and instructions on hardware installation.
2 ASUS High-Speed CD-ROM Drive User’s Manual
Page 3

II. SOFTWARE INSTALLATION
After you have installed the CD-ROM Drive into your computer, the drivers necessary to run the drive may now be installed. The CD-ROM Drive comes with an
ASUS CD/DVD-ROM Driver for DOS/Win 3.X Installation disk.
In addition to the hardware-dependent driver, a software-dependent driver is installed:
MSCDEX.EXE (version 2.21 or later), which is the Microsoft CD-ROM Extension, a
standard mechanism for interfacing CD-ROM drives with computers. The driver comes
with your operating system (OS), for example, MS-DOS.
DOS/Windows 3.x
1. Restart your computer in DOS Mode.
2. With the installation disk into either drive A or drive B, type A: install (or B:
install) and then press [Enter].
3. Choose your preferred setup option and then follow the onscreen instructions.
4. Highlight Start Installation and then press [Enter]. The installation utility will
update your AUTOEXEC.BAT and CONFIG.SYS files with the appropriate
settings and create the other options that you chose.
5. After the installation is completed, restart your computer.
II. S/W INST ALLATION
DOS/Windows/Others
Setup Options
T wo setup options are available: Express Setup, for quick and easy installation; and
Custom Setup, for customized installation settings, such as the target directory for
the driver and installation files, and special settings. For most users, Express Setup,
which installs the default CD-ROM driver setting, works just fine.
Transfer Mode (DOS only)
T o take advantage of the special settings to fully use your drive’s capability, highlight
T ransfer Mode under the Custom Setup dialog box and then press [Enter]. The different transfer mode options will be displayed, namely, PIO Mode or Programmed
Input/Output Mode, Multi-word DMA Mode or Multi-word Direct Memory Access
Mode, and Ultra DMA Mode, also known as Ultra-ATA or Ultra-DMA/33.
NOTE: These special settings require that you have a motherboard or install an adapter that
supports either or all of these modes. If your system supports it, select DMA Mode (preferably Ultra DMA Mode) for better performance.
Other Operating Systems
If your CD-ROM Drive is already installed, Windows 9x or Windows NT (see IV.
Troubleshooting for information on maximizing your drive’s capability) will auto-
matically detect it and determine the appropriate settings for the drive and install or
load the correct driver. Your CD-ROM Drive supports the AT API drive interface. Thus
other systems, such as Linux and OS/2, should be able to automatically detect your
CD-ROM Drive and load the appropriate device driver.
ASUS High-Speed CD-ROM Drive User’s Manual 3
Page 4

III. CD-ROM DRIVE OPERATION
Front Panel Controls
III. OPERA TION
Front Panel
➂➁
➀
➀
Headphones Jack allows you to connect a pair of earphones or headphones to the drive
for private listening. It also allows you to connect a pair of powered/self-amplified speakers.
Just plug them into the Headphones Jack.
NOTE: The Headphones Jack can only be used to listen to audio CD discs.
➁
V olume Controls allows you to adjust the volume of your earphones, headphones or powered/self-amplified speakers connected to the Headphones Jack. This control has no effect on the audio output from devices (such as speakers) connected to your sound card.
Disc Indicator lights up when there is a disc inside your CD-ROM Drive, otherwise this
➂
indicator will not light. This indicator flashes whenever your CD-ROM Drive is busy reading
information from your disc or when your drive is in use.
➃
Emergency Ejection Hole allows you to manually eject the tray . To manually eject the tray,
push gently but firmly the end of a large straightened paper clip about 3 cm (1.25 inches) into
the hole, slightly toward the right. When the tray is released, carefully pull the tray open.
WARNING! (1) Make sure your computer is off before you attempt to manually eject the
tray . Otherwise, your CD-ROM Drive may be damaged. (2) Do not force the tray open; wait
until the paper clip has dislodged it to be sure you don’t break the tray’s front.
Select Buttons allows you to manually control your audio discs without having to run any
➄
software program.
Open/Close/Stop Button
The right button has three states: OPEN, CLOSE, and STOP. If tray is closed, pressing this
button will OPEN or eject it. If tray is out, pressing this button will CLOSE it. If the drive is
playing, pressing this button will momentarily STOP or pause CD playback.
➃
➄
Play/Skip Button | Speed Button
The left button has three states: PLAY track and SKIP track, and change SPEED. If the
drive is idle, pressing this button will start PLA Y ing audio CD discs from the first track on. If
the drive has been momentarily STOPped or paused, pressing this button will resume CD
playback or rePLA Y the audio discs. If the drive is playing, pressing momentarily this button
will SKIP to the next track of an audio CD disc.
Change Speed Function
When playing a CD-ROM format disc, you may
want to reduce the speed. Pressing the Speed
Button for one second will reduce the CD-ROM
drive speed in the following sequence (assuming your CD-ROM drive speed is 50x): 40x,
32x, 24x, 8x. To reset the drive’s speed to its
topmost speed, open and close the CD-ROM
Drive’s tray.
Assuming your drive speed is 50x,
PRESS 1st time: 40x
PRESS 2nd time: 32x
PRESS 3rd time: 24x
PRESS 4th time: 8x
Wait at least 1 second for each interval
4 ASUS High-Speed CD-ROM Drive User’s Manual
Page 5

IV. TROUBLESHOOTING
General Problems
PROBLEM Unable to access CD-ROM Drive.
CAUSES 1. The information in your CONFIG.SYS or AUTOEXEC.BAT or both files might
be incorrect. (DOS only.)
2. Some BIOS that include power management features use IRQ14 or IRQ 15,
which should be reserved for IDE devices like your CD-ROM Drive. (DOS only.)
SOLUTIONS 1. Check the LASTDRIVE= entry in your CONFIG.SYS file. You might have to
set the drive letter to one higher than your actual last drive letter. For example,
if the last drive on your system is drive D, try setting the parameter in the
CONFIG.SYS file to LASTDRIVE=E. (DOS only.)
• Your CD-ROM Drive requires the drivers, MSCDEX.EXE and ASUSCD.SYS,
to access the drive. Check your AUTOEXEC.BAT file for the statement
C:\DOS\MSCDEX.EXE /D:ASUSCD01 and CONFIG.SYS file for the statement DEVICE=C:\ASUS_CD\ ASUSCD.SYS /D:ASUSCD01 (see II. Soft-
ware Installation for more information). (DOS only.)
2. Change the IRQ setting of the device that is using IRQ 14 or IRQ 15, for example, sound card or motherboard. Refer to the card or motherboard documentation for more information. (DOS only.)
PROBLEM Cannot detect the CD-ROM Drive (Windows 9x or Windows NT).
CAUSE There are times when Windows cannot detect a new hardware.
SOLUTION Install the drivers manually.
• Start the Add New Hardware wizard by double-clicking My Computer | Con-
trol Panel | Add New Hardware and then follow the instructions on your screen.
NOTE: Let Windows detect your CD-ROM Drive. Make sure you have installed and connected your CD-ROM Drive in your computer before running the wizard.
PROBLEM No sound from speakers.
CAUSES 1. Audio cable or speakers are not connected properly.
2. The volume is not adjusted to an audible level.
3. The drive may be faulty.
4. The card may be faulty.
SOLUTIONS 1. Check that the CD audio cable is connected to the Analog Audio line out connec-
tor on the drive and sound card. Check also that the pin definitions of your CDROM Drive and sound card are the same. If not, check with your dealer for a
compatible audio cable or ask a qualified technician to adjust the cables to match
your CD-ROM Drive’s pin definitions. Also, check that the speakers are connected to the correct jack on the sound card.
2. Make sure the volume control is turned up to an audible range.
3. Connect earphones or headphones to the Headphones Jack. If there is no sound
from your earphones or headphones, consult your dealer about your faulty drive.
4. Connect earphones or headphones to the sound card’s Headphones Jack. If there is no
sound from your earphones or headphones, check to see the audio cable is connected
from the drive to the sound card (refer to your sound card manual for more information). If the audio cable is connected and there is still no sound from your earphones
or headphones, consult your dealer about your faulty card.
ASUS High-Speed CD-ROM Drive User’s Manual 5
IV. TROUBLESHOOTING
Page 6

PROBLEM Cannot achieve the maximum data transfer rate performance specified for the CD-
CAUSES 1. If you are using a benchmarking utility, it may be old.
SOLUTIONS 1. Upgrade your benchmarking utility to one that supports tests on the outer tracks
IV. TROUBLESHOOTING
IV. TROUBLESHOOTING
ROM Drive.
2. The disc is not full.
3. Given the signal quality issues with PIO Mode 4 transfer rates in some systems
and such variables as error correction, caching, processor overhead, and rotational speed, higher transfer rates may not be achievable with the default transfer mode. Thus transfer rates may be lower.
4. The disc you are playing may not be in a CD-ROM or CD-ROM format.
of your drive. Your CD-ROM Drive uses Constant Angular Velocity (CAV)
technology, wherein the spindle motor is running at the same velocity, while
the drive is accessing data at the inner or outer tracks. In this way, the drive will
achieve lower data transfer rates at the inner tracks and higher transfer rates at
the outer tracks. Thus using some or older benchmarking utilities, such as
WinBench 96, will give lower data transfer rates because these utilities use the
drive’s inner tracks for its performance tests.
2. A disc will occupy only the inner tracks when it is not full. Thus, because of the
way your CD-ROM Drive accesses data (see preceding explanation on CAV
technology), the drive will achieve lower data transfer rates. Use a full disc if
possible to get the maximum transfer rate from your drive.
3. Change the transfer mode of your CD-ROM Drive to Multi-word or Ultra DMA
Mode to maximize its capability.
• For DOS, see Transfer Mode under II. Software Installation for more information.
• For Windows 95 or Windows NT, Bus Master driver must be installed. Unless
your computer dealer installed the driver when you bought it or your motherboard supports Bus Master mode, Windows will not use bus mastering for your
CD-ROM Drive.
– Double-click My Computer | Control Panel | System | Device Manager |
CD-ROM controllers. If you are using bus master, PCI Bus Master will be
displayed. If not and your motherboard has the new PCI controller chipsets
from Intel, for example, the 440BX, but does not have a CMOS setting for
Bus Master mode, you may have to get the driver from Intel. Check with
your dealer for more information.
• If you do not have Bus Master driver under W indows 9x, double-click My Com-
puter | Control Panel | System | Device Manager | CD-ROM, right-click
ASUS CD-Sxxx and then click Properties | Settings. Under Options of the
Settings tab, click DMA to enable DMA Mode.
4. Your CD-ROM drive reads data at dif ferent speeds depending on the disc format.
Your CD-ROM drive performs at its best when it is reading a CD-ROM or CDROM format disc. With other formats, such as Audio CD or Video CD, data transfer rate performance may be slower than the maximum rate performance specified.
PROBLEM Cannot display the directory on an audio CD disc with the DIR command.
CAUSE The DIR command does not work with audio CD discs while in DOS. You can use
the command, however, to display the directory on a data CD.
NOTE: You can use the DIR command to display the directory on an audio disc while in
Windows using the command prompt or MS-DOS Prompt. Refer to your Windows manual on
how to find the command prompt.
6 ASUS High-Speed CD-ROM Drive User’s Manual
Page 7

Page 8

High-Speed CD-ROM Drive
ATAPI / Enhanced IDE Interface
ASUS CONTACT INFORMATION
ASUSTeK COMPUTER INC.
Marketing Technical Support
Address: 150 Li-Te Road Telephone: +886-2-2890-7121 (English)
Peitou, Taipei, Taiwan 112 Telephone: +886-2-2890-7111 (Chinese)
Telephone: +886-2-2894-3447 Fax: +886-2-2895-9254
Fax: +886-2-2894-3449 Email: tsd@asus.com.tw
Email: info@asus.com.tw Newsgroup: news2.asus.com.tw
WWW: www.asus.com.tw
FTP: ftp.asus.com.tw/pub/ASUS
ASUS COMPUTER INTERNATIONAL
Marketing Technical Support
Address: 6737 Mowry Avenue Fax: +1-510-608-4555
Mowry Business Center, Building 2 BBS: +1-510-739-3774
Newark, CA 94560, USA Email: tsd@asus.com
Fax: +1-510-608-4555 WWW: www.asus.com
Email: info-usa@asus.com.tw FTP: ftp.asus.com/Pub/ASUS
®
ASUS COMPUTER GmbH
Marketing Technical Support
Address: Harkortstr. 25 Hotline: +49-2102-9599-0
40880 Ratingen, BRD, Germany Fax: +49-2102-9599-11
Fax: +49-2102-4420-66 Online Support: www.asuscom.de/de/support
Email: sales@asuscom.de WWW: www.asuscom.de
FTP: ftp.asuscom.de/pub/ASUSCOM
Federal Communications Commission Statement
This device complies with FCC Rules Part 15. Operation is subject to the following two conditions: (1) This device may not
cause harmful interference, and (2) This device must accept any interference received, including interference that may
cause undesired operation.
Canadian Department of Communications Statement
This digital apparatus does not exceed the Class B limits for radio noise emissions from digital apparatus set out in the
Radio Interference Regulations of the Canadian Department of Communications.
This Class B digital apparatus complies with Canadian ICES-003.
Cet appareil numérique de la classe B est conforme à la norme NMB-003 du Canada.
Copyright © 1999 ASUSTeK COMPUTER INC . All Rights Reserved.
Product Name: ASUS High Speed CD-ROM Drive
Manual Revision: 1.05 E458
Release Date: October 1999
Rev. 1.05
P/N 15-xxxxxxxxx
 Loading...