

Page 1
ASUS Essentio Desktop PC
CM6650
User Manual
Page 2

English
English
E6090
First Edition
October 2010
Copyright © 2010 ASUSTeK Computer Inc. All Rights Reserved.
No part of this manual, including the products and software described in it, may be reproduced,
transmitted, transcribed, stored in a retrieval system, or translated into any language in any form or by any
means, except documentation kept by the purchaser for backup purposes, without the express written
permission of ASUSTeK Computer Inc. (“ASUS”).
Product warranty or service will not be extended if: (1) the product is repaired, modied or altered, unless
such repair, modication of alteration is authorized in writing by ASUS; or (2) the serial number of the
product is defaced or missing.
ASUS PROVIDES THIS MANUAL “AS IS” WITHOUT WARRANTY OF ANY KIND, EITHER EXPRESS
OR IMPLIED, INCLUDING BUT NOT LIMITED TO THE IMPLIED WARRANTIES OR CONDITIONS OF
MERCHANTABILITY OR FITNESS FOR A PARTICULAR PURPOSE. IN NO EVENT SHALL ASUS, ITS
DIRECTORS, OFFICERS, EMPLOYEES OR AGENTS BE LIABLE FOR ANY INDIRECT, SPECIAL,
INCIDENTAL, OR CONSEQUENTIAL DAMAGES (INCLUDING DAMAGES FOR LOSS OF PROFITS,
LOSS OF BUSINESS, LOSS OF USE OR DATA, INTERRUPTION OF BUSINESS AND THE LIKE),
EVEN IF ASUS HAS BEEN ADVISED OF THE POSSIBILITY OF SUCH DAMAGES ARISING FROM ANY
DEFECT OR ERROR IN THIS MANUAL OR PRODUCT.
SPECIFICATIONS AND INFORMATION CONTAINED IN THIS MANUAL ARE FURNISHED FOR
INFORMATIONAL USE ONLY, AND ARE SUBJECT TO CHANGE AT ANY TIME WITHOUT NOTICE,
AND SHOULD NOT BE CONSTRUED AS A COMMITMENT BY ASUS. ASUS ASSUMES NO
RESPONSIBILITY OR LIABILITY FOR ANY ERRORS OR INACCURACIES THAT MAY APPEAR IN THIS
MANUAL, INCLUDING THE PRODUCTS AND SOFTWARE DESCRIBED IN IT.
Products and corporate names appearing in this manual may or may not be registered trademarks or
copyrights of their respective companies, and are used only for identication or explanation and to the
owners’ benet, without intent to infringe.
ii
Page 3

English
Contents
Notices ...........................................................................................................v
Safety information ......................................................................................... vii
Conventions used in this guide .................................................................... viii
Where to nd more information ................................................................... viii
Package contents ..........................................................................................ix
Chapter 1 Getting started
Welcome! .................................................................................................... 1-1
Getting to know your computer ................................................................... 1-1
Setting up your computer ............................................................................ 1-5
Turning your computer ON/OFF ................................................................. 1-8
Chapter 2 Using Windows® 7
Starting for the rst time .............................................................................. 2-1
Using Windows® 7 desktop ......................................................................... 2-2
Managing your les and folders .................................................................. 2-7
Restoring your system .............................................................................. 2-10
Protecting your computer ...........................................................................2-11
Getting Windows® Help and Support ........................................................ 2-15
Chapter 3 Connecting devices to your computer
Connecting a USB storage device .............................................................. 3-1
Connecting microphone and speakers ....................................................... 3-2
Connecting multiple external displays ........................................................ 3-5
Connecting an HDTV .................................................................................. 3-7
Chapter 4 Using your computer
Proper posture when using your Desktop PC............................................. 4-1
Using the memory card reader ................................................................... 4-2
Using the optical drive ................................................................................ 4-3
Using the multimedia keyboard (on selected models only) ........................ 4-4
English
Chapter 5 Connecting to the Internet
Wired connection ........................................................................................ 5-1
Wireless connection (on selected models only) .......................................... 5-3
iii
Page 4

English
English
Contents
Chapter 6 Using the Utilities
ASUS AI Suite II .......................................................................................... 6-1
ASUS AI Manager ..................................................................................... 6-10
Nero 9 ..................................................................................................... 6-15
Recovering your system ........................................................................... 6-19
Chapter 7 Troubleshooting
Troubleshooting .......................................................................................... 7-1
iv
Page 5
English
Notices
REACH
Complying with the REACH (Registration, Evaluation, Authorisation, and Restriction of
Chemicals) regulatory framework, we published the chemical substances in our products at
ASUS REACH website at http://green.asus.com/english/REACH.htm
Federal Communications Commission Statement
This device complies with Part 15 of the FCC Rules. Operation is subject to the following two
conditions:
• This device may not cause harmful interference; and
• This device must accept any interference received including interference that may cause
undesired operation.
This equipment has been tested and found to comply with the limits for a Class B digital
device, pursuant to Part 15 of the FCC Rules. These limits are designed to provide
reasonable protection against harmful interference in a residential installation. This
equipment generates, uses and can radiate radio frequency energy and, if not installed
and used in accordance with manufacturer’s instructions, may cause harmful interference
to radio communications. However, there is no guarantee that interference will not occur
in a particular installation. If this equipment does cause harmful interference to radio or
television reception, which can be determined by turning the equipment off and on, the user
is encouraged to try to correct the interference by one or more of the following measures:
• Reorient or relocate the receiving antenna.
• Increase the separation between the equipment and receiver.
• Connect the equipment to an outlet on a circuit different from that to which the receiver is
connected.
• Consult the dealer or an experienced radio/TV technician for help.
English
The use of shielded cables for connection of the monitor to the graphics card is required
to assure compliance with FCC regulations. Changes or modications to this unit not
expressly approved by the party responsible for compliance could void the user’s authority
to operate this equipment.
v
Page 6

English
English
RF exposure warning
This equipment must be installed and operated in accordance with provided instructions and
the antenna(s) used for this transmitter must be installed to provide a separation distance of
at least 20 cm from all persons and must not be co-located or operating in conjunction with
any other antenna or transmitter. End-users and installers must be provide with antenna
installation instructions and transmitter operating conditions for satisfying RF exposure
compliance.
Canadian Department of Communications Statement
This digital apparatus does not exceed the Class B limits for radio noise emissions from
digital apparatus set out in the Radio Interference Regulations of the Canadian Department of
Communications.
This class B digital apparatus complies with Canadian ICES-003.
Macrovision Corporation Product Notice
This product incorporates copyright protection technology that is protected by method
claims of certain U.S. patents and other intellectual property rights owned by Macrovision
Corporation and other rights owners. Use of this copyright protection technology must be
authorized by Macrovision Corporation, and is intended for home and other limited viewing
uses only unless otherwise authorized by Macrovision Corporation. Reverse engineering
or disassembly is prohibited.
CAUTION: Danger of explosion if battery is incorrectly replaced. Replace only with the
same or equivalent type recommended by the manufacturer. Dispose of used batteries
according to the manufacturer’s instructions.
vi
Lithium-Ion Battery Warning
Page 7

English
Safety information
Disconnect the AC power and peripherals before cleaning. Wipe the Desktop PC using a
clean cellulose sponge or chamois cloth dampened with solution of nonabrasive detergent
and a few drops of warm water then remove any extra moisture with a dry cloth.
• DO NOT place on uneven or unstable work surfaces. Seek servicing if the casing has
been damaged.
• DO NOT expose to dirty or dusty environments. DO NOT operate during a gas leak.
• DO NOT place or drop objects on top and do not shove any foreign objects into the
Desktop PC.
• DO NOT expose to strong magnetic or electrical elds.
• DO NOT expose to or use near liquids, rain, or moisture. DO NOT use the modem during
electrical storms.
• Battery safety warning: DO NOT throw the battery in re. DO NOT short circuit the
contacts. DO NOT disassemble the battery.
• Use this product in environments with ambient temperatures between 0˚C (32F)and
35˚C (95F).
• DO NOT cover the vents on the Desktop PC to prevent the system from getting
overheated.
• DO NOT use damaged power cords, accessories, or other peripherals.
•
To prevent electrical shock hazard, disconnect the power cable from the electrical outlet
before relocating the system.
•
Seek professional assistance before using an adapter or extension cord. These devices
could interrupt the grounding circuit.
•
Ensure that your power supply is set to the correct voltage in your area. If you are not
sure about the voltage of the electrical outlet you are using, contact your local power
company.
•
If the power supply is broken, do not try to x it by yourself. Contact a qualied service
technician or your retailer.
English
vii
Page 8
English
English
Conventions used in this guide
To ensure that you perform certain tasks properly, take note of the following symbols used
throughout this manual.
DANGER/WARNING: Information to prevent injury to yourselfInformation to prevent injury to yourself
when trying to complete a task.
CAUTION: Information to prevent damage to the componentsInformation to prevent damage to the components
when trying to complete a task.
IMPORTANT: Instructions that you MUST follow to complete a
task.
NOTE: Tips and additional information to help you complete aTips and additional information to help you complete a
task.
Where to nd more information
Refer to the following sources for additional information and for product and software
updates.
ASUS websites
The ASUS website provides updated information on ASUS hardware and software
products. Refer to the ASUS website www.asus.com.
ASUS Local Technical Support
Visit ASUS website at http://support.asus.com/contact for the contact information of
local Technical Support Engineer.
viii
Page 9
English
In
stalla
tion
Guide
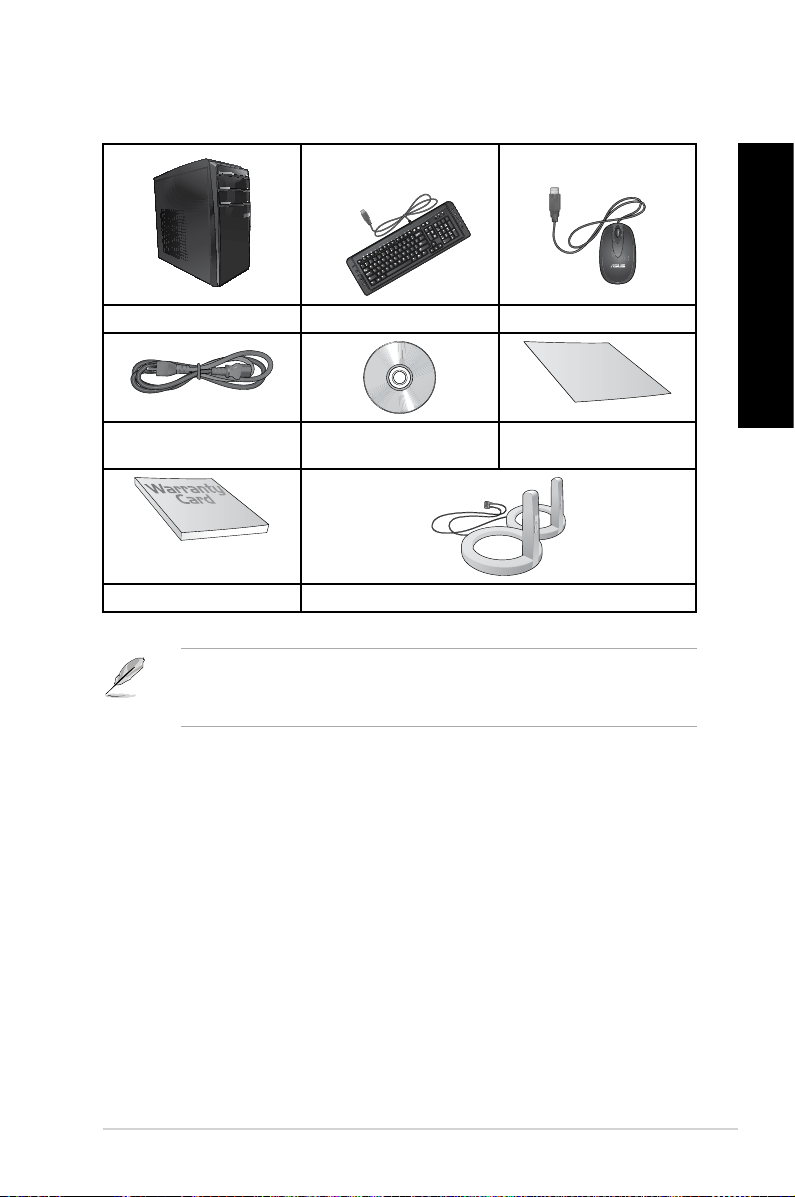
Package contents
ASUS Essentio Desktop PC Keyboard x1 Mouse x1
English
Power cord x1 Nero 9 burning software
Installation Guide x1
DVD x1
Warranty card x1 Antenna (optional) x2
• If any of the above items is damaged or missing, contact your retailer.
• The illustrated items above are for reference only. Actual product specications may vary
with different models.
ix
Page 10

English
x
Page 11
Chapter 1
Getting started
Welcome!
Thank you for purchasing the ASUS Essentio CM6650 Desktop PC!
The ASUS Essentio CM6650 Desktop PC provides cutting-edge performance,
uncompromised reliability, and user-centric utilities. All these values are encapsulated in a
stunningly futuristic and stylish system casing.
Read the ASUS Warranty Card before setting up your ASUS Desktop PC.
Getting to know your computer
Illustrations are for reference only. The ports and their locations, and the chassis color vary
with different models.
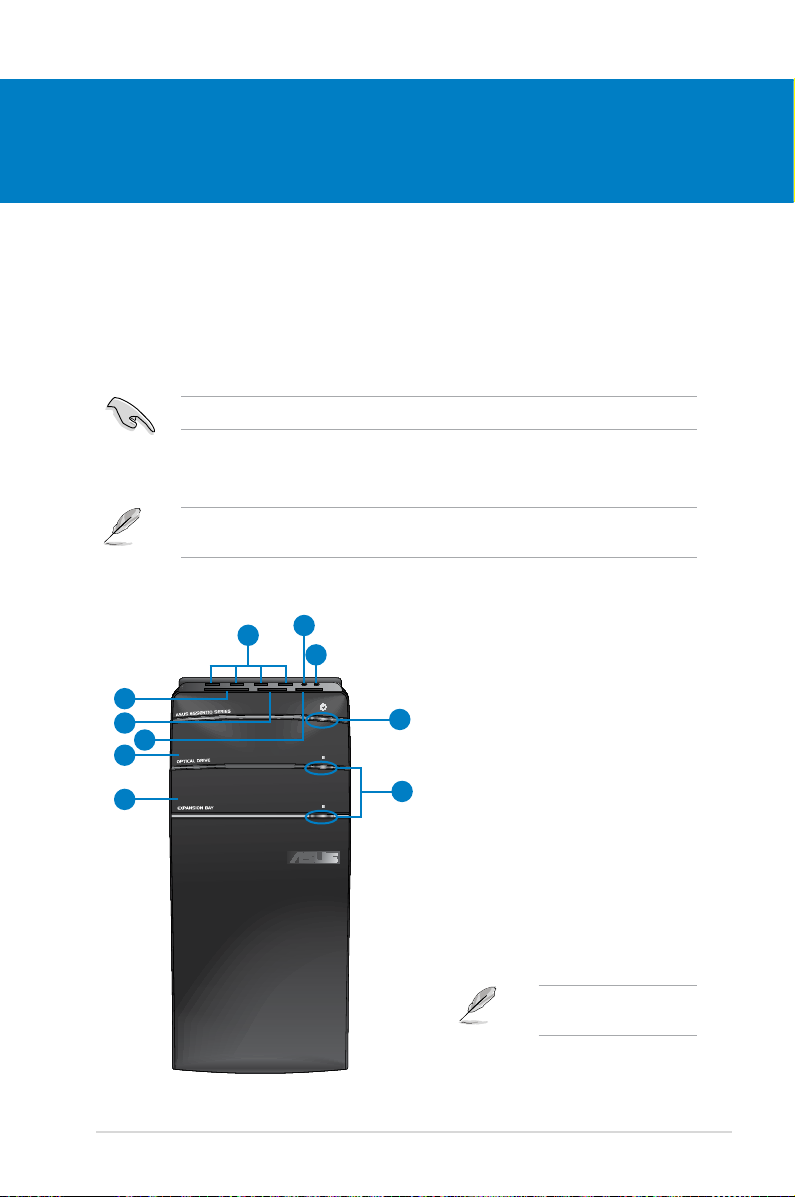
Front panel
2
10
1
9
8
7
3
4
6
ASUS CM6650 1-1
5
Click the number to view its
corresponding description.
Page 12

English
English
1. USB 2.0 ports. These Universal Serial Bus 2.0 (USB 2.0) ports connect to USB 2.0
devices such as a mouse, printer, scanner, camera, PDA, and others.
2. Microphone port (pink). This port connects to a microphone.
3. Headphone port (lime). This port connects to a headphone or speaker.
4. Power button. Press this button to turn on your computer.
5. Optical disk drive eject button. Press this button to eject the optical disk drive tray.
6. Optical disk drive bay (empty). Allows you to install an additional optical disk drive in
this bay.
7. Optical disk drive bay. There is an optical disk drive in this bay.
8. Memory Stick™ / Memory Stick Pro™ card slot. Insert a Memory Stick™ / Memory
Stick Pro™ card into this slot.
9. Secure Digital™ / MultiMediaCard slot. Insert a Secure Digital™ / MultiMediaCard
card into this slot.
10. CompactFlash® / Microdrive™ card slot. Insert a CompactFlash® / Microdrive™ card
into this slot.
Rear panel
1
2
3
5
7
8
10
11
14
13 17
21
16
15
1-2 Chapter 1: Getting started
18
4
6
9
12
19
20
Click the number to view its
corresponding description.
Page 13
English
1. Power connector. Plug the power cord to this connector.
2. Power switch. Switch to turn ON/OFF the power supply to your computer.
3. Air vents. These vents allow air ventilation.
DO NOT block the air vents on the chassis. Always provide proper ventilation for your
computer.
4. PS/2 Keyboard / Mouse Combo port (purple). This port is for a PS/2 keyboard or
mouse.
5. USB 2.0 ports. These Universal Serial Bus 2.0 (USB 2.0) ports connect to USB 2.0
devices such as a mouse, printer, scanner, camera, PDA, and others.
6. Optical S/PDIF_OUT port. This port connects to an external audio output device via
an optical S/PDIF cable.
7. HDMI port. This port is for a High-Denition Multimedia Interface (HDMI) connector,
and is HDCP compliant allowing playback of HD DVD, Blu-ray, and other protected
content.
8. DVI-D port. This port is for any DVI-D compatible device and is HDCP compliant
allowing playback of HD DVD, Blu-ray, and other protected content.
9. VGA port. This port is for VGA-compatible devices such as a VGA monitor.
10. USB 3.0 ports. These Universal Serial Bus 3.0 (USB 3.0) ports connect to USB 3.0
devices such as a mouse, printer, scanner, camera, PDA, and others.
English
• DO NOT connect a keyboard / mouse to any USB 3.0 port when installing Windows
operating system.
• Due to USB 3.0 controller limitation, USB 3.0 devices can only be used under Windows
OS environment and after the USB 3.0 driver installation.
• USB 3.0 devices can only be used as data storage only.
• We strongly recommend that you connect USB 3.0 devices to USB 3.0 ports for faster
and better performance for your USB 3.0 devices.
®
®
11. USB 2.0 ports.USB 2.0 ports. These Universal Serial Bus 2.0 (USB 2.0) ports connect to USB 2.0
devices such as a mouse, printer, scanner, camera, PDA, and others.
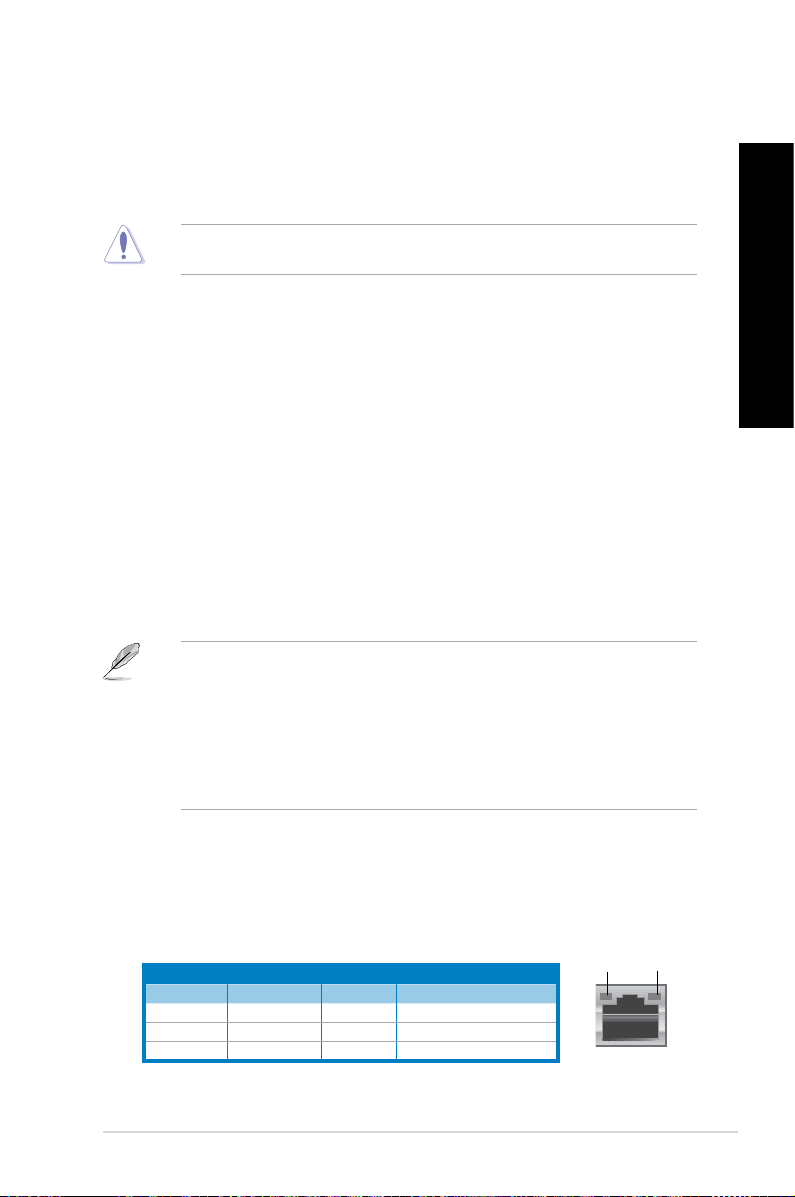
12. LAN (RJ-45) port. This port allows Gigabit connection to a Local Area Network (LAN)
through a network hub.
LAN port LED indications
Activity/Link LED Speed LED
Status Description Status Description
OFF No link OFF 10Mbps connection
ORANGE Linked ORANGE 100Mbps connection
BLINKING Data activity GREEN 1Gbps connection
ASUS CM6650 1-3
ACT/LINK
LED
LAN port
SPEED
LED
Page 14
English
English
13. Rear Speaker Out port (black). This port connects to the rear speakers in a 4, 6, and
8-channel audio conguration.
14. Side Speaker Out port (gray). This port connects to the side speakers in an 8-channel
audio conguration.
15. Microphone port (pink). This port connects to a microphone.
16. Line Out port (lime). This port connects to a headphone or speaker. In a 4, 6, or
8-channel conguration, the function of this port becomes Front Speaker Out.
17. Center/Subwoofer port (orange). This port connects to the center/subwoofer
speakers.
18. Line In port (light blue). This port connects to a tape, CD, DVD player, or other audio
sources.
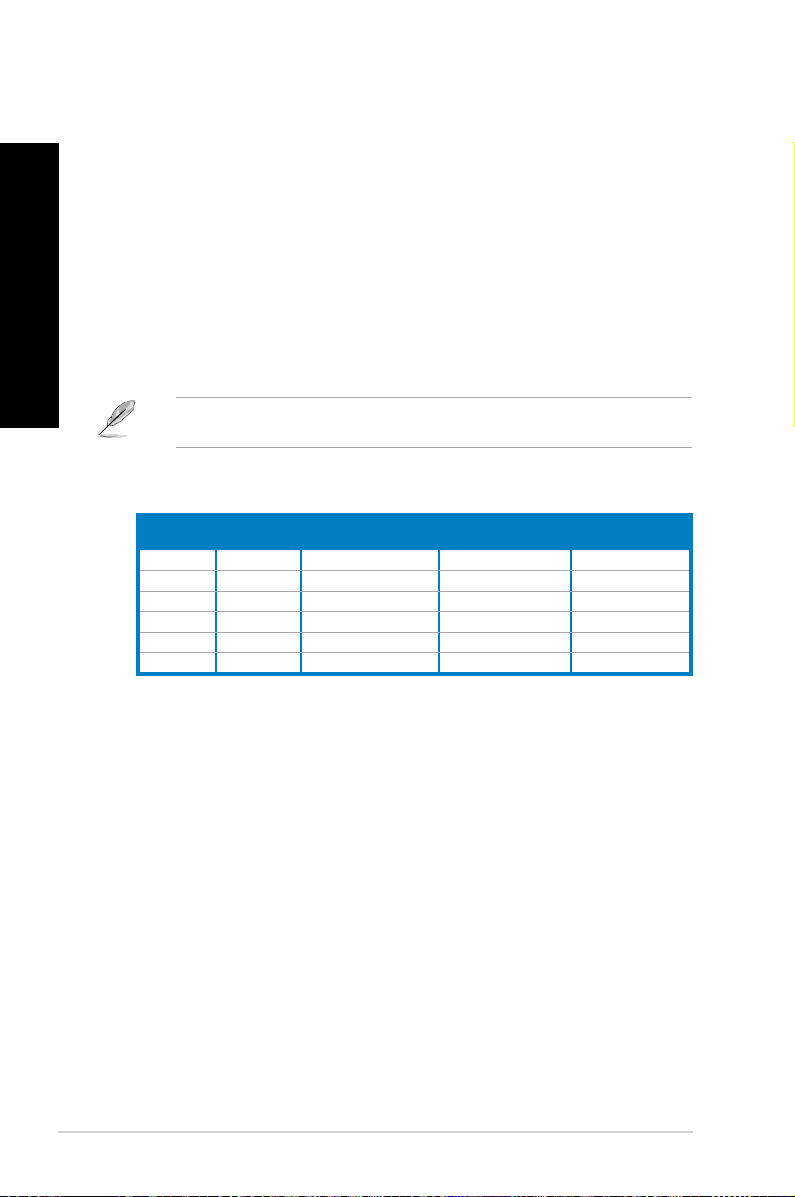
Refer to the audio conguration table below for the function of the audio ports in a 2, 4, 6,
or 8-channel conguration.
Audio 2, 4, 6, or 8-channel conguration
Port
Light Blue Line In Line In Line In Line In
Lime Line Out Front Speaker Out Front Speaker Out Front Speaker Out
Pink Mic In Mic In Mic In Mic In
Orange – – Center/Subwoofer Center/Subwoofer
Black – Rear Speaker Out Rear Speaker Out Rear Speaker Out
Gray – – – Side Speaker Out
Headset
2-channel
4-channel 6-channel 8-channel
19. ASUS Graphics Card (on selected models only). The display output ports on this
optional ASUS Graphics Card may vary with different models.
20. ASUS WLAN Card (on selected models only). This optional WLAN card allows your
computer to connect to a wireless network.
21. Expansion slot bracket. Remove the expansion slot bracket when installing an
expansion card.
1-4 Chapter 1: Getting started
Page 15

English
Setting up your computer
This section guides you through connecting the main hardware devices, such as the external
monitor, keyboard, mouse, and power cord, to your computer.
Connecting an external monitor
Using the ASUS Graphics Card (on selected models only)
Connect your monitor to the display output port on the discrete ASUS Graphics Card.
To connect an external monitor using the ASUS Graphics Card:
1. Connect a monitor to a display output port on the ASUS Graphics Card.
2. Plug the monitor to a power source.
The display output ports on the ASUS Graphics Card may vary with different models.
English
ASUS CM6650 1-5
Page 16
English
English
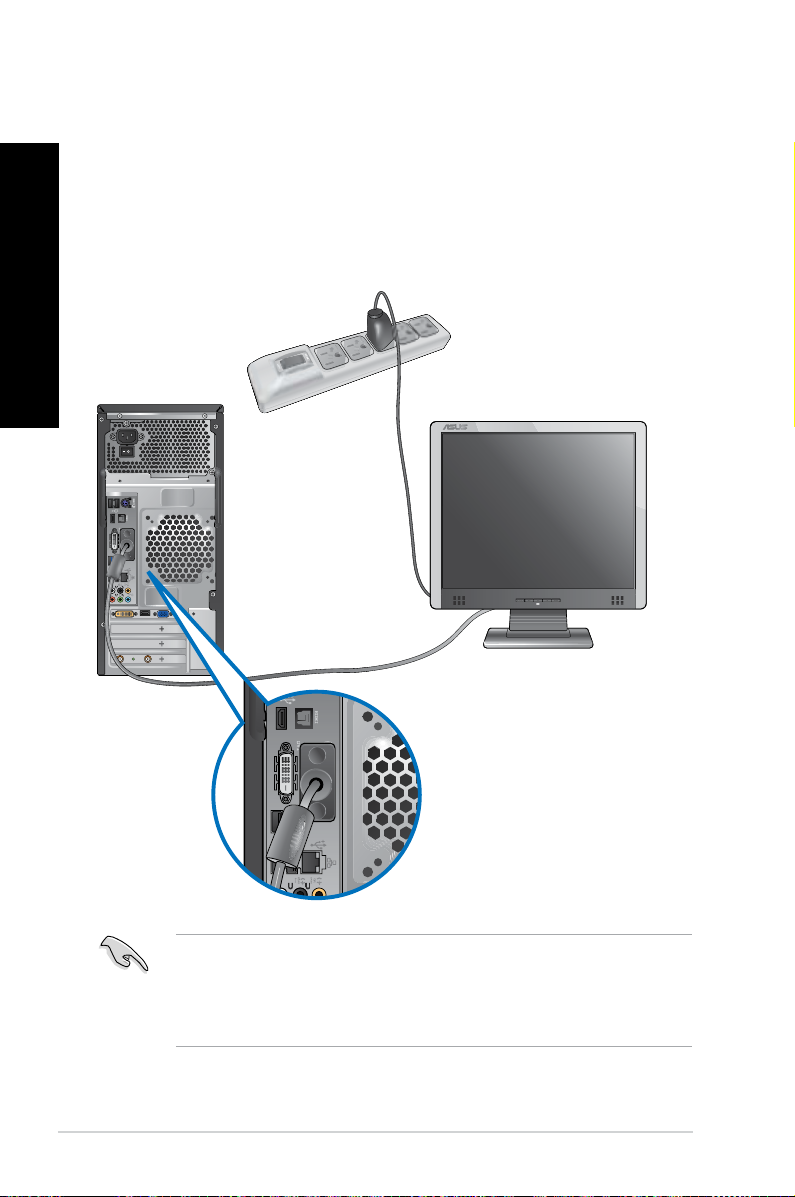
Using the onboard display output ports
Connect your monitor to the onboard display output port.
To connect an external monitor using the onboard display output ports:
1. Connect a VGA monitor to the VGA port, or a DVI-D monitor to the DVI-D port, or an
HDMI monitor to the HDMI port on the rear panel of your computer.
2. Plug the monitor to a power source.
• If your computer comes with an ASUS Graphics Card, the graphics card is set as the
primary display device in the BIOS. Hence, connect your monitor to a display output port
on the graphics card.
• To connect multiple external monitors to your computer, refer to Connecting multiple
external monitors in Chapter 3 of this user manual for details.
1-6 Chapter 1: Getting started
Page 17
English
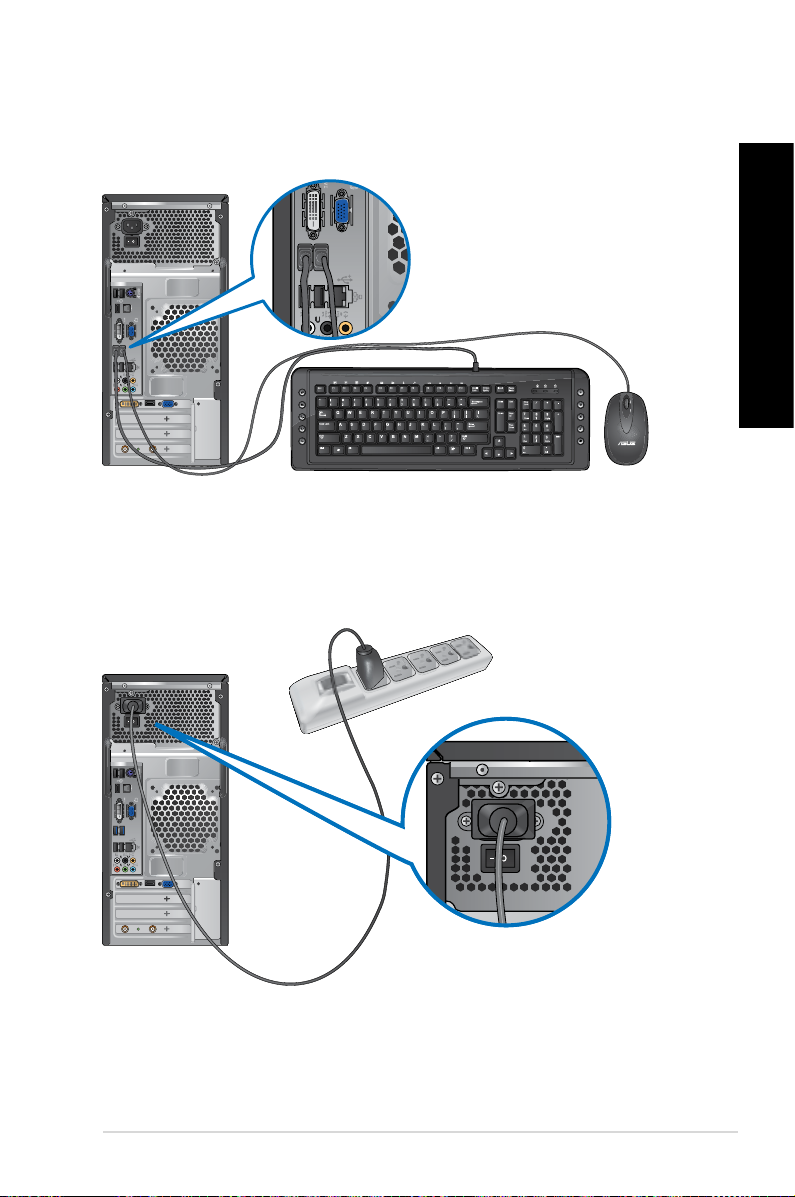
Connecting a USB keyboard and a USB mouse
Connect a USB keyboard and a USB mouse to the USB ports on the rear panel of your
computer.
Connecting the power cord
Connect one end of the power cord to the power connector on the rear panel of your
computer and the other end to a power source.
English
ASUS CM6650 1-7
Page 18
Turning your computer ON/OFF
This section describes how to turn on/off your computer after setting up your computer.
English
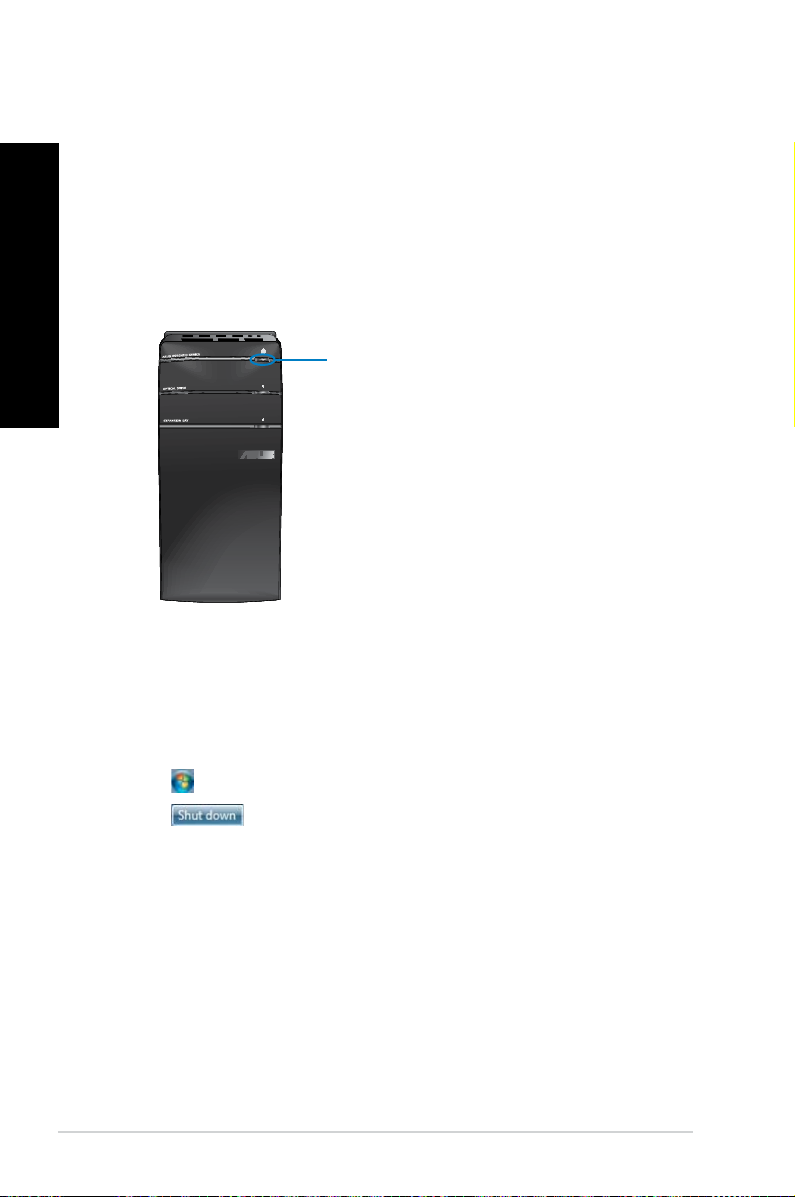
Turning your computer ON
To turn your computer ON:
1. Turn on the power switch.
2. Turn your monitor ON.
3. Press the power button on your computer.
Power button
4. Wait until the operating system loads automatically.
Turning your computer OFF
To turn your computer OFF:
1. Close all running applications.
2. Click on the Windows® desktop.
3. Click to shut down the operating system.
1-8 Chapter 1: Getting started
Page 19

Chapter 2
Using Windows® 7
Starting for the rst time
When you start your computer for the rst time, a series of screens appear to guide you in
conguring the basic settings of your Windows® 7 operating system.
To start for the rst time:
1. Turn your computer on. Wait for a few minutes until the Set Up Windows screen
appears.
2. From dropdown list, select your language. Click Next.
3. From the dropdown lists, select your Country or region, Time and currency, and
Keyboard layout. Click Next.
4. Key in uniques names for the user name and computer name. Click Next.
5. Key in the necessary information to set up your password, then click Next. You may
also click Next to skip this step without entering any information.
If you want to set up a password for your account later, refer to the section Setting up a
user account and password in this chapter.
6. Carefully read the license terms. Tick I accept the license terms and click Next.
7. Select Use recommended settings or Install important updates only to set up the
security settings for your computer. To skip this step, select Ask me later.
8. Review your date and time settings. Click Next. The system loads the new settings and
restarts. You may now start using your computer.
ASUS CM6650 2-1
Page 20
English
English
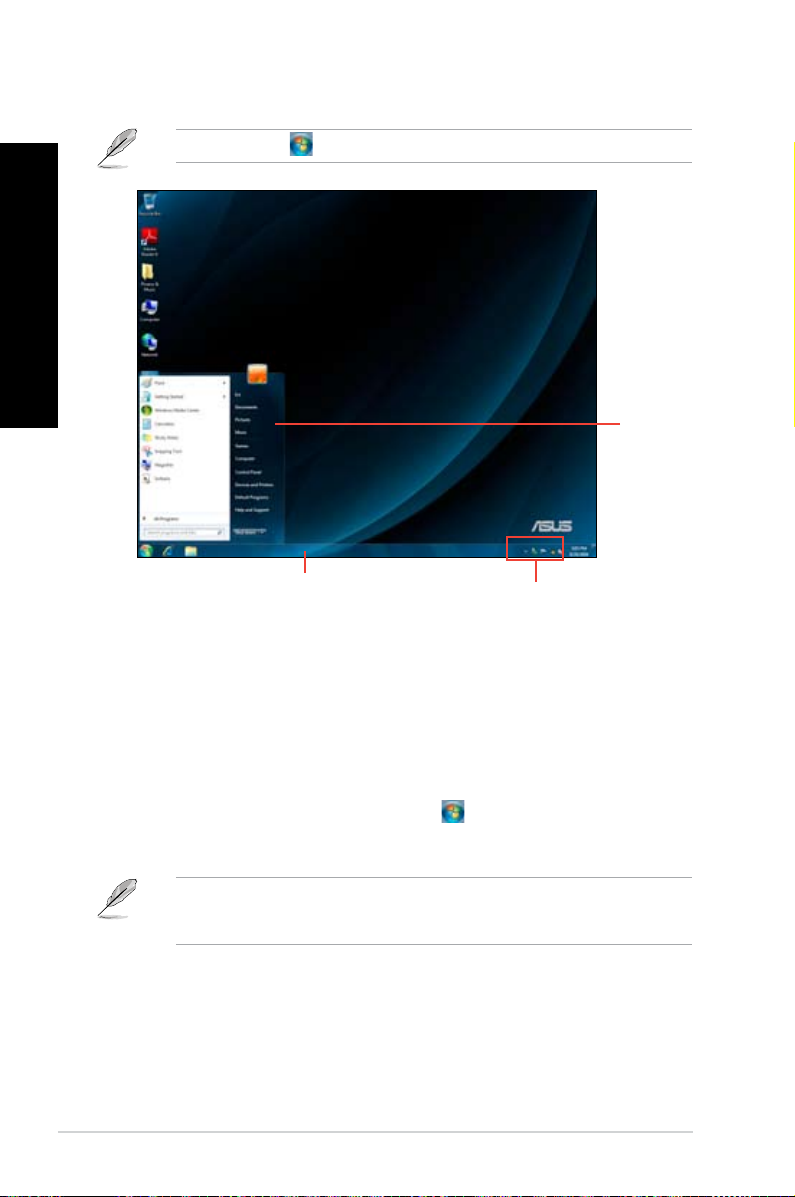
Using Windows® 7 desktop
Click the Start icon > Help and Support to obtain more information about Windows® 7.
Start menu
Taskbar
Notication area
Using the Start menu
The Start menu gives you access to programs, utilities, and other useful items on your
computer. It also provides you with more information about Windows 7 through its Help and
Support feature.
Launching items from the Start menu
To launch items from the Start menu:
1. From the Windows® taskbar, click the Start icon .
2. From the Start menu, select the item that you want to launch.
You may pin programs that you want constantly displayed on the Start menu. For more
details, refer to the section Pinning programs on the Start menu or taskbar on this
chapter.
2-2 Chapter 2: Using Windows® 7
Page 21
English
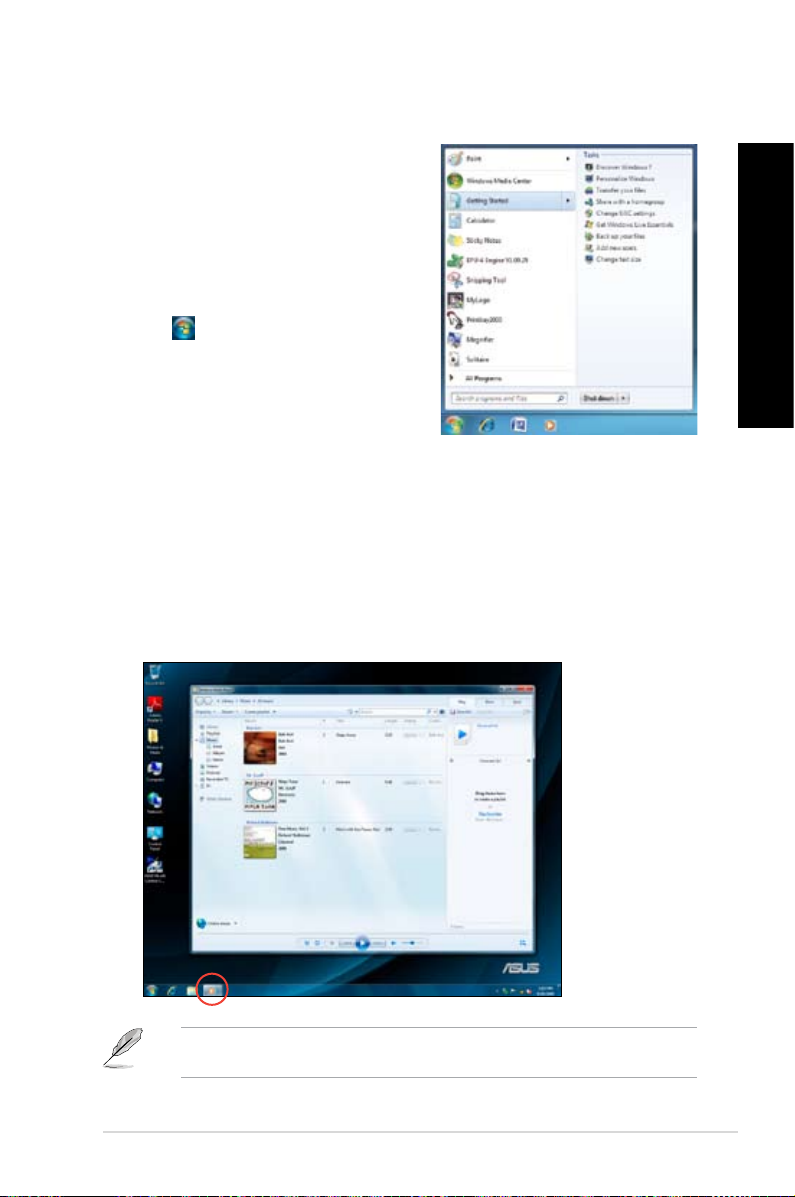
Using the Getting Started item
The Getting Started item on the Start menu
contains information about some basic tasks such
as personalizing Windows®, adding new users, and
transferring les to help you to familiarize yourself
with using Windows® 7.
To use the Getting Started item:
1. From the Windows® taskbar, click the Start
icon to launch the Start menu.
2. Select Getting Started. The list of available
tasks appears.
3. Select the task that you want to do.
Using the taskbar
The taskbar allows you to launch and manage programs or items installed on your computer.
Launching a program from the taskbar
To launch a program from the taskbar:
• From the Windows® taskbar, click an icon to launch it. Click the icon again to hide the
program.
English
You may pin programs that you want constantly displayed on the taskbar. For more details,
refer to the section Pinning programs on the Start menu or taskbar on this chapter.
ASUS CM6650 2-3
Page 22
English
English
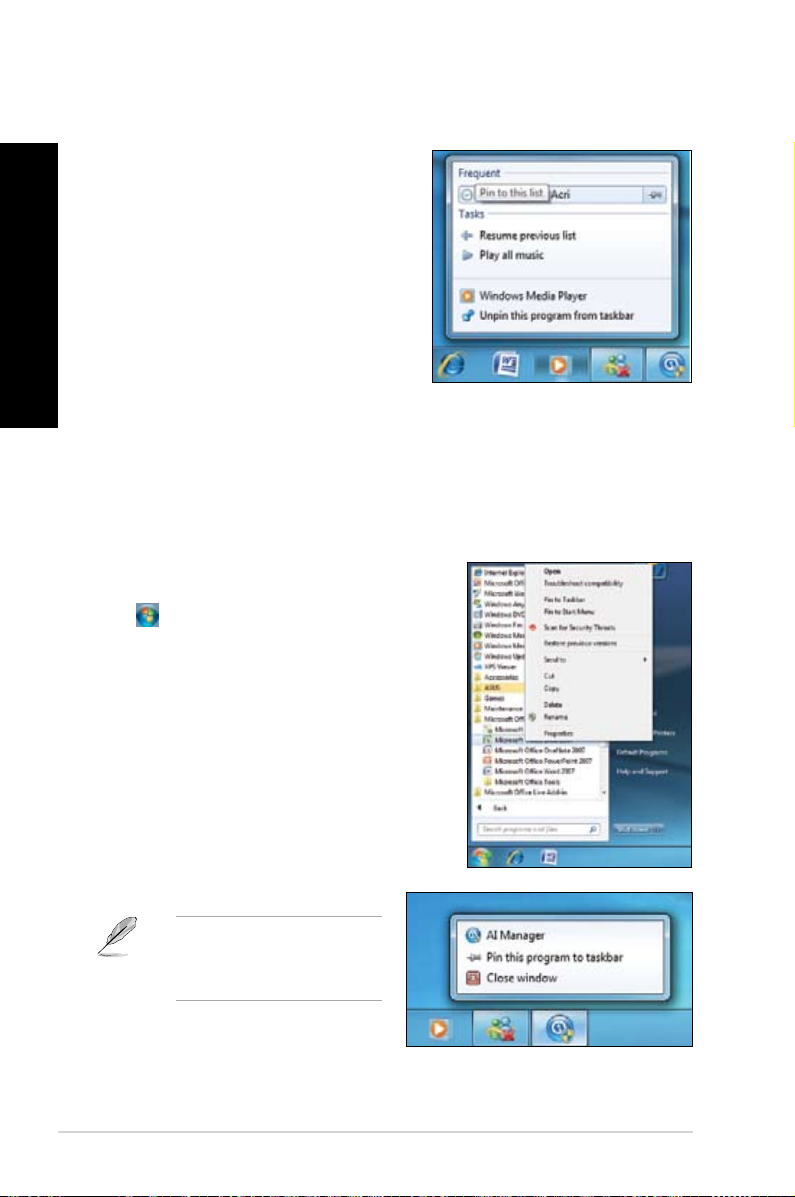
Pinning items on the jumplists
When you right-click an icon on the taskbar, a
jumplist launches to provide you with quick-access
to the program’s or item’s related links.You may
pin items on the jumplist such as favorite websites,
often-visited folders or drives, or recently played
media les.
To pin items to the jumplist:
1. From the taskbar, right-click an icon.
2. From the jumplist, right-click the item that
you want to pin, then select Pin to this list.
Unpinning items from the jumplist
To unpin items from the jumplist:
1. From the taskbar, right-click an icon.
2. From the jumplist, right-click the item that you want to remove from the jumplist, then
select Unpin from this list.
Pinning programs on the Start menu or taskbar
To pin programs on the Start menu or taskbar:
1. From the Windows® taskbar, click the Start icon
to launch the Start menu.
2. Right-click the item that you want to pin on the
Start menu or taskbar.
3. Select Pin to Taskbar or Pin to Start menu.
You may also right-click on the
icon of a running program on
the taskbar, then select Pin this
program to taskbar.
2-4 Chapter 2: Using Windows® 7
Page 23
English
Unpinning programs from the Start menu
To unpin programs from the Start menu:
1. From the Windows® taskbar, click the Start icon to launch the Start menu.
2. From the Start menu, right-click the program that you want to unpin, then select
Remove from this list.
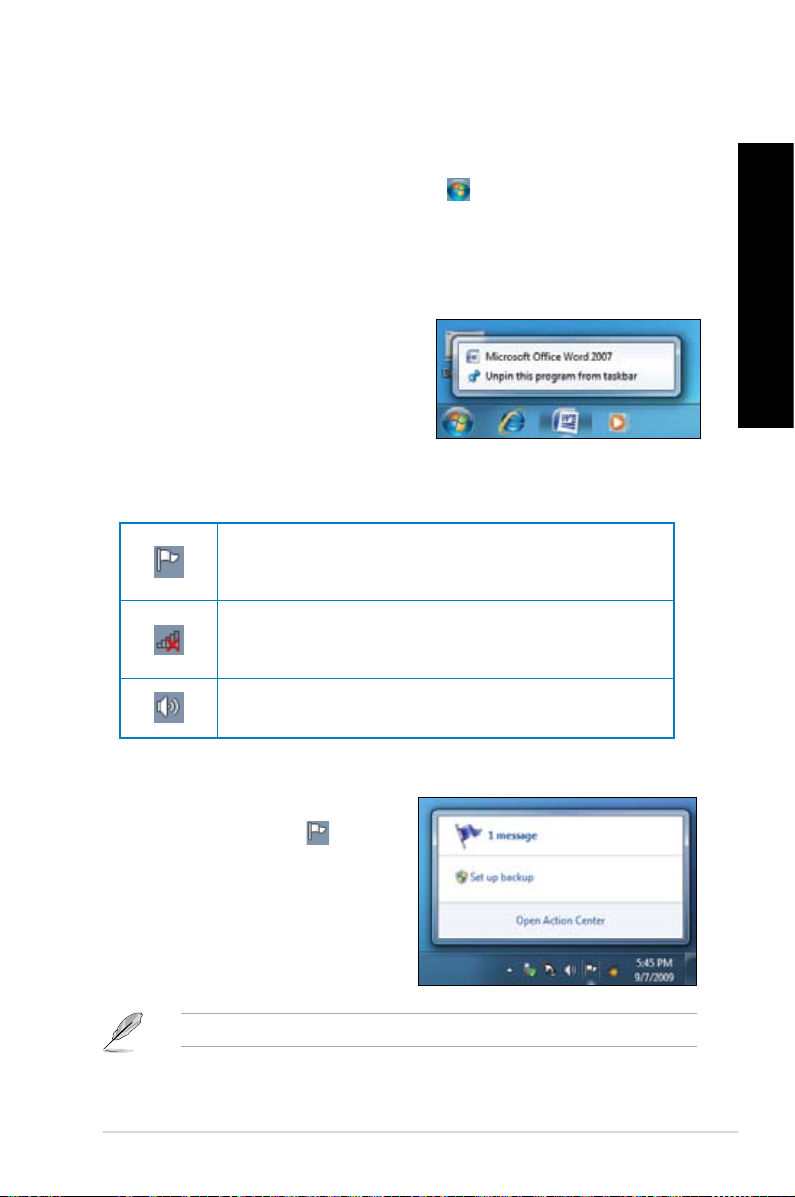
Unpinning programs from the taskbar
To unpin programs from the taskbar:
1. From the taskbar, right-click the program
that you want to remove from the taskbar,
then select Unpin this program from
taskbar.
Using the notication area
By default, the notication area shows these three icons:
Action Center notication
Click this icon to display all the alert messages/notications and
launch the Windows® Action Center.
Network connection
This icon displays the connection status and signal strength of the
wired or wireless network connection.
Volume
Click this icon to adjust the volume.
Displaying an alert notication
To display an alert notication:
• Click the Notication icon , then click
the message to open it.
English
For more details, refer to the section Using Windows® Action Center in this chapter.
ASUS CM6650 2-5
Page 24

English
English
Customizing icons and notications
You may choose to display or hide the icons and notications on the taskbar or on the
notication area.
To customize icons and notications:
1. From the notication area, click on the arrow icon .
2. Click Customize.
3. From the dropdown list, select the behaviors for the icons or items that you want
customize.
2-6 Chapter 2: Using Windows® 7
Page 25
English
Managing your les and folders
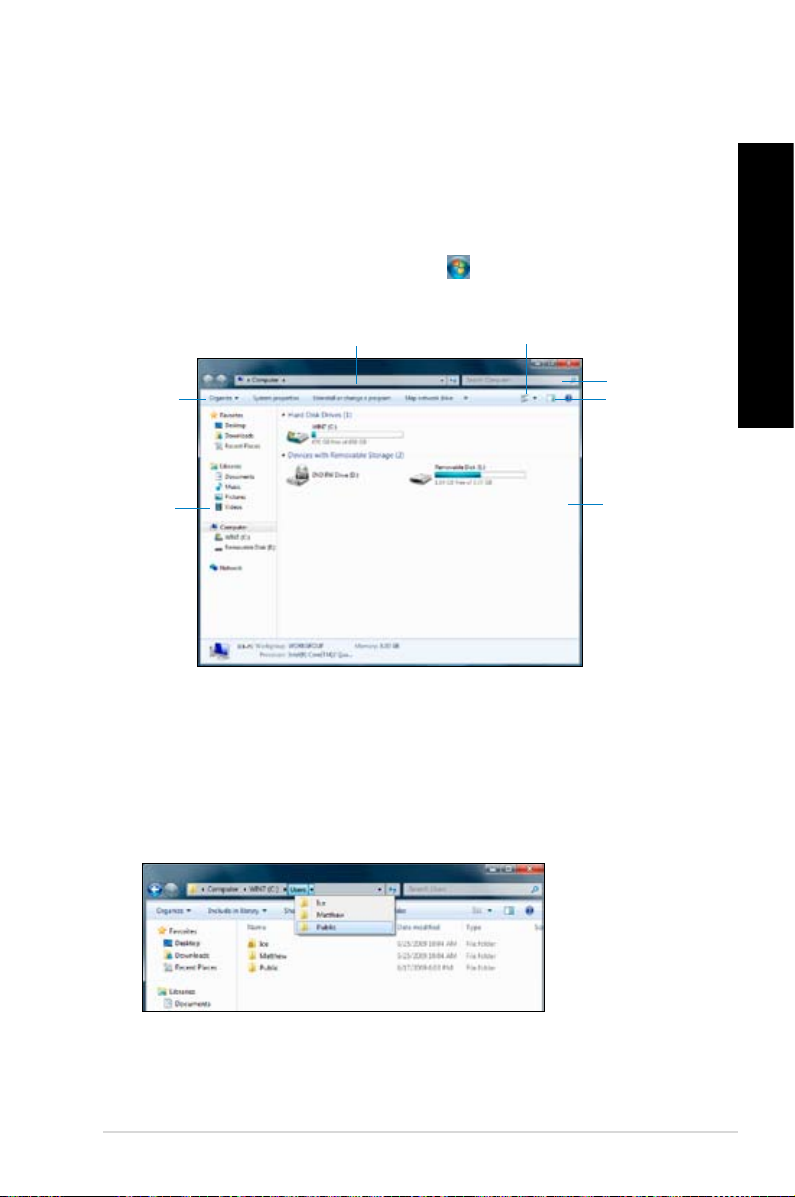
Using Windows® Explorer
Windows® Explorer allows you to view, manage, and organize your les and folders.
Launching Windows® Explorer
To launch Windows Explorer:
1. From the Windows® taskbar, click the Start icon to launch the Start menu.
2. Click Computer to launch Windows Explorer.
Breadcrumb bar
View icon
English
Toolbar
Navigation
pane
Search bar
Preview icon
View pane
Exploring les and folders
To explore les and folders:
1. Launch Windows Explorer.
2. From the navigation or view pane, browse for the location of your data.
3. From the breadcrumb bar, click the arrow to display the contents of the drive or folder.
ASUS CM6650 2-7
Page 26
English
English
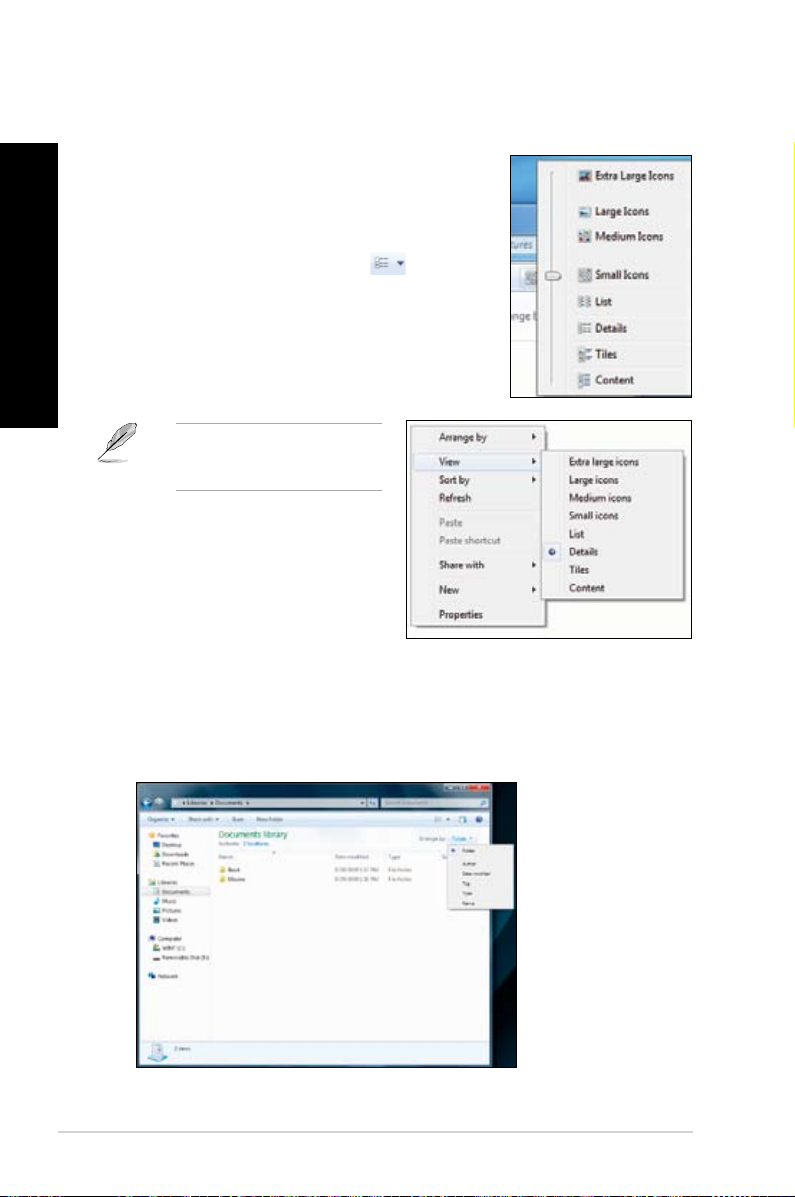
Customizing the le/folder view
To customize the le/folder view:
1. Launch Windows Explorer.
2. From the navigation pane, select the location of your
data.
3. From the toolbar, click the View icon .
4. From the View menu, move the slider to select how you
want to view the le/folder.
You may also right-click anywhere
on the View pane, click View, and
select the view type that you want.
Arranging your les
To arrange your les:
1. Launch Windows Explorer.
2. From the Arrange by eld, click to display the dropdown list.
3. Select your preferred arrangement type.
2-8 Chapter 2: Using Windows® 7
Page 27
English
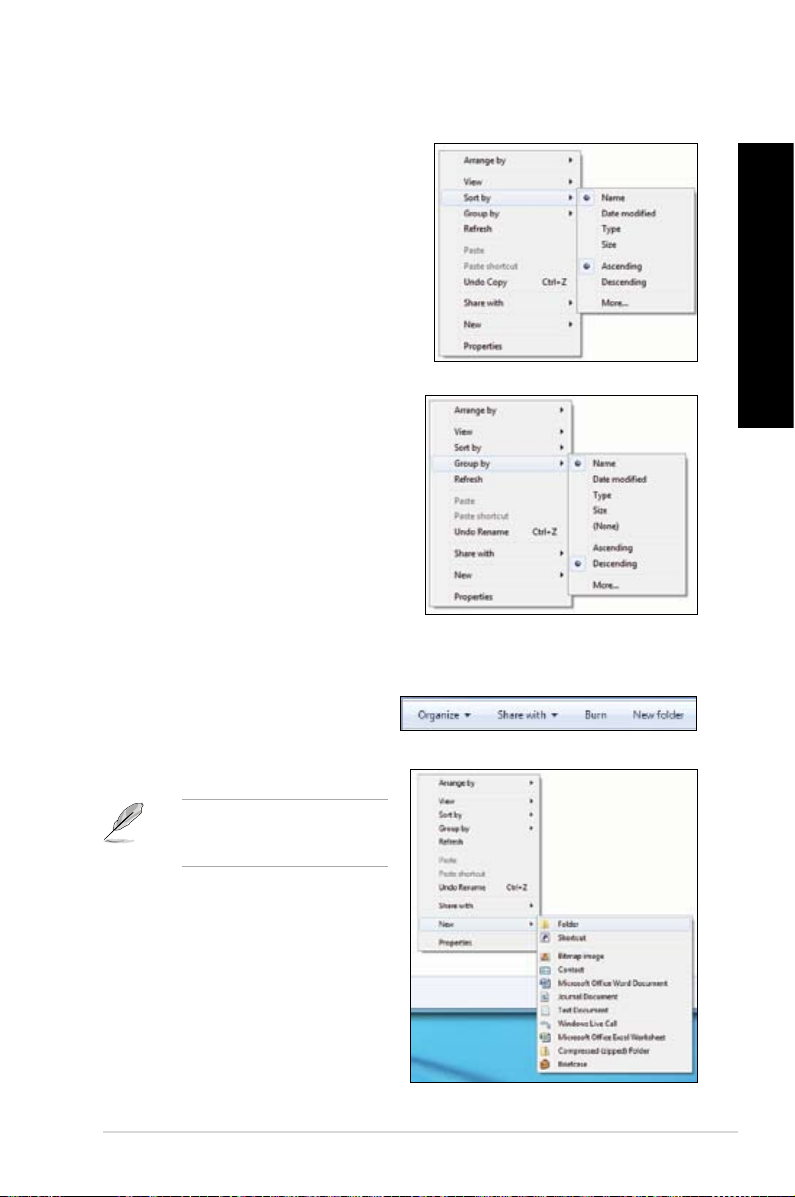
Sorting your les
To sort your les:
1. Launch Windows Explorer.
2. Right-click anywhere on the View pane.
3. From the menu that appears, select Sort
by, then select your preferred sorting type.
Grouping your les
To group your les:
1. Launch Windows Explorer.
2. Right-click anywhere on the View pane.
3. From the menu that appears, select
Group by, then select your preferred
grouping type.
Adding a new folder
To add a new folder:
1. Launch Windows Explorer.
2. From the toolbar, click New folder.
3. Key in a name for the new folder.
English
You may also right-click anywhere
on the View pane, click New >
Folder.
ASUS CM6650 2-9
Page 28

English
English
Backing up your les
Setting up a backup
To set up a backup:
1. Click > All Programs > Maintenance > Backup and Restore.
2. Click Set up backup. Click Next.
3. Select your backup destination. Click Next.
4. Select Let Windows choose (recommended) or Let me choose as your backup
mode.
If you select Let Windows choose, Windows will not back up your programs, FAT-
formatted les, Recycle Bin les, or temporary les that are 1GB or more.
5. Follow the onscreen instructions to nish the process.
Restoring your system
The Windows® System Restore feature creates a restore point where the computer’s system
settings are stored at certain time and date. It allows you to restore or undo changes to your
computer’s system settings without affecting your personal data.
To restore your system:
1. Close all running applications.
2. Click > All Programs > Accessories > System Tools > System Restore.
3. Follow the onscreen instructions to complete the process.
2-10 Chapter 2: Using Windows® 7
Page 29
English
Protecting your computer
Using Windows® 7 Action Center
Windows® 7 Action Center provides you with alert notications, security information, system
maintenance information, and the option to automatically troubleshoot and x some common
computer problems.
You may customize the notications. For more details, refer to the previous section
Customizing icons and notications in this chapter.
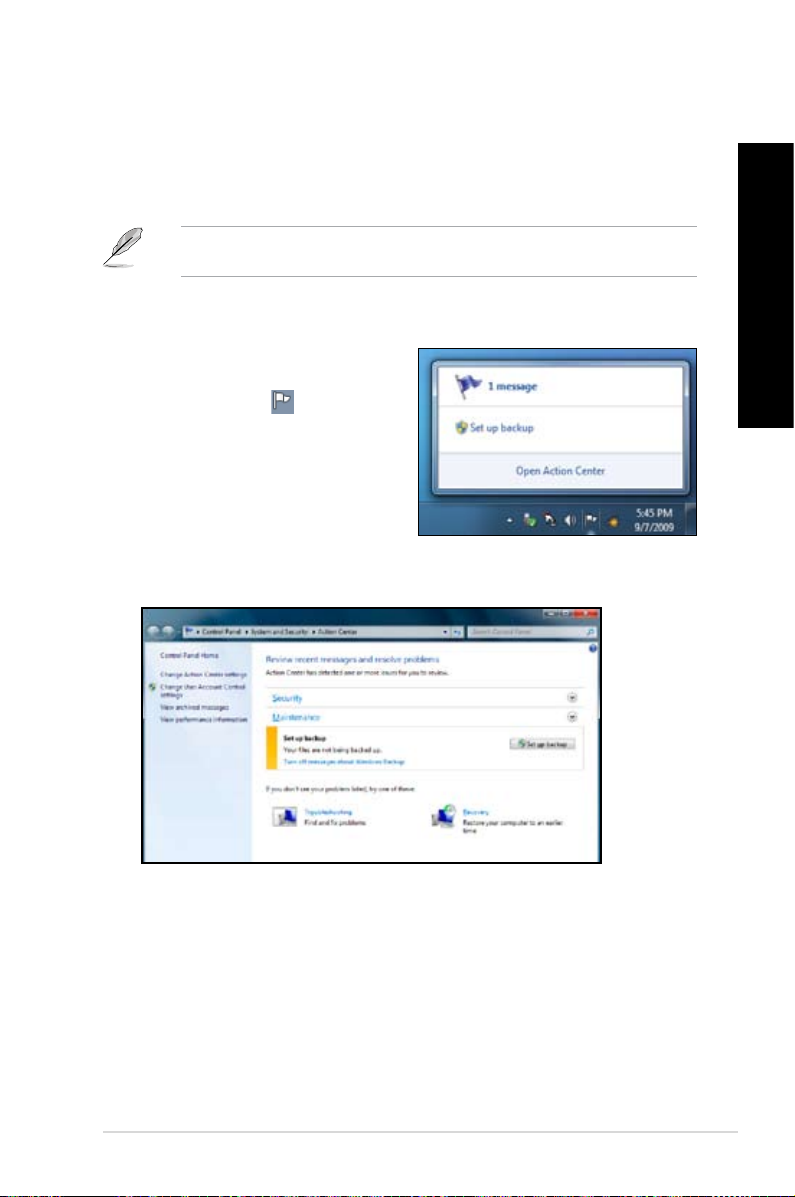
Launching Windows® 7 Action Center
To launch Windows® 7 Action Center:
1. To launch Windows 7 Action Center, click
the Notication icon , then click Open
Action Center.
2. From Windows 7 Action Center, click the task that you want to do.
English
ASUS CM6650 2-11
Page 30

English
English
Using Windows® Update
Windows Update allows you to check and install the latest updates to enhance the security
and performance of your computer.
Launching Windows® Update
To launch Windows® Update:
1. From the Windows® taskbar, click the Start icon to launch the Start menu.
2. Select All Programs > Windows Update.
3. From the Windows Update screen, click the task that you want to do.
2-12 Chapter 2: Using Windows® 7
Page 31

English
Setting up a user account and password
You may create user accounts and passwords for people who will use your computer.
Setting up a user account
To set up a user account:
1. From the Windows® taskbar, click > Getting Started > Add new users.
2. Select Manage another account.
3. Select Create a new account.
4. Key in the name of the new user.
5. Select either Standard user or Administrator as the user type.
6. When done, click Create Account.
English
ASUS CM6650 2-13
Page 32

English
English
Setting up a user’s password
To set up a user’s password:
1. Select the user that you would like to set a password.
2. Select Create a password.
3. Key in a password and conrm it. Key in your password’s hint.
4. When done, click Create password.
2-14 Chapter 2: Using Windows® 7
Page 33

English
Activating the anti-virus software
Trend Micro Internet Security is pre-installed on your computer. It is a third-party anti-virus
software protecting your computer from virus attacking. It is purchased separately. You have
a 60-day trial period after activating it.
To activate Trend Micro Internet Security:
1. Run the Trend Micro Internet Security application.
2. Carefully read the license terms. Click Agree & Activate.
3. Input your e-mail address and select your location. Click Next.
4. Click Finish to complete the activation.
Getting Windows® Help and Support
Windows® Help and Support provides you with guides and answers in using the applications
in Windows® 7 platform.
To launch Windows® Help and Support, click > Help and Support.
English
Ensure that you are connected to the Internet to obtain the latest Windows
ASUS CM6650 2-15
®
online help.
Page 34

English
2-16 Chapter 2: Using Windows® 7
Page 35

Chapter 3
Connecting devices to your computer
Connecting a USB storage device
This desktop PC provides USB 2.0/1.1 ports on both the front and rear panels. The USB
ports allow you to connect USB devices such as storage devices.
To connect a USB storage device:
• Insert the USB storage device to your computer.
Front panel
To remove a USB storage device:
1. Click from the Windows notication area on your
computer, then click Eject USB2.0 FlashDisk.
2. When the Safe to Remove Hardware message
pops up, remove the USB storage device from
your computer.
DO NOT remove a USB storage device when data transfer is in progress. Doing so may
cause data loss or damage the USB storage device.
ASUS CM6650 3-1
Rear panel
Page 36

English
English
Connecting microphone and speakers
This desktop PC comes with microphone ports and speaker ports on both the front and
rear panels. The audio I/O ports located on the rear panel allow you to connect 2-channel,
4-channel, 6-channel, and 8-channel stereo speakers.
Connecting Headphone and Mic
Connecting 2-channel Speakers
3-2
Chapter 3: Connecting devices to your computer
Page 37

English
Connecting 4-channel Speakers
Connecting 6-channel Speakers
English
ASUS CM6650
3-3
Page 38

English
English
Connecting 8-channel Speakers
3-4
Chapter 3: Connecting devices to your computer
Page 39

English
Connecting multiple external displays
Your desktop PC may come with VGA, HDMI, or DVI ports and allows you to connect multiple
external displays.
When a graphics card is installed in your computer, connect the monitors on the output
ports of the graphics card.
Setting up multiple displays
When using multiple monitors, you are allowed to set display modes. You can use the
additional monitor as a duplicate of your main display, or as an extension to enlarge your
Windows desktop.
To set up multiple displays:
1. Turn off your computer.
2. Connect the two monitors to your computer and connect the power cords to the
monitors. Refer to Setting up your computer section in Chapter 1 for details on how
to connect a monitor to your computer.
English
ASUS CM6650
For some graphic cards, only the monitor that is set to be the primary display has display
during POST. The dual display function works only under Windows.
3-5
Page 40

English
English
3. Turn on your computer.
4. Do any of the following to open the Screen Resolution setting screen:
• Click > Control Panel > Appearance and Personalization > Display >
Change display settings.
• Right click anywhere on your Windows desktop. When the pop-up menu appears,
click Personalize > Display > Change display settings.
5. Select the display mode from the Multiple displays: drop-down list.
• Duplicate these displays: Select this option to use the additional monitor as a
duplicate of your main display.
• Extend these displays: Select this option to use the additional monitor as an
extension display. This increases your desktop space.
• Show desktop only on 1 / 2: Select this option to show desktop only on monitor
1 or monitor 2.
• Remove this display: Select this options to remove the selected display.
6. Click Apply or OK. Then click Keep Changes on the conrmation message.
3-6
Chapter 3: Connecting devices to your computer
Page 41

English
Connecting an HDTV
Connect a High Denition TV (HDTV) to the HDMI port of your computer.
• You need an HDMI cable to connect the HDTV and the computer. The HDMI cable is
purchased separately.
• To get the best display performance, ensure that your HDMI cable is less than 15
meters.
English
ASUS CM6650
3-7
Page 42

English
3-8
Chapter 3: Connecting devices to your computer
Page 43

Chapter 4
Eye level to the top of
the monitor screen
Foot rest 90˚ angles
Using your computer
Proper posture when using your Desktop PC
When using your Desktop PC, maintaining the proper posture is necessary to prevent strain to
your wrists, hands, and other joints or muscles. This section provides you with tips on avoiding
physical discomfort and possible injury while using and fully enjoying your Desktop PC.
To maintain the proper posture:
• Position your computer chair to make sure that your elbows are at or slightly above the
keyboard to get a comfortable typing position.
• Adjust the height of your chair to make sure that your knees are slightly higher than
your hips to relax the backs of your thighs. If necessary, use a footrest to raise the level
of your knees.
• Adjust the back of your chair so that the base of your spine is rmly supported and
angled slightly backward.
• Sit upright with your knees, elbows and hips at an approximately 90º angle when you
are at the PC.
• Place the monitor directly in front of you, and turn the top of the monitor screen even
with your eye level so that your eyes look slightly downward.
• Keep the mouse close to the keyboard, and if necessary, use a wrist rest for support to
reduce the pressure on your wrists while typing.
• Use your Desktop PC in a comfortably-lit area, and keep it away from sources of glare
such as windows and straight sunlight.
• Take regular mini-breaks from using your Desktop PC.
4-1ASUS CM6650
Page 44

English
English
Using the memory card reader
Digital cameras and other digital imaging devices use memory cards to store digital picture or
media les. The built-in memory card reader on the front panel of your system allows you to
read from and write to different memory card drives.
1
To use the memory card:
1. Insert the memory card into the card slot.
• A memory card is keyed so that it ts in only one direction. DO NOT force a card into a
slot to avoid damaging the card.
• You can place media in one or more of the card slots and use each media independently.
Place only one memory card in a slot at one time.
2. Select a program from the AutoPlay window to access your les.
• If AutoPlay is NOT enabled in your computer, click Windows® 7 Start button on the
taskbar, click Computer, and then double-click the memory card icon to access the data
on it.
• Each card slot has its own drive icon which is displayed on the Computer screen.
• The memory card reader LED lights up and blinks when data is being read from or
written to the memory card.
3. When nished, right-click the memory card drive icon on the Computer screen, click
Eject, and then remove the card.
Never remove cards while or immediately after reading, copying, formatting, or deleting
data on the card or else data loss may occur.
To prevent data loss, use “Safely Remove Hardware and Eject Media” in the Windows
notication area before removing the memory card.
4-2 Chapter 4: Using your computer
Page 45

English
Using the optical drive
1
2
Inserting an optical disc
To insert an optical disc:
1. While your system is on, press the eject button below the drive bay cover to open the
tray.
2. Place the disc to the optical drive with the label side facing up.
3. Push the tray to close it.
4. Select a program from the AutoPlay window to access your les.
If AutoPlay is NOT enabled in your computer, click Windows® 7 Start button on the taskbar,
click Computer, and then double-click the CD/DVD drive icon to access the data on it.
3
English
Removing an optical disc
To remove an optical disc:
1. While the system is on, do either of the following to eject the tray:
• Press the eject button below the drive bay cover.
• Right-click the CD/DVD drive icon on the Computer screen, and then click Eject.
2. Remove the disc from the disc tray.
ASUS CM6650 4-3
Page 46

Using the multimedia keyboard
`
6
789 10 11 12 13 14 15 16 17
2
3
4
5
1
18
19
20
21
22
(on selected models only)
English
The keyboard varies with models. The illustrations on this section are for reference only.
ASUS SK-2045 keyboard
Keys Description Keys Description
1.
Launches Windows® gadgets.
2.
3.
4.
5.
6.
7.
8.
9.
10.
Activates Windows® Flip 3D.
Reduces picture size in Windows®
Photo Viewer.
Increases picture size in Windows®
Photo Viewer.
Functions with keys F1~F12.
Press <Fn + F1> to launch Microsoft®
Word.
Press <Fn + F2> to launch Microsoft®
Excel.
Press <Fn + F3> to launch Microsoft®
PowerPoint.
Press <Fn + F4> to launch Microsoft®
Internet Explorer.
Press <Fn + F5> to launch Microsoft®
Outlook.
Press <Fn + F6> to launch the
11.
Favorites folder in Windows® Internet
Explorer.
12.
13.
14.
15.
16.
17.
18.
19.
20.
21.
22.
Press <Fn + F7> to launch Microsoft®
MSN or, if not installed, connects to the
MSN download page.
Press <Fn + F8> to launch Windows®
Search screen.
Press <Fn + F9> to play or pause
playback in Windows® Media Player.
Press <Fn + F10> to stop playback in
Windows® Media Player.
Press <Fn + F11> to go to the previous
track in Windows® Media Player.
Press <Fn + F12> to go to the next
track in Windows® Media Player.
Decreases the system volume.
Increases the system volume.
Turns the volume’s mute mode on/off.
Launches Windows® Media Player.
Launches Windows® Media Center.
4-4 Chapter 4: Using your computer
The special function keys only work on Windows® Vista / Windows® 7 operating systems.
Page 47

ASUS-Razer Arctosa Gaming keyboard
English
Keys Description
1.
2.
3.
4.
5.
6.
7.
8.
Plays or pauses playback in a media
player.
Stops playback in a media player.
Goes to the previous track in a media
player.
Goes to the next track in a media
player.
Decreases the system volume.
Increases the system volume.
Turns the volume’s mute mode on/off.
Switches proles working with F1 ~
F10 keys.
• The special function keys work on Windows® XP / Vista / 7 operating systems.
• Install the keyboard driver before using. Visit the Razer website at
www.razersupport.com to download the driver.
132 5 6
4 8 7
4-5ASUS CM6650
Page 48

English
`
1
234 5
6
7
8
9
10 11
12
13
BTC 6200C keyboard
Keys Description Keys Description
1.
2.
3.
4.
5.
6.
7.
Enters into sleep mode. Press any key
to wake up your computer and return to
the previous working status.
Returns to the last page you viewed.
Goes to the next page you viewed
before.
Launches the default homepage in
Windows® Internet Explorer.
Launches the Favorites folder in
Windows® Internet Explorer.
Launches your default email application.
Decreases the system volume.
8.
9.
10.
11.
12.
13.
Increases the system volume.
Turns the volume’s mute mode on/off.
Goes to the previous track in a media
player.
Plays or pauses playback in a media
player.
Goes to the next track in a media player.
Stops playback in a media player.
• The special function keys work on Windows® ME / 2000 / XP / Vista / 7 operating
systems without installing a driver. For Windows® 98SE operating system, visit the BTC
website at www.btc.com.tw to download the driver.
• Install Microsoft® Internet Explorer 5.0 or later versions before using the Internet keys.
4-6 Chapter 4: Using your computer
Page 49

ASUS KB34211 modern wired keyboard
1 2 3
Hot keys Description
1.
2.
3.
The special function keys only work on Windows® Vista / Windows® 7 / XP operating
systems.
Turns the volume’s mute mode on/off.
Decreases the system volume.
Increases the system volume.
English
4-7ASUS CM6650
Page 50

English
4-8 Chapter 4: Using your computer
Page 51

Chapter 5
Modem
RJ-45 cable
Connecting to the Internet
Wired connection
Use an RJ-45 cable to connect your computer to a DSL/cable modem or a local area network
(LAN).
Connecting via a DSL/cable modem
To connect via a DSL/cable modem:
1. Set up your DSL/cable modem.
Refer to the documentation that came with your DSL/cable modem.
2. Connect one end of an RJ-45 cable to the LAN (RJ-45) port on the rear panel of your
computer and the other end to a DSL/cable modem.
3. Turn on the DSL/cable modem and your computer.
4. Congure the necessary Internet connection settings.
Contact your Internet Service Provider (ISP) for details or assistance in setting up your
Internet connection.
ASUS CM6650 5-1
Page 52

English
English
RJ-45 cable
LAN
Connecting via a local area network (LAN)
To connect via a LAN:
1. Connect one end of an RJ-45 cable to the LAN (RJ-45) port on the rear panel of your
computer and the other end to your LAN.
2. Turn on your computer.
3. Congure the necessary Internet connection settings.
Contact your network administrator for details or assistance in setting up your Internet
connection.
5-2 Chapter 5: Connecting to the Internet
Page 53

English
Wireless connection (on selected models only)
Wireless AP
Modem
Connect your computer to the Internet through a wireless connection.
To establish a wireless connection, you need to connect to a wireless access point (AP).
English
• To increase the range and sensitivity of the wireless radio signal, connect the external
antennas to the antenna connectors on the ASUS WLAN Card.
• Place the antennas on the top of your computer for the best wireless performance.
• The external antennas are optional items.
ASUS CM6650 5-3
Page 54

English
To connect to a wireless network:
English
1. Click the network icon in the notication area to display the available wireless
networks.
2. Select the wireless network that you want to connect to, then click Connect.
3. You may need to key in the network security key for a secured wireless network, then
click OK.
5-4 Chapter 5: Connecting to the Internet
Page 55

English
4. Wait while your computer is connecting to the wireless network.
5. The wireless connection is established successfully. The connection status is displayed
and the network icon displays the connected status.
English
ASUS CM6650 5-5
Page 56

English
5-6 Chapter 5: Connecting to the Internet
Page 57

Chapter 6
Using the Utilities
The support DVD and Recovery DVD may not be included in the package. You can burn
them by yourself. Refer to Recovering your system for details.
ASUS AI Suite II
ASUS AI Suite II is an all-in-one interface that integrates several ASUS utilities and allows
users to launch and operate these utilities simultaneously.
Installing AI Suite II
To install AI Suite II:
1. Place the support DVD in the optical drive. The Drivers installation tab appears if yourThe Drivers installation tab appears if your
computer has enabled the Autorun feature.
2. Click the Utilities tab, then click ASUS AI Suite II.
3. Follow the onscreen instructions to complete the installation.
Using AI Suite II
AI Suite II automatically starts when you enter the Windows® operating system (OS). The AI
Suite II icon appears in the Windows® notication area. Click the icon to open the AI Suite II
main menu bar.
Click each button to select and launch a utility, to monitor the system, to update the
motherboard BIOS, to display the system information, and to customize the settings of AI
Suite II.
Click to customize
Click to show the
system information
Click to update the motherboard BIOS
Click to monitor sensors
or CPU frequency
Click to select a utility
ASUS CM6650 6-1
the interface settings
Page 58

English
English
Tool
The Tool section includes the EPU, Probe II and Sensor
Record panels.
EPU
EPU is an energy-efcient tool that satises different computing needs. This utility provides
several modes that you can select to save system power. Selecting Auto mode will have the
system shift modes automatically according to current system status. You can also customize
each mode by conguring settings like CPU frequency, GPU frequency, vCore Voltage, and
Fan Control.
Launching EPU
After installing AI Suite II from the support DVD, launch EPU by clicking Tool > EPU on the
AI Suite II main menu bar.
Displays the following message
if no VGA power saving engine is
detected.
Displays current mode
The items lighting up
means power saving
engine is activated
Displays the amount
of CO2 reduced
*Shifts between the
display of Total and
Current CO2 reduced
Displays the current
CPU power
Advanced settings for each mode
Multiple system
operating modes
*• Select From EPU Installation to show the CO2 that has been reduced since you
installed EPU.
*• Select From the Last Reset to show the total CO2 that has been reduced since you
click the Clear button .
6-2 Chapter 6: Using the Utilities
Displays the system
properties of each mode
Page 59

English
Probe II
Probe II is a utility that monitors the computer’s vital components, and detects and alerts you
of any problem with these components. Probe II senses fan rotations, CPU temperature,
and system voltages, among others. With this utility, you are assured that your computer is
always at a healthy operating condition.
Launching Probe II
After installing AI Suite II from the support DVD, launch Probe II by clicking Tool > Probe II
on the AI Suite II main menu bar.
Conguring Probe II
Click the Voltage/Temperature/Fan Speed tabs to activate the sensors or to adjust the
sensor threshold values. The Preference tab allows you to customize the time interval of
sensor alerts, or change the temperature unit.
English
Saves your
conguration
Loads your saved
conguration
ASUS CM6650 6-3
Loads the default
threshold values
for each sensor
Applies your
changes
Page 60

English
English
Sensor Recorder
Sensor Recorder allows you to monitor the changes in the system voltage, temperature, and
fan speed, as well as recording the changes.
Launching Sensor Recorder
After installing AI Suite II from the support DVD, click Tool > Sensor Recorder on the AI
Suite II main menu bar to launch PC Probe .
Conguring Sensor Recorder
Click the Voltage/Temperature/Fan Speed tabs and select the sensors that you want to
monitor. The History Record tab allows you to record the changes in the sensors that you
enable.
Select the
sensors that you
want to monitor
Drag to view the
status during a
certain period
of time
Click to zoom in/out
Click to return to
the default mode
6-4 Chapter 6: Using the Utilities
Click to zoom in/out
the X axis
the Y axis
Page 61

English
Monitor
The Monitor section includes the Sensor and
CPU Frequency panels.
Sensor
The Sensor panel displays the current value of a system sensor such as fan rotation, CPU
temperature, and voltages. Click Monitor > Sensor on the AI Suite II main menu bar to
launch the Sensor panel.
CPU Frequency
The CPU Frequency panel displays the current CPU frequency and CPU usage. Click
Monitor > CPU Frequency on the AI Suite II main menu bar to open the CPU Frequency
panel.
English
Resident in the right pane (system information area)
Sensor panel
CPU Frequency panel
ASUS CM6650 6-5
Page 62

English
English
Update
The Update section allows you to update the
motherboard BIOS and the BIOS boot logo
with the ASUS designed update utilities.
ASUS Update
The ASUS Update is a utility that allows you to manage, save, and update the motherboard
BIOS in Windows® OS. The ASUS Update utility allows you to update the BIOS directly
from the Internet, download the latest BIOS le from the Internet, update the BIOS from an
updated BIOS le, save the current BIOS le or view the BIOS version information.
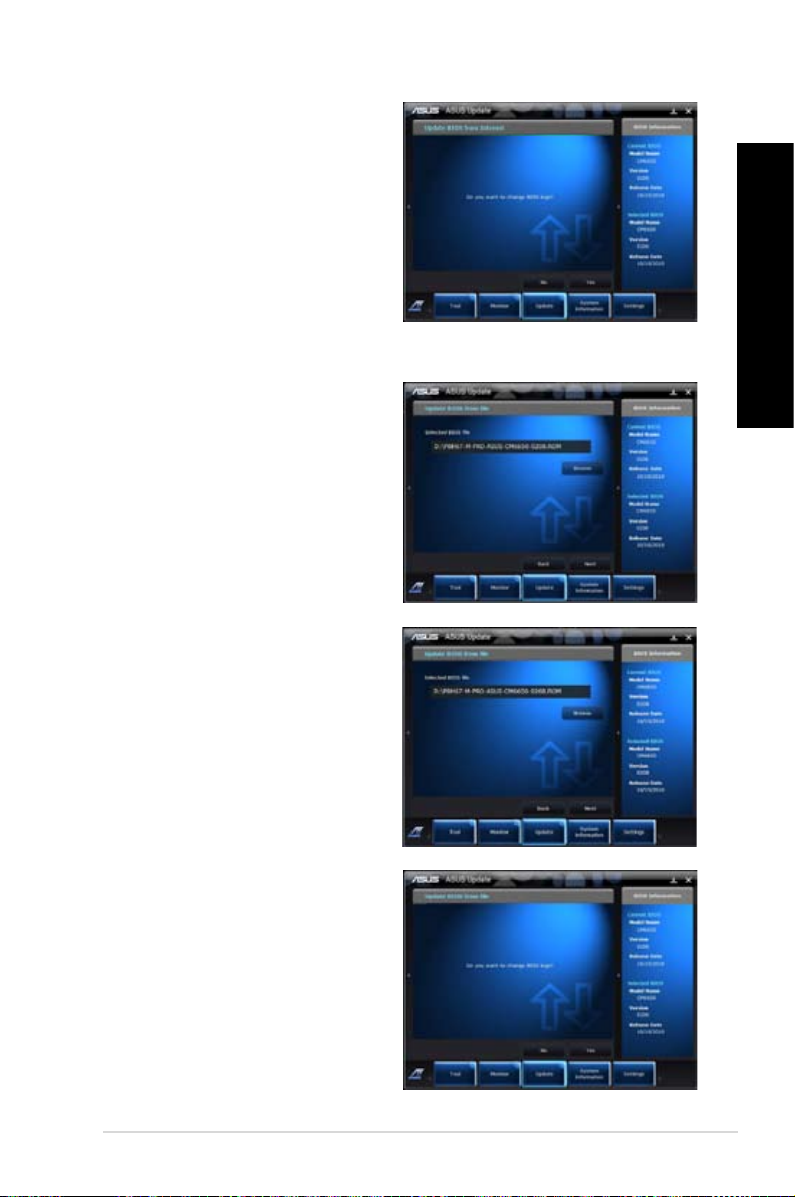
Updating the BIOS through the Internet
To update the BIOS through the Internet:
1. From the ASUS Update screen,
select Update BIOS from Internet,
and then click Next.
2. Select the ASUS FTP site nearest
you to avoid network trafc.
If you want to enable the BIOS
downgradable function and auto
BIOS backup function, check the
checkboxs before the two items on
the screen.
3. Select the BIOS version that you
want to download. Click Next.
When no updated version is
detected, it is shown as the screen
on the right side.
6-6 Chapter 6: Using the Utilities
Page 63
English
4. You can decide whether to change
the BIOS boot logo, which is the
image appearing on screen during
the Power-On Self-Tests (POST).
Click Yes if you want to change the
boot logo or No to continue.
5. Follow the onscreen instructions to
complete the update process.
Updating the BIOS through a BIOS
le
To update the BIOS through a BIOS le:
1. From the ASUS Update screen,
select Update BIOS from le, and
then click Next.
2. Locate the BIOS le from the Open
window, click Open, and click Next.
English
3. You can decide whether to change
the BIOS boot logo. Click Yes if you
want to change the boot logo or No to
continue.
4. Follow the onscreen instructions to
complete the update process.
ASUS CM6650 6-7
Page 64

English
English
System Information
The System Information section displays the
information about the motherboard, CPU, and
memory slots.
• Click the MB tab to see the details on the
motherboard manufacturer, product name,
version, and BIOS.
• Click the CPU tab to see the details on the
processor and the Cache.
• Click the SPD tab and then select
the memory slot to see the details on
the memory module installed on the
corresponding slot.
6-8 Chapter 6: Using the Utilities
Page 65

English
Settings
The Settings section allows you to customize the
main menu bar settings and the interface’s skin.
• Application allows you to select the
application that you want to enable.
• Bar allows you to modify the bar setting,
English
• Skin allows you to customize the interface’s
contrast, brightness, saturation, hue, and
gamma.
ASUS CM6650 6-9
Page 66

English
English
ASUS AI Manager
ASUS AI Manager is a utility which gives you quick and easy access to frequently-used
applications.
Installing AI Manager
To install AI Manager:
1. Place the support DVD in the optical drive. If Autorun is enabled, the Drivers installation
wizard appears.
If Autorun is disabled, double-click the setup.exe le from the ASUS AI Manager folder in
the support DVD.
2. Click the Utilities tab, then click ASUS AI Manager.
3. Follow the onscreen instructions to complete the installation.
Launching AI Manager
To launch the AI Manager from the Windows® desktop, click
AI Manager > AI Manager 1.xx.xx
After launching the application, the AI Manager icon appears in the Windows® taskbar.
Right-click this icon to switch between the quick bar and the
main window, and to launch the AI Manager either from the
quick bar or taskbar.
. The AI Manager quick bar appears on the desktop.
Start > All Programs > ASUS >
6-10 Chapter 6: Using the Utilities
Page 67

English
AI Manager quick bar
The AI Manager quick bar saves the desktop space and allows you to launch the ASUS
utilities or display system information easily. Click any of the Main, My Favorites, Support or
Information tab to display the menu’s contents.
Exit button
Switch to main Window
Add to ToolBar
Main
My Favorites
Click the Maximize/restore button to switch between full window and quick bar. Click the
Minimize button to keep the AI Manager on the taskbar. Click the Close button to quit
the AI Manager.
Main
The Main menu contains three utilities: AI Disk, AI Security, and AI Booting. Click the arrow
on the Main menu icon to browse through the utilities in the main menu.
Click to extend or restore
AI Disk
AI Disk allows you to easily clear temporary IE les, IE cookies, IE URLs, IE history,
or the Recycle Bin. Click the AI Disk icon on the quick bar to display the full AI Disk
window and select the items you want to clear. Click Apply when done.
Support
Information
English
ASUS CM6650 6-11
Page 68

English
AI Security
AI Security enables you to set a password to secure your devices, such as USB ash
disks and CD/DVD disks, from unauthorized access.
English
To lock a device:
1. When using AI Security for the rst time, you are asked to set a password. Key in
a password with at most 20 alphanumeric characters.
2. Conrm the password.
3. Key in the password hint (recommended).
4. When done, click Ok.
5. Select the device you want to lock, then click Apply.
6. Key in the password you have set previously, then click Ok.
To unlock the device:
1. Deselect the locked device, then click Apply.
2. Key in the password you have set previously, then click Ok.
To change the password:
• Click Change Password, then follow the onscreen instructions to change
6-12 Chapter 6: Using the Utilities
password.
Page 69

English
AI Booting
AI Booting allows you to specify the boot device priority sequence.
To specify the boot sequence:
1. Select a device, then click the left/right button to specify the boot sequence.
2. When done, press Apply.
My Favorites
My Favorites allows you to add applications that you frequently use, saving you from
searching for the applications throughout your computer.
English
To add an application:
1. Click Add, then locate the application you want to add to My Favorites.
2. Click Open on the le location window. The application is added to My Favorites list.
Right click on the application icon to launch, delete, or rename the selected application. You
can also double click to launch the selected application.
ASUS CM6650 6-13
Page 70

English
English
Support
Click any links on the Support window to go to the ASUS website, technical support website,
download support website, or contact information.
Information
Click the tab on the Information window to see the detailed information about your system,
motherboard, CPU, BIOS, installed device(s), and memory.
6-14 Chapter 6: Using the Utilities
Page 71

English
Nero 9
Nero 9 allows you to create, copy, burn, edit, share, and update different kinds of data.
Installing Nero 9
To install Nero 9:
1. Insert the Nero 9 DVD into your optical drive.
2. If Autorun is enabled, the main menu appears automatically.
If Autorun is disabled, double-click the SeupX.exe le from the main directory of your Nero
9 DVD.
English
3. From the main menu, click Nero 9 Essentials.
ASUS CM6650 6-15
Page 72

English
English
4. Select the language you want to use for Installation Wizard. Click Next.
5. Click Next to continue.
6. Tick I accept the License Conditions. When done, click Next.
6-16 Chapter 6: Using the Utilities
Page 73

English
7. Select Typical then click Next.
8. Tick Yes, I want to help by sending anonymous application data to Nero then click
Next.
English
9. When done, click Exit.
ASUS CM6650 6-17
Page 74

English
English
Burning les
To burn les:
1. From the main menu, click Data Burning > Add.
2. Select the les that you want to burn. When done, click Add.
6-18 Chapter 6: Using the Utilities
Page 75

English
3. After selecting les that you want to burn, click Burn to burn the les to a disc.
For more details about using Nero 9, refer to the Nero website at www.nero.com
Recovering your system
Using the Recovery Partition
The Recovery Partition quickly restores your Desktop PC’s software to its original working
state. Before using the Recovery Partition, copy your data les (such as Outlook PST les)
to USB storage devices or to a network drive and make note of any customized conguration
settings (such as network settings).
About the Recovery Partition
The Recovery Partition is a reserved space on your hard disk drive used to restore the
operating system, drivers, and utilities installed on your Desktop PC at the factory.
English
DO NOT delete the partition named
RECOVERY. The Recovery Partition
is created at the factory and cannot be
restored if deleted. Take your Desktop
PC to an authorized ASUS service
center if you have problems with the
recovery process.
Using the Recovery Partition:
1. Press <F9> during bootup.
2. Press <Enter> to select Windows Setup [EMS Enabled].
ASUS CM6650 6-19
Page 76

English
3. Select one of the following recovery options.
System Recovery:
This feature allows you to restore the system to the factory default settings.
System Image Backup:
This feature allows you to burn the system image backup in DVD discs, which you can use
later to restore the system to its default settings.
System DVD Backup:
This feature allows you to make a backup copy of the support DVD.
4. Follow the onscreen instructions to complete the recovery process.
Visit the ASUS website at www.asus.com for updated drivers and utilities.
Using the Recovery DVD (on selected models)
Prepare 1~3 blank writable DVDs as instructed to create the Recovery DVD.
Remove the external hard disk drive before performing system recovery on your Desktop
PC. According to Microsoft, you may lose important data because of setting up Windows on
the wrong disk drive or formatting the incorrect drive partition.
To use the Recovery DVD:
1. Insert the Recovery DVD into the optical drive. Your Desktop PC needs to be powered
ON.
2. Restart the Desktop PC and press <F8> on bootup and select the optical drive (may be
labeled as “CD/DVD”) and press <Enter> to boot from the Recovery DVD.
3. Select OK to start to restore the image.
4. Select OK to conrm the system recovery.
Restoring will overwrite your hard drive. Ensure to back up all your important data before
the system recovery.
5. Follow the onscreen instructions to complete the recovery process.
DO NOT remove the Recovery disc, unless instructed to do so, during the recovery process
or else your partitions will be unusable.
Visit the ASUS website at www.asus.com for updated drivers and utilities.
6-20 Chapter 6: Using the Utilities
Page 77

Chapter 7
Troubleshooting
Troubleshooting
This chapter presents some problems you might encounter and the possible solutions.
My computer cannot be powered on and the power LED on the front
?
panel does not light up
• Check if your computer is properly connected.
• Check if the wall outlet is functioning.
• Check if the Power Supply Unit is switched on. Refer to the section Turning
your computer ON/OFF in Chapter 1.
My computer hangs.
?
• Do the following to close the programs that are not responding:
1. Simultaneously press <Alt> + <Ctrl> + <Delete> keys on the keyboard,
2. Click Applications tab.
3. Select the program that is not responding, then click End Task.
• If the keyboard is not responding. Press and hold the Power button on the top
then click Start Task Manger.
of your chassis until the computer shuts down. Then press the Power button to
turn it on.
I cannot connect to a wireless network using the ASUS WLAN Card
?
(on selected models only)?
• Ensure that you enter the correct network security key for the wireless network
you want to connect to.
• Connect the external antennas (optional) to the antenna connectors on the
ASUS WLAN Card and place the antennas on the top of your computer
chassis for the best wireless performance.
The arrow keys on the number key pad are not working.
?
Check if the Number Lock LED is off. When the Number Lock LED is on,
the keys on the number key pad are used to input numbers only. Press the
Number Lock key to turn the LED off if you want to use the arrow keys on the
number key pad.
ASUS CM6650 7-1
Page 78

English
English
No display on the monitor.
?
• Check if the monitor is powered on.
• Ensure that your monitor is properly connected to the video output port on your
computer.
• If your computer comes with a discrete graphics card, ensure that you connect
your monitor to a video output port on the discrete graphics card.
• Check if any of the pins on the monitor video connector is bent. If you discover
bent pins, replace the monitor video connector cable.
• Check if your monitor is plugged to a power source properly.
• Refer to the documentation that came with your monitor for more
troubleshooting information.
When using multiple monitors, only one monitor has display.
?
• Ensure that the both monitors are powered on.
• During POST, only the monitor connected to the VGA port has display. The
dual display function works only under Windows.
• When a graphics card is installed on your computer, ensure that you connect
the monitors to the output port on the graphics card.
• Check if the multiple displays settings are correct. Refer to section
Connecting multiple external displays in Chapter 3 for details.
My computer cannot detect my USB storage device.
?
• The rst time you connect your USB storage device to your computer,
Windows automatically installs a driver for it. Wait for a while and go to My
Computer to check if the USB storage device is detected.
• Connect your USB storage device to another computer to test if the USB
storage device is broken or malfunctions.
7-2
I want to restore or undo changes to my computer’s system settings
?
without affecting my personal les or data.
The Windows® System Restore feature allows you to restore or undo changes
to your computer’s system settings without affecting your personal data such
as documents or photos. For more details, refer to the section Restoring your
system in Chapter 2.
Chapter 7: Troubleshooting
Page 79

English
The picture on the HDTV is stretched.
?
• It is caused by the different resolutions of your monitor and your HDTV. Adjust
the screen resolution to t your HDTV. To change the screen resolution:
1. Do any of the following to open the Screen Resolution setting screen:
• Click > Control Panel > Appearance and Personalization >
Display > Change display settings.
• Right click anywhere on your Windows desktop. When the pop-up
2. Adjust the resolution. Refer to the documentation came with your HDTV
3. Click Apply or OK. Then click Keep Changes on the conrmation
My speakers produce no sound.
?
• Ensure that you connect your speakers to the Line out port (lime) on the front
• Check if your speak is connected to a electrical source and turned on.
• Adjust your speakers’ volume.
• Ensure that your computer’s system sounds are not Muted.
• Connect your speakers to another computer to test if the speakers arer
menu appears, click Personalize > Display > Change display
settings.
for the resolution.
message.
panel or the rear panel.
• If it is muted, the volume icon is displayed as . To enable the system
sounds, click from the Windows notication area, then click .
• If it is not muted, click and drag the slider to adjust the volume.
working properly.
English
The DVD drive cannot read a disc.
?
• Check if the disc is placed with the label side facing up.
• Check if the disc is centered in the tray, especially for the discs with
non-standard size or shape.
• Check if the disc is scratched or damaged.
The DVD drive eject button is not respond.
?
1. Click > Computer.
2. Right-click , then click Eject from the menu.
ASUS CM6650
7-3
Page 80

English
English
Power
Problem Possible Cause Action
Incorrect power voltage
No power
(The power
indicator is off)
Your computer is not
turned on.
Your computer’s power
cord is not properly
connected.
• Set your computer’s power voltage
switch to your area’s power
requirements.
• Adjust the voltage settings. Ensure
that the power cord is unplugged
from the power outlet.
Press the power key on the front panel
to ensure that your computer is turned
on.
• Ensure that the power cord is
properly connected.
• Use other compatible power cord.
PSU (Power supply unit)
problems
Try installing another PSU on your
computer.
Display
Problem Possible Cause Action
No display
output after
turning the
computer on
(Black screen)
The signal cable is
not connected to the
correct VGA port on your
computer.
Signal cable problems Try connecting to another monitor.
• Connect the signal cable to the
correct display port (onboard VGA or
discrete VGA port).
• If you are using a discrete VGA
card, connect the signal cable to the
discrete VGA port.
7-4
Chapter 7: Troubleshooting
Page 81

English
LAN
Problem Possible Cause Action
Cannot access
the Internet
The LAN cable is not
connected.
LAN cable problems
Your computer is not
properly connected to a
router or hub.
Network settings
Problems caused by the
anti-virus software
Driver problems Reinstall the LAN driver
Connect the LAN cable to your
computer.
Ensure the LAN LED is on. If not,
try another LAN cable. If it still does
not work, contact the ASUS service
center.
Ensure that your computer is properly
connected to a router or hub.
Contact your Internet Service Provider
(ISP) for the correct LAN settings.
Close the anti-virus software.
Audio
Problem Possible Cause Action
Speaker or headphone is
connected to the wrong
port.
• Refer to your computer’s user
manual for the correct port.
• Disconnect and reconnect the
speaker to your computer.
English
No Audio
ASUS CM6650
Speaker or headphone
does not work.
The front and back audio
ports do not work.
Driver problems
Try using another speaker or
headphone.
Try both the front and back audio
ports. If one port failed, check if the
port is set to multi-channel.
Reinstall the audio driver
7-5
Page 82

English
English
System
Problem Possible Cause Action
Too many programs are
running.
System speed is
too slow
The system often
hangs or freezes.
Computer virus attack
Hard disk drive failure
Memory module problems
There is not enough
air ventilation for your
computer.
Incompatible softwares are
installed.
Close some of the programs.
• Use an anti-virus software to
scan for viruses and repair your
computer.
• Reinstall the operating system.
• Send the damaged hard disk
drive to ASUS Service Center for
servicing.
• Replace with a new hard disk drive.
• Replace with compatible memory
modules.
• Remove the extra memory
modules that you have installed,
then try again.
Move your computer to an area with
better air ow.
Reinstall the OS and reinstall
compatible softwares.
7-6
Chapter 7: Troubleshooting
Page 83

English
CPU
Problem Possible Cause Action
Your computer is booting
up.
Too noisy right
after turning on
the computer.
Computer is too
noisy when in use.
If the problem still persists, refer to your Desktop PC’s warranty card and contact the ASUS
Service Center. Visit the ASUS Support site at http://support.asus.com for the service
center information.
The BIOS settings have
been changed.
Old BIOS version
The CPU fan has been
replaced.
There is not enough
air ventilation for the
computer.
The system temperature is
too high.
It is normal. The fan runs on its
full speed when the computer is
powering on. The fan slows down
after entering the OS.
Restore the BIOS to its default
settings.
Update the BIOS to the latest
version. Visit the ASUS Support
site at http://support.asus.com to
download the latest BIOS versions.
Ensure that you are using a
compatible or ASUS-recommended
CPU fan.
Move your computer to an area with
better air ow.
• Update the BIOS.
• If you know how to reinstall the
motherboard, try to clean the inner
space of the chassis.
English
ASUS CM6650
7-7
Page 84

English
7-8
Chapter 7: Troubleshooting
Page 85

PC desktop ASUS Essentio
CM6650
Manual de utilizare
Page 86

Română
E6090
Prima ediţie
Română
Ianuarie 2011
Copyright © 2011 ASUSTeK Computer Inc. All Rights Reserved.
No part of this manual, including the products and software described in it, may be reproduced, transmitted,
transcribed, stored in a retrieval system, or translated into any language in any form or by any means, except
documentation kept by the purchaser for backup purposes, without the express written permission of ASUSTeK
Computer Inc. (“ASUS”).
Product warranty or service will not be extended if: (1) the product is repaired, modied or altered, unless such
repair, modification of alteration is authorized in writing by ASUS; or (2) the serial number of the product is
defaced or missing.
ASUS PROV IDES THIS MANUAL “A S IS” WIT HOUT WARRA NTY OF A NY K IND, EITHER EXPRESS OR I MPLI ED,
INCLUDING BUT NOT LIMITED TO THE IMPLIED WARRANTIES OR CONDITIONS OF MERCHANTABILITY OR FITNESS
FOR A PARTICULAR PURPOSE. IN NO EVENT SHALL ASUS, ITS DIRECTORS, OFFICERS, EMPLOYEES OR AGENTS BE
LIABLE FOR ANY INDIRECT, SPECIAL, INCIDENTAL, OR CONSEQUENTIAL DAMAGES (INCLUDING DAMAGES FOR
LOSS OF PROFITS, LOSS OF BUSINESS, LOSS OF USE OR DATA, INTERRUPTION OF BUSINESS AND THE LIKE), EVEN IF
ASUS HAS BEEN ADVISED OF THE POSSIBILITY OF SUCH DAMAGES ARISING FROM ANY DEFECT OR ERROR IN THIS
MANUAL OR PRODUCT.
SPECIFICATIONS AND INFORMATION CONTAINED IN THIS MANUAL ARE FURNISHED FOR INFORMATIONAL USE
ONLY, AND ARE SUBJECT TO CHANGE AT ANY TIME WITHOUT NOTICE, AND SHOULD NOT BE CONSTRUED AS A
COMMITMENT BY ASUS. ASUS ASSUMES NO RESPONSIBILITY OR LIABILITY FOR ANY ERRORS OR INACCURACIES
THAT MAY APPEAR IN THIS MANUAL, INCLUDING THE PRODUCTS AND SOFTWARE DESCRIBED IN IT.
Products and corporate names appearing in this manual may or may not be registered trademarks or copyrights
of their respective companies, and are used only for identication or explanation and to the owners’ benet,
without intent to infringe.
ii
Page 87

Română
Cuprins
Note........................................................................................................................................................v
Informaţii pentru utilizarea în condiţii de siguranţă ..........................................................vii
Convenţii utilizate în acest ghid ...............................................................................................viii
Unde puteţi găsi informaţii suplimentare ............................................................................ viii
Conţinutul ambalajului ................................................................................................................. ix
Capitolul 1 Noţiuni de bază
Bun venit! ........................................................................................................................................1-1
Cunoaşterea computerului ....................................................................................................... 1-1
Congurarea computerului ...................................................................................................... 1-5
PORNIREA/OPRIREA computerului ........................................................................................1-8
Capitolul 2 Utilizarea sistemului de operare Windows® 7
Prima pornire a computerului ................................................................................................. 2-1
Utilizarea desktopului sistemului de operare Windows® 7 ...........................................2-2
Gestionarea şierelor şi a folderelor. .....................................................................................2-7
Restaurarea sistemului .............................................................................................................2-10
Protejarea computerului ..........................................................................................................2-11
Obţinerea de Ajutor şi asistenţă Windows® ......................................................................2-15
Capitolul 3 Conectarea dispozitivelor la computer
Conectarea unui dispozitiv de stocare USB ........................................................................3-1
Conectarea microfonului şi a difuzoarelor .......................................................................... 3-2
Conectarea mai multor monitoare externe ........................................................................ 3-5
Conectarea unui televizor de înaltă deniţie .....................................................................3-7
Capitolul 4 Utilizarea computerului
Poziţia corectă a corpului în timpul utilizării PC-ului desktop .....................................4-1
Utilizarea cititorului de carduri de memorie ......................................................................4-2
Utilizarea unităţii optice ............................................................................................................. 4-3
Utilizarea tastaturii multimedia (numai la anumite modele) .......................................4-4
Română
Capitolul 5 Conectarea la Internet
Conexiune prin cablu .................................................................................................................. 5-1
Conexiunea wireless (numai pentru anumite modele) .................................................. 5-3
iii
Page 88

Română
Cuprins
Capitolul 6 Folosirea utilitarelor
Română
ASUS AI Suite II ..............................................................................................................................6-1
ASUS AI Manager........................................................................................................................6-10
Nero 9 ..........................................................................................................................................6-15
Recuperarea sistemului ............................................................................................................6-19
Capitolul 7 Depanarea
Depanarea ......................................................................................................................................7-1
iv
Page 89

Română
Note
REACH
Pentru a ne conforma cadrului normativ REACH (Registration, Evaluation, Authorisation, and
Restriction of Chemicals), am publicat lista de substanţe chimice din produsele noastre pe site-ul
Web ASUS REACH la adresa http://green.asus.com/english/REACH.htm.
Declaraţia Comisiei federale de comunicaţii
Acest dispozitiv este în conformitate cu Partea 15 a Regulilor FCC. Funcţionarea este supusă
următoarelor două condiţii:
• Acest dispozitiv nu poate cauza interferenţe dăunătoare;
• Acest dispozitiv trebuie să accepte orice interferenţă primită, inclusiv interferenţele care pot
cauza funcţionarea nedorită.
Acest dispozitiv a fost testat şi s-a constatat că se încadrează în limitele pentru un dispozitiv digital
din Clasa B, în conformitate cu Partea 15 a Regulilor FCC. Aceste limite sunt create pentru a asigura
protecţie rezonabilă împotriva interferenţei într-o instalaţie rezidenţială. Acest dispozitiv generează,
utilizează şi poate radia energie cu frecvenţă radio şi, dacă nu este instalat şi utilizat în conformitate
cu instrucţiunile producătorului, poate produce interferenţe dăunătoare comunicaţiilor radio. Cu
toate acestea, nu există nicio garanţie că nu vor apărea interferenţe în anumite instalaţii. Dacă acest
dispozitiv produce interferenţe dăunătoare recepţiei radio sau TV, care pot determinate prin
oprirea şi pornirea dispozitivului, utilizatorul este încurajat să încerce să corecteze interferenţele
printr-una sau mai multe dintre măsurile următoare:
• Reorientaţi sau reamplasaţi antena receptoare.
• Măriţi distanţa dintre dispozitiv şi receptor.
• Conectaţi dispozitivul la o priză dintr-un circuit diferit de cel la care este conectat receptorul.
• Cereţi sfatul distribuitorului sau al unui tehnician radio/TV experimentat.
Română
Pentru a se asigura conformarea la reglementările FCC, monitorul trebuie conectat la placa gracă
printr-un cablu ecranat. Orice modicări sau înlocuiri care nu sunt expres aprobate de către
partea responsabilă pentru conformitate pot anula autoritatea utilizatorului de a folosi acest
dispozitiv.
v
Page 90

Română
Avertizare privind expunerea la emisii în RF
Acest echipament trebuie instalat şi utilizat în conformitate cu instrucţiunile furnizate, iar antena
Română
utilizată pentru acest transmiţător trebuie instalată astfel încât să asigure o separare de cel puţin
20 cm faţă de persoane şi nu trebuie să e amplasată sau să funcţioneze împreună cu altă antenă
sau cu alt transmiţător. Utilizatorilor nali şi persoanelor care efectuează instalarea trebuie să li se
ofere instrucţiuni privind instalarea antenei şi condiţiile de funcţionare a transmiţătorului pentru
asigurarea conformităţii cu expunerea la RF.
Declaraţie a Departamentului de Comunicaţii din Canada
Acest aparat digital nu depăşeşte limitele Clasei B privind emisiile de zgomot radioelectric produse
de aparate digitale denite în Reglementările privind interferenţa radio ale Departamentului de
Comunicaţii din Canada.
Acest aparat digital din Clasa B este în conformitate cu reglementarea canadiană ICES-003.
Notă privind produsele Macrovision Corporation
Acest produs încorporează tehnologii cu drepturi de autor care sunt protejate prin revendicări de
metodă din anumite brevete din S.U.A. şi de alte drepturi de proprietate intelectuală deţinute de
Macrovision Corporation şi de alţi proprietari de drepturi. Utilizarea acestor tehnologii protejate
prin drepturi de autor trebuie autorizată de către Macrovision Corporation şi este destinată exclusiv
mediului rezidenţial şi altor scopuri de vizionare limitate, cu excepţia cazului în care Macrovision
Corporation permite o altfel de autorizare. Ingineria inversă sau dezasamblarea este interzisă.
Avertisment privind bateria cu litiu-ion
ATENŢIE: Pericol de explozie în cazul în care bateria este incorect înlocuită. Înlocuiţi numai
cu acelaşi tip de baterie sau un tip echivalent, recomandat de producător. Casaţi bateriile
uzate în conformitate cu instrucţiunile producătorului.
vi
Page 91

Română
Informaţii pentru utilizarea în condiţii de siguranţă
Deconectaţi alimentarea c.a. şi echipamentele periferice înainte de curăţare. Ştergeţi PC-ul
desktop cu un burete din celuloză curat sau cu piele de căprioară îmbibată într-o soluţie
neabrazivă de curăţare şi câteva picături de apă caldă şi îndepărtaţi umezeala în exces cu o cârpă
uscată.
• NU aşezaţi produsul pe suprafeţe de lucru neregulate sau instabile. În cazul în care carcasa s-a
deteriorat, solicitaţi operaţii de service.
• NU expuneţi produsul în medii murdare sau cu praf. NU utilizaţi produsul în timpul unei
scurgeri de gaze.
• NU aşezaţi şi nu scăpaţi obiecte pe suprafaţa PC-ului desktop şi nu introduceţi obiecte străine
în acesta.
• NU expuneţi PC-ul desktop la câmpuri magnetice sau electrice puternice.
• NU expuneţi PC-ul desktop la lichide, la ploaie sau la umezeală. NU utilizaţi PC-ul desktop în
timpul furtunilor cu descărcări electrice.
• Avertizări de siguranţă privind bateria: NU aruncaţi bateria în foc. NU scurtcircuitaţi contactele.
NU dezasamblaţi bateria.
• Utilizaţi PC-ul desktop în medii cu temperatura ambiantă cuprinsă între 0 ˚C (32 ˚F) şi 35 ˚C
(95 ˚F).
• NU acoperiţi fantele de ventilaţie ale PC-ului desktop pentru a preveni supraîncălzirea
sistemului.
• NU utilizaţi cabluri de alimentare, accesorii sau echipamente periferice deteriorate.
•
Pentru a preveni pericolul de electrocutare, deconectaţi cablul de alimentare de la priza
electrică înainte de reamplasarea sistemului.
•
Solicitaţi asistenţă tehnică înainte de a utiliza adaptoare sau cabluri prelungitoare. Aceste
echipamente pot întrerupe circuitul de punere la pământ.
•
Asiguraţi-vă că sursa de alimentare este setată la tensiunea locală de alimentare. Dacă nu ştiţi
cu siguranţă care este tensiunea prizei electrice pe care o utilizaţi, contactaţi compania locală
de electricitate.
•
Dacă sursa de alimentare se defectează, nu încercaţi să o reparaţi singur. Contactaţi un
tehnician de service calicat sau distribuitorul local.
Română
vii
Page 92

Română
Convenţii utilizate în acest ghid
Pentru a vă asigura că efectuaţi corespunzător anumite activităţi, luaţi în considerare următoarele
simboluri utilizate în acest manual.
Română
PERICOL/AVERTISMENT: Informaţii care au rolul să prevină rănirea dvs. atunci când
încercaţi să efectuaţi o activitate.
ATENŢIE: Informaţii care au rolul să prevină defectarea componentelor atunci când
încercaţi să efectuaţi o activitate.
IMPORTANT: Instrucţiuni pe care TREBUIE să le urmaţi pentru a efectua o activitate.
NOTĂ: Sfaturi şi informaţii suplimentare care să vă ajute să efectuaţi o activitate.
Unde puteţi găsi informaţii suplimentare
Consultaţi următoarele surse pentru informaţii suplimentare şi pentru actualizări de produse şi
software-uri.
Site-urile Web ASUS
Site-urile Web ASUS oferă informaţii actualizate despre produsele hardware şi software ASUS.
Consultaţi site-ul Web ASUS www.asus.com.
Asistenţă tehnică locală ASUS
Vizitaţi site-ul Web ASUS de la adresa http://support.asus.com/contact pentru informaţii
privind contactarea inginerilor de asistenţă tehnică din regiunea dvs.
viii
Page 93

Română
In
stalla
tion
Guide
Conţinutul ambalajului
PC desktop ASUS Essentio Tastatură x 1 Mouse x 1
Română
Cablu de alimentare x 1 DVD software de
Ghid de instalare x 1
inscripţionare Nero 9 x 1
Certicat de garanţie x 1 Antenă (opţional) x 2
• Dacă vreunul dintre articolele de mai sus este defect sau lipseşte, contactaţi distribuitorul.
• Articolele ilustrate de mai sus sunt doar orientative. Este posibil ca specicaţiile reale ale
produsului să difere de la un model la altul.
ix
Page 94

Română
x
Page 95

Capitolul 1
Noţiuni de bază
Bun venit!
Vă mulţumim că aţi achiziţionat PC-ul desktop ASUS Essentio CM6650!
PC-ul desktop ASUS Essentio CM6650 asigură performanţe înalte, abilitate excelentă şi utilitare
centrate pe utilizator. Toate aceste elemente valoroase sunt încorporate într-o carcasă futuristă şi
elegantă.
Înainte de a congura PC-ul desktop ASUS, citiţi Certicatul de garanţie ASUS.
Cunoaşterea computerului
Ilustraţiile au doar rol exemplicativ. Porturile, amplasarea lor şi culoarea şasiului variază în funcţie
de model.
Panoul frontal
2
10
1
9
8
7
3
4
6
ASUS CM6650 1-1
5
Faceţi clic pe numere
pentru a vedea descrierile
corespunzătoare.
Page 96

Română
1. Porturi USB 2.0. Aceste porturi Universal Serial Bus 2.0 (USB 2.0) se utilizează pentru
conectarea dispozitivelor USB 2.0 — mouse, imprimantă, scaner, cameră foto/video, PDA etc.
Română
2. Port pentru microfon (roz). Acest port se utilizează pentru conectarea unui microfon.
3. Port pentru cască (verde). Acest port se utilizează pentru conectarea unor căşti sau a unui
difuzor.
4. Buton de alimentare. Apăsaţi pe acest buton pentru a porni computerul.
5. Buton de ejectare al unităţii de disc optic. Apăsaţi pe acest buton pentru a ejecta sertarul
unităţii de disc optic.
6. Bay (gol) pentru unitate de disc optic. Vă permite să instalaţi o unitate de disc optic
suplimentară.
7. Bay pentru unitatea de disc optic instalată. În acest bay există o unitate de disc optic.
8. Slot pentru card Memory Stick™/Memory Stick Pro™. În acest slot puteţi introduce un card
Memory Stick™/Memory Stick Pro™.
9. Slot pentru card Secure Digital™/MultiMediaCard. În acest slot puteţi introduce un card
Secure Digital™/MultiMediaCard.
10. Slot pentru card CompactFlash®/Microdrive™. În acest slot puteţi introduce un card
CompactFlash®/Microdrive™.
Panoul din spate
1
2
3
5
7
8
10
11
14
13 17
21
16
15
1-2 Capitolul 1: Noţiuni de bază
18
4
6
9
12
19
20
Faceţi clic pe numere
pentru a vedea descrierile
corespunzătoare.
Page 97

Română
1. Conector de alimentare. Utilizaţi acest conector pentru a conecta cablul de alimentare.
2. Întrerupător de alimentare. Utilizaţi acest întrerupător pentru a PORNI/OPRI alimentarea
computerului.
3. Fante de ventilaţie. Aceste fante permit ventilarea cu aer.
NU BLOCAŢI fantele de ventilaţie de pe şasiu. Asiguraţi întotdeauna o ventilare corespunzătoare
a computerului.
4. Port combinat pentru tastatură/mouse PS/2 (mov). Utilizaţi acest port pentru a conecta o
tastatură sau un mouse PS/2.
5. Porturi USB 2.0. Aceste porturi Universal Serial Bus 2.0 (USB 2.0) se utilizează pentru
conectarea dispozitivelor USB 2.0 — mouse, imprimantă, scaner, cameră foto/video, PDA etc.
6. Port pentru ieşire optică S/PDIF_OUT. Utilizaţi acest port pentru a conecta un dispozitiv de
ieşire audio extern printr-un cablu optic S/PDIF.
7. Port HDMI. Acest port este pentru un conector High-Denition Multimedia Interface (HDMI)
şi este compatibil HDCP, permiţând redarea de discuri HD DVD sau Blu-ray şi a altor suporturi
de conţinut protejat.
8. Port DVI-D. Acest port este pentru orice dispozitiv compatibil DVI-D şi HDCP, permiţând
redarea de discuri HD DVD sau Blu-ray şi a altor suporturi de conţinut protejat.
9. Port VGA. Utilizaţi acest port pentru a conecta un dispozitiv compatibil VGA, de exemplu un
monitor VGA.
10. Porturi USB 3.0. Aceste porturi Universal Serial Bus 3.0 (USB 3.0) se utilizează pentru
conectarea dispozitivelor USB 3.0 — mouse, imprimantă, scaner, cameră foto/video, PDA etc.
• NU CONECTAŢI o tastatură sau un mouse la niciunul dintre porturile USB 3.0 atunci când
instalaţi un sistem de operare Windows®.
• Datorită limitărilor controlerului USB 3.0, se pot utiliza dispozitive USB 3.0 numai sub sisteme
de operare Windows® — după instalarea driverului USB 3.0.
• Se pot utiliza numai dispozitive USB 3.0 de stocare a datelor.
• Vă recomandăm insistent să conectaţi dispozitive USB 3.0 la porturile USB 3.0 pentru o
funcţionare mai rapidă şi mai bună a dispozitivelor USB 3.0.
Română
11. Porturi USB 2.0. Aceste porturi Universal Serial Bus 2.0 (USB 2.0) se utilizează pentru
conectarea dispozitivelor USB 2.0 — mouse, imprimantă, scaner, cameră foto/video, PDA etc.
12. Port LAN (RJ-45). Acest port permite o conexiune Gigabit la o reţea Local Area Network
(LAN) prin intermediul unui hub de reţea.
Indicaţiile LED-urilor portului LAN
LED activitate/conexiune LED viteză
Stare Descriere Stare Descriere
STINS Absenţă
PORTOCALIU Conexiune
APRINDERE
INTERMITENTĂ
ASUS CM6650 1-3
conexiune
prezentă
Activitate de date VERDE Conexiune de 1 Gbps
STINS Conexiune de 10 Mbps
PORTOCALIU Conexiune de 100 Mbps
LED ACT/
CONEX
LED
VITEZĂ
Portul LAN
Page 98

Română
13. Port Ieşire difuzor spate (negru). Acest port este pentru conectarea difuzoarelor din spate
într-o conguraţie audio cu 4, 6 sau 8 canale.
Română
14. Port Ieşire difuzor lateral (gri). Acest port este pentru conectarea difuzoarelor laterale într-
o conguraţie audio cu 8 canale.
15. Port pentru microfon (roz). Acest port se utilizează pentru conectarea unui microfon.
16. Port Ieşire linie (verde). Acest port se utilizează pentru conectarea unor căşti sau a unui
difuzor. Într-o conguraţie cu 4, 6 sau
8 canale, funcţia acestui port este Ieşire difuzor frontal.
17. Port Difuzor central/Subwoofer (portocaliu). Acest port este pentru conectarea
difuzorului central sau a subwooferului.
18. Port Intrare linie (albastru deschis). Acest port este pentru conectarea unui player cu
bandă, a unui CD/DVD player sau a altei surse audio.
Pentru funcţiile porturilor audio într-o conguraţie cu 2, 4, 6 sau 8 canale, consultaţi tabelul de
mai jos.
Conguraţia audio pentru 2, 4, 6 sau 8 canale
Port
Albastru
deschis
Verde Ieşire linie Ieşire difuzor frontal Ieşire difuzor frontal Ieşire difuzor frontal
Roz
Portocaliu – – Centru/Subwoofer Centru/Subwoofer
Negru – Ieşire difuzor spate Ieşire difuzor spate Ieşire difuzor spate
Gri – – – Ieşire difuzor lateral
Căşti
2 canale
Intrare linie Intrare linie Intrare linie Intrare linie
Intrare
microfon
4 canale 6 canale 8 canale
Intrare microfon Intrare microfon Intrare microfon
19. Placă gracă ASUS (numai la anumite modele). Porturile de ieşire pentru aşare de pe
această placă gracă ASUS opţională pot diferi în funcţie de model.
20. Placă WLAN ASUS (numai la anumite modele). Această placă WLAN opţională vă permite
să conectaţi computerul la o reţea wireless.
21. Capac pentru slot de extindere. Îndepărtaţi capacul slotului de extindere atunci când
instalaţi o placă de extindere.
1-4 Capitolul 1: Noţiuni de bază
Page 99

Română
Congurarea computerului
Această secţiune conţine indicaţii privind conectarea la computer a principalelor dispozitive
hardware: monitor extern, tastatură, mouse şi cablu de alimentare.
Conectarea unui monitor extern
Utilizarea plăcii grace ASUS (numai la anumite modele)
Conectaţi monitorul la portul de ieşire de aşare al plăcii grace ASUS separate.
Pentru a conecta un monitor extern utilizând placa gracă ASUS:
1. Conectaţi monitorul la un port de ieşire pentru aşare al plăcii grace ASUS separate.
2. Conectaţi monitorul la o sursă de alimentare.
Porturile de ieşire pentru aşare de pe placa gracă ASUS pot diferi în funcţie de model.
Română
ASUS CM6650 1-5
Page 100

Română
Utilizarea porturilor de ieşire pentru aşare de pe placa de bază
Conectaţi monitorul la portul de ieşire pentru aşare de pe placa de bază.
Română
Pentru a conecta un monitor extern utilizând porturile de ieşire pentru aşare de pe placa de
bază:
1. Conectaţi un monitor VGA la portul VGA sau un monitor DVI-D la portul DVI-D sau un
monitor HDMI la portul HDMI de pe panoul din spate al computerului.
2. Conectaţi monitorul la o sursă de alimentare.
• În cazul în care computerul se livrează cu o placă gracă ASUS, această placă gracă este
setată în BIOS ca dispozitiv de aşare principal. Prin urmare, conectaţi monitorul la un port de
ieşire pentru aşare de pe placa gracă.
• Pentru a conecta la computer mai multe monitoare externe, consultaţi secţiunea Conectarea
mai multor monitoare externe din Capitolul 3 al acestui manual de utilizare.
1-6 Capitolul 1: Noţiuni de bază
 Loading...