

Page 1

Index
English ............................................................................1
Dansk ............................................................................ 71
Suomi ..........................................................................141
Norsk .......................................................................... 211
Svenska ......................................................................281
Page 2

Page 3
ASUS Essentio Desktop PC
CM6340
User Manual
Page 4

ENGLISH
ENGLISH
E7503
First Edition
June 2012
Copyright © 2012 ASUSTeK Computer Inc. All Rights Reserved.
No part of this manual, including the products and software described in it, may be reproduced,
transmitted, transcribed, stored in a retrieval system, or translated into any language in any form or by any
means, except documentation kept by the purchaser for backup purposes, without the express written
permission of ASUSTeK Computer Inc. (“ASUS”).
Product warranty or service will not be extended if: (1) the product is repaired, modied or altered, unless
such repair, modication of alteration is authorized in writing by ASUS; or (2) the serial number of the
product is defaced or missing.
ASUS PROVIDES THIS MANUAL “AS IS” WITHOUT WARRANTY OF ANY KIND, EITHER EXPRESS
OR IMPLIED, INCLUDING BUT NOT LIMITED TO THE IMPLIED WARRANTIES OR CONDITIONS OF
MERCHANTABILITY OR FITNESS FOR A PARTICULAR PURPOSE. IN NO EVENT SHALL ASUS, ITS
DIRECTORS, OFFICERS, EMPLOYEES OR AGENTS BE LIABLE FOR ANY INDIRECT, SPECIAL,
INCIDENTAL, OR CONSEQUENTIAL DAMAGES (INCLUDING DAMAGES FOR LOSS OF PROFITS,
LOSS OF BUSINESS, LOSS OF USE OR DATA, INTERRUPTION OF BUSINESS AND THE LIKE),
EVEN IF ASUS HAS BEEN ADVISED OF THE POSSIBILITY OF SUCH DAMAGES ARISING FROM ANY
DEFECT OR ERROR IN THIS MANUAL OR PRODUCT.
SPECIFICATIONS AND INFORMATION CONTAINED IN THIS MANUAL ARE FURNISHED FOR
INFORMATIONAL USE ONLY, AND ARE SUBJECT TO CHANGE AT ANY TIME WITHOUT NOTICE,
AND SHOULD NOT BE CONSTRUED AS A COMMITMENT BY ASUS. ASUS ASSUMES NO
RESPONSIBILITY OR LIABILITY FOR ANY ERRORS OR INACCURACIES THAT MAY APPEAR IN THIS
MANUAL, INCLUDING THE PRODUCTS AND SOFTWARE DESCRIBED IN IT.
Products and corporate names appearing in this manual may or may not be registered trademarks or
copyrights of their respective companies, and are used only for identication or explanation and to the
owners’ benet, without intent to infringe.
2
Page 5

ENGLISH
Contents
Notices .......................................................................................................... 5
Safety information ........................................................................................ 10
Conventions used in this guide .....................................................................11
Where to nd more information ....................................................................11
Package contents ........................................................................................ 12
Chapter 1: Getting started
Welcome! ..................................................................................................... 13
Getting to know your computer .................................................................... 13
Setting up your computer ............................................................................. 16
Turning your computer ON/OFF .................................................................. 19
Chapter 2: Using Windows® 7
Starting for the rst time ............................................................................... 21
Using Windows® 7 desktop .......................................................................... 22
Managing your les and folders ................................................................... 24
Restoring your system settings .................................................................... 26
Protecting your computer ............................................................................. 27
Getting Windows® Help and Support ........................................................... 28
Chapter 3: Connecting devices to your computer
Connecting a USB storage device ............................................................... 29
Connecting microphone and speakers ........................................................ 30
Connecting multiple external displays ......................................................... 33
Connecting an HDTV ................................................................................... 35
ENGLISH
Chapter 4: Using your computer
Proper posture when using your Desktop PC.............................................. 37
Using the memory card reader .................................................................... 38
Using the optical drive ................................................................................. 39
Using the multimedia keyboard (on selected models only) ......................... 40
Chapter 5: Connecting to the Internet
Wired connection ......................................................................................... 43
Wireless connection (on selected models only) ........................................... 45
3
Page 6

ENGLISH
Contents
ENGLISH
Chapter 6: Using the utilities
ASUS AI Suite II ........................................................................................... 47
ASUS AI Manager ........................................................................................ 53
Ai Charger .................................................................................................... 55
ASUS Webstorage ....................................................................................... 56
ASUS Easy Update ..................................................................................... 58
ASUS Instant On ......................................................................................... 59
Nero 9 ........................................................................................................
Recovering your system .............................................................................. 61
60
Chapter 7: Troubleshooting
Troubleshooting ........................................................................................... 63
ASUS contact information ............................................................................ 70
4
Page 7

ENGLISH
Notices
REACH
Complying with the REACH (Registration, Evaluation, Authorisation, and Restriction of
Chemicals) regulatory framework, we published the chemical substances in our products at
ASUS REACH website at http://csr.asus.com/english/REACH.htm
ASUS Recycling/Takeback Services
ASUS recycling and takeback programs come from our commitment to the highest standards
for protecting our environment. We believe in providing solutions for you to be able to
responsibly recycle our products, batteries, other components as well as the packaging
materials. Please go to http://csr.asus.com/english/Takeback.htm for detailed recycling
information in different regions.
Federal Communications Commission Statement
This device complies with FCC Rules Part 15. Operation is subject to the following two
conditions:
• This device may not cause harmful interference.
• This device must accept any interference received, including interference that may cause
undesired operation.
This equipment has been tested and found to comply with the limits for a class B digital
device, pursuant to Part 15 of the Federal Communications Commission (FCC) rules.
These limits are designed to provide reasonable protection against harmful interference in
a residential installation. This equipment generates, uses, and can radiate radio frequency
energy and, if not installed and used in accordance with the instructions, may cause harmful
interference to radio communications. However, there is no guarantee that interference
will not occur in a particular installation. If this equipment does cause harmful interference
to radio or television reception, which can be determined by turning the equipment off and
on, the user is encouraged to try to correct the interference by one or more of the following
measures:
• Reorient or relocate the receiving antenna.
• Increase the separation between the equipment and receiver.
• Connect the equipment into an outlet on a circuit different from that to which the receiver
is connected.
• Consult the dealer or an experienced radio/TV technician for help.
ENGLISH
The use of a shielded-type power cord is required in order to meet FCC emission limits and
to prevent interference to the nearby radio and television reception. It is essential that only
the supplied power cord be used. Use only shielded cables to connect I/O devices to this
equipment. You are cautioned that changes or modications not expressly approved by the
party responsible for compliance could void your authority to operate the equipment.
(Reprinted from the Code of Federal Regulations #47, part 15.193, 1993. Washington
DC: Ofce of the Federal Register, National Archives and Records Administration, U.S.
Government Printing Ofce.)
5
Page 8

ENGLISH
ENGLISH
FCC Radio Frequency (RF) Exposure Caution Statement
Any changes or modications not expressly approved by the party responsible for
compliance could void the user’s authority to operate this equipment. “The manufacture
declares that this device is limited to Channels 1 through 11 in the 2.4GHz frequency by
specied rmware controlled in the USA.”
This equipment complies with FCC radiation exposure limits set forth for an uncontrolled
environment. To maintain compliance with FCC RF exposure compliance requirements,
please avoid direct contact to the transmitting antenna during transmitting. End users must
follow the specic operating instructions for satisfying RF exposure compliance.
IC Radiation Exposure Statement for Canada
This equipment complies with IC radiation exposure limits set forth for an uncontrolled
environment. To maintain compliance with IC RF exposure compliance requirements, please
avoid direct contact to the transmitting antenna during transmitting. End users must follow the
specic operating instructions for satisfying RF exposure compliance.
Operation is subject to the following two conditions:
• This device may not cause interference and
• This device must accept any interference, including interference that may cause
undesired operation of the device.
To prevent radio interference to the licensed service (i.e. co-channel Mobile Satellite systems)
this device is intended to be operated indoors and away from windows to provide maximum
shielding. Equipment (or its transmit antenna) that is installed outdoors is subject to licensing.
Déclaration d'Industrie Canada relative à l’exposition aux ondes radio
Cet appareil est conforme aux limites d'exposition aux radiations d’Industrie Canada dénies
pour un environnement non-contrôlé. Pour maintenir la conformité avec les exigences
d'exposition RF IC, veuillez éviter tout contact direct avec l'antenne pendant l'émission. Les
utilisateurs naux doivent suivre les instructions de fonctionnement spéciques pour satisfaire la
conformité aux expositions RF.
Son utilisation est sujette aux deux conditions suivantes :
• Cet appareil ne peut pas causer d'interférence, et
• Cet appareil doit accepter toute interférence, y compris les interférences qui pourraient
causer un fonctionnement non souhaité de l'appareil.
Pour éviter les interférences radio avec le service sous licence (c'est à-dire le partage de
canal avec les systèmes de téléphonie satellite), cet appareil est destiné à être utilisé en
intérieur et loin des fenêtres pour fournir un blindage maximal. Tout appareil (ou son antenne
d'émission) qui est installé en extérieur est sujet à cette licence.
Wireless Operation Channel for Different Domains
N. America 2.412-2.462 GHz Ch01 through CH11
Japan 2.412-2.484 GHz Ch01 through Ch14
Europe ETSI 2.412-2.472 GHz Ch01 through Ch13
6
Page 9
ENGLISH
CE Mark Warning
CE marking for devices without wireless LAN/Bluetooth
The shipped version of this device complies with the requirements of the EEC directives
2004/108/EC “Electromagnetic compatibility” and 2006/95/EC “Low voltage directive”.
CE marking for devices with wireless LAN/ Bluetooth
This equipment complies with the requirements of Directive 1999/5/EC of the European
Parliament and Commission from 9 March, 1999 governing Radio and Telecommunications
Equipment and mutual recognition of conformity.
This equipment may be operated in all members of the EU. Some areas of France have a
restricted frequency band. This equipment may be used indoor only.
低功率射頻電機設備警語
依據低功率電波輻射性電機管理辦法
第十二條
經型式認證合格之低功率射頻電機,非經許可,公司、商號或使用者均不得擅自
變更頻率、加大功率或變更原設計之特性及功能。
第十四條
低功率射頻電機之使用不得影響飛航安全及乾擾合法通信;經發現有乾擾現象
時,應立即停用,並改善至無干擾時方得繼續使用。
前項合法通信,指依電信法規定作業之無線電通信。
低功率射頻電機須忍受合法通信或工業、科學及醫療用電波輻射性電機設備之干擾。
ENGLISH
與5.25GHz 至5.35GHz 區域內操作之
無線設備的警告申明
工作頻率5.250~5.350GHz 該頻率限於室內使用
VCCI: Japan Compliance Statement
VCCI Class B Statement
7
Page 10
ENGLISH
ENGLISH
KC: Korea Warning Statement
Macrovision Corporation Product Notice
This product incorporates copyright protection technology that is protected by method
claims of certain U.S. patents and other intellectual property rights owned by Macrovision
Corporation and other rights owners. Use of this copyright protection technology must be
authorized by Macrovision Corporation, and is intended for home and other limited viewing
uses only unless otherwise authorized by Macrovision Corporation. Reverse engineering
or disassembly is prohibited.
Lithium-Ion Battery Warning
CAUTION: Danger of explosion if battery is incorrectly replaced. Replace only with the
same or equivalent type recommended by the manufacturer. Dispose of used batteries
according to the manufacturer’s instructions.
8
Page 11

ENGLISH
Safety information
Disconnect the AC power and peripherals before cleaning. Wipe the Desktop PC using a
clean cellulose sponge or chamois cloth dampened with solution of nonabrasive detergent
and a few drops of warm water then remove any extra moisture with a dry cloth.
• DO NOT place on uneven or unstable work surfaces. Seek servicing if the casing has
been damaged.
• DO NOT
• DO NOT
• DO NOT
• DO NOT
• Battery safety warning: DO NOT
• Use this product in environments with ambient temperatures between 0˚C (32F)and
• DO NOT
• DO NOT
•
•
•
•
expose to dirty or dusty environments. DO NOT operate during a gas leak.
place or drop objects on top and do not shove any foreign objects into the
Desktop PC.
expose to strong magnetic or electrical elds.
expose to or use near liquids, rain, or moisture. DO NOT use the modem during
electrical storms.
throw the battery in re. DO NOT short circuit the
contacts. DO NOT disassemble the battery.
35˚C (95F).
cover the vents on the Desktop PC to prevent the system from getting
overheated.
use damaged power cords, accessories, or other peripherals.
To prevent electrical shock hazard, disconnect the power cable from the electrical outlet
before relocating the system.
Seek professional assistance before using an adapter or extension cord. These devices
could interrupt the grounding circuit.
Ensure that your power supply is set to the correct voltage in your area. If you are not
sure about the voltage of the electrical outlet you are using, contact your local power
company.
If the power supply is broken, do not try to x it by yourself. Contact a qualied service
technician or your retailer.
ENGLISH
9
Page 12
ENGLISH
ENGLISH
Conventions used in this guide
To ensure that you perform certain tasks properly, take note of the following symbols used
throughout this manual.
DANGER/WARNING: Information to prevent injury to yourself
when trying to complete a task.
CAUTION: Information to prevent damage to the components
when trying to complete a task.
IMPORTANT: Instructions that you MUST follow to complete a
task.
NOTE: Tips and additional information to help you complete a
task.
Where to nd more information
Refer to the following sources for additional information and for product and software
updates.
ASUS websites
The ASUS website provides updated information on ASUS hardware and software
products. Refer to the ASUS website www.asus.com.
ASUS Local Technical Support
Visit ASUS website at
local Technical Support Engineer.
http://support.asus.com/contact for the contact information of
10
Page 13
ENGLISH
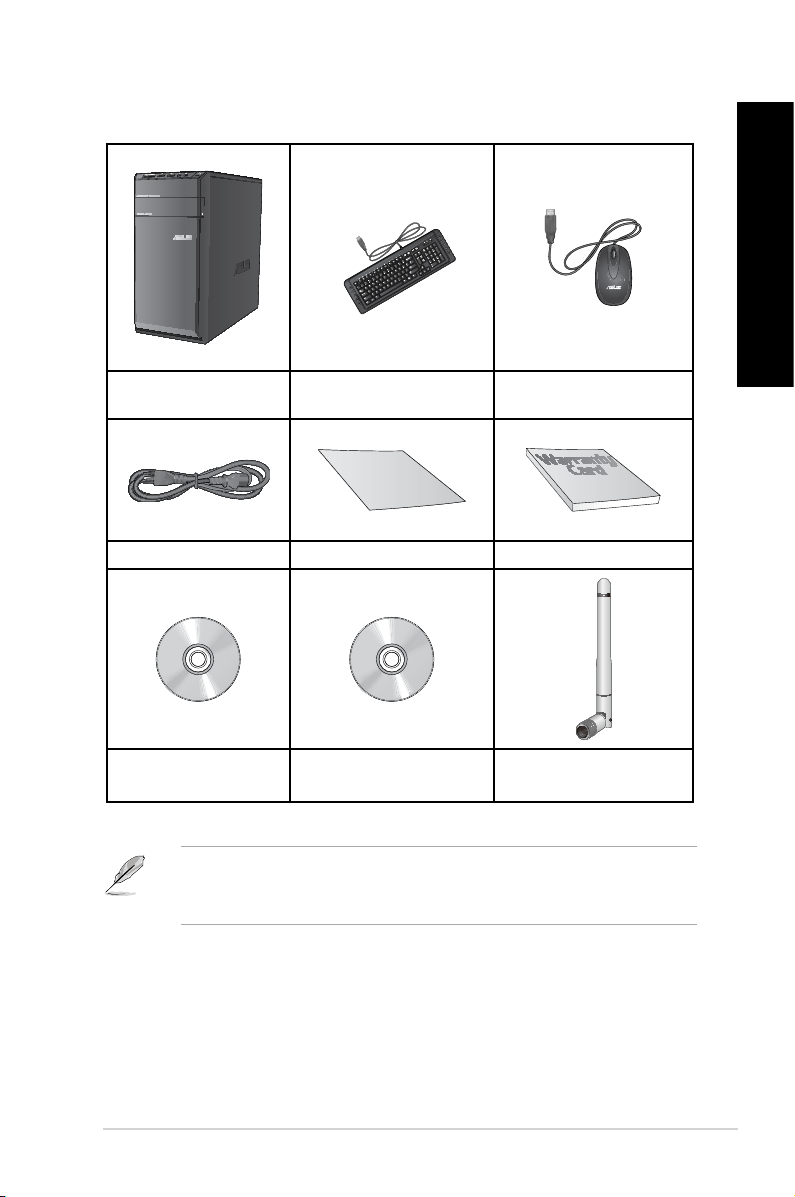
Package contents
Installation Guide
ENGLISH
ASUS Essentio Desktop
PC
Power cord x1 Installation Guide x1 Warranty card x1
Nero 9 burning software
DVD x1
• If any of the above items is damaged or missing, contact your retailer.
• The illustrated items above are for reference only. Actual product specications may vary
with different models.
Keyboard x1 Mouse x1
Support DVD (optional) x1
Recovery DVD (optional) x1
Antenna (optional) x1
11
Page 14

ENGLISH
12
Page 15
Chapter 1
Getting started
Welcome!
Thank you for purchasing the ASUS Essentio CM6340 Desktop PC!
The ASUS Essentio CM6340 Desktop PC provides cutting-edge performance,
uncompromised reliability, and user-centric utilities. All these values are encapsulated in a
stunningly futuristic and stylish system casing.
Read the ASUS Warranty Card before setting up your ASUS Desktop PC.
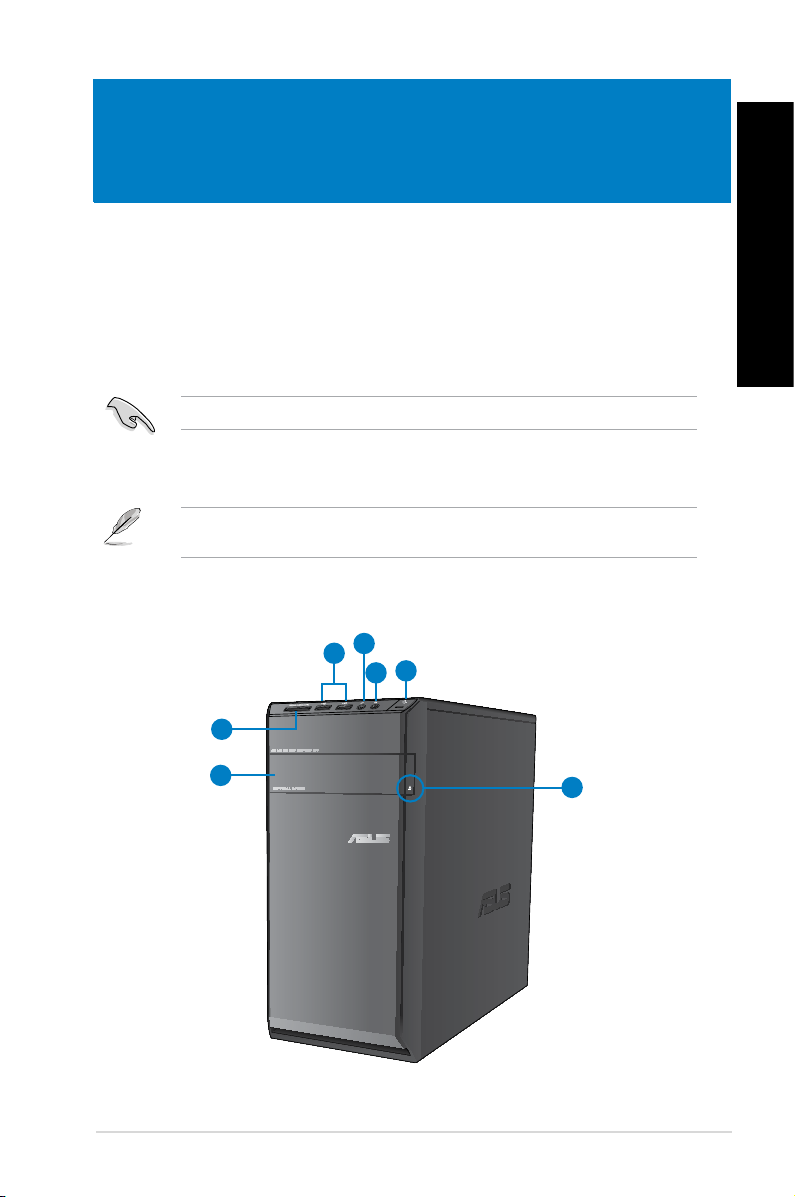
Getting to know your computer
Illustrations are for reference only. The ports and their locations, and the chassis color vary
with different models.
Front panel
2
1
7
6
4
3
5
ENGLISH
ASUS CM6340 13
Page 16
ENGLISH
ENGLISH
1. USB 2.0 ports.USB 2.0 ports. These Universal Serial Bus 2.0 (USB 2.0) ports connect to USB 2.0
devices such as a mouse, printer, scanner, camera, PDA, and others.
2. Microphone port.Microphone port.
3. Headphone port.Headphone port.
4. Power button.Power button.
5. Optical disk drive eject button.Optical disk drive eject button.
6. Optical disk drive bay.Optical disk drive bay.
7. MultiMediaCard(MMC) / xD-Picture (XD) / Secure Digital™ (SD) / High CapacityMultiMediaCard(MMC) / xD-Picture (XD) / Secure Digital™ (SD) / High Capacity
Secure Digital™(SDHC) / Memory Stick Pro™(MS/PRO) card slot.
supported memory card into this slot.
This port connects to a microphone.
This port connects to a headphone or speaker.
Press this button to turn on your computer.
Press this button to eject the optical disk drive tray.
There is an optical disk drive in this bay.
Insert a
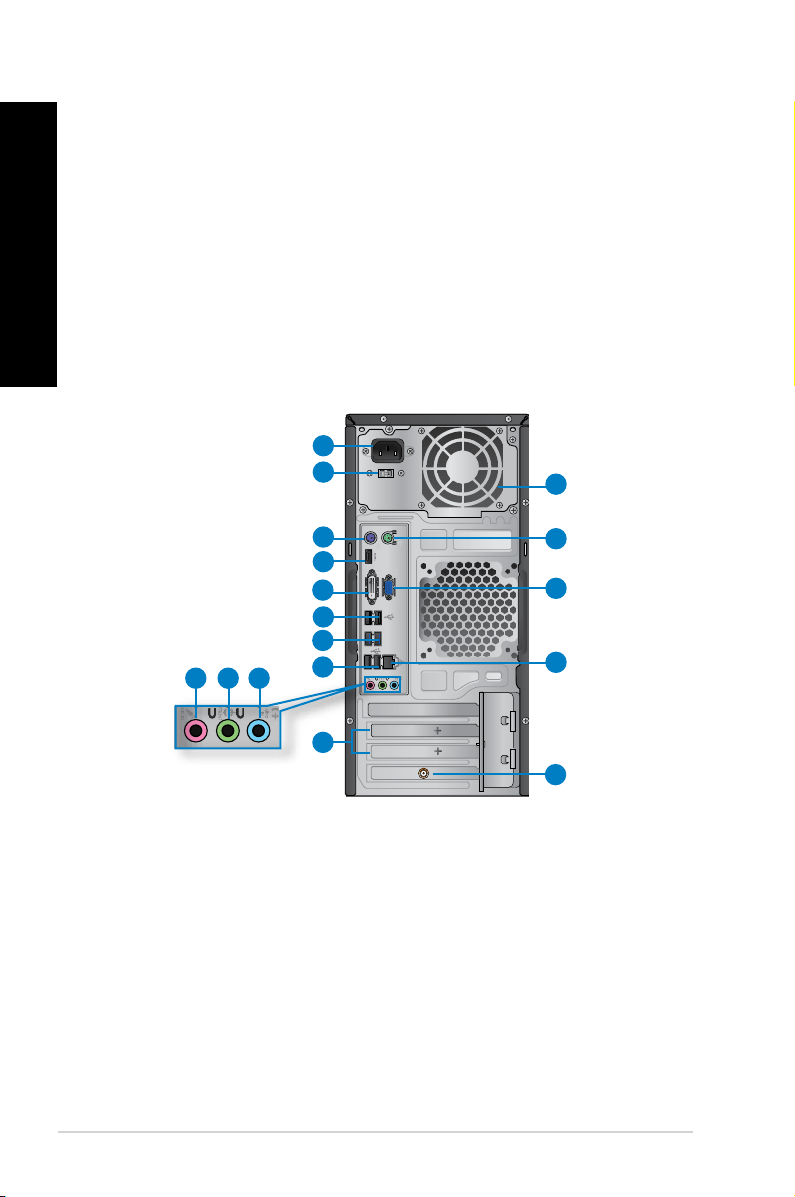
Rear panel
1
2
16
3
4
5
6
7
10 9
1. Power connector.Power connector. Plug the power cord to this connector.
2. Voltage selector switch.Voltage selector switch.
3. PS/2 keyboard port (purple). This port is for a PS/2 keyboard.
4. HDMI port.HDMI port.
and is HDCP compliant allowing playback of HD DVD, Blu-ray, and other protected
content.
5. DVI-D port.DVI-D port.
allowing playback of HD DVD, Blu-ray, and other protected content.
8
This port is for a High-Denition Multimedia Interface (HDMI) connector,
This port is for any DVI-D compatible device and is HDCP compliant
6
11
Switch to select the appropriate system input voltage.
15
14
13
12
14 Chapter 1: Getting started
Page 17
ENGLISH
6. USB 2.0 ports.USB 2.0 ports. These Universal Serial Bus 2.0 (USB 2.0) ports connect to USB 2.0
devices such as a mouse, printer, scanner, camera, PDA, and others.
7. USB 3.0 ports.USB 3.0 ports.
These Universal Serial Bus 3.0 (USB 3.0) ports connect to USB 3.0
devices such as a mouse, printer, scanner, camera, PDA, and others.
• DO NOT connect a keyboard / mouse to any USB 3.0 port when installing Windows
operating system.
• Due to USB 3.0 controller limitation, USB 3.0 devices can only be used under Windows
OS environment and after the USB 3.0 driver installation.
• USB 3.0 devices can only be used as data storage only.
• We strongly recommend that you connect USB 3.0 devices to USB 3.0 ports for faster
and better performance for your USB 3.0 devices.
®
8. Line In port (light blue).Line In port (light blue). This port connects to a tape, CD, DVD player, or other audio
sources.
9. Line Out port (lime).Line Out port (lime).
This port connects to a headphone or speaker. In a 4, 6, or
8-channel conguration, the function of this port becomes Front Speaker Out.
10. Microphone port (pink).
Refer to the audio conguration table below for the function of the audio ports in a 2, 4, 6,
or 8-channel conguration.
This port connects to a microphone.
Audio 2, 4, 6, or 8-channel conguration
Port 2-channel 4-channel 6-channel 8-channel
Light Blue (Rear panel) Line In Rear Speaker Out Rear Speaker Out Rear Speaker Out
Lime (Rear panel) Line Out Front Speaker Out Front Speaker Out Front Speaker Out
Pink (Rear panel) Mic In Mic In Bass/Center Bass/Center
Lime (Front panel) – – – Side Speaker Out
11. Expansion slot brackets.Expansion slot brackets. Remove the expansion slot bracket when installing an
expansion card.
12. ASUS WLAN Card (on selected models only).ASUS WLAN Card (on selected models only).
This optional WLAN card allows your
computer to connect to a wireless network.
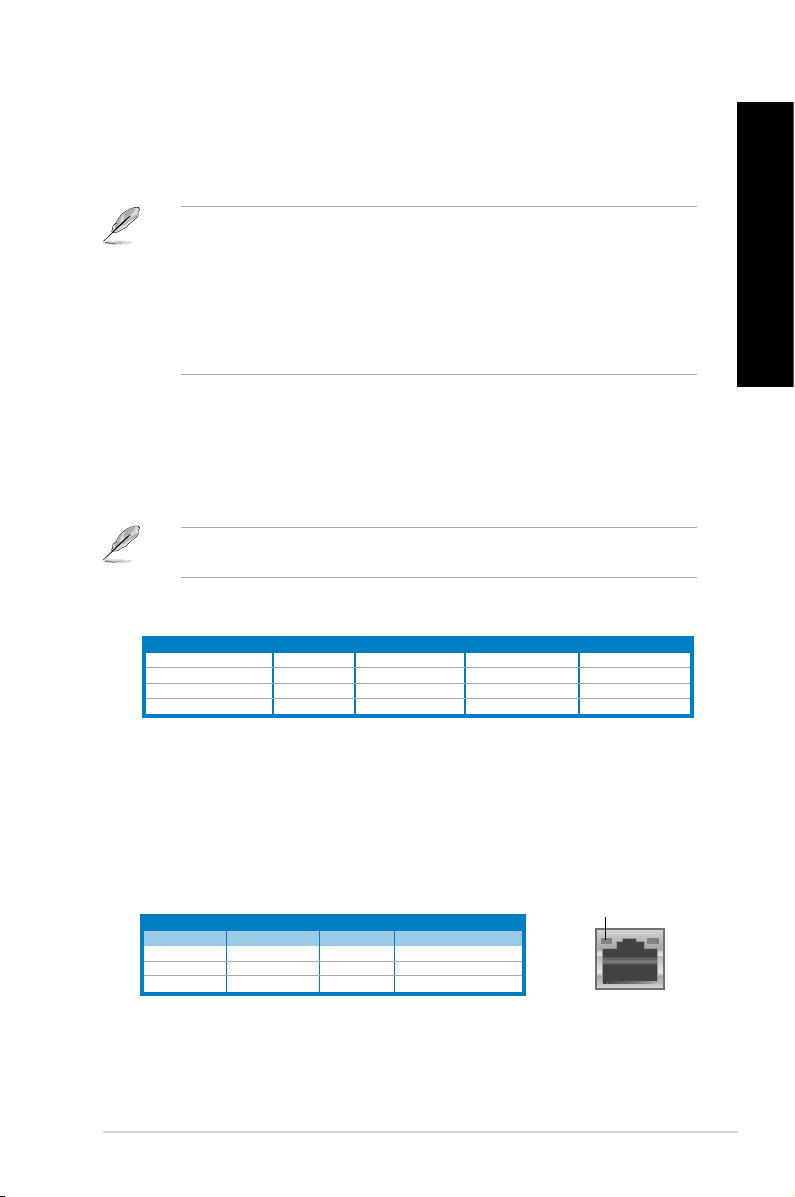
13. LAN (RJ-45) port.LAN (RJ-45) port.
This port allows Gigabit connection to a Local Area Network (LAN)
through a network hub.
LAN port LED indications
Activity/Link LED Speed LED
Status Description Status Description
OFF No link OFF 10Mbps connection
ORANGE Linked ORANGE 100Mbps connection
BLINKING Data activity GREEN 1Gbps connection
ACT/LINK
LED
SPEED
LED
LAN port
®
ENGLISH
ASUS CM6340 15
Page 18
ENGLISH
ENGLISH
14. VGA port.VGA port. This port is for VGA-compatible devices such as a VGA monitor.
15. PS/2 mouse port (green). This port is for a PS/2 mouse.
16. Air vents.Air vents.
These vents allow air ventilation.
DO NOT block the air vents on the chassis. Always provide proper ventilation for your
computer.
Setting up your computer
This section guides you through connecting the main hardware devices, such as the external
monitor, keyboard, mouse, and power cord, to your computer.
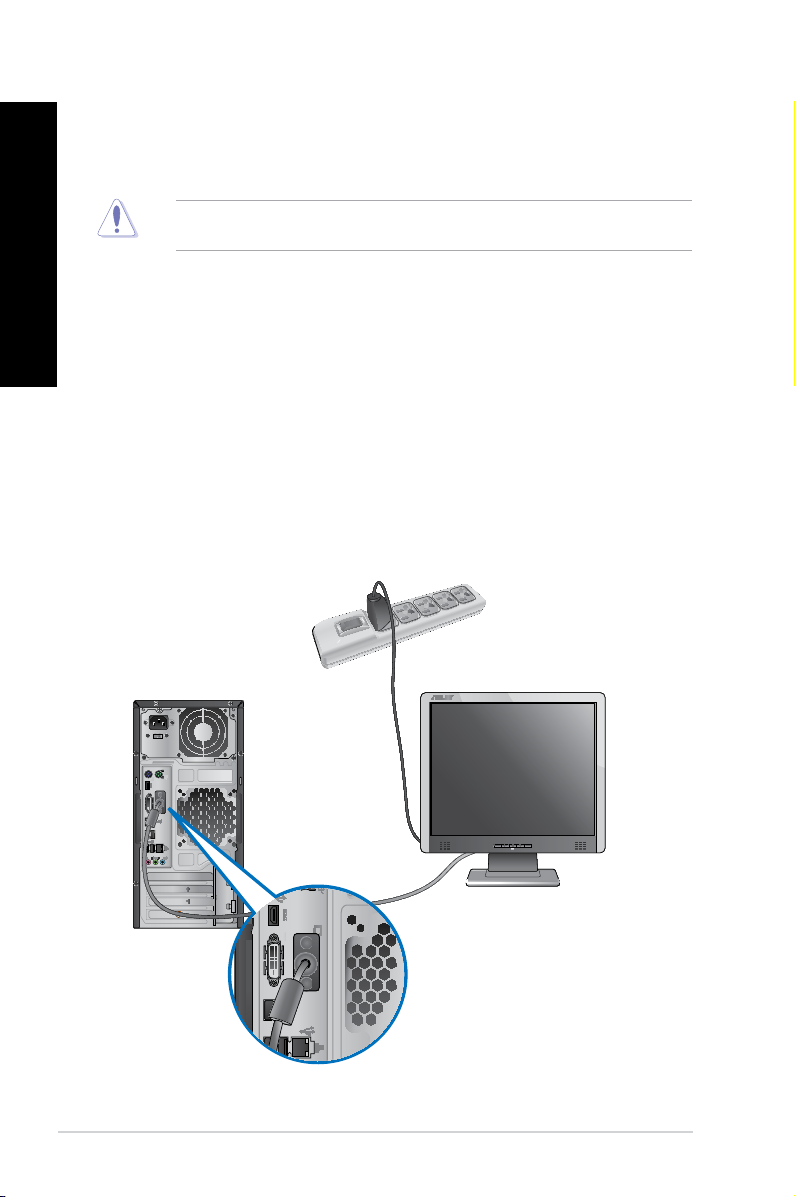
Connecting an external monitor
Using the onboard display output ports
Connect your monitor to the onboard display output port.
To connect an external monitor using the onboard display output ports:
1. Connect a VGA monitor to the VGA port, or a DVI-D monitor to the DVI-D port, or an
HDMI monitor to the HDMI port on the rear panel of your computer.
2. Plug the monitor to a power source.
16 Chapter 1: Getting started
Page 19
ENGLISH
• If your computer comes with an ASUS Graphics Card, the graphics card is set as the
primary display device in the BIOS. Hence, connect your monitor to a display output port
on the graphics card.
• To connect multiple external monitors to your computer, refer to Connecting multiple
external monitors
in Chapter 3 of this user manual for details.
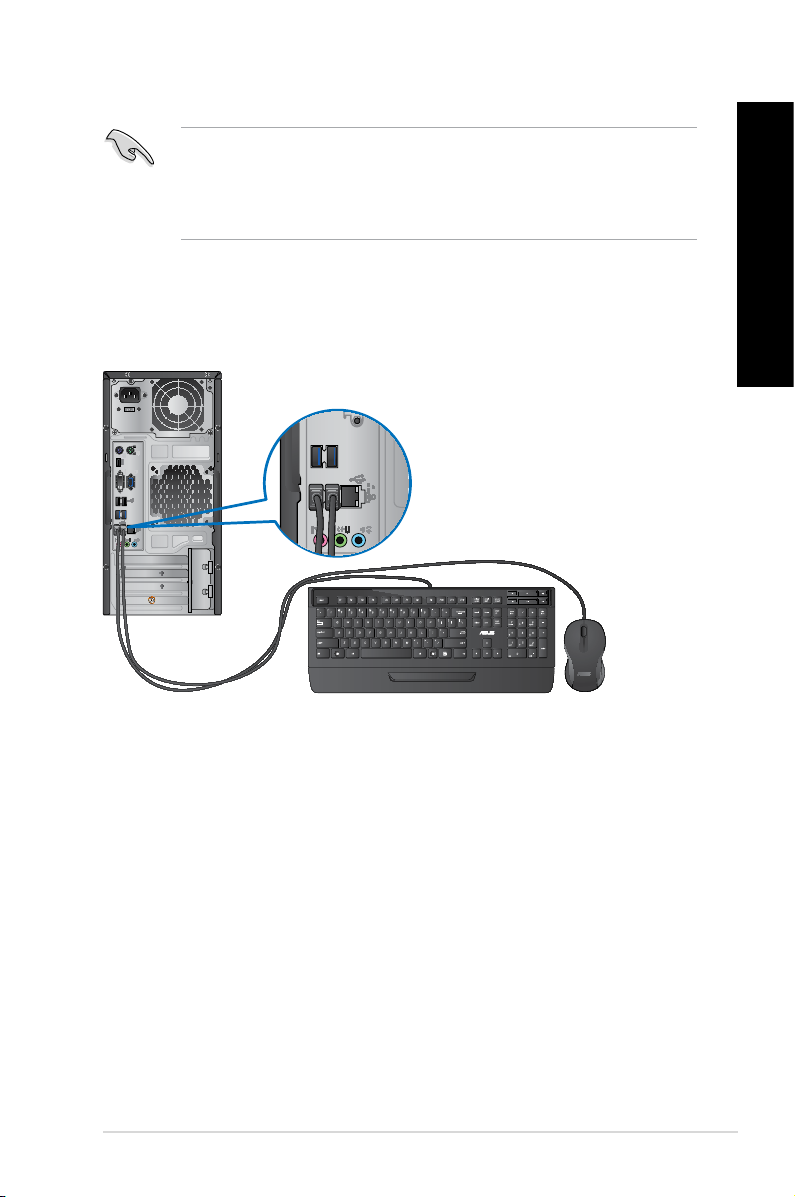
Connecting a USB keyboard and a USB mouse
Connect a USB keyboard and a USB mouse to the USB ports on the rear panel of your
computer.
ENGLISH
ASUS CM6340 17
Page 20
ENGLISH
ENGLISH
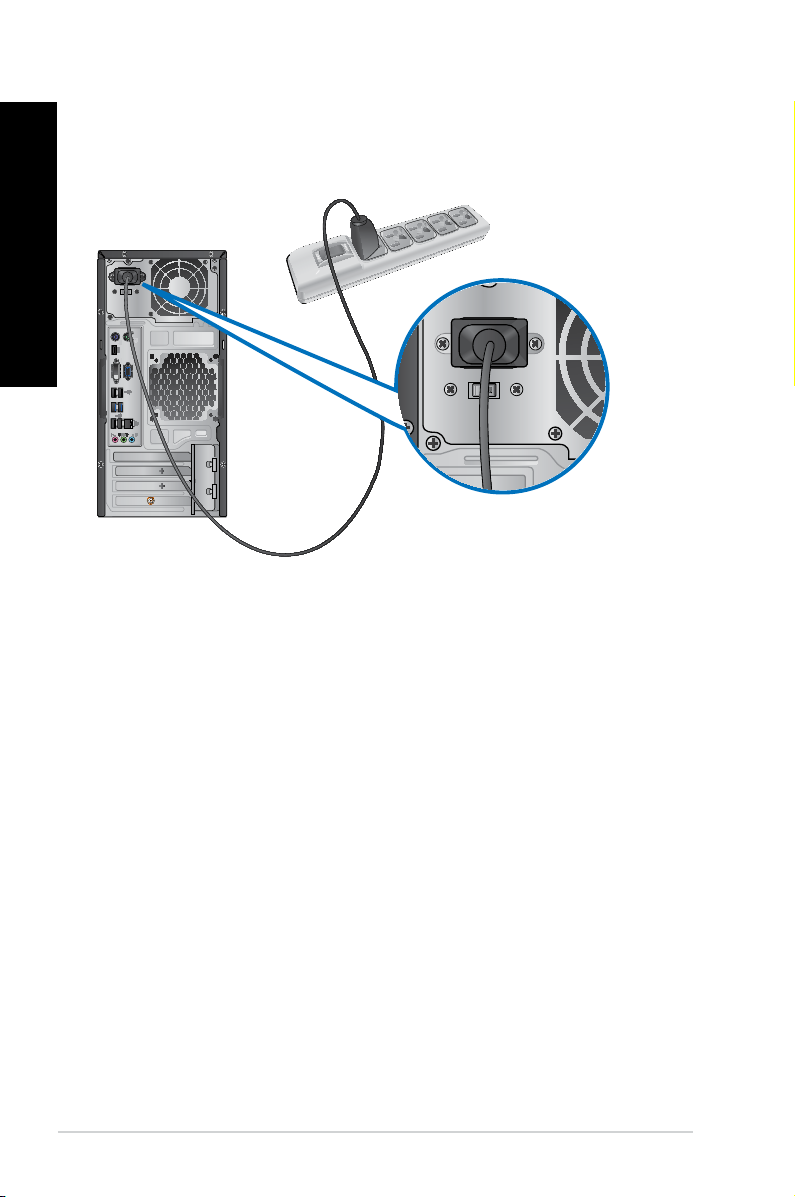
Connecting the power cord
Connect one end of the power cord to the power connector on the rear panel of your
computer and the other end to a power source.
18 Chapter 1: Getting started
Page 21
ENGLISH
Turning your computer ON/OFF
This section describes how to turn on/off your computer after setting up your computer.
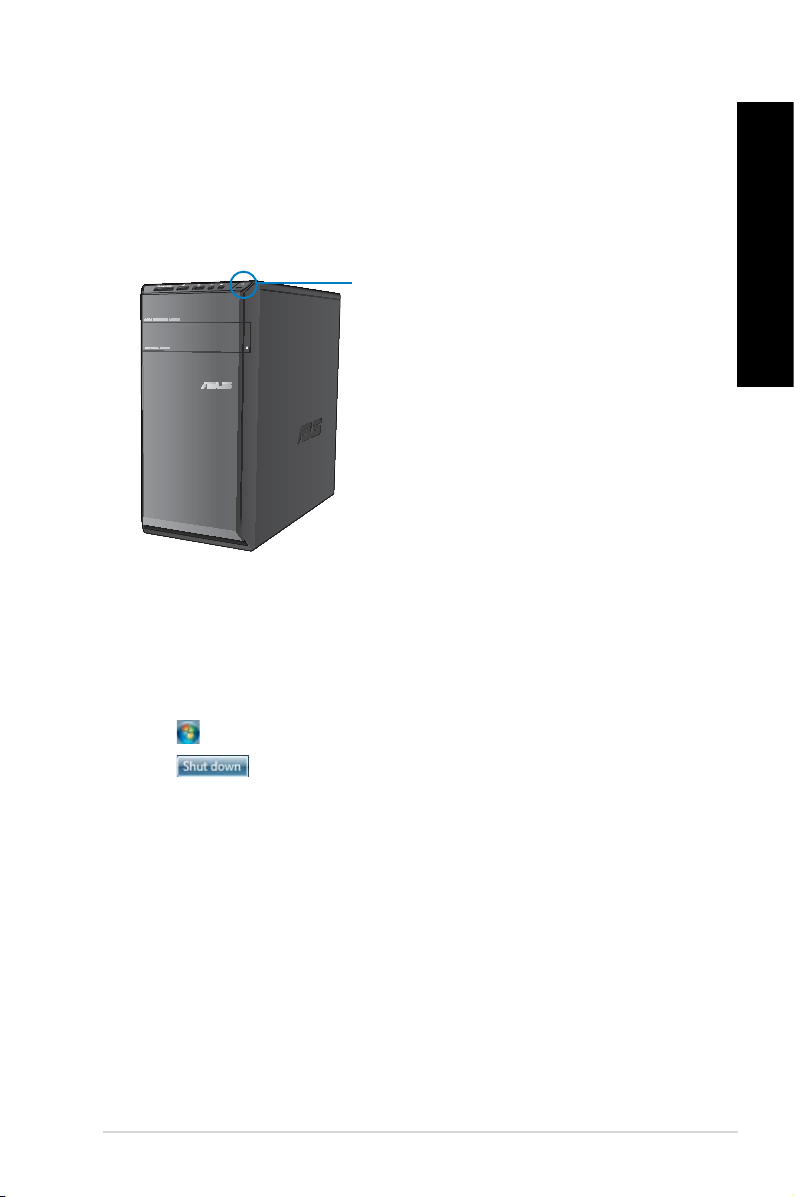
Turning your computer ON
To turn your computer ON:
1. Turn your monitor ON.
2. Press the power button on your computer.
Power button
3. Wait until the operating system loads automatically.
Turning your computer OFF
To turn your computer OFF:
1. Close all running applications.
ENGLISH
2. Click
3. Click
ASUS CM6340 19
on the Windows® desktop.
to shut down the operating system.
Page 22

ENGLISH
20 Chapter 1: Getting started
Page 23

Chapter 2
Using Windows® 7
Starting for the rst time
When you start your computer for the rst time, a series of screens appear to guide you in
conguring the basic settings of your Windows® 7 operating system.
To start for the rst time:
1. Turn your computer on. Wait for a few minutes until the Set Up Windows
appears.
2. From dropdown list, select your language, then click
3. From the dropdown lists, select your Country or region
Keyboard layout, then click Next.
4. Key in uniques names for the user name
5. Key in the necessary information to set up your password, then click
also click Next to skip this step without entering any information.
If you want to set up a password for your account later, refer to the section Setting up a
user account and password in this chapter.
6. Carefully read the license terms. Tick I accept the license terms and click Next.
7. Select Use recommended settings
security settings for your computer. To skip this step, select Ask me later.
8. Review your date and time settings. Click
restarts. You may now start using your computer.
and computer name, then click Next.
or Install important updates only to set up the
Next. The system loads the new settings and
Next.
, Time and currency, and
screen
Next. You may
ENGLISH
ASUS CM6340 21
Page 24
ENGLISH
Using Windows® 7 desktop
ENGLISH
Click the Start icon > Help and Support to obtain more information about Windows® 7.
Using the Start menu
The Start menu gives you access to programs, utilities, and other useful items on your
computer. It also provides you with more information about Windows 7 through its Help and
Support feature.
Launching items from the Start menu
To launch items from the Start menu:
®
1. From the Windows
2. From the Start menu, select the item that you want to launch.
You may pin programs that you want constantly displayed on the Start menu. For more
details, refer to the section Pinning programs on the Start menu or taskbar on this
chapter.
Using the Getting Started item
The Getting Started item on the Start menu contains information about some basic tasks
such as personalizing Windows®, adding new users, and transferring les to help you to
familiarize yourself with using Windows® 7.
To use the Getting Started item:
1. From the Windows
2. Select Getting Started
3. Select the task that you want to do.
taskbar, click the Start icon .
®
taskbar, click the Start icon to launch the Start menu.
. The list of available tasks appears.
Using the taskbar
The taskbar allows you to launch and manage programs or items installed on your computer.
Launching a program from the taskbar
To launch a program from the taskbar:
®
• From the Windows
program.
You may pin programs that you want constantly displayed on the taskbar. For more details,
refer to the section Pinning programs on the Start menu or taskbar on this chapter.
22 Chapter 2: Using Windows® 7
taskbar, click an icon to launch it. Click the icon again to hide the
Page 25
ENGLISH
Pinning items on the jumplists
When you right-click an icon on the taskbar, a jumplist launches to provide you with quickaccess to the program’s or item’s related links.You may pin items on the jumplist such as
favorite websites, often-visited folders or drives, or recently played media les.
To pin items to the jumplist:
1. From the taskbar, right-click an icon.
2. From the jumplist, right-click the item that you want to pin, then select Pin to this list
Unpinning items from the jumplist
To unpin items from the jumplist:
1. From the taskbar, right-click an icon.
2. From the jumplist, right-click the item that you want to remove from the jumplist, then
select Unpin from this list.
Pinning programs on the Start menu or taskbar
To pin programs on the Start menu or taskbar:
®
1. From the Windows
2. Right-click the item that you want to pin on the Start menu or taskbar.
3. Select Pin to Taskbar
You may also right-click on the icon of a running program on the taskbar, then select Pin
this program to taskbar.
taskbar, click the Start icon to launch the Start menu.
or Pin to Start menu.
ENGLISH
.
Unpinning programs from the Start menu
To unpin programs from the Start menu:
®
1. From the Windows
2. From the Start menu, right-click the program that you want to unpin, then select
Remove from this list
taskbar, click the Start icon to launch the Start menu.
.
Unpinning programs from the taskbar
To unpin programs from the taskbar:
1. From the taskbar, right-click the program that you want to remove from the taskbar,
then select Unpin this program from taskbar.
ASUS CM6340 23
Page 26

ENGLISH
ENGLISH
Using the notication area
By default, the notication area shows these three icons:
Action Center notication
Click this icon to display all the alert messages/notications and launch the Windows
Action Center.
Network connection
This icon displays the connection status and signal strength of the wired or wireless network
connection.
Volume
Click this icon to adjust the volume.
Displaying an alert notication
To display an alert notication:
®
• Click the Notication icon
For more details, refer to the section Using Windows® Action Center in this chapter.
, then click the message to open it.
Customizing icons and notications
You may choose to display or hide the icons and notications on the taskbar or on the
notication area.
To customize icons and notications:
1. From the notication area, click on the arrow icon
2. Click
Customize.
.
3. From the dropdown list, select the behaviors for the icons or items that you want to
customize.
Managing your les and folders
Using Windows® Explorer
Windows® Explorer allows you to view, manage, and organize your les and folders.
Launching Windows® Explorer
To launch Windows Explorer:
®
1. From the Windows
2. Click
Computer to launch Windows Explorer.
taskbar, click the Start icon to launch the Start menu.
24 Chapter 2: Using Windows® 7
Page 27
ENGLISH
Exploring les and folders
To explore les and folders:
®
1. Launch Windows
2. From the navigation or view pane, browse for the location of your data.
3. From the breadcrumb bar, click the arrow to display the contents of the drive or folder.
Explorer.
Customizing the le/folder view
To customize the le/folder view:
1. Launch Windows Explorer.
2. From the navigation pane, select the location of your data.
3. From the toolbar, click the View icon
4. From the View menu, move the slider to select how you want to view the le/folder.
You may also right-click anywhere on the View pane, click View, and select the view type
that you want.
.
Arranging your les
To arrange your les:
1. Launch Windows Explorer.
2. From the Arrange by
3. Select your preferred arrangement type.
eld, click to display the dropdown list.
ENGLISH
Sorting your les
To sort your les:
1. Launch Windows Explorer.
2. Right-click anywhere on the View pane.
3. From the menu that appears, select Sort by
, then select your preferred sorting type.
Grouping your les
To group your les:
1. Launch Windows Explorer.
2. Right-click anywhere on the View pane.
3. From the menu that appears, select Group by
type.
ASUS CM6340 25
, then select your preferred grouping
Page 28
ENGLISH
ENGLISH
Adding a new folder
To add a new folder:
1. Launch Windows Explorer.
2. From the toolbar, click New folder
3. Key in a name for the new folder.
You may also right-click anywhere on the View pane, click New > Folder.
Backing up your les
Setting up a backup
To set up a backup:
.
1. Click
2. Click Set up backup
3. Select your backup destination. Click
4. Select Let Windows choose (recommended)
5. Follow the onscreen instructions to nish the process.
> All Programs > Maintenance > Backup and Restore.
. Click Next.
Next.
or Let me choose as your backup
mode.
If you select Let Windows choose, Windows will not back up your programs, FAT-
formatted les, Recycle Bin les, or temporary les that are 1GB or more.
Restoring your system settings
The Windows® System Restore feature creates a restore point where the computer’s system
settings are stored at certain time and date. It allows you to restore or undo changes to your
computer’s system settings without affecting your personal data.
To restore your system:
1. Close all running applications.
2. Click
3. Follow the onscreen instructions to complete the process.
> All Programs > Accessories > System Tools > System Restore.
26 Chapter 2: Using Windows® 7
Page 29
ENGLISH
Protecting your computer
Using Windows® 7 Action Center
Windows® 7 Action Center provides you with alert notications, security information, system
maintenance information, and the option to automatically troubleshoot and x some common
computer problems.
You may customize the notications. For more details, refer to the previous section
Customizing icons and notications in this chapter.
Launching Windows® 7 Action Center
To launch Windows® 7 Action Center:
1. To launch Windows 7 Action Center, click the Notication icon
Action Center.
2. From Windows 7 Action Center, click the task that you want to do.
, then click Open
Using Windows® Update
Windows Update allows you to check and install the latest updates to enhance the security
and performance of your computer.
Launching Windows® Update
To launch Windows® Update:
®
1. From the Windows
2. Select All Programs
3. From the Windows Update screen, click the task that you want to do.
taskbar, click the Start icon to launch the Start menu.
> Windows Update.
Setting up a user account and password
You may create user accounts and passwords for people who will use your computer.
ENGLISH
Setting up a user account
To set up a user account:
®
1. From the Windows
2. Select Manage another account
3. Select Create a new account
4. Key in the name of the new user.
5. Select either Standard user
6. When done, click Create Account
ASUS CM6340 27
taskbar, click > Getting Started > Add new users.
.
.
or Administrator as the user type.
.
Page 30
ENGLISH
Setting up a user’s password
To set up a user’s password:
1. Select the user that you would like to set a password.
2. Select Create a password
3. Key in a password and conrm it. Key in your password’s hint.
4. When done, click Create password
.
.
Activating the anti-virus software
Trend Micro Internet Security is pre-installed on your computer. It is a third-party anti-virus
software protecting your computer from virus. It is purchased separately. You have a 30-day
trial period after activating it.
To activate Trend Micro Internet Security:
1. Run the Trend Micro Internet Security application.
2. Carefully read the license terms. Click Agree & Activate
3. Input your e-mail address and select your location. Click
4. Click Finish to complete the activation.
.
Next.
Getting Windows® Help and Support
Windows® Help and Support provides you with guides and answers in using the applications
in Windows® 7 platform.
To launch Windows® Help and Support, click > Help and Support.
Ensure that you are connected to the Internet to obtain the latest Windows
28 Chapter 2: Using Windows® 7
®
online help.
Page 31

Chapter 3
Connecting devices to your computer
Connecting a USB storage device
This desktop PC provides USB 2.0/1.1 ports on both the front and rear panels and USB3.0
ports on the rear panel. The USB ports allow you to connect USB devices such as storage
devices.
To connect a USB storage device:
• Insert the USB storage device to your computer.
Front panel
To remove a USB storage device:
1. Click
from the Windows notication area on your
computer, then click Eject USB2.0 FlashDisk.
Rear panel
ENGLISH
2. When the Safe to Remove Hardware
pops up, remove the USB storage device from
your computer.
DO NOT remove a USB storage device when data transfer is in progress. Doing so may
cause data loss or damage the USB storage device.
ASUS CM6340 29
message
Page 32

ENGLISH
ENGLISH
LINE OUT
Connecting microphone and speakers
This desktop PC comes with microphone ports and speaker ports on both the front and
rear panels. The audio I/O ports located on the rear panel allow you to connect 2-channel,
4-channel, 6-channel, and 8-channel stereo speakers.
Connecting Headphone and Mic
Connecting 2-channel Speakers
30 Chapter 3: Connecting devices to your computer
Page 33

ENGLISH
Connecting 4-channel Speakers
LINE OUT
LINE OUT
Connecting 6-channel Speakers
ENGLISH
ASUS CM6340 31
Page 34

ENGLISH
ENGLISH
LINE OUT
Connecting 8-channel Speakers
32 Chapter 3: Connecting devices to your computer
Page 35

ENGLISH
Connecting multiple external displays
Your desktop PC may come with VGA, HDMI, or DVI ports and allows you to connect multiple
external displays.
When a graphics card is installed in your computer, connect the monitors on the output
ports of the graphics card.
Setting up multiple displays
When using multiple monitors, you are allowed to set display modes. You can use the
additional monitor as a duplicate of your main display, or as an extension to enlarge your
Windows desktop.
To set up multiple displays:
1. Turn off your computer.
2. Connect the two monitors to your computer and connect the power cords to the
monitors. Refer to Setting up your computer section in Chapter 1 for details on how
to connect a monitor to your computer.
For some graphic cards, only the monitor that is set to be the primary display has display
during POST. The dual display function works only under Windows.
ENGLISH
ASUS CM6340 33
Page 36

ENGLISH
ENGLISH
3. Turn on your computer.
4. Do any of the following to open the Screen Resolution
setting screen:
• Click
• Right click anywhere on your Windows desktop. When the pop-up menu appears,
5. Select the display mode from the Multiple displays: drop-down list.
• Duplicate these displays
• Extend these displays
• Show desktop only on 1 / 2
• Remove this display
6. Click
> Control Panel > Appearance and Personalization > Display >
Change display settings
click Personalize > Display > Change display settings.
duplicate of your main display.
extension display. This increases your desktop space.
1 or monitor 2.
Apply or OK. Then click Keep Changes on the conrmation message.
.
: Select this option to use the additional monitor as a
: Select this option to use the additional monitor as an
: Select this option to show desktop only on monitor
: Select this options to remove the selected display.
34 Chapter 3: Connecting devices to your computer
Page 37

ENGLISH
Connecting an HDTV
Connect a High Denition TV (HDTV) to the HDMI port of your computer.
• You need an HDMI cable to connect the HDTV and the computer. The HDMI cable is
purchased separately.
• To get the best display performance, ensure that your HDMI cable is less than 15
meters.
ENGLISH
ASUS CM6340 35
Page 38

ENGLISH
36 Chapter 3: Connecting devices to your computer
Page 39

Chapter 4
Eye level to the top of
the monitor screen
Foot rest 90˚ angles
Using your computer
Proper posture when using your Desktop PC
When using your Desktop PC, maintaining the proper posture is necessary to prevent strain to
your wrists, hands, and other joints or muscles. This section provides you with tips on avoiding
physical discomfort and possible injury while using and fully enjoying your Desktop PC.
To maintain the proper posture:
• Position your computer chair to make sure that your elbows are at or slightly above the
keyboard to get a comfortable typing position.
• Adjust the height of your chair to make sure that your knees are slightly higher than
your hips to relax the backs of your thighs. If necessary, use a footrest to raise the level
of your knees.
• Adjust the back of your chair so that the base of your spine is rmly supported and
angled slightly backward.
• Sit upright with your knees, elbows and hips at an approximately 90º angle when you
are at the PC.
• Place the monitor directly in front of you, and turn the top of the monitor screen even
with your eye level so that your eyes look slightly downward.
• Keep the mouse close to the keyboard, and if necessary, use a wrist rest for support to
reduce the pressure on your wrists while typing.
• Use your Desktop PC in a comfortably-lit area, and keep it away from sources of glare
such as windows and straight sunlight.
• Take regular mini-breaks from using your Desktop PC.
ASUS CM6340 37
ENGLISH
Page 40

ENGLISH
ENGLISH
Using the memory card reader
Digital cameras and other digital imaging devices use memory cards to store digital picture or
media les. The built-in memory card reader on the front panel of your system allows you to
read from and write to different memory card drives.
1
To use the memory card:
1. Insert the memory card into the card slot.
• A memory card is keyed so that it ts in only one direction. DO NOT force a card into a
slot to avoid damaging the card.
• You can place media in one or more of the card slots and use each media independently.
Place only one memory card in a slot at one time.
2. Select a program from the AutoPlay window to access your les.
• If AutoPlay is NOT enabled in your computer, click Windows® 7 Start button on the
taskbar, click Computer, and then double-click the memory card icon to access the data
on it.
• Each card slot has its own drive icon which is displayed on the Computer
• The memory card reader LED lights up and blinks when data is being read from or
written to the memory card.
screen.
3. When nished, right-click the memory card drive icon on the Computer screen, click
Eject, and then remove the card.
Never remove cards while or immediately after reading, copying, formatting, or deleting
data on the card or else data loss may occur.
To prevent data loss, use “Safely Remove Hardware and Eject Media” in the Windows
notication area before removing the memory card.
38 Chapter 4: Using your computer
Page 41

ENGLISH
Using the optical drive
1
2
3
Inserting an optical disc
To insert an optical disc:
1. While your system is on, press the eject button below the drive bay cover to open the
tray.
2. Place the disc to the optical drive with the label side facing up.
3. Push the tray to close it.
4. Select a program from the AutoPlay window to access your les.
ENGLISH
If AutoPlay is NOT enabled in your computer, click Windows® 7 Start button on the taskbar,
click Computer, and then double-click the CD/DVD drive icon to access the data on it.
Removing an optical disc
To remove an optical disc:
1. While the system is on, do either of the following to eject the tray:
• Press the eject button below the drive bay cover.
• Right-click the CD/DVD drive icon on the
2. Remove the disc from the disc tray.
ASUS CM6340 39
Computer screen, and then click Eject.
Page 42

ENGLISH
ENGLISH
Using the multimedia keyboard (on selected models only)
The keyboard varies with models. The illustrations on this section are for reference only.
ASUS PRIMAX/KB2621 keyboard
Keys Description
1.
2.
3.
4.
5.
6.
Decreases the system volume.
Turns the volume’s mute mode on/off.
Increases the system volume.
Goes to the previous track in a media
player.
Plays or pauses playback in a media
player.
Goes to the next track in a media
player.
The special function keys only work on Windows® Vista / Windows® 7 operating systems.
2
4
5
3
31
6
40 Chapter 4: Using your computer
Page 43

ENGLISH
ASUS KB34211 modern wired keyboard
1 2 3
Hot keys Description
1.
2.
3.
The special function keys only work on Windows® Vista / Windows® 7 / XP operating
systems.
Turns the volume’s mute mode on/off.
Decreases the system volume.
Increases the system volume.
ENGLISH
ASUS PK1100 wired keyboard
ASUS CM6340 41
Page 44

ENGLISH
42 Chapter 4: Using your computer
Page 45

Chapter 5
Modem
RJ-45 cable
Connecting to the Internet
Wired connection
Use an RJ-45 cable to connect your computer to a DSL/cable modem or a local area network
(LAN).
Connecting via a DSL/cable modem
To connect via a DSL/cable modem:
1. Set up your DSL/cable modem.
Refer to the documentation that came with your DSL/cable modem.
2. Connect one end of an RJ-45 cable to the LAN (RJ-45) port on the rear panel of your
computer and the other end to a DSL/cable modem.
ENGLISH
3. Turn on the DSL/cable modem and your computer.
4. Congure the necessary Internet connection settings.
Contact your Internet Service Provider (ISP) for details or assistance in setting up your
Internet connection.
ASUS CM6340 43
Page 46

ENGLISH
ENGLISH
RJ-45 cable
LAN
Connecting via a local area network (LAN)
To connect via a LAN:
1. Connect one end of an RJ-45 cable to the LAN (RJ-45) port on the rear panel of your
computer and the other end to your LAN.
2. Turn on your computer.
3. Congure the necessary Internet connection settings.
Contact your network administrator for details or assistance in setting up your Internet
connection.
44 Chapter 5: Connecting to the Internet
Page 47

ENGLISH
Wireless connection (on selected models only)
Wireless AP
Modem
Connect your computer to the Internet through a wireless connection.
To establish a wireless connection, you need to connect to a wireless access point (AP).
ENGLISH
• To increase the range and sensitivity of the wireless radio signal, connect the external
antennas to the antenna connectors on the ASUS WLAN Card.
• Place the antennas on the top of your computer for the best wireless performance.
• The external antennas are optional items.
To connect to a wireless network:
1. Click the network icon in the notication area to display the available wireless
networks.
2. Select the wireless network that you want to connect to, then click
3. You may need to key in the network security key for a secured wireless network, then
click OK.
4. Wait while your computer is connecting to the wireless network.
5. The wireless connection is established successfully. The connection status is displayed
and the network icon displays the connected status.
ASUS CM6340 45
Connect.
Page 48

ENGLISH
46 Chapter 5: Connecting to the Internet
Page 49

Chapter 6
Using the utilities
The Support DVD and Recovery DVD may not be included in the package. You may use
the Recovery Partition feature to create the Support DVD and Recovery DVD. For details,
refer to Recovering your system in this chapter.
ASUS AI Suite II
ASUS AI Suite II is an all-in-one interface that integrates several ASUS utilities and allows
users to launch and operate these utilities simultaneously.
This utility is pre-installed on some models. For models without an operating system, follow
the steps below to install this utility.
Installing AI Suite II
To install AI Suite II:
1. Place the support DVD in the optical drive. The Drivers installation tab appears if
Autorun is enabled.
2. Click the
3. Follow the onscreen instructions to complete the installation.
Using AI Suite II
AI Suite II automatically starts when you enter the Windows® operating system. The AI Suite
II icon appears in the Windows® notication area. Click the icon to open the AI Suite II main
menu bar.
Click each button to select and launch a utility, to monitor the system, to update the
motherboard BIOS, to display the system information, and to customize the settings of AI
Suite II.
Utilities tab, then click ASUS AI Suite II.
ENGLISH
Click to select a
utility
ASUS CM6340 47
Click to monitor
sensors or CPU
frequency
Click to update the
motherboard BIOS
Click to show
the system
information
Click to customize
the interface
settings
Page 50

ENGLISH
ENGLISH
The Tool menu
The Tool menu includes the EPU, Probe II, and Sensor Recorder panels.
Launching EPU
EPU is an energy-efcient tool that provides you with a total power-saving solution. It detects
the current loading and intelligently adjusts the power usage in real-time. When you select
the Auto mode, the system changes modes automatically according to the current system
status. It allows you to customize each mode through conguring the settings such as CPU
frequency, vCore Voltage, and Fan Control.
To launch EPU:
• Click Tool > EPU
on the AI Suite II main menu bar.
Displays the following message
if no VGA power saving engine is
detected.
Displays current mode
The items lighting up
means power saving
engine is activated
Displays the amount
of CO2 reduced
*Shifts between the
display of Total and
Current CO2 reduced
Displays the current
CPU power
Advanced settings for each mode
Multiple system
operating modes
• * Select From EPU Installation to show the CO2 that has been reduced since you
installed EPU.
• *
Select From the Last Reset to show the total CO2 that has been reduced since you
click the Clear button .
48 Chapter 6: Using the utilities
Displays the system
properties of each mode
Page 51

ENGLISH
Launching and conguring Probe II
Probe II is a utility that monitors the computer’s vital components, and detects and alerts you
of any problem with these components. Probe II senses fan rotations, CPU temperature,
and system voltages, among others. With this utility, you are assured that your computer is
always at a healthy operating condition.
To launch Probe II:
• Click Tool > Probe II
To congure Probe II:
• Click the Voltage/Temperature/Fan Speed
sensor threshold values.
• The
Preference tab allows you to customize the time interval of sensor alerts, or
change the temperature unit.
on the AI Suite II main menu bar.
tabs to activate the sensors or to adjust the
ENGLISH
Saves your
conguration
Loads your saved
conguration
ASUS CM6340 49
Loads the default
threshold values
for each sensor
Applies your
changes
Page 52

ENGLISH
ENGLISH
Launching and conguring Sensor Recorder
Sensor Recorder allows you to monitor the changes in the system voltage, temperature, and
fan speed, as well as recording the changes.
To launch Sensor Recorder:
• Click
To congure Sensor Recorder:
• Click the Voltage/Temperature/Fan Speed
• The History Record
Tool > Sensor Recorder on the AI Suite II main menu bar.
tabs and select the sensors that you want
to monitor.
tab allows you to record the changes in the sensors that you
enable.
Select the
sensors that you
want to monitor
Drag to view the
status during a
certain period
of time
Click to zoom in/out
Click to return to
the default mode
50 Chapter 6: Using the utilities
Click to zoom in/out
the X axis
the Y axis
Page 53

ENGLISH
The Monitor menu
The Monitor menu includes the Sensor and CPU Frequency panels.
Launching Sensor
The Sensor panel displays the current value of a system sensor such as fan rotation, CPU
temperature, and voltages.
To launch Sensor:
• Click
Monitor > Sensor on the AI Suite II main menu bar.
Launching CPU Frequency
The CPU Frequency panel displays the current CPU frequency and CPU usage.
To launch CPU frequency:
• Click
Monitor > CPU Frequency on the AI Suite II main menu bar.
The Update menu
The Update menu allows you to update the motherboard BIOS and the BIOS boot logo with
the ASUS designed update utilities.
ASUS Update
The ASUS Update is a utility that allows you to manage, save, and update the motherboard
BIOS in Windows® OS. The ASUS Update utility allows you to update the BIOS directly
from the Internet, download the latest BIOS le from the Internet, update the BIOS from an
updated BIOS le, save the current BIOS le or view the BIOS version information.
ENGLISH
Updating the BIOS through the Internet
To update the BIOS through the Internet:
1. From the ASUS Update screen, select
2. Select the ASUS FTP site nearest you to avoid network trafc.
Tick the two items if you want to enable the BIOS downgradable and Auto-BIOS
backup functions.
3. Select the BIOS version that you want to download, then click
When no updated version is detected, a message is displayed informing you that there
is no new BIOS le from the BIOS server.
4. Click
5. Follow the onscreen instructions to complete the update process.
ASUS CM6340 51
Yes if you want to change the boot logo, which is the image appearing on screen
during the Power-On Self-Tests (POST). Otherwise, click
Update BIOS from le, then click Next.
Next.
No.
Page 54

ENGLISH
ENGLISH
Updating the BIOS through a BIOS le
To update the BIOS through a BIOS le:
1. From the ASUS Update screen, select
2. Locate the BIOS le from the Open window, click
3. Click
4. Follow the onscreen instructions to complete the update process.
Yes if you want to change the boot logo, which is the image appearing on screen
during the Power-On Self-Tests (POST). Otherwise, click No.
Update BIOS from le, then click Next.
Open, and click Next.
The System Information screen
The System Information screen displays the information about the motherboard, CPU, and
memory slots.
• Click the
version, and BIOS.
• Click the
• Click the
module installed on the corresponding slot.
MB tab to see the details on the motherboard manufacturer, product name,
CPU tab to see the details on the processor and the Cache.
SPD tab and then select the memory slot to see the details on the memory
The Settings screen
The Settings screen allows you to customize the main menu bar settings and the interface’s
skin.
• Application allows you to select the application that you want to enable.
• Bar allows you to modify the bar setting,
• Skin allows you to customize the interface’s contrast, brightness, saturation, hue, and
gamma.
52 Chapter 6: Using the utilities
Page 55

ENGLISH
ASUS AI Manager
ASUS AI Manager is a utility which gives you quick and easy access to frequently-used
applications.
This utility is pre-installed on some models. For models without an operating system, follow
the steps below to install this utility.
Installing AI Manager
To install AI Manager:
1. Place the support DVD in the optical drive. If Autorun is enabled, the Drivers installation
wizard appears.
If Autorun is disabled, double-click the setup.exe le from the ASUS AI Manager folder in
the support DVD.
2. Click the Utilities tab, then click ASUS AI Manager.
3. Follow the onscreen instructions to complete the installation.
Launching AI Manager
To launch the AI Manager from the Windows® desktop, click
AI Manager > AI Manager 1.xx.xx
After launching the application, the AI Manager icon appears in the Windows® taskbar.
Right-click this icon to switch between the quick bar and the main window, and to launch the
AI Manager either from the quick bar or taskbar.
. The AI Manager quick bar appears on the desktop.
AI Manager quick bar
The AI Manager quick bar saves the desktop space and allows you to launch the ASUS
utilities or display system information easily. Click any of the Main, My Favorites, Support or
Information tab to display the menu’s contents.
Start > All Programs > ASUS >
Exit button
Switch to main Window
Add to ToolBar
ENGLISH
Main
My Favorites
Click the Maximize/restore button to switch between full window and quick bar. Click the
Minimize button to keep the AI Manager on the taskbar. Click the Close button to quit
the AI Manager.
Support
Information
Main
The Main menu contains three utilities: AI Disk, AI Security, and AI Booting. Click the arrow
on the Main menu icon to browse through the utilities in the main menu.
ASUS CM6340 53
Page 56

ENGLISH
ENGLISH
AI Disk
AI Disk allows you to easily clear temporary IE les, IE cookies, IE URLs, IE history,
or the Recycle Bin. Click the AI Disk icon on the quick bar to display the full AI Disk
window and select the items you want to clear. Click Apply when done.
AI Security
AI Security enables you to set a password to secure your devices, such as USB ash
disks and CD/DVD disks, from unauthorized access.
To lock a device:
1. When using AI Security for the rst time, you are asked to set a password. Key in
2. Conrm the password.
3. Key in the password hint (recommended).
4. When done, click
5. Select the device you want to lock, then click
6. Key in the password you have set previously, then click
To unlock the device:
1. Deselect the locked device, then click
2. Key in the password you have set previously, then click
To change the password:
• Click Change Password
a password with at most 20 alphanumeric characters.
Ok.
Apply.
Ok.
Apply.
Ok.
, then follow the onscreen instructions to change
password.
AI Booting
AI Booting allows you to specify the boot device priority sequence.
To specify the boot sequence:
1. Select a device, then click the left/right button to specify the boot sequence.
2. When done, press
54 Chapter 6: Using the utilities
Apply.
Page 57

ENGLISH
My Favorites
My Favorites allows you to add applications that you frequently use, saving you from
searching for the applications throughout your computer.
To add an application:
1. Click
2. Click
Right click on the application icon to launch, delete, or rename the selected application. You
can also double click to launch the selected application.
Add, then locate the application you want to add to My Favorites.
Open on the le location window. The application is added to My Favorites list.
Support
Click any links on the Support window to go to the ASUS website, technical support website,
download support website, or contact information.
Information
Click the tab on the Information window to see the detailed information about your system,
motherboard, CPU, BIOS, installed device(s), and memory.
Ai Charger
Ai Charger is a unique software that allows you to quickly charge your Apple devices such as
iPod, iPhone, and iPad on your ASUS computer’s USB 2.0 / USB 3.0 port.
• There is no setting screen for Ai Charger. After its installation on your computer, the Ai
Charger icon appears on the Windows® taskbar.
• The Ai Charger icon (
USB port.
• Your Apple device can only be detected if its Apple USB driver is properly installed in it.
) shows if an Apple device is connected on your computer’s
ENGLISH
• The current Apple devices only support USB 2.0 performance. Even when you plug your
Apple device into a USB 3.0 port, the maximum charging rate is still 500mA, which is the
USB 2.0 maximum charging rate. Ai Charger can increase this limit to 700mA~900mA.
• There is no BIOS, hardware, or chipset requirements for Ai Charger.
ASUS CM6340 55
Page 58

ENGLISH
ENGLISH
ASUS Webstorage
ASUS webstorage is designed to help you retrieve your data to your notebooks, smartphones
or tablets wherever there is internet connection.
This utility is pre-installed on some models. For models without an operating system, follow
the steps below to install this utility.
Installing webstorage
To install webstorage:
Place the support DVD in the optical drive. Double-click the setup.exe le from the ASUS
WebStorage folder in the Software folder in the support DVD.
Launching Webstorage
To launch the WebStorage from the
Windows® desktop, click
Programs > ASUS > Webstorage
webstorage quick bar appears in the
Windows® taskbar. Right-click this icon to switch between the quick bar and the main window
Start > All
. The
Drive
Allows your to retrieve all your backups, synced les, share groups and password protected
data from here. Right-click the mouse to preview les before downloading or generating a
sharing URL.
Backup
To backup your most important data with simple steps: preset a backup shcedule with your
preferences in cloud storage; or select “Auto Backup” for complete data backup.
56 Chapter 6: Using the utilities
Page 59

ENGLISH
MySyncFolder
To store the updated les to MySyncFolder for easy access and share of all types of les
without the limitation of location or device.
Calendar
ASUS WebStorage automatically syncs the most updated calendar events to all personal
computers so that you know the exact events no matter which PC is in use.
BookmarkSyncer
The convenient BookmarkSyncer keeps our browser preference and bookmark to the cloud
automatically synchronized in multiple computer.
MobileApp
ASUS WebStorage mobile applications sync your les between multiple devices. It also
supports transcoding technology that allows preview and les streaming on your mobile
phone.
Go to Web
Experience the value-added cloud service through ASUS WebStorage, without the risk of
losing data.
Settings
1. Click the Settings icon , the settings interface appears.
2. Follow the onscreen instructions to complete the conguration.
ENGLISH
ASUS CM6340 57
Page 60

ENGLISH
ENGLISH
ASUS Easy Update
ASUS Easy Update is a software tool that automatically detects the latest drivers and
applications for your system.
1. From the Windows
right-click the ASUS Easy Update icon.
®
notication area,
2. Select
3. Select
4. Click OK to display the items you can
5. Check the item(s) you want to download,
Schedule to set how often you
want to update your system.
Update to activate the update.
download.
and then click OK.
58 Chapter 6: Using the utilities
Page 61

ENGLISH
ASUS Instant On
ASUS Instant On gives you with a quick access to the Hybrid Sleep mode.
Using ASUS Instant On
To use ASUS Instant On:
The Instant On utility is pre-installed on your computer and
automatically launches after starting up your computer.
1. When starting up your computer, you can see the utility
icon from Windows taskbar.
ENGLISH
2. Press <Alt + F1
the conrmation message. Your system
will enter the Hybrid Sleep mode.
> and then click OK on
The default hotkey is <Alt + F1>. To
change it, see the section below.
Setting up ASUS Instant On
To set up ASUS Instant On:
1. Right-click the ASUS Instant On icon
from Windows taskbar. The main settings
screen appears.
You can choose to enable/disable ASUS
Instant On hotkey, and show/hide ASUS
Instant On icon from Windows taskbar.
2. Click
3. Key in the combination keys you want to
4. Click OK to save your changes, and
Redene from the main settings
screen. The hotkey settings screen
appears.
use for ASUS Instant On hotkey.
Cancel to discard the changes you made.
Tick to not show this message next time.
ASUS CM6340 59
Page 62

ENGLISH
ENGLISH
Nero 9
Nero 9 allows you to create, copy, burn, edit, share, and update different kinds of data
Installing Nero 9
To install Nero 9:
1. Insert the Nero 9 DVD into your optical drive.
2. If Autorun is enabled, the main menu appears automatically.
If Autorun is disabled, double-click the SeupX.exe le from the main directory of your Nero
9 DVD.
3. From the main menu, click Nero 9 Essentials.
4. Select the language you want to use for Installation Wizard. Click
5. Click
6. Tick I accept the License Conditions
7. Select
8. Tick Yes, I want to help by sending anonymous application data to Nero
9. When done, click
Next to continue.
. When done, click Next.
Typical then click Next.
Next.
Exit.
Burning les
To burn les:
1. From the main menu, click Data Burning
2. Select the les that you want to burn. When done, click
3. After selecting les that you want to burn, click
> Add.
Add.
Burn to burn the les to a disc.
Next.
then click
For more details about using Nero 9, refer to the Nero website at www.nero.com
60 Chapter 6: Using the utilities
Page 63

ENGLISH
Recovering your system
Using the system recovery partition
The system recovery partition quickly restores your Desktop PC’s software to its original
working state. Before using the system recovery partition, copy your data les (such as
Outlook PST les) to USB storage devices or to a network drive and make note of any
customized conguration settings (such as network settings).
About the system recovery partition
The system recovery partition is a reserved space on your hard disk drive used to restore the
operating system, drivers, and utilities installed on your Desktop PC at the factory.
DO NOT delete the system recovery partition, which is the partition without volume label
on Disk 0. The system recovery partition is created at the factory and cannot be restored if
deleted. Take your Desktop PC to an authorized ASUS service center if you have problems
with the recovery process.
Using the system recovery partition:
1. Press <
2. Highlight Windows Setup [EMS Enabled] and press
3. From the Recover system to a partition screen, click
4. Follow the onscreen instructions to complete the recovery process.
F9> during bootup.
<Enter>.
<Next>.
Visit the ASUS website at www.asus.com for updated drivers and utilities.
ENGLISH
ASUS CM6340 61
Page 64

ENGLISH
Using the Recovery DVD (on selected models)
Prepare 1~3 blank writable DVDs as instructed to create the Recovery DVD.
Remove the external hard disk drive before performing system recovery on your Desktop
PC. According to Microsoft, you may lose important data because of setting up Windows on
the wrong disk drive or formatting the incorrect drive partition.
To use the Recovery DVD:
1. Insert the Recovery DVD into the optical drive. Your Desktop PC needs to be powered
ON.
2. Restart the Desktop PC and press <
labeled as “CD/DVD”) and press <Enter> to boot from the Recovery DVD.
3. Select OK to start to restore the image.
4. Select OK to conrm the system recovery.
Restoring will overwrite your hard drive. Ensure to back up all your important data before
the system recovery.
5. Follow the onscreen instructions to complete the recovery process.
DO NOT remove the Recovery disc, unless instructed to do so, during the recovery process
or else your partitions will be unusable.
Visit the ASUS website at www.asus.com for updated drivers and utilities.
F8> on bootup and select the optical drive (may be
62 Chapter 6: Using the utilities
Page 65

Chapter 7
Troubleshooting
Troubleshooting
This chapter presents some problems you might encounter and the possible solutions.
My computer cannot be powered on and the power LED on the front
?
panel does not light up
• Check if your computer is properly connected.
• Check if the wall outlet is functioning.
• Check if the Power Supply Unit is switched on. Refer to the section Turning
your computer ON/OFF
My computer hangs.
?
• Do the following to close the programs that are not responding:
1. Simultaneously press <Alt> + <Ctrl> + <Delete> keys on the keyboard,
2. Click
3. Select the program that is not responding, then click End Task
• If the keyboard is not responding. Press and hold the Power button on the top
then click Start Task Manager.
Applications tab.
of your chassis until the computer shuts down. Then press the Power button
to turn it on.
in Chapter 1.
.
ENGLISH
I cannot connect to a wireless nestwork using the ASUS WLAN Card
?
(on selected models only)?
• Ensure that you enter the correct network security key for the wireless network
you want to connect to.
• Connect the external antennas (optional) to the antenna connectors on the
ASUS WLAN Card and place the antennas on the top of your computer
chassis for the best wireless performance.
The arrow keys on the number key pad are not working.
?
Check if the Number Lock LED is off. When the Number Lock LED is on,
the keys on the number key pad are used to input numbers only. Press the
Number Lock key to turn the LED off if you want to use the arrow keys on the
number key pad.
ASUS CM6340 63
Page 66

ENGLISH
ENGLISH
No display on the monitor.
?
• Check if the monitor is powered on.
• Ensure that your monitor is properly connected to the video output port on
your computer.
• If your computer comes with a discrete graphics card, ensure that you connect
your monitor to a video output port on the discrete graphics card.
• Check if any of the pins on the monitor video connector is bent. If you discover
bent pins, replace the monitor video connector cable.
• Check if your monitor is plugged to a power source properly.
• Refer to the documentation that came with your monitor for more
troubleshooting information.
When using multiple monitors, only one monitor has display.
?
• Ensure that the both monitors are powered on.
• During POST, only the monitor connected to the VGA port has display. The
dual display function works only under Windows.
• When a graphics card is installed on your computer, ensure that you connect
the monitors to the output port on the graphics card.
• Check if the multiple displays settings are correct. Refer to section
Connecting multiple external displays
My computer cannot detect my USB storage device.
?
• The rst time you connect your USB storage device to your computer,
Windows automatically installs a driver for it. Wait for a while and go to My
Computer to check if the USB storage device is detected.
• Connect your USB storage device to another computer to test if the USB
storage device is broken or malfunctions.
in Chapter 3 for details.
I want to restore or undo changes to my computer’s system settings
?
without affecting my personal les or data.
The Windows® System Restore feature allows you to restore or undo changes
to your computer’s system settings without affecting your personal data such
as documents or photos. For more details, refer to the section Restoring your
system in Chapter 2.
64 Chapter 7: Troubleshooting
Page 67

ENGLISH
The picture on the HDTV is distorted.
?
• It is caused by the different resolutions of your monitor and your HDTV. Adjust
the screen resolution to t your HDTV. To change the screen resolution:
1. Do any of the following to open the Screen Resolution setting screen:
• Click
• Right click anywhere on your Windows desktop. When the pop-up
2. Adjust the resolution. Refer to the documentation came with your HDTV
3. Click
My speakers produce no sound.
?
• Ensure that you connect your speakers to the Line out port (lime) on the front
• Check if your speak is connected to a electrical source and turned on.
• Adjust your speakers’ volume.
• Ensure that your computer’s system sounds are not Muted.
• Connect your speakers to another computer to test if the speakers arer
for the resolution.
message.
panel or the rear panel.
• If it is muted, the volume icon is displayed as
sounds, click
• If it is not muted, click
working properly.
> Control Panel > Appearance and Personalization >
Display > Change display settings.
menu appears, click Personalize > Display > Change display
settings.
Apply or OK. Then click Keep Changes on the conrmation
. To enable the system
from the Windows notication area, then click .
and drag the slider to adjust the volume.
ENGLISH
The DVD drive cannot read a disc.
?
• Check if the disc is placed with the label side facing up.
• Check if the disc is centered in the tray, especially for the discs with
non-standard size or shape.
• Check if the disc is scratched or damaged.
The DVD drive eject button is not respond.
?
1. Click > Computer.
2. Right-click
ASUS CM6340 65
, then click Eject from the menu.
Page 68

ENGLISH
ENGLISH
Power
Problem Possible Cause Action
• Set your computer’s power voltage
No power
(The power
indicator is off)
Incorrect power voltage
Your computer is not
turned on.
Your computer’s power
cord is not properly
connected.
• Adjust the voltage settings. Ensure
Press the power key on the front panel
to ensure that your computer is turned
on.
• Ensure that the power cord is
• Use other compatible power cord.
switch to your area’s power
requirements.
that the power cord is unplugged
from the power outlet.
properly connected.
PSU (Power supply unit)
problems
Try installing another PSU on your
computer.
Display
Problem Possible Cause Action
No display
output after
turning the
computer on
(Black screen)
The signal cable is
not connected to the
correct VGA port on your
computer.
Signal cable problems Try connecting to another monitor.
• Connect the signal cable to the
correct display port (onboard VGA or
discrete VGA port).
• If you are using a discrete VGA
card, connect the signal cable to the
discrete VGA port.
66 Chapter 7: Troubleshooting
Page 69

ENGLISH
LAN
Problem Possible Cause Action
Cannot access
the Internet
The LAN cable is not
connected.
LAN cable problems
Your computer is not
properly connected to a
router or hub.
Network settings
Problems caused by the
anti-virus software
Driver problems Reinstall the LAN driver
Connect the LAN cable to your
computer.
Ensure the LAN LED is on. If not,
try another LAN cable. If it still does
not work, contact the ASUS service
center.
Ensure that your computer is properly
connected to a router or hub.
Contact your Internet Service Provider
(ISP) for the correct LAN settings.
Close the anti-virus software.
Audio
Problem Possible Cause Action
Speaker or headphone is
connected to the wrong
port.
• Refer to your computer’s user
manual for the correct port.
• Disconnect and reconnect the
speaker to your computer.
ENGLISH
No Audio
ASUS CM6340 67
Speaker or headphone
does not work.
The front and back audio
ports do not work.
Driver problems Reinstall the audio driver
Try using another speaker or
headphone.
Try both the front and back audio
ports. If one port failed, check if the
port is set to multi-channel.
Page 70

ENGLISH
ENGLISH
System
Problem Possible Cause Action
Too many programs are
running.
System speed is
too slow
The system often
hangs or freezes.
Computer virus attack
Hard disk drive failure
Memory module problems
There is not enough
air ventilation for your
computer.
Incompatible softwares are
installed.
Close some of the programs.
• Use an anti-virus software to
scan for viruses and repair your
computer.
• Reinstall the operating system.
• Send the damaged hard disk
drive to ASUS Service Center for
servicing.
• Replace with a new hard disk drive.
• Replace with compatible memory
modules.
• Remove the extra memory
modules that you have installed,
then try again.
Move your computer to an area with
better air ow.
Reinstall the OS and reinstall
compatible softwares.
68 Chapter 7: Troubleshooting
Page 71

ENGLISH
CPU
Problem Possible Cause Action
Your computer is booting
up.
Too noisy right
after turning on
the computer.
Computer is too
noisy when in use.
If the problem still persists, refer to your Desktop PC’s warranty card and contact the ASUS
Service Center. Visit the ASUS Support site at http://support.asus.com for the service
center information.
The BIOS settings have
been changed.
Old BIOS version
The CPU fan has been
replaced.
There is not enough
air ventilation for the
computer.
The system temperature is
too high.
It is normal. The fan runs on its
full speed when the computer is
powering on. The fan slows down
after entering the OS.
Restore the BIOS to its default
settings.
Update the BIOS to the latest
version. Visit the ASUS Support
site at http://support.asus.com to
download the latest BIOS versions.
Ensure that you are using a
compatible or ASUS-recommended
CPU fan.
Ensure that your computer is
working in an area with good air ow.
• Update the BIOS.
• If you know how to reinstall the
motherboard, try to clean the inner
space of the chassis.
ENGLISH
ASUS CM6340 69
Page 72

ASUS contact information
ASUSTeK COMPUTER INC.
Address 15 Li-Te Road, Peitou, Taipei, Taiwan 11259
Telephone +886-2-2894-3447
Fax +886-2-2890-7798
E-mail info@asus.com.tw
Web site www.asus.com.tw
Technical Support
Telephone +86-21-38429911
Online support support.asus.com
ASUS COMPUTER INTERNATIONAL (America)
Address 800 Corporate Way, Fremont, CA 94539, USA
Telephone +1-510-739-3777
Fax +1-510-608-4555
Web site usa.asus.com
Technical Support
Telephone +1-812-282-2787
Support fax +1-812-284-0883
Online support support.asus.com
ASUS COMPUTER GmbH (Germany and Austria)
Address Harkort Str. 21-23, D-40880 Ratingen, Germany
Fax +49-2102-959911
Web site www.asus.de
Online contact www.asus.de/sales
Technical Support
Telephone (Component) +49-1805-010923*
Telephone (System/Notebook/Eee/LCD) +49-1805-010920*
Support Fax +49-2102-9599-11
Online support support.asus.com
* EUR 0.14/minute from a German xed landline; EUR 0.42/minute from a mobile
phone.
Manufacturer: ASUSTeK Computer Inc.
Address: No.150, LI-TE RD., PEITOU, TAIPEI 112,
Authorised representative in
Europe:
Address: HARKORT STR. 21-23, 40880 RATINGEN,
TAIWAN
ASUS Computer GmbH
GERMANY
Page 73

ASUS Essentio Desktop PC
CM6340
Brugervejledning
Page 74

DANSK
DA7503
DANSK
Første udgave
Juni 2012
Ophavsret © 2012 ASUSTeK Computer Inc. Alle rettigheder forbeholdt.
Ingen del af denne manual, herunder produkterne og softwaret beskrevet i den, må på nogen måde
reproduceres, overføres, transkriberes eller lagres i et søgesystem eller oversættes til noget sprog,
undtagen dokumentation holdt af køberen for reservekopieringsformål, uden udtrykkelig skriftlig tilladelse
fra ASUSTeK Computer Inc. (“ASUS”).
Produktgarantien eller -servicen vil ikke blive forlænget, hvis: (1) produktet er repareret, modiceret eller
ændret, medmindre en sådan reparation, modikation eller ændring er skriftligt godkendt af ASUS, eller (2)
produktets serienummer er skamferet eller mangler.
ASUS LEVERER DENNE VEJLEDNING “SOM ER”, UDEN GARANTIER AF NOGEN ART, HVERKEN
UDTRYKKELIGE ELLER UNDERFORSTÅEDE, HERUNDER, MEN IKKE BEGRÆNSET TIL,
UNDERFORSTÅEDE GARANTIER ELLER VILKÅR FOR SALGBARHED ELLER EGNETHED TIL ET
BESTEMT FORMÅL. I INTET TILFÆLDE ER ASUS, DETS DIREKTØRER, CHEFER, ANSATTE ELLER
AGENTER ANSVARLIGE FOR NOGEN INDIREKTE, SÆRLIG, HÆNDELIG ELLER FØLGAGTIG
SKADE (HERUNDER SKADER I FORM AF TABT FORTJENESTE, TABT FORRETNING, TAB AF BRUG
ELLER DATA, AFBRYDELSE AF FORRETNING OG LIGNENDE), OGSÅ SELVOM ASUS ER BLEVET
INFORMERET OM MULIGHEDEN FOR SÅDANNE SKADER PÅ GRUND AF NOGEN DEFEKT ELLER
FEJL I DENNE BRUGERVEJLEDNING ELLER DETTE PRODUKT.
SPECIFIKATIONER OG OPLYSNINGER I DENNE VEJLEDNING ER KUN TIL INFORMATION. DE KAN
PÅ ET HVILKET SOM HELST TIDSPUNKT ÆNDRES UDEN FORUDGÅENDE MEDDELELSE DEROM
OG MÅ IKKE ANSES SOM EN FORPLIGTELSE FOR ASUS. ASUS PÅTAGER SIG IKKE NOGET
ANSVAR OG GARANTI FOR EVENTUELLE FEJL ELLER UNØJAGTIGHEDER I DENNE VEJLEDNING,
HERUNDER PRODUKTERNE OG SOFTWARET BESKREVET DERI.
Produkter og virksomhedsnavne i denne vejledning kan være eller ikke være registrerede varemærker
og ophavsretter tilhørende de respektive virksomheder. De er kun brugt som produktidentikation eller
forklaring og til ejernes fordel uden nogen hensigt om krænkelse.
72
Page 75

DANSK
Indhold
Bemærk ....................................................................................................... 75
Sikkerhedsinformation ................................................................................. 79
Konventioner brugt i denne vejledning ........................................................ 80
Yderligere oplysninger ................................................................................. 80
Pakkeindhold ............................................................................................... 81
Kapitel 1 Kom i gang
Velkommen! ................................................................................................. 83
Lær din computer at kende .......................................................................... 83
Installation af computeren ............................................................................ 86
TÆND/SLUK for computeren ...................................................................... 89
Kapitel 2 Brug af Windows® 7
Når der startes første gang .......................................................................... 91
Brug af Windows® 7 desktop ....................................................................... 92
Styring af ler og mapper ............................................................................. 94
Genopretning af systemet ............................................................................ 96
Beskyttelse af computeren .......................................................................... 97
Sådan fås Windows® Hjælp og Støtte ......................................................... 98
Kapitel 3 Tilslutning af enheder til computeren
Tilslutning af USB lagerenhed ..................................................................... 99
Tilslutning af mikrofon og højtalere ............................................................ 100
Tilslutning af multiple, eksterne skærme ................................................... 103
Tilslutning af HDTV .................................................................................... 105
DANSK
Kapitel 4 Sådan bruger du din computer
Korrekt arbejdsstilling, når du bruger desktop-Pc ...................................... 107
Brug af hukommelseskortlæseren ............................................................. 108
Sådan bruges det optiske drev .................................................................. 109
Brug af multimedietastaturet (på udvalgte modeller) ..................................110
73
Page 76

DANSK
Indhold
DANSK
Kapitel 5 Tilslutning til internettet
Ledningsført forbindelse .............................................................................113
Trådløs forbindelse (på udvalgte modeller) ................................................115
Kapitel 6 Brug af hjælperedskaber
ASUS AI Suite II-pakken .............................................................................117
ASUS AI Manager ...................................................................................... 123
Ai Charger .................................................................................................. 125
ASUS Webstorage ..................................................................................... 126
ASUS Easy Update (nem opdatering) ....................................................... 128
ASUS Instant On (tænd øjeblikkelig) ......................................................... 129
Nero 9 ......................................................................................................
Genopretning af systemet .......................................................................... 131
130
Kapitel 7 Fejlnding
Fejlnding .................................................................................................. 133
ASUS kontaktinformation ........................................................................... 140
74
Page 77

DANSK
Bemærk
REACH
Idet vi overholder REACH (registrering, vurdering og godkendelse af samt begrænsninger
for kemikalier) bestemmelserne, offentliggør vi vores produkters kemiske stoffer på ASUS
REACH webstedet http://green.asus.com/english/REACH.htm .
Tilbagetagningsservice
ASUS’ genbrugs- og tilbagetagningsprogrammer bunder i vores bestræbelser for at holde
en høj standard med hensyn til miljøbeskyttelse. Vi sætter en ære i at tilbyde vores kunder
løsninger til en ansvarlig genindvinding af vores produkter, batterier og andre komponenter
samt emballager. Gå til http://csr.asus.com/english/Takeback.htm for nærmere detaljer om
genindvinding i de forskellige lande.
Erklæring fra Den Føderale Kommunikationskommission (FCC)
Dette apparat opfylder FCC reglernes afsnit 15. Driften sker på følgende to betingelser:
• Dette apparat må ikke forårsage skadelig interferens, og
• Dette apparat skal acceptere enhver modtagen interferens, inklusive interferens, som
kan forårsage uønsket drift.
Dette udstyr er testet og fundet at opfylde grænserne for klasse B digitalt udstyr i henhold
til FCC reglernes afsnit 15. Disse grænser har til formål at skabe rimelige beskyttelse mod
skadelig interferens i private installationer. Dette udstyr skaber, bruger og kan udstråle
radiofrekvensenergi, som, hvis det ikke installeres og bruges i overensstemmelse med
fabrikantens instruktioner, kan forårsage skadelig interferens på radiokommunikation. Der er
imidlertid ingen garanti for, at der ikke vil opstå interferens i en given installation. Hvis dette
udstyr forårsager skadelig interferens på radio- og fjernsynsmodtagelse, hvilket kan afgøres
ved at slå udstyret til og fra, skal brugeren prøve at afhjælpe interferensen på en eller ere af
følgende måder:
• Ret modtagerantennen i en anden retning eller anbring den et andet sted.
• Øg afstanden mellem udstyret og modtageren.
• Forbind udstyret til en anden kontakt i et andet kredsløb end det, modtageren er
forbundet til.
• Bed forhandleren eller en erfaren radio- eller TV-teknikner om hjælp.
DANSK
Brugen af skærmet type netledning er påkrævet for at kunne opfylde FCC grænseværdier
for udstråling og for at forhindre interferens til tætliggende radio og fjernsynsmodtagelse.
Det er essentielt, at kun den medfølgende netledning bliver brugt. Brug kun skærmet
kabel til at forbinde I/O enheder til dette udstyr. Du er advaret om, at ændringer eller
modikationer, der ikke udtrykkeligt er godkendt af den myndighed, der er ansvarlig for
opfyldelse, kan ødelægge din autorisation til at bruge udstyret.
(Gentrykt fra Code of Federal Regulations #47, part 15.193, 1993. Washington DC:
Ofce of the Federal Register, National Archives and Records Administration, U.S.
Government Printing Ofce.)
75
Page 78

DANSK
FCC Radio Frequency (RF) Exposure Caution Statement
DANSK
Dette udstyr opfylder FCC grænser for strålingseksponering i ukontrollerede
omgivelser. For at opfylde FCC kravene vedrørende RF udsættelse, skal du undgå
direkte kontakt med transmissionsantennen under transmission. Slutbrugere skal
følge de specikke betjeningsanvisninger vedrørende RF udsættelse.
IC erklæring for Canada vedrørende strålingseksponering
Dette apparat overholder IC grænserne for strålingseksponering i ukontrollerede
omgivelser. For at opfylde IC kravene vedrørende RF udsættelse, skal du undgå
direkte kontakt med transmissionsantennen under transmission. Slutbrugere skal
følge de specikke betjeningsanvisninger vedrørende RF udsættelse.
Driften sker på følgende to betingelser:
• Dette apparat må ikke forårsage skadelig interferens, og
• dette apparat skal acceptere enhver interferens, inklusive interferens, som kan
For at forhindre radio-interferens til den licenserede service (dvs. ko-kanal
satellitbaserede mobilkommunikationssystemer), skal dette apparat, for at yde
maksimal afskærmning, opereres indendørs og væk fra vinduer. Udstyr (eller dets
sendeantenne) installeret udendørs skal licenseres.
Déclaration d'Industrie Canada relative à l’exposition aux ondes radio
Cet appareil est conforme aux limites d'exposition aux radiations d’Industrie Canada dénies
pour un environnement non-contrôlé. Pour maintenir la conformité avec les exigences
d'exposition RF IC, veuillez éviter tout contact direct avec l'antenne pendant l'émission. Les
utilisateurs naux doivent suivre les instructions de fonctionnement spéciques pour satisfaire la
conformité aux expositions RF.
Son utilisation est sujette aux deux conditions suivantes :
• Cet appareil ne peut pas causer d'interférence, et
• Cet appareil doit accepter toute interférence, y compris les interférences qui pourraient
Pour éviter les interférences radio avec le service sous licence (c'est à-dire le partage de
canal avec les systèmes de téléphonie satellite), cet appareil est destiné à être utilisé en
intérieur et loin des fenêtres pour fournir un blindage maximal. Tout appareil (ou son antenne
d'émission) qui est installé en extérieur est sujet à cette licence.
Kanaler for trådløs drift for forskellige domæner
N. Amerika 2,412-2,462 GHz Ch01 gennem CH11
Japan 2,412-2,484 GHz Ch01 gennem Ch14
Europa ETSI 2,412-2,472 GHz Ch01 gennem Ch13
En hvilken som helst ændring eller modikation, der ikke er udtrykkeligt
godkendt af parten ansvarlig for overensstemmelse, kan medføre
brugerens tab af retten til at bruge dette udstyr. “Producenten erklærer,
at dette apparat er begrænset til kanalerne 1 til 11 inden for 2.4GHz
frekvensen i speciceret fast programmel kontrolleret i USA.”
forårsage uønsket drift af enheden.
.
causer un fonctionnement non souhaité de l'appareil.
76
Page 79

DANSK
CE mærkning advarsel
CE mærkning af enheder uden trådløs LAN/Bluetooth
Den afsendte version af denne enhed overholder kravene i EEC direktiverne
2004/108/EC vedrørende ”Elektromagnetisk kompatibilitet” og 2006/95/EC , ”Lavs
pændingsdirektivet”.
CE mærkning af enheder med trådløs LAN/Bluetooth
Dette udstyr overholder kravene i direktiv 1999/5/EC fra Europaparlamentet og –
kommissionen af 9. Marts 1999 vedrørende radio- og telekommunikationsudstyr og
gensidig anerkendelse af overensstemmelse.
Dette udstyr er tilladt at bruge i alle EU-landene. Der er visse områder i Frankrig, hvor
frekvensbåndet er begrænset. Dette udstyr må gerne bruges indendørs.
低功率射頻電機設備警語
依據低功率電波輻射性電機管理辦法
第十二條
經型式認證合格之低功率射頻電機,非經許可,公司、商號或使用者均不得擅自
變更頻率、加大功率或變更原設計之特性及功能。
第十四條
低功率射頻電機之使用不得影響飛航安全及乾擾合法通信;經發現有乾擾現象
時,應立即停用,並改善至無干擾時方得繼續使用。
前項合法通信,指依電信法規定作業之無線電通信。
低功率射頻電機須忍受合法通信或工業、科學及醫療用電波輻射性電機設備之干擾。
DANSK
與5.25GHz 至5.35GHz 區域內操作之
無線設備的警告申明
工作頻率5.250~5.350GHz 該頻率限於室內使用
VCCI: Japansk overensstemmelseserklæring
VCCI-erklæring til klasse B udstyr
77
Page 80

DANSK
KC: Koreansk advarselserklæring
DANSK
Produkterklæring fra Macrovision Corporation
Dette produkt indeholder ophavsretligt beskyttet teknologi, som er beskyttet at bestemte
USA-patenter og andre intellektuelle ejendomsretter, ejet af Macrovision Corporation
og andre rettighedsejere. Brug af denne ophavsretbeskyttede teknologi skal godkendes
af Macrovision Corporation og er medmindre andet er godkendt af Macrovision
Corporation beregnet til hjemme- og andet begrænset brug. ”Reverse engineering” eller
demontering er forbudt.
Advarsel vedrørende lithium-ion batteri
PAS PÅ! Fare for eksplosion, hvis batteriet anbringes forkert. Udskift kun med samme
eller tilsvarende type anbefalet af fabrikanten. Bortskaf brugte batterier i henhold til
fabrikantens anvisninger.
78
Page 81

DANSK
Sikkerhedsinformation
Frakobl AC-strømmen og perifere enheder inden rengøring. Tør desktop Pc'en af
med en ren cellulosesvamp eller et rent vaskeskind med en lille smule ikke-slibende
rengøringsmiddel og et par dråber varmt vand. Fjern overskydende fugt med en tør klud.
• Anbring IKKE på ujævne eller ustabile arbejdsoverader. Send til reparation, hvis
kabinettet er blevet beskadiget.
• Brug den
gasudstrøming.
• Anbring
• Udsæt
• Udsæt og brug den
under uvejr.
• Batteri-sikkerhedsadvarsel: Kast IKKE
Skil IKKE batteriet ad.
• Anvend produktet i omgivelser med temperaturer på mellem 0˚C og 35˚C.
• Tildæk
overophedning sted.
• Brug
•
For at undgå faren for elektrisk stød, skal du fjerne netledningen fra stikkontakten, inden
du ytter systemet til et andet sted.
•
Søg professional hjælp, inden der bruges adapter og forlængerledning. Disse enheder
kan forstyrre jordforbindelsen.
•
Kontroller, at din strømforsyning er indstillet på den korrekte spænding i dit område. Hvis
du ikke er sikker med hensyn til spændingen i den anvendte stikkontakt, skal du kontakte
det lokale el-selskab.
•
Hvis strømforsyningen går i stykker, må du ikke prøve på selv at reparere den. Kontakt
en autoriseret servicetekniker eller forhandleren.
IKKE i snavsede støvede omgivelser. Brug den IKKE, hvis der er en
IKKE ting ovenpå desktop Pc'en og stik ikke ting ind i den.
IKKE for stærkt magnetiske og elektriske felter.
IKKE i nærheden af væsker, regn eller fugt. Brug IKKE modemmet
batteriet på åben ild. Kortslut IKKE kontakterne.
IKKE desktop Pc'ens ventilationsåbninger, idet der i så fald kan ske
IKKE beskadigede el-ledninger, perifere enheder og beskadiget tilbehør.
DANSK
79
Page 82

DANSK
Konventioner brugt i denne vejledning
For at sikre, at du udfører bestemte opgaver korrekt, skal du følge nedenstående symboler,
brugt i vejledningen.
DANSK
Yderligere oplysninger
Med hensyn til yderligere oplysninger vedrørende produkter og software-opdateringer, se
følgende kilder:
ASUS websteder
ASUS webstederne verden over indeholder opdateret information vedrørende ASUS
ASUS lokal teknisk hjælp
Besøg ASUS webstedet
FARE/ADVARSEL: Oplysninger for at undgå, at du skader dig selv under
udførelse af et job.
FORSIGTIG: Oplysninger for at undgå skader på dele under udførelse af et job.
VIGTIGT: Anvisninger, som du SKAL følge for at kunne fuldføre et job.
BEMÆRK: Tips og yderligere oplysninger, som kan hjælpe dig med at fuldføre en
opgave.
hardware- og software-produkter. Gå til ASUS webstedet www.asus.com.
http://support.asus.com/contact for kontaktoplysninger til lokal,
teknisk hjælpeingeniør.
80
Page 83

DANSK
Pakkeindhold
Installation Guide
DANSK
ASUS Essentio Desktop
PC
El-ledning x 1 Installationsvejledning x 1 Garantibevis x 1
Nero 9 brænder software-
dvd x 1
• Hvis nogle af ovennævnte dele er beskadiget eller mangler, skal du kontakte din
forhandler.
• Ovenstående illustrationer er kun til reference. Faktiske produktspecikationer kan
afvige modellerne imellem.
Tastatur x 1 Mus x 1
support-dvd (ekstraudstyr) x1
genoprettelses-dvd
(ekstraudstyr) x1
Antenne (ekstra) x 1
81
Page 84

DANSK
82
Page 85

Kapitel 1
Kom i gang
Velkommen!
Tak, fordi du har anskaffet dig en ASUS Essentio CM6340 desktop Pc!
ASUS Essentio CM6340 desktop Pc'en byder på avanceret ydelse, pålidelighed og
brugerrettede hjælpeprogrammmer. Alle disse værdier er indeholdt i et fantastisk futuristisk
og stilfuldt kabinet.
Læs ASUS garantibeviset inden installationen af ASUS desktop Pc'en.
Lær din computer at kende
Illustrationer er kun til reference. Portene og deres anbringelse samt kabinettets farve er
forskellig fra model til model.
Forpanel
2
1
7
4
3
DANSK
6
ASUS CM6340 83
5
Page 86

DANSK
1. USB 2.0 porte.USB 2.0 porte. Denne USB 2.0 port bruges til at tilslutte USB 2.0 enheder såsom mus,
DANSK
2. Mikrofonport.
3. Port til hovedtelefoner.Port til hovedtelefoner.
4. Strømknap.
5. Udskydningsknap til optisk drev.Udskydningsknap til optisk drev.
6. Bås til optisk drev.
7. MMC (MultiMediaCard)/XD (xD-Picture)/SD (Secure Digital™)/SDHC (HighMMC (MultiMediaCard)/XD (xD-Picture)/SD (Secure Digital™)/SDHC (High
Bagpanel
printer, skanner, kamera, PDA og andet.
Mikrofonport. Til tilslutning af mikrofon.
Til denne port forbindes hovedtelefoner eller højtaler.
Strømknap. Tryk på denne knap for at tænde for computeren.
optiske drev.
Der er et optisk diskdrev i denne bås.
Capacity Secure Digital™)/Kortindgang MS/PRO (Memory Stick Pro™).
understøttede kort i kortindgangen.
Tryk på denne knap for at udskyde bakken til det
1
2
16
Sæt et
3
4
5
6
7
10 9 8
1. Strømstik.Strømstik.
2. Spændingsomskifter.Spændingsomskifter.
3. PS/2 tastaturport (lilla). Denne port bruges til et PS/2 tastatur.
4. HDMI port.
overholder HDCP og tillader således afspilning af HD dvd, Blu-ray og andet beskyttet
indhold.
5.
DVI-D port. Denne port er beregnet til enhver DVI-D kompatibel enhed og er HDCP
overholdende og tillader således afspilning af HD dvd, Blu-ray og andet beskyttet indhold.
Forbind el-ledningen til dette stik.
Denne port er til et HDMI (High-Denition Multimedia Interface) stik,
6
11
Skift for at vælge den relevante system indgangsspænding.
15
14
13
12
84 Kapitel 1: Kom i gang
Page 87

DANSK
6. USB 2.0 porte.USB 2.0 porte. Denne USB 2.0 port bruges til at tilslutte USB 2.0 enheder såsom mus,
printer, skanner, kamera, PDA og andet.
7. USB 3.0 porte.USB 3.0 porte.
Denne USB 3.0 port bruges til at tilslutte USB 3.0 enheder såsom mus,
printer, skanner, kamera, PDA og andet.
• Der MÅ IKKE tilsluttes et tastatur eller en mus til nogen USB 3.0-port, mens Windows
operativsystemet installeres!
• Som følge af begrænsninger i styringen på USB 3.0, kan USB 3.0-udstyr kun anvendes i
Windows®-miljø, og kun efter at USB 3.0-driveren er installeret.
• USB 3.0-udstyr kan kun anvendes til datalagring.
• Vi anbefaler på det kraftigste, at USB 3.0-udstyr tilsluttes USB 3.0-porte til en hurtigere
og bedre ydelse for USB 3.0-udstyret.
®
8. Linje ind port (lyseblå). Denne port forbinder til en båndoptager, cd, dvd og andre
lydkilder.
9. Linje ud (limegrøn).
Denne port forbinder til hovedtelefoner eller højtaler. I en 4-, 6-
eller 8-kanals konguration fungerer denne port som fronthøjtaler-ud.
10. Mikrofonport (lyserød).
Se nedenstående lydkongurations-oversigt vedrørende lydportenes funktion i en 2-, 4- ,6eller 8-kanals konguration.
Denne port forbinder til en mikrofon.
Lyd 2-, 4-, 6- eller 8-kanals konguration
DANSK
Port
Lyseblå (Bagpanel) Linie-ind Baghøjtaler ud Baghøjtaler ud Baghøjtaler ud
Limegrøn (Bagpanel) Linje ud Fronthøjtaler ud Fronthøjtaler ud Fronthøjtaler ud
Lyserød (Bagpanel) Mik. ind Mik. ind Bas-center Bas-center
Limegrøn (Forpanel) - - - Sidehøjtaler ud
11. Ekspanstionsstikklamme.
Ekspanstionsstikklamme. Fjern ekspansionsstikklammen, når der installeres et
Hovedtelefoner
2-kanal
4-kanal 6-kanal 8-kanal
ekspansionskort.
12. ASUS WLAN kort (kun udvalgte modeller).
Med det optionelle WLAN kort kan
computeren forbinde til et trådløst netværk.
13. LAN (RJ-45) port.LAN (RJ-45) port.
Denne port muliggør Gigabit forbindelse til et lokalt områdenetværk
(LAN) via en netværksstikdåse.
LED
LAN port
HASTIGHED
LED
LAN port - LED indikationer
Aktivitet/Link LED Hastighed LED
Status Beskrivelse Status Beskrivelse
SLUKKET Ikke noget link SLUKKET 10Mbps forbindelse
ORANGE Linked ORANGE 100Mbps forbindelse
BLINKER Dataaktivitet GRØN 1Gbps forbindelse
ASUS CM6340 85
AKT/LINK
Page 88

DANSK
14. VGA port. Denne port er til VGA kompatible enheder såsom en VGA skærm.
15. PS/2 museport (grøn). Denne port bruges til en PS/2 mus
DANSK
16. Ventilationsåbninger.
Installation af computeren
Dette afsnit hjælper dig med at forbinde hovedharware-enhederne såsom den eksterne
skærm, tastatur, mus og el-ledning til computeren.
Tilslutning af ekstern skærm
Brug af onboard skærmudgangsportene
Forbind skærmen til onboard skærmudgangsporten.
Sådan forbindes en ekstern skærm ved hjælp af onboard skærmudgangsportene:
1. Forbind en VGA skærm til VGA porten eller en DVI-D skærm til DVI-D porten eller en
2. Forbind skærmen til en stikkontakt.
Disse bruges til luftventilation.
Bloker IKKE kabinettets ventilationsåbninger. Sørg altid for passende ventilation til
computeren.
HDMI skærm til HDMI porten på bagsiden af computeren.
86 Kapitel 1: Kom i gang
Page 89

DANSK
• Hvis din computer er leveret med et ASUS grakkort, er grakkortet indstillet som den
primære skærmenhed i BIOS. Forbind derfor skærmen til en skærmdudgangsport på
grakkortet.
• For at forbinde eksterne skærme til computeren, se Tilslutning af multiple, eksterne
skærme i afsnit 3 i denne brugervejledning for yderligere oplysninger.
Tilslutning af et USB tastatur og en USB mus
Forbind et USB tastatur og en USB mus til USB portene på bagsiden af computeren.
DANSK
ASUS CM6340 87
Page 90

DANSK
Tilslutning af el-ledning
Forbind el-ledningens ene ende til strømstikket på bagsiden af computeren og den anden
ende til en stikkontakt.
DANSK
88 Kapitel 1: Kom i gang
Page 91

DANSK
TÆND/SLUK for computeren
Dette afsnit beskriver, hvordan du tænder/slukker for computeren, efter at den er installeret.
TÆND for computeren
Sådan TÆNDER du for computeren:
1. Tryk på strømkontakten.
2. Tryk på computerens strømknap.
Strømknap
3. Vent, indtil styresystemet indlæser automatisk.
SLUK for computeren
Sådan SLUKKER du for computeren:
1. Luk alle igangværene programmer.
DANSK
2. Klik på
3. Klik på
ASUS CM6340 89
på Windows® desktoppen.
for at lukke styresystemet ned.
Page 92

DANSK
90 Kapitel 1: Kom i gang
Page 93

Kapitel 2
Brug af Windows® 7
Når der startes første gang
Når computeren startes første gang, vil en række skærme guide dig med hensyn til
kongurering af Windows® 7 styresystemets basale indstillinger.
Sådan startes der første gang:
1. Tænd for computeren. Vent et par minutter, indtil Set Up Windows (Installer
Windows) skærmen ses.
2. Vælg sprog i rullegardinmenuen. Klik på Next (Næste)
3. På rullelisten, vælg Country or region (Land eller region)
og valuta) og Keyboard layout (Tastatur-udformning). Klik på Next (Næste).
4. Indtast unikke navne for user name (brugernavn)
(Computernavn). Klik på Next (Næste).
5. Indtast de nødvendige oplysninger til installation af adgangskode og klik på Next
(Næste). Du kan også klikke på Next (Næste) for at springe dette trin over og uden at
indlæse nogen oplysninger.
Hvis du ønsker at installere en adgangskode til din konto, se afsnittet Installation af
brugerkonto og adgangskode i dette kapitel.
6. Læs licensbetingelserne grundigt. Afmærk I accept the license terms (Jeg
accepterer licensbetingelserne)
7. Vælg Use recommended settings (Brug anbefalede indstillinger)
important updates only (Installer kun vigtige opdateringer) for at foretage
sikkerhedsindstillingerne på computeren. For at springe dette trin over, vælg Ask me
later (Spørg mig senere).
8. Tjek dato- og tidsindstillinger. Klik på Next (Næste)
indstillinger og genstarter. Du kan nu begynde at bruge computeren.
og klik på Next (Næste).
.
, Time and currency (Tid
og computer name
eller Install
. Systemet indlæser de nye
DANSK
ASUS CM6340 91
Page 94

DANSK
Brug af Windows® 7 desktop
DANSK
Brug af menuen Start
Menuen Start giver adgang til programmer, hjælpeprogrammer og andre nyttige ting på
computeren. Den giver dig også yderligere oplysninger om Windows 7 via dens Help and
Support (Hjælp og støtte) funktion.
Start af punkter på menuen Start
Sådan startes punkter på menuen Start:
1. På Windows
2. I menuen Start, vælg punktet, som du gerne vil starte.
Brug af Kom-i-Gang punktet
Getting Started (Kom i gang) punktet i menuen Start indeholder oplysninger om basale
handlinger såsom personalisering af Windows®, tilføjelse af nye brugere og overførsel af ler
for at gøre dig bekendt med Windows® 7.
Sådan bruges Kom-i-Gang punktet:
1. På Windows
2. Vælg Getting Started (Sådan kommer du i gang)
3. Vælg jobbet, du ønsker at udføre.
Klik på Start ikonen > Help and Support (Hjælp og Støtte) for at få yderligere
oplysninger om Windows® 7.
®
jobbjælke, klik på Start ikonen .
Du kan anbringe programmer, som du ønsker konstant vist på menuen Start. For yderligere
oplysninger, se afsnittet Anbringelse af programmer i menuen Start eller på jobbjælken
i dette kapitel.
®
jobbjælken, klik på Start ikonen for at starte menuen Start.
. Listen med job til rådighed ses.
Brug af jobbjælken
På jobbjælken kan du starte og styre programmer og punkter installeret på computeren.
Start af program fra jobbjælken
Sådan startes et program fra jobbjælken:
®
• På Windows
at skjule programmet.
92 Kapitel 2: Brug af Windows® 7
opgavebjælken, klik på en ikon for at starte den. Klik på ikonen igen for
Du kan fastsætte programmer, som du ønsker konstant vist på jobbjælken. For yderligere
oplysninger, se afsnittet Anbringelse af programmer i menuen Start eller på jobbjælken
i dette kapitel.
Page 95

DANSK
Anbringelse af punkter på jumplisten
Når du højreklikker på en ikon på jobbjælken, giver en jumpliste dig hurtig adgang til
programmers eller punkter led. Du kan anbringe punkter på jumplisten såsom foretrukne
websteder, ofte besøgte mapper og drev og nyligt afspillede medieler.
Sådan anbringes punkter på jumplisten:
1. På jobbjælken, højreklik på en ikon.
2. På jumplisten, højreklik på punktet, som du ønsker at anbringe, og vælg Pin to this
list (Anbring på denne liste)
.
Fjernelse af punkter fra jumplisten
Sådan fjernes punkter fra jumplisten:
1. På jobbjælken, højreklik på en ikon.
2. På jumplisten, højreklik på punktet, som du ønsker at fjerne fra jumplisten, og vælg
Unpin from this list (Fjern fra denne liste).
Anbringelse af programmer i menuen Start eller på jobbjælken
Sådan anbringes programmer på menuen Start eller på jobbjælken:
®
1. På Windows
2. Højreklik på punktet, som du ønsker at abringe i menuen Start eller på jobbjælken.
3. Vælg Pin to Taskbar (Anbring på jobbjælke)
menuen Start).
jobbjælken, klik på Start ikonen for at starte menuen Start.
eller Pin to Start menu (Anbring i
Du kan også højreklikke på ikonen for et igangværende program på jobbjælken og derefter
vælge Pin this program to taskbar (Anbring dette program på jobbjælken).
DANSK
Fjernelse af programmer fra menuen Start
Sådan fjernes programmer fra menuen Start:
®
1. På Windows
2. I menuen Start, højreklik på programmet, som du ønsker at fjerne, og vælg derefter
Remove from this list (Fjern fra denne liste)
jobbjælken, klik på Start ikonen for at starte menuen Start.
.
Fjernelse af programmer fra jobbjælken
Sådan fjernes programmer fra jobbjælken:
1. På jobbjælken, højreklik på programmet, som du ønsker at fjerne fra jobbjælken, og
vælg Unpin this program from taskbar (Fjern dette program fra jobbjælken).
ASUS CM6340 93
Page 96

DANSK
Brug af statusfeltet
Som standard viser statusfeltet disse tre ikoner:
DANSK
Visning af advarselsmeddelelse
Sådan vises en advarselsmeddelelse:
• Klik på meddelelsesikonen
Tilpasning af ikoner og meddelelser
Du kan vælge mellem at vise og skjule ikoner og meddelelser på jobbjælken eller i
statusfeltet.
Sådan tilpasses ikoner og meddelelser:
1. I statusfeltet, klik på pil-ikonen
2. Klik på Customize (Tilpas)
3. På rullegardinlisten, vælg adfærden for de ikoner, som du gerne vil tilpasse.
Action Center meddelelse
Klik på denne ikon for at se alle advarselsmeddelelser og starte Windows® Action Center.
Netværksforbindelse
Denne ikon viser tilslutningssignalet og den ledningsførte eller trådløse
netværksforbindelses signalstyrke.
Lydstyrke
Klik på denne ikon for at indstille lydstyrken.
og klik derefter på meddelelsen for at åbne den.
For yderligere oplysninger, se afsnittet Brug af Windows® Action Center i dette kapitel.
.
.
Styring af ler og mapper
Brug af Windows® Explorer
Med Windows® Explorer kan du se, styre og organisere dine ler og mapper.
Start af Windows® Explorer
Sådan startes Windows Explorer:
®
1. På Windows
2. Klik på
94 Kapitel 2: Brug af Windows® 7
jobbjælken, klik på Start ikonen for at starte menuen Start.
Computer for at starte Windows Explorer.
Page 97

DANSK
Udforskning af ler og mapper
Sådan udforskes ler og mapper:
1. Start Windows Explorer.
2. I navigations- eller visningsruden, browse for at lokalisere dine data.
3. På brødkrummestien, klik på pilen for at se drevet og mappens indhold.
Tilpasning af visning af l/mappe
Sådan tilpasses visning af l/mappe:
1. Start Windows Explorer.
2. I navigationsruden, vælg dine datas lokalisering.
3. På jobbjælken, klik på Visning-ikonen
4. I menuen Visning, yt skydeknappen for at vælge, hvordan du vil se len/mappen.
Du kan også højreklikke hvor som helst i Visning ruden, klikke på View (Vis) og vælge den
ønskede visningstype.
.
Sortering af ler
Sådan sorteres dine ler:
1. Start Windows Explorer.
2. I Arrange by (Sorter efter)
3. Vælg din foretrukne sorteringsmåde.
feltet, klik for at se rullegardinlisten.
Sortering af lerne
Sådan sorteres dine ler:
1. Start Windows Explorer.
2. Højreklik hvor som helst i visningsruden.
3. I menuen, der fremkommer, vælg Sort by (Sorter efter)
sorteringsmåde.
og vælg derefter den ønskede
DANSK
Gruppering af lerne
Sådan grupperes dine ler:
1. Start Windows Explorer.
2. Højreklik hvor som helst i visningsruden.
3. I menuen, der fremkommer, vælg Group by (Grupper efter)
ønskede grupperingsmåde.
ASUS CM6340 95
og vælg derefter den
Page 98

DANSK
Tilføjelse af ny mappe
Sådan tilføjes en ny mappe:
DANSK
1. Start Windows Explorer.
2. På jobbjælken, klik på New folder (Ny
3. Indtast et navn for den nye mappe.
Backup (sikkerhedskopiering) af lerne
Installation af backup
Sådan installeres backup:
mappe).
Du kan også højreklikke hvor som helst i visningsruden og klikke på New (Ny) > Folder
(Mappe).
1. Klik på
Backup and Restore (Backup og genopret).
2. Klik på Set up backup (Installer backup)
3. Vælg din backup-destination. Klik på Next (Næste)
4. Vælg Let Windows choose (recommended) (Lad Windows vælg (anbefales))
Let me choose as your backup mode (Lad mig vælge backupmåde)
5. Følg instruktionerne på skærmen for at fuldføre processen.
> All Programs (Alle programmer) > Maintenance (Vedligeholdelse) >
. Klik på Next (Næste).
.
eller
.
Hvis du vælger Let Windows choose (Lad Windows vælg), vil Windows ikke udføre
backup af dine programmer, FAT formatterede ler, papirkurvler eller midlertidige ler, der
er 1GB eller mere.
Genopretning af systemet
"Windows® System Restore" funktionen skaber et genopretningspunkt, hvor computerens
systemindstillinger lagres på en bestemt tid og dato. På denne måde kan du genoprette
computerens systemindstillinger, uden at dine personlige data påvirkes.
Sådan genoprettes systemet:
1. Luk alle igangværene programmer.
2. Tryk på
Tools (Systemværktøjer) > System Restore (Systemgenopretning).
3. Følg instruktionerne på skærmen for at fuldføre processen.
> All Programs (Alle programmer) > Accessories (Tilbehør) > System
96 Kapitel 2: Brug af Windows® 7
Page 99

DANSK
Beskyttelse af computeren
Brug af Windows® 7 Action Center
Windows® 7 Action Center forsyner dig med advarselsmeddelelser, sikkerhedsoplysninger,
oplysninger vedrørende vedligeholdelse og muligheden for automatisk at nde fejl og løse
nogle almindelige computerproblemer.
Du kan tilpasse meddelelserne. For yderligere oplysninger, se det tidligere afsnit
Tilpasning af ikoner og meddelelser i dette kapitel.
Start af Windows® 7 Action Center
Sådan startes Windows® 7 Action Center:
DANSK
1. Start Windows 7 Action Center ved at klikke på meddelelsesikonen
på Open Action Center (Åbn Action Center).
2. I Windows 7 Action Center, klik på jobbet, som du gerne vil udføre.
og klik derefter
Brug af Windows® Update
Med Windows Update kan du tjekke og installere de seneste opdateringer for at forbedre
computerens sikkerhed og ydelse.
Start af Windows® Update
Sådan startes Windows® Update
®
1. På Windows
2. Vælg All Programs
3. På Windows Update skærmen, klik på jobbet, som du gerne vil udføre.
jobbjælken, klik på Start ikonen for at starte menuen Start.
(Alle programmer) > Windows Update.
Installation af brugerkonto og adgangskode
Der kan oprettes brugerkonti og adgangskoder for personer, som skal bruge computeren.
Oprettelse af brugerkonto
Sådan oprettes en brugerkonto:
®
1. På Windows
users (Tilføj nye brugere).
2. Vælg Manage another account (Styr anden konto)
3. Vælg Create a new account (Opret en ny konto)
4. Indtast navnet på den nye bruger.
5. Vælg enten Standard user (Standardbruger)
6. Når dette er gjort, skal du klikke på Create Account (Opret konto)
jobbjælken, klik på > Getting Started (Kom i gang) > Add new
.
.
eller Administrator som brugertype.
.
ASUS CM6340 97
Page 100

Installation af brugeradgangskode
Sådan oprettes en brugeradgangskode:
DANSK
1. Vælg brugeren, for hvem du vil installere en adgangskode.
2. Vælg Create a password (Opret en adgangskode)
3. Indtast en adgangskode og bekræft den. Indtast adgangskode-antydningen.
4. Når dette er gjort, skal du klikke på Create password (Opret adgangskode)
Aktivering af anti-virus software
"Trend Micro Internet Security" er forinstalleret på computeren. Det er et tredjeparts anti-virus
software, som beskytter computeren mod virusangreb. Det anskaffes separat. Der er en
30-dages prøvetid, efter at det er aktiveret.
Sådan aktiveres "Trend Micro Internet Security":
1. Kør "Trend Micro Internet Security" programmet.
2. Læs licensbetingelserne grundigt. Klik på Agree & Activate (Samtykke og aktivere)
3. Indtast din e-mail-adresse og vælg dit sted. Klik på Next (Næste)
4. Klik på Finish (Afslut) for at afslutte aktiveringen.
Sådan fås Windows® Hjælp og Støtte
Windows® Hjælp og Støtte giver dig vejledning og svar vedrørende brug af programmer på
Windows® 7 platformen.
.
.
.
.
For at starte Windows® Hjælp og Støtte, gå til > Help and Support (Hjælp og støtte).
Kontroller, at du er forbundet til internettet for at kunne få den seneste Windows® online
hjælp.
98 Kapitel 2: Brug af Windows® 7
 Loading...