

Page 1
A
B
A
B
A
B
ASUS Desktop PC Installation Guide
A
BM6AE(MD780)
BM1AE
1
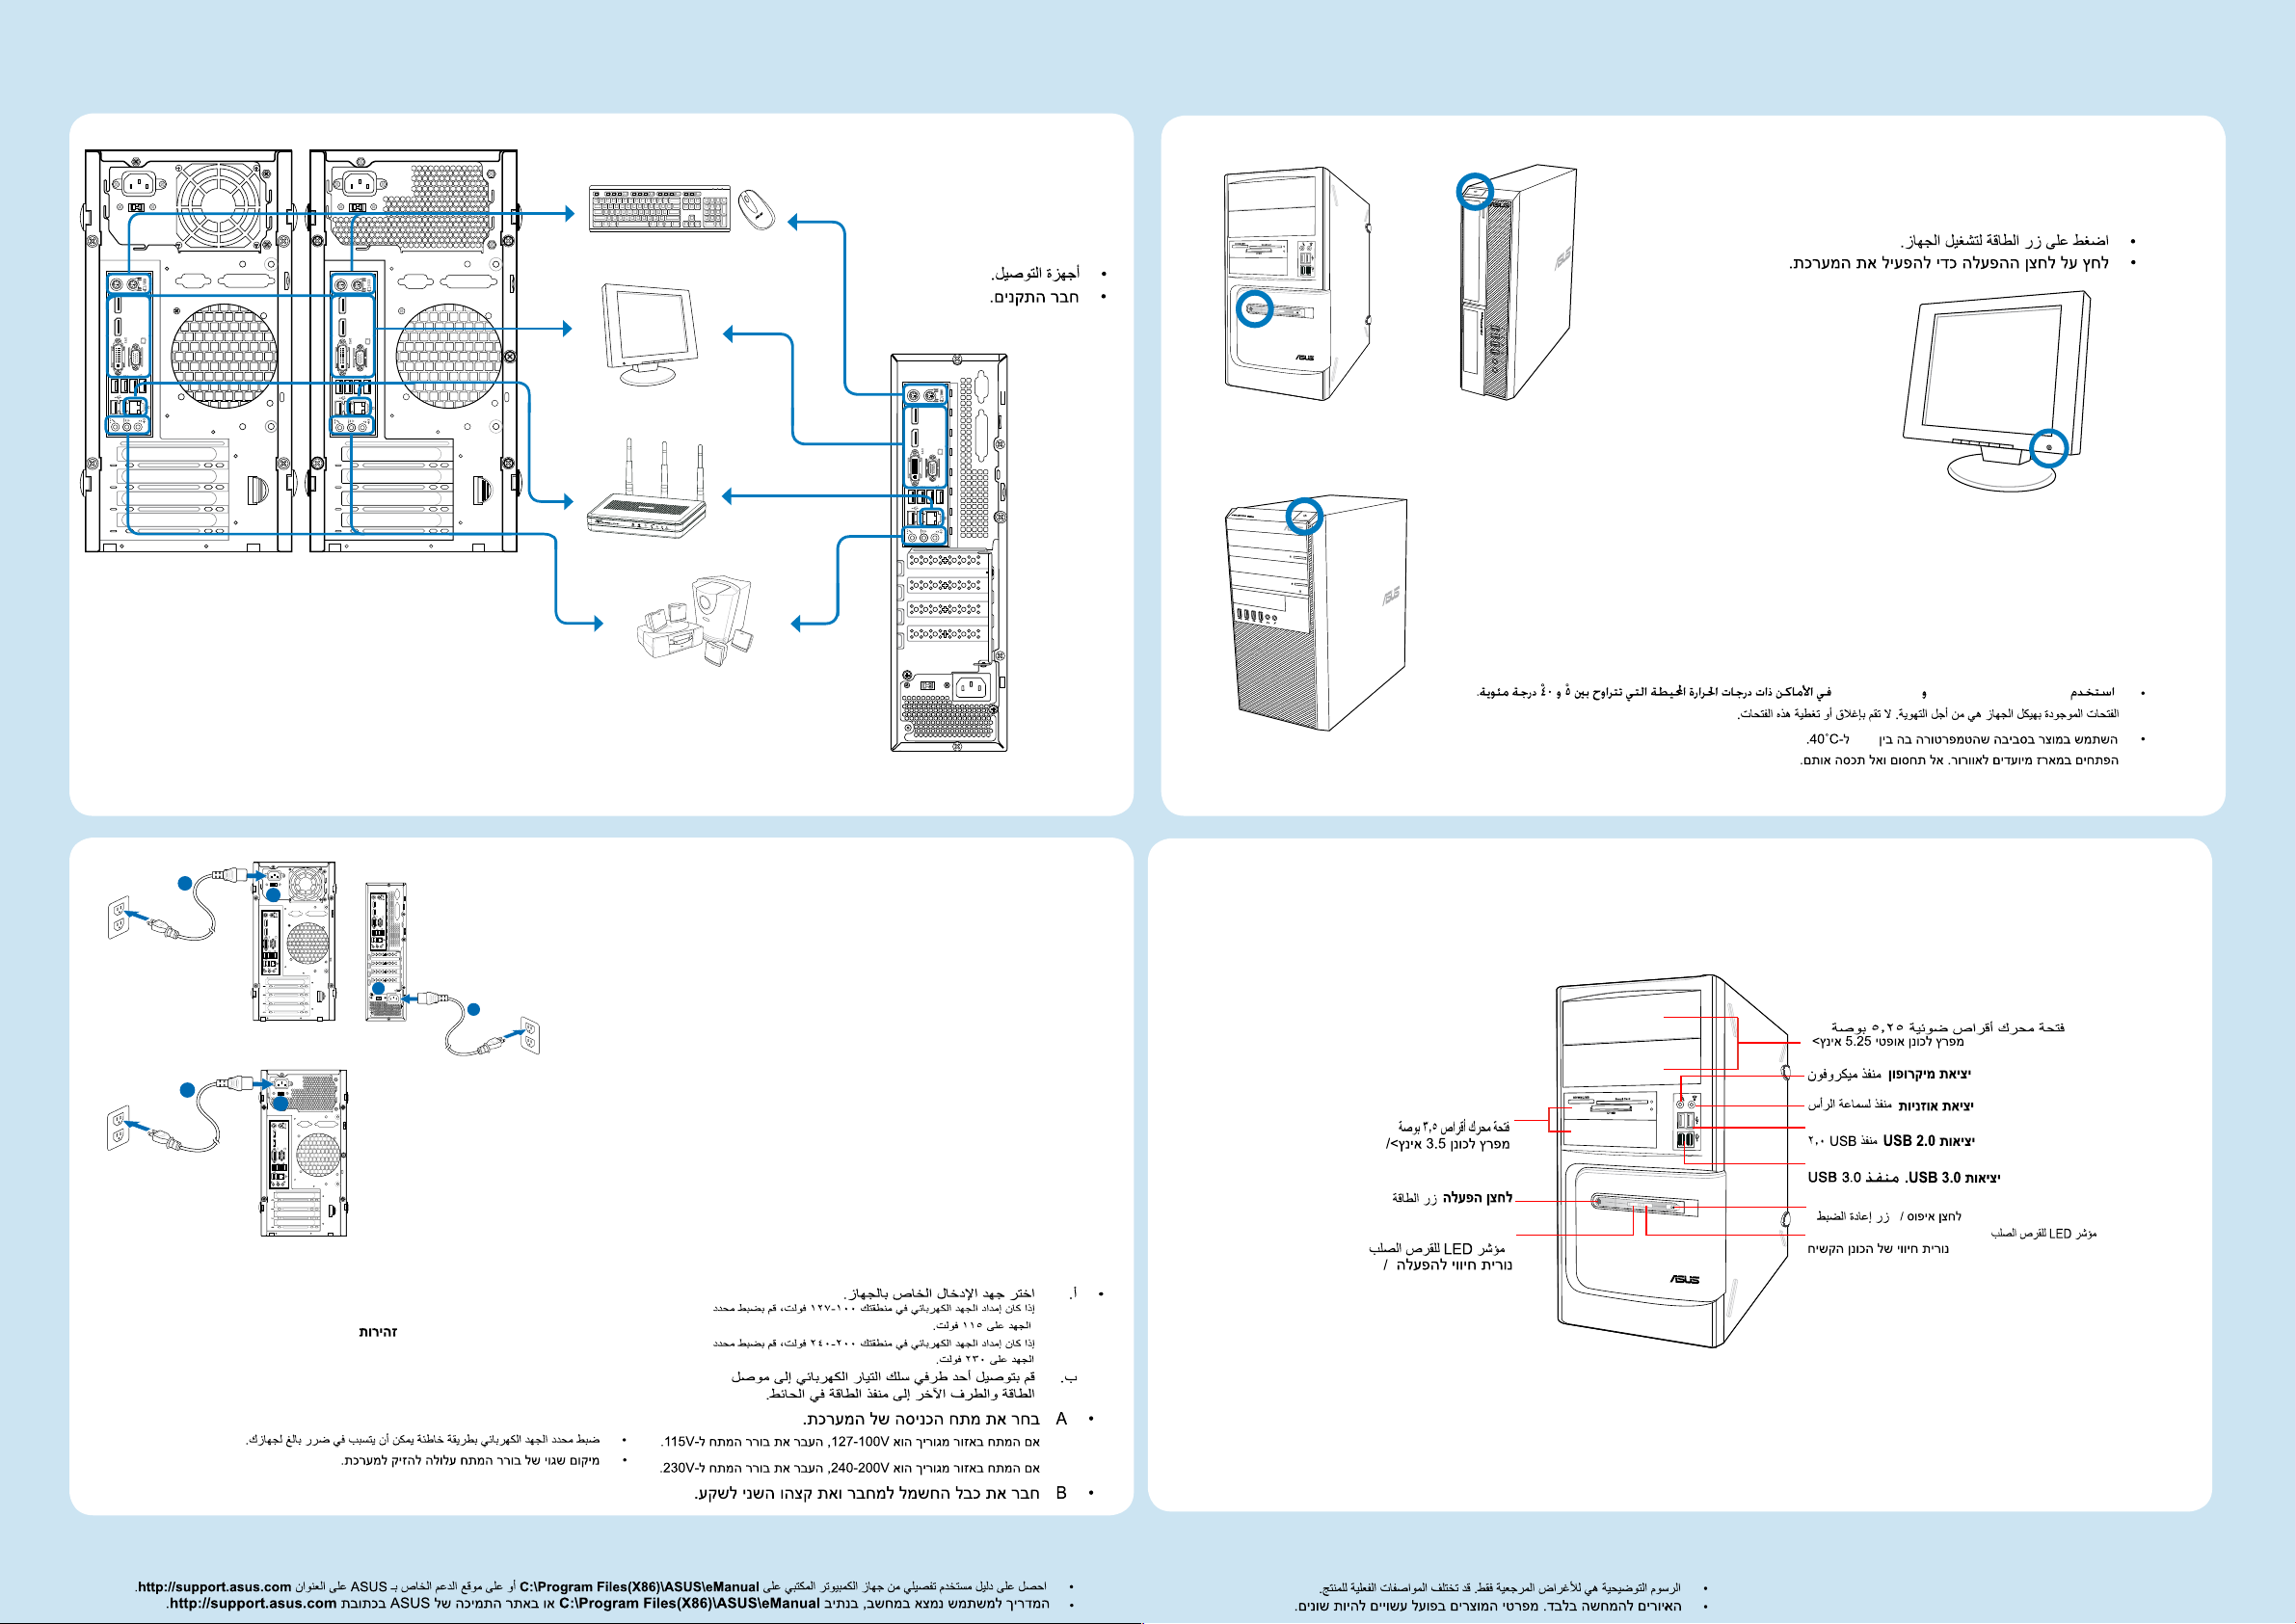
• Connect devices.
• Menyambungkan
perangkat.
• เชื่อมต่ออุปกรณ
• Press the power button to turn on the system.
BM6AE(MD780)
BP1AE(SD780)
WARNING/ PERINGATAN/ คำเตือน/ تحذير:
• Use BM6AE(MD780), BM1AE, and BP1AE(SD780) in environments with an ambient temperature between 5˚C
and 40˚C.
Openings on the chassis are for ventilation. DO NOT block or cover these openings.
• Gunakan BM6AE(MD780), BM1AE dan BP1AE(SD780) di lokasi dengan suhu lingkungan antara 5˚C dan 40˚C.
Celah pada chassis adalah untuk ventilasi. JANGAN halangi atau tutupi celah tersebut.
• ใช้ BM6AE(MD780), BM1AE และ BP1AE(SD780) ในสภาพแวดล้อมที่มีอุณหภูมิระหว่าง 5˚C ถึง 40˚C
ช่องเปิดต่างๆ บนตัวเครื่อง ใช้สำหรับการระบายอากาศ อย่าขวางกั้น หรือปิดช่องเปิดเหล่านี้
3
• Tekan tombol daya untuk menghidupkan sistem.
• กดปุ่มเพาเวอร์เพื่อเปิดระบบ
BM6AE(MD780), BM1AEBP1AE(SD780)
BM6AE(MD780)
BM1AE
BP1AE(SD780)
2
BP1AE(SD780)
• A. Select the system input voltage.
If the voltage supply in your area is 100-127V, set the voltage
selector to 115V.
If the voltage supply in your area is 200-240V, set the voltage
selector to 230V.
B. Connect one end of the power cord to the power connector
and the other end to a wall power outlet.
• A. Pilih tegangan masuk sistem.
Jika tegangan listrik di area Anda 100-127V, tetapkan pengatur
tegangan ke 115V.
Jika tegangan listrik di area Anda 200-240V, tetapkan pengatur
tegangan ke 230V.
B. Sambungkan salah satu ujung kabel daya ke konektor daya dan
ujung lainnya ke stopkontak.
• ก. เลือกแรงดันไฟฟ้าขาเข้าของระบบ
ถ้าแรงดันไฟฟ้าในพื้นที่ของคุณเป็น 100-127V
ให้ตั้งค่าตัวเลือก แรงดันไฟฟ้าไปที่ 115V
ถ้าแรงดันไฟฟ้าในพื้นที่ของคุณเป็น 200-240V
ให้ตั้งค่าตัวเลือก แรงดันไฟฟ้าไปที่ 230V
ข. เชื่อมต่อปลายข้างหนึ่งของสายไฟเข้ากับขั้วต่อ
เพาเวอร์ และปลายอีกด้านหนึ่งเข้ากับเต้าเสียบไฟ
ฟ้า ที่ผนัง
BM1AE
3.5 inch drive bay/ Wadah drive 3,5 inci/
ช่องใส่ไดรฟ์ 3.5 นิ้ว/
/
Power button/ Tombol daya /
ปุ่มเพาเวอร์/ /
Power LED / LED Daya / LED เพาเวอร์/
5˚C
5.25 inch optical disk drive bay / Wadah drive disk
optik 5,25 inc / ช่องเสียบออปติคัลดิสก์ไดรฟ์ 5.25
นิ้ว/
/
Microphone port / Port mikrofon/ พอร์ตไมโครโฟน/
Headphone port / Port headphone/ พอร์ตหูฟัง/
USB 2.0 port / Port USB 2.0/ พอร์ต USB 2.0/
USB 3.0 port/ Port USB 3.0/ พอร์ต USB 3.0/
Reset button/ Tombol atur ulang / ปุ่มรีเซ็ต
/ /
/
HDD LED / LED HDD / LED HDD/ /
/
/
/
/
WARNING/ PERINGATAN/ คำเตือน/ تحذير / :
• Setting the voltage selector wrong may seriously damage your system.
• Kesalahan saat menetapkan pengatur tegangan dapat menyebabkan kerusakan serius
pada sistem.
• การตั้งค่าตัวเลือกแรงดันไฟฟ้าผิดอาจทำให้เกิดความเสียหายกับระบบของ คุณอย่างรุนแรง
• Obtain a detailed User Manual from your Desktop PC at C:\Program Files(X86)\ASUS\eManual or the ASUS support site at http://support.asus.com.
• Dapatkan Panduan Pengguna rinci dari PC Desktop di
• รับคู่มือผู้ใช้อย่างละเอียดจากเดสก์ทอป PC ของคุณที่ C:\Program Files(X86)\ASUS\eManual หรือไซต์สนับสนุนของ ASUS ที่ http://support.asus.com
• Illustrations are for reference only. Actual product specications may vary.
C:\Program Files(X86)\ASUS\eManual atau situs dukungan ASUS di http://support.asus.com.
• Gambar hanya sebagai referensi. Spesikasi produk yang sebenarnya dapat berbeda
• ภาพสาธิตใช้สำหรับการอ้างอิงเท่านั้น ข้อมูลจำเพาะผลิตภัณฑ์ที่แท้จริงอาจแตกต่างจากนี้
BM6AE(MD780)
Page 2
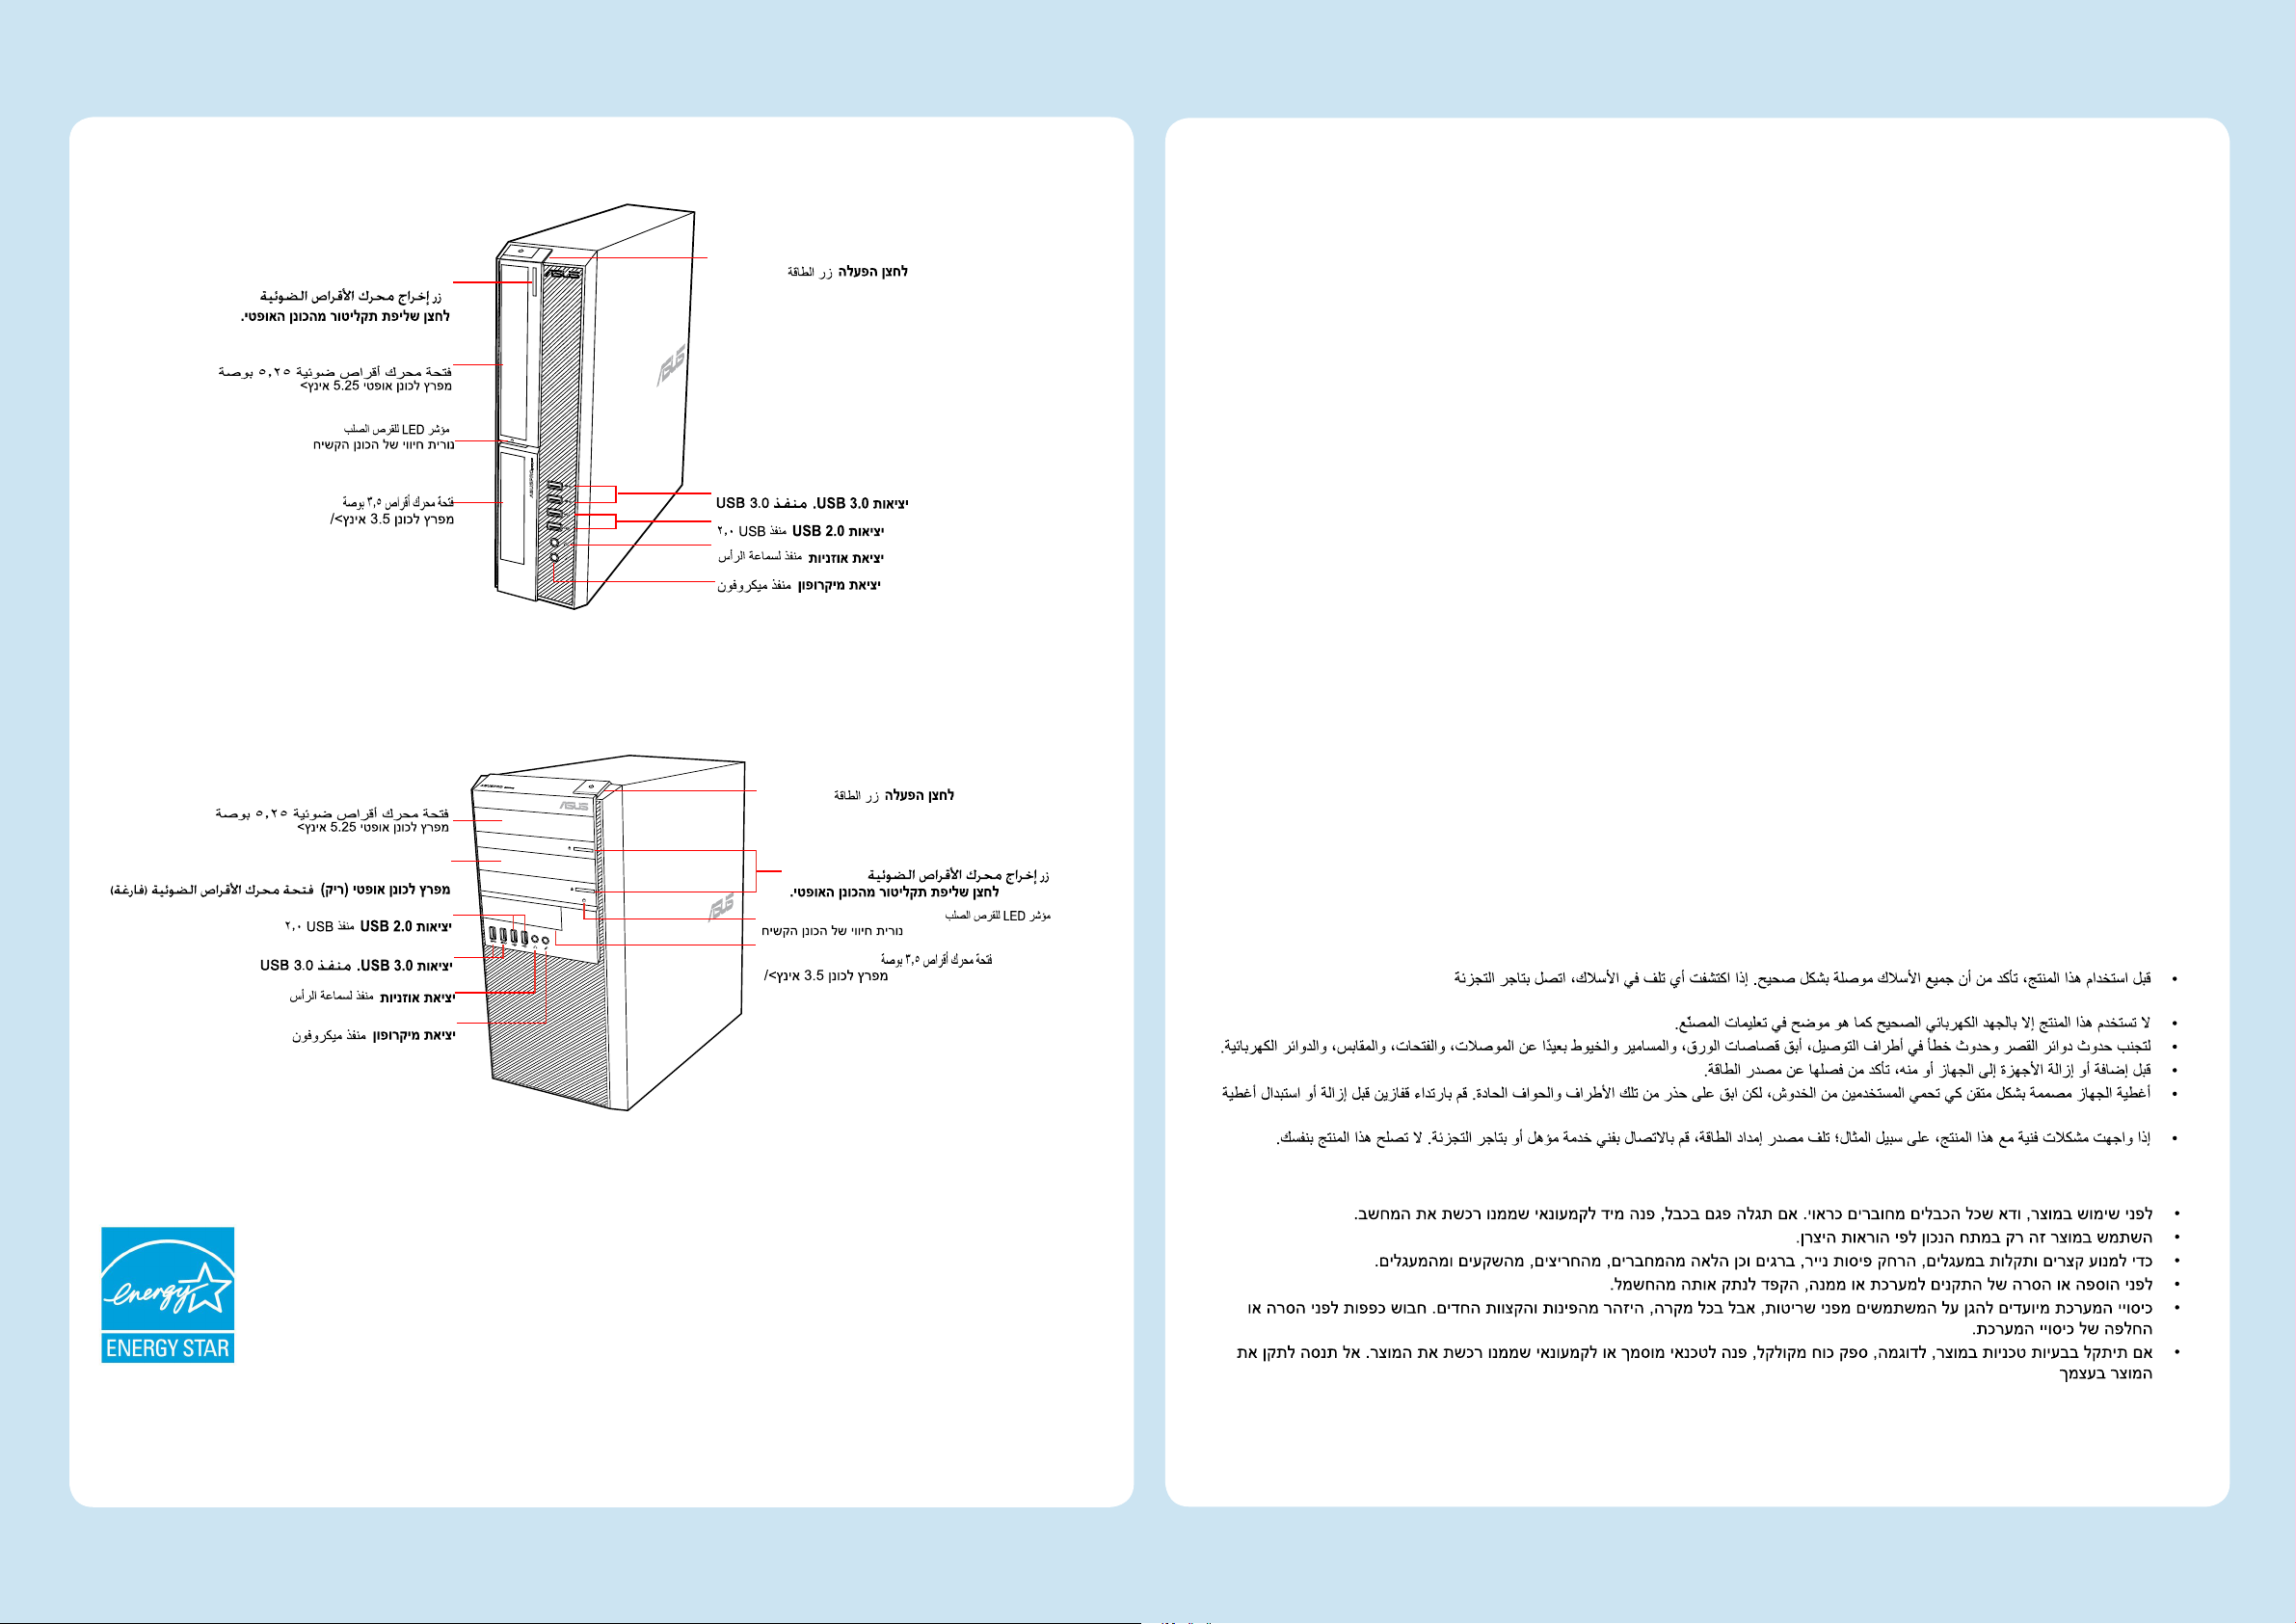
optical disk drive eject button/ tombol
pelepas drive disk optik/ปุ่มดีดออปติคัลดิส
ก์ไดรฟ์ออก/ /
5.25 inch optical disk drive bay / Wadah drive disk
optik 5,25 inc / ช่องเสียบออปติคัลดิสก์ไดรฟ์ 5.25
นิ้ว/
HDD LED / LED HDD / LED HDD/ /
3.5 inch drive bay/ Wadah drive 3,5 inci/
ช่องใส่ไดรฟ์ 3.5 นิ้ว/
/
/
BP1AE(SD780)
Power button/ Tombol daya /
ปุ่มเพาเวอร์/ /
USB 3.0 port/ Port USB 3.0/ พอร์ต USB 3.0/
USB 2.0 port / Port USB 2.0/ พอร์ต USB 2.0/
Headphone port / Port headphone/ พอร์ตหูฟัง/
Microphone port / Port mikrofon/ พอร์ตไมโครโฟน/
/
/
/
/
Safety information
• Before using this product, ensure that all cables are correctly connected. If you detect any cable damage, contact your retailer
immediately.
• Use this product only with the correct voltage as instructed by the manufacturer.
• To avoid short circuits and faulty contacts, keep scraps of paper, screws, and threads away from connectors, slots, sockets, and
circuits.
• Before adding or removing devices to or from the system, ensure to unplug it from the power source.
• The system covers are elaborately designed to protect users from scratches, but still be careful with those sharp tips and edges. Put
on a pair of gloves before removing or replacing the system covers.
• If you encounter technical problems with this product, e.g. the power supply is broken, contact a qualied service technician or
your retailer. DO NOT service this product yourself.
• Sebelum menggunakan produk ini, pastikan bahwa semua kabel telah tersambung dengan benar. Jika Anda menemukan adanya
kerusakan, segera hubungi agen Anda.
• Gunakan produk ini hanya dengan tegangan yang benar sesuai petunjuk produsen.
• Untuk mencegah hubungan arus pendek dan kerusakan kontak, jauhkan potongan kertas, sekrup, serta benang dari konektor, slot,
soket, maupun sirkuit.
• Sebelum menambah atau menghapus perangkat ke atau dari sistem, pastikan Anda telah melepaskannya dari catu daya.
• Penutup sistem dirancang secara khusus untuk melindungi pengguna dari goresan. Namun, Anda harus tetap berhati-hati terha
dap ujung atau tepian yang tajam. Gunakan sarung tangan sebelum memindahkan atau mengganti penutup sistem.
• Jika Anda mengalami masalah teknis pada produk, misalnya catu daya rusak, hubungi teknisi servis berpengalaman atau agen
terdekat. JANGAN perbaiki sendiri produk ini.
-
5.25 inch optical disk drive bay / Wadah drive disk
optik 5,25 inc / ช่องเสียบออปติคัลดิสก์ไดรฟ์ 5.25
นิ้ว/
optical disk drive bay (empty) / tempat drive disk optik
(kosong) /
USB 2.0 port / Port USB 2.0/ พอร์ต USB 2.0/
USB 3.0 port/ Port USB 3.0/ พอร์ต USB 3.0/
Headphone port / Port headphone/ พอร์ตหูฟัง/
Microphone port / Port mikrofon/ พอร์ตไมโครโฟน/
ช่องเสียบออปติคัลดิสก์ไดรฟ์ (ว่าง)/
/
/
/
/
/
/
ENERGY STAR is a joint program of the U.S. Environmental Protection Agency and the U.S. Department of Energy helping
us all save money and protect the environment through energy ecient products and practices.
All ASUS products with the ENERGY STAR logo comply with the ENERGY STAR standard, and the power management
feature is enabled by default. The monitor and computer are automatically set to sleep after 15 and 30 minutes of user
inactivity. To wake your computer, click the mouse or press any key on the keyboard.
Please visit http://www.energy.gov/powermanagement for detail information on power management and its benets
to the environment. In addition, please visit http://www.energystar.gov for detail information on the ENERGY STAR joint
program.
*Note: Energy Star is NOT supported on Freedos and Linux-based products.
BM1AE
Power button/ Tombol daya /
ปุ่มเพาเวอร์/ /
optical disk drive eject button/ tombol
pelepas drive disk optik/ปุ่มดีดออปติคัลดิส
ก์ไดรฟ์ออก/
/
HDD LED / LED HDD / LED HDD/ /
3.5 inch drive bay/ Wadah drive 3,5 inci/
ช่องใส่ไดรฟ์ 3.5 นิ้ว/
/
• ก่อนการใช้ผลิตภัณฑ์นี้ ให้แน่ใจว่าสายเคเบิลทั้งหมดเชื่อมต่ออย่างถูกต้อง ถ้าคุณพบความเสียหายใดๆ ให้ติดต่อตัวแทนจำหน่าย
ทันที
• ใช้ผลิตภัณฑ์นี้ด้วยแรงดันไฟฟ้าที่ถูกต้อง ตามที่ระบุโดยผู้ผลิตเท่านั้น
• เพื่อหลีกเลี่ยงการลัดวงจรหรือการสัมผัสถูกขั้วที่ทำให้เสียหาย ให้เก็บเศษกระดาษ สกรู และเศษลวดต่างๆ ให้ห่างจากขั้วต่อ สล็อต
ซ็อกเก็ต และแผงวงจร
• ก่อนที่จะเพิ่มหรือนำอุปกรณ์เข้าหรือออกจากระบบ ให้แน่ใจว่าได้ถอดปลั๊กอุปกรณ์จากแหล่งจ่ายไฟ
• แม้ว่าฝาปิดของระบบได้รับการออกแบบด้วยความประณีตเพื่อป้องกันไม่ให้เกิดรอยขีดข่วนต่อผู้ใช้ แต่ให้ใช้ความระมัดระวังบริเวณที่
เป็น
ปลายแหลม และขอบที่มีคม สวมถุงมือก่อนที่คุณจะถอดหรือใส่ฝาปิดของระบบ
• ถ้าคุณมีปัญหาทางด้านเทคนิคกับผลิตภัณฑ์นี้ เช่น แหล่งจ่ายไฟเสีย โปรดติดต่อช่างเทคนิคบริการที่มีคุณสมบัติ หรือร้านค้าที่คุณซื้อ
ผลิตภัณฑ์มา อย่าซ่อมแซมผลิตภัณฑ์นี้ด้วยตัวคุณเอง
15060-0DR0B1DP
 Loading...