

Page 1
AR200
2U RAID Storage Subsystem
User Guide
Page 2

Disclaimer/Copyrights
No part of this manual, including the products and software described in it, may be reproduced,
transmitted, transcribed, stored in a retrieval system, or translated into any language in any
form or by any means, except documentation kept by the purchaser for backup purposes, without
the express written permission of ASUSTeK COMPUTER INC. (“ASUS”).
ASUS PROVIDES THIS MANUAL “AS IS” WITHOUT WARRANTY OF ANY KIND, EITHER
EXPRESS OR IMPLIED, INCLUDING BUT NOT LIMITED TO THE IMPLIED WARRANTIES
OR CONDITIONS OF MERCHANTABILITY OR FITNESS FOR A PARTICULAR PURPOSE.
IN NO EVENT SHALL ASUS, ITS DIRECTORS, OFFICERS, EMPLOYEES OR AGENTS BE
LIABLE FOR ANY INDIRECT, SPECIAL, INCIDENTAL, OR CONSEQUENTIAL DAMAGES
(INCLUDING DAMAGES FOR LOSS OF PROFITS, LOSS OF BUSINESS, LOSS OF USE OR
DA T A, INTERRUPTION OF BUSINESS AND THE LIKE), EVEN IF ASUS HAS BEEN ADVISED
OF THE POSSIBILITY OF SUCH DAMAGES ARISING FROM ANY DEFECT OR ERROR IN
THIS MANUAL OR PRODUCT.
Product warranty or service will not be extended if: (1) the product is repaired, modified or
altered, unless such repair, modification of alteration is authorized in writing by ASUS; or (2) the
serial number of the product is defaced or missing.
Products and corporate names appearing in this manual may or may not be registered trademarks
or copyrights of their respective companies, and are used only for identification or explanation
and to the owners’ benefit, without intent to infringe.
The product name and revision number are both printed on the product itself. Manual revisions
are released for each product design represented by the digit before and after the period of the
manual revision number. Manual updates are represented by the third digit in the manual revision
number.
For previous or updated manuals, BIOS, drivers, or product release information, contact ASUS
at http://www.asus.com.tw or through any of the means indicated on the following page.
SPECIFICATIONS AND INFORMATION CONTAINED IN THIS MANUAL ARE FURNISHED
FOR INFORMA TIONAL USE ONL Y, AND ARE SUBJECT TO CHANGE A T ANY TIME WITHOUT
NOTICE, AND SHOULD NOT BE CONSTRUED AS A COMMITMENT BY ASUS. ASUS
ASSUMES NO RESPONSIBILITY OR LIABILITY FOR ANY ERRORS OR INACCURACIES
THAT MAY APPEAR IN THIS MANUAL, INCLUDING THE PRODUCTS AND SOFTWARE
DESCRIBED IN IT.
Copyright © 2003 ASUSTeK COMPUTER INC. All Rights Reserved.
Product Name: ASUS AR200
Manual Edition: First Edition V1 (E1287)
Release Date: May 2003
ii
Page 3

Contents
Disclaimer/Copyrights .....................................................................ii
Contents ......................................................................................... iii
Notices ...........................................................................................iv
Safety information ...........................................................................v
About this guide..............................................................................vi
ASUS contact information ............................................................. vii
AR200 specifications summary .................................................... viii
Chapter 1: Product introduction ......................................... 1-1
1.1 Package contents............................................................... 1-2
1.1.1 Standard items....................................................... 1-2
1.1.2 Optional items........................................................ 1-2
1.2 System overview ................................................................ 1-3
1.2.1 Front panel features............................................... 1-3
1.2.2 Rear panel features ............................................... 1-3
1.2.3 Internal features ..................................................... 1-4
1.3 System power button and LEDs......................................... 1-5
1.4 DA3100 RAID controller ..................................................... 1-6
Chapter 2: Hardware setup.................................................. 2-1
2.1 Removing the chassis cover .............................................. 2-2
2.2 Installing SCSI hard disk drives.......................................... 2-3
2.3 Cooling system................................................................... 2-4
2.4 SCSI backplane boards...................................................... 2-5
2.5 System interface board ...................................................... 2-6
2.6 DA3100 connectors............................................................ 2-7
2.7 Power supply...................................................................... 2-8
2.7.1 Power cable connections ....................................... 2-8
2.7.2 Removing a power supply module......................... 2-8
2.8 System connections ........................................................... 2-9
2.8.1 SCSI cabling for cluster system (MSCS) ............... 2-9
2.8.2 Standalone system ................................................ 2-9
2.8.3 Storage sub-system ............................................. 2-10
iii
Page 4

Notices
Federal Communications Commission Statement
This device complies with FCC Rules Part 15. Operation is subject to the
following two conditions:
• This device may not cause harmful interference, and
• This device must accept any interference received including interference
that may cause undesired operation.
This equipment has been tested and found to comply with the limits for a
Class B digital device, pursuant to Part 15 of the FCC Rules. These limits
are designed to provide reasonable protection against harmful interference
in a residential installation. This equipment generates, uses and can
radiate radio frequency energy and, if not installed and used in
accordance with manufacturer’s instructions, may cause harmful
interference to radio communications. However, there is no guarantee that
interference will not occur in a particular installation. If this equipment does
cause harmful interference to radio or television reception, which can be
determined by turning the equipment off and on, the user is encouraged to
try to correct the interference by one or more of the following measures:
• Reorient or relocate the receiving antenna.
• Increase the separation between the equipment and receiver.
• Connect the equipment to an outlet on a circuit different from that to
which the receiver is connected.
• Consult the dealer or an experienced radio/TV technician for help.
WARNING! The use of shielded cables for connection of the monitor
to the graphics card is required to assure compliance with FCC
regulations. Changes or modifications to this unit not expressly
approved by the party responsible for compliance could void the user’s
authority to operate this equipment.
Canadian Department of Communications Statement
This digital apparatus does not exceed the Class B limits for radio noise
emissions from digital apparatus set out in the Radio Interference
Regulations of the Canadian Department of Communications.
This class B digital apparatus complies with Canadian ICES-003.
iv
Page 5

Safety information
Electrical Safety
IMPORTANT
•
Before installing or removing signal cables, ensure that the power
cables for the system unit and all attached devices are unplugged.
• T o prevent electrical shock hazard, disconnect the power cable from
the electrical outlet before relocating the system.
• When adding or removing any additional devices to or from the
system, ensure that the power cables for the devices are unplugged
before the signal cables are connected. If possible, disconnect all
power cables from the existing system before you add a device.
• If the power supply is broken, do not try to fix it by yourself. Contact
a qualified service technician or your dealer.
CAUTION
This product is equipped with a three-wire power cable and
plug for the user’s safety. Use the power cable with a properly
grounded electrical outlet to avoid electrical shock.
Operation Safety
IMPORTANT
• Any mechanical operation on this server must be conducted by
certified or experienced engineers.
• Before operating the server, carefully read all the manuals
included with the server package.
• Before using the server, make sure all cables are correctly
connected and the power cables are not damaged. If any
damage is detected, contact your dealer as soon as possible.
• To avoid short circuits, keep paper clips, screws, and staples
away from connectors, slots, sockets and circuitry.
• Avoid dust, humidity, and temperature extremes. Place the
server on a stable surface.
v
Page 6
About this guide
Audience
This user guide is intended for system integrators, and experienced users
with at least basic knowledge on RAID configuration.
Contents
This guide contains the following parts:
1. Chapter 1: System overview
This chapter describes the general features of the AR200 RAID
system. It includes sections on front panel and rear panel
specifications.
2. Chapter 2: Hardware setup
This chapter lists the hardware setup procedures that you have to
perform when installing system components.
Conventions
To make sure that you perform certain tasks properly, take note of the
following symbols used throughout this manual.
WARNING: Information to prevent injury to yourself when trying to
complete a task.
CAUTION: Information to prevent damage to the components when
trying to complete a task.
IMPORTANT: Information that you MUST follow to complete a task.
NOTE: Tips and information to aid in completing a task.
vi
Page 7

ASUS contact information
ASUSTeK COMPUTER INC. (Asia-Pacific)
Address: 150 Li-Te Road, Peitou, Taipei, Taiwan 112
General Tel: +886-2-2894-3447
General Fax: +886-2-2894-3449
General Email: info@asus.com.tw
Technical Support
MB/Others (Tel): +886-2-2890-7121 (English)
Notebook (Tel): +886-2-2890-7122 (English)
Desktop/Server (Tel): +886-2-2890-7123 (English)
Support Fax: +886-2-2890-7698
Web Site: www.asus.com.tw
ASUS COMPUTER INTERNATIONAL (America)
Address: 44370 Nobel Drive, Fremont, CA 94538, USA
General Fax: +1-510-608-4555
General Email: tmd1@asus.com
Technical Support
Support Fax: +1-510-608-4555
General Support: +1-502-933-8713
Web Site: www.asus.com
Support Email: tsd@asus.com
ASUS COMPUTER GmbH (Germany and Austria)
Address: Harkortstr. 25, 40880 Ratingen, BRD, Germany
General Email: sales@asuscom.de (for marketing requests only)
General Fax: +49-2102-9599-31
Technical Support
Support Hotline: Components: +49-2102-9599-00
Notebook PC: +49-2102-9599-10
Support (Email): www.asuscom.de/kontakt (for online support)
Web Site: www.asuscom.de
Support Fax: +49-2102-9599-11
vii
Page 8

AR200 specifications summary
RAID level support
RAID processor
SCSI interface
SCSI channel
Max. logical devices
Cache RAM
Max. transfer rate
Connectors
Drive partitions
SAF-TE
Management SW
features
RAID 0, 1, 0+1, 3, 5, or JBOD
IBM PowerPC 6031 RISC CPU
Ultra160 SCSI
4 SCSI channels (each channel supports 15 SCSI devices)
6 devices (each logical drive can implement
a different RAID level)
Onboard 128MB registered ECC SDRAM DIMM
160 MB/sec. per channel
2 x 68-pin Ultra160 SCSI
8 partitions for each logical drive, maximum of 64 partitions
Supports SAF-TE (SCSI Access Fault Tolerant Enclosure)
Graphicaland web-based interface for RAID management
Background reconstruction (automatic or manual selection)
Automatic bad sector re-assignment
Automatic drive failure detection
Spare drive operations
(including global and local spare drive)
Fault tolerance
Power supply
Maintenance
Size
Weight
Online hard disk replacement
Supports global and local spare drives
Supports HDD hot-swap feature
Redundant power supply
Input: 115/230V (automatic switching)
Output: 5V, 40A; 12V, 12A; -5V, 0.5A; -12V, 0.5A
Wattage: 280W+280W redundant power supply
LCD panel and RS-232 port RAID configuration
Uses SNMP protocol for remote control functions
59.5 cm (L) x 43.0 cm (W) x 8.8 cm (H)
17.5 kg (without HDDs)
viii
Page 9

Chapter 1
This chapter describes the general features
of the AR200 RAID system. It includes
sections on front panel, rear panel, and
internal features of the system.
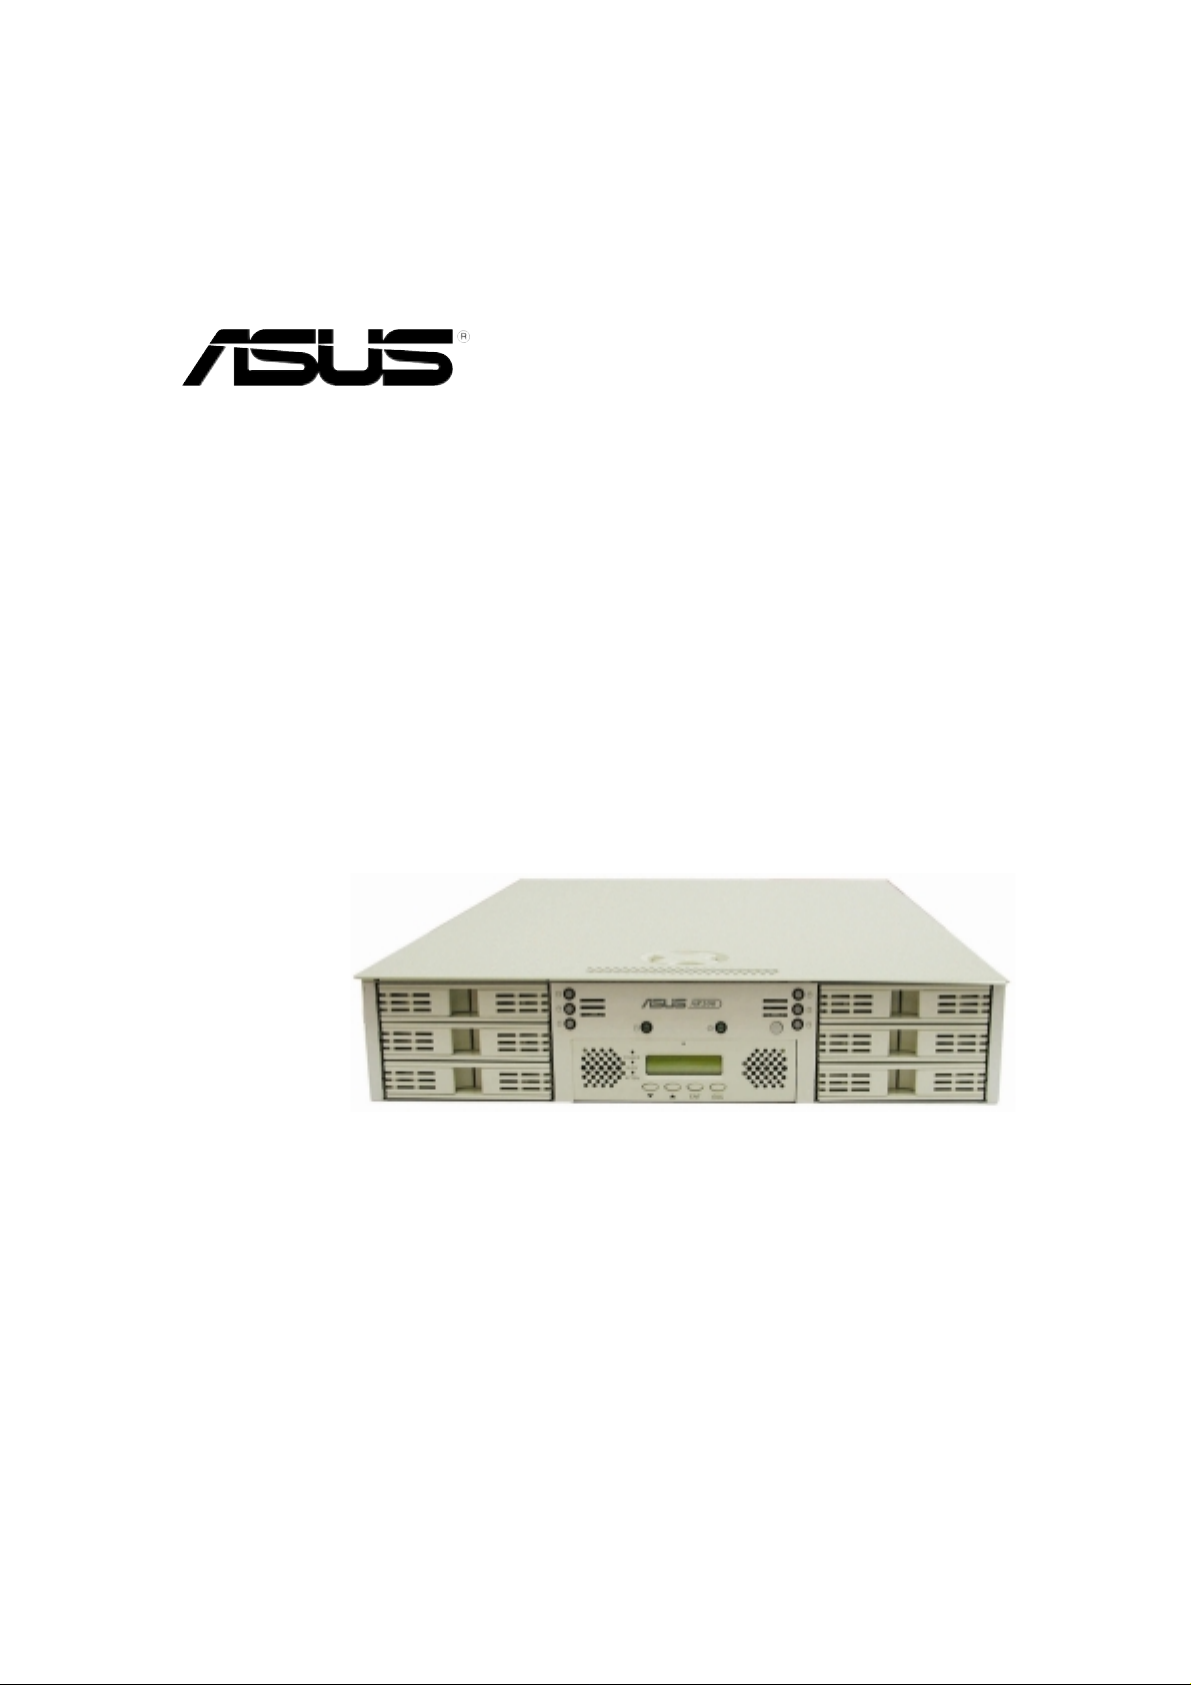
ASUS AR200 RAID system
Product introduction
1-1
Page 10

1.1 Package contents
1.1.1 Standard items
• Chassis AR-20 2U rackmount (19”)
• Power supply 280W redundant
• Cables Internal SCSI, management
• Terminator LVD/SE Active Terminator (2 pcs.)
• RAID controller DA3100
• Memory 128MB registered ECC SDRAM
• Rackmount rails R-20 rackmount rail kit
• Documentation AR200 User Guide
DA3100 Hardware Manual
1.1.2 Optional items
• Hard disk drives Up to six SCA-2 Ultra160 SCSI
If any of the above items is damaged or missing, contact your retailer.
1-2
Chapter 1: Product introduction
Page 11

1.2 System overview
The AR200 is a 2U RAID subsystem in a 2U chassis and configured on
the DA3100 RAID controller. The controller includes four channels that
allow several hard disk configurations to provide more than 365GB storage
capacity while keeping optimal fault tolerance and performance.
The system supports RAID 0, 1, 3, 5, 0+1, and JBOD protocols, and
comes with a comprehensive LCD panel information for easy
configuration.
1.2.1 Front panel features
Hard disk drive bays Hard disk drive baysSystem LEDs
ID0
ID1
ID2
DA3100 RAID controller
See section “1.3 System power button and LEDs” for the LED
descriptions, and section “1.4 DA3100 RAID controller” for the RAID
controller front panel information.
1.2.2 Rear panel features
12 3
ID3
ID4
ID5
4
1. Redundant power supply units
2. Redundant AC-In connectors
3. Terminators
4. Power supply power LED
576
ASUS AR200 RAID system
5. SCSI host channel 2
6. RS-232 management port
7. SCSI host channel 1
1-3
Page 12

1.2.3 Internal features
When you remove the top cover of the chassis, you will see the preinstalled components of the RAID system.
Refer to “Chapter 2 Hardware Setup” for instructions on removing and
installing the top cover of the chassis.
Rear panel
10
1
2
9
3
4
Front panel
5
1. PCI cage*
2. System interface board
3. 9-cm system fan
4. SCSI backplane board
5. Three SCSI drive bays
* The PCI cage is not used in this system.
6
6. DA3100 RAID controller
7. Three SCSI drive bays
8. SCSI backplane board
9. Redundant power supply
10. 12-cm system blower (underneath)
7
8
All the components of the AR200 RAID system are pre-installed and all
the internal cables are properly connected before shipping. Do not
remove any components or disconnect the cables. Chapter 2 provides
details on the internal components, and describes all the cable
configurations in case you accidentally detached any cable.
1-4
If you encounter any problems with the system, contact ASUS
technical support. See page vii of this user guide for ASUS contact
information.
Chapter 1: Product introduction
Page 13

1.3 System power button and LEDs
1
2
3
7
1-3 Hard disk drive power and status LEDs
(ID0, ID1, ID2 HDDs)
4-6 Hard disk drive power and status LEDs
(ID3, ID4, ID5 HDDs)
7. Hard disk activity LED
8. Power LED
9. Power button
8
9
4
5
6
Hard disk drive power and status LEDs
The SCSI hard drives have individual LEDs. When a hard drive is
installed, the specific LED for that hard drive is ON (steady green) under
normal conditions. If there is a problem, the LED may turn to a steady
amber. These LEDs are unlit when there is no hard drive is present.
Hard disk activity LED
This LED flickers (green) whenever there is a SCSI hard disk activity. This
LED is unlit when there is no disk activity.
Power LED
This LED lights up (steady green) when you apply power to the system by
pressing the power button. This LED goes off when you turn off the
system.
Power Button
The system power button is connected to the motherboard and is used for
turning the system ON or OFF.
ASUS AR200 RAID system
1-5
Page 14

1.4 DA3100 RAID controller
The front panel of the DA3100 RAID controller consists of an LCD display,
status LEDs, and navigation buttons that allow you full access to system
information and complete control of the RAID operation.
For detailed information on the RAID controller, refer to the DA3100
Hardware Manual that came with your system package.
8
1
2
3
4567
1. POWER LED Lights up when the power is ON
2. BUSY LED Unlit (OFF) when there is no disk activity
Blinks when data on any of the HDDs is being accessed
Lighted (ON) when any unprocessed data is still in the
cache memory
3. ATTEN LED Lights up when an error message appears, or when service
is required (e.g. when a drive fails and needs to be
replaced)
4. Down arrow Scroll down to view available options
5. Up arrow Scroll up to return to previous options
6. ENT Selects and/or executes an option
7. ESC Returns to the previous menu or cancels a selection
8. 2x16 LCD Displays system throughput during normal operation,
approximately 128Kbps per division. Displays messages
for configuration and management.
Do not remove the DA3100 RAID controller unit from the AR200
system. If you encounter any problems with the controller, or if you
wish to upgrade the memory, contact ASUS technical support. See
page vii of this user guide for ASUS contact information.
1-6
Chapter 1: Product introduction
Page 15

Chapter 2
This chapter describes the internal hardware
components and provides the procedures for
installing and removing hard disk drives. The
SCSI cable connections is also described and
illustrated in this chapter .
ASUS AR200 RAID system
Hardware setup
2-1
Page 16

2.1 Removing the chassis cover
The AR200 chassis is a 2U form factor designed for easy assembly and
disassembly, making the installation of internal components very
convenient. At the top of the chassis is a rotating lock that secures the
cover to the chassis.
Unlocking the Cover
To unlock the cover, turn the rotating lock clockwise until the triangle mark
points to OPEN.
Triangle Mark
Rotating Lock
CLOSE
OPEN
Removing the cover
Slide the top cover toward the front for about an inch, then lift it from the
chassis.
The top cover of the chassis has locking tabs at the rear end that
connect to the inner side of the back panel. Make sure to disengage
the locking tabs before lifting up the cover.
2-2
Chapter 2: Hardware setup
Page 17

2.2 Installing SCSI hard disk drives
The RAID system comes with six externally accessible hard disk drive
bays.
Hot-Swap Drive Tray
On each of the HDD bays is a hotswap tray for mounting a hard disk
drive. Flip open the tray levers to
release the tray, then slide the tray out
of the chassis.
Tray Levers
Take note of the drive tray orientation before you slide it out. The tray
will not fit back into the bay if you insert it the wrong way.
SCSI HDD Mounting
Place the SCSI hard disk drive to
the hot-swap tray and secure it
with four screws as shown.
HDD Installation
After the drive is secure on the tray,
carefully insert the drive into the bay,
then push the levers back in place.
ASUS AR200 RAID system
2-3
Page 18

2.3 Cooling system
The chassis includes an 8-cm system fan located at the front end of the
PCI cage, and a 12-cm system blower (underneath a metal hood) located
between the PCI cage and the power supply.
The metal hood is held in place by two tabs (one on each side) that rest on
the edge of the PCI cage and power supply, and two hooks attached to the
rear panel.
To remove the 12-cm system blower:
1. Disconnect the fan cable from the connector (labeled FAN1) on the
power interface board.
2. Lift up the inner side (with tabs) of the metal hood and detach the two
hooks from the rear panel edge.
Metal hood
12-cm System blower
(underneath the meatal hood)
8-cm System fan
2-4
Chapter 2: Hardware setup
Page 19

2.4 SCSI backplane boards
The system includes two SCSI backplane boards to support up to six
Ultra160 SCA SCSI hard disk drives. The backplane design incorporates a
hot-swap feature to allow easy connection or removal of SCSI hard disks.
Front side
The front side of a backplane has three 80-pin connectors available for
SCA SCSI hard disk drives. The hard disks are externally accessible from
the system front panel.
80-pin SCSI connectors
SLOT1
SLOT2
SLOT3
Back side
The back side of a backplane includes the SCSI, power, SMB, and LED
connectors. The two backplane boards in the AR200 RAID system are the
same but have different cable connections. The following pictures show
the right and left backplane board connectors and indicate to which they
are connected.
Left board (viewed from the back) Right board (viewed from the back)
SCSI In connector
(to DA3100 SCSI Ch. 3)
SMB In/Out
Upper pins: to SMB In/Out
on right board
Bottom pins: to system
interface board
SCSI In connector
(to DA3100 SCSI Ch. 0)
SMB In/Out
Upper pins: to SMB In/Out
on left board
Bottom pins: to power supply
Backplane
power connector
(connect P3 plug from
power supply)
SCSI Out connector
(for terminator on the rear panel)
HDD LED
connector
ASUS AR200 RAID system
Backplane
power connector
(connect P5 plug from
power supply))
SCSI Out connector
(for terminator on the rear panel)
HDD LED
connector
2-5
Page 20

2.5 System interface board
The system interface board interconnects the backplane boards, power
supply, cooling fans, and the DA3100 controller. Refer to the illustration
below for the specific cables connected to the interface board.
All the cables are already connected when you receive the system.
You do not need to disconnect the cables when installing drives or
creating a RAID configuration.
FAN1 connector
(connect fan cable from
12-cm system blower)
24-pin power connector
(connect P1 plug from power supply)
SMBus connector
(to I2C connector on DA3100 controller)
J2 (to power button on the front panel)
J1 (to SMB In/Out bottom pins on left backplane board)
FAN2 connector
(to 8-cm system fan on the PCI cage)
Power connector
(to left power connector on DA3100 controller)
2-6
Chapter 2: Hardware setup
Page 21

2.6 DA3100 connectors
Inside the DA3100 RAID controller are connectors that connect to other
system components using interface and power cables. Refer to the
illustration below for the specific cable connections.
All the cables are already connected when you receive the system.
You do not need to disconnect the cables when installing drives or
creating a RAID configuration.
SCSI Channel 2
(to SCSI host channel 2
on the rear panel)
SCSI Channel 3
(to SCSI In connector
on the left backplane)
Power connector
(connect 4-pin power plug
from system interface board)
SCSI Channel 0
(to SCSI In connector
on the right backplane)
SCSI Channel 1
(to SCSI host channel 1
on the rear panel)
RS-232 connector
(to COM1 port on the
rear panel)
ASUS AR200 RAID system
I2C connector
(to SMBus connector on
system interface board)
Power connector
(connect P4 plug from
power supply)
2-7
Page 22

2.7 Power supply
2.7.1 Power cable connections
The AR200 power supply unit (PSU) consists of two redundant power
supply modules with five power plugs. The picture below indicates where
you need to connect the PSU power plugs.
SMBus connector on
left backplane board
Left backplane board
P5
Right backplane board
DA3100 controller
P2
P3
P4
2
P1
System interface board
2.7.2 Removing a power supply module
The power supply modules that came with the system is redundant and
hot-swappable. This feature allows you to remove or change either one of
the modules even while the system in powered ON.
To remove a power supply module, squeeze and push down the handle of
the module that you wish to remove to release the module. The module
ejects for about 2 inches when released. Carefully pull out the module.
2-8
Chapter 2: Hardware setup
Page 23

2.8 System connections
2.8.1 SCSI cabling for cluster system (MSCS)
2.8.2 Standalone system
ASUS AR200 RAID system
2-9
Page 24

2.8.3 Storage sub-system
Refer to the following diagram to connect AR200 with AR201 (storage
cabinet) when creating a storage sub-system.
2-10
Chapter 2: Hardware setup
 Loading...