Asus 90MP01K0-BMUA00 Quick Start Guide

عيرسلا ليغشتلا ليلد

Contents


Package contents..........................................................................................

4

Replacing the switches................................................................................

4

Storing the USB dongle................................................................................

4

Replacing the Logo Plate.............................................................................

4

English........................................................................................

5

.....................................................................................

8

.....................................................................................

10

........................................................................................

12

......................................................................................

15

Français......................................................................................

16

Deutsch......................................................................................

18

Italiano.......................................................................................

20

Español.......................................................................................

22

Português do Brasil...................................................................

24

Pyccкий......................................................................................

26

Čeština........................................................................................

28

Nederlands.................................................................................

30

Suomi ........................................................................................

32

Magyar.......................................................................................

34

Norsk ........................................................................................

36

Polski ........................................................................................

38

Română......................................................................................

40

Svenska......................................................................................

42

Українська.................................................................................

44

ةيبرعلاArabic ........................................................................................

46

Türkçe ........................................................................................

48

Slovenský...................................................................................

50

Notices ...........................................................................................................

52

Warranty Form...............................................................................................

59

Asus 90MP01K0-BMUA00 Quick Start Guide

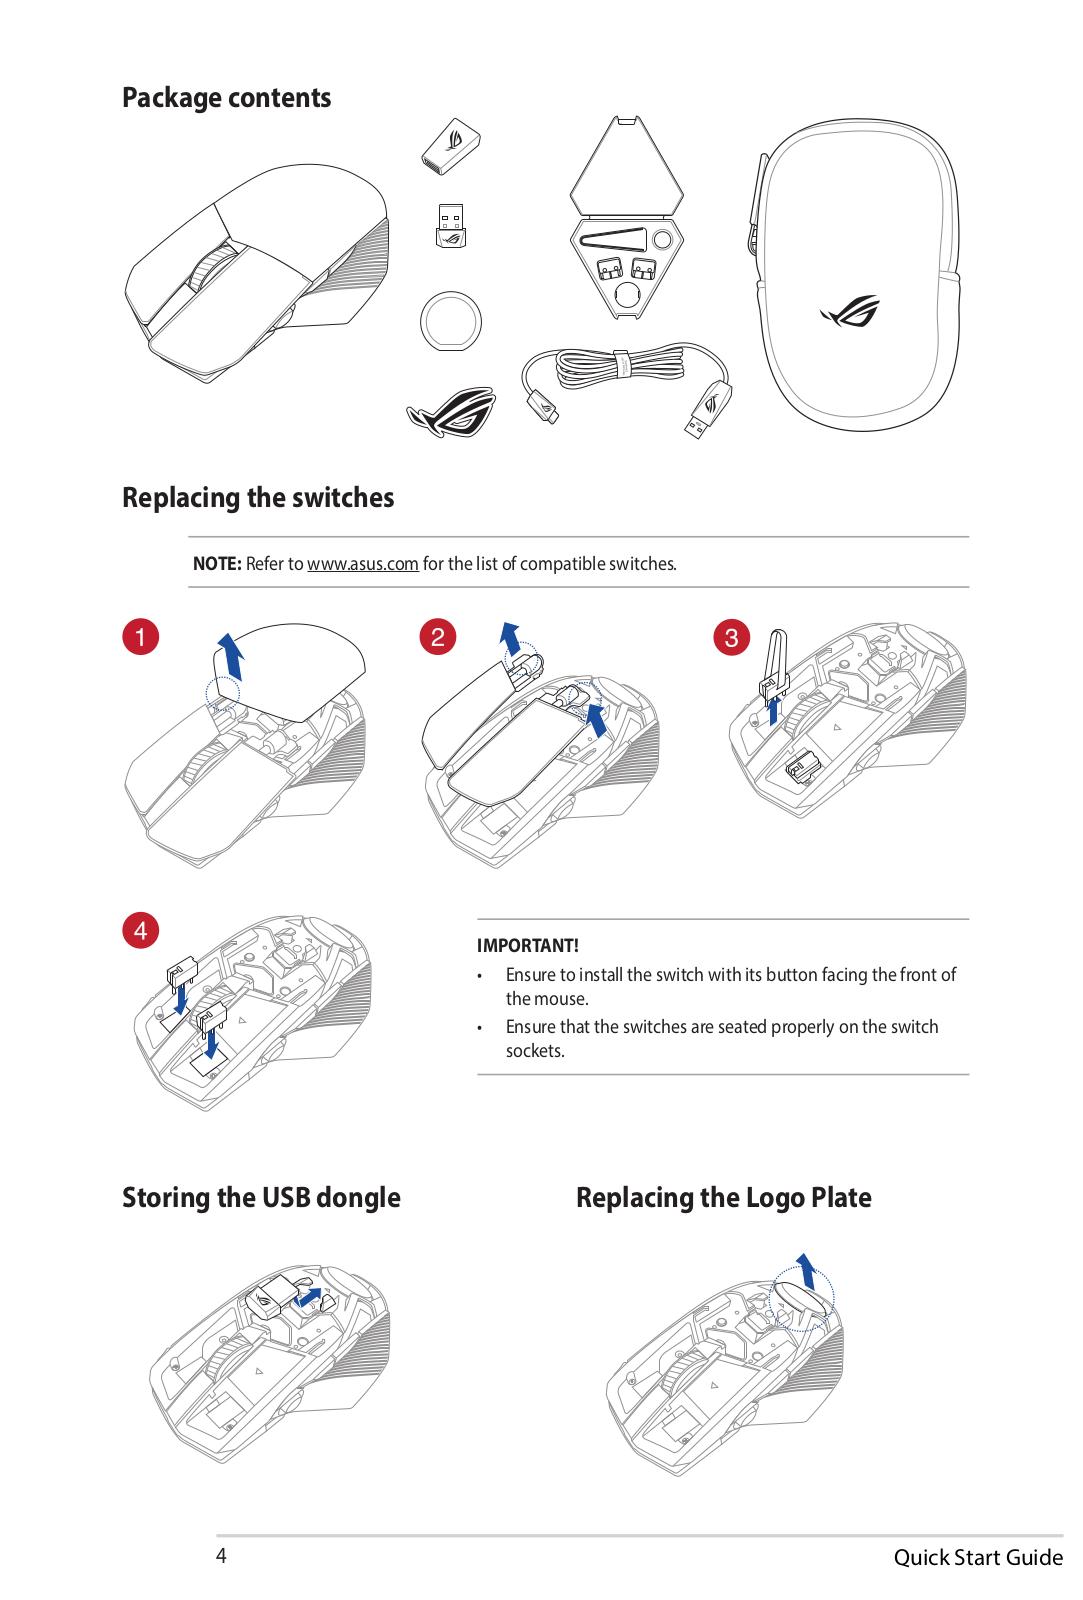
Package contents

Replacing the switches

NOTE: Refer to www.asus.com for the list of compatible switches.

IMPORTANT!

• Ensuretoinstalltheswitchwithitsbuttonfacingthefrontof the mouse.

• Ensurethattheswitchesareseatedproperlyontheswitch sockets.

Storing the USB dongle

Replacing the Logo Plate

4

Quick Start Guide

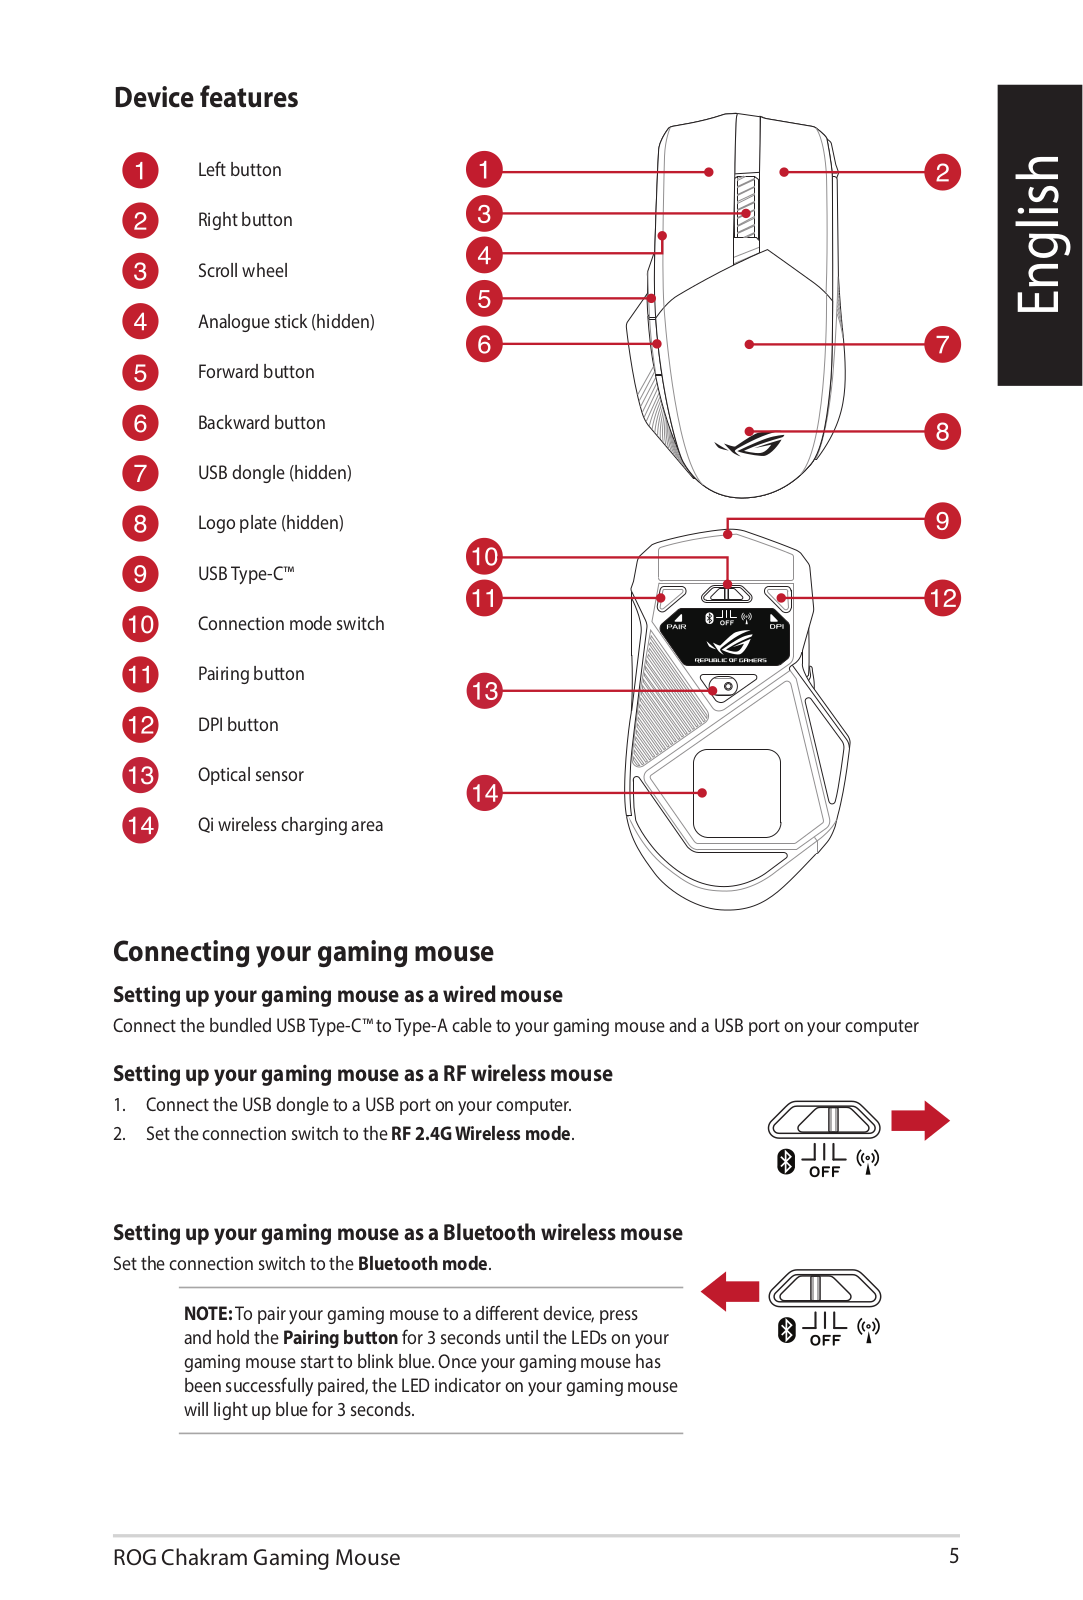
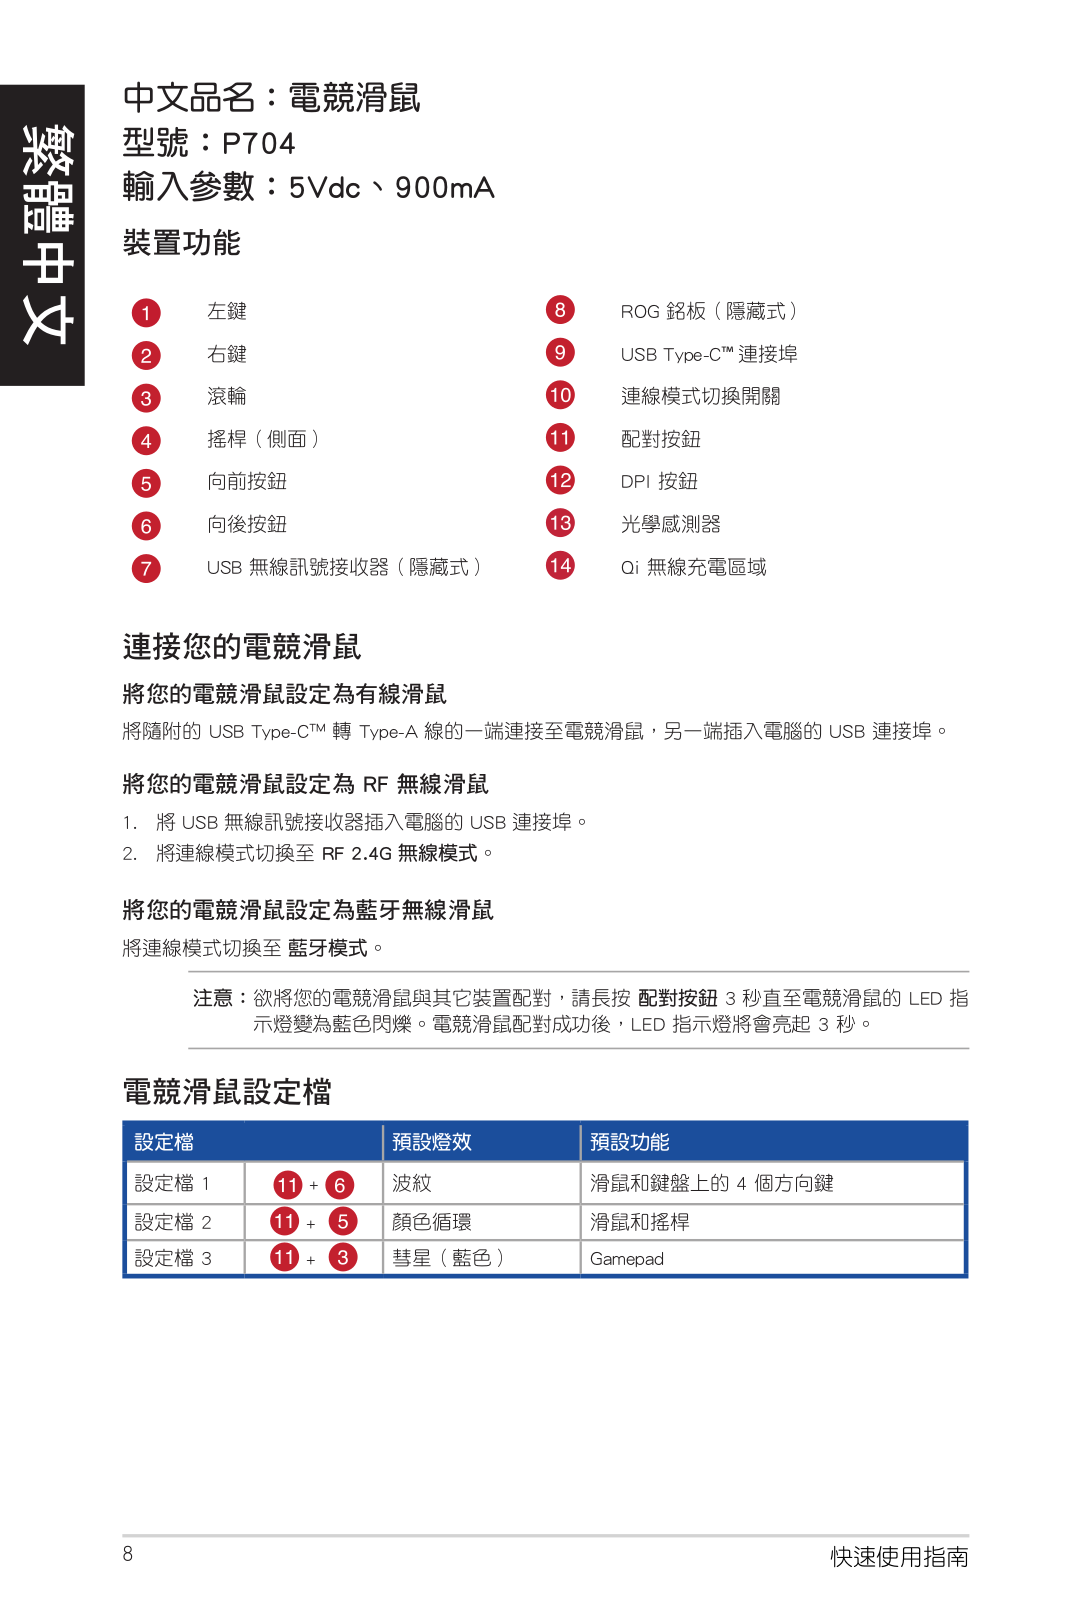
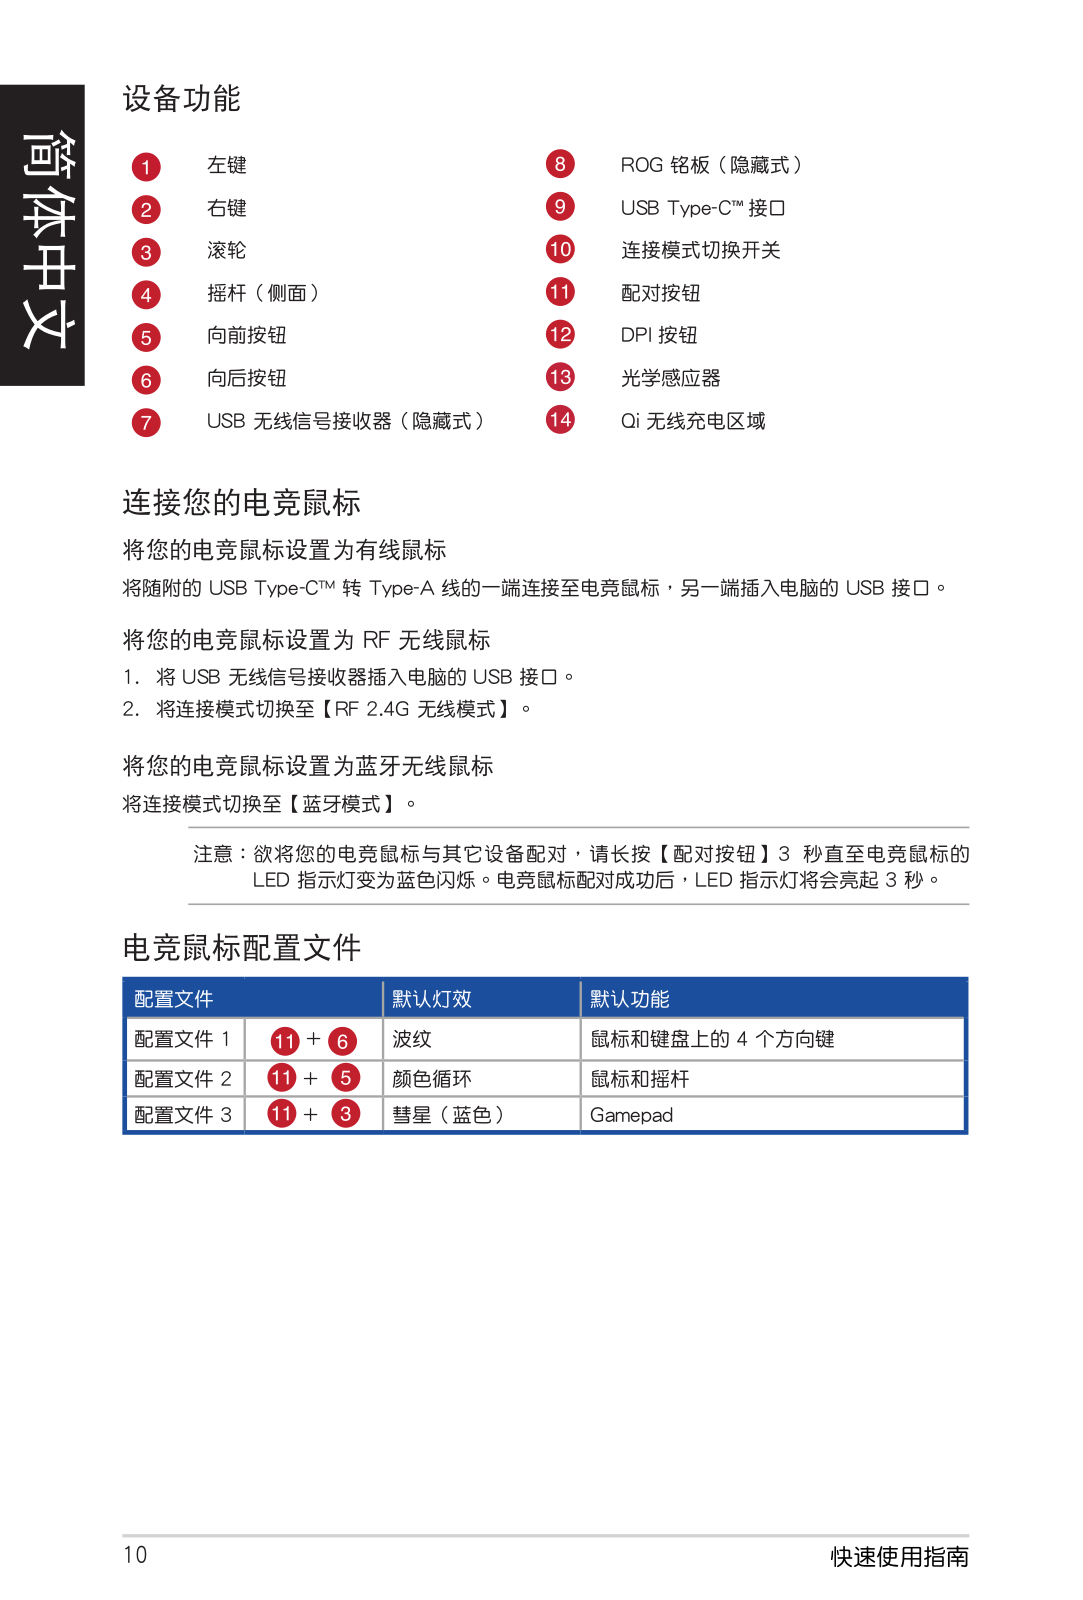
Device features

Leftbutton

Rightbutton

Scrollwheel

Analoguestick(hidden)

Forwardbutton

Backwardbutton

USBdongle(hidden)

Logoplate(hidden)

USBType-C™

Connectionmodeswitch

Pairingbutton

DPIbutton

Opticalsensor

Qiwirelesschargingarea

Connecting your gaming mouse

Setting up your gaming mouse as a wired mouse

ConnectthebundledUSBType-C™toType-AcabletoyourgamingmouseandaUSBportonyourcomputer

Setting up your gaming mouse as a RF wireless mouse

1.ConnecttheUSBdongletoaUSBportonyourcomputer.

2.SettheconnectionswitchtotheRF 2.4G Wireless mode.

Setting up your gaming mouse as a Bluetooth wireless mouse

SettheconnectionswitchtotheBluetooth mode.

NOTE: Topairyourgamingmousetoadifferentdevice,press andholdthePairing button for3secondsuntiltheLEDsonyour gamingmousestarttoblinkblue.Onceyourgamingmousehas beensuccessfullypaired,theLEDindicatoronyourgamingmouse willlightupbluefor3seconds.

English

ROG Chakram Gaming Mouse

5

English

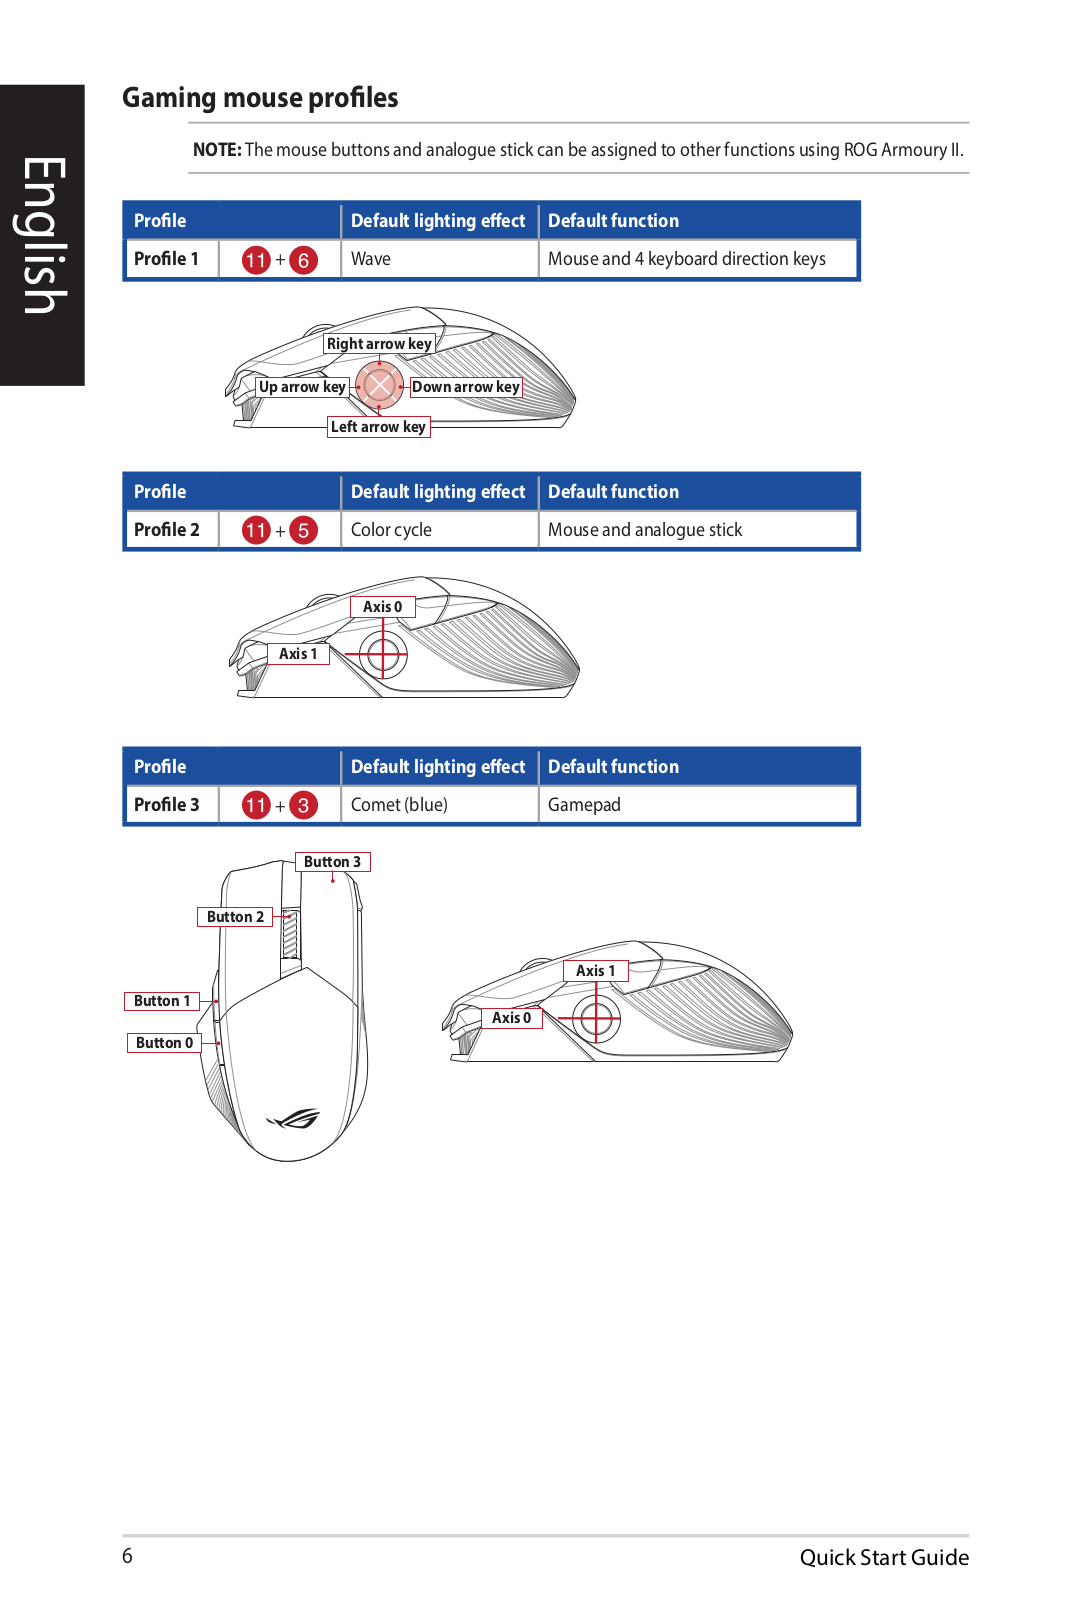
Gaming mouse profiles

NOTE: ThemousebuttonsandanaloguestickcanbeassignedtootherfunctionsusingROGArmouryII.

Profile


Default lighting effect

Default function

Profile 1

+

Wave

Mouseand4keyboarddirectionkeys


Right arrow key


Up arrow key

Down arrow key


Left arrow key


Profile


Default lighting effect

Default function

Profile 2

+

Colorcycle

Mouseandanaloguestick

Axis 0

Axis 1

Profile


Default lighting effect

Default function

Profile 3

+

Comet(blue)

Gamepad


Button 3


Button 2


Axis 1

Button 1


Axis 0


Button 0


6

Quick Start Guide

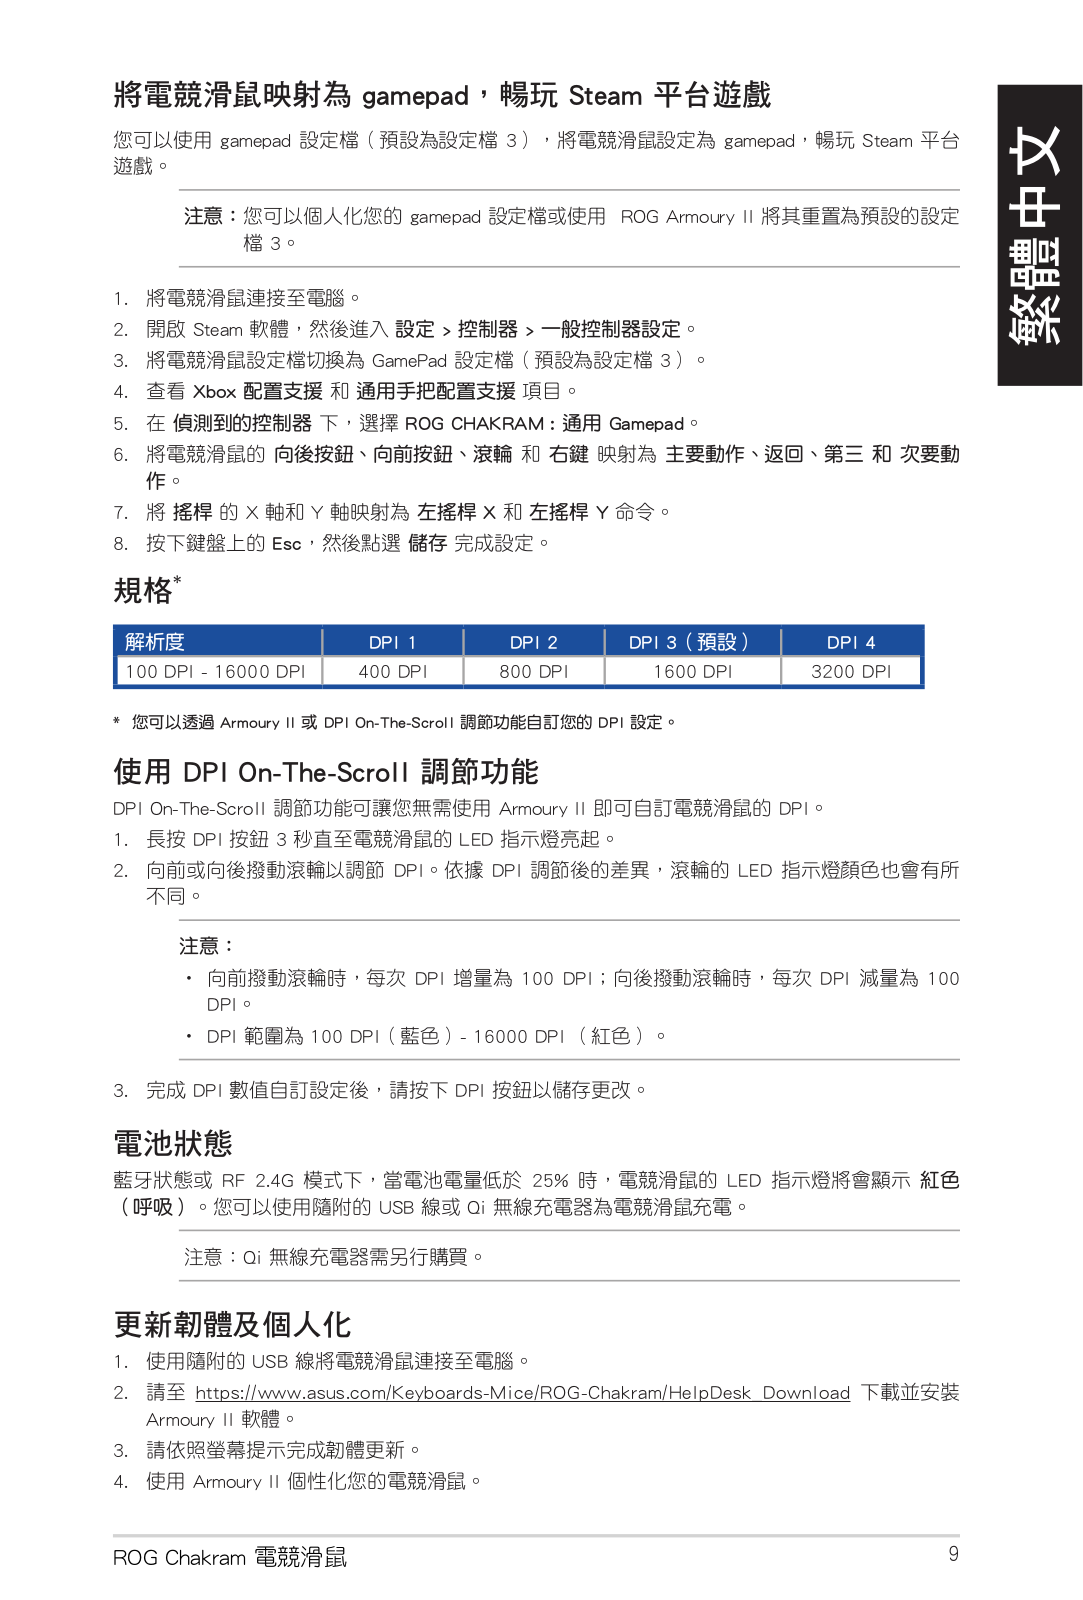
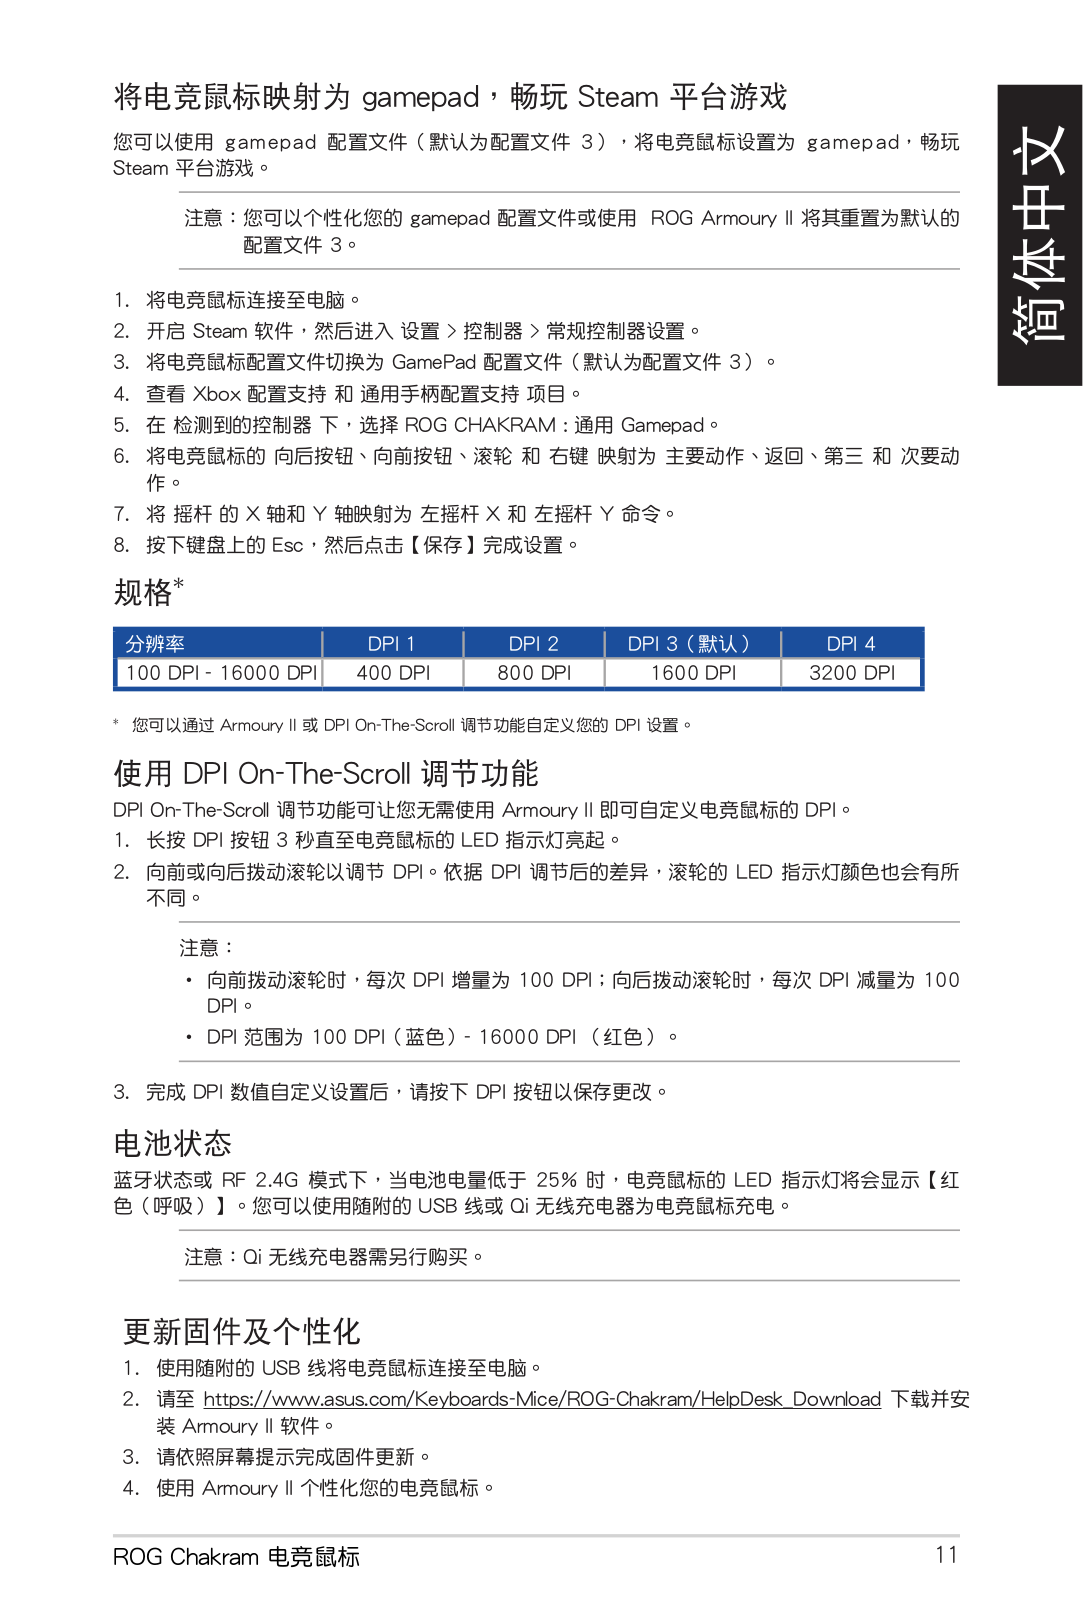
Mapping your gaming mouse as a gamepad for Steam

YoucansetupyourgamingmouseasagamepadforSteamusingthegamepadprofile(defaultedtoProfile3).

NOTE: YoumaycustomizeyourgamepadprofileorresetittothedefaultProfile3usingROGArmouryII.

1.Connectyourgamingmousetoyourcomputer.

2.LaunchSteam,thengotoSettings > Controller > GENERAL CONTROLLER SETTINGS.

3.Switchyourgamingmouseprofiletoyourgamepadprofile(defaultedtoProfile3).

4.Check the Xbox Configuration Support andGeneric Gamepad Configuration Support options.

5.UnderDetected Controllers,selectROG CHAKRAM : Generic Gamepad.

6.Map the Backward button,Forward button,Scroll wheel click,andRight button onyourgamingmouse to the Primary Action,Go back,Tertiary,andSecondary Action commands.

7.Mapthex-axisandy-axisoftheAnalogue stick to the Left Stick X andLeft Stick Y commands.

8.Press Esc onyourkeyboard,thenclickSAVE to complete.

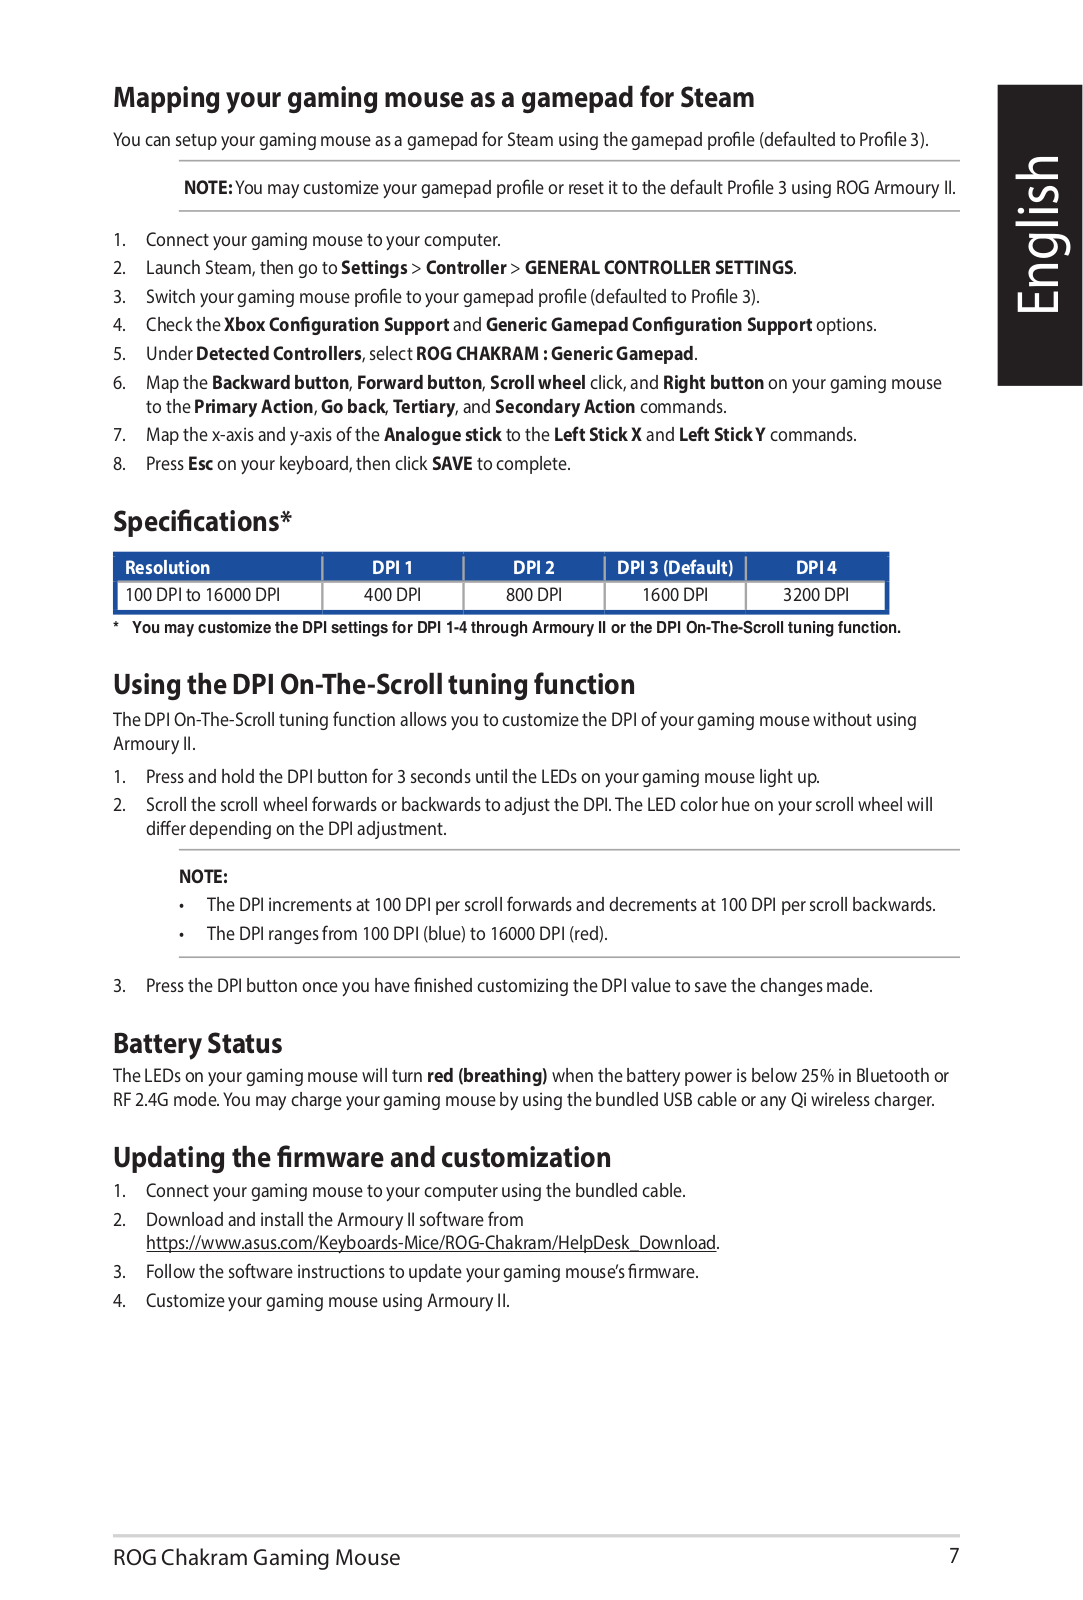
Specifications*

Resolution

DPI 1

DPI 2

DPI 3 (Default)

DPI 4

100 DPI to 16000 DPI

400 DPI

800 DPI

1600 DPI

3200 DPI


* You may customize the DPI settings for DPI 1-4 through Armoury II or the DPI On-The-Scroll tuning function.

Using the DPI On-The-Scroll tuning function

TheDPIOn-The-ScrolltuningfunctionallowsyoutocustomizetheDPIofyourgamingmousewithoutusing ArmouryII.

1.PressandholdtheDPIbuttonfor3secondsuntiltheLEDsonyourgamingmouselightup.

2.ScrollthescrollwheelforwardsorbackwardstoadjusttheDPI.TheLEDcolorhueonyourscrollwheelwill differdependingontheDPIadjustment.

NOTE:

TheDPIincrementsat100DPIperscrollforwardsanddecrementsat100DPIperscrollbackwards.

TheDPIrangesfrom100DPI(blue)to16000DPI(red).

3.PresstheDPIbuttononceyouhavefinishedcustomizingtheDPIvaluetosavethechangesmade.

Battery Status

TheLEDsonyourgamingmousewillturnred (breathing) whenthebatterypowerisbelow25%inBluetoothor RF2.4Gmode.YoumaychargeyourgamingmousebyusingthebundledUSBcableoranyQiwirelesscharger.

Updating the firmware and customization

1.Connectyourgamingmousetoyourcomputerusingthebundledcable.

2.DownloadandinstalltheArmouryIIsoftwarefrom https://www.asus.com/Keyboards-Mice/ROG-Chakram/HelpDesk_Download.

3.Followthesoftwareinstructionstoupdateyourgamingmouse’sfirmware.

4.CustomizeyourgamingmouseusingArmouryII.

English

ROG Chakram Gaming Mouse

7

P7045Vdc 900mA


ROG


USB Type-C™


DPI


USB

Qi

USB Type-C™ Type-A USB

RF

1.USB USB

2.RF 2.4G

3 LEDLED 3


1

+


4


2

+


3

+


Gamepad


8


gamepad Steam

gamepad 3 gamepad Steam

gamepad ROG Armoury II

3

2.Steam > >

3.GamePad 3

4.Xbox

5.ROG CHAKRAM : Gamepad

6.

7.X Y X Y

8.Esc

*


DPI 1

DPI 2

DPI 3

DPI 4


100 DPI - 16000 DPI

400 DPI

800 DPI

1600 DPI

3200 DPI

* Armoury II DPI On-The-Scroll DPI

DPI On-The-Scroll

DPI On-The-Scroll Armoury II DPI

1.DPI 3 LED

2.DPI DPI LED

DPI 100 DPI DPI 100 DPI

DPI 100 DPI - 16000 DPI

3.DPI DPI

RF 2.4G 25% LED

USB Qi

Qi

1.USB

2.https://www.asus.com/Keyboards-Mice/ROG-Chakram/HelpDesk_Download Armoury II

4.Armoury II

ROG Chakram

9


ROG


USB Type-C™


DPI


USB

Qi

USB Type-C™ Type-A USB

RF

1.USB USB

2.RF 2.4G

3 LED LED 3


1

+


4


2

+


3

+


Gamepad


10


gamepad Steam

gamepad 3 gamepad

Steam

gamepad ROG Armoury II

3

2.Steam > >

3.GamePad 3

4.Xbox

5.ROG CHAKRAM : Gamepad

7.X Y X Y

8.Esc

*


DPI 1

DPI 2

DPI 3

DPI

4

100 DPI - 16000 DPI

400 DPI

800 DPI

1600 DPI

3200

DPI

* Armoury II DPI On-The-Scroll DPI

DPI On-The-Scroll

DPI On-The-Scroll Armoury II DPI

1.DPI 3 LED

2.DPI DPI LED

DPI 100 DPI DPI 100 DPI

DPI 100 DPI - 16000 DPI

3.DPI DPI

RF 2.4G 25% LEDUSB Qi

Qi

1.USB

2.https://www.asus.com/Keyboards-Mice/ROG-Chakram/HelpDesk_Download

Armoury II

4.Armoury II

ROG Chakram

11


USB Type-C


DPI


USB

Qi


USB Type-C

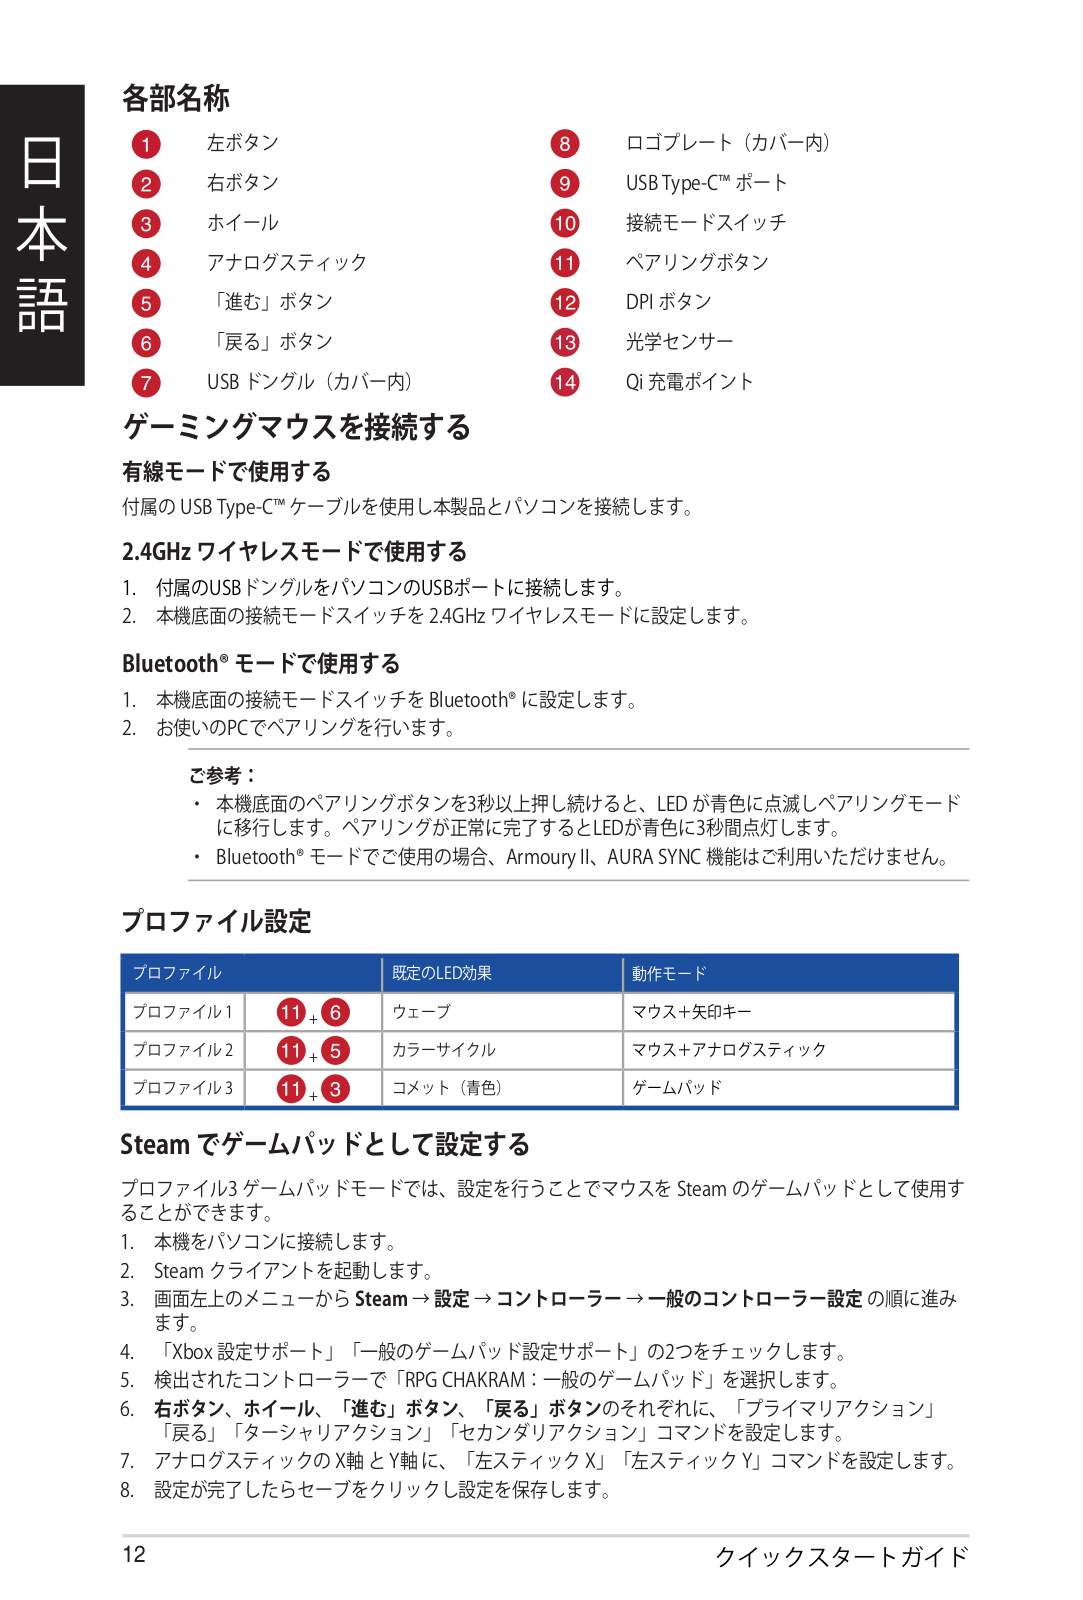
2.4GHz

1.USB USB

2.2.4GHz

Bluetooth®

1.Bluetooth®

2.PC

3 LEDLED 3

Bluetooth® Armoury II AURA SYNC


LED


1

+


2

+


3

+


Steam

3 Steam

2.Steam

3.Steam → → →

4.Xbox 2

5.RPG CHAKRAM

6. 「戻る」「ターシャリアクション」「セカンダリアクション」コマンドを設定します。

7.X Y X Y

12


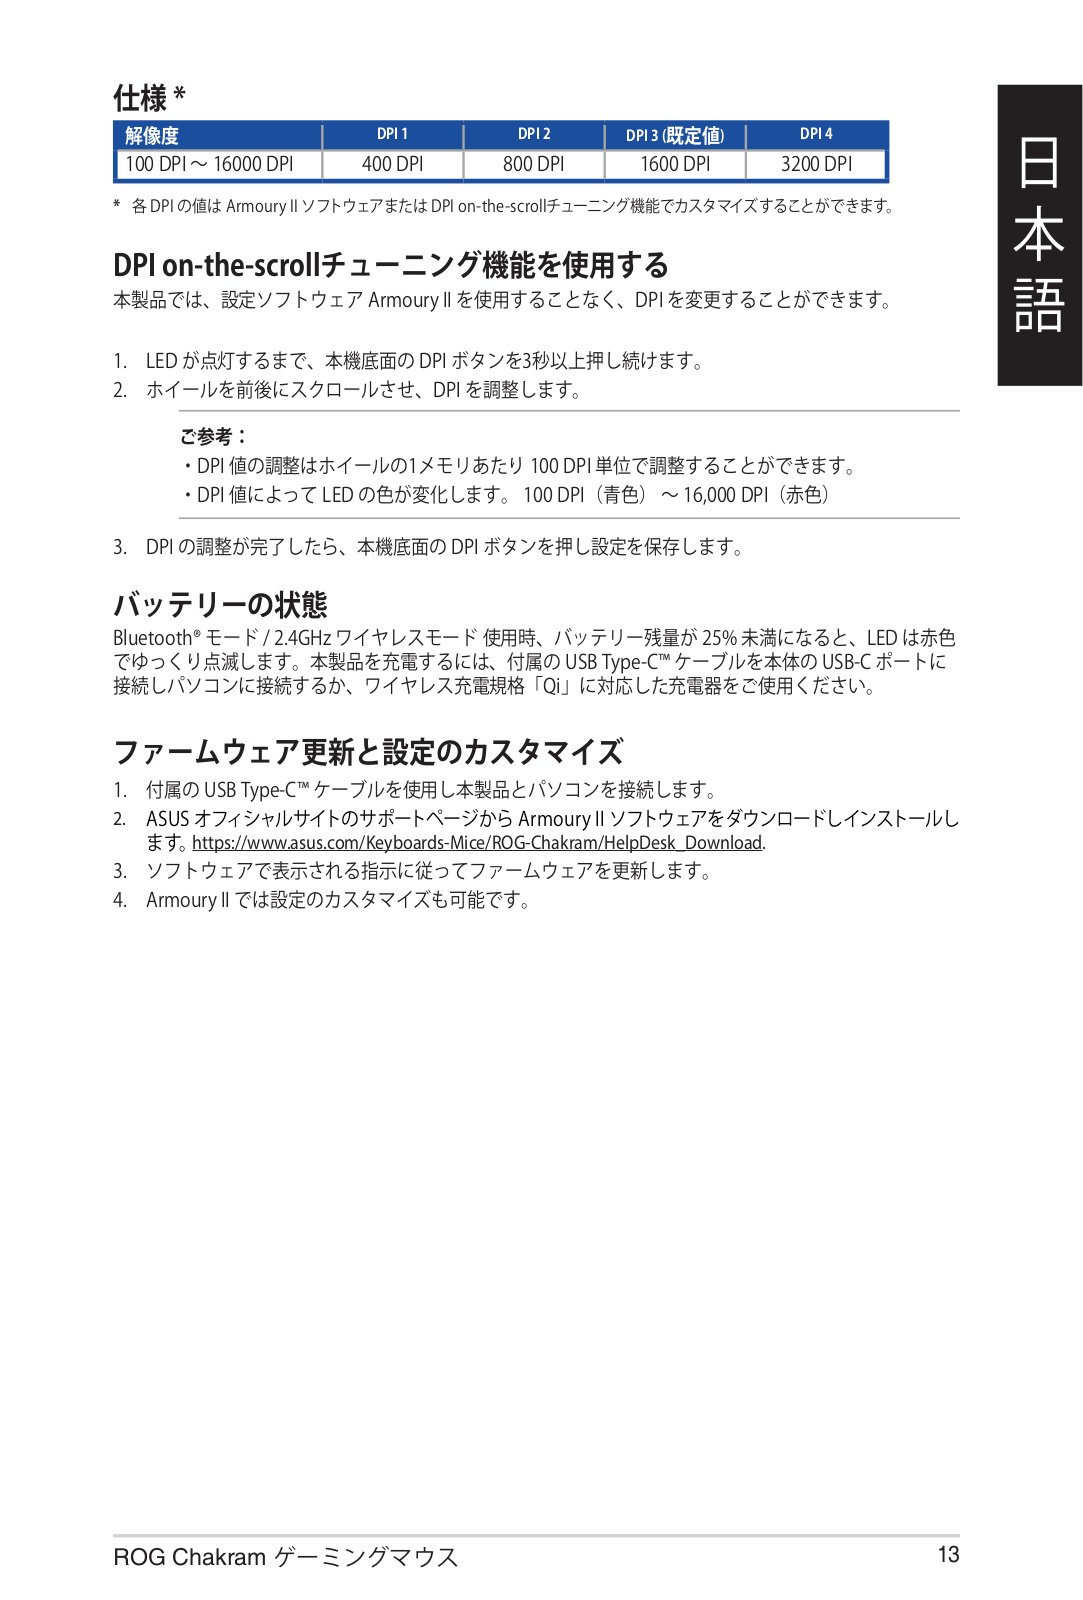
*


DPI 1

DPI 2

DPI 3 ( )

DPI 4

100 DPI 16000 DPI

400 DPI

800 DPI

1600 DPI

3200 DPI


* DPI Armoury II DPI on-the-scroll

DPI on-the-scroll

Armoury II DPI

1.LED DPI 3

2.DPI

DPI 1 100 DPIDPI LED 100 DPI 16,000 DPI

3. DPI DPI

Bluetooth® / 2.4GHz 25% LEDUSB Type-C USB-CQi

1.USB Type-C

2.ASUS Armoury IIhttps://www.asus.com/Keyboards-Mice/ROG-Chakram/HelpDesk_Download.

4.Armoury II

ROG Chakram

13

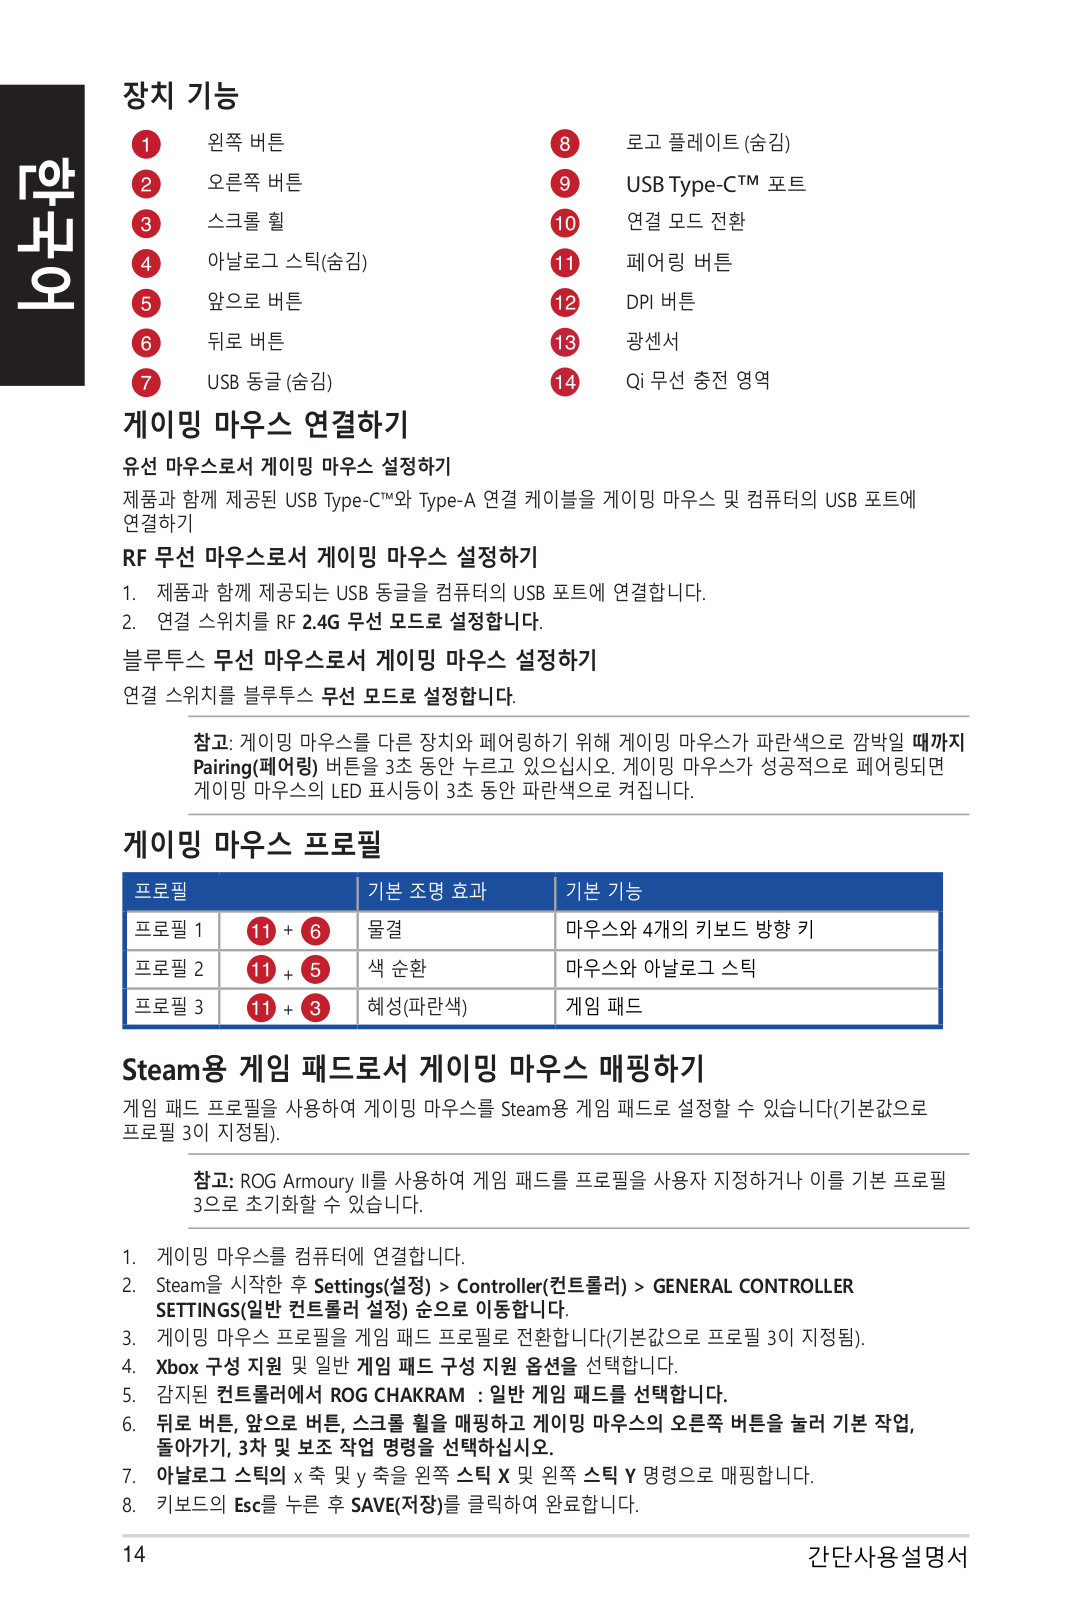
( )


USB Type-C™


( )


DPI


USB ( )

Qi


USB Type-C™ Type-A USB

RF

1.USB USB .

2.RF 2.4G .

.

: Pairing( ) 3 .LED 3 .


1

+


4


2

+


3

+

( )


Steam

Steam (3 ).

: ROG Armoury II 3 .

1..

2.Steam Settings( ) > Controller( ) > GENERAL CONTROLLER SETTINGS( ) .

3.( 3 ).

4.Xbox .

5.ROG CHAKRAM : .

6., , ,, 3 .

7.x y X Y .

8.Esc SAVE( ) .

14


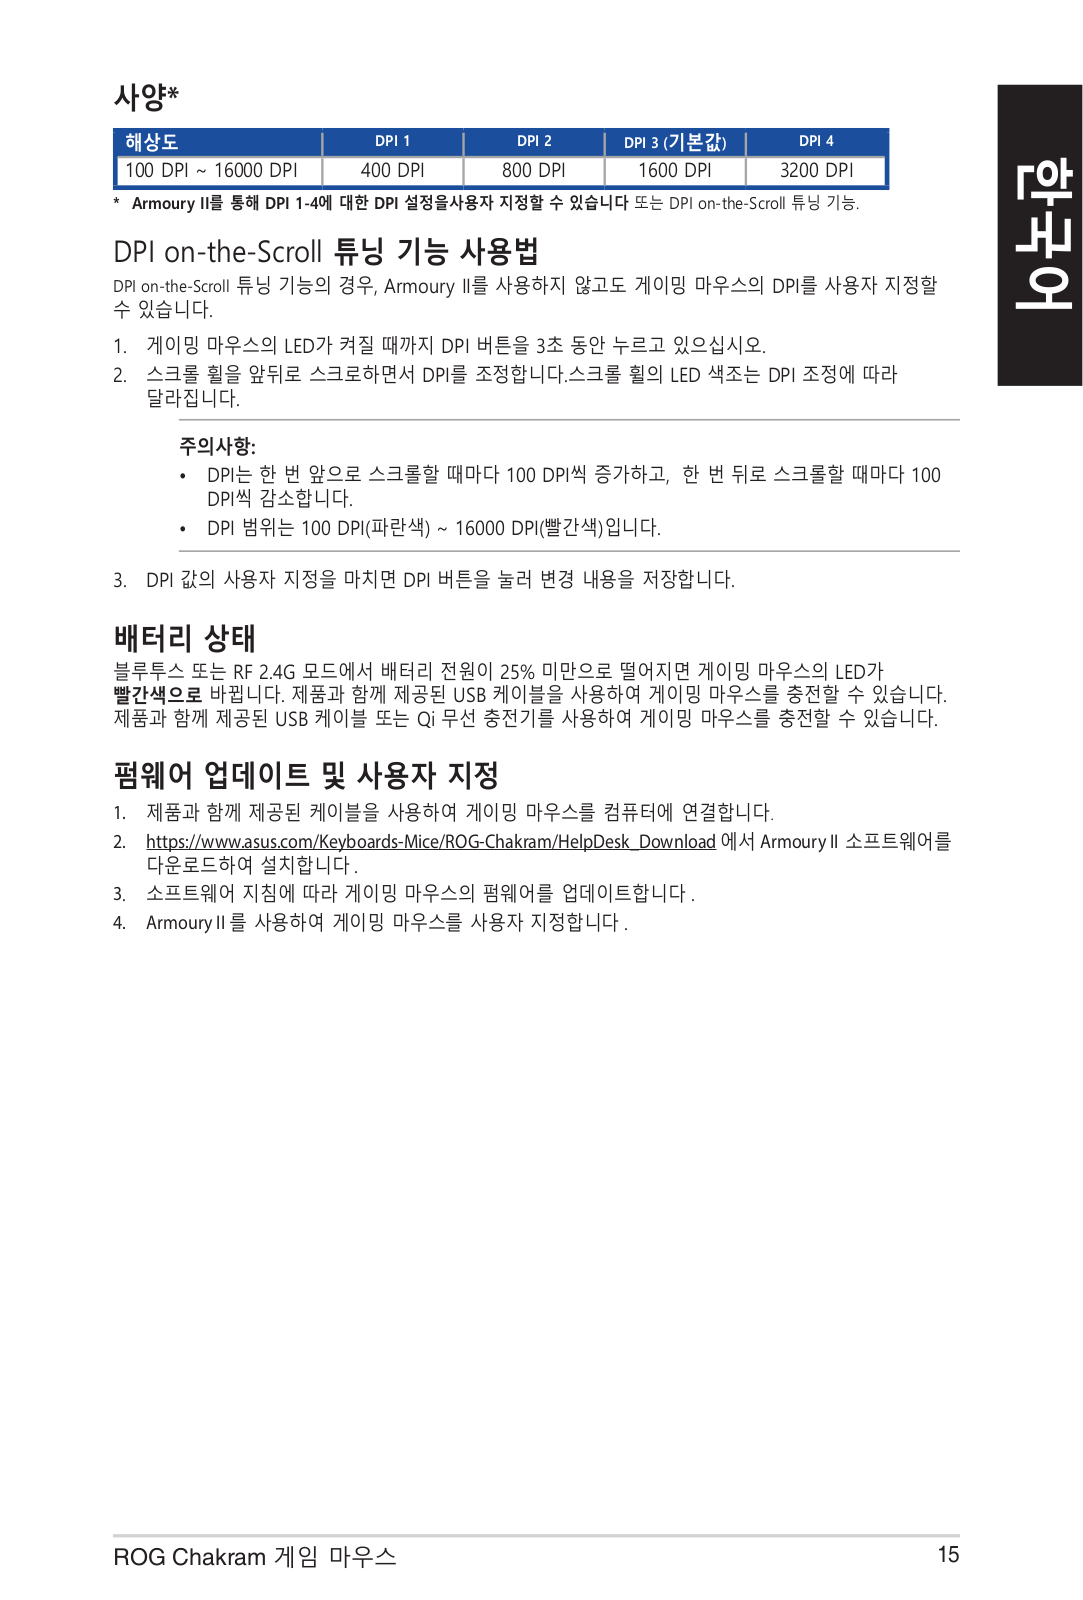
*


DPI 1

DPI 2

DPI 3 ( )

DPI 4

100 DPI ~ 16000 DPI

400 DPI

800 DPI

1600 DPI

3200 DPI


* Armoury II DPI 1-4 DPI DPI on-the-Scroll .

DPI on-the-Scroll

DPI on-the-Scroll , Armoury II DPI.

1.LED DPI 3 .

2.DPI . LED DPI.

:

DPI 100 DPI , 100 DPI .

DPI 100 DPI( ) ~ 16000 DPI( ) .

3.DPI DPI .

RF 2.4G 25% LED. USB .USB Qi .

1..

2.https://www.asus.com/Keyboards-Mice/ROG-Chakram/HelpDesk_Download Armoury II.

3. .

4.Armoury II .

ROG Chakram

15

Français

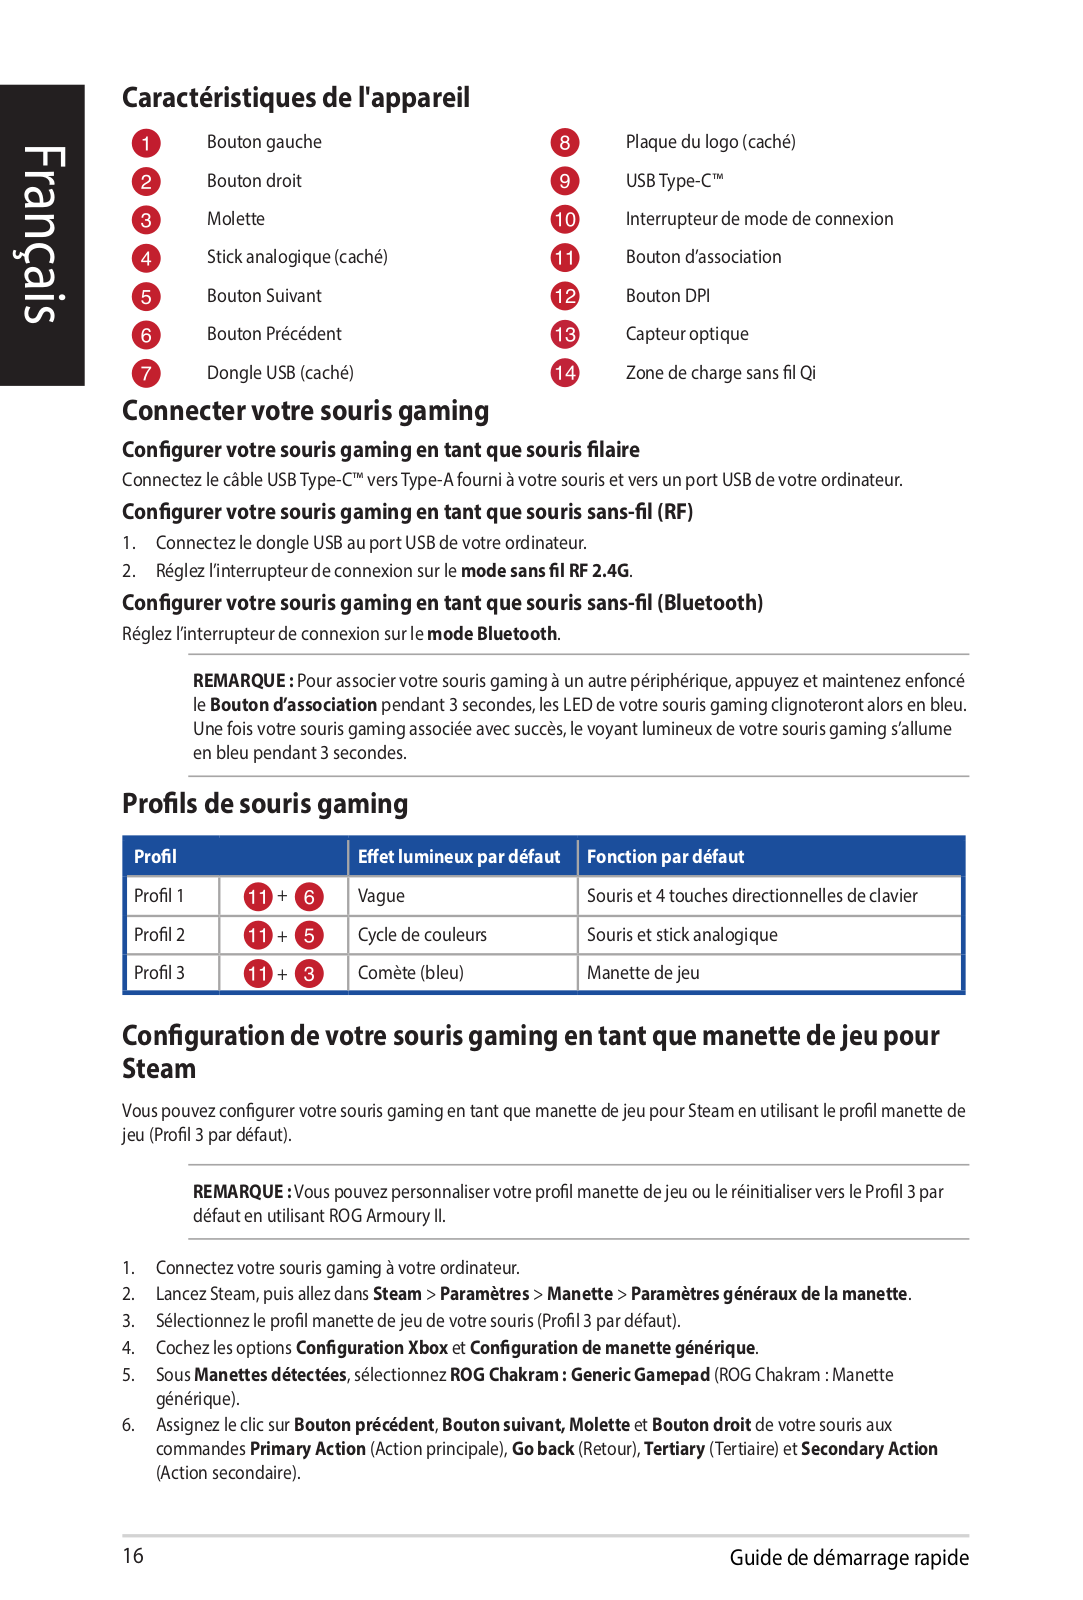
Caractéristiques de l'appareil

Bouton gauche

Plaque du logo (caché)

Bouton droit

USB Type-C™

Molette

Interrupteur de mode de connexion

Stick analogique (caché)

Bouton d’association

Bouton Suivant

Bouton DPI

Bouton Précédent

Capteur optique

Dongle USB (caché)

Zone de charge sans fil Qi

Connecter votre souris gaming


Configurer votre souris gaming en tant que souris filaire

Connectez le câble USB Type-C™ vers Type-A fourni à votre souris et vers un port USB de votre ordinateur.

Configurer votre souris gaming en tant que souris sans-fil (RF)

1.Connectez le dongle USB au port USB de votre ordinateur.

2.Réglez l’interrupteur de connexion sur le mode sans fil RF 2.4G.

Configurer votre souris gaming en tant que souris sans-fil (Bluetooth)

Réglez l’interrupteur de connexion sur le mode Bluetooth.

REMARQUE : Pour associer votre souris gaming à un autre périphérique, appuyez et maintenez enfoncé le Bouton d’association pendant 3 secondes, les LED de votre souris gaming clignoteront alors en bleu. Une fois votre souris gaming associée avec succès, le voyant lumineux de votre souris gaming s’allume en bleu pendant 3 secondes.

Profils de souris gaming

Profil


Effet lumineux par défaut

Fonction par défaut


Profil 1

+

Vague

Souris et 4 touches directionnelles de clavier


Profil 2

+

Cycle de couleurs

Souris et stick analogique


Profil 3

+

Comète (bleu)

Manette de jeu


Configuration de votre souris gaming en tant que manette de jeu pour Steam

Vous pouvez configurer votre souris gaming en tant que manette de jeu pour Steam en utilisant le profil manette de jeu (Profil 3 par défaut).

REMARQUE : Vous pouvez personnaliser votre profil manette de jeu ou le réinitialiser vers le Profil 3 par défaut en utilisant ROG Armoury II.

1.Connectez votre souris gaming à votre ordinateur.

2.Lancez Steam, puis allez dans Steam > Paramètres > Manette > Paramètres généraux de la manette.

3.Sélectionnez le profil manette de jeu de votre souris (Profil 3 par défaut).

4.Cochez les options Configuration Xbox et Configuration de manette générique.

5.Sous Manettes détectées, sélectionnez ROG Chakram : Generic Gamepad (ROG Chakram : Manette générique).

6.Assignez le clic sur Bouton précédent, Bouton suivant, Molette et Bouton droit de votre souris aux commandes Primary Action (Action principale), Go back (Retour), Tertiary (Tertiaire) et Secondary Action (Action secondaire).

16

Guide de démarrage rapide

7.Assignez les axes x et y du stick analogique aux commandes Left Stick X (Stick gauche X) et Left Stick Y (Stick gauche Y).

8.Appuyez sur Echap sur votre clavier, puis cliquez sur Sauvegarder pour terminer.

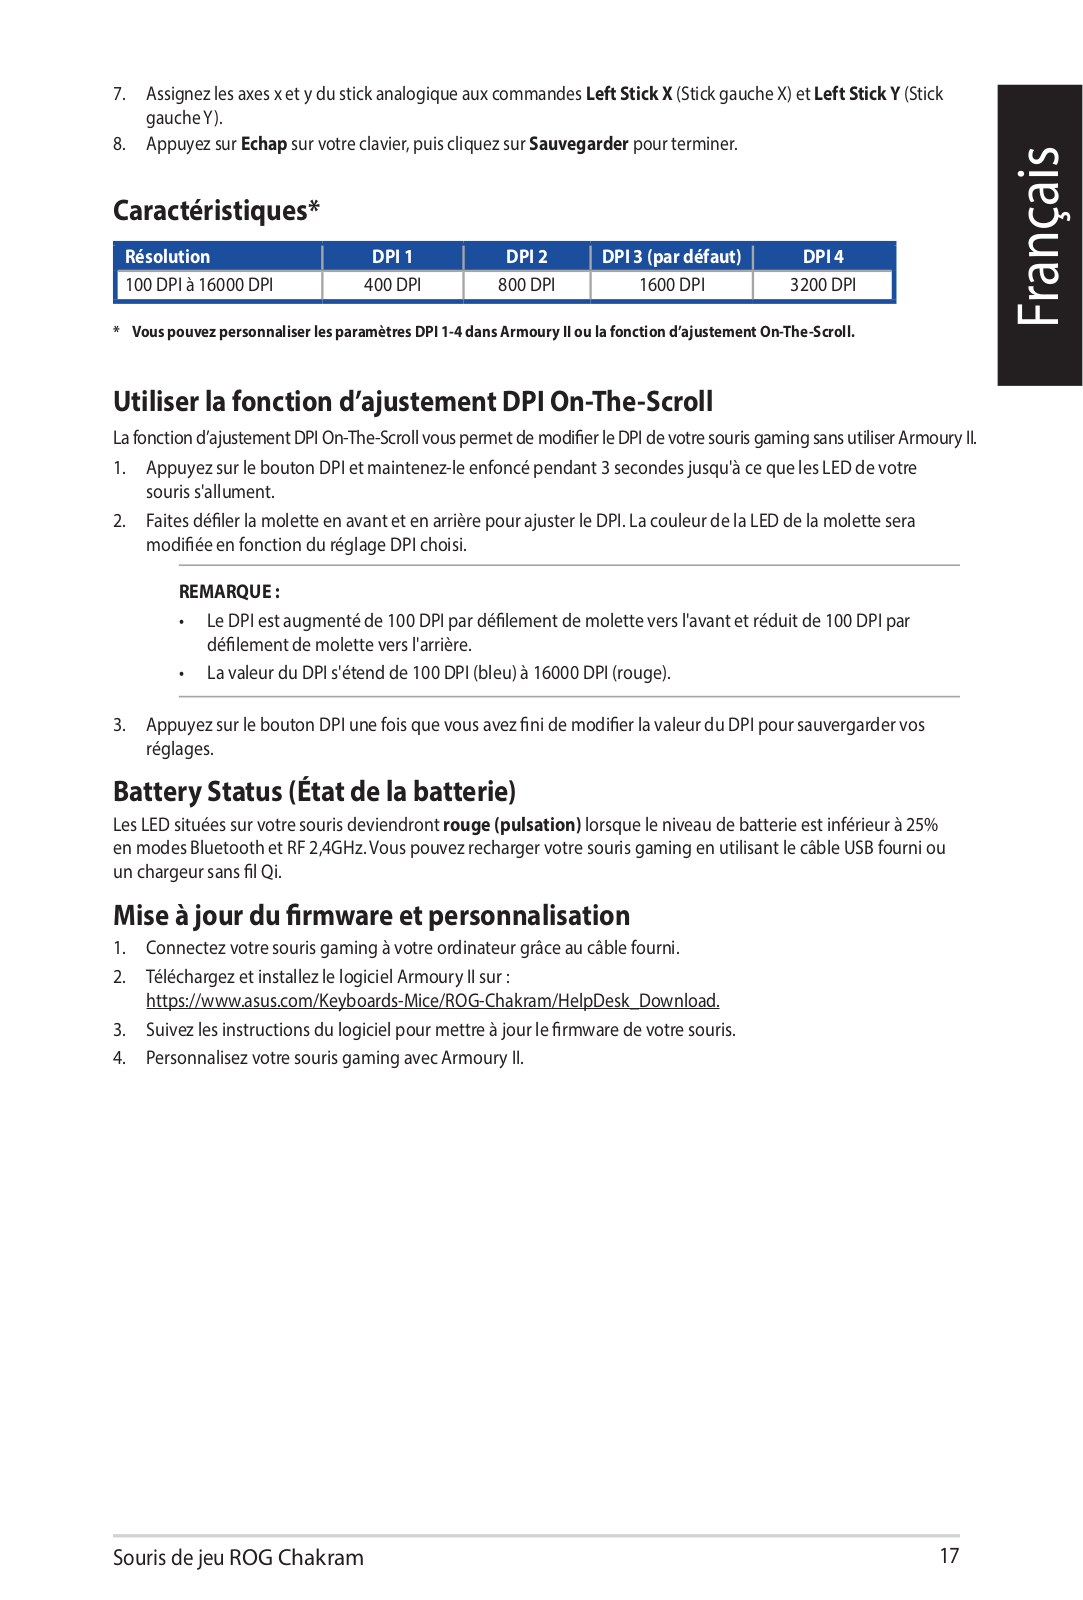
Caractéristiques*

Résolution

DPI 1

DPI 2

DPI 3 (par défaut)

DPI 4

100 DPI à 16000 DPI

400 DPI

800 DPI

1600 DPI

3200 DPI


* Vous pouvez personnaliser les paramètres DPI 1-4 dans Armoury II ou la fonction d’ajustement On-The-Scroll.

Utiliser la fonction d’ajustement DPI On-The-Scroll

La fonction d’ajustement DPI On-The-Scroll vous permet de modifier le DPI de votre souris gaming sans utiliser Armoury II.

1.Appuyez sur le bouton DPI et maintenez-le enfoncé pendant 3 secondes jusqu'à ce que les LED de votre souris s'allument.

2.Faites défiler la molette en avant et en arrière pour ajuster le DPI. La couleur de la LED de la molette sera modifiée en fonction du réglage DPI choisi.

REMARQUE :

LeDPIestaugmentéde100DPIpardéfilementdemoletteversl'avantetréduitde100DPIpar défilement de molette vers l'arrière.

LavaleurduDPIs'étendde100DPI(bleu)à16000DPI(rouge).

3.Appuyez sur le bouton DPI une fois que vous avez fini de modifier la valeur du DPI pour sauvergarder vos réglages.

Battery Status (État de la batterie)

Les LED situées sur votre souris deviendront rouge (pulsation) lorsque le niveau de batterie est inférieur à 25% en modes Bluetooth et RF 2,4GHz. Vous pouvez recharger votre souris gaming en utilisant le câble USB fourni ou un chargeur sans fil Qi.

Mise à jour du firmware et personnalisation

1.Connectez votre souris gaming à votre ordinateur grâce au câble fourni.

2.Téléchargez et installez le logiciel Armoury II sur : https://www.asus.com/Keyboards-Mice/ROG-Chakram/HelpDesk_Download.

3.Suivez les instructions du logiciel pour mettre à jour le firmware de votre souris.

4.Personnalisez votre souris gaming avec Armoury II.

Français

Souris de jeu ROG Chakram

17

Deutsch

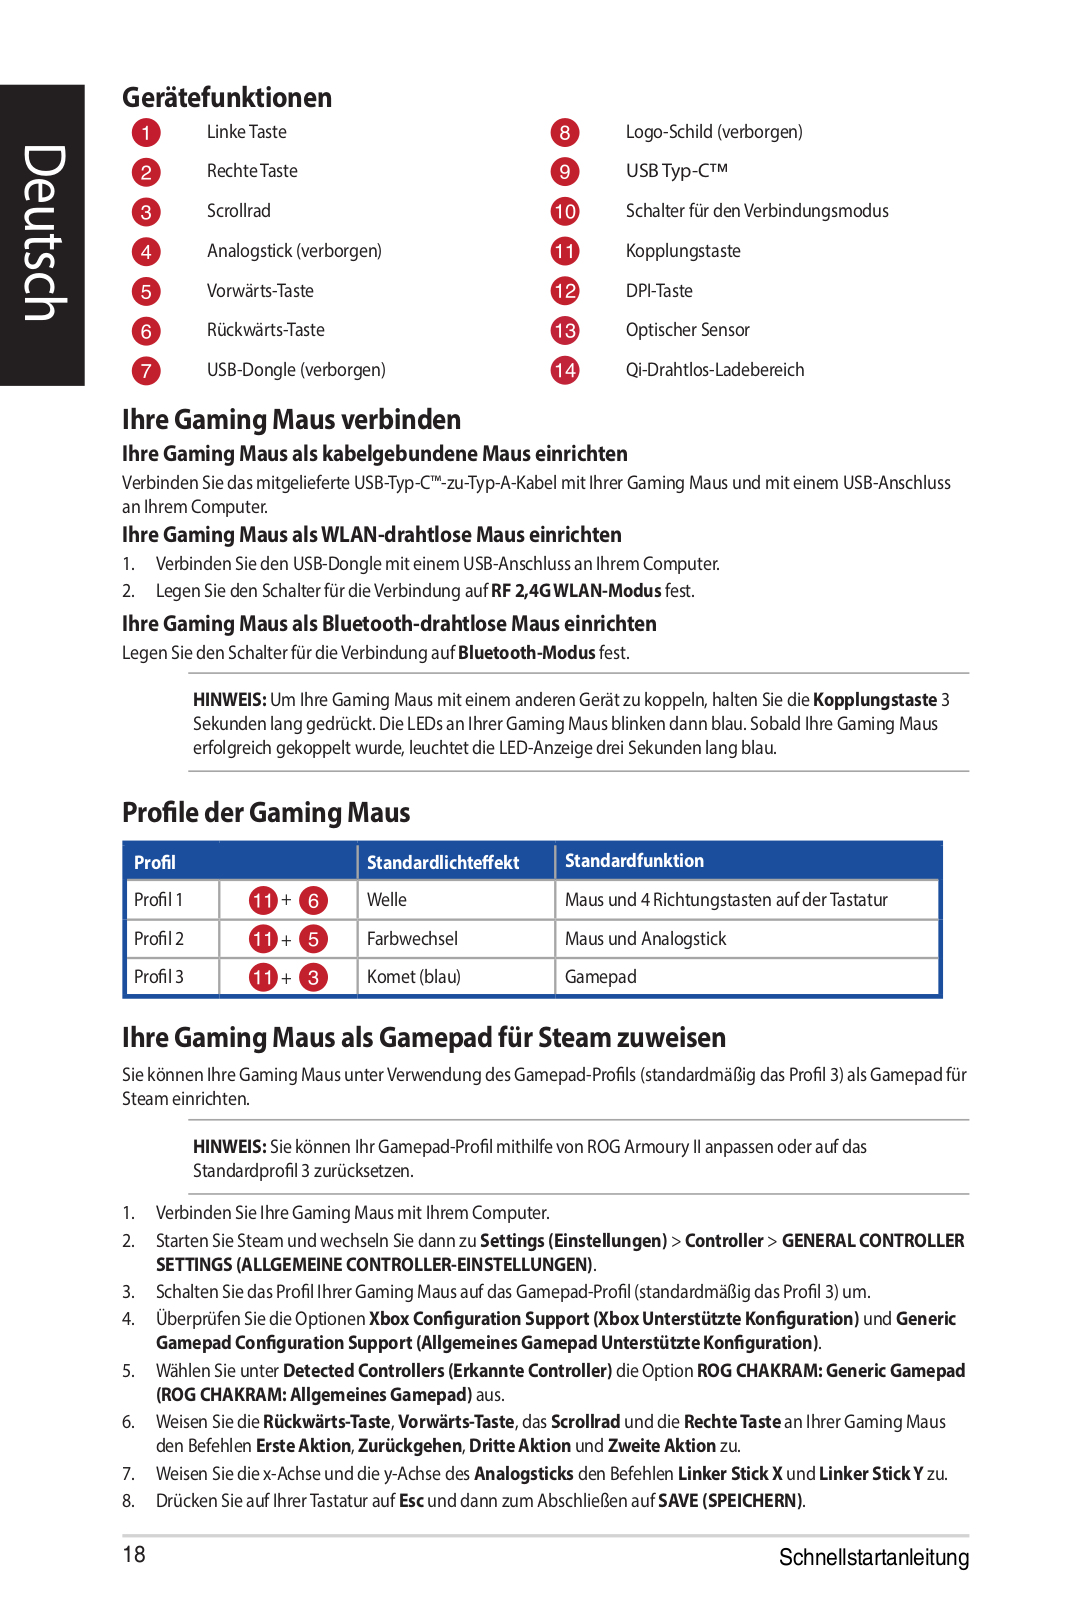
Gerätefunktionen

Linke Taste

Logo-Schild (verborgen)

Rechte Taste

USB Typ-C™

Scrollrad

Schalter für den Verbindungsmodus

Analogstick (verborgen)

Kopplungstaste

Vorwärts-Taste

DPI-Taste

Rückwärts-Taste

Optischer Sensor

USB-Dongle (verborgen)

Qi-Drahtlos-Ladebereich

Ihre Gaming Maus verbinden

Ihre Gaming Maus als kabelgebundene Maus einrichten

Verbinden Sie das mitgelieferte USB-Typ-C™-zu-Typ-A-Kabel mit Ihrer Gaming Maus und mit einem USB-Anschluss an Ihrem Computer.

Ihre Gaming Maus als WLAN-drahtlose Maus einrichten

1.Verbinden Sie den USB-Dongle mit einem USB-Anschluss an Ihrem Computer.

2.Legen Sie den Schalter für die Verbindung auf RF 2,4G WLAN-Modus fest.

Ihre Gaming Maus als Bluetooth-drahtlose Maus einrichten

Legen Sie den Schalter für die Verbindung auf Bluetooth-Modus fest.

HINWEIS: Um Ihre Gaming Maus mit einem anderen Gerät zu koppeln, halten Sie die Kopplungstaste 3 Sekunden lang gedrückt. Die LEDs an Ihrer Gaming Maus blinken dann blau. Sobald Ihre Gaming Maus erfolgreich gekoppelt wurde, leuchtet die LED-Anzeige drei Sekunden lang blau.

Profile der Gaming Maus

Profil


Standardlichteffekt

Standardfunktion

Profil 1

+

Welle

Maus und 4 Richtungstasten auf der Tastatur


Profil 2

+

Farbwechsel

Maus und Analogstick


Profil 3

+

Komet (blau)

Gamepad


Ihre Gaming Maus als Gamepad für Steam zuweisen

Sie können Ihre Gaming Maus unter Verwendung des Gamepad-Profils (standardmäßig das Profil 3) als Gamepad für Steam einrichten.

HINWEIS: Sie können Ihr Gamepad-Profil mithilfe von ROG Armoury II anpassen oder auf das Standardprofil 3 zurücksetzen.

1.Verbinden Sie Ihre Gaming Maus mit Ihrem Computer.

2.Starten Sie Steam und wechseln Sie dann zu Settings (Einstellungen) > Controller > GENERAL CONTROLLER SETTINGS (ALLGEMEINE CONTROLLER-EINSTELLUNGEN).

3.Schalten Sie das Profil Ihrer Gaming Maus auf das Gamepad-Profil (standardmäßig das Profil 3) um.

4.Überprüfen Sie die Optionen Xbox Configuration Support (Xbox Unterstützte Konfiguration) und Generic Gamepad Configuration Support (Allgemeines Gamepad Unterstützte Konfiguration).

5.Wählen Sie unter Detected Controllers (Erkannte Controller) die Option ROG CHAKRAM: Generic Gamepad (ROG CHAKRAM: Allgemeines Gamepad) aus.

6.Weisen Sie die Rückwärts-Taste, Vorwärts-Taste, das Scrollrad und die Rechte Taste an Ihrer Gaming Maus den Befehlen Erste Aktion, Zurückgehen, Dritte Aktion und Zweite Aktion zu.

7.Weisen Sie die x-Achse und die y-Achse des Analogsticks den Befehlen Linker Stick X und Linker Stick Y zu.

8.Drücken Sie auf Ihrer Tastatur auf Esc und dann zum Abschließen auf SAVE (SPEICHERN).

18

Schnellstartanleitung

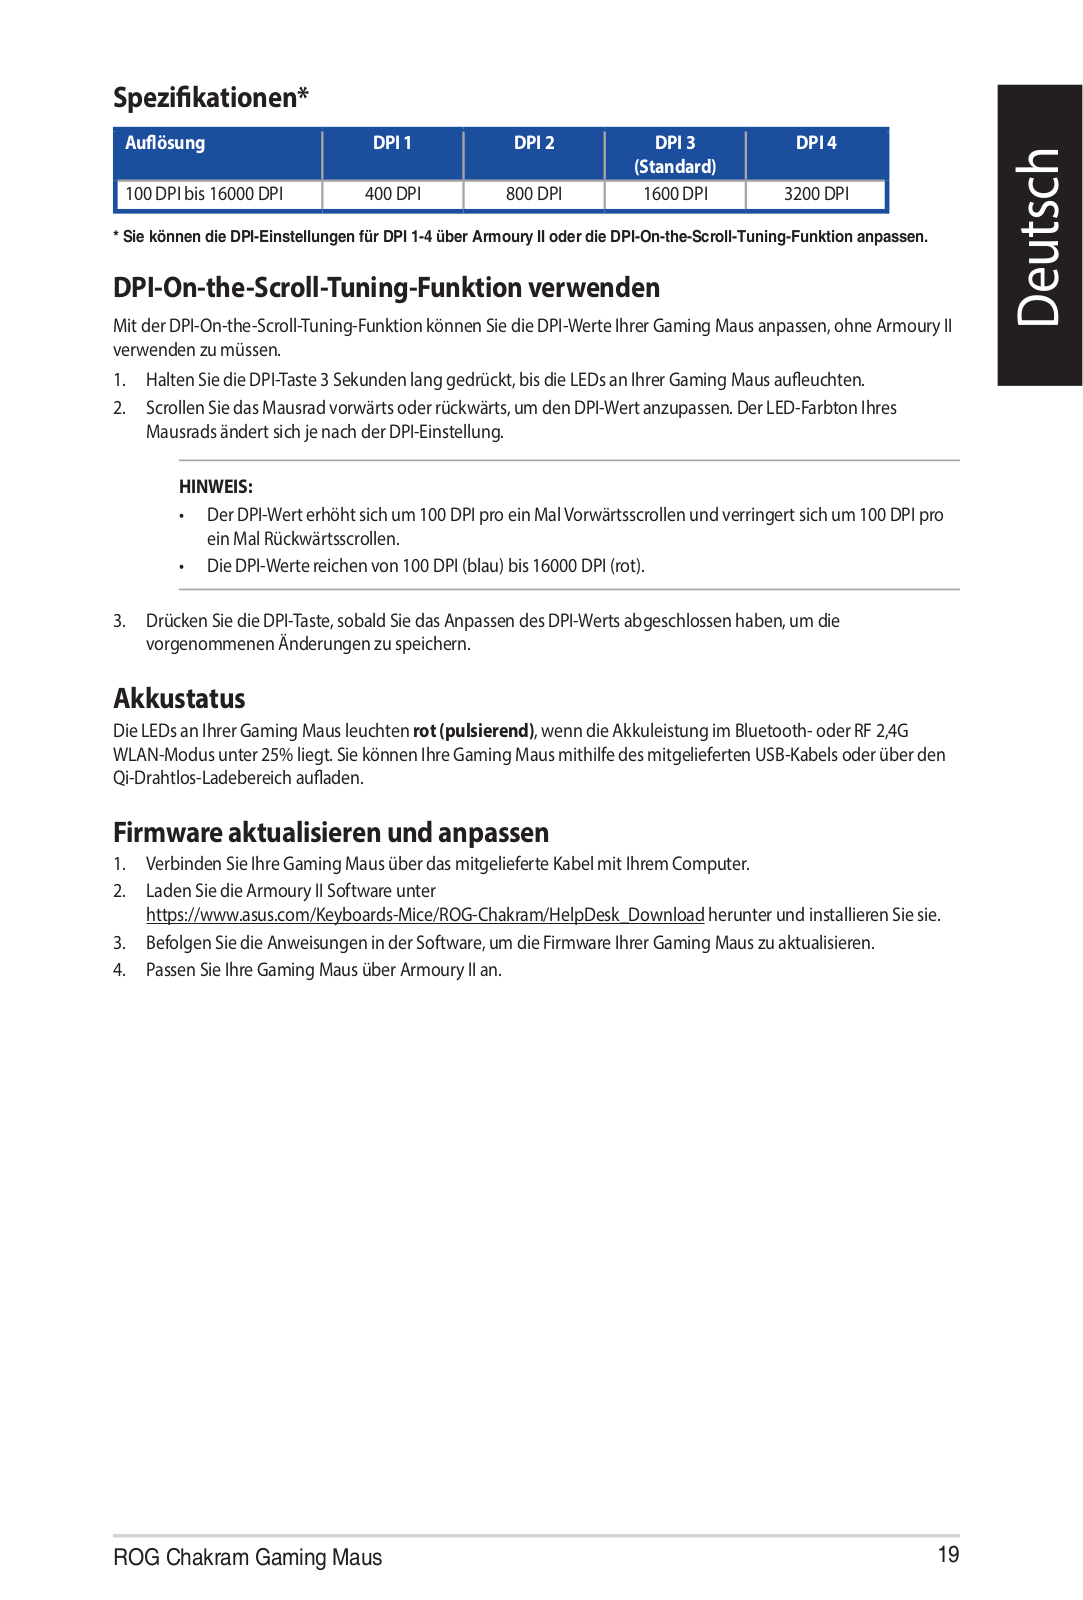
Spezifikationen*

Auflösung

DPI 1

DPI 2

DPI 3

DPI 4


(Standard)


100 DPI bis 16000 DPI

400 DPI

800 DPI

1600 DPI

3200 DPI


* Sie können die DPI-Einstellungen für DPI 1-4 über Armoury II oder die DPI-On-the-Scroll-Tuning-Funktion anpassen.

DPI-On-the-Scroll-Tuning-Funktion verwenden

Mit der DPI-On-the-Scroll-Tuning-Funktion können Sie die DPI-Werte Ihrer Gaming Maus anpassen, ohne Armoury II verwenden zu müssen.

1.Halten Sie die DPI-Taste 3 Sekunden lang gedrückt, bis die LEDs an Ihrer Gaming Maus aufleuchten.

2.Scrollen Sie das Mausrad vorwärts oder rückwärts, um den DPI-Wert anzupassen. Der LED-Farbton Ihres Mausrads ändert sich je nach der DPI-Einstellung.

HINWEIS:

DerDPI-Werterhöhtsichum100DPIproeinMalVorwärtsscrollenundverringertsichum100DPIpro ein Mal Rückwärtsscrollen.

DieDPI-Wertereichenvon100DPI(blau)bis16000DPI(rot).

3.Drücken Sie die DPI-Taste, sobald Sie das Anpassen des DPI-Werts abgeschlossen haben, um die vorgenommenen Änderungen zu speichern.

Akkustatus

Die LEDs an Ihrer Gaming Maus leuchten rot (pulsierend), wenn die Akkuleistung im Bluetoothoder RF 2,4G WLAN-Modus unter 25% liegt. Sie können Ihre Gaming Maus mithilfe des mitgelieferten USB-Kabels oder über den Qi-Drahtlos-Ladebereich aufladen.

Firmware aktualisieren und anpassen

1.Verbinden Sie Ihre Gaming Maus über das mitgelieferte Kabel mit Ihrem Computer.

2.Laden Sie die Armoury II Software unter https://www.asus.com/Keyboards-Mice/ROG-Chakram/HelpDesk_Download herunter und installieren Sie sie.

3.Befolgen Sie die Anweisungen in der Software, um die Firmware Ihrer Gaming Maus zu aktualisieren.

4.Passen Sie Ihre Gaming Maus über Armoury II an.

Deutsch

ROG Chakram Gaming Maus

19

Italiano

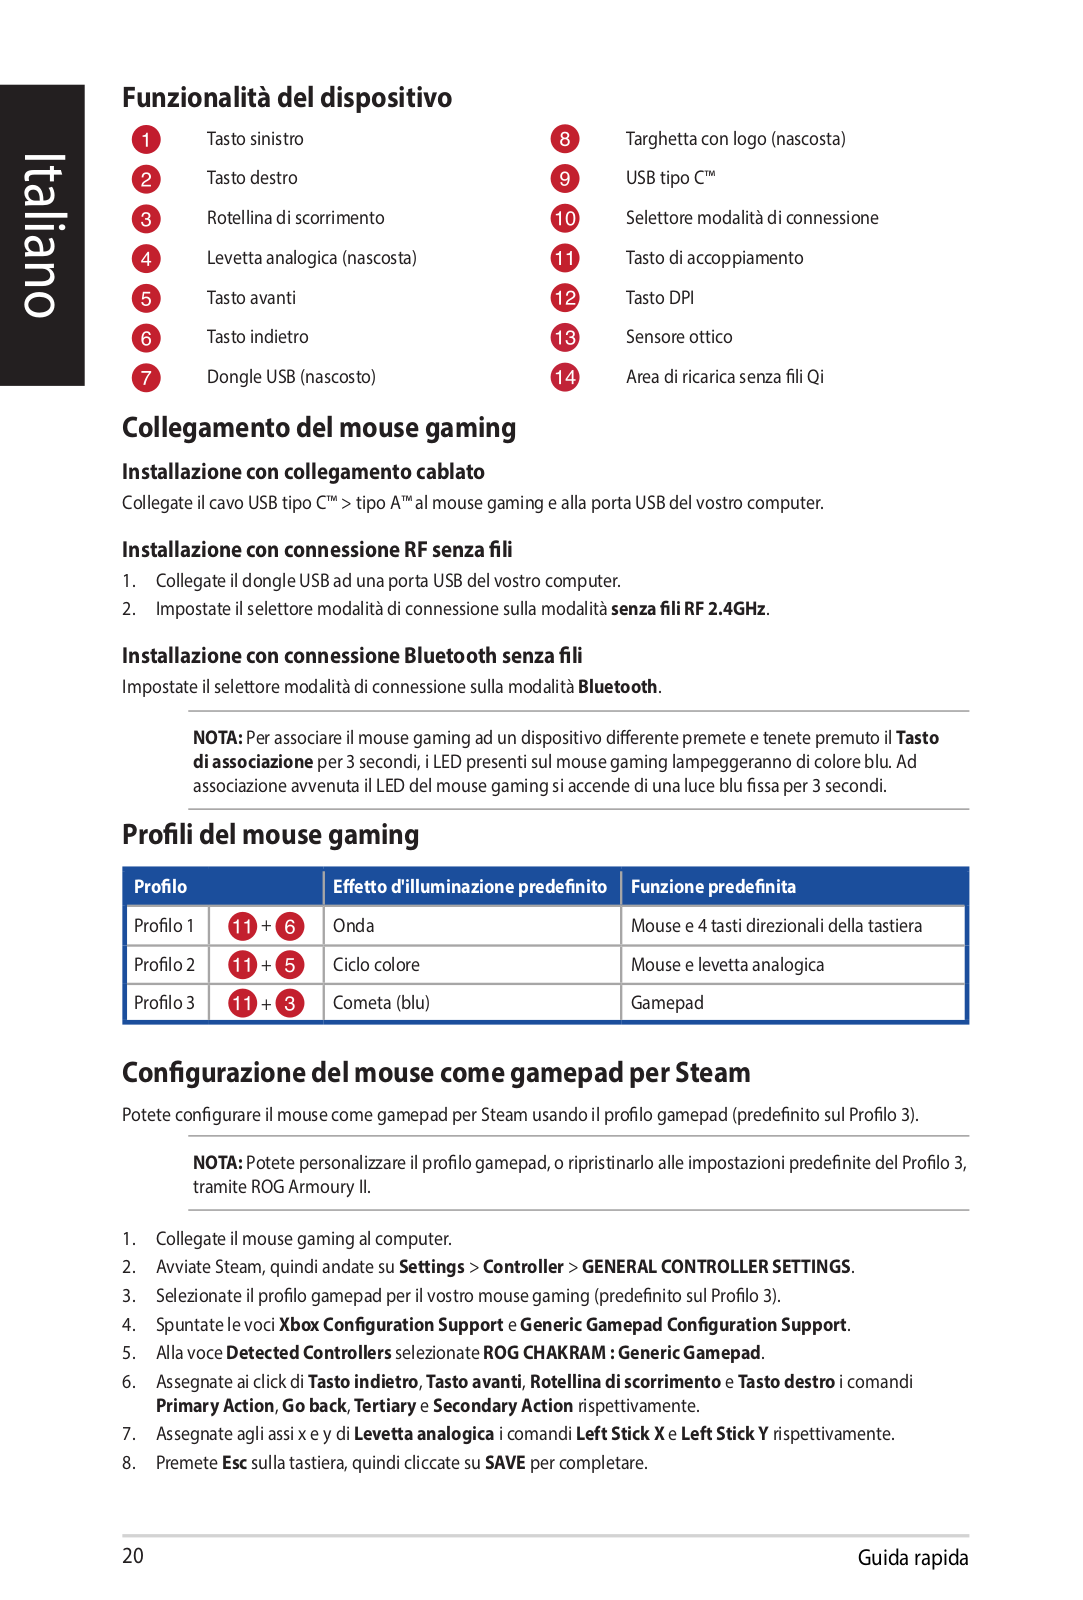
Funzionalità del dispositivo

Tasto sinistro

Targhetta con logo (nascosta)

Tasto destro

USB tipo C™

Rotellina di scorrimento

Selettore modalità di connessione

Levetta analogica (nascosta)

Tasto di accoppiamento

Tasto avanti

Tasto DPI

Tasto indietro

Sensore ottico

Dongle USB (nascosto)

Area di ricarica senza fili Qi

Collegamento del mouse gaming


Installazione con collegamento cablato

Collegate il cavo USB tipo C™ > tipo A™ al mouse gaming e alla porta USB del vostro computer.

Installazione con connessione RF senza fili

1.Collegate il dongle USB ad una porta USB del vostro computer.

2.Impostate il selettore modalità di connessione sulla modalità senza fili RF 2.4GHz.

Installazione con connessione Bluetooth senza fili

Impostate il selettore modalità di connessione sulla modalità Bluetooth.

NOTA: Per associare il mouse gaming ad un dispositivo differente premete e tenete premuto il Tasto di associazione per 3 secondi, i LED presenti sul mouse gaming lampeggeranno di colore blu. Ad associazione avvenuta il LED del mouse gaming si accende di una luce blu fissa per 3 secondi.

Profili del mouse gaming

Profilo


Effetto d'illuminazione predefinito

Funzione predefinita


Profilo 1

+

Onda

Mouse e 4 tasti direzionali della tastiera


Profilo 2

+

Ciclo colore

Mouse e levetta analogica


Profilo 3

+

Cometa (blu)

Gamepad


Configurazione del mouse come gamepad per Steam

Potete configurare il mouse come gamepad per Steam usando il profilo gamepad (predefinito sul Profilo 3).

NOTA: Potete personalizzare il profilo gamepad, o ripristinarlo alle impostazioni predefinite del Profilo 3, tramite ROG Armoury II.

1.Collegate il mouse gaming al computer.

2.Avviate Steam, quindi andate su Settings > Controller > GENERAL CONTROLLER SETTINGS.

3.Selezionate il profilo gamepad per il vostro mouse gaming (predefinito sul Profilo 3).

4.Spuntate le voci Xbox Configuration Support e Generic Gamepad Configuration Support.

5.Alla voce Detected Controllers selezionate ROG CHAKRAM : Generic Gamepad.

6.Assegnate ai click di Tasto indietro, Tasto avanti, Rotellina di scorrimento e Tasto destro i comandi Primary Action, Go back, Tertiary e Secondary Action rispettivamente.

7.Assegnate agli assi x e y di Levetta analogica i comandi Left Stick X e Left Stick Y rispettivamente.

8.Premete Esc sulla tastiera, quindi cliccate su SAVE per completare.

20

Guida rapida

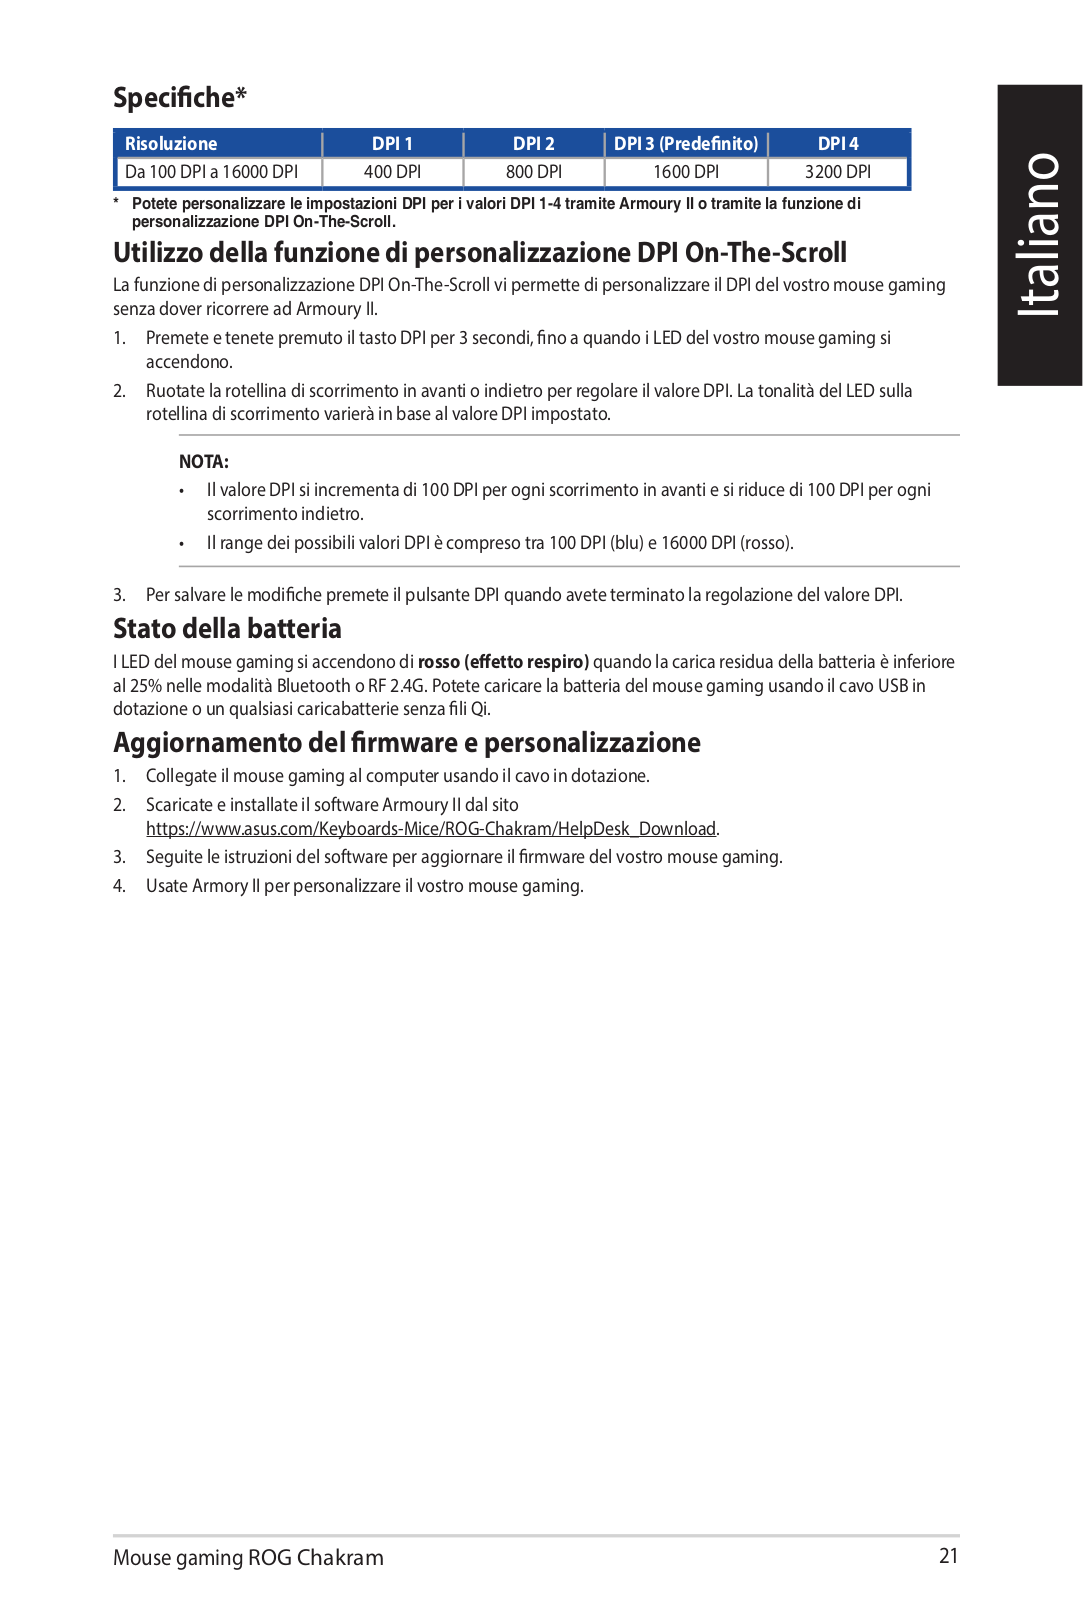
Specifiche*

Risoluzione

DPI 1

DPI 2

DPI 3 (Predefinito)

DPI 4

Da 100 DPI a 16000 DPI

400 DPI

800 DPI

1600 DPI

3200 DPI


*Potete personalizzare le impostazioni DPI per i valori DPI 1-4 tramite Armoury II o tramite la funzione di personalizzazione DPI On-The-Scroll.

Utilizzo della funzione di personalizzazione DPI On-The-Scroll

La funzione di personalizzazione DPI On-The-Scroll vi permette di personalizzare il DPI del vostro mouse gaming senza dover ricorrere ad Armoury II.

1.Premete e tenete premuto il tasto DPI per 3 secondi, fino a quando i LED del vostro mouse gaming si accendono.

2.Ruotate la rotellina di scorrimento in avanti o indietro per regolare il valore DPI. La tonalità del LED sulla rotellina di scorrimento varierà in base al valore DPI impostato.

NOTA:

IlvaloreDPIsiincrementadi100DPIperogniscorrimentoinavantiesiriducedi100DPIperogni scorrimento indietro.

IlrangedeipossibilivaloriDPIècompresotra100DPI(blu)e16000DPI(rosso).

3.Per salvare le modifiche premete il pulsante DPI quando avete terminato la regolazione del valore DPI.

Stato della batteria

I LED del mouse gaming si accendono di rosso (effetto respiro) quandolacaricaresiduadellabatteriaèinferiore al 25% nelle modalità Bluetooth o RF 2.4G. Potete caricare la batteria del mouse gaming usando il cavo USB in dotazione o un qualsiasi caricabatterie senza fili Qi.

Aggiornamento del firmware e personalizzazione

1.Collegate il mouse gaming al computer usando il cavo in dotazione.

2.Scaricate e installate il software Armoury II dal sito https://www.asus.com/Keyboards-Mice/ROG-Chakram/HelpDesk_Download.

3.Seguite le istruzioni del software per aggiornare il firmware del vostro mouse gaming.

4.Usate Armory II per personalizzare il vostro mouse gaming.

Italiano

Mouse gaming ROG Chakram

21

Español

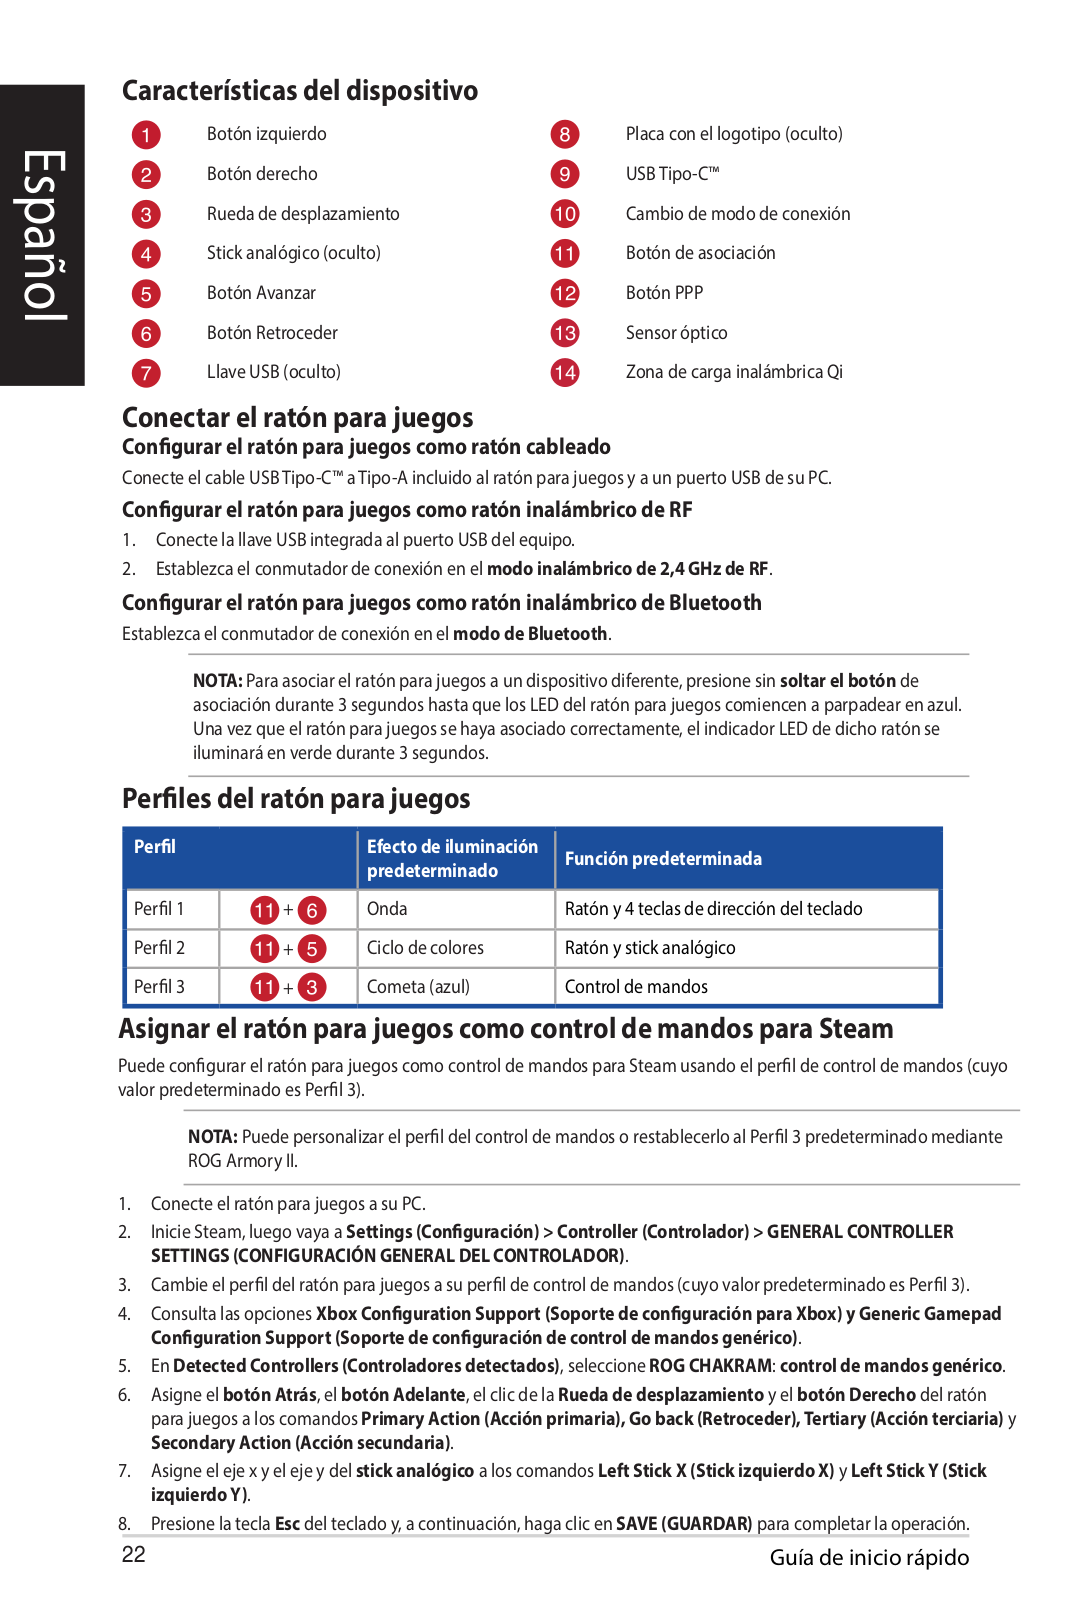
Características del dispositivo

Botón izquierdo

Placa con el logotipo (oculto)

Botón derecho

USB Tipo-C™

Rueda de desplazamiento

Cambio de modo de conexión

Stick analógico (oculto)

Botón de asociación

Botón Avanzar

Botón PPP

Botón Retroceder

Sensor óptico

Llave USB (oculto)

Zona de carga inalámbrica Qi

Conectar el ratón para juegos

Configurar el ratón para juegos como ratón cableado

Conecte el cable USB Tipo-C™ a Tipo-A incluido al ratón para juegos y a un puerto USB de su PC.

Configurar el ratón para juegos como ratón inalámbrico de RF

1.Conecte la llave USB integrada al puerto USB del equipo.

2.Establezca el conmutador de conexión en el modo inalámbrico de 2,4 GHz de RF.

Configurar el ratón para juegos como ratón inalámbrico de Bluetooth

Establezca el conmutador de conexión en el modo de Bluetooth.

NOTA: Para asociar el ratón para juegos a un dispositivo diferente, presione sin soltar el botón de asociación durante 3 segundos hasta que los LED del ratón para juegos comiencen a parpadear en azul. Una vez que el ratón para juegos se haya asociado correctamente, el indicador LED de dicho ratón se iluminará en verde durante 3 segundos.

Perfiles del ratón para juegos

Perfil


Efecto de iluminación

Función predeterminada


predeterminado


Perfil 1

+

Onda

Ratón y 4 teclas de dirección del teclado


Perfil 2

+

Ciclo de colores

Ratón y stick analógico


Perfil 3

+

Cometa (azul)

Control de mandos


Asignar el ratón para juegos como control de mandos para Steam

Puede configurar el ratón para juegos como control de mandos para Steam usando el perfil de control de mandos (cuyo valor predeterminado es Perfil 3).

NOTA: Puede personalizar el perfil del control de mandos o restablecerlo al Perfil 3 predeterminado mediante ROG Armory II.

1.Conecte el ratón para juegos a su PC.

2.Inicie Steam, luego vaya a Settings (Configuración) > Controller (Controlador) > GENERAL CONTROLLER SETTINGS (CONFIGURACIÓN GENERAL DEL CONTROLADOR).

3.Cambie el perfil del ratón para juegos a su perfil de control de mandos (cuyo valor predeterminado es Perfil 3).

4.Consulta las opciones Xbox Configuration Support (Soporte de configuración para Xbox) y Generic Gamepad Configuration Support (Soporte de configuración de control de mandos genérico).

5.En Detected Controllers (Controladores detectados), seleccione ROG CHAKRAM: control de mandos genérico.

6.Asigne el botón Atrás, el botón Adelante, el clic de la Rueda de desplazamiento y el botón Derecho del ratón para juegos a los comandos Primary Action (Acción primaria), Go back (Retroceder), Tertiary (Acción terciaria) y Secondary Action (Acción secundaria).

7.Asigne el eje x y el eje y del stick analógico a los comandos Left Stick X (Stick izquierdo X) y Left Stick Y (Stick izquierdo Y).

8.Presione la tecla Esc del teclado y, a continuación, haga clic en SAVE (GUARDAR) para completar la operación.

22

Guía de inicio rápido

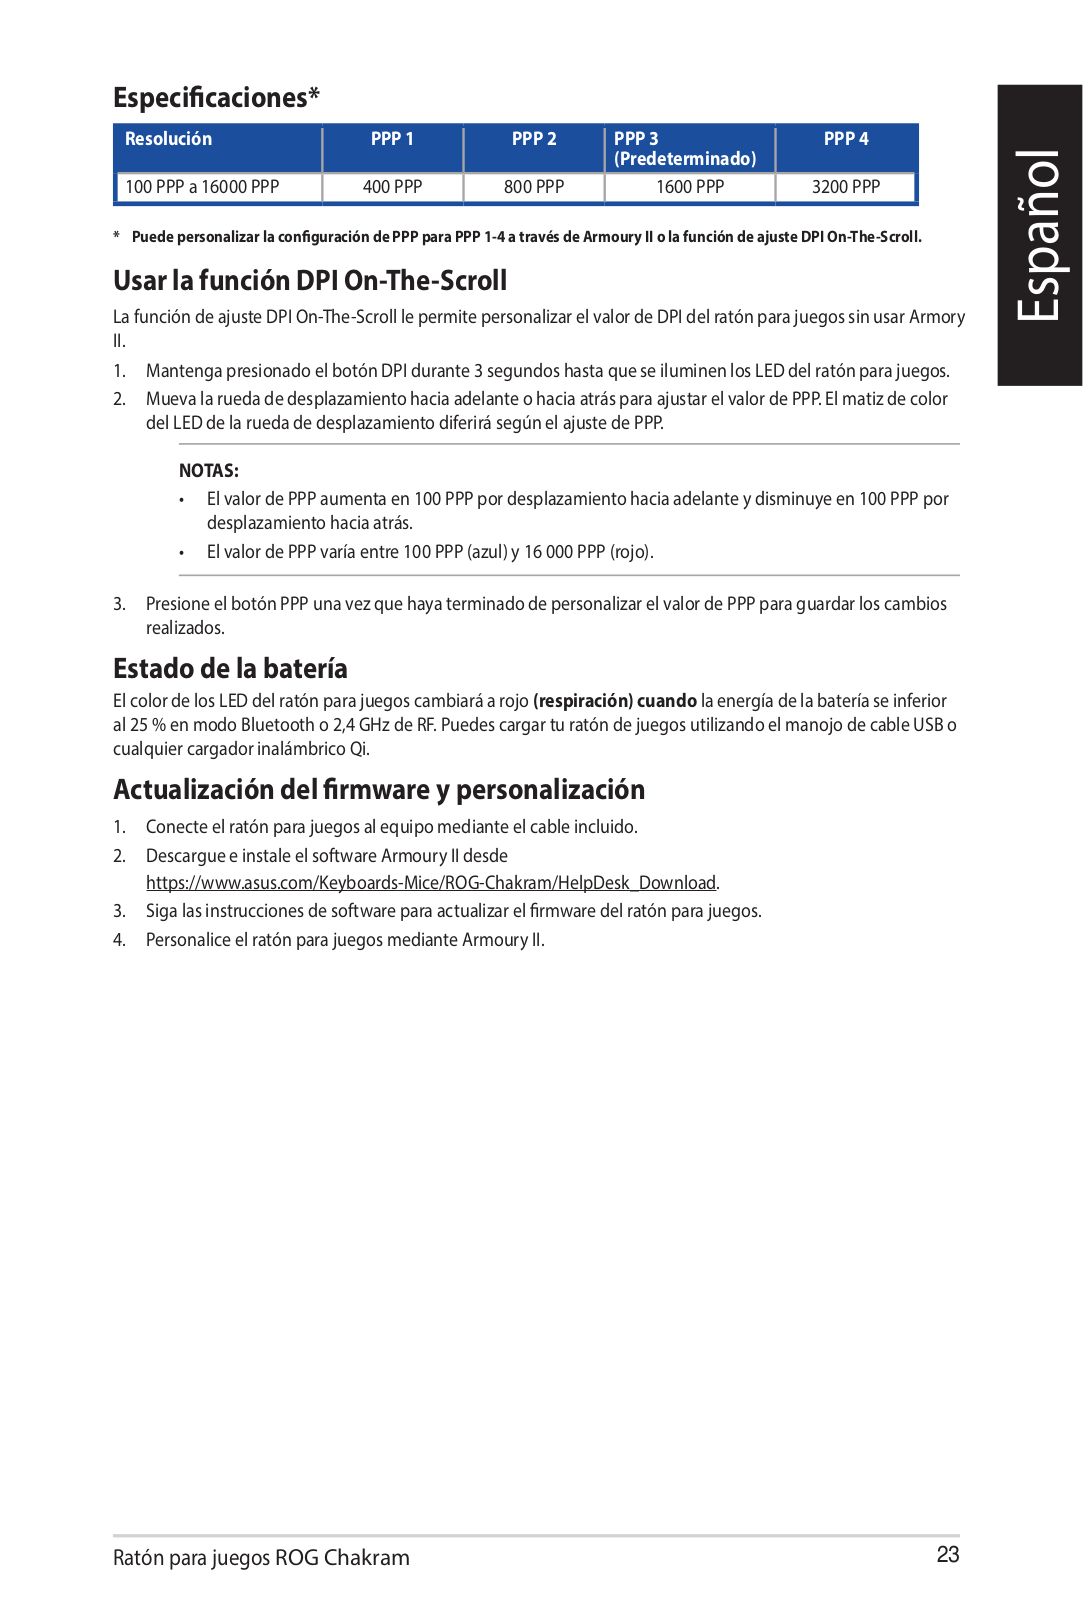
Especificaciones*

Resolución

PPP 1

PPP 2

PPP 3

PPP 4


(predeterminado)


100 PPP a 16000 PPP

400 PPP

800 PPP

1600 PPP

3200 PPP


* Puede personalizar la configuración de PPP para PPP 1-4 a través de Armoury II o la función de ajuste DPI On-The-Scroll.

Usar la función DPI On-The-Scroll

La función de ajuste DPI On-The-Scroll le permite personalizar el valor de DPI del ratón para juegos sin usar Armory II.

1.Mantenga presionado el botón DPI durante 3 segundos hasta que se iluminen los LED del ratón para juegos.

2.Mueva la rueda de desplazamiento hacia adelante o hacia atrás para ajustar el valor de PPP. El matiz de color del LED de la rueda de desplazamiento diferirá según el ajuste de PPP.

NOTAS:

ElvalordePPPaumentaen100PPPpordesplazamientohaciaadelanteydisminuyeen100PPPpor desplazamiento hacia atrás.

ElvalordePPPvaríaentre100PPP(azul)y16000PPP(rojo).

3.Presione el botón PPP una vez que haya terminado de personalizar el valor de PPP para guardar los cambios realizados.

Estado de la batería

El color de los LED del ratón para juegos cambiará a rojo (respiración) cuando la energía de la batería se inferior al 25 % en modo Bluetooth o 2,4 GHz de RF. Puedes cargar tu ratón de juegos utilizando el manojo de cable USB o cualquier cargador inalámbrico Qi.

Actualización del firmware y personalización

1.Conecte el ratón para juegos al equipo mediante el cable incluido.

2.Descargue e instale el software Armoury II desde https://www.asus.com/Keyboards-Mice/ROG-Chakram/HelpDesk_Download.

3.Siga las instrucciones de software para actualizar el firmware del ratón para juegos.

4.Personalice el ratón para juegos mediante Armoury II.

Español

Ratón para juegos ROG Chakram

23

Brasil do Português

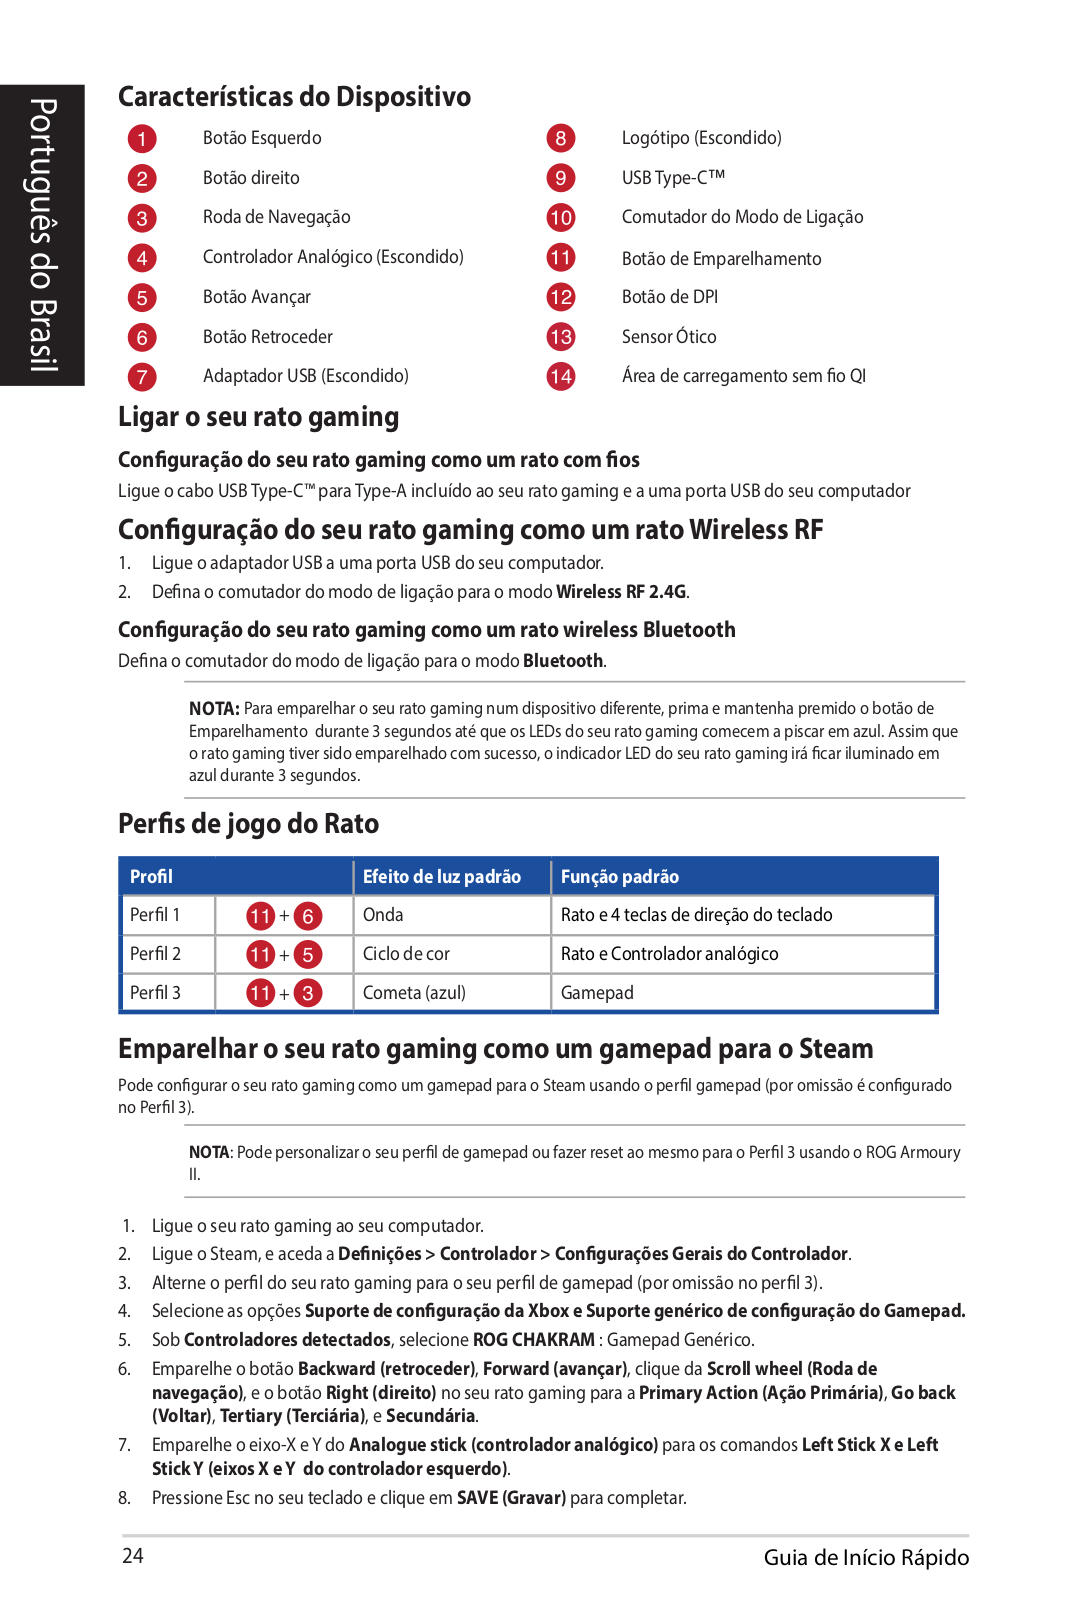
Características do Dispositivo

Botão Esquerdo

Logótipo (Escondido)

Botão direito

USB Type-C™

Roda de Navegação

Comutador do Modo de Ligação

Controlador Analógico (Escondido)

Botão de Emparelhamento

Botão Avançar

Botão de DPI

Botão Retroceder

Sensor Ótico

Adaptador USB (Escondido)

Área de carregamento sem fio QI

Ligar o seu rato gaming


Configuração do seu rato gaming como um rato com fios

Ligue o cabo USB Type-C™ para Type-A incluído ao seu rato gaming e a uma porta USB do seu computador

Configuração do seu rato gaming como um rato Wireless RF

1.Ligue o adaptador USB a uma porta USB do seu computador.

2.Defina o comutador do modo de ligação para o modo Wireless RF 2.4G.

Configuração do seu rato gaming como um rato wireless Bluetooth

Defina o comutador do modo de ligação para o modo Bluetooth.

Nota: Para emparelhar o seu rato gaming num dispositivo diferente, prima e mantenha premido o botão de Emparelhamento durante 3 segundos até que os LEDs do seu rato gaming comecem a piscar em azul. Assim que o rato gaming tiver sido emparelhado com sucesso, o indicador LED do seu rato gaming irá ficar iluminado em azul durante 3 segundos.

Perfis de jogo do Rato

Profil


Efeito de luz padrão

Função padrão


Perfil 1

+

Onda

Rato e 4 teclas de direção do teclado


Perfil 2

+

Ciclo de cor

Rato e Controlador analógico


Perfil 3

+

Cometa (azul)

Gamepad


Emparelhar o seu rato gaming como um gamepad para o Steam

Pode configurar o seu rato gaming como um gamepad para o Steam usando o perfil gamepad (por omissão é configurado no Perfil 3).

NOTA: Pode personalizar o seu perfil de gamepad ou fazer reset ao mesmo para o Perfil 3 usando o ROG Armoury II.

1.Ligue o seu rato gaming ao seu computador.

2.Ligue o Steam, e aceda a Definições > Controlador > Configurações Gerais do Controlador.

3.Alterne o perfil do seu rato gaming para o seu perfil de gamepad (por omissão no perfil 3).

4.Selecione as opções Suporte de configuração da Xbox e Suporte genérico de configuração do Gamepad.

5.Sob Controladores detectados, selecione ROG CHAKRAM : Gamepad Genérico.

6.Emparelhe o botão Backward (retroceder), Forward (avançar), clique da Scroll wheel (Roda de navegação), e o botão Right (direito) no seu rato gaming para a Primary Action (Ação Primária), Go back (Voltar), Tertiary (Terciária), e Secundária.

7.Emparelhe o eixo-X e Y do Analogue stick (controlador analógico) para os comandos Left Stick X e Left Stick Y (eixos X e Y do controlador esquerdo).

8.Pressione Esc no seu teclado e clique em SAVE (Gravar) para completar.

24

Guia de Início Rápido

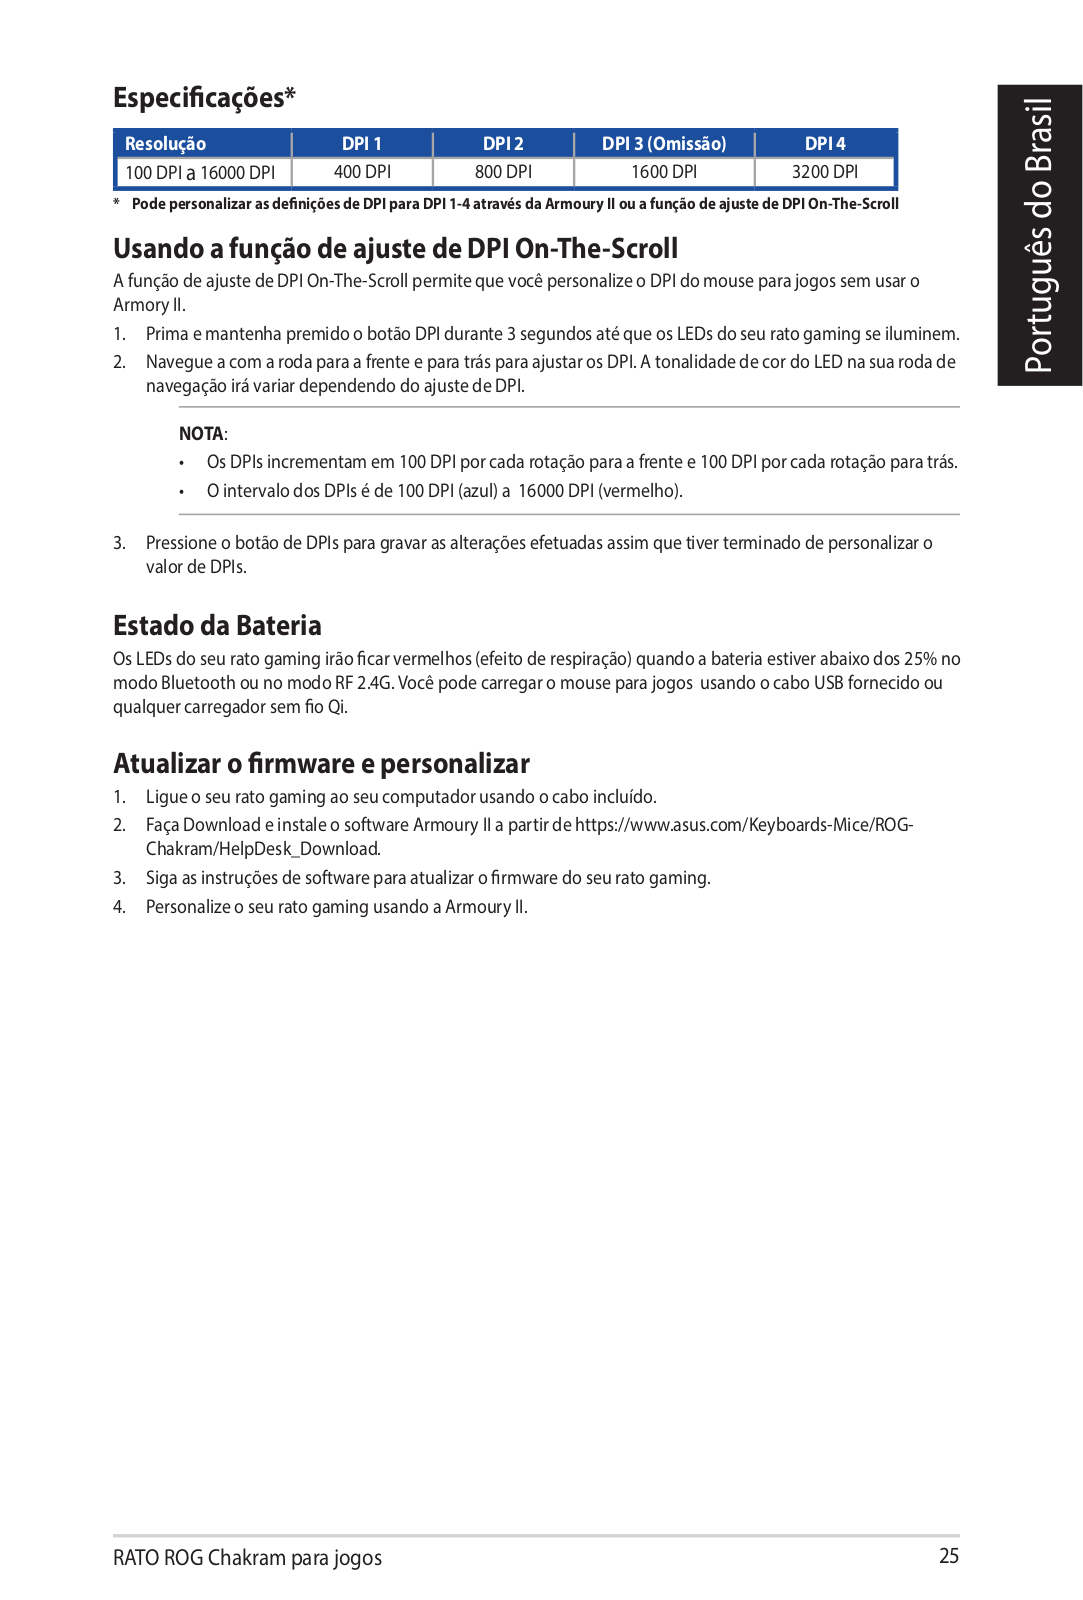
Especificações*

Resolução

DPI 1

DPI 2

DPI 3 (Omissão)

DPI 4

100 DPI a 16000 DPI

400 DPI

800 DPI

1600 DPI

3200 DPI


* Pode personalizar as definições de DPI para DPI 1-4 através da Armoury II ou a função de ajuste de DPI On-The-Scroll

Usando a função de ajuste de DPI On-The-Scroll

A função de ajuste de DPI On-The-Scroll permite que você personalize o DPI do mouse para jogos sem usar o Armory II.

1.Prima e mantenha premido o botão DPI durante 3 segundos até que os LEDs do seu rato gaming se iluminem.

2.Navegue a com a roda para a frente e para trás para ajustar os DPI. A tonalidade de cor do LED na sua roda de navegação irá variar dependendo do ajuste de DPI.

NOTA:

OsDPIsincrementamem100DPIporcadarotaçãoparaafrentee100DPIporcadarotaçãoparatrás.

OintervalodosDPIséde100DPI(azul)a 16000DPI(vermelho).

3.Pressione o botão de DPIs para gravar as alterações efetuadas assim que tiver terminado de personalizar o valor de DPIs.

Estado da Bateria

Os LEDs do seu rato gaming irão ficar vermelhos (efeito de respiração) quando a bateria estiver abaixo dos 25% no modo Bluetooth ou no modo RF 2.4G. Você pode carregar o mouse para jogos usando o cabo USB fornecido ou qualquer carregador sem fio Qi.

Atualizar o firmware e personalizar

1.Ligue o seu rato gaming ao seu computador usando o cabo incluído.

2.Faça Download e instale o software Armoury II a partir de https://www.asus.com/Keyboards-Mice/ROG- Chakram/HelpDesk_Download.

3.Siga as instruções de software para atualizar o firmware do seu rato gaming.

4.Personalize o seu rato gaming usando a Armoury II.

Português do Brasil

RATO ROG Chakram para jogos

25

Loading...
+ 57 hidden pages