

Page 1

R
3DP-V264GT/PRO
R
3DP-V264GT2/TV
3D Graphic Cards
USER'S MANUAL
Hardware & Video Drivers
Page 2

USER'S NOTICE
No part of this product, including the product and software may be reproduced,
transmitted, transcribed, stored in a retrieval system, or translated into any language in any form by any means without the express written permission of ASUSTeK
COMPUTER INC. (hereinafter referred to as ASUS) except documentation kept
by the purchaser for backup purposes.
Specifications are subject to change without notice. ASUS provides this manual
“as is” without warranty of any kind, either express or implied, including but not
limited to the implied warranties or conditions of merchantability or fitness for a
particular purpose. In no event shall ASUS be liable for any loss or profits, loss of
business, loss of use or data, interruption of business, or for indirect, special, incidental, or consequential damages of any kind, even if ASUS has been advised of
the possibility of such damages arising from any defect or error in this manual or
product. ASUS may revise this manual from time to time without notice.
Products mentioned in this manual are mentioned for identification purposes only.
Product names appearing in this manual may or may not be registered trademarks
or copyrights of their respective companies.
• IBM is a registered trademark of International Business Machines Corp.
• Windows and MS-DOS are registered trademarks of Microsoft Corporation.
• Sound Blaster AWE32 and SB16 are trademarks of Creative Technology Ltd.
• Adobe and Acrobat are registered trademarks of Adobe Systems Incorporated.
The product name and revision number are both printed on the board itself. Manual
revisions are released for each board design represented by the digit before and
after the period of the manual revision number . Manual updates are represented by
the third digit in the manual revision number. For previous or updated manuals,
BIOS, drivers, or product release information you may visit the ASUS home page
at http://www.asus.com.tw/ or contact ASUS from the following page.
© Copyright 1997 ASUSTeK COMPUTER INC. All rights reserved.
Product Name: ASUS 3DP-V264GT/PRO, 3DP-V264GT2/TV
Manual Revision: 1.01
Release Date: May 1997
2
ASUS 3DP-V264GT/PRO & 3DP-V264GT2/TV User’s Manual
Page 3

ASUS CONTACT INFORMATION
ASUSTeK COMPUTER INC.
Marketing Info:
Address: 150 Li-Te Road, Peitou, Taipei, Taiwan, ROC
Telephone: 886-2-894-3447
Fax: 886-2-894-3449
Email: info@asus.com.tw
Technical Support:
Fax: 886-2-895-9254
BBS: 886-2-896-4667
Email: tsd@asus.com.tw
WWW: http://www.asus.com.tw/
Gopher: gopher.asus.com.tw
FTP: ftp.asus.com.tw/pub/ASUS
ASUS COMPUTER INTERNATIONAL
Marketing Info:
Address: 721 Charcot Avenue, San Jose, CA 95131, USA
Telephone: 1-408-474-0567
Fax: 1-408-474-0568
Email: info-usa@asus.com.tw
Technical Support:
BBS: 1-408-474-0555
Email: tsd-usa@asus.com.tw
ASUS COMPUTER GmbH
Marketing Info:
Address: Harkort Str. 25, 40880 Ratingen, BRD, Germany
Telephone: 49-2102-445011
Fax: 49-2102-442066
Email: info-ger@asus.com.tw
Technical Support:
BBS: 49-2102-448690
Email: tsd-ger@asus.com.tw
ASUS 3DP-V264GT/PRO & 3DP-V264GT2/TV User’s Manual 3
Page 4

CONTENTS
I. Introduction......................................................................................7
Video Features............................................................................7
II. Features ...........................................................................................8
Resolution Table .........................................................................9
ASUS V264GT/PRO Layout ......................................................... 11
Adding Additional Memory .....................................................11
ASUS 3DP-V264GT2/TV Layout.................................................12
Adding Additional Memory .....................................................12
III. Hardware Installation ................................................................13
Installation Procedures: ............................................................13
IV. Driver Installation .......................................................................15
Video Driver Installation for Windows 95 .....................................15
Software MPEG & Video Player for Windows 95 ........................19
Display Settings for Windows 95 ..................................................20
Video Driver Installation for Windows 3.x ....................................21
Software MPEG & Video Player for Windows 3.x .......................23
V. V ideo Software...............................................................................25
ATI Desktop Control Panel ......................................................25
ATI Desktop Features...............................................................25
FlexDesk+ ......................................................................................26
FlexDesk+ Basic Settings ........................................................26
FlexDesk+ Advanced Settings .................................................28
DPMS (for Windows) ....................................................................29
Timer Settings ..........................................................................29
Buttons ..................................................................................... 29
DeskScape......................................................................................30
DeskScape Functions ...............................................................30
Buttons ..................................................................................... 31
WinSwitch......................................................................................31
Screen Adjustment ...................................................................32
DPMS Parameters ....................................................................34
4
ASUS 3DP-V264GT/PRO & 3DP-V264GT2/TV User’s Manual
Page 5
CONTENTS
VI. Video Player.................................................................................35
Windows Video Player...................................................................35
Features ..........................................................................................35
Playing Audio CDs (Only in window 95) .........................36
Playing Media Files...........................................................37
Playing Interactive Discs (Video CD 2.0) ..........................37
Capturing Audio/Video (only on 3DP-V264GT/PRO).....38
Capturing Still Frames........................................................39
Capturing V ideo..................................................................39
Playing Captured Video and Audio ....................................40
Intelligent Video In (only on 3DP-V264GT/PRO) ...........40
Features...............................................................................40
Using the VIDEO IN ..........................................................40
Using ImpacTV..............................................................................42
If there is no display, you may............................................42
need to enable ImpacTV. ....................................................42
VII. Other Driver Installation ..........................................................43
Video Driver Installation for Windows NT 4.0 .............................43
Video Driver Installation for Windows NT 4.0 .............................45
Video Driver Installation for Windows NT 3.5x ...........................46
Video Driver Installation for IBM OS/2 ........................................47
AutoCAD Video Driver Installation ..............................................48
Microstation Video Driver Installation ..........................................49
Select System Information (optional) ............................................50
Quick Setup (optional)...................................................................50
VDIF Files (optional).....................................................................51
Advanced Setup (optional) ............................................................52
A. Troubleshooting ............................................................................53
Diagnostics.....................................................................................53
Troubleshooting .............................................................................53
System Lockup ..............................................................................53
ASUS 3DP-V264GT/PRO & 3DP-V264GT2/TV User’s Manual 5
Page 6

FCC & DOC COMPLIANCE
Federal Communications Commission Statement
This device complies with FCC Rules Part 15. Operation is subject to the following
two conditions:
• This device may not cause harmful interference, and
• This device must accept any interference received, including interference that
may cause undesired operation.
This equipment has been tested and found to comply with the limits for a Class B
digital device, pursuant to Part 15 of the FCC Rules. These limits are designed to
provide reasonable protection against harmful interference in a residential installation. This equipment generates, uses and can radiate radio frequency energy and, if
not installed and used in accordance with manufacturer's instructions, may cause
harmful interference to radio communications. However, there is no guarantee that
interference will not occur in a particular installation. If this equipment does cause
harmful interference to radio or television reception, which can be determined by
turning the equipment off and on, the user is encouraged to try to correct the interference by one or more of the following measures:
• Re-orient or relocate the receiving antenna.
• Increase the separation between the equipment and receiver.
• Connect the equipment to an outlet on a circuit different from that to which
the receiver is connected.
• Consult the dealer or an experienced radio/TV technician for help.
WARNING: The use of shielded cables for connection of the monitor to the graphics
card is required to assure compliance with FCC regulations. Changes or modifications to this unit not expressly approved by the party responsible for compliance
could void the user's authority to operate this equipment.
Canadian Department of Communications Statement
This digital apparatus does not exceed the Class B limits for radio noise emissions
from digital apparatus set out in the Radio Interference Regulations of the Canadian Department of Communications.
6
ASUS 3DP-V264GT/PRO & 3DP-V264GT2/TV User’s Manual
Page 7

I. Introduction
The 3DP-V264GT/PRO & 3DP-V264GT2/TV adapters take advantage of 32-bit
PCI bus to provide high performance graphics. The 3DP-V264GT/PRO & 3DPV264GT2/TV are graphics controllers that integrate 3D, 2D, video accelerators,
palette DAC, and dual clock synthesizer into a single chip. The 3DP-V264GT/PRO
& 3DP-V264GT2/TV deliver superior texture mapping performance for 3D games,
3D Web browsing, TV quality video scaling for MPEG playback, industry-leading
mach64 2D performance, video expansion capability for video conferencing, and
other applications.
Active power management techniques are used to monitor activity levels within
these graphics controllers and to perform real-time power reductions such as dynamic clock control and graphics engine shutdown. Because full-speed operation
can be restored without delay, these techniques do not impact performance.
For multimedia video and game function acceleration, the 3DP-V264GT/PRO &
3DP-V264GT2/TV have color interpolation for full screen, full motion video, and
provides fast 30 frame/second animation engine, double buffering, fast host to screen
bitblts, virtual sprite, smooth page scrolling and object caching for game functions.
PC users with this adapter could enjoy smooth motion video and SEGA/SNES-class
games.
(Features)
I. Introduction
For V ideo playback features, 3DP-V264GT/PRO & 3DP-V264GT2/TV support software MPEG decoder . The driver not only provides smooth video playback, but also
provides user friendly utilities that allows customizing appearances.
You can use 3DP-V264GT/PRO & 3DP-V264GT2/TV to connect your computer to
a television. This feature is ideal for playing games, giving presentations, watching
movies, and browsing the Internet.
Now you can watch videos, games on your computer! 3DP-V264GT/PRO & 3DPV264GT2/TV let you watch full-motion video on the whole screen or in a window.
You can capture still frames and movie clips.
Video Features
• 32-bit PCI Local Bus graphics adapter
• Integrated 24-bit RAMDAC (200MHz Output Pixel Clock Interface)
• Max resolution at 1600x1200 high color at 60Hz refresh rate with 4MB
• DDC1 /2B monitor supported
• DPMS (Display Power Management Signaling) for Green PC Power Saving
ASUS 3DP-V264GT/PRO & 3DP-V264GT2/TV User’s Manual 7
Page 8

II. Features
Memory on 3DP-V264GT/PRO
• ATI RAGE Graphics Accelerator, 64-bit SGRAM memory interface
• Comes with 4MB SGRAM standard and upgradeable to 8MB SGRAM
Memory on 3DP-V264GT2/TV
• ATI RAGE Graphics Accelerator, 64-bit EDO DRAM memory interface
• Comes with 2MB EDO DRAM standard and upgradeable to 4MB EDO DRAM
(Specifications)
II. Features
3D Accelerator
• Complete 3D primitives - Points, Lines, Triangles, Trapezoids and Rectangles
• Full screen or windows double buffering for smoother animation
• Dithering down to 6 or 16 bits per pixels (bpp) from 24bpp 3D engine for smaller
• 3D Features: Perspectively Correct T exture Mapping, Gouraud Shading, Z-Buffer ,
2D Accelerator
• Hardware acceleration-Rectangle Fill, Line Draw , BitBlt, Polygon Fill, Panning/
• Hardware cursor up to 64x64x2
• Acceleration provided in 4/8/16/24/32bpp modes. Packed pixel support (24bpp)
• Game acceleration for Microsoft’s Direct Draw - Double Buffering, Virtual
memory foot print
Mip Maps, Lit and Video Textures, Dither , Alpha Blending and Interpolation,
and Fog Effects.
Scrolling, Bit Masking, Monochrome Expansion, Scissoring, and full ROP .
enables true color in 1MB configurations
Sprites, Transparent Blit, Masked Blit, and Context Chaining
Video In (only on 3DP-V264GT/PRO)
• Television quality video in a window and full screen.
• Composite video and S-Video inputs for VCR, video camera, laser-disc player,
video game consoles, etc.
• Still image and live video capture with a simple mouse click.
• Live motion video desktop, using your favorite video show as wallpaper.
• Zoom-in to any part of the screen.
TV Out
• View computer output directly on your television in either NTSC or PAL formats.
• Enhance your system with advanced flicker reduction and artifact suppression
circuitry.
• Connect using Composite or S-Video output capabilities.
• Display images on both the TV and PC montior simultaneously.
• Provide a big-screen experience for entertainment PCs which is ideal for playing games, giving presentations, watching movies, and browsing the Internet.
8 ASUS 3DP-V264GT/PRO & 3DP-V264GT2/TV User’s Manual
Page 9
II. Features
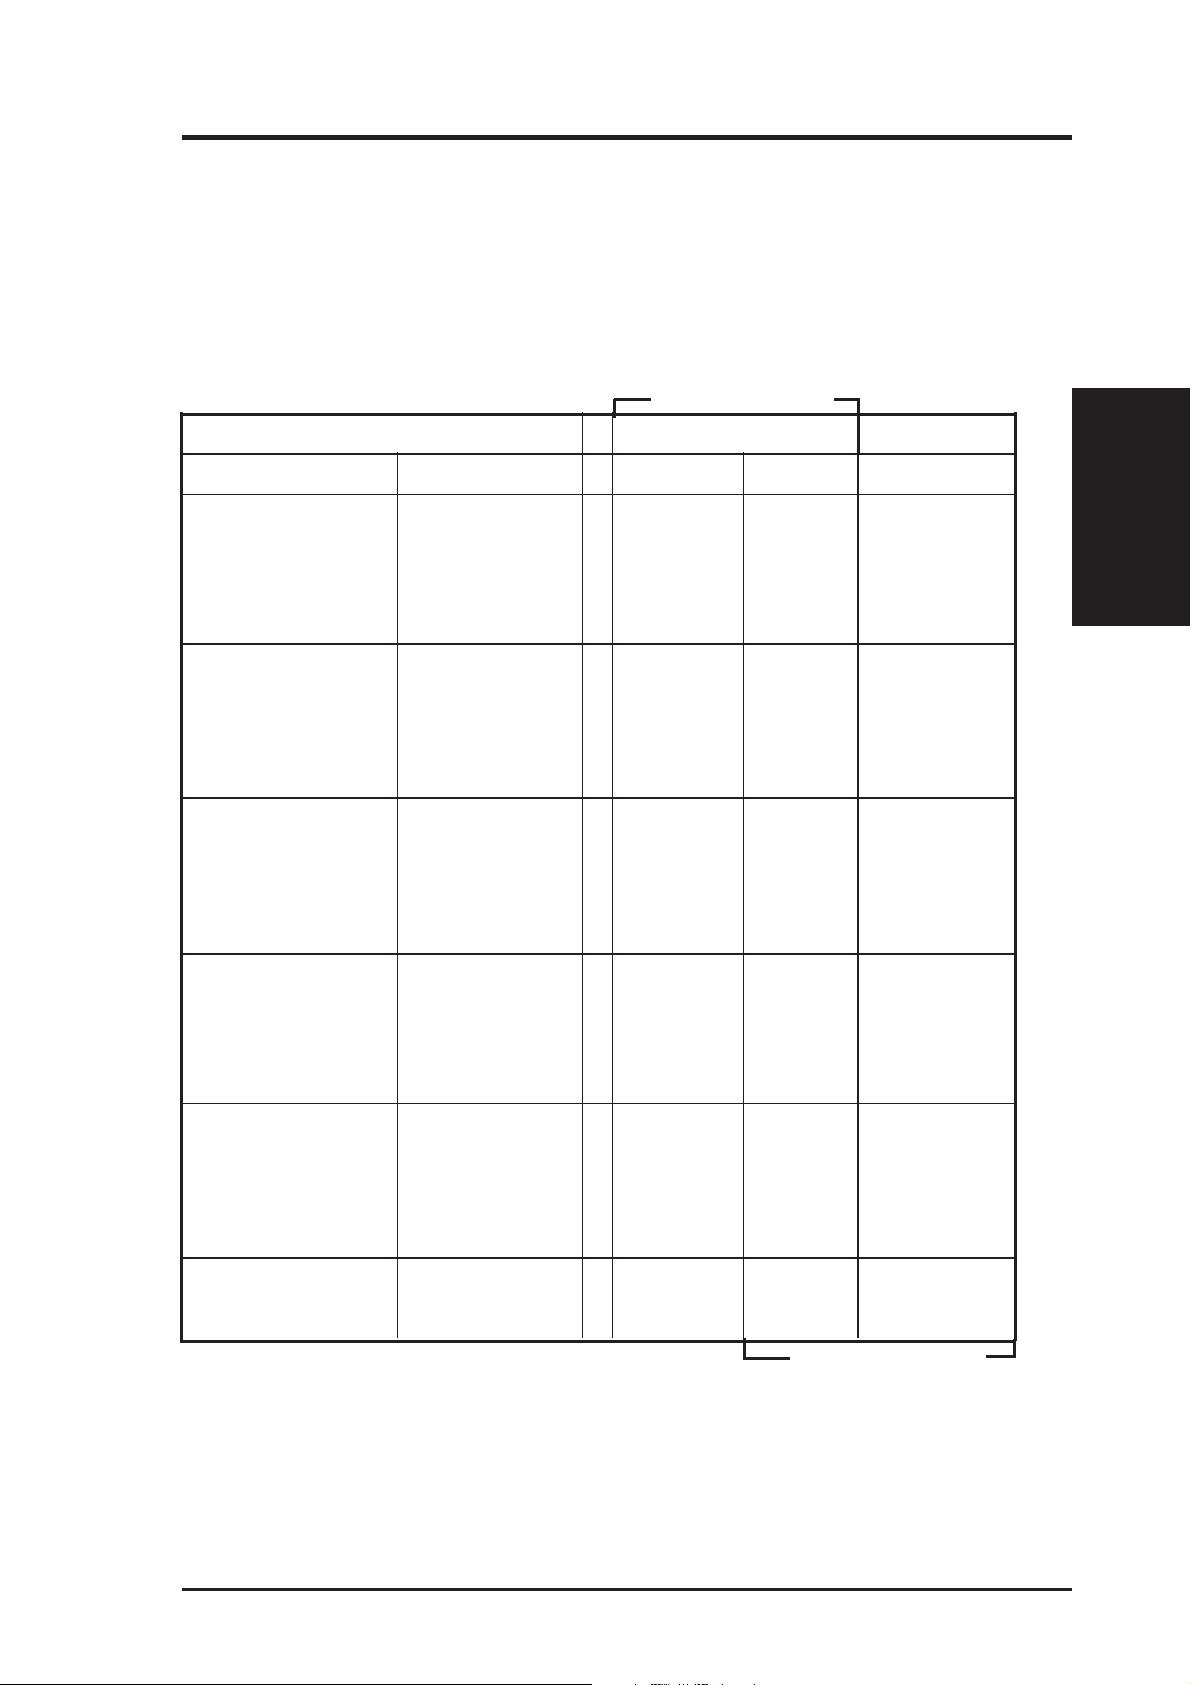
Resolution Table
When discussing color depth, 8 bits per pixel (8bpp) is the same as 256 colors and
16bpp = 65, 536 colors, 24bpp = 16.7 million, and 32bpp = 16.7 million colors. The
following is a table for the maximum refresh rates under the specified memory configuration for each card. Please note that the 3DP-V264GT2/TV has 2MB or 4MB
configurations and the 3DP-V264GT/PRO has 4MB or 8MB configurations.
3DP-V264GT2/TV
Max Referesh Rates
Resolution Colors 2MB 4MB 8MB
640 x 480 x 8 256 200Hz 200Hz 200Hz
640 x 480 x 16 65, 536 200Hz 200Hz 200Hz
640 x 480 x 24 16.7 Million 200Hz 200Hz 200Hz
640 x 480 x 32 16.7 Million 200Hz 200Hz 200Hz
800 x 600 x 8 256 200Hz 200Hz 200Hz
800 x 600 x 16 65, 536 200Hz 200Hz 200Hz
800 x 600 x 24 16.7 Million 160Hz 160Hz 160Hz
800 x 600 x 32 16.7 Million 120Hz 120Hz 120Hz
1024 x 768 x 8 256 150Hz 150Hz 150Hz
1024 x 768 x 16 65, 536 150Hz 150Hz 150Hz
1024 x 768 x 24 16.7 Million ------- 120Hz 120Hz
1024 x 768 x 32 16.7 Million ------- 100Hz 100Hz
1152 x 864 x 8 256 100Hz 100Hz 100Hz
1152 x 864 x 16 65, 536 100Hz 100Hz 100Hz
1152 x 864 x 24 16.7 Million ------- 85Hz 85Hz
1152 x 864 x 32 16.7 Million ------- 80Hz 80Hz
1280 x 1024 x 8 256 85Hz 85Hz 85Hz
II. Features
(Specifications)
1280 x 1024 x 16 65, 536 ------- 85Hz 85Hz
1280 x 1024 x 24 16.7 Million ------- 75Hz 75Hz
1280 x 1024 x 32 16.7 Million ------- ----- 75Hz
1600 x 1200 x 8 256 60Hz 60Hz 60Hz
1600 x 1200 x 16 65, 536 ------- 60Hz 60Hz
3DP-V264GT/PRO
ASUS 3DP-V264GT/PRO & 3DP-V264GT2/TV User’s Manual 9
Page 10

Video Accelerator
• Filtered horizontal and vertical scalers for TV-quality, full-screen and full-mo-
• Integrated video line buffers support filtered video scaling
• Color interpolation during scaling for improved high resolution video quality
• Supports AMC for additional video expansion capabilities such as: optional TV
(Specifications)
II. Features
• Optional MPEG-1 decoder for hardware video
• Support for 26-pin VESA compatible VGA Feature Connector (VFC) that sup-
Software
• 2D driver support
• Register compatible with IBM VGA standards
• BIOS compatible with VESA Super VGA
• Full support of Microsoft DCI and DirectDraw
• 3D driver support
• Microsoft Direct 3D including support for Reality Lab and OpenGL
• ATI 3D RAGE DOS and Windows API
• Intel 3DR
• Easy-to-use Windows utilities
• WinSwitch provides on-the-fly switching of resolution and color depth within
• DeskTop supports panning and scrolling across a virtual workspace of up to
• Utility for selecting DPMS power-down time-outs
• Video playback application and codec
• Video codec support for MPEG, Indeo, and Cinepak
• ATI MPEG video player application with VCR-like controls
• Extensive software driver support for major applications and operating systems
• Windows 3.1, W indows 95, W indows NT , AutoCAD, Microstation, OS/2, VESA
II. Features
tion video playback
tuner card available for video capture, video phone, TV overlay, or TV tuner
applications.
ports up to 1024x768 resolution.
Windows
1600x1200
as follows:
BIOS Extension support.
10 ASUS 3DP-V264GT/PRO & 3DP-V264GT2/TV User’s Manual
Page 11
III. Hardware Installation
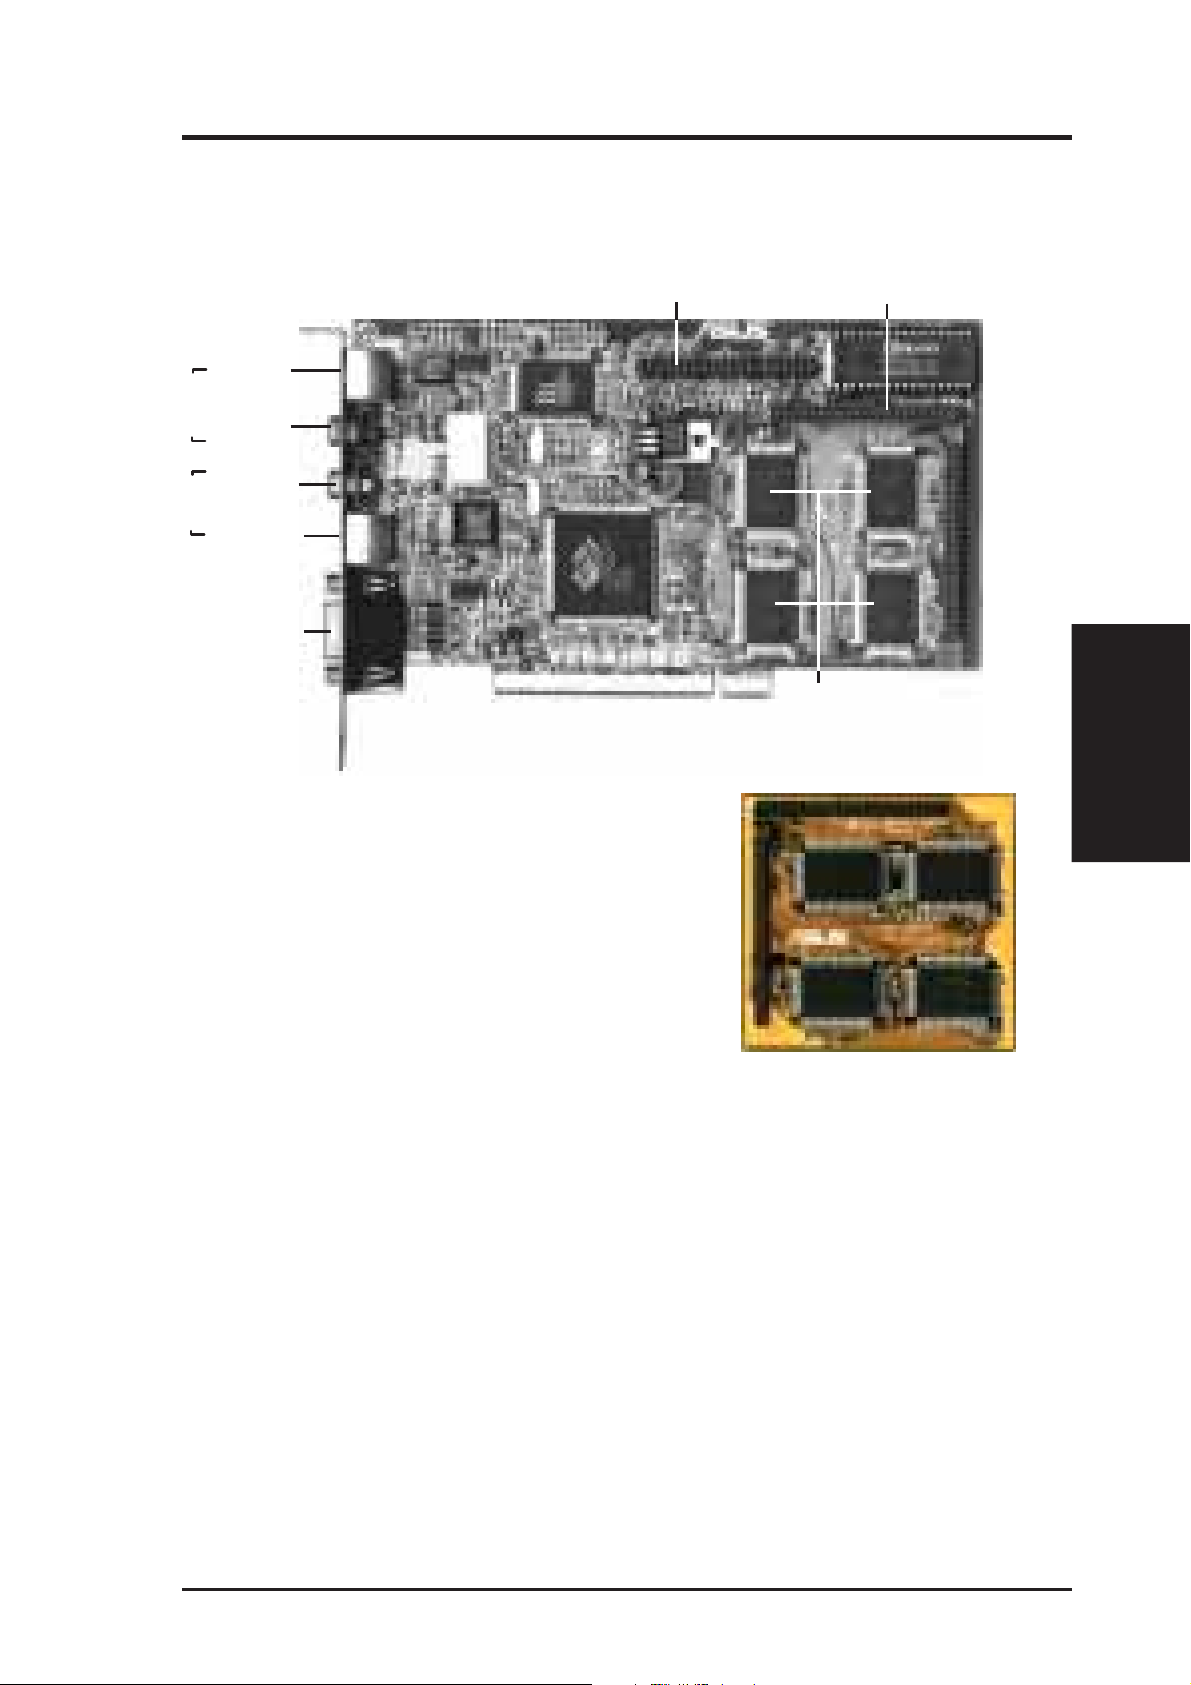
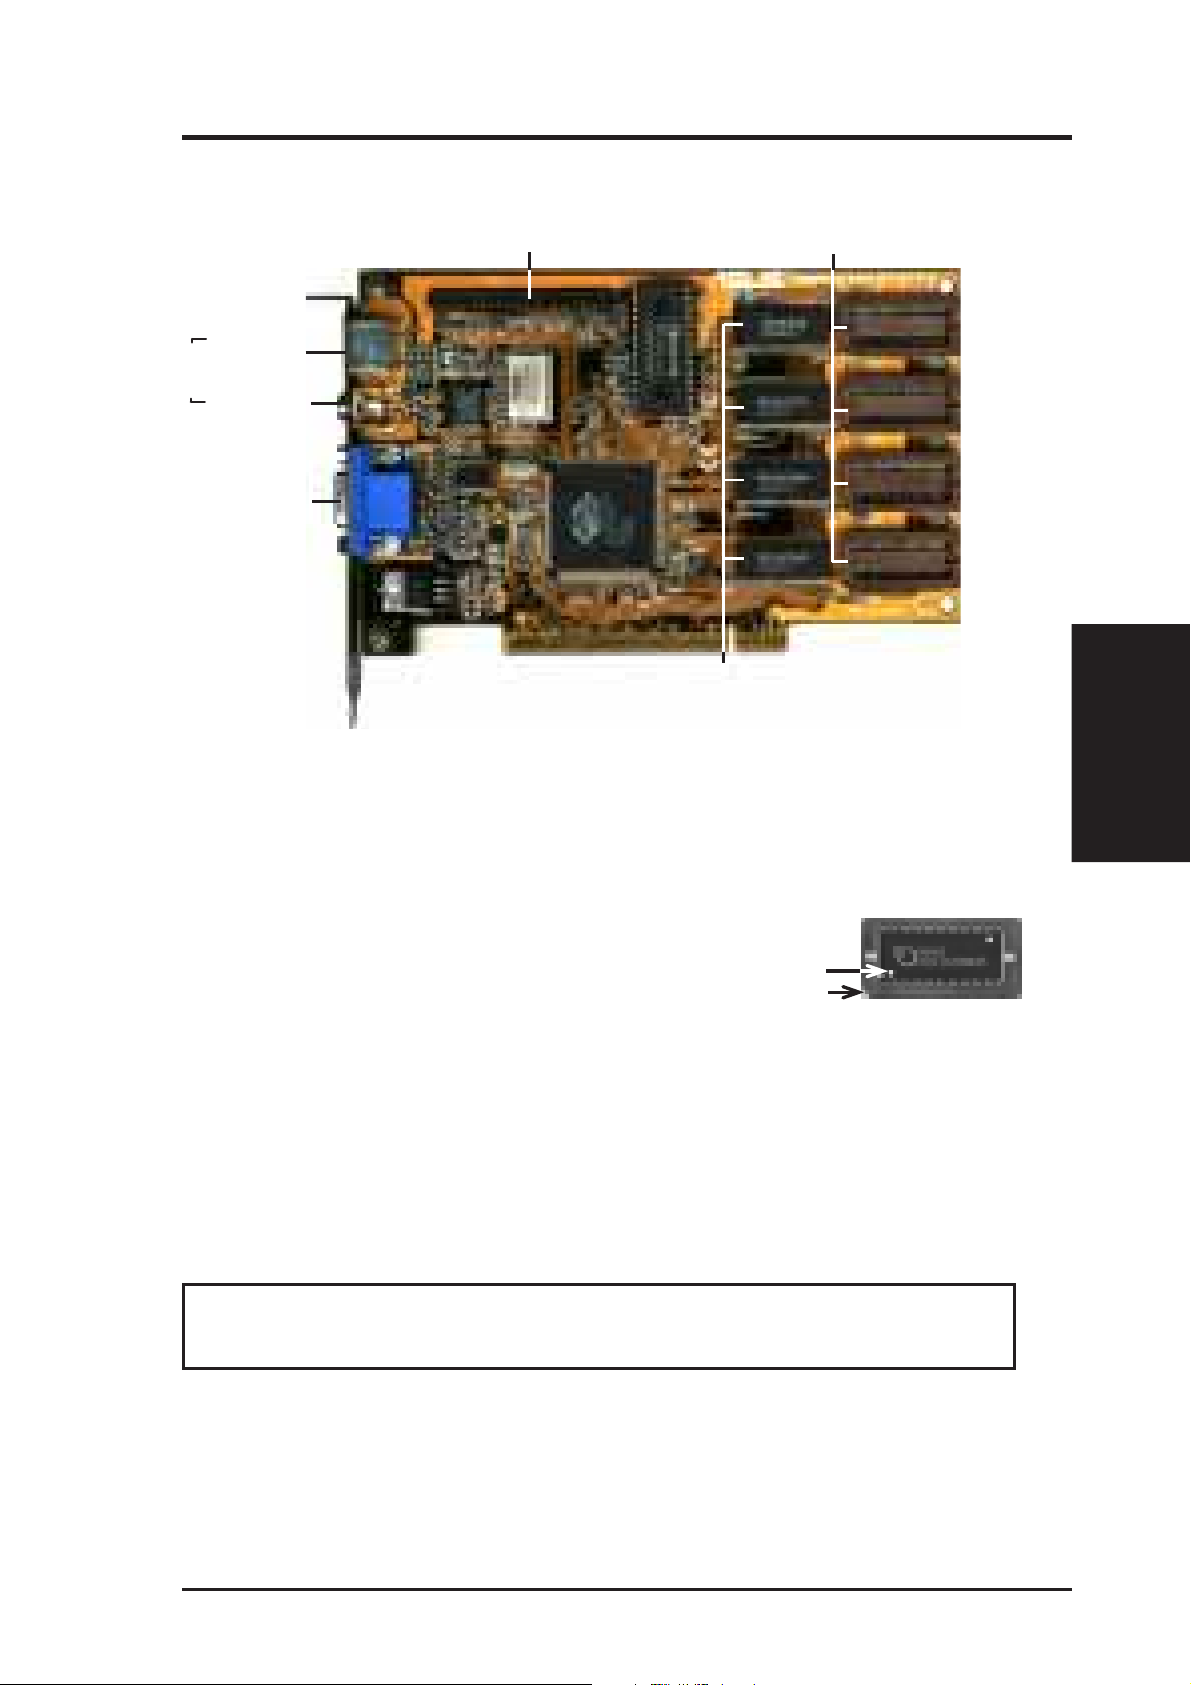
ASUS V264GT/PRO Layout
AMC Connector
S-Video In
(SVHS)
Composite
Video In
In (RCA)
Composite
Out (RCA)
TV Out
S-Video Out
(SVHS)
Monitor Out
(15-Pin VGA)
Adding Additional Memory
The ASUS 3DP-V264GT/PRO graphics card comes
with 4MB video memory configuration. Special
conntectors are available to upgrade the video
memory to 8MB by adding a daughter card.
Memory size of 5, 6, and 7MB is not supported on
this product. Specifications may change without
notice.
4MB Memory
Upgrade Connector
4MB Memory
(four 128K x 32 x 2 SGRAM)
III. H/W Installation
(3DP-V264GT/PRO)
Memory Specifications
Onboard: four 128K x 32 x 2 SGRAM chips
Upgrade: four 128K x 32 x 2 SGRAM chips on daughter card.
ASUS 3DP-V264GT/PRO & 3DP-V264GT2/TV User’s Manual 11
Page 12
III. Hardware Installation
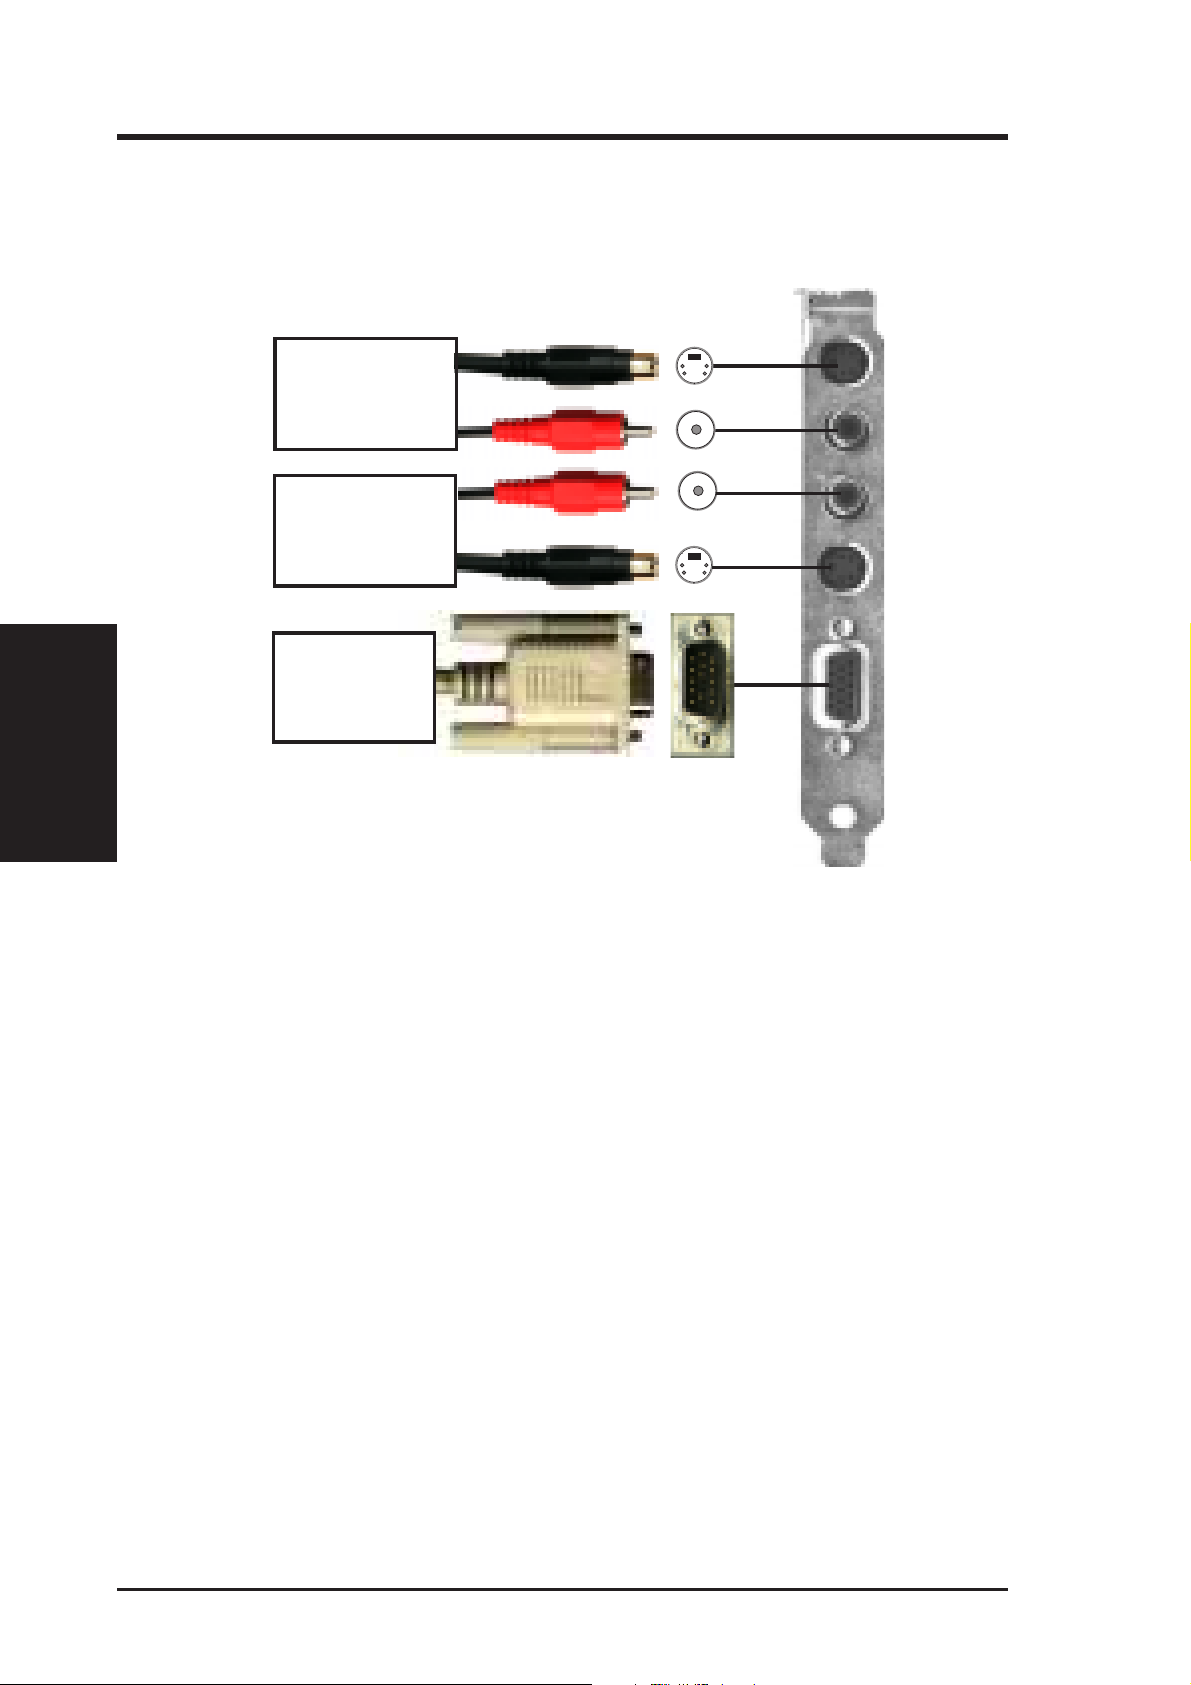
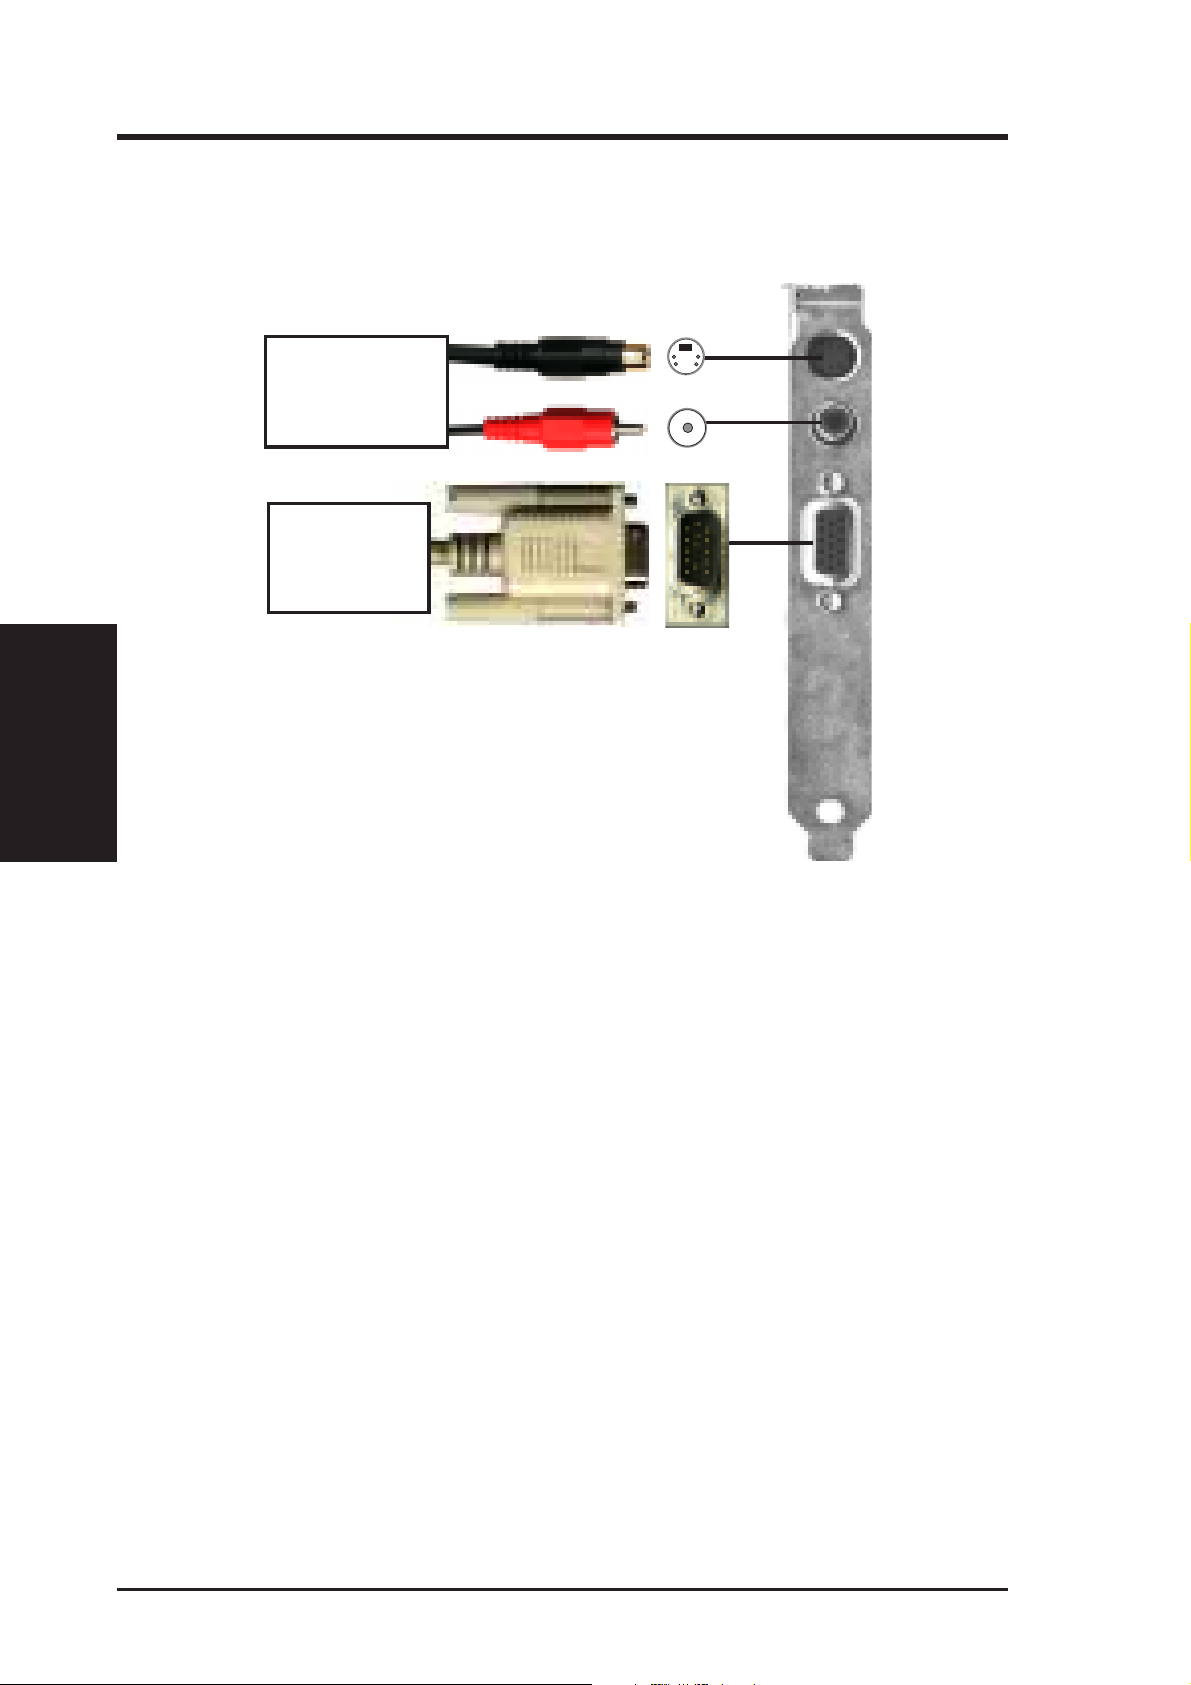
ASUS 3DP-V264GT/PRO Connection Examples
3DP-V264GT/PRO
S-Video
• Camcorder
• Video Cassette Player
• Laser Disc Player
• Other Video Devices
S-Video Plug
Input
Composite
Input
(3DP-V264GT/PRO)
III. H/W Installation
• Camcorder
• Video Cassette Recorder
• Television
• Other Video Displaying
or Recording Devices
• Computer Monitor
• Other VGA
Comatible devices
Note: ASUS Video cards come in either NTSC or PAL standards.
You must use the same standard for all devices.
RCA Plug
RCA Plug
S-Video Plug
15-Pin VGA Plug
Composite
Output
S-Video
Output
VGA
Output
IMPORTANT: External devices and ASUS Video cards both have NTSC and P AL
versions. You must make sure that all your devices and the ASUS Video card are of
the same type or else you will not have video capabilities.
12 ASUS 3DP-V264GT/PRO & 3DP-V264GT2/TV User’s Manual
Page 13
III. Hardware Installation
ASUS 3DP-V264GT2/TV Layout
AMC Connector
S-Video Out
(SVHS)
TV Out
Composite
Out (RCA)
Monitor Out
(15-Pin VGA)
Adding Additional Memory
2MB Memory
Upgrade Sockets
2MB Memory
(four 256K x 16 EDO DRAM)
The ASUS 3DP-V264GT2/TV graphics card comes with 2MB video memory configuration. Memory sockets are available to upgrade the video memory to 4MB by
adding 4 memory chips. Memory size 3MB is not supported on this product. Specifications may change without notice.
Memory Specifications
Onboard: four 256K x 16 EDO DRAM chips
Small indentation on
the chip's sloped edge
Socket's cut corner
Upgrade: four 256K x 16 EDO DRAM chips
This is an example of an installed DRAM. The indentations were made white for
visibility, they are normally black.
1. Match the small indentation on the chip’ s sloped edge with the socket’s cut corner .
2. Place the chip flat and evenly into the socket and press firmly but carefully so that
the chip enters evenly. When installed, the chip should be flush with the socket.
WARNING: Find help if in doubt! Installing the memory chip incorrectly may damage the memory and the product itself.
III. H/W Installation
(3DP-V264GT2/TV)
NOTE: For greater reliability, make sure that all video memory are of the same
type and speed.
ASUS 3DP-V264GT/PRO & 3DP-V264GT2/TV User’s Manual 13
Page 14
III. Hardware Installation
ASUS 3DP-V264GT2/TV Connection Examples
3DP-V264GT2/TV
S-Video
• Camcorder
• Video Cassette Recorder
• Television
• Other Video Displaying
or Recording Devices
• Computer Monitor
• Other VGA
Comatible devices
S-Video Plug
RCA Plug
Output
Composite
Output
VGA
Output
(3DP-V264GT2/TV)
III. H/W Installation
15-Pin VGA Plug
Note: ASUS Video cards come in either NTSC or PAL standards.
You must use the same standard for all devices.
IMPORTANT: External devices and ASUS Video cards both have NTSC and P AL
versions. You must make sure that all your devices and the ASUS Video card are of
the same type or else you will not have video capabilities.
14 ASUS 3DP-V264GT/PRO & 3DP-V264GT2/TV User’s Manual
Page 15
III. Hardware Installation
This section tells you how to install the ASUS graphics card in your PC computer.
The steps provided below demonstrate how to install the cards in a typical system.
Your system may be slightly different.
!
WARNING: Computer boards and components contain very delicate
Integrated Circuit (IC) chips. T o protect the computer board and other components against damage from static electricity, you should follow some precautions whenever you work on your computer.
1. Make sure that you unplug your power supply when adding or removing
expansion cards or other system components. Failure to do so may cause
severe damage to both your motherboard and expansion cards.
2. Hold components by the edges and try not to touch the IC chips, leads, or
circuitry.
3. Use a grounded wrist strap before handling computer components.
4. Place components on a grounded antistatic pad or on the bag that came with
the component whenever the components are separated from the system.
IMPORTANT: Keep the host adapter in its antistatic bag until you are ready
to install it. Before you pick up the adapter, ground yourself by touching an
unpainted surface on the computer chassis. Even a little static electricity can
destroy a host adapter component!
Installation Procedures:
1. Unplug all electrical cords on your computer.
2. Remove the screws for the back of the system unit cover.
3. Remove the system unit cover.
4. Find an unused 5 Volt PCI bus expansion slot or MediaBus expansion slot. Make
sure this slot is unobstructed. .
5. Remove the corresponding expansion slot cover from the computer chassis. The
slot cover is the metal strip in the back of the computer chassis that covers the
opening for the adapter’s external connector.
6. Ground yourself to an antistatic mat or other grounded source.
III. H/W Installation
(Warning/Procedures)
7. Pick up the board (still in its sleeve) by grasping the edge bracket with one hand.
Avoiding touching board components.
8. Remove the plastic sleeve.
ASUS 3DP-V264GT/PRO & 3DP-V264GT2/TV User’s Manual 15
Page 16
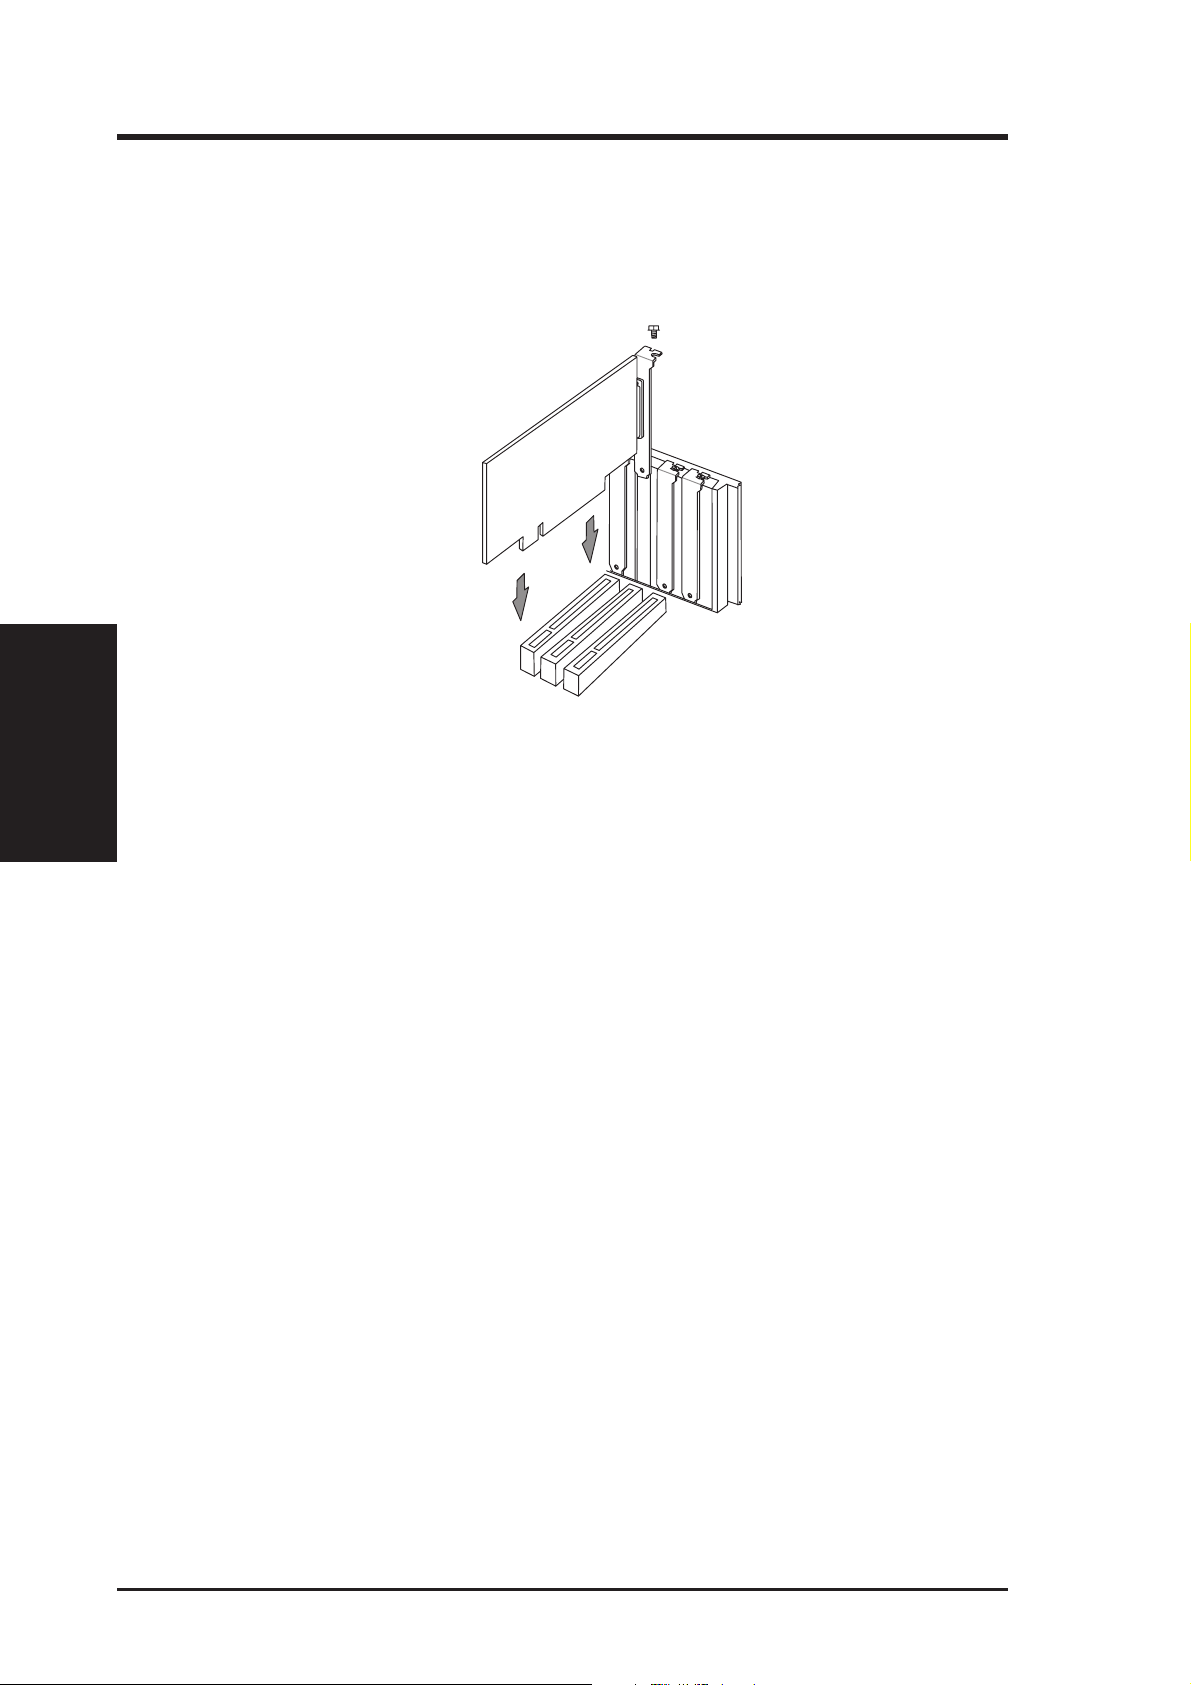
9. Position the card directly over the PCI slot and insert one end of the board in the
III. H/W Installation
(Procedures)
III. Hardware Installation
slot first. Carefully press the bus connector on the bottom of the card down into
the slot. Be sure the metal contacts on the bottom of the host adapter are securely
seated in the slot.
10. Anchor the board's mounting bracket to the computer chassis using the screw
from the slot cover you set aside previously.
12. Replace the cover on the system unit.
13. Connect your analog monitor's 15-pin VGA connector to the card and fasten the
retaining screws (if any).
14. Connect other cables and devices if available. (see software section for details)
16 ASUS 3DP-V264GT/PRO & 3DP-V264GT2/TV User’s Manual
Page 17

IV. Driver Installation
Video Driver Installation for Windows 95
Introduction
After installing the ASUS graphics card, software drivers and utilities must be installed. The following are various driver installation procedures for Windows 95
under specific situations.
Windows Plug and Play in Windows 95: (Auto installing drivers)
IMPORTANT: If an ASUS graphics card (or ATI compatible) was installed at one
time, Windows 95 Plug and Play may install ATI’s original driver upon entering
Windows 95. The old driver may cause your system to hang. If this happens, follow
these steps to reset your display driver to its basic defaults:
1. Enter Windows 95 in safe mode by pressing F5 repeatedly during bootup
2. Right click the mouse on the open desktop (not over any icons)
3. Select Properties
4. Click the Settings tab - Settings menu appears
5. Click Change Display Type - Change Display Type windows appears.
6. Click Change button - Select Device windows appears.
7. Click Show all devices - Manufacturers and Models appears
8. Click (Standard display types) - Standard Display Adapter (VGA) is selected
9. Click OK button - Change Display Type windows appears.
10. Click Apply button - System Settings Change window appears
11. Click Yes button to restart your computer now - restart in normal mode.
(Windows 95)
IV. Driver Installation
ASUS 3DP-V264GT/PRO & 3DP-V264GT2/TV User’s Manual 17
Page 18
IV. Driver Installation
Video Driver Installation for Windows 95
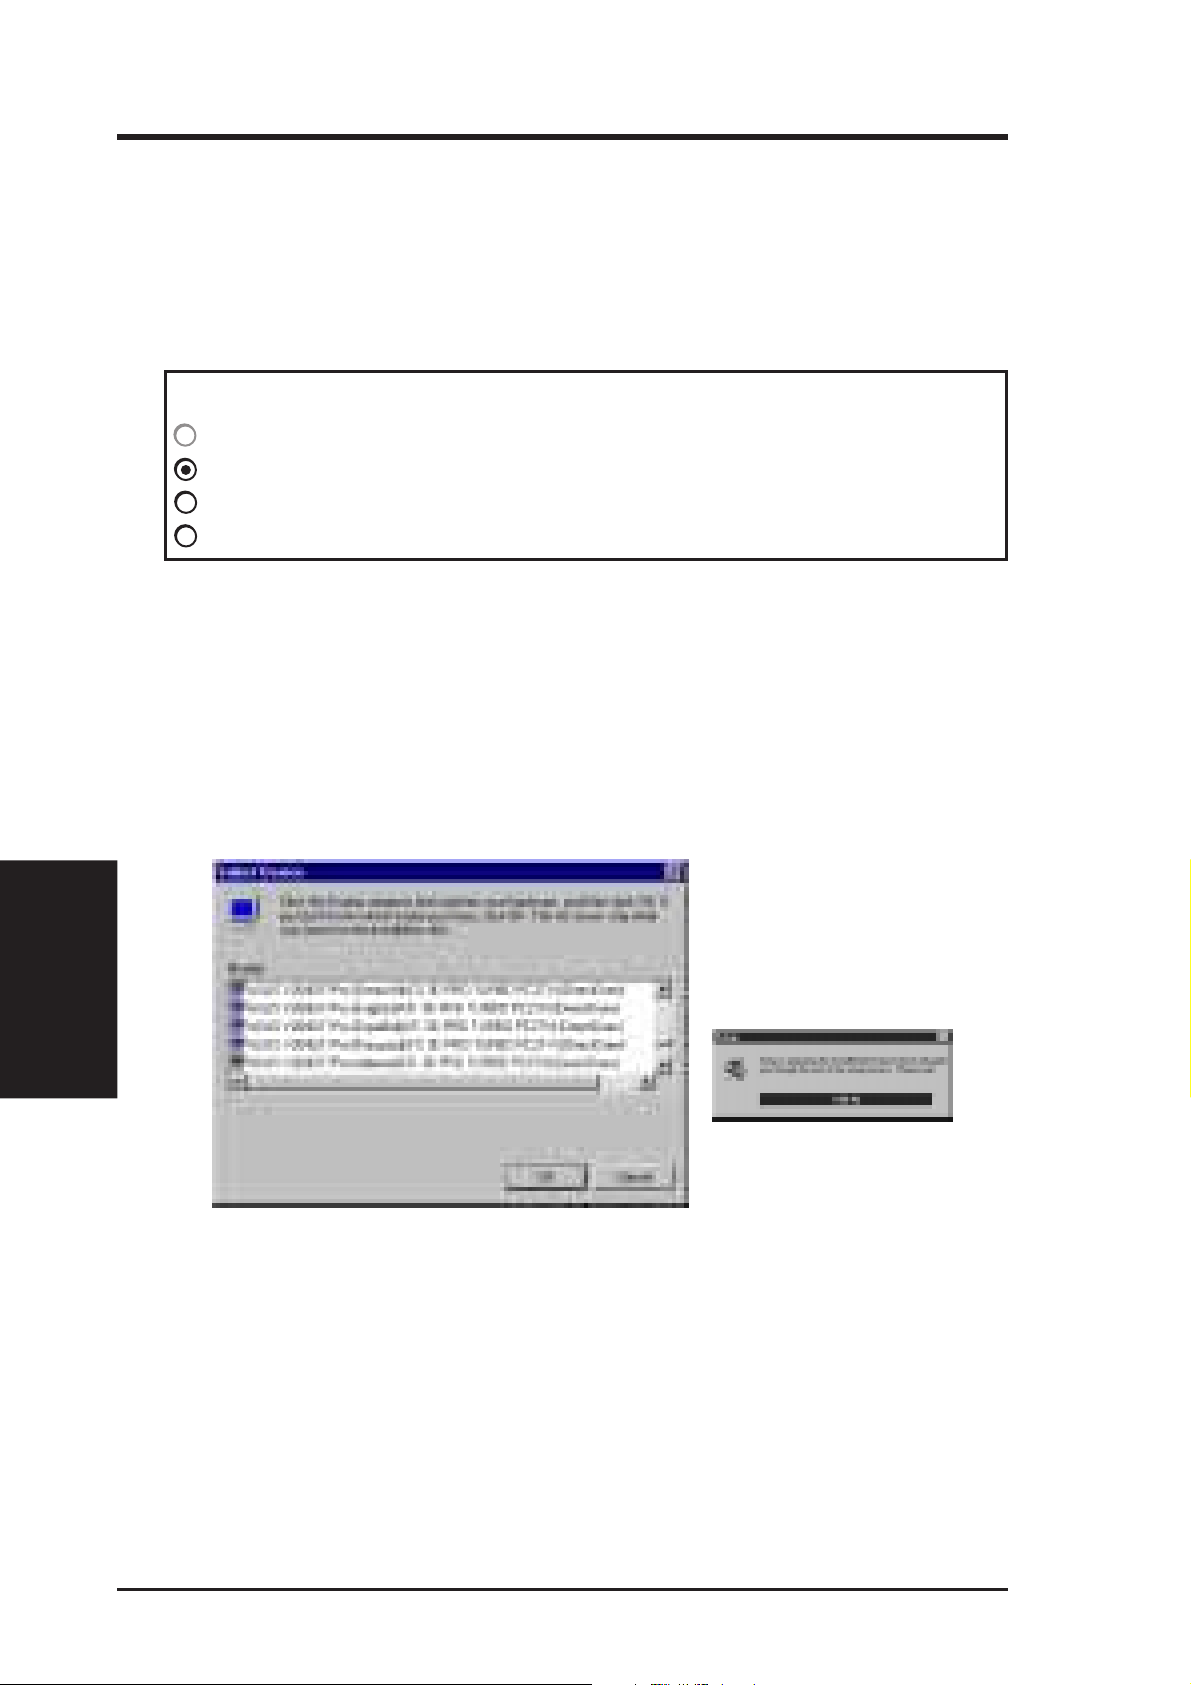
Installing ATI Video drivers in Windows 95: (New Hardware Found)
If installing an ASUS graphics card for the first time, a “New Hardware Found”
window will appear upon entering Windows 95:
Select which driver you want to install for your new hardware:
Windows default driver
Driver from disk provided by hardware manufacturer
Do not install a driver (Windows will not prompt you again)
Select from a list of alternate drivers
1. Click OK to use the default selection: “Driver from disk provided by hardware
manufacturer”
2. Insert ASUS installation CD and click Br owse button - Open windows appears.
3. Select you CD-ROM drive in the “Drives:” box
4. Select \win95 directory - macxw4.inf shows in ”File name:”
5. Click the OK button - Install from Disk appears - Click OK button again.
6. Select your device and language then click OK button - Copying Files... appears
IV. Driver Installation
(Windows 95)
(Your device selections may be different from this example.)
7. Click Yes button - ATI Desktop Help will appear upon restart, make changes as
necessary.
18 ASUS 3DP-V264GT/PRO & 3DP-V264GT2/TV User’s Manual
Page 19

IV. Driver Installation
Video Driver Installation for Windows 95
Installing ATI Video drivers in Windows 95 (Prompted by Windows 95)
If an ASUS graphics card (or ATI compatible) was installed unsuccessfully or modified at one time a “Display” message will appear upon entering Windows 95:
There is a problem with your display settings. The adapter type is
incorrect, or the current settings do not work with your hardware.
1. Click OK button to continue - The “Settings” tab of the Display Properties ap-
pears.
2. Click Change Display Type - Change Display Type windows appears.
3. Click Change button - Select Device windows appears.
4. Click Have Disk button - “Install From Disk” window appears
5. Insert ASUS instillation CD and Click Browse button - Open window appears
6. Select your CD-ROM drive in the “Drives:” box
7. Select \win95 directory - macxw4.inf shows in ”File name:”
8. Click the OK button - Install from Disk appears - Click OK button again.
9. Select your device and language then click OK button - Copying Files... appears
10. Change your monitor type if necessary - Click Close button when finished.
11. Adjust the “Desktop area,” “Color palette,” and “Font size” if necessary - Click
Apply button when finished - System Settings Change windows appears:
You must restart your computer before the new settings will take effect.
Do you want to restart your computer now?
12. Click Yes button - ATI Desktop Help will appear upon restart, make changes as
necessary .
(Windows 95)
IV. Driver Installation
ASUS 3DP-V264GT/PRO & 3DP-V264GT2/TV User’s Manual 19
Page 20

IV. Driver Installation
Video Driver Installation for Windows 95
Updating installation in Windows 95: (Using Autorun Screen)
If for some reason you need to reinstall the ATI video drivers or if you skipped the
previous procedures, you may use the following steps:
1. Insert the ASUS installation CD (or double click on the CD drive in “My Computer” if CD already inserted)- ASUS Windows 95 Install Shell appears.
2. Click Install Windows 95 Display Driver - Display Properties and installa-
IV. Driver Installation
(Windows 95)
3. Select the Settings tab and Continue from step 2 above.
tion information appears.
20 ASUS 3DP-V264GT/PRO & 3DP-V264GT2/TV User’s Manual
Page 21

IV. Driver Installation
Software MPEG & Video Player for Windows 95
Software MPEG allows the viewing of the following video files identified by their
extensions:
• MPEG Format: (*.MPG, *.DAT, *.MPV) Extensions
• AVI Files (*.AVI) Extensions
For Software MPEG support in Windows 95, you must first install DirectVideo
Upgrade For Microsoft Windows, then install ATI Video Player.
Installing Microsoft DirectVideo in Windows 95:
1. Reinsert the ASUS installation CD or select the CD from My Computer.
2. Click Install DirectX - Click
3. Restart Windows when finished.
Installing A TI Video Player in Windows 95:
1. Reinsert the ASUS installation CD or select the CD from My Computer.
2. Click Install Video Player - ATI Setup: ATI VIDEO PLAYER window ap-
pears.
3. Click the OK button - Installation complete message will appear
4. Click Restart Windows button when finished
The setup program will give you "ATI Multimedia" in your Programs group and
start button. The following icons will be available from the "Start" button once the
driver has successfully been installed. Click ATI Player to bring up the ATI Player
screen.
(Windows 95)
IV. Driver Installation
ASUS 3DP-V264GT/PRO & 3DP-V264GT2/TV User’s Manual 21
Page 22

IV. Driver Installation
Display Settings for Windows 95
Changing display settings:
T o enter the “Display Properties” at any time, right click your mouse on the desktop
and select “Properties” or double click the “Display” icon in the “Control Panel.”
Click the appropriate Tab as follows:
Adjustment
Adjustment: Click on the Position or Size arrows to make
your screen appear as centered and large as possible.
Panning
IV. Driver Installation
(Windows 95)
Color
Panning: This allows you to assign hotkeys in the
"Value" box to move your screen up, down, left, right,
in, or out in any application. Click on "Defaults" button
to fill in the 'Value" box with default values.
Color: This allows you to adjust the Gamma level for
your monitor and color levels for Red, Green, and Blue.
You can save your settings by clicking "Save As" button
and typing in a file name. This allows you to recall previously saved settings. Click on "Defaults" button to restore all settings to the default.
22 ASUS 3DP-V264GT/PRO & 3DP-V264GT2/TV User’s Manual
Page 23

IV. Driver Installation
Video Driver Installation for Windows 3.x
For your convenience, the ATI video drivers for Windows 3.x can be installed in
Windows 3.x or in DOS. The autorun ASUS Windows 3.1 Install Shell cannot be
automatically run by Window 3.x, so manual execution is necessary.
Installing ATI video drivers in Windows 3.x:
1. Start W indows 3.x
2. Run File Manager
3. Insert the ASUS installation CD.
4. Change to your CD drive.
5. Double click setup.exe - ASUS Windows 3.1 Install Shell appears
6. Click on Install Windows 3.1 Display Driver- Confirm Installation appears
7. Click Yes - Copying Files appears - Restart Windows appears
8. Click Restart now to complete installation - ATI Desktop group and icon will
appear upon restart - Install Shell Message appears:
Now installation process will continue. If you want to install Video for
Windows, please keep your ASUS driver CD in CD-ROM drive.
9. Click OK - Follow the instructions for Software MPEG & Video Player.
ASUS 3DP-V264GT/PRO & 3DP-V264GT2/TV User’s Manual 23
(Windows 3.x)
IV. Driver Installation
Page 24

IV. Driver Installation
Video Driver Installation for Windows 3.x
Installing ATI video drivers in DOS:
1. Enter DOS mode (Exit Windows, do not use Windows DOS prompt)
2. Change to your CD-ROM drive
3. Type: SETUP (assuming your CD-ROM drive is letter D) in DOS mode. ASUS
DOS installation shell will appear and present you with a list of install option.
IV. Driver Installation
(Windows 3.x)
5. Press Enter to confirm path of Windows 3.x or change if necessary.
6. “ASUS driver is successfully installed !!” - press any key.
7. “Do you want to launch Windows 3.1 to continue installation now? (Y/N)
8. Install Shell Message appears:
9. Click OK - Follow the instructions for Software MPEG & Video Player.
Note: You must make sure that ASUS ATI VGA card has been plugged in your
machine.” - Press Y.
Now installation process will continue. If you want to install Video for Windows, please keep your ASUS driver CD in CD-ROM drive.
24 ASUS 3DP-V264GT/PRO & 3DP-V264GT2/TV User’s Manual
Page 25

IV. Driver Installation
Software MPEG & Video Player for Windows 3.x
Software MPEG allows the viewing of the following video files identified by their
extensions:
• MPEG Format: (*.MPG, *.DAT, *.MPV) Extensions
• AVI Files (*.AVI) Extensions
For Software MPEG support in W indows 3.x, you must first install Microsoft’s V ideo
for Windows, then install ATI Video Player.
Installing Microsoft Video for Windows in Windows 3.x:
1. Click on Install Video for Windows - Video for Windows 1.1 Runtime appears
2. Click Continue - Setup appears - Setup Successful appears
3. Click Restart now to complete installation
Installing ATI Video Player in Windows 3.x:
1. Run File Manager
2. Insert the ASUS installation CD.
3. Change to your CD drive.
4. Double click setup.exe - ASUS Windows 3.1 Install Shell appears
5. Click on Install V ideo Player - Memory Requirement appears:
The ATI V ideo Player needs at least 600K conventional memory to execute.
If you are not sure or memory is not enough, you can type “MEMMAKER”
under DOS to optimize your memory configuration.
(Windows 3.x)
IV. Driver Installation
6. Click Continue - ATI Setup: ATI VIDEO PLAYER appears with message
7. Click OK to start installation - Installation completed message appears.
8. Click OK to complete installation - Restart Windows? appears
9. Click Restart Windows button.
10. The Video Player icon will be added to the ATI Desktop menu.
ASUS 3DP-V264GT/PRO & 3DP-V264GT2/TV User’s Manual 25
Page 26

(This page was intentionally left blank)
26 ASUS 3DP-V264GT/PRO & 3DP-V264GT2/TV User’s Manual
Page 27

V. Video Software
NOTE: This section shows screens for Windows 3.1x although featur e descriptions may be used for both Windows 3.1x and Windows 95.
ATI Desktop Control Panel
An ATI DeskTop is installed automatically when you install the enhanced driver for
Windows. Double click on the icon to display the ATI Desktop Control Panel.
The A TI DeskTop provides a consistent and integrated control. Depending on what
has been installed, your DeskTop may not have the same number of features as
shown above.
Each feature icon in the Mach64 product group shown in this DeskT op is described
on the following pages.
ATI Desktop Features
Help On: Click this icon, then click any other icon in the product group to display
Help information on the selected item.
Read Me: Click this icon then click the Mach64 logo or feature icon to display the
readme file on the item.
ATI Logo: Double click this logo to generate a problem report which includes
pertinent data on your system and card configuration to help solve your problem.
Have the report ready before contacting your vendor.
(Windows 3.x)
V. Video Software
Feature Icons: Double click a Feature icon to launch the associated control panel.
ASUS 3DP-V264GT/PRO & 3DP-V264GT2/TV User’s Manual 27
Page 28

V. Video Software
FlexDesk+
FlexDesk+ Basic Settings
FlexDesk+ is for configuring the operating modes and parameters of the ASUS 264
Series Card. The availability of options in FlexDesk+ is dependent on the card and
its hardware configuration. This control panel allows you to configure Colors (color
depth), Screen Size (resolution), Desktop Size (virtual desktop size), Advanced settings and Default parameters (factory settings). A Status Bar at the bottom of the
panel displays help information as you make your selection.
FlexDesk+ Provides dynamic screen information feedback as you adjust the slid-
ers for "Colors", "Screen Size" and "Desktop Size." Any setting not supported by
the card is shown in gray . A slider will always snap to the nearest supported setting
for the current slider combination.
The Sample Color Bar next to the Sample Monitor dynamically shows a color
palette that approximates the Colors setting as you adjust the Colors slider.
NOTE: If your desired resolution is not available, check your monitor configura-
V. Video Software
(Windows 3.x)
tion setting in the INSTALL program.
Sliders
Colors: Select color depts of 256; 32, 768; 65, 536; or 16.7million colors.
Screen Size: Selects standard screen resolutions of 640x480, 800x600, 1024x768,
1152x864, and 1280x1024.
Desktop Size: Selects virtual desktop sizes of 640x480, 800x600, 1024x768,
1152x864, 1280x1024, and 1600x1200. Desktop size is greater than or equal to
Screen size. The virtual desktop provides expanded work space on your screen even
if your monitor cannot display that resolution by allowing you to pan past your
visible screen.
28 ASUS 3DP-V264GT/PRO & 3DP-V264GT2/TV User’s Manual
Page 29

V. Video Software
Buttons
Test: Automatically switches on monitor to display the selected mode without exit-
ing this control panel, for 10 seconds or until the user clicks the End Test, OK, or
Cancel button. All other buttons and sliders are inactive at this time. To show
dynamic color depth changes in this test, the WinSwitch feature must by enabled
before starting the current session of Windows.
Defaults: Returns Screen Size, Colors, and Desktop Size sliders to the default positions. When OK is clicked, these changes will be effective.
Advanced...: Opens the Advanced panel. See FlexDesk+ Advanced Settings.
Help: Displays Help information on FlexDesk+.
OK: Exits the FlexDesk+ control panel and effects all new changes.
Cancel: Discards all changes and exits the FlexDesk+ control panel.
FILE Menu
Open: Opens an existing Setting file.
Save: Saves the current settings to the active Setting file.
Save As: Saves the current settings to an alternate Setting file which you can name.
Exit: Exits the FlexDesk+ control panel.
FEATURES Menu
Defaults: Provides same functionality as the push button.
Advanced...: Provides same functionality as the push button.
HELP Menu
Help: Provides same functionality as the push button.
Contents: Displays the Help index.
About...: Displays the product version number and information.
(Windows 3.x)
V. Video Software
ASUS 3DP-V264GT/PRO & 3DP-V264GT2/TV User’s Manual 29
Page 30

V. Video Software
FlexDesk+ Advanced Settings
Environment
This parameter specifies logical dots per inch (LDPI). Being logical, i.e., not physical dots, the effect will differ depending on screen size. Automatic Mode chooses
the optimal environment setting for the selected screen size. The Small, Large and
DTP settings are 96, 120, and 128 LDPI respectively.
256 Color Palette
This selection is only available in 256 color mode. Windows runs faster when this
option is turned off.
On: Allows the application to define color selection in the palette.
Off: Choose colors from a fixed palette.
Dithering Control
Dithering is meshing two colors to produce the illusion of a third. This selection is
only available in 256 color mode with 256 Color Palette on.
V. Video Software
(Windows 3.x)
On: Provides standard VGA dithering of colors and color selection boxes.
Off: Provides smooth dithering which results in faster performance than VGA dith-
ering.
Buttons
OK: Accepts the advanced settings as shown and returns to the FlexDesk+ main
panel.
Cancel: Discards all changes and returns to the FlexDesk+ main panel.
Help: Displays Help information on FlexDesk+.
30 ASUS 3DP-V264GT/PRO & 3DP-V264GT2/TV User’s Manual
Page 31

V. Video Software
DPMS (for Windows)
Win3.1 Limitation: In some newer BIOS, DPMS fucntion doesn't work normally.
VESA DPMS-compliant monitors conserve electrical energy by powering down
after a period of inactivity . You can use the DPMS panel (in W indows) to configure
the auto-shutdown timing sequence for your DPMS-compliant monitor . (The DOS
version of DPMS is described in another section.)
WARNING: Monitors that do not support VESA DPMS can be damaged by activation of the DPMS feature.
Do not use screen saver when DPMS is enabled. The screen saver will
conflict with the DPMS operation.
Enabline DPMS for Windows:
1. Click the DPMS icon.
2. Highlight the timer boxes one at a time and specify the values.
3. T urn on DPMS Enabled.
4. Click OK.
Timer Settings
Standby Time: Time value is in minutes, after which Standby mode is activated if
no user activity is detected. Standby is the first level of power conservation.
Suspend Time: Time value is in minutes, after which Suspend mode is activated if
no user activity is detected. The monitor conserves more energy at this level than at
Standby .
Off Time
Time value is in minutes, after which Off mode is activated if no service activity is
detected. At this level, energy conservation is the highest.
Buttons
(Windows 3.x)
V. Video Software
DPMS Enable: DPMS feature is enabled if box is checked.
Defaults: Sets DPMS timers to default values.
Help: Displays Help information on DPMS.
OK: Accepts settings as shown and exits.
Cancel: Discards all changes and exits.
ASUS 3DP-V264GT/PRO & 3DP-V264GT2/TV User’s Manual 31
Page 32

V. Video Software
DeskScape
NOTE: Press Default to fill in the fields with default keys first.
DeskScape allows more control over your Virtual Desktop using keyboard keys.
For a description of Screen and Desktop, Refer to the Using FlexDesk+ section.
The displayed image on the screen is a "window" showing only a portion of the
entire virtual desktop. The non-displayed portion can be brought into view by panning. Four keys are assigned to this function, one for each direction of up, down,
left and right. If you are using a mouse, the window may be panned by moving the
mouse cursor to any edge of the window as well.
Zoom In will display a larger image but less of the desktop; Zoom Out has the
opposite effect. What you can zoom is dependent on the relative settings of Screen
Size and Desktop Size.
Use this panel to assign the six hot keys to Panning and Zooming functions. Alphanumeric keys may be assigned in any combination with <AL T>,<Ctrl> and <Shift>.
We recommend that you assign all the keys in one session.
V. Video Software
(Windows 3.x)
DeskScape Functions
Pan Up: Moves the "window" upward, with user defined keys, e.g., Alt ↑.
Pan Left: Moves the "window" to the left, with user defined keys, e.g., Alt ←.
Pan Right: Moves the "window" to the right, with user defined keys, e.g., <Alt →.
Pan Down: Moves the "window" downward, with user defined keys, e.g., <Alt ↓.
Zoom In: Makes the screen image larger, with user defined keys, e.g.,
<Alt>+<Home>. NOTE: The entire desktop can be panned.
Zoom Out: Displays more of the virtual desktop, with user defined keys, e.g.,
<Alt>+<End>
32 ASUS 3DP-V264GT/PRO & 3DP-V264GT2/TV User’s Manual
Page 33

V. Video Software
Buttons
Defaults: Assigns default keys to DeskScan.
Help: Displays Help information on DeskScan.
OK: Accepts key assignments as shown and exits.
Cancel: Discards all changes and exits.
WinSwitch
NOTE: Press Default to fill in the fields with default keys first.
By pressing a user-defined set of keyboard keys WinSwitch can dynamically change
screen attributes (i.e., Colors, Screen Size and Desktop Size) without exiting Windows.
When enabled, WinSwitch is actually operating in 24bpp mode-i.e., all other color
depths and resolutions are emulations. As such, graphics performance across various color depths will be practically identical to that of 24bpp (16.7 million colors).
Therefore, WinSwitch should be used only when color depth changes are desired.
For maximum performance in 256 or 65, 536 color modes, you should disable
WinSwitch. FlexDesk+ or DeskScan can provide the same dynamic screen size or
desktop size switching functions.
Configuring the WinSwitch Panel
At the top of the panel is a checkbox labelled W inSwitch Enabled. This switch must
be turned on (checked) to enable WinSwitch, which is primarily a dynamic color
switching function. Clicking one of the four radio buttons (e.g., key 1) will display
the slider positions currently associated with that key.
Procedure:
1. Select a radio button. Define the key combination in the field below it. You
must include <Ctrl> or <Alt>.
2. Adjust any or all of the sliders. Slider functions are identical to those in
FlexDesk+.
3. Either enable WinSwitch by checking the WinSwitch Enabled box, or disable
WinSwitch by removing the check mark.
4. Click Ok.
(Windows 3.x)
V. Video Software
ASUS 3DP-V264GT/PRO & 3DP-V264GT2/TV User’s Manual 33
Page 34

V. Video Software
Buttons
Key 1: First of four radio buttons labeled key1, key 2, key 3, and key 4. The slider
settings shown are associated with the selected radio button.
Defaults: Restores key combination and slider settings to defaults.
Help: Displays Help information on WinSwitch.
OK: Accepts current settings and exits.
Cancel: Discards all changes and exits.
WinSwitch: Switching function is enabled when the box is Checked; disabled when
the box is empty.
Key Combination Fields
Key 1 Field: Keyboard key combinations to be used to activate WinSwitch are
specified in the four key combination fields, associated with Keys 1-4.
Sliders - These sliders provide the same functions as the FlexDesk+ sliders.
Colors: Selects a color depth from one of the supported Colors.
Screen Size: Sets the screen resolution to one of the supported sizes.
Desktop Size: Sets the virtual desktop to one of the supported sizes.
Screen Adjustment
(Windows 3.x)
This allows the selection of different resolutions supported by your monitor . Select
the proper monitor by pressing the "Select Monitor" button and then choosing from
the list of monitors.
34 ASUS 3DP-V264GT/PRO & 3DP-V264GT2/TV User’s Manual
Page 35

V. Video Software
If your monitor came with a VDIF file then you may insert it into your floppy drive
and press the "Load VDIF" button. The "Custom" button allows you to select the
resolution and refresh rates. You may try out different settings that will optimize
your display preferences but too high of a refresh rate will push your monitor past its
specifications. Use the Preview/Adjust to see the results and allow digital adjustments to the screen. If the image is distorted you may press <Esc> or wait a few
seconds to return to the original menu without the change.
ASUS 3DP-V264GT/PRO & 3DP-V264GT2/TV User’s Manual 35
(Windows 3.x)
V. Video Software
Page 36

V. Video Software
The ASUS 264 Series Card supports a VESA power management control specification called DPMS-Display Power Management Signaling. Monitors that comply
with DPMS can provide energy savings up to 80% compared to non DPMS compliant monitors. This also translates into extended monitor life.
DPMS control functions are provided for DOS and W indows operations. This chapter
describes the DOS version, a T erminate-and-Stay-Resident program. TSR means it
runs in the background once activated. The W indows version provides control via a
Windows type control panel in the ATI DeskTop.
NOTES:
• Monitors that do not support VESA DPMS can be damaged by activation of
the DPMS feature. Check your monitor specifications.
• Do not use screen saver when DPMS is enabled. The screen saver will conflict with DPMS operation.
DPMS (for DOS)
When you run DPMS for the first time, without parameters, DPMS will set the
Standby, Suspend, and Off timers to default values. If DPMS has been loaded,
running it again without parameters will display the current timer values, as follows:
If you run DPMS with at least one timer parameter, DPMS will set that value and
disable the unspecified timers.
DPMS parameters are to be included in the command separated by spaces, as follows:
DPMS parameter <Enter>
Example: T o set the Standby timer to 5 minutes, and disable the Suspend and Off
timers: DPMS STBY 5 <Enter>
V. Video Software
(Windows 3.x)
DPMS Parameters
stby x - Places the monitor into Standby mode after x minutes and seconds. For
example, x for two minutes and ten seconds is specified as 2:10. Standby is the first
level of power conservation. The monitor is instantly ready if activity is detected.
susp x - Places the monitor into Suspend mode after x minutes and seconds. The
monitor conserves more energy at this level than at Standby.
Standby timer: 15 minutes
Suspend timer: 30 minutes
off timer: 60 minutes
off x - Places the monitor into Off mode after x minutes and seconds. The monitor
is at the highest level of energy conservation.
nomouse - Does not detect mouse activity.
quiet - Suppresses DPMS messages.
unload - Un-installs DPMS from system memory.
help - Displays help messages.
36 ASUS 3DP-V264GT/PRO & 3DP-V264GT2/TV User’s Manual
Page 37

VI. Video Player
Windows Video Player
ATI Player and control panel (Win3.1x and Win95)
If VIDEO drivers are installed, for playing video clips, the ATI Player icon will
appear in the DeskTop. Double click on this icon to bring up the Video Screen as
shown here: (Detailed button definitions are shown when holding the cursor over
the individual buttons for a few seconds.)
The Task Control Panel
The Task control panel indicates what mode the player is in and what it’s doing.
(Your Task control panel may not look exactly like the illustration-only installed or
available features will have controls.)
Under win31 environment
VI. Video Player
(Windows 95/3.x)
Under Win95 environment
CDAudio–Play standard audio CDs (only in Windows 95)
MPEG Playback—Play MPEG and AVI video files
Video In (T uner button)—Display live video
sources (only on 3DP-V264GT/PRO)
Capture–Capture still images, video sequences,
or audio-only (only on 3DP-V264GT/PRO)
MPEG Video In Capture Help Minimize ExitCD Audio
Features
The question mark on top right of the Video Screen allows inspection into each
button on the control panel. Click on the “?” then on a button that you would like to
know about.
ASUS 3DP-V264GT/PRO & 3DP-V264GT2/TV User’s Manual 37
Page 38

(Windows 95/3.x)
VI. Video Player
Click the Audio CD button in the Task control panel to switch to Audio CD mode
VI. Video Player
Playing Audio CDs (Only in window 95)
Loop
Stop
Random
Play
Pause Intro
Play
Track
Down
Position
Slider
Skip
Back
Skip
Forward
TrackUpTime
Mode
Time
Display
Volume
Control
SetupEject
Volume
Mute
The Audio CD player has its own control panel for contr olling the audio CD playback.
You can use the Audio CD panel to play standard audio CDs. Advanced features
such as Random play , Intro play , which plays the first ten seconds of each track, and
Loop play are available.
Current Time Track Name Current TimeDisc Name
The Audio CD player has its own display.
To play an audio CD
1. Insert the audio CD into your CD-ROM drive.
2. In the Audio CD panel, click the Setup Dialogs button
3. Click the Disc Info tab.
4. From the Available Tracks list, add or remove tracks as desired.
The Play List displays your current selections.
5. Click OK.
6. In the Audio CD panel, click the Play button
The Audio CD player uses Windows 95 standard INI file to store disc names, track
names, and the play list. You can use the Setup dialog to enter the name of the artist
and the disc.
38 ASUS 3DP-V264GT/PRO & 3DP-V264GT2/TV User’s Manual
Page 39

VI. Video Player
Playing Media Files
Click the MPEG Playback button in the Task control panel to switch to playback mode.
The Control panel changes to the Playback panel.
To view/hide the Playback panel in Full Screen mode, press F2.
VI. Video Player
(Windows 95/3.x)
Screen
First
Frame
RewindFull
Advance
Last
Frame
Previous
Track
Next
Track
Audio Track
SelectFile Name
Open File
Volume
Control
Setup
Dialog
Volume
Mute
Loop Track/
Playlist
Play/Stop
You can use the Media Playback panel to play the following media files:
• MPEG-1 digital audio and video, including Karaoke?including dual-channel audio, CDi, Games, and reference application titles
• *.AVI video files
To play a file
1. In the Playback panel, click the File Open button
2. Select a file from the list.
3. Click Add, then click OK.
4. Click the Play button
5. The file plays in the Display panel.
Open
Setup
File
Playing Interactive Discs (Video CD 2.0)
Play Menu Selection Audio Track
Select
Play Return
Selection
DialogCapture
Play
Default
When playing V ideo CD 2.0 discs, the Control panel changes to this interactive panel.
ASUS 3DP-V264GT/PRO & 3DP-V264GT2/TV User’s Manual 39
Page 40

(Windows 95/3.x)
VI. Video Player
Still images. You can capture full-color, 24-bit-per-pixel still images from your
camcorder , save them on your computer’s hard disk, and print them. The images are
placed on the clipboard, or you can display them in their own window as
“thumbnails”(miniature images).
V264GT/PRO saves still images as Windows-standard bitmaps (.bmp). It also supports most industry-standard graphics file formats, so you can insert the images into
reports, presentations, letters, and other documents, to add impact to training applications and presentations.
Full-motion video. You can capture a stream of full-motion video plus audio from
your video source and save it as an .AVI file on your computer’s hard disk. You also
have the option of capturing only audio
VI. Video Player
Capturing Audio/V ideo (only on 3DP-V264GT/PRO)
Click the CAPTURE button in the T ask contr ol panel to switch to capture mode.
The Control panel changes to the Capture panel.
Y ou can use the Save As... button to compress your captured video and save it in one
of several industry-standard formats. See the on-line help for more information on
this feature.
Capture
Capture Stream
Play Capture File
Sequence Capture Still File Name Save File
Open File
You can use the Setup button to specify capture options, file names,
display options, and file handling for captured video Captured File.
40 ASUS 3DP-V264GT/PRO & 3DP-V264GT2/TV User’s Manual
Page 41

VI. Video Player
Capturing Still Frames
To capture still frames
Click the camera button to capture the current frame.
To review captured images
Click the image’s thumbnail.
• If the selected image has not been saved, the thumbnail has a red border . If it has
been saved, the border is green.
• If an unselected image has been saved, its border is grey . If it has not been saved,
there is no border.
You can use the buttons at the top of the still capture window to save the captured
image, delete it, print it, or make it into a desktop pattern.
If you try to delete an unsaved still frame, 3DP-V264GT/PRO prompts you to save
it before deleting.
VI. Video Player
(Windows 95/3.x)
Capturing Video
You can capture video in two ways:
• As a stream of video and audio that you save as an .AVI file.
• As a sequence of still frames that you save in an .AVI file.
The quality of the video that you capture depends on the following conditions:
• speed of your system (CPU)
• amount of system memory (RAM)
• performance of your Hard Disk (HDD)
• size of the video capture window
To capture a stream of video and audio
Click the Record Stream button in the Capture panel.
V264GT/PRO starts recording video and audio.
To capture a sequence of frames
Click the Capture Sequence button in the Capture panel.
V264GT/PRO starts recording a sequence of frames. Note that audio is not captured
in this mode.
ASUS 3DP-V264GT/PRO & 3DP-V264GT2/TV User’s Manual 41
Page 42

VI. Video Player
(Windows 95/3.x)
VI. Video Player
Playing Captured Video and Audio
To play captured video and audio
Click the Play button
tured file.
Now you can watch videos, games on your computer! 3DP-V264GT/PRO lets you
watch full-motion video on the whole screen or in a window. You can capture still
frames and movie clips.
Features
• Television quality video in a window and full screen.
• Composite video and S-Video inputs for VCR, video camera, laser-disc player,
video game consoles, etc.
• Still image and live video capture with a simple mouse click.
• Live motion video desktop, using your favorite video show as wallpaper.
• Zoom-in to any part of the screen.
in the Capture panel. 3DP-V264GT/PRO plays your cap-
Intelligent Video In (only on 3DP-V264GT/PRO)
T o connect other devices to your 3DP-V264GT/PRO:
1. Turn off your computer and other devices.
2. Determine if your external device has an S-Video
or RCA connection.
3. Looking at the back of your computer , locate your
graphics card.
4. Using a cable with either S-Video or RCA connectors, attach one end of the cable to your the
output of your device to the input on the 3DPV264GT/PRO card.
5. Turn on your computer and your devices.
Using the VIDEO IN
You can use the Video In to:
• Watch a videotape or laser disk movie on your computer.
• Capture, save, and print video images.
• Replace your desktop with live VIDEO display.
S-Video In:
S-Video connector
from external device
Composite In:
RCA phono plug
from external device
The 3DP-V264GT/PRO accepts a wide range of video inputs — from just about any
device that has a VIDEO OUT connector: VCR, V ideo camera, laser disk, and video
games.
42 ASUS 3DP-V264GT/PRO & 3DP-V264GT2/TV User’s Manual
Page 43

VI. Video Player
Click the TUNER button in the Task control panel to switch to Video In mode.
The Control panel changes to the Video In control panel.
Cable
Connector*
Super VHS
(S-Video)
VHS
(Composite)
Normal
Zoom
Zoom
In
Zoom
Out Capture Setup
Full
Screen
Volume
Control
Volume
Mute
*The Cable Connector is for an optional TV-Tuner available only when using a
third-party TV-Tuner card connected to the V264GT/PRO’s AMC connector.
Zooming and Unzooming - To select and enlarge a portion of the display
VI. Video Player
(Windows 95/3.x)
1. Click within the display panel.
2. Hold down the mouse button and draw a rectangle around the area you want to zoom.
T o return your display to normal, click the Unzoom button in the Control panel.Select
and enlarge a portion of the display by dragging the mouse across the Display Panel
ASUS 3DP-V264GT/PRO & 3DP-V264GT2/TV User’s Manual 43
Page 44

VI. Video Player
(Windows 95/3.x)
VI. Video Player
Using ImpacTV
If you have a 3DP-V264GT/PRO or 3DP-V264GT2/TV card, you can use ATI’s
ImpacTV to connect a television for your computer’s display.
You can use ImpacTV to do the following:
• V iew computer output directly on your television in either NTSC or PAL formats
• Enhance your system with advanced flicker reduction and artifact suppression
circuitry
• Connect using Composite or S-Video output capabilities
• Display images on both the TV and PC monitor simultaneously
• Provide a big-screen experience for entertainment PCs which is ideal for playing games, giving presentations, watching movies, and browsing the Internet
T o connect your computer to a television, simply attach a connector cable (S-Video
or Composite) from your 3DP-V264GT/PRO or 3DP-V264GT2/TV card to the television. S-Video will produce the best results.
To connect your graphics card to
a television
1. Turn off your computer and
your television.
2. Determine if your television has
an S-Video connection or an
RCA video in connection.
3. Looking at the back of your
computer, locate your graphics
card.
4. Using a cable with either SVideo or RCA connectors, attach one end of the cable to your
3DP-V264GT/PRO or 3DPV264GT2/TV card and the
other to your television.
5. Turn on your computer and
your television.
Composite Output to TV:
Attach to TV using a cable fitted
with RCA plugs.
S-Video Output to TV:
Attach to TV using S-Video plug
VGA Out:
Graphics Connector to Monitor
3DP-V264GT/PRO
3DP-V264GT2/TV
If there is no display, you may
need to enable ImpacTV.
To enable ImpacTV
1. Click Start.
2. Point to Settings.
3. Click Control Panel.
4. Double-click Display.
5. Click on the Settings tab.
6. Check the Television checkbox to enable ImpacTV. (click Help if necessary)
44 ASUS 3DP-V264GT/PRO & 3DP-V264GT2/TV User’s Manual
Page 45

VII. Other Driver Installation
Video Driver Installation for Windows NT 4.0
Windows Plug and Play in Windows NT 4.0: (Auto installing drivers)
IMPORTANT: If an ASUS Graphics device (or ATI compatible) was installed at
one time, Windows NT 4.0 Plug and Play may install ATI’s original driver upon
entering Windows NT 4.0 . The old driver may cause your system to hang. If this
happens, follow these steps to reset your display driver to its basic defaults:
1. Ener Windows NT 4.0 in safe mode by pressing F5 repeatedly during bootup
2. Right click the mouse on the open desktop (not over any icons)
3. Select Properties
4. Click the Settings tab - Settings menu appears
5. Click Change Display Type - Change Display Type windows appears.
(Windows NT 4.0)
VII. Other Drivers
6. Click Change button - Select Device windows appears.
7. Click Show all devices - Manufacturers and Models appears
8. Click (Standard display types) - Standard Display Adapter (VGA) is selected
9. Click OK button - Change Display Type windows appears.
10. Click Apply button - System Settings Change window appears
11. Click Yes button to restart your computer now - restart in normal mode
NOTE: Video for Windows, Direct Video, & Video Player is not available for any versions of Windows NT.
ASUS 3DP-V264GT/PRO & 3DP-V264GT2/TV User’s Manual 45
Page 46

Video Driver Installation for Windows NT 4.0
Installing ATI Video drivers in Windows NT 4.0: (New Hardware Found)
If installing an ASUS Graphics device for the first time, a “New Hardware Found”
window will appear upon entering Windows NT 4.0:
VII. Other Drivers
(Windows NT 4.0)
Select which driver you want to install for your new hardware:
Windows default driver
Driver from disk provided by hardware manufacturer
Do not install a driver (Windows will not prompt you again)
Select from a list of alternate drivers
1. Click OK to use the default selection: “Driver from disk provided by hardware
manufacturer”
2. Insert ASUS installation CD and click Br owse button - Open windows appears.
3. Select you CD-ROM drive in the “Drives:” box
4. Select \nt40 directory - ati.inf shows in “File name:”
5. Click the OK button - Install from Disk appears - Click OK button again.
6. Select your device and language then click OK button - Copying Files... appears
- message appears to restart your computer.
VII. Other Driver Installation
7. Click Yes button - ATI Desktop Help will appear upon restart, make changes as
necessary.
NOTE: Video for Windows, Direct Video, & Video Player is not available for any versions of Windows NT.
46 ASUS 3DP-V264GT/PRO & 3DP-V264GT2/TV User’s Manual
Page 47

VII. Other Driver Installation
Video Driver Installation for Windows NT 4.0
Installing ATI Video drivers in Windows NT 4.0 (Prompted by Windows NT)
If an ASUS Graphics device (or compatible) was installed at one time a “Display”
message will appear upon entering Windows NT 4.0 :
There is a problem with your display settings. The adapter type is
incorrect, or the current settings do not work with your hardware.
1. Click OK button to continue - The “Settings” tab of the Display Properties appears.
2. Click Display Type - Change Display Type windows appears.
3. Click Change button - Select Device windows appears.
4. Click Have Disk button - “Install From Disk” window appears
5. Insert ASUS instillation CD and Click Br owse button - Open window appears
6. Select your CD-ROM drive in the “Drives:” box
7. Select \nt40 directory - ati.inf shows in ”File name:”
8. Click the OK button - Install from Disk appears - Click OK button again.
9. Select the appropriate model of your Graphics device - messages appears: “Y ou
are about to install a third-party driver...”
10. Click Yes - Copying Files... appears - message appears: “The drivers were
successfully installed”
11. Click OK button
12. Change your monitor type if necessary - Click Close button when finished.
13. Adjust the “Desktop area,” “Color palette,” and “Font size” if necessary - Click
Apply button when finished - System Settings Change windows appears:
You must restart your computer before the new settings will take effect.
Do you want to restart your computer now?
14. Click Yes button - ATI Desktop Help will appear upon restart, make changes
as necessary.
(Windows NT 4.0)
VII. Other Drivers
Updating installation in Windows NT 4.0: (Using Autorun Screen)
If for some reason you need to reinstall the ATI video drivers or if you skipped the
previous procedures, you may use the following steps:
1. Insert the ASUS installation CD (or double click on the CD drive in “My Computer” if CD already inserted)- ASUS Windows NT Install Shell appears.
2. Click Install Windows NT Display Driver - Display Properties and installa-
tion information appears.
3. Select the Settings tab and Continue from step 2 above.
NOTE: Video for Windows, Direct Video, & Video Player is not available for any versions of Windows NT.
ASUS 3DP-V264GT/PRO & 3DP-V264GT2/TV User’s Manual 47
Page 48

Video Driver Installation for Windows NT 3.5x
The mach64 driver for W indows NT is shipped with W indows NT. Before installing
the mach64 driver, you must have installed W indows NT and selected VGA display.
Installing ATI video drivers in Windows NT 3.5, 3.51:
VII. Other Drivers
(Windows NT 4.0)
1. Boot W indows NT
2. Double-click the Main icon.
3. Double-click the Control Panel icon.
4. Double-click the Display icon.
5. Click Change Display Type button.
6. Click Change button.
7. Insert the installation CD into the CD-ROM drive.
VII. Other Driver Installation
8. Click Other button.
9. Supply the Setup program with the location of the NT files of your revision,
for example, type: D:\NT351 (or D:\NT35)
10. Click OK button.
11. Select the appropriate driver for your ASUS 264 series card
12. Click Install button.
13. Click Yes to change to your system configuration.
14. Click Continue to confirm the full path name.
15. If you are upgrading your driver, you will be asked whether you want to use
the “Current” or “New” driver. Select New driver to install the drivers.
16. After the files have been copied to your computer, click OK
17. Reboot Windows NT
18. After reboot the Invalid Display Settings window appears - Click OK
19. The Display Settings dialogue box appears - Select a desired display mode.
For more detailed information about changing your display mode, click Help.
NOTE: Video for Windows, Direct Video, & Video Player is not available for any versions of Windows NT.
48 ASUS 3DP-V264GT/PRO & 3DP-V264GT2/TV User’s Manual
Page 49

VII. Other Driver Installation
Video Driver Installation for IBM OS/2
The ATI OS/2 video driver is to be used for the English version of OS/2 only.
Installing ATI video drivers in English OS/2 or OS/2 Warp:
1. Start OS/2
2. Check that OS/2 is using standard VGA driver and other applications are closed.
3. Double-click the OS/2 System folder.
4. Double-click the Command Prompts folder.
5. Double-click the OS/2 Full Screen object.
6. Insert the installation CD (assuming your CD-ROM drive is letter D)
7. Type D: <Enter>, CD OS2 <Enter>, OS2INST <Enter>
(Windows NT 4.0)
VII. Other Drivers
8. Select IBM OS/2 - Install OS/2 Driver appears.
9. Select your version of OS/2.
10. Type C: (the drive letter of your OS/2 system) <Enter> - copying files appears.
11. Exit the installation program
12. Type C: <Enter>, CD\MACH_OS2 <Enter>, DSPINSTL
13. Display Driver Install panel appears - select Primary Display.
14. Click OK - Driver selection list appears.
15. Select the latest ATI mach64 enhanced driver version from the list - click OK.
16. In the Monitor Configuration Selection Utility, select Install Using Defaults
for Monitor Type, then click OK.
17. When the source directory panel appears, choose Change and enter path or use
the default location of C:\MACH_OS2 - Click SET
18. Click INSTALL.
19. Type EXIT to close the OS/2 full screen command prompt.
20. Shut down OS/2
21. Restart OS/2. It will default to 640x480 in 256 colors. To change screen resolution and/or color depth, see your OS/2 User’s Guide.
ASUS 3DP-V264GT/PRO & 3DP-V264GT2/TV User’s Manual 49
Page 50

AutoCAD Video Driver Installation
Installing A TI AutoCAD Video Drivers:
1. Enter DOS mode (Exit Windows, do not use Windows DOS prompt)
2. Insert the installation CD (assuming your CD-ROM drive is letter D)
VII. Other Drivers
(Windows NT 4.0)
3. Type SETUP at the CD-ROM
drive letter and the ASUS DOS
installation shell will appear and
present you with a list of install
options.Select Install DOS Utilities and Drivers.
VII. Other Driver Installation
4. Select Drivers Installation and
press <Enter>
5. Select the Application name
AutoCAD <Enter>
6. Follow the instructions to complete
the installation of the drivers.
7. Press Enter when completed and
press ESC twice and Y to exit the
installation program.
8. Reboot the computer from DOS - Your Windows 3.x & DOS system ATI drivers
should be installed and ready to use.
50 ASUS 3DP-V264GT/PRO & 3DP-V264GT2/TV User’s Manual
Page 51

VII. Other Driver Installation
Microstation Video Driver Installation
Installing ATI Microstation Video Drivers:
1. Enter DOS mode (Exit Windows, do not use Windows DOS prompt)
2. Insert the CD (assuming your CD-ROM drive is letter D)
3. Type SETUP at the CD-ROM
drive letter and the ASUS DOS
installation shell will appear and
present you with a list of install
options.Select Install DOS Utilities and Drivers.
(Windows NT 4.0)
VII. Other Drivers
4. Select Drivers Installation and
press <Enter>
5. Select the Application name
Microstation <Enter>
6. Follow the instructions to complete
the installation of the drivers.
7. Press Enter when completed and
press ESC twice and Y to exit the
installation program.
8. Reboot the computer from DOS - Your W indows 3.x & DOS system ATI drivers
should be installed and ready to use.
ASUS 3DP-V264GT/PRO & 3DP-V264GT2/TV User’s Manual 51
Page 52

VIII. Driver Installation Options
Select System Information (optional)
The program will check the system for possible conflicts with the card, and display
both the card and system configurations in the INFO BOX. In case of a conflict, it
will issue a warning and suggest possible corrective actions.
Your ASUS V264GT/PRO Card is a PCI Plug-and-Play compatible: your system
will automatically allocate system resources and resolve possible conflicts between
your Plug-and-Play compatible mach64 accelerator card and other expansion cards.
System Information
(System Information)
Quick Setup (optional)
VIII. Install Options
Select Quick Setup to configure the accelerator card to work with your monitor. As
you highlight each monitor, the display specifications for that monitor type are listed
in the INFO BOX. Proper monitor selection is necessary for correct resolution and
refresh rate operation. You have four options to choose a correct Monitor Type.
Selecting Your Monitor Type: Factory Default/Apple.../IBM.../MIT.../NEC.../
VESA-Std.../Generic.../Read VDIF.../Custom...
Select Read VDIF... If you have a VDIF file for your monitor and wish to use its
parameters to automatically configure the mach64. Additional VDIF details are provided later in this chapter, in the section: VDIF Files
Select Custom... if none of the above applies to you, or you wish to manually configure the settings. Please refer to the information provided later in this chapter in
the section: Custom Configuration
Notes On Refresh Rates:
• A higher refresh rate reduces screen flicker, and therefore reduces eye strain.
Not all refresh rates are supported at all color depths. Refer to the features
section for specifications of your ASUS 264 Series Card.
• The resolution used by your software application is independent of the refresh rate.
Resolution depends on the installed software driver and selected display mode.
52 ASUS 3DP-V264GT/PRO & 3DP-V264GT2/TV User’s Manual
Page 53

VIII. Driver Installation Options
VDIF Files (optional)
VDIF files are VESA Display Information Format files. They contain all the necessary configuration parameters for getting optimal resolution and refresh rate operation from the specified monitor . Consult your monitor manufacturer for availability
of VDIF files.
If you have a VDIF file for your monitor , select it. The INSTALL program will read the
VDIF file and automatically configure the card to properly work with your monitor .
Procedure:
1. Start the INSTALL program.
2. Select Quick Setup and press <Enter>.
3. Insert into a floppy drive the disk containing the VDIF file.
4. Select READ VDIF... and press <Enter>.
5. Type in the location of the VDIF file (typically A: or B:). INSTALL will read
the file and configure the card to support your monitor according to the VDIF
specification.
Custom Configuration
If your monitor is not listed in the Monitor Selection Menu, or you are not using
DDC or VDIF, you can set up display modes, i.e., resolutions and refresh rates, on
the card using the Custom... option. This option is useful even if you had selected a
monitor from the list. For example, you can modify the screen centering or refresh
rate on one resolution, and not change the other resolutions.
Procedure:
1. Start the INSTALL program.
2. Select Quick Setup and press <Enter>.
3. Select Custom... and press <Enter>.
4. Pick a resolution, then a refresh rate. You will see a box outline.
WARNING: Using the wrong refresh rate may permanently damage your
monitor. For more information, please refer to the manual.
NOTE: An incorrect Monitor Type setting may damage your monitor. Review your
monitor specifications before making a selection from the Monitor Selection Menu.
Do not exceed the monitor specifications. Using a refresh rate (i.e., vertical frequency)
that is higher than specified may damage your monitor . The manufacturer will not be
liable for any damage caused by incorrect settings. Consult your monitor manual to
determine the highest refresh rate for each resolution that your monitor supports. A
scrambled screen indicates your monitor is not capable of the selected display mode.
In which case, you should immediately press <Esc> to exit.
(VDIF Files)
VIII. Install Options
TIP: If the monitor produces a scrambled display, try a lower refresh rate. If it is
already at the lowest refresh rate, set that resolution to Not Supported.”
5. Adjust the size and position of the box outline. Press <Enter> to accept.
6. Repeat steps 2 and 3 until you are satisfied with the box outline for all the
resolutions. When finished, remember to exit and save the settings.
ASUS 3DP-V264GT/PRO & 3DP-V264GT2/TV User’s Manual 53
Page 54

VIII. Driver Installation Options
Advanced Setup (optional)
If you wish to fine tune its settings for your monitor and system type, select Advanced Setup from the Main Menu. On-screen context sensitive help is displayed as
you highlight each Advanced Menu item.
WARNING: The Advanced Configuration option allows you to use certain
features that may add additional performance to your card. However these
options may not be compatible with your system. If problems appear after
an advanced option is changed, returning the card to factory defaults will
rectify the situation.
Factory Defaults
The card can be reset to factory defaults by pressing <Shift>+<F7>.
Saving Your Configuration
Once you have finished configuring the necessary parameters described above, save
them by pressing <F10>.
VIII. Install Options
(Advanced Options)
54 ASUS 3DP-V264GT/PRO & 3DP-V264GT2/TV User’s Manual
Page 55

A. T roubleshooting
Diagnostics
All installed graphics modes in the mach64 accelerator can be viewed and tested,
by running the INSTALL program from the DOS prompt, or by running a diagnostics program called M64DIAG.EXE. Do not run it in a windowed or full-screen
DOS box.
In the INSTALL program, select Test Graphics Adapter from the Diagnostics...
option of the Main Menu. The Test Graphics Adapter menu has the following options:
• VGA Tests ...
• Accelerator Tests ...
Any time you suspect there is a problem, especially during installation, run the
above tests. The information provided in this appendix will enable you to solve
most problems.
Troubleshooting
Because a typical computer system consists of many different parts, difficulties
may arise from a combination of items, from software or hardware installation, to
monitor compatibility . Listed below are several checks you can make to help determine what the problem is.
System Lockup
• If you are using a memory manager such as QEMM or 386MAX you need to
modify the command line in the CONFIG.SYS file so that the address of the
graphics card video BIOS, C000 - C7FF, is excluded. For example, add “EXCLUDE = C000 - C7FF” to the command line.
• Remove all unnecessary boards.
• Disable shadow RAM.
• Ensure that the board is seated correctly and that the card has been installed
using the proper utilities.
(Diagnostics)
A. Troubleshooting
• Try the card in a different system and reset to factory defaults using the INSTALL program. If the card works in another system, the problem is likely
due to incorrect configuration.
ASUS 3DP-V264GT/PRO & 3DP-V264GT2/TV User’s Manual 55
Page 56

A. T roubleshooting
Test Patterns OK; Applications Do Not Sync
The wrong monitor type has been selected. Change the settings in the INSTALL
program.
Windows Driver Not Installing Properly
Windows must be running in 386 Enhanced Mode. Incompatible memory managers
may prevent Windows from starting in enhanced mode. If this occurs, remove the
offending driver or memory manager.
Windows NT 4.0 driver cannot pass “Test VGA.”
Please bypass “Test VGA” then load ATI drivers after completing installation.
AutoCAD Driver Not Installing Properly
If using a 386, ensure that AutoCAD has been configured for the appropriate ADI
driver. The protected mode driver requires extended memory.
Error Codes and Messages
Problems and solutions for some common errors found by the test program are provided for your reference as follows:
Memory aperture test failure or Diagnostics program locks or Reboots during
aperture test
If you receive an error message indicating that the memory aperture location is conflicting with your system memory, restart the INSTALL program as follows: INSTALL APMAP <Enter>. Now when you enable Memory Aperture, you must select a location above but not overlapping System Memory (S), BIOS (B) or Reserved (R) locations. Not applicable for ISA cards.
Desired resolution is disabled and displayed in gray
A mode displayed in gray means that the BIOS is told this mode is not available,
based on the card configuration. Reinstall using custom monitor selection.
A. Troubleshooting
(Error Codes)
Menu item is disabled and displayed in gray
The test program has determined that the mode or test is not available under the
current configuration. Aperture tests are not available if the aperture is disabled, and
CR T mode and pixel depth are determined by current installation, DAC type, memory
size, and memory type.
Adapter not detected
This message should only occur when a mach64 ASIC is not detected. If this message occurs and a mach64 board is present, it may indicate an I/O conflict, conflicts
between the Extended Memory Manager (EMM) and the video ROM. Try removing all other boards from the system and booting from a plain DOS disk. T ry excluding the video BIOS address (C0000-C7FFF) from the memory manager. Refer to
the documentation furnished with the memory manager software for information.
56 ASUS 3DP-V264GT/PRO & 3DP-V264GT2/TV User’s Manual
Page 57

A. T roubleshooting
Any FIFO test error
The effects of a bad command FIFO should be visible. (e.g., the screen does not
come up, or it displays garbage.)
Quick memory test error
Run Detailed RAM Test to confirm the error and identify the address of the error.
Detailed memory test error.
Run Detailed RAM Test several times to confirm the error and take notes of any
messages and error codes.
DAC LUT test failure.
An error has occurred while testing the DAC LookUp T able. The problem should be
visible on the top color bar of any 8bpp mode.
ROM checksum error.
An error has been detected in the ROM.
Draw sequence failure.
An error has occurred in the draw engine. If the error is intermittent, it might indicate a marginal RAM failure. The effects of this failure may not be immediately
apparent.
ASUS 3DP-V264GT/PRO & 3DP-V264GT2/TV User’s Manual 57
(Error Codes)
A. Troubleshooting
Page 58

A. T roubleshooting
Windows 95 mach64 enhanced display driver
The Windows 95 mach64 enhanced display driver is capable of using monitor timing data contained within W indows 95. This data is selected by configuring a monitor type at Windows 95 installation time or via the “Settings” page of the display
properties sheet.
The Windows 95 mach64 enhanced display driver may incorrectly interpret Windows 95 monitor timing data for some older monitors which require interlaced modes.
This may cause some options to be disabled. A solution to this problem is to select
one of the “(Standard monitor types)” available via the settings page of the display
properties sheet.
If you change the selected monitor type via the “Settings” page of the display properties sheet the new timing data may not take effect until after restarting Windows
95. A solution to this problem is to always restart Windows 95 after changing the
monitor type.
In Windows 95, display drivers can be installed via the “Add New Hardware” wizard. This is not recommended because when the Windows 95 mach64 enhanced
display driver is installed via the “Add New Hardware” wizard the “Settings” page
does not get installed into the mach64 display adapter property sheet.
Windows 95 property page problems
While adjusting monitor settings in the Adjustment page of the Display Properties
sheet, your monitor could become unreadable. If this occurs, press the ESC key to
return to your previous monitor settings.
ATI Video Player Notes
Q: Why can my Video Player not execute in Windows 3.1 ?
A. Troubleshooting
A: The Video Player needs at least 600K DOS CONVENTIONAL MEMOR Y. You
(Windows)
can try to close some programs to acquire more memory to use. If it still happens,
return to DOS and run “MEMMAKER” in your DOS directory to modify your
memory configuration. Quiting some DOS TSRs (Terminate and Stay Resident)
programs also helps.
Q: After installing Xing MPEG Player, my ATI Video Player can not play Video
CD even standard MPEG files.
A: Xing MPEG Player and ATI Video Player can not be installed together. They
confilct with each other . The previously installed player will work abnormally. You
can re-install ATI Video Player to recover it.
58 ASUS 3DP-V264GT/PRO & 3DP-V264GT2/TV User’s Manual
 Loading...