

Page 1
Eee PC
User Manual
Windows® XP Edition
Eee PC 1004DN
E4361
Page 2

ii
Table of Contents
Table of Contents
Table of Contents ......................................................................................................................ii
About This User’s Manual ......................................................................................................iv
Notes for This Manual .............................................................................................................iv
Safety Precautions.....................................................................................................................v
Chapter 1: Knowing the Parts
Top Side ....................................................................................................................................1-2
Bottom Side .............................................................................................................................1-5
Right Side .................................................................................................................................1-6
Left Side ....................................................................................................................................1-7
Front Side ................................................................................................................................. 1-8
Rear Side ................................................................................................................................... 1-9
Keyboard Usage ...................................................................................................................1-10
Touchpad Usage ..................................................................................................................1-12
Chapter 2: Getting Started
Powering on your Eee PC ................................................................................................... 2-2
First-time Startup ..................................................................................................................2-3
Desktop .....................................................................................................................................2-4
ASUS EeePC Tray Utility .......................................................................................................2-5
Enabling and Disabling Devices .......................................................................2-5
Adjusting the display resolution .......................................................................2-6
Network Connection ............................................................................................................2-7
Configuring a wireless network connection.................................................2-7
Local Area Network ................................................................................................2-8
Browsing web pages ...........................................................................................2-11
Chapter 3: Using the Eee PC
Bluetooth Connection ......................................................................................................... 3-2
Fingerprint Registration ......................................................................................................3-4
Super Hybrid Engine ............................................................................................................3-6
Super Hybrid Engine Modes...............................................................................3-6
Microsoft® Office Trial ........................................................................................................... 3-7
Page 3

ASUS Eee PC
iii
Eee Storage ..............................................................................................................................3-8
Data Sync ................................................................................................................................3-10
EzMessenger .........................................................................................................................3-12
Font Resizer ...........................................................................................................................3-13
Eee Splendid .........................................................................................................................3-14
NIS 2009 Trial .........................................................................................................................3-16
Ulead Burn.Now 4.5 SE ......................................................................................................3-17
Chapter 4: Support DVD & System Recovery
Support DVD information ..................................................................................................4-2
Running the support DVD ...................................................................................4-2
Drivers menu ............................................................................................................4-3
Utilities menu ...........................................................................................................4-3
Contact .......................................................................................................................4-3
Other information ..................................................................................................4-3
System Recovery....................................................................................................................4-4
Using the Support DVD ........................................................................................4-4
Using Recovery Partition .....................................................................................4-5
Boot Booster............................................................................................................................4-6
Appendix
Declaration of Conformity(R&TTE directive 1999/5/EC)...........................A-2
CE Mark Warning ....................................................................................................A-2
Wireless Operation Channel for Different Domains ..................................A-2
France Restricted Wireless Frequency Bands ...............................................A-2
UL Safety Notices ....................................................................................................A-4
Power Safety Requirement .................................................................................A-5
REACH Notice ...........................................................................................................A-5
Nordic Lithium Cautions (for lithium-ion batteries)...................................A-6
Copyright Information .........................................................................................................A-8
Limitation of Liability ...........................................................................................................A-9
Service and Support .............................................................................................................A-9
Page 4
iv
Table of Contents
About This User’s Manual
You are reading the Eee PC User’s Manual. This User’s Manual provides
information regarding the various components in the Eee PC and how to
use them. The following are major sections of this User’s Manual:
1. Knowing the Parts
Provides information on the Eee PC’s components.
2. Getting Started
Provides information on getting started with the Eee PC.
3. Using the Eee PC
Provides information on using the Eee PC’s utilities.
4. Support DVD and System Recovery
Gives you information on support DVD contents and system
recovery.
5. Appendix
Gives you safety statements.
The actual bundled applications differ by models and territories.
There may be differences between your Eee PC and the pictures
shown in this manual. Please accept your Eee PC as being correct.
Notes for This Manual
A few notes and warnings are used throughout this guide, allowing you
to complete certain tasks safely and effectively. These notes have different
degrees of importance as follows:
WARNING! Important information that must be followed for safe
operation.
IMPORTANT! Vital information that must be followed to prevent
damage to data, components, or persons.
TIP: Tips for completing tasks.
NOTE: Information for special situations.
Page 5

ASUS Eee PC
v
Safety Precautions
The following safety precautions will increase the life of the Eee PC. Follow
all precautions and instructions. Except as described in this manual, refer
all servicing to qualified personnel. Do not use damaged power cords,
accessories, or other peripherals. Do not use strong solvents such as
thinners, benzene, or other chemicals on or near the surface.
Disconnect the AC power and remove the battery pack(s) before
cleaning. Wipe the Eee PC using a clean cellulose sponge or chamois
cloth dampened with a solution of nonabrasive detergent and a
few drops of warm water and remove any extra moisture with a dry
cloth.
Battery safety warning: DO
NOT throw the battery in
fire. DO NOT short circuit the
contacts. DO NOT disassemble
the battery.
DO NOT leave the Eee PC
on your lap or any part
of the body to prevent
discomfort or injury from
heat exposure.
DO NOT expose to dirty or
dusty environments. DO
NOT operate during a gas
leak.
DO NOT expose to strong
magnetic or electrical fields.
DO NOT expose to or use near
liquids, rain, or moisture. DO
NOT use the modem during
electrical storms.
DO NOT press or touch the
display panel. Do not place
together with small items
that may scratch or enter
the Eee PC.
DO NOT place on uneven
or unstable work surfaces.
Seek servicing if the casing
has been damaged.
DO NOT place or drop objects
on top and do not shove any
foreign objects into the Eee
PC.
Page 6

vi
Table of Contents
SAFE TEMP: This Eee PC
should only be used
in environments with
ambient temperatures
between 5°C (41°F) and
35°C (95°F)
INPUT RATING: Refer to the
rating label on the bottom
of the Eee PC and be sure
that your power adapter
complies with the rating.
DO NOT carry or cover a
Eee PC that is powered
ON with any materials that
will reduce air circulation
such as a carrying bag.
Incorrect installation of
battery may cause explosion
and damage the Eee PC.
DO NOT throw the Eee PC in municipal waste. This product has
been designed to enable proper reuse of parts and recycling. The
symbol of the crossed out wheeled bin indicates that the product
(electrical, electronic equipment and mercury-containing button
cell battery) should not be placed in municipal waste. Check local
regulations for disposal of electronic products.
DO NOT throw the battery in municipal waste. The symbol of the
crossed out wheeled bin indicates that the battery should not be
placed in municipal waste.
Transportation Precautions
To prepare your Eee PC for transport, you should turn it OFF and
disconnect all external peripherals to prevent damage to the
connectors. The hard disk drive’s head retracts when the power is turned
OFF to prevent scratching of the hard disk surface during transport.
Therefore, you should not transport your Eee PC while the power
is still ON. Close the display panel to protect the keyboard and display
panel.
The Eee PC’s surface is easily dulled if not properly cared for. Be careful
not to rub or scrape surfaces when transporting your Eee PC. You can put
your Eee PC in a carrying case for protection from dirt, water, shock, and
scratches.
Page 7

ASUS Eee PC
vii
Charging Your Batteries
If you intend to use battery power, be sure to fully charge your battery
pack and any optional battery packs before going on long trips.
Remember that the power adapter charges the battery pack as long as it is
plugged into the computer and an AC power source. Be aware that it takes
much longer to charge the battery pack when the Eee PC is in use.
Remember to fully charge the battery (8 hours or more) before first use
and whenever it is depleted to prolong battery life. The battery reaches its
maximmum capacity after a few full charging and discharging cycles.
Airplane Precautions
Contact your airline if you want to use the Eee PC on the airplane. Most
airlines have restrictions for using electronic devices. Most airlines allow
electronic use only between and not during takeoffs and landings.
There are three main types of airport security devices: X-ray
machines (used on items placed on conveyor belts), magnetic
detectors (used on people walking through security checks), and
magnetic wands (hand-held devices used on people or individual
items). You can send your Eee PC and diskettes through airport X-ray
machines. However, it is recommended that you do not send your
Eee PC or diskettes through airport magnetic detectors or expose
them to magnetic wands.
Page 8

viii
Table of Contents
Page 9

Top Side
Bottom Side
Right Side
Left Side
Rear Side
Keyboard Usage
Touchpad Usage
1
Knowing the Parts
Page 10
Chapter 1: Knowing the Parts
1-2
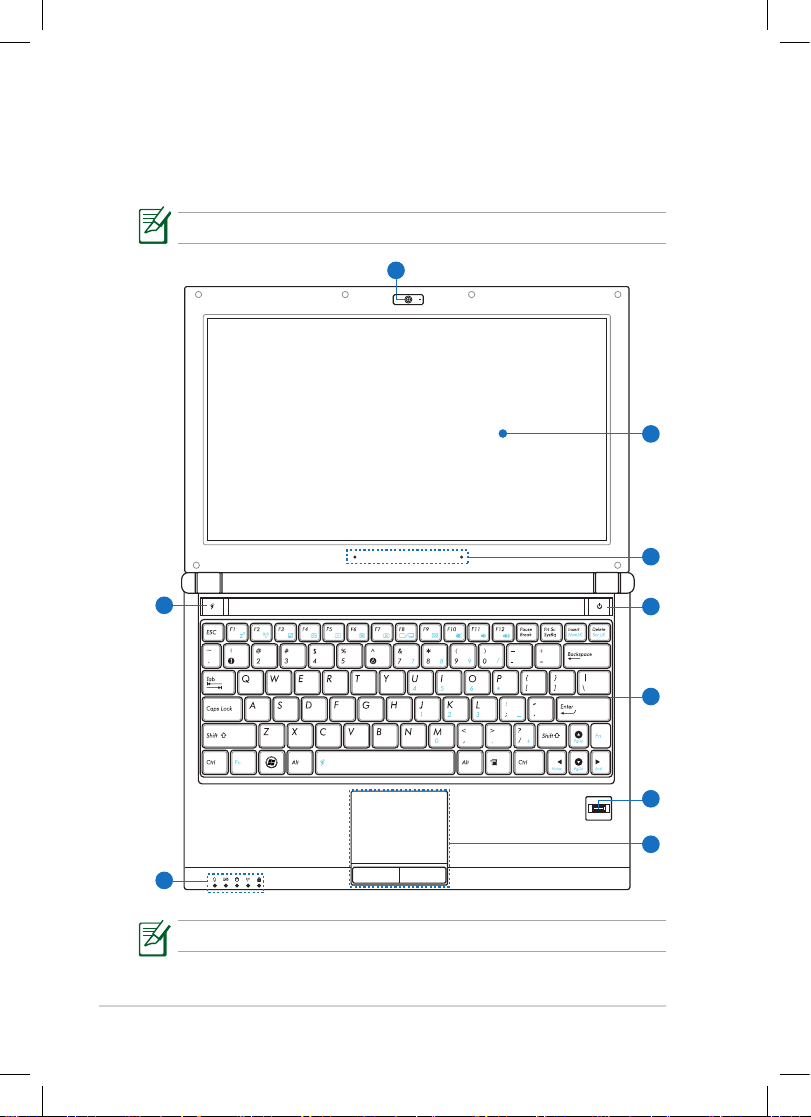
Top Side
Refer to the illustration below to identify the components on this side of
the Eee PC.
The top side may vary in appearance depending on model.
The keyboard differs for each territory.
2
9
1
4
3
7
5
6
8
Page 11
ASUS Eee PC
1-3
Built-in Camera
Display Panel
Array Microphone (Built-in)
The built-in array microphone is more clear and echo-free
compared with traditional single microphones and can be used
for video conferencing, voice narrations, audio recordings, and
multimedia applications.
Power Switch
The power switch allows powering ON and OFF the Eee PC and
recovering from STR. Press the switch once to turn ON and hold
it to turn OFF the Eee PC. The power switch only works when the
display panel is opened.
Power Indicator
The power indicator lights when the Eee PC is turned ON
and blinks slowly when the Eee PC is in the Save-to-RAM
(Suspend) mode. This indicator is OFF when the Eee PC is
turned OFF.
Keyboard
The keyboard provides keys with comfortable travel (depth at
which the keys can be depressed) and palm rest for both hands.
The keyboard differs depending on model.
Fingerprint Scanner
The built-in fingerprint scanner allows use of security software
using your fingerprint as your identification key.
Touchpad and Buttons
The touchpad and its buttons comprises a pointing device that
provides the same functions as a desktop mouse.
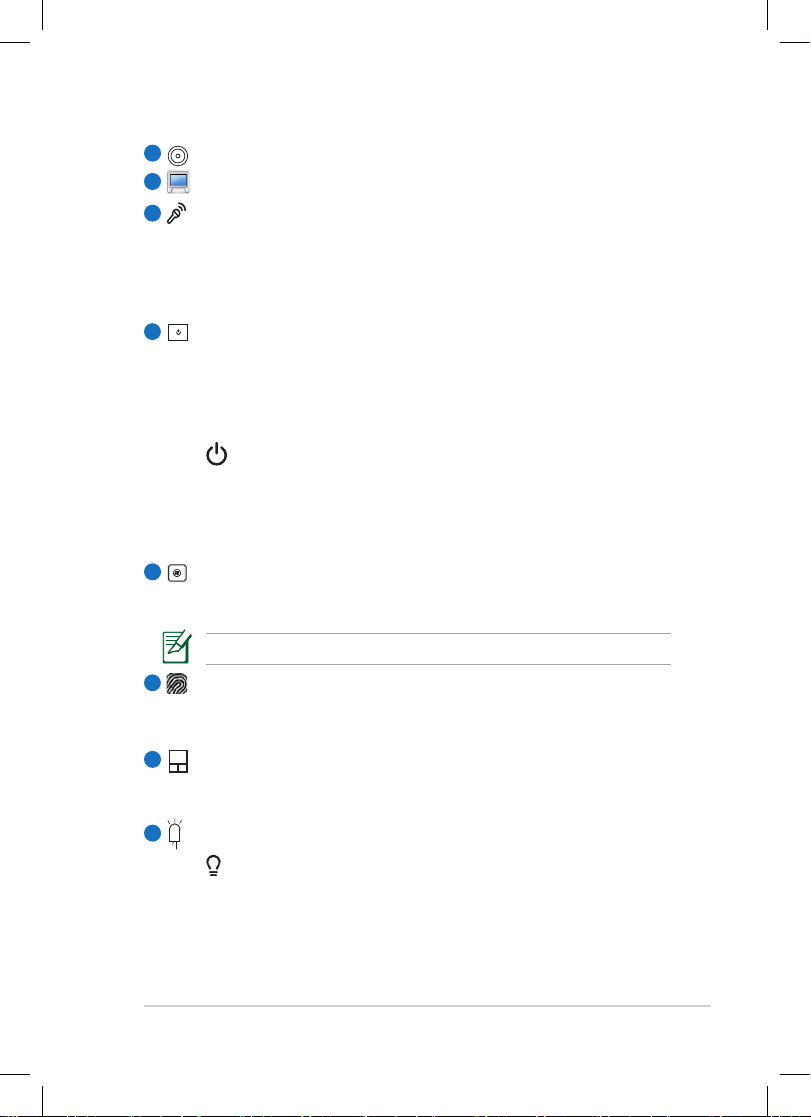
Status Indicators
Power Indicator
The power indicator lights when the Notebook PC is turned
ON and blinks slowly when the Notebook PC is in the
Suspend-to-RAM (Sleep) mode. This indicator is OFF when
the Notebook PC is turned OFF or in the Suspend-to-Disk
(Hibernation) mode.
1
2
3
4
5
6
7
8
Page 12
Chapter 1: Knowing the Parts
1-4
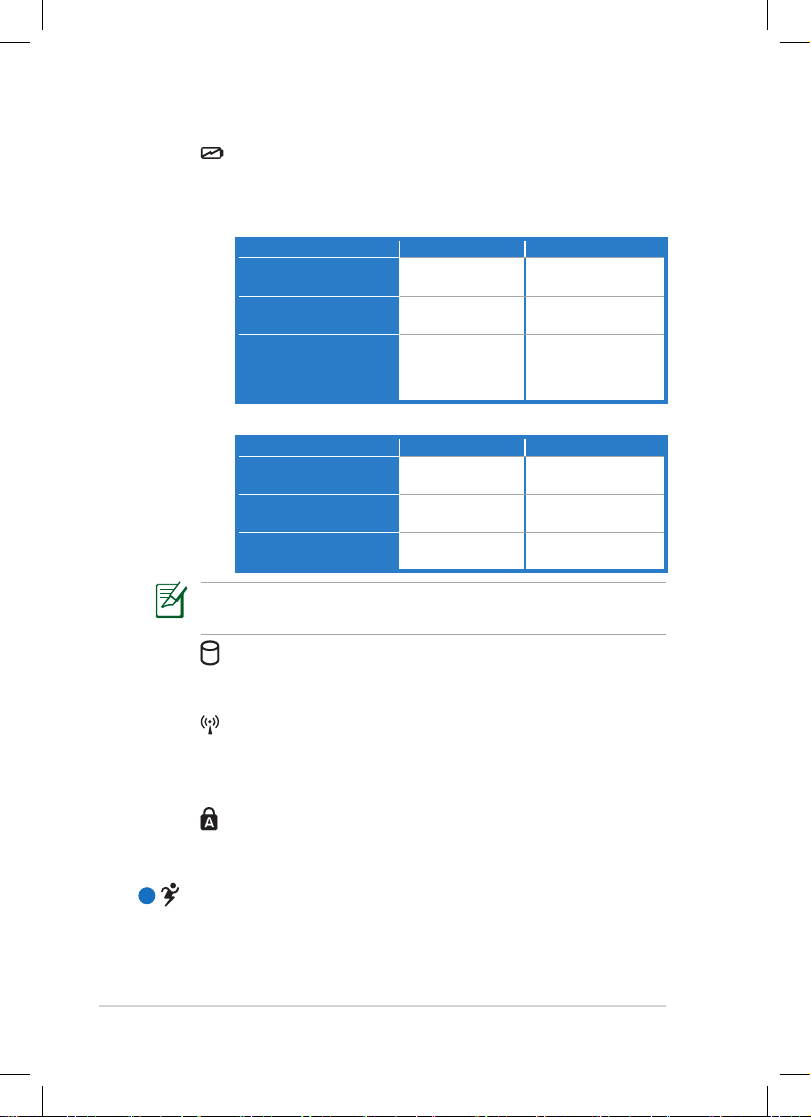
9
Battery Charge Indicator
The battery charge indicator (LED) shows the battery
charging status as follows:
Powered ON / Standby mode
With Adapter Without Adapter
High battery power
(95%–100%)
Green ON Off
Medium battery power
(11%–94%)
Orange ON Off
Low battery power
(0%–10%)
Orange Blinking
Orange Blinking
(Power ON)
Off (Standby mode)
Powered OFF
With Adapter Without Adapter
High battery power
(95%–100%)
Green ON Off
Medium battery power
(11%–94%)
Orange ON Off
Low battery power
(0%–10%)
Orange Blinking Off
The Battery Charge Indicator will not light when the battery is
removed from your Eee PC.
Hard Disk Drive (HDD) Indicator
The hard disk drive indicator blinks when data is written to
or read from the disk drive.
Wireless/Bluetooth Indicator
This is only applicable on models with built-in wireless
LAN/Bluetooth. When the built-in wireless LAN/Bluetooth is
enabled, this indicator lights.
Capital Lock Indicator
Indicates that capital lock [Caps Lock] is activated when
lighted.
Super Hybrid Engine Key
Press this key to switch among various power saving modes. The
selected mode is shown on the display.
Page 13
ASUS Eee PC
1-5
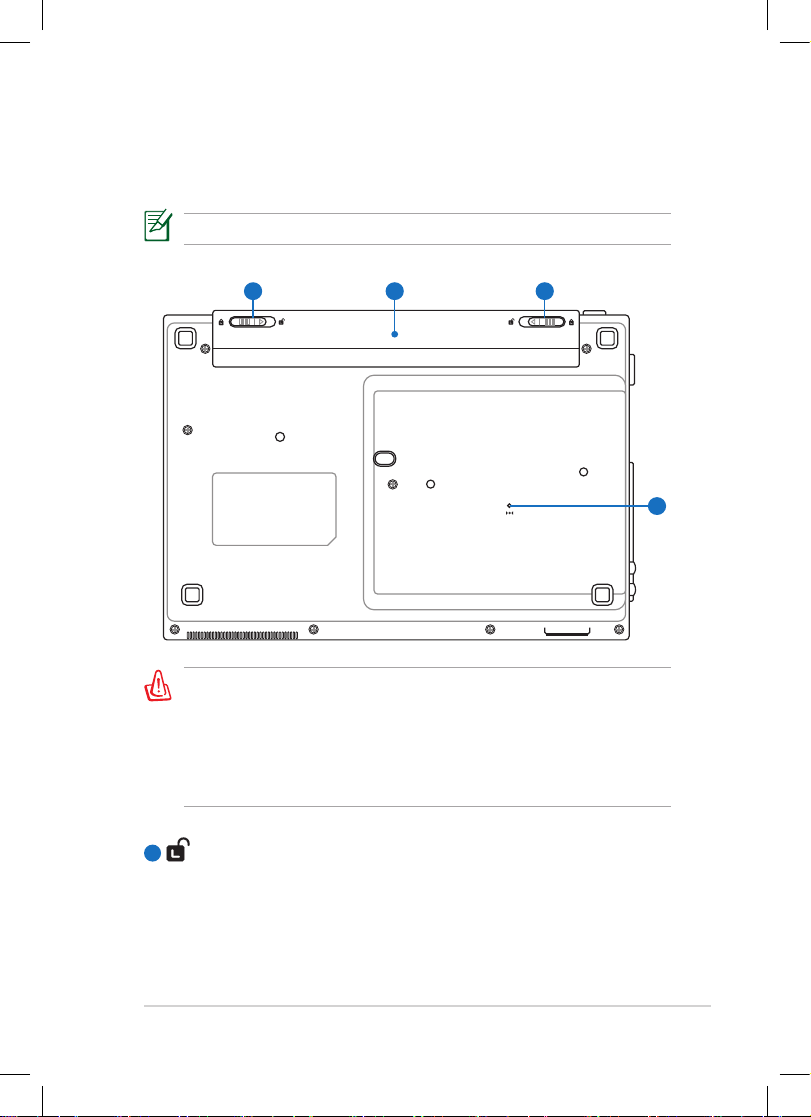
Bottom Side
Refer to the illustration below to identify the components on this side of
the Eee PC.
The bottom side may vary in appearance depending on model.
The bottom of the Eee PC can get very hot. Be careful when
handling the Eee PC while it is in operation or recently been in
operation. High temperatures are normal during charging or
operation. DO NOT use on soft surfaces such as beds or sofas, which
may block the vents. DO NOT PUT THE Eee PC ON YOUR LAP OR
OTHER PARTS OF THE BODY TO AVOID INJURY FROM THE HEAT.
21 3
4
Battery Lock - Spring
The spring battery lock keeps the battery pack secure. When
the battery pack is inserted, it will automatically lock. When
removing the battery pack, this spring lock must be retained in
the unlocked position.
1
Page 14
Chapter 1: Knowing the Parts
1-6
Battery Pack
The battery pack is automatically charged when connected
to an AC power source and maintains power to the Eee PC
when AC power is not connected. This allows use when moving
temporarily between locations. Battery time varies by usage and
by the specifications for this Eee PC. The battery pack cannot be
disassembled and must be purchased as a single unit.
Battery Lock - Manual
The manual battery lock is used to keep the battery pack secured.
Move the manual lock to the unlocked position to insert or
remove the battery pack. Move the manual lock to the locked
position after inserting the battery pack.
Reset Button (Emergency)
In case your operating system cannot properly turn OFF or restart,
the reset button can be depressed with a pin or a straightened
paper clip to restart the Eee PC.
The reset button is available on selected models.
2
3
4
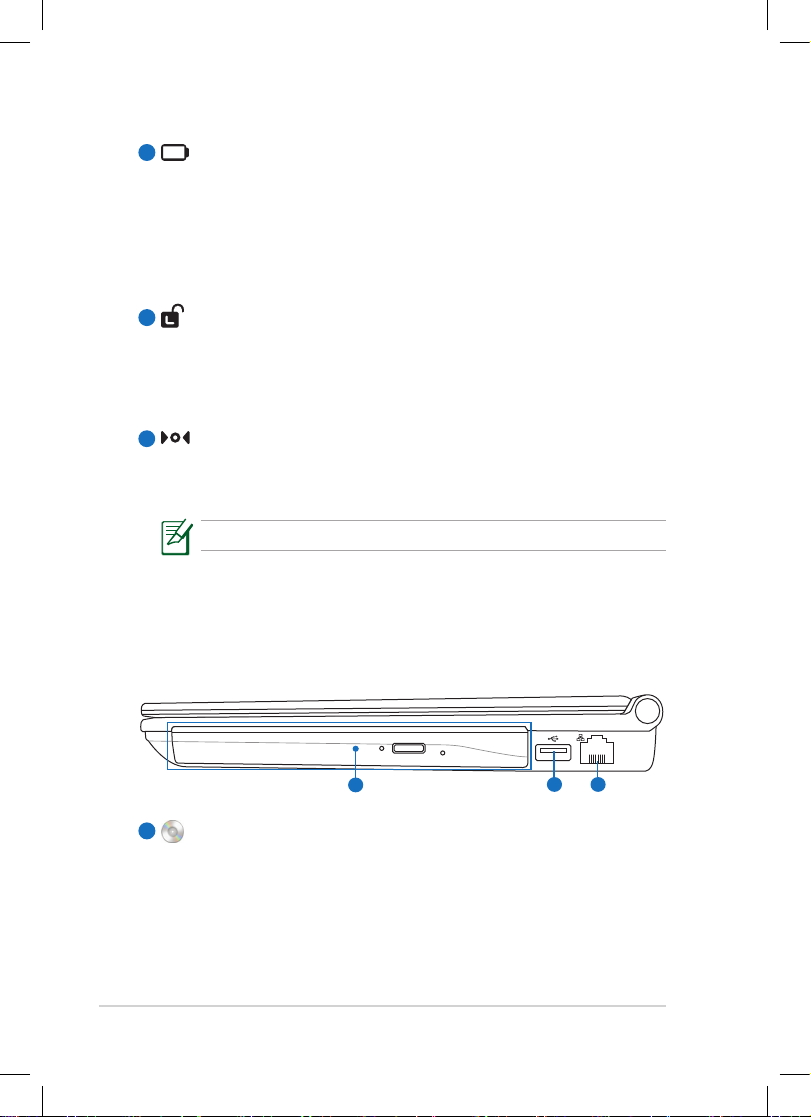
Right Side
Refer to the illustration below to identify the components on this side of
the Eee PC.
1
32
1
Optical Drive
The Notebook PC comes in various models with different optical
drives. The Notebook PC’s optical drive may support compact
discs (CD), digital video discs (DVD), or both and may have
recordable (R) or rewritable (RW) capabilities.
Page 15

ASUS Eee PC
1-7
2
3
USB Port (2.0/1.1)
The USB (Universal Serial Bus) port is compatible with USB 2.0 or
USB 1.1 devices such as keyboards, pointing devices, cameras, and
storage devices, connected in a series up to 12Mbits/sec (USB 1.1)
and 480Mbits/sec (USB 2.0). Also, the USB supports hot-swapping
function.
LAN Port
The eight-pin RJ-45 LAN port (10/100M bit) supports a standard
Ethernet cable for connection to a local network. The built-in
connector allows convenient use without additional adapters.
3
6
1 2
4 5 7
Left Side
Refer to the illustration below to identify the components on this side of
the Eee PC.
Power (DC) Input
The supplied power adapter converts AC power to DC power
for use with this jack. Power supplied through this jack supplies
power to the Eee PC and charges the internal battery pack. To
prevent damage to the Eee PC and battery pack, always use the
supplied power adapter.
Display (Monitor) Output
The 15-pin D-sub monitor port supports a standard VGA-
compatible device such as a monitor or projector to allow
viewing on a larger external display.
1
2
Page 16
Chapter 1: Knowing the Parts
1-8
4
5
7
6
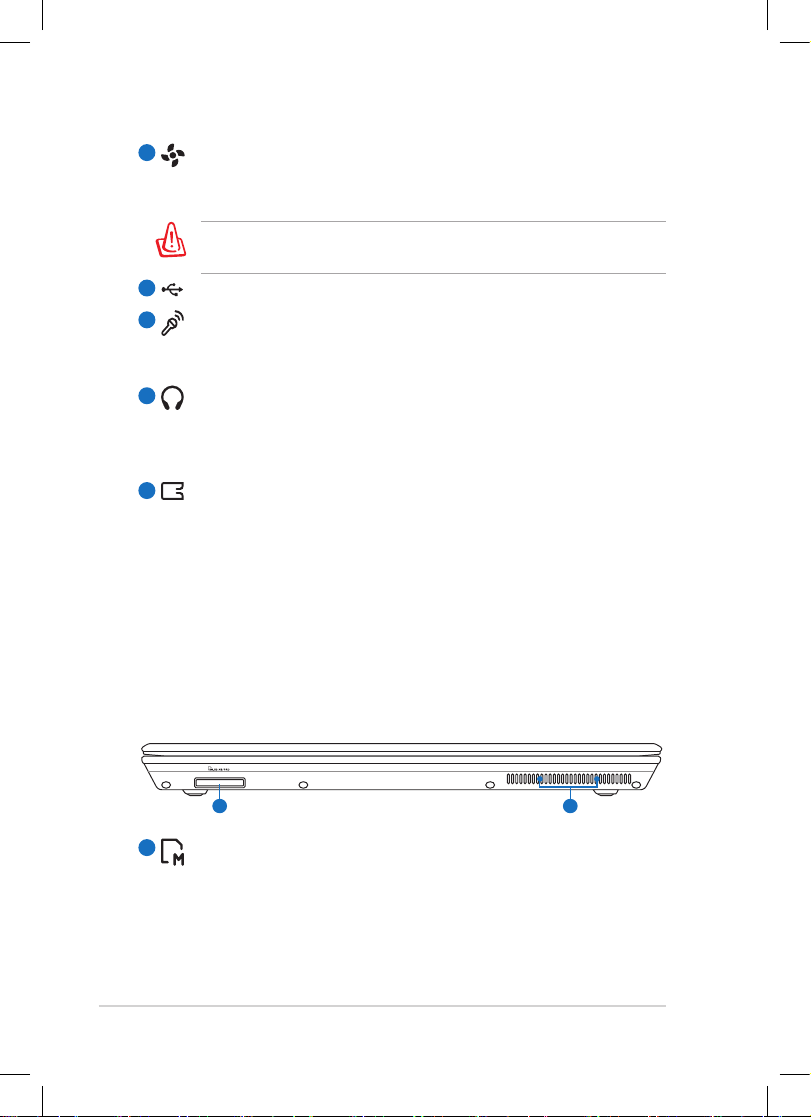
1
Memory Card Slot
The built-in memory card reader can read MMC, SD, MS, MS-PRO,
xD, mini-SD, MS Duo, and MS-Pro Duo cards.
Front Side
Refer to the illustration below to identify the components on this side of
the Eee PC.
1 2
Air Vents
The air vents allow cool air to enter and warm air to exit the Eee
PC.
Ensure that pa per, books, clothing, cables, or other objects do
not block any of the air vents or else overheating may occur.
USB Port (2.0/1.1)
Microphone Jack
The microphone jack is designed to connect the microphone
used for Skype, voice narrations, or simple audio recordings.
Headphone Output Jack
The 1/8” stereo headphone jack (3.5mm) connects the Eee PC’s
audio out signal to amplified speakers or headphones. Using this
jack automatically disables the built-in speakers.
ExpressCard Slot
One 26pin Express card slot is available to support one
ExpressCard/34mm expansion card.
3
Page 17
ASUS Eee PC
1-9
Battery Pack
The battery pack is automatically charged when connected
to an AC power source and maintains power to the Eee PC
when AC power is not connected. This allows use when moving
temporarily between locations. Battery time varies by usage and
by the specifications for this Eee PC. The battery pack cannot be
disassembled and must be purchased as a single unit.
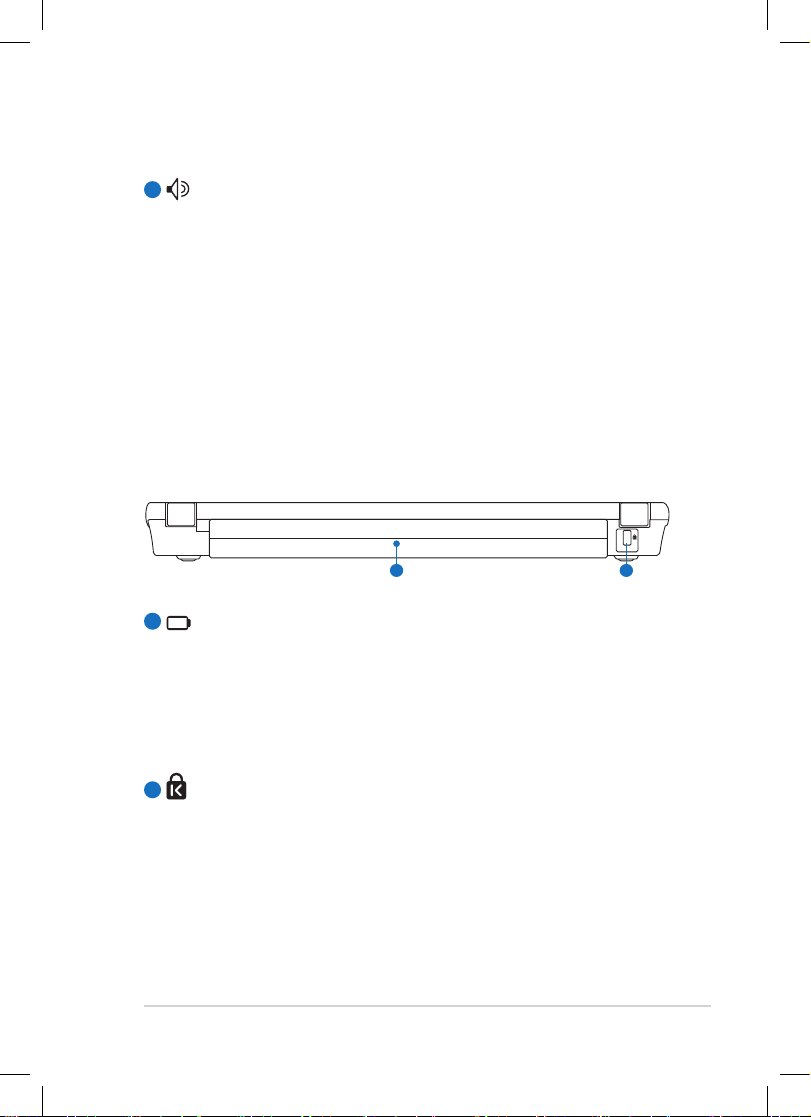
Kensington® Lock port
The Kensington® lock port allows the Eee PC to be secured
using Kensington® compatible security products. These security
products usually include a metal cable and lock that prevent the
Eee PC to be removed from a fixed object.
2
Rear Side
Refer to the illustration below to identify the components on this side of
the Eee PC.
21
1
2
Audio Speaker System
The built-in stereo speaker system allows you to hear audio
without additional attachments. The multimedia sound system
features an integrated digital audio controller that produces rich,
vibrant sound (results improved with external stereo headphones
or speakers). Audio features are software controlled.
Page 18

Chapter 1: Knowing the Parts
1-10
Keyboard Usage
Special Function Keys
The following defines the colored hot keys on the Eee PC’s keyboard. The
colored commands can only be accessed by first pressing and holding the
function key while pressing a key with a colored command. Some function
icons appear in the Notification area after activation.
The Hot Key locations on the function keys may vary depending on
model but the functions should remain the same. Follow the icons
whenever your hot key locations do not match the manual.
zzZ Icon (F1): Places the Eee PC in suspend mode
(Save-to-RAM).
Radio Tower (F2): Wireless Models Only: Toggles
the internal wireless LAN or Bluetooth (on selected
models) ON or OFF with an on-screen-display.
When enabled, the corresponding wireless indicator
will light.
The default setting is WLAN ON / Bluetooth OFF.
Touchpad (F3): Toggles the touchpad ON/OFF.
Resolution Selection (F4): Press to adjust the display
resolution.
The Touchpad (<Fn> + <F3>) and Resolution Selection (<Fn> +
<F4>) functions are available on selected models.
Sun Down Icon (F5): Decreases the display brightness.
Sun Up Icon (F6): Increases the display brightness.
Crossed Screen Icon (F7): Turns off the display backlight.
LCD/Monitor Icons (F8): Toggles between the Eee PC’s
LCD display and an external monitor.
Page 19
ASUS Eee PC
1-11
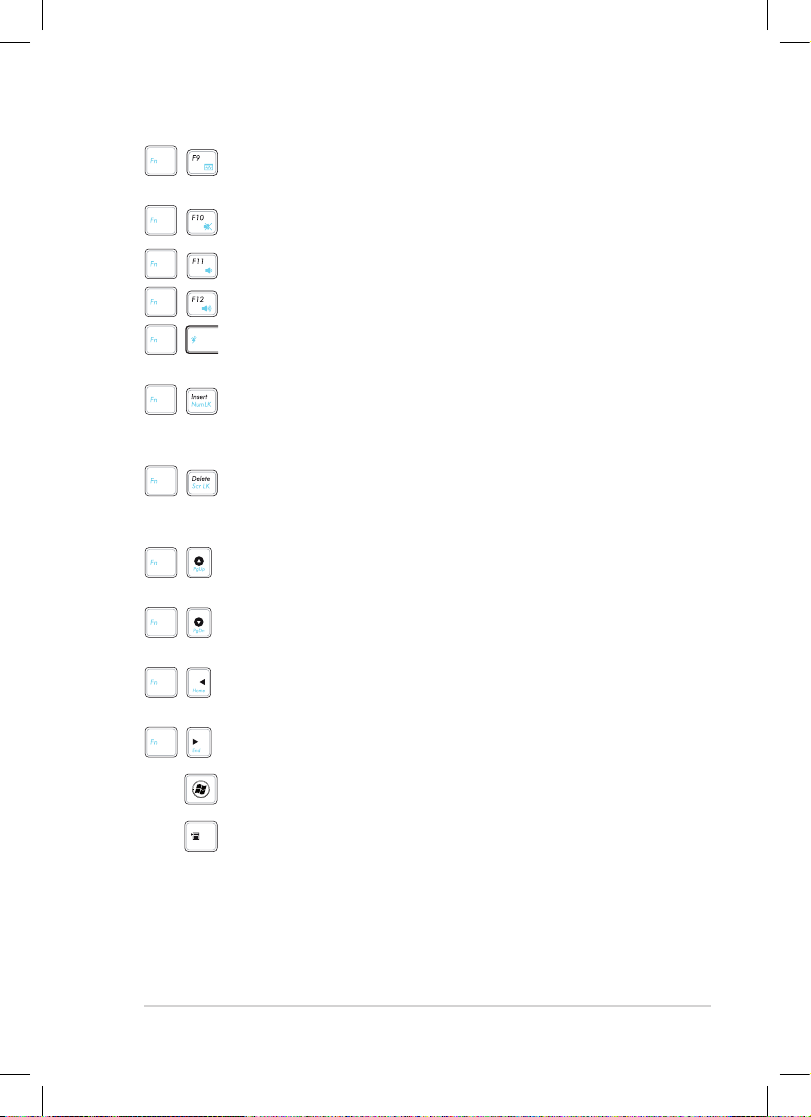
Task Manager Icon (F9): Initiates the Task Manager to
view the application process or terminates applications.
Crossed Speaker Icon (F10): Mutes the speaker.
Volume Down Icon (F11): Decreases speaker volume.
Volume Up Icon (F12): Increases the speaker volume.
Super (Fn+Space Bar): Toggles among various power
saving modes. The selected mode is shown on the display.
Num Lk (Insert): Toggles the numeric keypad
(number lock) ON and OFF. Allows use of a larger portion of
the keyboard for number entering.
Scr Lk (Delete): Toggles the “Scroll Lock” ON and OFF.
Allows you to use a larger portion of the keyboard for cell
navigation.
Pg Up (↑): Press to scroll up in documents or the web
browser.
Pg Dn (↓): Press to scroll down in documents or the web
browser.
Home (←): Press to move the pointer to the beginning of
the line.
End (→): Press to move the pointer to the end of the line.
Windows icon: Displays the start menu.
Menu with pointer icon : Activates the properties menu
and is equivalent to right-clicking the touchpad/mouse on
an object.
Page 20

Chapter 1: Knowing the Parts
1-12
Touchpad Usage
Multi-finger gesture input
Finger gesture Applications
Two-finger zooming in/out Impress, Adobe reader, Photomanager
Two-finger zooming in/out - Moving two fingertips apart or together on
the touchpad to zoom in or zoom out. This is convenient when viewing
photos or reading documents.
Zoom in
Zoom out
Page 21

Powering on your Eee PC
First-time Startup
Desktop
ASUS Eee PC Tray Utility
Network Connection
2
Getting Started
Page 22

Chapter 2: Getting Started
2-2
Powering on your Eee PC
These are only quick instructions for using your Eee PC.
1. Install the battery pack 2. Connect the AC power
adapter
• When you open the display panel, do not force it down to
the table or else the hinges may break! Never lift the Eee PC
by the display panel!
• Only use battery packs and power adapters supplied with
this Eee PC or specifically approved by the manufacturer or
retailer for use with this model or else damage may occur to
the Eee PC. The output voltage of this adapter is +12Vdc, 3A.
• Never attempt to remove the battery pack while the Eee PC
is turned ON, as this may result in the loss of working data.
Remember to fully charge the battery before first use and whenever
it is depleted to prolong battery life.
3. Turn ON the Eee PC
Damage may occur if you use
a different adapter to power
the Eee PC. You may damage
both your battery pack(s) and
the Eee PC with a faulty ACDC adapter.
3
1
2
Page 23
ASUS Eee PC
2-3
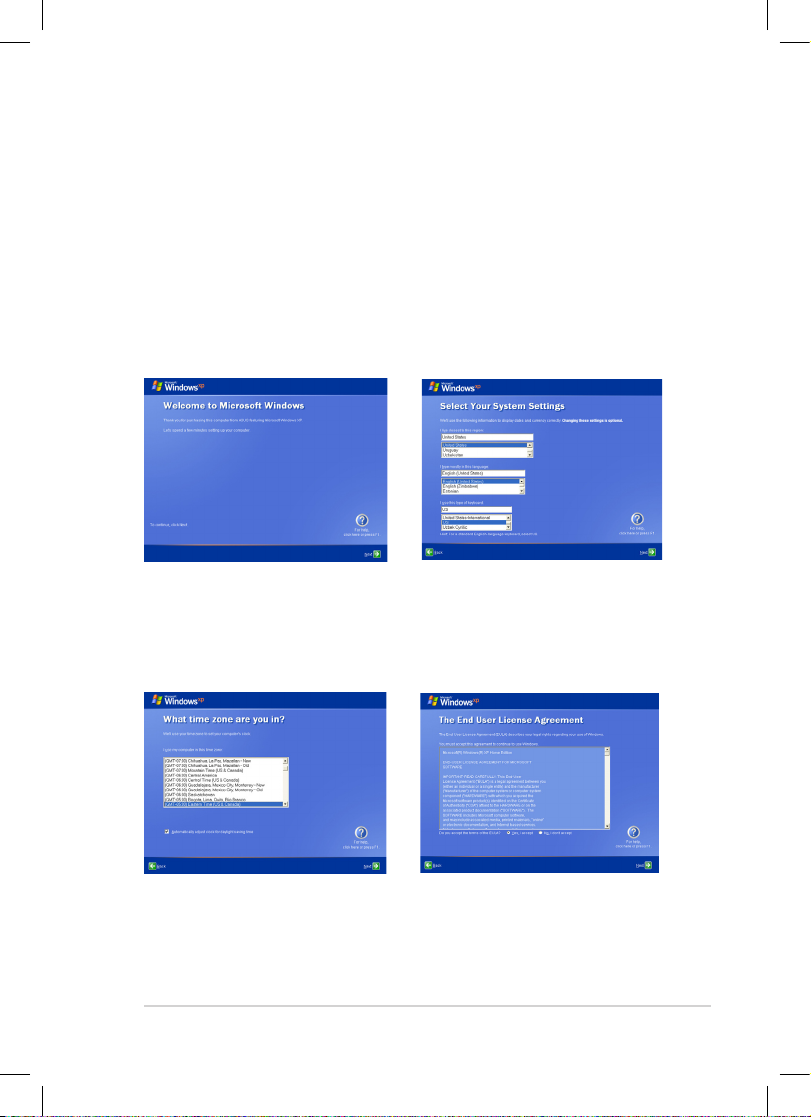
First-time Startup
For the first time you start your Eee PC, the Windows wizard will launch
automatically and lead you through setting up your preferences and some
basic information.
Follow the wizard instructions to finish the initialization:
2. Select you system settings by
specifying the region you are
in, the language you use and
the keyboard type you use.
Click Next to continue.
1. The Welcome message
appears. Click Next to
continue.
3. Select the time zone you
are in and click Next to
continue.
4. Read the end user license
agreement and click Yes,
I accept. Click Next to
continue.
Page 24
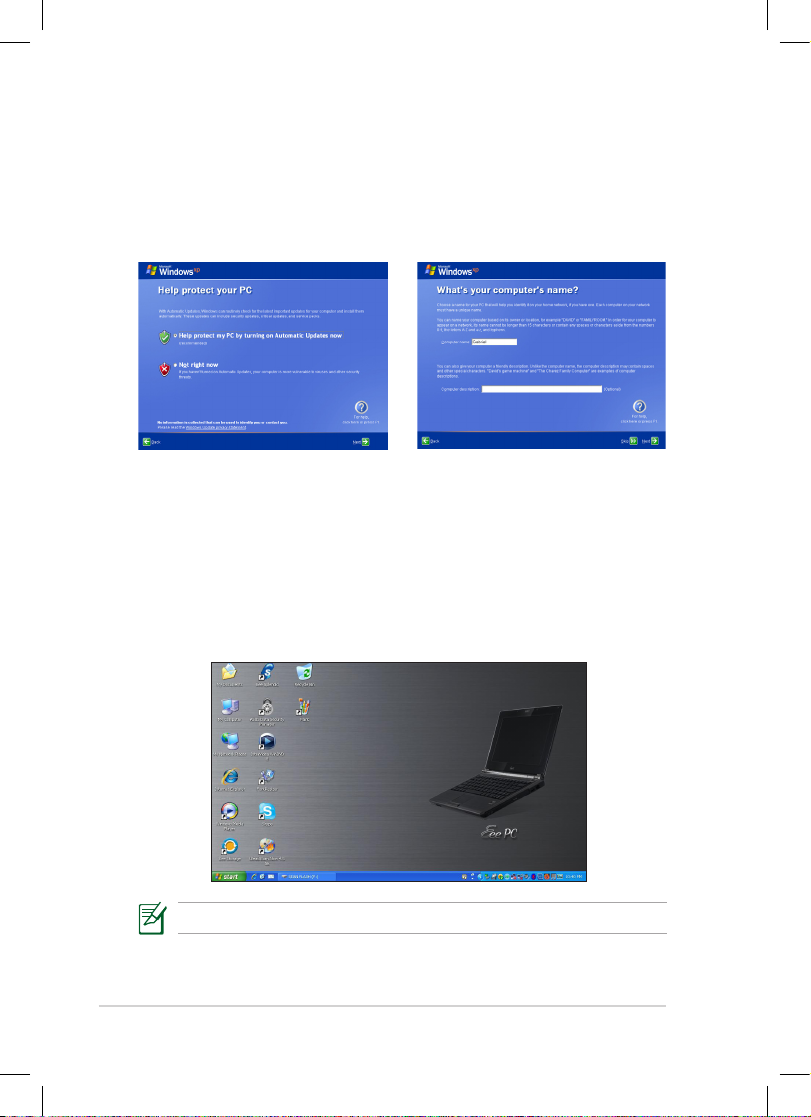
Chapter 2: Getting Started
2-4
5. Click Help protect my PC
by turning on Automatic
Updates now to get the
latest important updates
and click Next to continue.
6. Type your computer’s name
in the Computer name box
and click Next to continue.
7. Follow the onscreen instructions to register with Microsoft and finish
the initialization.
Desktop
The are several shortcuts on the desktop. Double-click them to launch
the corresponding applications and enter the specified folders. Some
applications would form minimized icons in the Notification area.
The actual Desktop screen may vary according to different models.
Page 25

ASUS Eee PC
2-5
ASUS EeePC Tray Utility
The preloaded ASUS EeePC Tray utility allows you to turn off some devices
to minimize the power consumption and helps you adjust the display
resolution easily.
Enabling and Disabling Devices
To disable or enable devices
1. Right-click the ASUS EeePC Tray Utility icon in the Notification area
and the utility shows the available options:
Disable WLAN: Turns on and off the wireless LAN connection.
Disable Blue Tooth: Turns on and off the Bluetooth connection.
Disable Camera: Enable or disable the built-in camera.
2. Select an option to turn it on or off based on your needs. The
unavailable options are dimmed.
Page 26

Chapter 2: Getting Started
2-6
Adjusting the display resolution
Click the ASUS EeePC Tray Utility icon in the Notification area to adjust the
display resolution. Select the resolution based on your needs.
You need not scroll up and down the screen when you select LCD
Compress Mode.
When you select LCD 1024 x 768, move the pointer to scroll up and down
the screen.
Scroll down to see the bottom of the
screen.
Scroll up to see the top of the screen.
The CRT-related options are unavailable when there is no connected
external monitors.
When the display mode of your Eee PC is CRT Only and the power
mode is Power Saving, DO NOT use a resolution higher than 1024
x 600 pixels. Doing so would make the connected external monitor
function abnormally.
Page 27

ASUS Eee PC
2-7
Network Connection
Configuring a wireless network connection
1. Double-click the crossed wireless network icon in the
Notification area.
3. When connecting, you may have to
enter a password.
2. Select the wireless access point
you want to connect to from the
list and click Connect to build the
connection.
If you cannot find the desired access
point, click Refresh network list in
the left pane and search in the list
again.
If the wireless connection icon does not show in the Notification
area. Activate the wireless LAN function by pressing
+
(<Fn> + <F2>) before configuring a wireless network connection.
4. After a connection has been
established, the connection is shown
on the list.
5. You can see the wireless network
icon in the Notification area.
The wireless connection icon disappears when you Press
+
(<Fn> + <F2>) to disable the WLAN function.
Page 28

Chapter 2: Getting Started
2-8
Local Area Network
To establish a wired network, follow the instructions below:
Using a dynamic IP:
1. Right-click the network icon with a
yellow warning triangle on the
Windows® taskbar and select Open
Network Connections.
3. Click Internet Protocol
(TCP/IP) and click Properties.
2. Right-click Local Area Connection
and select Properties.
4. Click Obtain an IP address
automatically and click OK.
Page 29

ASUS Eee PC
2-9
5. Click Create a new
connection to start the New
Connection Wizard.
6. Click Next.
7. Select Connect to the
Internet and click Next.
8. Select Set up my connection
manually.
9. Select your connection type
and click Next.
10. Enter your ISP Name and click
Next.
Page 30

Chapter 2: Getting Started
2-10
11. Enter your User name and
Password. Click Next.
12. Click Finish to finish the
configuration.
13. Enter your user name and
password. Click Connect to
connect to the Internet.
Using a static IP:
1. Repeat the step 1–3 of Using a dynamic IP to start the static IP
network configuration.
2 Click Use the following IP address.
3. Enter the IP address, Subnet mask and Gateway from your service
provider.
4. If needed, enter the preferred DNS Server address and alternative
address.
5. After entering all the related values, click OK to build the network
connection.
Contact your Internet Service Provider (ISP) if you have problems
connecting to the network.
Page 31

ASUS Eee PC
2-11
Browsing web pages
After you finish the network setup, click Internet Explorer on the desktop
and start enjoying net surfing.
Visit our Eee PC homepage (http://eeepc.asus.com) to obtain the
latest information and register at http://vip.asus.com for full service
of your Eee PC.
Page 32

Chapter 2: Getting Started
2-12
Page 33

Bluetooth Connection
Fingerprint Registration
Super Hybrid Engine
Microsoft® Office Trial
Eee Storage
Data Sync
EzMessenger
Font Resizer
Eee Splendid
NIS 2009 Trial
Ulead Burn.Now 4.5 SE
3
Using the Eee PC
Page 34

Chapter 3: Using the Eee PC
3-2
Bluetooth Connection
This device contains FCC ID: TLZ-BT253 and IC ID:6100A-AWBT253.
Bluetooth technology eliminates the need for cables for connecting
Bluetooth-enabled devices. Examples of Bluetooth-enabled devices may
be Notebook PCs, Desktop PCs, mobile phones, and PDAs.
To connect to a Bluetooth-enabled device:
1. Press <Fn> + <F2> repeatedly until
Bluetooth ON or WLAN & Bluetooth
ON is shown.
2. Click My Bluetooth Places on the
desktop and follow the onscreen
instructions to finish initialization.
Click Next to continue.
4. To decide the Bluetooth
services this device offers,
click Next to continue.
5. Select the service you would
like to offer from the list and
click Next to continue.
3. Name your Eee PC and select
the device type. Click Next to
continue.
6. Click Next to start setting up
the Bluetooth connection.
Page 35

ASUS Eee PC
3-3
7. Select a Bluetooth-enabled
device from the list and click
Next.
8. Enter the Bluetooth security
code and start pairing.
9. After the paired relationship is
built, select the service you are
interested in from the list and
click Next to continue.
10. A message appears to show
that the selected shortcuts
have been created on the My
Bluetooth Places screen of
Windows Explorer. Click Ok
to continue.
11. Click Skip to set up connection
later and continue.
11. Click Finish to complete
the initial bluetooth
configuration.
Page 36
Chapter 3: Using the Eee PC
3-4
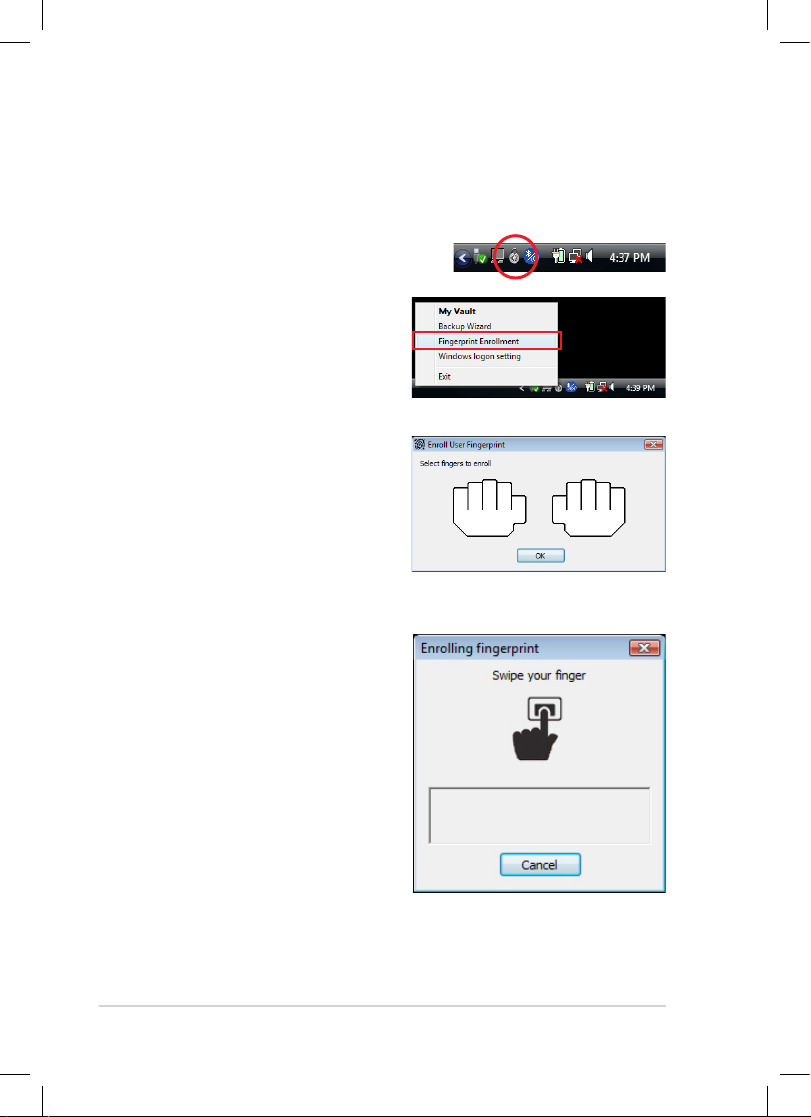
Fingerprint Registration
The fingerprint scanner can be used for instant and secure user
authentication. These instructions will show you how to setup the
fingerprint registration.
1. Right-click the ADSM icon in
the Notification area and select
Fingerprint Enrollment.
2. In the Enroll User Fingerprint
window, click a finger to start
fingerprint enrollment.
3. Swipe the select finger on the
fingerprint scanner to start
fingerprint enrollment.
Page 37
ASUS Eee PC
3-5
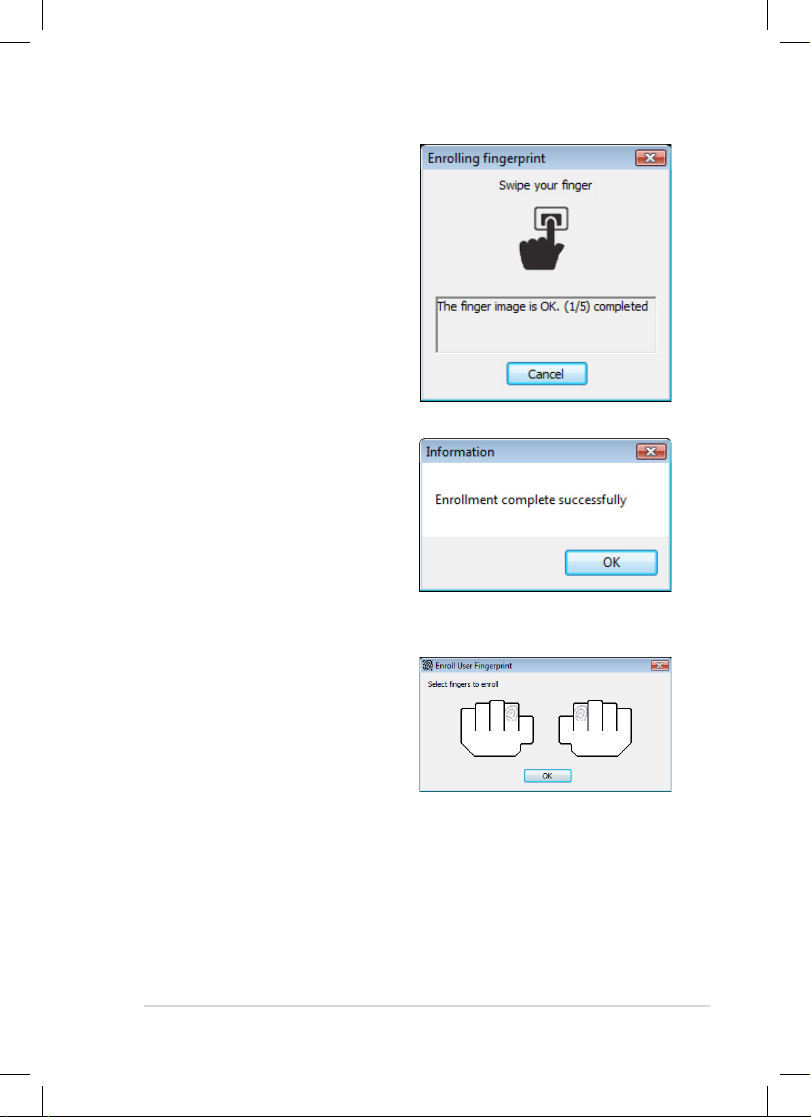
4. Swipe your finger for 5 times to
finish fingerprint enrollment.
5. When finished, click OK to
continue.
6. You can continue to enroll
more fingerprints in the Enroll
User Fingerprint window, or
click OK to finish fingerprint
enrollment.
Page 38
Chapter 3: Using the Eee PC
3-6
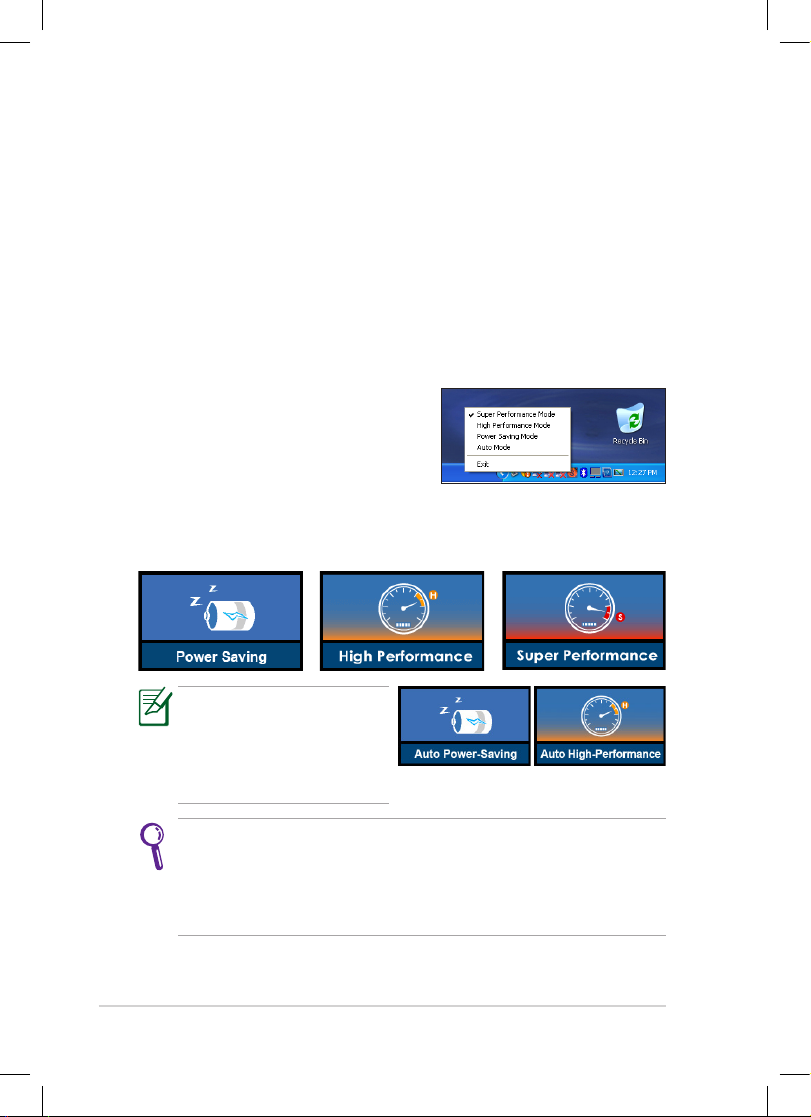
Super Hybrid Engine
Super Hybrid Engine offers different power modes. The assigned instant
key toggles power savings between various power saving modes. The
power saving modes control many aspects of your Eee PC to maximize
performance versus battery time. The selected mode is shown on the
display.
To change the power mode
• Click Start > All Programs > ASUS > SuperHybridEngine >
SuperHybridEngine.
• Press Instant Key 3 repeatedly to switch power modes.
• Right-click the Super Hybrid Engine
icon in the Notification area, and
select a preferred power mode.
Super Hybrid Engine Modes
Auto High Performance and
Auto Power-Saving mode
are available only when
applying or removing the
power adapter.
If your external monitor functions abnormally in Power Saving
mode at a resolution of 1024 x 768 pixels or higher, press <Fn> +
<F5> repeatedly to switch the display mode to LCD Only or LCD
+ CRT Clone and reset the power mode to High Performance or
Super Performance.
Page 39

ASUS Eee PC
3-7
Microsoft® Ofce Trial
Eee PC users can enjoy Microsoft Office Suite free trial for 60 days. Do the
following instructions to start the free trial.
1. Ensure that your Eee PC is connected to the Internet and doubleclick Microsoft Office 60 Day Trial - Online on the desktop.
2. Click TRY NOW.
3. Enter your E-mail address and
click SUBMIT.
4. Copy your product key and click
the link.
5. Enter your product key and follow
the onscreen instructions to finish
the activation process before
starting the free trial.
If you want to use other applications in the Microsoft Office Suite,
click start and point to All Programs > Microsoft Office to select a
desired application.
Page 40

Chapter 3: Using the Eee PC
3-8
Eee Storage
Eee PC users can enjoy free online space. With Internet connection, you
can access and share any files whenever you want and wherever you are.
To use Eee Storage
Ensure that your Eee PC is connected to the Internet.
1. Double-click the Eee Storage
shortcut on the desktop, and read
the service agreement before
clicking Yes to continue.
The content of the free service provided to you is subject to Eee
Storage Web Hard Drive Service Agreement on Eee Storage
official website. Eee Storage reserves the rights to modify or
discontinue the provided web storage service with or without
further notice. Visit the official website for details.
2. Double-click Eee Internet Storage.
Page 41

ASUS Eee PC
3-9
Double-click Setup Your Eee Storage Account information in the
Web Storage folder to apply an account and setup a password if
you need to use more advanced functions. This set of account and
password is also indispensable when you use Eee Storage service
with other computer.
3. You can easily drag and drop to upload files onto your free online
space.
Page 42

Chapter 3: Using the Eee PC
3-10
Data Sync
Data Sync allows you to easily synchronize the data on your Eee PC with
another PC (station PC) at home or in the office under the same network
segment.
To install Data Sync Station to another
PC
1. Click Start > All Programs > ASUS
> Data Sync > Data Sync or double-
click the Data Sync shortcut on the
desktop.
2. Save the DataSyncStationSetup file
into a USB storage device inserted
into your Eee PC's USB port.
3. Unplug the USB storage device, insert it into the USB port of another
PC (station PC), then install the DataSyncStationSetup file.
To start the data synchronization
1. Launch Data Sync Station on the station PC, select a connection
type, and click Start.
Connection Type Description
Current connection Your Eee PC and the station PC must be under the
same network segment.
Ad-hoc connection The Ad-hoc mode allows the Eee PC to connect
to another wireless device. No access point (AP) is
required in this wireless environment.
Ad-hoc connection
(Encrypted)
You are required to enter the same Grouping code
in both the Eee PC and the station PC for the pairing
process.
(Eee PC) (Station PC)
2. Launch Data Sync on your Eee PC.
Page 43

ASUS Eee PC
3-11
4. From the Members list, select the station
PC and click Connect.
5. Select the data transmitting direction,
sync type, and the folder or folders to be
synchronized. Click Sync when done.
3. Select the same connection type as the one you selected on the
station PC.
(Station PC)(Eee PC)
6. Click Finish to complete the
synchronization.
Page 44

Chapter 3: Using the Eee PC
3-12
EzMessenger
EzMessenger allows you to chat and share files with another Eee PC user
under the same network segment.
To use EzMessenger
1. Click Start > All Programs > ASUS > EzMessenger > EzMessenger
or double-click the EzMessenger shortcut on the desktop to launch
EZMessenger.
2. Ensure that your Eee PC and the other Eee
PC that you want to connect to have the
same connection type.
Connection Type Description
Current connection Your Eee PC and the station PC must be under the
same network segment.
Ad-hoc connection The Ad-hoc mode allows the Eee PC to connect
to another wireless device. No access point (AP) is
required in this wireless environment.
3. From the Members list, double-click the
Eee PC that you want to connect to, and a
message box appears.
4. Use the message box to enter your
messages or share files with the other
Eee PC user.
To share a file or a file, simply drag the
file to the typing area, then the other
Eee PC user needs to click Accept to
start the file transmission.
To send a message, simply enter your text
message, then click Send.
Page 45

ASUS Eee PC
3-13
Font Resizer
Font Resizer allows you to adjust the font/text size on your Eee PC screen.
To resize the font
1. Double-click the FontResizer shortcut on the desktop.
2. Select your font size from Normal, Large Fonts, and Extra Large
Fonts. You can see the actual font size from the preview window
below the selections.
3. Click Apply, and a message pops up to notify you that you need to
restore to the factory settings if characters drop out and disappear
after you resize the font. Click Apply to confirm your selection, or
Cancel to discard the selection.
Preview window
Font size
selections
Page 46

Chapter 3: Using the Eee PC
3-14
Eee Splendid
Eee Splendid helps improve your Eee PC display in terms of the contrast,
brightness, skin tone, and color saturation for red, green, and blue
independently.
To use Eee Splendid
1. Double-click the Eee Splendid shortcut on the desktop, and the Eee
Splendid utility window appears.
2. Click LCD Splendid or Video Splendid to adjust the effect of the
LCD display or video clips.
3. If you want to use other pictures or video clips for comparison, click
Open File and access the file you want to use. ClickFull Screen to
view the image comparison in full screen.
The supported file formats are:
Image file formats: .bmp, jpg, jpeg
Video file formats: .mpeg, .mpg
Click to display in
full screen
Click to open a file
Image/video splendid
adjustments
Splendid
applied frame
Original frame
Page 47

ASUS Eee PC
3-15
LCD Splendid mode
When in LCD Splendid mode, you can select from the Splendid, Vivid,
Soft, and Theater splendid enhancement selections. Click Normal to
restore the original appearance. Click Apply to confirm or Cancel to
discard the setting.
Video Splendid mode
When in Video Splendid mode, move the slider to adjust the contrast
effect. Click Default to restore the default setting. Click at the upper
right corner of the Applied Frame to play the video clip with the Windows
® Media Player. Click Apply to confirm or Cancel to discard the setting.
Splendid
enhancement
selections
Click to restore
the original
appearance
Click to play the
video clip
Move the slider to adjust
the contrast effect
Click to restore
the default
setting
Page 48

Chapter 3: Using the Eee PC
3-16
NIS 2009 Trial
You can enjoy Norton Internet Security (NIS) trial for 60 days to protect
your Eee PC from virus attack or other security threats.
To use NIS
Double-click the Norton Internet Security shortcut on the desktop, and
the utility window appears.
• From the Computer area, you are able to scan infected areas, scan
your entire computer, or run a custom scan of drives, folder, or disks.
• From the Internet area, Internet attacks are detected and blocked;
emails and instant messages are examined and discovered threats are
blocked and removed.
• From the Identity area, your identity is secured during any web
activities. Fraudulent websites are also detected by the intelligent
analysis.
To change or customize your protection, access the detailed features from
the Setting window.
To get more detailed support, click Help & Support on the upper right
corner of the utility panel.
Toggles
on/off the
features
Displays your current
CPU/memory usage
Allows smart scanning of
files on your computer
Page 49
ASUS Eee PC
3-17
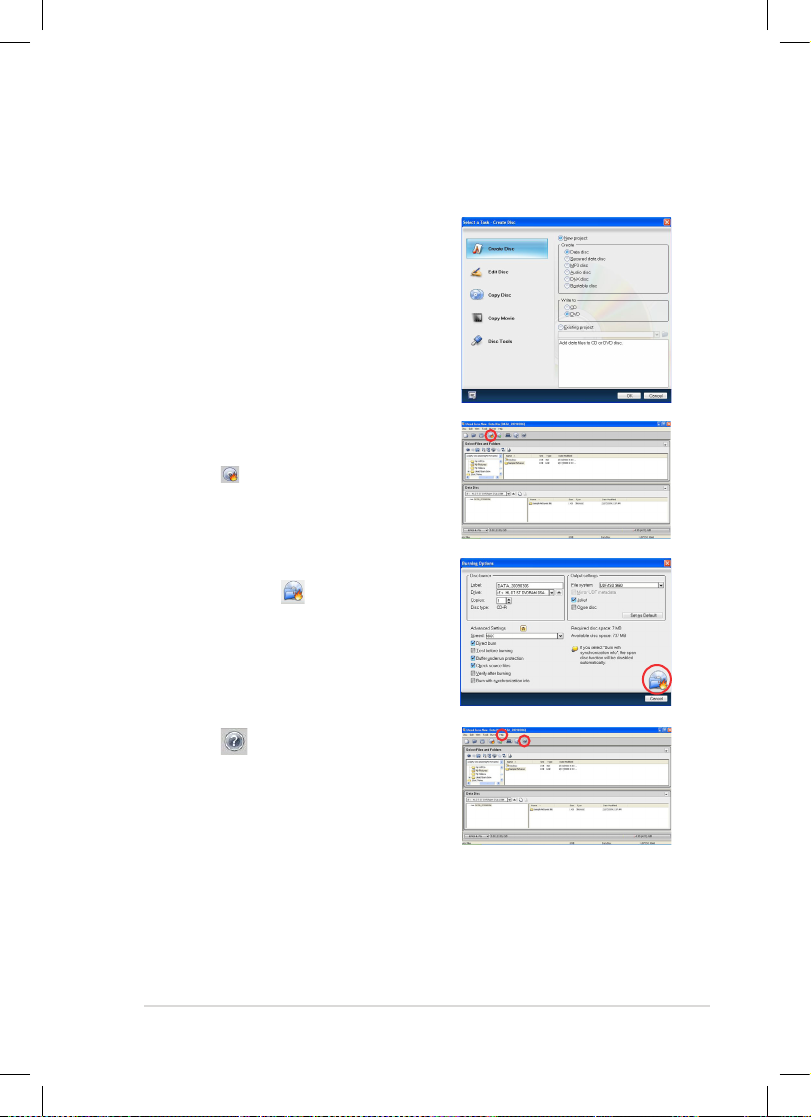
Ulead Burn.Now 4.5 SE
Ulead Burn.Now helps you create a CD or DVD disc.
To create a disc
1. Launch Ulead Burn.Now 4.5 SE, and
click Create Disc.
2. If you select New project, select the
disc type and the type of disc that
you want to create from the Create
and Write to sections.
If you select Existing project, locate
the .udn file you previously saved in
your Eee PC. Click OK.
3. Select the files or folders that you
want to copy in the new disc.
Click to continue.
4. Configure the related burning
options. Click to start the disc
burning task.
5. Click or go the Help from
the Menu bar for more detailed
instructions on the other tasks.
Page 50

Chapter 3: Using the Eee PC
3-18
Page 51

Support DVD information
System Recovery
4
Support DVD &
System Recovery
Page 52

Chapter 4: Support DVD & System Recovery
4-2
Support DVD information
The support DVD that comes with the Eee PC package contains the
drivers, software applications, and utilities that you can install to avail all
the features.
Running the support DVD
Insert the support DVD in the external optical drive. The DVD
automatically displays the Drivers menu if Autorun is enabled in your
computer.
If Autorun is NOT enabled in your computer, browse the contents of
the support DVD to locate the file ASSETUP.EXE from the BIN folder.
Double-click the ASSETUP.EXE file to run the DVD.
The drivers and utilities bundled in the support DVD may vary by
models and are subject to change without notice.
Click an item to install
Click an icon to display
support DVD/ Eee PC
information
Page 53
ASUS Eee PC
4-3
Drivers menu
The Drivers menu shows available device drivers when the system detects
installed devices. Install the necessary drivers to activate the devices.
Utilities menu
The Utilities menu shows the applications that the Eee PC supports.
Contact
Click the Contact tab to display the ASUS contact information.
Other information
The icons on the top right corner of the screen provide additional
information on the Eee PC and the contents of the support DVD. Click an
icon to display the specified information.
File list
Technical support
DVD content
System information
Page 54
Chapter 4: Support DVD & System Recovery
4-4
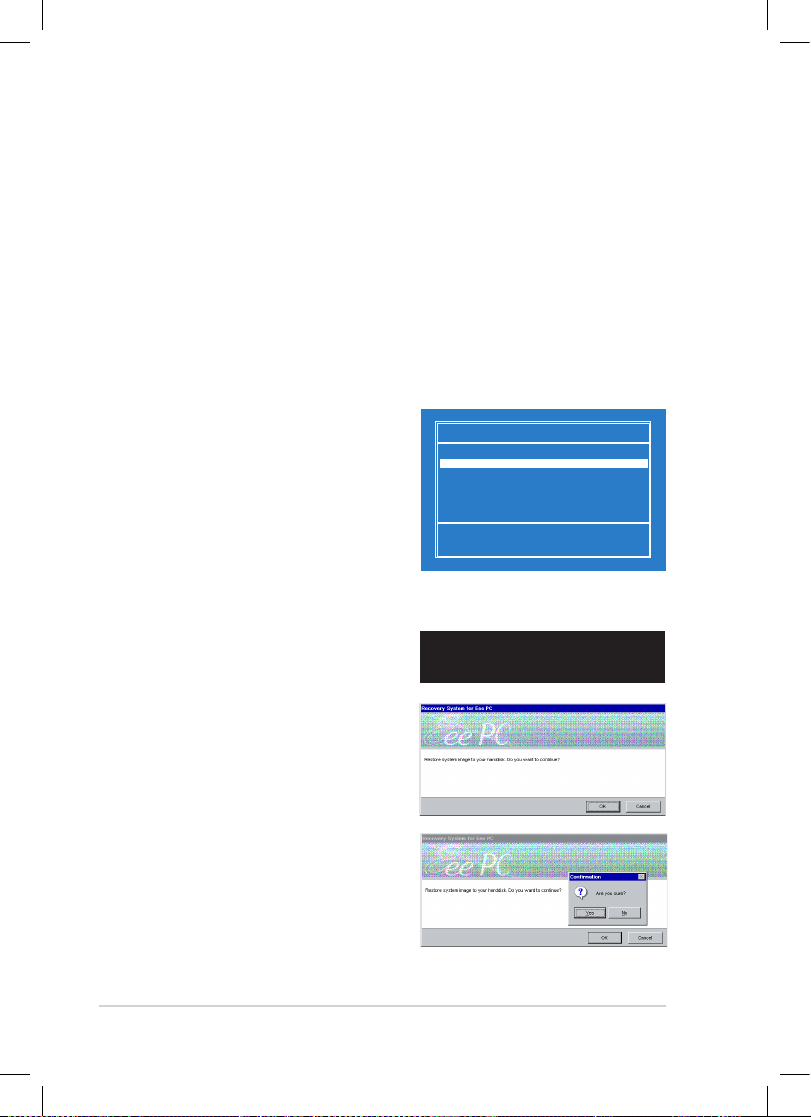
Please select boot device:
↑
and ↓ to move selection
ENTER to select boot device
HDD:PM-ST9160310AS
USB:XXXXXXXX
System Recovery
Using the Support DVD
The Support DVD includes an image of the operating system, installed on
your system at the factory. The Support DVD provides a comprehensive
recovery solution that quickly restores your system to its original working
state, provided that your system drive is in good working order. Before
using the Support DVD, copy your data files to a USB storage device or to
a network drive and make note of any customized configuration settings
(such as network settings).
1. Insert the Support DVD into the optical drive.
2. Press <ESC> on bootup and
the Please select boot device
screen appears. Select USB:
XXXXXX (may be labeled as the
ODD brand name) to boot from
the optical drive.
3. Press any key to boot from the
optical drive.
Press any key to boot from CD...
5. Click Yes to start the system
recovery.
4. Click OK in the Recovery System
for Eee PC dialog box.
Page 55

ASUS Eee PC
4-5
You will lose all your data during the system recovery. Ensure to back
up your important data before recovering your system.
6. After the system recovery is
completed, eject the the Support
DVD from the optical drive and
click OK to restart the Eee PC.
Using Recovery Partition
About the Recovery Partition
The Recovery Partition is a space reserved on your hard disk drive used to
restore the operating system, drivers, and utilities installed on your Eee PC
at the factory.
Using the Recovery Partition:
1. Press <F9> during bootup (requires a Recovery Partition)
Disable Boot Booster in BIOS setup before your perform system
recovery from USB flash disk, external optical drive or hidden
partition. Refer to the end of this chapter for details.
2. Click the check mark button to start the system recovery.
3. The system starts system recovery automatically and follow the
onscreen instructions to complete the recovery process.
Page 56

Chapter 4: Support DVD & System Recovery
4-6
Boot Booster
The Boot Booster item in BIOS setup helps shorten your Eee PC bootup
time. However, you MUST disable this BIOS item before you change any
Eee PC components or perform system recovery (from USB flash disk,
external optical drive or hidden partition). Follow the instructions below
to disable Boot Booster:
1. Start the system and press <F2> on bootup to show the POST
screen. Press <F2> again to enter the BIOS setup.
2. Set Boot Booster to [Disabled]
v02.58 (C)Copyright 1985-2005, American Megatrends, Inc.
BIOS SETUP UTILITY
Main Advanced Security Boot Exit
Boot Device Priority
BootSettingsConguration
OnBoard LAN Boot ROM [Enabled]
Boot Booster [Disabled]
←→ Select Screen
↑↓ Select Item
Enter Go to Sub Screen
F1 General Help
F10 Save and Exit
ESC Exit
SpeciestheBoot
Device Priority
sequence.
Avirtualoppydisk
drive (Floppy Drive B:
) may appear when you
set the CD-ROM drive
astherstboot
device.
3. Press <F10> to save the configuration and restart Eee PC.
If you fail to see the POST screen or enter the BIOS setup by doing
the instruction above, restart the system and try pressing <F2>
repeatedly on bootup.
Remember to enable Boot Booster after you complete hardware
change or system recovery.
Page 57

Declarations and Safety Statements
Copyright Information
Limitation of Liability
Service and Support
A
Appendix
Page 58

Appendix
A-2
Declaration of Conformity (R&TTE directive 1999/5/EC)
The following items were completed and are considered relevant and
sufficient:
• Essential requirements as in [Article 3]
• Protection requirements for health and safety as in [Article 3.1a]
• Testing for electric safety according to [EN 60950]
• Protection requirements for electromagnetic compatibility in [Article
3.1b]
• Testing for electromagnetic compatibility in [EN 301 489-1] & [EN 301]
• Testing according to [489-17]
• Effective use of the radio spectrum as in [Article 3.2]
• Radio test suites according to [EN 300 328-2]
CE Mark Warning
This is a Class B product, in a domestic environment, this product may
cause radio interference, in which case the user may be required to take
adequate measures.
Wireless Operation Channel for Different Domains
N. America 2.412-2.462 GHz Ch01 through CH11
Japan 2.412-2.484 GHz Ch01 through Ch14
Europe ETSI 2.412-2.472 GHz Ch01 through Ch13
France Restricted Wireless Frequency Bands
Some areas of France have a restricted frequency band. The worst case
maximum authorized power indoors are:
• 10mW for the entire 2.4 GHz band (2400 MHz–2483.5 MHz)
• 100mW for frequencies between 2446.5 MHz and 2483.5 MHz
Channels 10 through 13 inclusive operate in the band 2446.6 MHz
to 2483.5 MHz.
Page 59

ASUS Eee PC
A-3
There are few possibilities for outdoor use: On private property or on
the private property of public persons, use is subject to a preliminary
authorization procedure by the Ministry of Defense, with maximum
authorized power of 100mW in the 2446.5–2483.5 MHz band. Use
outdoors on public property is not permitted.
In the departments listed below, for the entire 2.4 GHz band:
• Maximum authorized power indoors is 100mW
• Maximum authorized power outdoors is 10mW
Departments in which the use of the 2400–2483.5 MHz band is permitted
with an EIRP of less than 100mW indoors and less than 10mW outdoors:
01 Ain Orientales 02 Aisne 03 Allier
05 Hautes Alpes 08 Ardennes 09 Ariège
11 Aude 12 Aveyron 16 Charente
24 Dordogne 25 Doubs 26 Drôme
32 Gers 36 Indre 37 Indre et Loire
41 Loir et Cher 45 Loiret 50 Manche
55 Meuse 58 Nièvre 59 Nord
60 Oise 61 Orne 63 Puy du Dôme
64 Pyrénées Atlantique 66 Pyrénées 67 Bas Rhin
68 Haut Rhin 70 Haute Saône 71 Saône et Loire
75 Paris 82 Tarn et Garonne
84 Vaucluse 88 Vosges 89 Yonne
90 Territoire de Belfort 94 Val de Marne
This requirement is likely to change over time, allowing you to use your
wireless LAN card in more areas within France. Please check with ART for
the latest information (www.art-telecom.fr)
Your WLAN Card transmits less than 100mW, but more than 10mW.
Page 60

Appendix
A-4
UL Safety Notices
Required for UL 1459 covering telecommunications (telephone) equipment
intended to be electrically connected to a telecommunication network
that has an operating voltage to ground that does not exceed 200V peak,
300V peak-to-peak, and 105V rms, and installed or used in accordance
with the National Electrical Code (NFPA 70).
When using the Eee PC modem, basic safety precautions should always
be followed to reduce the risk of fire, electric shock, and injury to persons,
including the following:
• DO NOT use the Eee PC near water, for example, near a bath tub,
wash bowl, kitchen sink or laundry tub, in a wet basement or near a
swimming pool.
• DO NOT use the Eee PC during an electrical storm. There may be a
remote risk of electric shock from lightning.
• DO NOT use the Eee PC in the vicinity of a gas leak.
Required for UL 1642 covering primary (nonrechargeable) and secondary
(rechargeable) lithium batteries for use as power sources in products.
These batteries contain metallic lithium, or a lithium alloy, or a lithium
ion, and may consist of a single electrochemical cell or two or more cells
connected in series, parallel, or both, that convert chemical energy into
electrical energy by an irreversible or reversible chemical reaction.
• Do not dispose the Eee PC battery pack in a fire, as they may explode.
Check with local codes for possible special disposal instructions to
reduce the risk of injury to persons due to fire or explosion.
• Do not use power adapters or batteries from other devices to reduce
the risk of injury to persons due to fire or explosion. Use only UL
certified power adapters or batteries supplied by the manufacturer or
authorized retailers.
Page 61

ASUS Eee PC
A-5
Power Safety Requirement
Products with electrical current ratings up to 6A and weighing more than
3Kg must use approved power cords greater than or equal to: H05VV-F, 3G,
0.75mm2 or H05VV-F, 2G, 0.75mm2.
This symbol of the crossed out wheeled bin indicates that the
product (electrical, electronic equipment, and mercury-containing
button cell battery) should not be placed in municipal waste. Check
local regulations for disposal of electronic products.
REACH Notice
Complying with the REACH (Registration, Evaluation, Authorisation,
and Restriction of Chemicals) regulatory framework, we published the
chemical substances in our products at ASUS REACH website at http://
green.asus.com/english/REACH.htm.
Page 62

Appendix
A-6
Nordic Lithium Cautions (for lithium-ion batteries)
CAUTION! Danger of explosion if battery is incorrectly
replaced. Replace only with the same or equivalent type
recommended by the manufacturer. Dispose of used
batteries according to the manufacturer’s instructions.
(English)
ATTENZIONE! Rischio di esplosione della batteria se
sostituita in modo errato. Sostituire la batteria con un una
di tipo uguale o equivalente consigliata dalla fabbrica. Non
disperdere le batterie nell’ambiente. (Italian)
VORSICHT! Explosionsgefahr bei unsachgemäßen
Austausch der Batterie. Ersatz nur durch denselben oder
einem vom Hersteller empfohlenem ähnlichen Typ.
Entsorgung gebrauchter Batterien nach Angaben des
Herstellers. (German)
ADVARSELI! Lithiumbatteri - Eksplosionsfare ved fejlagtig
håndtering. Udskiftning må kun ske med batteri af samme
fabrikat og type. Levér det brugte batteri tilbage til
leverandøren. (Danish)
VARNING! Explosionsfara vid felaktigt batteribyte.
Använd samma batterityp eller en ekvivalent typ som
rekommenderas av apparattillverkaren. Kassera använt
batteri enligt fabrikantens instruktion. (Swedish)
VAROITUS! Paristo voi räjähtää, jos se on virheellisesti
asennettu. Vaihda paristo ainoastaan laitevalmistajan
sousittelemaan tyyppiin. Hävitä käytetty paristo
valmistagan ohjeiden mukaisesti. (Finnish)
Page 63

ASUS Eee PC
A-7
ATTENTION! Il y a danger d’explosion s’il y a remplacement
incorrect de la batterie. Remplacer uniquement avec
une batterie du mêre type ou d’un type équivalent
recommandé par le constructeur. Mettre au rebut les
batteries usagées conformément aux instructions du
fabricant. (French)
ADVARSEL! Eksplosjonsfare ved feilaktig skifte av batteri.
Benytt samme batteritype eller en tilsvarende type anbefalt
av apparatfabrikanten. Brukte batterier kasseres i henhold
til fabrikantens instruksjoner. (Norwegian)
(Japanese)
Page 64

Appendix
A-8
Copyright Information
No part of this manual, including the products and software described in
it, may be reproduced, transmitted, transcribed, stored in a retrieval system,
or translated into any language in any form or by any means, except
documentation kept by the purchaser for backup purposes, without the
express written permission of ASUSTeK COMPUTER INC. (“ASUS”).
ASUS PROVIDES THIS MANUAL “AS IS” WITHOUT WARRANTY OF ANY
KIND, EITHER EXPRESS OR IMPLIED, INCLUDING BUT NOT LIMITED TO THE
IMPLIED WARRANTIES OR CONDITIONS OF MERCHANTABILITY OR FITNESS
FOR A PARTICULAR PURPOSE. IN NO EVENT SHALL ASUS, ITS DIRECTORS,
OFFICERS, EMPLOYEES OR AGENTS BE LIABLE FOR ANY INDIRECT, SPECIAL,
INCIDENTAL, OR CONSEQUENTIAL DAMAGES (INCLUDING DAMAGES
FOR LOSS OF PROFITS, LOSS OF BUSINESS, LOSS OF USE OR DATA,
INTERRUPTION OF BUSINESS AND THE LIKE), EVEN IF ASUS HAS BEEN
ADVISED OF THE POSSIBILITY OF SUCH DAMAGES ARISING FROM ANY
DEFECT OR ERROR IN THIS MANUAL OR PRODUCT.
Products and corporate names appearing in this manual may or may not
be registered trademarks or copyrights of their respective companies, and
are used only for identification or explanation and to the owners’ benefit,
without intent to infringe.
SPECIFICATIONS AND INFORMATION CONTAINED IN THIS MANUAL
ARE FURNISHED FOR INFORMATIONAL USE ONLY, AND ARE SUBJECT
TO CHANGE AT ANY TIME WITHOUT NOTICE, AND SHOULD NOT
BE CONSTRUED AS A COMMITMENT BY ASUS. ASUS ASSUMES NO
RESPONSIBILITY OR LIABILITY FOR ANY ERRORS OR INACCURACIES
THAT MAY APPEAR IN THIS MANUAL, INCLUDING THE PRODUCTS AND
SOFTWARE DESCRIBED IN IT.
Copyright © 2008 ASUSTeK COMPUTER INC. All Rights Reserved.
Page 65

ASUS Eee PC
A-9
Limitation of Liability
Circumstances may arise where because of a default on ASUS’ part or
other liability, you are entitled to recover damages from ASUS. In each
such instance, regardless of the basis on which you are entitled to claim
damages from ASUS, ASUS is liable for no more than damages for bodily
injury (including death) and damage to real property and tangible
personal property; or any other actual and direct damages resulted
from omission or failure of performing legal duties under this Warranty
Statement, up to the listed contract price of each product.
ASUS will only be responsible for or indemnify you for loss, damages
or claims based in contract, tort or infringement under this Warranty
Statement.
This limit also applies to ASUS’ suppliers and its reseller. It is the maximum
for which ASUS, its suppliers, and your reseller are collectively responsible.
UNDER NO CIRCUMSTANCES IS ASUS LIABLE FOR ANY OF THE FOLLOWING:
(1) THIRD-PARTY CLAIMS AGAINST YOU FOR DAMAGES; (2) LOSS OF, OR
DAMAGE TO, YOUR RECORDS OR DATA; OR (3) SPECIAL, INCIDENTAL, OR
INDIRECT DAMAGES OR FOR ANY ECONOMIC CONSEQUENTIAL DAMAGES
(INCLUDING LOST PROFITS OR SAVINGS), EVEN IF ASUS, ITS SUPPLIERS OR
YOUR RESELLER IS INFORMED OF THEIR POSSIBILITY.
Service and Support
Visit our multi-language web site at http://support.asus.com
Page 66

Appendix
A-10
 Loading...