

Page 1

f you are installing more then one Venture telephone,
ine 1 must be the same telephone number for all sets!
Three separate lines
OR
contained on one jack
❶ Disconnect any
equipment, such as
other phones, faxes or
modems from the lines
you will be using for
your Venture system.
❷ Review the
configuration drawing
or see the User Guide
for detailed
configuration
instructions.
❸ Install and check one
Venture phone at a
time.
❹ Check to see that your
Venture system is
properly installed and
communicating.
❺ Reconnect any
equipment
disconnected in ❶.
Use up to three separate
telephone lines and jacks
Connect your telephone
and handset
Quick start card
Ports 2 and 3 may be
used for an optional
fax or modem
Ensure that the Port 1 line cord is routed
through the Base stand
Venture 3-Line Telephone with Answering Device
Page 2
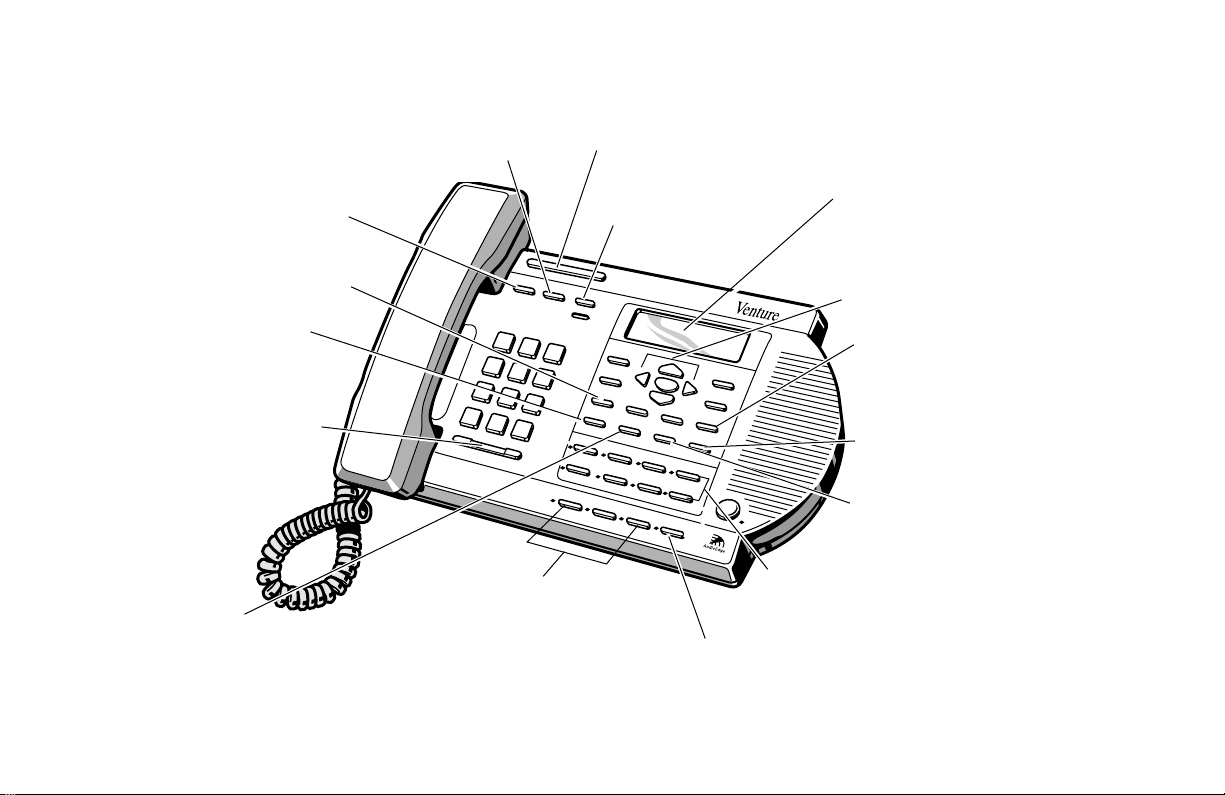
Venture’s Standard Functional Keys
f — answers Call Waiting
calls and activates telephone company
features such as 3 Way Calling*(Flash
is the same as Link)
˙ — places calls
on or off Hold; enters a pause
q — stops any
activity without ending a call
¡ — edits
Directory, Callers list,
Services list or memory key
information
Multipurpose Light — flashes or
lights for incoming calls, messages
and features on/off
g (orange) —
ends an active call
Display — shows incoming caller
information* and instructions for
using the set—even in the dark
Navigational ”’“‘ (blue)
— moves through lists and accesses
further information
ß — stores names
and numbers in the Directory,
Services list, and memory keys;
sets your various Option selections
Quick start card
¶ — sets
the ringer volume when the
phone is idle; sets the
receiver and speaker
volume while on a call
d — removes
entire entries or lists; removes
individual characters or
numbers from lists
* You may be required to subscribe to a telephone company feature.
Venture 3-Line Telephone with Answering Device
Lines 1, 2 and 3 (green) —
answers incoming calls when light
flashes; press to hear dial tone for
outgoing calls
⁄ — sends calls to
other phones in your Venture
system (page 21)
ø — links up
to 2 other callers for a
conference (page 21)
8 Memory keys with lights — stores
a name and number or feature for easy
one key access (page 48)
Û “Intercom” (green) —
makes or answers calls between other
Venture sets using this intercom key
(page 17)
Page 3

Venture’s Answering Device and List Keys
¥ — displays the list of
42 options to customize your
D — enters the list
of Public and Private Directory
names and numbers.
The Public Directory is
automatically updated across
all Venture sets in your system
when a change is made
(page 53)
† — views
the last 10 outgoing
telephone numbers
(page 52)
Venture set (page 25)
——
——
Play/Action key (blue) —
plays messages, greetings, memos
and voice tags; when idle, activates
a feature; dials displayed numbers
when in a list (
this key is not labelled
ç —displays a list of up to
200 incoming calls and their status
(page 52)
£ — displays a list of up
to 20 telephone company features*
(page 53)
k (blue) — displays a
list of mailboxes, greetings and
answering machine features
(page 35, page 53)
Quick start card
)
œ (blue) — press to record
and modify greetings, voice tags and
memos (page 33)
*You may be required to subscribe to or pay a charge for the features.
Handsfree/Mute key and light (green)
— press to listen and talk without using the
handset; press again to mute conversations (
key is not labelled
) (page 20)
this
Venture 3-Line Telephone with Answering Device
Page 4

TIPS
☞
Review the instructions and the illustrations on pages 9, 10 and 11 as well as pages 71, 72 and 73.
Line 1
MUST
☞
☞
Install one phone at a time and verify the installation of each set before moving on to the next phone.
☞
To verify, first lift the handset and press the line 1 key on any ONE set. You should hear a dial tone and the
line 1 light should be lit—leave the handset off hook. Next, move to each Venture set in the system. If the line
1 indicator light is lit on all sets, you have successfully installed your Venture system!
If you want to change the volume of the handset receiver permanently, set “14 Hndset deflt” on page 28 to on.
☞
be the same telephone number for all installed phones in the system.
☞
If your display shows
☞
If you experience problems, verify the installation (pages 8 through 15), check the option settings (beginning
on page 25), and then review the Troubleshooting section (pages 63 through 66).
Quick start card
☞
The answering device default is On. To turn off the answering device, see “31 Answr machne” on page 30.
☞
To hear all messages press
To hear a specific message press
☞
☞
If you greeting always plays twice, ensure that Option “32 Auto attend” on page 31 is set to off.
You hear...
Messages, voice tags, mailbox tags and memos.
Callers hear...
Greetings, general and mailbox specific.
Venture 3-Line Telephone with Answering Device
Key is locked
—
, see option “22 Lock lists” on page 29.
(Play) twice.
cc
cc
and use
[[[[
]]
or
]]
to display the message; press — (Play).
P0814617 02 CC1870 Rev 01
 Loading...