

Page 1

9617
Telephone &
Personal
Call Manager
Online
User Guide
List of Help Topics
Using this Guide
Troubleshooting
Warranty and Technical Support
Glossary
Index
P0875282 ❊ Issue 04 CC1908 Rev 01
1
Page 2

List of Help Topics
The 9617 telephone and Personal Call Manager
■
Welcome
■
Installing the M9617 telephone
■
Starting and Exiting Personal Call Manager
page 23
■
Becoming familiar with the telephone and soft-
ware
on page 3
on page 5
on page 27
on
Setup and customization
■
Storing your contacts
■
Looking up contacts
■
■
Making, answering and holding calls
on page 79
on page 137
on page 227
page 228
Advanced features
■
Keyboard shortcuts
■
on page 305
on page 398
Other applications
The Voice Mail Assistant
■
The Launch Pad application
■
on page 392
on
on page 394
2
Page 3

Welcome
Welcome to Aastra’s 9617 telephone with Personal Call
Manager.
The 9617 telephone is an advanced two-line telephone
designed to work with Personal Call Manager software.
Without the software, the 9617 telephone works on its
own. When Personal Call Manager is running, you can
control calls using either Personal Call Manager or the
telephone.
The 9617 telephone and Personal Call Manager are
designed to take full advantage of the latest services
offered by your local telephone company—Caller ID and
Call Waiting ID. (The names of these services may vary
from area to area.)
For more information, refer to
page 4.
Feature Highlights
on
3
Page 4

Feature Highlights
The 9617 telephone features:
■
a personal Directory that stores up to 100 contacts
a Callers List and a Redial List that record incoming
■
and outgoing calls
■
two-line capability
■
a three-line back-lit display that allows for features
like Call Waiting ID
■
advanced features such as Don’t Disturb and Autobusy Redial
Personal Call Manager features:
an Address Book which allows you to store the
■
names, addresses, and telephone numbers of an
unlimited number of contacts on your computer
the ability to export and import contact information
■
to and from text files
■
simplified multiline interaction so it is easier to manage multiple calls
■
visual and audible caller identification
■
advanced features such as call screening and pager
notification
For more information, refer to
Personal Call Manager work together
How the telephone and
on page 76
.
4
Page 5

Installing the 9617 telephone
The topics below take you step by step through the
installation of the telephone. Follow them in the order
that they appear.
■
Determining whether you have two telephone
lines on one telephone cord
■
Connecting the cords
■
Attaching the stand
■
Adjusting the telephone display
■
Inserting the number card and lens
Plugging in the telephone for the very first
■
on page 19
time
■
Changing the telephone display language
on page 7
on page 12
page 20
on page 6
on page 18
on page 17
on
Setting the date and time on the telephone
■
page 21
Telephone network services you should sub-
■
scribe to
■
Connecting a fax machine or modem to the
telephone
on page 22
on page 387.
on
5
Page 6

Determining whether you have two telephone lines on one telephone cord
The 9617 telephone is a two-line telephone. Before you
begin installing it, you need to know how your telephone
lines are set up (you may have two telephone lines on one
telephone cord). If you already know your setup, go to
the next step:
don’t, follow the steps below first.
To determine your telephone line setup:
1
Connect one end of your telephone cord to the 1
jack on the telephone and the other end to the wall
jack. Ensure nothing is plugged into the 2 jack on
the telephone.
2
If you have not already done so, connect the small end
of the power adaptor to the jack on the back of
the telephone, and plug the other end into a wall
plug.
3
Read the telephone display. (If it prompts you to select
a language, follow the directions on the telephone display to choose your language of choice.)
Connecting the cords
on page 7. If you
If only the time and date appear on the telephone display,
you have two telephone lines on the telephone cord.
If the following message appears on the telephone
display, you only have one line on that telephone cord:
Check line cord
Line 2
If you want to combine two lines onto one telephone
cord, contact your telephone company.
6
Page 7

Connecting the cords
Proceed with the following steps once you know whether
both telephone lines are on one telephone cord. If you are
not sure, refer to
telephone lines on one telephone cord
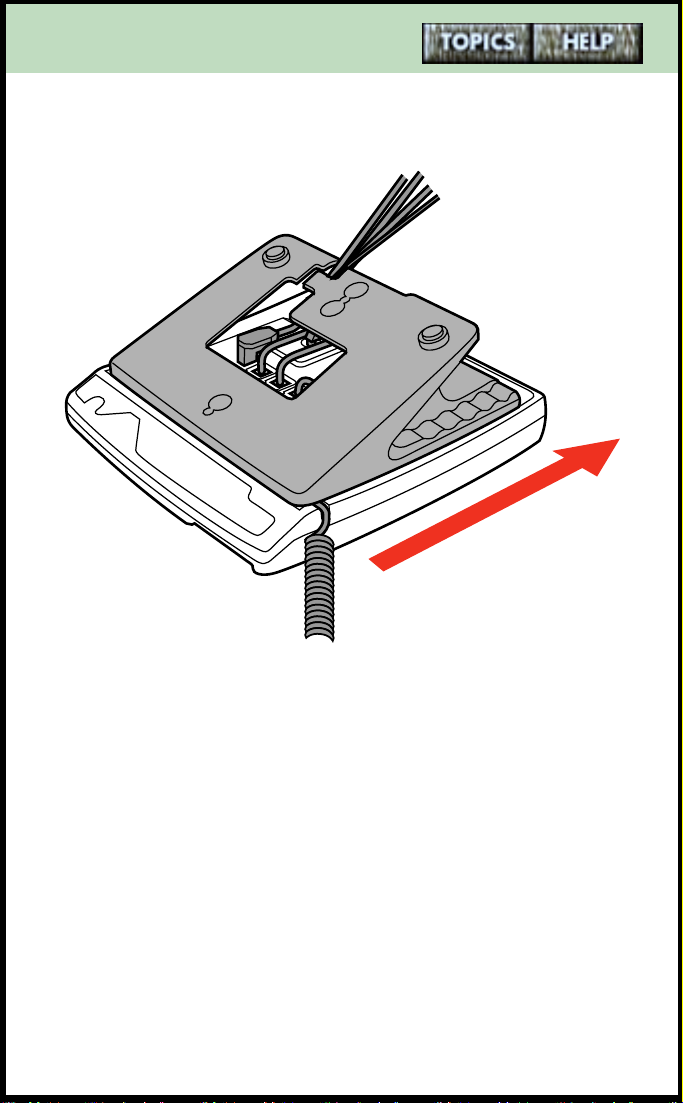
To connect the telephone cords:
1
Pass all cords except the coiled handset cord through
the hole in the base as shown below.
Determining whether you have two
on page 6.
Route the
handset cord
along this
groove.
continued...
7
Page 8
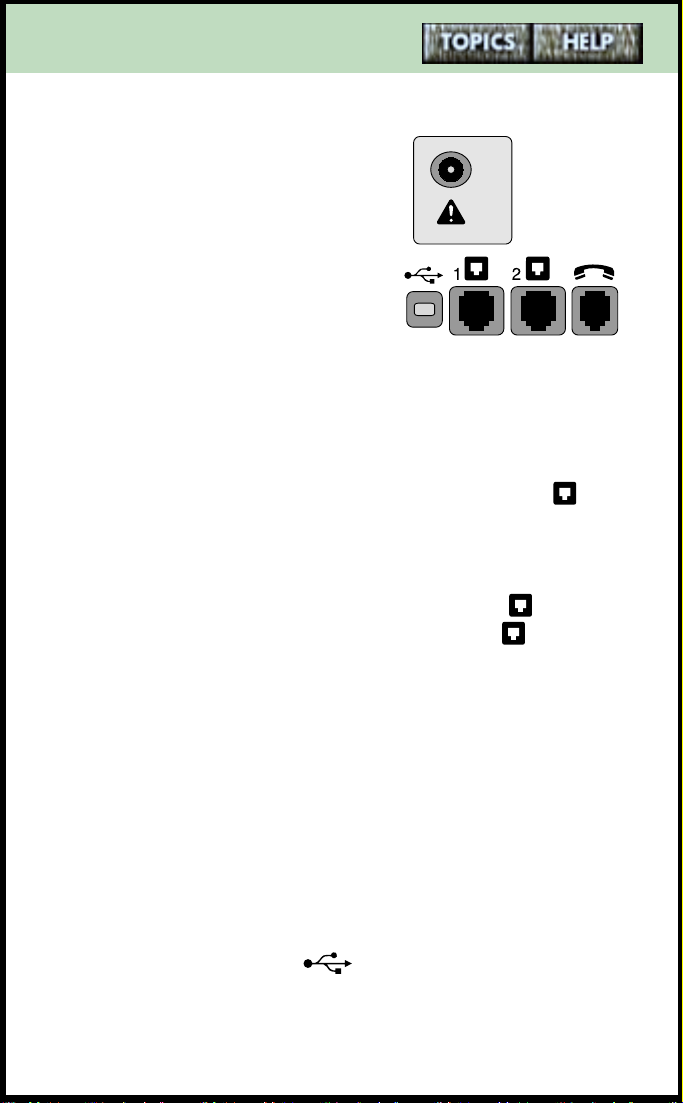
2 Connect the telephone cords.
Refer to the illustration of
the telephone jacks on the
right when following these
steps.
You may find it helpful to
refer to one of the following
illustrations:
of a one telephone-cord
setup
telephone-cord setup
If both telephone lines are on one telephone cord,
plug one end of the telephone cord into the 1 jack,
and plug the other end into the wall jack.
If your telephone lines are on separate telephone
cords, plug one telephone cord into the 1 jack, and
plug the other telephone cord into the 2 jack. Plug
the other ends of the telephone cords into your wall
jacks.
on page 10 or
An illustration
An illustration of a two
on page 11.
Attach one end of the coiled handset cord to the
handset and the other end to the handset jack. Then
route the handset cord along the groove leading off
the side of the telephone as shown in the illustration
on page 7.
3
Insert the hooked end of the thick USB cord into the
USB jack on the back of the telephone. Insert the
straight end into the jack at the back of your
computer.
continued...
8
Page 9

4
Connect the small end of the power adaptor to the
jack on the back of the telephone, and plug the other
end into a nearby electrical outlet.
To avoid potential electrical shock hazard or damage to
only
the telephone, use
equipment and installation procedures. Specifically, use
only 2 or 4 conductor modular teledapt plug/cords with
this product, and an AC transformer that is CSA/UL or
CSA-NRTL/C approved Class 2, Level C, rated.
Substitution of non-approved equipment will void the
Aastra Telecom warranty.
If you want to attach a fax machine or modem, refer to
Connecting a fax machine or modem to the
telephone
on page 387.
the manufacturer-supplied
When ready, go to the next step:
on page 12.
Attaching the stand
9
Page 10
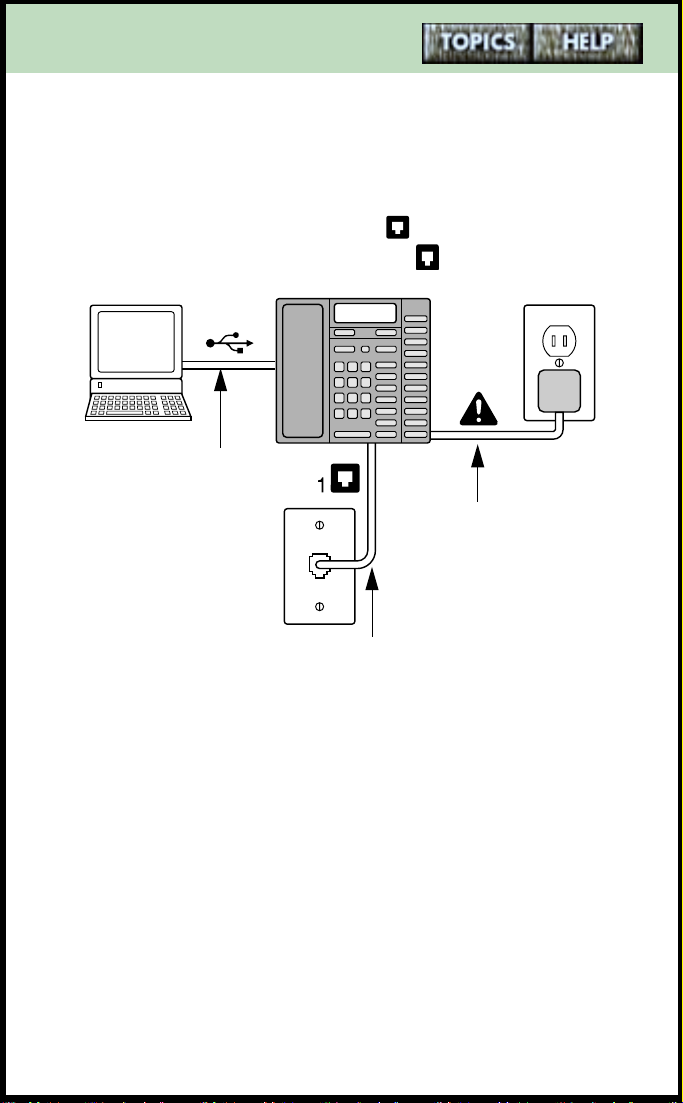
An illustration of a one telephone-cord setup
In a one telephone-cord setup, two telephone lines (each
with a separate telephone number) are combined into
one telephone cord. If this is your line setup, plug one end
of the telephone cord into the 1 jack, and plug the
other end into the wall jack. (The 2 jack is not used.)
The USB cord.
The power
adaptor.
This telephone cord
contains both of your
telephone lines.
Return to
Connect the telephone cords.
on page 8.
10
Page 11
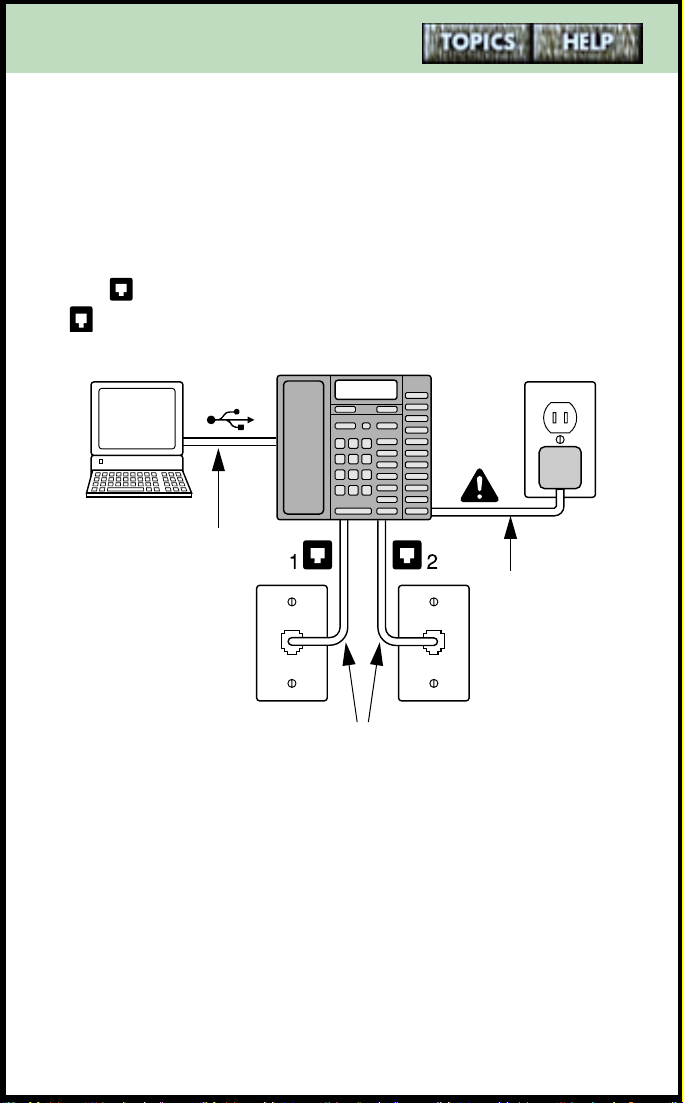
An illustration of a two telephone-cord
setup
In a two telephone-cord setup, each of your two
telephone lines (each with a separate telephone number)
is on a separate telephone cord. If you have this setup,
you need to use two jacks. Plug one telephone cord into
the 1 jack, and plug the other telephone cord into the
2 jack. Plug the other ends of the telephone cords into
your wall jacks.
The USB cord.
The power
adaptor.
Return to
Each telephone line is on a separate
telephone cord. For two lines, you
have two telephone cords.
Connect the telephone cords.
on page 8.
11
Page 12

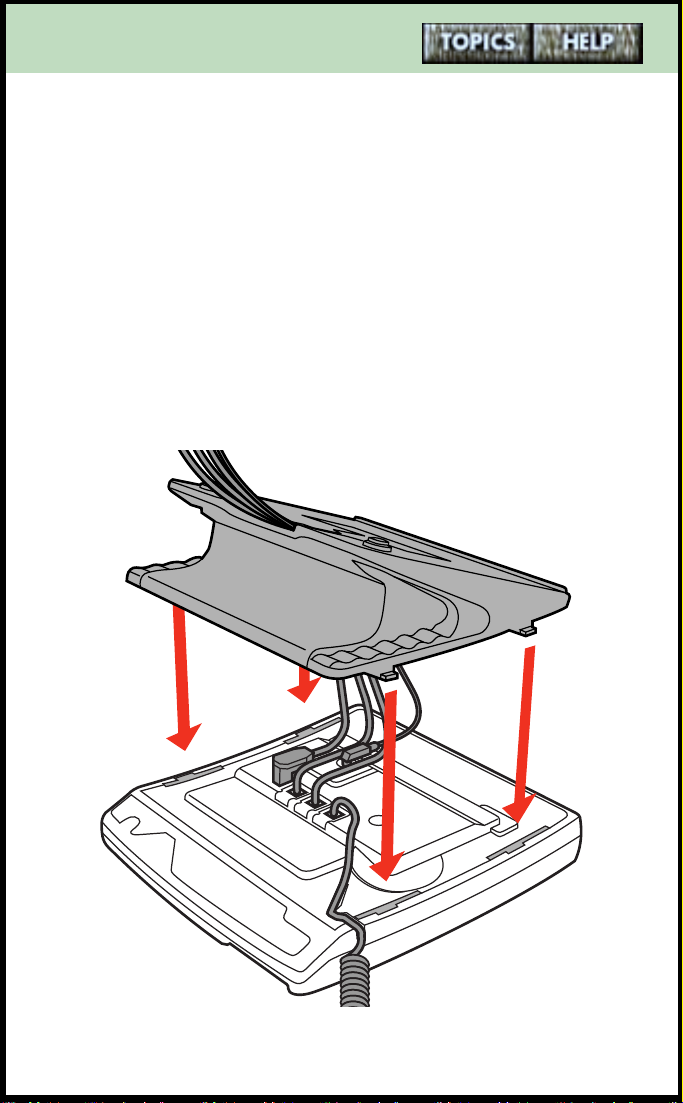
Attaching the stand
You have already routed the telephone cords through the
hole in the stand, and routed the coiled handset cord in
its groove. You can now attach the telephone stand.
How you attach the stand depends on whether you want
to keep the telephone on a desk or mount it on a wall.
When you have decided how you want to store the
telephone, choose one of the topics below.
■
Desk-mounting the telephone
■
Wall-mounting the telephone
on page 13
on page 15
12
Page 13
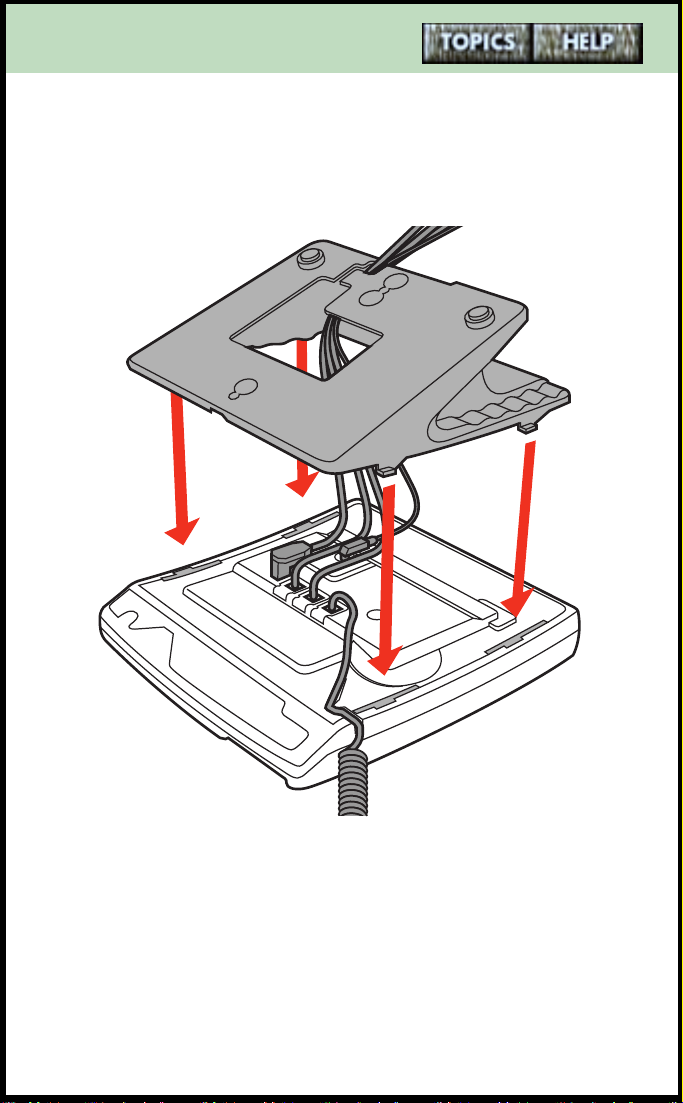
Desk-mounting the telephone
To mount the telephone on the desk:
1
Lower the stand as shown below into the slots on the
back of the telephone.
continued...
13
Page 14
2 Slide the stand in the direction shown below until it
clicks into the locked position.
When ready, go to the next step: Inserting the number
card and lens on page 17.
14
Page 15
Wall-mounting the telephone
When wall-mounting the telephone, it is recommended
that you use a wall-mounting plate which is available
through your telephone company or at a local retailer.
You may also find it easier to wall-mount the telephone if
you purchase one or two short 20 cm (8”) telephone
cords and use them in place of the long telephone
cord(s).
To wall-mount the telephone:
1 Lower the stand into the slots on the back of the tele-
phone as shown below by the arrows.
15
Page 16
continued...
2 Slide the stand in the direction shown below until it
clicks into the locked position.
3 Line up the keys on the
wall mounting plate with
the key holes on the base
of the 9617 telephone as
shown. Push the phone
onto the wall mounting
plate, and then push
down to secure the telephone into place. Tuck
the excess cord inside the stand itself.
When ready, go to the next step: Inserting the number
card and lens on page 17.
16
Page 17

Inserting the number card and lens
The 9617 telephone comes with a small paper number
card and a clear plastic number card lens. This card allows
telephone users to know what telephone number they
are calling from.
To insert the number card and lens:
1 Write your telephone number on the paper number
card.
2 Place the number card into the slot underneath the
handset.
3 Bend the clear plastic lens and place it on top of the
number card in the slot.
When ready, go to the next step: Adjusting the
telephone display on page 18.
17
Page 18
Adjusting the telephone display
When you have finished installing the telephone, adjust
the angle of the telephone display to your liking.
∆ to adjust the contrast. The contrast
Press
feature allows you to adjust the brightness of the display.
When ready, go to the next step: Plugging in the
telephone for the very first time on page 19.
18
Page 19

Plugging in the telephone for the very first
time
The very first time you plug-in your 9617 telephone, a
message appears asking you to make a language
selection. Simply follow the directions on the telephone
display.
Your telephone also runs a test to ensure that the line
cords are connected properly. If the test fails, the message
Check line cord appears on the telephone display, and
the line that is not connected is identified. Make sure that
all connections are fastened securely. For more
information, refer to Clearing the Check line cord
message on page 48.
You can now change the display language or set the date
and time. For more information, refer to the following
topics:
■ Changing the telephone display language on
page 20
■ Setting the date and time on the telephone on
page 21
19
Page 20

Changing the telephone display language
You may wish to change the language of the messages
and prompts that appear on the display of your 9617
telephone.
To change the display language on the telephone:
1 Press the Options key. (To see the location of the
Options key, refer to The M9617 telephone keys
and lights on page 29.)
2 Enter your Options password if required. Refer to Set-
ting the Options password using the telephone
on page 87 for more information.
3 Use
ª to scroll to option number 1 or press
‚ ⁄.
4 Press •. The current language selection is shown by a
checkmark.
5 Press
6 Press • to select the language that appears on the
7 Press
Note: You cannot change the display language for the
Personal Call Manager software.
– until you see the desired language.
display.
®.
20
Page 21

Setting the date and time on the telephone
If you subscribe to a Caller ID service from your telephone
company, the date and time displayed on the 9617
telephone are set automatically when you receive your
first telephone call.
Only if you do not subscribe to a Caller ID service must
you set the date and time by following the steps below.
To manually set the date and time:
1 Press the Options key. (To see the location of the
Options key, refer to The M9617 telephone keys
and lights on page 29.)
2 Enter your Options password if required. Refer to Set-
ting the Options password using the telephone
on page 87 for more information.
3 Use
ª to scroll to option number 2 or press
‚ ¤.
4 Press •.
5 Follow the instructions on the telephone display. Press
‘ to backspace and delete numbers, and
ß to save each entry.
press
6 Press ®.
Note: To revert back to the automatic date and time
setting after you have manually set the date and time,
unplug the power adapter and then plug it back in again.
The next telephone call you receive will then set the date
and time automatically (if you subscribe to a Caller ID
service).
21
Page 22

Telephone network services you should subscribe to
The 9617 telephone and Personal Call Manager are
designed to take advantage of many telephone network
services. The recommended services are listed below. To
subscribe to these services, contact your local telephone
company.
Note: The names of these services may vary from area to
area. Contact your telephone company for more
information.
Caller Identification (Caller ID)
When you subscribe to this service, the telephone
company sends you the name and number of people who
call you. For more information, refer to Answering a call
using your telephone on page 264 and Caller ID and
Personal Call Manager on page 272.
Call Waiting Identification (Call Waiting ID)
This service is similar to Caller ID, except it applies to Call
Waiting callers. When you subscribe to this service, the
telephone company sends you the name and number of
Call Waiting callers. For more information, refer to
Answering a Call Waiting call using the telephone
on page 266.
Three Way Calling
When you subscribe to this service, you can conference
two callers on one line of the 9617 telephone. This
feature is useful for making conference calls. For more
information, refer to Making a Three Way Call on
page 297.
22
Page 23

Starting and Exiting Personal Call Manager
The following sections give an overview of starting and
exiting Personal Call Manager.
■ The very first time you start Personal Call Man-
ager on page 24
■ Starting Personal Call Manager on page 25
■ Exiting Personal Call Manager on page 26
Once you have launched the application, you need to set
up Personal Call Manager. Refer to Setting up Personal
Call Manager on page 123 for more information.
23
Page 24

The very first time you start Personal Call
Manager
To start Personal Call Manager:
1 If you see a shortcut for Personal Call
Manager (shown on the right) on your
desktop, double-click on it.
OR
1 Click on the Start button and point to
the Programs menu item. A submenu appears.
2 Point to the Personal Call Manager menu item. A
submenu appears.
3 Click on the Personal Call Manager menu item.
The very first time you launch Personal Call Manger, the
Choose a TAPI Line dialog box appears. For information
on choosing a TAPI line, refer to Specifying the TAPI
line used by Personal Call Manager on page 124.
When you have chosen a TAPI line, the Dialing
Properties dialog box appears. Use this dialog box to
specify the dialing properties for the location you are
dialing from (refer to Specifying dialing properties for
the location you are dialing from on page 125).
For more information, refer to the following topics:
■ Starting Personal Call Manager on page 25
■ Getting to know Personal Call Manager on
page 53
■ Personal Call Manager preferences on page 127
24
Page 25

Starting Personal Call Manager
To start Personal Call Manager:
1 If you see a shortcut (shown on the
right) for Personal Call Manager on
your desktop, double-click on it.
OR
1 Click on the Start button and point to
the Programs menu item. A submenu appears.
2 Point to the Personal Call Manager menu item. A
submenu appears.
3 Click on Personal Call Manager menu item.
When the application launches, the Personal Call
Manager icon appears on the task tray and task bar, and,
by default, the Personal Call Manager main window
appears.
Synchronization on startup
Each time you start Personal Call Manager, the software
synchronizes with the information in the telephone. For
more information, refer to How the telephone and
Personal Call Manager work together on page 76 and
Changing the Startup synchronization setting on
page 134.
25
Page 26
Exiting Personal Call Manager
You can exit Personal Call Manager from the task tray or
the main window.
To exit Personal Call Manager using the task tray:
1 Right-click on the Personal Call Manager icon in the
task tray.
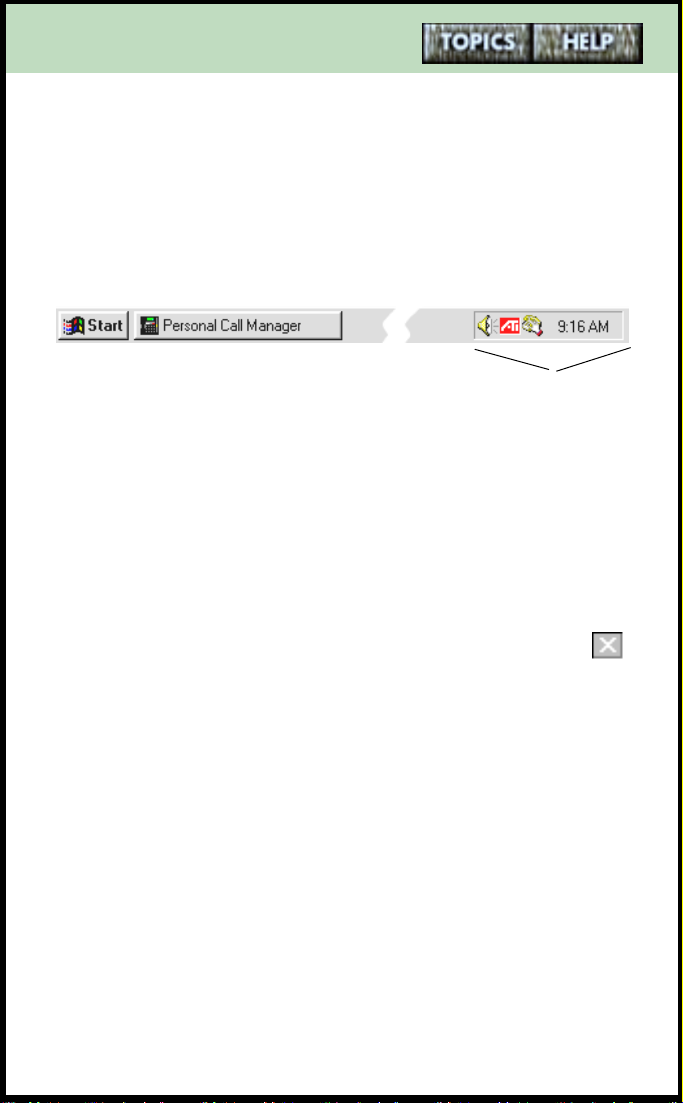
The task tray
2 Click on the Exit menu item.
To exit Personal Call Manager using the main win-
dow:
1 Click on the File menu.
2 Click on the Exit menu item.
You can also exit Personal Call Manager by clicking
on the close window button (shown on the right)
in the top right hand corner of the Personal Call
Manager main window or by typing ALT+F4 on the
keyboard.
26
Page 27

Becoming familiar with the telephone and software
The first two sections listed below help you get
acquainted with the telephone and Personal Call
Manager. Once you are familiar with their features, read
the third section to learn more about how they enhance
each other.
Refer to the following topics:
■ Getting to know the M9617 telephone on
page 28
■ Getting to know Personal Call Manager on
page 53
■ How the telephone and Personal Call Manager
work together on page 76
27
Page 28

Getting to know the 9617 telephone
The 9617 telephone has a three-line backlit display and
several indicator lights.
For more information, refer to the following topics:
■ The M9617 telephone keys and lights on
page 29
■ Telephone key descriptions on page 30
■ Telephone display and light messages on
page 33
■ Viewing multiple display and light messages on
page 42
■ The Callers List on page 43
■ Voice Mail notification on page 46
■ Controlling the volume of your telephone on
page 49
■ The telephone Directory on page 139
28
Page 29

The 9617 telephone keys and lights
Adjustable display
Set indicator light
Left/right arrows
Sliding panel
Down/up arrows
Options key
Hold
Handsfree/Mute
indicator light
Line indicator lights
6 memory keys
Line 2
Line 1
Handsfree
Mute
Rls
Redial
Dial
Conference
Link
Contrast
Directory
Callers
Save
Delete
For descriptions of how these keys work, refer to
Telephone key descriptions on page 30.
29
Page 30

Telephone key descriptions
∆ Selects one of eight display contrast
settings.
¢ Stores and accesses the names and
telephone numbers of up to 100 contacts.
≈ Accesses a list of the last 100 calls you have
received, starting with new calls.
ß Stores numbers and names in the Directory
and in memory keys.
∑ Erases memory keys, deletes the Redial List,
and deletes items in the Directory and
Callers List.
ª Moves up and down through any list such
as the Options List, Directory , Callers List, or
Redial List.
“ Backspaces and erases when you are
predialing and when you are adding or
changing numbers and names in the
Options List, Directory, or memory keys.
continued...
30
Page 31

‘ Adds a space when you are entering names
in the Directory or in memory keys, and
allows you to view multiple status
messages on the telephone display.
˙ Puts the call on hold and inserts a pause
between digits you are storing in the
Directory or memory keys.
® Releases (hangs up) a call and exits the
Options List, Callers List, Redial List or
Directory.
˚ Accesses network features such as Call
Waiting. (The Link key is also referred to as
the Flash key.)
µ Accesses a list of the last ten numbers you
dialed.
∂ Dials the telephone number on the
telephone display on your prime line.
ç Joins two calls to create a conference call.
¬ Selects Line 1 or Line 2 and turns on
Handsfree mode if you have not picked up
the handset. It also dials the telephone
number on the telephone display.
continued...
31
Page 32

© Activates the speaker and microphone so
you can listen and talk without using the
handset. Also mutes the microphone so
that your caller cannot hear you.
√ Adjusts the receiver, speaker, and ringer
volume.
∫ Memory keys store numbers, names, and
features. You label these keys with the
name, number or feature you store in them
by using the paper key cap label sheet
provided.
† The unlabeled Options key is hidden under
the sliding panel. This key accesses the
Options List, which contains options that
customize the features of your telephone.
Refer to Using the Options List to
customize the M9617 telephone on
page 81 for more details.
32
Page 33

Telephone display and light messages
The 9617 has a backlit three-line display that uses icons
and messages for your call information.
For more information, refer to the following topics:
■ General telephone display messages on page 34
■ Light messages - what they mean on page 37
■ Extension in Use notification on the telephone
on page 41
■ Viewing multiple display and light messages on
page 42
■ The Callers List on page 43
■ Voice Mail notification on page 46
■ The Clear Message Waiting option on page 47
■ Clearing the Check line cord message on
page 48
33
Page 34

General telephone display messages
The table below shows some common display messages.
Common General Display Messages (page 1 of 3)
Message What it means
->
Check line cord
Line 1 or Line 2
Directory empty
Use SAVE to add
Directory full
No changes made
Extension in use
Feature ON
There is more information to be
shown on the telephone display.
‘ to see it.
Press
The telephone line indicated is not
connected properly.
The Directory remains empty until
you save numbers and names in it.
The Directory has a 100 entry limit.
If you want to add another item,
first delete an item you no longer
use to make room for the new one.
Someone on an extension telephone
is using the line you have selected.
The FeatureLight On key has been
pressed and the code dialed out. To
turn off the feature and the light,
press the FeatureLight Off key and
lift the handset or press
©,
∂, or ¬. See
Using feature keys for network
telephone services on page 356.
34
Page 35

Common General Display Messages (page 2 of 3)
Message What it means
<Forwarded Call
Key is locked
Make calls first
or
Make second call
Message Waiting
Line x
Conference held
Press Conference
The incoming call is forwarded from
another telephone.
The memory key is factoryprogrammed and cannot be erased
or reprogrammed. Program a
different memory key.
The caller is calling from outside
your local area (i.e., long distance).
You must make two calls before you
press ç.
Your Voice Mail service has a
message for you. To subscribe to the
Voice Mail service, contact your telephone company.
A conference call is on hold.
This appears when you try to take a
held conference call off hold by
Press line key
pressing
˙. Press
ç to take the conference
calls off hold.
This appears when you press
˙ and your call is already
on hold. Press
the held call.
¬ to retrieve
35
Page 36

Common General Display Messages (page 3 of 3)
Message What it means
Private number
or
Private name
Redial List is
empty
Ringer is OFF
Line x
Unknown name or
Unknown number
>…xxxxxxxxxxxx
or
…xxxxxxxxxxxxx
XX New Callers
The caller has requested that the
telephone company not deliver his
or her name or telephone number.
You pressed µ but there
are no numbers in the Redial List to
dial.
The ringer volume is turned off for
that line. To turn it on, press the
volume bar.
The name or number is unavailable.
The telephone number is longer
than the telephone display.
New callers have been added to the
Callers List since you last checked it.
Indicates an incoming call.
Indicates that the phone is off hook.
Indicates an incoming Call Waiting
call.
36
Page 37

Light messages - what they mean
The 9617 telephone set indicator light turns on to alert
you when the telephone rings, a feature is on, or when
someone on an extension telephone is using the same
line as you. Indicator lights beside the line keys and
© key show you their status (e.g., whether they
are being used).
For more information, refer to the following topics:
■ Set indicator light messages on page 38
■ Line indicator light messages on page 39
■ Handsfree/Mute indicator light messages on
page 40
37
Page 38

Set indicator light messages
To see the location of the set indicator light, refer to The
M9617 telephone keys and lights on page 29.
Set indicator
light status
The light is on. Someone on an extension telephone
is using one of your telephone lines.
Refer to Extension in Use notifica-
tion on the telephone on page 41
OR
You have pressed a FeatureLight ON
key and the feature is active. Refer
to Using FeatureLight keys on
page 363
The light is
flashing slowly.
The light is
flashing quickly.
You have a have a new Voice Mail
message. Check your Voice Mail. To
receive voice messages, you must
subscribe to Voice Mail services fr om
your telephone company.
You have an incoming call. Refer to
Answering calls on page 263.
Telephone status
38
Page 39

Line indicator light messages
To see the location of the line indicator lights, refer to The
M9617 telephone keys and lights on page 29.
Line indicator light
status
The light is on. The line is in use.
The light is flashing. The line is on hold.
The light is flashing
very quickly.
An incoming call is coming in
on that line.
Line status
39
Page 40

Handsfree/Mute indicator light messages
To see the location of the Handsfree/Mute indicator light,
refer to The M9617 telephone keys and lights on
page 29.
Handsfree/Mute
indicator light
status
The light is on. The telephone is in Handsfree
Handsfree/Mute status
mode.
The light is flashing
quickly.
For more information on Handsfree mode and muted
calls, refer to Handsfree calls on page 261 and Muting
a Handsfree call on page 262.
The Handsfree/Mute microphone is muted so your caller
cannot hear you.
40
Page 41

Extension in Use notification on the
telephone
Line indicator lights let you know whether a line is
available for you to use. When another extension is using
a line, the line indicator light for that line (located beside
the line key) turns on. To see the location of the Line
indicator lights, refer to The M9617 telephone keys
and lights on page 29.
When you are on a call and someone on an extension
telephone tries to use your line, the set indicator light (the
light above the
remains on and the message Extension in use appears
until the person at the other extension hangs up.
Extension in Use and the Fax switch feature
˚ key) turns on. The light
When you lift the handset or press
telephone automatically selects the prime line (for
information on the prime line feature, see Changing the
prime line on page 240).
If your prime line is Line 2 and a fax switch peripheral
device (e.g,. a fax machine) is using that line, Line 2 is not
selected when you pick up the handset. Instead, the
message Extension in use / Press line key appears on
the telephone display.
Then, if you press
make a call. If you press
and may interrupt the call to the peripheral.
For more information, refer to Extension in Use
notification in Personal Call Manager on page 73.
ø, you access Line 1 and can
π, you access Line 2
©, the 9617
41
Page 42

Viewing multiple display and light messages
There are several messages that can be active at any time,
such as date and time, X New Callers, Feature ON,
Message Waiting, and Ringer is OFF. When more than
one of these messages is active, the telephone display
shows the most recent message and an arrow beside it
(e.g., 1 New Caller ‚).
You can view the other messages by pressing
Each time you press
shows the next active message (and, if applicable, the set
indicator light associated with the message).
If you are on Line 1 and a call comes in on Line 2, an
arrow (->) appears on the screen. To see the Caller ID
information, press
‘, the telephone display
‘.
‘.
42
Page 43

The Callers List
The 9617 telephone Callers List logs your incoming calls.
It can hold up to 100 calls. For each call, it logs the caller’s
name and number (if available), the time of the call and
whether the call was long distance.
To view the Callers List, press
≈.
A sample Callers List entry is shown below.
The item number
in the Callers List
The call was
answered
Indicates a new call
You have returned
the call
01 Steve Gervais
555-1234 (403)
AUG 13 12:45
The date and time
of the call
The name of the caller
The caller’s number
The area code 403 has
been stripped off and
placed in brackets
PM
The call was long distance
after the number.
You must subscribe to Caller ID services from your local
telephone company to receive caller information such as a
name or number.
Note that even if you subscribe to Caller ID, you may
sometimes receive “Private name”, “Unknown name”,
“Private number” or “Unknown number” instead of the
caller’s actual name or number.
For more information, refer to Callers List telephone
display messages on page 44.
43
Page 44

Callers List telephone display messages
Common Callers List Display Messages (page 1 of 2)
Message What it means
Callers List is
empty
Calls bumped=xx
<Forwarded
No number
Private number
or
Private name
The Callers List has not logged any
calls, or you’ve deleted all the calls in
the Callers List. (Your telephone
does not record incoming calls until
you subscribe to the Caller ID
service.)
A number (xx) of old calls have been
automatically removed from the
Callers List to make room for new
calls. The Callers List limit is 100
calls.
The call was forwarded from
another location.
The call was long distance.
You are trying to call someone in
your Callers List and the number is
“Unknown” or “Private.”
The caller has requested that the
telephone company not deliver his
or her name or telephone number.
Unknown name or
Unknown number
The name or number is unavailable
from the telephone company.
44
Page 45

Common Callers List Display Messages (page 2 of 2)
Message What it means
01√Unknown Name
555-5555
NN
NN
MAR04 3:30pm
…xxxxxxxxxxxxx
The checkmark (√) means that you
have returned the call from the
Callers List.
N means a new call.
An ellipse “…“ followed by x’s means
the number is longer than the telephone display.
Indicates an unanswered call in the
Callers List.
Indicates an answered call in the
Callers List.
Indicates a Call Waiting call in the
Callers List.
45
Page 46

Voice Mail notification
When you have a Voice Mail message, the 9617
telephone’s red indicator light (located above the
˚ key) flashes slowly and the telephone display
shows:
Message Waiting
Line x
or
Message Waiting
Line 1 Line 2
In Personal Call Manager, the message waiting
icon (shown on the right) flashes in the task tray
when you have a Voice Mail message.
Tip: Voice Mail Assistant is an application, installed with
Personal Call Manager, which allows you to access voice
mail from your computer. To start this program, right-click
on the flashing Message Waiting icon in the task tray and
then click on the Start VoiceMailAssist menu item. For
more information, refer to The Voice Mail Assistant on
page 392.
Once you have listened to your message(s), the indicator
light stops flashing and the Message Waiting display
message disappears. If the message does not disappear
and the light continues flashing, you can use the Clear
Message Waiting option to remove them. Refer to The
Clear Message Waiting option on page 47 for more
information.
Contact your local telephone company to find out how
you can subscribe to Voice Mail services.
46
Page 47

The Clear Message Waiting option
There may be times when Message Waiting appears on
the telephone display and the set indicator light continues
flashing when there are no new Voice Mail messages.
If so, you can turn the display message and light off using
the Clear Message Waiting option.
To clear message waiting:
1 Press the Options key.
2 Enter your Options password if required. Refer to Set-
ting the Options password using the telephone
on page 87 for more information.
3 Use
ª to scroll to option number 6 or press
‚ fl.
4 Press • to clear message waiting.
5 Press ¬ for the line with the Voice Mail ser-
vice.
If required, repeat steps 4 and 5 for the other line.
Note: This option only applies if you subscribe to Voice
Mail services from your telephone company.
47
Page 48

Clearing the Check line cord message
There may be times when Check line cord appears on
the telephone display and you want to clear this message.
For example, you may have only one line cord connected.
You can remove the Check line cord message from the
telephone display by turning off the Check Line Cord
option for the line that is not connected.
To enable or disable the check line cord message:
1 Press the Options key.
2 Enter your Options password if required. Refer to Set-
ting the Options password using the telephone
on page 87 for more information.
3 Use
ª to scroll to option number 13 or press
⁄ ‹.
4 Press •.
5 Press ¬ of the line the Check line cord mes-
sage applies to.
6 Press
7 Press ®.
• to enable the Check line cord message. Press
to disable the Check line cord message.
£
48
Page 49

Controlling the volume of your telephone
Y ou can contr ol the volume of the ringer, handset speaker
and Handsfree speaker. Y ou can also choose the ring tone
for the 9617 telephone ringer.
For more information, refer to the following topics:
■ Setting the ringer volume on page 50
■ Choosing the ring tone for the ringer on
page 51
■ The handset and Handsfree speaker volume on
page 52
49
Page 50

Setting the ringer volume
To adjust the ringer when the telephone is idle:
1 Press one side of √.
2 Press ¬ for the line you want to adjust the
ringer for.
3 Press the right side of
Continue pressing it until you reach the desired ring
volume. (Pressing the left side decreases the volume
and pressing the right side increases the volume.)
4 Press
To adjust the ringer volume when the telephone is
ringing on one line:
1 Press the left or right side of the volume bar
ß.
√. The ringer sounds.
√ to adjust the ringer volume for the ring-
ing line.
To turn the ringer off:
1 Ensure the phone is not off the hook (i.e., ensure the
handset is resting in the cradle and the Handsfree indicator light is off).
2 Press
3 Press ¬ for the line you want to adjust the
4 Press the left side of
√.
ringer for.
√. Continue pressing
the left hand side until the ringer is off.
5 Press
ß. Ringer is OFF and the line affected
appear on the telephone display.
50
Page 51

Choosing the ring tone for the ringer
You can choose one of four different ring tones for each
line independently.
To select the ring tone:
1 Make sure that the ringer is turned on (see Setting
the ringer volume on page 50).
2 Press the Options key.
3 Enter your Options password if required. Refer to Set-
ting the Options password using the telephone
on page 87 for more information.
4 Use
ª to scroll to option number 4 or press
‚ ›.
5 Press •.
6 Press ¬ for the line you want to set the ring
tone for. The current ring tone sounds.
7 Use
8 Press ß when you are satisfied with ring tone
9 Press
– until you hear the ring tone you want
to select. When selecting the ring tone, press the left
or right side of
and ringer volume. Repeat steps 5-8 for the other line
if desired.
√ to adjust the volume.
®.
51
Page 52

The handset and Handsfree speaker volume
The handset volume
To adjust the handset volume:
1 While you are on a call, press the left or right side of
the volume bar
returns to normal after you have completed your call.
The speaker volume
To adjust the speaker volume:
1 While you are listening to the Handsfree speaker, you
can press the left or right side of the volume bar
√. The handset volume
√. The speaker volume remains at the vol-
ume level you last selected until the next time you
change it.
52
Page 53

Getting to know Personal Call Manager
Personal Call Manager provides an easy-to-use computer
interface for the 9617 telephone.
For more information, refer to the following topics:
■ Startup icons on page 54
■ The task tray icon on page 55
■ The task tray menu on page 56
■ The Main Window on page 58
53
Page 54

Startup icons
When Personal Call Manager starts up, two icons are
added to the screen: the taskbar icon and the task tray
icon. These two icons have distinctly different functions.
Use the taskbar icon to open the Personal Call Manager
main window when it is minimized or hidden behind
other application windows.
The task tray icon provides quick access to Personal Call
Manager functions when you are using other programs.
The diagram below shows where each icon is found.
The task bar icon
The task tray
For more information, refer to The task tray icon on
page 55.
54
Page 55

The task tray icon
The Personal Call Manager icon (shown on the
right) appears in the task tray. This task tray icon
provides quick access to Personal Call Manager
functions when the main window is closed.
If you turn on the Don’t Disturb feature, this icon changes
(refer to Don’t Disturb and Personal Call Manager on
page 327).
Note: If you want to use the task tray icon when you are
in Personal Call Manager, first click outside the Personal
Call Manager window to deselect Personal Call Manager.
The task tray
When you let the mouse pointer hover over the Personal
Call Manager icon, the number of current calls appears.
When you right-click on the Personal Call Manager icon,
a menu appears that allows you to:
■ set Personal Call Manager preferences;
■ start the Voice Mail Assistant application
■ open the Personal Call Manager main window; or
■ exit from Personal Call Manager.
When you single click on the Personal Call Manager icon,
the task tray menu appears. From the task tray menu you
can perform most basic call functions.
For more information, refer to The task tray menu on
page 56.
55
Page 56

The task tray menu
Y ou can use the task tray menu to perform most basic call
functions, such as making and answering calls, placing
calls on hold and creating conference calls with two other
callers (a three-call conference).
The Personal Call Manager task tray menu is divided into
two main sections, the upper and the lower.
The upper portion of the menu contains the current calls
and their status icons. These icons are explained below.
(These icons also appear in the Calls menu.) If there are
no calls, the upper portion of the menu does not appear.
Icons in the Task Tray or Calls Menu (page 1 of 2)
Icon Call Status Description
Active Call Appears beside the call you are
currently on.
Held Call Appears beside calls that are
on hold.
Conference
Call
Held
Conference
Appears beside the calls that
are part of a conference call.
Appears beside calls that are
part of a conference that is on
hold.
56
Page 57

Icons in the Task Tray or Calls Menu (page 2 of 2)
Icon Call Status Description
Ringing Appears beside calls that you
have not answered.
The lower portion of the menu contains the following
features:
■ Callers List – a list of the last ten calls you received
that you can use to return calls (see The Callers List
in Personal Call Manager on page 353)
■ Redial List – a list of the last ten telephone numbers
you dialed that you can use to redial telephone numbers (see The Redial List in Personal Call Manager
on page 354)
■ Quick Dials – a list of telephone numbers stored in
the Quick Dials folder that you can use to make calls
(see The Quick Dials folder on page 160)
■ Manual Dial – a command that lets you dial a tele-
phone number using the keyboard (see Dialing
using the Dial dialog box on page 250)
■ DND – a command that turns the Don’t Disturb fea-
ture on or off (see Don’ t Disturb and Personal Call
Manager on page 327)
57
Page 58

The Main Window
The main window allows you access to all of Personal Call
Manager’s features.
Opening the main window
When you start Personal Call Manager, the main window
appears. By default, the window remains open.
To maximize the main window (if it is closed):
■ Click on the Personal Call Manager icon in the task-
bar.
OR
■ Right-click on the Personal Call Manager icon in the
task tray and then click on the Open menu item.
If you do not want the main window to remain open, you
can set the Startup Option so that the window minimizes
to an icon on the task bar when you launch Personal Call
Manager. (See The Startup Option on page 130.)
For more information, refer to the following topics:
■ The parts of the main window on page 60
■ Closing the main window on page 59
58
Page 59

Closing the main window
When you close the main window, it minimizes to an icon
on the taskbar as shown below.
To close the main window (if it is open):
■ Click on the minimize button (shown on the
right) in the top right corner of the window.
When you close the main window, you can still
control your telephone calls from the Personal Call
Manager icon in the task tray.
For more information, refer to the following topics:
■ The task tray icon on page 55
■ The task tray menu on page 56
■ Exiting Personal Call Manager on page 26
59
Page 60

The parts of the main window
Menu bar
Toolbar
Address
book
Current
calls
Status
bar
Tree View
Calls box
List View
The Personal Call Manager main window is made up of
the following:
■ the Menu bar
■ the Toolbar
Conference box
■ the The Address Book section
■ the The Current Calls section
■ the Status bar
All of these components, except the Menu bar, can be
turned on or off to suit your needs. You can resize any of
the sections in the main window by dragging their
borders. You can also move the toolbar by dragging it to
a new position.
60
Page 61

Menu bar
You use the menus on the menu bar to access all of the
features available in Personal Call Manager. The menu bar
is always visible on the main window.
Menu Description
File Lets you add new contacts and folders, set
properties for contacts, import and export
contact information from and to text files
and exit Personal Call Manager.
Edit Lets you cut, copy, paste and delete contacts
and folders; lets you undo the last action you
have performed.
View Lets you choose how contacts are displayed;
lets you show or hide the toolbar and status
bar.
Calls Lets you make and answer calls, access call
lists and turn Do Not Disturb on or off. This
menu is identical to the task tray menu. See
The task tray menu on page 56.
Tools Lets you set dialing properties and prefer-
ences, configure a TAPI line and find
contacts.
9617
Options
Help Lets you view help topics and the software
Lets you access the Quick Dial Manager
and Memory Keys dialog boxes, and hide
the 9617 Options part of the toolbar.
version you are using.
61
Page 62

Toolbar
The Personal Call Manager toolbar has two sections, the
main toolbar and the 9617 Options toolbar.
These toolbar sections contain buttons that provide quick
and easy access to Personal Call Manager functions.
To hide or display both toolbar(s):
1 Click on the View menu.
2 Click on the Toolbar menu item. The combined tool-
bar either appears or disappears.
When the toolbar is visible, a checkmark (✔) appears
beside the Toolbar menu item in the View menu.
To show or hide the 9617 Options toolbar:
1 Click on the 9617 Options menu.
2 Click on the 9617 Toolbar menu item. The 9617 tool-
bar either appears or disappears. Choose this menu
item again to toggle between these settings.
For more information, refer to Toolbar button
descriptions on page 63.
62
Page 63

Toolbar button descriptions
The toolbar buttons provide quick access to commonly
used features. To access or activate a feature, simply click
on the appropriate toolbar button. The toolbar buttons
are described below.
Toolbar Buttons (page 1 of 4)
Button Feature Description
Up One
Level
New
Folder
New
Contact
Cut Copies the selected folder or
Copy Copies the selected folder or
Exits from the current folder
and moves one level up in the
Address Book.
Creates a new folder in the
Address Book.
Creates a new contact in the
Address Book, and opens the
New Contact Address Prop-
erties dialog box.
contact into the Clipboard and
then deletes it.
contact into the Clipboard.
63
Page 64

Toolbar Buttons (page 2 of 4)
Button Feature Description
Paste Pastes the folder or contact
you copied to the clipboard
into the selected folder. (The
clipboard still retains a copy
even after you have used this
command, so you can paste a
copied item more than once.)
Properties
(This
button is
black.)
Large
Icons
Small
Icons
List Displays the folders and
Displays the Address Proper-
ties dialog box for the selected
contact or the Properties
dialog box for the selected
folder.
Displays the folders and
contacts in the Address Book
as large icons.
Displays the folders and
contacts in the Address Book
as small icons.
contacts in the Address Book
as small icons organized in
vertical columns.
64
Page 65

Toolbar Buttons (page 3 of 4)
Button Feature Description
Report Displays the folders and
contacts in the Address Book
in a report view format. In this
format the icon, first name,
last name, telephone numbers,
and email information for the
contact are shown.
Find
Person
Calls Log Displays the Calls Log
Configure
Telephony
Device
Help Displays the application Help
Memory
Key
Displays the Find dialog box.
You can use this dialog box to
find a contact within the
Address Book.
window. This window allows
you to view the log of
incoming and outgoing calls.
Displays the 9617 Configura-
tion Properties dialog box
which allows you to set the
options for your telephone.
screen which allows you to
view help topics.
Displays the Memory Keys
dialog box which allows you to
use the memory keys.
65
Page 66

Toolbar Buttons (page 4 of 4)
Button Feature Description
Directory
Synchronization
9617
Property
Page
(This
button is
blue.)
Quick Dial
Manager
Synchronizes the Quick Dials
folder with the telephone
Directory so that they both
contain the same contacts.
Displays the 9617 Property
dialog box which allows you to
set the ring configuration for
the selected contact. This
button is only available when a
Quick Dials contact is selected.
Opens the Quick Dial
Manager window so you can
set the ring configuration for
your Quick Dials. See
page 331.
66
Page 67

The Address Book section
The Address Book is a list of all the contacts stored in
Personal Call Manager. The Address Book consists of two
parts:
■ the Tree View, located on the left-hand side of the
Address Book, shows the structure of your folders
■ the List View, located on the right-hand side, shows
the folders and the contacts stored in whichever
folder is selected in the Tree View section
To see where each part is located, refer to The parts of
the main window on page 60.
To display the Address Book:
1 Click on the View menu.
2 Click on the Only Address Book menu item to dis-
play only the Address Book.
OR
Click on the Both Address Book and Calls menu
item to display both the Address Book and the Current
Calls.
A bullet symbol (•) appears beside the current
selection.
For more information on using the Address Book, refer to
The Address Book in Personal Call Manager on
page 157.
67
Page 68

The Current Calls section
The Current Calls section consists of two parts:
■ the Calls box which shows your current calls
■ the Conference box which shows the calls that have
been joined together in a conference
To see where these are located, refer to The parts of the
main window on page 60.
To display the Current Calls:
1 Click on the View menu.
2 Click on the Only Calls menu item to display only the
Current Calls.
OR
Click on the Both Address Book and Calls menu
item to display both the Address Book and the Current
Calls.
A bullet symbol (•) appears beside the current
selection.
For more information, refer to the following topics:
■ Current Calls icons on page 69
■ Current Calls toolbar on page 71
68
Page 69

Current Calls icons
Current Calls icons appear in the Calls and Conference
boxes to show you the status of your calls.
Note: Different versions of these icons are used in the
Calls menu and task tray menu. For more information,
refer to The task tray menu on page 56.
Current Calls icons (page 1 of 2)
Icon Call Status Description
Ringing Appears in the Calls box
beside the calls that are
currently ringing.
Active Call Appears in the Calls box
beside the call you are
currently on.
Held Call Appears in the Calls box
beside calls that are on hold.
Conference
Call
Held Conference Call
Appears in the Conference
box beside calls that are part
of a conference.
Appears in the Conference
box beside conference calls
that are on hold.
69
Page 70

Current Calls icons (page 2 of 2)
Icon Call Status Description
Extension In
Use
Appears in the Calls box for
calls made on other telephones using your line. See
page 73.
70
Page 71

Current Calls toolbar
You manage the calls in the Calls box and the Conference
box using the toolbars above them. The toolbar buttons
are briefly described below.
Current Calls Toolbar (page 1 of 2)
Button Feature Description
Manual
dial
Release
Call
Properties Displays the Address Proper-
Large
Icons
Small
Icons
Displays the Dial dialog box so
that you can enter a phone
number using the keyboard.
This feature is useful for calling
a number that is not in the
Address Book.
Hangs up the selected call.
ties dialog box for the selected
caller and lets you add new
callers to the Address Book.
Displays current calls as large
icons.
Displays current calls as small
icons.
71
Page 72

Current Calls Toolbar (page 2 of 2)
Button Feature Description
List Displays current calls as small
icons in vertical columns.
Report Displays current calls in a
report view format. In this
format the icon, the callers
name, the telephone number
and the call timer are
shown.The call timer is a
running count of how long the
call has been connected.
72
Page 73

Extension in Use notification in Personal Call
Manager
When someone is using one of your telephone
lines on another telephone in your home or
business, the Extension in Use icon (shown on
the right) appears in the Calls box.
To join the call:
■ right-click the call icon and click on the Unhold
menu item, or
■ press ¬ for the line the call is on.
For more information, refer to Extension in Use
notification on the telephone on page 41.
73
Page 74

Status bar
When visible, the Status bar appears at the bottom of the
screen and provides three information message areas.
Help messages
Line used
DND
Help messages – Shows a help message, if available, for
the area the mouse pointer is over. For example, if the
mouse is over one of the buttons on the toolbar, the
Status bar describes what that button does.
Line used – Identifies which TAPI line and which
telephone line is being used by Personal Call Manager.
(See page 433 for a definition of “TAPI”.) Also displays
the progress of synchronization between the software
and the telephone.
■ Default or Line 1 indicates that Line 1 will be used
when you make calls from Personal Call Manager.
■ Line 2 indicates that Line 2 will be used when you
make calls from Personal Call Manager.
DND – When the Don’t Disturb feature is enabled,
“DND” appears in this area.
To show or hide the Status bar:
1 Click on the View menu.
2 Click on the Status Bar menu item. The Status bar
appears or disappears depending on its previous set-
ting. When the Status bar is visible, a checkmark (✔)
appears beside the Status Bar menu item.
74
Page 75

The About Personal Call Manager window
The About Personal Call Manager window shows the
version of the Personal Call Manager software you are
using. You will be asked to provide this information if you
contact us for technical support.
To access the About Personal Call Manager window:
1 Click on the Help menu.
2 Click on the About PCM menu item.
75
Page 76

How the telephone and Personal Call Manager work together
There are four areas of functionality that ar e synchronized
(or shared) between the 9617 telephone and Personal
Call Manager:
1. The Options List and the Memory keys on the
telephone and the 9617 Configuration Properties
dialog box in Personal Call Manager
The Options List in the 9617 telephone allows you to set
the same options as the 9617 Configuration Properties
dialog box in Personal Call Manager. The changes you
make in one place are automatically made in the other.
For example, you can program the telephone’s memory
keys using the telephone itself or using Personal Call
Manager. The changes you make in one are automatically
made in the other. (For more on memory keys, see
Memory keys and the M9617 telephone on
page 146.)
If you change settings in the Options List when Personal
Call Manager is not running, these changes are updated
automatically when you start Personal Call Manager.
Some exceptions: The Pager Notification, Call Blocking
and Ring Configuration options can only be set using
Personal Call Manager.
continued...
76
Page 77

2. The Directory on the telephone and Quick Dials in
Personal Call Manager
The telephone Directory and the Personal Call Manager
Quick Dials folder synchronize. This means that Personal
Call Manager and the 9617 telephone work together to
keep the list of contacts stored in the telephone Directory
the same as the list stored in the Quick Dials folder.
Normally, the 9617 telephone Directory and the Quick
Dials folder in Personal Call Manager are identical.
Differences can arise when:
■ contacts are added to the Personal Call Manager
Quick Dials folder while the 9617 telephone is
unplugged or not connected to the computer; or
■ contacts are added to the 9617 telephone Directory
when Personal Call Manager is not running.
When there are differences between the two lists, you
must choose between them which one you want to keep.
You cannot automatically combine the two lists. The
Startup Synchronization setting you choose determines
which list – the telephone Directory or the Quick Dials
folder – is kept. If you want to manually combine the two
lists, you can choose not to synchronize them. For more
information, refer to Changing the Startup
synchronization setting on page 134.
continued...
77
Page 78

3. The Callers List and Redial List
When Personal Call Manager starts, it compares the call
lists in the 9617 telephone and in the program. If there
are differences (if you have made or received a call when
Personal Call Manager wasn’t running), Personal Call
Manager updates its Callers List, Redial List and Calls Log
Window.
4. Call Control (making, answering and holding calls)
You can do common call control operations such as
hanging up a telephone call using either the 9617
telephone or Personal Call Manager. For example, to end
a call, you can press
Release menu item in Personal Call Manager.
® on the telephone or click on the
78
Page 79

Setup and customization
You can customize the way the 9617 telephone and
Personal Call Manager manage calls. You can also add
passwords, dialing restrictions, personal security numbers
and more.
For more information, refer to the following topics:
■ Setting up the M9617 telephone on page 80
■ Setting up Personal Call Manager on page 123
79
Page 80

Setting up the 9617 telephone
There are two ways to customize the features of the 9617
telephone. You can use the Options List in the telephone,
or you can use the computer.
Y ou will find all the options in the telephone’s Options List
in the 9617 Configuration Properties dialog box in
Personal Call Manager.
It doesn’t matter which method you choose. The changes
you make in the telephone Options List are also made in
the 9617 Configuration Properties dialog box, and vice
versa.
Some exceptions: The Pager Notification, Call Blocking
and Ring Configuration options can only be set using
Personal Call Manager.
For more information, refer to the following topics:
■ Using the Options List to customize the M9617
telephone on page 81
■ Using the computer to customize the M9617
telephone on page 89
80
Page 81

Using the Options List to customize the 9617 telephone
You can customize the 9617 telephone using the settings
in the Options List. To view this list, press the Options key
on the telephone. Y ou may have to move the slider beside
the telephone’s indicator light to the right to reveal the
Options key . (To see where this key is located, refer to The
M9617 telephone keys and lights on page 29.)
If an Options password has been set up, the telephone
display prompts you to enter it (see Setting the Options
password using the telephone on page 87).
Once you have entered the password and accessed the
list, the following appears on the 9617 telephone display:
Options List=26
Use ÏÔ to view
The number 26 refers to the number of features (or
settings) you can customize. Use
telephone to scroll through the list of options.
ª on the
For more information, refer to The telephone Options
List.
81
Page 82

The telephone Options List
The 9617 telephone Options List (page 1 of 5)
Use this option... to do this...
01. Language
choice
02. Time/Date Set the date and time on your
03. Line x is prime Choose which of your two lines
04. Pick ring tone Select one of four ring tones for
05. Live dialpad
OFF (ON)
Choose the language you want
to see on the telephone display.
You can choose English, French
or Spanish. See page 20.
telephone display. See page 21.
is the prime line. See page 240.
Line 1 or Line 2. You can pick a
different ring tone for each line.
See page 51.
T urn the live dialpad option on or
off. When this option is on,
numbers are dialed out as you
enter them. When this option is
off, the numbers you enter are
not dialed out until you lift the
handset or press
∂,
© or a line key. See
page 239.
82
Page 83

The 9617 telephone Options List (page 2 of 5)
Use this option... to do this...
06. Clear Msg.
Wtg.
07. Change
CALLERS
08. Call wait ID Turn the display of Call Waiting
09. Set list mode Specify that the Callers List for
Clear the Message Waiting
display prompt when you have
finished listening to your Voice
Mail messages. See page 47.
Specify for each line whether the
Callers List logs all calls, no calls
or only unanswered calls. See
page 336.
ID on or off. If you turn Call Wait
ID off, you will only hear the Call
Waiting tone when you receive a
Call Waiting call. You must
subscribe to Call Waiting from
your telephone company. See
page 268.
both lines be combined or separate. See page 338.
10. Fax switch OFF
(ON)
11. Change Answer Specify which line is answered
T urn the Fax switch on or off. See
page 387.
when both are ringing and you
lift the handset or press
©. See page 270.
83
Page 84

The 9617 telephone Options List (page 3 of 5)
Use this option... to do this...
12. Headset
disabled
(enabled)
13. Check line
cord
14. Area codes Enter area codes that you don’t
15. Restrictions Prevent certain numbers from
16. Overrides Specify up to three numbers to
Use a headset instead of the
handset to speak on the telephone. See page 238.
Specify for each line whether or
not your telephone checks to
ensure the line cord is
connected. The telephone
displays a message when a line
cord is not connected. See
page 48.
want to appear in the Callers List
or on the telephone display. See
page 375.
being dialled out. See page 378.
override the dialing restrictions
you have entered into the
Restrictions option. See
page 381.
17. Security
numbers
Prevent certain numbers such as
passwords or Calling Card
Numbers from being displayed
on your telephone when you dial
them. See page 383.
84
Page 85

The 9617 telephone Options List (page 4 of 5)
Use this option... to do this...
18. Call timer ON
(OFF)
19. Don’t dsturb
OFF (ON)
20. Timer key Program the Call timer option
21. Don’t dsturb
key
22. Busy redial
key
Enable the automatic display of
the call timer, which shows how
long you have been on a call. See
page 365.
Stop or prevent the ringing of
your telephone. See page 323.
into a memory key. When you
press the Timer key, the Call
timer appears on the telephone
display. See page 366.
Program the Don’t disturb option
into a memory key. When you
press the memory key , the option
turns off or on, depending on
what it was set to when you
pressed it. See page 325.
Program the Busy redial option
into a memory key. When you
press the memory key , the option
is activated or deactivated. See
page 371.
23. Busy retry
delay
Specify the time between automatic busy redial attempts. See
page 372.
85
Page 86

The 9617 telephone Options List (page 5 of 5)
Use this option... to do this...
24. Busy attempts Specify the number of automatic Busy redial attempts. See
page 373.
25. Options
password
26. Versions View the version of firmware
Enter a password to restrict
access to the Options List. See
page 87.
(resident software) your telephone uses. You may be asked
to provide this information if you
contact the Aastra customer
support line.
86
Page 87

Setting the Options password using the
telephone
You can enter a password to prevent others from viewing
or changing your Options List.
To enter or change an Options List password:
1 Press the Options key.
2 Enter the old Options password if one has been set.
3 Use
ª to scroll to option number 25 or press
¤ fi.
4 Press •.
5 Enter your password (6 digits maximum).
6 Press ß.
7 Press ® .
For more information, refer to the following topics:
■ Using the backdoor feature to access the
Options list on page 88
■ Setting the Options Password using Personal
Call Manager on page 108
87
Page 88

Using the backdoor feature to access the
Options list
If you have forgotten your Options password, you can still
access the Options list by using the backdoor password.
The backdoor password is simply the month, day and
hour (based on a 24-hour clock) displayed on your
telephone display.
AM
For example, if the display shows MAY 09 10:30
backdoor password is 050910 (05 for the month, 09 for
the day, and 10 for the hour).
PM
If the display shows Feb 25 3:55
the backdoor password
is 022515 (02 for the month, 25 for the day and 15 for
the hour).
Once you are in the Options List, you can view or change
your Options password.
Note: The backdoor feature does not work for accessing
the 9617 Configuration Properties dialog in Personal
Call Manager.
, the
For more information, refer to Setting the Options
password using the telephone on page 87.
88
Page 89

Using the computer to customize the 9617 telephone
The 9617 Configuration Properties dialog box allows
you to customize the features of the 9617 telephone
using your computer.
You can access this dialog box several ways. For more
information, refer to the following topics:
■ Customizing the telephone using the menu bar
or toolbar on page 90
89
Page 90

Customizing the telephone using the menu
bar or toolbar
To customize your telephone features:
1 Click on the Tools menu.
2 Click on the Dial Using menu item.
The Choose a TAPI Line dialog box appears.
3 Click on the Configure Line button.
4 If required, type the Options List password.
5 Click on the OK button. The 9617 Configuration
Properties dialog box appears.
Tip: Instead of doing steps 1 to 5, click on the
Configure Telephony button (shown on the
right) on the toolbar.
Note: You may also be able to access this dialog box
from other TAPI applications.
continued...
90
Page 91

6 Move to the tab that has the feature or setting you
want to change. For more information on the features
of each tab, refer to The M9617 Configuration
Properties dialog box on page 92.
The settings you specify on the Configuration Properties dialog box are made in the Options List of the
telephone automatically.
7 Customize the settings as desired.
8 Click the Apply button to apply your settings.
9 If desired, move to another tab and repeat steps 7 and
8.
10 When you are finished, click on the OK button.
91
Page 92

The 9617 Configuration Properties dialog
box
To see how to access this dialog box, refer to Using the
computer to customize the M9617 telephone on
page 89.
The 9617 Configuration Properties dialog box consists
of six tabs. Each tab groups together related features.
These tabs include all of the features in the telephone’s
Options List. The settings you specify in this dialog box are
stored in the telephone’s Options List automatically.
Note: There are a few exceptions. The Pager Notification,
Call Blocking and Ring Configuration options can only be
set using Personal Call Manager, although these settings
are still stored in the telephone itself.
For more information, refer to the following topics:
■ The Line tab on page 93
■ The General tab on page 95
■ The Phone Display tab on page 99
■ The Feature tab on page 101
■ The Security tab on page 106
■ The Memory Keys Assignment tab on page 110
92
Page 93

The Line tab
This tab on the 9617 Configuration Properties dialog
box allows you to specify line features for both Line 1 and
Line 2 independent of each other.
For information on how to access this dialog box, refer to
Using the computer to customize the M9617
telephone on page 89.
Options For – Select the telephone line (Line 1 or Line 2)
you want to set options for. The settings (listed in detail
below) that you make on this tab only affect the line that
is selected when you make them.
Enable Line Cord Check – With this option enabled, the
9617 telephone checks to ensure that your telephone
lines are connected properly. If a line cord is not
connected properly, is malfunctioning, or is not present,
the 9617 telephone displays the “Check line cord”
message.
Enable Pager Notification – This option enables the
Pager Notification feature. When this feature is enabled,
the telephone numbers of the incoming calls you specify
are forwarded to the pager number you have specified on
the Feature tab. Refer to Sending your calls to your
pager on page 306.
Note: The Pager Notification option is not visible in the
9617 telephone Options List. However, it still works when
Personal Call Manager is not running or the computer is
off.
continued...
93
Page 94

The Line tab (continued)
Ring Volume – This slider determines the ring volume of
the phone.
Ring Tone – Select from one of four ring tones for the
phone. Setting different tones for each line can help you
identify which line incoming calls are on.
Call Waiting ID – This option enables the display of Call
Waiting ID. If you subscribe to Call Waiting ID from your
local telephone company, turn this option on to have Call
Waiting ID appear on the 9617 telephone and in the You
have a new call dialog box in Personal Call Manager. If
you do not subscribe to this service, turn this option off.
(The name of this service may vary from area to area.)
Callers Display – This option determines which calls are
logged in the Callers List. You can select All Calls, No
Calls, or Unanswered Calls. If you are going to use the
Pager feature, you must set up the Callers List in a
particular way. For more information, refer to About the
Callers List and the Pager feature on page 337 and
Sending your calls to your pager on page 306.
94
Page 95

The General tab
This tab on the 9617 Configuration Properties dialog
box allows you to specify general telephone features.
For information on how to access this dialog box, refer to
Using the computer to customize the M9617
telephone on page 89.
Enable Headset – Select this option if you are going to
attach a headset to the 9617 telephone.
Enable Fax Switch – Enabling this option is one of the
steps you must complete to allow the 9617 telephone to
route fax or modem calls to the fax machine or modem
connected to Jack 2. For more information on setting up
this feature, refer to Connecting a fax machine or
modem to the telephone on page 387.
Enable Live Dialpad – With Live Dialpad enabled, the
9617 telephone begins dialing as soon as you enter a
number on the keypad. If this option is not selected, the
telephone does not dial the telephone number you have
entered until you lift the handset or press
∂,
©, or ¬.
Enable Call Timer – When this option is selected, a timer
appears on the 9617 telephone display for incoming and
outgoing calls. If this option is not selected, the timer
does not appear; however, call times still appear in the
Calls Log Window in Personal Call Manager and in the
Report view of the Calls and Conference boxes.
continued...
95
Page 96

The General tab (continued)
Set List Mode to be – This option determines how
callers are tracked; callers can be split by line, or
combined into a single list.
Note: List Mode affects only the Callers List on the 9617
telephone, not on Personal Call Manager. The Personal
Call Manager Callers List is always combined.
Set Prime Line to be – This option sets the default line
for the 9617 telephone. The prime line is the line that is
activated when you pick up the handset.
Set Language to be – The language for the 9617
telephone display can be set to English, French, or
Spanish with this option.
Note: The Set Language to be option affects only the
9617 telephone. You cannot change the language of
Personal Call Manager.
Answer Preference – If both lines are ringing at the
same time, this option determines which line is answered
first when you pick up the handset or press
on the telephone.
©
“Answer Longest” answers the line that has been ringing
the longest. “Answer Prime” answers the line that has
been designated the prime line (see the Set Prime Line
to be option above).
continued...
96
Page 97

The General tab
Note: The following four features are not visible on the
M9716 telephone Options List. However, they still work
when Personal Call Manager is not running or the
computer is off.
Suppress First Ring – Many of the 9617 telephone’s
features require Caller Identification (Caller ID)
information to work. (For example, see Block Private
Call and Block Unknown Call, below.) However, Caller
ID information isn’t received by the 9617 telephone until
after the first ring.
When you enable the Suppress First Ring option, the
9617 telephone does not ring until after it has received
the Caller ID information. (While the telephone won’t
ring, the line indicator light will flash and the call
information will be displayed for a few moments before
the phone rings). This allows you to more effectively
screen your calls. (See Screening your telephone calls
on page 312.)
(continued)
Block Private Call – Enabling this option prevents the
9617 telephone from ringing for all calls that have a
Caller ID of “private.” Callers can request that their ID be
listed as “private” by the telephone company. Blocked
calls ring once, unless Suppress First Ring is enabled.
Block Unknown Call – Enabling this option prevents the
9617 telephone from ringing for all calls that have a
Caller ID of “unknown.” A caller is listed as “unknown” if
the telephone company has no information for that caller .
Blocked calls ring once, unless Suppress First Ring is
enabled.
continued...
97
Page 98

The General tab (continued)
Special Ring for Long Distance – With this option
enabled, the 9617 telephone sounds a special ring
whenever you receive a long distance call. (Long distance
calls ring once normally before the special ring is activated
unless the Suppress First Ring option is enabled.)
98
Page 99

The Phone Display tab
This tab on the 9617 Configuration Properties dialog
box allows you to set display options for the telephone.
For information on how to access this dialog box, refer to
Using the computer to customize the M9617
telephone on page 89.
Display Contrast – Drag the slider to increase or
decrease the contrast of the phone’s display. Click on the
Apply button to see the results of a new setting without
exiting the 9617 Configuration Properties dialog box.
Area Codes – In some areas, the telephone company
sends the area code of all local calls with the Caller ID
information. However, you may not be able to dial local
numbers using the Callers List in the telephone until you
remove the area code from the number. If this is the case
in your area, you can use the area code stripping feature.
When you enter an area code or prefix using this feature,
your 9617 telephone removes that code or prefix from
numbers stored in the telephone’s Callers List.
For example, if you enter your area code into this option,
all calls in your area code will appear in the Callers List
with the area code stripped off (the area code appears in
brackets after the number like this: 555-1234 (403)).
continued...
99
Page 100

You can enter three separate area codes or prefixes, each
up to seven digits long.
Note: It is highly recommended that you enter your local
area code in one of these three fields and
Code field on the Dialing Properties dialog box. To
access this dialog box, click on the Tools menu in
Personal Call Manager and select the Dialing Properties
menu item. For more information on Dialing Properties,
refer to Specifying dialing properties for the location
you are dialing from on page 125.
For more information on the Area Code feature and the
telephone, refer to Stripping area codes from
numbers in the telephone Callers List on page 375.
in the Area
100
 Loading...