

Page 1

50 MEMORY
50 MEMORY
50 MEMORY50 MEMORY
NAME & NUMBER
NAME & NUMBER
NAME & NUMBERNAME & NUMBER
CALLER ID
CALLER ID
CALLER IDCALLER ID
WITH CALL WAITING
WITH CALL WAITING
WITH CALL WAITINGWITH CALL WAITING
MODEL: AT
MODEL: AT----50CWR
MODEL: ATMODEL: AT
50CWR
50CWR50CWR
USER’S GUIDE
USER’S GUIDE
USER’S GUIDEUSER’S GUIDE
THOMAS JOHN
9 I4-968-2I00
CALL#
NEW
04
DELETE DIAL F LASH
Please read this instruction manual carefully.
Please read this instruction manual carefully.
Please read this instruction manual carefully.Please read this instruction manual carefully.
I0:45
AM
4/09
!
CC 1832 Rev 1.0
REVIEW
Important Safety Instructions
Important Safety Instructions
AAAA
Important Safety InstructionsImportant Safety Instructions
Basic safety precautions should always be
followed to reduce the risk of fire, electrical
shock, and injury to persons including the
following:
1. Read and understand all instructions.
2. Follow all warnings and instructions
marked on the product.
3. Unplug this product from the wall outlet
before cleaning. Do not use liquid
cleaners, or aerosol cleaners. Use a
damp cloth for cleaning. If necessary,
use a mild soap.
4. Do not use this product near water, for
example near a bathtub, wash bowl,
kitchen sink, or laundry tub, in a wet
basement, or near a swimming pool.
5. Do not place this product on an unstable
cart, stand or table. The product may fall,
causing serious damage to the product.
6. This product should be operated only
from the type of power source indicated
on the marking label. If you are not
sure of the type of power supply to your
home, consult your dealer or local
"
power company.
7. Do not allow anything to rest on the
telephone line cord. Do not locate this
product where persons walking on it
will abuse the cord.
8. Never push objects of any kind into this
product through the cabinet slots as
they may touch dangerous voltage
points or short out parts that could re-
11. Avoid using a telephone (other than a
cordless type) during an electrical
storm. There may be a remote risk of
electrical shock from lightning.
12. Do not overload wall outlets and extension cords as this can result in the
risk of fire or electrical shock.
13. Do not use the telephone to report a
gas leak in the vicinity of the leak.
SAVE THESE INSTRUCTIONS
SAVE THESE INSTRUCTIONS
SAVE THESE INSTRUCTIONSSAVE THESE INSTRUCTIONS
CAUTION
CAUTION ---- To Reduce the Risk of Fire or
CAUTION CAUTION
Injury to Persons, Read and Follow these
Injury to Persons, Read and Follow these
Injury to Persons, Read and Follow these Injury to Persons, Read and Follow these
Instructions.
Instructions.
Instructions.Instructions.
1. Use only the following type and size of
2. Do not dispose of the batteries in a
3. Exercise care in handling batteries in
4. Do not attempt to recharge the batter-
To Reduce the Risk of Fire or
To Reduce the Risk of Fire or To Reduce the Risk of Fire or
battery: Two (2) AA size 1.5 volt (15A)
carbon-zinc or alkaline batteries.
fire. The cell may explode. Check with
local codes or possible special disposal
instructions.
order not to short the battery with conductors such as rings, bracelets, and
keys. The battery or conductor may
overheat and cause burns.
ies provided with or identified for use
with this product by heating them. The
battery may leak corrosive electrolyte
or may explode.
Table of Co
Table of Contents
Table of CoTable of Co
Important Safety Instructions
Important Safety Instructions
Important Safety InstructionsImportant Safety Instructions
Features
Features
FeaturesFeatures
Introduction to Caller
Introduction to Caller----ID Service
Introduction to CallerIntroduction to Caller
Installation
Installation
InstallationInstallation
Battery Installation ...................................D
Telephone Line Installation ....................... D
Operation
Operation
OperationOperation
Setting the Display Language ............... E
Setting Area Code 1 ............................. E
Setting Area Codes 2&3 ....................... E
Setting the Alternate LD Prefix .............. E
Setting the Time and Date .................... E
Receiving Caller-ID Information ............ E
Multi-Function LED Indicator ................. E
Call Waiting Display ............................. E
Reviewing Calls ...................................................E
Using the Dial Button
Using the Flash Button ........................................E
Message Waiting ................................................E
Deleting Calls ......................................................E
Troubleshooting
Troubleshooting
TroubleshootingTroubleshooting
Care and Maintenance
Care and Maintenance
Care and MaintenanceCare and Maintenance
ntents
ntentsntents
...................... A
..................................................... B
ID Service
ID ServiceID Service
.....................................................D
...................................................................E
..........................................................F
..............................................G
................. C
....................................E
sult in a risk of fire or electric shock.
Never spill liquid of any kind on the
product.
9. To reduce the risk of electric shock, do not
disassemble this product, but take it to a
qualified serviceman when some service or
repair work is required. Opening or removing covers may expose you to dangerous voltages or other risks. Incorrect reassembly can cause electric shock when
the appliance is subsequently used.
10. Unplug this product from the wall out-
let and refer to qualified service personnel under the following conditions:
a. When the power supply cord or plug is
damaged or frayed.
b. If liquid has been spilled into the prod-
uct.
c. If the product has been exposed to rain
or water.
d. If the product does not operate nor-
mally by following the operating instructions. Adjust only those controls
that are covered by the operating instructions because improper adjustment of other controls may result in
damage and will often require extensive work by a qualified technician to
restore the product to normal operation.
e. If the product has been dropped or the
cabinet has been damaged.
f. If the product exhibits a distinct change
in performance.
5. Do not attempt to rejuvenate the batteries provided with or identified for
use with this product by heating them.
Sudden release of the battery electrolyte may occur causing burns or irritation to eyes or skin.
6. All batteries should be replaced at the
same time. Mixing fresh and discharged batteries could increase internal cell pressure and rupture the discharged batteries.
7. When inserting batteries into this product, the proper polarity or direction
must be observed. Reverse insertion of
batteries can cause charging, and that
may result in leakage or explosion.
8. Remove the battery from this product if
the product will not be used for a long
period of time (several months or
more) since during this time the battery
could leak in the product.
9. Discard dead batteries as soon as possible since dead batteries are more
likely to leak in a product.
10. Do not store this product, or the battery provided with or identified for use
with this product, in high temperature
areas. Batteries that are stored in a
freezer or refrigerator for the purpose
of extending shelf life should be protected from condensation during storage and defrosting. Batteries should be
stabilized at room temperature prior to
use after cold storage.
Page 2
Features
Features BBBB
FeaturesFeatures
•
Easy to Read 3 line display - Provides
Name, Number, Time and Date of call*
• Trilingual Display Language - English,
French, or Spanish
•
50 Name & Number Call Log with New
Call Counter
• Compatible with Caller-ID with Call Wait-
ing Service*
• Compatible with most Voice Mail Message
Waiting Indication Services*
• Stand-By Screen - Displays Total Calls and
New Calls received as well as current time
and date.
•
Dual Review Up/Down buttons provides
easy reviewing of Call Log records.
•
Delete button erases stored calls selectively or collectively
•
Dial Button provides easy call back of
numbers from the Call Log display
•
Flash Button - Used to answer Call Waiting calls and switch between callers
•
Multi-Function LED - Indicates Line In Use,
New Call, Blocked Call, and Voice Mail.
•
Supplied with UL listed 9 VDC - 300mA, Center positive Class 2 type AC power adapter.
•
Uses two 1.5 volt, AA size batteries to provide
optional memory backup (not included)
∗
This device provides all of the above features
This device provides all of the above features
This device provides all of the above features This device provides all of the above features
only when connected to a phone line equipped
only when connected to a phone line equipped
only when connected to a phone line equipped only when connected to a phone line equipped
with Caller
with Caller----ID with Call Waiting service as well
with Callerwith Caller
as Voice Mail Waiting
as Voice Mail Waiting service. Co
as Voice Mail Waiting as Voice Mail Waiting
phone company for subscription details.
phone company for subscription details.
phone company for subscription details.phone company for subscription details.
ID with Call Waiting service as well
ID with Call Waiting service as well ID with Call Waiting service as well
service. Contact your
service. Coservice. Co
ntact your
ntact your ntact your
Installation
Installation
InstallationInstallation
DDDD
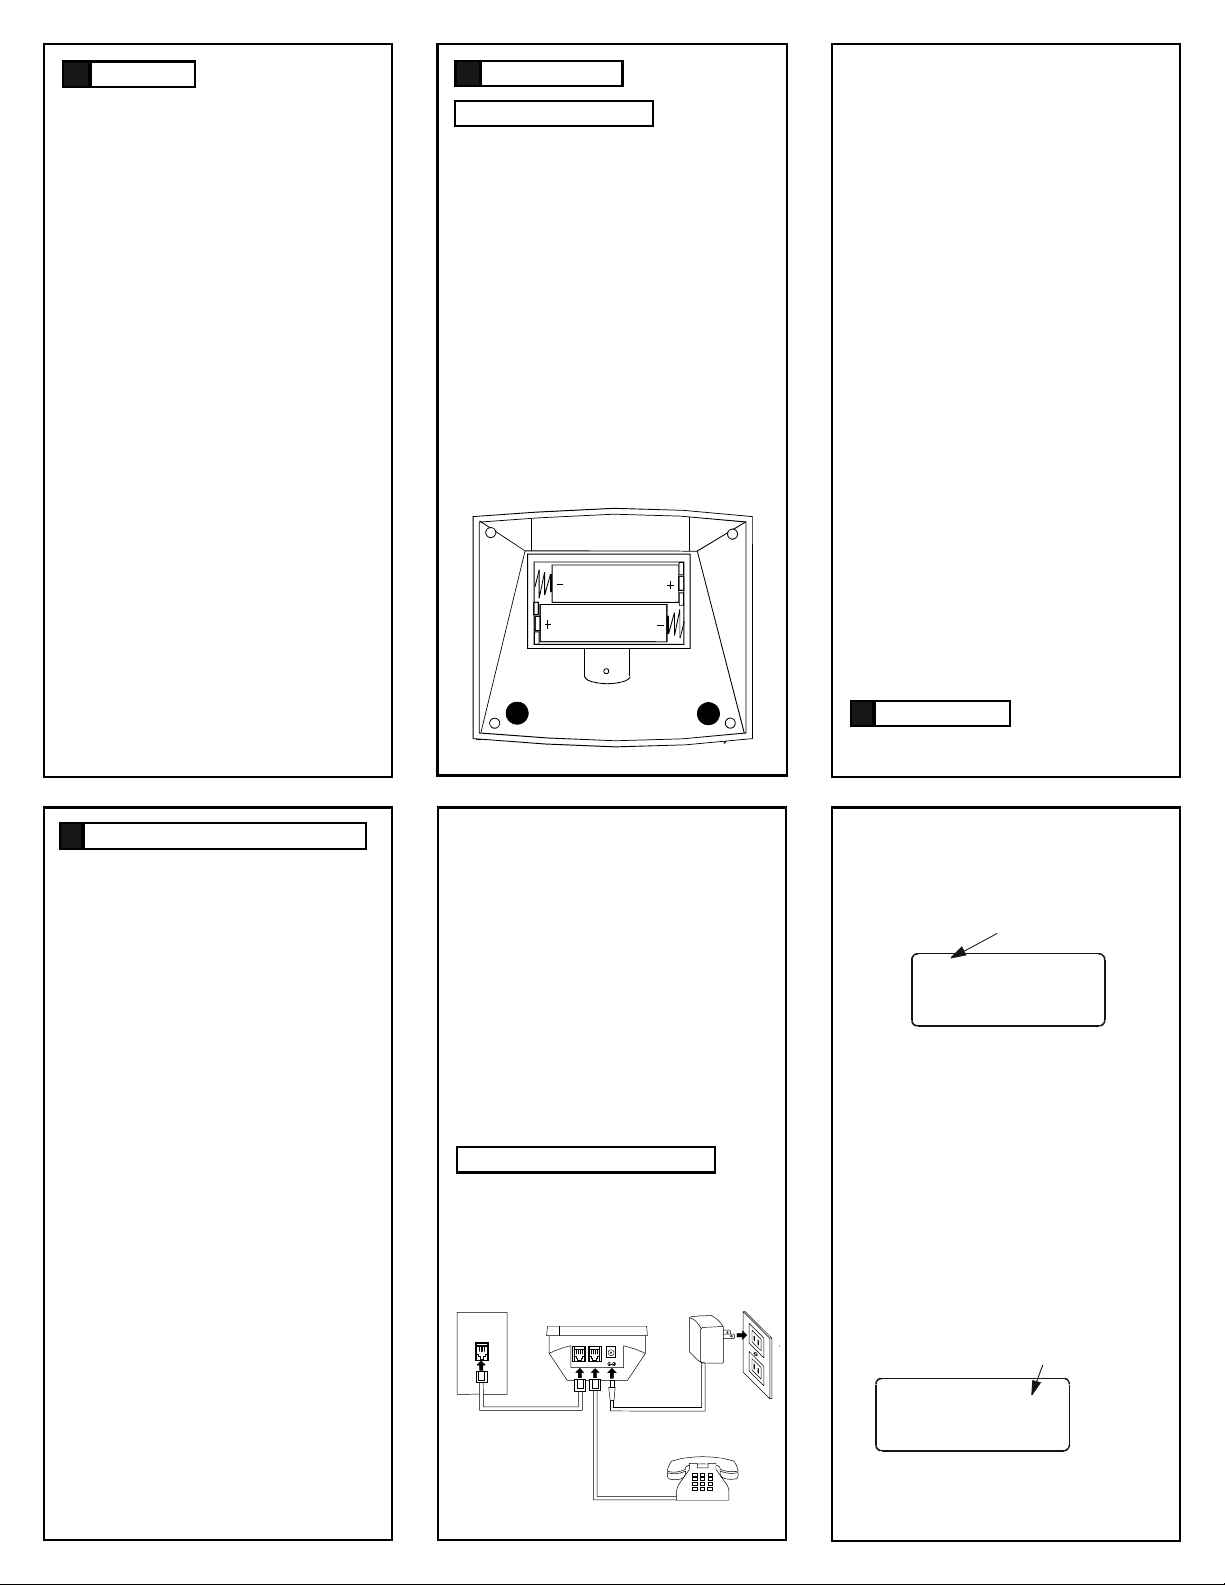
Battery Installation
Battery Installation
Battery InstallationBattery Installation
The AT-50CWR uses two AA size batteries
(optional, not required for operation) to provide memory backup in case of power loss.
Follow these directions to install or change the
batteries.
WARNING: ALWAYS DISCONNECT THE
WARNING: ALWAYS DISCONNECT THE
WARNING: ALWAYS DISCONNECT THE WARNING: ALWAYS DISCONNECT THE
TEL
TELEEEEPHONE LINE FROM THE WALL OUTLET
PHONE LINE FROM THE WALL OUTLET
TELTEL
PHONE LINE FROM THE WALL OUTLET PHONE LINE FROM THE WALL OUTLET
BEFORE SERVICING, DISASSEMBLING THIS
BEFORE SERVICING, DISASSEMBLING THIS
BEFORE SERVICING, DISASSEMBLING THIS BEFORE SERVICING, DISASSEMBLING THIS
EQUIPMENT, OR REPLACING BATTERIES.
EQUIPMENT, OR REPLACING BATTERIES.
EQUIPMENT, OR REPLACING BATTERIES.EQUIPMENT, OR REPLACING BATTERIES.
1. Use a small Philips head screwdriver to
remove the battery cover safety screw.
2. Place your finger under the battery door
latch to open the battery compartment.
Figure 1
3. Lift the battery door up and away from
1.5V "AA" Battery
1.5V "AA" Battery
IIIIMPORTANT:
MPORTANT: Caller-ID devices with Call
MPORTANT: MPORTANT:
Waiting must be connected directly to the
telephone line. Do not plug the unit directly
into a Fax, Modem or Answering Machine.
Always use a duplex adapter, sold in most
retail phone stores, to split a wall jack so it
can feed the Caller-ID unit directly as well as
the other device sharing the same wall jack.
1. Plug one end of the telephone line cord
(included) into the LINE
ID unit. See Figure 2
2. Plug the other end of the cord into a
nearby telephone line wall jack.
3. Plug a telephone to the jack marked
PHONE
PHONE on the Caller-ID unit.
PHONEPHONE
4. Plug the cord from the supplied power
adapter into the DC9V
5. Plug the power adapter into a non-
switched electrical outlet.
6. After applying power, all the display
screen segments will appear briefly.
7. Next, "ENTER LANGUAGE"
8. After a few seconds, the Multi-Function
9. Proceed immediately to set the display
SETTING THE DISPLAY LANGUAGE
SETTING THE DISPLAY LANGUAGE
SETTING THE DISPLAY LANGUAGESETTING THE DISPLAY LANGUAGE
"ENTER LANGUAGE" will appear in
"ENTER LANGUAGE""ENTER LANGUAGE"
the display.
LED will light and [ENG] ESP FRA
pear in the display for 10 seconds.
language as required.
E
Operation
Operation
OperationOperation
LINE jack on the Caller-
LINELINE
DC9V jack on the unit.
DC9VDC9V
ENG] ESP FRA will ap-
ENG] ESP FRAENG] ESP FRA
Introduction to Caller
Introduction to Caller----ID Service
CCCC
Introduction to CallerIntroduction to Caller
Congratulations on your purchase of your
new AT-50CWR Call Waiting Caller-ID display unit. This device works with Caller-ID,
Caller-ID with Call Waiting and Voice Mail.
You must subscribe to one or all of these
services from your local telephone company to enjoy all the features of your unit.
Caller-ID, Caller-ID with Call Waiting and
Voice Messaging are services that may be
available from your local telephone company. Your local telephone company may
use a different name for these services.
There is an extra charge added to your
monthly telephone bill for these services.
The AT-50CWR Caller-ID can be used to
screen unwanted calls, eliminate harassment from annoying calls, or to get prepared before answering a call.
The AT-50CWR retains a record of the
above information for the last 50 calls received, including those received while you
were away.
Check the contents of this package to confirm that it has the following items.
1. AT-50CWR Caller-ID unit
2. AC Power adapter
3. Telephone line cord
4. User’s Guide
ID Service
ID ServiceID Service
the unit.
4.
Be sure to observe proper battery polarity when installing fresh batteries.
5. When replacing discharged batteries,
install fresh batteries within 15 seconds.
Taking more time will result in the loss
of Caller-ID information that is stored in
memory.
6. Re-install the battery door.
7. Use a small Philips head screwdriver to
install the battery cover safety screw.
Take care not to over tighten the screw.
Telephone Line Installation
Telephone Line Installation
Telephone Line InstallationTelephone Line Installation
Connect the AT-50CWR Caller-ID to the
telephone line in the following manner.
Figure 2
TELEPHONE
WALL JACK
CALLER-ID
DC9V
LINE PHONE
AC POWER
ADAPTER
TELEPHONE
The display language can be set to English,
Spanish or French. English is the default
display language. No change is required if
English is used as the display language.
1.
Press the REVIEW
desired display language.
2. Press the DELETE
the selection.
3. The display will indicate "AREA CODE:
1"
1" and the digit to enter the area code
1"1"
will be flashing.
SETTING AREA CODE 1
SETTING AREA CODE 1
SETTING AREA CODE 1SETTING AREA CODE 1
Enter your area code if you want your local
numbers displayed as seven digit numbers,
the same way they are dialed.
1. Press the REVIEW
to enter the first digit of your local three
digit area code.
[ENG] ESP FRA
AREA CODE 1:
ENGLISH
ENGLISH
ENGLISHENGLISH
REVIEW UP
UP button to select the
REVIEW REVIEW
UPUP
DELETE button once to retain
DELETEDELETE
"AREA CODE:
"AREA CODE: "AREA CODE:
FIRST DIGIT
FIRST DIGIT
FIRST DIGITFIRST DIGIT
_
AM
I2:00
REVIEW UP
REVIEWREVIEW
I/0 I
UP button as required
UPUP
Page 3

2. Press the DELETE
DELETE button once to retain
DELETEDELETE
the selection.
3. Press the REVIEW UP
REVIEW UP button as required
REVIEW UPREVIEW UP
to enter the second digit.
4. Press the DELETE
DELETE button once to retain
DELETEDELETE
the selection.
5. Press the REVIEW UP
REVIEW UP button as required
REVIEW UPREVIEW UP
to enter the third digit.
6. Press the DELETE
DELETE button once to retain
DELETEDELETE
the selection.
SETTING AREA CODES 2 & 3
SETTING AREA CODES 2 & 3
SETTING AREA CODES 2 & 3SETTING AREA CODES 2 & 3
Two additional neighboring area codes can
be entered provided that only seven digits
are required to dial the telephone number
received from the neighboring area code.
Follow steps 1 through 6 above for each
additional area code to be entered.
1. If additional neighboring area codes are
not going to be entered, you may skip
entering them by repeatedly pressing
the DELETE
DELETE button six (6) times.
DELETEDELETE
2. Next, """"ALT, LD:
ALT, LD:""""____ will appear in the dis-
ALT, LD:ALT, LD:
play.
SETTING THE ALTERNATE LD PREFIX
SETTING THE ALTERNATE LD PREFIX
SETTING THE ALTERNATE LD PREFIXSETTING THE ALTERNATE LD PREFIX
Normally the digit 1111 is used as your long
distance prefix. If desired, you may enter
an alternate long distance prefix, up to
seven digits in length. An alternate long
distance carrier can be used instead of
TOTA L:00 NEW:00
I2:00
AM
I/0 I
2. You may change any of the above settings while in Stand-By Screen mode.
Press and hold the REVIEW UP
VIEW DOWN
VIEW DOWN buttons at the same time
VIEW DOWN VIEW DOWN
REVIEW UP and RRRRE-
REVIEW UP REVIEW UP
E-
E-E-
for at least six (6) seconds.
3. Start from the first step, “Setting the
Display Language“. You may skip steps
that do not require change by pressing
the DELETE
DELETE button as required.
DELETEDELETE
RECEIVING CALLER
RECEIVING CALLER----ID INFORMATION
RECEIVING CALLERRECEIVING CALLER
ID INFORMATION
ID INFORMATIONID INFORMATION
When a call is received, the display will
indicate the caller’s phone number and
name if available, as well as the time and
date of the call.
1. The NEW
NEW icon will be displayed when
NEWNEW
new calls are received.
2. The Multi
Multi----Function
Function LED will begin to
MultiMulti
FunctionFunction
flash indicating a new call has been
received.
BROWN THOMAS
20 I-8 4 6 -2 9 7 4
NEW
CALL# RPT#
02 I
I2:30
PM
8/2 I
NEW ICON
CALL WAITING DISPLAY
CALL WAITING DISPLAY
CALL WAITING DISPLAYCALL WAITING DISPLAY
To utilize the full capabilities of the AT50CWR, you must have Caller-ID with
name and number delivery as well as Call
Waiting with Caller-ID service installed.
The AT-50CWR does not provide Caller-ID
and Call Waiting features unless these
services have been ordered from your local
telephone company at a monthly charge.
Check with your local phone company to
confirm both of these services are available. If
you only have Caller-ID service, the AT50CWR will not receive and display Call
Waiting with Caller-ID information.
The AT-50CWR will let you know when a
call is waiting as well as who is calling
before you answer. The AT-50CWR will
alert you to retrieve your call in following
manner.
1. When a call waiting signal is received,
the CW
CW icon in the display will flash.
CWCW
The name and telephone number of the
person who is calling will appear in the
display.
BROWN THOMAS
20 I-846-2974
CALL# RPT#
NEW
02 I
I2:30 8/2 I
PM
CW ICON
2. Press the FLASH
FLASH button on AT-50CWR
FLASHFLASH
your primary carrier when re-dialing a
telephone number from the call record
long that is outside of your area code.
Setting the alternate long distance prefix is
done in the same manner as setting Area
Code 1.
1. The first digit for entering your alternate
long distance prefix will be flashing.
ALT.LD :
2. Press the REVIEW UP
_
I2:00
REVIEW UP button as required
REVIEW UPREVIEW UP
AM
FIRST DIGIT
FIRST DIGIT
FIRST DIGITFIRST DIGIT
I/0 I
to enter the first digit.
3. Press the DELETE
DELETE button to retain the
DELETEDELETE
selection.
4. Repeat the above steps as required to
enter all the digits of your alternate
long distance prefix.
SETTING THE TIME AND DATE
SETTING THE TIME AND DATE
SETTING THE TIME AND DATESETTING THE TIME AND DATE
The time and date is automatically set when
the first call is received, and is updated each
time Caller-ID information is received.
1. After approximately ten seconds, the display will go to Stand-By Screen mode as
shown below. The AT-50CWR is now
ready to receive calls.
3. After 60 seconds, the display will return to
the Stand-By screen until another call is
received or a button is pressed.
4. The Stand-By screen will indicate the total
number of calls stored in the call log as
well as how many new calls have not yet
been reviewed.
MULTI
MULTI----FUNCTION LED I
FUNCTION LED INDICATOR
MULTIMULTI
FUNCTION LED IFUNCTION LED I
New Call Alert and Voice Mail Waiting
New Call Alert and Voice Mail Waiting
New Call Alert and Voice Mail WaitingNew Call Alert and Voice Mail Waiting
NDICATOR
NDICATORNDICATOR
When a new call has been received, the
Multi
Multi----Function
Function LED will flash once every
MultiMulti
FunctionFunction
two seconds. It will stop flashing once you
have reviewed all the new call log records.
When you have Voice Mail Waiting, the
Multi
Multi----Function
Function LED will flash until the mes-
MultiMulti
FunctionFunction
sages are retrieved.
Line in Use Indication
Line in Use Indication
Line in Use IndicationLine in Use Indication
The Multi
Multi----Function
Function LED will light continu-
MultiMulti
FunctionFunction
ously anytime the telephone line is being
used.
Blocked Call Indication
Blocked Call Indication
Blocked Call IndicationBlocked Call Indication
The Multi
Multi----Function
Function LED will blink rapidly
MultiMulti
FunctionFunction
while the line is ringing when the caller
has blocked their Caller ID information.
Figure 3
Figure 3
Figure 3Figure 3
MULTI
MULTI ----FUNCTION
FUNCTION
MULTIMULTI
FUNCTIONFUNCTION
LED
LED
LEDLED
to put the existing call on hold and
answer the new call.
3. If you choose not to answer the call, the
Call Waiting Caller-ID information will
be stored for future reference. The CW
CW
CWCW
icon will remain on until you hang up
the telephone.
4. When you finish the call, press the
FLASH
FLASH button to return to the original
FLASHFLASH
call. The CW
CW icon will go off automatic-
CWCW
ally.
REVIEWING CALLS
REVIEWING CALLS
REVIEWING CALLSREVIEWING CALLS
A maximum of 50 calls can be stored in
the call record log. A fter 50 cal l s have
been received, new call records will
automatically replace the oldest call
records.
1. Press the REVIEW
DOWN
DOWN button as required to review the
DOWNDOWN
REVIEW UP
UP or the REVIEW
REVIEWREVIEW
UP UP
REVIEW
REVIEWREVIEW
stored call record log.
2. The caller’s phone number and name (if
available) as well as the time & date of
the call will be displayed.
3. The NEW
NEW icon is attached to each
NEWNEW
incoming call and is removed after the
call has been reviewed.
Page 4

1. If the Multi
Multi----Function
Function LED is still flashing
MultiMulti
Function Function
after the display goes back to the
Stand-By screen, there are new calls
that you have not yet reviewed.
2. When you have reached the end of the
call record log, "END OF LIST"
"END OF LIST" will be
"END OF LIST""END OF LIST"
displayed indicating there are no more
stored calls.
Out Of Area Calls
Out Of Area Calls
Out Of Area CallsOut Of Area Calls
When a call is received from an area that
is not yet providing Caller-ID delivery to
your area via the long distance network,
"UNAVAILABLE"
"UNAVAILABLE" will be indicated in the
"UNAVAILABLE""UNAVAILABLE"
display.
Private Calls
Private Calls
Private CallsPrivate Calls
If the caller has exercised their option to
block their number or name from being
sent, "PRIVATE CALL"
"PRIVATE CALL" will be displayed.
"PRIVATE CALL""PRIVATE CALL"
Line Error
Line Error
Line ErrorLine Error
The display will indicate """"----LINE ERROR
LINE ERROR----"""" if
LINE ERRORLINE ERROR
a call has been received that has a transmission or reception error. Always wait at
least one ring to prior to answering a call.
USING THE DIAL BUTTON
USING THE DIAL BUTTON
USING THE DIAL BUTTONUSING THE DIAL BUTTON
The DIAL
DIAL button can be used to call a tele-
DIALDIAL
phone number stored in the call log.
1. Press the REVIEW UP
REVIEW UP or REVIEW DOWN
REVIEW UPREVIEW UP
REVIEW DOWN
REVIEW DOWNREVIEW DOWN
button to select the desired call record.
MMMMESSAGE WAITING
ESSAGE WAITING
ESSAGE WAITINGESSAGE WAITING
If you have Voice Mail service, the AT-50CWR
will alert you when there are messages to
retrieved.
1. The display will indicate """"MESSAGE
WAITING
WAITING"""" for 60 seconds when a mes-
WAITINGWAITING
MESSAGE
MESSAGE MESSAGE
sage waiting signal is received from the
telephone company Central Office.
2. The MSG
MSG icon will appear in the display
MSGMSG
and the Multi
Multi----Function
Function LED will flash
MultiMulti
Function Function
rapidly.
3. The MSG
MSG icon is not attached to any
MSGMSG
individual call. When turned on, it can
be viewed from the Stand-By screen or
when reviewing any call record.
MESSAGE WAITING
CALL#
02
I2:30 8/2 I
PM
MSG
MESSAGE
WAITING
ICON
3. After you have retrieved your messages,
the Central Office will send a signal to
cancel the message waiting alert.
4. The MSG
MSG icon will go out and the Multi
MSGMSG
Function
Function LED will stop flashing.
FunctionFunction
Multi----
MultiMulti
DELETING CALLS
DELETING CALLS
DELETING CALLSDELETING CALLS
Deleting individual calls:
Deleting individual calls: When reviewing
Deleting individual calls: Deleting individual calls:
calls, the displayed call record can be deleted.
Troubleshooting
Troubleshooting FFFF
TroubleshootingTroubleshooting
No Caller
No Caller----ID data received
No CallerNo Caller
ID data received
ID data receivedID data received
1. Contact your phone company to make
sure that Caller-ID service is activated.
2. Caller-ID data is sent to the unit between
the first and second rings. Don't answer
the call before the start of the second ring.
3. If you are using a telephone answering
machine, make sure that it is set to answer after two rings.
The Multi Function LED is on continuously
The Multi Function LED is on continuously
The Multi Function LED is on continuouslyThe Multi Function LED is on continuously
1. Verify that the unit is connected directly to
the telephone line wall jack.
2. Check that all extension phones are hung
up.
Call Waiting Caller
Call Waiting Caller----ID does not work
Call Waiting CallerCall Waiting Caller
ID does not work
ID does not workID does not work
1. The telephone you are using must
plugged into the Caller-ID unit. Check the
Line and Phone connections on the back
of the unit. Make sure the telephone is
connected to the jack marked PHONE
PHONE.
PHONEPHONE
2. Check with the telephone company to
make sure Caller-ID with Call Waiting
service is activated. Request a test call
from the phone company repair service.
How do I set the time and date
How do I set the time and date
How do I set the time and dateHow do I set the time and date
1. The time and date is automatically set
when the first call is received, and is updated each time Caller-ID information is
received.
2. If the number can be dialed as displayed,
press the DIAL
DIAL button, then lift the hand-
DIALDIAL
set to begin dialing.
3. If the number cannot be dialed as displayed, press the DIAL
DIAL button as required
DIALDIAL
to reformat the displayed number into a
number that can be dialed.
4. Each press of the DIAL
DIAL button will display
DIALDIAL
another format. The display will return to
the original format after all available formats have been reviewed.
5. Choose one of the following formats:
•
Area Code + 7 digit number.
•
1 + Area Code + 7 digit number.
•
Alternate Long Distance prefix + Area
Code + 7 digit number.
6. Once you have selected the correct format, lift your telephone handset, dialing
will begin automatically.
USING THE FLASH BUTT
USING THE FLASH BUTTON
USING THE FLASH BUTTUSING THE FLASH BUTT
The FLASH
FLASH button provides access to a Call
FLASHFLASH
ON
ONON
Waiting call. It performs the same function as
the FLASH
FLASH button on a telephone.
FLASHFLASH
1. When a Call Waiting beep is heard, press
the FLASH
FLASH button to access the call.
FLASHFLASH
2. You can alternate between the two calls
by pressing the FLASH
FLASH button.
FLASHFLASH
1. Press the DELETE
DELETE button twice, the dis-
DELETEDELETE
played call record will be erased, and the
remaining call records will be renumbered.
Deleting all calls:
Deleting all calls: When reviewing calls, you
Deleting all calls: Deleting all calls:
can delete all call records.
1. Press and hold the DELETE
DELETE button at least
DELETEDELETE
six (6) seconds.
2. The display will indicate """"NO CALL
NO CALL"""", con-
NO CALLNO CALL
firming there are no call records.
LOW BATTERY INDICATI
LOW BATTERY INDICATION
LOW BATTERY INDICATILOW BATTERY INDICATI
ON
ONON
If you do not install memory backup batteries
or if the batteries require replacement, the
LOW BATTERY
LOW BATTERY icon will be displayed.
LOW BATTERYLOW BATTERY
1. If you have batteries installed, always
replace them as soon as possible when
the LOW BATTERY
LOW BATTERY icon comes on.
LOW BATTERY LOW BATTERY
I2:30
8/2 I
LOW
PM
TOTA L:00 NEW:00
CALL#
02
NEW
LOW BATTERY ICON
Care and Maintenance
Care and Maintenance GGGG
Care and MaintenanceCare and Maintenance
Please read the following instructions.
•
Keep the unit away from high temperatures that can distort or melt plastic
parts.
•
If the unit gets wet, wipe it dry immediately. Liquids can contain minerals that
can corrode electronic circuits.
•
Dropping the unit may damage the
plastic cabinet or circuitry, which can
cause it to malfunction.
•
Do not use any type of chemical or
any abrasive powder to clean the
cabinet. Wipe it with a soft, clean
cloth.
4
 Loading...