

Page 1
Quick Setup Guide
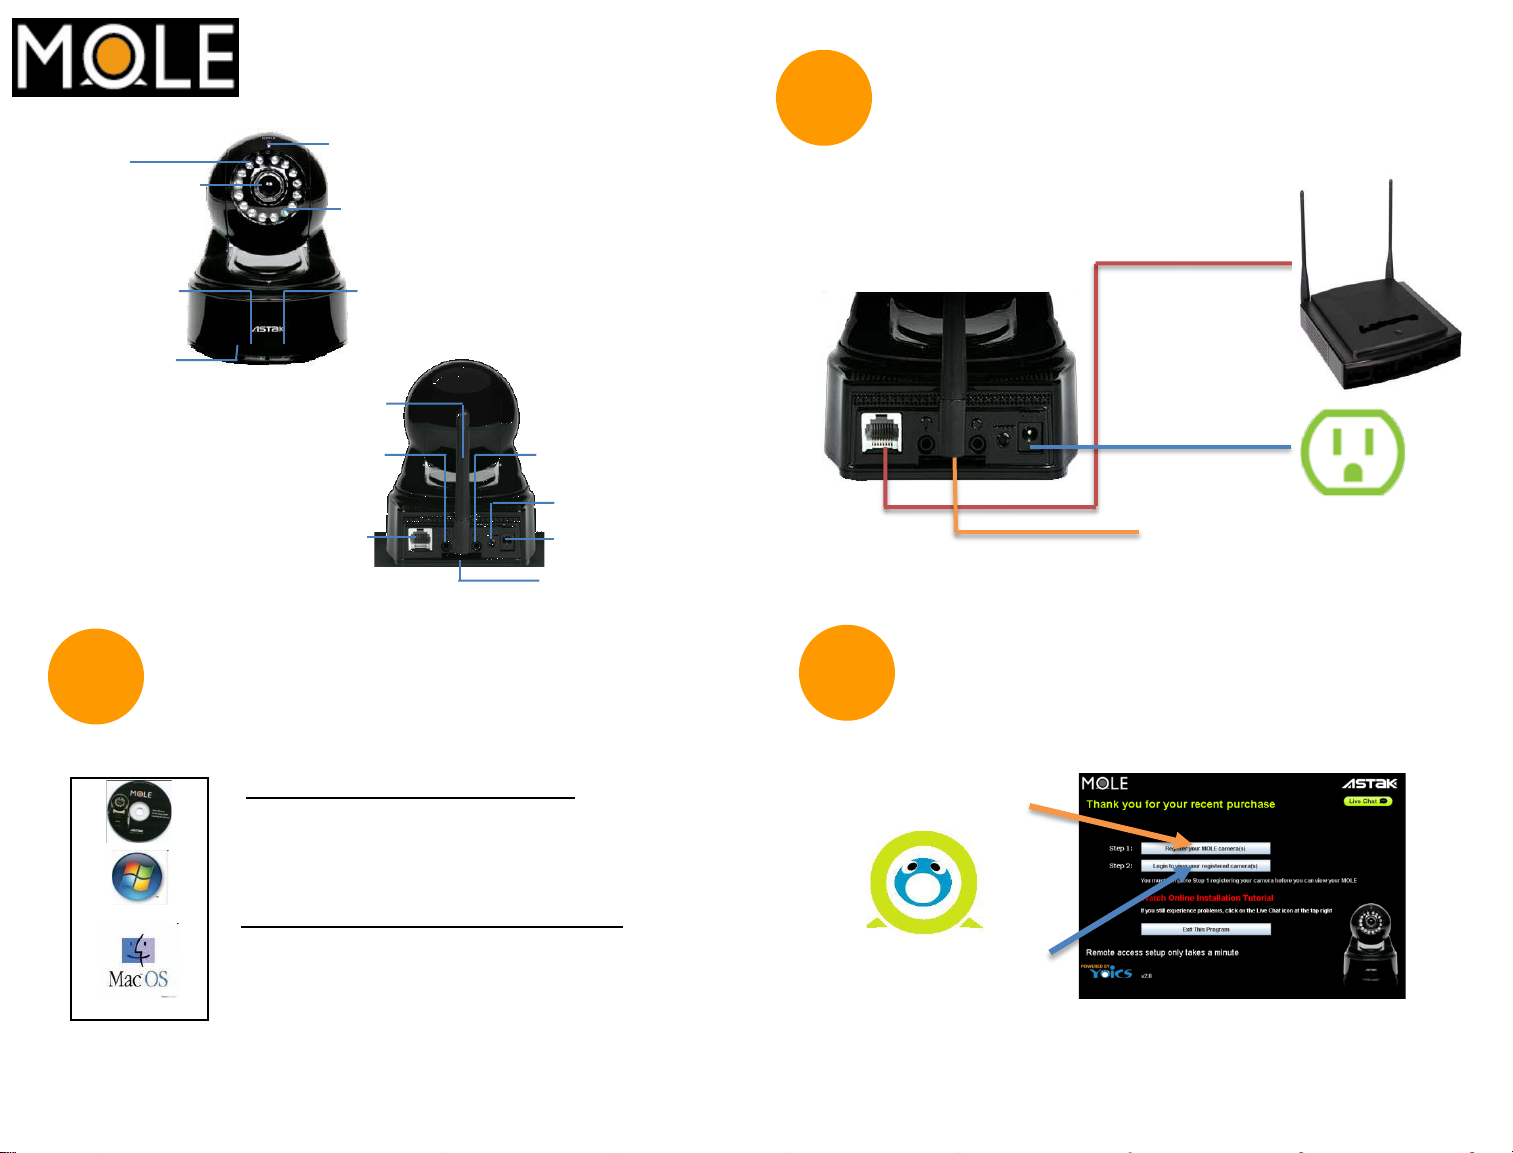
Plug in
LEDs
Microphone
Lens
SD Card
Indicator
Built-in
2
Power Indicator
Light Sensor
Network
Indicator
WIFI Antenna
Audio Input
Ethernet Port
Audio Output
Reset
Power Slot
SD Card Slot
Install Setup Software
1
First connect the network cable to Router,
Then connect the AC power and WiFi Antenna
Step 1.
Router (Network)
Step 2.
AC Power
Step 3. WiFi Antenna
*Please DO NOT connect the MOLE directly to
the computer
3
Run the Setup Software
Insert Setup CD into your computer’s DVD or CD drive
Windows (XP/Vista/Windows7)
- Browser CD to ‘Windows’ folder
- Double-click ‘mole-setup.exe’
- Follow screens to install on desktop
XP/Vista/W7
v10.5/v10.6
*If you have any problems installi ng the C D software, please
refer to Web Setup Guide for optional web based registration.
Mac OS X (Leopard/Snow Leopard)
- Open Finder to CD’s ‘Mac OS’ folder
- Open ‘mole-setup.zip’ file
- Drag ‘Remote Cameras’ app to desktop
1. Start the Remote
Camera Setup
2. View registered
cameras
Software will walk you through the setup process
Page 2
4
1) Find Camera
In the Remote Setup, you can detect cameras, create
accounts, and name your camera
Complete Registration
2) Register User
3) Register Camera
5
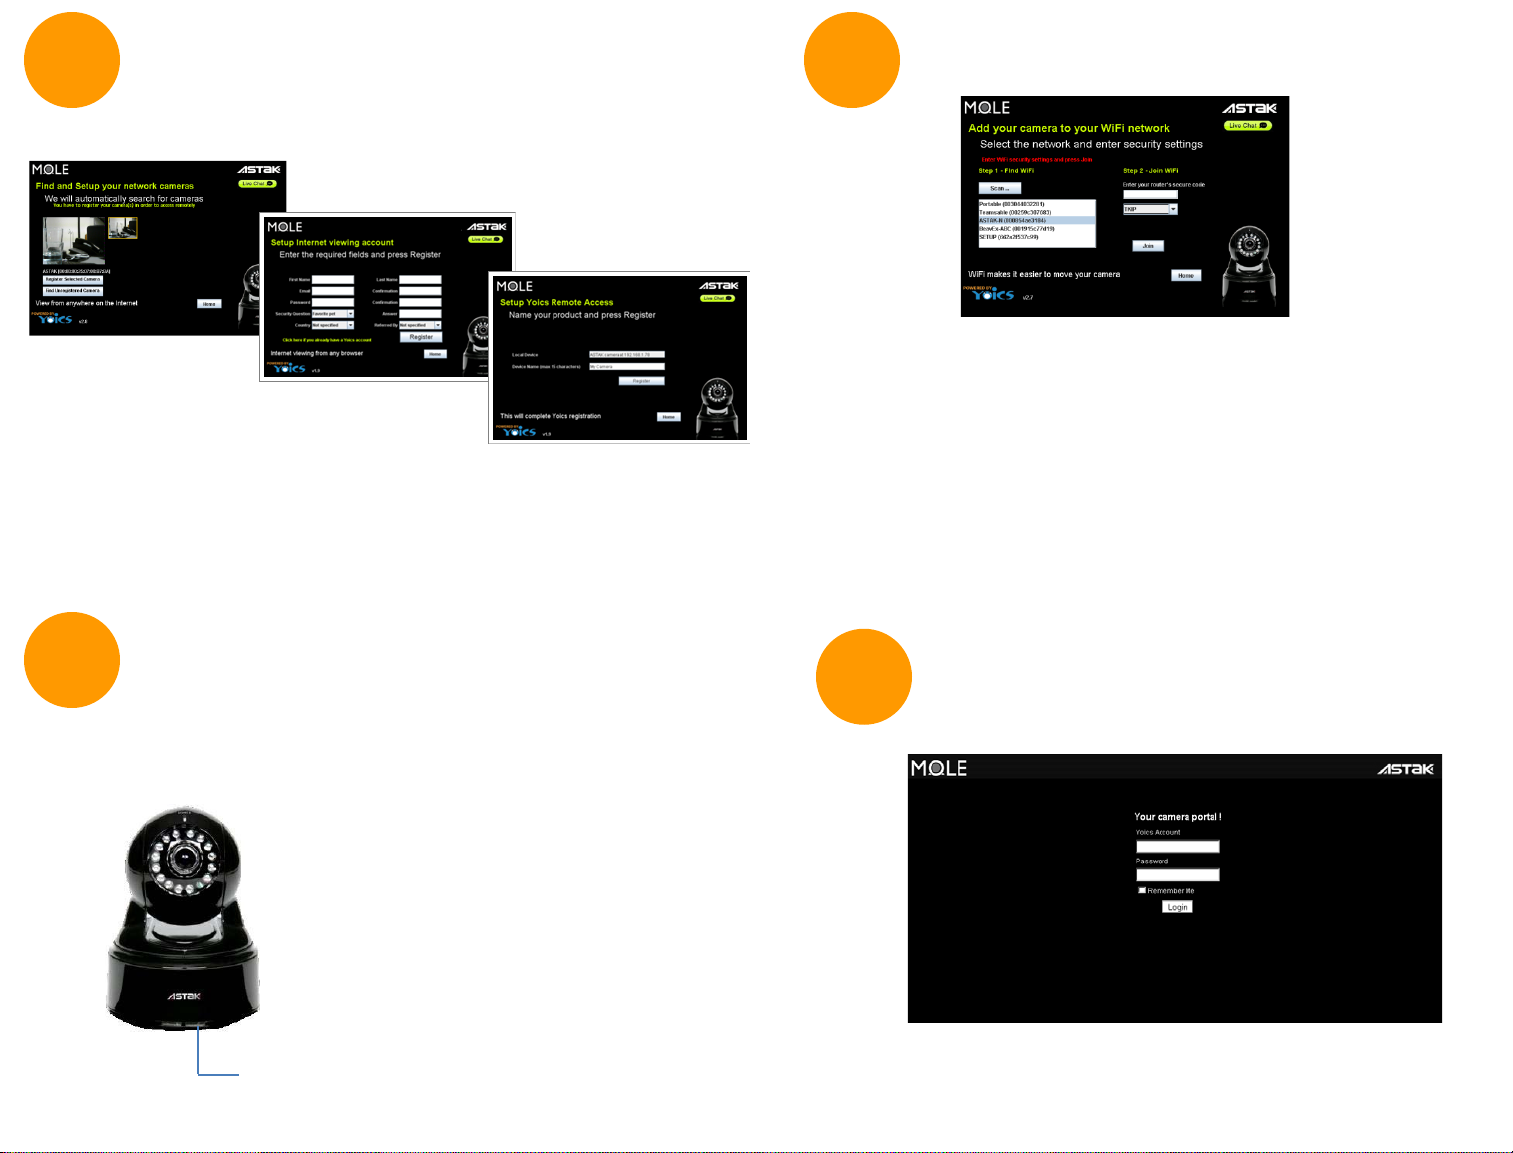
1. WiFi networks are scanned and listed
2. Select the network and enter security code
3. Press Join to check then activate WiFi
4. Follow verification steps to ensure access
5. Disconnect both Ethernet Cable and Power
Plug in the power ONLY to restart the camera
6.
in WiFi mode
Note: WiFi access varies by distance and position.
WiFi Setup (Optional)
6
After plugging the power back, the LED on
the front of the camera will turn blue to let
you know that it has connected successfully
over WiF i.
Note:
To go back to Ethernet mode, unplug
the power from your camera, plug in
an Ethernet cable, and plug the power
back in to the camera.
Network Indicator LED
Login at:
7
mole.yoics.com
Please bookmark this page for future
reference.
Page 3

A-1
Quicktime Setup
If you experience any problems viewing the camera
through Firefox, Chrome, or Safari browser, please
see the instructions below:
Open QuickTi me, select Pr eferences, and Quicktime
Preferences from pull dow n menu.
•Click Advanced tab. On Transport Setup pull down menu,
choose Custom. Set Transport Protocol to HTTP and click
the Port 80 button. Cl i ck OK.
For Mac OS X 10.5, Qui cktime Pr eferences ar e set from
System Preferences. With QuickTime Player open, select
QuickTi me Preferences from the QuickTime Player pull
down menu.
A-2
If you are using Microsoft’s Inter net Ex plorer, the first
time that you view your camera you will be prompted
to install software plug-in.
ActiveX Plug-in
•Advanced: From the T ransport Setup pull down menu,
choose Custom. Set Transport Protocol
to HTTP and click the P ort 80 button. Click OK.
For Mac OS X 10.6 Snow Leopard Instead of the
preference panel on QuickT ime, use rs need to change
the setting using a command li ne in the Terminal pr ogr am.
•Terminal is normally found in the Utilities folder under the
Applications folder. Please open the Terminal and enter
the following command:
qtdefaults writ e TransportSetting s HTTP 80
Note: Record and Snapshot functions are not available
because of Quicktime Player limitations.
Page 4

A-3
Image and Video Settings
Advanced Settings
Motion detection, YouTube,
Twitter, Email, FTP, Security,
+ more
A-4
Getting Local IP Address
Easily find cameras at your location.
System logs & upgrades
*Please check our Advanced User Guide for
more information.
A-5
On your Smart Phone
1. Use the CamSearch tool in the CD (For
Windows users only)
2. Use the Yoics device finder at:
www.yoics.net/web/FindDevice.aspx
A-6
Optional “Pro Service” from Yoics*
Web Browser and Mobile Access Yoics Basic
(Free)
Web/Mobile Connection per day 10 100
Web/Mobile Connection time per session 30 Minutes 2 hours
Simultaneous Web/Mobile Device
Connection
1 10
Yoics Pro**
($24.95/Yr.)
1. Go to astak.yoics.com using your mobile web
browser.
2. Login using the same Yoics username and
password you registered with Yoics.
3. After login, choose your camera from the list.
Tip: You can bookmark the site for easy access later .
Advanced Sharing Control (time limits, etc) No Yes
Sharing with non-Yoi cs users No Yes
Advertising Free Access No Yes
Cost Free $24.95/Yr
*Yoics is a third-party company providing remote access for Mole cameras.
The remote access service (Yoics Basic) is free for all Mole users.
**Yoics provides optional “Pro Service” for Mole users for a fee ($24.95/yr).
For more details, please check: http://www.yoics.com/category/services/
 Loading...