

Page 1

G660 User’s Manual
Page 2

CONTENTS
1.
2.
3.
Before Use
Cautions upon Use
Package Components
Names of Product Components
Installing the Power
Installing in the Vehicle
Basic Product Functions
Using the Memory Card
Firmware Update
Key Product Features
How to Operate the Product
Voice Guidance on Product States and LED Display
Checking through the Micro SD Card
PC Viewer Features
4.
Installing the PC Viewer
PC Viewer Features
Product Specifications
Product Specifications
Page 3

Cautions upon Use
Information
Contents intended to prevent potential dangers by notifying consumers on the level of damage
(bodily, monetary) of product safety matters (electric shock, fire, explosion) in cases of consumer
misuse. Read the following contents carefully for proper use.
Chapter 01┃ Before Use
Safety Warnings – Failure to observe the
safety instructions within this category could
result in serious injury or death.
Product Related
Do not disassemble, repair or modify the product.
Such acts may result in electric shock. For inspections or repairs, please visit your place of purchase or a designated repair
center. The occurrence of accidents due to disassembly, modification or other forms of abnormal operations may prevent you
from receiving maintenance services.
Quickly turn off the power within abnormal states, such as smoke or burning smells coming from the device.
Such as lead to fire or electric shock.
Keep device away from water source.
As the device is not waterproof, such acts could result in product malfunction and lead to fire or electric shock.
Safety Cautions – Failure to observe the
safety instructions within this category could
result in system error or damage.
01
01
Before Use
Page 4

Cautions upon Use
Product related
Never clean the product with chemical materials, such as benzene or thinners.
Such materials may damage the device surface or cause internal malfunctions.
Do not subject the product to severe shock or introduce foreign objects.
Please heed caution as the introduction of foreign substances could lead to product malfunction.
Chapter 01┃ Before Use
02
01 Before Use
Always maintain the front side of the product in a clean state.
If foreign substances or stickers are placed in front of the product lens, normal recording is not possible.
In addition, placing other objects in the vicinity of the product may be visible through reflections in the mirror. Never place
other objects nearby the product.
Firmly fasten the product when installing for the first time.
Improper installation could result in abnormal product operation or the product may fall off while driving.
Following installation, heed caution not to subject the product to excessive force and shock.
When connecting the product power, use the genuine power cable supplied by our company.
The use of non-genuine power cables or connecting the cable to other products may result in malfunction or fire.
If the product breaks, continued use may lead to hand or face injury. Visit a service center for repair before
use.
Page 5

Cautions on Safety and upon Use
Driving related
Refrain from prolonged use with the ignition turned off.
Such acts could lead to battery discharge.
Do not watch or operate the product while driving.
Operating the product while driving may result in accidents.
Heed caution as the quality of recorded videos may not be good in cases of sudden changes to brightness, such as when
entering a tunnel, when the backlight is very strong, or when there is no light source during the night.
Refrain from excessive front window tints.
Heed caution as videos recorded within vehicles with sun tints may be somewhat blurry or distorted.
Chapter 01┃ Before Use
01 Before Use
Heed caution as event data may not be recorded within this product in cases of accidents under a certain impact level.
In such cases, it is possible to use the manual recording feature to manually record such videos separately. If not, such are recorded as
infinite recording files.
Heed caution as video data may not be recorded if the device power becomes disconnected during a major accident.
Power installation must be done by a installation specialist.
The method of installation may differ depending on the vehicle. User installations may result in vehicle and product malfunction.
Damage to the vehicle and/or product caused by user installation/disassembly is the sole responsibility of the user.
03
Page 6

Chapter 01┃ Before Use
Cautions on Safety and upon Use
GPS Related
Semi-commercial GPS products possess a margin of error of approximately 15m.
Buildings, underground roads, tunnels, and roadside trees could increase the margin of error or prevent the GPS from being properly
received.
The time required to receive the GPS signal from the point of turning on the device could be more than 10 minutes
depending on the weather or environmental conditions.
01 Before Use
04
Page 7
Package Components
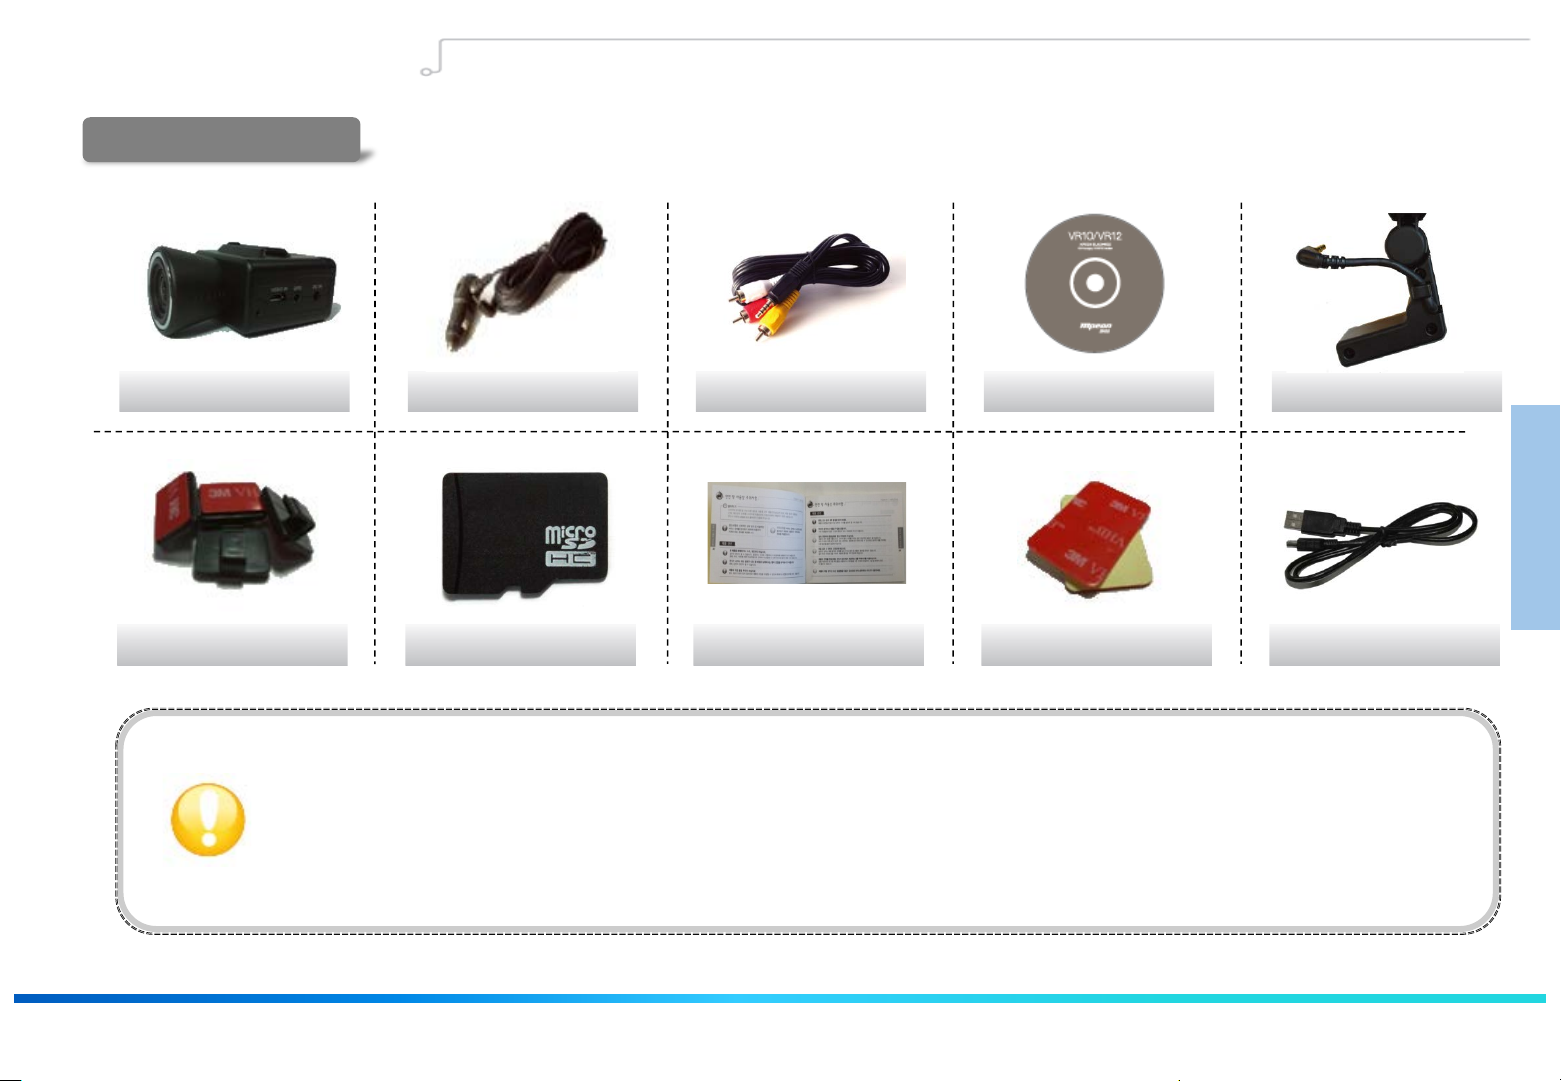
Basic Components
Chapter 01┃ Before Use
Camera Power Cable A/V Cable
Cable Organizer Micro SD Card User’s Manual
• Check to see that all of the product components, shown above, are included.
• In case of missing components, please contact your place of purchase.
• The contents of this user’s manual are subject to change without prior notice for product improvement.
• Additional basic components are sold separately.
Installation CD
Extra Adhesive Tape
GPS Receiver
USB Cable
01 Before Use
05
Page 8
Chapter 01┃ Before Use
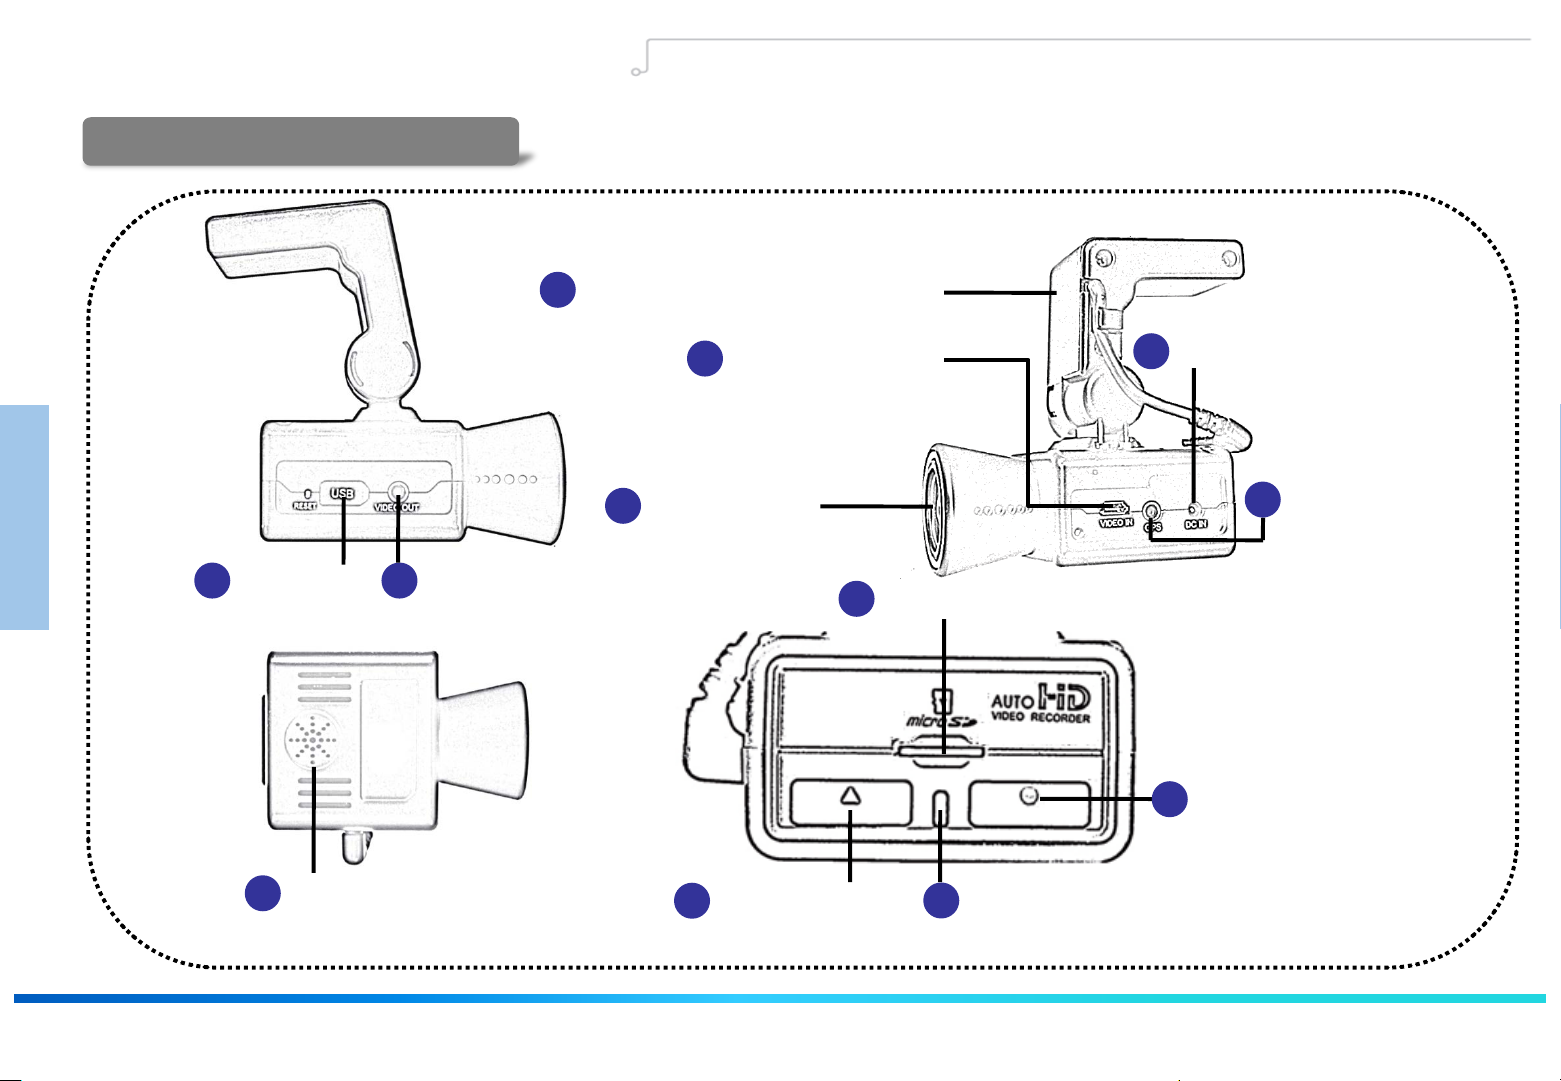
Names of Product Components
Names of Product Components
12
Mount (external GPS included)
DC Power Input
11
Video Input port
01 Before Use
Camera Lens
4
6
Terminal
10) GPS
10
Input terminal
06
2
USB Port
Speaker
3
※ The outer appearance may differ with the actual product and is subject to change without prior notice for performance and quality improvements.
1
VIDEO Output port
Cancel Button
4
Micro SD Slot
7
6
LED
Record Button
6
Page 9

Chapter 01┃ Before Use
Names of Product Components
Descriptions of Product Components
Name Description
1) VIDEO output port Displays live video of recorded scenes .
2) USB Port When connected with a PC, plays recorded videos and used to copy files to storage devices.
3) Speaker Outputs product operating states through voice guidance.
4) Camera Lens
Record Button( ) Button related to recording and settings.
5) Button
Cancel Button ( ) Button related to canceling recording and settings.
6) LED Displays the various operating states through LED (red / green).
7) Micro SD Slot Micro SD card slot. (Check to see that the card side before inserting.)
8) Microphone Built-in microphone records sounds.
9) DC Power Input terminal This is the vehicle DC power input terminal. (12V ~ 24V)
10) GPS Input terminal This is the GPS input terminal.
11) VIDEO Input port The rear view camera is connected through the video input port.
12) Mount
Films the front of the vehicle.
(Heed caution so that foreign substances do not cover the front of the lens.)
Structure that is convenient to attach to the room mirror.
The mount is integrated with an external GPS.
01 Before Use
07
Page 10
Chapter 01┃ Before Use
Installing in the Vehicle
Caution upon Installation
• Please refrain from repeated detaching/re-attaching once the product has been installed.
• Do not install or use the device outside of the vehicle.
Attach the device in a place where the driver’s field of vision is not blocked.
01 Before Use
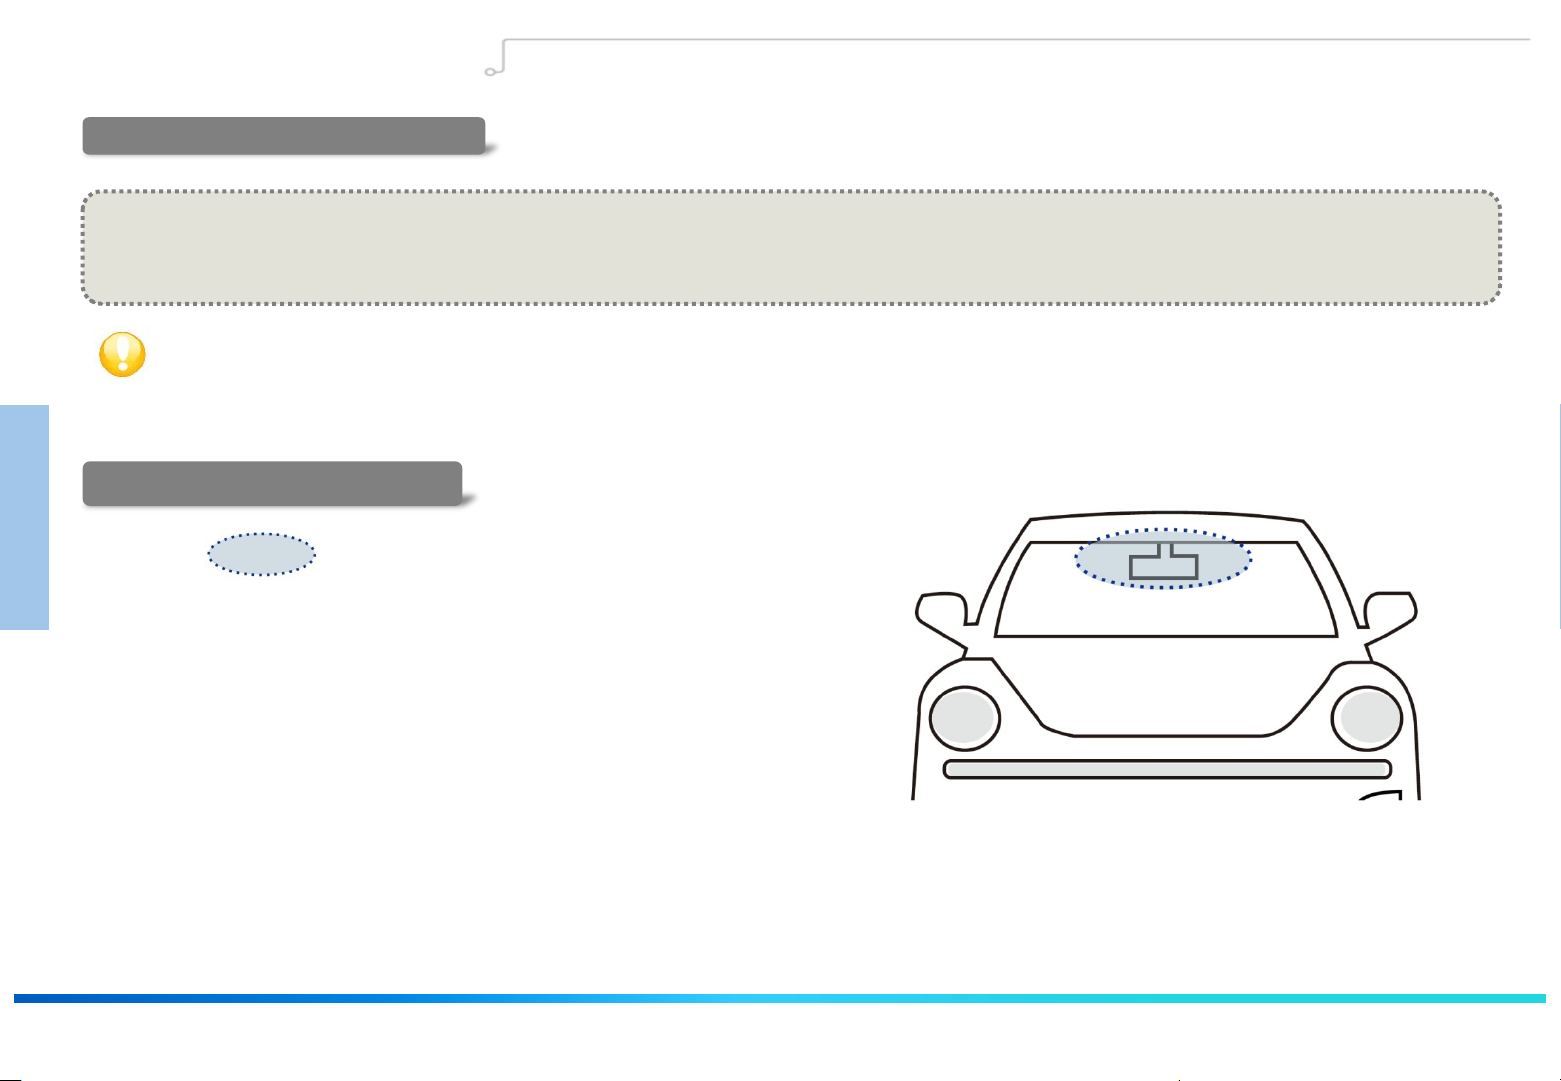
Position of Installation
• Position: recommended area of Black box installation
08
•After attaching the Black box to the recommended installation area, use
the product handles to adjust the camera so that it is horizontal and
facing the front.
(Here, heed caution so that there are no obstructions in front of the
lens.)
Once power is turned on, the product led will turn on and "Starting
Infinite recording” voice guidance is provided and recording will start.
Page 11
Installing in the Vehicle
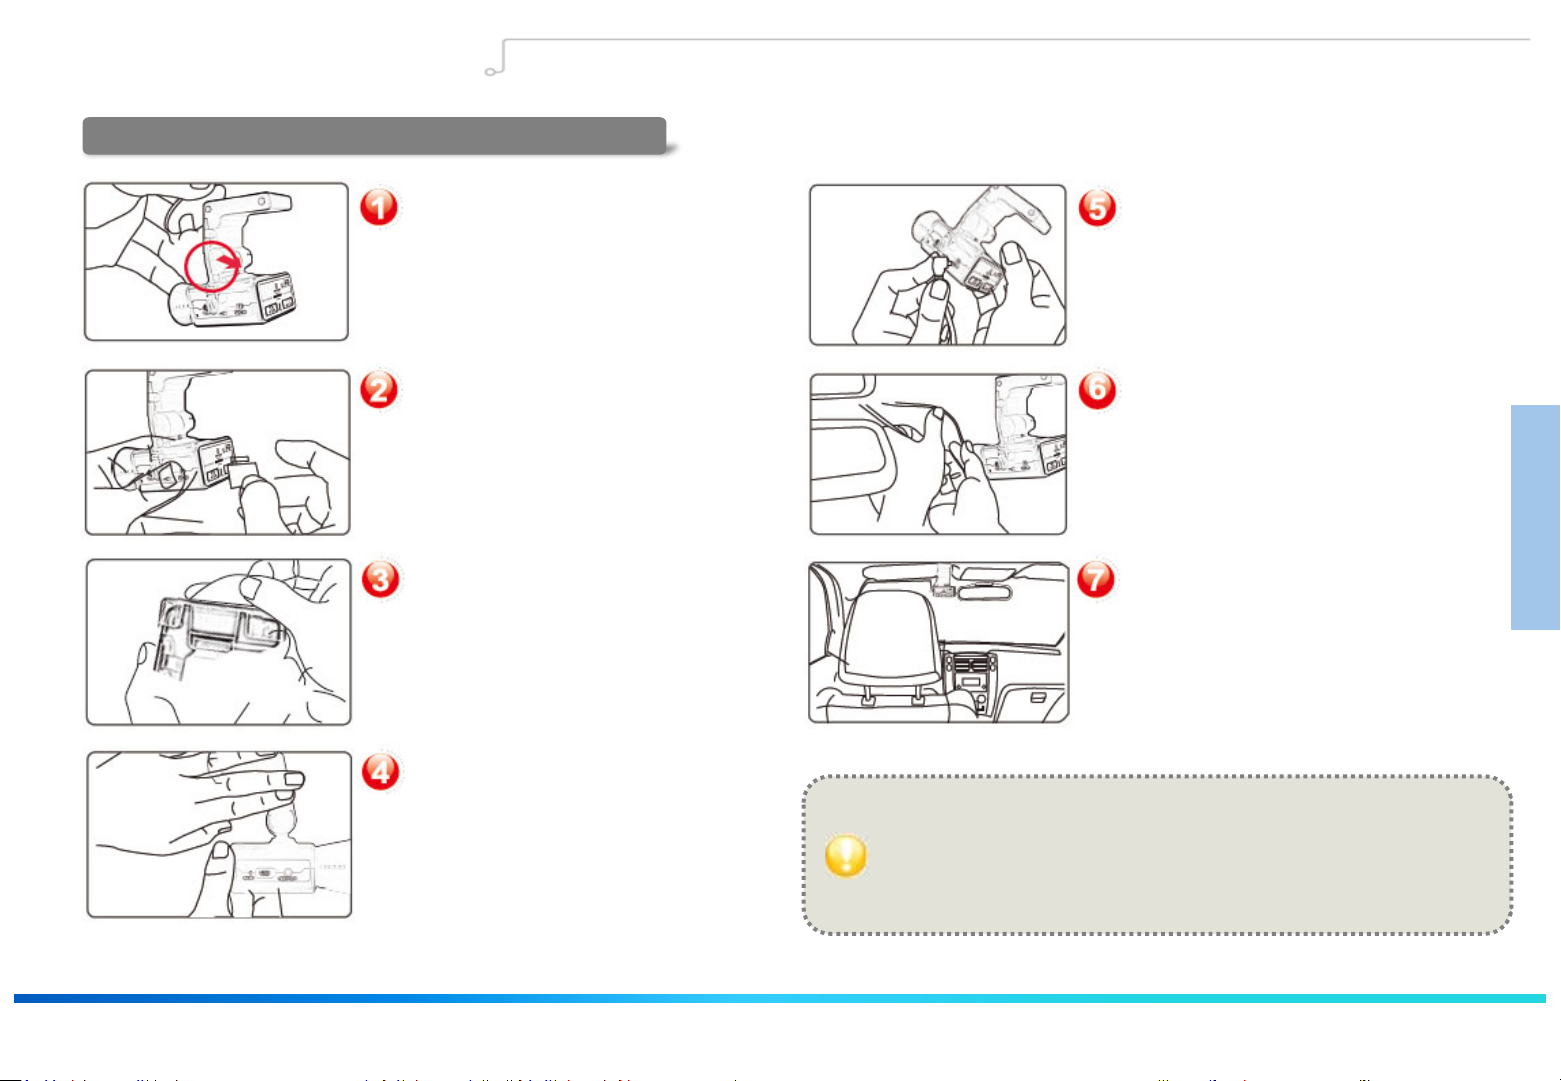
Connecting the camera to the vehicle
Chapter 01┃ Before Use
Connect the Main Unit and the Mount
Place the groove at the top side of the main
unit against the groove area on the mount and
push until a “click” sound is heard.
Insert the Memory Card
When inserting memory cards, check to
see that the correct side of the card is
facing up before inserting into the slot.
Remove Double-sided Tape
Remove the double-sided tape attached to
the mount.
Connect the Main Unit and the
Mount
Attach the device at an appropriate
position, turn the handles to adjust the
footage angle of the product so that the
camera is facing the front and the vehicle
interior. Here, heed caution so that there
are no obstructions in front of the lens.
Connect Cigarette Jack (Main Unit)
Connect the cigarette jack cable with the
main unit.
Organize Power Cable, Connect
Power
Use the cable clip to organize the power
line and connect the power with the
cigarette jack socket.
Vehicle Installation Complete
After turning on the ignition, check to see
whether the device LED turns on.
Recording will start once the LED turns on
and "Starting Infinite power recording.”
voice guidance is provided.
• Attaching the device in a position that interferes with driver’s field of
vision or with vehicle operations could result in accidents.
• Firmly attach the device so that it does not move or fall off while
driving.
01 Before Use
09
Page 12

Installing in the Vehicle
Inserting the Memory Card
Chapter 02┃ Basic Product Functions
02
10
• Insert the memory card with the part where the cut edge facing up. (refer to the product image above)
Basic Product Functions
• Fully insert the card into the card slot.
• After inserting, connect the power plug and check whether the memory card is properly inserted through the
voice guidance.
Memory Card Recommendations and Cautions
※Supported Memory Cards : Up to 32GB (Class 10 recommended)
Cautions upon Using Memory Cards
If the card is not fully inserted, then footage may not record properly. Make sure to fully insert the card until you hear the 'click’
sound.
Heed caution not to touch card contact area (gold area) or introduce foreign substances.
Do not use the memory card used within the product for other purposes. Such could lead to abnormal operation.
When purchasing Micro SD cards, compatibility issues may exist even with some genuine products.
If such occurs, visit your place of purchase.
Do not take out memory card during the recording. It will cause the data loss and other functional errors.
Page 13

Chapter 02┃ Basic Product Functions
Using the Memory Card
Recording Times by Memory Capacity
The recording times shown below are the maximum values calculated for each recording mode and may slightly differ upon actual use.
Infinite Mode Parking Mode
Memory
Size
8GB
16GB
32GB
Classification
Infinite
Recording
Event
Recording
Manual
(Forced) Event
Recording
Parking
Recording
Event/ Motion
Recording
Max saving time 32 minutes 7 minutes 5 minutes 36 minutes 23 minutes
Max No. of Files 64 Files 15 Files 10 Files 72 Files 47 Files
Max saving time 65 minutes 15 minutes 11 minutes 74 minutes 49 minutes
Max No. of Files 131 Files 31 Files 22 Files 148 Files 98 Files
Max saving time 126 minutes 31 minutes 21 minutes 143 minutes 95 minutes
Max No. of Files 253 Files 62 Files 42 Files 287 Files 190 Files
Reference
<Standard>
-HD level 2CH 30fps Infinite recording
- H.264 Encoding
- 8Mbps (high resolution)
- High Profile
<Memory occupation by recording
mode>
- Infinite Mode : 75%
- Parking Mode : 25%
02
11
Basic Product Functions
Recording times may partially change with future firmware updates.
Page 14
02
Chapter 02┃ Basic Product Functions
Firmware Update
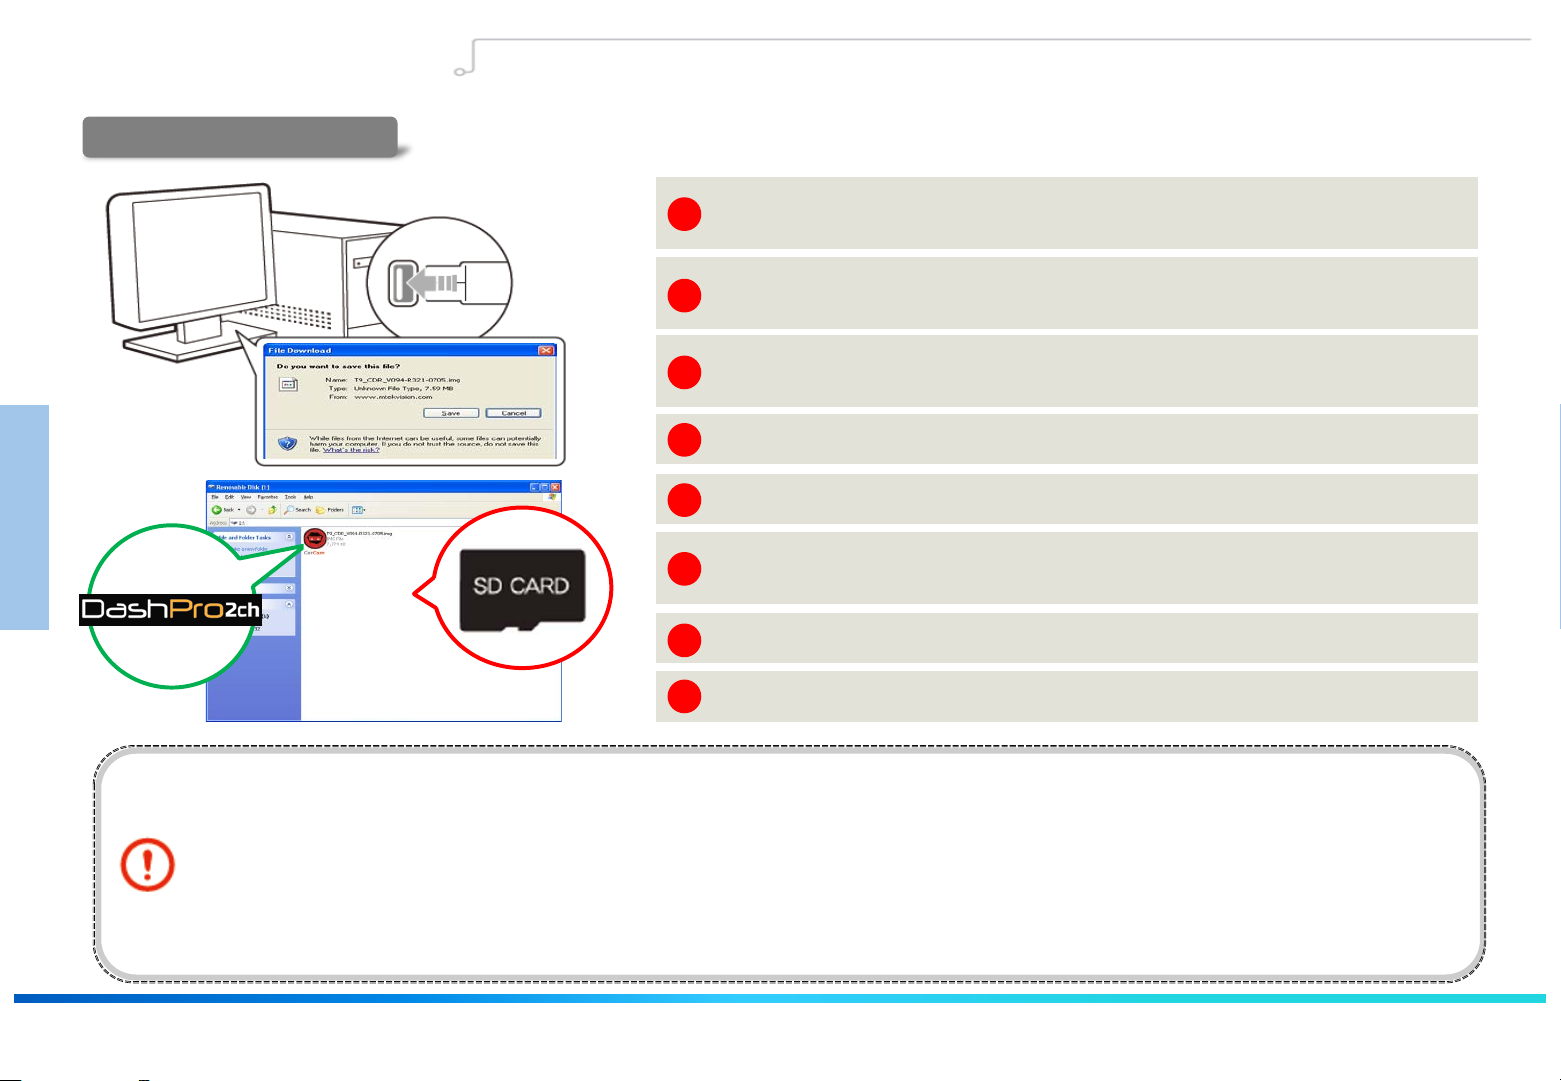
Firmware Update
Download the firmware from the following website.
1
Remove the Micro SD card from the device and use a card reader to
2
connect with the PC.
Back up data currently in the memory card separately and format the
3
memory card.
Basic Product Functions
COPY
Copy the downloaded firmware into the SD card.
4
Insert the SD card with the firmware copied and turn the power on.
5
At such time, the red LED will remain on.
6
Once the firmware upgrade is complete, the LED will change to green.
12
Cautions upon using
Memory Cards
Once upgrade ends, the downloaded firmware is automatically deleted.
7
Once upgrade is complete, the device will automatically reboot and
8
recording can begin.
• Problems may occur within SD cards that have been used for prolonged periods of time.
• Regularly format the SD card for use.
• When formatting SD cards, set the format type as FAT32.
• For stable recording functionality, the entire capacity of the SD card is not used.
Page 15

Key Product Features
Chapter 02┃ Basic Product Functions
Key Product Features
1. 720P HD Resolution Real Time Recording
Within the HD (1280 x 720) resolution of the
16:9 WIDE screen, recording is conducted up
to max 30 frames. A 2-million resolution
camera suited to HD resolution has been
equipped.
2. VIDEO-OUT Features
Navigation systems and external monitors
can be connected to be display live video .
3. Voice Recording
Sounds are recorded through the built-in
microphone. In addition, it is possible to turn off
the microphone within the Configuration window
for personal privacy protection.
4. Compatibility with various memory
Supports up to 32GB memory cards.
5. Mount Structure
Designed so that the Black box frame can be
freely adjusted upwards/downwards while
the wide viewing angle (120 degrees) enables
monitoring of the vehicle exterior.
6. Dedicated Video Player
Through the dedicated PC program, the video
and voice data saved within the memory card
are used to view driving video, vehicle information,
time information and location information.
In addition, recorded videos can be captured
to print or save as image files.
7. Configurations Feature
02
13
Basic Product Functions
Through the Configuration window, users
are able to modify the recording speed,
video quality, sensor sensitivity, voice recording
settings and other settings.
Page 16

Key Product Features
Various Recording Features
8. Various Recording Features
Chapter 02┃ Basic Product Functions
02
14
Continuous Recording
Normal video files are saved starting from device
turning on until turning off. If the data exceeds the capacity
of the Micro SD card during continued recording,
files are sequentially deleted starting with the oldest file
in order to record new videos.
Basic Product Functions
(saved as inf file name, Example: inf_20120410_121030A)
Event Recording (Impact Detection Recording)
In the case of an accident, sudden braking, sudden acceleration,
sudden turn, or some other form of impact on the vehicle,
the 3-axis acceleration sensor is used to save event files totaling
1 minute each comprised of 10 seconds prior to impact and
50 seconds after impact.
(Impact detection recording during Infinite recording
Saved as evt file name,
Example: evt_20120410_121030A, Impact detection
recording during Parking recording saved as epk file name,
Example: epk_20120410_121030A)
Manual Recording (Emergency Recording)
If the user presses the Manual record button, then the
corresponding video will be saved as a manual recording
file even when there is no impact.
(saved as man file name, Example: man_20120410_121030A)
Motion Event Recording
When requiring parking recording that records only
when there is movement, motion event recording can
be used. The Configuration window can be used to set
motion event recording for parking recording only
when there is movement.
(saved as epk file name, Example: epk_20120410_121030A)
9. GPS Driving Information Saving
Through GPS data, the dedicated program
can be used to check various related information,
such as driving routes, speed information and
driving time information.
Page 17

How to Operate the Product
Operating the Product
After product installation, if the vehicle power or the ignition is turned on, the red / green LED is alternately displayed and then
after about 10 seconds, and then the red LED will blink twice, and then the LED will blink as green and the ‘Starting recording’
Power ON
voice guidance will sound to indicate that recording is starting in infinite recording mode.
After power is connected, the mode will always start as infinite recording mode.
Chapter 02┃ Basic Product Functions
Power OFF
Continuous
Recording
If the vehicle ignition is turned off or the power cable is removed, then the ‘Dong Ding’ voice guidance will sound and the red
LED will blink. The device will completely turn off after the LED turns off.
The power will turn off after the LED is completed off.
After power is connected, inside the super-cap is not charging, if you want to power off , it will cause abnormal
operation. so please be careful. (Super-cap charging after power on, wait at least 1 minute fully charging.)
Once booting is complete, the green LED will turn on and the ‘Starting recording’ voice guidance will sound and recording mode
will start.
(When voice recording is set to Off, the green LD will be displayed as ON state upon conducting infinite recording.)
Turning Voice Recording Off
For personal privacy protection, Voice Recording can be turned off. While recording is stopped, pressing and holding
cancel button will turn voice recording On/Off.
(It is also possible to turn Voice Recording On/Off by using the program Configuration window.)
When Voice Recording is On, the green LED will blink during Infinite Recording.
When Off, the green LED will remain ON during infinite recording).
02
15
Basic Product Functions
Page 18

How to Operate the Product
Operating the Product
An accident, sudden braking, sudden acceleration, sudden turn, or some other form of impact on the vehicle is detected
by the built-in sensor.
Event
Recording
The ‘Bee Beep’ voice guidance will sound and the red /green LED will blink alternately to indicate that an event video is
being recorded. Once event recording is complete, the device will automatically convert back to infinite recording
mode.
Chapter 02┃ Basic Product Functions
02
16
Basic Product Functions
Manual
Recording
During infinite recording, if the user wants to record a video even though there is no impact, press the button.
The ‘Bee Beep’ voice guidance will sound and the red /green LED will blink alternately to indicate that a manual video
is being recorded. Once manual recording is complete, the device will automatically convert back to infinite recording
mode.
Page 19

How to Operate the Product
Voice Guidance on Product States and LED Display
Chapter 02┃ Basic Product Functions
State Operating State
Power ON Power turned On -
Power OFF Power turned Off - Blinks 3 times OFF “Dong Ding” “Dong Ding”
GPS Connection GPS initially connected -
Start Infinite
Recording
End Infinite
Recording
Event Start
Event End
After power is connected,
immediately converts to
infinite recording mode
In infinite recording mode,
stops infinite recording
In infinite mode, changes to
event recording
Automatically converts from
event recording to infinite
mode
Button
Operation
- OFF
Shortly press
-
- OFF
RED LED GREEN LED
After ON for 0.2
seconds, turns ON after
10 seconds and then
blinks twice
On for 0.1 second in 3
second cycles
ON OFF - -
Normal blinking
(Alternates)
ON for 0.2 seconds
(After red is ON for 0.2 seconds)
-
. Voice Recording ON : Normal
blinking
. Voice Recording OFF: ON
Normal blinking
(Alternates)
. Voice Recording ON : Normal
blinking
. Voice Recording OFF: ON
Voice Guidance Beep
“Location information
(Voice guidance upon
initial connection)
“ Starting recording.” “Bba~bam”
Voice Guidance
- -
is detected”
“Bee Beep” “Bee Beep”
- -
“Ding ~ Dong”
02
17
Basic Product Functions
Start Manual
Recording
End Manual
Recording
Changes from infinite
recording mode to manual
recording mode Shortly press
Automatically converts from
manual recording mode to
infinite recording mode
- OFF
Normal blinking
(Alternates)
Normal blinking
(Alternates)
. Voice Recording ON : Normal
blinking
. Voice Recording OFF: ON
“Bee Beep” “Bee Beep”
- -
Page 20

How to Operate the Product
Voice Guidance on Product States and LED Display - 2
Chapter 02┃ Basic Product Functions
02
Basic Product Functions
18
State Operating State
Eject Micro SD When ejecting Micro SD - Normal blinking OFF
Insert Micro SD When inserting Micro SD - ON OFF - -
Insert Defective
SD
When requiring
SD Card
Formatting
When conducting
SD Card
Formatting
When inserting a defective
SD
When SD card requires
formatting
When conducting SD card
formatting
Button
Operation
- Normal blinking OFF
- - - “Ddiling Ddiling” “Ddiling Ddiling”
- - - “Ddiling Ddiling” “Ddiling Ddiling”
RED LED GREEN LED
Voice Guidance Beep
“Storage is not checked.
Please insert it”
“Please check the storage
Voice Guidance
device”
“Ddiling Ddiling”
“Ddiling Ddiling”
Page 21

How to Operate the Product
Voice Guidance on Product States and LED Display - 3
Chapter 02┃ Basic Product Functions
State Operating State
When connecting rear
view camera
When disconnecting
rear view camera
System Error
Key Input When Key input - - - “Ding~” “Ding~”
ON the voice recording Turn on the voice recording
OFF the voice recording Turn off the voice recording
When connecting rear view
camera
When disconnecting rear
view camera
When camera and recording
device reset has failed
Button
Operation
- - -
- - -
-
Press and hold
Press and hold
RED LED GREEN LED
Normal
blinking
OFF
OFF ON “Ddiling Ddiling” “Ddiling Ddiling”
OFF
Normal
blinking
Voice Guidance Beep
“Rearview recording is selected”
“Rearview recording is released”
“Please reboot”
“Ddiling Ddiling” “Ddiling Ddiling”
Voice Guidance
“Ddililing(↑)”
“Ddililing(↓)”
“Ddiling Ddiling”
02
19
Basic Product Functions
Page 22

02
Chapter 02┃ Basic Product Functions
Checking through the Micro SD Card
1. Eject the Micro SD card from the device and use a card reader to connect with the PC.
2. Once connected with the PC, a removable disc will be started.
3. As shown in the figure, pressing “open folder to view files” will display the folder.
1
Basic Product Functions
2
5
20
【 Micro SD card contents 】
【 Record folder contents 】
3
4
6
7
8
9
【 Front folder contents 】
Page 23

Checking through the Micro SD Card
Record : Folder with recorded files
1
• As folder in which recorded video files are saved, includes Front/Rear folders.
• Front folder : Folder where front camera video files are saved
• Rear folder : Folder where rear camera video files are saved
• Front/Rear folders include Infinite/ event/ parking/ parking event/ manual files.
sys_data.ini : System Information
2
• Save user set information : resolution, impact detection, even setting, camera setting, etc.
Front folder : Folder where front camera video files are saved
3
• Includes Infinite/ event/ parking/ parking event/ manual files related to front camera videos.
Rear folder : Folder where rear camera video files are saved
4
• Includes Infinite/ event/ parking/ parking event/ manual files related to rear camera videos.
Chapter 02┃ Basic Product Functions
02
Basic Product Functions
Parking event recording files (epk) : Event files (impact/motion) that occur during parking recording mode
5
Parking recording files (pak) :Files recorded during parking recording mode (require special power
6
supply)
7
Event recording files (evt) : Event files (impact) that occur during infinite recording mode
8
Continuous recording files (inf) : Files recorded during infinite recording mode
9
Manual recording files (man) : Files recorded manually during infinite recording mode
21
Page 24

Installing the PC Viewer
Chapter 03┃ PC Viewer Features
03
22
PC VIEWER Features
1) double click
the G660 CarcamPCViewerSetup
file.
2) In the installation window,
click “Next” to start installation.
3) Designate the folder where you
wish to save. If there are no
changes, click “Next”.
4) To continue, click “Next”. To save as a
different name, enter the desired name.
5) Check the desired icons you want to
create and click “Next”.
6) Once the installation setup is complete,
click “Install” to conduct installation.
To return to a previous screen,
click “Back”.
Page 25

Installing the PC Viewer
1) To install Microsoft Visual C++ 2008
Redistributable, click “Next”.
2) Click “Next”.
Chapter 03┃ PC Viewer Features
03
PC VIEWER Features
3) Check the “I agree” box and click
“Install”.
4) After installation is complete, click “Finish”.
5) Once the PC Viewer is properly installed, the
G660 CarcamPCViewer and
PCViewerConfEditor shortcut buttons will be
displayed on your desktop.
23
Page 26

03
PC VIEWER Features
PC Viewer Features
1
2
5
Chapter 03┃ PC Viewer Features
Main Control
1
Play Control
2
File List & Accelerometer Information
3
Map
4
Setting Button
5
Information :
PC Viewer image and functions may partially
change with future updates.
24
3
1. Main Screen
Recorded files in file list are shown simultaneously as 2CH video.
2. Play Control
1) Play: After selecting the file to play, the file can be played by clicking
the play button or double-clicking the file from the file list.
2) Play in Frame units: The button can be used to play in Frame units.
3) Speedometer / Compass: If GPS information exists within the video,
displays the speed and direction.
4) Video Capture: The currently playing video screen is saved or printed.
Play previous file
Defog
Decrease Play
speed(-5~+5)
4
Play/Pause (Toggle)
Increase Playspeed (-5~+5)
Move in Frame
units (forward direction)
Stop
Play next file
Play position
Video Capture
(File or Printer)
Volume control
Speedometer
(KM/H,MPH)
Compass
Page 27

PC Viewer Features
3. File List
Chapter 03┃ PC Viewer Features
1) Add Video Files
① Add Directory using Buttons
- Click the ‘+’ button to select directory
- Select the Directory to open then press OK
② Add File using Buttons
- Click the ‘+’ button to select file
- Select the file to open then press OK
③ Add Directory using Drag & Drop
- Drag & Drop is possible within the UI except only the Map area.
- Same as adding by using the ‘+’ button.
④ Add File using Drag & Drop
- Drag & Drop is possible within the UI except only the Map area.
- Same as adding by using the ‘+’ button.
3) Select Video Type
When the right-side mouse button is pressed within the fie list title area, the
selection menu shown below is displayed. The file list is sorted in ascending
or de r.
4) Sort File List
When opening a directory of the same structure as in the Black box memory
card, the file list is sorted in ascending order according to the date and time.
Other added files are not sorted and added at the very end.
Double-clicking the file list header will resort the file list. Each time the
header is clicked, the sorting order is changed between ascending and
descending order.
03
25
PC VIEWER Features
2) Delete Video Files
① Use the ‘-’ button to delete
② Use the DEL key to delete
Information :
PC Viewer image and functions may partially change with future updates.
Page 28

PC Viewer Features
Chapter 03┃ PC Viewer Features
4. Partial Video Zoom-In
03
PC VIEWER Features
1) Partial Video Zoom-In
Select the area to zoom-in on by dragging with the mouse.
The zoom-in area is shown on the opposite side. If the area
is not properly selected, then video zoom-in is canceled.
2) Cancel Partial Video Zoom-In
Within the zoom in video, right-clicking with the mouse will
cancel video zoom-in.
26
6. G-Sensor Information
5. Full Screen Mode
1) Full Screen Mode
Double-clicking the play screen will convert to Full Screen mode.
2) Cancel Full Screen Mode
Double-clicking the screen or pressing the ESC key will cancel
Full Screen mode.
3) Play Control Bar
Moving the mouse towards the bottom-side of the screen will
display the play control bar.
1) G-sensor information can be viewed by clicking the Sensor Tab.
Information:
PC Viewer image and functions may partially
change with future updates.
Page 29

PC Viewer Features
Chapter 03┃ PC Viewer Features
7. Map
If GPS information exists within
the video, then the map is displayed
at the bottom right side.
Upon clicking, the play position will jump
to the selected position to begin playing.
Jump play the same role as the play
progress bar.
If GPS information does not exist or the
Internet is not connected, then a logo
is displayed within the map display area.
8. Automatic Recognition of
Black Box Memory
If the program is started with the black box connected to the system, the
videos within the black box memory are automatically added to the list.
If the black is connected to the system after
the program has started, the following window
is displayed. Clicking the window will
automatically add the videos within the black
box memory to the list. At this time, the
previous list is reset.
9. Video Capture
While playing, clicking the video capture button will save or print
the current screen.
10. Defog
Feature used to capture current screen and make the image clearer.
The +, - buttons are used to enlarge/reduce the image while the mouse
is dragged to move the image.
: Reset video size
Defog scale: 0 ~ 15 (0: original image)
Save : Saves resulting file
Print : Prints resulting file
03
27
PC VIEWER Features
Information:
PC Viewer image and functions may partially change with future updates.
Page 30

Chapter 03┃ PC Viewer Features
03
PC VIEWER
28
PC Viewer Features
기능설명
Configuration
For your convenience, the function of the black box is a program to easily configure the
settings.
• Recording Settings : Recording-related functions should set.
• Camera Settings : Camera-related functions should set.
• Parking Setting : Parking must set mode-related functions.
• ETC setting : Other settings should function
• Viewer settings : PC Viewer-related functions should set.
Information :
Configuration menus can be used by clicking the Configuration button on the top right side of
the PC Viewer or by starting the PCViewerConfEditor.exe file.
Information :
Settings files can be opened by Drag & Drop, but applies only to sys_data.ini files . If the file
name is different, use the Open button to open.
Information :
Configurations are normally saved within the sys_data.ini file within the Black box memory
card.
However, “Viewer” settings limited to the PC Viewer are saved within the PC registry.
1
2 3 4 5
6
Saves setting and closes Configuration.
1
2
Applies changes
3
Changes file to save settings
Restores default values
4
5
Closes the Configuration screen
Opens a Settings file
6
Information:
PC Viewer image and functions may partially change with future updates.
Page 31

PC Viewer Features
Chapter 03┃ PC Viewer Features
Recording
1. Video Resolution
: HD(1280 * 720)
2. Infinite Video Quality
: Set infinite video quality
3. G-Sensor Sensibility
: Sets event sensitivity during
infinite recording
4. Audio Input Volume
: Adjusts volume upon
recording (when set to 0, sound
is not recorded)
5. Infinite Event Mode
: Set whether to detect events
during infinite recording
Camera
1. Brightness
: Sets Camera Brightness
2. Contrast
: Sets Camera Contrast
3. Sharpness
: Sets Camera Sharpness
4. Frequency
: Sets Camera Frequency
5. Camera Rotate Mode
: Sets whether to rotate front
camera screen
03
PC VIEWER
29
기능설명
Information:
PC Viewer image and functions may partially change with future updates.
Page 32

Chapter 03┃ PC Viewer Features
03
30
PC VIEWER Features
PC Viewer Features
Information :
Motion Event will operate upon
setting to Save Event Only during
parking recording
Parking
1. Parking Video Quality
: Sets parking video quality
2. Parking Event Mode
: Sets whether to detect events during
parking recording
3. Impact Event Sensibility
: Sets impact event sensitivity during
parking
4. Motion Event Sensibility
: Sets motion event sensitivity during
parking recording
5. Parking AE Gain
: Adjusts the AE Gain level during
parking recording
6. Background Recording
: Feature used to save only event
recordings during parking recording
7. Detect Parking Mode
: Sets whether to enter parking mode
through either manual or auto entry
settings
ETC
1. Language
: Supports only English
2. Watermark
: Sets whether to display watermark
information on video recording
3. Audio Output Volume
: Sets speaker volume level
4. Preview Camera Selection
: Select TV-out preview video
5. Timezone
: Country-specific time set.
6. DST(Summer Time)
: Summer Time set.
7. Voice Service Option
: Sets Voice or Beep sound .
Viewer
1. UI Language
: Sets PC Viewer Language.
2. Rear Camera Sync
: Time adjustments to keep sync
with the Front Camera
Information:
PC Viewer image and functions may partially change with future updates.
3. Unit of Speed
: Speed display Settings
Page 33

Chapter 04┃Product Specifications
Product Specifications
Category Specifications Reference
CPU MV8670
Product Classification Front HD 30fps, Rear HD 30fps 2Chs Black Box
Color/Size/Weight Black / 79mm x 53mm x Ø30mm
Supported Capacity micro SD 8GB / 16GB / 32GB Maker : ADATA, Class 10 recommended
Sensor 2M HD CMOS Sensor
Camera
Sound
Acceleration Sensor 3-Axis Acceleration Sensor +2g / -2g
Input Support DC 12V / 24V Support
Current Consumption MAX 400mA @12V
Operating
Temperature
Viewing
Angle
Resolution 720p HD(1280 x 720) HD 720p 30fps (2CH)
Diagonal 120 degrees/ Horizontal 88 degrees / Vertical 53
degrees
Built-in Microphone
Built-in Speaker 8ohm Voice Guidance
0˚C ~ 60˚C
Based on Front Camera.
Voice recording
(No-sound recording feature included)
Specifications
31
04
Product
Page 34

Chapter 04┃Product Specifications
Product Specifications
Category Specification Reference
04
Product Specifications
32
Infinite Recording
Infinite
Mode
Recording Method
Video Saving MOV (Video: H264, Audio: ADPCM)
Interface
Video Output CVBS 1Vp-p
Exclusive Viewer O
Parking
Mode
When power is turned OFF,
saves currently recording video
GPS / Video Out (TV out ) /
Video In (rear camera) / USB
Event Recording (Impact / Manual)
Parking Recording (require
Parking
Recording
Event Only Recording (Impact / Motion)
extra power supply)
Event Recording
(Impact / Motion)
File Saving Method
: Fixed Size
- Infinite Recording : 64MB
- Parking Recording : 16MB
Infinite Mode
: Based on 2CH 720p 30fps
Parking Mode
: Based on2CH 720p 5fps
Motion Event
: Record after Motion
Recognition
Map Synchronization
(Google)
1 minute recording
1 minute recording – 10 seconds before event / 50
seconds after
1 minute recording
1 minute recording – 10 seconds before event
(excluding motion) / 50 seconds after
1 minute recording – 10 seconds before event
(excluding motion) / 50 seconds after
Super Cap applied for saving of last recording video.
Licensing must be acquired by Brand companies
General Viewer KM player
Basic Accessories RCA CABLE / Cigar Jack / USB Cable
Options GPS
 Loading...