

Page 1
DIGITAL DOOR VIEWER
USER MANUAL
Warranty Limitations:
Mul-T-Lock reserves the right to invalidate the product's
warranty if without prior consent the product's functionality
or appearance has been altered; or if the product is used in an
environment or manner not specified within this document.
Page 2

2
Page 3
1.
2.
3.
4.
5.
Attention:
AA
AAAA
A
A
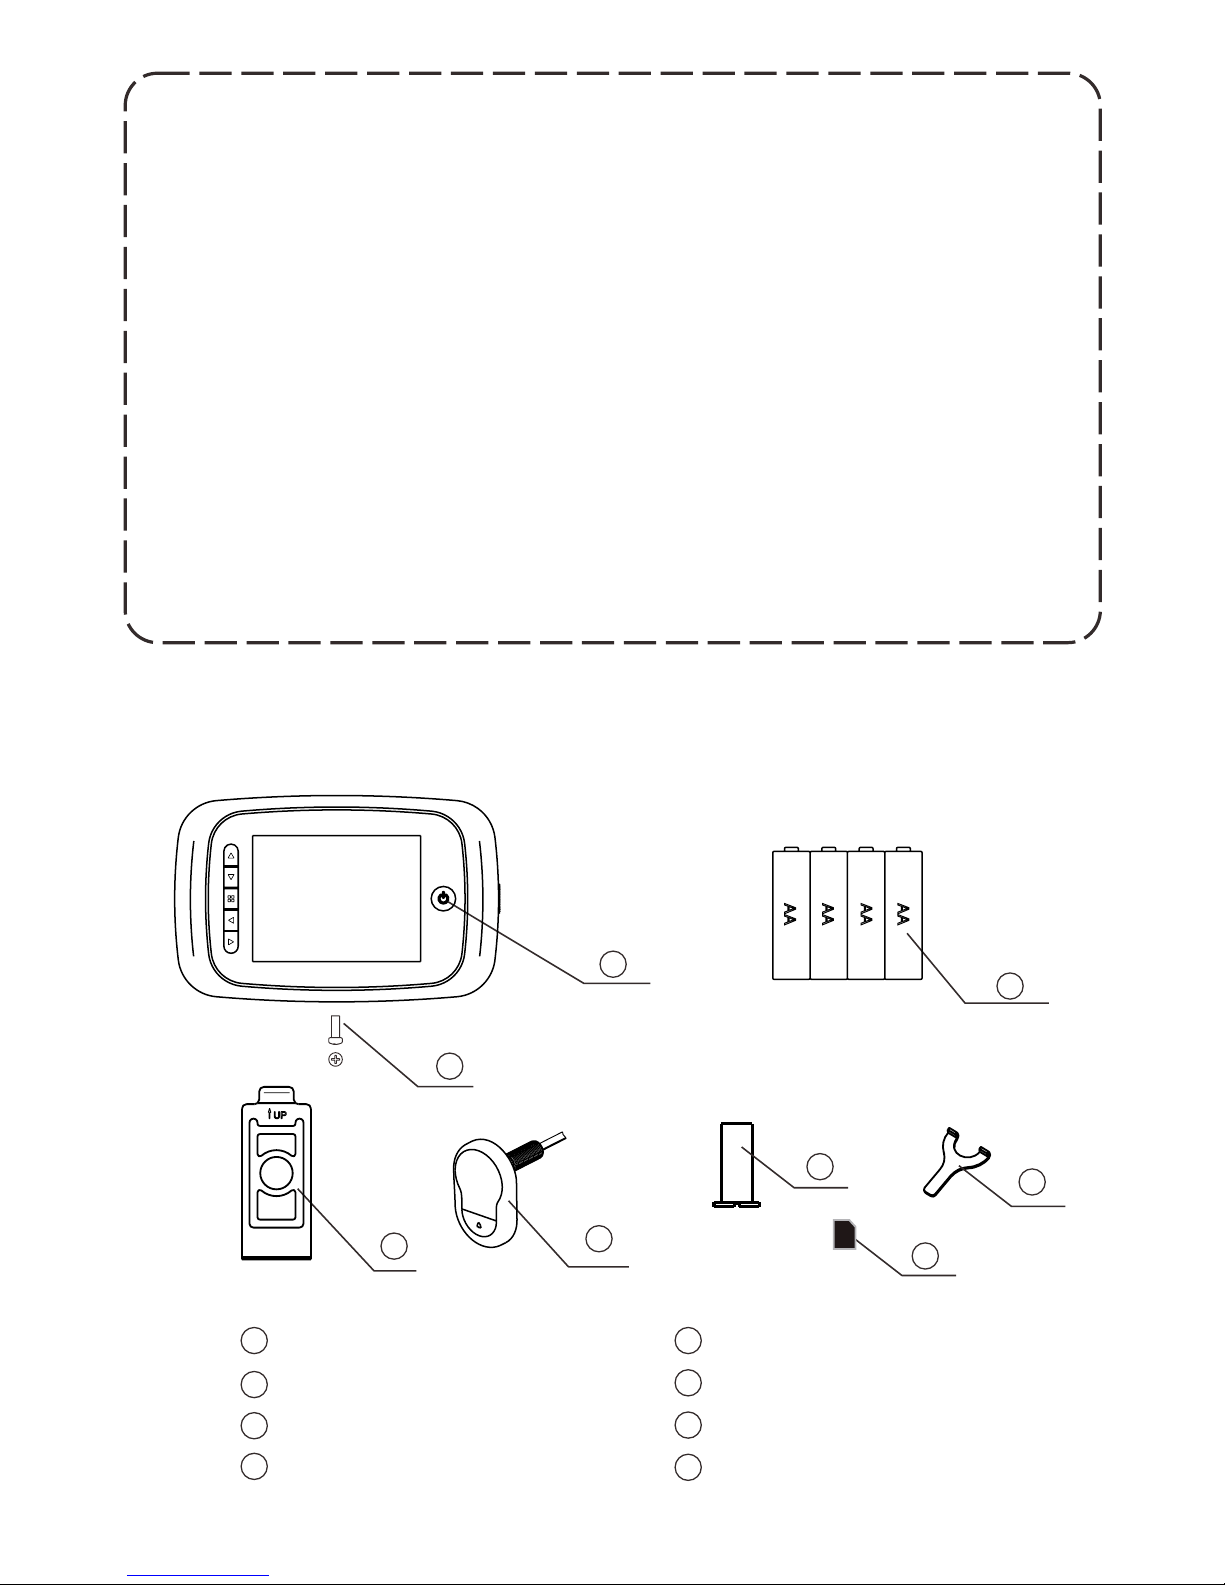
Package contents:
LCD screen
AA batteries (4)
Camera
Screw (1)
Holding plate
Locking barrel
Memory card
3
Tightening wrench
1
1
2
2
3
3
4
4
5
5
6
6
8
8
7
7
Before using this device, please read this user manually in its
entirety.
To avoid injury and maintain the product's warranty, never
attempt to repair or modify the device or its accessories on
your own.
Incorrect usage and extreme environmental conditions may
cause memory loss on the SD card. Mul-T-Lock in not
responsible for data loss and strongly recommends retaining
copies of backup video.
NEVER use chemicals to clean the Digital Door Viewer.
To avoid damage, change batteries promptly once the
low-battery indicator signals.
Page 4
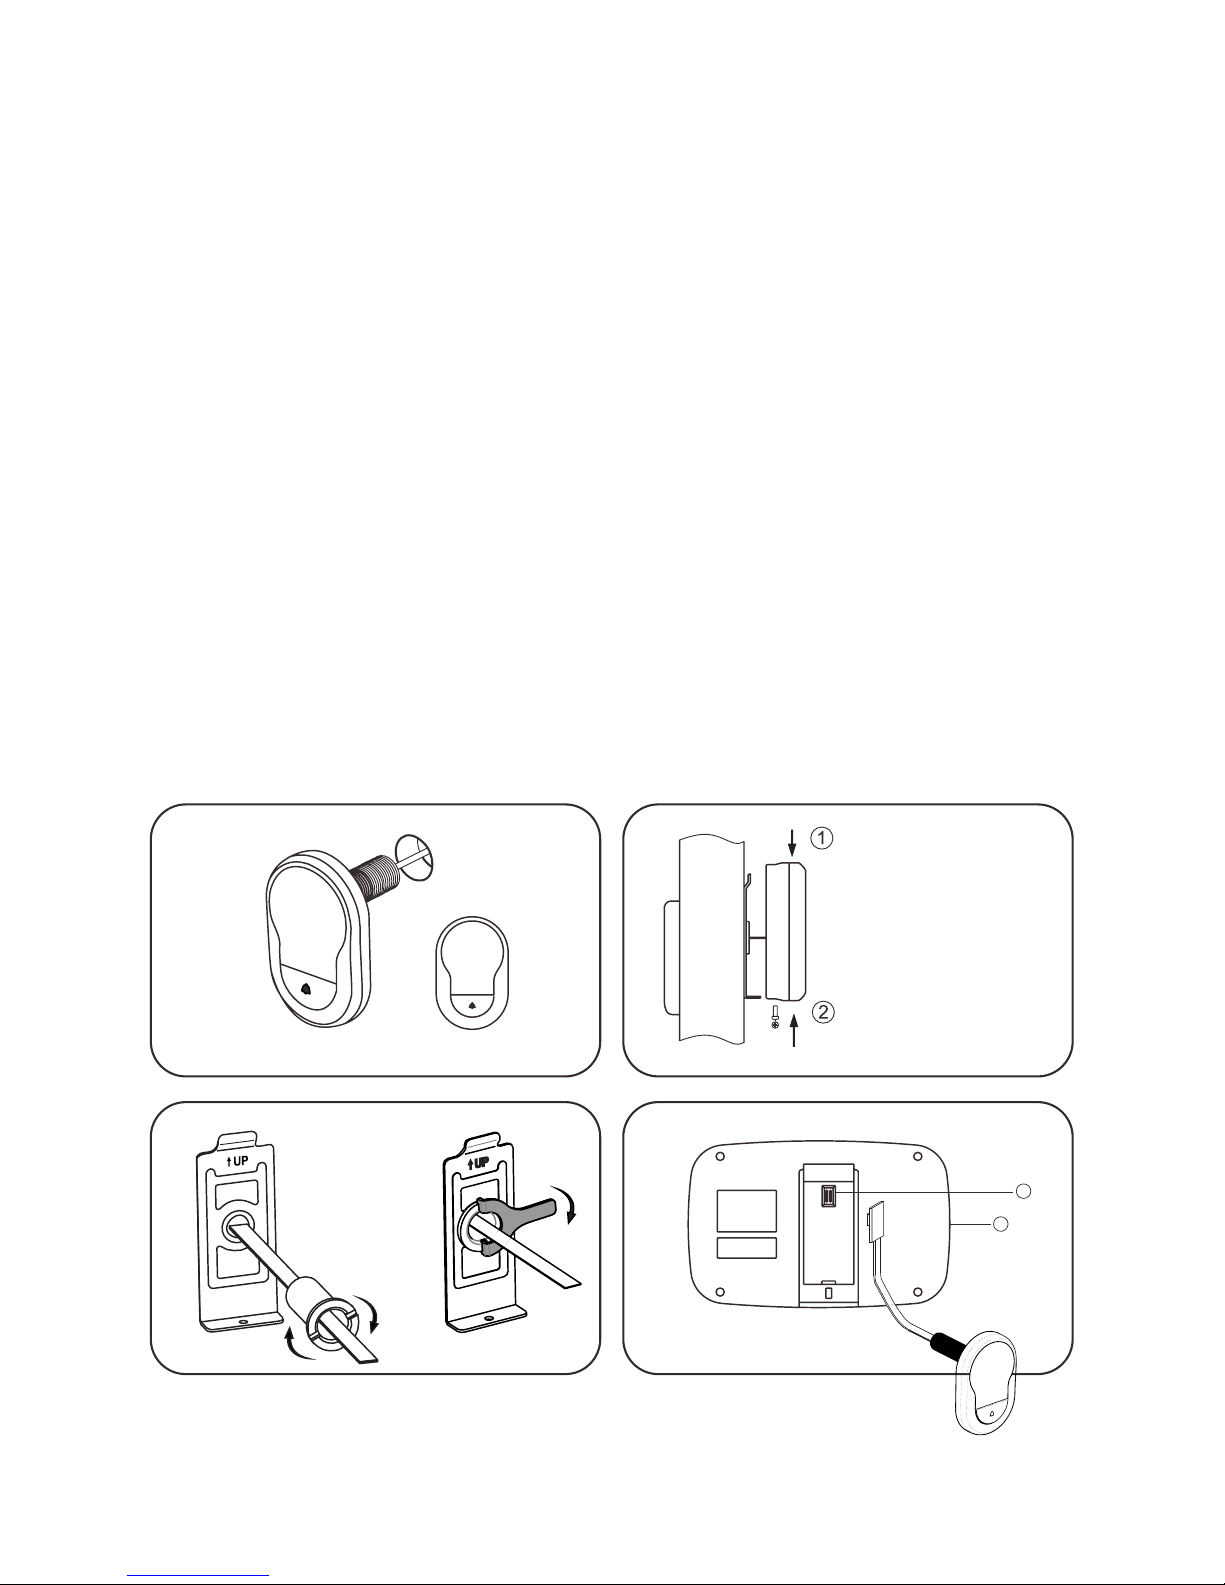
Installation instructions:
1.
2.
3.
4.
5.
4
Fix the screen
case over the
bracket
Insert and fix
screw
DO OR
FIG. 1
FIG. 2
FIG. 4
FIG. 3
8
7
up
If there is an existing door viewer, remove and replace with the camera
front facing. If a door viewer does not exist, drill a 14mm hole in the
door at the required height and then insert the camera. The washer
should be fitted between the camera and the door. The doorbell should
be positioned at the bottom, while the camera should be adjusted so
that it is horizontal. (FIG. 1)
Peel the backing off the 3M stickers on the holding plate and fit it over
the end of the lens. Then screw the locking barrel on to the threaded
sleeve of the camera and tighten. This will hold the plate to the door.
Make sure that the arrow on the plate points upwards. (FIG. 2)
Securely plug the data wire into the back of the screen. Any excess
wire should be gently placed into the groove at the back of the screen.
Fix the screen over the bracket at the top of the plate. Then secure it by
inserting the screw at the bottom of the screen case. (FIG. 3)
Connect the camera to the back of the screen case. (FIG. 4)
Page 5
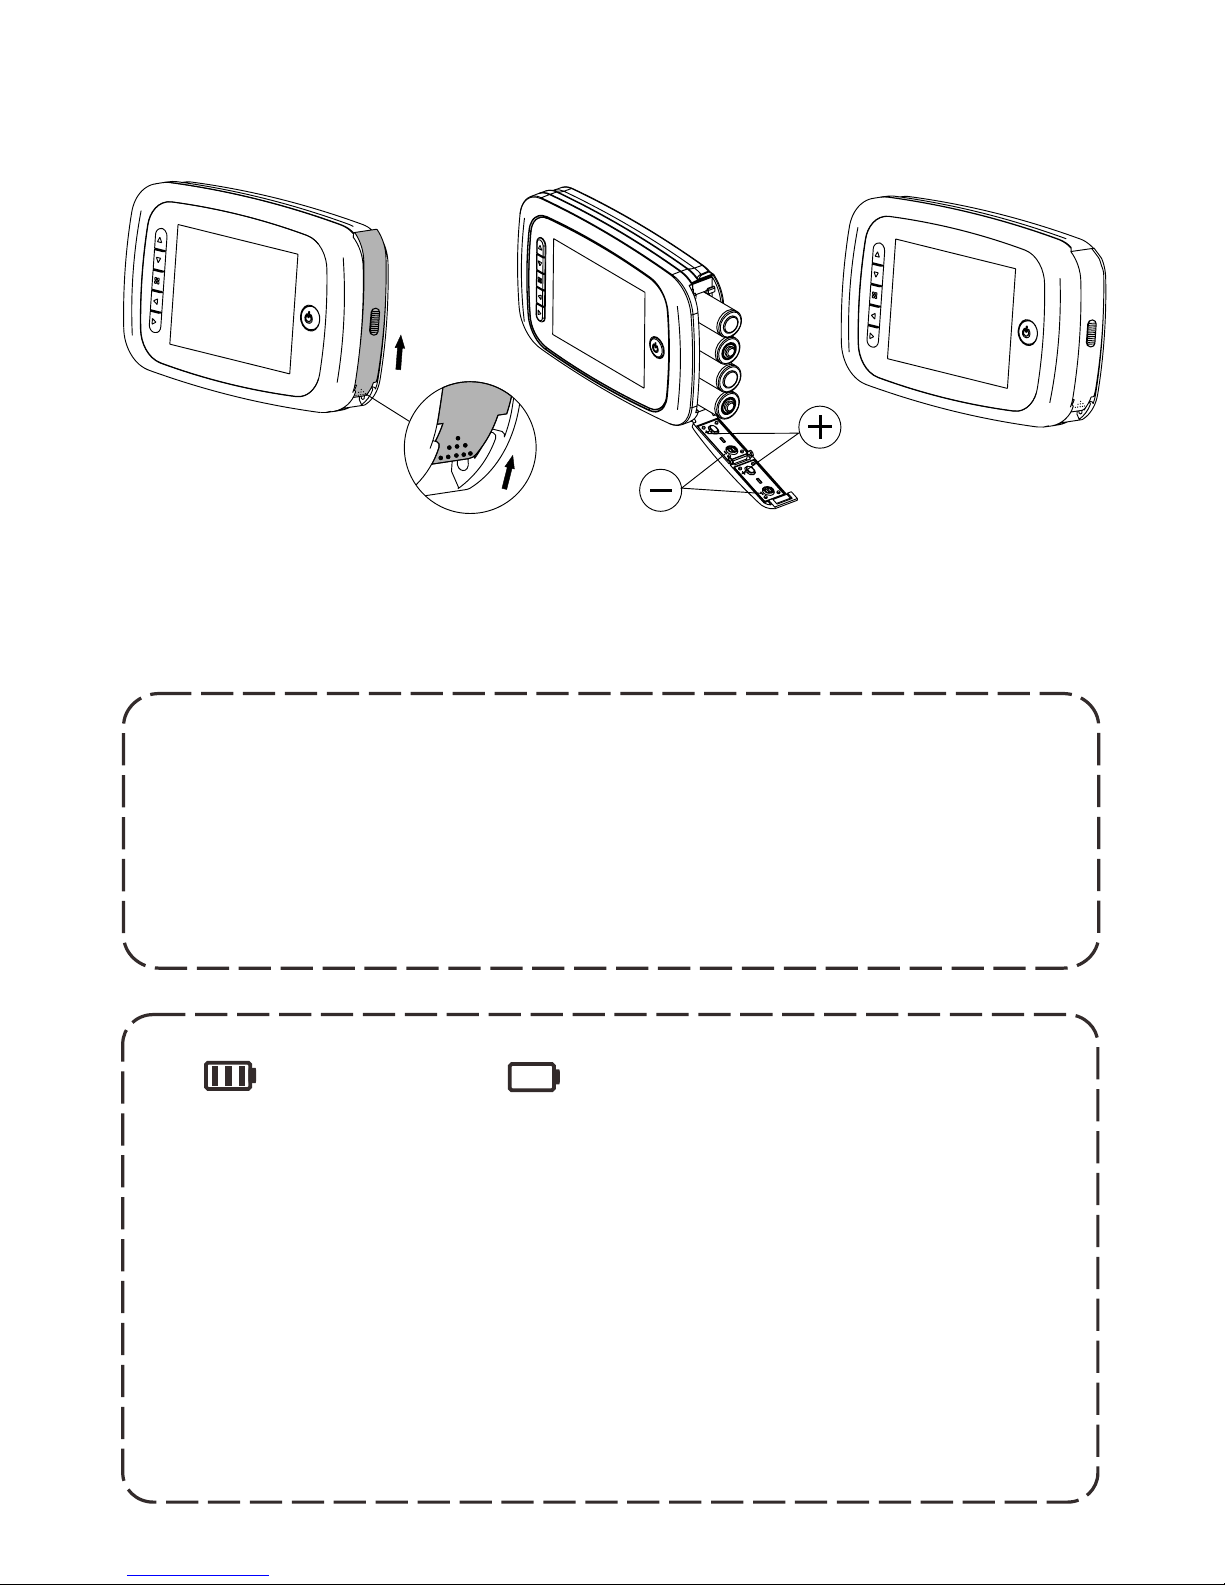
Installation and replacement of batteries:
Installation
1. Slide the lid upward and then outward —as shown in diagram.
2. Insert batteries according to the “+” “-” sign on the lid.
3. To close the lid, simply reverse the action.
1.Never use force when opening and closing the lid.
2.Never press or move the lid in the opposite direction.
3.When the low-battery indicator is on, replace batteries
promptly to avoid any damage from battery leaks.
To avoid damage:
5
Full power No power
AA
AA
AA
AA
The battery icon shows the power status. As the batteries are
depleted, the number of bars in shown in the icon are reduced.
For certain types of rechargeable batteries, the power status
shown in the icon may be unstable — this is normal.
Replace batteries when the power icon is empty. The
following types of batteries can be used: AA, LR6 1.5V
alkaline battery. Used batteries should be safely disposed of
according to local rules and regulations.
Page 6
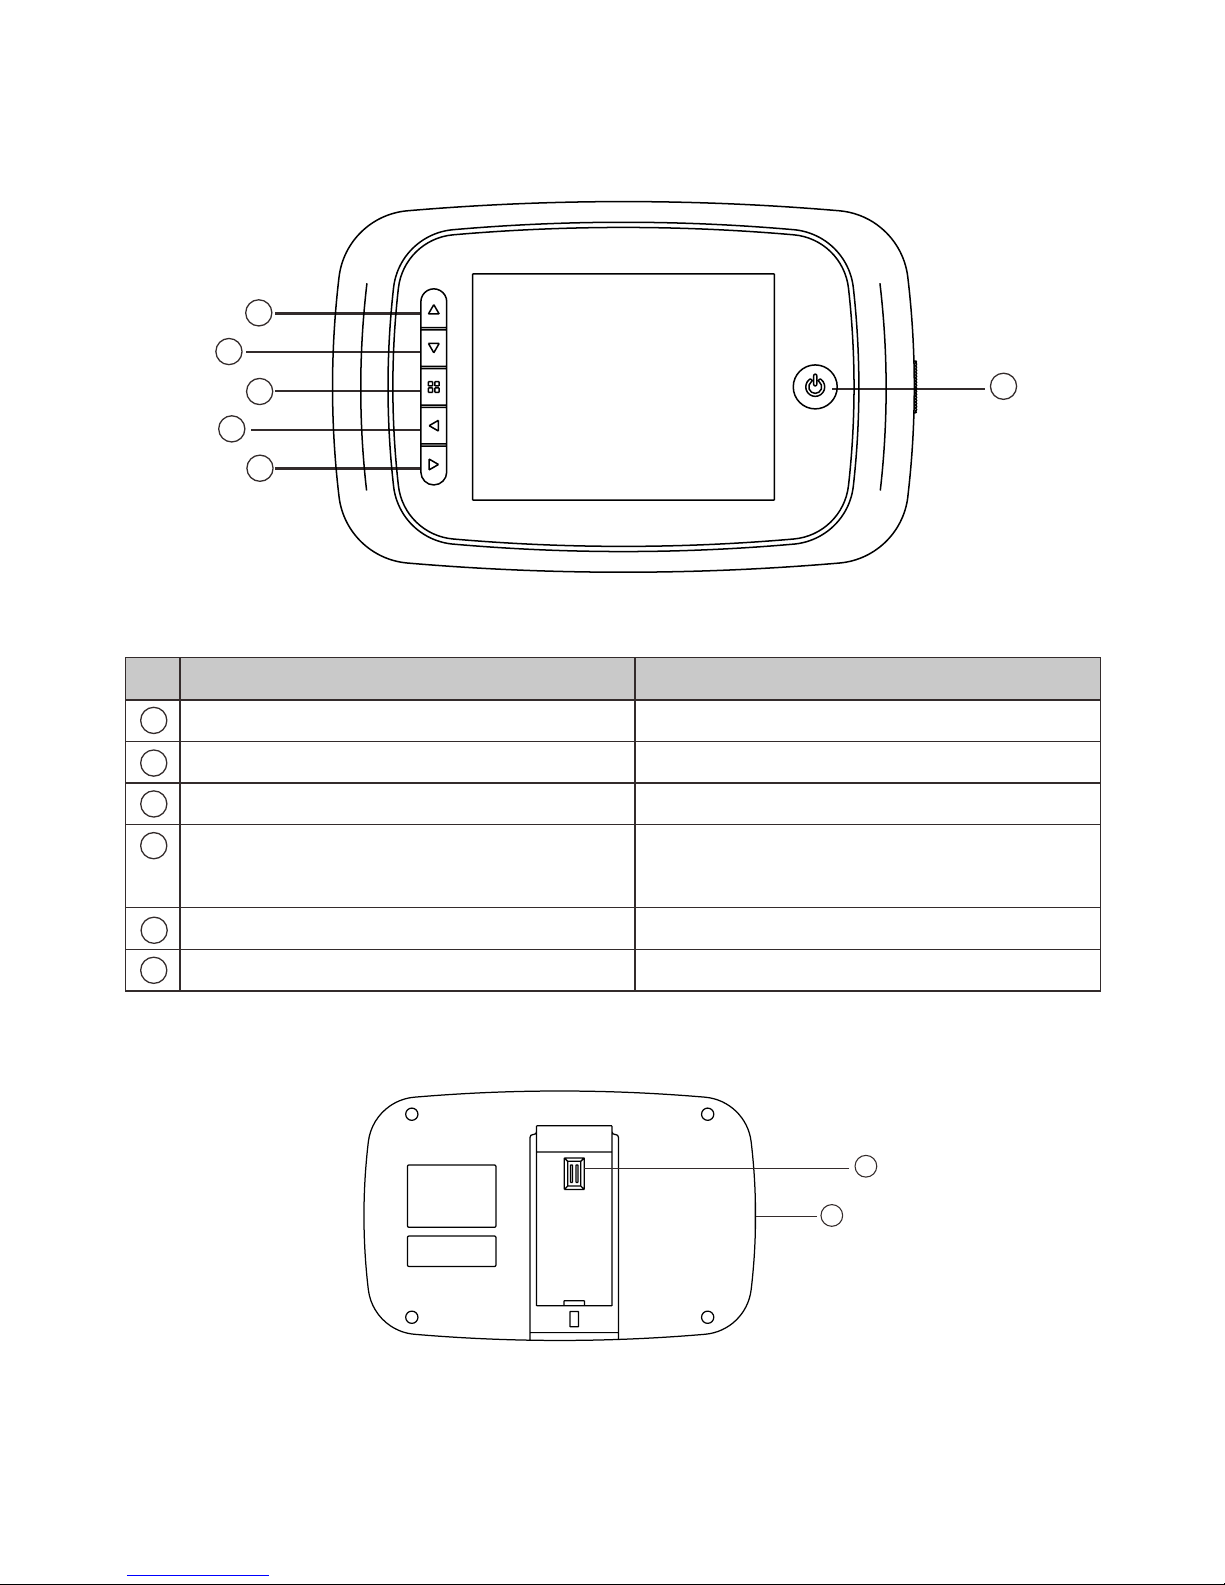
8
7
1
2
3
4
5
6
Backside of screen case
Basic function
Additional function
1
Upward shift
2
Downward shift
3
Menu
4
Left shift (only in menu setting) Selection key for replay mode
5
Right shift (only in menu setting) Begin video key in normal use
6
Power button
Screen operating instructions
Part specifications
Button functions
7. TF card socket
8. Camera datawire or data-wire connector
during normal use
6
Page 7
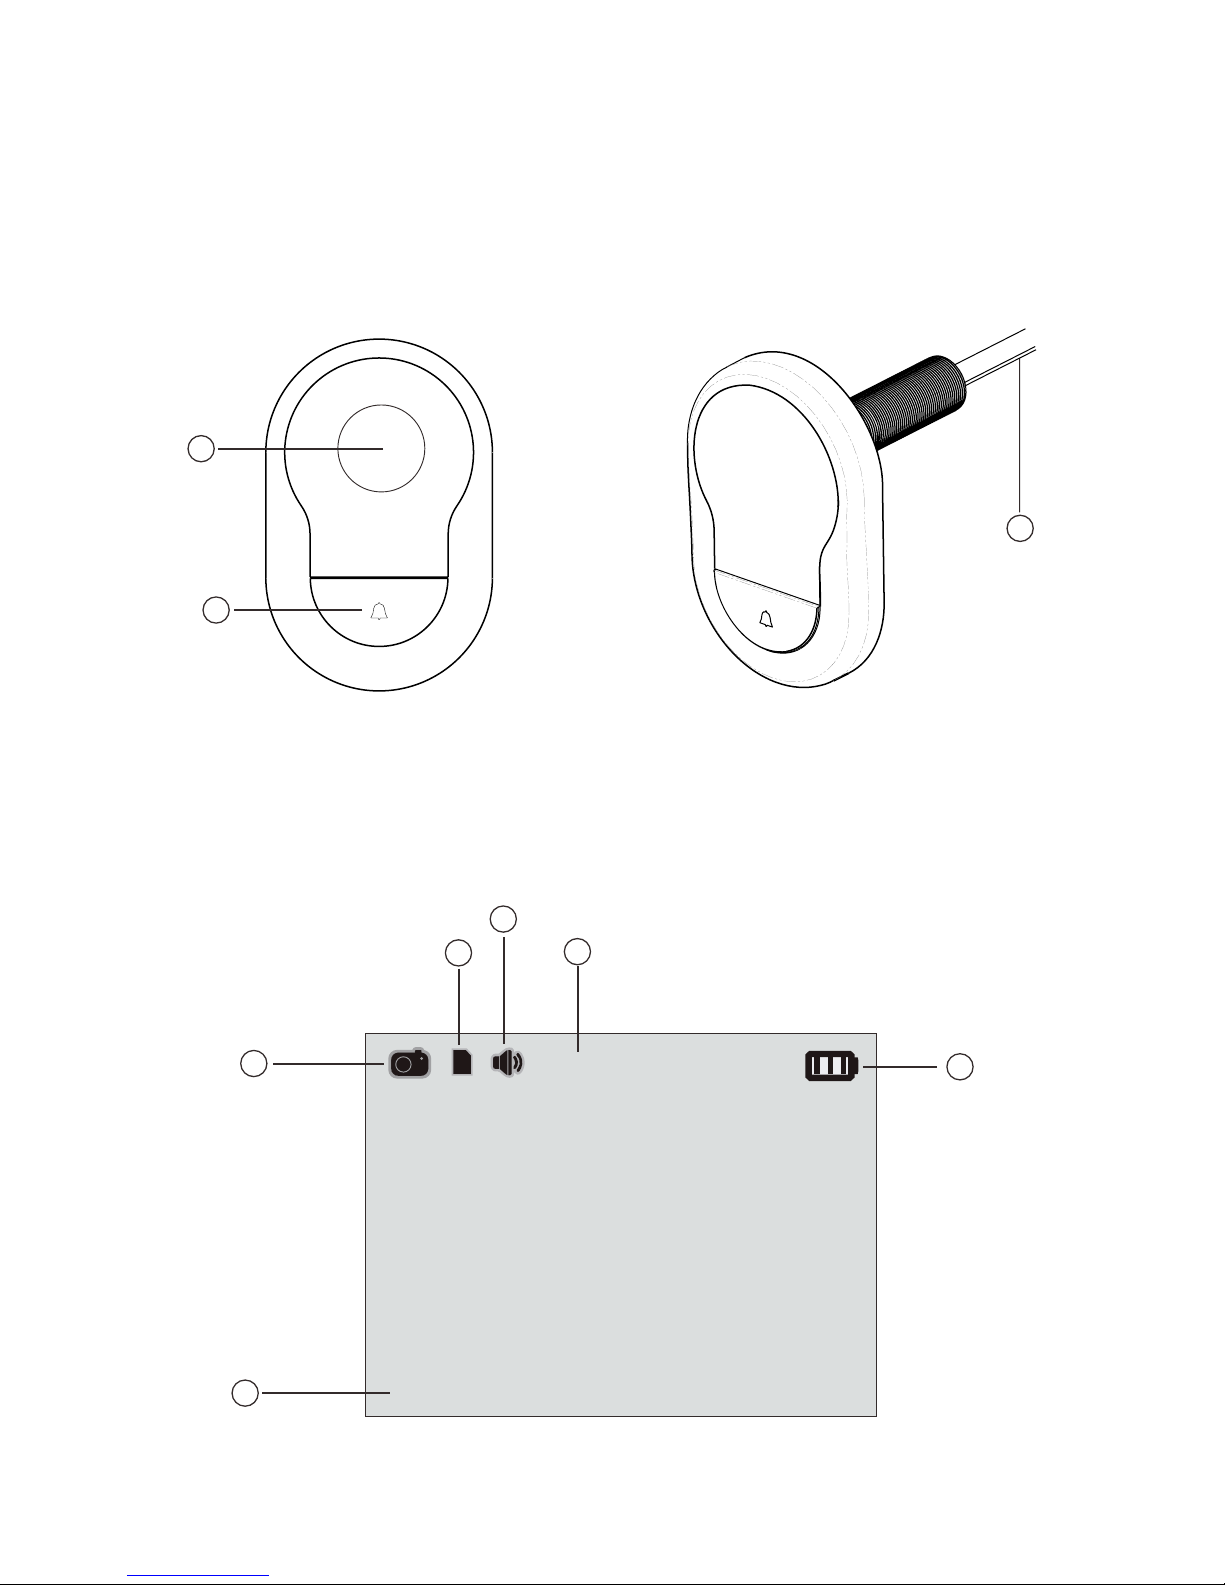
Camera front view
1.Camera 2. Doorbell button 3. Data wire
Camera operating instructions
Part specifications:
Menu interface instructions:
2011-01-01
00000
1
2
3
4
5
6
2
1
3
Camera side view
7
TF
Page 8
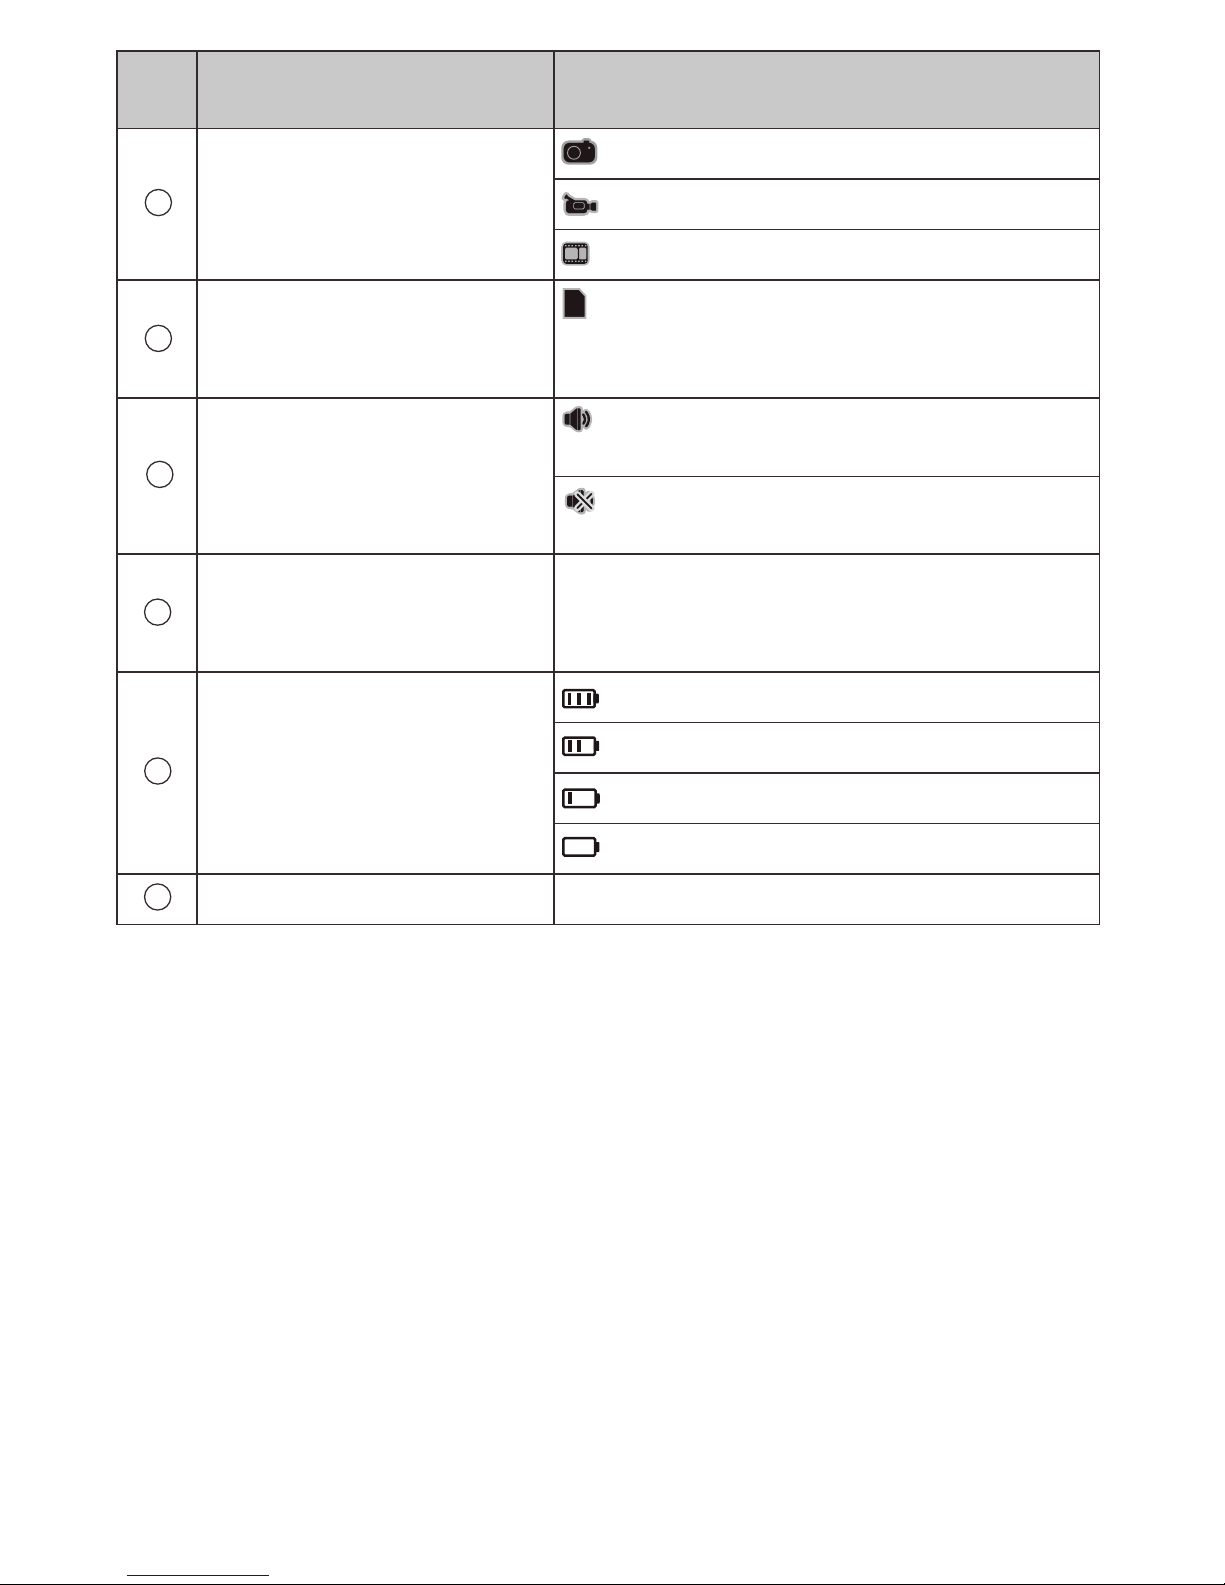
N˚:
Icon
1
Mode icons
2
4
5
Doorbell status icon
Photo shooting mode
3
TF
This icon shows the DND(Do not
Disturb) mode
Picture memory
Indicates full battery remaining
Indicates 70% battery remaining
Indicates 40% battery left
Indicates battery is is almost empty
Power status icon
6
System date icon
Function
TF card plug-in icon
Shows the current system date
Video shooting mode
Playback mode for photos or videos
This icon shows that the TF card is
plugged in and recognized by
the system
This icon shows the normal
doorbell mode
8
*
-
-
-
-
*
-
-
Memory Card Installation:
Please insert the memory card before installing the batteries.
Before inserting the memory card, make sure the marked side is
facing front - When you hear the card click into place, it has been
correctly inserted.
This product supports a SD memory card of up to 8GB.
To remove the memory card: press it gently and it will
slightly elevate. Once elevated you can remove the card.
Please set the system date and time after installing the batteries.
Press the menu button and shift the selection key to date setting.
System time and date setting:
Maximum number of stored
pictures (depends on the volume
of the memory card)
Page 9

Select the setting the date key and press the menu button to enter.
keys to adjust the numbers.
If you want to add date and time information on the photos,
set the time and date display to ON.
-
-
This product has a user-defined setting for auto-power off.
If you need to change the default setting, please press the menu
button, and select auto power off and press the menu button
to enter.
There are 4 options to choose in this menu: 10S/20S/30S/OFF.
20S is the default mode, which is the best option for balancing the
power consumption with operational convenience.
OFF mode is for laboratory testing, and for customers with special
needs. Caution, in this mode the screen will stay on until manually
turned off, if not turned off, the batteries will quickly run out of
power.
*
-
-
-
-
Auto-power OFF setting:
*
-
-
-
Press the power button, and an image of the exterior will appear
on the screen.
The screen will automatically turn off after 20 seconds if no
additional action is taken.
After turning on the device, press the power button again to turn
the device off.
To view outside
“ ”keys to select the digits to be set, then use the “ ”
9
*
-
-
-
Visitors:
When visitors press the doorbell on the door viewer camera,
the doorbell will ring inside of the room.
At the same time, the screen will turn on automatically and show
the exterior.The screen continues projecting for 20 seconds
before automatically shutting off.
Additionally, whenever the doorbell is pressed, the system
will automatically take a photo of the visitor. The image will
be stored on the TF card in the event the host is away.
Use
Page 10
*
-
-
-
“ ”
“ ”
When viewing the exterior, photos or videos can be taken
simultaneously.
When the screen is on, press to take a photo.
To take a video, press the until the instruction icon appears
*
- Different language options are available in the language setting.
10
*
-
-
-
-
Stored photos and videos can be replayed, deleted or edited.
To replay a video, press the “ ” button until the card icon appears.
Select the photo or video you want to play using the “ ” buttons.
If you want to delete certain photos or videos, select it then press
the menu button to edit.
Videos do not include audio.-
prompting a switch into video mode. Press“ ”to start shooting,
one more press of “ ”will stop the video function.
-
-
Users can select the doorbell chime and volume.
Choose the doorbell setting and press enter. Press the up button
to select the doorbell chime.
Choose the OFF mode to activate the DND mode and turn off
the doorbell chime.
To format the memory card, please choose this option.
This process cannot be reversed, once the process finishes, all
data and operations in this card will be removed. Be cautious!
Doorbell:
Select the High mode for maximum volume and the Low mode
for 70% lower volume.
-
While the device is battery powered, nearby AC power supplies
may affect image quality. To avoid degradation in image quality
set the device to the local frequency. Where 100-120V is used
(US, Japan, etc), set the device to 60Hz. If the local frequency is
220-240V (Europe, Middle East etc.), the device should be set
to 50Hz.
Page 11
11
Door width: 40-70mm
Door barrel diameter: 14mm
Camera: 0.3 mega pixels
LCD Screen: 3.5” TFT
Power: 4 AA batteries
Memory card: Micro SD card (TF), Max. 8GB
Photo volume for 1GB: 15000pc (the actual volume could differ
under different circumstances)
Infrared wavelength: 940nM
Size: 135 (L) x 86(H) x 25(W)mm
Weight: 310gms
The device has an infrared function, enabling users to observe
exterior images at night, or in dark areas.
Due to the image-forming principle, all images shown are screened
in black and white.
*
-
-
All photos are saved in the JPEG format. Videos are taken and saved in MP4
format. Users can scan and edit these photos and videos using
Windows.
*
-
- Camera /Video ON/OFF:
- If you choose the factory reset option, all settings will be reset to
their original state and user settings will be erased.
The camera and video functions can be enabled and disabled,
using the ON/OFF mode. Press the menu button and enter the
camera menu. When in ON mode the device will automatically
take a photo of the exterior when the doorbell in pressed, when
set to OFF, the device will not automatically take a photo.
Users can also use the right button to take photos of videos.
Page 12
12
© 2012 Mul-T-Lock Technologies Ltd.
The Mul-T-Lock name and the muscleman logo, are registered/pending trademarks of Mul-T-Lock Ltd. in various countries.
Cat. No. 89102666-A
WARNING
.
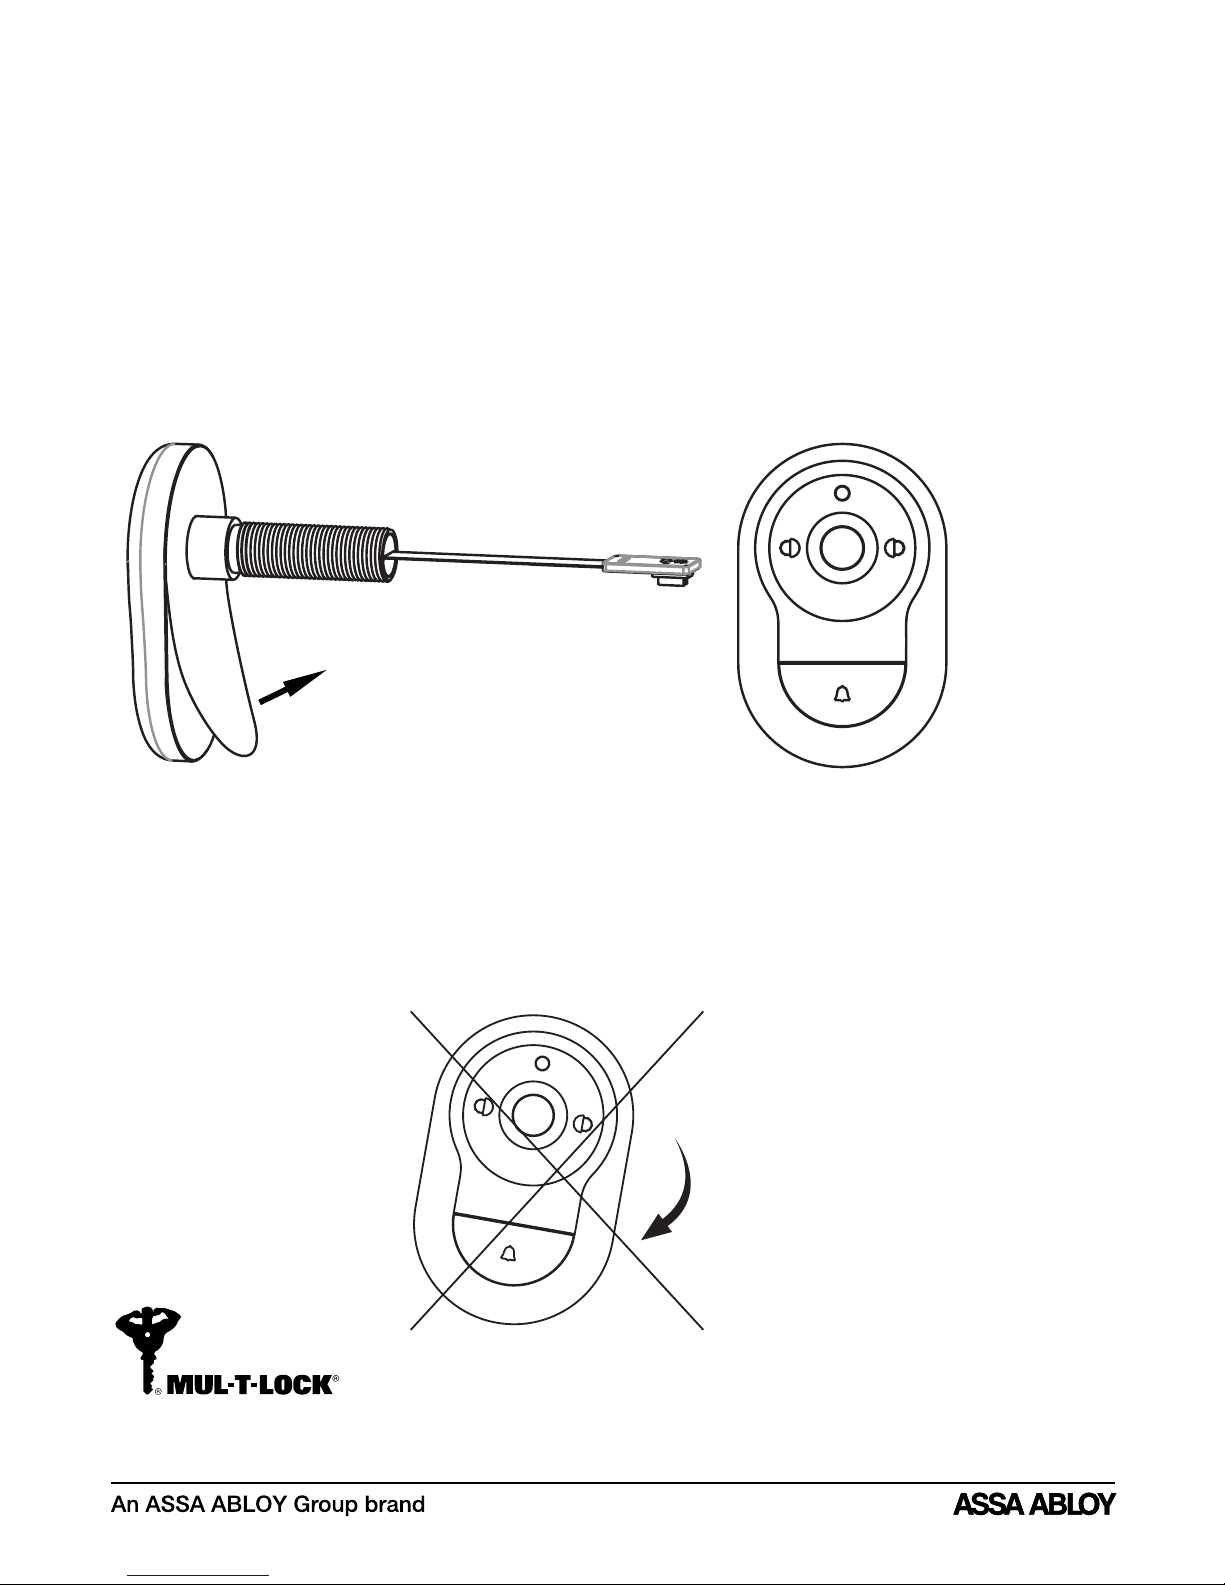
Correct Assembly
Fix the camera on the outside of the door, making sure the doorbell
is located on the bottom Fig2
( )
.
Incorrect Assembly
DO NOT mount the doorbell camera without first using the 3M sticker to
adhere it to the door.
Fig1
Fig 2
Use care when installing the doorbell camera. DO NOT disassemble the
camera or pull on its wires.
Pulling or folding the camera's wires could damage the device.
Not fixing the doorbell camera with the sticker may result in the
device moving, which could cause damage.
Fig 3
When fitting the doorbell camera, first unscrew the camera barrel and then
peel the protective seal on the 3M sticker on the back of the camera (Fig1)
 Loading...