

Page 1
PN# 500-18800 Page 1
Rev. A.1, 8/01
SECURITRON MODEL MUNL-12, MUNL-24 MORTISE UNLATCH
INSTALLATION AND OPERATING INSTRUCTIONS
1. DESCRIPTION
Securitron’s Mortise UnLatch is a revolutionary new type of electric strike which eliminates the
necessity to perform a routing operation on the door frame for installation. The motor
driven Mortise UnLatch also presents a fully concealed appearance on the door which not
only enhances architectural appeal but improves security over a conventional electric strike as
an intruder is less able to determine the type of security device present on the door. The
Mortise UnLatch functions with all North American mortise locks and includes a latch
status output which reports when the door is in latched (secure) condition or is open.
Product Specifications are: Input Voltages: 12 VDC (MUNL-12), +20%, -10%. 24 VDC
(MUNL-24), +20%, -10%. Current: At rest: 40 mA (either voltage). When operating- 4 Amp
input surge @ 12 VDC; 2 Amp input surge @24 VDC for 100 milliseconds and 600 mA @ 12
VDC or 300 mA @ 24 VDC during motor movement. Operating Temperature: -10° to 125° F.
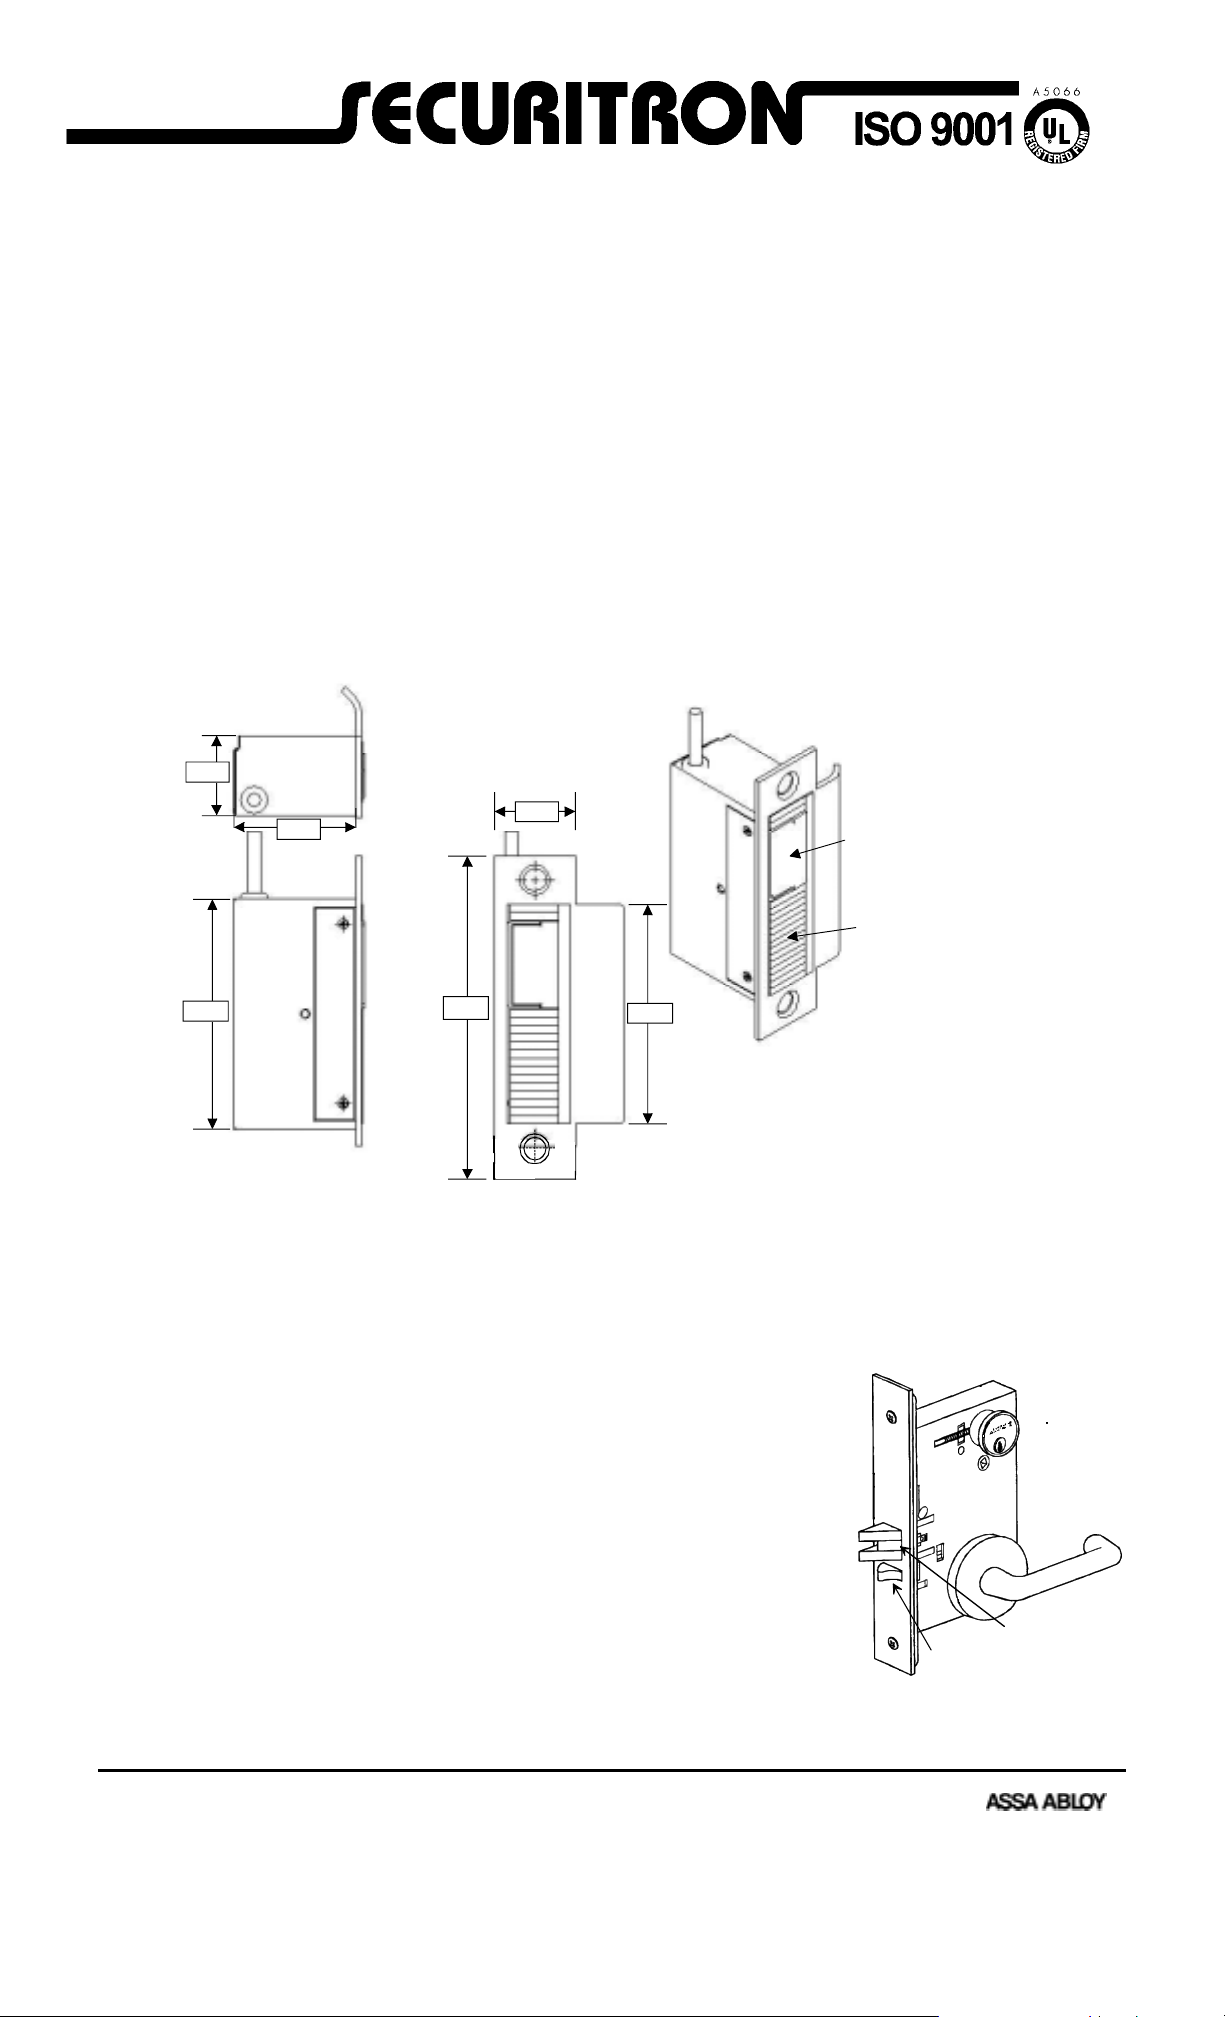
FIG 1: MORTISE UNLATCH DIMENSIONS (INCHES)
1.25
1.88
3.50
4.88
2. PHYSICAL INSTALLATION
2.1 SURVEY
1.25
3.38
SPRINGLATCH
PLUNGER
DEADLATCH
FINGERS
RECOMMENDED TOOLS
MEDIUM + SMALL PHILLIPS DRIVER
MEDIUM SLOTTED DRIVER
CHISEL, 5/64 ALLEN WRENCH
WIRE CUTTER/STRIPPER
VOLT/OHM MET ER
CRIMP CONNECTORS
CRIMP PLIERS
The installer must first be sure that the latch is of the mortise type
(see the drawing to the right.) A mortise lock (or latch) includes a
square shaped springlatch and a “pin” called the deadlatch pin or
guard bolt which may be positioned either above or below the
springlatch. Most mortise panic bar latches are also perfectly
compatible with the MUNL. Note, however, that if the mortise lock
assembly includes a dead bolt, the dead bolt will not be operable
The most common alternate type of latch in use in North America is
called cylindrical, tubular or bored. The standard UnLatch (model
numbers UNL-12 and UNL-24) is designed for this alternate type of
latch. Securitron does not offer an UnLatch solution for a rim latch
(rim latches are on the surface of the door rather than being mortised
Springlatch
into the middle of the door). Deadlatch Pin
Copyright, 2001, all rights reserved • Securitron Magnalock Corp., 550 Vista Blvd., Sparks NV 89434, USA
Tel: (775) 355-5625 • (800) MAGLOCK • Fax: (775) 355-5636 • Website: www.securitron.com
An ASSA ABLOY Group company
Page 2

Rev. A.1, 8/01 Page- 2
2.2 HOLLOW METAL (STEEL) FRAME MOUNTING
Remove the existing ANSI 4 7/8” strike plate (it will be discarded) and experimentally try to fit
the Mortise UnLatch in the resulting cavity. In some cases the cavity will be large enough to
accommodate the Mortise UnLatch and you will have nothing to do but pull the wires up the
hollow door frame and screw the Mortise UnLatch into place. In other cases you will find a
“dust box” within the frame that will get in the way of the Mortise UnLatch. The dust box must
be cleared away to make room. Generally, a sabre saw, dremel tool or a drill with a fly cutting
bit is the most effective tool to do this. You can also find that the edge of the dry wall panel
interferes with the Mortise UnLatch. Simply chip away some of the dry wall with a screwdriver.
Once you are able to fit the Mortise UnLatch into the frame, vacuum out any concrete dust
and metal shavings (these can work their way into the UnLatch mechanism and cause
problems) and loosely mount it and proceed to Section 2.4, adjusting for latch/deadlatch
location. Note that the face of the Mortise UnLatch is protected by a removable film.
Leave this on during the “pre-mounting” so as to preserve the metal finish against scratching
and to block the possible entry into the mechanism of dust or metal shavings. Remove the film
when you adjust the unit for latch/deadlatch location (Section 2.4).
2.3 WOOD FRAME MOUNTING
For installation in a wood frame use a chisel to create a space for the Mortise UnLatch behind
the existing strike. Remove the strike and place the template (last page of this manual) on the
door (registering it to the strike mounting holes). This will show you the space that must be
chiseled out. As you get close to finishing the chiseling job, experimentally try to fit the body of
the Mortise UnLatch in the cavity. This will avoid chiseling too big a space. A tight fit is
preferred as it helps the solidity of the mounting. Normally, with a wood frame, the wires will be
run inside the wall. Simply drill from the back of the cavity you have created rearward into the
wall space to admit the wires. To mount the Mortise UnLatch to the wood frame, use the two
#12 x 1” furnished flat head wood screws. Once you are able to fit the Mortise UnLatch into the
frame, vacuum out any wood dust and metal shavings (these can work their way into the
UnLatch mechanism and cause problems) and loosely mount it and proceed to Section 2.4,
adjusting for latch/deadlatch location. Note that the face of the Mortise UnLatch is protected
by a removable film. Leave this on during the “pre-mounting” so as to preserve the metal
finish against scratching and to block the possible entry into the mechanism of dust or metal
shavings. Remove the film when you adjust the unit for latch/deadlatch location (Section 2.4).
2.4 ADJUSTING FOR LATCH/DEADLATCH LOCATION
One of the remarkable features of the Mortise UnLatch is that it adjusts to suit different
models of North American mortise locks. With conventional electric strikes, the strike model
typically needs to be matched to the lock/latch model and this complicates sourcing the electric
strike. There is one known exception: Sargent model 7800 or 8200 in retrofit (the lock is
already present). The Sargent lock can not normally be accommodated because its springlatch
and deadlatch pin are positioned so close to the bottom of the opening. To employ the Mortise
UnLatch with Sargent, purchase the accessory tab kit, model #STK-1. These new mounting
tabs sufficiently reposition the Mortise UnLatch to make it work with the Sargent Lock. Note that
in new construction, when the door and frame have been specifically prepared for the Mortise
UnLatch and Sargent 7800/8200, the accessory tab kit is not needed.
Adjustment of the Mortise UnLatch is necessary because different lock manufacturers vertically
position both the springlatch and deadlatch pin in widely differing locations along the lock body.
The Mortise UnLatch accommodates this by allowing positional adjustment of its springlatch
plunger (the component which pushes in the springlatch) and then operating the deadlatch pin
though moving “deadlatch fingers” which fill the rest of the strike opening.
The adjustment procedure is accomplished in two logical steps. First you must determine the
position of the springlatch plunger and then perform the adjustment to set that position.
2.4.1 DETERMINING SPRINGLATCH PLUNGER LOCATION
The goal of this determination is to vertically align the Mortise UnLatch’s springlatch
plunger with the lock’s springlatch. The deadlatch pin will then be “automatically” operated
by the deadlatch fingers regardless of its position on the lock. It’s important, however, to
determine the position in such a way that maximum tolerance is achieved in the event that the
door shifts against the frame.
To begin, loosely mount the Mortise Unlatch and close the door so that you can see the top and
bottom of the lock’s springlatch. Draw lines on the lip of the Mortise UnLatch’s strike which
correspond to the lock’s springlatch position. Next dismount the Mortise UnLatch. The drawn
Page 3

Rev. A.1, 8/01 Page- 3
lines and knowledge of the gap between the springlatch and deadlatch pin are used to
determine the vertical position of the springlatch plunger. When this gap is greater than ¼”,
best reliability is obtained when the springlatch plunger position is centered on the springlatch.
When the gap is smaller than ¼”, however, simply centering the springlatch plunger risks
positioning the deadlatch pin too close to the springlatch plunger so the procedure is to position
the edge of the springlatch plunger midway between the springlatch and deadlatch pin. Figure 2
illustrates these points.
FIG. 2: DETERMINING POSITION OF SPRINGLATCH PLUNGER
GREATER THAN 1/4" GAP
SPRINGLATCH
MEASURE GAP
BETWEEN
SPRINGLATCH AND
DEADLATCH PIN
DEADLATCH PIN
(MAY BE ABOVE)
GAP BETWEEN
DOOR AND FRAME
SPRINGLATCH
PLUNGER
DRAW LINES ON MORTISE
UNLATCH DENOTING TOP
AND BOTTOM OF SPRINGLATCH
CURVED LIP OF
MORTISE UNLATCH
LESS THAN 1/4" GAP
WHEN THE GAP BETW EEN THE SPRING L AT CH AND DEA D LATCH PI N
IS LESS THA N 1/ 4 ", SET THE BOTTOM EDGE OF THE SPRINGL ATCH
PLUNGER MID WA Y BET WE EN THE SPR I NG L ATCH AND DEAD LAT C H
PIN. (NOTE THAT THE DEADLATCH PIN MAY BE BELOW THE
SPRINGLAT CH AS IN THIS EXA MPLE, OR ABOVE IT)
SPRINGLAT CH BOTTO M EDG E (EXAMPLE)
DEADLATCH PIN TOP EDGE (EXAMPLE)
EXAMPLE OF SPRINGLATCH
PLUNGER CENT ER ED WI T H
RESPECT TO SPRINGLATCH
POSITION (SHOWN BY
DRAWN LINES). THE PLUNGER
SHOULD BE CENTERED WHEN
THE GAP BETWEEN THE
SPRINGLATCH AND DEADLATCH
PIN IS GREATER THAN 1/4"
MIDWAY POSITI ON
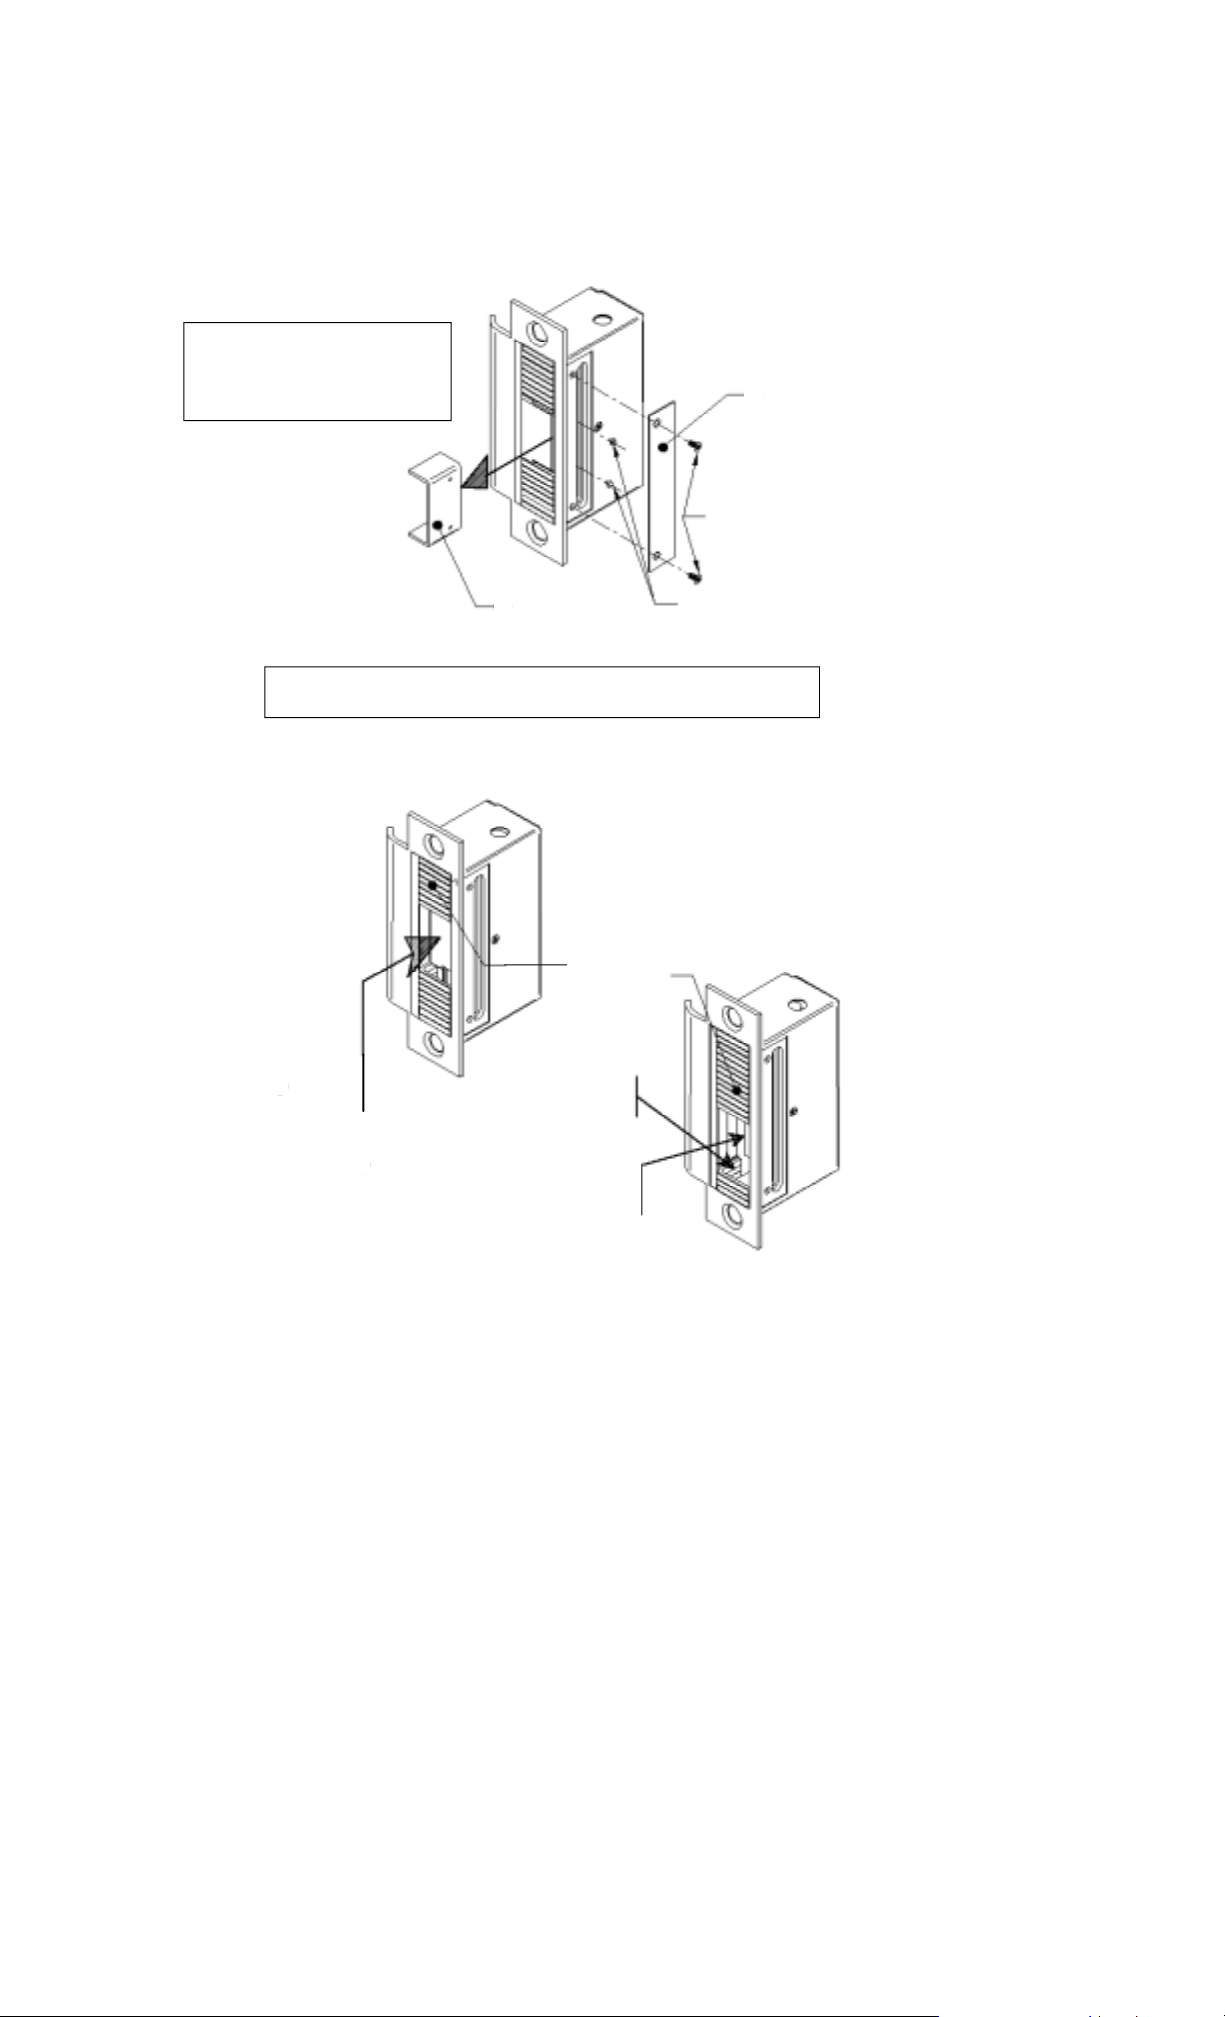
2.4.2 ADJUSTING SPRINGLATCH POSITION
Now that you have marked the unit with the correct position for the springlatch plunger, the
actual adjustment must be performed. Figure 3 shows the procedure.
Page 4
Rev. A.1, 8/01 Page- 4
FIG. 3: ADJUSTING SPRINGLATCH POSITION
Perform these adjustments
with the unit on a flat surface
and be careful not to lose
the small screws
Remove Small Cover
A-
(Small Phillips Driver)
SMALL COVER (A)
Remove "U" Shi el d
B-
(5/64" Allen Wrench)
Be especially careful not to let a screw or any other object fall
inside the housing as it can jam the Mortise UnLatch
C-
Push in Springlatch plunger
and hold it
"U" SHIELD
D-
Slide Fingers as necessary
(You must push them from
their base; you can use a
small screwdriver)
SMALL COVER SCREWS (B)
SHIELD SCREWS
(SOCKET HEAD CAP)
Deadlatch
Fingers
E-
Slide and center springlatch + shield
in the new opening. Then allow it
to spring out.
F-
Replace Shield and Small Cover
2.5 FINAL ADJUSTMENT WITH SPACERS
For reliable operation, the door needs to close so that the latch easily enters and is retained by
the Mortise UnLatch. The door should not have to be pushed to engage as can be the case
with a poorly fitting or poorly closing door. To check this point, when the Mortise UnLatch has
been mounted, after the door is closed and latched, you should be able to “rattle” the latch
against the Mortise UnLatch plunger by pushing the door in and out. The amount of
movement in the door latch should be about 1/16-1/8” (1.5-3MM).
If the amount of slack or rattling is greater than 1/16-1/8”, you need the door to “close
earlier”. In effect, the edge of the stop needs to be closer to the Mortise UnLatch. To adjust for
this, first check to see if the stop has “silencers” on it. These are cylindrical rubber bumpers
which quiet the noise of a closing door but also have the effect of making the door close earlier.
If you have silencers and the door is still rattling too much, contact the factory for additional door
stop spacers (the Mortise UnLatch is shipped with two). If you don’t have silencers, add one or
two door stop spacers as is shown in Figure 4 to cause the door to close earlier.
Page 5

Rev. A.1, 8/01 Page- 5
If the amount of slack or rattling is less than 1/16-1/8”, you have a “tight” door and the ability
of the door to close and latch reliably is in question. To adjust for this, first check to see if the
stop has “silencers” on it. These are cylindrical rubber bumpers which quiet the noise of a
closing door but also have the effect of making the door close earlier. Remove the silencers
(they pull out) and this will add slack to the closed position of the door. Be sure to check the
entire length of the door for the silencers. If the door has no silencers and is still tight in
latching, a locksmith should be engaged to readjust the door so that it closes properly or the
installation will not be reliable.
Figure 4 illustrates the points made in this Section.
FIG. 4: FINAL ADJUSTMENT OF DOOR CLOSING TOLERANCE
VIEW OF MORTISE UNLATCH LOOKING STRAIGHT INTO DOOR FRAME
DEADLATCH
FINGERS
SPRINGLATCH PLUNGER
SILENCER
TWO SPACERS
3. OPERATION
While you can make a successful installation without knowing how the Mortise UnLatch
functions, it’s best if you understand its operation in the event you run into difficulties or
questions. The operation of the Mortise UnLatch is, of course, intimately connected with the
way mortise locks work on a door so we’ll cover this first.
Mortise locks are the highest quality and heaviest duty locks for sale in North America. They not
only provide long operating life but deliver the highest level of physical security obtainable in a
mechanical latch. To assure this security, all mortise locks include deadlatching function. This
means that when the door is closed and latched, a deadlatch pin, present on the lock face, is
pressed in. This mechanically pins the springlatch so that it cannot be moved by an object
(such as a credit card) which is pushed in between the door and frame.
In order to release the mortise latch, the Mortise UnLatch has two moving elements under the
control of a motor. We call these the springlatch plunger and deadlatch fingers. When the
door is in the closed and secure position, the springlatch pushes in the springlatch plunger and
the deadlatch pin rests on the deadlatch fingers which push in the deadlatch pin. This maintains
the latch in the secure position and makes full use of the deadlatching function.
When the Mortise UnLatch operates (the trigger wire connects to the +V wire), the deadlatch
fingers retract into the body of the Mortise UnLatch which allows the deadlatch pin to move out.
Then the springlatch plunger and deadlatch fingers simultaneously push the latch and deadlatch
pin back into the lock body and the door may be opened from the outside. This operation takes
about 1/3 of a second. When the trigger wire is removed from the +V wire, the Mortise UnLatch
will return to its initial condition: the springlatch plunger will retract into the Mortise UnLatch body
which allows the latch to resecure the door and the deadlatch fingers will push out depressing
the deadlatch pin and freezing the latch for best security.
Page 6

Rev. A.1, 8/01 Page- 6
FIG 5: MORTISE UNLATCH SIDE VIEW IN REST (SECURE) POSITION
DEADLATCH
FINGERS
DEADLATCH PIN
SPRINGLATCH
PLUNGER
IN THE REST (SECURE) POSITION, THE SPRINGLATCH IS ALLOWED TO COME OUT BY THE SPRINGLATCH
PLUNGER THEREBY SECURING THE DOOR. THE DEADLATCH FINGERS, HOWEVER, PUSH IN THE
DEADLATCH PIN WHICH "FREEZES" THE SPRINGLATCH FOR BEST SECURITY.
SPRINGLATCH
FIG 6: MORTISE UNLATCH IN OPERATION
DEADLATCH PIN
DEADLATCH PIN
DEADLATCH
FINGERS
SPRINGLATCH
PLUNGER
IN THE FIRST OPERAT ION AL ST EP, THE DEAD LAT C H
FINGERS WITHDRAW WHICH ALLOWS THE DEADLATCH
PIN TO COME OUT. THIS "UNFREEZES" THE
SPRINGLATCH
SPRINGLATCH
DEADLATCH
FINGERS
SPRINGLATCH
PLUNGER
FINALLY, BOTH THE DEADLATCH FINGERS AND
THE SPRINGLATCH PLUNGER MOVE FORWARD
TOGETHER. THIS PUSHES OUT THE SPRINGLATCH AND DEADLATCH PIN AND THEREBY
RELEASES THE DOOR
SPRINGLATCH
Page 7

Rev. A.1, 8/01 Page- 7
Note that if the door is heavily pre-loaded (by someone trying to pull it open before the Mortise
UnLatch has released it for example), the Mortise UnLatch may not possess enough power to
release the door. This is termed a stall condition for the motor. When a motor is stalled for a
period of time, it can be damaged by heat build up as motors draw heavy current when they’re
not permitted to move. The Mortise UnLatch automatically detects any stall condition that
persists for more than 1.5 seconds and shuts itself off. To operate, the Mortise UnLatch must
simply be triggered again (which is the normal action for anyone who has failed to enter).
4. WIRING
4.1 GENERAL ELECTRICAL CHARACTERISTICS
The Mortise UnLatch is a six wire device. Power (12 or 24VDC depending on the model) is
applied to the red and black wires observing polarity and power should be continuously
present on these wires. If you connect power in reverse, the Mortise UnLatch will not
operate but it will be damaged if left connected for an extended period of time. To
operate the Mortise UnLatch, the trigger wire (orange) is connected to the red wire (+V) via an
external switch. When this connection is made, the Mortise UnLatch will release the door and
keep it released so long as the red and orange wires are connected. When connection between
these wires is broken, the door will be resecured (once it recloses). In certain applications the
door is released all day and secured all night. There is no problem operating the Mortise
UnLatch in this manner (continuous duty) but it is more common for the door to be released for
only a few seconds at a time for controlled entry. This is typically done by relay contacts which
close from an external card reader, digital keypad or keyswitch. The external control device
includes a timing function which will operate the Mortise UnLatch for a few seconds to permit
each entry. Like most conventional electric strikes, the Mortise UnLatch is fail secure which
means that it will maintain the door in a secure position if power is lost. Entry is not possible
(except with a key) but people can, of course, exit by simply turning the door handle or knob
from the inside.
FIG. 7: MORTISE UNLATCH WIRING
DC
POWER SUPPLY
+-
UNLATCH
POWER SHOULD BE CONSTANTLY CONNECTED
BLACK (NEG)
RED (+V)
ORANGE (TRIGGER)
WHITE (STATUS: COM)
GREEN (STATUS: N.C.)
BLUE (STATUS: N.O.)
CLOSURE
BETWEEN +V IN
AND TRIGGER
RELEASES LATCH
In normal operation, the Mortise UnLatch draws about 600 mA @ 12 VDC or 300 mA @ 24VDC
when it operates (the plungers are moving) and a steady 40 mA at all times. Note that regulated
input voltage is not required to operate the Mortise UnLatch. Full wave rectified DC is
acceptable (transformer + bridge rectifier). Power supply surge capacity, however, is ideally
4 Amps @ 12 VDC or 2 Amps @ 24 VDC for best operation. This is because the Mortise
UnLatch’s motor (like all motors) will momentarily draw a lot more current if it has to “work
harder”. This occurs for a very short time at motor start. If power supply surge capacity is
limited, the Mortise UnLatch will still operate, but more slowly. The same condition of high
current draw will occur for a longer period of time if the latch is binding which could be a
permanent condition of the latch or could be because the person trying to enter is pulling on the
door. Again, the Mortise UnLatch will function but more slowly and weakly. If a full capacity
power supply is not practical, a 1 Amp power supply which includes battery backup such as
Securitron’s model BPS-12-1 or BPS-24-1 (with battery) is an equally effective device to power
the Mortise UnLatch as the battery will provide extra surge current as it is needed. Another
point to note is that when one relatively large power supply is serving a number of Mortise
Page 8

Rev. A.1, 8/01 Page- 8
UnLatches, the extra current capability will always be there as each unit will operate at different
times so each can draw extra current from the power supply when needed.
If you are using a smaller capacity power source, you may be satisfied with the operation of
the Mortise UnLatch since the reduction in torque is only noticeable when the door is preloaded. There is, however, an important electronic effect. During the brief moment while the
motor is starting to move, the Mortise UnLatch will “try” to draw 4 or 2 Amps (depending on the
voltage). A power supply of lower capacity will react to this condition by sharply dropping its
voltage for the same period. While this will not harm the power supply, it may “crash”
microprocessor equipped devices like digital keypads (such as Securitron’s model DK-11 or DK-
26) that are being operated from the same power supply. If, therefore, your installation
includes a digital keypad, or other microprocessor equipped device, make sure you have full
power supply capacity (or a smaller supply with battery backup) or use a separate power supply
for the keypad or other device.
4.2 WIRE GAUGE SIZING
If the power supply is some distance from the lock, voltage will be lost (dropped) in the
connecting wires so that the Mortise UnLatch will not receive full voltage. The amount of
voltage that is dropped in the wires depends on the resistance of the “round trip” wire run
compared to the resistance of the Mortise UnLatch. The issue is complicated by the fact that
the resistance of the Mortise UnLatch is 20 Ohms @ 12 VDC or 80 Ohms @ 24 VDC when it is
operating (the motor is moving) but the resistance drops as low as 3 Ohms @ 12 VDC or 12
Ohms @ 24 VDC for 100 milliseconds just as the motor starts. If the unit is denied full voltage
during this motor start period, it will operate but with less torque so it will not release the latch as
crisply when the latch has pre-load on it. Selecting thick wires to power the Mortise
UnLatch will maintain strong torque even during start up. The following table shows
distances from the Mortise UnLatch to the power source and calls out the wire gauge needed to
fully maintain torque. Note that if your installation requires the power source to be more distant
or has other complications, the factory can assist you.
Distance (one way) 50 ft. (15 M) 100 ft. (30 M) 200 ft. (60 M)
Wire Gauge for UNL-12 16 14 12
Wire Gauge for UNL-24 22 20 18
4.3 LATCH STATUS SENSING
The Mortise UnLatch includes a latch status sensing feature. When
the door is closed and the door latch has engaged the Mortise UnLatch
(specifically the springlatch plunger has been pushed in by the door
latch), the Mortise UnLatch will report this secure condition by
outputting a closed circuit condition between the white (COM) and
GREEN
BLUE
WHITE
NC
NO
COM
green wires (see the drawing to the right). When the door is not
securely latched, the closure will be between the white and blue wires. This dry SPDT output
can carry 1 Amp @ 30 VDC maximum. This signal is normally connected to the building alarm
system and it provides superior information compared to conventional door contacts which show
only that the door is closed, not whether it is latched. Note that the Mortise UnLatch’s ability to
report on the latched status of the door depends on it receiving constant power. Any time
power is cut to the Mortise UnLatch, it will report the door as secure regardless of whether it is
latched or not.
The Mortise UnLatch uses the information as to whether the door is latched or not for a second
purpose. The Mortise UnLatch will not operate unless the latch is in the secure position
(the springlatch plunger is pushed in). Operationally, the door can be opened anyway (it is not
latched) so there is no benefit to the end user from the Mortise UnLatch operating unless the
door is latched. Inhibiting operation when the door is not properly closed and latched also helps
protect the Mortise UnLatch against operating its motor into some jam condition in the event of
severe misalignment of the door.
Page 9

Rev. A.1, 8/01 Page- 9
MAGNACARE LIMITED LIFETIME WARRANTY
SECURITRON MAGNALOCK CORPORATION warrants that it will replace at customer’s request, at any time for
any reason, products manufactured and branded by SECURITRON.
SECURITRON will use its best efforts to ship a replacement product by next day air freight at no cost to the
customer within 24 hours of SECURITRON’s receipt of the product from customer. If the customer has an account
with SECURITRON or a valid credit card, the customer may order an advance replacement product, whereby
SECURITRON will charge the customer’s account for the price of the product plus next day air freight, and will
credit back to the customer the full amount of the charge, including outbound freight, upon SECURITRON’s receipt
of the original product from the customer.
SECURITRON’s sole and exclusive liability, and customer’s sole remedy, is limited to the replacement of the
SECURITRON product when delivered to SECURITRON’s facility (freight and insurance charges prepaid by
customer). The replacement, at SECURITRON’s sole option, may be the identical item or a newer unit which
serves as a functional replacement. In the event that the product type has become obsolete in SECURITRON’s
product line, this MAGNACARE warranty will not apply. This MAGNACARE warranty also does not apply to
custom, built to order, or non-catalog items, items made by others (such as batteries), returns for payment,
distributor stock reductions, returns seeking replacement with anything other than the identical product, or products
installed outside of the United States or Canada. This MAGNACARE warranty also does not apply to removal or
installation costs.
SECURITRON will not be liable to the purchaser, the customer or anyone else for incidental or consequential
damages arising from any defect in, or malfunction of, its products. SECURITRON does not assume any
responsibility for damage or injury to person or property due to improper care, storage, handling, abuse, misuse, or
an act of God.
EXCEPT AS STATED ABOVE, SECURITRON MAKES NO WARRANTIES, EITHER EXPRESS OR IMPLIED, AS
TO ANY MATTER WHATSOEVER, INCLUDING WITHOUT LIMITATION THE CONDITION OF ITS PRODUCTS,
THEIR MERCHANTABILITY OR FITNESS FOR ANY PARTICULAR PURPOSE.
Page 10

Rev. A.1, 8/01 Page- i
APPENDIX A: TROUBLESHOOTING
PROBLEM-- Unit will not operate when trigger wire is connected to +V.
On a new installation, make sure that DC power (12 or 24 volts depending on the model) is connected to the red
and black wires with correct polarity. When this is confirmed, note that the Mortise UnLatch will never operate
unless the springlatch plunger is pushed in by the springlatch (see Section 3.3). You can be “fooled” by this feature
if you’re trying to test operate the Mortise UnLatch with the door open. To do this, use a pencil or other similar
object to lightly push in the springlatch plunger and then close the trigger wire to +V and you will see the Mortise
UnLatch plungers move.
On a service call for a unit with successful operating history, in addition to the checks mentioned above, check to
see if the door and latch have gotten into a warped situation where there is heavy pre-loading on the door. The
Mortise UnLatch’s motor may not be able to release the latch under this condition but you should be able to hear it
trying to release the latch. The Mortise UnLatch will automatically shut down its motor if it can’t release the latch
within 1.5 seconds. It will operate normally when it is re-triggered. You should be able to try operation by removing
the pre-loading by pushing the door closed with enough force to counteract the pre-loading. Note that this situation
is more likely if power supply capacity is less than 2 or 4 Amps (see Section 3.1). Corrections for this type of
warped door situation is to have the door serviced and possibly increase the capacity of the power supply.
If the unit still will not function, note that it does have an internal microprocessor that could have gotten into a crash
condition. This can happen some times if the unit is under-powered (see Section 3.1) and has consequently stalled
(the motor is not receiving enough power to operate the latch). While the motor is in the process of stalling, voltage
to the processor will sharply drop and this can crash the microprocessor. A crash can also occur as a random
event but this is unusual. The recovery technique is to de-power the unit, and then re-power it with the red and
orange wires already connected (both then connect to +V). This re-initializes the firmware. Naturally, once this
operation has been performed, return the unit to standard wiring (orange only connects to +V to trigger the unit.)
Finally, the unit could have experienced motor failure or other internal electronic failure. It is repairable by the
factory.
PROBLEM -- Unit will occasionally not operate.
Generally, this comes from too much door pre-loading possibly coupled with a low capacity power source. When
the Mortise UnLatch can’t generate enough torque to release the latch, it automatically shuts down but then
operates the next time it is triggered. See the previous paragraph.
PROBLEM -- Latch does not re-secure when the door re-closes.
This is not a problem with the Mortise UnLatch but is rather a problem with the installation. The latch is simply not
moving into position. Make sure the door closer is properly operating to re-close the door with reasonable force.
Next, re-read Section 2.5 to make sure the Mortise UnLatch is in the correct position with respect to the door stop.
PROBLEM -- Latch status sensing does not function.
The latch status output contacts (see Section 3.3) will change state when the springlatch plunger is pushed in. To
check this, therefore, push the springlatch plunger lightly in with a pencil or other similar object. Make sure the unit
is receiving power when you make this check or the output contacts will not switch. If they still do not switch, the
unit will need to be returned to the factory for repair.
PATENTS
The Mortise UnLatch is covered under U.S. patents #5,474,342 and #6,022,056 with other US
and international patents pending.
Page 11

Rev. A.1, 8/01 Page- ii
TEMPLATE FOR CHISELING OUT A WOOD FRAME
1 1/4"
INSTALLATION IN WOOD FRAME
DOTTED LINE SHOWS AREA TO
CHISEL OUT 1 7/8" DEEP FOR
4 7/8"
4 1/8"
CENTER LINE
 Loading...