

Page 1

ASRock WiFi-802.11n Module
Operation Guide
1
Page 2

1. Introduction
ASRock WiFi-802.11n module is an easy-to-use wireless local area network (WLAN)
adapter to support WiFi+AP function. With ASRock WiFi-802.11n module, you can
easily create a wireless environment and enjoy the convenience of wireless network
connectivity. Therefore, from anywhere within the signal range, you will be able to
play LAN games, connect to the internet, access and share printers, and make Internet
phone calls easily. Please read this operation guide carefully before you start to set up
ASRock WiFi-802.11n module.
1.1 Specifications
Standard
Data Rate
Security
Network Architecture T ypes
Frequency Band
Operating Range
Number of Connected Devices
(AP Mode)
Antenna
LED
- IEEE 802.11n
- 15, 30, 45, 60, 90, 120, 135, 150Mbps
- AES, TKIP , WEP
- Access Point mode (AP mode)
- Station mode: Infrastructure mode and
Ad-Hoc mode
- 2.4GHz ISM radio band
- Indoor: 330ft (100m)
- Outdoor: 980ft (300m)
* The range varies in different
environments
- up to 16 stations
- ASRock WiFi-802.11n
omni-directional antenna
- Green data transmission (AIR) LED
Support OS
Compatibility
Software Support
- Windows® XP / XP 64-bit / VistaTM /
VistaTM 64-bit
- Full compatible with IEEE 802.11n
standard products
- ASRock WiFi-802.11n Wizard
2
Page 3

1.2 LED Indicators and Antenna Ports
ASRock W iFi-802.11n module has a green LED for transmission status mounted
onboard, and two antenna ports for connection to the external antennas.
Antenna Ports
LED
LED Status Indication
On Power on, transmit/receive/site survey
Off Power off, no wireless connection
1.3 Signal Range
The signal range of ASRock WiFi-802.11n module varies from the operating
environment. Obstacles such as walls and metal barriers could reflex and absorb ratio
signals. Devices like microwave ovens may also interfere with the wireless network
greatly.
Signal range:
Indoor 330ft (100m), outdoor 980ft (300m)
By default, ASRock WiFi-802.11n module should automatically adjust the data rate.
The closer the wireless stations are the better the signal and transmission speed they
will receive.
Note:
* To reach higher data rate, we advise users to adjust the channel bandwidth of Wireless AP to
40MHz instead of 20MHz. However, under the circumstances of a noisy environment, users
may adjust the setting back to 20MHz, which may get less interference.
3
Page 4
2. Hardware & Software Installation
2.1 System Requirements
Before installing ASRock WiFi-802.11n module to your motherboard, please make
sure your system satisfies the following requirements.
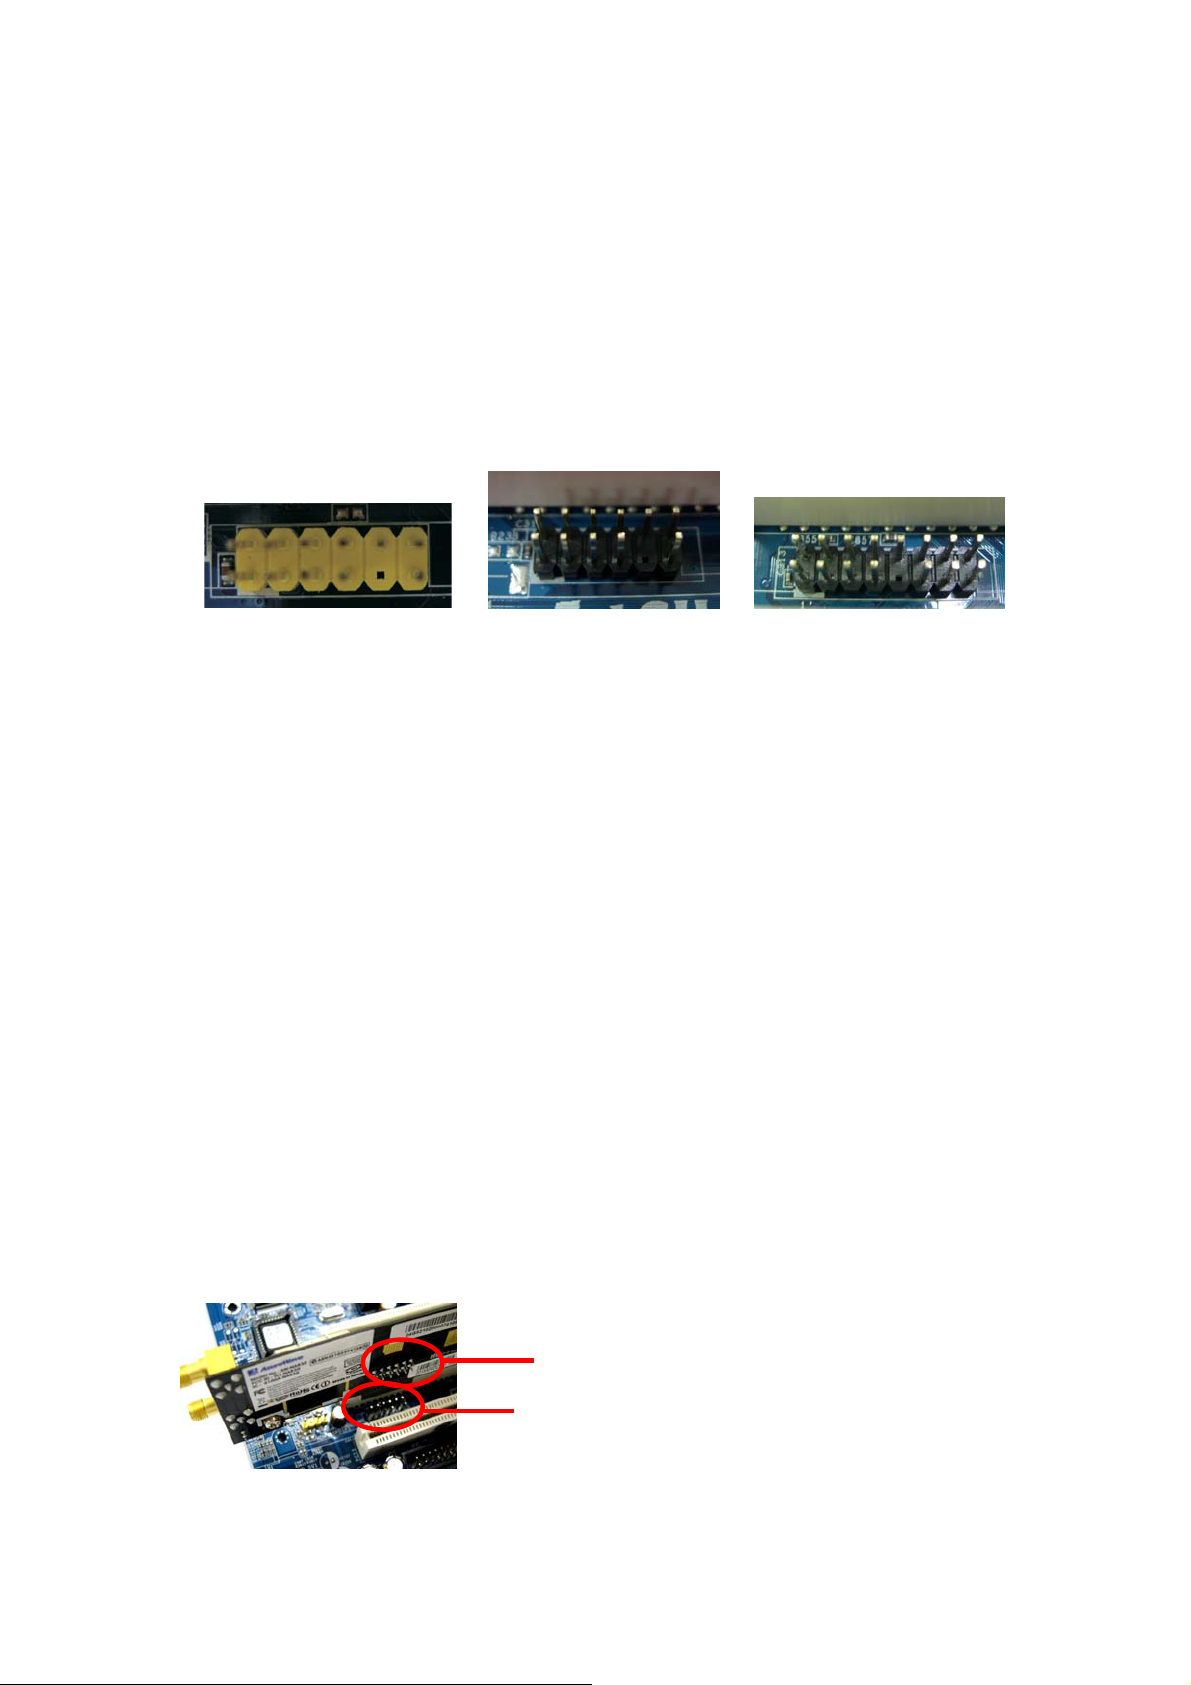
1. ASRock motherboard with a USB/WiFi (yellow), WiFi (black) or WiFi/E (black)
header. (Please refer to ASRock motherboard manual for the location of
USB/WiFi, WiFi or W iFi/E header.)
USB/WiFi Header (2 x 6 Pin) WiFi Header (2 x 6 Pin) WiFi/E Header (2 x 8 Pin)
2. A minimum of 256MB system memory
3. Operating system: Windows® XP / XP 64-bit / VistaTM / VistaTM 64-bit
4. An optical drive / CD-ROM for driver and utility installation
2.2 Installing ASRock WiFi-802.11n Module and Antennas
After you make sure your system satisfies the requirements above, please follow
below steps for installing your ASRock WiFi-802.11n module. If the motherboard you
purchase is equipped with ASRock WiFi-802.11n module, which is screwed next to
the audio jack of the I/O panel, please skip step 2 to 6.
1. Shut off the PC before installing ASRock WiFi-802.11n module.
2. Move out your motherboard from the chassis.
3. Fasten the bracket to the proper position of the chassis with screws.
4. Plug ASRock WiFi-802.11n module with its connector-side to the USB/WiFi
(yellow), WiFi (black) or WiFi/E (black) header on the motherboard. (The location
of the USB/WiFi, WiFi or WiFi/E header may vary on motherboard models. Please
refer to your motherboard manual for the motherboard layout.)
Connector-side
USB/WiFi, WIFI or WIFI/E Header
5. Fasten ASRock WiFi-802.11n module to the motherboard with screws.
4
Page 5

6. Place your motherboard to the chassis.
7. Connect the cable-end from the antennas to the antenna ports on ASRock
WiFi-802.11n module.
8. Place the antennas at an elevated location. A wide and open position will enhance
the operating range.
Note:
* You may connect two antennas to ASRock WiFi-802.11n module. However, please place
the two antennas apart for a distance of at least 50cm and put them on different elevation of
height to avoid interference of each others.
2.3. Driver and Utility Installation
After you finish the hardware installation, you need to install WiFi driver and utility
to your system. Please boot your system and follow below steps to install the WiFi
driver and utility.
1. Insert ASRock motherboard support CD to the optical drive.
2. The system will automatically display the driver menu. Click “ASRock
WiFi-802.11n Driver and Utility” and follow screen instructions to finish the driver
installation.
After above steps, the WiFi driver and utility are installed to your system
simultaneously.
Note:
®
* Microsoft
network in Windows
http://support.microsoft.com/kb/928152/en-us
had released a hotfix to improve the connectivity and performance of wireless
®
Vista-based system. To download the hotfix, please go to:
®
* Microsoft
file in Windows
z http://support.microsoft.com/kb/932045/en-us to download the necessary hotfix when this
had also released three hotfix to improve the connectivity for transferring large
®
Vista-based system. Please go to:
5
Page 6

situation happened: "The connection has been lost" – this error message may occur when you try
to copy a large file from one Windows
®
Vista-based computer to another Windows Vista-based
computer.
z http://support.microsoft.com/kb/932170/en-us
to download the necessary hotfix when this
situation happened: When you copy large files to or from earlier operating systems, the copy
operation may be slower than expected on some Windows
z http://support.microsoft.com/kb/931770/en-us
to download the necessary hotfix when this
®
Vista-ba sed computers.
situation happened: The copy process may stop responding when you try to copy files from a
server on a network to a Windows
®
Vista- based computer.
2.4 Utility Setup
After you have installed the driver and utility to your system, now you are ready to set
up the utility in your network. ASRock WiFi-802.11n module supports two kinds of
wireless network mode: Access Point Mode (AP Mode) and Station Mode. Please
refer to below introduction and select the most appropriate mode when setting it up.
A. Access Point Mode (AP Mode)
If you want to share the Internet access with the wireless stations in your
environment, such as PC, notebook and other devices, you can configure ASRock
WiFi-802.11n module in an access point mode (AP mode). In this mode, ASRock
WiFi-802.11n module becomes the wireless access point that provides local area
network and Internet access for your wireless stations. The AP Mode feature is ideal
for home/SOHO networks with several computers, a shared printer, and a shared
Internet connection.
Internet
ADSL or Cable
Modem (if any)
Station 1
Printer 1
ASRock MB With
WiFi-802.11n
Module
Station 4
Station 3
Station 2
6
Page 7

B. Station Mode
If you do not plan to use AP function with ASRock WiFi-802.11n module, but just
want to use the wireless function to connect the access point (AP), or connect
with other stations in the wireless range instead, please set up ASRock WiFi-802.11n
module in station mode. There are two choices provided in station mode:
Infrastructure mode and Ad-hoc mode. Please read below introduction for the
differences of these two modes.
B-1. Infrastructure Mode
If you have a present access point (AP) in your wireless network environment for this
station to join, you can set up ASRock WiFi-802.11n module in Infrastructure mode.
In this mode, ASRock WiFi-802.11n module acts as a wireless adapter. In other words,
it is centered on an AP that provides Internet access and LAN communication for the
wireless stations, such as PC, notebook and other devices.
ADSL or Cable
Internet
Modem (if any)
Access Point
Station 2
ASRock MB With
WiFi-802.11n Module
Station 1
B-2. Ad-hoc Mode
If you don’t have a present access point in your wireless network environment, you
can set up ASRock WiFi-802.11n module in Ad-hoc mode. The wireless network
brings together workstations, PC, notebook and other devices for wireless
communication.
7
Page 8

Station 2
ASRock MB With
WiFi-802.11n Module
Station 1
8
Page 9
3. General Setup with ASRock WiFi-802.11n Wizard
If you want to easily set up ASRock WiFi-802.11n for general use, please use ASRock
WiFi-802.11n Wizard and follow below procedures according to the mode you
choose.
Here we take Windows® VistaTM for example in the following pictures. Since
the setup procedures are quite similar in different operating systems, please refer to
below procedures when setting up ASRock WiFi-802.11n wizard under other
operating systems.
3.1 Setting up the AP Mode
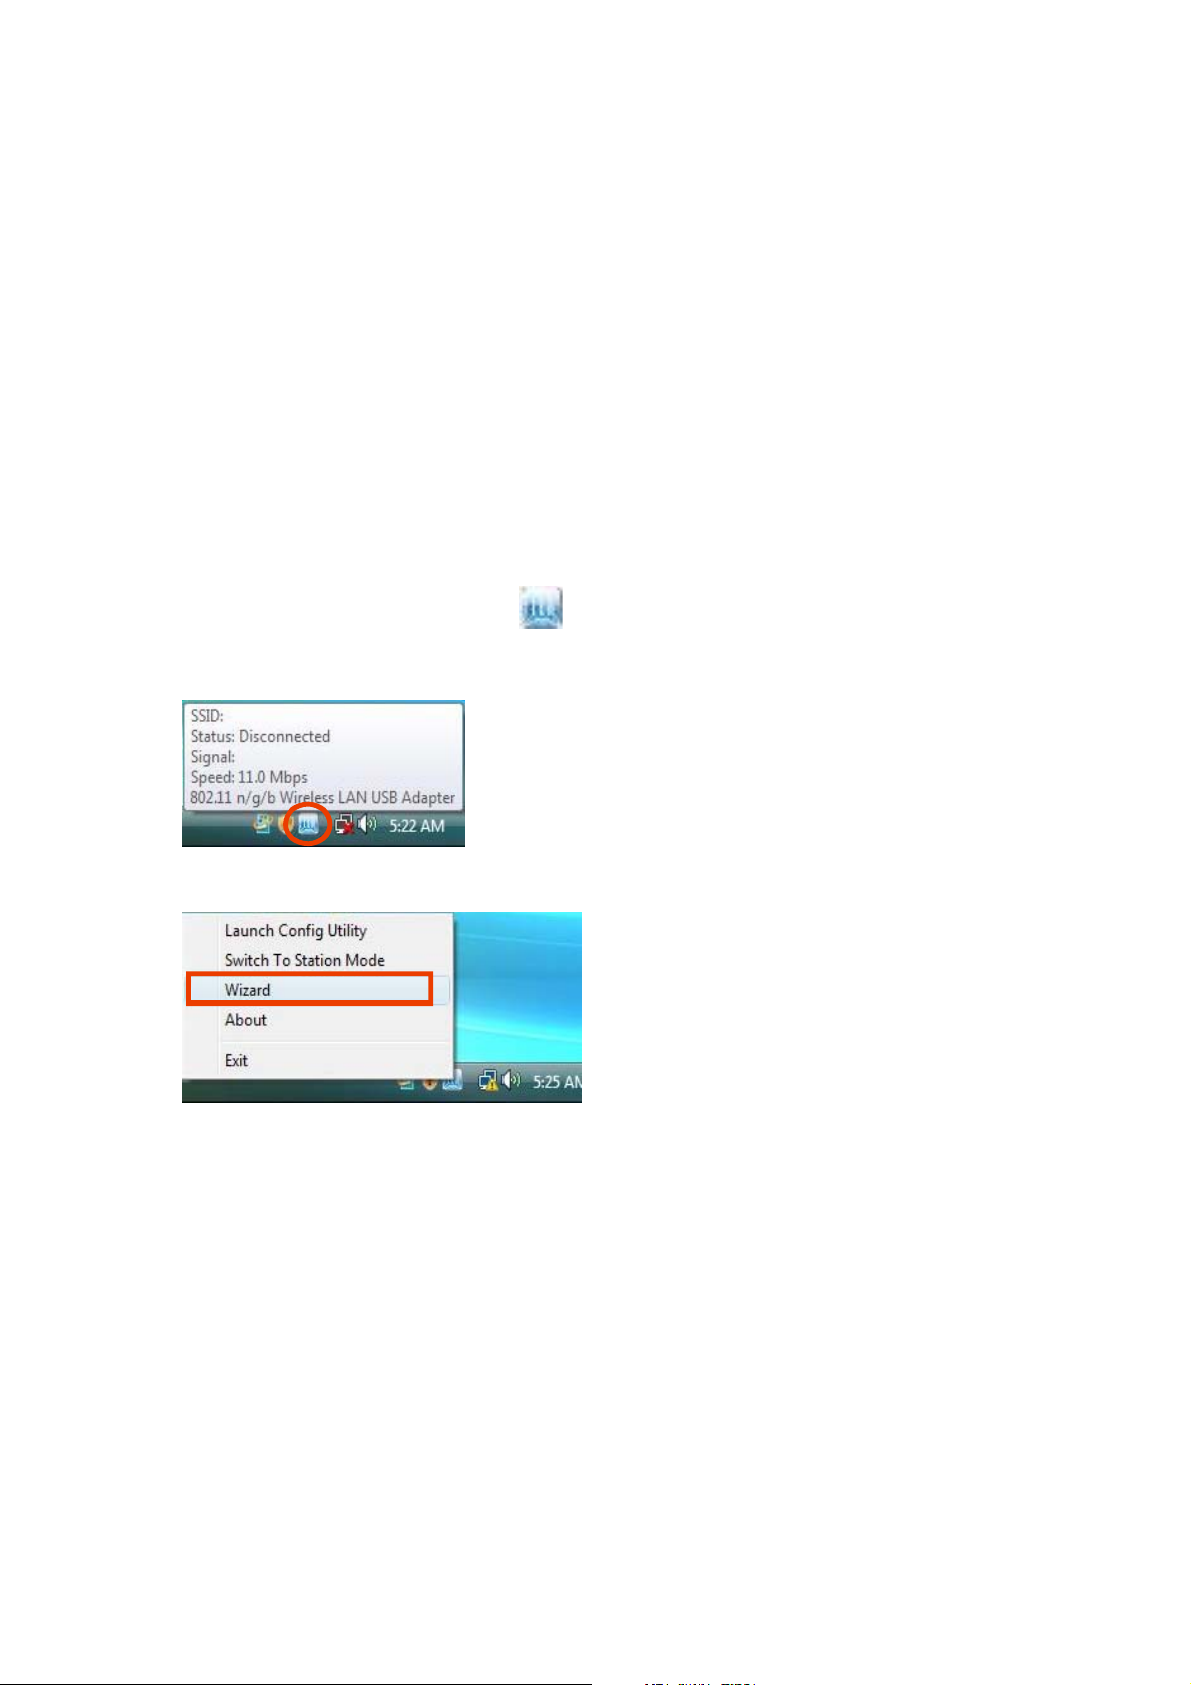
1. Move your mouse cursor to the icon on the Windows® taskbar and
right-click the icon.
2. Select Wizard to launch the WiFi setup wizard.
3. Select Create a wireless access point and click Next.
9
Page 10
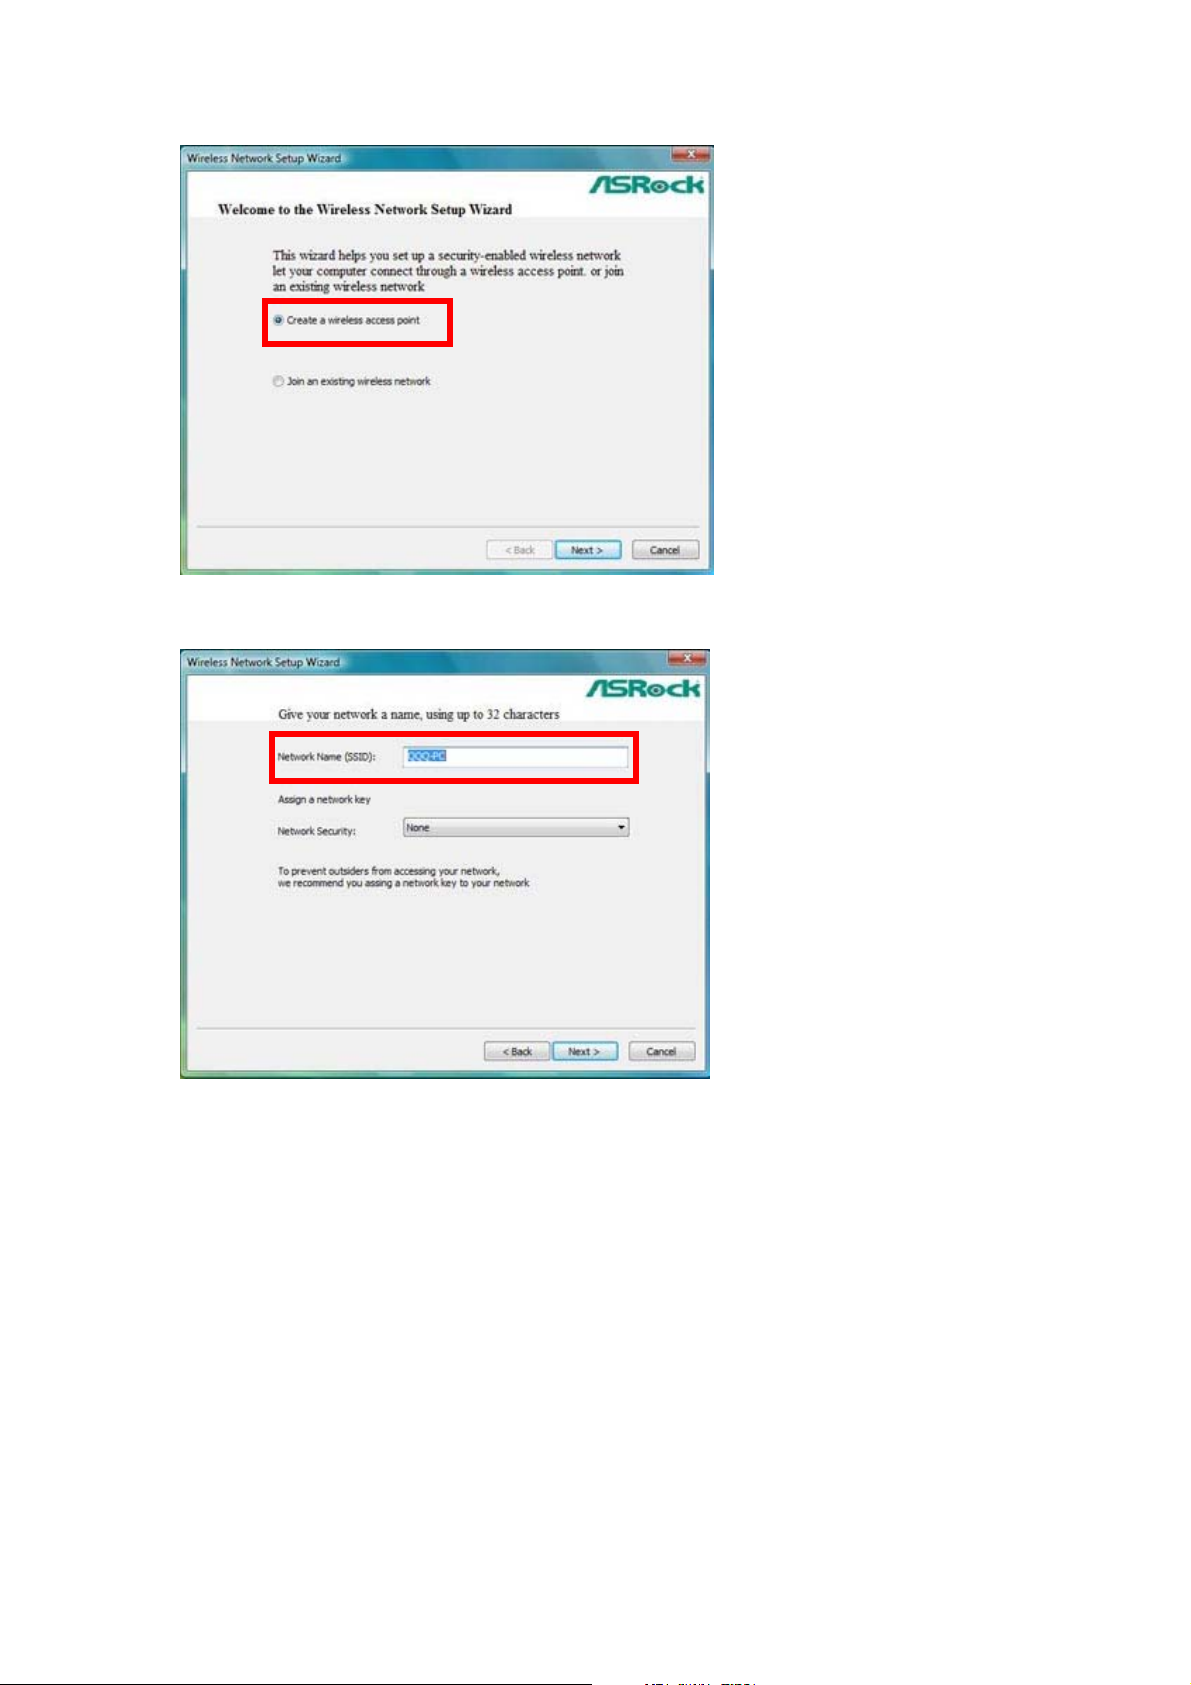
4. The system will automatically generate a SSID for the AP mode. You can rename
the SSID if you want.
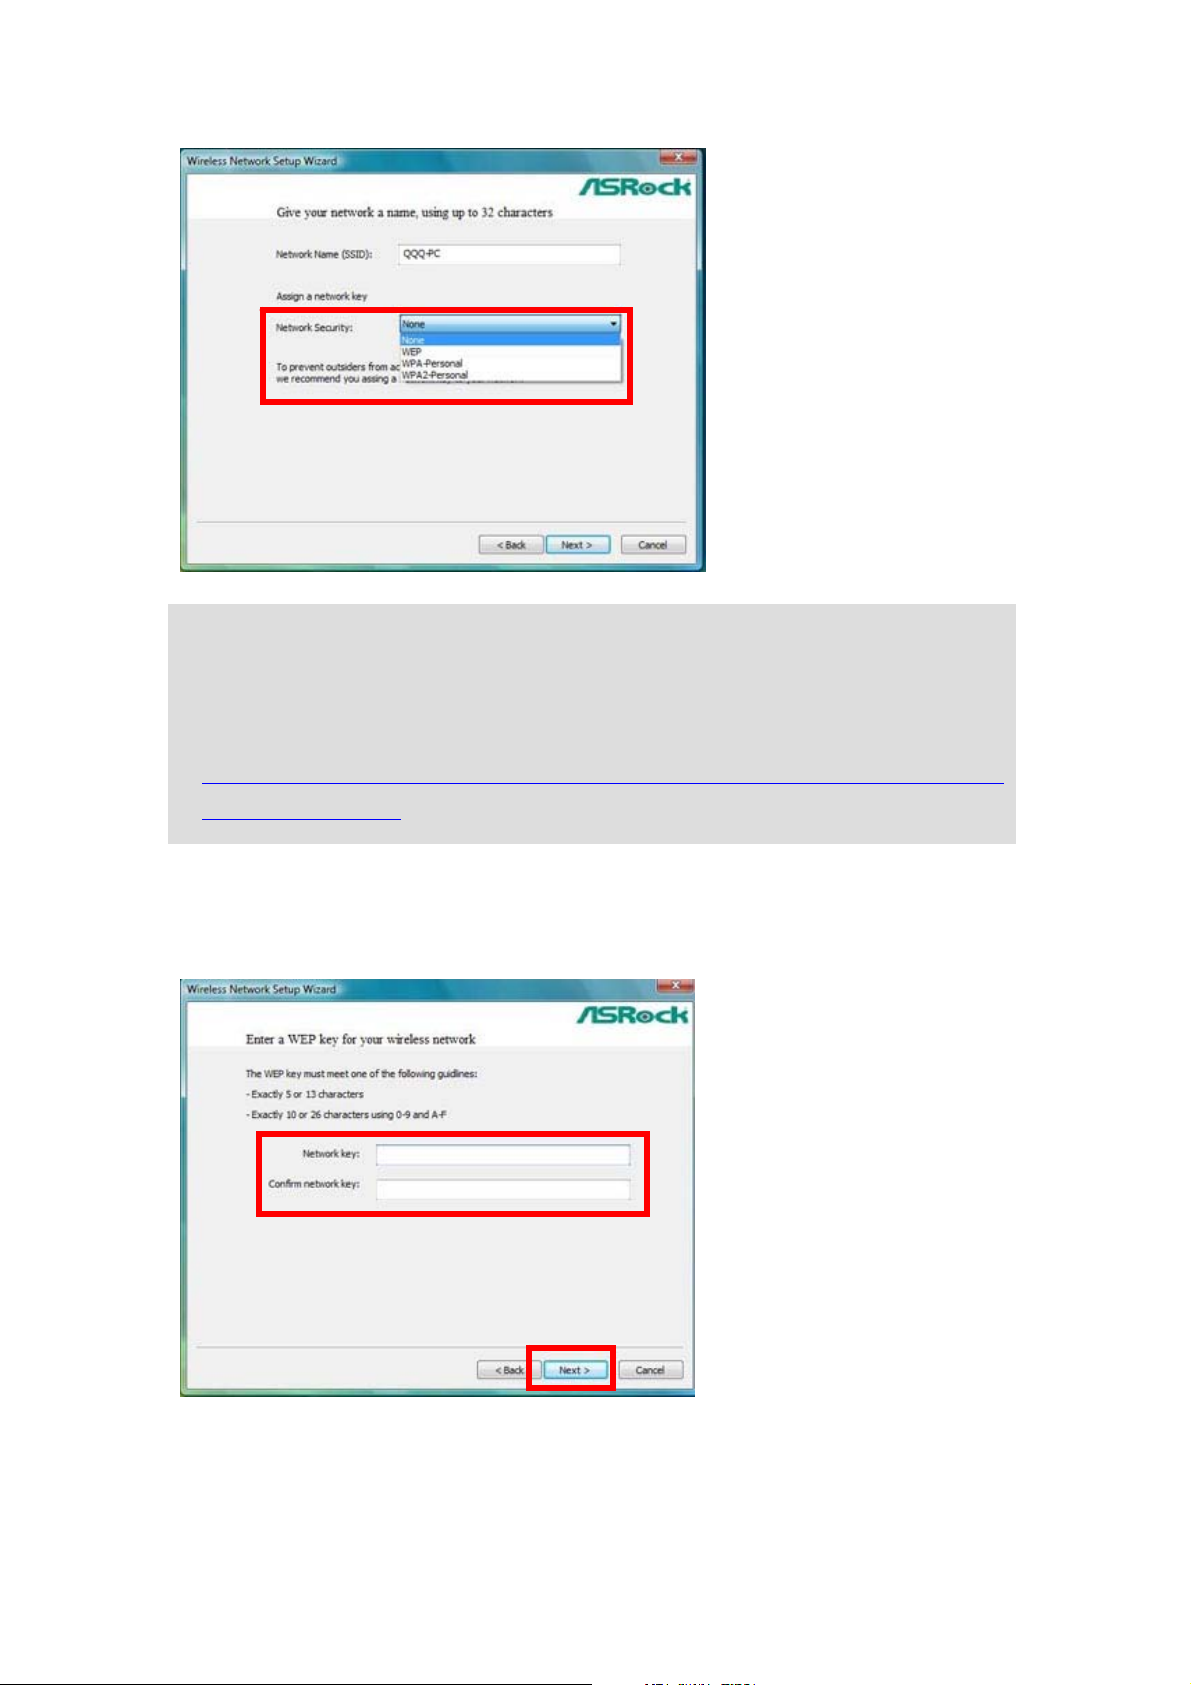
5. Select a Network Security level for your AP mode. The configurable options are
None, WEP, WPA-Personal and WPA2-Personal. Select an appropriate level and
click Next.
10
Page 11
Note:
®
* If your operating system is Windows
XP with Service Pack 2, it is required to install the
Microsoft hotfix in order to support WPA2-Personal function. Please go to this link to
download the necessary hotfix:
http://www.microsoft.com/downloads/details.aspx?familyid=662BB74D-E7C1-48D6-95EE-145923
4F4483&displaylang=en
6. If you select WEP, WPA-Personal or WPA2-Personal. You need to input a
password. Follow the wizard guidelines for key entry rules. Then click Next to
continue.
7. Select your Internet connection and click Next.
11
Page 12

Note:
* You need to have another LAN connector connected to your ADSL / cable modem, and
already set it up for Internet access. Please refer to the manual from your ISP for detailed
setup steps.
8. The AP mode configuration is complete. Record the setup information on your note
and click Finish to quit the wizard.
3.2 Setting up the Station Mode
Note:
* Please be noted that the wizard for WiFi-802.11n Module does not provides Ad-Hoc mode.
If you want to set up Ad-Hoc mode, please refer to page 26 - page 36 for advanced setup.
12
Page 13

3.2.1 Setting up the Infrastructure Mode
1. Move your mouse cursor to the icon on the Windows® taskbar and
right-click the icon.
2. Select Wizard to launch the WiFi setup wizard.
3. Select Join an existing wireless network and click Next.
4. Click Finish to exit the wizard.
13
Page 14

5. Move your mouse cursor to the Wireless Network Connection icon on the
Windows® taskbar and right-click the icon. Click Connect to a network to select
available internet network.
6. Choose an available internet network and click Connect.
14
Page 15

* If you choose a security-enabled wireless network, you have to input the network
key.
7. Your system is now connecting to a network.
8. You have connected to internet wireless network successfully. If you want to start
the connection automatically next time, you may save the network by checking Save
this network box, and click Close.
15
Page 16

16
Page 17

4. Advanced Setup in ASRock WiFi-802.11n Utility
If you want to set up ASRock WiFi-802.11n module for advanced use, please follow
below procedures according to the mode you choose. For general users, it is
unnecessary to read below advanced setup of ASRock WiFi-802.11n module.
Here we take Windows® VistaTM for example in the following pictures. Since
the setup procedures are quite similar in different operating systems, please refer to
below procedures when setting up ASRock WiFi-802.11n wizard under other
operating systems.
4.1 Setting up the AP Mode
If you want to set up ASRock WiFi-802.11n module for advanced use in AP mode,
please use ASRock WiFi-802.11n utility and follow below steps according to the
operating system you install.
1. Double-click the utility shortcut on the desktop or double-click the
icon on your Windows® taskbar to open the setup utility.
2. Refer to the mode indicator on the top-right corner of the main window to know
which mode ASRock WiFi-802.11n is in. If it is in station mode, click the mode
switch button to switch it to AP mode.
17
Page 18

3. The system will automatically generate a SSID for the AP mode. You can rename
the SSID if you want.
4. Select a Network Authentic ation for your AP mode. The configurable options are
Open System, Shared Key, WPA-PSK and WPA2-PSK. Select an appropriate
one.
Note:
®
* If your operating system is Windows
XP with Service Pack 2, it is required to install the
Microsoft hotfix in order to support WPA2-Personal function. Please go to this link to
download the necessary hotfix:
http://www.microsoft.com/downloads/details.aspx?familyid=662BB74D-E7C1-48D6-95EE-145923
4F4483&displaylang=en
5. If you select Open System, the configurable options of Data Encryption are None
and WEP for you to choose. This option allows you to select Key Length.
18
Page 19

6. If you select Shared Key, the configurable options of Data Encryption is WEP
only. This option allows you to select Key Length.
7. If you select WPA-PSK, the configurable option of Data Encryption is TKIP only.
You can’t select Key Length in this option.
19
Page 20

8. If you select WPA2-PSK, the configurable option of Data Encryption is AES only.
You can’t select Key Length in this option either.
9. In this case, we select Open System for the rest of the setups. If you select WEP,
please select the Key Length. The configurable options are 64 Bits and 128 Bits.
(However, if you select None in the Data Encryption, you will not be able to
choose the Key Length.)
10. Key in the Network password and click Apply to confirm.
20
Page 21

11. Click ICS (Internet Connection Sharing) button on the left-bottom corner of the
main window.
12. Select the correct internet connection and click Apply.
Note:
* You need to have another LAN connector connected to your ADSL / cable modem, and
already set it up for Internet access. Please refer to the manual from your ISP for detailed
setup steps.
13. The AP mode configuration is completed.
21
Page 22

4.2 Setting up the Station Mode
There are two choices provides in station mode: Infrastructure mode and Ad-hoc
mode. For the differences of Infrastructure mode and Ad-hoc mode, please refer to
page 5 and 6 for details.
If you want to set up ASRock WiFi-802.11n module for advanced use in station mode,
please use Windows® configuration and follow below steps according to the mode you
choose and the operating system you install.
4.2.1 Setting up the Infrastructure Mode
For Windows® XP / XP 64-bit:
1. Move your mouse cursor to Wireless Network Connection icon on the
Windows® taskbar and right-click the icon.
2. Select View Available Wireless Networks.
3. Choose an available wireless network. Click Connect.
22
Page 23

4. If you choose a security-enabled wireless network, input the network key and
click Connect.
5. You are now connected to a internet wireless network successfully.
For Windows® VistaTM / VistaTM 64-bit:
1. Click Start. Click Settings. And select Control Panel.
23
Page 24

2. Click Network and Internet.
3. Click Network and Sharing Center.
4. Click Connect to a network.
5. Choose an available network and click Connect.
24
Page 25

6. If you choose a security-enabled wireless network, input the network key and
click Connect.
7. You have connected to internet wireless network successfully. If you want to start
the connection automatically next time, you may save the network by checking
Save this network box, and click Close.
25
Page 26

4.2.2 Setting up the Ad-hoc Mode
For Windows® XP / XP 64-bit:
1. Move your mouse cursor to Wireless Network Connection icon on the
Windows® taskbar and right-click the icon.
2. Select View Available Wireless Networks.
3. Click Change advanced settings.
4. Switch to Wireless Networks tab and click Advanced.
26
Page 27

5. Select Computer-to-computer (ad hoc) networks only and clear the
Automatically connect to non-preferred networks box if it is selected. Click
Close.
6. On the Wireless Networks tab, click Add. In the Wireless Network Properties
dialog box, specify a Network name (SSID). Click OK to close all dialog boxes.
27
Page 28

7. Select the Network Authentication for advanced setups. The configurable options
are Open, Shared and WPA2-None. Select an appropriate one.
28
Page 29

8. If you select Open, the configurable option of Data Encryption is WEP only . You
may select Disabled or WEP. This option allows you to select Key Index.
9. If you select Shared, the configurable option of Data Encryption is WEP only . You
29
Page 30

may select Disabled or WEP. This option allows you to select Key Index.
10. If you select WPA-None, the configurable options of Data Encryption are TKIP
and AES. You may select either TKIP or AES. You can’t select Key index in this
option.
30
Page 31

11. Launch V iew A vailable Wir eless Networks again. You are now in Ad-hoc
network, you may wait for other users to connect you or you may select the desired
ad-hoc network and click Connect.
For Windows® VistaTM / VistaTM 64-bit:
1. Click Start. Click Settings. And select Control Panel.
2. Click Network and Internet.
31
Page 32

3. Click Network and Sharing Center.
4. Click Manage wireless networks.
32
Page 33

5. In the Manage wireless networks that use (Wireless Network Connection)
window, click Add.
6. Click Create an ad hoc network.
7. In the Set up a wireless ad hoc network window, click Next.
33
Page 34

8. Specify a network name, select the security type. The configurable options are No
Authentications (Open), WEP and WPA2-Personal.
34
Page 35

9. Select an appropriate one, and key in the security password. Then click Next.
10. You have completed setting up an Ad-hoc network. Click Close to exit.
11. You are now in Ad-hoc network, you may wait for other users to connect you or
you may select the desired ad-hoc network.
35
Page 36

36
 Loading...