

Page 1

1
AMD RAID Installation Guide
1. AMD BIOS RAID Installation Guide ........................................................................................................ 2
1.1 Introduction to RAID .................................................................................................................... 2
1.2 RAID Configurations Precautions ................................................................................................. 4
1.3 UEFI RAID Configuration .............................................................................................................. 6
2. AMD Windows RAID Installation Guide ............................................................................................... 19
2.1 Create a RAID volume under Windows ...................................................................................... 19
2.2 Delete a RAID array under Windows. ........................................................................................ 26
Page 2

2
1. AMD BIOS RAID Installation Guide
The BIOS screenshots in this guide are for reference only and may differ from the exact settings for
your motherboard. The actual setup options you will see shall depend on the motherboard you
purchase. Please refer to the product specification page of the model you are using for information on
RAID support. Because the motherboard specifications and the BIOS software might be updated, the
content of this documentation will be subject to change without notice.
AMD BIOS RAID Installation Guide is an instruction for you to configure RAID functions by using the
onboard FastBuild BIOS utility under BIOS environment. After you make a SATA driver diskette, press [F2] or
[Del] to enter BIOS setup to set the option to RAID mode by following the detailed instruction of the “User
Manual” in our support CD, then you can start to use the onboard RAID Option ROM Utility to configure
RAID.
1.1 Introduction to RAID
The term “RAID” stands for “Redundant Array of Independent Disks”, which is a method combining two or
more hard disk drives into one logical unit. For optimal performance, please install identical drives of the
same model and capacity when creating a RAID set.
RAID 0 (Data Striping)
RAID 0 is called data striping that optimizes two identical hard disk drives to read and write data in parallel,
interleaved stacks. It will improve data access and storage since it will double the data transfer rate of a
single disk alone while the two hard disks perform the same work as a single drive but at a sustained data
transfer rate.
WARNING!!
Although RAID 0 function can improve the access performance, it does not provide any fault tolerance. HotPlug any HDDs of the RAID 0 Disk will cause data damage or data loss.
Page 3

3
RAID 1 (Data Mirroring)
RAID 1 is called data mirroring that copies and maintains an identical image of data from one drive to a
second drive. It provides data protection and increases fault tolerance to the entire system since the disk
array management software will direct all applications to the surviving drive as it contains a complete copy
of the data in the other drive if one drive fails.3
RAID 5 (Block Striping with Distributed Parity)
RAID 5 stripes data and distributes parity information across the physical drives along with the data blocks.
This organization increases performance by accessing multiple physical drives simultaneously for each
operation, as well as fault tolerance by providing parity data. In the event of a physical drive failure, data
can be re-calculated by the RAID system based on the remaining data and the parity information. RAID 5
makes efficient use of hard drives and is the most versatile RAID Level. It works well for file, database,
application and web servers.
Page 4

4
RAID 10 (Stripe Mirroring) RAID 0 drives can be mirrored using RAID 1 techniques, resulting in a RAID 10
solution for improved performance plus resiliency. The controller combines the performance of data
striping (RAID 0) and the fault tolerance of disk mirroring (RAID 1). Data is striped across multiple drives
and duplicated on another set of drives.4
1.2 RAID Configurations Precautions
1. Please use two new drives if you are creating a RAID 0 (striping) array for performance. It is
recommended to use two SATA drives of the same size. If you use two drives of different sizes, the
smaller capacity hard disk will be the base storage size for each drive. For example, if one hard disk has
an 80GB storage capacity and the other hard disk has 60GB, the maximum storage capacity for the
80GB-drive becomes 60GB, and the total storage capacity for this RAID 0 set is 120GB.
2. You may use two new drives, or use an existing drive and a new drive to create a RAID 1 (mirroring)
array for data protection (the new drive must be of the same size or larger than the existing drive). If
you use two drives of different sizes, the smaller capacity hard disk will be the base storage size. For
example, if one hard disk has an 80GB storage capacity and the other hard disk has 60GB, the maximum
storage capacity for the RAID 1 set is 60GB.
3. Please verify the status of your hard disks before you set up your new RAID array.
Page 5

5
WARNING!!
Please backup your data first before you create RAID functions. In the process you create RAID, the system
will ask if you want to “Clear Disk Data” or not. It is recommended to select “Yes”, and then your future
data building will operate under a clean environment.
Page 6

6
1.3 UEFI RAID Configuration
Setting up a RAID array using UEFI Setup Utility and installing Windows
STEP 1: Set up UEFI and create a RAID array
1. While the system is booting, press [F2] or [Del] key to enter UEFI setup utility.
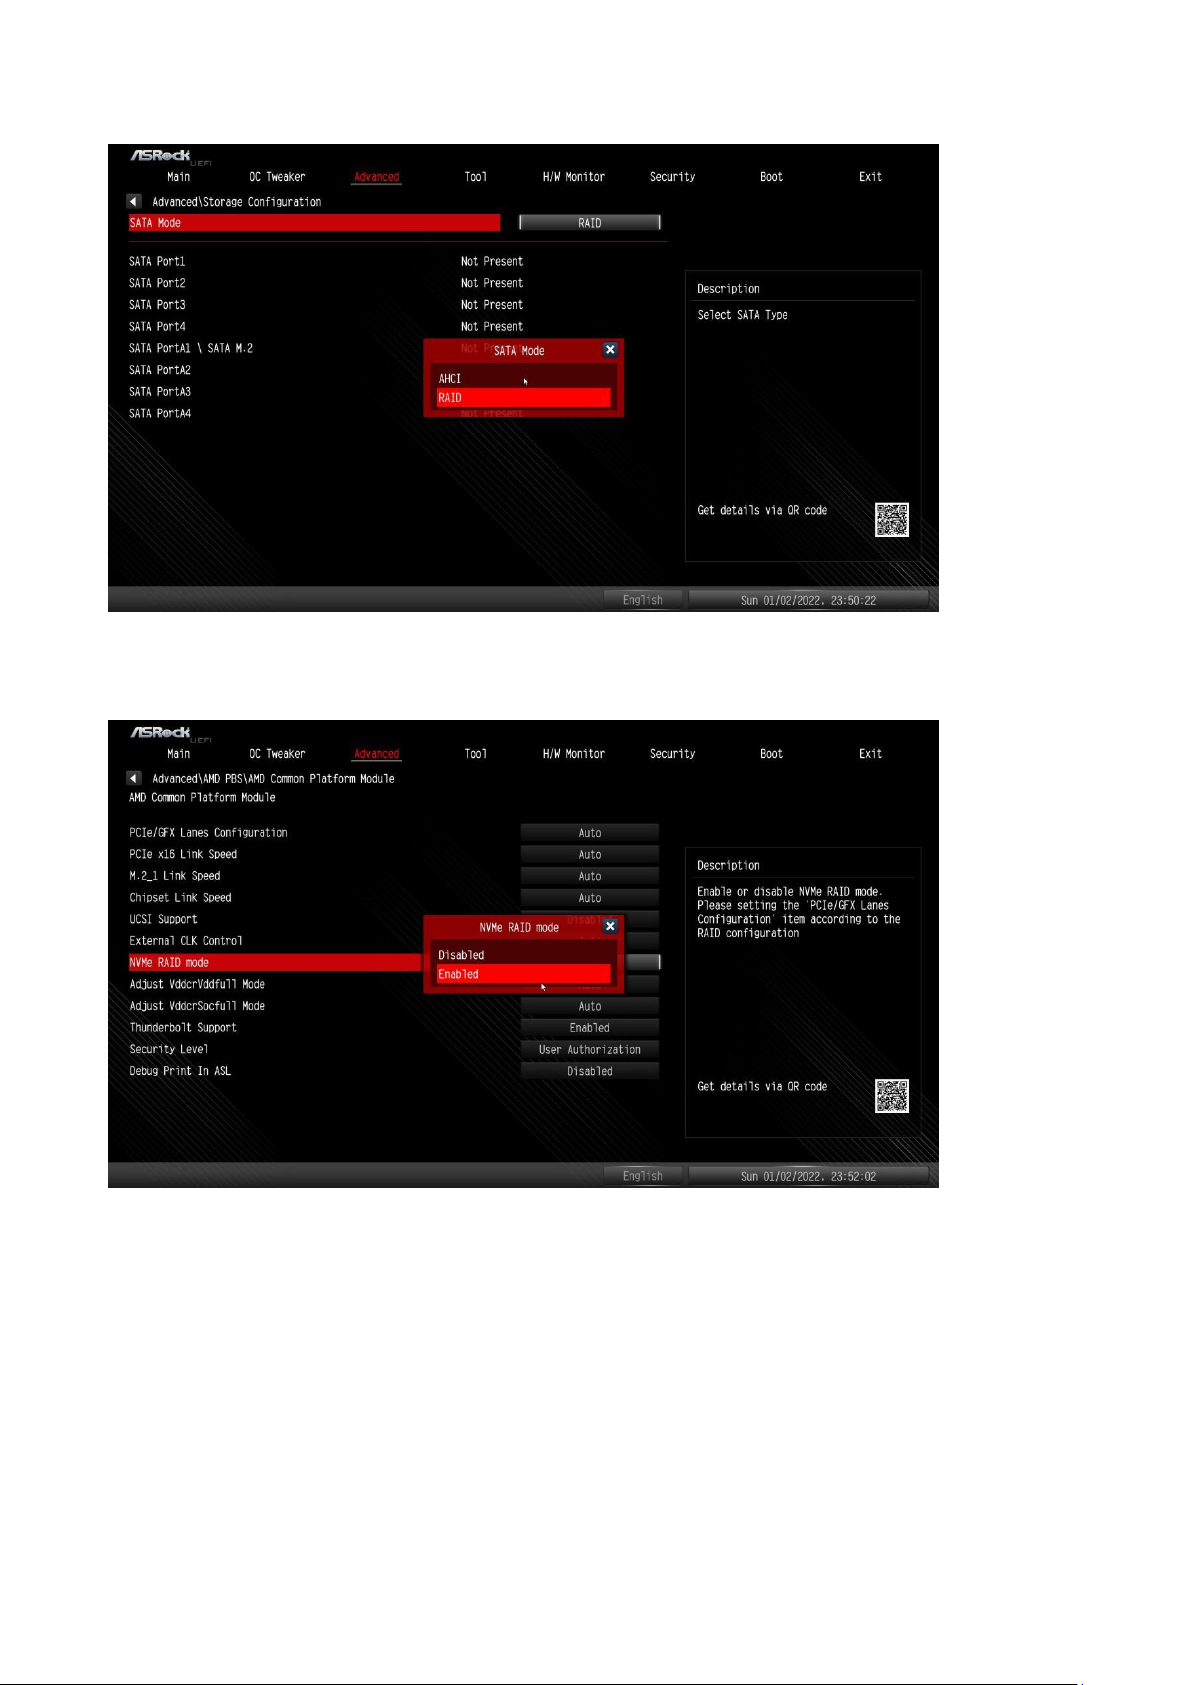
2. Go to Advanced\Storage Configuration.
3. Set “SATA Mode” to <RAID>.
4. Go to Advanced\AMD PBS\AMD Common Platform Module and set “NVMe RAID mode” to <Enabled >.
Page 7

7
5. Press [F10] to save your changes and exit, and then enter the UEFI Setup again.
6. After saving the previously changed settings via [F10] and rebooting the system, the “RAIDXpert2
Configuration Utility” submenu becomes available.
7. Go to Advanced\RAIDXpert2 Configuration Utility\Array Management, and then delete the existing disk
arrays before creating a new array.
Even if you have not configured any RAID array yet, you might have to use “Delete Array” first.
Page 8

8
Page 9

9
8. Go to Advanced\RAIDXpert2 Configuration Utility\Array Management\Create Array
Page 10

10
9A. Select “RAID Level”
9B. Select “Select Physical Disks”.
Page 11

11
9C. Change “Select Media Type” to “SSD” or leave at “BOTH”.
9D. Select “Check All” or enable specific drives that you want to use in the array. Then select “Apply
Changes”.
Page 12

12
9E. Select “Create Array”.
10. Press [F10] to save to exit.
*Please note that the UEFI screenshots shown in this installation guide are for reference only. Please refer to
ASRock’s website for details about each model.
https://www.asrock.com/index.asp
STEP 2: Download driver from ASRock's website
A. Please download the “SATA Floppy Image” driver from ASRock's website
(https://www.asrock.com/index.asp) and unzip the file to your USB flash drive.
Normally you can also use the RAID driver offered via the AMD website.
Page 13

13
STEP 3: Windows installation
Insert the USB drive with Windows 11 installation files. Then restart the system. While the system is
booting, please press [F11] to open the boot menu that is shown in this picture. It should list the USB drive
as a UEFI device. Please select this to boot from. If the system restarts at this point, then please open the
[F11] boot menu again.
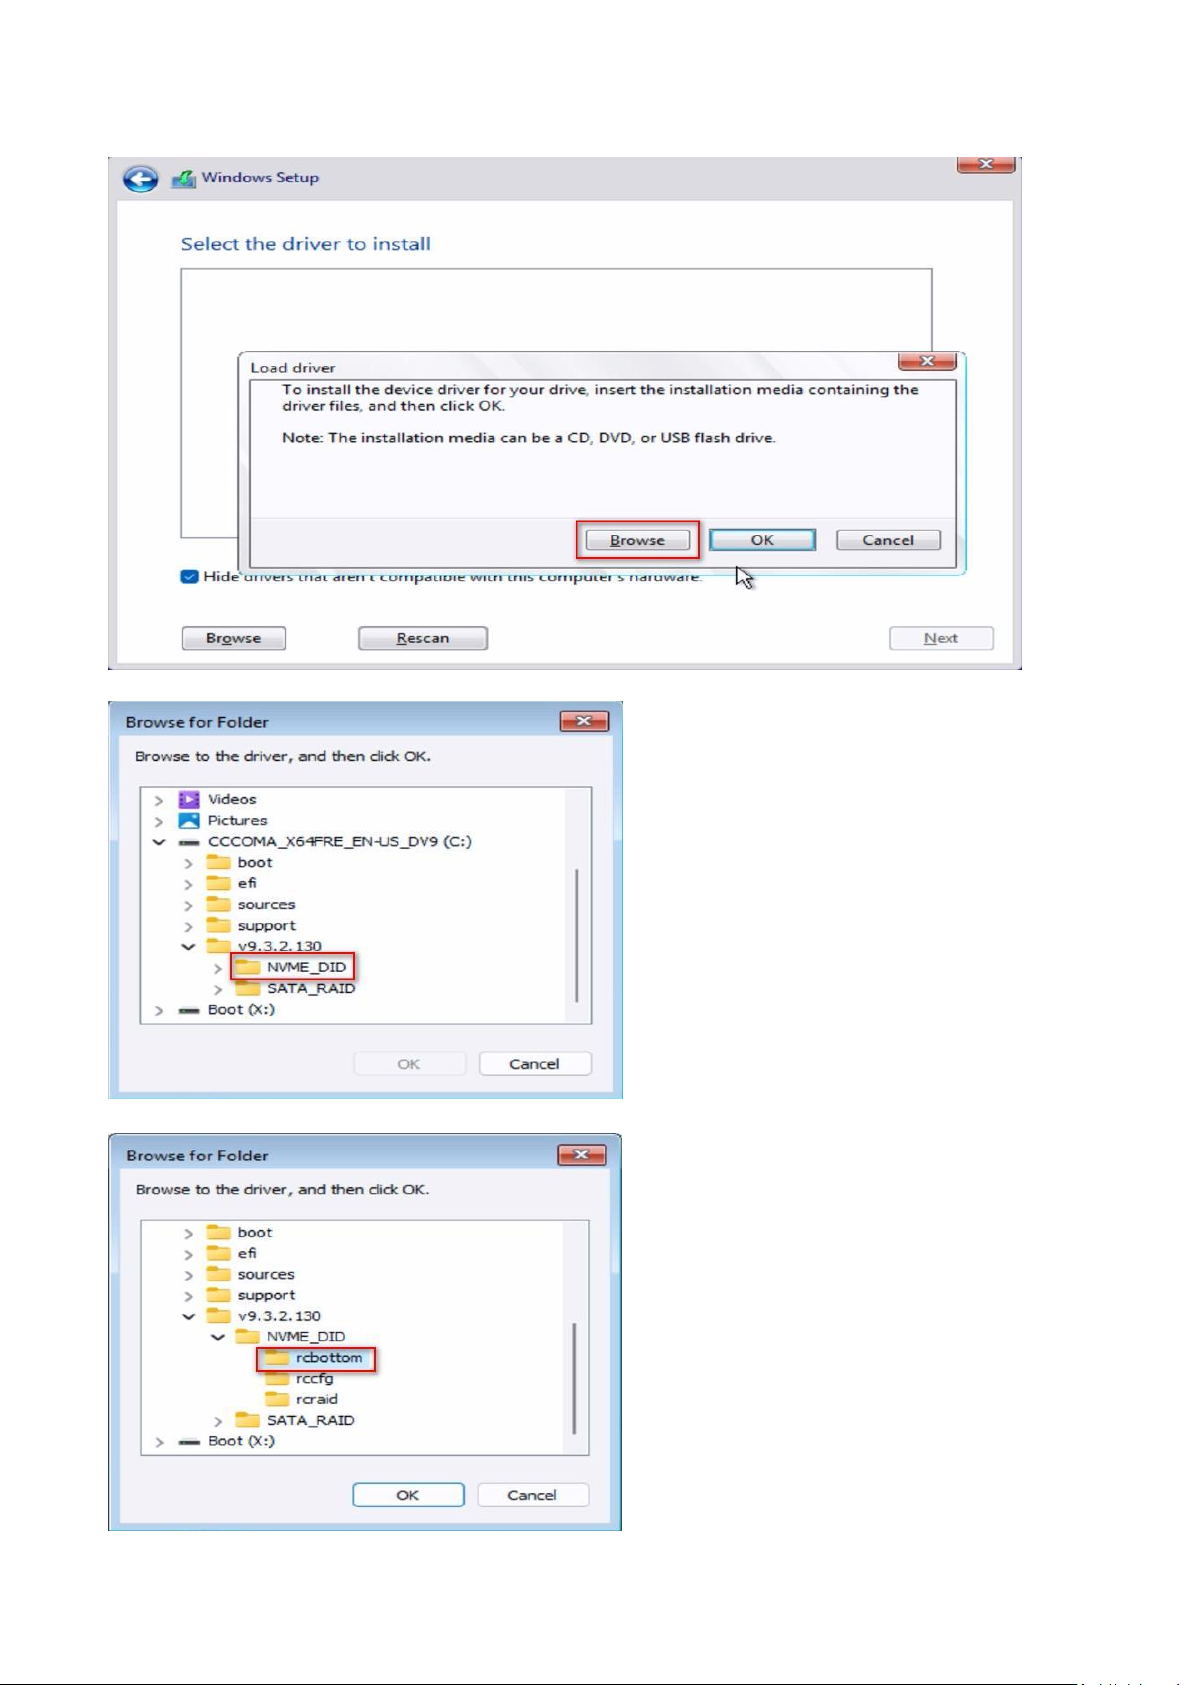
1. When the disk selection page shows up during the Windows installation process, please click <Load
Driver>. Do not try to delete or create any partition at this point.
Page 14
14
2. Click <Browse> to find the driver on your USB flash drive. Three drivers must be loaded. This is the first.
The folder names might look different depending on the driver package that you are using.
Page 15

15
3. Select “AMD-RAID Bottom Device” and then click <Next>.
4. Load the second driver.
Page 16

16
5. Select “AMD-RAID Controller” and then click <Next>.
6. Load the third driver.
Page 17
17
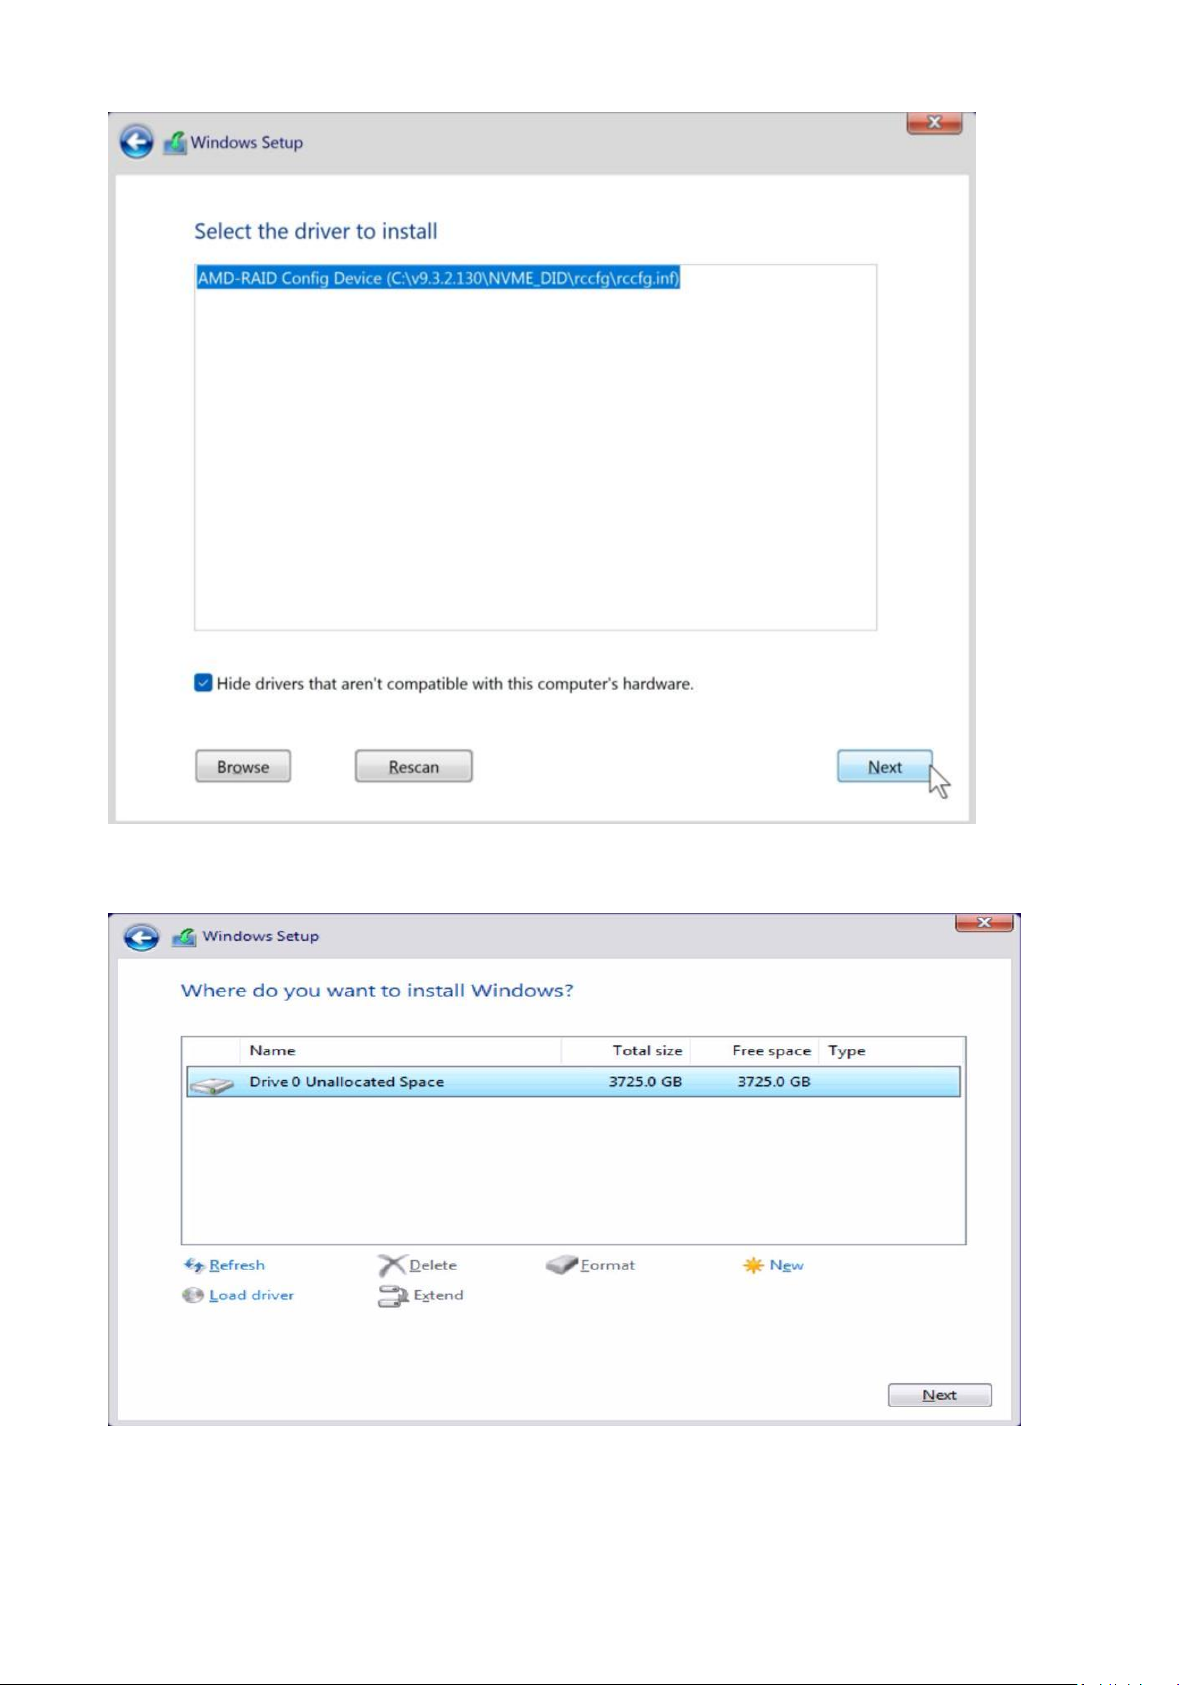
7. Select “AMD-RAID Config Device” and then click <Next>.
8. Once the third driver is loaded, a RAID disk appears. Select unallocated space and then click <Next>.
Page 18

18
9. Please follow the Windows installation instructions to finish the process.
10. After the Windows installation is finished, please install the drivers from ASRock’s website.
https://www.asrock.com/index.asp
Page 19

19
11. Go to Boot menu and set “Boot Option #1” to <Windows Boot Manager (AMD-RAID)>.
2. AMD Windows RAID Installation Guide
Caution:
This chapter describes how to configure a RAID volume under Windows. You can use for the following
scenarios:
1. Windows is installed on a 2.5” or 3.5” SATA SSD or HDD. You want to configure a RAID volume with
NVMe M.2 SSDs.
2. Windows is installed on an NVMe M.2 SSD. You want to configure a RAID volume with 2.5” or 3.5”
SATA SSDs or HDDs.
2.1 Create a RAID volume under Windows
1. Enter the UEFI Setup Utility by pressing <F2> or <Del> right after you power on the computer.
Page 20
20
2. Set the “SATA Mode” option to <RAID>. (If you are using NVMe SSDs for RAID configuration, please skip
this step)
3. Go to Advanced\AMD PBS\AMD Common Platform Module and set “NVMe RAID mode” to <Enabled >.
(If you are using 2.5” or 3.5” SATA drives for RAID configuration, please skip this step)
4. Press “F10” to save the setting and reboot to Windows.
Page 21

21
5. Install the “AMD RAID Installer” from the AMD website:
https://www.amd.com/en/support
Select “Chipsets”, select your socket and chipset, and click “Submit”.
Please find “AMD RAID Installer”.
6. After installing the “AMD RAID Installer”, please launch “RAIDXpert2” as administrator.
Page 22

22
7. Find “Array” in the menu and click on “Create”.
8. Select the RAID type, the disks which would like to use for RAID, volume capacity and then create the
RAID array.
Page 23
23
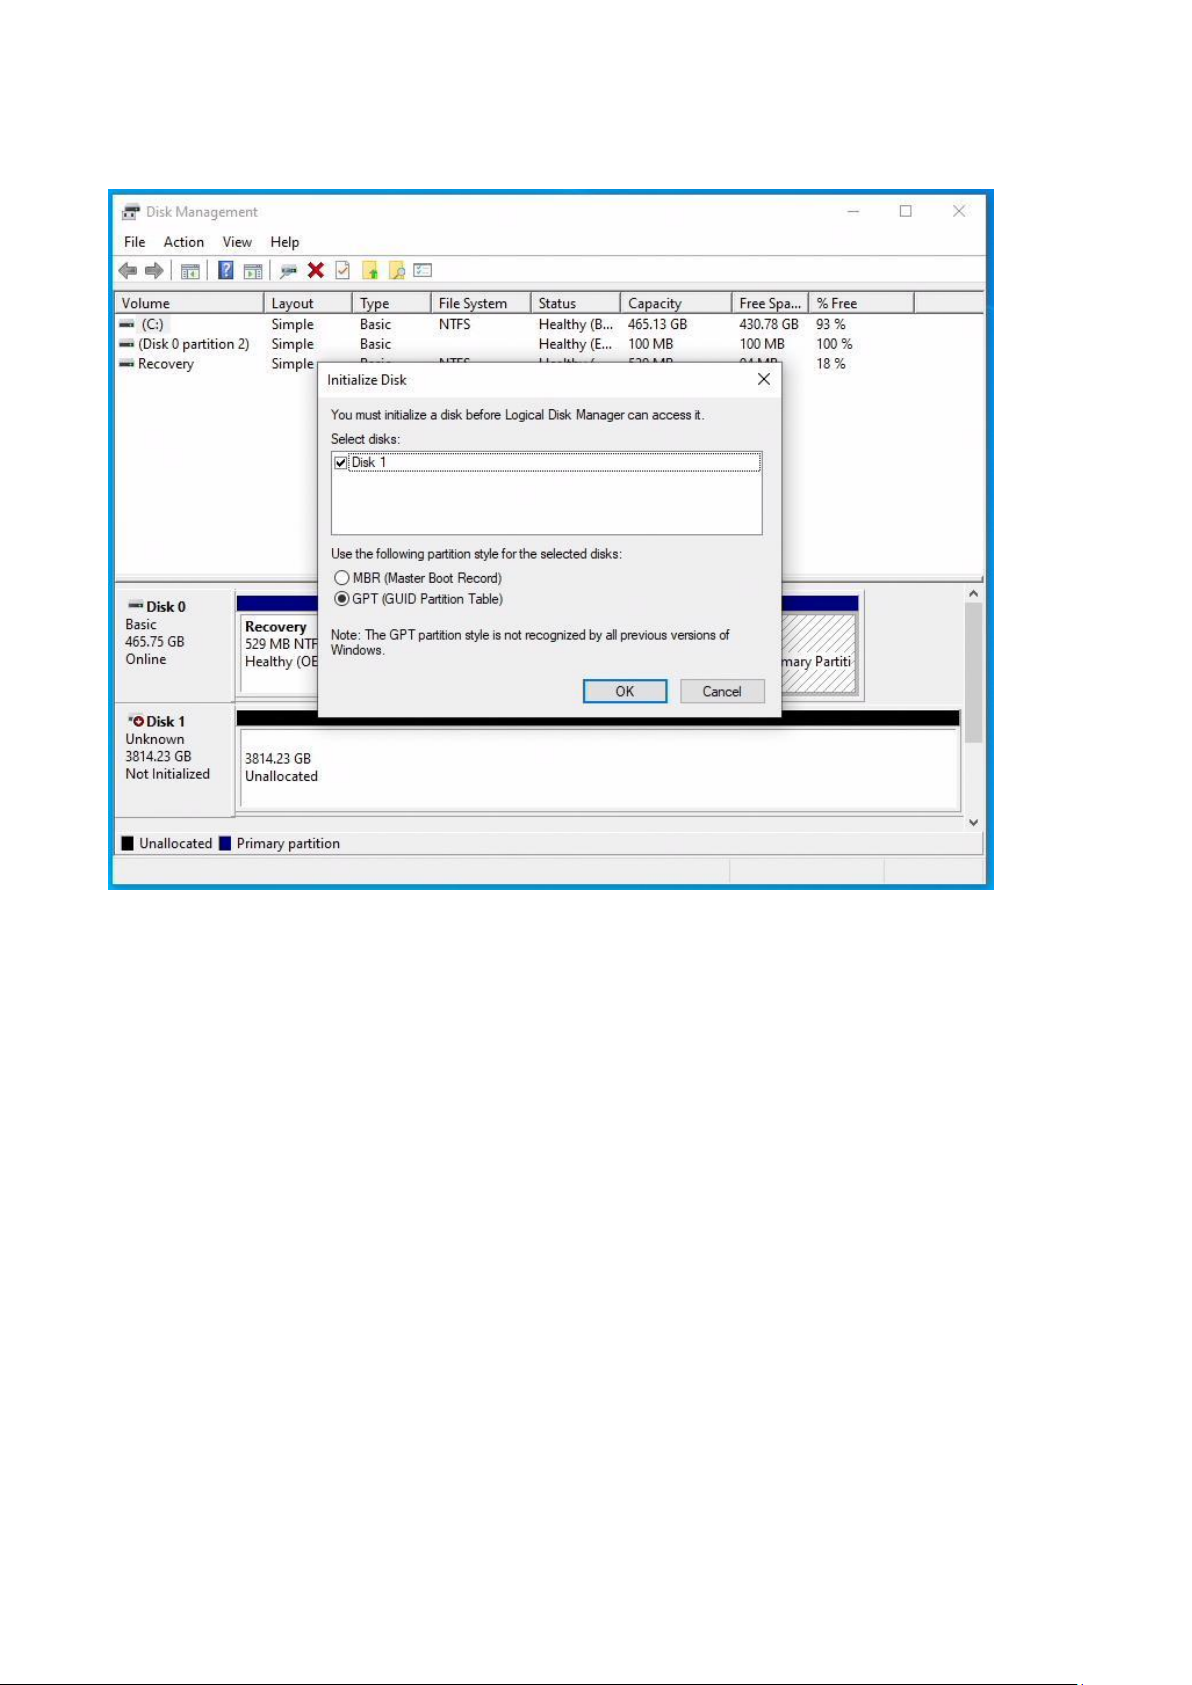
9. In Windows open “Disk Management”. You will be prompted to initialize the disk. Please select “GPT”
and click “OK”.
Page 24

24
10. Right click at the “Unallocated” section of the disk and create a new simple volume.
11. Follow the “New Simple Volume Wizard” to create a new volume.
Page 25

25
12. Wait a bit for the system to create the volume.
13. After creating the volume, the RAID is available to use.
Page 26

26
2.2 Delete a RAID array under Windows.
1. Select the array which you would like to delete.
2. Find “Array” in the menu and click on “Delete”.
Page 27

27
3. Click “Yes” to confirm.
 Loading...