


This product incorporates copyright protection technology that is protected by method
claims of certain U.S. patents and other intellectual property rights owned by Macrovision
Corporation and other rights owners. Use of this copyright protection technology must be
authorized by Macrovision Corporation, and is intended for home and other limited
viewing uses only unless otherwise authorized by Macrovision Corporation. Reverse
engineering or disassembly is prohibited.
Manufactured under license from Dolby Laboratories. "Dolby" and the
double-D symbol are trademarks of Dolby Laboratories. All rights
reserved.
"DTS" and "DTS Digital Out" are trademarks of Digital Theater Systems,
Inc.
AD-6000 and Aspire Digital are trademarks of Aspire Digital LLC. All other marks are
trademarks of their respective owners.
Copyright 2002 Aspire Digital, LLC. All rights reserved
Printed in China.

TABLE OF CONTENTS
--------------------------------------------------------------------------
----------------------------------------------------------------------------
25

SAFETY PRECAUTIONS
Safety Symbols
This symbol indicates there is uninsulated dangerous
voltages within the AD-6000 housing that may be of
sufficient magnitude to constitute a risk of electric shock.
To avoid the risk of electric shock, do not open the housing
at any time.
This symbol identifies important operating and maintenance
(servicing) instructions.
Be sure to follow instructions identified with this symbol to
avoid potential damage to your unit.
Safety Precautions
WARNING: TO REDUCE THE RISK OF FIRE OR
ELECTRIC SHOCK, DO NOT EXPOSE THIS
APPLIANCE TO RAIN OR MOISTURE. DANGEROUS
HIGH VOLTAGES ARE PRESENT INSIDE THE
ENCLOSURE. DO NOT OPEN THE CABINET.
REFER SERVICING TO QUALIFIED PERSONNEL ONLY.
This DVD player employs a laser system. To prevent direct exposure to laser beam, do
Not try to open the enclosure or defeat the interlocks.
DO NOT STARE INTO BEAM OR BLINDNESS MAY RESULT.
Use of controls, adjustments or the performance of procedures other than those
specified may result herein hazardous radiation exposure. To prevent direct exposure to
laser beam, do not try to open the enclosure. Visible laser radiation when open and
interlocks defeated.
1

Other Precautions
Do not put any objects in the tray other tha n ap prov ed vide o a nd audi o disc s.
Do not open the unit, touch the inner parts or insert any foreign objects into the unit.
Place the unit on a level, open surface. Do not locate the unit under direct sunshine, near
heating devices or in very dusty or dirty places. Otherwise, the unit may be damaged.
Hold the plug tight when connecting or disconnecting the AC power supply. Do not put any
weight on AC cord or attempt to service the AC cord if it becomes damaged.
Keep unit away from open windows or near anyplace where water may get into the unit
and damage it.
Keep the unit away from magnetic sources, such as speakers. Do not stack heavy objects
on the unit.
Condensation may form in the unit when moving it from very cold to very warm or humid
locations. In such cases, wait for the unit to come to room temperature and the
condensation to evaporate before using the unit.
Do not place the unit near radio receivers or other video or audio devices. Should a nearby
radio receiver experience interference while the unit is running, turn the AD-6000 unit off.
2

CARING FOR YOUR AD-6000
1.Read this Manual
After unpacking this
product read the
manual carefully
and follow all the
operating instructions.
2.Power Sources
This product should
be operated only
from the type of
power source
indicated on the unit.
If you are not sure of
the type of power supply to
your home, consult your product
dealer or local power company.
3.Grounding or Polarization
This product may
be equipped with a
polarized alternating
current line plug (a
plug having one blade
wider than the other).
This plug will fit into the
power outlet only one
way. This is a safety feature.
If you are unable to insert the
plug fully into the plug,
contact your electrician to
replace your obsolete outlet.
Do not try to bypass the safety
purpose of the polarized plug.
4.Ventilation
Slots and openings
in the cabinet are
provided for
ventilation and to
ensure operation of
the product and to
protect it from overheating.
Do not block or cover these
openings.
5.Heat
Position the unit
away from heat
sources such as
radiators, heat
registers, stoves,
or other products (including
amplifiers) that produce heat.
6.Water and Moisture
Do not use this
product near water
such as near a
bathtub, wash
bowl, kitchen sink,
or laundry tub, in a wet
basement, near a swimming pool
or the like.
7.Cleaning
Unplug this product
from the A/C outlet
before cleaning.
Use a damp cloth to
clean the unit. Do not
use liquid or aerosol cleaners.
8.Power Cord Protection
Power supply cords
should be routed so
that they are not
likely to be walked
on or pinched by
items placed upon or against
them. Pay particular attention
to cords at plugs, convenience
receptacles, and the point
where they exit from the
product.
9.Overloading
Do not overload
wall outlets or
extension cords
as this can result
in a risk of fire or
electric shock.
3

CARING FOR YOUR AD-6000
10.Lightning
Unplug the unit from
the wall outlet during
storms to prevent
damage from lightning
and power surges.
11.Objects and Liquids
Never push objects
into this product as
that could result in
a fire or electric shock.
Never spill liquids on the
product.
12.Attachments
Do not use attachments not
recommended by the product
manufacturer as they may
cause hazards.
13.Accessories
Do not place this product on
an unstable platform. The
product may fall, causing
serious injury or serious
damage to the product.
14.Disc Tray
Keep your fingers
clear of the disc
tray as it is closing.
Neglecting to may cause
serious personal injury.
15.Burden
Do not place heavy
objects on the
product. The object
may fall causing serious
personal injury and serious
damage to the product.
16.Discs
Do not use a
cracked, deformed
or repaired disc.
These discs are
easily broken and may cause
serious personal injury and
product malfunction.
17.Damage Requiring Service
Unplug the unit from the A/C
outlet and refer servicing
to qualified service
personnel under the
following conditions:
a) When the power cord or
plug is damaged.
b) If liquid has been spilled
into or objects have
fallen into the product.
c) If the product has been
exposed to rain or water.
d) If the product does not
operate normally.
e) If the product has been
dropped or damaged in any
way.
f) When the product exhibits
a distinct change in
performance.
18. Servicing
Do not attempt to
service this product
yourself as this
may expose you
to dangerous
voltage or other hazards.
Refer all servicing to
qualified service personnel.
19. Replacement Parts
Be sure the service
technician has used
authorized replacement
parts. Unauthorized
substitutions may
result in fire, electric
shock,
or other hazards.
20.Safety Check
Upon completion of any
service or repairs, ask the
service technician to
perform safety checks to
determine that the product
is in proper operating
condition.
4

CONTROL REFERENCE
OPERATING KEYS
FRONT PANEL
1. POWER SWITCH
2. OPEN/CLOSE
3. TRAY
4. REMOTE SENSOR
5. VFD DISPLAY WINDOW
6. NEXT
REAR PANEL:
A. Y/Py, Cb/Pb, Cr/Pr OUTPUT (component)
B. 5.1 CHANNEL OUTPUT
C. COAXIAL OUTPUT
D. VIDEO OUTPUT
7. PREVIOUS
8. PAUSE
9. STOP
10. PLAY
11. VS 6.1 INDICATOR
12. PSCAN INDICATOR
13. DVD-AUDIO INDICATOR
E. S-VIDEO OUTPUT
F. OPTICAL OUTPUT
G. 2 CHANNEL AUDIO OUTPUT
5

REMOTE CONTROL
1
2
POWER
OPEN/CLOSE
Functions see page
18
3
4
5
6
7
8
9
10
11
12
13
14
15
16
17
RETURN
SETUP STOP
MENU
PREV NEXT F.REV F.FWD
1 2
4
7
SEARCH
SUBTITLE PSCAN
TITLE
OSD
ZOOM/PROG
REPEAT A-B RPT
PAUSE/STEP
5
8 9
10+0
VIDEO/Y
SLOW
ANGLE
VOLUMEAUDIOVS6.1
ENTER/PLAY
3
6
MUTE
19
20
21
22
23
24
25
26
27
28
29
30
6

Quick Start: Setup
ACCESSORIES
Audio/Video cord
Remote control
SYSTEM CONNECTION
Connect with TV
1.Using Video(shown as Fig. 1)
TV
Operation manual
AAA batteries
Power cord
2.Using S-VIDEO(shown as Fig.2)
TV
To audio
Input
To S-video
S-VIDEO cord
Audio cord
Y / Py Cb / Pb
VIDEO OUT
To audio
input
Player
CENTER
FL
SUB-WOOFER
Cr / PrVIDEO
5.1-CHANNEL OUT
FR
To video input
Video cord
DIGITAL
SL
AUDIO OUT
COAXIAL
SR
S-VIDEO
OPTICAL
VIDEO OUT
L
2-CHANNEL AUDIO OUT
Y / Py Cb / Pb
VIDEO
Cr / Pr
VIDEO OUT
Audio Cord
R
1
CENTER
SUB-WOOFER
Player
5.1-CHANNEL OUT
FL
FR
AUDIO OUT
COAXIAL
SR
VIDEO OUT
2-CHANNEL AUDIO OUT
S-VIDEO
OPTICAL
DIGITAL
SL
2
3.If your TV has a progressive scan or YUV input socket, the connections is below
(shown as Fig.3)
TV
Amplifier
R
L
Y
LEFT
RIGHT
AUDIO IN VIDEO IN
Video cable
Pb/Cb
Pr/Cr
Y / Py Cb / Pb
VIDEO
VIDEO OUT
Player
CENTER
FL
SUB-WOOFER
Cr / Pr
FR
5.1-CHANNEL OUT
DIGITAL
SL
AUDIO OUT
COAXIAL
R
L
S-VIDEO
VIDEO OUT
2-CHANNEL AUDIO OUT
OPTICAL
SR
To Audio
input
Audio cable
3
4. Connect player with TV and 5.1 channel speakers(shown as Fig.4). See page 20 for
surround 5.1 setup.
To digital
audio
Input
Coaxial
TV
To video
Input
Video cord
Y / Py Cb / Pb
VIDEO OUT
Player
CENTER
FL
SUB-WOOFER
Cr / PrVIDEO
FR
5.1-CHANNEL OUT
DIGITAL
SL
AUDIO OUT
COAXIAL
R
L
SR
2-CHANNEL AUDIO OUT
S-VIDEO
OPTICAL
VIDEO OUT
4
Amplifier
7

QUICK START: PLAY A DISC
QUICK START: PLAY A DISC
Before You Begin
1.Connect the audio and video cables per the instructions on page 7.
2.Plug in the A/C power cord.
3.Turn the TV on.
4.Load batteries in the remote control.
Playing a DVD, CD or MP3 using the DVD Player
1.Press POWER on the front panel to turn the unit on.
2.Press OPEN/CLOSE to open the tray.
3.Place a disc in the tray, and press OPEN/CLOSE again to close the tray.
4.If playing a DVD and a menu appears, use the arrow keys on the remote
to select menu options.
5.Press PLAY on the unit or ENTER/PLAY on the remote to start playing.
Viewing a Kodak Picture CD
1.Press POWER on the front panel to turn the unit on.
2.Press OPEN/CLOSE below to the DVD drive to open the tray.
3.Place a disc in the tray, and press OPEN/CLOSE again to close the tray.
4.Press NEXT or PREV to view photos, or press PLAY to view the photos
in sequence as a slide show.
Pausing or Stopping Playback
Pressing PAUSE during playing will pause the unit, press
continue playing the disc.
Press STOP during playing to stop playing altogether.
F.REV and F.FWD
Each press of "F.REV " or " F.FWD " during playing will enter different fast
modes, the fifth press will return to normal playing.
PAUSE again to
8

VIRTUAL 6.1 FUNCTION AND DVD-AUDIO
Virtual 6.1 Function
1) Virtual 6.1
A. Dolby Digital B. Virtual 6.1
2)Virtual 6.1 Function Introduction
Virtual 6.1 performs virtual 3D process on SL and SR surround sound based on Dolby 5.1
technology, and thus creates a virtual rear-center channel. This process will result in a more
accurate audio field, and a more real and directional sound effect.
DVD-Audio
1).Playback effect
DVD-Audio adopts 192kHz/24bit audio digital A/D translator to process mass information
in DVD-Audio music data, and attains a high-precision output. Max sampling sequence is
192kHz/24bit, with frequency band 88kHz.
Quantization Super High data density Super High Resolution ability
Sampling Frequency
DVD-Audio is capable of playback on 2 channel Hi-Fi sounds and 6-channel home theater
surround sound (96kHz/24bit). DVD-Audio allows user to setup different hits and sampling in
different channel outputs. For example, Front left, Front right and Center channel can be set
to 96kHz/24bit, and rear channel set to 48kHz/16bit.
2).Super large music information storage
DVD-Audio single layer stores 4.7GB. To store a 2 channel stereo music in 44.1 kHz/16
bit format, storage capacity can reach 400 minutes. To store a 6 channel music in PCM 96
kHz/24bit format, or to store a 2 channel in 192kHz/24bit format, storage capacity can reach
74 minutes.
DVD-Audio takes advantage of the large storage capacity, it allows you to enjoy all kinds
of video such as the still images, song titles, actor profile, and website addresses while
listening to music.
9

MP3 PLAYBACK
10

Viewing JPEG and Photo CDs
Playing JPEG Discs
To play a JPEG disc:
1. Press POWER to turn the unit on.
2. Press OPEN/CLOSE to open the tray.
3. Place a disc in the tray, and press OPEN/CLOSE again to close the tray.
4.Choose the picture folder and press ENTER/PLAY. Then use the arrow keys to view
the pictures desired.
5.Press NEXT or PREV to view photos, or press PLAY to view the photos in sequence
a s a slid e show.
The photos will be displayed in sequence. Press PAUSE to pause the current picture for
extended viewing, then ENTER/PLAY to continue.
Press ZOOM to start zoom function, and ZOOM ON will be shown on the screen.
Press F.REV and F.FWD to select different enlargement ratio: 0.25, 0.5, 1, 1.5 and 2 times.
Use the arrow keys to move the enlarged picture as needed
Playing Kodak Picture CDs
A Kodak Picture CD has the size and shape of a regular CD. You can order a Kodak
Picture CD simply by checking the box on the photo finishing envelope when you drop off
a roll of film (35 mm or Advanced Photo System (APS) color print film) at the time of
processing in Kodak Express store displaying "Kodak Picture CD" sign. When your order
is returned, you receive your prints, negatives, and your full roll of pictures safely stored
on your Kodak Picture CD. Each Kodak Picture CD brings you the tools to enhance, share
and manage your pictures on your computer.
When a Kodak Picture CD is inserted on a player an automatic slide show is launched.
Each picture in the Kodak Picture CD will be displayed consecutively in a slide-show
fashion and will be scaled to fit in the whole TV screen. Twelve slide show transition
modes are provided. Use the RETURN key to select.
Mode 0: N o specia l transitio n effec t (b y default)
Mode 1: Wip e from to p t o bottom
Mode 2: Wip e from bottom t o top
Mode 3: Wip e from top/bottom t o center
Mode 4: Wip e from cente r t o top/bottom
Mode 5: Vertica l blind
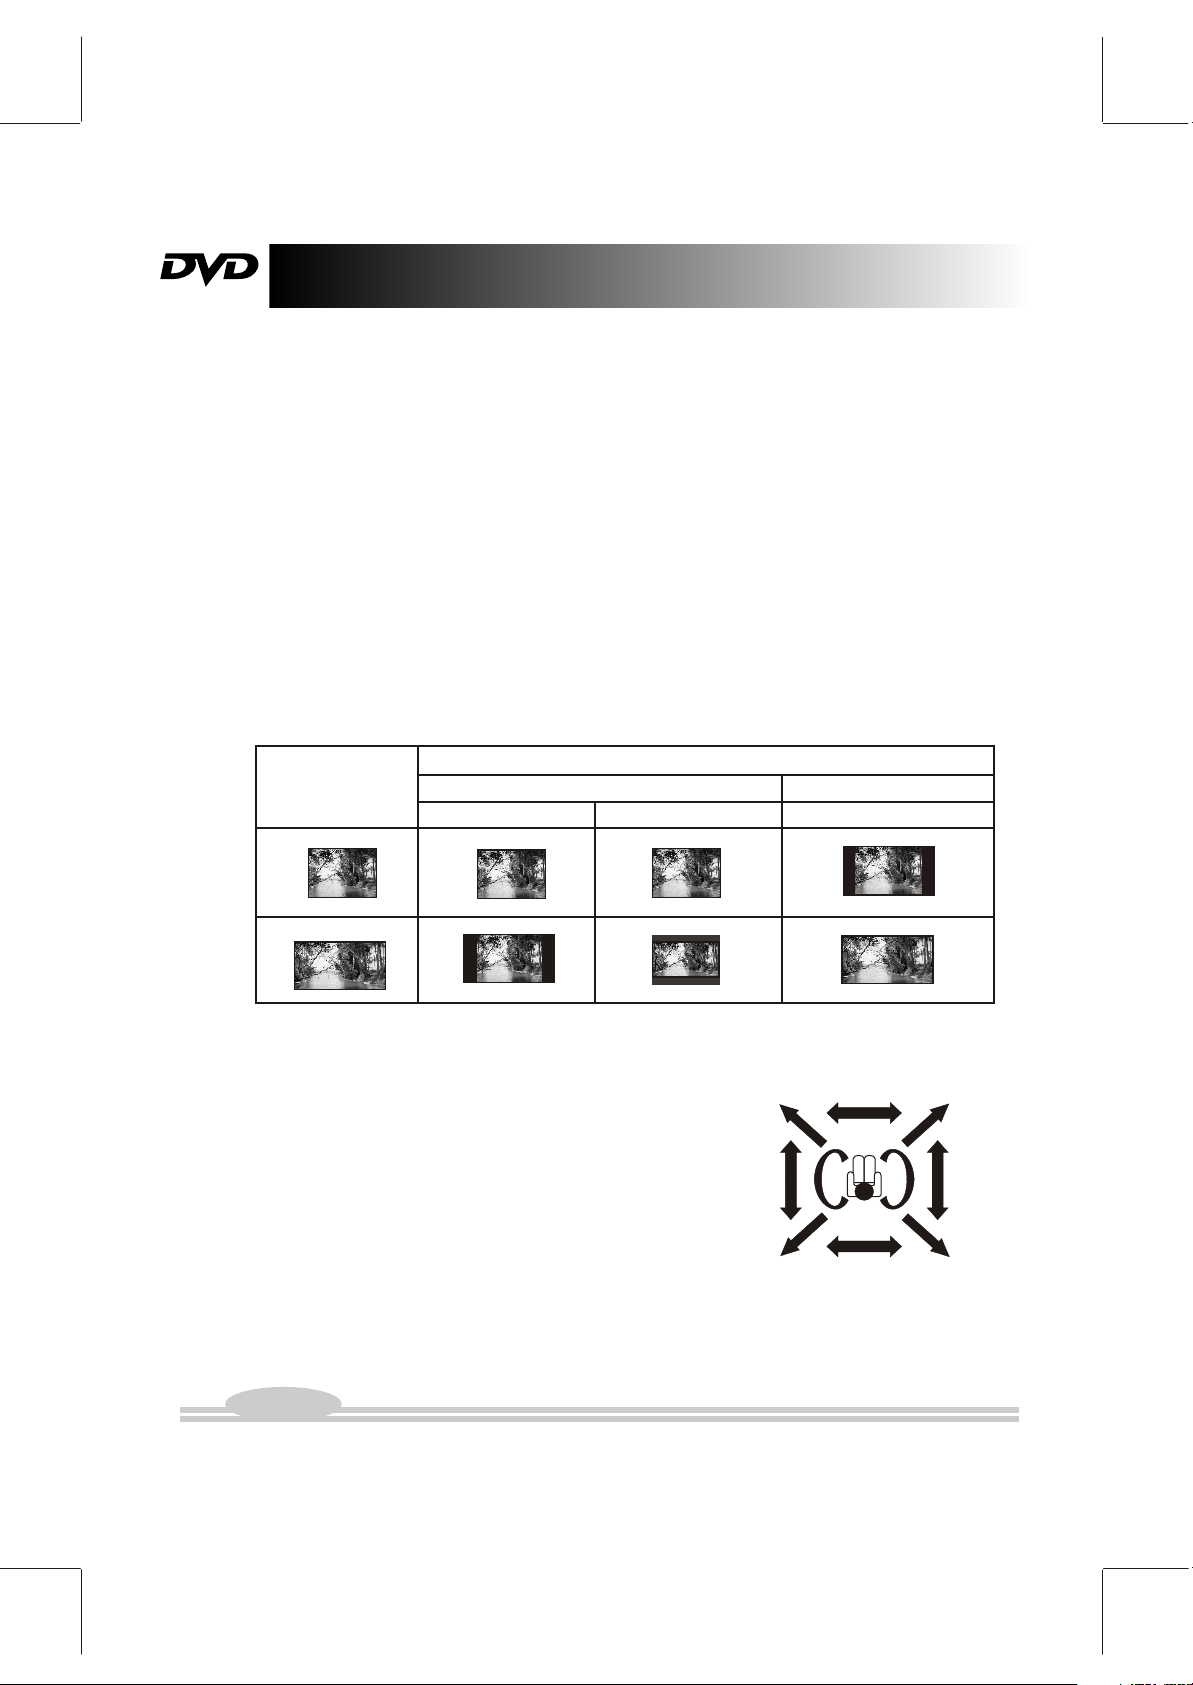
Rotating Images
There are four modes to rotate a picture: "Invert," "Mirror," "Left" and "Right." These
operations are allowed only when a picture is being displayed normally and will be canceled automatically when a new picture is displayed. The arrow key is used to select the
different rotation modes:
Up Invert/Normal
Down Mirror/Normal
Note: If the screen saver engages, press any key on remote control or on front panel to
activate the unit.
Left Rotate left
Right Rotate right
11

SYSTEM SETUP
SETUP MENUS
Press SETUP on remote control to display the setup menu. (If the unit is in playback
mode, it will automatically pause, press RETURN or SETUP to continue playing.)
Press ENTER/PLAY to enter setup mode, use the cursors (arrow keys) to select an
option, then press ENTER/PLAY to complete.
.
MAIN PAGE
MAIN PAGE
Use the cursor buttons on the
remote control to set
NORMAL/FULL VIEW,
NORMAL/LETTER-BOX AND
WIDE SCREEN. See page 20
for further explanation of TV
format and size.
12
MAIN PAGE
MAIN PAGE

SYSTEM SETUP
MAIN PAGE
When finishing setup, press
"RETURN" to main setup menu.
Use cursor DOWN to select
SPEAKER SETUP page,
"ENTER" to enter.
DOWNMIX
CENTER
REAR
SUBWOOFER
CNTR DELAY
REAR DELAY
MAIN PAGE
MAIN PAGE
MAIN PAGE
MAIN PAGE
13

SYSTEM SETUP
DOWNMIX
CENTER
REAR
SUBWOOFER
CNTR DELAY
REAR DELAY
MAIN PAGE
SET SURROUND DELAY
15MS
9MS
3MS
OFF
14

SYSTEM SETUP
MAIN PAGE
This can set the type of TV system
to AUTO, NTSC and PAL s, NTSC
is North American standard ;
is the European standard.
MAIN PAGE
PAL
MAIN PAGE
MAIN PAGE
MAIN PAGE
15

REMOTE CONTROL FEATURES
OSD (On Screen Display)
Press the OSD button on the remote up to four times to display the title, chapter, remaining
time of the title and remaining time of current chapter of the disc. Press the OSD button
again to cancel.
SUBTITLE
Press SUBTITLE to select one of 32 languages, depending on how many are stored on a
disc.
ANGLE
Some discs allow you to view the video from multiple angles: side, exterior, etc. Press this
key to watch the video from different angles. ( Valid only on DVD discs that possess this
feature.)
TITLE
When viewing DVDs, press TITLE to display the title menu. (DVDs only)
MENU
Press the MENU key to display the DVD menu and select tracks according to your
preferences. (DVDs only)
SEARCH
To jump to a particular point on a disc, press the SEARCH button, enter the desired
chapter, then press ENTER/PLAY.
Note: The input cannot exceed the actual maximum time of a disc or chapter.
A-B RPT (A-B Repeat)
To repeat a particular section of a disc, press A-B RPT to set a start-point, press again to
set an end point. The section will be repeated. Press A-B RPT to cancel.
REPEAT
Press REPEAT once to repeat a chapter, twice to repeat a title. Press a third time to cancel.
VIDEO/Y
Press the VIDEO/Y key on the remote to select video output either using composite video
or YUV.
VS 6.1
When DVD player set to 5.1CH output, press "VS 6.1" button, the system will output with
VS 6.1,the TV screen will display "VIRTUAL 6.1 ON". Press "VS 6.1" again the system will
be change to 5.1CH output. The TV screen will display "VIRTUAL 6.1 OFF".
16

REMOTE CONTROL FEATURES
ZOOM
The picture can be zoomed (enlarged) up to four times. Press once for a X1.5 magnification,
again for X2, again for X4. Press again to cancel.
AUDIO
Press AUDIO on remote control while playing a DVD disc to select one of the following
modes: audio1 or audio2.
VOLUME and MUTE
Press "+" at the right of the VOLUME key to increase volume, "-" to decrease volume. The
first press MUTE key will mute the sound, the second press will return the audio to the
previous volume.
PSCAN (Progressive Scan)
When in DVD mode, press the PSCAN button then the SETUP button to turn on or off
progressives scan mode (a higher quality of video output).
Notes:
In order to view progressive scan quality, you must connect the AD-6000 unit to your TV
using the component video output jacks as shown on page 7 .
When you turn on progressive scan, the on-screen display will display "Progressive TV".
When you turn it off, the screen will display "Interlace TV".
This function can only work with Progressive Scan TV and under connection per as item 3
of page 7.
RETURN
Use this key to return back to the previous menu . (Press RETURN twice to exit the Menu
altogether.)
PROG (Program)
In stop mode, press PROG to enter program mode. Press digits to select tracks, then press
ENTER/PLAY to start playback.
To cancel for DVDs, press STOP, then PROG then ENTER/PLAY.
STEP
Press the STEP button to pause. And every time you press this button, the still picture will go
a step forward. Press ENTER/PLAY to resume normal playback.
SLOW
Press SLOW to play a disc in slow forward, each time the SLOW button is pressed,
the slow motion speed changes. Press ENTER/PLAY to resume normal playback;
Press SLOW to play a disc in slow reverse, each time the SLOW button is pressed,
the slow reverse speed changes. Press ENTER/PLAY to resume normal playback.
Note: This function is invalid for CD and MP3.
17

TROUBLESHOOTING
If there is a problem playing or recording, see the following for common causes and
remedies before calling for technical support.
SYMPTOM
NO POWER
NO PICTURE
NO VOICE
DISC DO NOT
PLAY
REMOTE CONTROL
DOES NOT WORK
DISTORTED
IMAGE
REMEDY
PLUG THE LEAD TIGHT IN SOCKET
CONFIRM CORRECT CONNECTION AMONG PLAYER AND OTHER DEVICES
CONFIRM TV IS WORKING PROPERLY
CONFIRM CORRECT CONNECTION AMONG PLAYER AND OTHER DEVICES
CONFIRM TV AND AMPLIFIER ARE WORKING PROPERLY
CONFIRM DISCS ARE PROPERLY INSERTED (WITHLABELUPWARD)
CONFIRM DISC CLEAR
REMOVE OBSTACLE BETWEEN REMOTE CONTROL AND PLAYER
POINT AT RECEIVER ON FRONT PANEL
CHECK BATTERY
SWITCH PSCAN OFF WHEN COMPONENT VIDEO NOT CONNECTED
IF ANY BREAKDOWN OCCURS, SWITCH OFF THE UNIT FOR
SEVERAL SECONDS BEFORE TURNING ON. IF NO PROBLEM
EXISTS, YOU CAN USE IT FREELY.
BUTTON DOES
NOT RESPOND
18
COULD BE CAUSED BY POWER FLUCTUATION OR OTHER ABNORMAL
PHENOMENA. PLEASE RESTART THE UNIT.

DVD CHARACTERISTICS
DVD player is the ticket of your home theater. Every technical feature of this machine is far
more superior to any previous audio visual equipment. This completely new digital
technology has compressed the audio-visual effect of cinema into 12cm diameter disc which
is the same in dimension as the CD disc. Especially the Dolby digital output can provide
prominent digital surround effect. It can also be compatible with the CD.
Compare DVD disc with other discs:
Encode
method
Capacity
Playing Time
Disc diameter
Horizontal
resolution
Picture
proportion
Subtitle
Language
Singleside
singlelayer
4.7G
133
minutes
DVD CD
Digital/MPEG
Double
-side
single
-layer
8.5G
242
minutes
More than 500 line
Singleside
doublelayer
9.4G
266
minutes
12cm/8cm 12cm/8cm
Multiple kinds
32 kinds
8 kinds
Doubleside
doublelayer
17G
484
minutes
80minutes
Digital
700MB
2 kinds
DVD-Audio
Digital
Varies
Varies
12cm
32 kinds
8 kinds
Sound quality
48KHz, 96KHz/
6, 20, 24bit
44.1KHz/
16bit
96KHz/
24bit
19
DVD SPECIAL FUNCTIONS
PARENTAL LOCK
This player lets you set the Parental Lock if the DVD has a parental lock level recorded on it. With Parental
Lock capable discs, you can block access to material you feel is inappropriate for your children. Refer to the
DVD disc jacket and the accompanying documentation to see if a particular disc contains a parental lock level.
Password: 3308
MULTI-LANGUAGE SUPPORT
DVD allows up to 8 languages and 32 subtitles on a single disc.
MULTI-SCENARIO SUPPORT
There are different scenarios you can select when viewing a program.
MULTI-ANGLE SUPPORT
You can select a camera angle when viewing DVDs with the multi-angle option.
SETTING THE TV SCREEN SIZE
Multi-aspect ratio adjusts to different TV screen sizes.
TV Screen Size
Picture format on Disc
4:3
Pan Scan
4:3
Letter-box Wide screen
16:9
16:9
DOLBY DIGITAL 5.1 SURROUND SOUND
HOW TO SETUP SURROUND SOUND
FL
CENTER
1. Press the SETUP button on your remote control.
2. Using the arrow keys, select SPEAKER SETUP
a nd pre ss ENTER/PLAY.
3. Under DOWNMIX, use the arrow keys to select
MULTICHANNE L a nd pre ss ENTER/PLAY.
4. Press RETURN and using the arrow keys, select
AUD IO SETU P a nd pre ss ENTER/PLAY.
5. Using the arrow keys, select SPDIF/RAW and
pre ss ENTER/PLAY.
SL BACK
6. Press SETUP to return to the main menu.
Dolby, AC-3, Pro- Logic and the double-D symbol are trademarks of Dolby Laboratories. All rights
reserved.
20
FR
SR

DVD FUNCTIONS
Functions supported by DVD discs
Functions supported by DVD discs are numerous and may vary by producer.
Regional code and signal system
Dolby digital surround sound
DTS output
Language selection
Subtitle languages
Picture proportional mode
Parental lock
Angles for viewing
Close caption
Disc protection:
1. Hold the disc by the edges so the surface will not
be damaged with finger prints.
2. Do not stick scraps of paper on the disc surface.
3. Wipe the disc with a dry soft cloth from the center
hole toward the outer edge.
4. Do not bend discs.
5. Do not store the disc in direct sunlight, or in
humid or dusty areas.
6. Store discs in the original box or jewel case to
prevent damage.
21

DISC TYPES
The following discs can be played:
DISCS
DVD-Video
DVD-Audio
CD-DA
CD-R
MP3
DIMENSION
LABEL
CD+G
Kodak Picture CD
22

SPECIFICATIONS
VF Signal system
Audio response
Audio S/N ratio > 90 dB
Audio output
(analog audio)
Output
Power
Power consumption
Product dimensions
Weight
Video output
S-Video output
NTSC/PAL
20Hz-20KHz
Electric level output :1.8V resistance:10KW
Electric level output :1Vp--p Resistance :75W Unbalanced negative
Electric level output : brightness(Y)1Vp--p,
Chrominance (C) :0.286Vp--p,resistance :75W
~ 110V/60Hz
<30W
17(L)X12(W)X2.3(H)inches
7.04lbs
23

WARRANTY
Standard Limited Warranty
THIS MANUAL CONTAINS THE STANDARD WARRANTY FOR OUR PRODUCTS.
THE SPECIFIC RIGHTS AND OBLIGATIONS OF PURCHASERS OF PARTICULAR ASPIRE
DIGITAL PRODUCTS SHALL BE GOVERNED BY THE WARRANTY CARD.
Warranty: ASPIRE DIGITAL warrants the enclosed AD-6000 unit to be free from defects in material
and workmanship for the period set forth on the warranty card supplied with the product.
Repair Procedures, Exclusive Remedy: ASPIRE DIGITAL will, at its option, repair or replace
products not conforming to this limited warranty at no charge. THIS IS THE SOLE AND EXCLUSIVE
REMEDY AVAILABLE FOR BREACH OF WARRANTY OR UNDER ANY OTHER LEGAL THEORY
WITH RESPECT TO ASPIRE DIGITAL PRODUCTS. If you find a product to be defective, contact
your authorized ASPIRE DIGITAL representative or ASPIRE DIGITAL. When you receive authorization, return the product as directed, including proof of purchase and purchase date, at your expense
and risk. Product repairs not covered by warranty, and product updates, will be provided at a set rate.
Limitations: This warranty is void if the product is damaged by improper or abnormal use or by
accident, if the product is altered or modified in any way, or if any attempt is made to repair the
product without authorization from ASPIRE DIGITAL. It is solely the purchaser's responsibility to
determine the suitability of these products for each particular application. ASPIRE DIGITAL products
are in all events not suitable, and are not authorized, for use with systems potentially injurious to life
or health. This warranty is not assignable.
No Other Warranties: EXCEPT AS PROVIDED IN THE LIMITED WARRANTY SET FORTH IN THE
WARRANTY CARD SUPPLIED WITH THE PRODUCT, ASPIRE DIGITAL PRODUCT MANUALS ARE
PROVIDED AS IS. ALL OTHER WARRANTIES AND REPRESENTATIONS, ORAL OR WRITTEN,
EXPRESS OR IMPLIED, INCLUDING BUT NOT LIMITED TO ANY IMPLIED WARRANTIES OF
MERCHANTABILITY OR FITNESS FOR A PARTICULAR PURPOSE, ARE EXCLUDED AND DO
NOT APPLY. THERE ARE NO WARRANTIES WHICH EXTEND BEYOND THE DESCRIPTION OF
THE FACE HEREOF. Except as required by law, no representative, agent, or employee of ASPIRE
DIGITAL is authorized to make warranties, representations, or obligations inconsistent with or in
addition to those set forth in this limited warranty.
No Damages: IN NO EVENT WILL ASPIRE DIGITAL BE LIABLE FOR DIRECT, INDIRECT, SPECIAL,
INCIDENTAL, OR CONSEQUENTIAL DAMAGES RESULTING FROM ANY BREACH OF WARRANTY
OR UNDER ANY OTHER LEGAL THEORY, EVEN IF ADVISED OF THE POSSIBILITY OF SUCH
DAMAGES. In no event will ASPIRE DIGITAL be liable for sums in excess of the purchase price of
the product. ASPIRE DIGITAL is thus not liable for lost profits or good will; downtime; damage or
destruction of any program, data, equipment, or other property; costs of recovering, reprogramming,
or reproducing any program, data, or equipment; personal injury or loss; or any other damages.
Notice: (1) Any changes or modifications not expressly approved by Aspire Digital, LLC could void the
user's authority to operate the equipment.
Contacting Technical Support
If you need help setting up your AD-6000 or if any parts are missing from the box, do not return the
unit to the place of purchase. Instead, contact Aspire Digital at:
1606 Lockness Place 310-856-0630
Torrance, Ca 90501 310-856-0634 fax
Support@aspiredigital.com
www.aspiredigital.com
24

REGISTRATION CARD
You must be registered to:
Call our technical support hotline.
Be informed of future software updates.
Receive information on new products and special offers.
Aspire Digital warrants this product to be free from defects of material and workmanship
for one (1) year, from the date of purchase. During the warranty period, Aspire Digital will
repair or replace, at its option, the product at no charge to the customer. The replacement
unit may be a remanufactured unit or a unit of equal or reater functionality. After one (1)
year, customer shall pay for all parts, labor and service. If a unit is replaced during the
warranty period, the original warranty shall remain in effect until the end of the one (1) year
period or 30 days, whichever is longer.
This warranty shall not apply if customer: (1) Abuses or modifies the
product;
(2) Operates the product in an environment with excessive dirt,
moisture, chemical fumes, extremes of temperature or other improper
conditions; (3) Operates the product with other hardware not specified
for the product.
Please fill out the following information, or tape your business card
here:
Mail this form to: Aspire Digital, LLC.
1606 Lockness Place
Torrance, Ca 90501
Or fax the form to: 310-856-0634
Or email the above information to registration@aspiredigital.com
25

4301-5368-0
 Loading...