

Page 1
Speeder Revvo Kit
User Manual
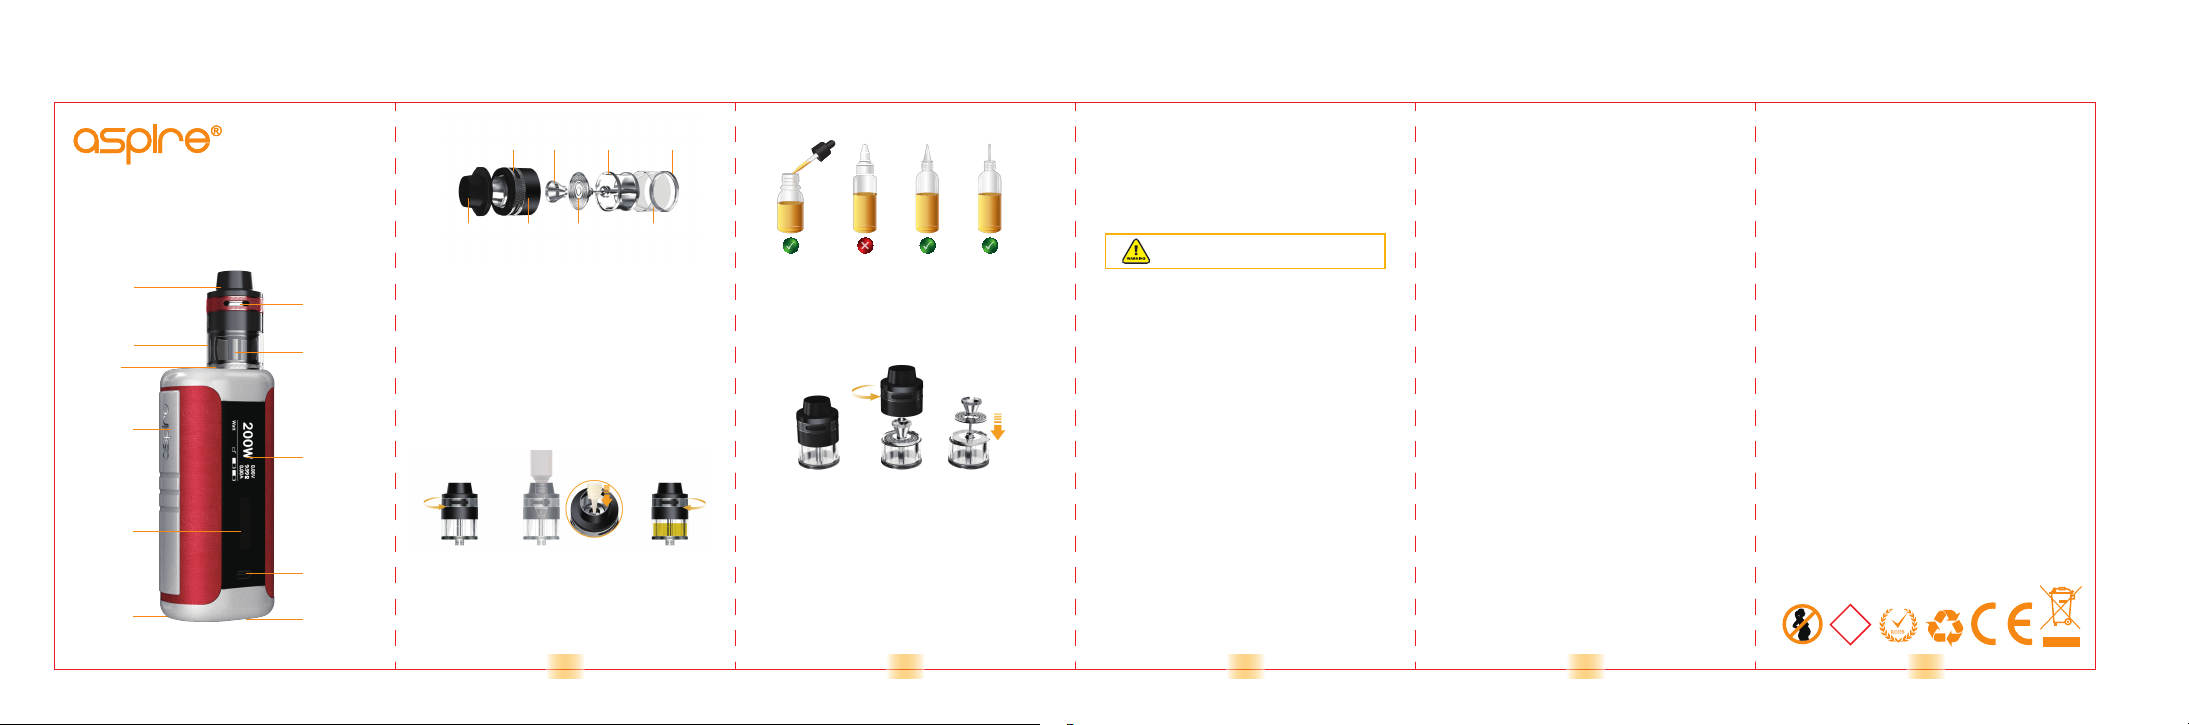
Wide bore Delrin
Drip cap
Glass tube
Glass
securing ring
Fire Button
Up and Down
Button
Battery Door
Airflow control ring
Base hardware
0.96inch
OLED Display
Micro-USB Port
Ventilation holes
Revvo tank
Tank Features
• Ultra Convenient Top Fill
• Adjustable airflow
• 3.6ml capacity
• Innovative ARC(Aspire Radial Coil) technology
• Coil resistance 0.10-0.16ohms
• Wattage range: 50-100W (Optimal 80-85W)
• Diameter: 24mm
• Length: 45mm
Top fill instructions
Filling this tank is super easy and convenient, the filling hole is
inside the tank, which can be reached by using a gorilla bottle
or just as simply by a glass dropper.
1. Locate your filling bottle/dropper onto the spring loaded filling
tube and press it down (only minimal pressure is required).
2. Squeeze the filling bottle/dropper to fill the tank.
Note:
1. After filling, release pressure on the filling tube to allow it to
seal, then release pressure on bottle before removing
completely, this will draw off any excess e-liquid and avoid
spillage directly onto the coil.
2. Due to the special design of the tank, after the first filling and
when replacing the coil, you should turn the tank upside
down for 2 minute to help saturate the coil with e-liquid.
Wide bore Delrin
Drip cap
Airflow
Mounting
control ring
Top Chamber ARC coil Glass tube
Base hardware
screw
1 2 3 4 5
Glass
securing ring
Compatible bottle types
Coil installation
1. Unscrew and remove the top chamber.
2. Unscrew and remove the mounting screw.
3. Remove the used ARC coil by lifting over the filling tube
4. Place a new coil over the filling tube; make sure the coil edge
is lined up with the tank, and sits securely.
5. Screw the mounting screw back onto the base hardware.
6. Replace the top chamber
NB: The mounting screw also acts as a ‘spit-back’ guard.
Replacing glass
1. Unscrew and remove the glass securing ring from the base
hardware.
2. Pull and remove the used glass tube.
3. Insert a new glass tube.
4. Screw the glass securing ring back onto the base hardware
firmly, but do not over-tighten.
Protective cap
1. It is recommended to close the airflow slots and to use the
provided protective cap when travelling or when the tank is
not in use to avoid leakage and prevent dust and dirt from
entering the top chamber.
2. It is also advisable to use the protective cap when carrying
onto a plane as the cabin pressure can adversely affect the
pressure inside the tank.
Precautions:
• Do not press the fire button without the top cap in place to
avoid potential spitting and hot e-liquid hitting your skin.
• Do not press the fire button when not vaping, this may cause
excess unvaporized e-liquid to build up inside top chamber
which could be unpleasant.
• While vaping, periodically invert the tank to ensure that the coil
doesn’t dry out, running the risk of burning the coil.
Do not let the tank become completely empty. Refill
the tank to avoid dry burning or damage to the
atomizer.
Speeder mod specifications
Wattage range: 1-200W
Output Voltage: 0.1-8.4V
Resistance Parameters: 0.1-3.5ohms
Continuous Fire Time can be adjusted from 5s to 15s
Charging Port: Micro-USB charging port
Screen: 0.96 inch OLED screen
Firmware update via Micro-USB port
Dimensions: 88*46*31mm
Battery: Dual 18650 high rate discharge batteries
Temperature Control
Temperature Range (F): 200-600
Temperature Range (C): 100-315 oC
Protection Features
• Automatic Cut Off
• Short Circuit Protection
• Overheat Protection
• Over charge Protection
• Over Discharge Protection
• Battery Reverse Protection
Instructions
1. The mod will automatically turn on after installing battery, the
screen will then display user’s previous settings, after 15
seconds of being idle the screen will turn off.
2. Press the fire button 5 times within 2 seconds to either lock or
unlock the device. While the mod is locked, press the fire
button for 3 seconds to turn the system off. To turn the mod
back on press the fire button 5 times rapidly.
3. Pressing fire button and down button simultaneously to either
o
F
lock or unlock keys, which is indicated by a lock symbol on
the screen. While the keys are in locked mode, wattage or
temperature settings can not be adjusted but fire button still
functions.
4. Pressing fire button and up button simultaneously for 0.5
second will allow you to select between Wattage, Voltage,
Bypass, CPS(C1/C2/C3), TC(Ni/Ti/SS316L) and TCR(M1/
M2/M3). Pressing up or down button to select modes, fire
button to confirm.
5. TCR settings: While the mod is in TCR(M1/M2/M3) mode,
pressing up and down buttons simultaneously to enter or exit
PWR and TCR settings. Pressing fire button to select
between PWR and TCR, up and down button to change
numbers, PWR numbers can be adjusted from 1W to 200W,
while TCR range is from 0.10 to 9.99. (Note: TCR numbers
for TC(Ni/Ti/SS316L) can not be adjusted.)
6. When the mod is in CPS (Customizable Power Settings),
pressing up and down buttons simultaneously will allow you
to fine-tune your heat ramp-up (power curve). Pressing up or
down button to change wattage, fire button to select time
from 1 to 10 seconds, pressing up and down buttons
simultaneously again will exit your Customizable Power
Settings.
7. While the mod is in TC mode attaching a new atomizer the
mod will read “New Atomizer? ” followed by “YES+/NO-“
Select “YES+” and the mod will read the original coil
resistance. Select “NO-“ and the mod will keep its previous
coil resistance settings. (Note: To ensure accuracy, when first
installing a new atomizer make sure the screen is lit and the
coil attached is at room temperature before attaching it to the
mod.)
8. When the mod is on, pressing the fire button 3 times quickly
to put the mod into or out of stealth mode, while in stealth
mode the mod can still fire but the wattage or temperature
settings cannot be adjusted.
9. To change temperature to Fahrenheit(F) or to Celsius(C),
press the “+”or “-” button all the way to pass the temperature
range, the temperature will switch over to either Celsius or
Fahrenheit automatically.
10. The Screen will auto rotate for ease of use.
Charging
• Charging the Speeder via Micro-USB charging port, the
maximum current can reach up to 2A.
• Connect your Speeder mod to the charger and the screen will
display a flashing battery icon as well as battery voltage level,
charge current and charge time. When the battery charge
reaches 4.2V or is fully charged, the mod will stop charging
and the screen will remain off.
• The batteries can not be replaced while charging. Please
unplug the USB cable before changing your batteries.
• When the battery charge drops below 1.5V or battery
incorrectly installed the mod will stop charging.
• When the mod detects the USB charge voltage is less than
4.3V, it will stop charging and the screen will display “CHECK
CHARGER”.
• To accomplish 2A charge current, the adaptor output should
be 5V/2A.
Firmware update
• Download the driver software and firmware file from Aspire
website: http://www.aspirecig.com/upgrade/
• Connect the Speeder to your PC. The driver will detect your
mod automatically.
• Click “OpenFile” to choose the correct firmware file.
• Click “Update” to upgrade your mod.
• If it failed during the update process please repeat step 3 to
step 4.
Contents:
1* Speeder mod
1* 3.6ml Revvo tank
2* Coils (0.10-0.16ohms)
1* Glass tube
10* O-rings
1* USB cable
2* Warning cards
1* User manual
1* Warranty card
1* Protective silicone cap
* Never use batteries with damaged wrappers as it is a safety
hazard.
To learn more about your products and how to use,
please visit:
www.aspirecig.com
Shenzhen Eigate Technology Co., Ltd.
Building 3, Xinhongtai Industrial Park, 14 Jian'an Rd,
Tangwei, Fuyong Town, Bao'an District, Shenzhen, China
Tel: +86-755-81499783 Email: service@aspirecig.com
Manufactured By Eigate MADE IN CHINA
+
18
 Loading...