

Page 1
Charging
● Charging the NX75 via Micro-USB charging port, the
maximum current can reach up to 2A.
● Connect your NX75 mod to the charger and the screen
will show a flashing battery icon. When the battery
charge reaches 4.2V or is fully charged, the mod will
stop charging and the screen will remain off.
● The battery can not be replaced while charging. Please
unplug the USB cable before changing your battery.
● When the battery charge drops below 0.5V or battery
incorrectly installed the mod will stop charging.
● To accomplish 2A charge current, the adaptor output
should be 5V/2A.
Customizable Firing Button Profiles (CFBP)
Customizable Firing Button Profiles (CFBP) Intro:
The CFBP feature allows for heat ramp-up (power
curve) to be fine-tuned. This customization can be
made with just a few clicks of the NX mod buttons.
There is no need to connect to computer to program
settings making this function very easy to use. Firing
button profiles create extraordinary flavor with no
limitations on tanks.
9 10 11
Press W button to select VW,VV,Bypass, C1,C2 and
C3. C1,C2,C3 are CFBP. Under CFBP, users can
customize power curves to create their preferred taste.
The graph above shows the CFBP curve when the mod
been idle.
When the firing button is held down, the screen will
display the power curve you have preset. Users can set
the wattage for each second if needed.
While in CFBP, Press W button for 1.5 seconds will
bring you to CFBP interface
While in CFBP setting interface, press W or T button to
set time, press “+” button to increase wattage, press “-”
button to decrease wattage. To save settings simply
press the fire button.
Firmware Upgrade
● Download the driver software from Aspire website:
http://www.aspirecig.com/upgrade/
● Connect your NX75 to your PC. The driver will detect
your NX mod automatically.
● Click “OpenFile” to choose the correct firmware file.
● Click “Update” to upgrade your NX mod.
● If it failed during the update process please repeat step
3 to step 4.
Note:
● SS under TC Mode only supports SS316L coils.
● The mod supports passthrough charging. To lengthen
the life of the mod, we do not recommend vaping while
charging (passthrough).
To learn more about your products and how to use,
www.aspirecig.com
please visit:
Designed and Manufactured By Eigate in China
Copyright 2016 Aspire. All Rights Reserved.
EVO75 KIT U ser Manua l
Kit Contents
● 1*Atlantis Evo Tank (0.4Ω Coil Pre-installed rated at
40-50w)
● 1*NX75 Mod
● 1*USB Cable
● 1*2ml Replacement Pyrex Tube
● 1*Extra Coil (0.5Ω 35-40W)
● 1*User Manual
● 1*Warranty Card
Top Fill Instructions
1 2 3
1. Unscrew and remove the top cap.
2. Squirt E-Liquid into the tank.
3. Reattach the top cap to your tank and begin to vape.
Coil Installation
- Unscrew the top cap from the Atlantis Evo tank
- Remove the Pyrex tube
- Replace the atomizer with a new one.
Notes
- Atlantis Evo tank is compatible with Aspire Atlantis coils.
- 0.4ohm Kanthal Clapton coil is pre-installed
• When using a new atomizer, let the tank stand for 2 minutes, so
the cotton can be saturated with juice before firing.
• Do not let the tank become completely empty. Refill the tank to
avoid dry burning or damage to the atomizer.
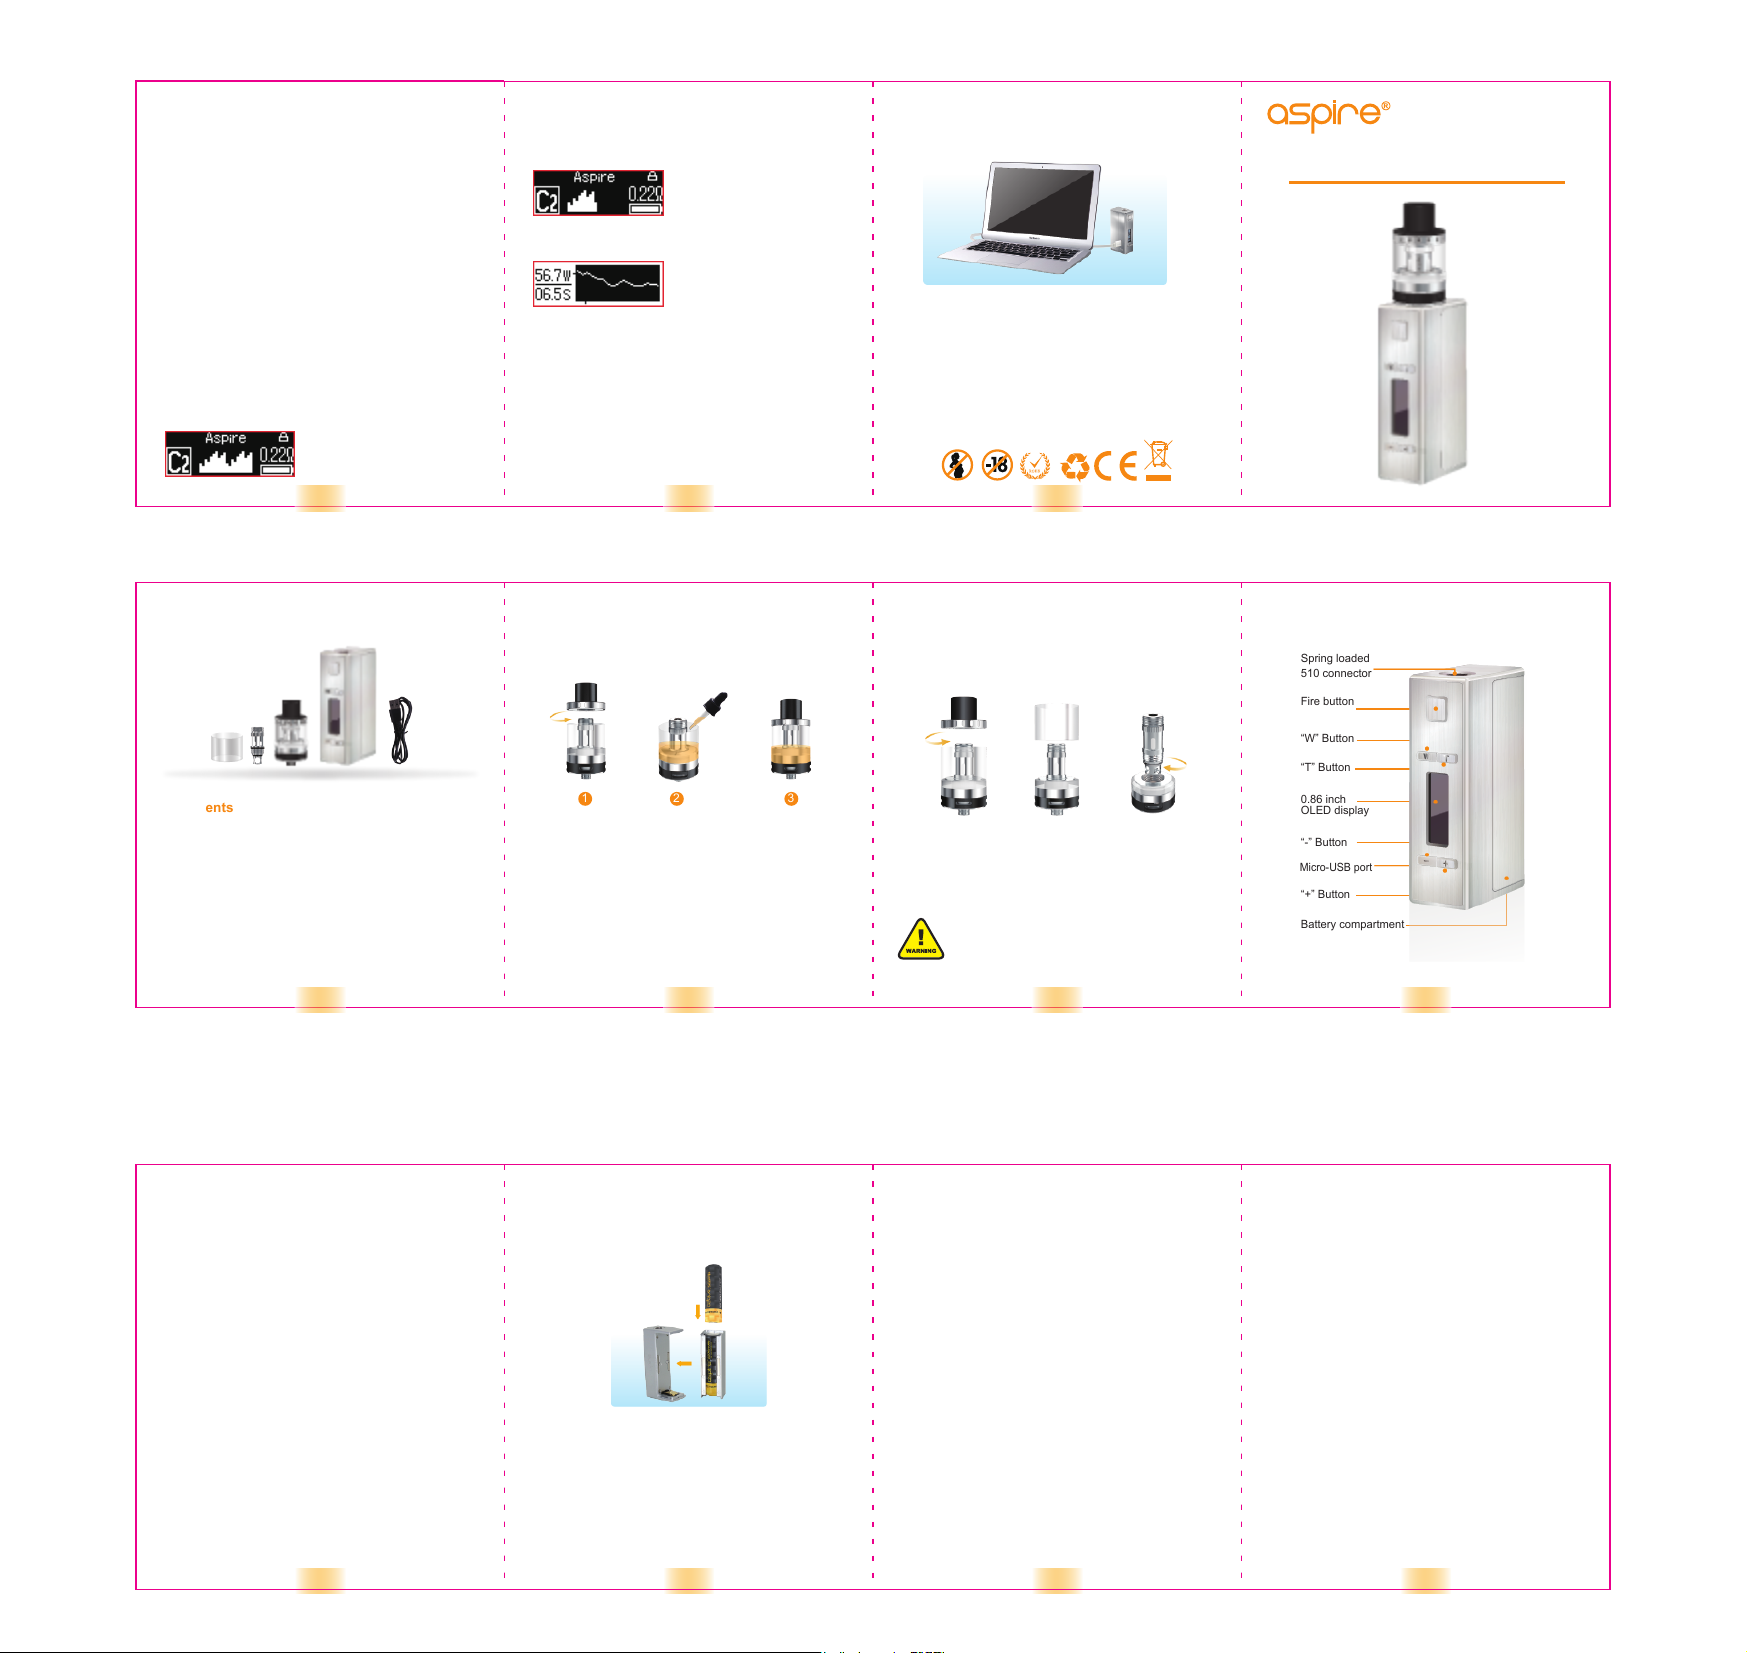
Mod Appearence
Spring loaded
510 connector
Fire button
“W” Button
“T” Button
0.86 inch
OLED display
“-” Button
Micro-USB port
“+” Button
Battery compartment
4321
Specifications
Wattage Range: 1-75W
Output Voltage Range: 0.00-8.50V
Resistance Parameters: In both Wattage Mode and TC
Mode it can fire coil resistance from 0.1ohm to 3.5ohm
(Wattage may be less than 75 watts when coil resistance
exceeds 0.2-0.9ohm).
Continuous Fire Time can be adjusted from 5s to15s
Charging Port: Micro-USB charging port
Screen: OLED 0.86 inch
Firmware update via Micro-USB port
Dimensions: 22.5*36.8*75mm
Battery: 3.7V single 18650 high rate discharge battery
Temperature Control
Temperature Range (F): 200-600F
Temperature Range (C): 100-315℃
Protection Features
● Automatic Cut Off
● Short Circuit Protection
● Low Resistance Protection
● Overheat Protection
● Over charge Protection
● Over Discharge Protection
5 6 7 8
Instructions
● The mod will automatically turn on after installing
battery, the screen will then display user’s previous
settings, after 15 seconds of being idle the screen will
turn off.
● Press the fire button 5 times within 2 seconds to either
lock or unlock the device. while the mod was locked,
press the fire button for 3 seconds will turn the system
off. To turn the mod back on press the fire button 5
times rapidly.
● When the mod is on, press W button to switch mode
between VW,VV and Bypass modes. Press T button to
select Ni200, Ti, SS316 or TCR (M1, M2, M3 manual
modes).
● Press “+” to increase wattage, voltage or temperature “-”
button to decrease. Press “+” or “-” button longer will
change the number faster.
● When the mod is on press the fire button 3 times quickly
to put the mod into or out of stealth mode, while in
stealth mode the mod can still fire but the wattage or
temperature settings cannot be adjusted.
● While the mod is in TC mode attaching a new atomizer
the mod will read “New Atomizer? ” followed by
“YES+/NO-“ Select “YES+” and the mod will read the
original coil resistance. Select “NO-“ and the mod will
keep its previous coil resistance settings.
● The NX75 will detect and lock coil resistance
automatically under TC mode. To ensure accuracy
when first installing a new atomizer make sure the coil
is at room temperature before attaching it to the mod.
● To change temperature to Fahrenheit(F) or to
Celsius(C), press the “+”or “-” button all the way to pass
the temperature range, the temperature will switch over
to either Celsius or Fahrenheit automatically.
● The preset continuous fire time is 10 seconds, after 10
seconds of continuous use, the mod will stop firing and
the display will flash “10s”. Users then can adjust the
fire time from 5s to 15s by pressing "+"/"-" button.
Functions
● Lock and Unlock buttons: Press "W" and
"+"simultaneously for 2 seconds to lock or unlock
buttons. There will be a lock or unlock symbol in the
upper right corner of the screen. When the buttons have
been locked the mod can still fire, but the settings
cannot be adjusted.
● Child Lock: Press "W" and "-" simultaneously for 2
seconds to enter or exit Child lock mode. Press "+"or "-"
button to select numbers, press fire button to confirm,
the original pass word is"000", choose arrow symbol to
reset. Users need input the pass word to lock or unlock.
● Change Logo function: Press "T" and "-" simultaneously
for 2 seconds to enter or exit change logo settings.
Press "+" or "-" to select letters, press fire button to
confirm,"W" button to delete, and button "T" to select
between lowercase and capital letters.
● TCR settings: Press"T"and "+" simultaneously to
change TCR settings. Press “T” button to select coil
material from Ni, Ti, SS, M1, M2, M3. Press “W” button
to select between “PWR” (Power) and “TCR”
(Temperature Control) under M1, M2, M3 mode. Press
“+” and “-” buttons to change PWR or TCR numbers
(note TCR numbers can be adjusted from 0.20‰ to
9.99‰) Note: ‰=×10
● Language Selection: Pressing the fire button while
installing the battery will bring up the firmware version
then you may select English and Chinese language.
Press “+” or “-” button to select, fire button to confirm.
● The display will auto rotate for easy of use.
3
-
 Loading...