

Page 1

STERRAD
User’s Guide
®
200 Sterilization System
REF 99712
99712_01
May 2008
Page 2

STERRAD
User’s Guide
®
200 Sterilization System
REF 99712
33 Technology Drive
Irvine, California 92618 USA
1-888-STERRAD
(1-888-783-7723)
949-581-5799
www.sterrad.com
For warranty information, please visit our website or
contact our Customer Care Center.
For additional copies of this guide, please visit www.e-ifu.com
©2008 Advanced Sterilization Products. All rights reserved. STERRAD® is a registered trademark of Advanced Sterilization
Products. Teflon
mentioned in this publication are trademarked by their respective corporations. Reproduction, adaptation or translation of this
®
, Tyvek® and Nylon® are registered trademarks of E.I. du Pont de Nemours and Company. Other products
publication without prior written permission is prohibited. Printed in the USA.
Page 3

Contents
About This Guide 5
Overview ....................................................................................................................5
Chapter 1. Introduction 7
Overview ....................................................................................................................7
System Details............................................................................................................8
Chapter 2. For Your Safety 11
Overview ....................................................................................................................11
Personal Safety and First Aid.....................................................................................11
Device Safety..............................................................................................................13
Cassette Handling.......................................................................................................14
Safe Maintenance .......................................................................................................15
Additional Information...............................................................................................15
Chapter 3. Preparing Items To Be Sterilized 17
Overview ....................................................................................................................17
Indications for Use ................................................................................................17
How to Determine What Can be Sterilized in the STERRAD® 200 System..............19
Items Not Recommended ...........................................................................................20
Cleaning, Rinsing, and Drying...................................................................................21
Guidelines for Wrapping, Packaging, and Loading....................................................23
Chapter 4. Day-to-Day Operation 27
Safe Operation............................................................................................................27
Sterilizer Operation.....................................................................................................27
Display Sequence..................................................................................................29
Using the Displays.................................................................................................30
Preparing the Load......................................................................................................32
Biological Indicators .............................................................................................34
Chemical Indicators...............................................................................................36
Preparing the Two-Tier Shelf................................................................................37
Creating the Load Item Data List..........................................................................38
Transferring the Load into the Sterilizer...............................................................40
Inserting a Cassette................................................................................................42
Starting a Cycle ..........................................................................................................45
Entering a Password..............................................................................................46
Cycle Notes ...........................................................................................................50
Watching a Cycle ..................................................................................................51
Completing a Cycle...............................................................................................53
STERRAD® 200 User’s Guide 3
Page 4

Additional System Information.............................................................................58
Unloading and Handling .......................................................................................58
Cycle Completion Flow Chart...............................................................................61
Cassette Control..........................................................................................................62
Obtaining a Cycle History..........................................................................................63
Administrative Functions............................................................................................66
System Setup.........................................................................................................66
System Configuration Screen................................................................................67
User/Password Administration Screen..................................................................68
Resetting the Date and Time .................................................................................69
Network Settings Screen .......................................................................................71
Chapter 5. Routine Maintenance 73
Overview ....................................................................................................................73
Maintaining the Printer...............................................................................................74
Replacing the Printer Ribbon Cartridge................................................................74
Replacing the Printer Paper...................................................................................75
Cleaning the Sterilizer ................................................................................................76
Chapter 6. Troubleshooting 77
Overview ....................................................................................................................77
Rebooting the System.................................................................................................77
Using the Message Table............................................................................................78
Appendix A. Specifications 81
4 STERRAD® 200 User’s Guide
Page 5

About This Guide
Overview
This guide is designed to provide useful and complete information on the day-today operation and routine maintenance of the STERRAD
The guide is divided into 6 chapters and 1 appendix. These chapters provide
information on using the sterilizer, load preparation, routine maintenance, and
troubleshooting the system should problems arise. The appendix contains the
system specification.
The chapters and the appendix are:
• About This Guide-this section gives you important information on how to
• Chapter 1. Introduction-the first chapter of the guide has important details
®
200 Sterilizer.
get the most use out of this guide.
about the STERRAD 200 System including the major parts of the sterilizer
and STERRAD Process information.
STERRAD® 200 User’s Guide 5
Page 6

About This Guide
• Chapter 2. For Your Safety-this may be the most important chapter in the
guide. You must read it thoroughly, understand the information, and follow
all the safety procedures in this chapter. These safety procedures include safe
handling of cassettes, safe transfer of sterilized materials using the two-tier
shelf and carriage, and first aid information in case of possible hydrogen
peroxide exposure.
• Chapter 3. Preparing Items To Be Sterilized-this chapter provides details
on preparing items to be sterilized, packaging the load, using the two-tier
shelf and carriage to transfer the load to the sterilizer and a brief description
of the items that can be sterilized in the STERRAD 200 System.
• Chapter 4. Day-to-Day Operation-this chapter gives you detailed
information on how to use the sterilizer. It shows you the typical displays
that you will see as you use the sterilizer and the different screens available
to the operator and administrator level passwords. It details how to use the
touch screens and how to run cycles.
• Chapter 5. Routine Maintenance-the routine maintenance of the
STERRAD 200 Sterilizer is very minimal. This chapter shows you how to
change the printer paper and ribbon and what steps to follow to keep the
sterilizer clean.
• Chapter 6. Troubleshooting-the STERRAD 200 Sterilizer displays a
number of messages to tell you what the system status is at any given
moment. Many of these messages do not require any action from you.
Others require that you call your ASP service representative.
• Appendix A. Specifications-this appendix provides tables detailing the
technical data relevant to the STERRAD 200 Sterilizer. Size, electrical
requirements, equipment rating and an explanation of the warning symbols
used on the sterilizer are some of the information found in this appendix.
6 STERRAD® 200 User’s Guide
Page 7

Chapter 1.
Introduction
Overview
The STERRAD® 200 Sterilization System is a general purpose, low temperature
sterilizer using the STERRAD Process to inactivate microorganisms on a broad
range of medical devices and surgical instruments. This sterilizer offers an
effective, safe, fast, economical, easy to use, reliable, and flexible sterilization
method.
The length of all cycle phases and the setpoints for all critical process parameters
are controlled by a microprocessor and software. The system reliably sterilizes
various material and load configurations, without leaving toxic residue.
-6
The system consistently provides 10
international standards, for clinical use on all allowed substrates within the limits
of the claims for materials and geometries.
sterility assurance level, as defined by
STERRAD® 200 User’s Guide 7
Page 8

1 Introduction
Figure 1. STERRAD® 200 Sterilizer input side on a two
door unit, or front side on a one door unit.
System Details
Here are details of the important parts of the STERRAD 200 Sterilizer.
• The items to be sterilized are placed on the two-tier shelf. The two-tier shelf
(see the following diagram) has 1 adjustable, removable shelf and a fixed
bottom shelf. The packed two-tier shelf is easily moved, using the carriage,
into or out of the sterilizer.
8 STERRAD® 200 User’s Guide
Page 9

Introduction 1
Figure 2. STERRAD® 200 Two-Tier Shelf and Carriage
• The carriage is used to move the two-tier shelf into position. This carriage is
a wheeled unit that locks onto the front of the machine so that you can easily
transfer a large load into or out of the sterilizer.
• Your system may have one or two doors. If you have a two-door unit, a door
is located on each side of the unit. One side, the input side, is used for
moving wrapped items to be sterilized into the sterilizer. The other side, the
output side, is used to remove the sterile items from the sterilizer. These
sterile items are then usually moved into a sterile storage area. On the one
door unit, the door is used for both input and output.
STERRAD® 200 User’s Guide 9
Page 10

1 Introduction
Figure 3. STERRAD® 200 Sterilizer–output side on
a two door unit. Note the absence of a cassette slot.
• A touch screen computer display, mounted on the upper right front of the
sterilizer, enables you to operate the sterilizer. There is a touch screen on
each side of the double door unit.
• A printer, located on the upper left front panel of the unit, delivers printed
messages, process parameters, and other information for your permanent
records. There is usually only one printer on the unit regardless of the
number of doors, however other printer options are available. Contact the
ASP Customer Care Center for more details.
• There is an optional barcode scanner available for the sterilizer. The barcode
scanner is used to conveniently enter bar-coded data from product tags,
labels or other items.
• The usable chamber capacity is approximately 150 liters.
10 STERRAD® 200 User’s Guide
Page 11

Chapter 2.
For Your Safety
Overview
Your safety is of primary concern to ASP. This chapter provides information on
safely using the sterilizer. You must read, understand and use the information
in this chapter before operating the unit. Also, always pay attention to the
warnings, cautions and notes throughout this guide. This information is for your
safety and to ensure that you receive the most benefit from the safe operation of
your STERRAD
®
200 Sterilization System.
Personal Safety and First Aid
♦ WARNING! HYDROGEN PEROXIDE IS CORROSIVE
Concentrated hydrogen peroxide is corrosive to skin, eyes, nose, throat,
lungs, and the gastrointestinal tract. Always wear chemical resistant latex,
PVC (vinyl), or nitrile gloves when removing items from the sterilizer
following a cancelled cycle or if any moisture is noted on items in the load
following a completed cycle.
♦ WARNING! HYDROGEN PEROXIDE IS AN OXIDIZER
Hydrogen peroxide is a strong oxidizing agent and poses a hazard for fire,
explosion, or container rupture. Avoid allowing hydrogen peroxide to contact
organic materials, including paper, cotton, wood, or lubricants. Do not use or
store near heat or open flame. Shoes, clothing, or other combustible material
that have come into contact with hydrogen peroxide must be immediately
and thoroughly rinsed with water to avoid a potential fire hazard. In case of
fire, use only water to extinguish.
STERRAD® 200 User’s Guide 11
Page 12

2 For Your Safety
♦ WARNING! CONCENTRATED HYDROGEN PEROXIDE IS TOXIC
Ingestion of hydrogen peroxide may be life threatening. If swallowed, call a
“poison control” center or physician immediately for treatment advice. Have
the person drink plenty of water if the person is able to swallow. Do not give
anything by mouth to an unconscious person. Do not induce vomiting unless
instructed to do so by the poison control center or physician.
♦ WARNING! RISK OF EYE INJURY
Direct hydrogen peroxide contact with eyes can cause irreversible tissue
damage. If contact with eyes occurs, hold the eyes open and flush with large
amounts of water for at least 15-20 minutes. Remove contact lenses, if
present, and then continue rinsing the eyes. Consult a physician immediately
after flushing the eyes.
♦ WARNING! RISK OF RESPIRATORY IRRITATION
Inhalation of hydrogen peroxide mist can cause severe irritation of lungs,
throat, and nose. If inhalation occurs, move the person to fresh air. If the
person is not breathing, call for emergency medical attention, or an
ambulance, then give artificial respiration, preferably mouth-to-mouth, if
possible. Consult a physician immediately.
♦ WARNING! RISK OF SKIN INJURY
Direct hydrogen peroxide contact with the skin can cause severe irritation.
Wear chemical resistant latex, PVC (vinyl) or nitrile gloves when handling
used cassettes or ejected cassettes, items from a cancelled cycle, or items that
have moisture present after a completed cycle. Immediately take off
contaminated clothing and rinse thoroughly with water to avoid potential fire
hazard and wash before re-use.
♦ WARNING! HEATED STERILIZATION SURFACES.
At the end of a cycle, the interior of the sterilizer may be hot. Do not touch
the inside of the chamber or door with your bare or gloved hands. The
vaporizer may be hot. Do not touch it with your bare or gloved hands. Allow
the sterilizer to cool before touching interior surfaces.
12 STERRAD® 200 User’s Guide
Page 13

For Your Safety 2
♦ WARNING! RISK OF BREATHING DIFFICULTIES
On rare occasions, the outlet filter on the vacuum pump can prematurely fail.
If this occurs, you may see mist or what some users have described as “haze”
or “smoke” in the room where the sterilizer is operating. The chemical
composition of the mist is primarily airborne mineral oil with trace amounts
of other compounds. Oil mist exposure may, theoretically, pose an increased
risk to people with certain respiratory conditions, such as asthma, and they
should take special precautions not to be exposed to the mist. If you observe
these conditions, personnel should leave the room as a precaution and
discontinue use of the STERRAD System until the system is repaired.
Personnel should avoid working in the room until the mist has cleared.
Please note that all STERRAD Sterilizers should be used and installed in a
well-ventilated environment (a minimum of 10 air exchanges per hour).
Device Safety
• DO NOT ATTEMPT TO STERILIZE ITEMS OR MATERIALS THAT
DO NOT COMPLY WITH THE GUIDELINES SPECIFIED IN THIS
GUIDE. In addition, you should read the medical device manufacturer's
instructions, or call the ASP Customer Care Center to determine whether an
item can be sterilized by this unit. Information may also be obtained from the
device manufacturer.
• All items must be cleaned and thoroughly dried before loading into the
sterilizer. Loads containing moisture may cause cycle cancellation.
• The chapter on preparing items to be sterilized contains information about
the materials and devices that can be processed by the STERRAD 200
Sterilizer.
• Metal objects must not come into contact with the chamber walls, the doors
or the electrode. Contact with the walls, doors, or electrode could damage the
sterilizer or instruments.
• Do not change the power source without checking the electrical phase
rotation. Prior to relocating the STERRAD 200 Sterilizer to a new power
source, electrical phase rotation should be checked by a qualified technician.
Failure to verify and match phase rotation may cause damage to the sterilizer
and void the warranty.
• If you plan to disconnect and store the sterilizer for any length of time, please
contact your ASP service representative at 1-888-STERRAD (1-888-783-
7723) for instructions.
STERRAD® 200 User’s Guide 13
Page 14

2 For Your Safety
• An ASP-approved biological indicator (BI) should be used to monitor the
sterilization cycle. Should a cancellation occur when a biological indicator is
in the chamber, discard the biological indicator and then use a new biological
indicator when re-starting the cycle. Call the ASP Customer Care Center for
information on approved biological indicators.
Cassette Handling
• STERRAD 200 CASSETTES CONTAIN CONCENTRATED
HYDROGEN PEROXIDE, A STRONG OXIDIZER.
CONCENTRATED HYDROGEN PEROXIDE IS CORROSIVE TO
SKIN, EYES, NOSE, THROAT, LUNGS, AND GASTROINTESTINAL
TRACT. Direct contact with the skin can cause severe irritation. If skin
contact occurs, immediately flush with large amounts of water. If symptoms
are severe or persist, consult a physician immediately. Direct contact with
eyes can cause irreversible tissue damage. If eye contact occurs, immediately
flush with large amounts of water and immediately consult a physician.
Inhalation of mist can cause severe irritation of lungs, throat, and nose. If
inhalation occurs, move to fresh air and consult a physician immediately.
Ingestion can produce corrosion that may be life threatening. If swallowed,
drink plenty of water immediately to dilute. Do not induce vomiting. Consult
a physician.
• Do not remove the plastic wrapper from the cassette package if the indicator
strip is red. Red indicates that the cassette might have been damaged. Call the
ASP Customer Care Center for more information.
• Do not remove used cassettes from the protective cardboard sleeve. Dispose
of the cassette inside the protective sleeve according to your facility’s
procedures.
• If it is necessary to handle a used cassette that is not in the cardboard sleeve,
wear chemical resistant latex, PVC (vinyl) or nitrile gloves. Do not touch
your gloved hands to your face or eyes.
14 STERRAD® 200 User’s Guide
Page 15

For Your Safety 2
Safe Maintenance
• WARNING! HYDROGEN PEROXIDE MAY BE PRESENT
If white residue is visible on the load; this may be residue from the hydrogen
peroxide stabilizer. Wear chemical resistant latex, PVC (vinyl), or nitrile
gloves when removing a load with visible white residue. White residue can
be minimized by making sure regular Planned Maintenance (PM) procedures
are performed on your sterilizer. The sterilizer will inform you when Planned
Maintenance is due. Please schedule your PM service in a timely manner.
• Repairs and adjustments should only be attempted by experienced
technicians who are fully trained to maintain and repair the STERRAD 200
Sterilizer.
• Use of unauthorized parts for maintenance or repair could cause personal
injury, result in costly damage or unit malfunction, and void the warranty.
• Do not clean the chamber door area with abrasives. The sterilization chamber
uses an O-ring vacuum seal to maintain a vacuum in the chamber. Never use
rough cleaning tools, such as a wire brush or steel wool, on the door housing
or chamber assembly. This could damage the seal.
Additional Information
• The information contained in this chapter is repeated where appropriate
throughout this guide for your safety and use. This information is
subsequently labeled: WARNINGS, Cautions or Notes as appropriate.
• WARNINGS are shown in the text in all bold upper case letters. They
indicate events or conditions that can result in serious injury or death.
• Cautions are shown in the text in bold letters. They indicate events or
conditions that can result in damage to equipment.
• Notes are shown in the text with a check mark . They highlight specific
information about the proper use and maintenance of the STERRAD 200
Sterilizer.
STERRAD® 200 User’s Guide 15
Page 16

Page 17

Chapter 3.
Preparing Items To Be
Sterilized
Overview
The STERRAD® 200 Sterilizer can process many of the items you commonly
sterilize as well as instruments that are sensitive to heat and moisture. However,
there are a few important exceptions. Please review the “How to Determine What
Can be Sterilized in the STERRAD 200 System” foldout page contained in this
chapter. It contains details on recommended materials and lumen sizes.
Indications for Use
The STERRAD 200 Sterilizer is designed for sterilization of both metal and
nonmetal medical devices at low temperatures. Because the cycle operates within
a dry environment and at low temperatures, it is especially suitable for
instruments sensitive to heat and moisture. The sections that follow contain more
information on the types of items and materials that can be sterilized in the
STERRAD 200 Sterilizer.
• The STERRAD 200 Sterilizer can sterilize instruments having diffusionrestricted spaces, such as the hinged portion of forceps and scissors.
• Teflon
or larger and lengths of 310 mm or shorter can be processed in the
STERRAD 200 Sterilizer.
®
or polyethylene lumened instruments with inside diameters of 6 mm
• Medical devices with only a single stainless steel lumen with:
STERRAD® 200 User’s Guide 17
Page 18

3 Preparing Items To Be Sterilized
» an inside diameter of 1 mm or larger and a length of 125 mm or shorter,*
» an inside diameter of 2 mm or larger and a length of 250 mm or shorter,*
» an inside diameter of 3 mm or larger and a length of 400 mm or shorter.
can be processed in the STERRAD 200 Sterilizer.
*Validation testing for this lumen size was conducted using a maximum of 12
lumens per load. Your loads should not exceed the maximum number of lumens
validated by this testing.
Note: The validation studies for this sterilizer were performed
using the STERRAD cycle consisting of a 6-minute, 45second injection phase followed by a 2-minute diffusion
phase, and a 2-minute plasma phase. The validation
studies were performed using a validation load consisting
of four instrument trays, each weighing 9.12 lbs. (the total
weight of the load was 36.48 lbs.).
Note: Determination of true length is based upon actual
instruments identified as intended for reprocessing and
meet all other criteria for processing in the STERRAD 200
Sterilizer.
WARNING! DO NOT ATTEMPT TO STERILIZE ITEMS OR
MATERIALS THAT DO NOT COMPLY WITH THE
GUIDELINES SPECIFIED IN THIS GUIDE. IN
ADDITION, YOU SHOULD READ THE MEDICAL
DEVICE MANUFACTURER’S INSTRUCTIONS, OR
CALL THE ASP CUSTOMER CARE CENTER TO
DETERMINE WHETHER AN ITEM CAN BE
STERILIZED BY THIS UNIT.
18 STERRAD® 200 User’s Guide
Page 19

Preparing Items To Be Sterilized 3
How to Determine What Can be
Sterilized in the STERRAD® 200
System
The following page is a chart that unfolds to show you detailed lists of
recommended items, materials, and some typical devices that can be sterilized in
the STERRAD 200 Sterilizer. You should refer to it whenever you need
materials information. Be sure to check with the medical device manufacturer’s
instruction before loading any item into the STERRAD 200 Sterilizer.
®
♦ Important! Stainless steel, polyethylene, and Teflon
lumens that can be sterilized in the STERRAD 200 Sterilizer.
Note: There are a wide variety of materials and devices that
can be sterilized in the STERRAD 200 Sterilizer. As more
manufacturers complete testing of their products with the
STERRAD 200 Sterilizer, the range of recommended
and/or compatible items grows. ASP maintains updated
information and we are happy to share it with you. Please
contact the ASP Customer Care Center for an up-to-date
list of recommended materials, devices and/or device
manufacturer information. Call 1-888-STERRAD (1-888783-7723).
are the only types of
STERRAD® 200 User’s Guide 19
Page 20

®
How To Determine What Can Be Sterilized In The STERRAD 200 Sterilizer
How To Determine What Can Be Sterilized In The STERRAD 200 Sterilizer
®
1
2
Is The Reprocessable Medical Device Made Of The Following Materials?**
** This list of materials does not apply to trays and containers or other packaging materials. Please refer to the STERRAD 200 User’s Guide for information on appropriate packaging
materials for use in the STERRAD System.
- Aluminum
- Brass
®
- Delrin acetal resin (polyacetal)
- Ethylvinyl acetate (EVA)
- Glass
May have limited life after repeated sterilization.
®® ®
Delrin , Nylon , and Teflon are registered trademarks of the DuPont Corporation.
KRATON™ Polymers is a trademark of KRATON Polymers U.S. L.L.C.
- KRATON Polymers
- Neoprene
- Non-mated Nylon (polyamide)
- Polycarbonate
- Polyethylene
TM
®
ULTEM Polymers is a registered trademark of the GE Company.
Contact ASP or the device manufacturer to determine the compatibility of any device manufactured from PMMA.
- Polyetherimide (ULTEM Polymers)
- Polymethyl methacrylate (PMMA)
- Polyphenylene sulfone (Radel )
- Polypropylene
- Polystyrene
®
®
®
®
- Polyurethane
- Polyvinyl chloride (PVC)
- Silicone elastomers
- Stainless steel
®
- Teflon (polytetrafluoroethylene)
- Titanium
Does The Reprocessable Medical Device Have A Lumen?
Yes
Yes
No/Don’t
Know
No
Please call the device manufacturer for
information on how to properly sterilize
this device.
Proceed with
Processing.
3
4
Is The Lumen Made Of Stainless Steel, Or Teflon ?
®
Yes
Proceed With Processing If The Lumen Conforms To The Dimensions Listed Below
®
__
Stainless Steel Lumen
Inside Diameter
1 mm or larger
2 mm or larger
3 mm or larger
* Validation testing for this lumen size was conducted using a maximum of 12 lumens per load.
Your loads should not exceed the maximum number of lumens validated by this testing.
Length
125 mm or shorter*
250 mm or shorter*
400 mm or shorter
Teflon /Polyethylene Lumens
Inside Diameter
6 mm or larger
310 mm or shorter
If the lumens do not conform to these dimensions, please call the device
manufacturer for information on how to properly sterilize these devices.
Lumens not conforming to these dimensions should not be processed in
the STERRAD 200 Sterilizer.
Length
No/Don’t
Know
Please call the device manufacturer for
information on how to properly sterilize
this device.
Inside Lumen
Diameters
1 mm (0.039 inches)
2 mm (0.078 inches)
3 mm (0.118 inches)
4 mm (0.157 inches)
5 mm (0.196 inches)
6 mm (0.236 inches)
200 mm 250 mm 310 mm 400 mm0mm 125 mm
Measurements are approximate and are for reference only.
Lumen Lengths
More Information
More Information
Page 21
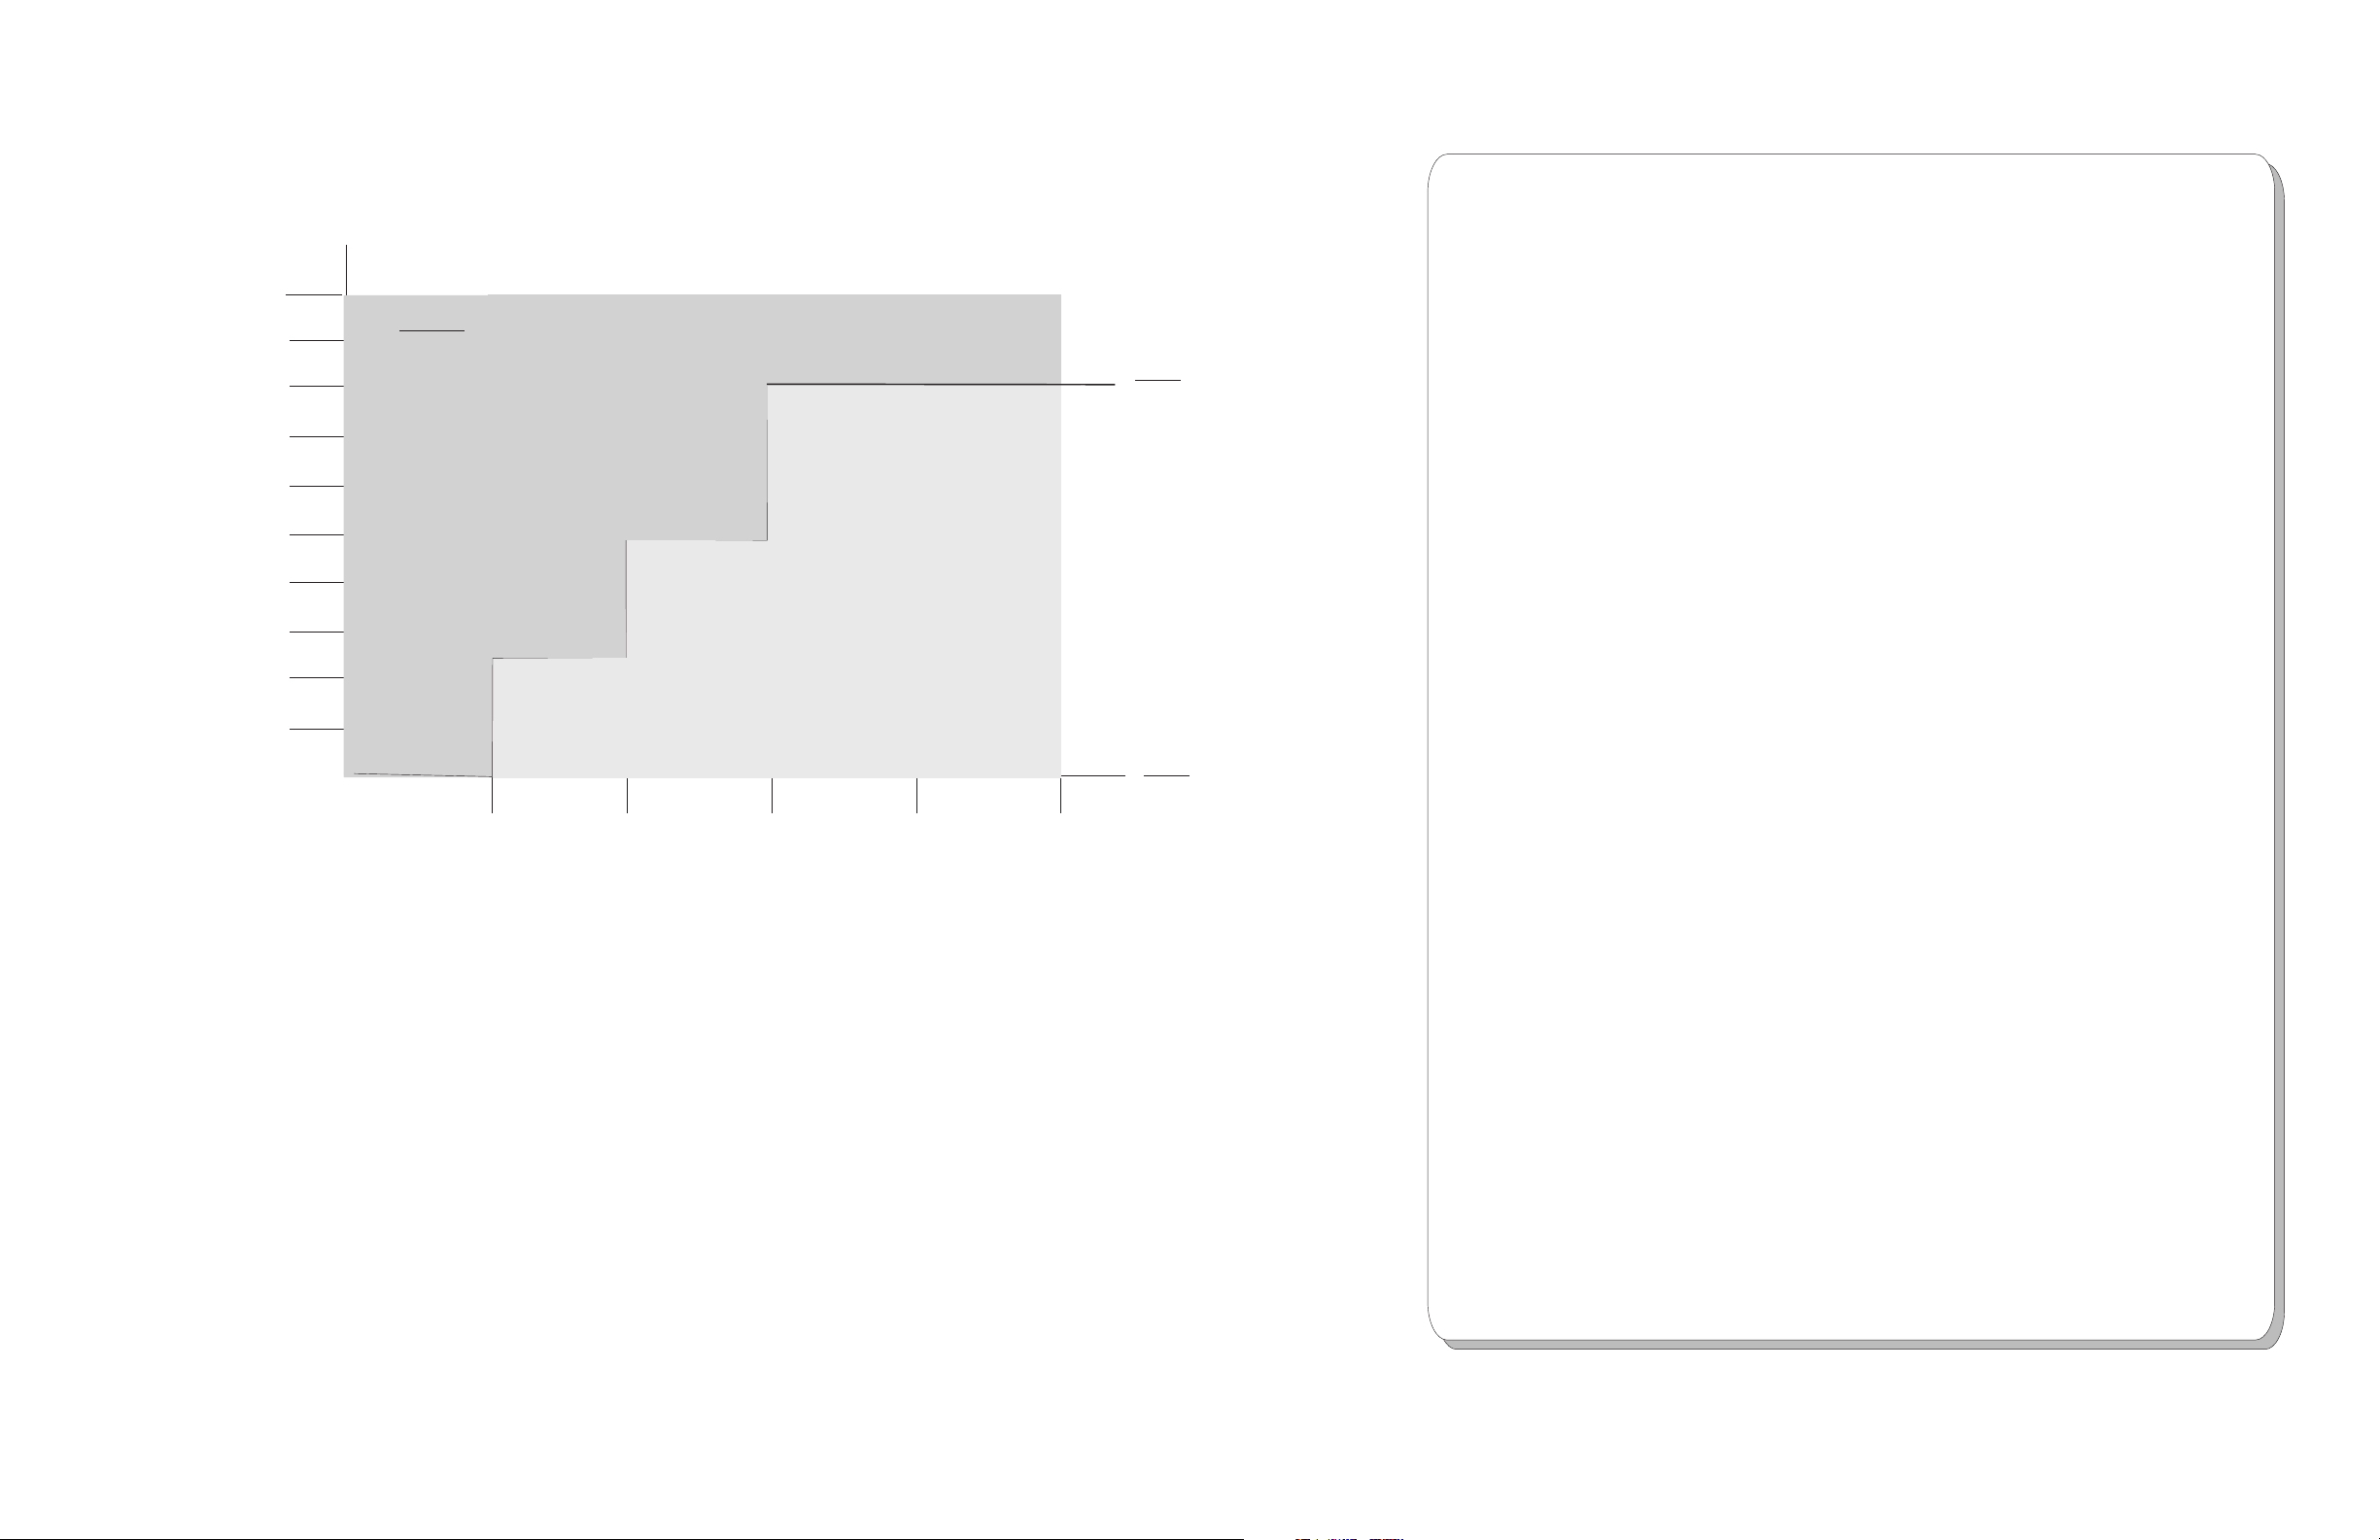
Processing Stainless Steel Lumens
in the STERRAD 200 Sterilizer
®
Typical Devices Sterilized in the STERRAD 200 Sterilizer*
®
500 mm
450 mm
400 mm
350 mm
300 mm
250 mm
Lengths
200 mm
150 mm
100 mm
50 mm
Cannot be processed in
the STERRAD 200 Sterilizer
®
125 mm
1mm 2 mm
250 mm
Can Be Processed In
the STERRAD 200 Sterilizer
3mm
Inside Diameter
400 mm
®
4mm
5mm
- Stereotactic equipment
-
Defibrillator paddles
-
Electrocautery instruments
~
~
-
Esophageal dilators
-
Cranial pressure transducer cables
-
Metal instruments
-
Patient lead cables
- Endoscopic instruments
-
Rigid endoscopes
-
Laryngoscope blades
- Trocar sheaths
- Cryoprobes
- Surgical power equipment and batteries
~
~
- Fiberoptic light cables
- Laser hand-pieces, fibers, and accessories
- Ophthalmic lenses (diagnostic, magnifying)
- Pigmentation hand-pieces
- Dopplers
- Shaver hand-pieces
- Radiation therapy equipment
- Ultrasound probes
- Video cameras and couplers
- Resectoscope/working elements and sheaths
If you have questions about whether your particular device can
be sterilized in the STERRAD Sterilizer, please call the
device manufacturer or call ASP at 1-888-STERRAD.
Visit our website at www.sterrad.com.
* Any devices processed in the STERRAD 200 Sterilizer
must be within the claim limits of the sterilizer.
Page 22

3 Preparing Items To Be Sterilized
Items Not Recommended
♦ Items made with copper or copper alloys (such as Monel), should not be
used. Please contact the ASP Customer Care Center at 1-888-STERRAD for
more information.
♦ Instrument mats other than STERRAD Instrument Mats.
♦ Instrument trays other than STERRAD Instrument Trays or APTIMAX
Instrument Trays.
♦ Any item that is not completely dry.
♦ Items or materials that absorb liquids.
♦ Items made of materials that contain cellulose, such as cotton, paper or
cardboard, linens, huck towels, gauze sponges, or any item containing wood
pulp.
®
♦ Paper instrument count sheets or lot stickers.
♦ Liquids and powders.
®
♦ Items with mated, Nylon
♦ Single use items for which the manufacturer does not recommend
resterilization.
♦ Implants for which the manufacturer has not specifically recommended
sterilization in the STERRAD 200 Sterilizer.
♦ Instruments and devices that cannot withstand a vacuum and are labeled for
gravity steam sterilization methods only.
♦ Items whose design permits the surfaces to collapse onto each other unless
some method is used to keep the surfaces separated.
♦ Devices with internal parts, such as sealed bearings, that cannot be immersed
may present difficulties in cleaning and should not be processed in the
STERRAD 200 Sterilizer.
surfaces.
20 STERRAD® 200 User’s Guide
Page 23

Preparing Items To Be Sterilized 3
Cleaning, Rinsing, and Drying
Cleaning and sterilization are two separate processes. Proper cleaning of
instruments and devices is a critical and necessary step prior to sterilization.
♦ All items including trays must be thoroughly cleaned, rinsed, and dried
before loading into the sterilizer.
♦ Carefully inspect all instruments and devices for cleanliness and dryness
prior to packaging. If visible soil is present, the item must be re-cleaned and
dried prior to sterilization. If moisture is present, dry the item thoroughly
prior to sterilization.
♦ Carefully inspect all instruments and devices for flaws or damage prior to
packaging. Devices and instruments with flaws or damage should be replaced
or repaired before using.
Note: Periodic careful inspection of the items after repeated
exposure to disinfectant/cleaner/sterilant is necessary, due
to the potential damaging effects of the chemical agents on
the items.
Cleaning is necessary to remove organic and inorganic soil and debris from
equipment. This process also removes many microorganisms from the surface of
the items. Sterilization then inactivates all remaining spores and live
microorganisms.
♦ Clean
♦ Rinse
your devices according to the medical device manufacturers'
instructions. You must remove all blood, tissue, and soil from items using
appropriate detergents, cleansers and/or methods.
items thoroughly to remove detergent or cleanser residue. Use treated
water that is of a quality that ensures hard water stains do not occur. Failure
to remove all organic materials or detergents may result in the formation of
light-colored residue on the devices. If residue is visible, you should clean,
rinse, dry, and resterilize the device prior to use.
STERRAD® 200 User’s Guide 21
Page 24

3 Preparing Items To Be Sterilized
♦ Dry all items thoroughly. An acceptable method for drying is to blow
compressed gas through the lumen until no moisture exits the distal end of
the device. Please ensure that any method used to dry the devices is in
accordance with the manufacturers' instructions for use or contact the device
manufacturer to obtain appropriate and safe procedures. It is necessary to
remove moisture from all parts of the items. Only dry items should be
loaded into the sterilization chamber to prevent cycle cancellation.
WARNING! POSSIBLE RESIDUAL HYDROGEN PEROXIDE
CONTACT! FAILURE TO ENSURE THAT
INSTRUMENTS ARE COMPLETELY DRY BEFORE
THEY ARE PROCESSED IN THE STERRAD
STERILIZER MAY RESULT IN RESIDUAL
HYDROGEN PEROXIDE BEING PRESENT ON THE
OUTER SURFACE OF THE LOAD. THIS MAY
CAUSE CONTACT BURNS WHEN THE SURFACE
OF THE LOAD IS HANDLED.
®
♦ Some complex reusable medical devices may require disassembly for proper
cleaning and sterilization. It is very important that you follow the device
manufacturers' recommendations concerning cleaning and sterilization. In the
absence of STERRAD
relevant medical device manufacturer.
WARNING! POSSIBLE NON-STERILE DEVICE! LOADS
CONTAINING MOISTURE MAY RESULT IN EITHER
A NON-STERILE DEVICE OR CYCLE
CANCELLATION. WEAR CHEMICAL RESISTANT
LATEX, PVC (VINYL), OR NITRILE GLOVES WHEN
HANDLING ITEMS FROM ANY LOAD CONTAINING
MOISTURE.
®
System-specific instructions, please contact the
22 STERRAD® 200 User’s Guide
Page 25

Preparing Items To Be Sterilized 3
Guidelines for Wrapping, Packaging,
and Loading
Proper preparation of trays, pouches, and instruments can minimize or prevent
cycle cancellation and positive BI results due to load-related problems.
®
♦ Only STERRAD and APTIMAX
Accessories are recommended for use in the STERRAD 200 Sterilizer.
STERRAD and APTIMAX
allow diffusion of hydrogen peroxide and the plasma around all the items in
the load. The trays should only be padded with STERRAD Instrument Tray
Mats or polypropylene sterilization wrap. Do NOT use linen, cellulosic, or
any materials shown in the “Items Not Recommended” list. Follow the
instructions for use included with the STERRAD Instrument Tray Mats to
determine the number of mats that can be used at one time in the chamber.
®
Instrument Trays and STERRAD
Instrument Trays are specially designed to
Figure 4. Use only STERRAD® Instrument Trays and
APTIMAX
♦ Improper loading of the sterilizer may result in cycle cancellations and/or
positive biological indicator results.
♦ Configure loads with a combination of metal and nonmetal items, and
wrapped trays and pouches to maximize the efficiency of the cycle.
♦ Do not use foam pads in instrument trays. They may absorb the hydrogen
peroxide.
♦ Do not use any wraps or packaging that are not approved by ASP and listed
in the previous section on “items not recommended.”
STERRAD® 200 User’s Guide 23
®
Instrument Trays
Page 26

3 Preparing Items To Be Sterilized
♦ Use only STERRAD 200 Sterilizer compatible polypropylene sterilization
wrap and Tyvek
containing cellulose or cotton.
♦ Place STERRAD Chemical Indicator Strips inside trays and Tyvek
♦ Secure all wraps with STERRAD SealSure
♦ Arrange items to ensure that the hydrogen peroxide and plasma can contact
all surfaces.
♦ Place peel pouches loosely on edge, if possible. Arrange them so that the
transparent side of a pouch faces the opaque side of the next pouch. Do not
stack pouches on top of each other.
♦ Do not allow any item to touch the walls of the sterilization chamber, doors,
or electrode.
Note: Do not stack instruments inside the trays. Do not stack
Note: If you are using rigid containers cleared by the FDA for
®
pouches. Do not use paper pouches or sterilization wraps
®
Chemical Indicator Tape.
trays. Do not stack trays within trays. Do not wrap
instruments within a wrapped tray.
use in the STERRAD System, follow the same procedures
that are recommended for use with the STERRAD or
APTIMAX
inside the containers. Do not stack containers. Do not
stack containers within containers. Do not wrap
instruments within the containers.
®
Instrument Trays. Do not stack instruments
®
pouches.
Caution: Metal objects must not come into contact with the
walls of the sterilization chamber, door, or
electrode. Contact with the walls, door, or
electrode can interrupt the plasma phase of the
process, cause a cycle cancellation, and/or
damage the item or the sterilizer.
24 STERRAD® 200 User’s Guide
Page 27

Preparing Items To Be Sterilized 3
♦ Provide at least 25 mm (1 inch) of space between the ceiling of the electrode
and the top of the load.
®
♦ Place STERRAD CycleSure
Biological Indicator (BI) or an ASP-approved
biological indicator in the chamber. Frequency of biological testing should
be at least once per day or in accordance with your facility’s policy. Review
the instructions included with the biological indicator to ensure proper use.
♦ Proceed to “Chapter 4. Day-to-Day Operation” for information on starting a
cycle.
STERRAD® 200 User’s Guide 25
Page 28

Page 29

Chapter 4.
Day-to-Day Operation
Safe Operation
Before operating the STERRAD® 200 Sterilizer, you must thoroughly read,
understand and follow the information in “Chapter 2. For Your Safety” as well as
“Chapter 3. Preparing Items for Sterilization.”
Sterilizer Operation
The STERRAD 200 Sterilizer automatically monitors and controls the
sterilization process. The STERRAD 200 Sterilizer reports its status in three
ways:
• Touch Screen (flat panel, high color VGA Display)–The display indicates
the status of the unit at all times the unit is powered on. It also indicates the
time remaining to cycle completion. There is a display on each side of the
sterilizer in the two-door configuration. The display on the output side may
not be active at all times and may not allow you to perform as many
functions as on the input side.
STERRAD® 200 User’s Guide 27
Page 30
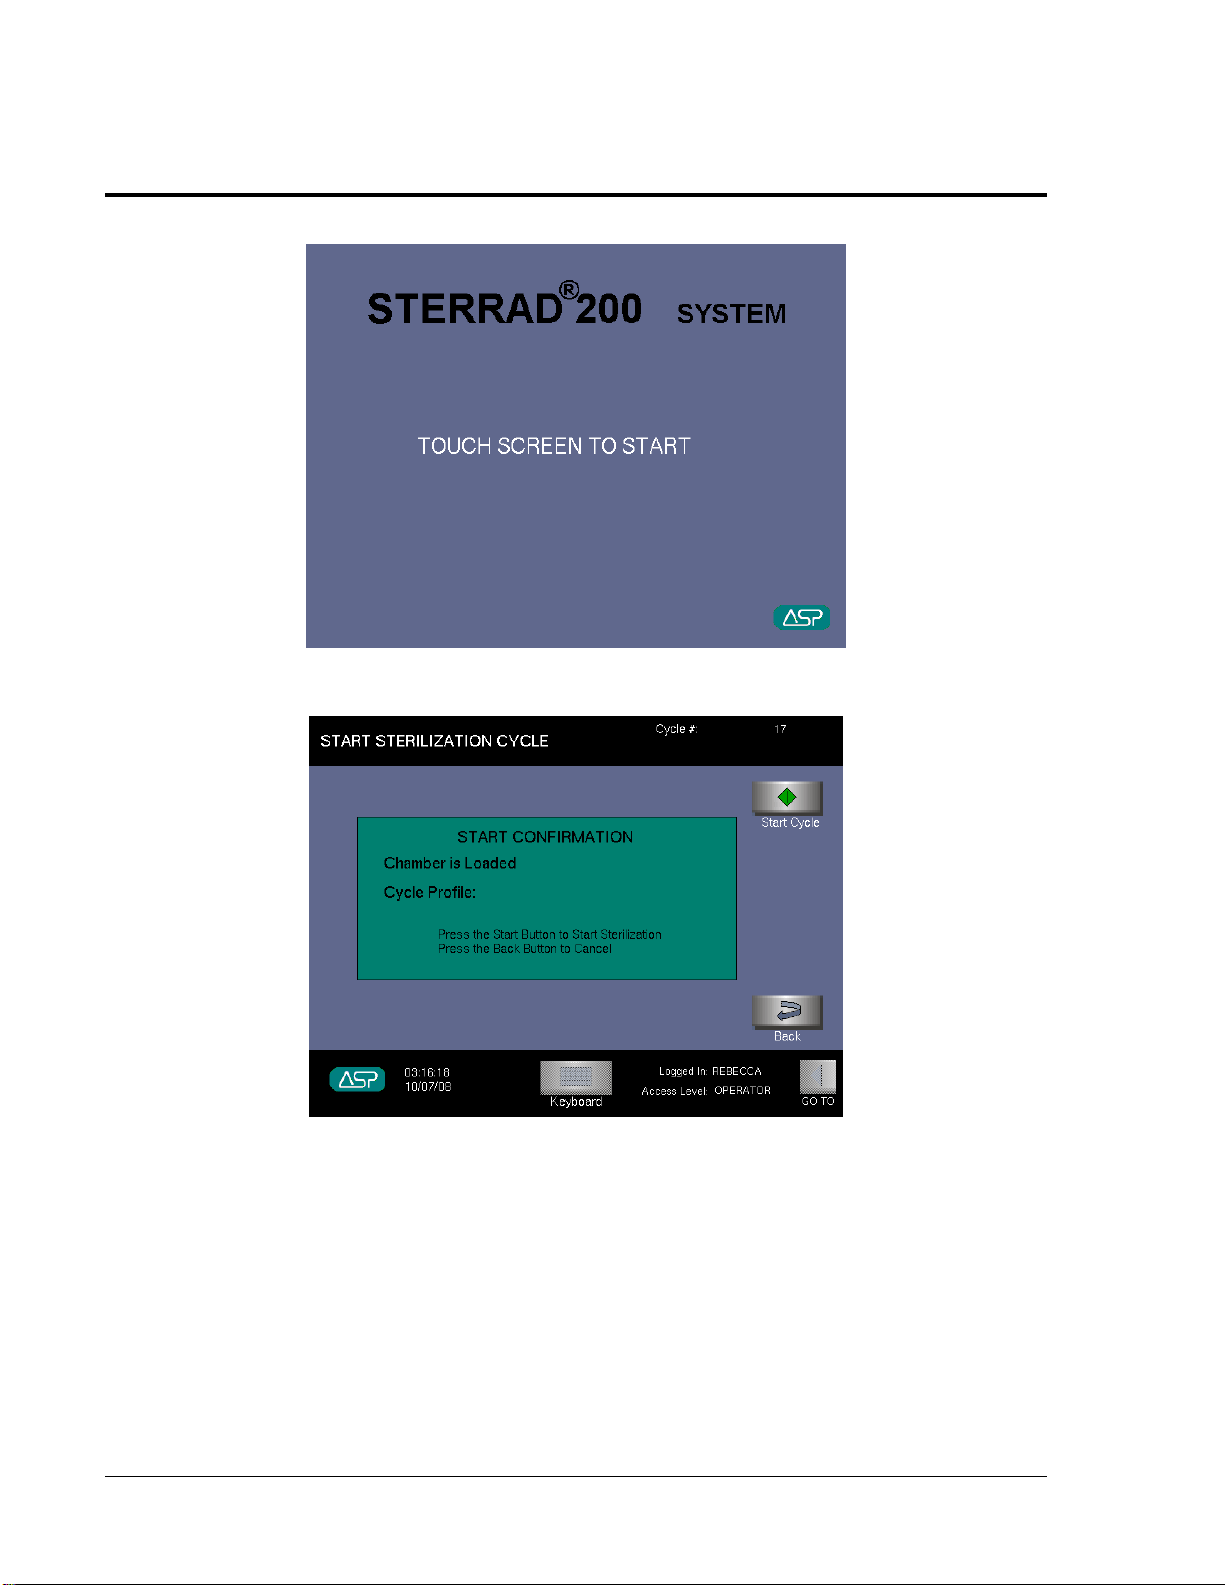
4 Day-to-Day Operation
Figure 5. Main Display. Touch anywhere to begin.
Figure 6. Touch Start Cycle to begin sterilization. This display is seen after
log in and the Load Item Data display. Your display may be
slightly different. Touch Back to return to the Load Item Data display.
• Paper printout–A printed record is produced after each cycle completion or
cancellation. This is a record of the cycle parameters and may be kept for
your records. The print should be completely black. Red print indicates a
problem with the cycle. The printer is located behind the printer door on the
upper left panel on the input side.
28 STERRAD® 200 User’s Guide
Page 31

Day-to-Day Operation 4
• Beeps–Beeps alert you when a cycle is complete, or a cancellation has
occurred. A long beep indicates a complete cycle.
Display Sequence
Following is an abbreviated version of the displays that appear, and the steps
required, during the start-up, processing, and the completion of a cycle.
• Log in on the input side (if login is enabled).
• Load items into the sterilizer.
• Enter load item data (if desired and if login is enabled).
• Start the cycle.
• Cycle completes. System logs the user out from the input side.
• Log in required on the output side (if enabled).
• Review the cycle summary results.
• Log out.
STERRAD® 200 User’s Guide 29
Page 32

4 Day-to-Day Operation
Using the Displays
The following table presents typical buttons that you use to perform tasks related
to sterilizing your instruments or to actually starting the sterilization cycle.
These buttons do not appear on all displays. On two door units, the current
display is shown on both sides. However, only one side at a time has an active
touch screen. The active side is the input side when items are being loaded, load
item data is being entered and the cycle is in progress. The output side is the
active side when a cycle has completed successfully and the load can be
removed.
Button Function
Touch to begin the sterilization cycle.
Touch to cancel a cycle or any other operation.
Touch to open the sterilizer door. This button is
only available when the cycle is not running.
The door it controls is the door on the active side.
You cannot open both doors at once. The Close
Door button has the arrow pointing upwards.
Touch to return to the previous display.
Touch to confirm an action you have taken.
Touch to open the Function Button Bar. This
button bar has different button choices depending
on whether the system is running a cycle, is
being serviced, or is idle.
Touch to log in to the system prior to running a
cycle. Also, allows you to log out from the
system.
In the password administration display, touch
this button to add a new user. You may not have
access depending on your password level.
30 STERRAD® 200 User’s Guide
Page 33

Day-to-Day Operation 4
Button Function
In the password administration display, touch
this button to modify existing information for the
selected user; i.e., password, etc. You may not
have access depending on your password level.
Touch to open the system configuration display.
You may not have access depending on your
password level.
Allows input of settings for connection to a
computer network. You may not have access
depending on your password level. You must
contact your ASP service representative prior to
performing this set-up.
Touch to change the date and/or time. This
button appears on the Function Button Bar on
systems configured to operate without ID and
password login.
Touch to display the utilities menu. This menu
includes, Cycle History, File Management,
System Set-up and Diagnostics. You may not
have access to all menus choices depending on
your password level.
Touch to open the Cycle Notes display. Enter
text relevant to the load that is being processed.
These notes are only applicable to the current
cycle and can be printed.
Touch to print the information displayed.
Touch to collapse the Function Button Bar. (GO
TO... is displayed when the Function Button Bar
is closed.)
Touch to expand or collapse the virtual
keyboard. This button may not be available on all
displays.
STERRAD® 200 User’s Guide 31
Page 34

4 Day-to-Day Operation
Function Button Bar Displays
The Login button is explained in the section on passwords. Touching Close
collapses the Function Button Bar. The other buttons are explained in the
preceding table. An alternate Function Button Bar is only seen when the system
has been configured at installation to operate without an ID or a password. With
this configuration, the date and time function is available to the operator. If the
system is configured to require an ID and password, the date and time function is
part of the system setup menu and is available to Administrator level passwords
(or higher) by pressing the Utilities button.
♦ Pressing Utilities displays a login screen.
♦ The other buttons function in the same manner as previously explained.
Preparing the Load
Proper preparation of trays, pouches, and instruments can minimize or prevent
cycle cancellation due to load-related problems. The two-tier shelf may be used
in two ways: it can be used with the carriage to transfer the load into, and
remove it from, the sterilizer. It may also remain in the sterilizer and the items to
be sterilized can be placed on the two-tier shelf without the use of the carriage.
Regardless of whether the carriage is used, the two-tier shelf must be used. Items
cannot be placed in the sterilization chamber without using the two-tier shelf.
More information on load preparation is found in “Chapter 3. Preparing Items for
Sterilization.”
• Arrange the items in a tray to ensure that the hydrogen peroxide and plasma
can surround them. Do not stack basins within the trays.
• Place trays flat on the two-tier shelf. Do not stack trays.
♦ Place peel pouches on edge, if possible. Arrange them so that the transparent
side of a pouch faces the opaque side of the next pouch. Do not stack
pouches on top of each other.
• Do not allow any item to touch the walls of the sterilization chamber or the
electrode.
• The load must not project above the top or beyond the edges of the two-tier.
• When needed, place an ASP-approved biological indicator in the sterilization
chamber at the back of the bottom shelf.
32 STERRAD® 200 User’s Guide
Page 35

Day-to-Day Operation 4
• Provide at least 25 mm (1 inch) of space between the electrode and the top of
the load.
Note: Do not stack instrument inside the trays. Do not stack
trays. Do not stack trays within trays. Do not wrap
instruments within the trays.
Note: If you are using rigid containers cleared by the FDA for
use in the STERRAD System, follow the same procedures
that are recommended for use with the STERRAD or
APTIMAX
®
Instrument Trays. Do not stack instruments
inside the containers. Do not stack containers. Do not
stack containers within containers. Do not wrap
instruments within the containers.
CAUTION: Metal objects must not come into contact with
the chamber walls, the doors or the electrode.
Contact with the walls, doors, or electrode could
damage the sterilizer or instruments.
STERRAD® 200 User’s Guide 33
Page 36

4 Day-to-Day Operation
Biological Indicators
Confirming that sterilizing conditions were achieved during a cycle is an
important part of the sterilization process. Biological indicators (BIs) are one way
to ensure that your sterilizer is operating correctly. Frequency of biological
testing should be at least once per day or in accordance with your facility’s
policy.
• Contact your ASP Representative regarding biological indicators specifically
designed for use in STERRAD Sterilizers.
ASP Biological Indicators contain microorganisms that are known to be resistant
to the sterilization process and are one way to verify proper processing. The
biological indicator should be placed on the two-tier shelf, at the back part of the
bottom shelf. Review the instructions that are included with the biological
indicators for proper use. Should a cancellation occur when a biological
indicator is in the chamber, discard the biological indicator and use a new
biological indicator when starting the next cycle.
Suspected Positive BI
The following flowchart details the steps you need to follow when a positive
biological indicator result is received. The flowchart details the procedures for
the STERRAD CycleSure
®
Biological Indicator.
34 STERRAD® 200 User’s Guide
Page 37

Day-to-Day Operation 4
STERRAD® CycleSure® Biological Indicator
STERRAD® 200 User’s Guide 35
Page 38

4 Day-to-Day Operation
Chemical Indicators
STERRAD Chemical Indicator Strips and STERRAD SealSure® Chemical
Indicator Tape offer additional ways to verify processing in the sterilization
cycle. They should be used in addition to, not in place of, the biological
indicator. STERRAD Chemical Indicator Strips and STERRAD SealSure
Chemical Indicator Tape do not indicate sterilization; they only indicate that the
indicator has been exposed to the hydrogen peroxide. The color of the Chemical
Indicator Strips and Tape changes from red to gold (or lighter) when exposed to
hydrogen peroxide.
Note: Use only ASP biological indicators, STERRAD SealSure
Using Chemical Indicator Strips
Chemical Indicator Tape, and/or STERRAD Chemical
Indicator Strips. Do not use indicators designed for other
sterilization processes.
®
®
Place STERRAD Chemical Indicator Strips in trays and pouches to show
exposure to hydrogen peroxide during the sterilization cycle. Please refer to the
Instructions for Use included with the STERRAD Chemical Indicator Strips for
more information.
Figure 7. STERRAD® Chemical Indicator Strips
should be used in each instrument tray.
36 STERRAD® 200 User’s Guide
Page 39

Day-to-Day Operation 4
Using Chemical Indicator Tape
STERRAD SealSure® Chemical Indicator Tape should be used to secure the
polypropylene sterilization wrap around the instrument tray.
Figure 8. STERRAD® SealSure® Chemical Indicator Tape should be used to
secure the polypropylene wrap around each instrume nt tr ay.
Please refer to the Instructions for Use included with the STERRAD SealSure®
Chemical Indicator Tape for more information.
Preparing the Two-Tier Shelf
The procedures listed here must be followed for safe placement of the trays and
pouches on the two-tier shelf when used with the carriage.
• Make sure the two-tier shelf is fully seated on the carriage and locked to the
carriage before placing items on the two-tier shelf. The alignment wheels on
the bottom of the two-tier shelf should be on the outside of the carriage rails.
• Place items on the two-tier shelf so that the items do not protrude from the
sides, the back, the top, or the front. The two-tier shelf may be loaded from
any position that is comfortable.
• Do not stack trays on top of each other.
• Do not place pouches directly on the shelves.
• When the carriage has been unloaded, it should be located in areas where it
will not impede foot traffic. Follow your facility’s policy for storage of such
items.
• If the two-tier shelf is being used without the carriage, it must remain inside
the sterilizer and be firmly locked in place.
STERRAD® 200 User’s Guide 37
Page 40

4 Day-to-Day Operation
Creating the Load Item Data List
The following steps assume that your sterilizer has been configured to use a
password and a load list, and that you have logged into the system (see the
section on “Starting a Cycle” for complete login information). If it does not
require a load list, you may skip this section and go directly to the section on
transferring the load into the sterilizer.
1. Enter the ID and password information as shown later in this chapter. The
item list entry or load list display is shown. The load list can be entered in
three ways:
Figure 9. Type or scan load item data. Touch Keyboard to
expand or collapse the keyboard display
WARNING! DO NOT LOOK DIRECTLY AT THE LIGHT IN THE
SCANNER HEAD. DO NOT POINT THE SCANNER
AT PEOPLE.
38 STERRAD® 200 User’s Guide
Page 41

Day-to-Day Operation 4
• Scan a pre-determined list using barcodes and the barcode scanner. Point the
scanner head at the barcode and touch the button. An audible beep is heard
when the barcode is successfully read. The red light must cover the barcode
from left to right.
• Enter a list using the virtual keyboard and touching the “typewriter” keys on
the display. After entering load item information touch Enter. A new line
appears prompting you to enter the next item. As multiple items are entered,
the list expands and up and down scroll arrows appear on the right hand side
of the list.
• Use an external keyboard the same way as shown above to enter the
information.
Note: The external keyboard must be attached and the system
booted in order to function.
2. Touch Done to complete the entry of the load list.
3. If you would like to enter additional information pertaining to the load such
as the doctor’s name, etc., follow this step. Otherwise you may go to step 5.
Touch GO TO... to open the function button bar. Touch Cycle Notes to
open the Notes display. Enter any text information that is exclusive to this
load (use the up and down arrows to scroll through the information). This
information can be printed separately by touching Print. It also prints as part
of the process completion data.
4. Touch Done to complete the entry of the notes.
5. Touch Start Cycle to begin the cycle as shown in the “Starting a Cycle”
section.
STERRAD® 200 User’s Guide 39
Page 42

4 Day-to-Day Operation
Transferring the Load into the Sterilizer
The load is easily transferred on the two-tier shelf into the sterilizer using the
following steps:
1. Move the carriage containing the tray-filled two-tier shelf to the sterilizer.
Note: Metal objects must not come into contact with the
chamber walls, the doors or the electrode. Contact with the
walls, doors, or electrode could damage the sterilizer or
instruments. The door should remain closed when not in
use.
2. Verify that the sterilizer status is ready to use and the door is open.
Figure 10. Make sure the carriage is completely
seated and locked into the foot mechanism.
40 STERRAD® 200 User’s Guide
Page 43
Day-to-Day Operation 4
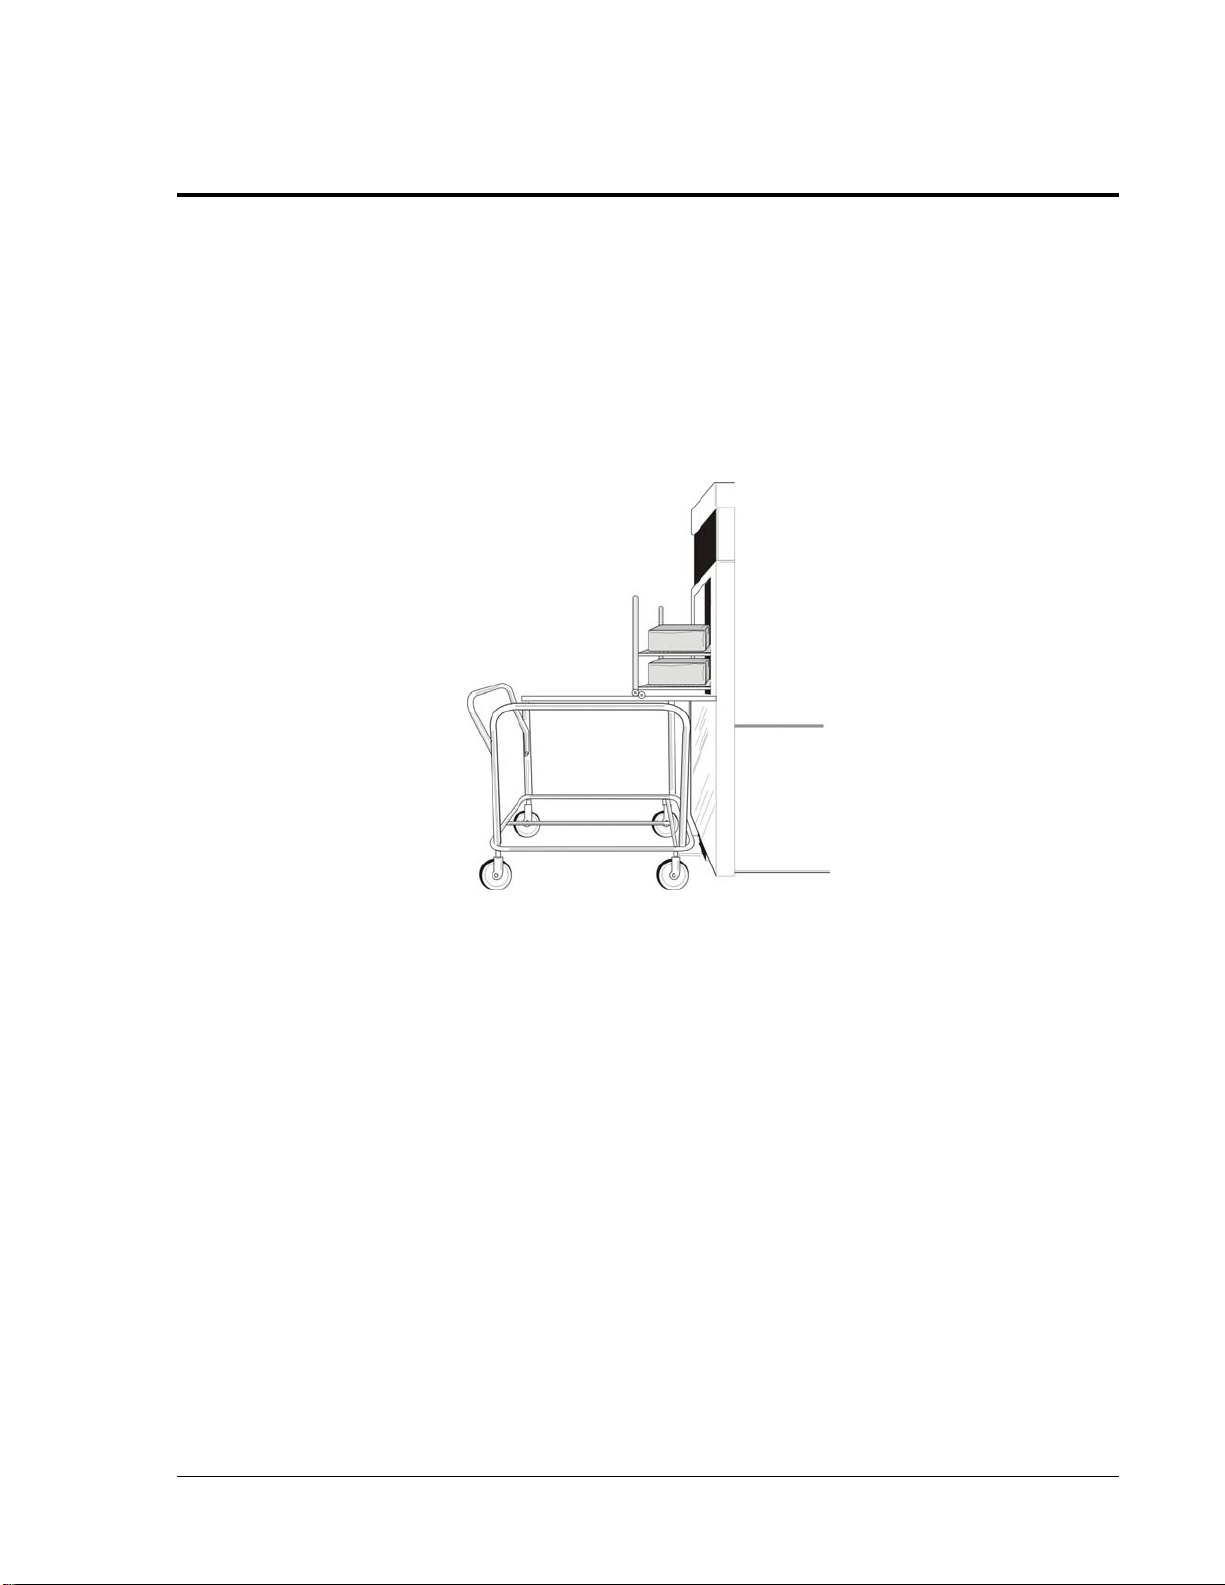
3. Gently push the carriage into the sterilizer so that the foot mechanism on the
bottom of the sterilizer contacts and locks into the flange at the bottom of the
carriage. The top front of the carriage rests just inside the chamber.
4. Release the two-tier shelf using the release. Gently push the two-tier shelf
forward into the sterilizer. Make sure the alignment wheels are correctly
positioned on the rails for smooth movement. Continue pushing until the
two-tier shelf is completely inside the chamber and it engages the inside stop.
Figure 11. Push the two-tier shelf completely into the chamber.
5. Step on the carriage release and move the carriage to the desired location.
6. Verify that no part of the two-tier shelf or its contents comes in contact with
the door or electrode. Close the door and begin your desired cycle or go to
the section on “Inserting a Cassette.”
STERRAD® 200 User’s Guide 41
Page 44

4 Day-to-Day Operation
Inserting a Cassette
The STERRAD 200 Sterilizer uses hydrogen peroxide, contained in special
cassettes, to sterilize items placed into the sterilization chamber. Each STERRAD
200 Cassette provides enough hydrogen peroxide for 2 cycles. The message
screen of the STERRAD 200 Sterilizer notifies you when a new cassette is
needed.
WARNING! STERRAD 200 CASSETTES CONTAIN CONCEN-
TRATED HYDROGEN PEROXIDE, A STRONG
OXIDIZER. CONCENTRATED HYDROGEN
PEROXIDE IS CORROSIVE TO SKIN, EYES, NOSE,
THROAT, LUNGS, AND GASTROINTESTINAL
TRACT. DIRECT CONTACT WITH THE SKIN CAN
CAUSE SEVERE IRRITATION. IF SKIN CONTACT
OCCURS, IMMEDIATELY FLUSH WITH LARGE
AMOUNTS OF WATER. IF SYMPTOMS ARE
SEVERE OR PERSIST, CONSULT A PHYSICIAN
IMMEDIATELY.
DIRECT CONTACT WITH EYES CAN CAUSE
IRREVERSIBLE TISSUE DAMAGE. IF EYE
CONTACT OCCURS, IMMEDIATELY FLUSH WITH
LARGE AMOUNTS OF WATER AND IMMEDIATELY
CONSULT A PHYSICIAN.
INHALATION OF MIST CAN CAUSE SEVERE
IRRITATION OF LUNGS, THROAT, AND NOSE. IF
INHALATION OCCURS, MOVE TO FRESH AIR AND
CONSULT A PHYSICIAN IMMEDIATELY.
INGESTION CAN PRODUCE CORROSION THAT
MAY BE LIFE-THREATENING. IF SWALLOWED,
DRINK PLENTY OF WATER IMMEDIATELY TO
DILUTE. DO NOT INDUCE VOMITING. CONSULT A
PHYSICIAN.
42 STERRAD® 200 User’s Guide
Page 45

Day-to-Day Operation 4
Figure 12. If skin contact occurs,
immediately flush the area with water.
WARNING! DO NOT REMOVE THE PLASTIC WRAPPER FROM
THE CASSETTE PACKAGE IF THE INDICATOR
STRIP IS RED. RED INDICATES DAMAGE. CALL
THE ASP CUSTOMER CARE CENTER FOR CREDIT.
To insert a cassette, do the following:
1. Confirm that the sterilizer display indicates that a new cassette is needed.
2. Confirm that the chemical indicator strip on the cassette sleeve is NOT red;
red indicates a damaged cassette and concentrated hydrogen peroxide may be
present.
3. Confirm that the cassette expiration date has not passed.
Note: The system considers the cassette expired 8 days after
insertion regardless of the printed expiration date. The
cassette is ejected at that time. Once the cassette has been
removed, even if it was not used, the barcode is rendered
unreadable and the cassette cannot be reinserted.
STERRAD® 200 User’s Guide 43
Page 46

4 Day-to-Day Operation
4. Remove the plastic wrapping from the cassette sleeve. Do NOT remove the
cassette from the remaining cardboard sleeve.
5. Orient the arrow so that the top of the cassette sleeve is pointing away from
you.
6. Hold the cardboard sleeve by its edges and insert it into the sterilizer.
7. Firmly push the cardboard sleeve in until it can go no further. If positioned
properly, the cassette moves into place.
Figure 13. Insert the cassette and sleeve into the sterilizer.
This illustration shows the printer on the input side. Your system
may be different.
8. If the cardboard sleeve is not pushed in all the way, the monitor continues to
read INSERT CASSETTE.
9. If the cardboard sleeve is properly positioned, the cassette is automatically
accepted and positioned for use by the sterilizer. The display reads
CASSETTE ACCEPTED.
10. If the cassette is not accepted because the barcode cannot be read or the
cassette has expired, PLEASE REMOVE CASSETTE is displayed. Should
this occur, remove that cassette and insert a valid one.
Note: The system microprocessor monitors the status of the
cassette and informs the operator when the cassette is
empty or expired. Empty or expired cassettes must be
replaced prior to starting a cycle.
44 STERRAD® 200 User’s Guide
Page 47

Day-to-Day Operation 4
WARNING! DO NOT REMOVE USED CASSETTES FROM THE
PROTECTIVE CARDBOARD SLEEVE. DISPOSE OF
THE CASSETTE INSIDE THE PROTECTIVE SLEEVE
FOLLOWING YOUR FACILITY’S PROCEDURES. IF
THE USED CASSETTE FALLS OUT OF THE
SLEEVE, WEAR CHEMICAL RESISTANT LATEX,
PVC (VINYL), OR NITRILE GLOVES TO PLACE THE
PLASTIC CASSETTE BACK IN THE ORIGINAL
SLEEVE.
Please refer to the Instructions for Use included with the STERRAD 200
Cassette for more information.
Starting a Cycle
Note: You must read, understand, and follow “Chapter 2. For
Your Safety” prior to starting a cycle.
This display appears following log out, or after power shut down. Touch the
screen to view the displays needed to enter a password (if the system is
configured for this function), enter a load item list (if the system is configured for
this function), and start the sterilization process. The ability to perform certain
functions prior to starting a cycle is determined by whether the system requires
an ID and password. See the section on “Entering a Password” for more details.
STERRAD® 200 User’s Guide 45
Page 48

4 Day-to-Day Operation
Figure 14. Touch the main display to begin.
Entering a Password
Your system administrator should assign you a log in ID and a password. You
must use the ID and password in order to create a load list. You can log in to the
system in 3 ways, (touch Keyboard to expand or collapse the virtual keyboard):
• Type your ID and password using the virtual keyboard and touching the
• Type your ID and password using an external keyboard (the keyboard
• Scan your ID and password using the external barcode scanner.
If your log in or ID is not recognized, you are prompted to repeat the log in
procedure.
keys.
must be connected and then the system must be rebooted).
46 STERRAD® 200 User’s Guide
Page 49

Day-to-Day Operation 4
Figure 15. Enter ID and password
You would enter the load item list, if that function is available, at this point. Load
item list information is shown previously in this chapter.
STERRAD® 200 User’s Guide 47
Page 50

4 Day-to-Day Operation
Password Levels
Following are the various password levels assigned at installation. These levels
can only be changed by someone with Administrator access (Level 3) or by an
ASP Field Service Engineer (Level 4). Password levels are optional. They can
be used (or not) if a password is set at installation.
Password Level Function Access Capabilities
Level 4-Service
Level 3-Administrator
Level 2-Programmer
Level 1-Operator
When your ID and password are accepted, the following display is shown: Touch
Start Cycle to begin or touch Back then GO TO . . . to display the Function
Button Bar.
• All the functions of password levels 1-3.
• Assign and change passwords of all levels.
• Access to service menus.
• Assign/change passwords for level 1 and level 2
users.
• Change the date and time.
• Run a cycle.
• Enter notes.
• Run a cycle.
• Enter notes.
• Run a cycle.
• Enter notes.
48 STERRAD® 200 User’s Guide
Page 51

Day-to-Day Operation 4
You are ready to start the cycle after the following has taken place: the load has
been correctly placed on the two-tier shelf and transferred to the sterilizer; the
biological and chemical indicators are in place; and the load list, if any, has been
entered.
Figure 16. Touch Start Cycle to begin sterilization.
STERRAD® 200 User’s Guide 49
Page 52

4 Day-to-Day Operation
Cycle Notes
The Cycle Notes screen allows you to enter additional information about the
current cycle.
To display Cycle Notes, first display the Function Button Bar, then touch Cycle
Notes.
Figure 17. Enter additional cycle information.
Use the virtual keyboard to enter cycle notes information in the indicated field.
When you are finished, touch Done. The information you entered is added to the
cycle history file.
50 STERRAD® 200 User’s Guide
Page 53
Day-to-Day Operation 4
Watching a Cycle
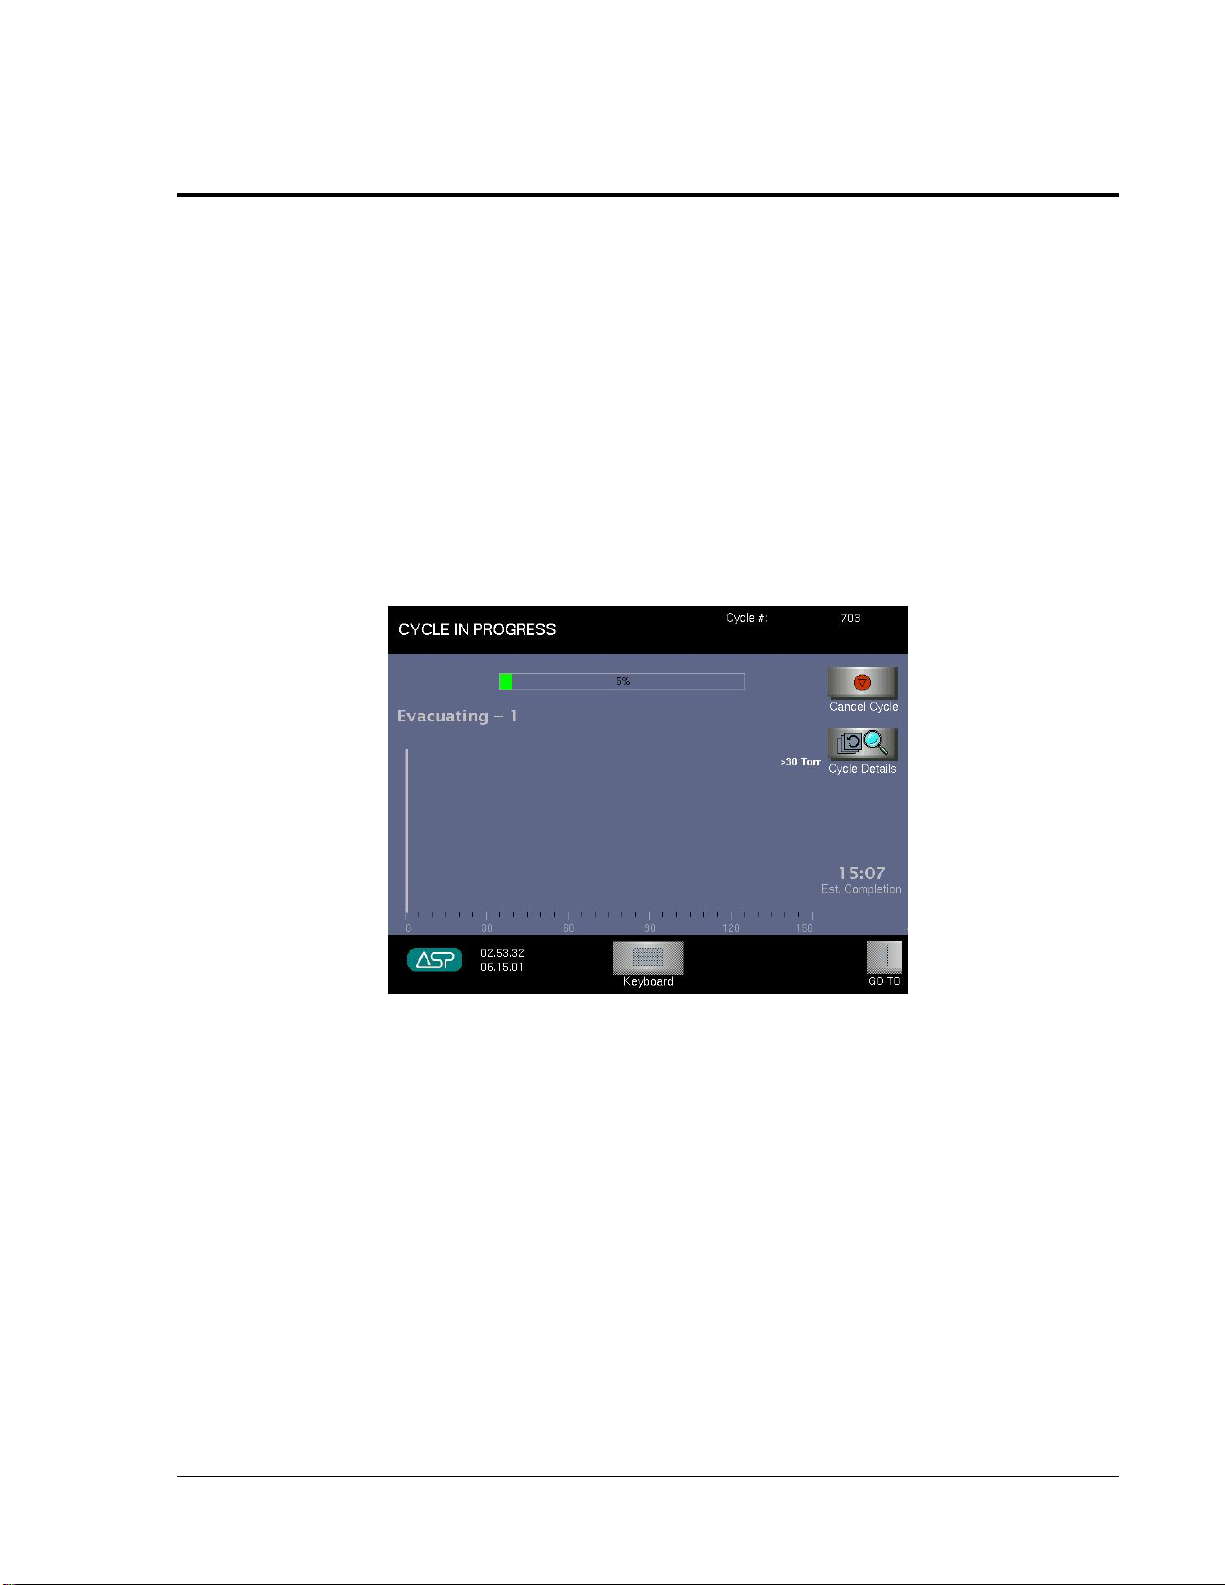
You can monitor the progress of a cycle by watching the display; it indicates the
phase of the cycle and certain process parameters. A long beep signals that the
cycle is complete.
The display indicates the status of the unit at all times: the current stage of the
sterilization cycle; the temperature in the chamber; the pressure in the chamber;
the cycle start time, and the cycle estimated end time. You can change the display
to show a graph or a numerical readout of the cycle. Each load goes through nine
consecutive stages: vacuum, pre-plasma, injection, diffusion, plasma, injection,
diffusion, plasma, and vent.
Figure 18. Cycle In Progress–Graph Display. Your display may look slightly different.
STERRAD® 200 User’s Guide 51
Page 54

4 Day-to-Day Operation
Figure 19. Cycle In Progress–Numerical Display.
52 STERRAD® 200 User’s Guide
Page 55

Day-to-Day Operation 4
Completing a Cycle
Cycle completion is signaled as follows:
• A long beep sounds.
• The paper printout (on the input side) shows the process parameters (in black
letters only; red letters usually indicate a problem).
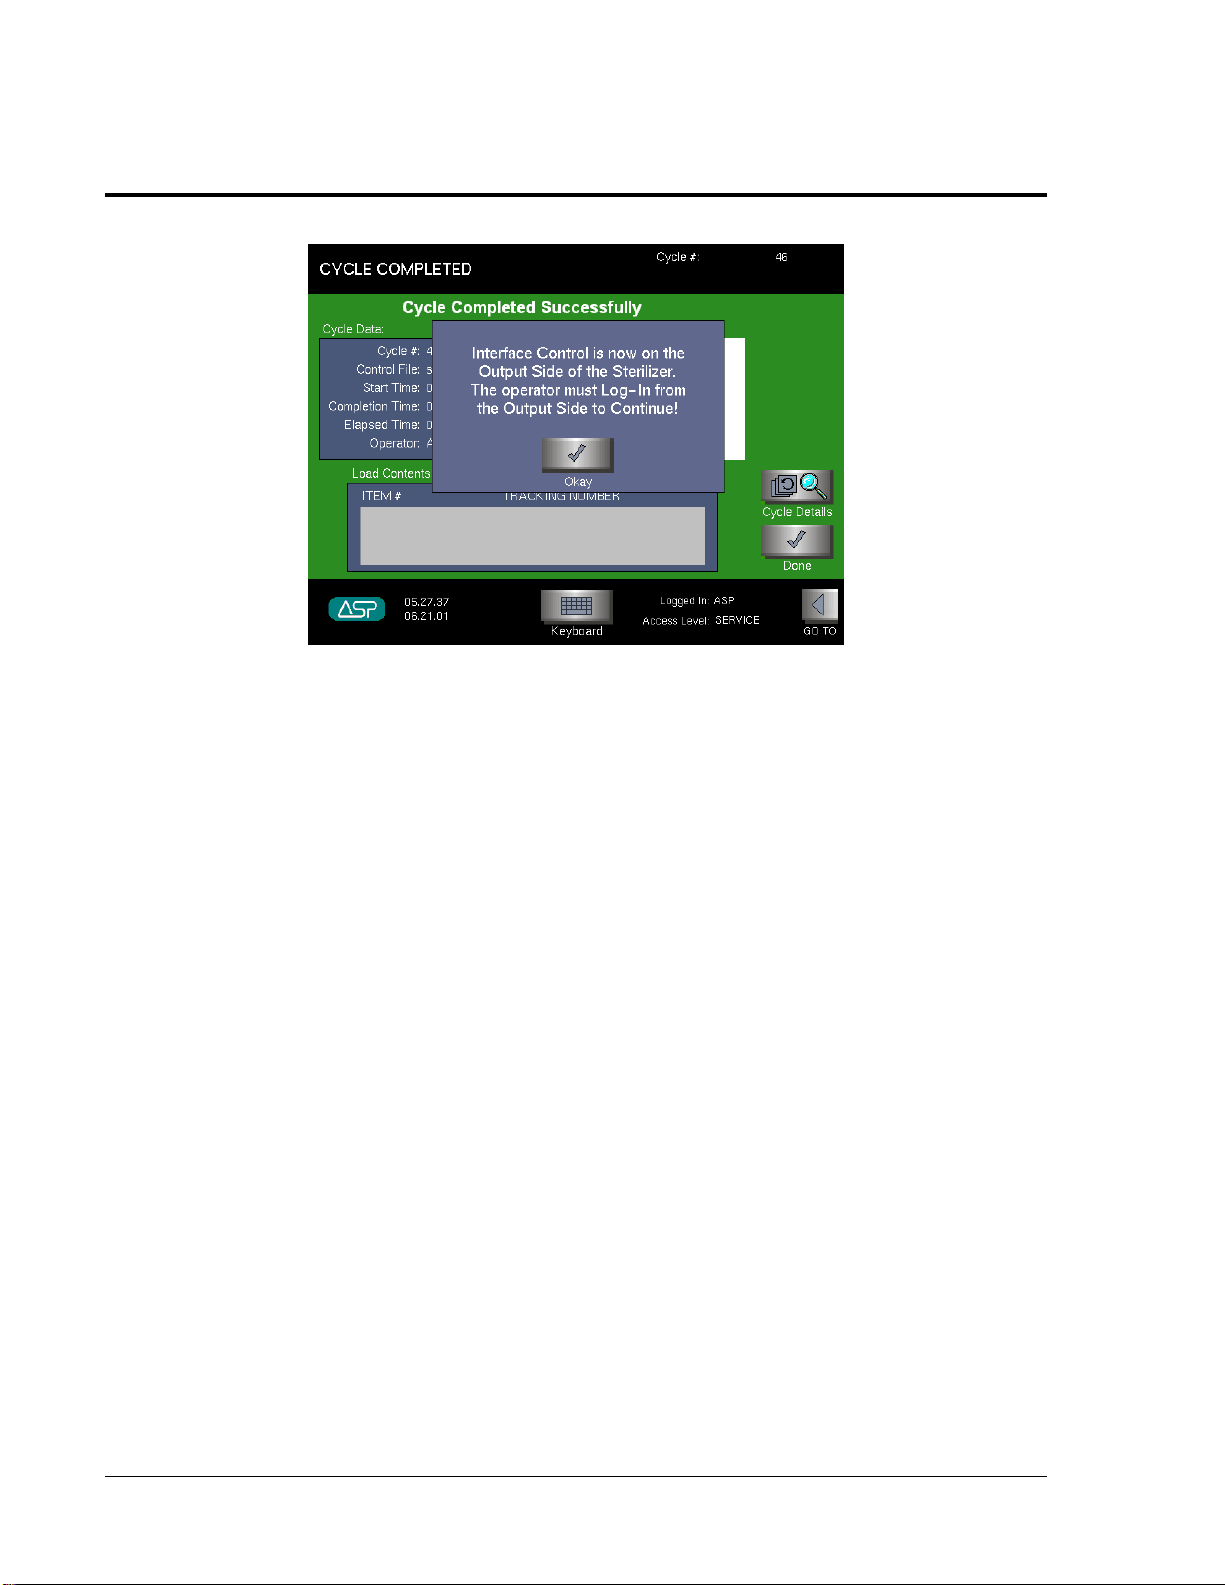
• For two door configurations requiring an ID and password: Cycle Completed
Successfully is shown on the display. You are automatically logged out from
the input side and must log in to the output side to open the door and remove
the load. After the load is removed, touch Done and Close Door to log out
from the output side.
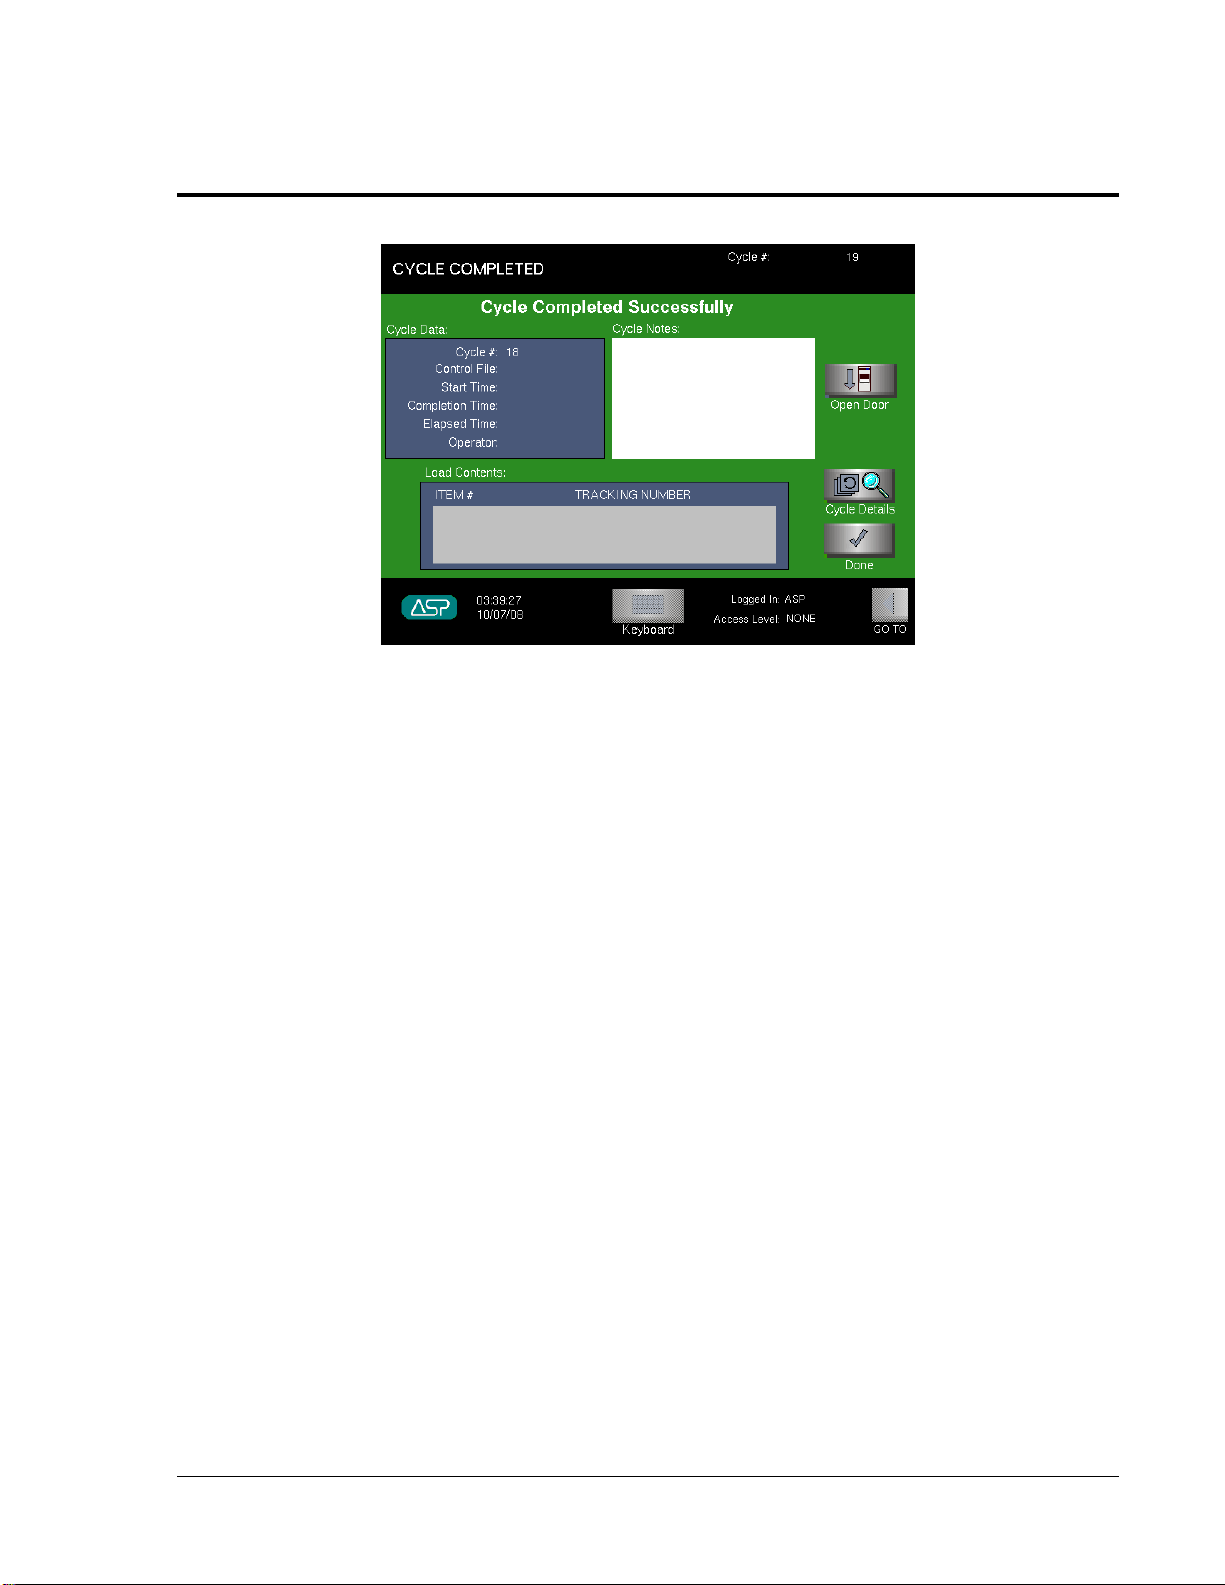
• For one-door configurations requiring an ID and password: Cycle Completed
Successfully is shown on the display. After the load is removed, touch Done
and Close Door to activate the log in screen for the next load.
Figure 20. Cycle Complete display for systems requiring an ID and password.
STERRAD® 200 User’s Guide 53
Page 56
4 Day-to-Day Operation
Figure 21. Cycle Complete-Touch Okay, then log in on the output side.
♦ For two door configurations where no log in has been set up: Cycle
Completed Successfully is shown on the display and only the output side is
active. You must touch Open Door FROM THE OUTPUT SIDE. Remove
the load and touch Done and Close Door to activate the input side display.
♦ For one-door configurations where no log in has been set up: Cycle
Completed Successfully is shown on the display. Touch Open Door, remove
the load and touch Done and Close Door.
54 STERRAD® 200 User’s Guide
Page 57
Day-to-Day Operation 4
Figure 22. Cycle Completed Successfully.
This display may look different depending on your login.
Logging Out-Two Door Systems
After the sterile items have been removed from the output side, and no further
review of the information is necessary, you should log out from the system. This
returns control to the input side. To log out from the output side, do the
following:
1. Touch GO TO... to open the toolbar. Touch Login.
2. Logout Confirmation is displayed.
3. Touch YES (or Confirm) to log out.
4. Touch Cancel to cancel the log out procedure and view the previous display.
STERRAD® 200 User’s Guide 55
Page 58

4 Day-to-Day Operation
Canceled Cycles
You can cancel a cycle at any time by touching Cancel Cycle, except during the
final vent phase. The STERRAD 200 Sterilizer may also cancel a cycle if it
detects a problem with the cycle. The load from a canceled cycle can only be
removed from the input side.
To manually cancel a cycle:
1. Touch Cancel Cycle.
2. Cancel Confirmation is displayed.
3. Touch YES to confirm cancellation and cancel the cycle. Touch NO to
return to the Cycle in Progress display.
4. Ten beeps sound and the Cycle Canceled/Operator Cancellation message is
displayed.
Figure 23. Touch Cancel to start a manual cancellation.
The display requests confirmation of the cancellation.
Touch YES to confirm. Touch NO to return to the previous display.
5. A paper printout exits the printer with a message in red ink.
6. The sterilizer automatically completes the cancellation process (which
includes a short plasma stage during most phases of the process).
56 STERRAD® 200 User’s Guide
Page 59

Day-to-Day Operation 4
Note: The exact sequence of cancellation actions depends on
which process was in operation at the time of cancellation.
7. The display indicates when cancellation is complete and a summary display
appears.
Loads from canceled cycles should be re-wrapped using new polypropylene
wrap, STERRAD Chemical Indicator Strips, and STERRAD SealSure
®
Chemical
Indicator Tape. If a biological indicator was used in the canceled load, a new one
should be placed in the chamber before restarting the new cycle.
WARNING! IF A CYCLE CANCELS AND THE ITEMS IN THE
LOAD APPEAR WET, HYDROGEN PEROXIDE MAY
BE PRESENT. WEAR CHEMICAL RESISTANT
LATEX, PVC (VINYL), OR NITRILE GLOVES WHILE
REMOVING THE ITEMS FROM THE CHAMBER,
AND TO WIPE OFF THE ITEMS WITH A DAMP
CLOTH. DISPOSE OF THE CONTAMINATED CLOTH
ACCORDING TO YOUR FACILITIES PROCEDURES.
Automatic Cancellation
If the sterilizer control system cancels a cycle, the display indicates when the
cancellation process is complete. As with manual cancellation (above), the load
should be repackaged using new polypropylene wraps, chemical indicators, etc.
Note the messages on the display and on the paper printout, and refer to “Chapter
6. Troubleshooting” for more information.
STERRAD® 200 User’s Guide 57
Page 60

4 Day-to-Day Operation
Additional System Information
Under certain conditions the system may not perform normally and yet not
generate a message. This is particularly true during power failures or low power
situations. If there is a power failure, a leak in the pneumatic system can cause
the door (doors) to open without power being present. It is possible that
hydrogen peroxide would be present at that time. Take precautions when
unloading a system in these situations. If it is anticipated that the power will be
off for more than 24 hours, call your ASP service representative for additional
instructions.
WARNING! CONCENTRATED HYDROGEN PEROXIDE IS
CORROSIVE TO SKIN, EYES, NOSE, THROAT,
LUNGS, AND GASTROINTESTINAL TRACT. IF A
CYCLE CANCELS AND THE ITEMS IN THE LOAD
HAVE ANY VISIBLE MOISTURE OR LIQUID,
HYDROGEN PEROXIDE MAY BE PRESENT. YOU
MUST FOLLOW ALL SAFETY PRECAUTIONS
REQUIRED FOR DEALING WITH HYDROGEN
PEROXIDE.
Unloading and Handling
After ensuring that the STERRAD Chemical Indicators exhibit the correct color
change, the sterilized items are ready for immediate use, following your facility’s
policies and procedures. No additional time for aeration is required because the
by products are water vapor and oxygen. Follow your facility’s policy for release
of sterilized items.
On a two-door system, the input side displays are locked at the completion of a
cycle. You must access the display from the output side in order to remove the
load.
1. Log in to the system using your assigned ID and password as shown
previously.
2. Touch Open Door.
3. Move the empty carriage to the sterilizer if you are using it to transfer the
load.
58 STERRAD® 200 User’s Guide
Page 61

Day-to-Day Operation 4
4. Push the carriage gently into the sterilizer so that the foot mechanism on the
bottom of the sterilizer contacts and locks into the flange at the bottom of the
carriage. The top front of the carriage rests just inside the chamber and
releases the latch holding the two-tier shelf in the sterilizer.
5. Gently pull the two-tier shelf onto the carriage. Make sure the alignment
wheels are correctly positioned on the rails for smooth movement.
Figure 24. Make sure the carriage is correctly positioned and locked
to the foot mechanism. Pull the two-tier shelf gently onto the carriage.
6. Continue pulling until the two-tier shelf is completely seated on the carriage
and is locked in place.
7. Step on the carriage release and move the two-tier shelf and carriage to the
desired location.
8. Touch Close Door.
STERRAD® 200 User’s Guide 59
Page 62

4 Day-to-Day Operation
Transferring the Load Without Using the Carriage
1. Touch Open Door.
2. Move a trolley or supply cart to the sterilizer.
3. Transfer the sterilized items to the trolley/cart.
4. Move the transferred items to the desired location.
5. Touch Close Door.
60 STERRAD® 200 User’s Guide
Page 63

Day-to-Day Operation 4
Cycle Completion Flow Chart
STERRAD® 200 User’s Guide 61
Page 64

4 Day-to-Day Operation
Cassette Control
From time-to-time it may be necessary to control the function of the cassette or to
view the cassette barcode data. You may do that by using the H
This button is located on the Function Button Bar and is accessible to all
password levels. To use the “Cassette Control” function, do the following:
1. Touch GO TO . . . to display the Function Button Bar.
Control.
2O2
2. Touch H
Figure 25. H2O2 Interface Utility or Cassette Control.
Touch H
♦ Touch Eject to eject a cassette that is stuck in the chute.
Control on the Function Button Bar to view this display.
2O2
Control. The following is displayed.
2O2
♦ The Index function is only available to Service level passwords.
♦ State and Mode refer to the status of the sterilizer.
♦ Fault displays the sterilizer error message, if any.
♦ Cassette Data displays the information contained in the barcode, which is
automatically scanned when the cassette is inserted into the sterilizer. If the
cassette is not usable, the error information is displayed in the error field.
62 STERRAD® 200 User’s Guide
Page 65

Day-to-Day Operation 4
Obtaining a Cycle History
Administrator access is needed to perform this function. To review the cycle
history, do the following:
1. Touch GO TO… to open the toolbar.
2. Touch Utilities, then touch Cycle History.
Figure 26. Cycle History Display. Depending on system configuration,
the file size column may not be displayed.
3. The Cycle History display contains information about the previous 1500
cycles. The display shows the name of the cycle (assigned by the system), the
size of the data file (not available on all configurations), and the cycle date
and time. Touch the file name and then touch View History, which shows
details of the highlighted file including load item data. Touch Statistics to
view cycle cancellation information. In addition, the View History display
has a cycle history button that provides more detail on the particular cycle
including a cycle graph and the ability to print the cycle information.
4. When you are done viewing a display, touch Back to return to the previous
display.
STERRAD® 200 User’s Guide 63
Page 66

4 Day-to-Day Operation
Figure 27. Touch View History to see this display.
Figure 28. Touch Statistics to see this display.
64 STERRAD® 200 User’s Guide
Page 67

Day-to-Day Operation 4
Figure 29. From the View History Display, Touch Cycle History
to see this display. Touch Print to print the displayed information.
Figure 30. Touch Cycle Graph from the previous display to see this display.
The arrows advance through the graph. Touch Print to print the
displayed information. Touch Quit to return to the previous display.
STERRAD® 200 User’s Guide 65
Page 68
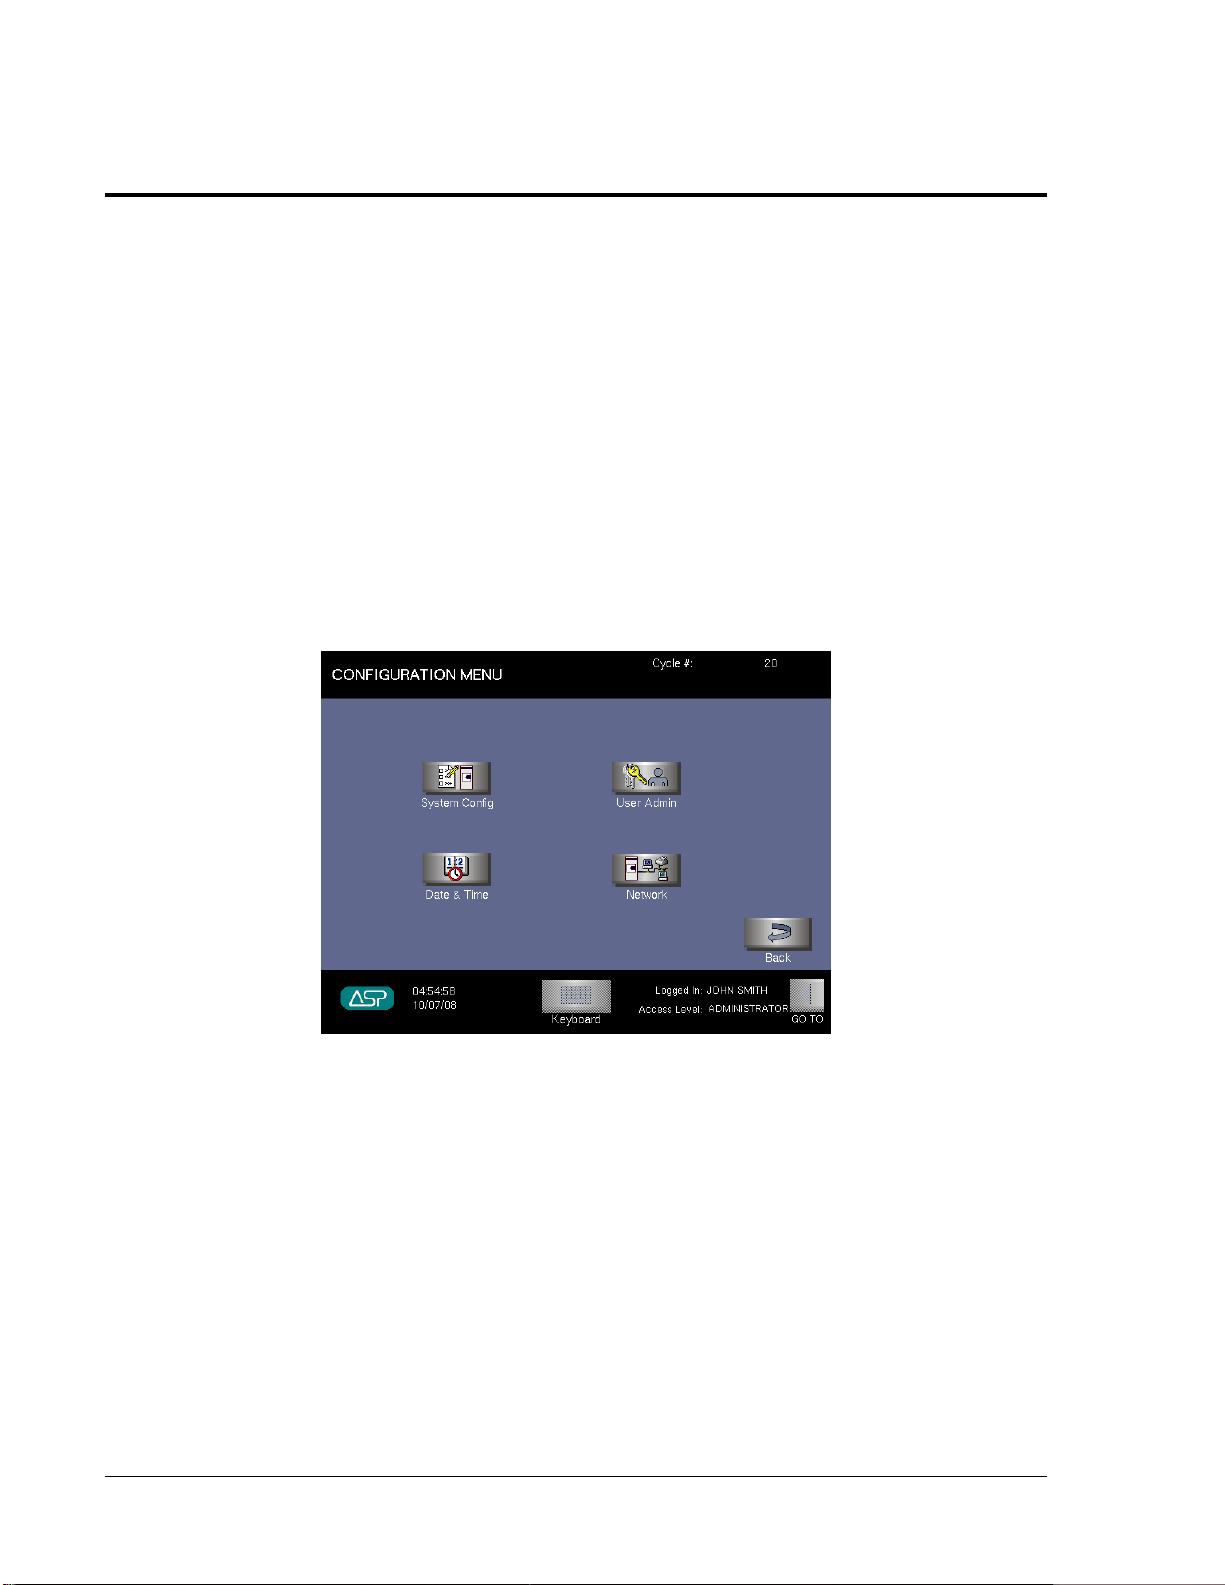
4 Day-to-Day Operation
Administrative Functions
The password level “Administrator” allows you to perform functions that are not
available at the “Operator” level. These functions include: assigning and
modifying passwords, changing the date and time displayed on the sterilizer,
configuring the sterilizer to function on a network, and assigning the system ID
information. These displays and descriptions of their functions are shown in this
section.
System Setup
Touch System Setup on the Utilities Menu to display the Configuration Menu.
The Configuration Menu allows you to select any of four configuration options.
Figure 31. Touch System Setup to view this menu.
• Touch System Config to display basic configuration parameters for the
STERRAD 200 Sterilizer.
• Touch User Admin to display user names, passwords, and privileges.
• Touch Date & Time to enter the display that allows you to change the date
and time for the system clock and calendar.
• Touch Network to display and/or update the optional network connection
parameters.
66 STERRAD® 200 User’s Guide
Page 69

Day-to-Day Operation 4
System Configuration Screen
To display the System Configuration screen, touch System Config on the
Configuration Menu.
The System Configuration screen allows you to display and/or enter identifying
and configuration information about the sterilizer. This information is typically
entered at the factory or by an ASP service technician when the sterilizer is
installed and is ordinarily not changed in the field.
Figure 32. System Configuration.
♦ The Sterilizer Identification block allows you to enter the name of your
facility and a label that identifies the individual machine. The serial number
is displayed for information purposes and cannot be changed by the user.
♦ The Door/Side Configuration block indicates the number of doors and which
door is used for cycle loading.
♦ The Language Selection block allows you to choose the language used on all
sterilizer displays.
♦ Touch Done to return to the Configuration Menu.
♦ Touch Cancel to cancel any changes you made to fields in the System
Configuration screen.
STERRAD® 200 User’s Guide 67
Page 70
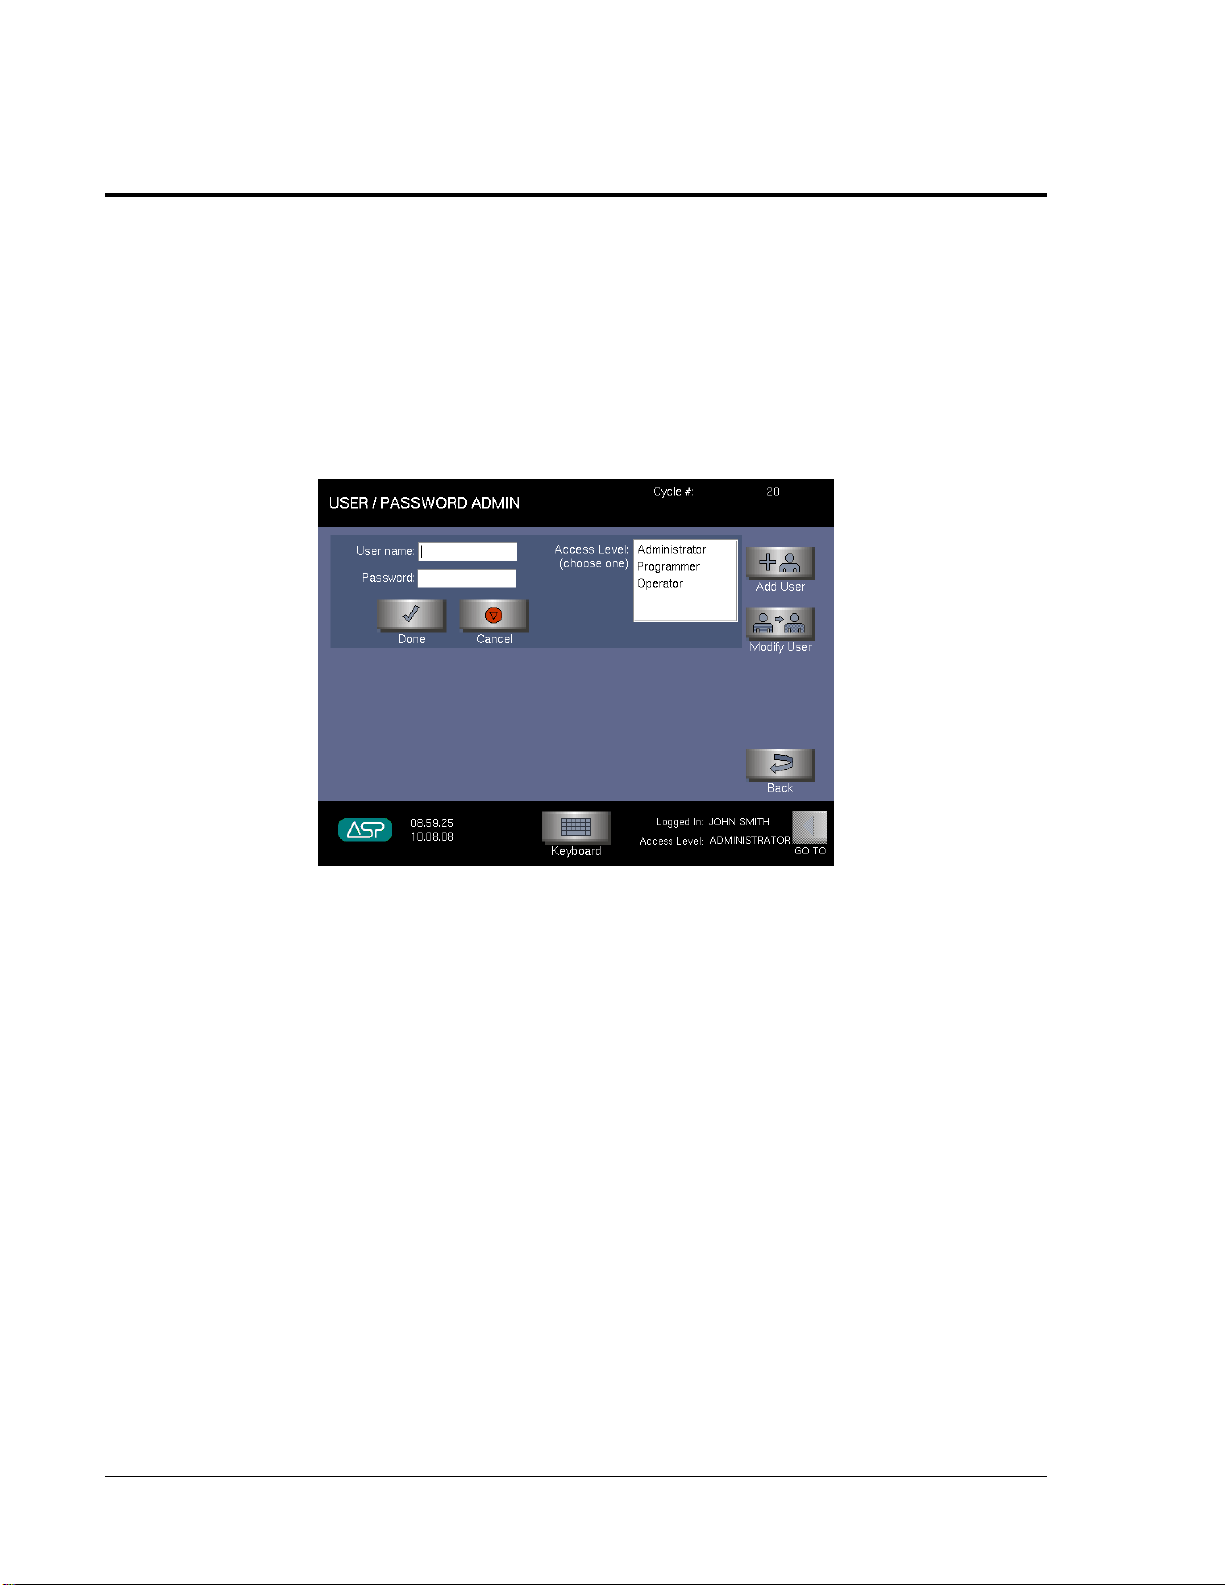
4 Day-to-Day Operation
User/Password Administration Screen
To display the User/Password Admin screen, touch User Admin on the
Configuration Menu.
The User/Password Administration screen allows you to add new users, modify
users, and assign passwords and access privileges.
Figure 33. User/Password Administration.
Adding a New User
1. Touch Add User to add a new user to the system.
2. In the Username field, type the new user’s name.
3. In the Password field, type the new user’s password.
4. In the Access Level list box, choose the appropriate access level for the new
user. You cannot assign a “Service” access level – this is reserved for ASP
Service personnel only.
5. To cancel an addition, touch Cancel. To accept the new entry, touch Done.
To return to the Configuration Menu, touch Back.
68 STERRAD® 200 User’s Guide
Page 71
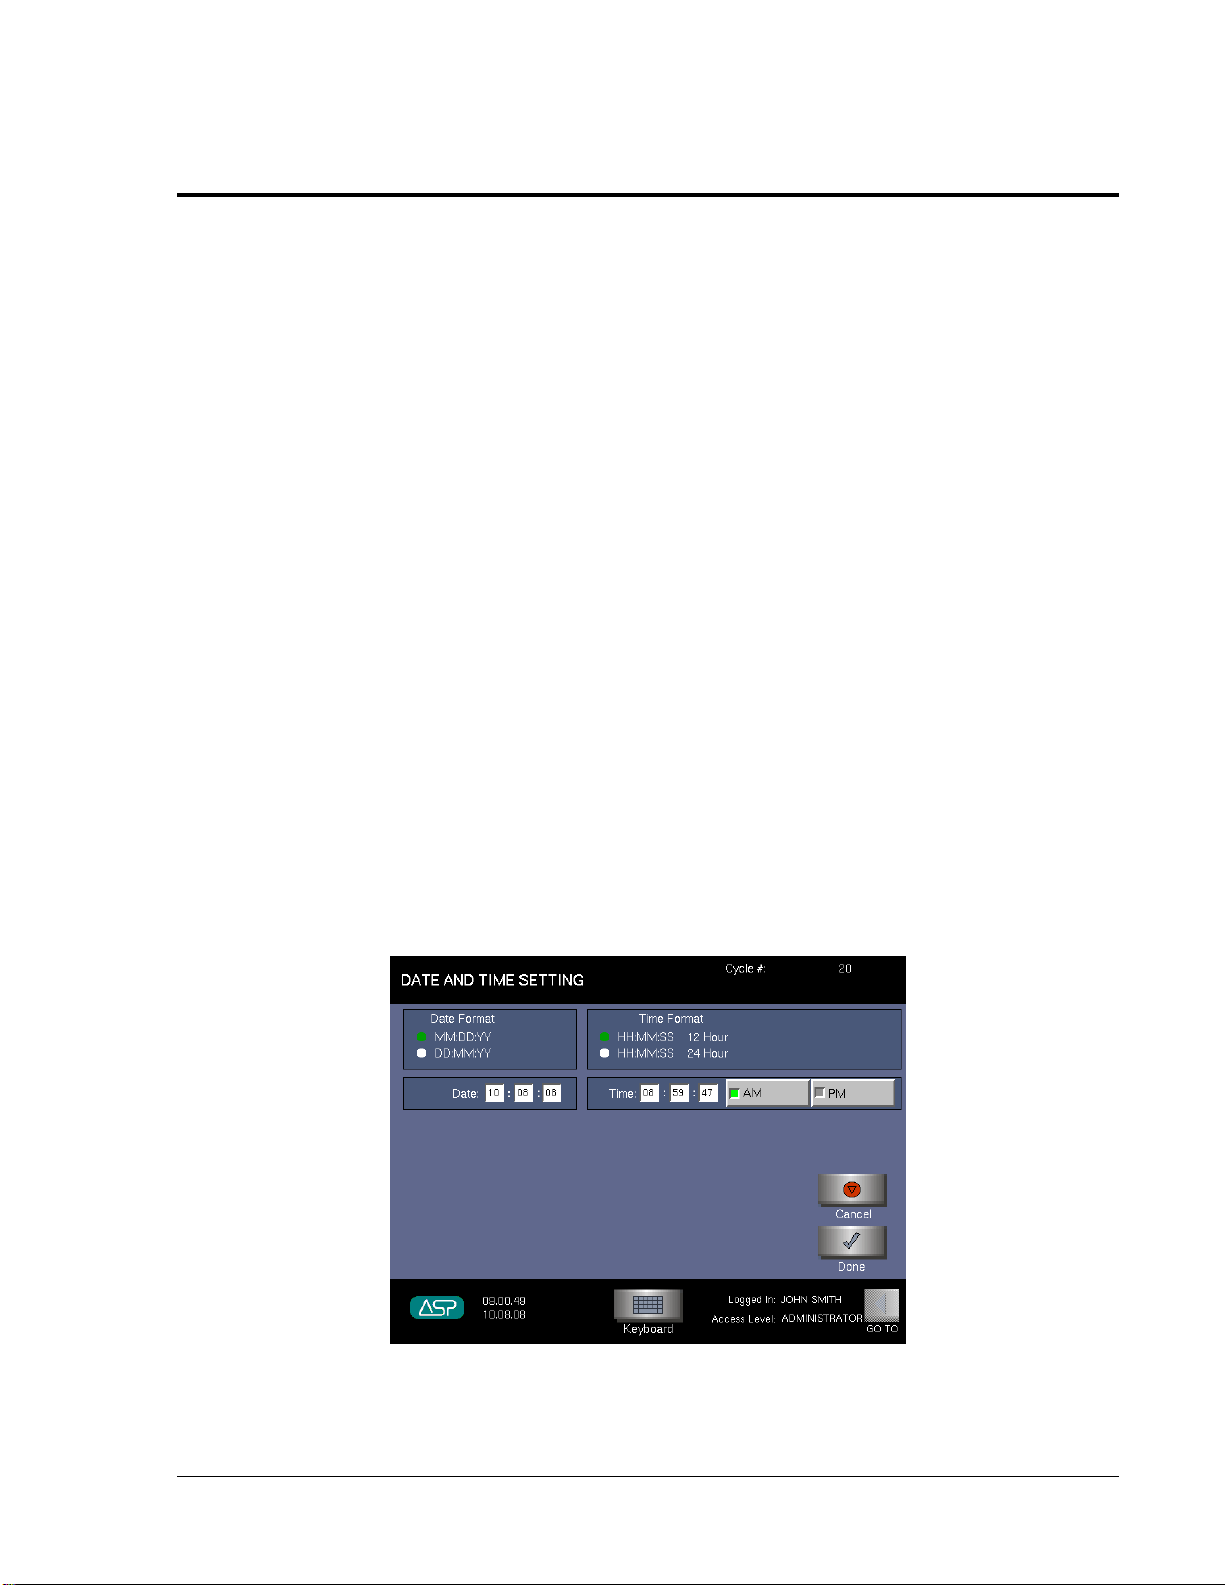
Day-to-Day Operation 4
Modifying an Existing User’s Information
1. Touch Modify User to change the password or access privileges of an
existing user.
2. In the Username field, enter the name of the user to be modified.
3. In the Password field, enter the user’s password.
4. In the Access Level list box, choose the appropriate access level for the user.
You cannot assign a “Service” access level – this is reserved for ASP Service
personnel only.
5. To cancel a change, touch Cancel. To accept the modified information, touch
Done. To return to the Configuration Menu, touch Back.
Resetting the Date and Time
The date and time are set by your Service Representative at installation. If you
have an administrator level password, you can change these settings at any time
to conform to local standards.
Note: Date and Time are also available on the Function Button
Bar on systems configured to operate without an ID or
password login.
Figure 34. Date And Time Display.
STERRAD® 200 User’s Guide 69
Page 72

4 Day-to-Day Operation
To change the date
1. Touch GO TO…, then touch Utilities.
2. Touch System Setup, then touch Date and Time.
3. Touch the Date Format you desire. The radio button (green dot) should
light by your selection.
4. Touch the Date field. Touch Keyboard and using the number keys, enter
the correct date.
5. Touch Done to accept and save the entered information. Touch GO TO… to
exit the display.
6. Touch Cancel (the red circle) at any time to cancel and exit without saving.
To change the time
1. Touch the Time format you desire. The radio button should be green by
your selection.
2. Touch the Time field. Touch Keyboard and using the number keys, enter
the correct time.
3. Touch AM or PM if applicable for your desired time format.
4. Touch Done (the check mark) to accept and save the entered information.
Touch GO TO... to exit the display.
5. Touch Cancel (the red circle) at any time to cancel and exit without saving.
70 STERRAD® 200 User’s Guide
Page 73
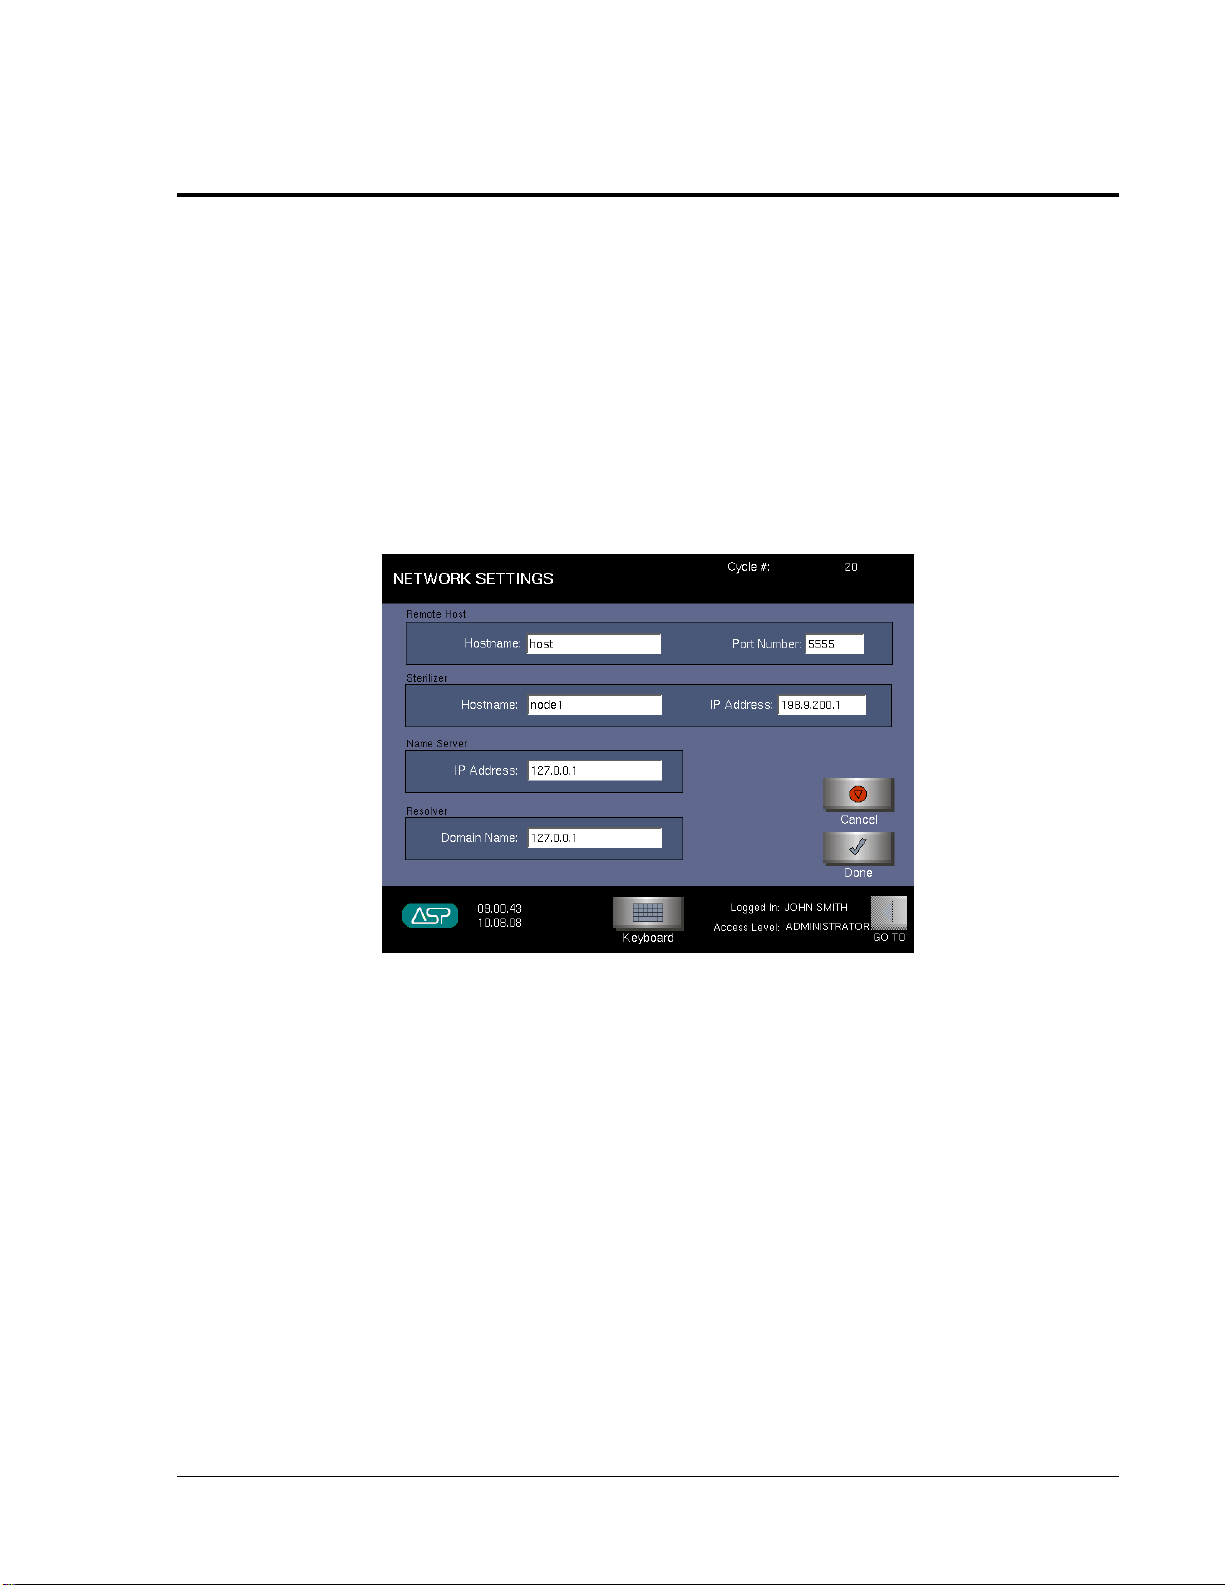
Day-to-Day Operation 4
Network Settings Screen
Note: This function should not be performed arbitrarily.
Please call your ASP service representative for help
configuring these settings.
The Network Settings screen allows the users with administrator level passwords
access to configure the host name and port number when the sterilizer is
connected to a network.
Figure 35. Network Settings.
1. Use the virtual keyboard to enter the host name in the “Hostname” field and
the network port number in the “Port Number” field.
2. When you have entered the information, touch Done to update the network
configuration.
3. To leave this screen without making any changes to the displayed data, touch
Cancel.
STERRAD® 200 User’s Guide 71
Page 74

Page 75

Chapter 5.
Routine Maintenance
Overview
This chapter is provides details regarding the following maintenance procedures
for the STERRAD
• Replacing the printer cartridge
• Replacing the printer paper
• Cleaning the STERRAD 200 Sterilizer
Contact the ASP Customer Care Center for guidance on performing any other
maintenance procedures.
WARNING! ONLY EXPERIENCED TECHNICIANS WHO ARE
CAUTION: Regularly scheduled, or Planned Maintenance
®
200 Sterilizer:
FULLY TRAINED TO MAINTAIN THE STERRAD 200
STERILIZER SHOULD REPAIR OR ADJUST THIS
UNIT. USE OF UNAUTHORIZED PARTS FOR
MAINTENANCE OR REPAIR COULD CAUSE
PERSONAL INJURY, RESULT IN COSTLY DAMAGE
OR UNIT MALFUNCTION, AND WILL VOID THE
WARRANTY.
(PM) must be performed at the interval specified on
the system. Make sure you schedule a service call
in a timely manner when notified that a PM is due.
STERRAD® 200 User’s Guide 73
Page 76

5 Routine Maintenance
Maintaining the Printer
The printer requires that the ribbon cartridge be replaced whenever the print
becomes too light to read easily. The paper should be changed when the colored
bars begin to appear on the paper. This indicates the paper supply is running
low.
Replacing the Printer Ribbon Cartridge
To replace a printer cartridge do the following:
1. Open the printer access service door on the upper left.
2. Remove the used cartridge by firmly, but carefully, pulling on the right side,
as indicated by the arrow on the cartridge.
3. Discard the used cartridge.
4. Insert a new cartridge by aligning the left side of the cartridge in the printer.
Push on the right side of the cartridge to snap it into place.
Figure 36. Tilt the ribbon cartridge into position and snap it in place.
5. Turn the knob on the cartridge clockwise to remove any slack from the
ribbon.
6. Feed the printer paper through the printer paper slot in the service door and
close the printer access service door.
74 STERRAD® 200 User’s Guide
Page 77

Routine Maintenance 5
Replacing the Printer Paper
To replace the paper roll do the following:
1. Open the printer access service door on the upper left.
2. Remove the empty paper core and discard the core. Retain the metal paper
roller and insert it into the new roll of paper.
Figure 37. Retain the metal roller and insert it into the new paper core.
3. Place a new paper roll into position so that the paper feeds from the back of
the roll. You may need to tilt the paper so that the roller fits securely into the
grooves.
Figure 38. Tilt the paper roll into one side of the printer,
then set it into the other side. The paper feeds from the back.
STERRAD® 200 User’s Guide 75
Page 78

5 Routine Maintenance
4. Feed the edge of the paper into the slot behind the printer. Press the Paper
Figure 39. Feed the paper up through the mechanism and then
5. Feed the printer paper through the slot in the access door and close the door.
Advance button on the door until the mechanism begins to pull the paper.
Continue pressing Paper Advance until about 150 to 160 mm (6 inches) of
paper exits the printer cartridge.
through the slot in the door.
Cleaning the Sterilizer
The outside surfaces of the sterilizer can be cleaned with water and a mild
detergent. The inside of the sterilization chamber does not normally require
cleaning. The chamber door and the chamber should not be cleaned with an
abrasive, such as a wire brush or steel wool. If you have any questions regarding
cleaning the STERRAD 200 Sterilizer, call your ASP service representative.
CAUTION: Do not clean the chamber door area with
abrasives. The sterilization chamber uses an O-ring
vacuum seal to maintain a vacuum in the chamber.
Never use rough cleaning tools, such as a wire
brush or steel wool on the door housing or chamber assembly. This could damage the seal. Use a
damp, lint free cloth to clean the chamber door.
76 STERRAD® 200 User’s Guide
Page 79

Chapter 6.
Troubleshooting
Overview
The STERRAD® 200 Sterilizer is a relatively trouble-free device, requiring only
routine maintenance and care in load preparation to help prevent system
cancellations.
WARNING! YOU MUST WEAR CHEMICAL RESISTANT LATEX,
PVC (VINYL), OR NITRILE GLOVES WHEN
REMOVING A LOAD AFTER A CYCLE
CANCELLATION.
Rebooting the System
Rebooting is used in certain troubleshooting procedures. When power is turned
off then back on, it causes the computer in the sterilizer to reload the software
control program automatically; this action “reboots” the sterilizer. (Rebooting is
used in certain troubleshooting procedures.) The display indicates sterilizer status
after power has been reapplied.
The Power ON-OFF switch is located on the service side of the sterilizer (this is
to the right as you face the input side of the sterilizer). If instructions indicate that
you should reboot the system, flip the switch to the OFF position. Wait a few
seconds for the system to completely power down, then flip the switch to the ON
position. The display indicates sterilizer status after power has been reapplied.
STERRAD® 200 User’s Guide 77
Page 80

6 Troubleshooting
Using the Message Table
To use this table, look at the message displayed and then find the same message
in the table (it is in alphabetical order). The table shows the message, the printout
associated with the displayed message, and suggests some actions to take. If you
touch Help when any message is displayed, you receive additional solutions and
actions to take. You may receive similar messages during different stages of the
system cycle. The action you are to take is usually the same regardless of the
cycle stage.
If your question was not answered either by the table below or by using the
“Help” display, call the ASP Customer Care Center for more information.
Message Table
Displayed Messages Printed Messages Condition/Action
Delivery Subsystem Failure
H2O2 Delivery Failure
Insert New Cassette
Operator Cancellation
Power Failure
RF Subsystem Failure
Delivery Subsystem
Failure
Delivery Failure
H
2O2
(System parameters are
included on printout.)
No Printout
Operator Cancellation
Power Failure
RF Subsystem Failure
(RF system parameters
are included on printout.)
The system was unable to successfully
complete the injection. Call the ASP
Customer Care Center.
Acceptable hydrogen peroxide
concentration was not detected. Insert
a new cassette and run the cycle again.
If the problem persists, call the ASP
Customer Care Center.
Insert a new cassette and restart the
sterilizer.
The operator has cancelled the cycle.
Restart the sterilizer.
The power was turned off during a
cycle. Restart the sterilizer
WARNING! If plasma failed to light,
please use extra caution when handling
load.
Make sure the shelf or other metal
objects are not in contact with the
electrode, door, or chamber walls.
Repackage and reprocess load. If
problem persists, call the ASP
Customer Care Center.
Temperature Has Not Risen
78 STERRAD® 200 User’s Guide
No Printout
The sterilizer is not at the temperature
Page 81

Troubleshooting 6
Displayed Messages Printed Messages Condition/Action
Call ASP Technical Service
needed to run a cycle. Call the ASP
Customer Care Center.
Temperature Out Of Range
Timeout Failure
Vacuum System Failure
Warming Up
Please Wait
Temperature Out Of
Range (System
temperature parameters
are included on printout.)
Timeout Failure
Vacuum System Failure
(Vacuum system
parameters are included
on printout.)
No Printout
The door, chamber, vaporizer, or tube
temperatures are above or below the
operating temperatures. Call the ASP
Customer Care Center.
A timeout event occurred when the
sterilizer was unable to complete a task
within a preset timeout period. Run the
cycle again, if the timeout problem
persists, call the ASP Customer Care
Center.
The load may contain too much
moisture contain cellulose material or
there may be too many packages in the
chamber. If problem persists, start a
cycle with an empty chamber. If the
vacuum stage is still not successful,
call the ASP Customer Care Center.
You must wait until the system warms
up to run a cycle.
STERRAD® 200 User’s Guide 79
Page 82

Page 83

Appendix A.
Specifications
Space Requirements
Sterilizer Size Width: 915 mm (36 inches)
Depth: 1130 mm (44 ½ inches)
Height: 1754 mm (69 inches)
Weight 475 kg/1047 lbs.
Operation
Electrical Operation 208 VAC, 60 Hz 3 phase WYE, 20 amps NEMA L21-20
receptacle, CBA phase rotation
Ambient Temperature +18o C to +40o C (+64o F to +103o F)
Relative Humidity 10% to 85% up to +30o C ambient and linearly decreasing
from 85% at +30
Air Exchanges Minimum 10/hour
Heat Generation 1919 BTU/Cycle
Pollution Degree 2
Installation Category II
Atmospheric Pressure 700 hPa to 1060 hPa
Altitude Up to 2000 meters
o
C to +70% at +40o C noncondensing
STERRAD® 200 User’s Guide 81
Page 84

A Specifications
Installation (please call ASP at 1-888-STERRAD before re-installing the sterilizer)
Space Requirements 225.4 cm H x 291.5 cm W x 213.0 cm D (88.7 in x 114.8 in
x 83.7 in)
Mobility Freestanding unit: Movable
In-Wall Unit: Mounted movable freestanding unit or
mounted in-wall unit
Venting Requirements None required
Gas Tank Requirements None required
Electrical Requirements 3 m/10 ft. power cord
Weight 475 kg/1047 lbs.
Equipment Rating
High Voltage 200V~, 3~, 50/60 Hz, 4 wire, 15 A
208V~, 3~, 50/60 Hz, 5 wire, 15 A
380V~/400V~/415V~, 3~, 50/60 Hz, 5 wire, 15 A
Electrical Requirements
The STERRAD® 200 Sterilizer should only be plugged into outlets approved by a qualified technician.
For further requirements, refer to the label on the back panel of the sterilizer or call your ASP service
representative. Only a qualified technician can determine when the STERRAD 200 Sterilizer can be
safely moved to a new power source.
Protection
Protection Class Class 1
Protection Against Ingress of Water Ordinary (IPXO)
Mode of Operation Continuous
I/O Connections
Keyboard DIN-5 Type
Barcode D-SUB 9 Type
82 STERRAD® 200 User’s Guide
Page 85

Specifications A
Transport and Storages
Ambient Temperature -40o C to +70o C (-40o F to +158o F)
Relative Humidity 10% to 85% up to 30° C ambient and linearly decreasing
from 85% at 30°C to 70% at 40°C
Atmospheric Pressure 500 hPa to 1060 hPa
Note: ASP provides circuit diagrams, component part lists,
descriptions, and calibration instructions on request to
appropriately qualified personnel on the assemblies that
ASP feels are serviceable by non-ASP personnel.
Explanation of Warning Symbols
Attention, consult accompanying documents
IEC 378-0300
Dangerous voltage
IEC 878-03-0
I/O
Caution: Mechanical crushing hazard. Do not touch
Caution: Mechanical crushing hazard when door is closing.
Protective earth
Three phase neutral
On/Off
Alternating current
The door must be blocked before maintenance is performed.
STERRAD® 200 User’s Guide 83
 Loading...