

Page 1
Ultralight SV1+ / Ultralight LXl
USER GUIDE
PROXIMA®
www.proxima.com
Page 2

TABLE OF CONTENTS
INHALTSVERZEICHNIS TABLE DES METIERES INDICE INDICE ÍNDICE
A. SUPPLIED MATERIAL
LIEFERUMFANG
EQUIPEMENT FOURNI
MATERIAL SUMINISTRADO
MATERIALE FORNITO
MATERIAL FORNECIDO
B. SETTING UP PROCEDURE
ANSCHLUSS
INSTALLATION
PROCEDIMIENTO DE CONEXIÓN
PROCEDIMENTO DI IMPOSTAZIONE
INSTALAQÀO
C. START-STOP.
START-STOP
MISE EN/HORS SERVICE
ENCENDIDO - APAGADO
AVVIO - ARRESTO
LIGAR - DESLIGAR
D. IMAGE ADJUSTMENTS
BILDEINSTELLUNGEN
MISE AU POINT DE L'IMAGE
AJUSTE DE LA IMAGEN
REGOLAZIONE DELL'IMMAGINE
AJUSTES DA IMAGEM
E. REMOTE CONTROL & KEYBOARD
FERNBEDIENUNG UND BEDIENFELD
TELECOMMANDE ET CLAVIER
CONTROL REMOTO Y TECLADO
TELECOMANDO E TASTIERA
CONTROLE REMOTO E TECLADO
............
...................
......................
..................
.......
OVERVIEW / CEILING MOUNT.
ÜBERSICHT / DECKENMONTAGESATZ
PRESENTATION / MONTAGE AU PLAFOND
VISTA GENERAL / MONTAJE EN ELTECHO
PROSPETTO / MONTATURA PER IL SOFFITTO
VISTA GERAL / SUPORTE DE TETO
H. MAINTENANCE
PFLEGE
MAINTENANCE
LIMPIEZA
MANUTENZIONE
MANUTENÇÂO
I. LAMP REPLACEMENT.
AUSTAUSCH DER LAMPE
REMPLACEMENT DE LA LAMPE
SUSTITUCIÓN DE LA LAMPARA
SOSTITUZIONE DELLA LAMPADINA
RECOLOCAÇÂO DA LÀMPADA
J. TROUBLESHOOTING........................................ 15
FEHLERBEHEBUNG
SOLUTION AUX PROBLÈMES LES PLUS FRÉQUENTS
SOLUCIÓN DE PROBLEMAS
SOLUZIONE DEI PROBLEMI
LOCALIZAÇÂO DE DEFEITOS
K. TECHNICAL DATA............................................. 17
TECHNISCHE DATEN
CARACTERISTIQUES TECHNIQUES
DATOS TÉCNICOS
DATI TECNICI
DADOS TÉCNICOS
.................................................
......................
......................................
12
13
14
MENU ADJUSTMENTS
MENÜEINSTELLUNGEN
OPTIONS DE MENU
MENÙ DE AJUSTES
IMPOSTAZIONI DAL MENU
AJUSTES DO MENU
........
Ultralight SV1+ / Ultralight LXl
10
L. FCC STATEMENT...............................................19
M. SERVICE INFORMATION
..................................
20
www.proxima.com
Page 3
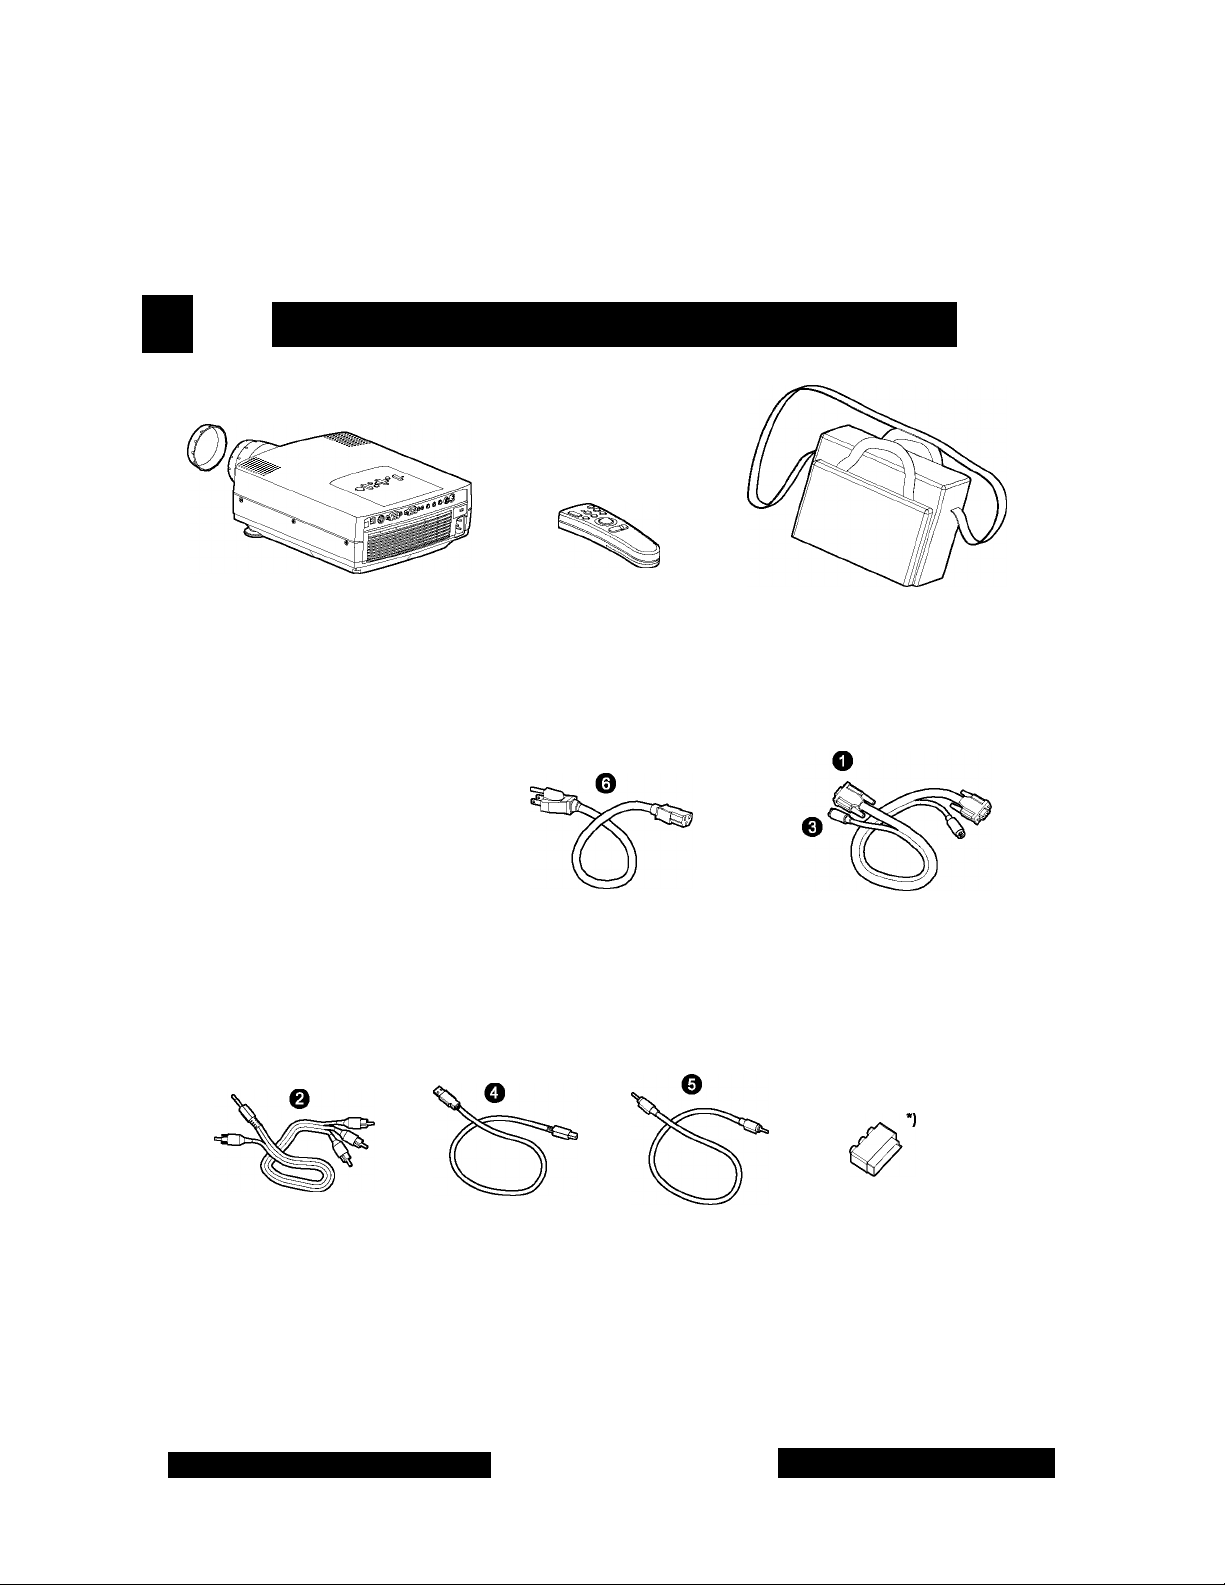
SUPPLIED MATERIAL
LIEFERUMFANG EQUIPEMENT FOURNI MATERIAL SUMINISTRADO MATERIALS FORNITO MATERIAL FORNECIDO
LCD Projector with lenscap
LCD Projektor mit Schutzkappe
Projecteur LCD avec protection ientiile
Proyector LCD con tapa del lente
Proiettore LCD con coperchietto
Projeter DLP corn protetor de lente
Batteries for remote control
Batterien für Fernbedienung
Piles pour la télécommande
Baterías para el control remoto
Pile per II telecommando
Baterías para remoto o controle
Remote control
Fernbedienung
Télécommande
Control remoto
Telecomando
Controle remoto
Power cord
Netzkabel
Cordon d'alimentation
Cable de alimentaciòn
Cavo alimentazione
Cebo de allmentaçâo
Soft Case
Soft-Tragetasche
EtuI souple
Funda
Valigetta
Maleta
Computer & Mouse Cable
Computer- & Mauskabel
Câble d'ordinateur et souris
Conexión para computador y raton
Cavo computer e mouse
Cabo do computador & do rato
Video Cable
Videokabel
Câble vidéo
Conexión de vídeo
Cavo video
Cabo de Vídeo
*) Country dependent Länder abhängig Dépendant du pays Depende del pais Dipendentemente al paese di destinazione Dependendo do pais
USB Mouse Cable
USB Mauskabel
Cable soutis USB
Cable raton USB
Cavo mouse USB
Cabo de Mouse USB
Ultralight SV1+ / Ultralight LXl
Audio Cable
Audio Kabel
Câble audio
Cable de audio
Cavo audio
Cabo de Àudio
SCART adapter
SCART-AnschluB
Adaptateur audio
Adaptador de Scanner
Presa scart
Adaptador SCART
www.proxima.com
Page 4
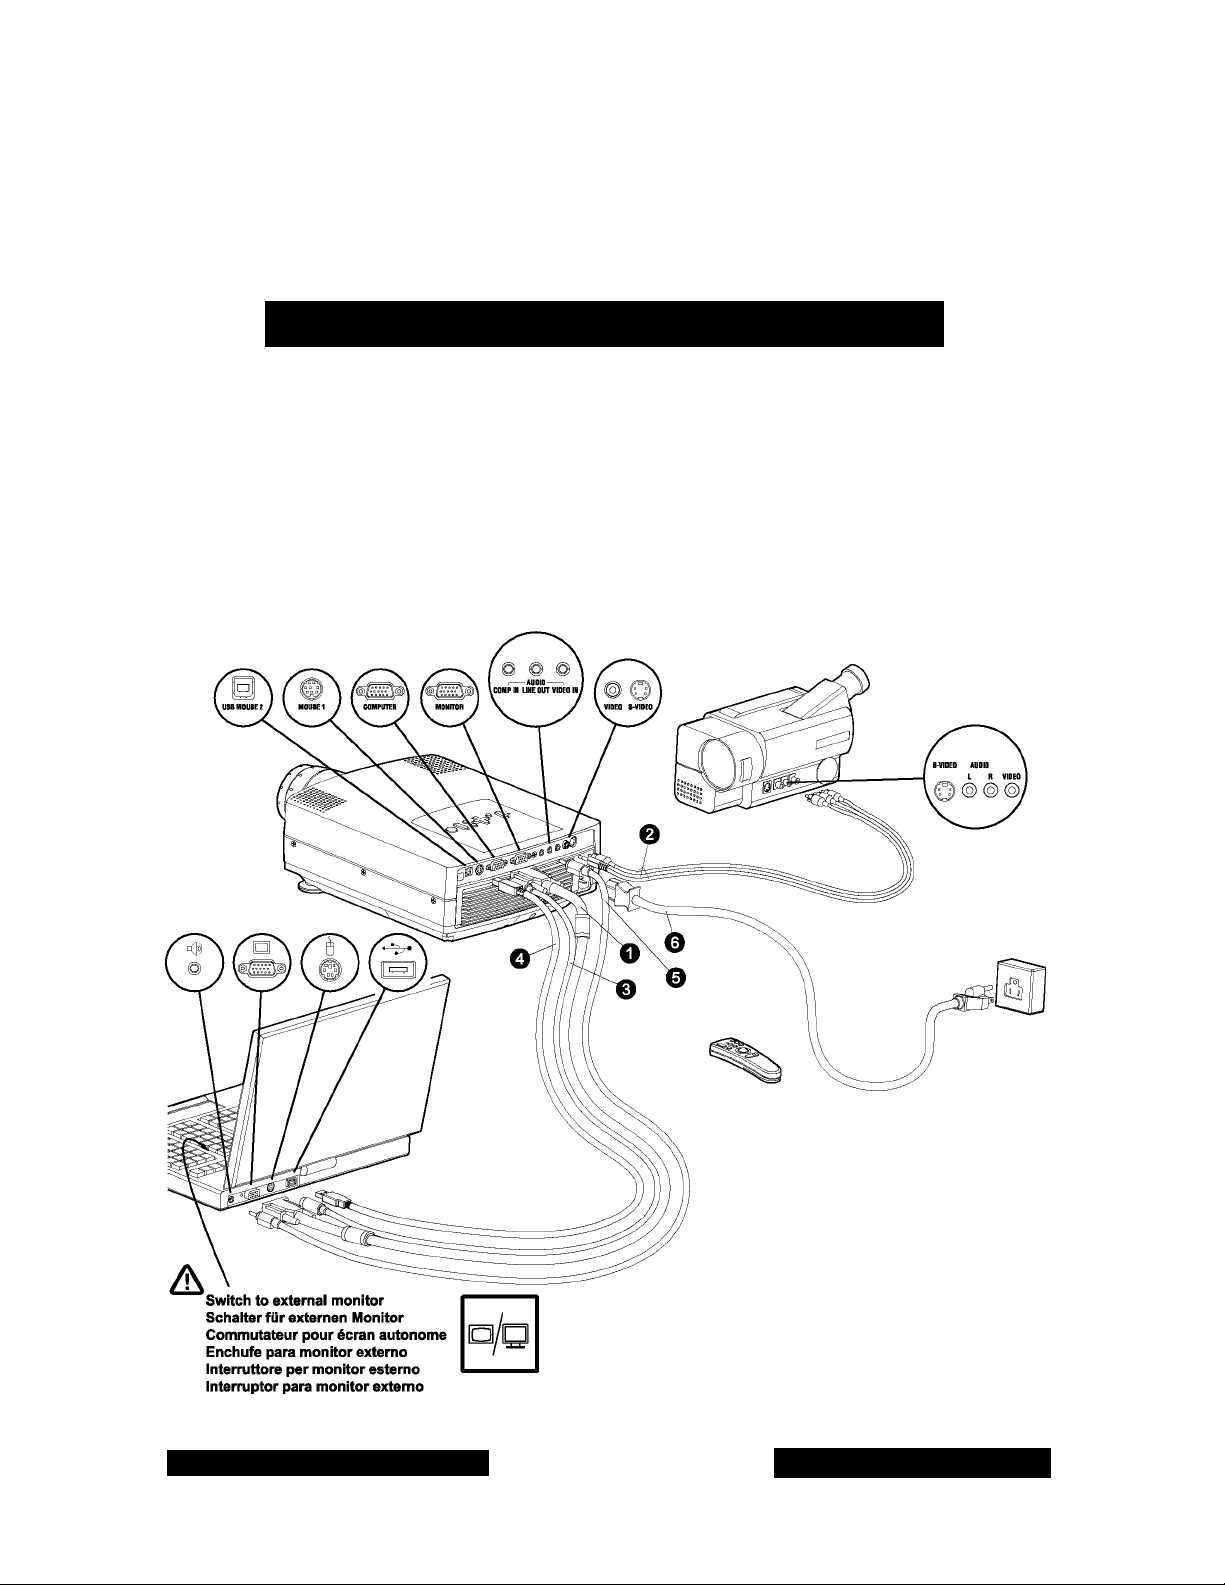
B
SETTING UP PROCEDURE
ANSCHLUSS INSTALLATION PROCEDIMIENTO DE CONEXIÓN PROCEDIMENTO DI IMPOSTAZIONE INSTALAQAO
1. Connect the projector to:
2. For mouse control use:
3. For computer sound connection, use the audio cable (5)
4. Connect power cord to projector (6)
5. Turn on the projector, then the source(s)
- the data source with the Computer Cable (1)
- the video source with the Video Cable (2)
- the PS/2 mouse cable (3) attached to (1) or
- the USB mouse cable (4)
Ultralight SV1+ / Ultralight LXl
www.proxima.com
Page 5
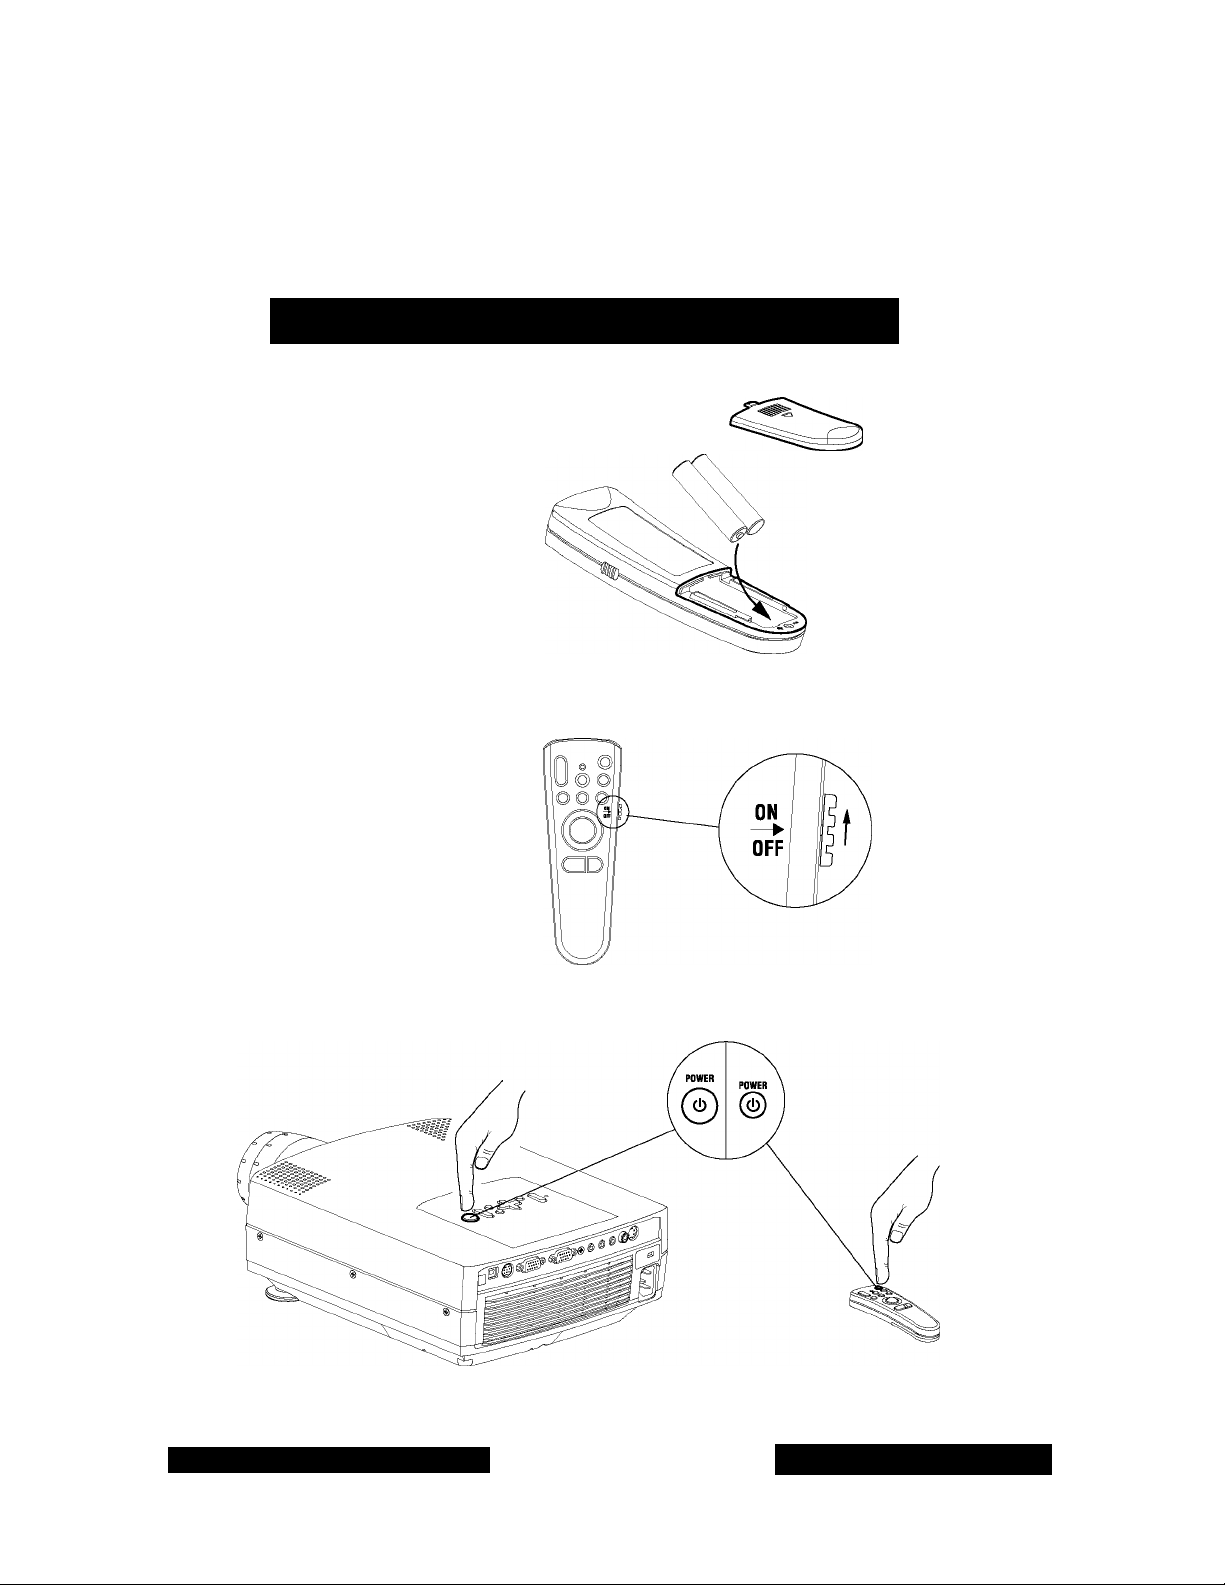
START - STOP
START - STOP MISE EN/HORS SERVICE ENCENDIDO - APAGADO AVVIO - ARRESTO LIGAR - DESLIGAR
A
Instali batteries
Batterien einlegen
Mettre des piles en place
Colocar las baterías
Inserimento pile
Colocar as pilhas
Switch ON to operate remote control
Ultralight SV1+ / Ultralight LXl
www.proxima.com
Page 6

IMAGE ADJUSTMENT
BILDEINSTELLUNG MISE AU POINT DE L'IMAGE AJUSTE DE LA IMAGEN REGOLAZIONE DELL'IMMAGINE AJUSTES DA IMAGEM
Release projector feet to adjust display angle (1) or manually adjust feet (2)
Ultralight SV1+ / Ultralight LXl
www.proxima.com
Page 7

A
A
REMOTE CONTROL & KEYBOARD FERNBEDIENUNG UND BEDIENFELD
TELECOMMANDE ET CLAVIER CONTROL REMOTO Y TECLADO TELECOMANDO E TASTIERA CONTROLE REMOTO E TECLADO
RED light indicates lamp replacement required. Ref. I (LAMP REPLACEMENT)
Das ROTE Licht zeigt an, daß die Lampe ausgewechselt werden muß. Ref. I (AUSTAUSCH DER LAMPE)
La lumière ROUGE indique que ia iampe doit être remplacée. Ref. I (REMPLACEMENT DE LA LAMPE)
La luz ROJA indica que se debe de reemplazar la bombilla. Ref. I (SUSTITUCIÓN DE LA LÁMPARA)
ALARM
/ I \
ALARM
La luce ROSA indica che bisogna sostituire la lampadina. Ref. I (SOSTITUZIONE DELLA LAMPADINA)
A luz VERMELHA Indica que a lampada deve ser substituida. Ref. I (RECOLOCAÇÂO DA LÀMPADA)
RED FLASHING when the projector is overheated. Power off and let cool down
ROTES BLINKLICHT zeigt Überhitzung des Projektors an. Ausschalten und abkühlen lassen
Un CLIGNOTEMENT ROUGE signale la surchauffé du projecteur. Débrancher ralimentation et laisser refroidir
LUZ ROJA PARPADEANTE cuando el proyector está sobrecalentado. Desconectar la alimentación y dejar enfriar
La luce ROSSA INTERMITTENTE Indica che II proiettore si è surriscaldato. Scollegare rallmentazione e lasciare raffreddare
A luz VERMELHA Intermitente Indica superaquecimento do projeter. Desligar e debear esfriar
Ultralight SV1+ / Ultralight LXl
A
CAUTION
LASER RADIATION
DO HOT STARE INTO BEAM
LASER DIODE Wavelength 670nm
CLASS II LASER PRODUCT
www.proxima.com
_________
Max output 1mW
Page 8

REMOTE CONTROL & KEYBOARD FERNBEDIENUNG UND BEDIENFELD
TELECOMMANDE ET CLAVIER CONTROL REMOTO Y TECLADO TELECOMANDO E TASTIERA CONTROLE REMOTO E TECLADO
- Activate by pressing actuai key(s).
- Zum Aktivieren Jeweiiige Taste(n) drücken.
- Activer en pressant la (les) touches correspondante(s).
Turn the projector ON/OFF
OM j
POWER
Switch between connected
sources
SOURCE
®l
Scroll menu and select on-screen
menu function
S£l£CT
Adjust volume Blackens the projected Image
Synchronizes the projector
settings to the active source
©
Mouse control Laser pointer
- Activer pulsando la(s) tecla(s) indicativa(s).
- Attivare premendo il /1 tasto /1 attivi.
- Ativar pressionando a(s) tecla(s) correspondante(s).
0
Activates/deactivates on screen
menu
®'0
3+CU
❖
Choose area to magnify
(1)
Ultralight SV1+ / Ultralight LXl
©
dl\E)
Use trackball/arrows to magnify
(2)
©
Reset picture to full size
(3)
www.proxima.com
Page 9

MENU ADJUSTMENTS
MENÜEINSTELLUNGEN OPTIONS DE MENU MENÚ DE AJUSTES IMPOSTAZIONI DAL MENU AJUSTES DO MENU
Activate/deactivate by:
Aktivieren/Deaktiviaren mit:
Activer et désactiver à i'aide:
Activar/desactívar puisando:
Attivare/disattivare premendo:
Ativa/Desativa com:
COLOR
RESET
ADVANCED
HELP
Navigate by:
Steuem mit:
Pour naviguer:
Navegar puisando:
Spostarsi premendo:
Navegar corn:
Adjusts contrast range
from 0 to 100
Adjusts brightness range
from Oto 100
Adjusts colour intensity
WIDTH
posmoN
COLOR TEMP
TINT
1B:9
SHARPNESS
POSITION
COLORTEMP
TINT
16:9
SHARPNESS
COLORTEMP
TINT
16:9
SHARPNESS
Choose function with:
Funktion wähien mit:
Choisissez ia fonction avec:
Seieccionar función con:
Scegiiere ia funzione con:
Escoiha a funçâo com:
Adjusts horizontal
phase/fine tunes image
Adjusts width to image
size
Adjusts position to
image size
a
CONTRAST
BRIGHTNESS
COLOR
Synchronizes the
projector settings to the
active source
CONTRAST
BRIGHTNESS
COLOR
Indicates information
about active source
Ultralight SV1+ / Ultralight LXl
10
TUNE
WIDTH
PMmON
TINT
16:9
SHARPNESS
Modifies colour
temperature balance
Varies the hue in
video images
www.proxima.com
Page 10

MENU ADJUSTMENTS
MENUEINSTELLUNGEN OPTIONS DE MENU MENU DE AJUSTES IMPOSTAZIONI DAL MENU AJUSTES DO MENU
TUNE
WIDTH
POSITION
COLOR TEMP
TINT
«HARNESS
Select 16:9 image
SOURCE SEARCH
format
Select to hide
On-Sreen Display
TUNE
WIDTH
POSITION
COLOR TEMP
TINT
1S;S
_________
DEUTSCH
ENGUSH
ESPAÑOL
FRANÇAIS
ITALIANO
NORSK
PORTUGUÉS
SIMPL. CHINESE
TRAD. CHINESE
JAPANESE
IWREAN
CEIUNG
HIDE OSD
SOURCE SEARCH
Adjust sharpness
Select language
Select for rear
projection
REAR
CEIUNG
HIDE OSD
FACTORY RESET
LAMP TIMER
Select to activate/
deactivate automatic
source search
Select to reset all
options to factory
settings
Select to display
service information
Ultralight SV1+ / Ultralight LXl
Select for ceiling
mounted projection
11
FACTORY RESET
INFO
2^
Select to reset lamp
timer after lamp
replacement (Ref. I)
www.proxima.com
Page 11

OVERVIEW / CEILING MOUNT VISTA GENERAL / MONTAJE EN EL ТЕСНО
PROSPETTO / MONTATURA PER IL SOFFITTO VISTA GERAL / MONTAGEM DE TETO OVERSIKT / TAKMONTERING
Adjustable foot
Hôhenverstellbarer
Pieds réglables
Pata ajustable
Plede regolablle
Pé ajustével
Speakers
Lautsprecher
Haut-parleurs
Altavoces
Lamp house
Lampenfach
Ventilation In
Lufteintritt
Entrée ventilation
Entrada de ventilación
Griglia di ventilazione di entrata
Entrada de ventllagéo
Support de lampe
Lugar para la lampara
Scomparto lampadina
Compartimento da làmpad
Keyboard
Bedienfeld
Sortle ventllation
Salida de ventllaclón
Griglia di ventilazione di uscita
Salda de ventllagào
Power
Netzanschluß
Alimentation
Alimentación
Alimentazione elettrica
Alimentaçâo elétrica
- Ceiling mount. Min. distance from
celling/rearwall: 30/50 cm, 12/20 Inch.
- Deckenmontagesatz. Mindestabstand von
Decke/rückwOrtigerWand 30/50 cm.
- Montage au plafond. Distance minimum au
plafbnd/mur arrière: 30/50 cm.
- Montaje en el techo. Distancia mínima desde
el techo/pared posterior; 30/50 cm.
- Montatura per II soffitto. Distanza minima dal
soffìtto/muro posteriore 30/50 cm.
- Montagem de teto. Distènda min. teto/parede
treseire: 30/50 cm.
- Takbeslag. Min. distanse fra tak/bakvegg:
30/50 em, 12^0 tommer.
Foc^
Fokus
Poignée
Foco
Messa a fuoco
Foco
Ultralight SV1+ / Ultralight LXl
Adjustable foot
Höhenverstellbarer Fuß
Pieds réglables
Pata ajustable
Plede regolablle
Pé ajustével
12
Handle
Tragegriff
Mise au point
Asa
Manico
Traitement
www.proxima.com
Page 12

MAINTENANCE
H
PFLEGE MAINTENANCE LIMPIEZA MANUTENZIONE MANUTENÇÂO
1. Remove bottom lid to access the filter (fig. 1a & 1b)
2. Clean filter (fig. 2)
3. Replace clean filter and close bottom lid (fig. 3)
4. Clean filter regularly for sufficient air flow
A
Damp cloth only
Nur feucht abwischen
Linge humide uniquement
Usar sólo un paño húmedo
Usare solo un panno umido
Usar somante um pano ùmido
A
Disconnect power
Netzstecker ziehen
Débrancher ralimentation
Desconectar la alimentación
Disinserire la spina
Desconectar a energia elétrica
0&O
Ultralight SV1+ / Ultralight LXl
13
www.proxima.com
Page 13

LAMP REPLACEMENT AUSTAUSCH DER LAMPE REMPLACEMENT DE LA LAMPE
SUSTITUCIÓN DE LA LÁMPARA SOSTITUZIONE DELIA LAMPADINA SUBSTITUIÇAO DA LÁMPADA
A
Change lamp when lifetime expired. Replace expired lamp only with same type and rating
Wechseln Sie die Lampe nach Ablauf ihrer Lebensdauer aus. Nur lampen des gleichen Typs und gieicher Stärke verwenden
Remplacer la lampe à la fin de sa durée de vie nominaie. Ne rempiacer ia iampe que par un éiément de type et puissance identiques
Sustituya la lámpara cuando esté gastada. Sustituya ia iámpara gastada sólo por otra del mismo tipo y características
Sostituire la lampadina quando è scarica. Fornita esclusivamente con una lampadina dello stesso tipo e con la stessa potenza
Substituir a làmpada quando estiver gasta. Substitua a làmpada gasta somente por outra do mesmo tipo e características
A
Disconnect power
Netzstecker ziehen
Débrancher l'alimentation
Desconectar la alimentación
Disinserire la spina
Desconectar a energia elétrica
1. Open screws on lamp housing
2. Pull out lamp housing
3. Insert new lamp housing
4. Tighten screws
5. Check filter pad (Ref. H)
A
Reset lamp timer
Zähler auf Null setzen
Réinitialiser le compteur de lampe
Poner a cero el temporizador de la lámpara
Aserare il timer della lampadina
Reiniciar о cronómetro da làmpada
A
Refer service to qualified personnel only
Reparaturen sind von Fachpersonal durchzufiihren
Confiertoute intervention à un professionnel qualifié
La asistencia técnica debe realizarle por personal cualificado
Eventual! riparazioni devono essere effettuate esclusivamente da personale qualificato
A assisténcia técnica deve ser efetuada somente por pessoal qualificado
Ultralight SV1+ / Ultralight LXl
14
www.proxima.com
Page 14

I rtwWDkbwrlWwl 11^ VI FEHLERBEHEBUNG SOLUTION AUX PROBLEMES LES PLUS FREQUENTS
TROUBLESHOOTING
SOLUCIÓN DE PROBLEMAS SOLUZIONE DEI PROBLEMI LOCALIZAÇÂO DE DEFEITOS
No Image on the screen
Kein Bild auf der Leinwand
Pas d'image sur l'écran
Sin Imagen en pantalla
Assenza dl Immagine sullo schermo
Nao há imagem na tela
2. Verify the settings on your laptop
Einstellungen am Laptop überprüfen
Vérifiez les paramètres sur votre portable
Verifique las configuraciones de su ordenador
Verificare le impostazioni del computer
Verifique as configuraçôes no seu laptop
The projected image is not focused
Das projizierte Bild ist nicht scharf
L'Image projetée n'est pas au point
La Imagen proyectada no está enfocada
L'immagine proiettata non è a fuoco
A imagem projetada está fora de foco
2. Adjust the focus ring on the projection lens
Fokusring an der Llnse verstellen
Réglez la bague de mise au point sur la lentille de projection
Ajuste el aro de enfoque de la lente de proyecciôn
Regolare l'anello di messa a fuoco sulla lente di proiezione
Ajuste 0 anel de foco à lente de projeçâo
1. Verify the power connections to the projector (check that the power light is on)
Stromanschluss des Projektors überprüfen (Power-Leuchtanzeige muss leuchten)
Vérifíez les connexions de l'alimentation au projecteur (vérifiez que l'indicateur d'alimentation
est allumé).
Verifique las conexiones del proyector (compruebe que la luz de energía está encendida)
Verificare la connessione dell'alimentazione del proiettore (controllare che la spia
dell'alimentazione sia accesa).
Verifique as conexôes de alimentaçâo elétrica do projetor (veja se a luz que indica o estado
de ligado está acesa^.
3. Verify that the black-button is not activated on the remote
Prüfen, dass "Black" (Verdunkeln) an der Fernbedienung nicht aktiviert ist
Vérifiez que le bouton noir n'est pas activé sur la télécommande
Verifique que el botén negro no esté activado para control remoto
Verificare che il pulsante nero sul telecomando non sia attivato
Assegure-de que botâo prete näo esteja ativado no controle remote
4. Check if lens cap is mounted
Sicherstellen, dass die Linsenabdeckung abgenommen ist
Assurez-vous que la protection de la lentille n'est pas posée
Compruebe que la tapa de la lente está montada
Controllare che non sia montato il coperchio della lente
Verifique se o protetor de lente està colocado
1, Ensure that the distance from the projector to the screen is at least at the minimum
specified.
Überprüfen, ob der Abstand zwischen Projektor und Leinwand groß genug ist
Vérifiez que la distance minimum indiquée entre le projecteur et l'écran est respectée
Asegúrese de que la distancia desde el proyector a la pantalla
Assicurarsi che la distanza dal proiettore allo schermo non sia inferiore al minimo di specifica
Certifique- se de que a distància entre o projetor e a tela esteja pelo menos no minimo
especificado.
3. Ensure that the projection lens is dean
Prüfen, Ob Unse sauber ist
Vérifiez que la lentille de projection est propre
Asegúrese de que la lente de proyección está limpia
Assicurarsi che la lente di proiezione sia pulita
Assegure-se de que a lente de proje
4. In Video: Check the sharpness setting in the advanced/picture menu i
and adjust if necessary.
Bei Video; Schärfeeinstellung im Menu Optionen/Bild prüfen und bei
Bedarf ändern.
Source Vidéo: Vérifiez le réglage de netteté de l'image dans le menu
"advanced/picture" et réglez si besoin est.
En video: compruebe la configuración de la nitidez en el menú
avanzado/de imagen y ajúsfelo si fuera necessàrio.
In Video: Controllare la regolazione della nitidezza nel menù
Advanced / Picture e regolarla se necessario.
No video: verifique a configuraçâo da nitidez no menu avançado/imagem
e ajuste-a se necessàrio.
No sound
Kein Ton
Pas de son
Sin sonido
Nessun suono
Nào ha som
1. Check the audio input connections
Verbindung am Audioeingang überprüfen
Vérifiez les connexions entrée audio
Compruebe las conexiones de entrada de audio
Controllare i collegamenti di ingresso audio
Verifique as conexöes de entrada de àudio
3. Verify that the audio cable is OK
Prüfen, obAudiokabel in Ordnung ist
Vérifiez que le câble audio n'est pas endommagé
Verifique que el cable de audio está bien
Verificare che il cavo audio sia a poste
Verifique se o cabo de àudio está conforme
Ultralight SV1+ / Ultralight LXl
, Verify that the projector is correctly aligned with the projected screen
Prüfen. ob der Projektor richtig zur Leinwand ausgerichtet ist
Vérifiez que le projecteur est correctement aligné avec l'écran
Verifique que el proyector está correctamente alineado con la pantalla proyectada
Verificare che il proiettore sia allineato correttamente con lo schermo
Verifique se o projetor està corretamente alinhado com a tela de projeçâo
2. Adjust the volume
Lautstärke verstellen
Réglez le volume
Ajuste el volumen
Regolare il volume
Ajuste 0 volume
4. Adjust the audio source
Einstellungen an der Audioquelle vornehmen
Réglez la source audio
Ajuste la fuente de audio
Regolare la sorgente audio
^uste a fonte de àudio
15
www.proxima.com
Page 15

TROUBLESHOOTINGI rVwWD^^WriwW I II^W FEHLERBEHEBUNG SOLUTION AUX PROBLEMES LES PLUS FREQUENTS
SOLUCIÓN DE PROBLEMAS SOLUZIONE DEI PROBLEMI LOCALIZAÇÂO DE DEFEITOS LOCALIZAÇÂO DE DEFEITOS
The projected Image is distorted
Das projizierte Bild Ist verzerrt
L'lmage projetée est déformée
La imagen proyectada está distorsionada
L'immagine proiettata è distorta
A imagem projetada está destorcida
2. Select Menu on remote or on projector
Menü über Fernbedienung oder Bedienfeld wählen
Sélectionnez Menu sur la télécommande ou sur le
projecteur
Seleccione el Menú рог control remoto о en el proyector
Selezionare Menù sul telecomando о sul proiettore
Selecione о Menu no controle remoto ou no projeter
Select Picture
Bild wählen
Sélectionnez Picture
Seleccione Picture
Selezionare Picture
Selecione Imagem
3. Verify that the projector is not tilted/elevated and that it is parallel with the
projected screen
Sichetatellen, dass der Projektor nicht schief oder zu hoch steht und dass
er parallel zur Leinwand ausgerichtet ist
Vérifíez que le projecteur n'est pas incliné/surélevé et qu'il est patallèle à
l'écran de projection
Verifique que el proyector no está inclinado/elevado y que está en paralelo
con la imagen proyectada
Verificare che II proiettore non sia inclinato/elevato e che sia parallelo allo
schermo di proiezione
Verifique se o projetor näo está inclinado/elevado e se està paratelo à tela
projetada
1. Press the Power button and go to Reset
Auf Power drücken und Reset durchführen
Appuyez sur le boyton "Power" et Remettez à zéro
Puise el botón Power y vaya a Reset (restablecer)
Premere il tasto Power e iniziare il Ripristino (reset)
Desligue e ligue novamente o projeter pressionando o botào LIG/DESLIG
Go to Advanced
Zu Optionen gehen
Choisissez Advanced
Vaya a Advanced
Portami SU Advanced
Vä ao menu Avançado
Select Frequency or Tuning for image manual adjustments
Frequenz oder Tuning für manuelle Bildeinstellung wählen
Sélectionnez Frequency ou Tuning pour le réglage manuel de l'image
Seleccione Frequency o Tuning pam ajustar manualment la imagen
Selezionare Frequency o TXinlng per la regolazione manuale dell'immagine
Selecione Freqüência ou Sintonia para ajustes manuals da imagem
4. Check tf the digitai keystone function is active. Adjust if necessary
Prüfen, Ob Trapezentzerrung aktiv ist. Falls nötig, einstellen
Regardez si la fonction keystone digitate est active. Réglez si besoin est
Compruebe si la función de distorsión digital está activada. Ajústela si fuera
necesario
Controllare che sia attiva la funzione di distorsione digitale. Regolarla se
necessario
Veja se a fungäo digitai do ángulo trapezòide està ativa. Ajuste se necessàrio
Remote does not respond
Fernbedienung funktioniert nicht
La télécommande ne marche pas
El control remoto no responde
il telecomando non risponde
O controle remoto nào funciona
2. Check for other interfering IR sources in the room i.e. fluorescent light tubes, sunlight, active IR COM ports from laptops etc.
Nach anderen störenden Infrarotquelle im Raum suchen, z.B. Leuchtsteffröhren, Sonnenlicht, aktive Infrarot-Anschlüsse von Laptops, etc.
Recherchez dans la pièce d'autres sources IR pouvant interférer: tubes néons, lumière du soleil, ports COM IR actite de portables, etc.
Compruebe otras posibles fuentes de interferencias de infrarrojos en la habitación, p.e. tubos fluorescentes, luz solar, puerto COM infrarrojo del ordenador activo, etc.
Controllare che nella stanza non vi siano altre sorgenti IR che possano interferire quali tubi luminosi fluorescenti, luce solare, PC portatili con porte COM attive ad IR, ecc.
Veja se hà outras fontes de itradiagäo eletromagnética interferindo no locai, ou seja, tubos de luz fluorescente, luz do sol, portes de comunicagào a infmverme Iho de laptops etc.
Ultralight SV1+ / Ultralight LXl
Verify that working beatteries is inserted in the remote and that it has been swiched on
Prüfen, Ob Batterien fehlen bzw. leer sind und ob Fernbedienung ei geschaltet ist.
Vérifíez que les piles sont en place et qu'elle est allumée Verifique el control
remoto tiene pilas y que está encendido.
Verifique que el control remoto tiene pilasy qye está encendido.
Verificars che nel telecomando siano inserite batterie funzionanti e che il telecomando
Verifique se as baterías estäo boas, se estâo corretamente inseridas no controle
remoto e se este está ligado.
16
www.proxima.com
Page 16

TECHNICAL DATA
TECHNISCHE DATEN CARACTERISTIQUES TECHNIQUES DATOS TÉCNICOS DAT1TECNICI CARACTERÍSTICAS TÉCNICAS
GENERAL
CONDITIONS
Storage temperature,
sea level
Storage humidity,
non-condensing
Operating
temperature
ambient, sea level
Operating humidity Betriebsfeuchtigkeit
PROJECTOR UNIT PROJEKTOR/
Dimensions
(hlxWxL)
Weight Gewicht Poids Peso Peso
Projection lens
Projection distance Projektionsabstand Distance de
Keystone correction Trapezentzerrung Compensation de
Projection lamp Projektionslampe Lampe de projection Lámpara para
Light output Lichtleistung Puissance
Light valve Lichtverstärker-
Colors Farben Couleurs Colores Colori
Contrast Kontrast Contraste Contraste Contrasto Contraste 300:1
Pixels
Subject to change Änderungen
ALLGEMEINE
DATEN
Lagertemperatur,
Meeresspiegel
Lagerfeuchtigkeit,
nicht kondensierend
Raumtemperatur
für Betrieb,
Meeresspiegel
GERÄT
Maße
(HxBxL)
Linse
Röhre
Auflösung Résolution
Vorbehalten
ENVIRONNEMENT CONDICIONES
Température de
stockage au
niveau de la mer
Humidité de
stockage, sans
condensation
Température
ambiante de
fonctionnement au
niveau de la mer
Humidité de
fonctionnement
PROJECTEUR PROYECTOR UNITÀ DEL
Encombrement
(HxPxL)
Objectif de projection Lente de proyección
projection
distorsion trapézoïdale
dëclai rement
Valeur lumineuse Diafragma Rele ottico Diafragma 3x0.9 inch
Sous réserve de
modifications
GENERALES
Temperatura de
almacenamiento,
a nivel del mar
Humedad relativa de
almacenamiento sin
condensación
Temperatura
ambiente de
funcionamiento, a
nivel del mar
Humedad relativa de
funcionamiento
Dimensiones
(Alto X Ancho X Largo)
Distancia de
proyección
Corrección de la
clave
proyección
Potencia luminosa Erogazione luminosa Vida útil da
Pixels Pixel
Sujetos a posibles
cambios
CONDIZIONI
GENERALI
Temperatura di
conservazione,
a livello del mare
Umidità di
consenrazione,
senza condensa
Temperatura di
funzionamento
ambiente, a livello
del mare
Umidità di
funzionamento
PROIETTORE
Dimensioni
(Alt. X Largh. x Lungh.)
Lente di proiezione
Distanza di
proiezione
Correzione della
deformazione
Lampadina di
proiezione
Soggetti a modifica Sujeito a alteraçôes
CONDigÒES
GERAIS
Temperatura de
armazenagem,
nivel do mar
Umidade de
amiazenagem,
sem condensacào
Temperatura
ambiente de
funcionamento,
nivel do mar
Umidade de
funcionamento
PROJETOR
Dimensdes
(AxLxC)
Peso
Lente de projegào
Distancia de
projegao
Correggo de
deformacào
Làmpada de
projegào
làmpada
Cores
Pixels
■20 - 60 *C
■4-140 F
10-90% RH
41 - 95 F
20 - 80% RH
99x236x282 mm.
(347 incl. lens)
3.9x9.3x11.1 inch.
(13.7 incl. lens)
3.7 kq/8.1 lbs.
1.3 zoom ratio
f=38-50 mm
F=1.8-2.1
1.1-10 m
3.6-32.5 ft.
10 degrees
120WUHP
SV1+:700 ANSI lumen
LXl :800 ANSI lumen
polysilicon
TFT LCD
16.7 MILLION
SV1+:
800x600x3
LXl:
1024x768x3
5-35 *C
Ultralight SV1+ / Ultralight LXl
17
www.proxima.com
Page 17

TECHNICAL DATA
TECHNISCHE DATEN CARACTERISTIQUESTECHNIQUES DATOS TÉCNICOS DATITECNICI CARACTERÍSTICAS TÉCNICAS
PROJECTOR UNIT PROJEKTOR/ PROJECTEUR PROYECTOR UNITÀ DEL PROJETOR
Video frequency Videofrequenz Entrée ordinateur Frecuencia de vídeo Frequenza video Freqüencia de video 12-150 MHz
Horizontal sync. Horizontalfrequenz Sync, horizontale Sine, horizontal Sine, orizz. Sinc. horizontal 15-100 KHz
Vertical sync. Vertikalfrequenz Sync, verticale Sine, vertical Sink. vert.
Computer input Computereingang Entrée ordinateur Entrada de señal del Ingresso computer Entrada computador
Audio input Audioeingang Entrée audio Entrada de audio Ingresso audio Entrada àudio 1 VRMS
Speakers Lautsprecher Haut-parleurs Altavoces Altoparlanti Alto-falantes 2x1 W
Conformance Prüfzeichen Conformité Homologación Conformità
Power supply Netzteil Alimentation Suministro de Alimentazione
Computer Computercompatibility resized kompatibilität. ordinateur au ordenador ajustada a computer
to native pixel Resizing auf redimensionnement la resolución pixels. (riclassificata in base ajustada à 800x600
resolution Originalauflösung de la résolution Resolución en pixels
Video compatibility Videokompatibilität Compatibilité vidéo Compatibilidad de Compatibilità video
Subject to change Änderungen
PROJECTION PROJEKTIONS- DISTANCES DE DISTANCIAS DE DISTANZE DI DISTANCIAS DE
DISTANCES ABSTÄNDE PROJECTION PROYECCIÓN PROIEZIONE
WIDE WEITWINKEL GRAND ANGULAIRE GRAN ANGULAR GRANDANGOLO
Distance Entfernung Distancia Distance Distanza Distáncia 1.1-10m/3.6-32.5 ft.
Diagonal Diagonale Diagonal Diagonals Diagonale Diagonal
Width Breite Largeur Ancho Larghezza Largura 0.6-5.2m/1.9-16.9 ft.
Height Höhe Hauteur Alto Altezza Altura 0.5-3.9m/1.6-12.7 ft.
TELE TELEOBJEKTIV TELEOBJECTIF TELEOBJETIVO TELEOBIETTIVO TELEOBJETIVA
Distance
Diagonal Diagonale Diagonal Diagonal Diagonale
Width Breite Largeur Ancho Larghezza
Height Höhe
Variation of -i-/-10%. Abweichung von -k/- 10% Variation de -i-/-10% Variazione di +/-10% Variación de -k/- 10% Variagáo de +/-10%
GERÄT PROIETTORE
ordenator
électrique corriente elettrica
Compatibilité Compatibilidad del Compatibilità
(Pixel) d'origine (pixels) originaria)
vídeo
Vorbehalten
Entfernung
Sous réserve de
modifications
Distancia Distancia Distanza
Hauteur
Sujetos a posibles
cambios
Alto Altezza
alla risoluzione pixel
Soggetti a modifica Sujeito a alteragdes
Sine, vertical
Conformidade
Ligagáo de energia
elétiiea
Compatibilidade do
computador
resol ugáo de
pixels original
Compatibilidade de
vídeo
PROJECÁO
GRANDE ANGULAR
Distáncia
Diagonal
Largura
Altura
43.5-130 Hz
0-1 Vpp
CE. UL. CUL
GOST R. FCC,
Subpart J, Part 15.
100-240 VAC,
50-60 HZ
2.5-1 A
640x480
720x400
832x624
1024x768
1152x864
1152x870
1280x1024
PAL BGHI, N,
combination N, M.
NTSC M, N, 4.43,
Japan.
SECAM
0.7-6.5nV2.3-21.1 ft.
1.1-10m/3.6-32.5 ft.
0.6-5.2m/1.9-16.9 ft.
0.5-4,2m/1.6-13,7 ft.
0.35-3.2m/1.1-10.4 ft.
Ultralight SV1+ / Ultralight LXl
18
www.proxima.com
Page 18

TECHNICAL DATA
TECHNISCHE DATEN CARACTERISTIQUESTECHNIQUES DATOS TECNICOS DATITECNICI CARACTERISTICAS TECNICAS
FCC STATEMENT
This equipment complies with the limits for a Class A computing device, pursuant to Subpart J of Part 15 of FCC rules. Only peripherals (computer input/output
devices, terminals, printers, etc.) certified to comply with the Class A limits may be attached to a computer that complies with Class A limits. When connecting to a
peripheral device, a shielded inpuVoutput cable is required to ensure compliance with FCC rules. The shielded cable that must be used is supplied with the
equipment. Operation with non-certified peripherals or non-shielded cables is likely to result in interference to radio and TV reception.
This equipment generates and uses radio-frequency energy and, if not installed and used in accordance with the instruction manual, may cause interference to radio
and television reception. It has been tested and found to comply with the limits for a Class A computing device in accordance with the specifications in Subpart J of
Part 15 of the FCC rules, which are designed to provide reasonable protection against such interference when operated in a commercial environment. However,
there is no guarantee that interference will not occur in a particular installation. If this equipment does cause interference to radio or television reception, which can be
determined by turning the equipment off and on, the user is encouraged to try to correct the interference by one or more of the following measures:
• Reorient the receiving antenna.
• Relocate the projector with respect to the receiver.
• Plug the equipment to a different outlet so that equipment
and receiver are on different branch circuits.
• Fasten cables using mounting screws to ensure adequate EMI control.
You may require the following booklet from the Federal Communications Commission (FCC): "How to identify and resolve radio and TV interference problems",
available from the U.S. Government Printing Office, Washington, DC 20402, Stock No. 004-000-00345-4.
Ultralight SV1+ / Ultralight LXl
19
www.proxima.com
Page 19

SERVICE INFORMATION
A
This product contains no user serviceabie parts.
Attempts to modify mechanics or eiectronics inside the housing
wili vioiate any warranties, and may be hazardous.
If for any reason the product fails to work properly, please contact your dealer for technical
support. Prepare a list of the symptoms you observe to make diagnosing easier for your
dealer.
Please also include the following:
- Serial number of the unit
- Date code
- Software revision (under Main Menu selection ADVANCED/SERVICE/INFO)
- Connected source information (under main menu selection HELP).
For Americas:
Proxima Corporation
9440 Carroll Park Drive
San Diego, CA 92121-2298
USA
Phone (800) 447-7692, option 2.
Fax (858) 457-9647
http://www.proxima.com
Ultralight SV1+ / Ultralight LXl
For Europe/Middie East/Africa:
Proxima Netheriands
Horsterweg 24
6191 RXBeek
The Netherlands
Tel: +31 (0)43 358 52 00
Fax: +31 (0)43 358 52 01
http ://www. proxi ma. com
20
For Asia:
Proxima Singapore
29, Int Business Park
# 04-02 Acer Bldg, Tower B
609923 Singapore
Singapore
Tel: +65 566 8102
Fax: +65 565 1080
http://www.proxima.com
www.proxima.com
 Loading...