

Askoll Robofood User Manual
Askoll Due S.p.A.
Via Industria, 32/34 - 36031 DUEVILLE (VI) - ITALIA www.askoll.com
E0160500 06F11
1. IMPORTANT INFORMATION
Before using this product, read and understand this instruction manual in
all its parts.
This manual is an integral part of the product: keep it for future reference.
This product is not intended for use by persons (including children) with
reduced physical, sensory and mental capabilities or lack of experience
and knowledge, unless they have been given supervision or instruction
concerning the use of the product by a person responsible for their safety.
Children should be supervised to ensure that they do not play with the
product.
Use this product only as a sh feeder to be positioned on an ornamental
aquarium for indoor domestic use.
Do not use the product with foodstuffs.
In order not to damage the product:
Avoid contact with water.
During operation, do not block in any way whatsoever the rotation of the
feeder.
Do not use rechargeable batteries.
When the batteries are low and/or you replace them, the programming is
cancelled: it is necessary to reset the programmed feeding mode.
Use preferably with micro-pellet sh food.
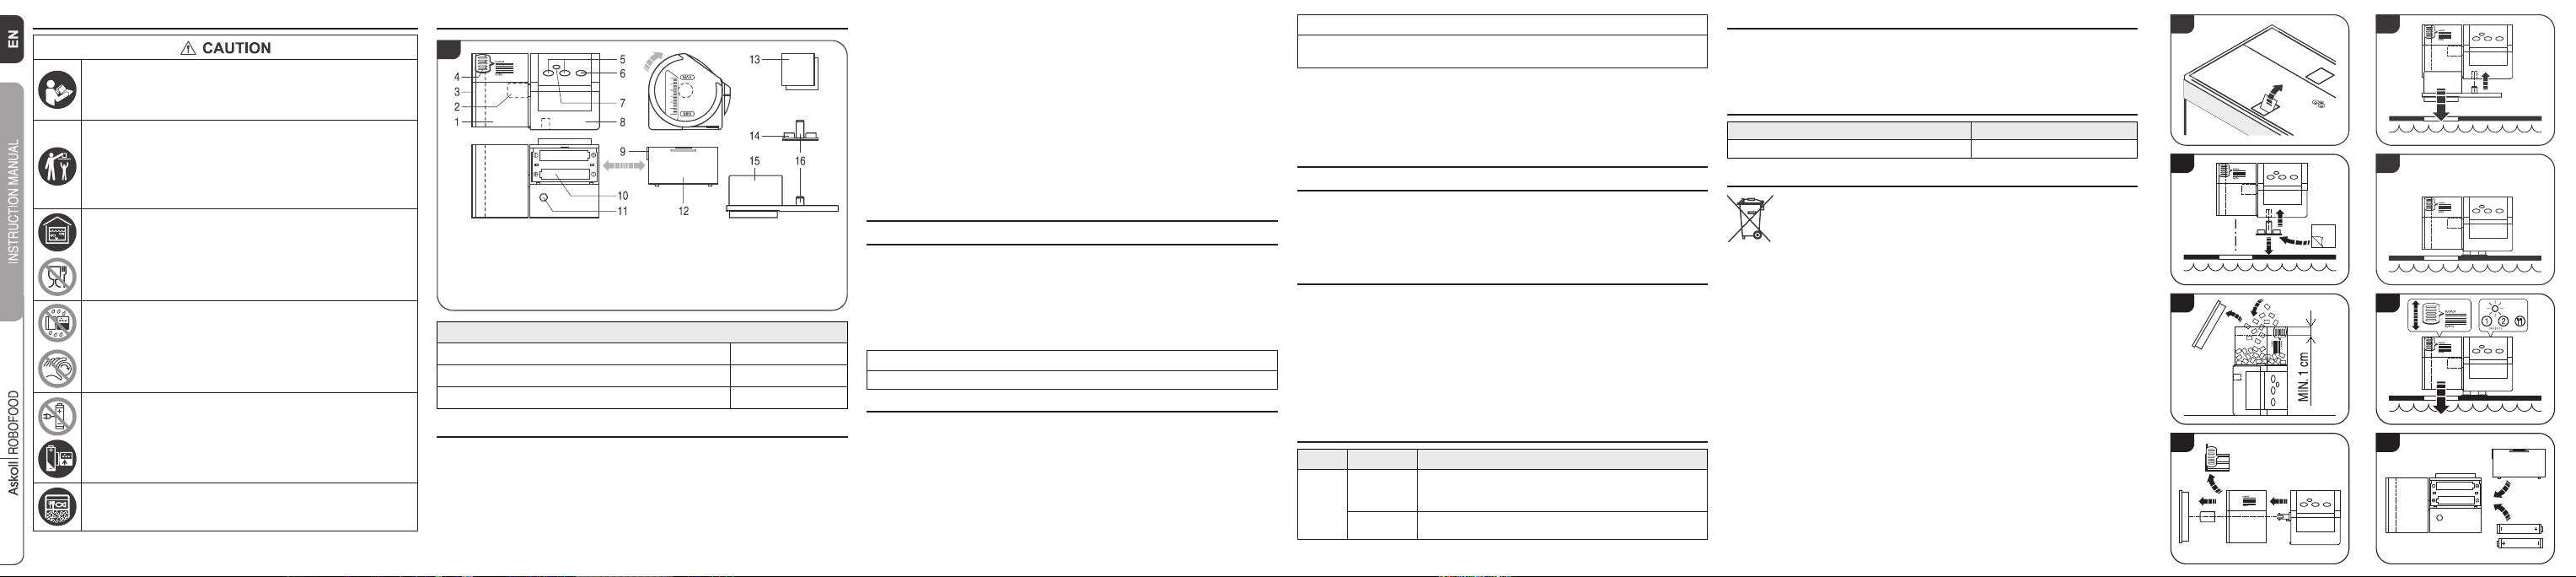
2. PRODUCT SPECIFICATIONS 7. STORAGE AND PACKAGE
1
Legend:
1) Feeder
2) Motor shaft plug
3) Cover
4) Dosing device
5) Programming keys
6) Manual feeding key
7) LED (blue colour)
8) Motor body
9) Release lever
10) Battery compartment
11) Pin insertion seat
12) Battery compartment
cover
13) Double sticking tape
14) Support
15) Adapter
16) Pin
Technical data
Power supply (No. 2 AA non-rechargeable batteries) V 3
Feeder capacity (max.) ml 85
Use temperature (min./ max.) °C from +5 to +35
3. PREPARING PRODUCT FOR USE
1) Open the package, extract the product and check that there are all components contained
in g. 1.
2) Dispose of the package in compliance with the regulations in force in the country where
disposal takes place.
3) Open the battery compartment cover acting on the release lever, extract the two pieces
of double sticking tape and insert the two AA non-rechargeable batteries (not supplied)
observing the polarity shown on the battery compartment (see g. 1).
4) Close the cover.
5) In case of application on Askoll PURE Aquarium KIT Model M / L / XL aquariums:
a) Open the handle of the lighting unit cover (see g. 2).
b) Insert the adapter into the proper pin insertion seat located on the base of the motor body
and place the product on the aquarium with the buttons positioned on the front side (see
g. 3).
In case of use on other types of aquariums (equipped with feeder hole):
a) Apply a piece of double sticking tape under the base of the support and insert the support
in the proper pin insertion seat positioned on the base of the motor body and remove the
protective lm from the double sticking tape (see g. 4).
b) Place the product on the aquarium with the buttons on the front side and the feeder
matching the aquarium hole (see g. 5).
c) Preserve the remaining double sticking tape for future use and dispose of the protection
lm in compliance with the regulations in force in the country where
disposal takes place.
4. OPERATION INSTRUCTIONS
4.1. Loading the food into the feeder
1) Remove the product from the adapter or support.
2) Place the product vertically on a leaning surface and remove the cover of the feeder; pour the
sh food up to about 1 cm from the edge and close the cover (see g. 6).
3) Set the quantity of food to be supplied by moving the proper dosing device to MAX or MIN
(see g. 7).
4) It is possible to verify the quantity of fed food by pressing the manual feeding key.
5) Place the product back on the adapter or support.
REMARK
It is advisable to test the food feeding outside the acquarium.
4.2. Food feeding
The product can be used in manual or programmed mode to feed the food up to two meals a
day automatically (see g. 7).
Manual mode:
• Press the manual feeding key; the LED turns on for the entire duration of the feeder rotation.
Programmed mode:
• First meal: on the wished feeding time, press the key 1 until the LED turns on, signalling
the successful programming. The LED will remain on until the end of the feeder rotation.
• Second meal: use the key 2 to program the desired second feeding time repeating the
operation described above.
REMARK
If the sh eat all the food in few minutes, food quantity is right; otherwise, modify the dosing
device setting (see par. 4.1).
To verify the occurred programming press the key 1 or 2 for more than 2 seconds and then
release it: if the feeder does not rotate, the LED will turn on. This means that the time has been
saved.
To cancel the programming press and keep simultaneously pressed the keys 1 and 2 (Reset): the
LED turns and remains ON until the cancellation has ended; then, release the keys.
5. MAINTENANCE AND CLEANING
5.1. Cleaning the feeder
1) Remove the product from the adapter or support.
2) Detach the feeder from the motor body; remove the dosing device and the motor shaft plug
(see g. 8).
3) Clean the feeder, reassemble and reposition the components carefully repeating the above
described procedure in opposite order.
5.2. Replacing the batteries
1) Remove the product from the adapter or support.
2) Open the battery compartment cover acting on the release lever (see g. 9).
3) Extract the batteries and insert the new ones (non-rechargeable AA batteries) observing the
polarity given on the battery compartment.
4) Place the components back to their position repeating the above described procedure in
opposite order.
5) Set the food feeding programmed mode again (see par. 4.2).
6) Dispose of the replaced batteries in compliance with the regulations in force in the country
where disposal takes place.
6. TROUBLESHOOTING
Anomaly Causes Solutions
The
Lack of power
product
does not
work
Other Refer to your trustworthy retailer
Verify that the batteries are installed and charged. If necessary,
replace the batteries (do not use rechargeable batteries)
In case of product storage:
1) Clean all parts making up the product; extract the batteries.
2) Store the product in the original package box or in other suitable containers.
3) Keep indoor in a dry place, protected against weathering and temperature lower than 0°C.
8. SPARE PARTS
Component (see g. 1) Code
Feeder AB600001
9. PRODUCT DECOMMISSIONING
Decommissioning in compliance with 2002/95/EC, 2002/96/EC, and
2003/108/EC Directives, concerning the reduction in the use of hazardous
substances in electric and electronic equipment, as well as waste disposal.
On the package and/or in the product, the symbol indicating the separate collection of
electric and electronic equipment is printed in a visible, readable and indelible way. It consists of
a crossed-out wheeled bin. The user shall convey the discarded product to the collection centres
in the own Municipality or return it to the trustworthy retailer when purchasing a new equivalent
product, on a one-against-one basis. Suitable separate collection, which allows for the following
recycling, treatment and compatible environmental disposal of the discarded product, contributes
to prevent to affect negatively the environment and the health, besides easing reuse and/or
recycling of the material of which the product is made. Abusive disposal of the product by the
user implies the application of the administrative sanctions set forth by the regulations in force in
the country of disposal.
2 3
4 5
6 7
8 9
 Loading...