

Page 1
PURE
руководство по эксплуатации
AQUARIUM KIT
Instruction manual
Manuel d’instructions
Bedienungsanleitung
Handleiding
inoizurtsiidelaunaM
Page 2
Congratulations!
1. IMPORTANT SAFETY INFORMATION
By purchasing an Askoll PURE S Aquarium you will not only enjoy a fully
made-in-Italy design that harmonises well with several interior design
styles, but you will also be able to rely on a product that concentrates the
best of Askoll technology, a company that can boast more than thirty years
experience in the design and production of articles for aquariums and
ponds.
In just a few minutes, after starting installation, we are sure that you will
appreciate a product conceived in every detail to make any operation easy
and fast. You will enjoy even more the moment in which you will be able to
dedicate your time to create a nature corner in your new Askoll PURE S
Aquarium and you will be able to count on cutting edge devices to preserve
the beauty of the aquatic world along the time, in a simple way.
Before starting, kindly read and follow the warnings and hints contained in
this manual carefully.
To choose sh, plants, and the arrangement suitable for your aquarium,
follow the suggestions of an expert retailer.
This product was designed and manufactured in compliance with the
2006/95/EC and 2004/108/EC Directives to assure a safe use along its
entire life-cycle. However, an improprer use of the product (not complying
with the provisions of this manual) may cause damages to the product and
jeopardise the user's safety.
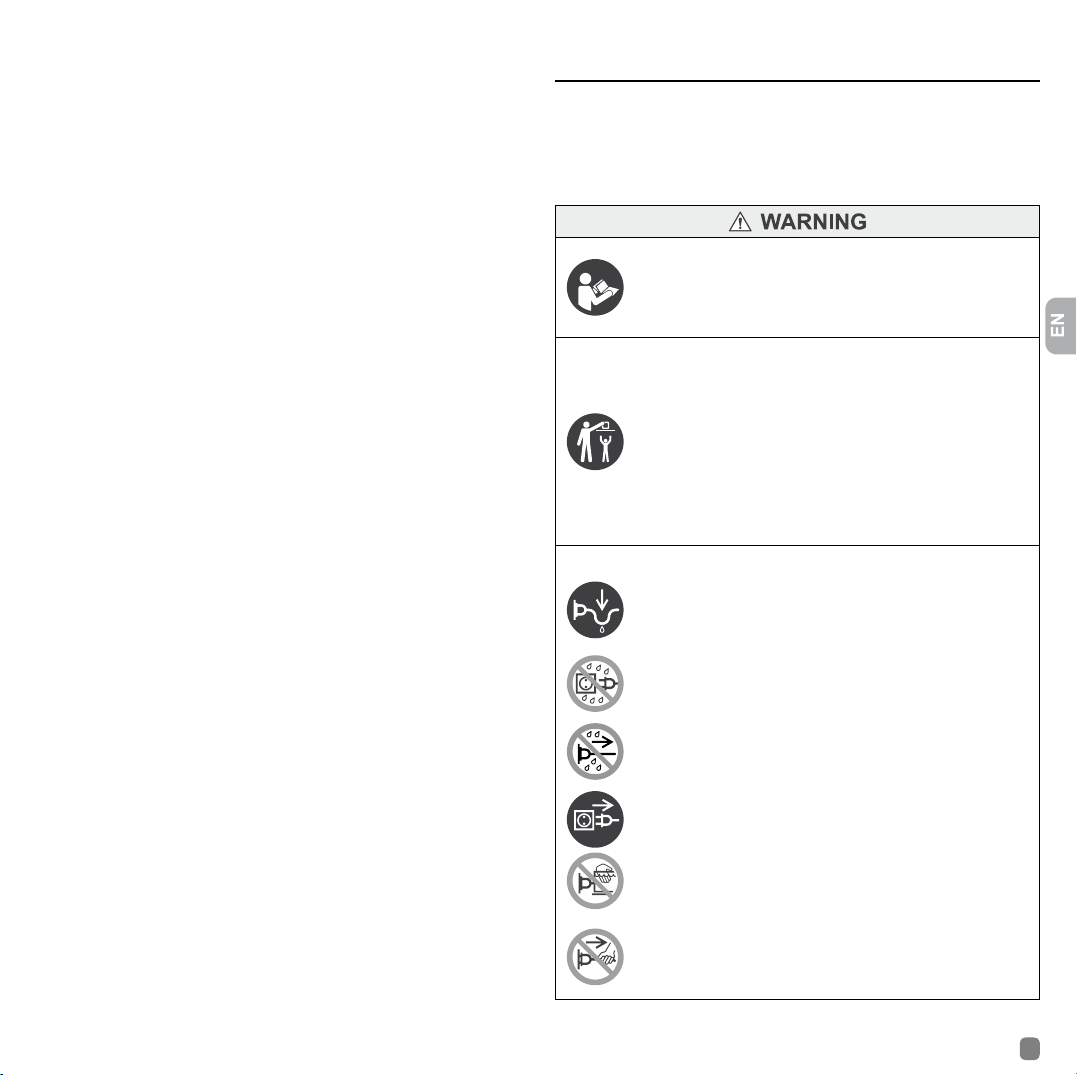
Before using the product read and understand this instruction
manual in all its parts.
This manual is an integral part of the product: keep it for
future reference.
This product is not intended for use by persons (including
children) with reduced physical, sensory and mental
capabilities or lack of experience and knowledge, unless they
have been given supervision or instruction concerning the
use of the product by a person responsible for their safety.
Children should be supervised to ensure that they do not play
with the product.
To avoid electric risk:
Each power cable of the electric devices has to show a drip
loop positioned lower than the plug-outlet connection point in
order to prevent any drop from reaching such point.
The electric devices plug and outlet should not get wet.
Should the plug or outlet of any of the electric devices
become wet, do not disconnect the cable. Disconnect power
supply to the electric system acting on the main switch.
Disconnect the plugs of the electric devices from the outlets
before handling the product and/or immersing the hands in
water.
Never pull the cable of the electric devices to disconnect the
plugs from the outlets. To disconnect them, grab the plugs
and pull them.
1
Page 3
PURE Aquarium KIT
2. TABLE OF CONTENTS
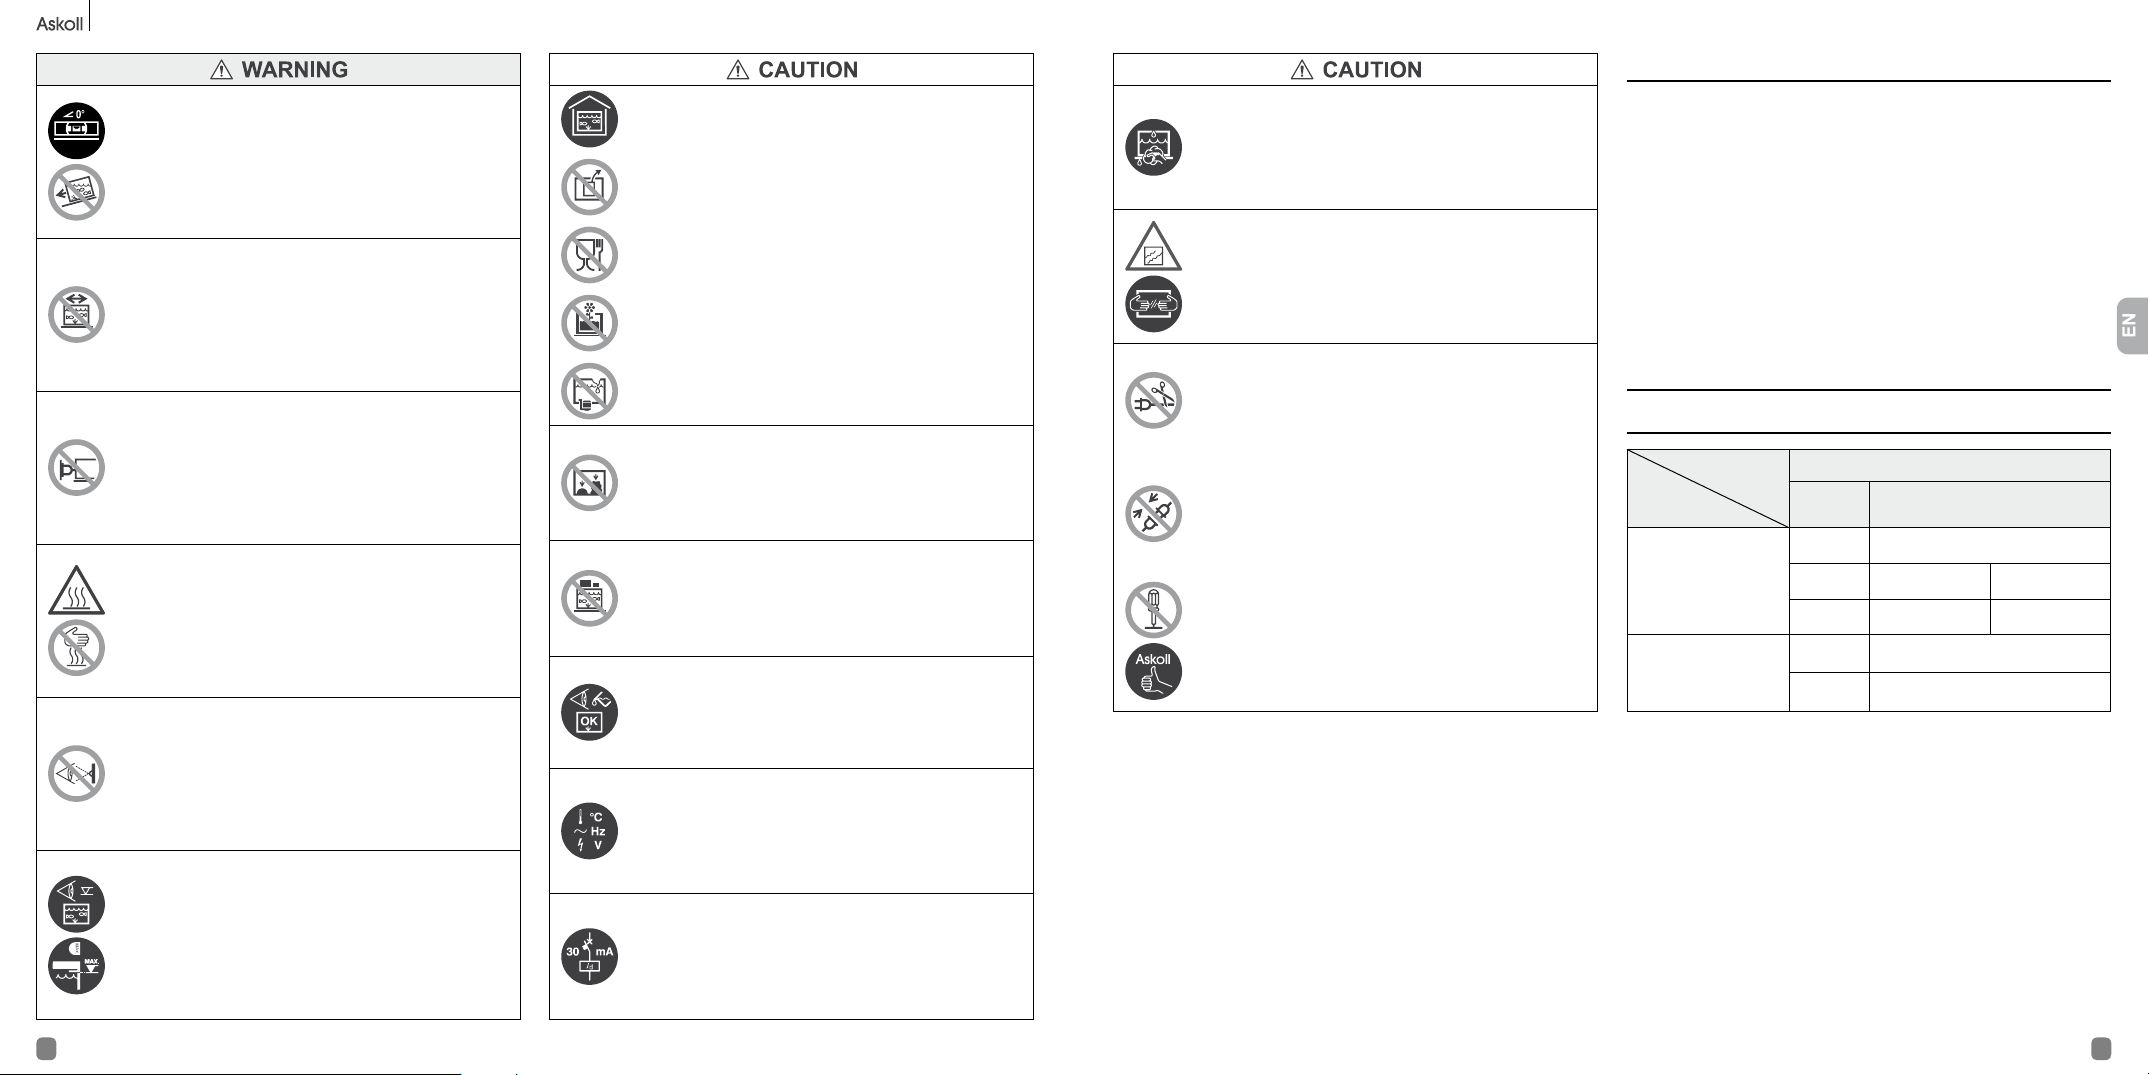
To avoid instability risk: check with a level that the support
surface of the product is horizontal.
Do not lean the product on inclined surfaces.
After installation, do not move the product.
If necessary, move it only if the tank is completely empty.
Do not connect the electric devices of the product to the
mains before having completed the installation or having
repositioned the same after maintenance operations. Do not
use the pump dry.
To avoid the risk of burns:
After disconnecting the plug, let the hot parts of the lighting
unit cool down (about 5 minutes) before handling them.
Use the product exclusively as decorative aquarium for
indoor domestic use.
Each component is an integral part of the product.
It shall not be used on other products.
Do not use the product for use with foodstuffs.
Do not use the product as terrarium.
Do not use the product, if damaged and/or disassembled.
Do not lean any rocks, stones or other heavy decorating
elements directly on the bottom of the tank.
Do not place any item on the product.
Verify the integrity of the product before pouring water into
the tank.
After maintenance operations, if necessary, dry the external
parts of the product and the surface on which it is positioned.
To protect the polished surfaces of the product from scratches
and scrapes, pay utmost care when cleaning and handling
the same.
Do not cut the power cables.
Power cables cannot be repaired.
If the cable is damaged, the product has to be discarded.
Do not use extension cables.
If the length of the power cable of the electric devices is not
sufcient, refer to an electrician.
Do not try to repair any product component: in case of
damage replace the damaged component with original spare
parts (see chap. 9).
1. IMPORTANT SAFETY INFORMATION ..................................................1
2. TABLE OF CONTENTS ..........................................................................3
3. PRODUCT SPECIFICATIONS ...............................................................3
4. PREPARE PRODUCT FOR USE ...........................................................6
5. OPERATION INSTRUCTIONS ...............................................................8
6. MAINTENANCE AND CLEANING .........................................................9
7. TROUBLESHOOTING ..........................................................................12
8. STORAGE AND PACKAGE .................................................................12
9. SPARE PARTS .....................................................................................12
10. PRODUCT DECOMMISSIONING ......................................................12
3. PRODUCT SPECIFICATIONS
3.1. Product identication
Askoll PURE Aquarium KIT
Components
Lighting unit
Pump
Name
Model PURE S
Model LIGHT UNIT S
Version AC 230 V AC 240 V
Type D-52020 D-52021
Model PURE PUMP 170
Type C-19011
Do not direct the light beam produced by the lighting unit
directly in the eyes of people.
Check that the water is always at the level shown on the
frame.
After maintenance operations, if necessary, restore the
proper water level.
2 3
Install the electric devices of the product observing the
voltage and frequency values shown on the devices and the
temperature ones specied among the technical data under
par. 3.4.
Connect the electric devices to mains protected by a residual
current device with a sensitivity ≤ 30 mA.
Page 4
PURE Aquarium KIT
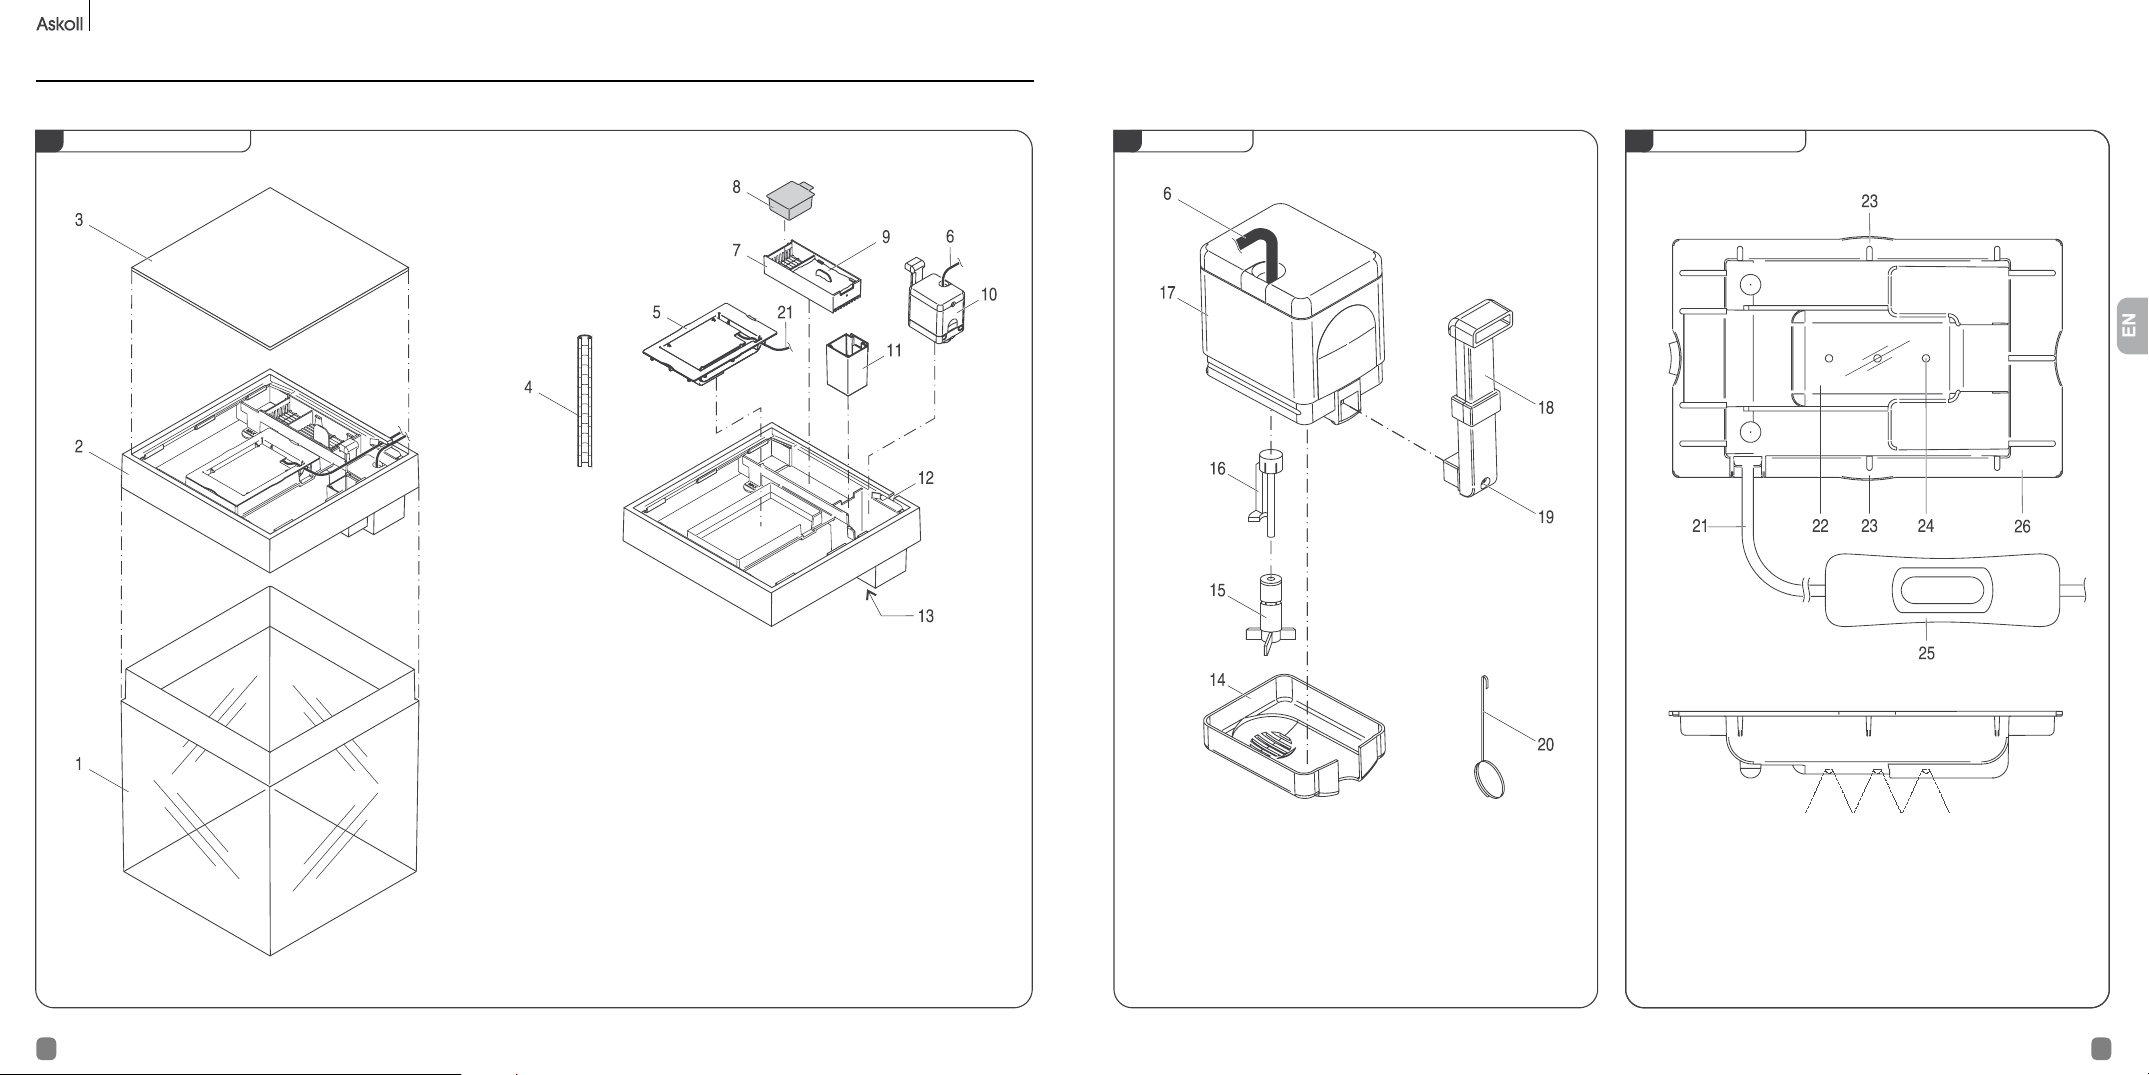
3.2. Component name and package content
Check that the package contains the components shown in the following gures.
Product and frame detail
1
Legend (g. 1-2-3):
1) Tank
2) Frame
3) Cover
4) Cable guiding element
5) Lighting unit
6) Power cable with plug
7) Basket for mechanical ltration sponges and carbon and
mix cartridges
8) Carbon (No. 1) and mix (No. 1) cartridges
9) No. 2 mechanical ltration sponges
10) Pump
11) Thermal heater support
12) Fairlead seat
inlet pre-arrangement
13) CO
2
Detail: Pump
2 3
14) Lower cover
15) Magnetic impeller
16) Pump shaft
17) Motor body
18) Delivery tube
19) Water recirculation hole
20) Pump shaft extracting device
Detail: Lighting unit
21) Power cable with switch and transformer
22) LED assembly
23) Grip points
24) LEDs
25) ON-OFF switch
26) Support base on the frame
4 5
Page 5
PURE Aquarium KIT
3.3. Optional modules
The product may be equipped with the following modules (not included).
Module Function
Askoll CO
PRO-GREEN SYSTEM
Askoll THERM S thermal
heater (35W)
System - CO2
2
It allows providing CO2 to the aquarium thus
easing plant growth.
It allows regulating aquarium temperature
(from 18°C to 31°C).
3.4. Technical data
Description
Capacity l 13
Imp gal 2.85
Product weight kg 2.92
Max. weight with water kg 18
Height cm 29
Width cm 24.5
Depth cm 24.5
Water temperature (min./ max.) °C from +5 to +35
PUMP / LIGHTING UNIT
Power supply V / Hz See data given on
the individual electric
Consumption
IP protection code
W
devices making up the
product.
4.2. Positioning
Select the place where to install the product with care, observing the
following provisions.
To avoid instability risk: check with a level that the support
surface of the product is horizontal.
Do not lean the product on inclined surfaces.
Place the product on a sturdy support able to bear the
maximum weight set for the product (see technical data).
Such support must have a levelled, smooth and clean
support surface.
In order not to ease algae proliferation, place the product far
from heat sources and direct exposure to sunlight.
Place the product with the fairlead seat on the rear side and at such a
distance from the outlet that it is possible to create a drip loop for each of
the power cables of the electric devices.
4.3. Installation
To clean the product do not use abrasive products, toxic
substances or detergents.
Also prevent algae or other items present in the tank from
clogging the hole for water circulation or the pump inlet grids.
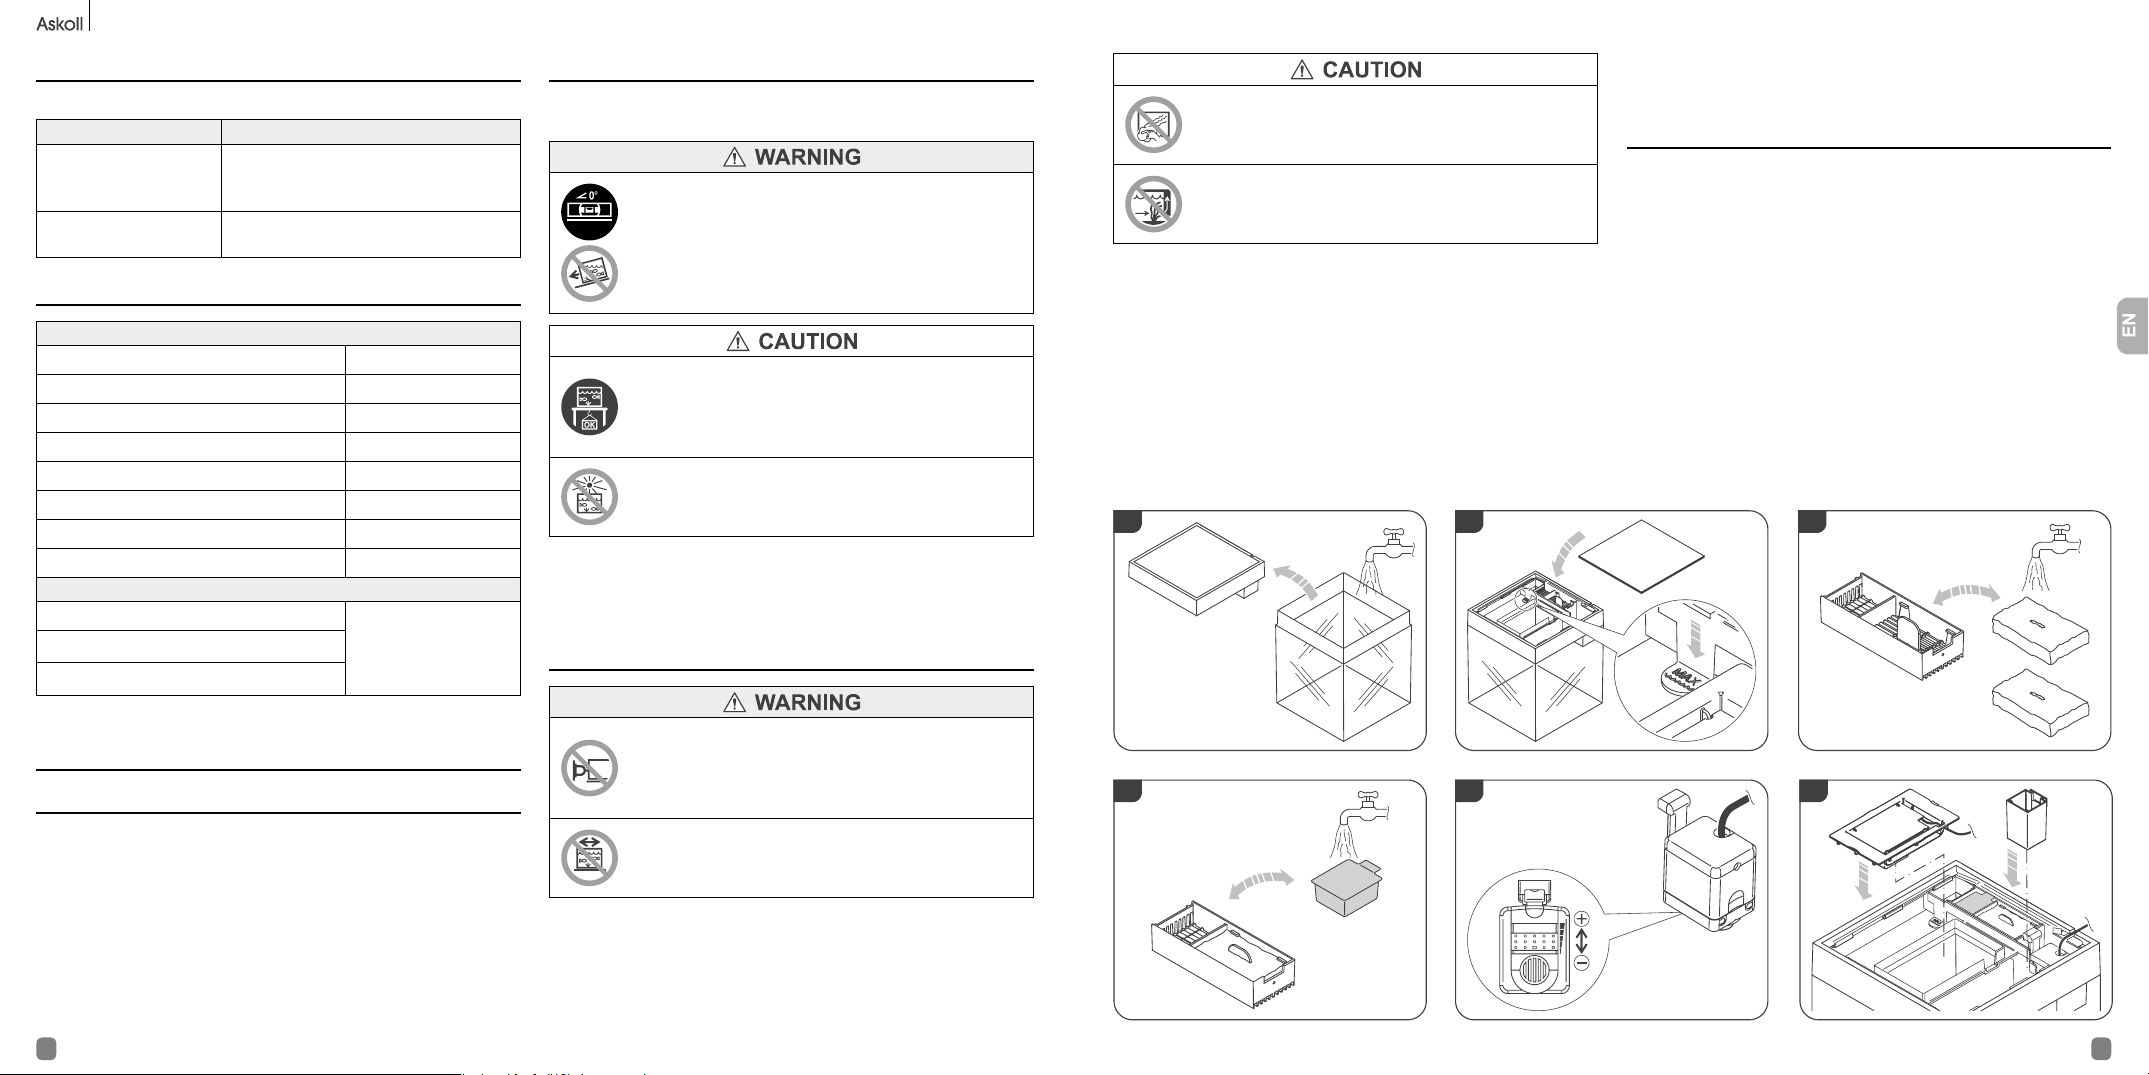
1) Remove the frame and the cover (place them on a at and clean
surface, avoid scratching them)
2) Rinse the inner side of the tank under running water (see g. 4).
3) Prepare the tank bottom (sand or other suitable material) according to
the arrangement desired.
4) Slowly ll the tank with about 1/3 water and place any decorations or
aquatic plants.
5) Place the frame back on the tank and slowly ll the tank until water
4
5
reaches the level shown on the frame (see g. 5).
6) Close the cover and verify that there are no leaks.
4.4. Assembly
1) Remove the cover and extract the basket for the mechanical ltration
sponges, and the carbon and mix cartridges.
2) Extract the mechanical ltration sponges, rinse them under running
water and place them back into the basket (see g. 6).
3) Open the bag containing the carbon cartridge, rinse it under running
water and place it back in the basket (see g. 7) (it will be replaced by
the mix cartridge according to the instructions given under chap. 6).
4) Place the basket with the mechanical ltration sponges and the carbon
cartridge in the frame.
5) Set the pump ow rate selector (see g. 8) to the maximum value and
insert the pump into the frame.
6) Insert the lighting unit into the frame and, if the use of the thermal
heater is forecast, insert also the thermal heater support (see g. 9).
6
4. PREPARE PRODUCT FOR USE
4.1. Unpacking
1) Open the package, remove the corner elements and extract the bag
containing the product handling it with care.
2) Place it on a at, smooth and clean surface avoiding to scratch and/or
damage the tank bottom.
3) Extract from the package the carton containing some disassembled
components.
4) Dispose of the packaging materials in compliance with the regulations
in force in the country where disposal takes place.
5) Check that the product has all components shown in par. 3.2.
6 7
Do not connect the electric devices of the product to the
mains before having completed the installation or having
repositioned the same after maintenance operations. Do not
use the pump dry.
After installation, do not move the product.
If necessary, move it only if the tank is completely empty.
7
8
9
Page 6
PURE Aquarium KIT
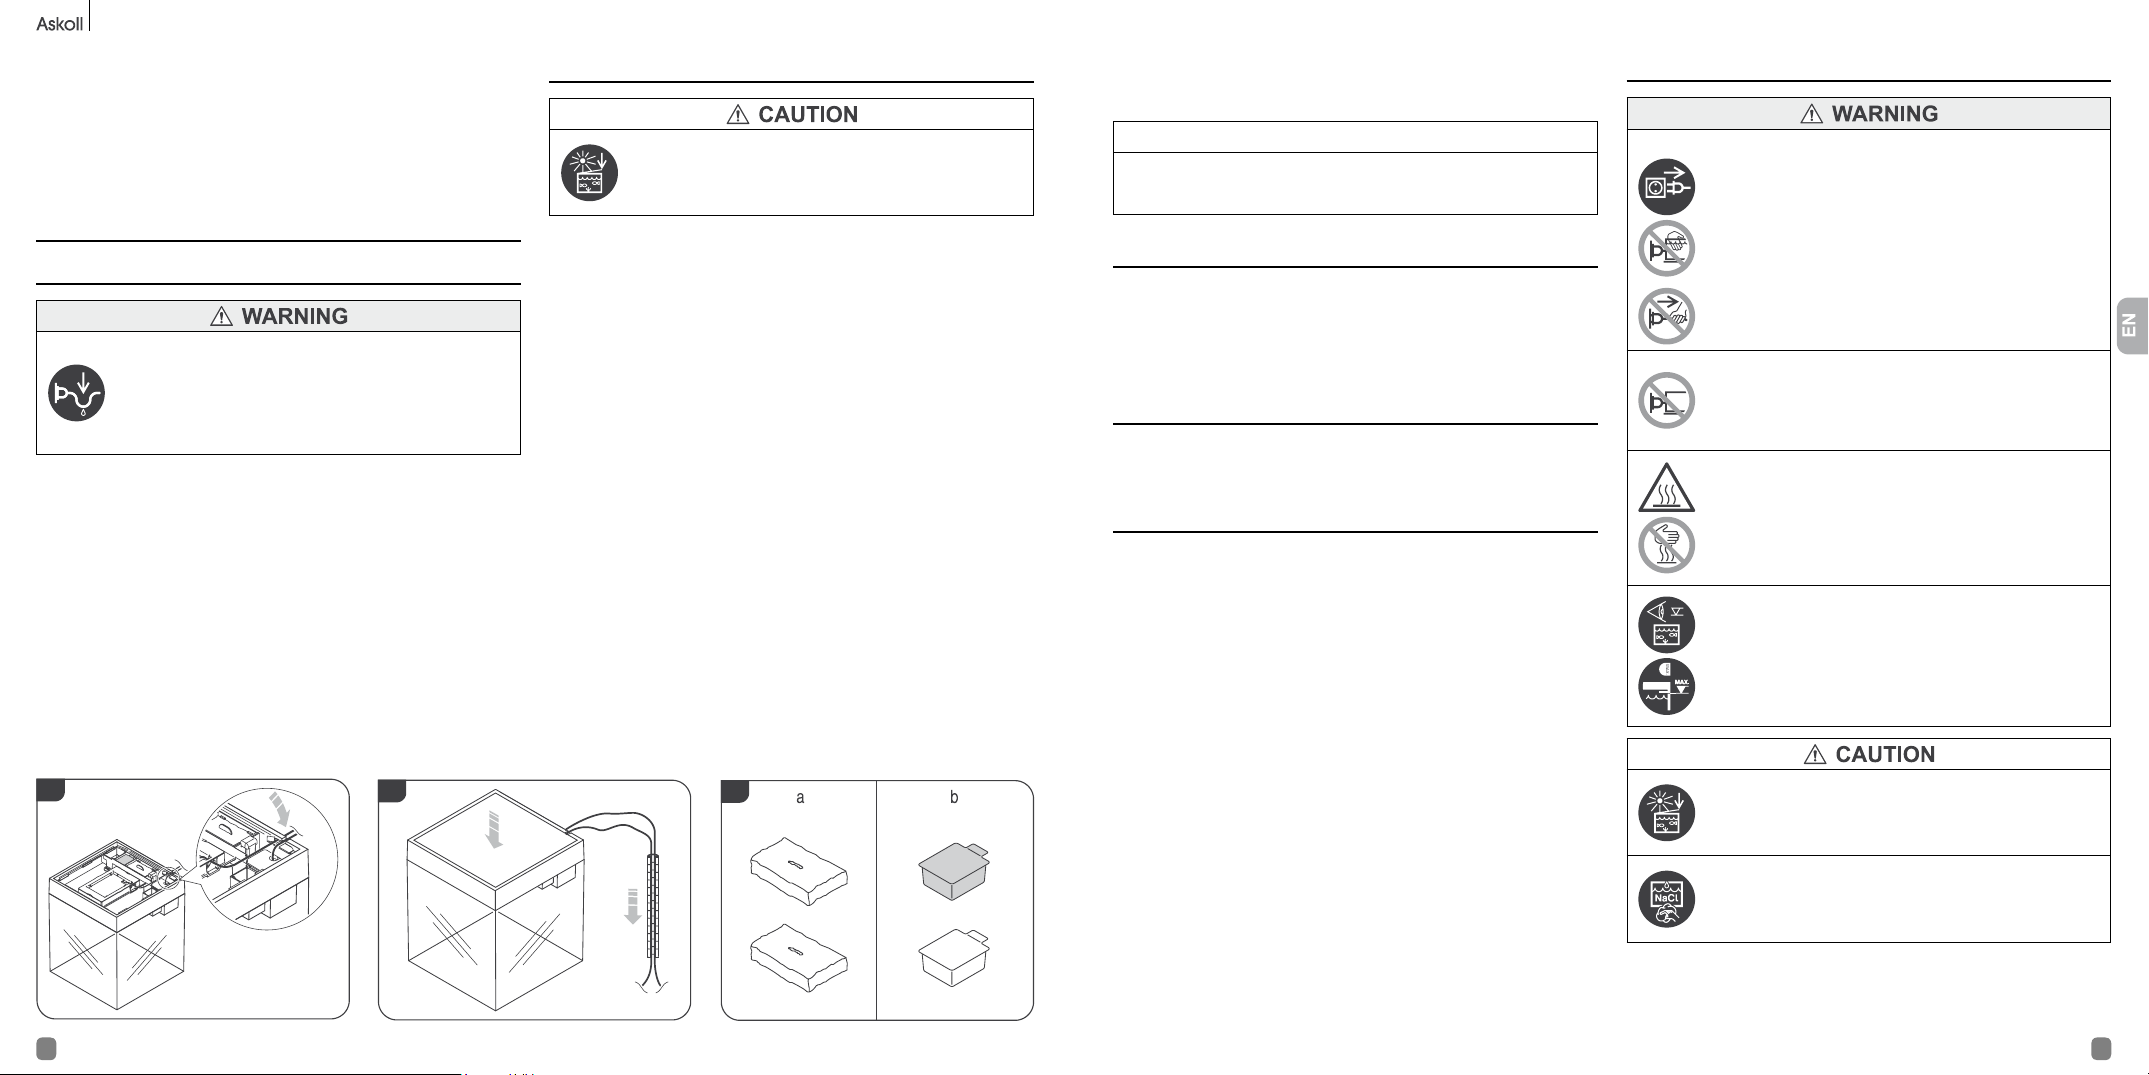
7) Lay the power cables (of the lighting unit and pump) into the proper
fairlead seat (see g. 10) and then in the cable guiding element
(see g. 11).
8) Place the cover back and dispose of the carbon cartridge plastic bag in
compliance with the regulations in force in the country where disposal
takes place.
5. OPERATION INSTRUCTIONS
5.1. Routine operation
To avoid electric risk:
Each power cable of the electric devices has to show a drip
loop positioned lower than the plug-outlet connection point in
order to prevent any drop from reaching such point.
1) Read the warnings under chap. 1.
2) After having connected the plug of each electric device verify the
operation of the same (in case of malfunction refer to chap. 7):
• Water has to exit from delivery output.
• By pressing on the ON-OFF switch of the lighting unit, this latter has
to start working (press the switch once again to turn it off).
3) Add the sh, if wished, according to your own experience and following
the rules relating to aquariology good practices.
5.1.1. Filtration
Always close the cover, after having performed the necessary
operations in order to avoid promoting algae proliferation in
the lters due to the presence of light.
In order to provide for the best habitat for sh and plants, the water of each
aquarium has to continuously undergo mechanical, biological and chemical
ltration.
The mechanical ltration (see g. 12a), carried out by the mechanical
ltration sponges made of polyurethane, eliminates any suspended
particles making water clear. It is always possible to visually check the
clogging level of the sponges simply by opening the cover.
The biological ltration (see g. 12a), carried out by the nitrifying bacteria
nesting in the mechanical ltration sponges, aims at keeping aquarium water
free from chemicals, which are harmful for the aquatic fauna, transforming
the ammonia produced by the sh into nitrates. In order to allow a sufcient
quantity of bacteria to settle down in the ltration media and carry out such
water purication function, about 4 weeks are necessary. Therefore, the rst
month of an aquarium is rather critical and the sh has to be added very
gradually in order to allow the nitrifying bacteria to settle down, reproduce
and be effective,
Finally, the chemical ltration (see g. 12b) is carried out by the active
carbon contained in the carbon cartridge or by the mix of resins contained
in the mix cartridge. Thanks to the very high carbon porosity, potentially
noxious chemical compounds, pharmaceutical residues, smells, waste
substances, which reduce water clarity, etc. are removed. The mix cartridge
allows removing efciently nitrates and phosphates, freeing water from the
main cause of algae proliferation.
The regular and alternated use of the carbon and mix cartridges
(see par. 6.2) allows keeping under control the water pollution degree,
efciently preventing algae development and keeping water clear and
crystalline.
REMARK
In saltwater aquariums the mix cartridge function is limited to the
removal of phosphates, while it is ineffective against nitrates.
5.1.2. Lighting
Thanks to the high efciency LEDs, the lighting unit recreates natural
lighting and enhances the colours of the aquatic fauna and ora.
The lighting unit is controlled by an ON-OFF switch, which allows turning it
on and off without need of disconnecting the power plug.
5.1.3. Water recirculation
The pump is equipped with a water circulation hole on the delivery tube to
improve water circulation in the aquarium.
5.2. In case of power failure
Power failure (blackout) can result, after some hours, in the progressive
deterioration of the biological lter effectiveness with possible following
damages to the aquarium ecosystem.
In case of malfunction refer to chap. 7.
6. MAINTENANCE AND CLEANING
To avoid electric risk:
Disconnect the plugs of the electric devices from the outlets
before handling the product and/or immersing the hands in
water.
Never pull the cable of the electric devices to disconnect the
plugs from the outlets. To disconnect them, grab the plugs
and pull them.
Do not connect the electric devices of the product to the
mains before having completed the installation or having
repositioned the same after maintenance operations. Do not
use the pump dry.
To avoid the risk of burns:
After disconnecting the plug, let the hot parts of the lighting
unit cool down (about 5 minutes) before handling them.
Check that the water is always at the level shown on the
frame.
After maintenance operations, if necessary, restore the
proper water level.
10
8 9
11 12
Always close the cover, after having performed the necessary
operations in order to avoid promoting algae proliferation in
the lters due to the presence of light.
In case of saltwater aquariums, perform a frequent and
careful cleaning (at least once a month) of the parts affected
by saline condensate.
Page 7
PURE Aquarium KIT
6.1. Maintenance and cleaning interventions
Observe the forecast intervention schedule in order to preserve maximum
effectiveness of the product.
Frequency Intervention point Intervention description
Every week
See RFS
(see par. 6.2)
Every 6 months Pump Cleaning
Filters Visual check
Tank Water level check
Filters Replacement
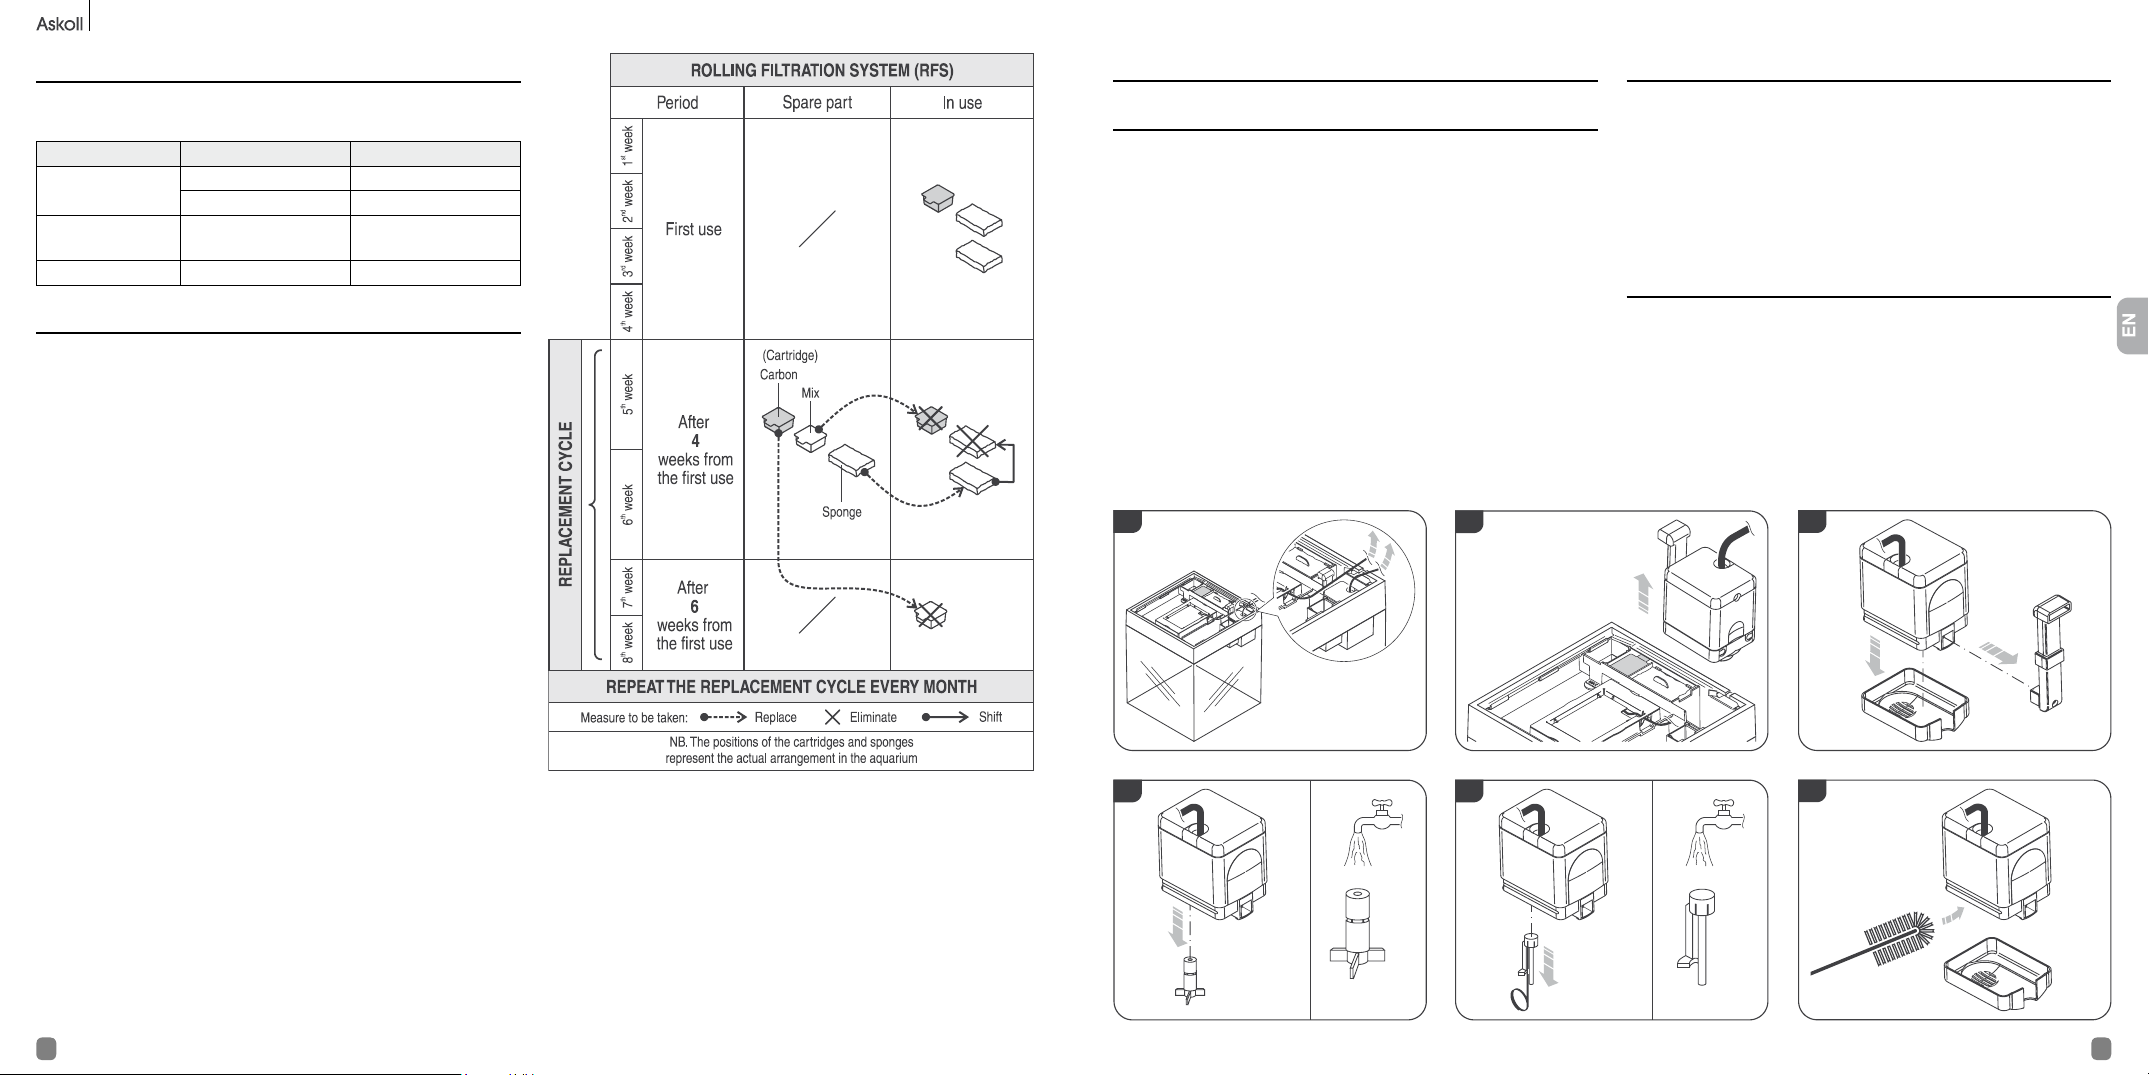
6.2. Rolling Filtration System
In order to assure maximum efciency of the lter at any time , as well as
the best water conditions in the aquarium, Askoll recommends to replace
the ltration media regularly, in compliance with the Rolling Filtration
System (RFS).
This can be attained very easily by purchasing the original spare parts Kit
by Askoll, which includes everything needed.
To replace the sponges and cartridges, proceed as follows:
1) Open the cover.
2) Remove the sponges and the cartridges and dispose the same in full
compliance with the regulations in force in the country where product
disposal takes place.
3) Replace the sponges and cartridges as established in the table.
4) Close the cover.
6.3. Pump maintenance
6.3.1. Pump cleaning
1) After disconnecting the plug of each electric device, remove the cover
and extract the cables from the fairlead seat and the cable guiding
element (see g. 13).
2) Extract the pump from the frame (see g. 14).
3) Disassemble the delivery tube and the lower cover from the pump
(see g. 15).
4) Extract the magnetic impeller and rinse it under running water
(see g. 16).
5) Using the proper extracting device, extract the pump shaft and rinse it
under running water (see g. 17).
6) Clean the inner side of the pump with a non abrasive bottle brush
(see g. 18).
7) Reassemble the disassembled components and place the pump
and the cover back to their position, repeating the above described
procedure in opposite order.
13
14
6.3.2. Pump replacement
1) After disconnecting the plug of each electric device, remove the cover
and extract the cables from the fairlead seat and the cable guiding
element (see g. 13).
2) Extract the pump from the frame (see g. 14) and replace it.
3) Dispose of the pump as specied under chap. 10.
4) Place the new pump, reassemble and reposition the components
carefully repeating the above described procedure in opposite order.
6.4. Lighting unit replacement
1) After disconnecting the plug of each electric device, remove the cover
and extract the cables from the fairlead seat and the cable guiding
element (see g. 13).
2) Extract the lighting unit using the grip points and replace it.
3) Dispose of the lighting unit in compliance with chap. 10.
4) Place the new lighting unit, reassemble and reposition the components
carefully repeating the above descried procedure in opposite order.
15
The PURE FILTER MEDIA KIT S spare parts kit for aquariums Askoll
PURE S can be purchased from your trustworthy retailer (see product code
under chap. 9) and contains the following ltration media:
• 1 sponge for mechanical and biological ltration.
• 1 active carbon cartridge for chemical ltration.
• 1 mix cartridge (anti-nitrates and anti-phosphates) for chemical ltration.
In order to keep optimal aquarium conditions, Askoll suggest purchasing a
package of PURE FILTER MEDIA KIT S each month.
The scheme on the side outlines the replacement sequence for the
individual ltration media, which involves the replacement of the sponge for
mechanical ltration once every 4 weeks and the alternation of the carbon
cartridge with the mix cartridge every 2 weeks.
10 11
16
17
18
Page 8
PURE Aquarium KIT
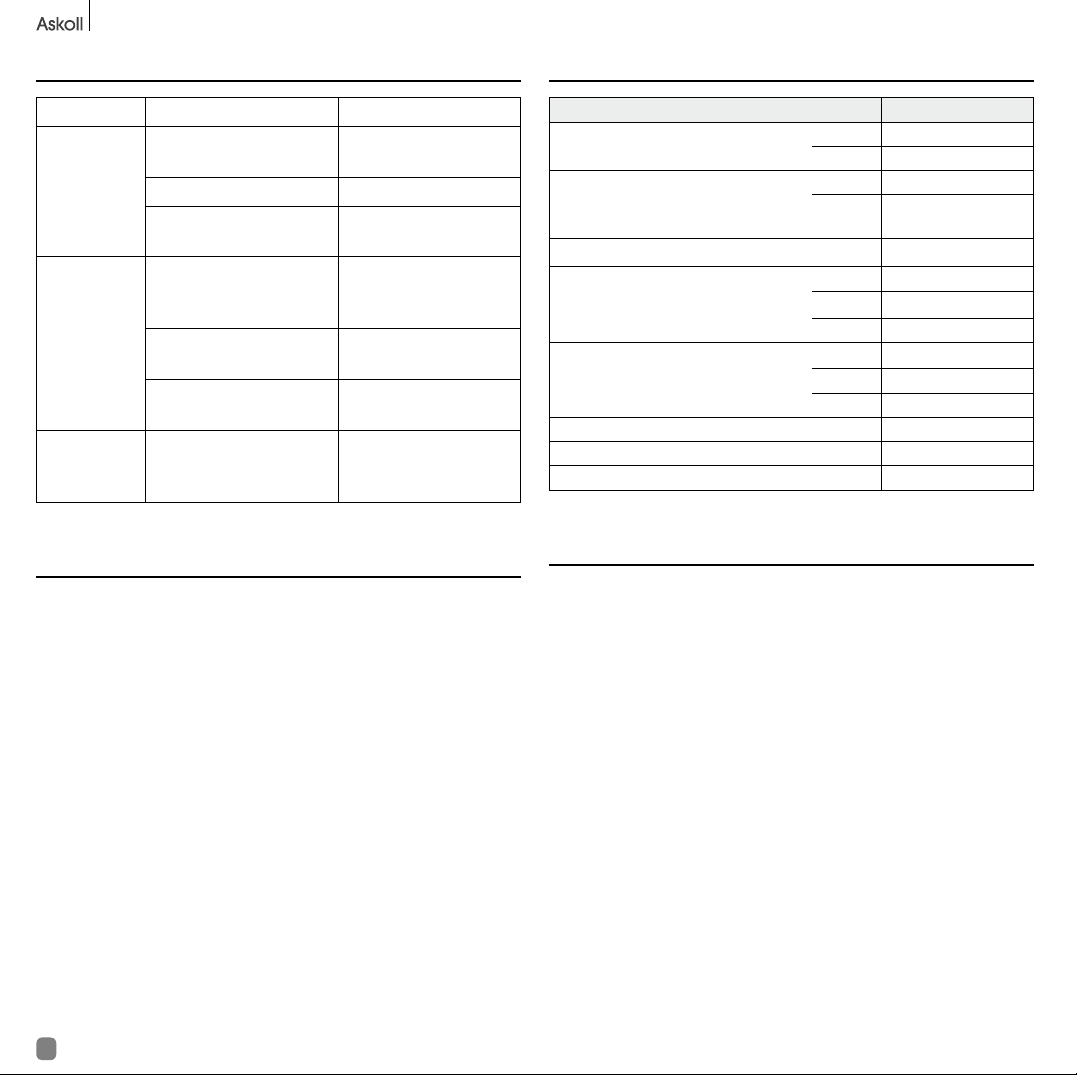
7. TROUBLESHOOTING
ANOMALIES CAUSES SOLUTIONS
Lighting not
working
No water ow
rate
Water
ow rate
insufcient
Lack of connection of the
plug to the power outlet
Lighting unit not working Replace the lighting unit
Other
Lack of connection of the
plug of the pump to the
power outlet
Pump blocked
Other
Inlet grids, pump, delivery
tube clogged
Connection the plug to
the power outlet
Refer to a trustworthy
retailer
Connection the plug to
the power outlet
Clean the magnetic
impeller (see par. 6.3.1)
Refer to a trustworthy
retailer
Clean the parts
8. STORAGE AND PACKAGE
In case of product storage:
1) Clean and dry all parts making it up carefully. The mechanical ltration
sponges, carbon and mix cartridges have to be disposed of in
compliance with the regulations in force in the country where disposal
takes place.
2) Store the product and its components in the original package box or in
other suitable containers.
3) Keep indoor in a dry place, protected against weathering and
temperature lower than 0°C.
9. SPARE PARTS
Component (see g. 1, g. 2, and g. 3) Codes
Pump
PURE PUMP 170
Lighting unit
LIGHT UNIT S
thermal heater and basket support KIT AB350017
Cable guiding element (No. 2)
Cover
PURE FILTER MEDIA KIT S AC350004
Magnetic impeller AB350035
Pump shaft and extracting device AB350036
Europe AB350001
UK AB350002
Europe AB350006
UK AB350007
white AB350021
black
sand AB350023
white AB350025
black AB350026
sand AB350027
AB350022
10. PRODUCT DECOMMISSIONING
In compliance with 2002/95/EC, 2002/96/EC, and 2003/108/EC
Directives, concerning the reduction in the use of hazardous
substances in electric and electronic equipment, as well as waste
disposal.
On the package and/or in the product, the symbol indicating the separate
collection of electric and electronic equipment is printed in a visible,
readable and indelible way. It consists of a crossed-out wheeled bin.
The user shall convey the discarded product to the collection centres in
the own Municipality or return it to the retailer when purchasing a new
equivalent product, on a one-against-one basis.
Suitable separate collection, which allows for the following recycling,
treatment and compatible environmental disposal of the discarded product,
contributes to prevent to affect negatively the environment and the health,
besides easing reuse and/or recycling of the material of which the product
is made. Abusive disposal of the product by the user implies the application
of the administrative functions set forth by the regulations in force in the
country of disposal.
Page 9
Askoll Due S.p.A.
Via Industria, 32/34 - 36031 DUEVILLE (VI) - ITALIA
www.askoll.com
09627800 27E11
 Loading...