

Page 1

USE AND CARE GUIDE
SAVE THESE INSTRUCTIONS FOR FUTURE REFERENCE
IMPORTANT!
To get the best performance from
your washer, read all operating
instructions before using it for the
first time.
WASHER
CONTENTS
IMPORTANT SAFETY INSTRUCTIONS 2
CHILD SAFETY FEATURES 2
ASKO WASHER FEATURES 3
INSTALLATION INSTRUCTIONS 4
PREPARING THE LAUNDRY 6
THE DETERGENT DRAWER 8
DETERGENTS 8
FABRIC SOFTENERS 9
FABRIC DYEING 9
RECOMMENDED WASH TEMPERATURES 9
W6021 OPERATING INSTRUCTIONS 10
W6441 OPERATING INSTRUCTIONS 12
W6761 OPERATING INSTRUCTIONS 15
CARE AND MAINTENANCE INSTRUCTIONS 21
COMMON LAUNDRY PROBLEMS 22
TROUBLESHOOTING 23
ASKO PRODUCT WARRANTY 25
INDEX 26
Page 1
Page 2

IMPORTANT SAFETY INSTRUCTIONS
T o reduce the risk of fire, electric shock, or injury to
persons when using your appliance, follow basic
precautions, including the following:
♦ Read all instructions before using the appliance.
♦ Do not run appliance while you are out of the home.
♦ Do not wash or dry articles that have been previously
cleaned in, washed in, soaked in, or spotted with
gasoline, dry-cleaning solvents, cooking oils, or other
flammable or explosive substances because they
give off vapors that could ignite or explode.
♦ Do not allow children to play on or in the appliance.
Close supervision of children is necessary when the
appliance is used near children.
♦ Before the appliance is removed from service or discarded,
remove the door to the washing compartment.
♦ Do not reach into the appliance if the drum is moving.
♦ Do not install or store this appliance where it will be
exposed to the weather.
♦ Do not tamper with controls.
♦ Do not repair or replace any part of the appliance or
attempt any servicing unless specifically
recommended in the user-repair instructions or in
published user-repair instructions that you
understand and have the skills to carry out.
♦ Do not add gasoline, dry-cleaning solvents, or other
flammable or explosive substances to the wash
water. These substances give off vapors that could
ignite or explode.
♦ Under certain conditions, hydrogen gas may be
produced in a hot water system that has not been
used for 2 weeks or more. HYDROGEN GAS IS
EXPLOSIVE. If the hot water system has not been
used for such a period, before using a washing
machine or combination washer-dryer, turn on all
water faucets and let the water flow from each for
several minutes. This will release any accumulated
hydrogen gas. As the gas is flammable, do not
smoke or use an open flame during this time.
WARNING!
This appliance must be properly grounded.
GROUNDING INSTRUCTIONS
A) Grounding instructions for a grounded, cordconnected appliance
In the event of malfunction or breakdown, grounding
will reduce the risk of electric shock by providing a path
of least resistance for electric current. This appliance is
equipped with a cord having an equipment-grounding
conductor and a grounding plug. The plug must be
plugged into an appropriate outlet that is properly
installed and grounded in accordance with all local codes
and ordinances.
WARNING!
Improper connection of the equipment-grounding
conductor can result in a risk of electric shock.
Check with a qualified electrician or service
representative or personnel if you are in doubt as
to whether the appliance is properly grounded.
Do not modify the plug provided with the appliance. If it
will not fit the outlet, have a proper outlet installed by a
qualified electrician.
B) Grounding instructions for a permanently
connected appliance:
This appliance must be connected to a grounded metal,
permanent wiring system, or an equipment-grounding
terminal or lead on the appliance.
NOTE: This manual does not cover every possible
condition and situation that may occur. Use
common sense and caution when installing,
operating, and maintaining any appliance.
CHILD SAFETY FEATURES
CHILD-SAFE DETERGENT DRAWER
ASKO washers have a child-safety catch on the detergent
drawer that can be engaged to prevent a child from
opening the drawer and possibly coming into contact with
the detergent or fabric softener. Refer to page 8 for
instructions on how to engage the child-safety catch.
CHILD-SAFE TEMPERATURE KNOB
Model W6021 has a child-safety catch that can be engaged
to prevent children from tampering with the temperature
knob. The catch is located below the temperature knob
behind the edge of the control panel. To engage it, insert a
flathead screwdriver in the slot on the catch. Press upwards
as you turn the catch clockwise. When you release the catch
it should protrude slightly below the control panel.
Once the catch is engaged, you must hold it up as you
turn the temperature knob to the desired setting.
CHILD-SAFE START
Y ou can program Models W6441 and W6761 not to start
unless the Start button is held down for three seconds.
Page 2
This is to prevent children from inadvertently starting
the machine. Refer to the operating instructions for these
models to program this safety feature.
MORE CHILD-SAFETY TIPS
♦ Laundry detergents are corrosive, so always keep
them out of reach of children.
♦ Should a child swallow detergent, give plenty to drink
immediately , i.e., one or two glasses of milk or water .
Do not try to induce vomiting. Seek medical advice
immediately: 1-800-POISON1
♦ Always close the door and start the appliance as
soon as you put in the detergent.
♦ Always turn the power off to the machine when it is
not in use.
♦ Always keep small children away from the machine
when it is open. There may be some detergent
residue left inside the machine.
♦ If laundry detergent gets in someone’s eyes, rinse
them with plenty of water for at least 15 minutes.
Page 3
ASKO WASHER FEATURES
Your new energy-efficient ASKO washer is designed to
give you maximum cleaning performance using less
water, energy and detergent. To make the most of the
washer’s functions and features, we recommend that
you read this manual carefully before using your machine
for the first time. For operating instructions, refer to
pages 10 through 20.
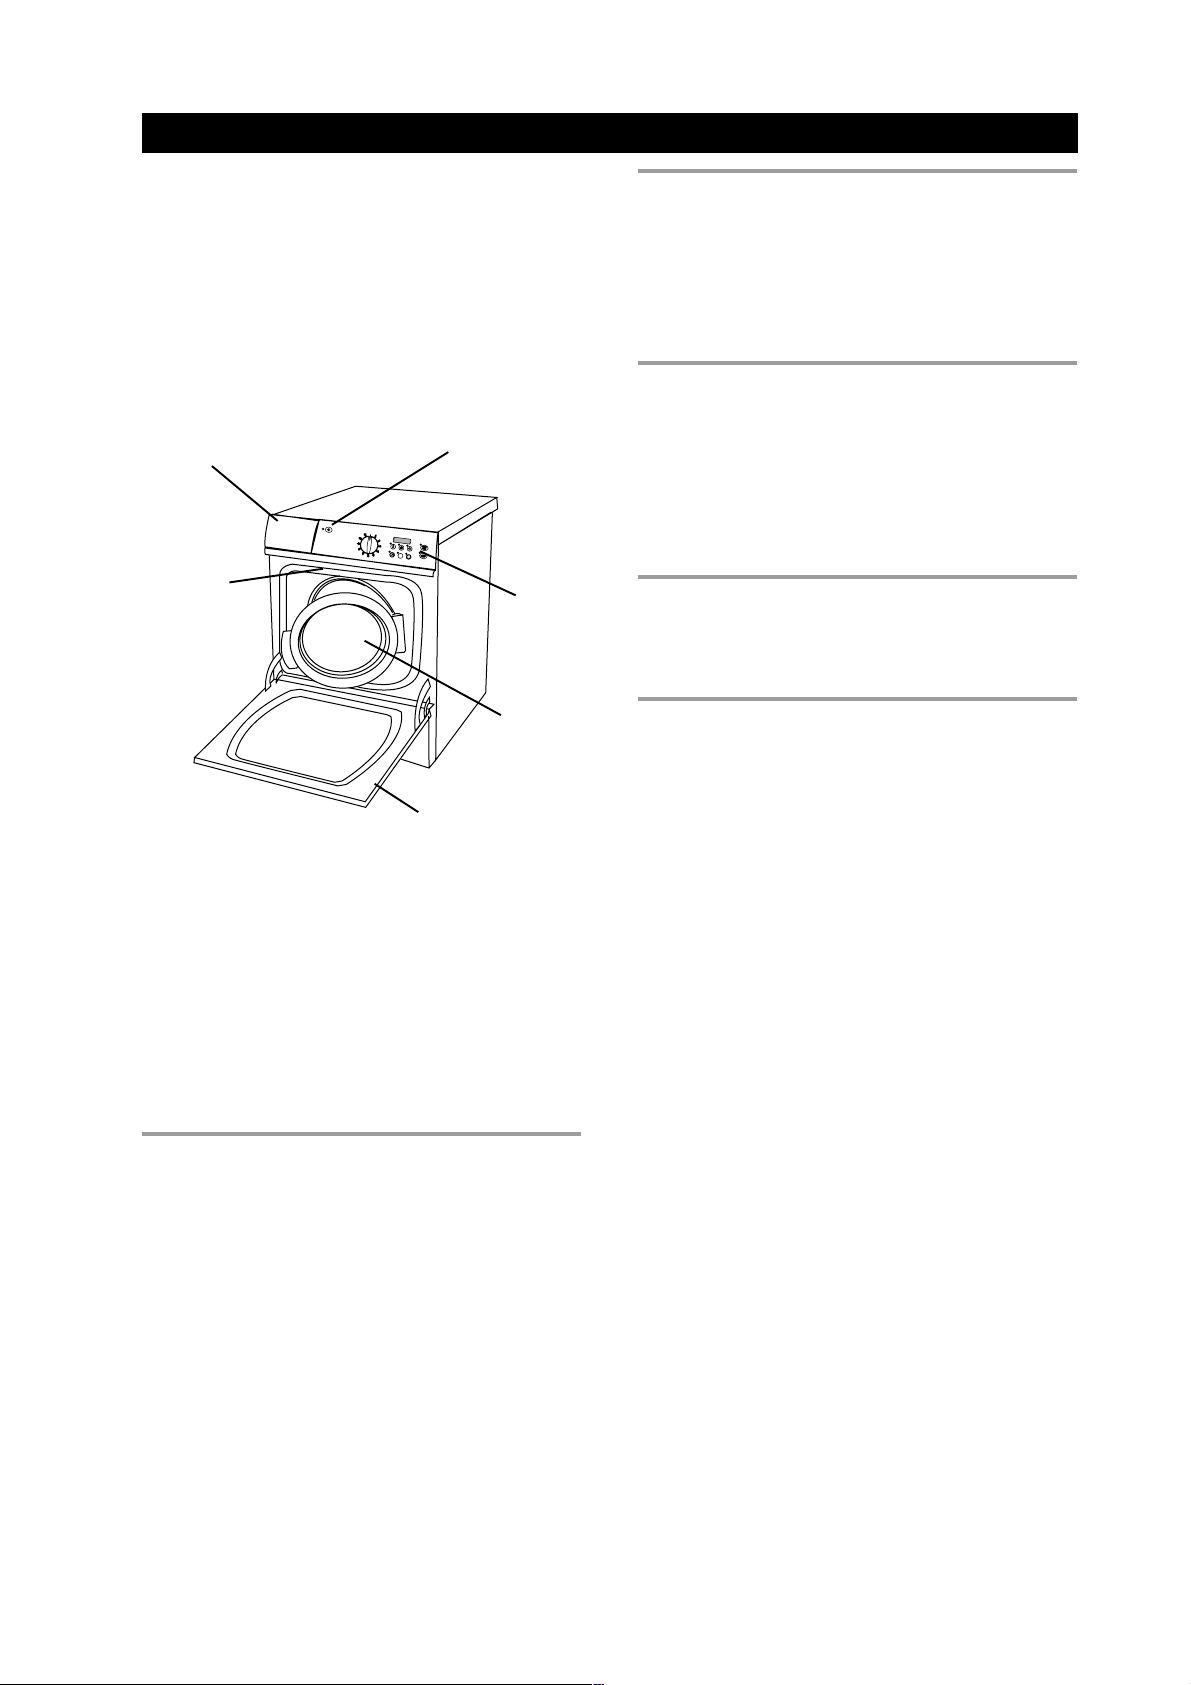
Below is an illustration of the external parts and features
of your ASKO washer.
Detergent and Fabric
Softener Dispenser
Type Plate
(with Type
and Serial
Number)
Power
Button
2
E
2h
Outer Door
(W6441 and W6761)
Control
Panel
Glass
Door
ENZYME STEP
To successfully remove all dirt and stains from fabric,
the enzymes in your detergent need to work at a
temperature between 105° and 140° F for a longer time
period. This longer wash cycle gives the enzymes in the
detergent ample time to remove stains, eliminating the
need for stain sprays and spot removers.
MORE RINSE CYCLES
Most washers have only two or three rinse cycles; some
have an option to add a fourth. ASKO washers have
five rinses and a Super Rinse option that adds two more.
ASKO washers get the soil and detergent out of your
laundry that most other washers leave in. That’s why
your whites will remain white and your colored fabrics
will remain bright.
SUPER RINSE OPTION
This option is designed for people with sensitive skin or
who are allergic to detergents. It can also be used for
large, heavily soiled loads.
SPIN OPTIONS
ASKO washers have faster spin speeds than most other
washers, which may decrease the time it takes to dry
your laundry. The spin speeds range from 400 rpm to
1600 rpm, depending on the model. You can also turn
the spin cycle off.
SENSOR LEVEL CONTROL (SLC)
ASKO washers do not need high, medium, or low water
level settings to compensate for different sized loads.
ASKO units have a consumption sensor—Sensor Level
Control—that ensures the correct amount of water is
pumped into the machine for any size load. It even
compensates for fabric saturation, letting in more water
if needed. This eliminates worry about selecting the right
water level setting for each laundry load.
TEMPERATURE CONTROL
Because wash water temperature is a major factor in
getting laundry clean, ASKO washers have built-in heating
elements and a sensor that keeps the temperature to
within +/-1° F of the selected program temperature.
ASKO washers are programmed not to advance in a
cycle until the selected water temperature is reached,
so the length of the cycles may vary, depending upon
the household cold water temperature, the amount of
laundry in the washer, and the wash temperature setting.
Page 3
Page 4
INSTALLATION INSTRUCTIONS
Read these instructions carefully and completely before
you install the machine. The installation should be
carried out by a qualified person who is familiar with all
local codes and ordinances for electrical and plumbing
connections.
SPECIFICATIONS
Height 33-1/2”–34-1/2 (850–876 mm)
Width 23-7/16” (595 mm)
Depth W6761: 23-7/16" (595 mm)
W6021/W6441: 24-7/16” (620 mm)
Weight 167 lbs. (73 kg)
Rated load See data plate
Supply voltage Single-phase 230 V, 60 Hz
Heating element 2000 W
Fuse 15 A (2 internal fuses)
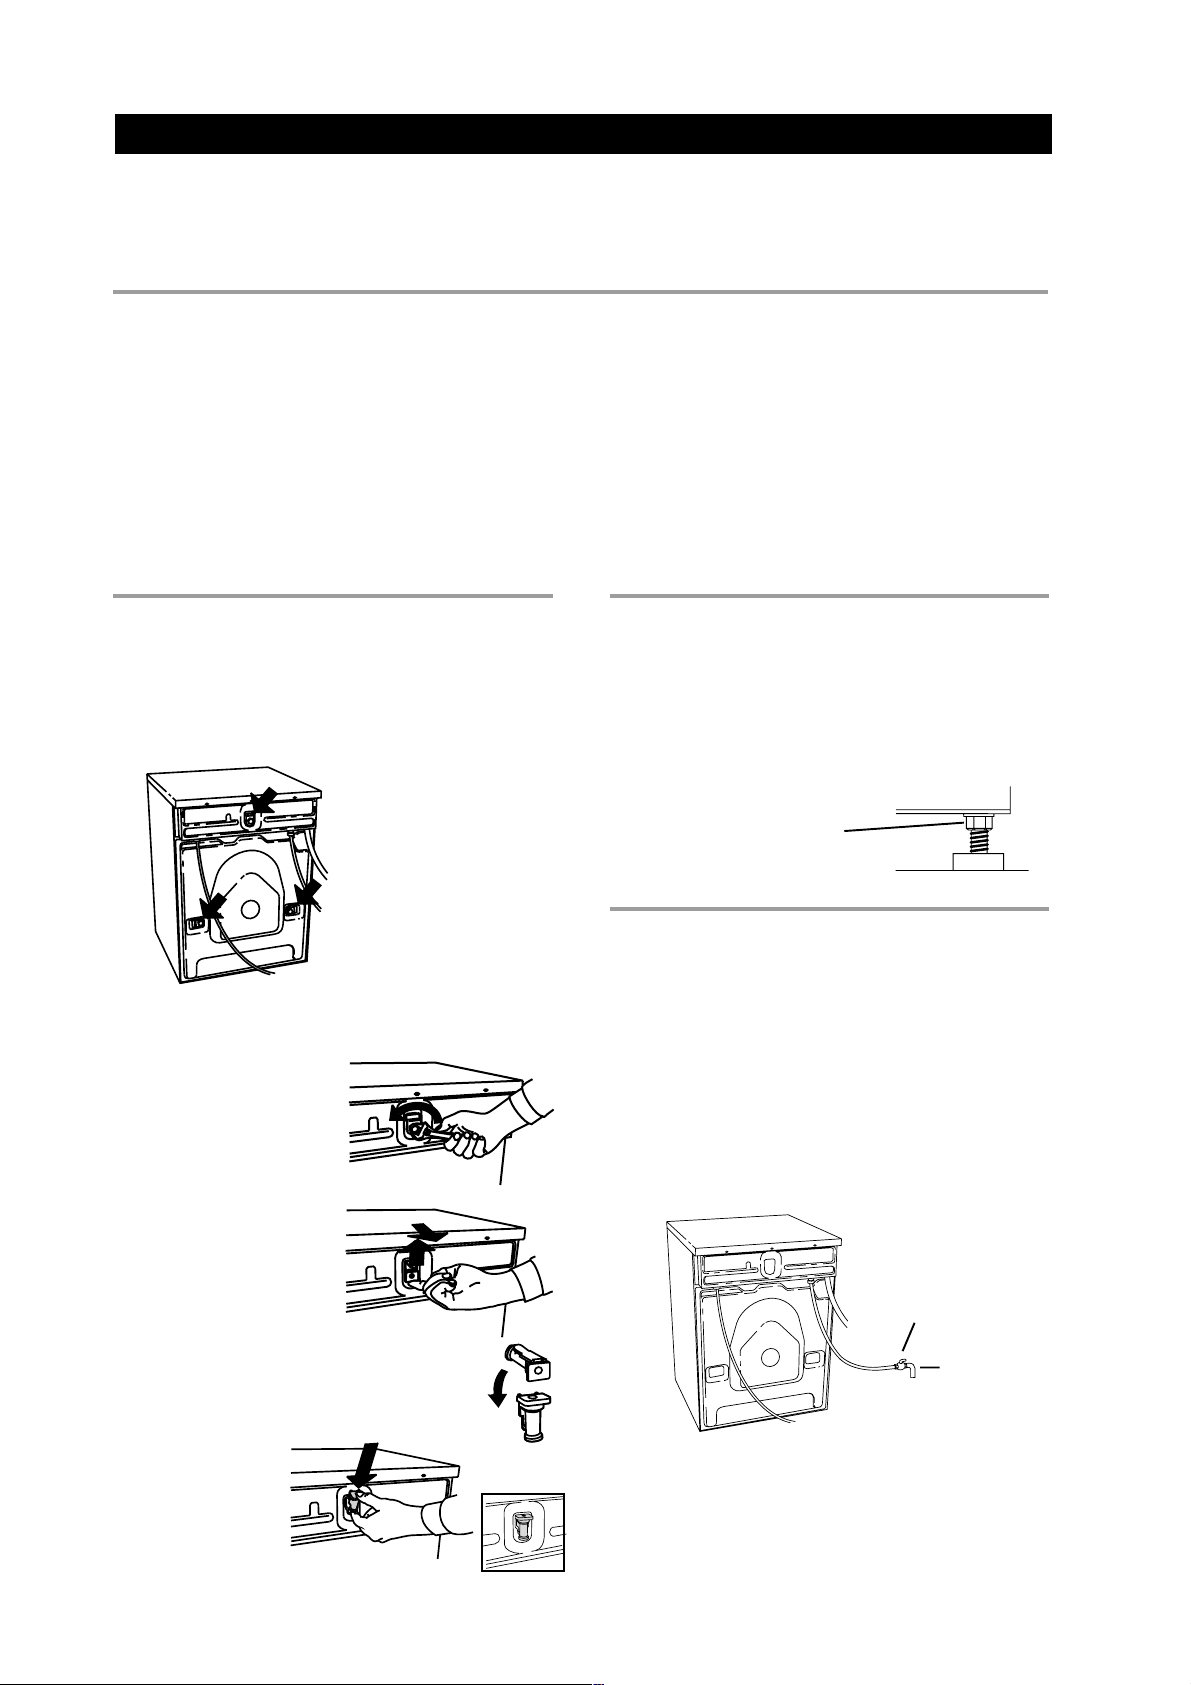
REMOVING THE SHIPPING
SUPPORTS
The machine is transported with three shipping supports,
as illustrated below. These supports hold the tub in place
during shipment. When you unpack the machine, you
must remove these supports.
IMPORTANT NOTE:
Cosmetic damage must be reported to your dealer
within five days from the date of purchase. After
unpacking the washer, thoroughly check the unit for
cosmetic damage.
Drum and Barrel Stainless steel
Outer casing Stove-enamelled hot-dipped
galvanized steel or stainless steel
Mounting Four adjustable rubber-covered
feet
Inlet supply hose 5 ft. (1.5 m) PEX tubing with
brass ferrules
Supply pressure 15–142 PSI
Outlet hose 5.5 ft. (1.7 m) polypropylene hose,
3/4” ID
LEVELING THE MACHINE
It is important that the machine is level so it won’t vibrate
excessively during the spinning cycles. Each foot on
the washer is adjustable, so you can level the washer
on any surface. Once it is level, securely tighten the
lock nuts on the feet to prevent excessive vibration during
the spin cycles.
You must remove the
shipping supports before
you install the washer.
To remove the shipping supports, follow the instructions
below:
1. Unscrew the 5/8” (12
mm) bolts holding the
supports in place and
remove the bolts.
2. Push the rubber spacer
up then pull it out of the
slot.
2
1
ACCESSORIES
3. Rotate the spacer so that the extruded end
points toward the machine.
Be sure to tighten the
lock nuts securely when
you level the machine.
WATER SUPPLY CONNECTION
Because ASKO washers have their own heating element,
you only need to have a cold water inlet. The connection
should be made by someone who is sufficiently skilled.
Use the hose supplied with the washer. (The inlet hose is
marked for proper connections.)
Water pressure must be in the range of 15–146 PSI.
A tap should be fitted on the water supply pipe.
If a new supply pipe has been installed for the washer, it
should be flushed thoroughly to remove any foreign
particles that might clog the strainer in the water inlet.
Tap
Cold water
supply
4. Insert it into the
slot and push
down to lock it
into position.
Page 4
NOTE: If unit is installed on a second story , follow local
building codes. We recommend a drip pan be
installed.
Page 5
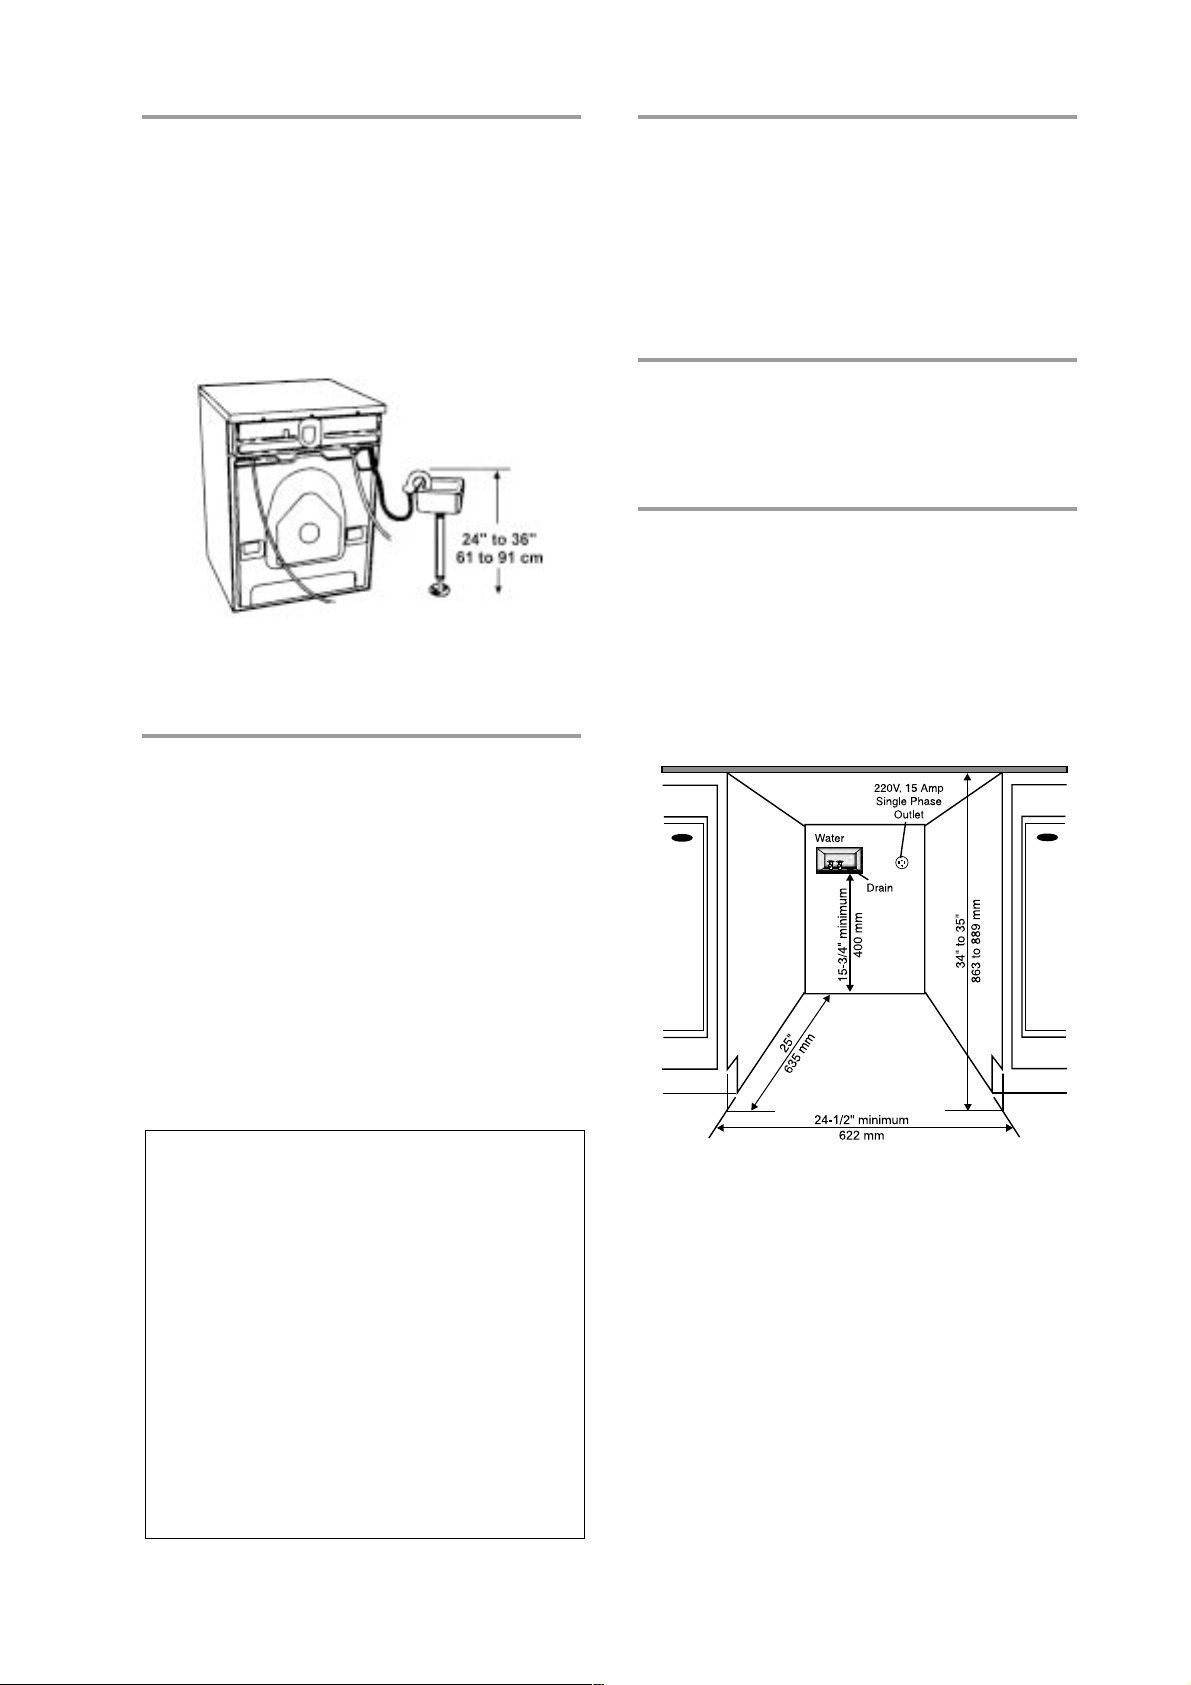
DRAIN OUTLET CONNECTION
The machine is supplied with the outlet hose already
attached. The hose should be extended over a suitable
sink edge or drain pipe at a height of 24” to 36” (610
mm to 914 mm) above the bottom of the unit. (The lower
height is preferable.) Make sure that the hose is not
kinked.
NOTE: If the hose is extended, the internal diameter
of the coupling must not be less than 1/2”.
WARNING!
Do not extend the drain hose higher than
36” (914 mm) from the bottom of the unit.
ELECTRICAL CONNECTIONS
The machine is delivered ready-fitted with a plug and is
intended for connection to an ASKO Dryer, which is
equipped with a matching receptacle. The plug supplied
with the washer can only be used with an ASKO Dryer.
If the washer is used separately or with another dryer, it
must be on a separate 220 V single-phase circuit.
If the machine is to be used in a wet area, the supply
must be protected by a residual current device.
As supplied: 230 V, 60 Hz
2000 W heating element
15 A fuse required
FREESTANDING INSTALLATION
The washer can be placed next to the dryer. It is essential
that the machine is leveled and the locknuts tight to
prevent excessive vibration during the spin cycles. Also
be sure to leave a minimum of 1/2”
(12 mm) of space between the washer and the dryer.
The height adjustment for the washer is 33-1/2” to
34-1/2” (850 mm to 876 mm). Do not raise it higher
than 34-1/2”.
STACKED INSTALLATION
ASKO washers should never be stacked on a counter
or a dryer. You can, however, stack an ASKO dryer on
an ASKO washer. Refer to your Dryer Use and Care
Guide for instructions on how to do this.
BUILT-IN INSTALLATION
ASKO washers can be installed beneath a cabinet or
worktop with a height of 34-1/2” ( 876 mm). There must
be a gap of about 1/2” (12 mm) all around the machine,
including between the rear edge of the machine top panel
and the back wall. The opening width must be at least
24-1/2” (622 mm).
Space must also be available for the inlet and drain
hoses. See the diagram below for measurements and
positions.
WARNING!
Connection to a permanently wired
supply point must be made only by a
qualified electrician.
GROUNDING INSTRUCTIONS
This appliance must be grounded. In the event of
malfunction or breakdown, grounding will reduce the risk
of electric shock by providing a path of least resistance
for electric current. This appliance is equipped with a cord
having an equipment-grounding conductor and a
grounding plug. The plug must be plugged into an
appropriate outlet that is properly installed and grounded
in accordance with all local codes and ordinances.
WARNING! Improper connection of the
equipment-grounding conductor can result in a
risk of electric shock. Check with a qualified
electrician or serviceman if you are in doubt as
to whether the appliance is properly grounded.
Do not modify the plug provided with the
appliance. If it will not fit the outlet, have a proper
outlet installed by a qualified electrician.
If the drain outlet is higher than 24”, the connections will
need to be recessed.
Page 5
Page 6
PREPARING THE LAUNDRY
We believe ASKO washers clean better than any other
washer available on the market. With proper attention
to how you prepare your laundry items for washing and
drying, your wardrobe and linens will look like new for
years.
SORTING THE LAUNDRY
Properly sorting your laundry is a very important factor
in ensuring that your clothing and linens look new for a
long time. Another important factor is properly following
the care label instructions (see next page).
Below are some basic rules for sorting your laundry:
Sort by
1. Fabric color
Whites; pastels and medium colors; bright colors;
dark colors
2.2.
2. Amount of soil
2.2.
Heavily soiled items should be washed separately
from lightly soiled items.
3.3.
3. Fabric Type
3.3.
Delicates should be washed separately. You should
also consider separating fabrics that tend to shed
lint (e.g., cotton, chenille, and terrycloth) from fabrics
that attract lint (e.g., permanent press, corduroy,
velveteen, flannel and synthetics).
IMPORT ANT NOTE:
If the care label says "Wash Separately," the fabric is
likely to lose color (excess dye) for the first few washings.
T o minimize the possibility of the color transferring to white
or lighter colored items, wash new colored garments with
items of similar color or separately. Bright reds and
oranges on cottons are the dyes most likely to transfer
colors to the wash load. Fluorescent colors should always
be washed separately.
RECOMMENDED LOAD SIZES
To reduce wrinkling, you should determine the load size
based on the type(s) of fabrics being washed. The chart
below gives recommended load sizes for different fabrics.
Load Size Fabrics
Full Cotton, linen
Half Perm press, synthetics, acrylics
Third Special finish cottons, machine
washable wool, silk, acetates
Cotton and Linen Fabrics
These items should be washed in full loads because
the tumble action of the tub along with the gentle rubbing
and lifting and falling movement of the clothes gives the
best cleaning result.
Permanent Press Fabrics
These items need more room to move freely during
washing for the most wrinkle-free results. Therefore, fill
the machine only half full for permanent press loads.
These items should have only a brief spin cycle and
they should be removed promptly from the washer and
put directly into the dryer or hung to dry.
Delicate Fabrics
More delicate fabrics, such as machine washable wool
and silk, should only be washed in one-third size loads
for the best results.
ADVICE FOR PERSONS WITH
SENSITIVE SKIN
ASKO washers are ideal for people allergic to detergent.
Our Heavy, Normal and Light wash programs have five
rinse cycles and a Super Rinse option that adds two
more rinses. This ensures that all the detergent residue
is rinsed out of your laundry.
As an extra precaution, you should use mild detergents
and be careful not to use too much.
GENERAL LAUNDRY ADVICE
♦ Always follow the care label instructions (see page
7).
♦ Remove any sharp ornaments, pins or buckles to
prevent snags.
♦ Empty pockets and turn them inside out.
♦ Close zippers and hooks to prevent snagging.
♦ Tie sashes and strings to prevent tangling.
♦ Mend any small rips to prevent them from enlarging.
♦ Turn colored cotton garments, velvet and finer
knitwear inside out before washing.
♦ Turn delicate items, sweaters and T-shirts inside out
to prevent pilling and to protect the prints.
♦ Prewash severely soiled items.
♦ Wash colored fabrics separately the first time.
♦ Thoroughly rinse down items, such as comforters
(Super rinse).
♦ Use fabric softener to eliminate static electricity in
synthetic garments and to soften cotton.
Page 6
Page 7
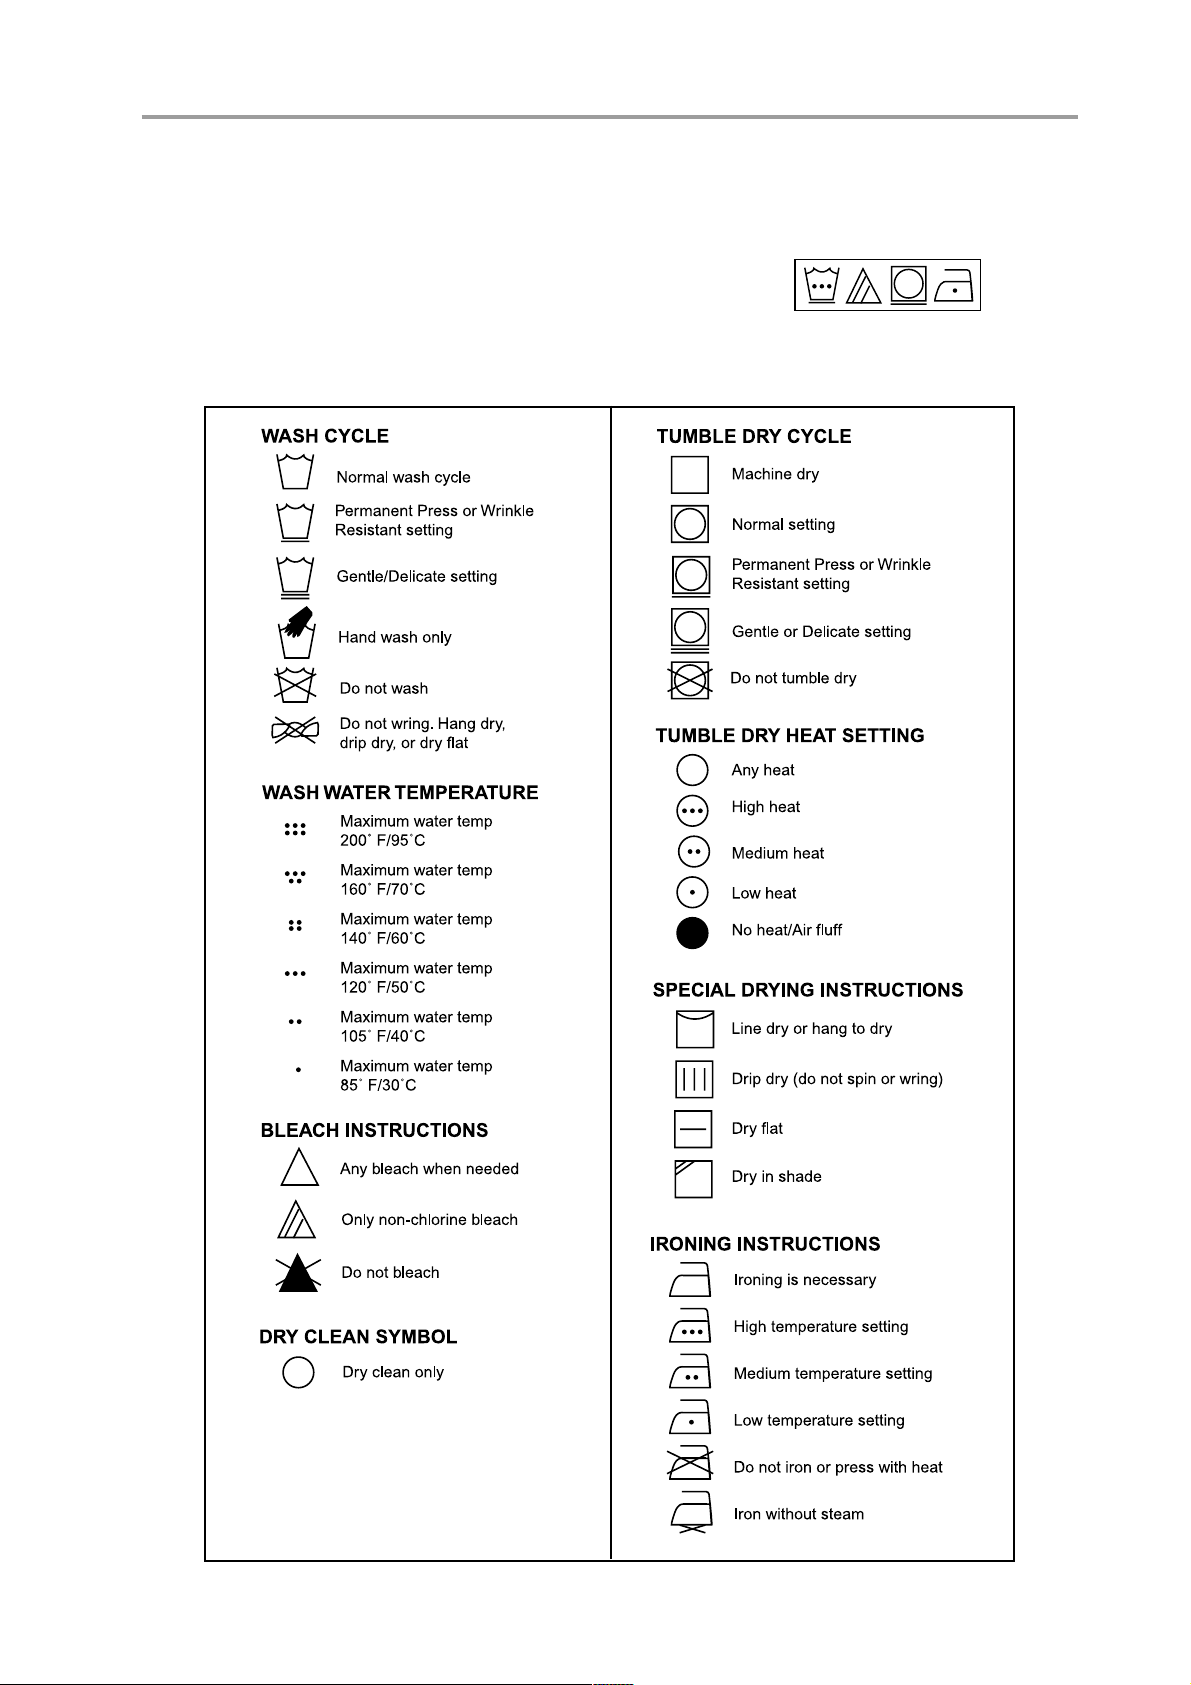
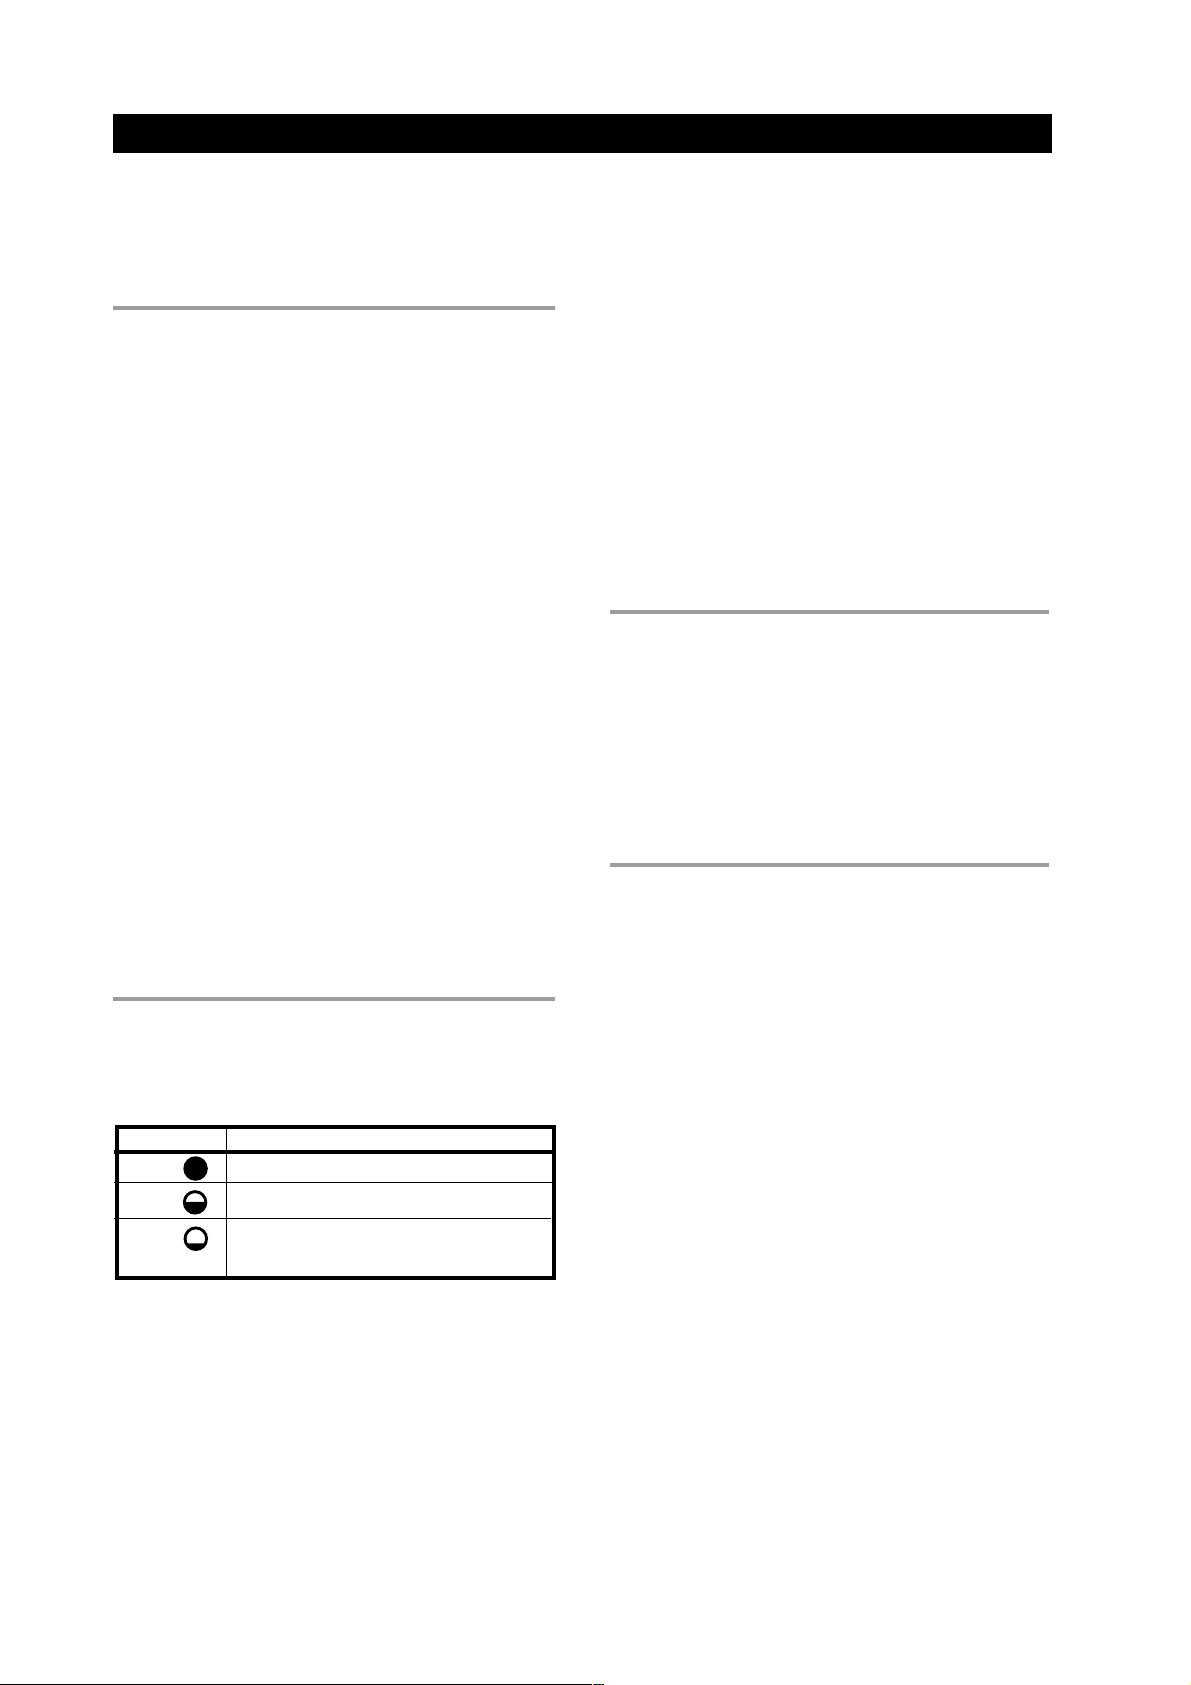
CARE LABEL INSTRUCTIONS
Most clothes and other washable items have permanent
care labels. Read these labels carefully! Care label
instructions and warnings should be followed for the best
cleaning results.
The table below defines the symbols used on fabric care
labels. (NOTE: Some manufacturers may use slightly
different symbols.)
CARE LABEL SYMBOLS
As an example, the symbols in the label illustrated below
mean: wash in warm water on permanent press setting.
Use non-chlorine bleach. Dry on permanent press setting.
Iron on low temperature setting.
Page 7
Page 8
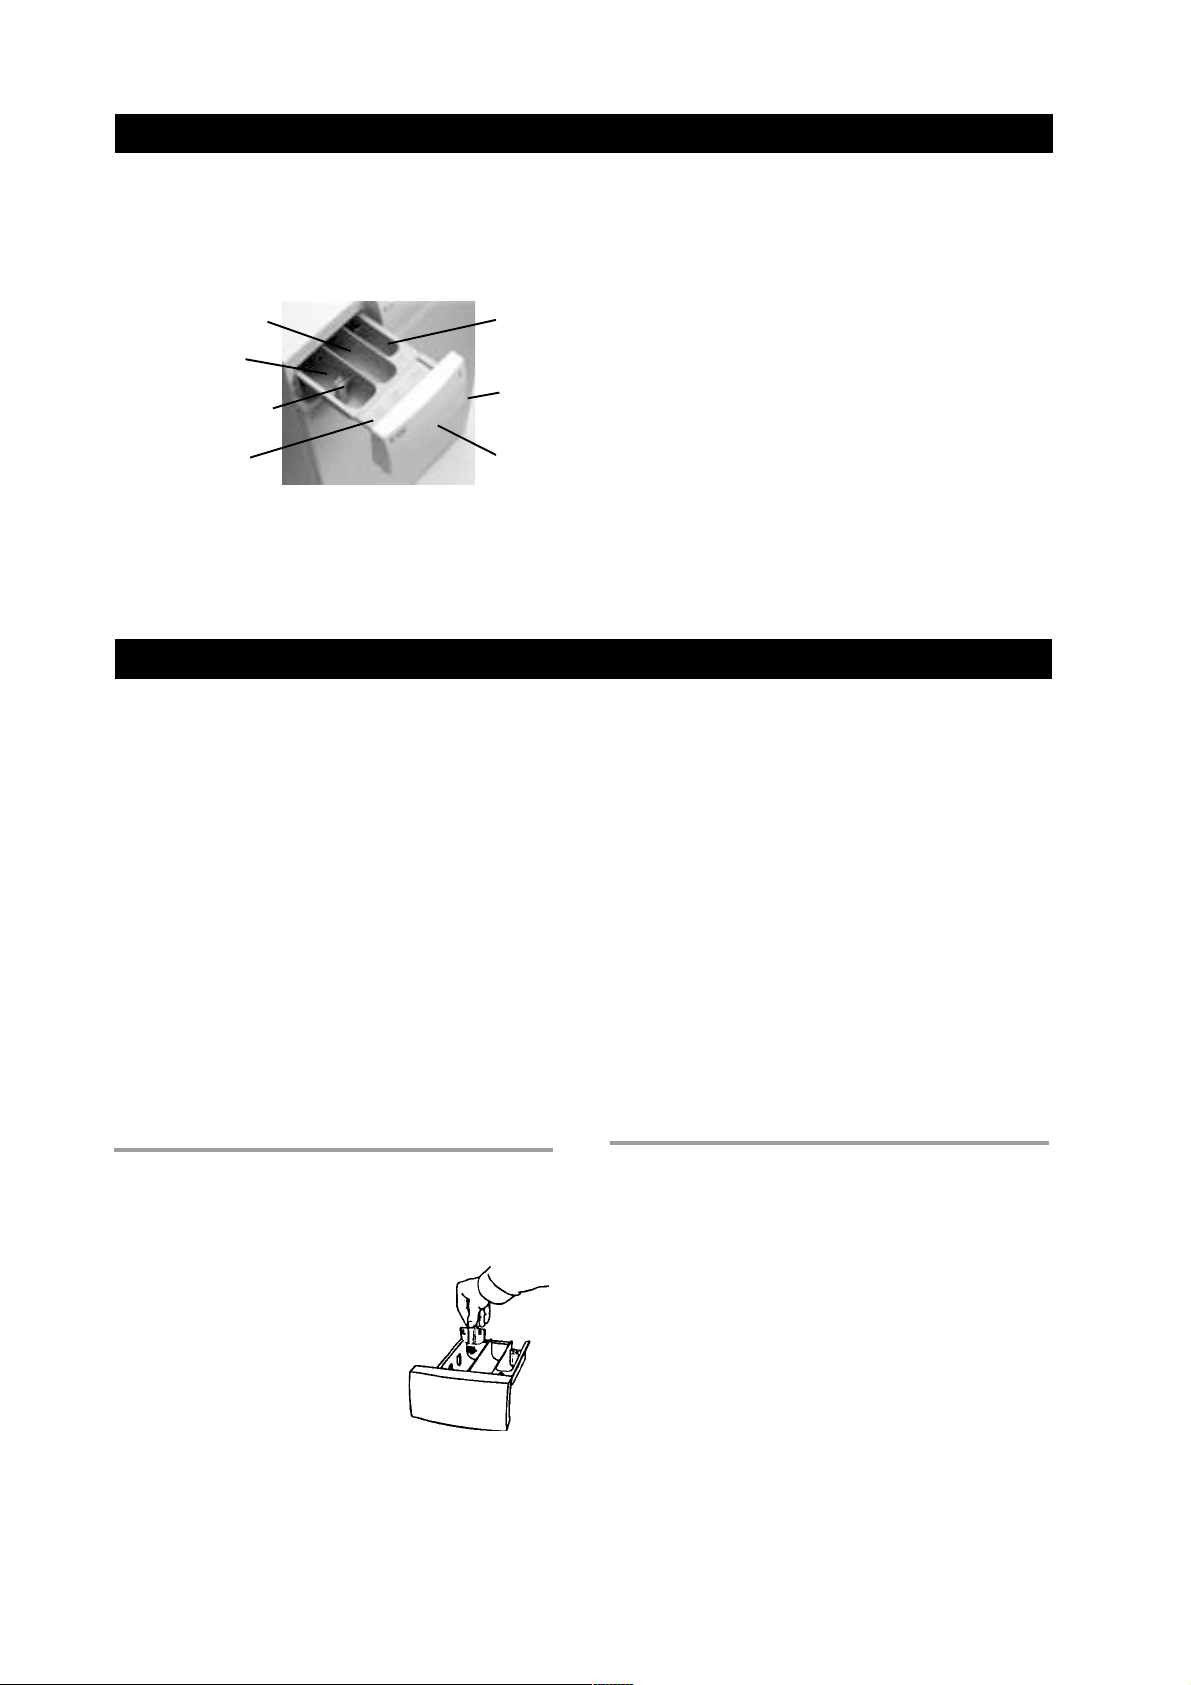
THE DETERGENT DRAWER
The detergent drawer on ASKO washers automatically
dispenses the detergent and fabric softener at the
appropriate times. Simply pour the measured amounts
of detergent and softener into the proper compartments
(as illustrated) and close the drawer.
Prewash
detergent
Main wash
detergent
Liquid detergent
partition (see below)
Control Button
Definitions
NOTE: To avoid oversudsing, do not put detergent in the
prewash compartment unless you are using one of
the Heavy wash programs which has a prewash
cycle.
Fabric
softener
Childsafety
catch
Pullout
handle
DETERGENTS
Laundry detergents are available in low-, normal- and
high-sudsing formulas. A detergent´s ability to clean is
not relative to the amount of suds it produces. Excess
suds in a front-loading washer actually interfere with
the cleaning because they cushion the tumbling action.
Also, high-sudsing detergents are more difficult to
completely rinse out.
The use of anything other than a low-sudsing detergent
can cause severe oversudsing, which could cause suds
to backup through the detergent compartment and run
down the front of the washer onto the floor. If oversudsing
occurs, run the wash through one or more rinse programs
until all items are thoroughly rinsed. Remove the laundry
then run the washer through a Normal wash program to
get rid of any remaining detergent.
We recommend that you don’t use bleach in your
ASKO washer. The tumbling wash action, temperature
control options, extended wash times and proper amount
of detergent are sufficient to remove most stains.
Control Button Definitions
Inside the detergent drawer is a plate that illustrates the
buttons on the control panel and defines each button.
Refer to the “Operating Instructions” in this guide for
your specific model for more details regarding the control
buttons.
Child-Safety Catch
All ASKO washers have a child-safety catch on the
detergent drawer that can be engaged to prevent a child
from opening the drawer and possibly coming into
contact with the detergent or fabric softener.
The safety catch is the red plastic piece on the back
right side of the pull-out handle. To engage the catch,
open detergent drawer a little then pull the catch forward
and release it. Once the catch is engaged, you must
push it to the left each time you open the detergent
drawer.
To disengage the catch, push it to the left then back.
RECOMMENDED POWDER
DETERGENTS
ASKO washers use 50% to 75% less detergent than
most other washers. This is because of their low water
consumption and the fact that all the wash water is
repeatedly circulated through the laundry, ensuring that
all the detergent is fully utilized. We recommend that
you use powder detergents made specifically for frontloading washers. These are sometimes called HE (HighEfficiency) detergents. Listed below are some lowsudsing powder detergents that have been successfully
tested in ASKO washers:
♦ Fab
♦ Amway SA8
We recommend that you do not use any powder
detergent that doesn’t wash completely out of the
detergent drawer.
♦ All
♦ Tide HE
♦ Fresh Start
♦ Wisk HE
LIQUID DETERGENTS
We don’t recommend liquid detergents because they
tend to produce more suds than powder detergents when
used in water temperatures of 150° F or higher. If you
should try a liquid detergent, start
with a very small amount, such as
1 to 2 tablespoons. Also, liquid
detergent can be used for all
programs without prewash, so add
it into the main wash compartment.
Should you prefer to use a liquid
detergent, we have provided a
partition piece with the detergent
drawer specifically for use with liquid detergents. Insert
the partition in the slot at the back of the main wash
compartment before you pour in the liquid detergent.
NOTE: The partition piece is packaged under the
detergent drawer.
Page 8
AMOUNT OF DETERGENT TO USE
The amount of detergent needed varies among the
different brands, but for most detergents, you need only
one or two tablespoons. Using too much detergent
can result in detergent residue being left in your clothes,
which can cause them to appear gray or dingy. You
should start with a small amount of detergent and
increase it only if the cleaning results are unsatisfactory.
Additionally, you should never put detergent in the
prewash compartment unless you are using a wash
program that has a prewash cycle. This could cause
excess foaming, which could damage the machine.
The amount of detergent needed can also depend on
the hardness of the water in your area. See the “Detergent
Amounts Based on Water Hardness” section on the next
page for more details.
Page 9
Detergent Amounts Based on Water Hardness
The amount of detergent needed can vary due to
differences in water hardness. To determine the water
hardness in your area, contact your local water utility or
area water softening company. The harder the water,
the more detergent you may need. Refer to the chart
below for the recommended detergent amounts based
on water hardness. Remember, you should adjust the
amount of detergent you use by small amounts until
you find the correct amount.
Note that 12 grains and higher is extremely hard water
Recommended Detergent Amounts Based on Water Hardness
Water Hardness
Soft (0-3 grains per gal.) 1 teaspoon 1 to 1-1/2 tablespoons
Medium (4-8 grains per gal.) 1 teaspoon 1 to 2 tablespoons
Hard (9+ grains per gal.) 1 teaspoon 2 to 3 tablespoons
Prewash Main Wash
and detergent alone may not be enough. Y ou may need to
use a water softener to maximize the performance of your
washer. Also, in areas with extremely hard water (9+) you
may need to wash at lower temperatures to prevent hard
water deposits from forming in the tank and wash system.
Different brands of detergent have different amounts of
phosphorous for softening water. If you have hard water
and use a detergent with less than 8.7% phosphorous
content, you may need to use more detergent or use a
detergent with a higher phosphorous content.
Detergent Amounts
FABRIC SOFTENERS
Fabric softeners are available in several concentrations.
We recommend that you use only two tablespoons of
fabric softener. If more softening is desired, try adding
slightly more the next time.
FABRIC DYEING
To dye fabrics in your washing machine, pour the dye
directly into the drum, not in the detergent compartment.
Select Normal wash with the Super Rinse option and
use the temperature recommended on the dye package.
If you’re dyeing polyester, select a spin speed of 800
rpm.
After you have removed the dyed items, be sure to clean
the drum before you wash a load of laundry. Do this by
running the empty machine through a Normal wash
program using the normal amount of detergent.
RECOMMENDED WASH TEMPERATURES
Different fabrics require different wash temperatures. The
table below gives recommended wash temperatures for
different fabrics as well as recommended programs, load
Wash Wash Load Spin
Fabric Type Temp. Program Size
White cotton w/out elastic 140–205° F Normal Full Long spin, high rpm
and/or decorative trim
White cotton w/elastic 120–140° F Normal Full Long spin, high rpm
and/or decorative trim
Colored cotton 120–140° F Normal Full Long spin, high rpm
Linen (white and colorfast) 120–140° F Normal Half Short spin, low rpm
Cotton/polyester blends 105–120° F Normal/Permanent press Half Short spin, low rpm
Polyester/acrylic blends 105–120° F Normal/Permanent press Half Short spin, low rpm
Rayon and acetate 105° F Delicate/Wool Half Short spin, low rpm
Washable silk and nylon 85° F (cold) Delicate/Wool Third Short spin, low rpm
Washable wool and 85–105° F Delicate/Wool Third Short spin, low rpm
wool blends (cold)
Handwash wool & silk
(3)
85° F (cold) Delicate/Wool Third Short spin, low rpm
sizes, and spin options. These are only suggestions.
We recommend that you always refer to the care label
instructions (see page 7).
(1)
Options
(2)
NOTES:
(1) The load size should be determined by the type of fabric being washed. (See page 6.)
(2) Spin speed options are not available on all models.
(3) Some hand-washable wool and silk items should not go through a spin cycle. These items should be removed
from the washer then pressed out in a terry towel to remove excess water before being hung up or laid flat to dry .
Page 9
Page 10

W6021 OPERATING INSTRUCTIONS
WARNING! To reduce the risk of electric shock or injury to persons, read the ”Important Safety
Instructions” section on page 2 before operating this appliance.
THE CONTROL PANEL
Door Open Button
Press to open the glass door. (Please note
that the unit must be at the end of a program
to open the glass door.)
Start
Stop
Temperature Control
Turn clockwise to select the
wash temperature.
Power Indicator Light
Glows when the power is
turned on.
Power Button
Press to turn on power to
the machine.
Start/Stop Button
Press to start or stop/
interrupt a program.
Super Rinse
Button
Press to program
seven rinses.
POWER BUTTON
The Power button turns the power to the machine on
and off. When the power is on, the power indicator light
glows red. The power must be on before you can open
the door, set the programs or start the machine.
START/STOP BUTTON
Once you’ve selected the program and options, press
this button to start the washer.
To stop the washer during a program, press and hold
this button down until the unit stops (about 3 seconds).
DOOR OPEN BUTTON
When the washer has completed a program, press this
button to open the door. Note that the power must be on
and the unit must be at the end of a program and the
water drained before the door will open.
NOTE: For instructions on how to open the door
manually in case of power failure, see page 24.
205
160
No Spin/No Drain
Press to omit the spin and
final drain cycles.
OPTION BUTTONS
Super Rinse
Press this button to add two rinses. Press the button
again to turn this option off. (This option cannot be
cancelled after the main wash water has pumped out.)
This option is recommended for persons with sensitive
skin or allergies.
No Spin/No Drain
Press this button to omit the spin cycles in all programs
along with the final drain. If you select this option, the
unit will stop with water in the drum, so you will have to
run the Drain program before you can open the door.
800 RPM
Press this button to reduce the spin speed from 1200
rpm to 800 rpm. This option is for delicate fabrics that
should not be spun at high speeds. Note: This option
does not apply to the Rinse and Spin programs.)
Program Control
Turn to select a program. (Please
note that the dial does not move as
the program advances.)
ProgramsTemperature °F
Drain
85
Spin
Rinse
105175
Hand/
Delicate
120
140
Wool
800 RPM Spin Button
Press to reduce spin speed from
1200 rpm to 800 rpm.
Stain
Heavy
Normal
Perm a
press
Quick
Super quick
PROGRAM CONTROL KNOB
Turn this knob to the desired program. The table on the
following page defines each program.
TEMPERATURE CONTROL KNOB
Turn this knob clockwise to the desired wash
temperature. Always refer to the garments’ care labels
for recommended wash temeratures.
Please note that the wash temperature for the Wool
Wash and Hand Wash/Delicate programs will not heat
higher than 105° F.
Page 10
CANCELLING A PROGRAM
To cancel a program after it has started, press and hold
the Start/Stop button until the unit stops. If there is w ate r
in the unit, you will have to turn the Program Control
knob to Drain then press Start. The water will drain and
the unit will stop in 30 to 45 seconds. You can then open
the door.
Page 11

W6021 PROGRAMS AND OPTIONS
Your ASKO washer has several programs and options specifically designed to give you the cleanest laundry possible.
The tables below define each program.
(1)
Temp.
(° F)# R i nses
(2)
(2)
Int.
Spin
Final
Spin
Spin
Sp eed
Load
Size
3 no Short 800 T hird
3 no Short 800 T hird
Program
Pre-
wash
Main
Wash
Wash
Action
Stain y es Long Normal 140 5 2 Long 1200 Full
Heav y wash no Long Normal 140 5 2 Long 1200 F ull
Normal wash no Short N ormal 105 5 2 Long 1200 Full
Synthetic wash no Short N ormal 105 3 no short 800 Half
Qu ick wash no Short Normal 105 3 no Long 1200 Full
Super quick w ash no Shor t Normal 105 2 no Short 800 Half
W ool wash no Short Gentle 85
Hand wash/Delicate no Short G ent le 85
Rinse n/a n/a n/a n/a 1 n/a Long 1200 Full
Spin n/a n/a n/ a n/a n/a n/a Long 1200 F ull
Drain n/a n/a n/a n/ a n/a n/a n/a n/a Full
NOTES: (1) Program times will increase when you select higher wash temperatures. (See “T emperature
Control” on page 3.)
(2) The maximum wash temperature for the Wool Wash and Hand Wash/Delicate programs is
105° F.
CAUTION!
Some fabrics may not be able to withstand extremely hot temperatures. Always refer to the garment care label
for recommended wash temperature.
Page 11
Page 12

W6441 OPERATING INSTRUCTIONS
WARNING! To reduce the risk of electric shock or injury to persons, read the ”Important Safety
Instructions” section on page 2 before operating this appliance.
THE CONTROL PANEL
LED Window
Power Button
Press to turn on power to
the machine.
Power Indicator
Light
Glows when the
power is on.
Drain
Spin
Rinse
Hand/
Delicate
Wool
Programs
Displays wash temperature, program options,
estimated running time, and the remaining time.
Stain
Heavy
Normal
Perma
press
Quick
Super quick
Start/Stop
Button
Press to start
or stop/
interrupt a
program.
Program Knob
Turn to select a program. (Please
note that the dial does not move as
the program advances.)
POWER BUTTON
The Power button turns the power to the machine on
and off. When the power is on, the power indicator light
glows red. The power must be on before you can open
the door, select program options, or start the machine.
PROGRAM KNOB
Turn this knob to the desired program. The programs
are described in the table below. Please note that the
knob does not move as the program advances.
Stop Position – The Stop position is where the line on
the top of the dial aligns with the line on the panel.
LED WINDOW
The LED window displays the wash temperature for the
selected program, the estimated running time, and the
remaining time. It also displays the available options
for each program. (See ‘Option Buttons” on the next
page.)
“00” on the LED indicates no program has been selected.
“End” on the LED indicates the program is complete.
Remaining Time Indication
When you select a program, the LED displays the
estimated program time based on the time the program
ran previously. As the program progresses, the LED
displays the remaining program time. This time will vary
somewhat due to the temperature of the incoming water
and the size of the load. The remaining time is
recalculated before the final rinse and may be increased
or decreased on the LED.
The program time and remaining time display as the
hours followed by an “H” and the minutes, as illustrated:
Option Buttons
Press to select a
program option.
Door Open Button
Press to open the glass door.
(Please note that there will be a
three-second delay before the
door will open.)
START/STOP BUTTON
Once you’ve selected the program and options, press
this button to start the washer. To stop the washer during
a program, press and hold this button until the indicator
light above it goes off. If you press this button to stop a
program, the program will start again from the
beginning.
DOOR OPEN BUTTON
The power must be on and you must press this button
to open the door. Hold down the button until the indicator
light goes off (about 3 seconds). You will hear the door
lock release. Please note that the water must be drained
before the door will open.
NOTE: For instructions on how to open the door
manually in case of power failure, see page 24.
INTERRUPTING OR CANCELLING A
PROGRAM
T o interrupt a program to add an item to the wash, press
and hold the Door Open button until the indicator light
next to the button comes on (about 3 seconds). Any
water in the machine will be pumped out before the
door will open. Add the item to be washed and, if
necessary, add more detergent. When you close the
door, the unit will start at the point it was interrupted.
To cancel a program, press and hold the Start/Stop
button until the indicator light above it goes off. When
you press Start/Stop again, the program will restart from
the beginning.
Page 12
1h12
Page 13

PROGRAMS
Your ASKO washer has several programs and options specifically designed to give you the cleanest laundry possible.
The table below defines each program. The program and temperature options are defined on the next page.
Pre-
Program
St ain Yes Long Normal Cold, 85 t o 20 5 5 2 Long 1400 Full
Heavy No Long Normal Cold, 85 to 2 05 5 2 Long 1400 Full
wash
Normal No Short Normal
Perma press
Quick
Super quick
Wool
Hand/ D e licat e
Rinse n/a n/a n/a n/a 1 n/a Long 1400 F ull
Spin n/a n/a n/a n/a n/a n/a Long 1400 Full
Drain n/a n/a n/a n/a n/a n/a n/a n/a Full
NOTE: See below for temperature options. Please note also that program times will increase when you select higher
wash temperatures. (See “Temperature Control” on page 3.)
CAUTION!
Some fabrics may not be able to withstand extremely hot temperatures. Always refer to the garment care label
for recommended wash temperatures.
OPTION BUTTONS
The Option buttons allow you to select wash
temperatures, spin speeds, delayed start, extra rinses,
high-water level, and anti-crease. Each of these options
is defined in more detail in the following paragraphs.
NOTE: The unit is programmed to retain the option
selections, except for temperatures above 140°
and Delayed Start.
Temperature Button
Select wash temperatures by pressing this button until
the temperature you desire displays on the LED. The
temperature options are 85°, 105°, 120°, 140°, 160°,
175°, and 205° F.
“C” on the LED indicates the wash temperature will be
the same as that of the incoming water (cold).
The wash temperature for the Wool and Hand/Delicate
wash programs can only be set for cold, 85° F, or 105° F.
NOTE: The temperature selection cannot be changed
after the main wash has started.
Spin Speed Button
Select the spin speed by pressing this button until the
spin speed you desire displays. The spin speeds advance
in 200 rpm increments. The minimum spin speed is 400
rpm and the maximum is 1400 rpm.
The spin speed for the Perma Press, Wool and Hand/
Delicate programs cannot be set higher than 800 rpm.
You can also select No Spin, which is indicated by a
zero on the LED. The program will not have a spin cycle,
but it will drain.
There is also a No Spin/No Drain option, which is
indicated in the LED by the letters “no d.” When you
select this option, the program will not have a spin cycle
and the unit will stop with water in the machine. Y ou will
have to set the Program knob Drain, to drain the unit
before you can open the door. If you wish to spin the
Main
Wash
No
Short Normal Cold, 85 to 205 3
No
Short Normal Cold, 85 to 205 3
No
Short Normal Cold, 85 to 205 2
No
Short Gentle Cold, 85 or 105 3
No
Short Gentle Cold, 85 or 105 3
Wash
Action Temp. (° F)# Rinses
Cold, 85 to 205
Int.
Fina l
Spin
Spin
Max Spin
Speed
Load
Size
5 2 Long 1400 Full
No
Short 800 Half
No
Long 1400 Full
No
Long 1400 Half
No
Short 800 Third
No
Short 800 Third
load before you remove it, set the Program knob to Spin
so it will spin and drain.
NOTE: The spin speed can only be altered before the
main wash water is pumped out.
Delayed Start Button
This button lets you delay starting the program from 1
to 24 hours. This means you can set the washer to start
at the most convenient time for you, such as an hour
before you arrive home from work. This feature is also
useful in areas where utility companies offer discount
rates during off-peak hours.
T o select delayed start, press this button until the number
of hours you wish to delay starting the program displays
in the LED then press Start.
If you change your mind before you press Start, you
can void delay start by continuing to press the button
until a zero displays in the LED. To void this selection
after you have pressed Start, press and hold the Start
button until the selected temperature displays on the
LED.
Super Rinse Button
Press this button to add two rinses. The indicator light
next to the button stays lit when this option is selected
(on). Press the button again to turn the option off. (This
option cannot be altered after the main wash water is
pumped out.)
High Water Button
The normal water level for an ASKO is just below the
bottom of the glass door. Some users prefer to see the
water level, so ASKO added this option, which increases
the water level to about an inch above the bottom of the
glass door. It doesn’t necessarily enhance the washer’s
cleaning performance.
The indicator light next to the button stays lit when this
option is on. To cancel this option, hold down the button
until the indicator light goes off. This option cannot be
Page 13
Page 14

cancelled after the main wash has started.
NOTE: The Wool and Hand/Delicate wash programs
automatically have a higher water level.
Anti-Crease Button
This option is designed to reduce wrinkling of garments
that are not going to be taken out of the washer right
away . When you select Anti-crease, the drum will rotate
once every minute at the end of the program for two
hours or until you press the Door Open button.
The indicator light will stay lit when this option is on. To
cancel this option, hold down the button until the indicator
light goes off. This option cannot be cancelled after you
have started the program.
CHANGING TEMPERATURE
READOUT FROM CELSIUS TO
FAHRENHEIT
You can change the temperature readout on the LED
from Celsius to Fahrenheit and vice versa. To do this,
follow the steps below:
1. Turn the machine off then on again. (00 should show
on the display.)
2. Press the Start button five times in succession then
press the Temperature button five times. (This must
be done within 15 seconds.) The LED will display a
C or F, whichever is the current selection.
3. Within three seconds, press the Temperature button
again to change the readout.
PROGRAMMING CHILD-SAFE
START/STOP
Y ou can program the washer not to start unless the Start
button is held down for three seconds. This is to prevent
children from inadvertently starting the machine. To
program this function, follow the steps below:
1. Turn the machine off then on again. (00 should show
on the display.)
2. Press the Start button five times in succession then
press the Spin Speed button five times. (This must
be done within 15 seconds.)
3. Within three seconds, press the Spin Speed button
again to select Child-safe start. The LED will display
“3” to indicate the Child-safe function is active. (If
the child-safe start has already been activated, “0”
will display after you press the Spin Speed button.)
W6441 ERROR MESSAGES
Error messages will display on the LED if faults occur
while a program is in progress. The table below defines
each possible error message.
MESSAGE ERROR
When this symbol flashes on the LED it merely means the glass door isn’t closed securely.
Close the door and try again.
0000 If this message flashes on the LED, the machine has failed to spin. This could be because the
load is out of balance. Turn the power off then on again. Open the door and redistribute the
washing. Run the Spin program again.
FI This indicates an overflow has occurred. Call a service technician.
F2 This indicates a problem with the motor. Call a service technician.
F3 This indicates a problem with the drain pump. Refer to the Troubleshooting chapter for possible
solutions.
F4 This indicates a problem with the water inlet. Refer to the Troubleshooting chapter for possible
solutions.
F5 This indicates a problem with the thermistor. Call a service technician.
F6 This indicates a temperature stop fault. Call a service technician.
F8 This indicates a door opening fault. Call a service technician.
To remove the message, turn the power off or change
the program.
Page 14
Page 15

W6761 OPERATING INSTRUCTIONS
WARNING! To reduce the risk of electric shock or injury to persons, read the ”Important Safety
Instructions” section on page 2 before operating this appliance.
THE CONTROL PANEL
Model W6761 has ASKO’s state-of-the-art
EasyControl™ panel, as illustrated below. To select a
wash program, simply press one of the preset program
Preset Programs
Power Button
Press to turn on power to
the machine.
Press one of these buttons to
select a program.
buttons then press Start. Refer to “Preset Programs” on
the next page for a definition of these programs.
LCD Window
Displays the wash program, spin speed,
temperature settings, and program run time.
Power Indicator
P1 P2 P3 P4
Light
Glows when the power
is turned on.
Start/Stop Button
Press to start or stop/
interrupt a program.
Door Open Button
Press to open the glass door.
POWER BUTTON
The Power button turns the power to the machine on
and off. When the power is on, the power indicator light
glows red. The power must be on before you can open
the glass door, set the programs or start the machine.
START/STOP BUTTON
Once you’ve selected a program and options, press this
button to start the washer. You also press this button to
stop the washer during a program.
DOOR OPEN BUTTON
When the washer has completed a program, press this
button to open the glass door. Note that the power must
be on and the unit must be at the end of a program and
the water drained before the door will open.
Start
Stop
Menu Enter
Program Selection Controls
These buttons allow you to customize the preset program settings,
such as wash temperatures, spin speed, rinses, display language,
etc. Refer to pages 18–20 for instructions.
NOTE: For instructions on how to open the door
manually in case of power failure, see page 24.
INTERRUPTING OR CANCELLING A
PROGRAM
T o interrupt a program to add an item to the wash, press
and hold the Door Open button until the unit stops (about
3 seconds). The machine will stop and the water will be
pumped out before the door will open. Add the item to
be washed and, if necessary, add more detergent. When
you close the door, the unit will start at the point it was
interrupted.
To cancel a program, press and hold the Start/Stop
button until the unit stops (about 3 seconds). Press Door
Open. If there is water in the unit, it will drain before the
door will open. If you stop a program this way, you will
have to reselect a program and press Start/Stop to restart
the machine. The program will start from the beginning.
UNDERSTANDING THE LCD WINDOW
The LCD window is easy to read and understand. It displays the wash program selection along with the wash temperature,
spin speed, and program run time. The illustration below explains each item on the LCD window.
Temperature
Wash temperature for the selected
program.
rpm
1400
Program Time
When you start a program, the total
time the program runs is displayed.
As the program progresses, the time
remaining displays. The program
time toggles between the hours (e.g.,
1h) and the minutes (e.g., 22).
rpm
Spin speed for the selected
program.
Stop
Indicates that the program has ended or
that you pressed Stop.
Page 15
Program
When you press the Power
button, the display toggles
between the program numbers
and the wash program names,
(e.g., Normal, Super quick,
etc.)
Preset Programs
Displays the program that is
selected/running.
Door Open
Displays when you press the
Door Open button.
P1 Light wash
P2 Light wash
P3 Quick wash
P4 Hand wash
P1 P2 P3 P4 Start
Start
Indicates that you pressed Start and
the program is running.
Stop
105˚ 43
Page 16

THE PRESET PROGRAMS
Model W6761 is delivered preset with four commonly used programs. The table below lists the preset programs and
the settings for each. To select a program, simply press one of the program buttons and press Start.
Preset Wash Spin # of #
Program Wash Cycle Types of Laundry Temp Speed * Rinses Spins
P1 Light wash Normally soiled loads 140° F 1600 rpm 5 3
P2 Light wash Normally soiled perm press 105° F 1600 rpm 5 3
P3 Quick wash Lightly soiled fabrics 105° F 1600 rpm 3 1
P4 Hand wash Washable silks, nylon, etc. 85° F 800 rpm 3 1
* The spin speeds in the preset programs are the maximum speed settings for these specific wash programs.
CAUTION! Some fabrics may not be able to withstand extremely hot temperatures. Always refer to the
garment care label for recommended wash temperatures.
CUSTOMIZING THE PRESET PROGRAM BUTTONS
In addition to the preset programs listed above, you can customize the preset buttons to use any of the programs
listed in the table below. This table also lists the pre-programmed settings for each program. For example, if you
select Perma Press on the program menu, it is automatically programmed to wash at 105° F using a normal wash
action, rinse three times then do a short spin, then rinse two more times, do a long spin and drain. You can modify
some of these settings (see “Wash Program Options” below).
AVAILABLE PROGRAMS
Pre-
Program
Heav y wash y es Long Normal 140 5 2 Long 1600 Full
Normal wash no Long Nor mal 140 5 2 Long 1600 Full
Light wash no Short Normal 140 5 2 Long 1600 Full
Synthetic wash no Short Normal 105 3 no Short 800 Half
Q uick w ash no Short Normal 105 3 no Long 1600 F ull
Super quick wash no Short Normal 105 2 no Short 800 Half
Wool wash no Short Gentle 85 3 no Short 800 Third
Hand wash no Short Gentle 85 3 no Short 800 Third
Rinse n/a n/a n/a n/a 1 n/a Long 1600 Full
Spin n/a n/a n/a n/a n/a n/a Long 1600 Full
Drain n/a n/a n/a n/a n/a n/a n/a n/a Full
wash
Main
Wash
Wash
Action
Temp.
(° F)# Rinses
Int.
Spin
Final
Spin
Spin
Speed
Load
Size
WASH PROGRAM OPTIONS
The table below defines the wash program options. Not all options are available with all programs. For example, the
wash temperature for the Wool and Hand wash programs cannot be set above 140° F. Only the options available for
the program you select will display. The table on page 17 details which options are available with each program.
OPTION DEFINITIONS
Option Set this option to “On” to:
Pre-soak Get a two-hour cold presoak before the wash program starts. For heavily soiled items. Only
available with the wash programs.
E2:Eco/ Extend the main wash time by 22 minutes (see note below). When used with low wash
Efficiency
Super rinse Get two additional rinses. Recommended for persons with sensitive skin or allergies. Only available
Anti-crease Rotate the drum once every minute at the end of the program to prevent wrinkling. Continues for
temperatures (85°–100° F), this program conserves energy but gives the same high level of
cleaning. Can also be used with higher temperature settings to clean heavily soiled items. Only
available with the Heavy, Normal, and Light wash programs.
with the wash programs.
two hours or until the door is opened.
High water level Increase the amount of water used for the wash cycle.
NOTE: The main wash cycle in a Normal program is 43 minutes.
Page 16
Page 17

The table below lists the options available with each wash program. These options can be temporary or permanent,
depending on your preference. Refer to the “Programming Instructions” section below for detailed instructions on how
to navigate the program menu and make temporary and permanent changes to the programs.
OPTIONS AVAILABLE WITH EACH WASH PROGRAM
OPTIONS (On/Off)
Temp
(1) (2)
Spin
(3)
Wash Setting Speed Delayed Pre- E2:Eco Super Anti- High
Programs (° F) (rpm) Start (hrs) Soak Efficiency Rinse Crease Water
Heavy Cold, 85°–205° 400-1600 1–24 yes yes yes yes yes
Normal Cold, 85°–205° 400-1600 1–24 yes yes yes yes yes
Light Cold, 85°–205° 400-1600 1–24 yes yes yes yes yes
Synthetic Cold, 85°–205° 400-800 1–24 yes no yes yes yes
Quick Cold, 85°–205° 400-1600 1–24 yes no yes yes yes
Super quick Cold, 85°–205° 400-1600 1–24 yes no yes yes yes
Woo l Cold, 85°–105° 400-800 1–24 yes no yes yes no
Hand wash Cold, 85°–105° 400-800 1–24 yes no yes yes no
NOTES: (1) Program times will increase when you select higher wash temperatures.
(2) Some fabrics may not be able to withstand extremely hot temperatures. Always refer to
the garment care label for recommended wash temperatures.
(3) You can also select a No Spin or No Spin/No Drain option. (See “Spin Speed” on page 18.)
PROGRAMMING INSTRUCTIONS
Below are the basic instructions for changing a preset wash program. The following sections explain the menus and
how to navigate them. You can make temporary (one-time) program changes, or you can make permanent program
changes.
1. Press the button for the preset
program you want to change
(P1P4). The program you
select will display in the lower left
corner of the LCD window.
2. Press MENU until the menu you
want to change displays (e.g.,
programs, temperature, etc.).
3. Press
to scroll through the
available options or to toggle
between off and on.
4. Press ENTER to save your setting and return to the Main Program screen. The LCD will display the new setting.
5. If you only want to use this setting temporarily (for this one load), press START. When the program ends it will
revert back to the previous setting.
6. If you want to save this setting permanently, press ENTER again then press START. The program will retain the
change.
See “Navigating the Menus” on pages 18 and 19 for detailed instructions on creating customized programs.
P1 P2 P3 P4
Start
Stop
Menu Enter
Page 17
Page 18

NAVIGATING THE MENUS
The following paragraphs explain how to navigate
through the menus and customize the preset programs.
If you don’t want to make changes in all of the menus,
continue to press MENU until the one you do want to
change displays.
T o restore a preset program to its factory default setting,
simply press the button for the preset program you want
to restore (P1–P4) and hold it down while your press
ENTER. The program will revert to its factory default
setting.
If you change your mind in the process of changing a
program, press the Power button to switch the washer
off. When you switch the power back on, the program
will be as originally set.
Remember, the first step to customizing a preset
program is to press the button for the program
you want to customize (P1P4).
Programs
This lets you set the wash program you prefer. (See the
“Available Programs” chart on page 16.) You also use
this menu to set the machine for a rinse, spin, or drain
program.
1. Press MENU until “Select Program” displays.
Temperature
This lets you set the wash temperature. The options are
85°, 105°, 120°, 140°, 160°, 175°, and 205°. Only the
temperatures available for the wash program you
selected will display. (See the “Options Available” chart
on page 17.)
1. Press MENU until “Select temperature” displays.
2. Use the Arrow buttons to raise or lower the
temperature setting.
3. When the temperature you prefer displays, press
ENTER. The LCD will display the new temperature.
4. If you only want to use this setting temporarily (for
this one load), press START. When the program
ends it will revert back to the previous setting.
5. If you want to save this setting permanently, press
ENTER again then press START. The program will
retain the change.
NOTE: To prevent inadvertent damage to fabrics, the
highest temperature you can change
permanently is 140°.
2. Use the Arrow buttons to scroll through the
programs (Heavy, Normal, Light, etc.).
3. When the program you prefer displays, press
ENTER. The LCD will display the new program.
4. If you only want to use this setting temporarily (for
this one load), press START. When the program
ends it will revert back to the previous setting.
5. If you want to save this setting permanently, press
ENTER again then press START. The program will
retain the change.
Spin Speed
This lets you set the spin speed. The spin speeds
advance in 200 rpm increments. Only the spin speeds
available for the wash program you selected will display.
(See the “Options Available” chart on page 17.)
1. Press MENU until “Select spin speed” displays.
2. Use the Arrow buttons to raise or lower the spin
speed setting. T o omit the spin cycle, press the arrow
button until “No Spin” displays. To omit the spin and
final drain cycles, press the arrow until “No Drain”
displays. (Note: You will have to run a drain program
to open the door.)
3. When the spin speed you prefer displays, press
ENTER. The LCD will display the new spin speed.
4. If you only want to use this setting temporarily (for
this one load), press START. When the program
ends it will revert back to the previous setting.
5. If you want to save this setting permanently, press
ENTER again then press START. The program will
retain the change.
Page 18
Page 19

Delayed Start
This lets you set a delayed start from 1 to 24 hours.
This means you can set the washer to start at the most
convenient time for you, such as an hour before you
arrive home from work. This feature is also useful in
areas where utility companies offer discount rates during
off-peak hours.
1. Press MENU until “Select time for delayed start”
displays.
CHANGING THE LANGUAGE ON
THE LCD WINDOW
There are eleven languages available for the LCD
window:
♦ English
♦ French
♦ Spanish
♦ Portuguese
♦ Italian
♦ Swedish
♦ Danish
♦ Norwegian
♦ Netherlands
♦ Finnish
♦ German
To change the language, follow the steps below:
1. Turn the machine off then on again.
2. Press ENTER five times in succession then press
P1 five times. (This must be done within 15 seconds.)
2. Use the Arrow buttons to increase or decrease the
delay time. (The numbers indicate hours.)
3. When the number of hours you want to delay starting
the machine displays, press ENTER. The LCD will
display the delay start time.
4. If you only want to use this setting temporarily (for
this one load), press START. When the program
ends it will revert back to the previous setting.
5. If you want to save this setting permanently, press
ENTER again then press START. The program will
retain the change.
Selecting Options
This lets you select Super Rinse, ECO (Economy), Presoak, Anti-crease, or High Water Level.
1. Press MENU until “Select options” displays.
2. Continue to press MENU to scroll through the
options.
3. When the option you wish to select displays, press
an Arrow to toggle between Off and On.
4. Press ENTER. The LCD will display the new setting.
5. If you only want to use this setting temporarily (for
this one load), press START. When the program
ends it will revert back to the previous setting.
6. If you want to save this setting permanently, press
ENTER again then press START. The program will
retain the change.
RESTORING A PRESET
PROGRAM
T o restore a preset program to its factory default settings,
simply press the button for the preset program you want
to restore and hold it down while your press ENTER.
The program will revert to its factory default settings.
NOTE: If you change the P3 program then decide to
restore its factory default settings, after
pressing P3 and ENTER, you must go into the
Options menu (see “Selecting Options” above)
and turn off Short Spin.
3. When the Language menu displays, press
advance to the desired language.
4. When your preference displays, press ENTER.
to
CHANGING THE TEMPERATURE
READOUT ON THE LCD WINDOW
FROM CELSIUS TO FAHRENHEIT
You can change the temperature readout on the LCD
window from Celsius to Fahrenheit and vice versa. To
do this follow the steps below:
1. Turn the machine off then on again.
2. Press ENTER five times in succession then press
P2 five times. (This must be done within 15 seconds.)
3. When the Temperature menu displays, press an
Arrow button to toggle between Fahrenheit and
Celsius.
4. When your preference displays, press ENTER.
CHILD-SAFE START BUTTON
As a safety measure, you can program Model W6761
not to start unless the Start button is held down for three
seconds. To do this, follow the steps below:
1. Turn the machine off then on.
2. Press ENTER five times, then press P3 five times.
(This must be done within 15 seconds.)
3. “Delayed start” displays with “0” flashing in the lower
right corner. Press the right Arrow button to toggle
the display to “3.”
4. Press ENTER.
CHILD-SAFE MENU BUTTON
Please note that when you set the child-safe Start button,
the Menu button is automatically programmed to delay
for three seconds before it becomes active. This prevents
a child from accidentally changing the program settings.
When you want to change a program, press the Menu
button for three seconds to activate the menus. The
Menu button will work normally (without the 3-second
delay) until you have completed your changes. If it is
not pressed for two minutes, it will automatically revert
back to the child-safe mode.
Page 19
Page 20

W6761 ERROR MESSAGES
Error messages will display in the LCD window if faults
occur while a program is in progress. The table below
defines each possible error message.
ERROR MESSAGE SOLUTION
When this symbol flashes at the lower right corner of the display it merely means
the glass door isn’t closed securely. Close the door and try again.
0000 If this message flashes at the top right of the LCD window, the machine has failed
to spin. This could be because the load is out of balance. Turn the power off
then on again. Open the door and redistribute the washing. Run the Spin
program again.
Door lock fault Call a service technician.
Overflow Call a service technician
Pressure sensor fault Call a service technician.
Temperature stop fault Call a service technician.
Thermistor fault Call a service technician.
Wash motor fault Call a service technician.
Water inlet fault Make sure the water tap is open.
Water outlet fault Check the pin trap for possible blockage. Make sure the outlet hose isn’t kinked.
To remove the message, turn the power off or change
the program.
Page 20
Page 21

CARE AND MAINTENANCE INSTRUCTIONS
CLEANING THE DETERGENT
DRAWER
1. Pull the drawer out as far as it goes then lift it up and
pull it out completely, as illustrated.
2. Clean the drawer with a
soft brush under warm
running water. Do not put
the drawer into a
dishwasher.
3. Replace the drawer by
tilting it into position.
CLEANING THE PIN TRAP
Your washing machine has a pin trap designed to trap
pins, hairpins, coins and similar items. This trap should
be cleaned occasionally. To do this, follow the steps
below:
1. Make sure as much water as possible is drained out
of the tub then turn off the power to the machine.
2. Using the flat edge of the
liquid detergent partition
piece, a flathead screwdriver or similar item,
gently pry open the drain
pump cover, as shown.
3. There is always a small amount of water in the drain
pump area. Before you open the drain cover, place a
shallow container, such as a pie pan, on the floor
below the drain to catch the water.
4. Pull the small black
drain hose loose from its
position on the door
cover and let the water
drain into the pan.
5. Unscrew the pin trap cover and lift it out.
CLEANING THE CONTROL PANEL
T o clean the control panel, use only a warm, damp cloth.
To prevent penetration of water into the door lock and
electrical components, never spray water or cleaning
solvents on the control panel. Also, never use abrasive
cleaners or scouring pads on the outer surfaces because
they will scratch the finish and could remove the writing
on the control panel. Some paper towels may also
scratch the finish.
WARNING!
Never spray clean the control panel. You could damage the
electrical components. Also, never use abrasive cleaners,
scouring pads or paper towels on the outer surfaces because
they will scratch the finish and they could remove the writing
on the control panel.
REMOVING AN OBJECT FROM
BETWEEN THE DRUM AND
OUTER CONTAINER
Occasionally, a small item may fall between the drum
and the outer container. Such items should be removed
because they could corrode and cause rust stains on
the laundry. To remove the item, follow the instructions
below:
1. Insert a flathead
screwdriver in the center
hole in the paddle and
carefully push it to the left.
2. Grip the paddle with your
other hand and pull it
toward you.
3. Lift up the paddle and
remove the object.
4. Replace the paddle in its
fixing hole with the F-mark
toward you. Check that the
paddle clips are properly located in the slots and slide
the paddle toward the back as far as it will go.
6. You can now clean out
any grit or small objects.
Y ou should also clean the
pump rotor at the back of
the pump housing.
7. Replace the drain cover and reconnect the drain hose
securely to its position on the door.
REMOVING HARD WATER STAINS
FROM THE DRUM
If you live in an area with hard water, the washer drum
may become coated with a grey-white deposit. To
remove it, pour about an ounce of citric acid in the drum
and run a Normal wash program at 205° F.
Page 21
Page 22

COMMON LAUNDRY PROBLEMS
Most items can be safely washed in an ASKO washing
machine. We recommend that you follow the care label
instructions as closely as possible for the best cleaning
results. Should problems occur, some possible causes
and suggested solutions are listed below.
NOTE: ASKO has no control over what is put in our
appliances once installed in a customer’s home. You
are solely responsible for what you wash in your
ASKO washing machine.
Problem Possible Cause Suggested Solution
Graying Not using proper amount
of detergent
Water not hot enough
Improperly prewashed or
presoaked
Washer overload
Soap used in hard water
areas
Yellowing Not enough detergent
Water not hot enough
Iron or manganese in
water
You may need to use slightly more detergent if clothes are heavily
soiled, have oily stains, or if your water is very hard. You may need
less detergent if you have soft water or if you notice detergent residue
in your clothes.
Select a hotter temperature setting for each type of load.
Be sure to add a prewash and/or presoak for heavily soiled or oily
items.
Once wet, the clothes must have room to tumble freely, especially
synthetics and permanent press.
Be sure you use a laundry detergent, not a “soap.” Soap reacts with
the minerals in hard water to form a soap curd, which can be
deposited on clothes.
Add slightly more detergent.
Use the hottest recommended temperature for each type of load.
If possible, install a water filter. A small amount of Calgon or other
type of water conditioner added once a week is advisable in hard
water areas.
Excessive
wrinkling
Shrinkage Improper washing or
Knit shrinkage
Stains Incorrect water
Lint or residue
left on clothes
Machine too full
Water too hot
drying
Overheating
Delayed or gradual
shrinkage
Poor construction
temperature
Old stains
Improper sorting of clothes
Non-phosphate detergent
Fabric softener used
improperly
Pilling
Permanent press items should be washed in half-loads to prevent
wrinkling. If possible, use a slower spin speed.
Use lower wash temperature settings.
Follow garment care label instructions carefully (see page 7). Some
fabrics will shrink no matter how they are washed. Some may be
machine washed but not machine dried.
Knits tend to shrink more than woven fabrics. If a knit has been
heat-shaped, wash in cool or warm water. Dry with the low setting.
This can occur when special stabilizing finishes are reduced from
wear or repeated washings. Garment may sometimes be reshaped
by pressing after washing and drying.
Shrinkage can occur if the knit fabric was not stretched properly by
the manufacturer. Press back into shape each time garment is
washed and dried.
Protein stains, such as milk, egg, blood and soy formula should be
removed in cold water. Oily stains should be washed in the hottest
water recommended for each fabric type.
The longer a stain remains on a fabric, the harder it is to remove.
Treat stains promptly. Do not set stains by machine drying or ironing
fabrics until stains are completely removed.
Separate clothes that shed lint (chenille and terrycloth) from clothes
that attract lint (synthetics, corduroy, velveteen).
Non-phosphate detergents can combine with minerals in hard water
and form a residue which can appear to be lint. Use a low phosphate
detergent. If possible, install a water softener.
Read labels. Most softeners should only be used in the final rinse.
Add softener to the softener compartment. If added to the wash cycle,
softeners can have a reaction with detergents, producing a white
residue.
Pilling, which can look like lint, is produced by normal wear on cotton/
polyester blend fabrics. To reduce pilling, wash these fabrics inside
out. For the best results, wash in the delicate cycle.
Page 22
Page 23

COMMON LAUNDRY PROBLEMS (CONTINUED)
8
8
7
7
7
Problem Possible Cause Suggested Solution
Fading and
discoloring
Improper sorting
Crayons or pens in pockets
Water too hot
Dark clothes, especially cottons, can bleed excess dyes into wash
water. White or light-colored clothes can absorb the dye and discolor .
Separate light items from dark items.
Always empty all pockets before washing.
Cool or cold water is best for retaining dark or bright colors.
Rips, snags,
excess wear
Sharp objects in pockets
Hooks, snaps, zippers,
buckles
Harsh chemicals
Empty all pockets and turn inside out before laundering.
Fasten all hooks, snaps, and zippers before laundering to avoid snags.
Remove sharp buckles. Turn knits inside out.
Before washing, rinse harsh chemicals (such as battery acid, hair care
chemicals, cleaning solutions, etc.) from towels and other articles to
avoid holes in fabrics. Do not allow these unrinsed items to contact
other fabrics.
Existing rips and tears
Permanent press items
Mend all garments before laundering to prevent enlarging of rips.
These items may fray at edges from normal wear, not the washer.
Wash only in half loads and don’t wash in the same load with heavy
items, such as towels or jeans.
TROUBLESHOOTING
If you should experience a problem with your washer,
you should review the following list of frequently
encountered situations or go to our website at
www.askousa.com. It could save you the cost and
inconvenience of a service call.
Even though the product is under warranty, if the problem
is not caused by defective workmanship or materials,
you will be charged for a service call. Refer to page 25
to determine what is and is not covered under your
warranty. If you’re still not sure, contact the AM Advisory
Center before you call a service technician.
BEFORE YOU CALL
Before calling for service or contacting ASKO regarding
a warranty issue, make a note of the model name, type
number and serial number. The model is on the front of
the detergent drawer. The type plate with the type name
and serial numbers is located above the glass door. (See
illustration below.)
Model Name
(e.g., W6021)
EMERGENCY DRAIN HOSE
Should you ever need to drain the water from the unit in
the event of a power outage, use the drain hose next to
the pin trap, as illustrated below.
1. Using the flat edge of the
liquid detergent partition
piece, a flat-head
screwdriver or similar
item, gently pry open the
drain pump cover, as
illustrated.
2. Before you proceed, place a shallow container on
the floor near the drain to catch the water.
3. Pull the small black drain
hose loose from its position
on the door cover and let
the water drain into the
container.
4. When the machine is
empty, reconnect the
hose securely to its
position on the door
before you close the drain
pump cover.
Type plate
(see below)
Type Name
23456
23456
T ype: WMxx
23456
xx x xxxxxxxxMxxxxxxxW
2
E
2345678901234567
2345678901234567
000000000000
2h
12-digit
Serial
Number
Page 23
Page 24

TROUBLESHOOTING (CONTINUED)
The door wont open.
♦ Make sure the power to the unit is on. If the power
is on and the indicator lamp is not lit, there is no
power supply. Check that the machine is properly
plugged into the electrical outlet. If it is, the fuses
may be blown. Call a service technician.
♦ Make sure all the water has drained out.
♦ If there is no water in the machine and the door won’t
open in the normal manner, you should be able to
open it manually using the emergency door handle,
as follows:
1. Make sure the tub is as
empty as possible and
the power is turned off.
2. Using the flat edge of the
liquid detergent partition
piece, a flathead
screwdriver or similar
item, gently pry open the
drain pump cover.
3. Using a T20 or flathead
screwdriver, unscrew
the red plastic looped
handle.
4. Pull the handle toward
you. The door should
open.
Emergency
Door Handle
Extreme vibration during spin cycle.
♦ Make sure the packaging and shipping supports were
removed properly. (See page 4.)
♦ Check that the machine is level.
♦ Adjust machine feet and tighten locknuts. (See page 4.)
Oversudsing.
♦ Too much detergent could cause suds to backup
through the detergent compartment and run down
the front of the washer onto the floor. The suds will
condensate into water and form a small puddle on the
floor. (See page 8 for detergent recommendations.)
Washer stops during cycle.
♦ It is normal for the machine to pause occasionally
during operation, especially between cycles and
during the delicate wash program.
♦ Make sure the No Spin option isn’t turned on.
♦ If the power switch is on and the indicator lamp is
not lit, there is no power supply. Make sure the
machine is properly plugged into the electrical outlet.
♦ Check the house breaker switch/fuses.
Foam in the final rinse water.
♦ Make sure nothing is blocking the outlet hose.
♦ Check for kinks in the outlet hose.
♦ Make sure the pin trap isn’t blocked. (See page 21.)
♦ Make sure that no part of the hose (including any
joints) is less than 3/4” (19 mm) in diameter.
The machine wont start.
♦ Check that the glass door is closed securely.
♦ Make sure the power switch is turned on.
♦ If the power switch is on and the indicator lamp is not
lit, there is no power supply. Make sure the machine
is properly plugged into the electrical outlet.
♦ Check the house breaker switch/fuses.
The machine doesnt fill.
♦ Make sure the tap to the water supply line is open.
♦ Turn off the water supply then disconnect the inlet
hose and check to see if the strainer in the inlet
connection is blocked.
The machine will not spin.
♦ Make sure the pin trap or outlet hose isn’t blocked.
Clean if necessary. (See page 21.)
♦ Make sure the No Spin option is turned off.
♦ If a load is out of balance, the washer will rotate a
few seconds to redistribute the load then attempt to
spin again. It will do this up to ten times at a high
spin speed (1000 rpm or higher). If it still isn’t
balanced, it will advance the timer with no spin.
Water left in the machine after final
spin.
♦ Make sure the No Spin option isn’t turned on.
♦ Make sure the pin trap isn’t clogged. (See page 21.)
♦ Make sure the outlet hose isn’t clogged.
♦ Check for kinks in the outlet hose.
♦ Make sure that no part of the outlet hose (including
any joints) is less than 3/4” (19 mm) in diameter.
Water leaks.
♦ All hoses should be inspected at least once a year.
If they show signs of cracking, they should be
replaced.
♦ Check to see if hose connections at faucets are tight.
♦ Make sure the end of the outlet hose is securely
inserted into the drain receptacle.
♦ Make sure nothing is caught between the Smart Seal
and the tank, such as apron strings, small
handkerchiefs, socks, etc.
Page 24
Page 25

PRODUCT WARRANTY
MODELS W6021, W6441, W6761
Be sure to complete the Warranty Registration Card you received with your appliance and mail it to AM
Appliance Group to validate your appliance warranty.
Cosmetic damage must be reported to your dealer within five days from the date of purchase. After unpacking
the washer, thoroughly check the unit for cosmetic damage.
FOR RESIDENTIAL INSTALLATIONS ONLY
LENGTH OF WARRANTY
Three-Year Full
From date of purchase.
Fourth & Fifth Year Limited
Three year full plus fourth and fifth year limited
from date of purchase.
Lifetime
AM APPLIANCE GROUP WILL PAY FOR:
ASKO replacement parts and/or repair labor to correct defect in
materials or workmanship. Service must be provided by an
authorized ASKO service agent.
ASKO replacement parts (labor cost not included) for any defective
solid-state controls, timers, motors, or pumps. Service must be
provided by an authorized ASKO service agent.
ASKO replacement parts (labor cost not included) of the stainless
steel tank if it fails to hold water due to a manufacturing defect,
such as rusting or cracking. Service must be provided by an
authorized ASKO service agent.
FOR NON-RESIDENTIAL INSTALLATIONS
Six-Month Full Warranty
From date of purchase.
ASKO replacement parts and/or repair labor to correct defect
in materials or workmanship. Service must be provided by an
authorized ASKO service agent.
AM APPLIANCE GROUP WILL NOT PAY FOR:
A. Service calls to:
1. Correct the installation of the appliance.
2. Repair damage due to shipment, delivery, installation, misuse or abuse.
3. Instruct how to use the appliance.
4. Replace house fuses or correct house wiring.
5. Correct house plumbing, including drainage problems related to improper installation.
6. Clean or service air device in drain line.
B. Repair and/or replacement parts for failure of product if appliance is used for other than home/residential use.
C. Damage resulting from accident, fire, floods, acts of God, alteration, misuse, abuse, improper installation, or
installation not in accordance with local electrical or plumbing codes.
D. Any shipping costs for parts during the limited warranty period.
E. Replacement parts or repair labor costs for units operated outside the continental United States.
F. Pickup and delivery. ASKO washers are designed to be repaired in the home.
IN NO EVENT SHALL AM APPLIANCE GROUP BE RESPONSIBLE
FOR ANY INCIDENT AL OR CONSEQUENTIAL DAMAGES.
Some states will not allow the exclusion or limitation of incidental or consequential damages, so this exclusion or
limitation may not apply to you. This warranty gives you specific legal rights and you may also have other rights which
vary from state to state.
For warranty service, contact the dealer from whom you purchased the unit or an authorized ASKO service
agent. Service will be provided during normal business hours. Should you have a service problem that cannot be
resolved locally, contact AM Appliance Group at the numbers listed below. Before calling for service or contacting AM
Appliance Group regarding a warranty issue, make a note of the model, type name, and serial number (see page 23).
Write to us at:
AM Appliance Group
P. O. Box 851805
Richardson, Texas 75085-1805
www.askousa.com
Division of AM Appliance Group at
Or call our
ASKO Advisory Center a
800-898-1879 or
972-238-0794
Page 25
Page 26

INDEX
Symbols
7 button 10
800 button 10
A
Allergies 6
Anti-crease button (W6441) 14
Anti-crease option (W6761) 17
Automatic water level control 3
B
Bleach 8
Built-in installation 5
C
Cancelling a program (see “interrupting a program”)
Care and cleaning 21
Care label instructions 7
Celsius, changing readout
W6441 14
W6761 19
Changing the display readout (W6761) 19
Child safety features 2
Child-safety catch 8
Child-safe menu button (W6761) 20
Child-safe start
W6441 14
W6761 19
Control panel
cleaning 21
W6021 10
W6441 12
W6761 15
Cottons 6, 9
Customizing the preset programs (W6761) 18
D
Delay Start menu (W6761) 19
Delayed Start button (W6441) 13
Delicate fabrics 6
Detergent 8, 9
Detergent drawer 8
cleaning 21
Digital display window 15
Discoloring 22
Door, cleaning 21
Door lock fault error 20
Door Open button 10, 12, 16
Drain hose, emergency 23
Drain outlet connection 5
Drum 21
Drum paddles, removing 21
Dyeing fabric 9
E
EasyControl Panel (W6761) 16
Economy option 17
Electrical connections 5
Emergency door handle 24
Emergency drain hose 23
Enzyme step 3
Error messages
W6441 14
W6761 20
F
Fabric softener 9
Fabrics
dyeing 9
recommended wash temps 9
Fading and discoloring 2 2
Fahrenheit, changing display window
W6441 14
W6761 19
Fluorescent colored fabrics 6
Foam in final rinse 24
Foaming error 20
Free-standing installation 5
G
Garment care label instructions 7
Glass door
emergency opening 24
Graying 22
Grounding instructions 5
H
Hard water 9
Hard water stains, removing 21
Hazardous materials 2
HE detergents 8
High water option
W6441 14
W6761 17
I
Installation instructions 4, 5
Interrupting a program
W6021 10
W6441 12
W6761 16
K
Knit shrinkage 22
L
Languages, changing the LED (W6761) 19
Laundry detergents 8
Laundry problems 22, 23
Laundry tips 6
LCD window (W6761) 15
LED window (W6441) 12
Leveling the machine 4
Linens 6
Lint (Pin) trap 21
Lint left on clothes 22
Liquid detergent 8
Load sizes, recommended 6, 9
Low-sudsing detergents 8
M
Menus, programming (W6761) 17–19
N
Navigating the menus (W6761) 18, 19
No spin/no drain option
W6021 10
W6441 13
W6761 17
Nylon 9
O
Operating instructions
W6021 10
W6441 12
W6761 15
Options
W6021 10
W6441 13
W6761 17
Overflow error 20
Oversudsing 24
Page 26
Page 27

INDEX (continued)
P
Paddles, removing 21
Permanent press items 6
Pin trap, cleaning 21
Poison hotline 2
Polyester blends 9
Powder detergents 8
Power button
W6021 10
W6441 12
W6761 15
Preparing the laundry 6
Preset Programs (W6761) 16
Preset programs (W6761)
restoring 19
Problems (e.g., stains, etc.) 22, 23
Program buttons (W6761) 16
Program changes, temporary (W6761) 16
Program knob
W6021 10
W6441 12
Program menu (W6761) 18
Programming
Celsius or Fahrenheit (W6441) 1 4
Celsius or Farenheit (W6761) 19
child-safe start (W6441) 14
child-safe start (W6761) 20
Language 19
Menus 18
Programming instructions (W6761) 18
Programs 10, 13
W6021 10
W6441 13
W6761 16
R
Rayon and acetate 9
Recommended detergents 8
Recommended wash temps 9
Remaining time indication
W6021 10
W6441 12
W6761 15
Restoring preset programs (W6761) 19
Rinse cycles 3
Rips 23
S
Safety instructions 2
Sensitive skin, advice 6
Sensor Level Control 3
Serial number location 23
Service 25
Shipping supports 4
Shrinkage 22
Silk 9
Snags 23
Solutions to problems 23
Sorting the laundry 6
Specifications 4
Spin options 3, 9
Spin speed (W6761), temporarily changing 16
Spin Speed button (W6441) 13
Spin Speed menu (W6761) 1 9
Spray cleaner warning 21
Stacked installation 5
Stains 22
Start/Stop button 10, 12, 15
Super Rinse button
W6021 10
W6441 13
Super Rinse 3
Super Rinse option (W6761) 1 7
T
Temperature
changing readout (W6441) 14
changing readout (W6761) 19
control 3
menu (W6761) 18
settings (W6761) 16
T emperature button (W6441) 13
T emperature stop error 20
T emporary program changes
(W6761) 16
Thermistor error 20
Troubleshooting 23
Type plate location on unit 2 3
V
Vibration, extreme 24
W
Warranty information 25
Wash motor error 20
Wash programs 9
options (W6761) 18
W6021 10
W6441 13
W6761 16
Wash temperature control 3
Wash temperatures 9
Washer features 3
Washing special items 22, 23
Water
hardness 9
inlet error 20
leak 24
level control 3
outlet error 20
supply connection 4
Wear 23
Wool and wool blends 9
Wrinkling 23
Y
Yellowing 22
Page 27
 Loading...